Before I begin, I want to be very clear that this is not something I recommend. I believe strongly that keeping your machine as up to date as possible is an important part of keeping yourself safe online. Letting Windows Update do its thing automatically, without having to think about it at all, is the best, safest way for the vast majority of Windows 10 users.
Unfortunately, in recent months we’ve seen Windows Updates cause problems on a small number1 of machines. The ability to disable Windows Update — even temporarily — can be an important step in getting on with your work while you await updated updates that no longer cause problems.
Unfortunately, while Windows 10 Professional has some control over when updates are installed, Windows 10 Home has no such option.
We need to bring out a bigger hammer.
The approach
The basic approach will be to stop the Windows Update service and then disable it so it can’t be automatically started by subsequent automated update attempts.
Since this is intended to be a short-term solution — a “pause” in taking updates, if you will — we’ll also re-enable the service to start it once again.
Finally, it’s important to realize that this is only about Windows Update (also referred to as Microsoft Update, when all Microsoft applications are included), and not any other update mechanisms used by other programs. That means that while the service is disabled, you will get no Microsoft-related updates: none for Windows, none for Windows Defender, none for Windows Defender’s database of known malware, and none for any Microsoft products you may have installed. (Other programs will continue to update in whatever fashion they’ve implemented.)
This is a big hammer. You’ll want to leave things disabled for as short a time frame as you can.
Disable and stop
Run either Windows PowerShell or Windows Command Prompt as administrator. The easiest approach is to right-click on the Start menu and then click on the corresponding app with the “(Admin)” description.

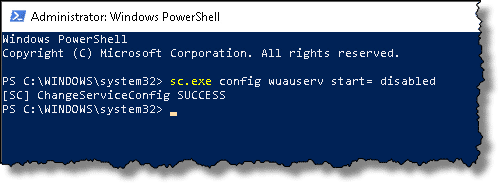
In PowerShell or Command Prompt (which I’ll just refer to as “Command Prompt” from here), type the following command, followed by Enter:
sc.exe config wuauserv start= disabled
Breaking that down:
- sc.exe – the “Service Control” management program. (The “.exe” part is important in PowerShell.2)
- config – the action we’re taking
- wuauserv – the internal name of the “Windows Update Service” service.
- start= – the configuration setting we’re changing. The space between this and the next item is important.
- disabled – to set the start-up option of this service to the disabled state.
The result will be a success message.
All we’ve done is so far is change whether the service is allowed to start. It’s likely the service will still be running if it had already been started, so we need to stop it. Enter the command:
sc.exe stop wuauserv
This stops the Windows Update Service. You’ll likely get a fairly confusing success message.
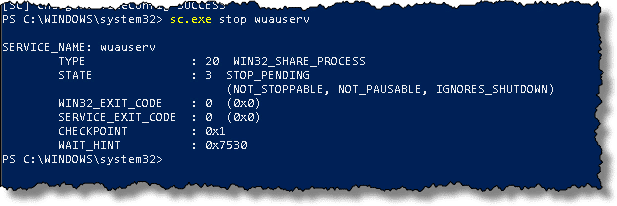
Even though it states “STOP_PENDING”, it’s likely that the service has stopped completely by the time you’ve finished reading the message.
Confirming it’s off
We can confirm that Windows Update is disabled by visiting the Updates section of the settings app and clicking on Check for updates. It should fail.
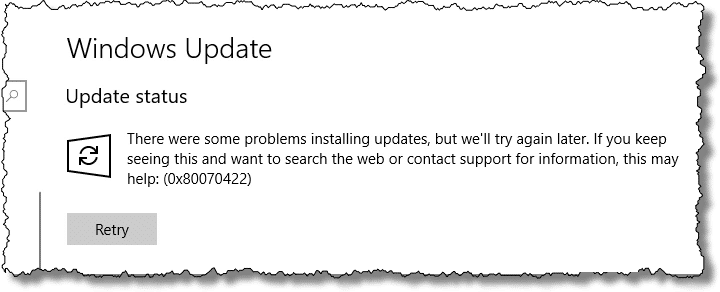
Your machine is no longer receiving Windows Updates.
Re-enable and re-start
To re-enable Windows Updates, reverse the process.
First, change the setting that will allow the service to be started:
sc.exe config wuauserv start= auto
This sets the startup setting to “auto”, for automatic, which allows the service to be started as needed.
To confirm this works, start the service:
sc.exe start wuauserv
Finally, return to Windows Update in the Settings app and click on Retry (if you’d left it from the prior test) or Check for updates.
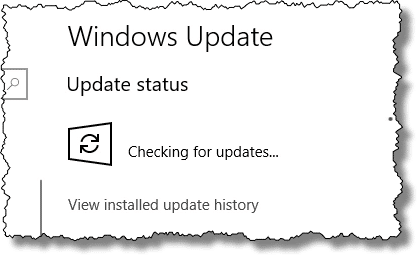
This time, Windows Update checks for updates. How many updates are available depends on how long you left it disabled.
Yet more caveats (and work-arounds)
I have heard, but have not been able to verify, that a disabled Windows Update service can magically become re-enabled after some period of time. It’s unclear if this is days, weeks, or longer.
If you find yourself needing to do this frequently, one approach would be to put the disable and enable commands into their own “batch” or command file.
For example, create a simple text file in Notepad called disable-wu.cmd. In that file, put the two lines:
sc.exe config wuauserv start= disabled
sc.exe stop wuauserv
Then run that batch file from within an admin Windows Command Prompt. You’ll probably also want to have its counterpart:
sc.exe config wuauserv start= auto
sc.exe start wuauserv
to be used when it’s time to re-enable the service.
Only if you have to
As I said at the beginning, this is meant as a work-around only for those who need to stop Windows Update for a short period of time. Most folks shouldn’t need this, and I advise against using it unless you know you do.
It’s extremely unfortunate, for a variety of reasons, that we would need to resort to these steps. I do believe that Windows should expose controls for Windows Update at its old, Windows 7 level of granularity, allowing you to choose if and when to take updates and which updates to take or ignore. I understand Microsoft’s intent with the Windows 10 design, but unfortunately, it only really works if we can always and completely trust Windows Updates without fail. For some small number of people, that will clearly never be the case.
Podcast audio
More for Patrons of Ask Leo!
Silver-level patrons have access to this related video from The Ask Leo! Video Library.
![]() Disabling Windows Update in Windows 10 Home
Disabling Windows Update in Windows 10 Home
1: And I do mean small number. Just because you hear a lot of complaining doesn’t mean that a large number of machines have been affected. The masses that have no problem have no reason to complain, so you won’t hear from them.
2: If you’re running Windows Command Prompt, you can leave off the “.exe”. In Windows PowerShell, it’s required to disambiguate from a PowerShell internal “sc” command.
Зачем отключать обновления Windows
Регулярные обновления призваны поддерживать работоспособность операционной системы. Например, через апдейты Windows получает новые протоколы безопасности для защиты от вредоносных программ.
Однако в некоторых ситуациях это может создавать неудобства для пользователя. Бывают случаи, когда только что вышедшие обновления содержат ошибки и ухудшают работу ПО или железа — например, снижают производительность процессора, приводят к зависаниям.
Чтобы избежать таких проблем, вы можете временно или навсегда отключить автоматическое обновление. Однако не забывайте, что обновление — важный элемент безопасности. Хотя бы три-четыре раза в год устанавливайте обновления для своей Windows.
Способ № 1: Отключиться от интернета
Первый способ — самый очевидный. Вы можете отключить ваш ПК или ноутбук от интернета. Так операционная система потеряет доступ к своим серверам и не сможет скачивать обновления.
Другое дело, что при этом ваше устройство сильно потеряет в функциональности. То есть вы не сможете пользоваться браузерами и мессенджерами, а также обновлять установленные программы.
Да, подходит, но, скорее, в качестве экстренной меры.
Способ № 2: Отключить обновления на определённый период
Вы можете изменить настройки вашего ПК и временно отключить апдейты операционной системы. Максимум — на 35 дней.
Для этого:
Откройте поисковую строку Windows и найдите «Центр обновлений».
Перейдите в «Дополнительные параметры» и выберите нужную дату в окошке «Приостановить до…».
Способ № 3: Навсегда отключить обновления
Полностью отключить апдейты ОС можно через системный раздел «Службы»: Нажмите комбинацию клавиш Win+R и вбейте в поисковой строке services.msc.
Пролистайте до пункта «Центр обновления Windows», нажмите на него правой клавишей мыши → «Остановить».
Возможно, в обновлении нуждается не столько ваша ОС, сколько сам ПК? Не пропустите выгодные сезонные акции в нашем интернет-магазине и подберите себе хороший ноутбук сегодня. У нас — рассрочка, кредит и щедрый кешбэк.
Looking for ways how to control windows 10 Automatic update installation? Or you have experienced Previously windows 10 auto-update/upgrade broken your system settings, face different problems like store app/start menu stopped working, apps start misbehaving etc. And this time you are looking to stop windows 10 updates to download and install automatically. If you’re running a professional version of Windows 10 (Professional, Enterprise or Education), you actually can disable windows 10 automatic updates using the Group Policy editor. But like most people, if you are using Windows 10 Home (Where the group policy feature not available). Here is how to disable automatic updates on windows 10 Home.
Contents
- 1 Disable automatic updates windows 10 Home
- 1.1 Tweak windows registry
- 1.2 Disable the Windows Update service
- 1.3 Setup metered connection
- 1.4 Turn the Battery Saver on
- 1.5 Tweak Group policy editor
Disable automatic updates windows 10 Home
Microsoft regularly rollout windows updates with feature and security improvements, and bug fixes to fix the security hole created by third-party applications. So an up-to-date operating system is a secure operating system. And with Windows 10 Microsoft Decided to Windows 10 automatically checks for, download and install new updates to your PC whether you like it or not. But everyone doesn’t like Windows automatically download and install updates. And windows didn’t leave any options to control these options. But don’t worry here we have 3 Tweaks to disable automatic updates on windows 10.
Note: automatic updates are typically a good thing and I recommend leaving them on in general. As such these methods should primarily be used for preventing a troublesome update from automatically reinstalling (the dreaded crash loop) or stopping a potentially troublesome update from installing in the first place.
— Advertisement —
Tweak windows registry
This is the best method to control Windows 10 Automatic updates installation for both Windows 10 home And pro users. As Windows 10 Home users don’t have group policy feature Tweak registry editor is the best way to stop windows 10 Automatic update installation.
Press Windows + R, type regedit and click ok to open the windows registry editor. Now first backup the registry database and navigate to the following path.
HKEY_LOCAL_MACHINE\SOFTWARE\Policies\Microsoft\Windows
Here Right-click the Windows (folder) key, select New -> Key and Rename it to WindowsUpdate.
— Advertisement —

Again Right-click the newly created key (WindowsUpdate), select new -> Key And name the new key AU.

Now right-click on AU, select New and click DWord (32-bit) Value and rename it to AUOptions.
— Advertisement —
Double-click on AUOptions key. Set the base as “Hexadecimal” and change its value data using any of the below-mentioned value:
- 2 – “Notify for download and notify for install”.
- 3 – “Auto download and notify for install”.
- 4 – “Auto download and schedule the install”.
- 5 – “Allow local admin to choose the settings”.

You can use any of these available values, your best choice is to change the value to 2 to configure the “Notify for download and notify for install” option. Using this value prevents Windows 10 from downloading updates automatically, and you’ll get a notification when new updates are available. Note: When you want to re-enable (windows update) then either delete AUOptions or change its value data to 0.
Disable the Windows Update service
>Windows Update service can detect, download and install the Windows updates and programs. Once disabled, you can not use the Windows automatic update feature, and programs will not be able to automatically download and install. This is another best way to stop windows 10 Updates from automatically download and install.
To do this Press Windows + R, type services.msc and hit the enter key. This will open windows services, scroll down and look for Windows update service. When you got simply double-click on it on properties Change the Startup type Disable and Stop the service if it’s running. Now click the Recovery tab, select Take No Action in the First failure section, then click Apply and OK to save the setting.

Whenever you change your mind to re-enable Windows Update simply repeat these steps, but change the Startup Type to ‘Automatic’ And Start the service.
Setup metered connection
Windows 10 offers users on metered connections a compromise to save bandwidth. Microsoft confirms the operating system will only automatically download and install updates it classifies as ‘Priority’. So whether it is Windows 10 home or professional does not permit the Windows Update files to download when the metered connection is functional.
Note: If your PC uses an Ethernet cable to connect to the Internet the Metered Connection option will be disabled as it works with Wi-Fi connections only.
Setup your internet connection as metered Open Settings -> Network & Internet. On the left side select WiFi, Double click on your wifi connection and Toggle ‘Set as metered connection’ to On.

Now, Windows 10 will assume that you have a limited data plan on this network and won’t download all updates over it automatically.
Turn the Battery Saver on
This is another option To Disable Automatic Updates on Windows 10. You can use the opportunity of enabling a Battery saver setting. Go to Settings -> System -> Battery and click on the toggle the respective setting towards On mode.
Also, you can control it with a single click on Action Center, Or by clicking on the Battery icon on the system tray.

Tweak Group policy editor
This solution is not applicable for Windows 10 Home users, Because of Group policy feature not available for on Windows 10 Home users.
This is one more method to control Disable windows 10 Automatic updates. It works only for Windows 10 Pro (Professional, Enterprise or Education) users. To do this type gpedit.msc on start menu search and hit the enter key. On group policy window navigate to Computer Configuration > Administrative Templates > Windows Components > Windows Update.
On middle pane double-click on the Configure Automatic Updates and select the radio button Enabled. Now Under Configure automatic updating, select option 2 – “Notify for download and auto install” to stop the automatic installation of updates. Click Apply then OK and restart windows to successfully apply these settings.

That’s all you have successfully disable automatic updates on Windows 10 Home. Still have any queries, suggestions or any other ways to stop Windows 10 updates that you know. Feel free to share in the comments below.
Also, Read
- Fix your windows license will expire soon on Windows 10
- How to repair corrupted system files in Windows 10, 8.1 and 7
- Can’t adjust screen brightness on laptop after windows 10 update? Try these solutions
- How To well Optimize Windows 10 Performance For Gaming
- Bluetooth disappeared after a recent Windows 10 update? Try these solutions to fix it
With the latest Windows 10, Microsoft made Cumulative updates install automatically to make sure that every computer has the latest security patches, performance, and stability improvements. But some of the users do not want some updates to install immediately, Few users report Windows 10 download and install updates automatically, but I really don’t want to update my operating system because the automatic update might take up the system and network resources. Well, controlling Windows updates is somewhat difficult in Windows 10 but you can regain control and stop automatic updates using Group Policy and Registry.
Contents
- 1 Disable Windows 10 update permanently
- 1.1 Disable Windows Update Service
- 1.2 Postpone Windows updates
- 1.3 Disable Windows update using Group Policy
- 1.4 Disable automatic updates using Registry
Disable Windows 10 update permanently
Here this article introduces the simple and easy methods to stop Windows 10 update completely., Note: You don’t need to try them all; just work your way down the list until you find the one that works for you.
Remember keeping your machine as up-to-date as possible is an important part of keeping yourself safe online. And that’s why We Do Not Recommend to turning off Windows Updates. Installing Windows Updates Are good for securing your Windows 10 and Get the latest New Feature, Security updates, Bug fixes regularly
Disable Windows Update Service
Windows Update is essentially just another Windows Service and can be turned off in a similar manner to other services. While disabling the automatic update service will temporarily halt any Windows 10 cumulative updates, But the service will re-enable itself after a certain amount of time. If you are looking for halt Windows update for a certain period of time disable the Windows update service by following the steps below.
- Fire up the Run command using Windows logo + R, type in “services.msc” and hit Enter
- This will open the Windows services console,
- Scroll down and select the Windows Update service from the Services list
- Right-click on Windows Update, then select Properties.
- Under the “General” tab and change the “Startup Type” to “Disabled”
- Next, Click stop next to the service status,
- That’s all Click apply and ok, now onwards Windows 10 won’t check and install Windows updates until the Windows update running.
When you want to re-enable automatic updates you just follow the same procedure except you select “Automatic” when choosing the “Startup Type”.

Postpone Windows updates
If you’re looking to postpone updates for a certain period of time, then you don’t need to disable the feature permanently. Windows 10 allows pause updates for 35 days until you’re ready to install them. And using the Settings app, you can pause updates following the steps below.
- Click on the start menu and select settings,
- Go to Update & Security then Windows Update,
- Here on the right-hand side click the Advanced options button.
- Under the “Pause updates” sections, use the drop-down menu at the bottom of the page, and select the number of days that you want to defer quality updates.
- After you complete the steps, your computer won’t download and install Windows updates until the schedule reaches its limit.

Disable Windows update using Group Policy
Also, Windows 10 Education, Pro, or Enterprise Edition use the Local Group Policy editor to disable automatic updates permanently or can change the Windows Update settings to decide when updates should be installed. Well, Users of the Windows 10 Home edition are out of luck regarding this way of disabling Windows 10 updates. But they can tweak the windows registry (steps listed next) to permanently disable Windows updates.
- Use Windows + R, hotkey, type gpedit.msc and click ok
- This will open local group policy editor,
- Here Navigate to Computer Configuration\Administrative Templates\Windows Components\Windows Update
- On the right side Double-click the Configure Automatic Updates policy
- Select the radio button Disabled to completely turn off the policy, click apply and ok,
- Now onwards Windows 10 will stop downloading updates automatically.

Here also you can select the Enable Radio button to enable the policy and configure automatic updating (refer to the image below) and select 2 – Notify for download and auto-install.

Disable automatic updates using Registry
If you have Windows 10 Home Edition, you can tweak the Windows registry to permanently disable automatic update installation on Windows 10.
- Press Windows + R, type Regedit and click ok,
- This will open the Windows registry editor,
- On the left-hand side navigate HKEY_LOCAL_MACHINE\SOFTWARE\Policies\Microsoft\Windows
- Here Right-click the Windows (folder) key, and select the New -> Key option. And Name the new key WindowsUpdate

- Again right-click on the newly created Windows update key, select New -> Key Name the new key AU
- Now right-click on AU select New and click the DWORD (32-bit) Value option, Name the new key NoAutoUpdate
- And finally, Double-click the newly created key NoAutoUpdate and change its value from 0 to 1.
- Close everything and restart your PC
Also, you can set the value following numbers to configure Windows update when to download or install.
2 — Notify for download and auto-install.
3 — Auto download and notify for install.
4 — Auto download and schedule the install.
5 — Allow local admin to choose settings.

Now onwards, Windows Update should stop trying to download and install updates automatically on your device.
Also read:
- The Ultimate Windows 10 Security Guide to Secure your PC
- How To Clear Windows Update Cache on Windows 10, 8.1 and 7
- Solved: Print Spooler keeps stopping Not Running on Windows 10
- Download Google Chrome (Offline installer) For Windows 10
- Solved: wuauserv (Windows update) High CPU usage in Windows 10