Skip to content
Windows 10 Creators Update version 1703 brought yet another change to Windows 10’s UI. There is a new app called Windows Defender Security Center. It has been created to help the user control his security and privacy settings in a clear and useful way. Many users would like to disable it. Here is how.

Before you proceed, here is what you need to know. Don’t be confused between Windows Defender and Windows Defender Security Center. Windows Defender is the built-in anti-virus software which provides real-time protection against threats. The Windows Defender Security Center app is just a dashboard which allows you to track your protection state. It can be used to configure various security options like SmartScreen. It shows an icon in the system tray. In most cases and for many users, it might be enough to disable Windows Defender and/or remove the Defender Security Center app’s tray icon. If this is not enough for you, here is how you can disable it.
To Disable Windows Defender Security Center, do the following.
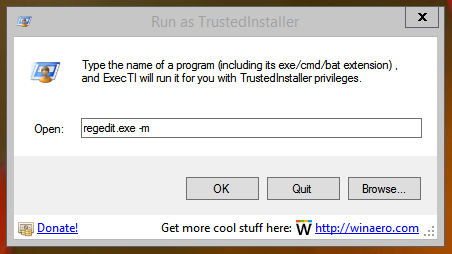
- Download the portable app ExecTI and unpack it to any folder you like: Download ExecTI.
- Unblock the downloaded file.
- Using ExecTI, run the «regedit.exe» app. See the screenshot below.
 This will open a new instance of the Registry editor app running with TrustedInstaller permissions, so it will allow you to modify the required Registry key.
 - Go to the following Registry key:
HKEY_LOCAL_MACHINE\SYSTEM\CurrentControlSet\Services\SecurityHealthService

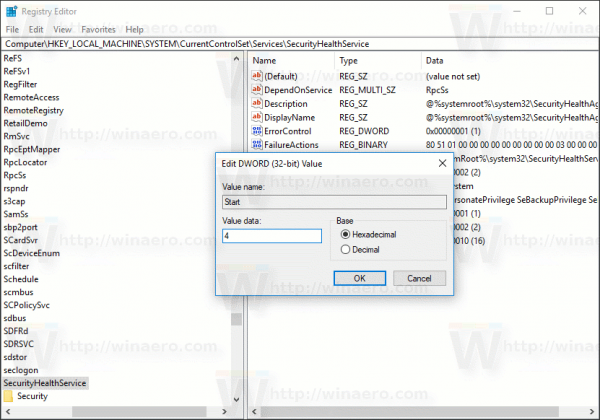
- On the right, modify the 32-bit DWORD value named Start. Change its value data from 2 to 4.
This will disable the service SecurityHealthService, which is used by the Windows Defender Security Center. - Now, restart Windows 10.
 This will open a new instance of the Registry editor app running with TrustedInstaller permissions, so it will allow you to modify the required Registry key.
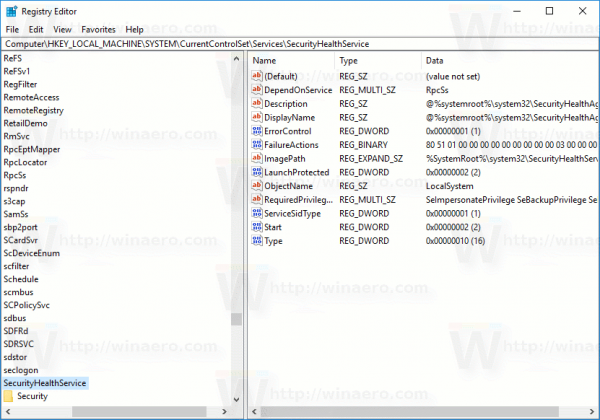
Voila, you just disabled Windows Defender Security Center. The service will be disabled too.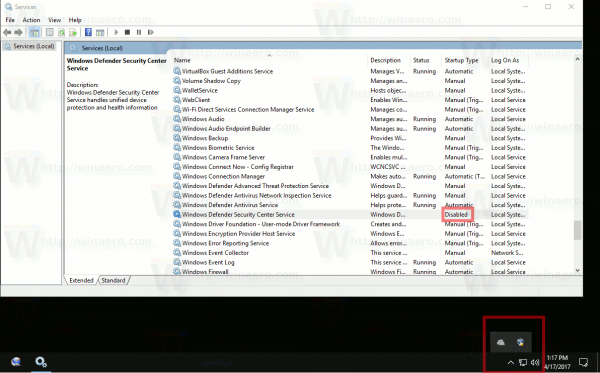
Now, you can use the classic Windows Defender app instead of the the Security Center. See Get Classic Windows Defender in Windows 10 Creators Update.
To restore the app, execute the Registry editor from ExecTI again. Go to the key
HKEY_LOCAL_MACHINE\SYSTEM\CurrentControlSet\Services\SecurityHealthService
and modify the Start value from 4 to 2. Restart your computer to re-enable the Windows Defender Security Center app.
That’s it.
Support us
Winaero greatly relies on your support. You can help the site keep bringing you interesting and useful content and software by using these options:
If you like this article, please share it using the buttons below. It won’t take a lot from you, but it will help us grow. Thanks for your support!
Download Windows Speedup Tool to fix errors and make PC run faster
The Windows Security Center makes it easier for you to view and control the security protections you choose and better understand the security features already protecting your Windows 11/10 device. In this post, we will show you how to manually enable or disable Windows Security via the Registry in Windows 11/10.

Disabling the Windows Security Center service will not disable Windows Defender AV or disable Windows Defender Firewall.
However, Windows Defender AV will be disabled automatically when a third-party antivirus product is installed and kept up to date.
Warning: It is highly recommended to not disable Windows Security – doing so, will significantly lower the protection of your device and could lead to malware infection.
Since this is a registry operation, it is recommended that you back up the registry or create a system restore point as necessary precautionary measures.
The intended registry operation will modify the DWORD value in the registry keys below for Windows Defender Security Center Service and Security Center service respectively.
HKEY_LOCAL_MACHINE\SYSTEM\CurrentControlSet\Services\SecurityHealthService
HKEY_LOCAL_MACHINE\SYSTEM\CurrentControlSet\Services\wscsvc
To disable Windows Security Center for all users on Windows 10, do the following:
- Press Windows key + R to invoke the Run dialog.
- In the Run dialog box, type
notepadand hit Enter to open Notepad. - Copy and paste the syntax below into the text editor.
[HKEY_LOCAL_MACHINE\SYSTEM\CurrentControlSet\Services\SecurityHealthService]
"Start"=dword:00000004

[HKEY_LOCAL_MACHINE\SYSTEM\CurrentControlSet\Services\wscsvc]
"Start"=dword:00000004
- Now, click the File option from the menu and select Save As button.
- Choose a location (preferably desktop) where you want to save the file.
- Enter a name with .reg extension (eg; Disable_WSC.reg).
- Choose All Files from the Save as type drop-down list.
- Double-click the saved .reg file to merge it.
- If prompted, click on Run > Yes (UAC) > Yes > OK to approve the merge.
- You can now delete the .reg file if you like.
To enable Windows Security Center for all users on Windows 10, do the following:
- Open Notepad.
- Copy and paste the syntax below into the text editor.
[HKEY_LOCAL_MACHINE\SYSTEM\CurrentControlSet\Services\SecurityHealthService]
"Start"=dword:00000002

[HKEY_LOCAL_MACHINE\SYSTEM\CurrentControlSet\Services\wscsvc]
"Start"=dword:00000002
- Now, click the File option from the menu and select Save As button.
- Choose a location (preferably desktop) where you want to save the file.
- Enter a name with .reg extension (eg; Enable_WSC.reg).
- Choose All Files from the Save as type drop-down list.
- Double-click the saved .reg file to merge it.
- If prompted, click on Run > Yes (UAC) > Yes > OK to approve the merge.
- You can now delete the .reg file if you like.
That’s it on how to enable or disable the Windows Security Center in Windows 11/10.
Obinna has completed B.Tech in Information & Communication Technology. He has worked as a System Support Engineer, primarily on User Endpoint Administration, as well as a Technical Analyst, primarily on Server/System Administration. He also has experience as a Network and Communications Officer. He has been a Windows Insider MVP (2020) and currently owns and runs a Computer Clinic.
This tutorial shows the way to completely disable Defender Security Center and all the Defender protection services (Antivirus, Firewall, Threat protection) in Windows 10. Before you continue to apply the steps mentioned below, you must know that Windows 10, enables by default the Defender Antivirus and the Defender Firewall, if no any other security program has installed on the computer.

That means that if you install another security program to protect your PC, Windows Defender will be disabled automatically by Windows 10 and there is no need to perform any other action to disable Defender. So, follow the steps in this tutorial only if you face problems with Windows Defender protection or if you want to permanently remove the Windows Defender antivirus and/or firewall for other reasons.
How to Disable Windows Defender Security Center (Antivirus, Firewall, etc.)
Method 1. Disable Windows Defender Antivirus from Windows GUI.
Method 2. Disable Windows Defender Antivirus by editing the registry Offline.
Method 1. Disable Windows Defender Antivirus from Windows GUI.
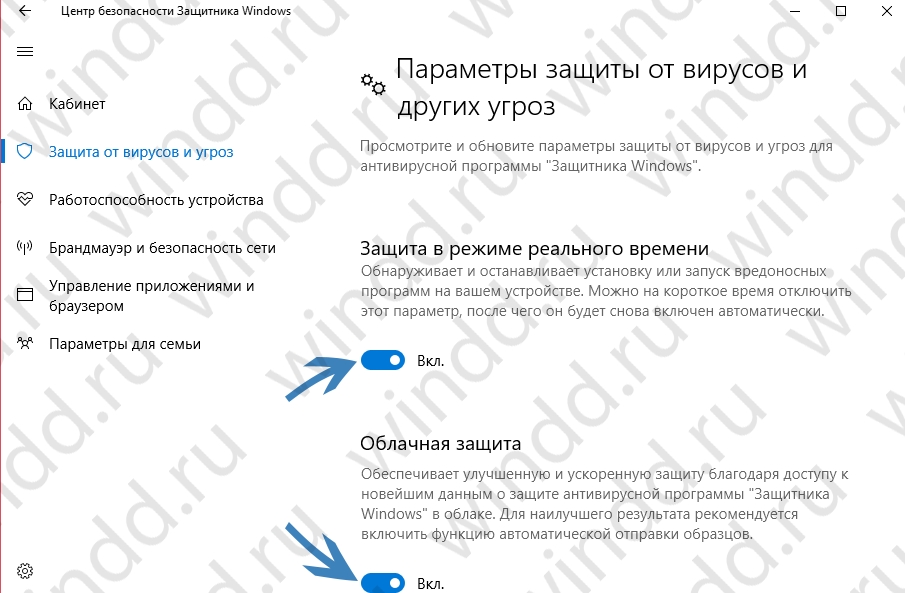
Step 1. Turn OFF Windows Defender Antivirus Real Time Protection.
To turn off Real-time Protection, double click at Windows Defender icon ![]() in the taskbar, click Virus & threat protection
in the taskbar, click Virus & threat protection![]() and then at Virus & threat Protection settings set to OFF the Real-time Protection and the Cloud-delivered protection.
and then at Virus & threat Protection settings set to OFF the Real-time Protection and the Cloud-delivered protection.

Step 2. Modify Registry Permissions and Disable Defender Antispyware & Antivirus Protection.
1. Open Registry editor. To do that:
1. Simultaneously press the “Win”
+ “R” keys to load the Run dialog box.
2. Type regedit and press Enter to open Registry Editor.

2. Navigate (from the left pane) to this registry location/key:
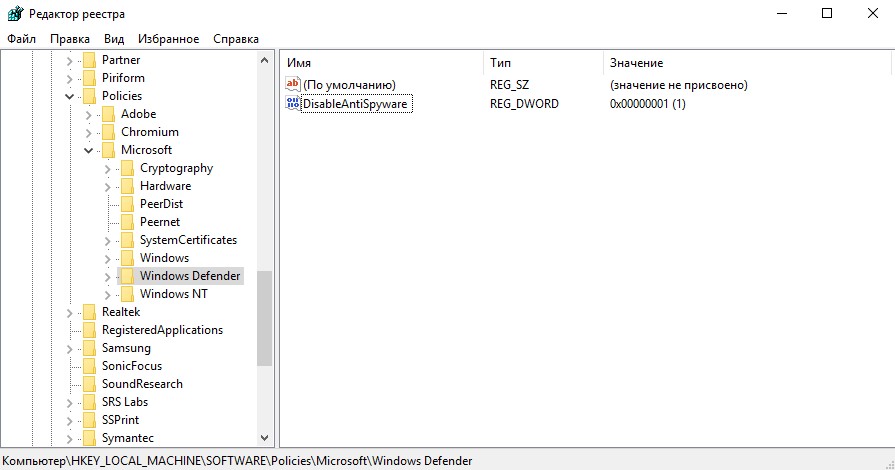
- HKEY_LOCAL_MACHINE\SOFTWARE\Microsoft\Windows Defender
3. (IMPORTANT): Before you continue, first take a backup of the «Windows Defender» registry key settings, and then use the backup file if something goes wrong. To take a backup of ‘Windows Defender’ key:
1. Right click on «Windows Defender» key and select Export.

2. Type a filename for the registry backup file (e.g. «Windows Defender») and Save the file at your Desktop. *
* Note: If needed, double click at the exported .reg file, to restore your registry back!

4. Right click at the Windows Defender key and select Permissions.

5. At ‘Permissions for Windows Defender’ window, click Advanced.

6. Click Change Owner.

7. Type Administrators and press OK.

8. Check the «Replace owner on subcontainers and objects» checkbox and click Apply.

9. Then double-click to open Administrators entry.

10. Select the Full Control checkbox and press OK three (3) times. *
* Update (October 2019): After the latest Windows 10 system update, Microsoft doesn’t allow to modify the permissions on the ‘Windows Defender’ key with error «Unable to save permission changes on Windows Defender. Access is denied». If you face this error, then skip the rest instructions of this step (press OK -> Cancel and OK to close the permissions window), and continue to Step-3 below.

11. At the right-pane of Windows Defender key:
11a. Open the DisableAntiSpyware REG_DWORD value and change the Value data from 0 to 1 disable Windows Defender Antispyware protection. Click OK when done. *
* Note: If you cannot edit (modify) the value data, then close and re-open Registry Editor or make sure that the «Real Time Protection’ remains off (step-1).

11b. Then open the DisableAntiVirus REG_DWORD value and change the Value data from 0 to 1 disable Windows Defender Antivirus protection. Click OK when done.

12. Proceed to the the next step to disable Windows Defender Services.
Step 3. Disable Defender Security Center, Antivirus & Firewall Services.
The final step is to disable the Defender’s services, as described below: *
* Note: If you cannot modify one (or more) of the mentioned registry values with error «Cannot Edit Start: Error writing the value’s contents«, then proceed and modify the registry offline, by following the steps at method-2 below.
1. To Disable the Windows Defender Security Center Service, modify the Start REG_DWORD value, from 2 to 4 at the following registry key:
- HKEY_LOCAL_MACHINE\SYSTEM\CurrentControlSet\Services\SecurityHealthService

2. To Disable the Windows Defender Antivirus Service,modify the Start REG_DWORD value, from 3 to 4 at the following registry key:
- HKEY_LOCAL_MACHINE\SYSTEM\CurrentControlSet\Services\WinDefend
3. To Disable the Windows Defender Antivirus Network Inspection Service, modify the Start REG_DWORD value, from 3 to 4 at the following registry key:
- HKEY_LOCAL_MACHINE\SYSTEM\CurrentControlSet\Services\WdNisSvc
4. To Disable the Windows Defender Firewall Service, modify the Start REG_DWORD value, from 2 to 4 at the following registry key:
- HKEY_LOCAL_MACHINE\SYSTEM\CurrentControlSet\Services\MpsSvc
5. Close registry editor and restart your computer.
Method 2. How to Disable the Windows Defender by Editing the Registry Offline.
Step 1. Create a System Restore Point. *
* Note: This step is optional, but, for precautionary reasons I suggest to create a restore point of your system current state in order to restore your PC if something goes wrong.
To Create a restore point:
1. Open Windows Explorer.
2. At the left pane, right-click on «This PC» icon and select Properties.
3. Click System Protection.
4. At System Protection settings, click Configure.

5. At Restore Settings window:
a. Check the Turn on system protection.
b. Adjust the maximum disk space used for system protection, to (about) 10-15% of the maximum disk space.
c. Click OK.

6. Now click Create to create a restore point of the current state.

7. Type a recognizable name for the restore point and click Create.
8. When the operation is completed, continue to next step.
Step 2. Disable Windows Defender services Offline.
1. Proceed and start Windows 10 in recovery mode. To do that use one of the following ways:
A. From Windows GUI: Right click on Start menu and then press the Restart button while pressing the SHIFT key on your keyboard.
B. From Windows Sign-in screen: Click on the Power button and then choose Restart while pressing the SHIFT key on your keyboard.

2. At Recovery options, go to Troubleshoot -> Advanced Options -> Command Prompt. (Your computer will restart)
3. After restart, select an account with administrative privileges, type the password (if any) and click Continue.
4. In command prompt window type regedit and press Enter.

5. In Registry Editor, highlight the HKEY_LOCAL_MACHINE key.

6. From File menu, select Load Hive.

7. At ‘Look in’ select the disk where Windows are installed on (commonly is listed as disk «D:»).

8. Now navigate to the following path on the OS disk:
- Windows\system32\config\
9. Highlight the SYSTEM file and click Open.

10. Type a Key Name for the offline registry database (e.g. «Offline«) and press OK.

11. Now navigate at the following registry keys and set the Start value to 4 :
- HKEY_LOCAL_MACHINE\Offline\SYSTEM\ControlSet001\Services\MpsSvc
- HKEY_LOCAL_MACHINE\Offline\SYSTEM\ControlSet001\Services\SecurityHealthService
- HKEY_LOCAL_MACHINE\Offline\SYSTEM\ControlSet001\Services\WdNisSvc
- HKEY_LOCAL_MACHINE\Offline\SYSTEM\ControlSet001\Services\WinDefend
12. When done, highlight the key you previously created (e.g. the «Offline» key ) and from the File menu, choose Unload Hive to write back the changes you made to the Registry.

13. Select Yes when asked to unload the current key,

14. Close the ‘Registry Editor’ and the ‘Command Prompt’ windows.
15. Click Turn off your PC.

16. Power On you PC and boot to Windows normally.
You ‘re done! Let me know if this guide has helped you by leaving your comment about your experience. Please like and share this guide to help others.

Обновленный Защитник Windows, которым уже можно пользоваться стоит по умолчанию ещё с Windows 8. С времен перехода на Windows 10 я вообще забыл об сторонних антивирусных программах, поскольку защитник Windows, фильтр SmartScreen и брандмауэр действительно не плохо защищают систему. Но всё же многим пользователям новый защитник Windows 10 совсем не по душе.
Поэтому в этой статье мы рассмотрим как отключить центр безопасности защитника Windows 10. Способов как это можно сделать сейчас действительно много. А также стоит отметить что в последних сборках операционной системы нужно отключать центр безопасности защитника Windows, которого предыдущих версиях не было.
Как отключить Центр безопасности Защитника Windows 10 (начиная с версий 1703, 1709 и новее)
Если же Вы обновились до последней версии Windows 10, что собственно мы всегда рекомендем делать, то этих настроек Вы уже не увидите. Начиная с версии 1703 обновления Creators Update все параметры защиты перенесены в одно место, которые Майкрософт назвали Центр безопасности защитника Windows 10.
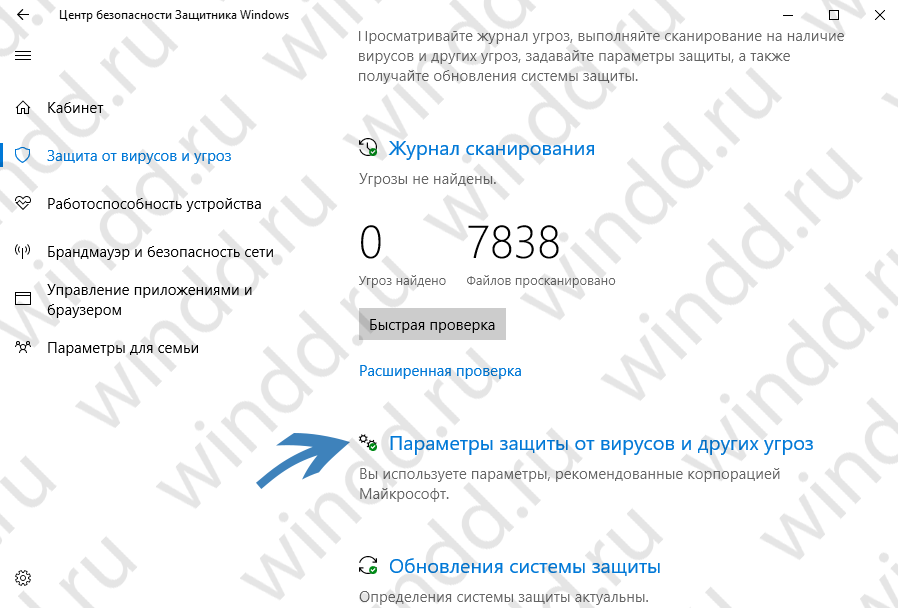
- Нажимаем Win+Q и в поисковой строке вводим Центр безопасности Защитника Windows.
- Дальше переходим в раздел Защита от вирусов и угроз.
- И нажимаем на кнопку Параметры защиты от вирусов и других угроз.

- И в этом же окне отключаем такие параметры как Защита в режиме реального времени и Облачная защита.

Редактор групповой политики отсутствует в домашней и начальной версиях Windows 10, и есть только в профессиональной и корпоративной. Можно его перенести с профессиональной версии, но проще воспользоваться другим способом. Если Вы используете профессиональную или корпоративную версию Windows 10, тогда этот способ для Вас.
- Откроем редактор локальной групповой политики нажав на клавиши Win+R в окно Выполнить введем gpedit.msc и нажмем ОК.
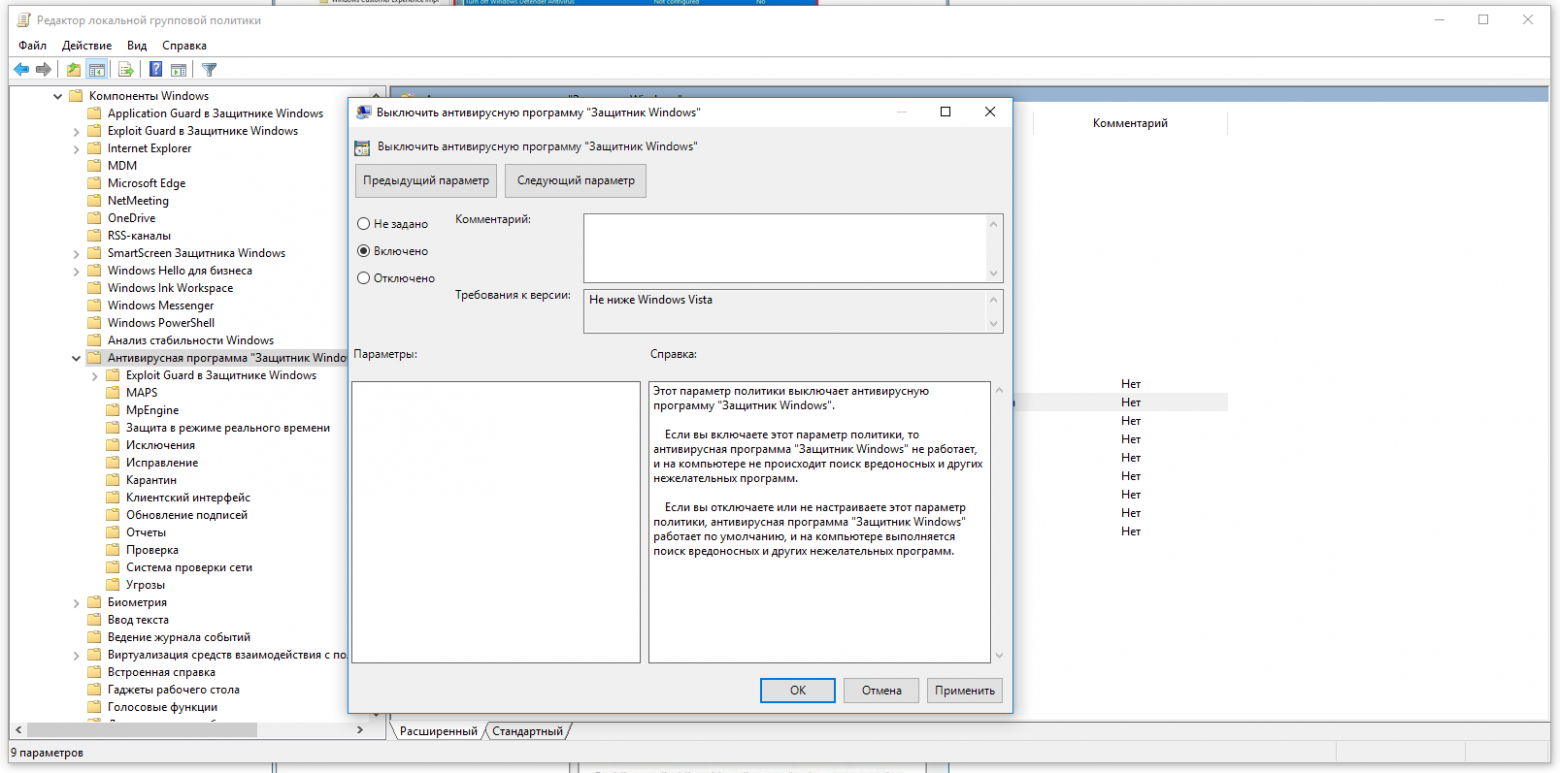
- Перейдем по пути: Конфигурация компьютера > Административные шаблоны > Компоненты Windows > Антивирусная программа «Защитник Windows» ищем параметр Выключить антивирусная программу «Защитник Windows.
- Открываем параметр и меняем состояние параметра на Включено (если Вы включаете этот параметр политики, то антивирусная программа «Защитник Windows» не работает, и на компьютере не происходит поиск вредоносных и других нежелательных программ).
Как отключить Windows Defender в Windows 10 с помощью редактора реестра
А также для продвинутых пользователей есть возможность отключить Windows защитник Windows 10 с помощью редактора реестра.
- Для этого откроем редактор реестра Win+R и в окне Выполнить введем regedit.
- Перейдем по пути HKEY_LOCAL_MACHINE\ SOFTWARE\ Policies\ Microsoft\ Windows Defender.
- Создадим параметр с именем DisableAntiSpyware, и зададим значение 1 для того чтобы отключить защитник Windows.
Для того чтобы назад включить защитник Windows нужно установить значения параметра DisableAntiSpyware на 1 или просто удалить текущий параметр.
Отключить защиту в реальном времени Windows 10 одной командой
Есть также возможность отключить защиту в реальном времени защитника Windows 10 всего одной командой.
- Откройте оболочку PowerShell от имени администратора, рекомендую воспользоваться поиском.
- Вставьте и выполните команду: [stextbox id=’info’]Set-MpPreference -DisableRealtimeMonitoring $true[/stextbox]


После выполнение одной команды, защитник Windows будет отключен. Если же не получилось и пишет не достаточно прав, тогда запустите оболочку PowerShell от имени администратора.
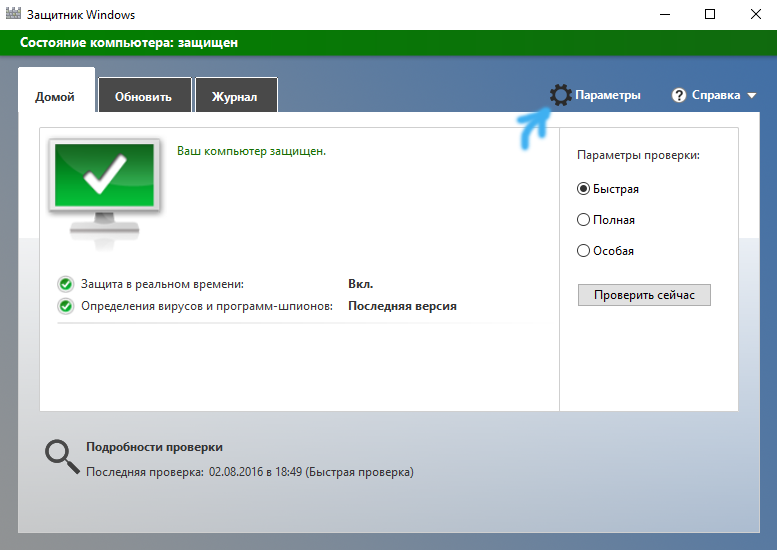
Как полностью отключить Защитник Windows 10 (до версии 1703)
- Откроем меню Пуск и начнем в поиске вводить Защитник Windows.

- В результатах поиска выберем Защитник Windows — классическое приложение. Хочу заметить что открыть защитник Windows можно и другими способами, но этот является самым удобным.

- Перейдем в Параметры защитника. В отличие от Windows 8.1 в Windows 10 нам откроются общие параметры системы, в которые уже вынесены настройки защитника Windows. Пользователи Windows 8 могут отключить защитник прямо с интерфейса программы.
- В этом окне нам нужно перетянуть ползунок защита в реальном времени и облачная защита в состояние Откл.


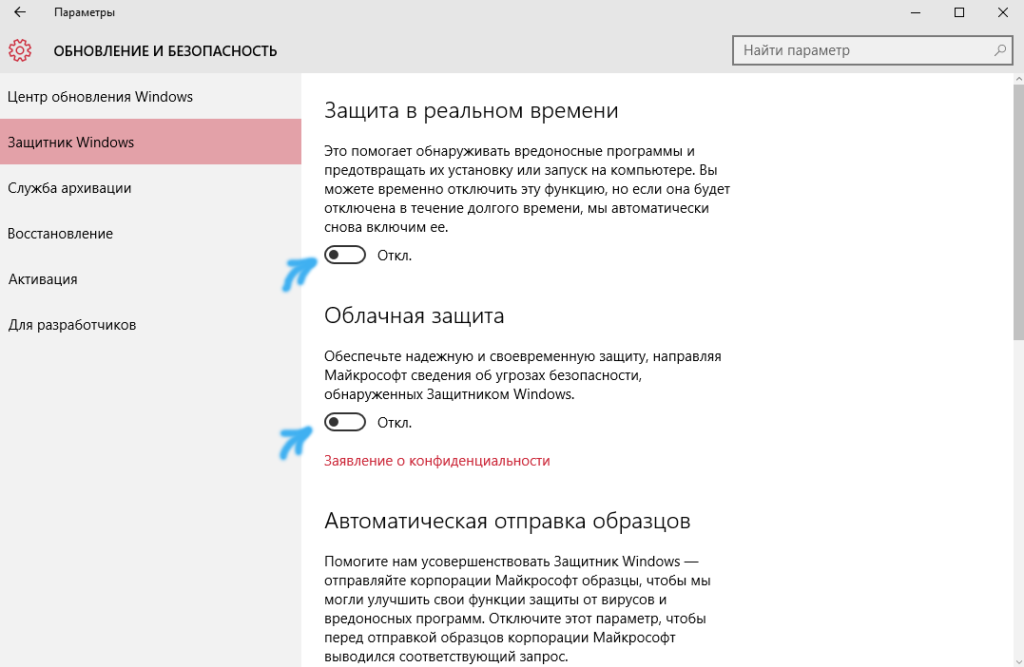
А также что бы не искать защитник Windows в Windows 10 есть возможность просто открыть Пуск > Параметры > Обновление и безопасность > Защитник Windows и Вы попадете в этот же раздел, откуда мы отключили Windows защитника.
Как отключить службу Защитника Windows 10 с помощью утилиты Win Updates Disabler
Сама утилите Win Updates Disabler очень хорошая и многофункциональная, с её помощью Вы можете как отключить защитник Windows, так и ограничить возможность обновляться Вашей Windows 10, что чаще всего происходит в неподходящий момент.
- Просто скачайте утилиту с www.site2unblock.com/win-updates-disabler и запустите. Рекомендую использовать версию Portable, которая не требует установки.

- Дальше в разделе Отключить ищем Защитник Windows, ставим галочку и нажимаем Применить сейчас и соглашаемся на перезагрузку.

После перезагрузки Вы увидите что защитник Windows полностью отключен. Чтобы включить его, нужно во вкладке Включить установить галочку Включить Защитник Windows, и также применить изменения.
Выводы
Как мы уже говорили, после перехода на Windows 10, даже можно сказать что после перехода на Windows 8.1 можно забыть о сторонних антивирусных программах. Встроенного Защитника Windows хватало с головой, а сейчас он обновился и стал ещё лучше. По этому мы не рекомендуем его вообще отключать, поскольку как не как, но это Ваша защита.
Для тех кто все же надумал отключать его мы рассмотрели как отключить центр безопасности защитника Windows 10 и его службу простыми способами. Для того что бы включить защитник Windows, Вам нужно делать все в обратном порядке.
(1 оценок, среднее: 5,00 из 5)
Администратор и основатель проекта Windd.pro. Интересуюсь всеми новыми технологиями. Знаю толк в правильной сборке ПК. Участник программы предварительной оценки Windows Insider Preview. Могу с лёгкостью подобрать комплектующие с учётом соотношения цены — качества. Мой Компьютер: AMD Ryzen 5 3600 | MSI B450 Gaming Plus MAX | ASUS STRIX RX580 8GB GAMING | V-COLOR 16GB Skywalker PRISM RGB (2х8GB).
Время на прочтение
3 мин
Количество просмотров 952K
В Windows 10 имеется встроенный антивирус Windows Defender («Защитник Windows»), защищающий компьютер и данные от нежелательных программ: вирусов, шпионских программ, программ-вымогателей и многих других типов вредоносных программ и действий хакеров.
И хотя встроенного решения для защиты достаточно для большинства пользователей, бывают ситуации, в которых вы можете не захотеть пользоваться этой программой. К примеру, если вы настраиваете устройство, которое не будет выходить в сеть; если вам необходимо выполнить задачу, блокируемую этой программой; если вам нужно уложиться в требования политики безопасности вашей организации.
Единственная проблема связана с тем, что полностью удалить или отключить Windows Defender у вас не выйдет – эта система глубоко интегрирована в Windows 10. Однако есть несколько обходных путей, при помощи которых вы можете отключить антивирус – это использование локальной групповой политики, реестра или настроек Windows в разделе «Безопасность» (временно).
Как отключить Защитник Windows через настройки безопасности Windows
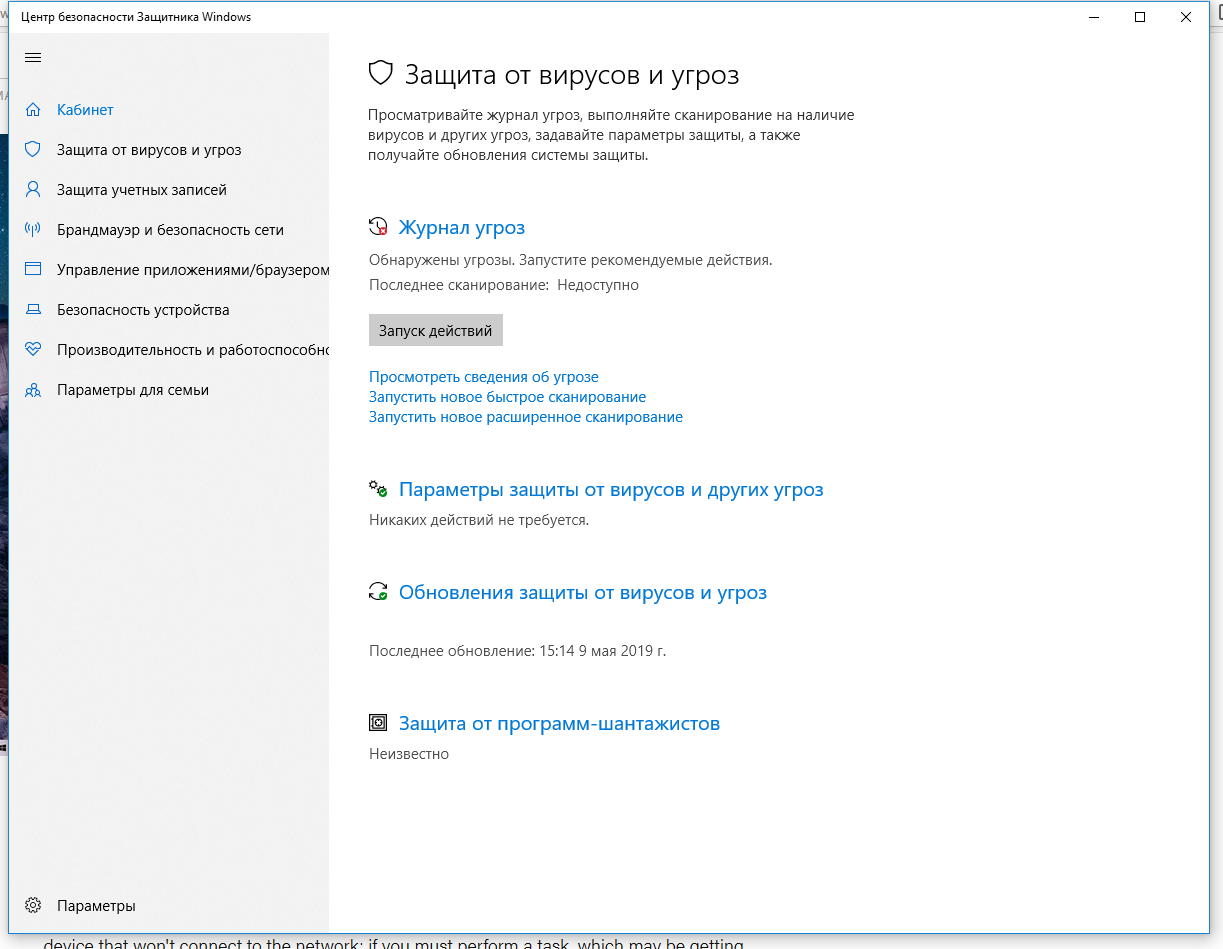
Если вам нужно выполнить определённую задачу, и не нужно отключать Защитника полностью, вы можете сделать это временно. Для этого при помощи поиска в кнопке «Пуск» найдите раздел «Центр безопасности Защитника Windows», и выберите в нём пункт «Защита от вирусов и угроз».
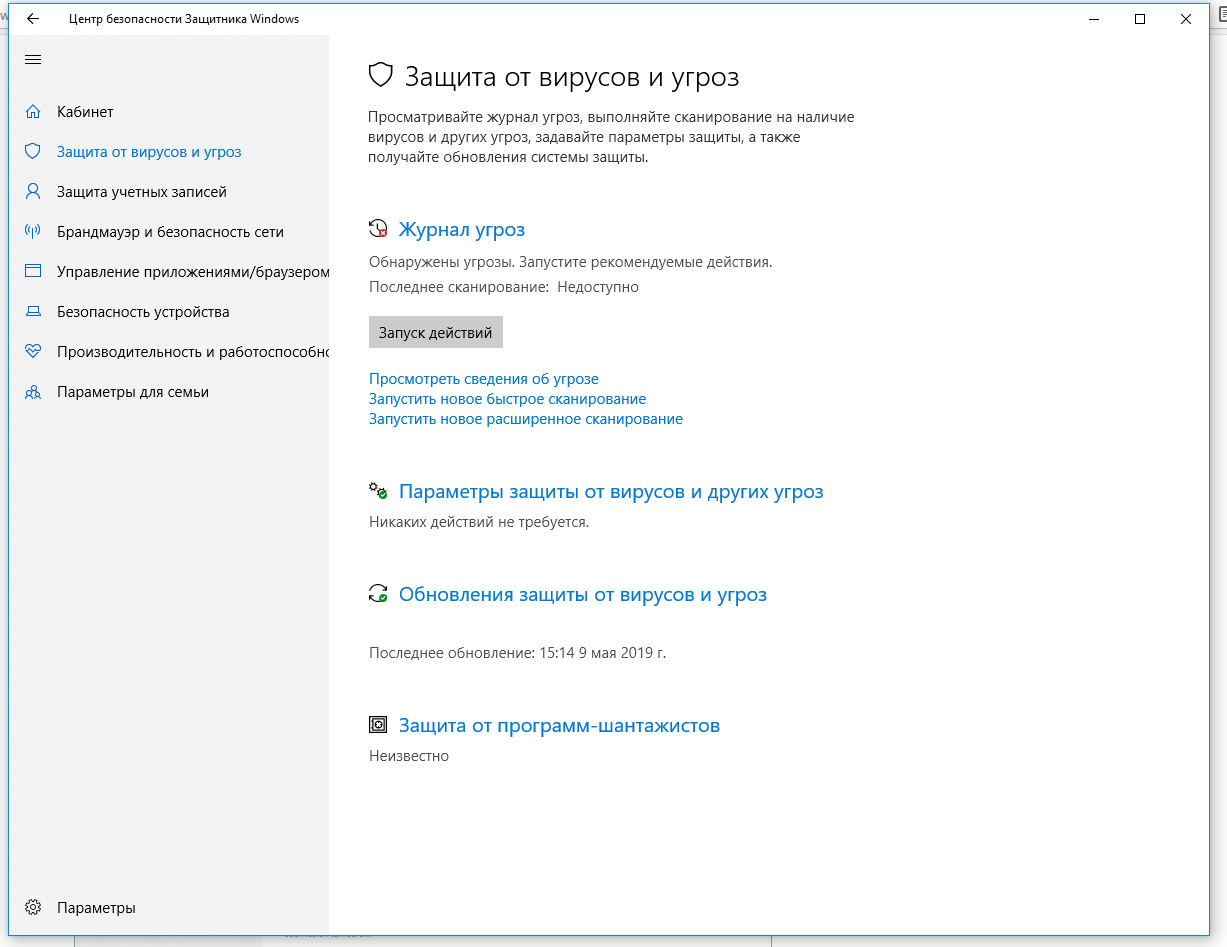
Там перейдите в раздел «Параметры защиты от вирусов и других угроз» и кликните по переключателю «Защита в режиме реального времени».
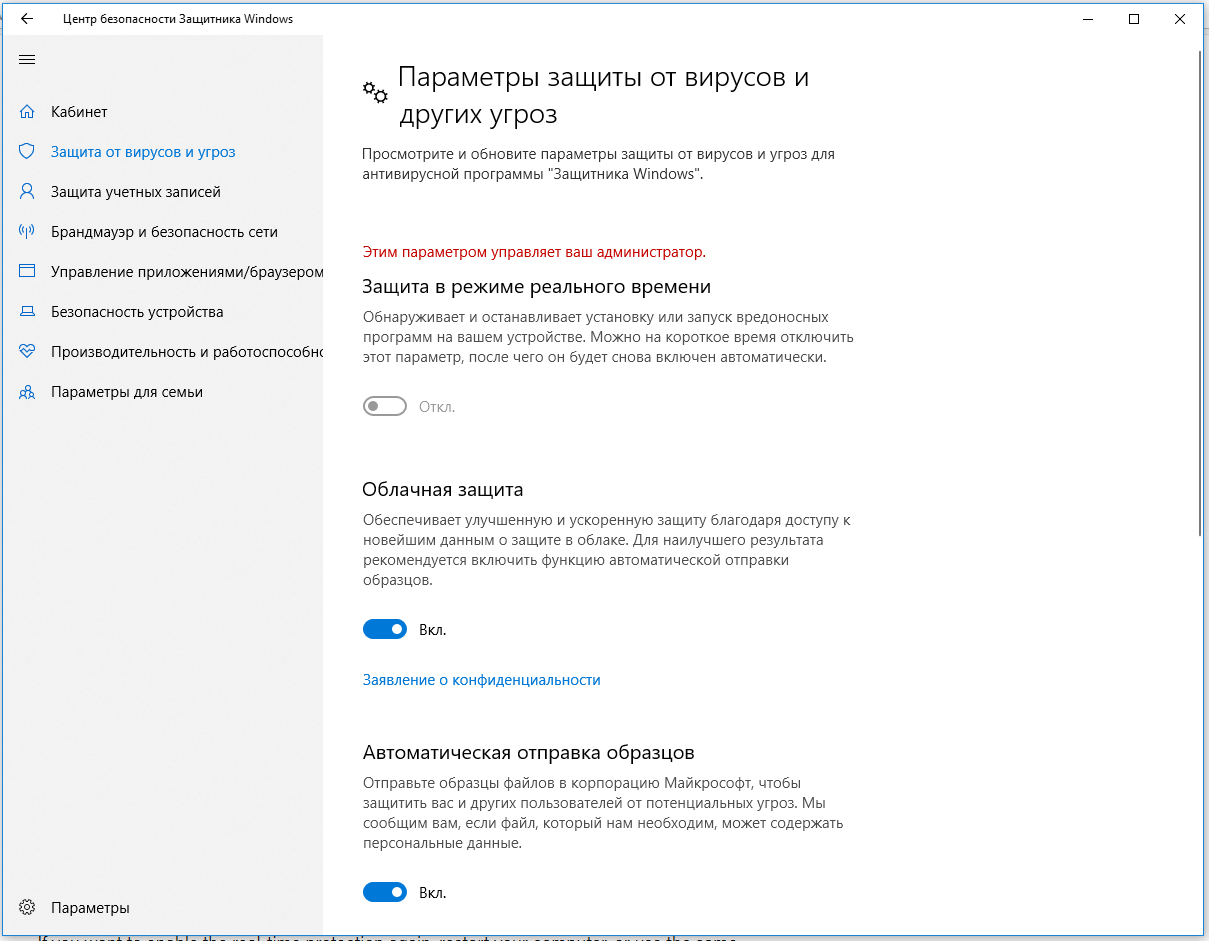
После этого антивирус отключит защиту компьютера в реальном времени, что позволит вам устанавливать приложения или выполнять определённую задачу, которая была недоступна вам из-за того, что антивирус блокировал необходимое действие.
Чтобы снова включить защиту в реальном времени, перезапустите компьютер или заново пройдите все этапы настроек, но на последнем шаге включите переключатель.
Это решение не является постоянным, но лучше всего подходит для отключения антивируса Windows 10 для выполнения определённой задачи.
Как отключить Защитник Windows через групповые политики
В версиях Windows 10 Pro и Enterprise вам доступен редактор локальных групповых политик, где можно навсегда отключить Защитника следующим образом:
Через кнопку «Пуск» запустите исполняемый скрипт gpedit.msc. Откроется редактор политик. Перейдите по следующему пути: Конфигурация компьютера > Административные шаблоны > Компоненты Windows > Антивирусная программа «Защитник Windows».

Двойным нажатием откройте пункт «Выключить антивирусную программу „Защитник Windows“». Выберите настройку «Включено» для включения этой опции, и, соответственно, отключения Защитника.
Нажмите «ОК» и перезапустите компьютер.
После этого антивирус будет навсегда отключён на вашем устройстве. Но вы заметите, что иконка со щитом останется в панели задач – так и должно быть, поскольку эта иконка принадлежит к приложению «Безопасность Windows», а не самому антивирусу.
Если вы передумаете, вы всегда можете заново включить Защитника, повторив эти шаги, и на последнем шаге выбрав вариант «Не задано», после чего снова нужно будет перезагрузить компьютер.
Как отключить Защитник Windows через реестр
Если у вас нет доступа к редактору политик, или у вас установлена Windows 10 Home, вы можете отредактировать реестр Windows, отключив тем самым Защитника.
Напоминаю, что редактировать реестр рискованно, и ошибки в этом деле могут нанести непоправимый ущерб текущей установленной копии Windows. Лучше сделать резервную копию системы перед тем, как начинать редактирование.
Чтобы полностью отключить Защитиника через реестр, запустите через кнопку «Пуск» программу regedit, и перейдите в ней по следующему пути:
HKEY_LOCAL_MACHINE\SOFTWARE\Policies\Microsoft\Windows Defender
Совет: этот путь можно скопировать и вставить в адресную строку редактора реестра.
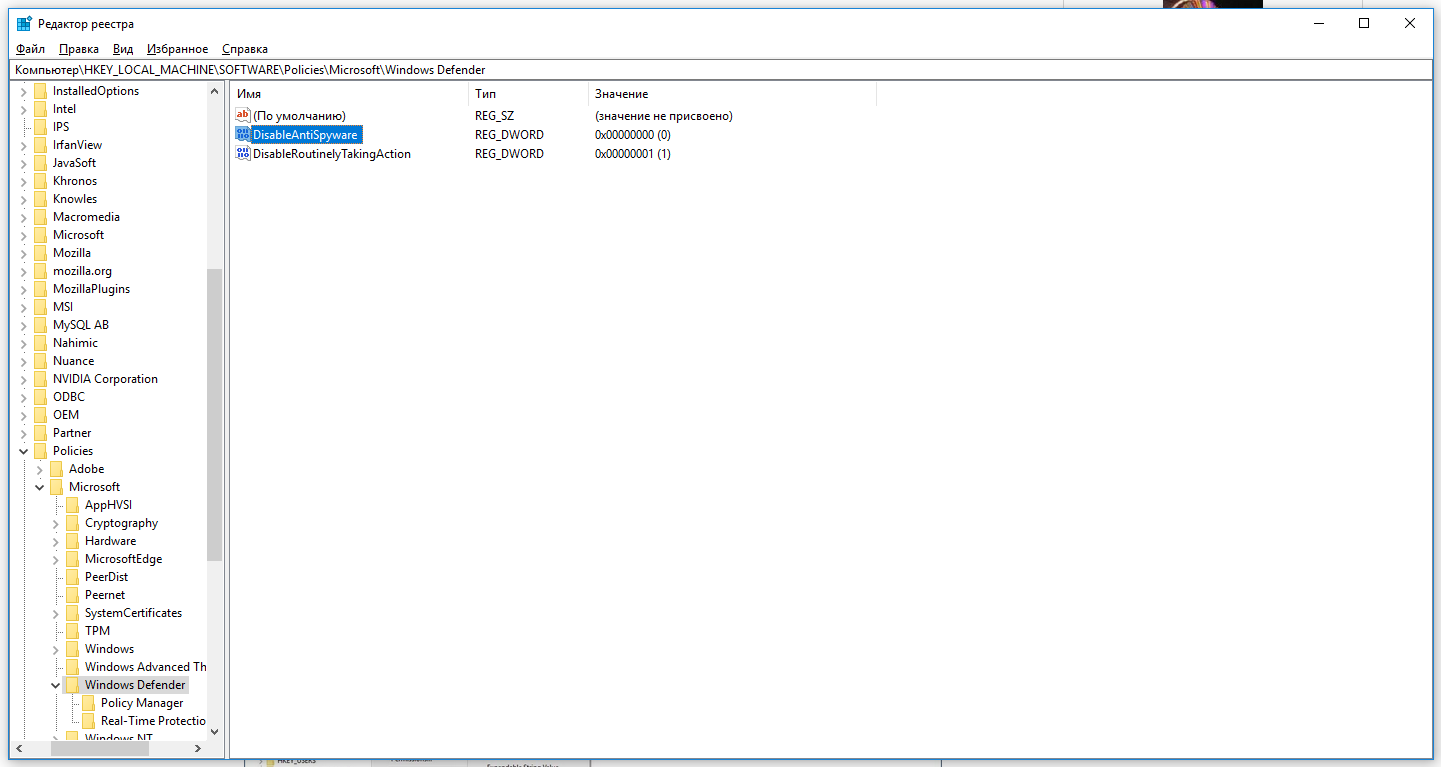
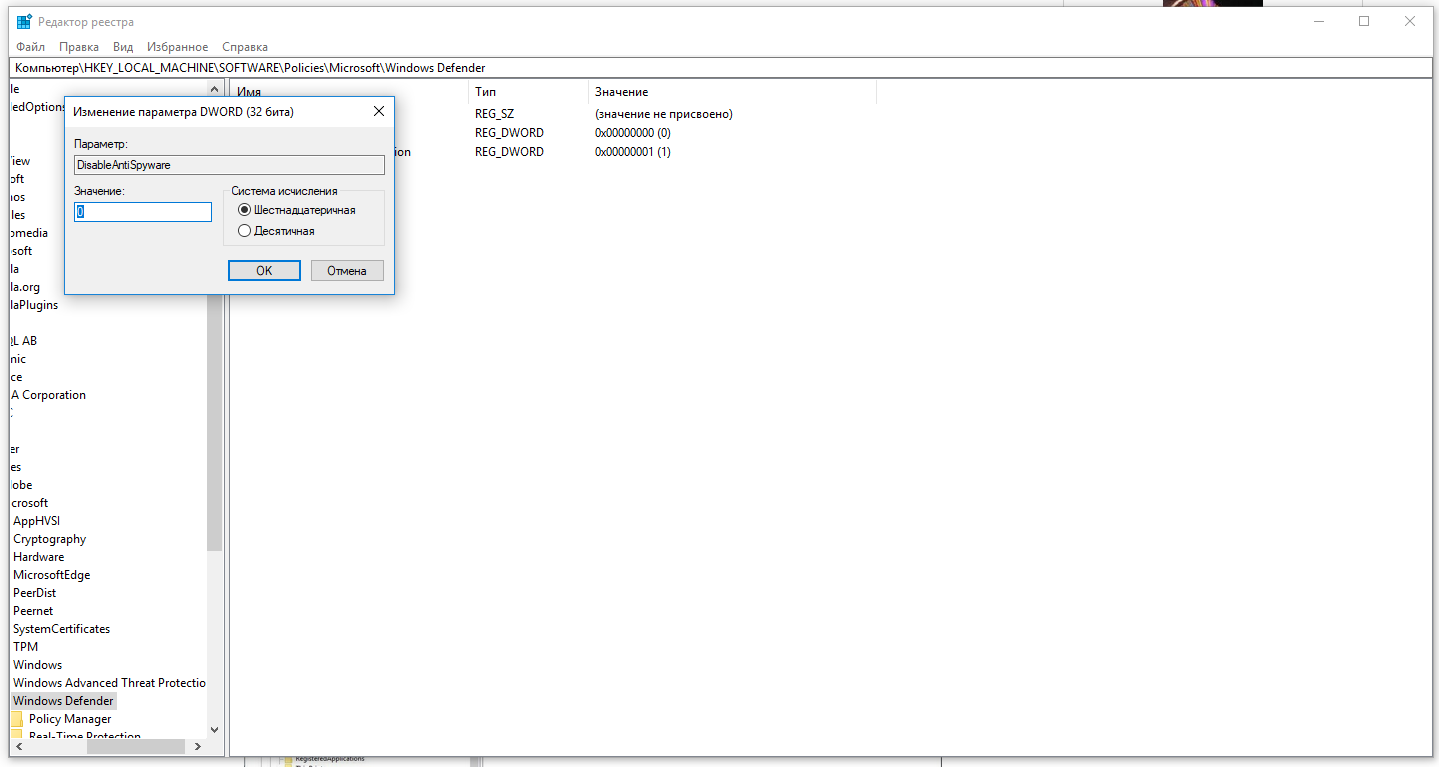
Затем правой клавишей нажмите на ключ (каталог) Windows Defender, выберите «Новый» и DWORD (32-bit) Value. Назовите новый ключ DisableAntiSpyware и нажмите «Ввод». Затем двойным щелчком откройте редактор ключа и задайте ему значение 1.
Нажмите ОК, и перезапустите компьютер.
После этого Защитник Windows уже не будет защищать вашу систему. Если вы захотите отменить эти изменения, повторите все шаги, но в конце удалите этот ключ или назначьте ему значение 0.
Рекомендации
Несмотря на наличие нескольких методов отключения Защитника Windows, мы не рекомендуем использовать компьютер вообще без антивирусных программ. Однако вы можете столкнуться с ситуациями, в которых отключение этой функции будет лучшим вариантом. А если вы устанавливаете стороннюю программу-антивирус, вам не нужно отключать Защитника вручную, поскольку во время установки он отключится автоматически.