The Customer Experience Improvement Program (CEIP) is a feature that comes enabled by default on Windows 10, and it secretly collects and submits system information to Microsoft. The information that the feature collects includes hardware configuration and how you use the operating system and other products, which helps the company to improve the quality of future releases.
Although Microsoft ensures that the program doesn’t collect your personal information, there isn’t a way to verify the exact information your device sends out. If you feel this is a privacy concern or you simply are not interested in participating, you should consider turning off this feature.
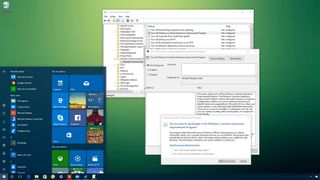
While Windows 10 doesn’t include an option to opt-out completely of the program, you can use the Local Group Policy Editor or the Registry to turn off the Customer Experience Improvement Program on your PC. Using these tools, you’ll stop Microsoft from collecting hardware configuration and software usage while saving a few bits of internet data in the process.
In this Windows 10 guide, we’ll walk you through the steps to stop Microsoft from collecting system information and usage patterns from your computer using the Local Group Policy Editor and the Registry.
How to stop the Customer Experience Improvement Program using Group Policy
If you’re running Windows 10 Pro or a higher version, you can use the Local Group Policy Editor to quickly turn off the Customer Experience Improvement program on your computer.
To disable the Customer Experience Improvement Program, do the following:
- Use the Windows key + R keyboard shortcut to open the Run command.
- Type gpedit.msc and click OK to open the Local Group Policy Editor.
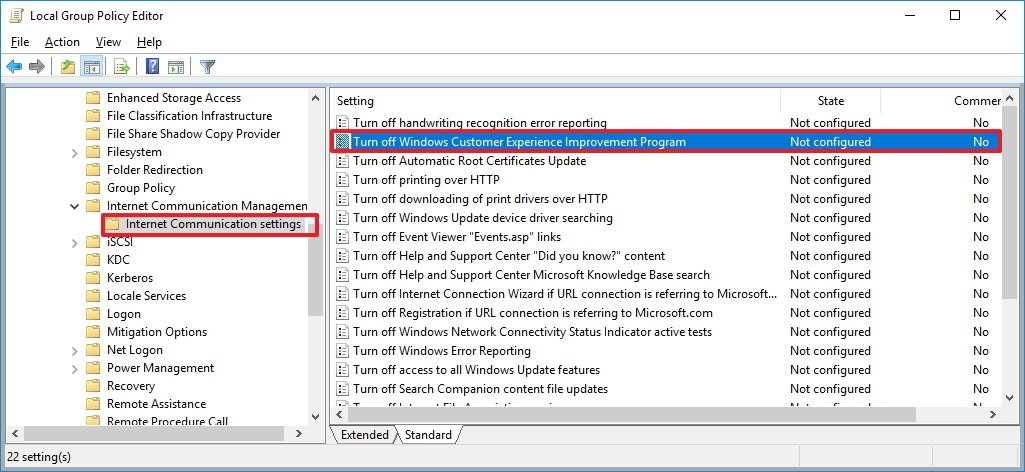
- Browse the following path:
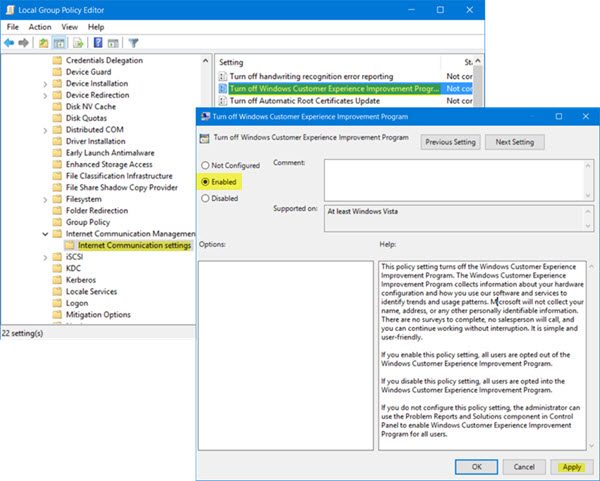
Computer Configuration > Administrative Templates > System > Internet Communication Management > Internet Communication settings - On the right side, double-click the Turn off Windows Customer Experience Improvement Program policy.
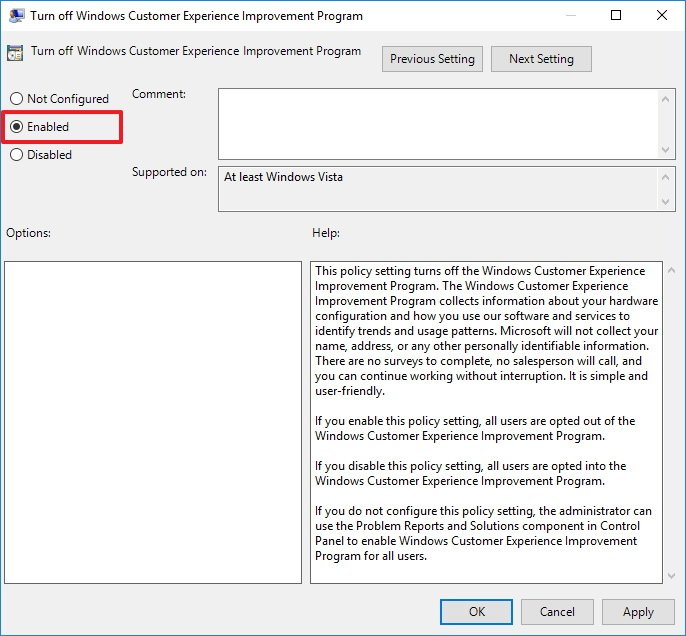
- On the top-left, select the Enabled option to disable the policy.
- Click Apply.
- Click OK.
- Close the Group Policy editor.
- Restart your computer to complete the task.
Once you completed the steps, all users in your computer will no longer be participating in the Customer Experience Improvement Program.
You can always revert the changes by using the same steps, but this time on step 5, make sure to select the Not configured option.
How to stop the Customer Experience Improvement Program using Registry
The Home version of Windows 10 doesn’t include the Local Group Policy Editor, but you can use the Registry to opt-out of the Customer Experience Improvement Program on your computer.
To turn off the Customer Experience Improvement Program, do the following:
- Use the Windows key + R keyboard shortcut to open the Run command.
- Type regedit, and click OK to open the registry.
- Browse the following path:
HKEY_LOCAL_MACHINE\SOFTWARE\Policies\Microsoft\SQMClient - Select the SQMClient (folder) key, right-click it, select New, and click Key.
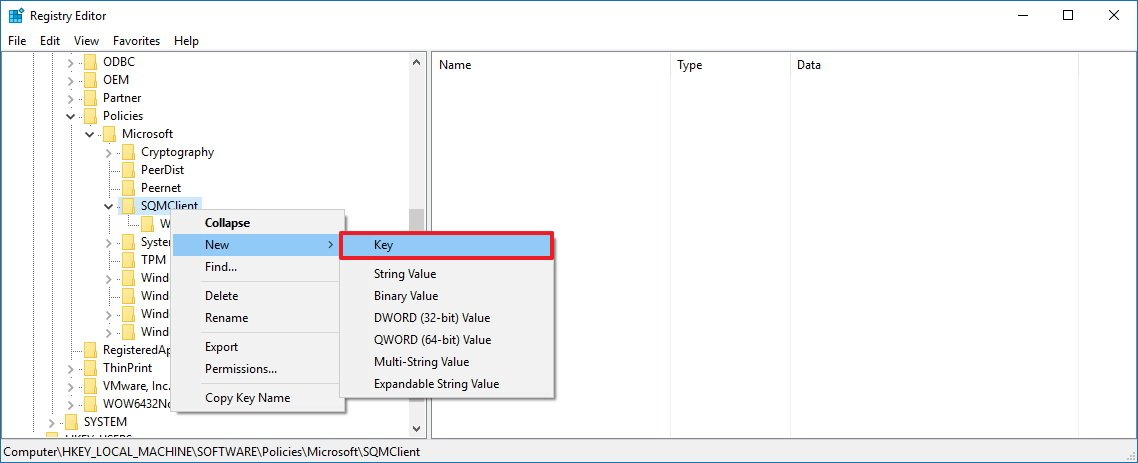
- Name the key Windows and press Enter.
- Select the newly created key, right-click on the right side, select New, and click on DWORD (32-bit) Value.
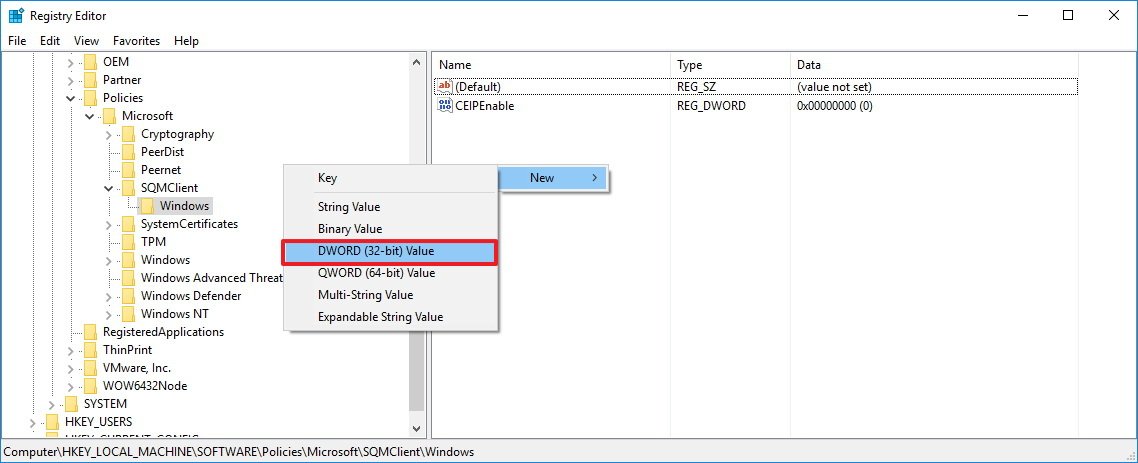
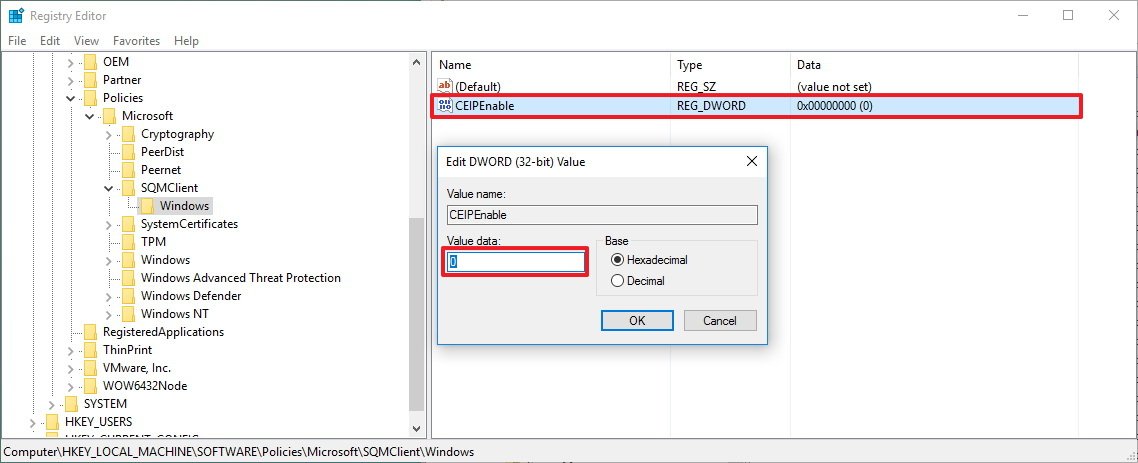
- Name the DWORD CEIPEnable and press Enter.
- Double-click the newly created DWORD and make sure its value is set to 0.
- Click OK.
- Close the Registry.
- Restart your computer to complete the task.
After completing the steps, your computer running Windows 10 Home or Pro should no longer send hardware configuration and software usage to Microsoft.
You can always revert the changes by using the same steps, but this time on step 8, make sure to change the DWORD CEIPEnable value from 0 to 1.
Do you think Microsoft should include an easier way to opt-out of the program? Tell us in the comments below.
More Windows 10 resources
For more help articles, coverage, and answers on Windows 10, you can visit the following resources:
- Windows 10 on Windows Central – All you need to know
- Windows 10 help, tips, and tricks
- Windows 10 forums on Windows Central
All the latest news, reviews, and guides for Windows and Xbox diehards.
Mauro Huculak is technical writer for WindowsCentral.com. His primary focus is to write comprehensive how-tos to help users get the most out of Windows 10 and its many related technologies. He has an IT background with professional certifications from Microsoft, Cisco, and CompTIA, and he’s a recognized member of the Microsoft MVP community.
The Customer Experience Improvement Program (CEIP) is a discrete feature that collects your computer systems information and usage patterns and transmits it back to Microsoft.
Microsoft ensures that this program doesn’t collect any personal information but there isn’t a way to verify what it is sending out.
If you value your privacy, as I do, and wish to disable the Windows 10 CEIP feature this article will show you how.
Stop the Customer Experience Improvement Program
The Home version of Windows 10 doesn’t include the Local Group Policy Editor, but you can use the Registry Editor to opt-out of the Customer Experience Improvement Program (CEIP) on your Windows 10 computer.
To turn off the Customer Experience Improvement Program (CEIP):
- Use the Windows key + R keyboard shortcut to open the Run command.
- Type regedit, press OK and then select Yes to to open the registry.
- Browse to the following path:
- HKEY_LOCAL_MACHINE\SOFTWARE\Policies\Microsoft\SQMClient
- If the folders (Keys) do not exist you will need to create them.
- Right click on the SQMClient (folder) and select New then Key.
- Name the new key Windows and press enter to save.
- Select the newly created key (Windows) and right-click within the window pane on the right side, select New, and click on DWORD (32-bit) Value.
- Name the DWORD CEIPEnable and press enter.
- Double-click the newly created DWORD and make sure its value is set to 0.
- Click OK.
- Close the Registry Editor app and restart your computer for the changes to take effect.
- HKEY_LOCAL_MACHINE\SOFTWARE\Policies\Microsoft\SQMClient

After completing these steps, your computer running Windows 10 Home or Pro should no longer send your computer’s hardware configuration details and usage patterns to Microsoft. To undo this, simply change the DWORD CEIPEnable value to 1 rather than 0.
You may want to also disable any scheduled tasks related to the Customer Experience Improvement Program (CEIP). To do so, click on the Windows 10 Start button down at the bottom left of your computer screen and type in Task. From the provided items that appear, select the Task Scheduler desktop app.
At the bottom, within the Active Tasks area locate Consolidator and double click on it.

Next you’ll want to disable any tasks, in our case we had two ready to run. Not anymore!


Conclusion
I welcome your thoughts, questions or suggestions on my article on how to disable the Windows 10 Customer Experience Improvement Program.
You may support my work by sending me a tip using your Brave browser or by sending me a one time donation using your credit card.
Let me know if you found any errors within my article or if I may further assist you by answering any additional questions you may have.
Editors Note:
- This article was originally published on Feb. 28th, 2019. It was revised to update the sub-headings and text to make it easier to navigate the article.
Практически все современные версии Windows подключены к так называемой программе по улучшению качества программного обеспечения (Customer Experience Improvement Program, CEIP), которая собирает анонимную информацию об использовании ОС и пересылает их в Microsoft с целью, как утверждается, «анализа и повышения надёжности и производительности операционных систем софтверного гиганта». CEIP осуществляет сбор информации об оборудовании компьютера и использовании Windows, сведений о конфигурации системы, производительности некоторых компонентов ОС и определённых типах событий, возникающих проблемах при работе ПК и прочих статистических данных. Microsoft заверяет, что передаваемая CEIP информация не содержит сведений, которые позволяют определить личность пользователя или название компании. Возможно, так оно и есть, что на фоне многочисленных публикаций в сети и экспертных исследований на эту тему выглядит очень сомнительным.
Кто не привык слепо верить чужим словам и в жизни руководствуется принципом «доверяй, но проверяй», тот может подстраховаться и отказаться от участия в программе улучшения ПО. Раньше для этого было достаточно перейти в раздел «Панель управления -> Центр поддержки -> Настройка центра поддержки -> Параметры улучшения качества ПО» и выставить в настройках Windows соответствующую галочку. Однако в последних сборках Windows 10 компания Microsoft то ли случайно, то ли умышленно (что вероятнее) исключила такой параметр из настроек, и теперь приходится прибегать к альтернативным вариантам отключения CEIP, будь то использование редактора локальных групповых политик (gpedit.msc) или правка реестра ОС. Мы же в данной заметке предлагаем самый простой способ деактивации упомянутой службы.
Для этого необходимо проделать три простых шага.
1. Щёлкаем правой кнопкой мыши в левом нижнем углу по кнопке «Пуск» и выбираем пункт «Командная строка (администратор)».

2. В запущенной с администраторскими правами консоли набираем C:\windows\system32\rundll32.exe werconcpl.dll,ShowCEIPDialog.
3. Откроется окно программы по улучшению качества ПО Windows. В нём потребуется отметить мышью пункт «Нет, я не хочу участвовать в программе» и нажать «Сохранить изменения».

Если всё сделать правильно, то автоматизированный сервис сбора данных CEIP прекратит свою работу, а операционная система Windows перестанет собирать и пересылать статистические сведения в компанию Microsoft.
Download Windows Speedup Tool to fix errors and make PC run faster
We have earlier taken a look at the Customer Experience Improvement Program and seen how a user can opt-out of it easily via the Control Panel. Today, we will see how you can turn off or disable the Windows Customer Experience Improvement Program using Group Policy or the Registry in Windows 11/10.
The Customer Experience Improvement Program (CEIP) is an effort by Microsoft to increase customer satisfaction. By gathering information from people who use its software and services, Microsoft hopes to improve the quality and performance of its products. This is a volunteer program. You do not have to participate to use Microsoft products.

Here’s how the Customer Experience Improvement Program works:
- When installing software that is part of the program, you will be asked if you want to join the program. If you join, the Customer Experience Improvement Program runs on your computer, without interfering with your tasks or how your computer functions.
- During computing sessions, small amounts of information about how you use your computer are sent to Microsoft, to be analyzed for aggregate trends and usage patterns. This information is then used to improve the quality of Microsoft products and to respond to the needs of its customers. Aside from joining the program, you do not need to do anything else.
- The information collected by the Customer Experience Improvement Program is completely anonymous. It cannot be traced back to you and it does not contain any personal information (such as your name or location). Microsoft does not share the data collected with other companies, and the Customer Experience Improvement Program is not an advertising campaign.
- You can join or leave the Customer Experience Improvement Program at any time.
Thus, in short, the CEIP program helps Microsoft improve Windows and its other software. Without interrupting you, it collects information about your computer hardware and how you use Windows. The program also periodically downloads a file to collect information about problems you might have with Windows.
While it is recommended that you keep the default settings and help Microsoft make Windows still better, you can if you wish chose to opt out, turn off or disable the Customer Experience Improvement Program.
To disable the Customer Experience Improvement Program, open Control Panel and type Customer Experience Improvement Program in the search bar. Click on the Change Customer Experience Improvement Program settings link in the search results. In the box which opens, select No, I don’t want to participate in the program and Save Changes. You can also use GPEDIT or REGEDIT.
Using Group Policy Editor
Press Windows Key + R simultaneously. In the ‘Run’ dialog box that pops up on your computer screen instantly, type gpedit.msc and click OK.
Next, when the main screen of Local Group Policy Editor opens, navigate to the following setting:
Computer Configuration > Administrative Templates > System > Internet Communication Management > Internet Communication settings
In right pane look for ‘Turn off Windows Customer Experience Improvement’ option and double-click it to open its Properties.
This policy setting turns off the Windows Customer Experience Improvement Program. The Windows Customer Experience Improvement Program collects information about your hardware configuration and how you use our software and services to identify trends and usage patterns. Microsoft will not collect your name, address, or any other personally identifiable information. There are no surveys to complete, no salesperson will call, and you can continue working without interruption. It is simple and user-friendly. If you enable this policy setting, all users are opted out of the Windows Customer Experience Improvement Program. If you disable this policy setting, all users are opted into the Windows Customer Experience Improvement Program. If you do not configure this policy setting, the administrator can use the Problem Reports and Solutions component in Control Panel to enable Windows Customer Experience Improvement Program for all users.
Select ‘Enabled’ and click ‘Apply’ and ‘OK’ to save changes.
Using Registry Editor
If your Windows does not ship with the Group Policy Editor, you can tweak the Windows Registry to disable the feature. To do so, type regedit.exe in Start Search and hit the Enter to open the Windows Registry Editor.
Navigate to the following key:
HKEY_LOCAL_MACHINE \SOFTWARE \Policies \Microsoft \SQMClient \Windows
If the SQMClient and Windows keys do not exist, create them by right-clicking on Microsoft first and selecting New > Key from the context menu, and then on the created SQMClient next, to create Windows.

Now right-click on Windows > New > Dword (32-bit) Value. Name this newly created DWORD as CEIPEnable and set its value to 0.
Restart your Windows computer.
You can also disable the Windows Customer Experience Improvement Program by using an answer file with an unattended installation, by using Server Manager or by disabling the related task in the Task Scheduler. To read more about it, visit Technet.
Anand Khanse is the Admin of TheWindowsClub.com, a 10-year Microsoft MVP (2006-16) & a Windows Insider MVP (2016-2022). Please read the entire post & the comments first, create a System Restore Point before making any changes to your system & be careful about any 3rd-party offers while installing freeware.
The Customer Experience Improvement Program, or CEIP for short, is used by Windows to collect and send information to Microsoft. This information includes but is not limited to program crashes, the performance of different components in Windows, system configuration, what programs you are using, how many network connections you have, etc. From time to time, CEIP also uploads a small file to Microsoft servers containing the summary of all the information collected. Even though CEIP doesn’t collect or send any personally identifiable information, it is enabled by default. So, if you don’t want to send this information to Microsoft, you can disable it completely.
There are four different ways to disable the Customer Experience Improvement Program in Windows 10. Follow the one you are most comfortable with.
Disable CEIP from Control Panel
Since Windows provides the necessary options, the easiest way to disable CEIP is to use the Control Panel. Search for «Control Panel» in the Start menu and open it.

The CEIP is buried deep in the Control Panel. To find it, search for «Customer» using the search bar, and click on the link «Change Customer Experience Improvement Program settings» from the search results.

The above action will open the Settings window. Here, select the «No, I don’t want to participate in the program» radio button, and click on the «Save Changes» radio button.
Just restart the system to make sure the changes take effect.
Disable CEIP from Task Scheduler
Alternatively, you can simply disable the scheduled CEIP tasks so the program doesn’t run to collect the data. To disable the scheduled tasks, search for «Task Scheduler» in the Start Menu and open it.

Now on the left panel, navigate to the folder «Task Scheduler Library -> Microsoft -> Windows -> Application Experience.» Once you are here, select all the tasks in the middle panel, right-click on them and select the option «Disable.»

That’s it. If you ever want to enable CEIP, then simply follow the same procedure and select the option «Enable» from the right-click menu.

Disable CEIP Using Group Policy Editor
If for some reason you cannot use the Control Panel settings to change CEIP behavior, then you can use the Group Policy Editor to do the same thing. Press «Win + R,» type gpedit.msc and press the Enter button to open the Group Policy Editor.

In the Group Policy Editor navigate to «Computer Configuration -> Administrative Templates -> System -> Internet Communication Management -> Internet Communication Settings.»

Once you are here, find and double-click on the option «Turn off Windows Customer Experience Improvement Program» appearing on the right panel.

The above action will open the policy settings window. Here, select the «Enabled» radio button, and click on the «Ok» button to save the changes.

Just restart your system or use the below command as an administrator to make the changes take effect.
To revert back, select the «Not Configured» radio button or «Disabled.»
Disable CEIP Using Registry Editor
If you are using the Windows Home version, then you won’t have access to the Group Policy Editor. In those situations you can use the Registry Editor. To open the Windows Registry Editor, press «Win + R,» type regedit and press the Enter button.

In the Registry Editor navigate to the following location:
HKEY_LOCAL_MACHINE\SOFTWARE\Policies\Microsoft

Here, right-click on the «Microsoft» key and select the option «New -> Key.»

Name the new key as «SQMClient,» and press the Enter button.

We need to create another key, so right-click on the newly created key, and select the option «New» and then «Key.»

Name the new key «Windows.»

After creating the required keys, select the «Windows» key that we just created, right-click on the right panel and select the option «New -> DWORD (32-bit) Value.»

Name the new DWORD value «CEIPEnable.»

By default, the value has the value data of «0.» However, if you already have the «CEIPEnable» value in your Registry Editor, then you might have to modify the value data. To do that, double-click on the value, enter «0» in the Value Data field and click on the «OK» button to save the changes.

Don’t forget to restart your system to make the changes take effect. If you ever want to revert back, simply change the Value Data from «0» to «1.»
Do comment below sharing your thoughts and experiences about using the above methods to disable the Customer Experience Improvement Program in Windows 10.

Vamsi is a tech and WordPress geek who enjoys writing how-to guides and messing with his computer and software in general. When not writing for MTE, he writes for he shares tips, tricks, and lifehacks on his own blog Stugon.
Subscribe to our newsletter!
Our latest tutorials delivered straight to your inbox