Command-line tools allow you to get rid of Hyper-V in a few clicks
by Loredana Harsana
Loredana is a passionate writer with a keen interest in PC software and technology. She started off writing about mobile phones back when Samsung Galaxy S II was… read more
Updated on
- Windows 11 Hyper-V is a fantastic feature since it allows you to create virtual machines in a separate environment without interfering with your main workspace.
- However, some users have reported that they wish to disable it, but they can’t do so.
- One way to disable the feature is to use the Command Prompt and paste in the commands we attached below.
XINSTALL BY CLICKING THE DOWNLOAD
FILE
Virtualization has gained popularity as a result of the fact that it allows us to run many operating systems on a single computer, even if their file systems are incompatible with one another. Some may wonder whether they can disable Hyper-V in Windows 11.
In the shape of Hyper-V, Microsoft has created its virtualization technology. By using this feature, we can create and run virtual machines of various types (including but not limited to Windows, Linux, and others).
One of the reasons you want to enable Hyper-V in Windows 11 is the ability to run virtual machines in their own isolated space, which allows us to run not only one but multiple virtual machines simultaneously, which is very convenient. However, some users said they wish to disable this beautiful Windows feature.
Follow along as we have put together a comprehensive list of ways to disable Hyper-V in Windows 11 with cmd and other ways right after we respond to the often-asked question about virtual machine integration in Windows 11.
Does Windows 11 have a virtual machine?
Virtual machines enable developers to work with Windows without installing the operating system on their workstations.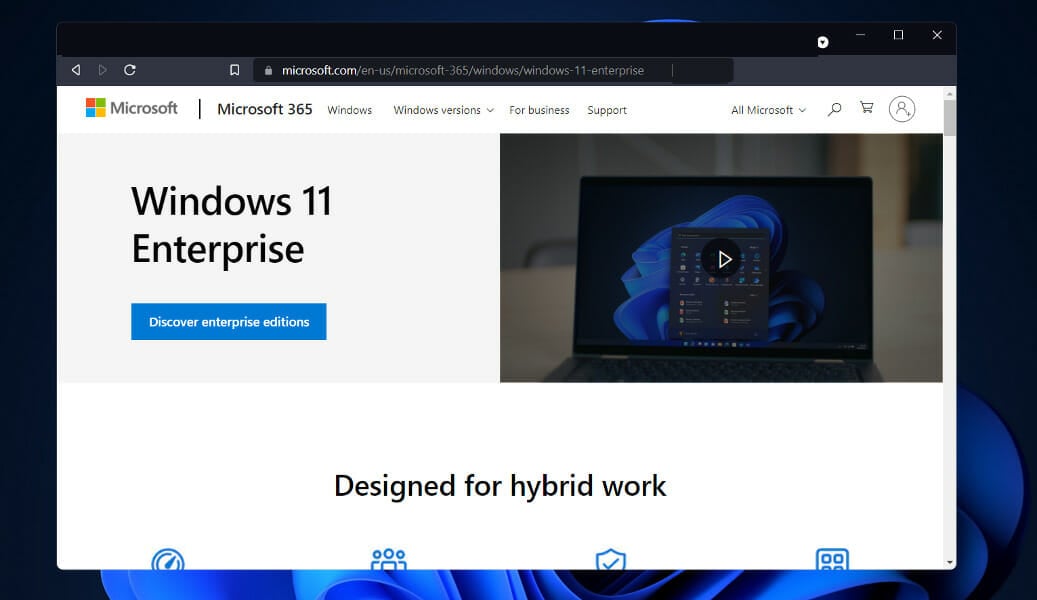
In addition to working from devices running other operating systems, such as Linux or macOS, developers will be able to work from a Windows 11 Enterprise virtual OS. Users have a variety of alternatives when it comes to developing a virtual machine.
According to Microsoft, the virtual machine enables developers to start constructing Windows apps quickly by using a pre-installed feature with the newest versions of Windows, the developer tools, SDKs, and examples ready to use.
If you were wondering where Hyper-V is in Windows 11, the Enterprise virtual machine (VM) can now be downloaded from the Microsoft website. Developers can get a free copy of it. VMware, Hyper-V, VirtualBox, and Parallels are among the virtualization software solutions included in Microsoft’s bundle.
How can I disable Hyper-V in Windows 11?
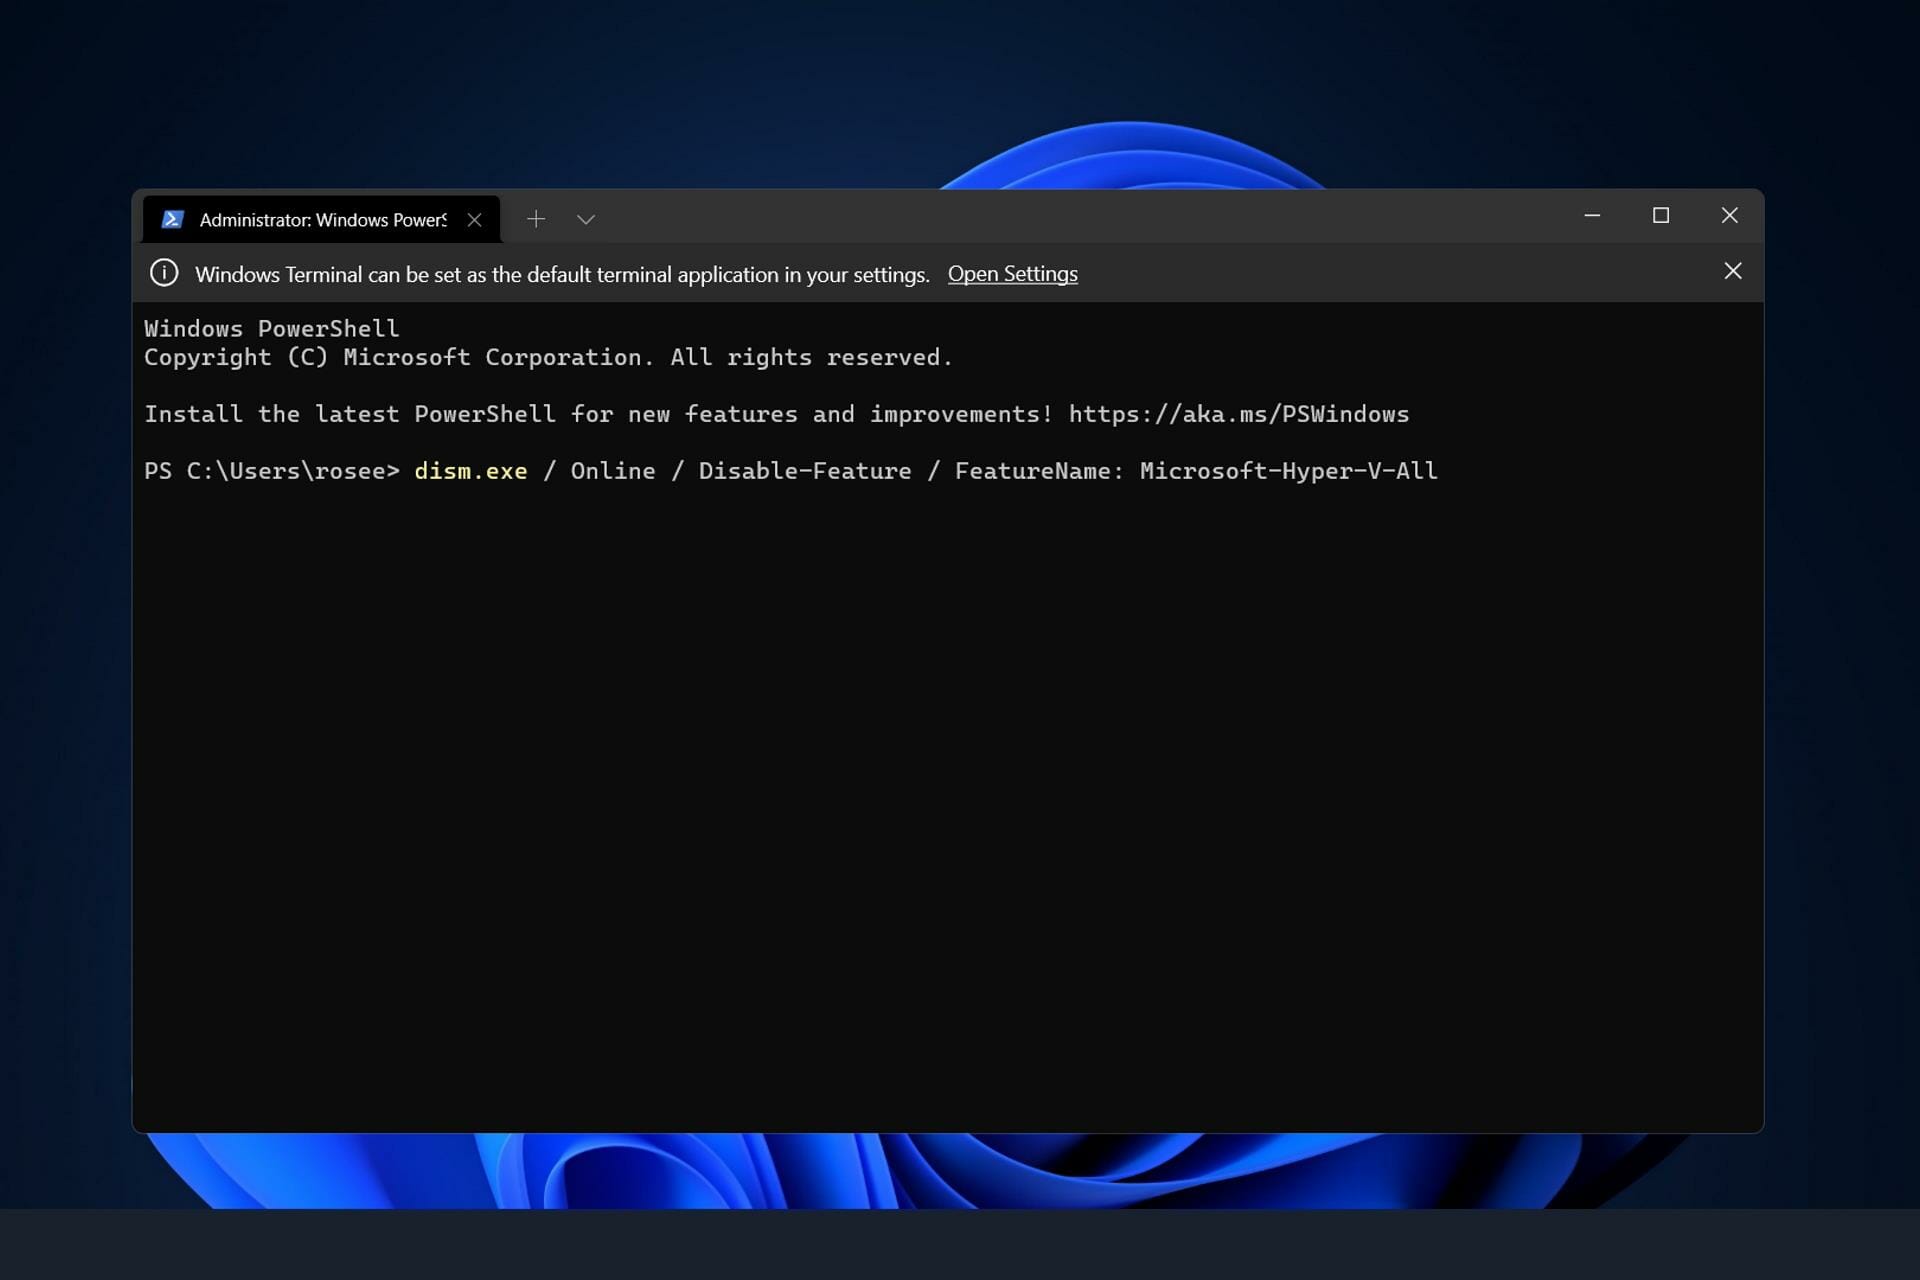
1. Disable it via CMD
At the time, the available methods to disable Hyper-V are through command line-tools. Of course, the tool that users prefer to use is Command Prompt. So, if wanted to find out how to disable Hyper-V in Windows 11 Command Prompt, check the steps below.
How we test, review and rate?
We have worked for the past 6 months on building a new review system on how we produce content. Using it, we have subsequently redone most of our articles to provide actual hands-on expertise on the guides we made.
For more details you can read how we test, review, and rate at WindowsReport.
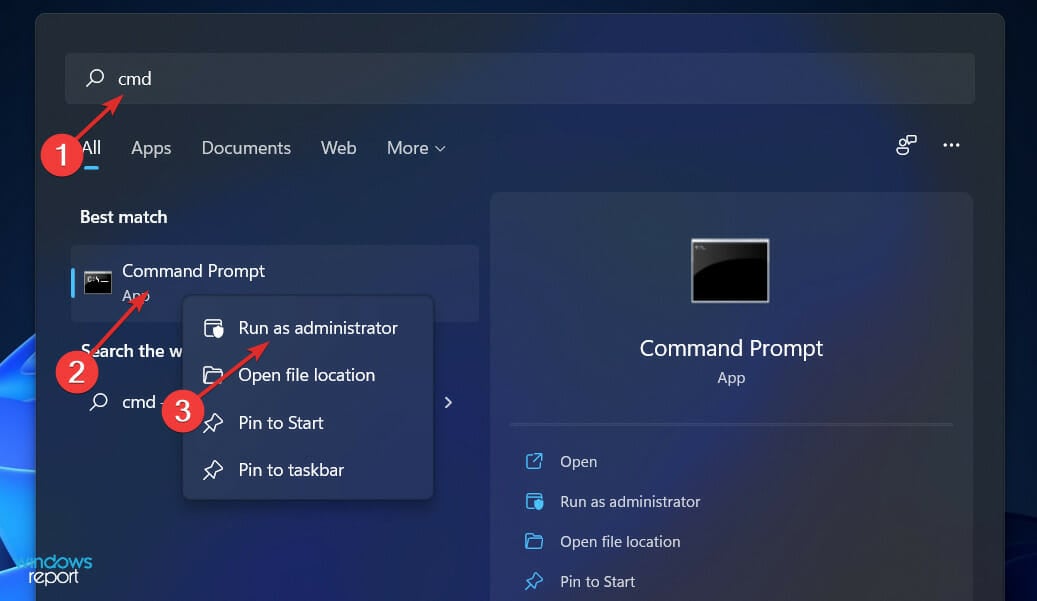
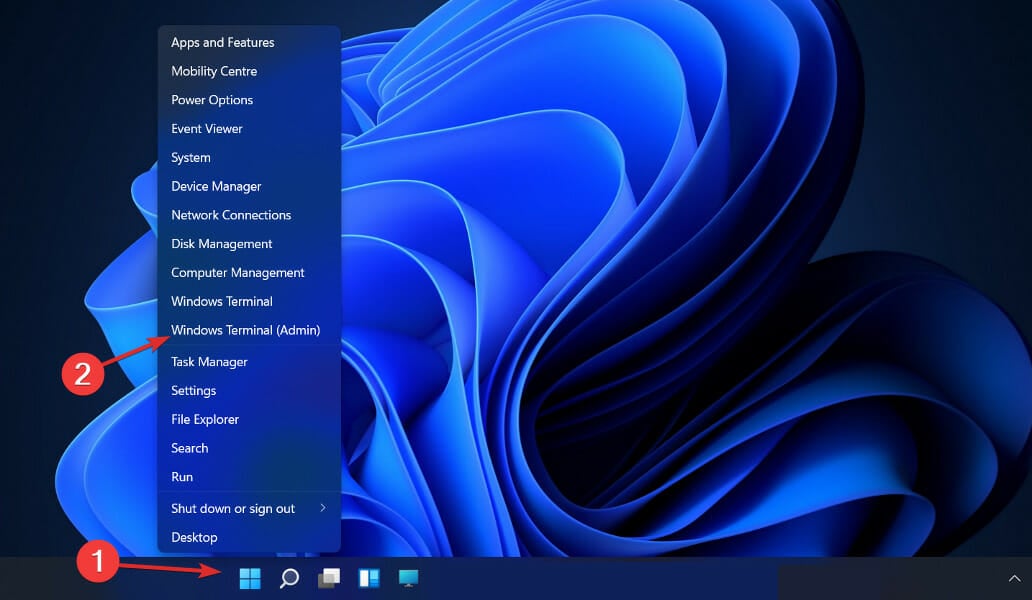
1. Press the Windows + S keys at the same time on your keyboard to open the Search bar.
2. Type cmd in the Search bar.
3. Right-click on the most relevant result and select Run an administrator from the list of options available.
4. The Command Prompt window will open.
5. Now type or paste in the following command:DISM /Online /Disable-Feature /FeatureName:Microsoft-Hyper-V-All
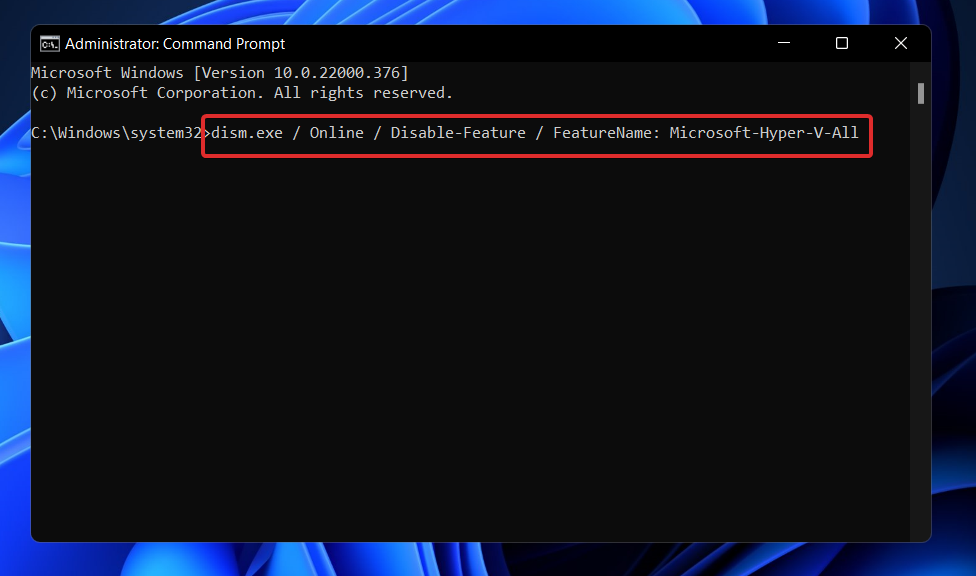
6. Press Enter to run the command.
7. Hyper-V is now disabled on your PC.
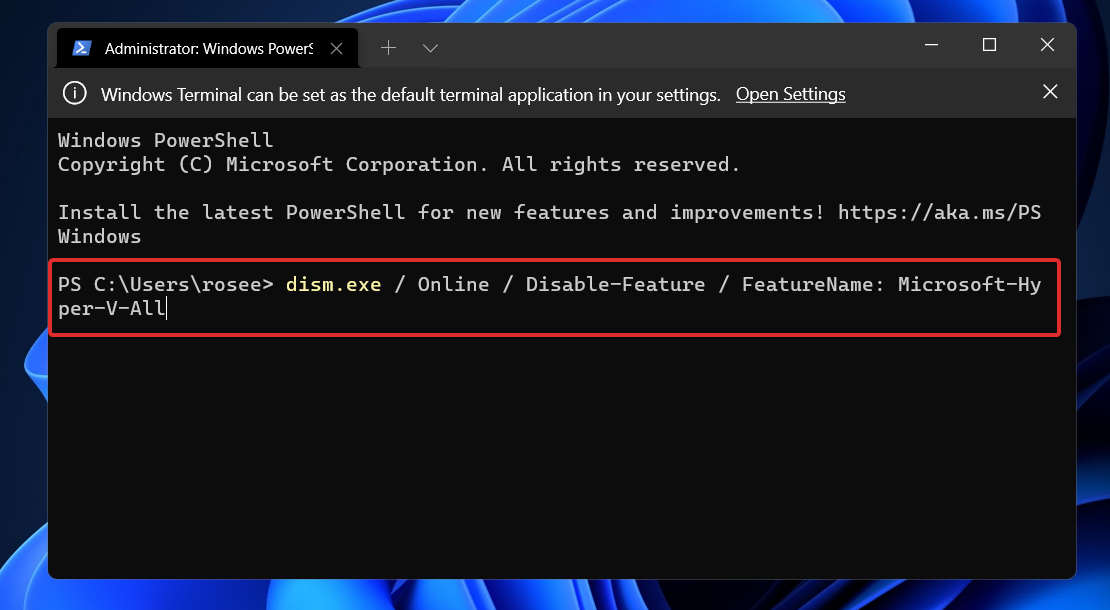
2. Use PowerShell
- Right-click on the Start icon then click on the Windows Terminal (Admin) option to open the PowerShell interface.

- Type or paste in the following command, then press Enter and let it run:
DISM /Online /Disable-Feature /FeatureName:Microsoft-Hyper-V-All
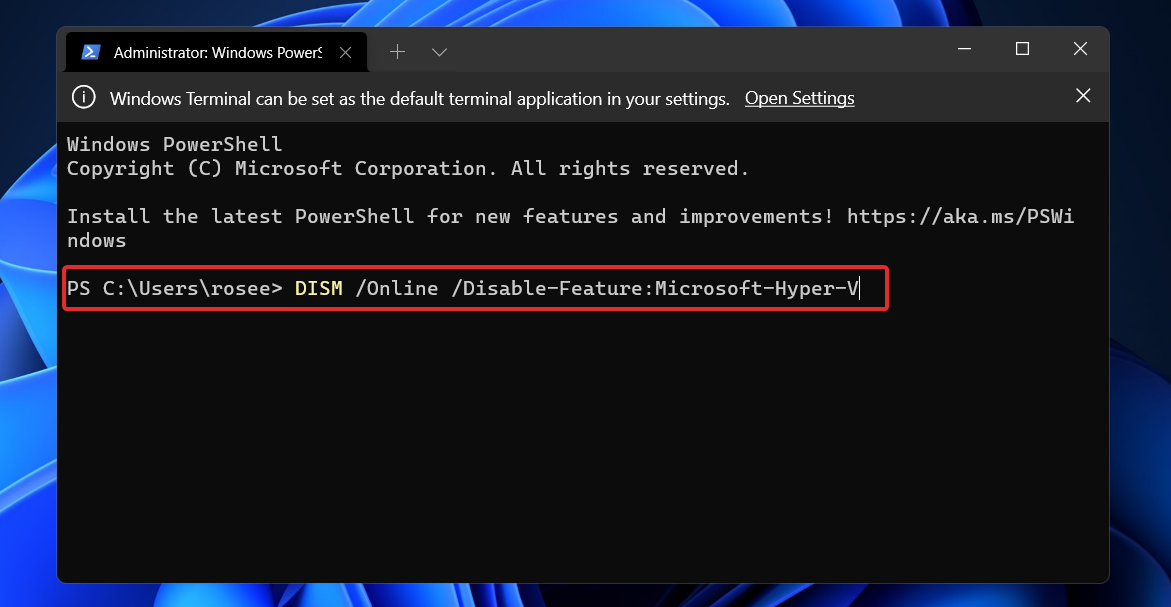
3. Disable with DISM
- Right-click on the Start icon then click on the Windows Terminal (Admin) option.
- Now type or paste in the below command and press Enter to run it:
DISM /Online /Disable-Feature:Microsoft-Hyper-V
To finish the uninstallation procedure and entirely uninstall Hyper-V, a machine’s UEFI/BIOS settings must be configured to disable Secure Boot.
The technique for disabling Secure Boot will differ based on your hardware vendor and the manufacturer of your motherboard.
How much RAM does Hyper-V need?
Typically, memory is the most valuable resource available on a virtualization host. It is not possible to share it between virtual computers. The computing expenses associated with compressing or de-duplicate it are prohibitively high, making neither option practical.
The amount of physical memory deployed in a virtual machine has a significant impact on its density, but the financial cost of memory increases rapidly as chip capacities grow larger and larger.
Memory assignment and activity tracking in Hyper-V are not without their own set of drawbacks. Hyper-V alone requires approximately 300 MB of memory to run its operations.
For each virtual machine, any quantity of memory up to and including the first megabyte necessitates using 32 megabytes of overhead. Every gigabyte added after the first incurs an additional 8 megabytes overhead.
There are other requirements besides the 512 megabytes required by the management operating system (it will often be useless, but it cannot be pre-estimated with any level of accuracy).
Because of this, you should expect your physical host to be unable to utilize the absolute bare minimum amount of RAM available for virtual machines, which is one gigabyte (GB).
Furthermore, it is frequently noticed in practice that other activities in the management operating system require even more memory to be set aside than is initially required. A typical Hyper-V host will require approximately 2 GB of RAM solely to run Hyper-V and the management operating system.
If you want to learn how to optimize your OS, check out our guide on how to make Windows 11 faster and more responsive.
And if you encounter issues while installing the feature, we have already prepared a post on what to do if you can’t install Hyper-V on your computer. The solutions will apply to Windows 11 as well!
Let us know in the comments section below which solution worked best for you and why you chose to disable Hyper-V.
![]()
If Hyper-V is getting in the way of your plans, you can get rid of it on Windows 11 using these tips.
Hyper-V comes pre-installed on Windows 11 computers. While the virtualization tool is not available out of the box on the Home edition of the OS, you can install it with a batch script.
Unfortunately, Hyper-V can conflict with third-party apps on your PC. As a result, you may encounter the Hyper-V detected error when trying to launch an app, PC games, or hardware tuning utilities.
Luckily, you can disable Hyper-V in Windows 11 with the help of the classic Windows Features dialog, Command Prompt, and PowerShell.
How to Check if Hyper-V Is Running on Windows 11

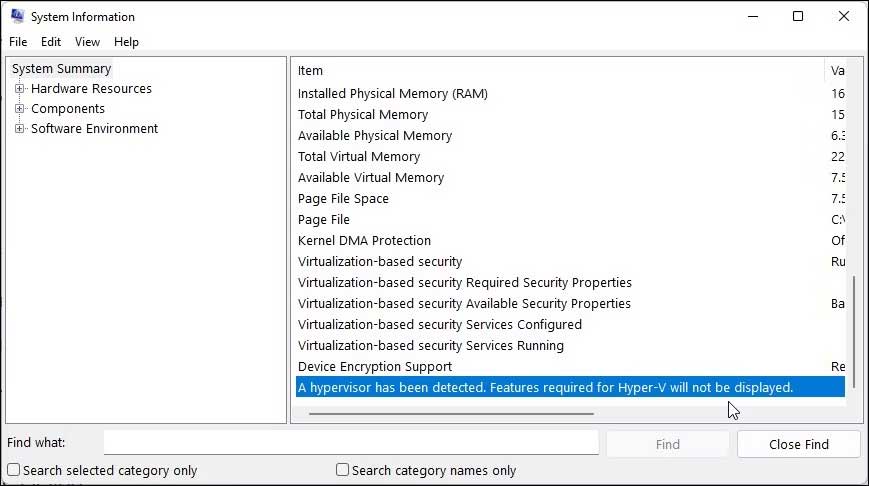
You can access the System Information app to determine if Hyper-V virtualization is running. This is useful if you need to verify Hyper-V’s status after disabling it.
To check the current Hyper-V status on your computer:
- Press Win + R to open Run.
- Type msinfo32.exe and click OK to open the apps.
- Next, check if the following entry is available at the bottom of the details tab:
A hypervisor has been detected. Features required for Hyper-V will not be displayed. - If yes, you’ll need to disable Hyper-V, Memory integrity, and the Credential Guard feature, as discussed below to use other virtualization tools without any error.
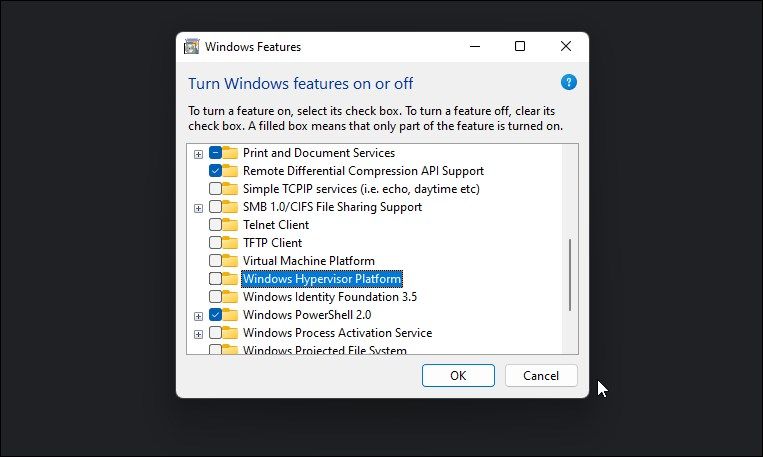
1. How to Disable Hyper-V via the Windows Features Dialog
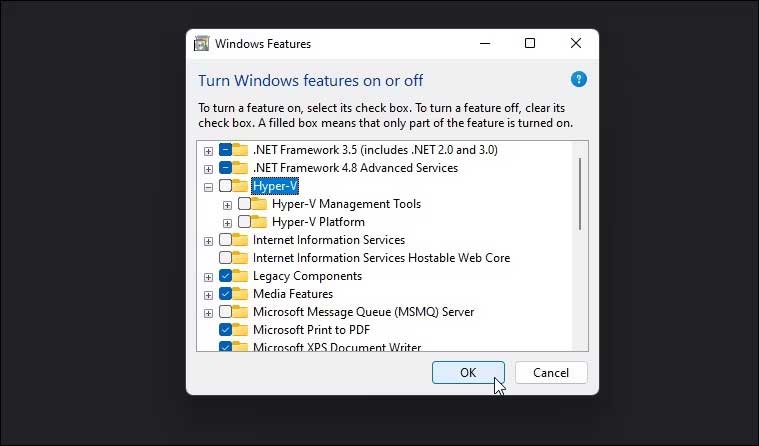
The Windows Features dialog lets you add additional features that are disabled by default in Windows 11. You can also use it to disable some advanced features, including Hyper-V.
Note that to fix the Hyper-V detected error, you will need to disable the Virtual Machine Platform and Windows Hypervisor Platform feature in addition to Hyper-V.
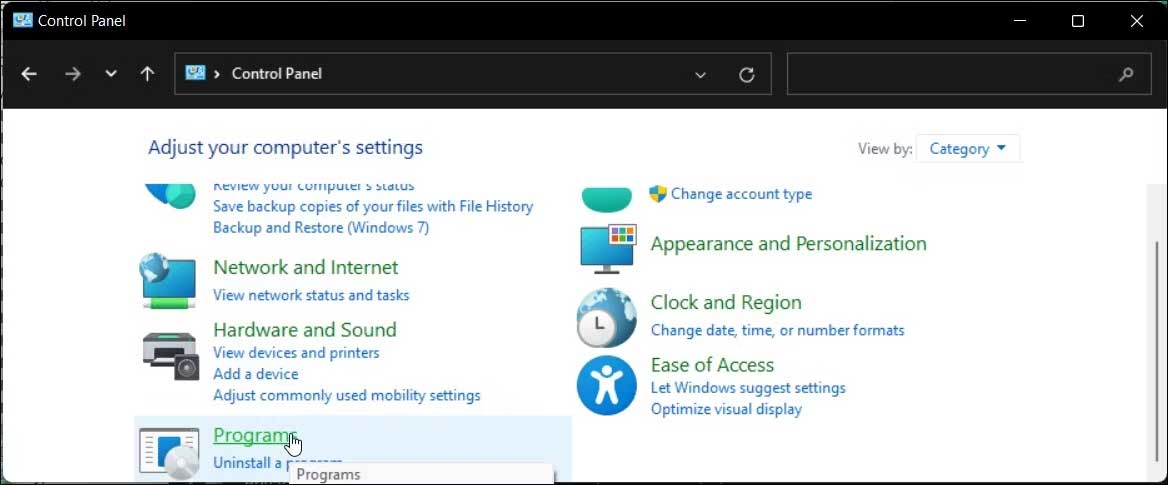
To disable Hyper-V using the Windows Features dialog:
- Press the Win + R key to open the Run dialog.
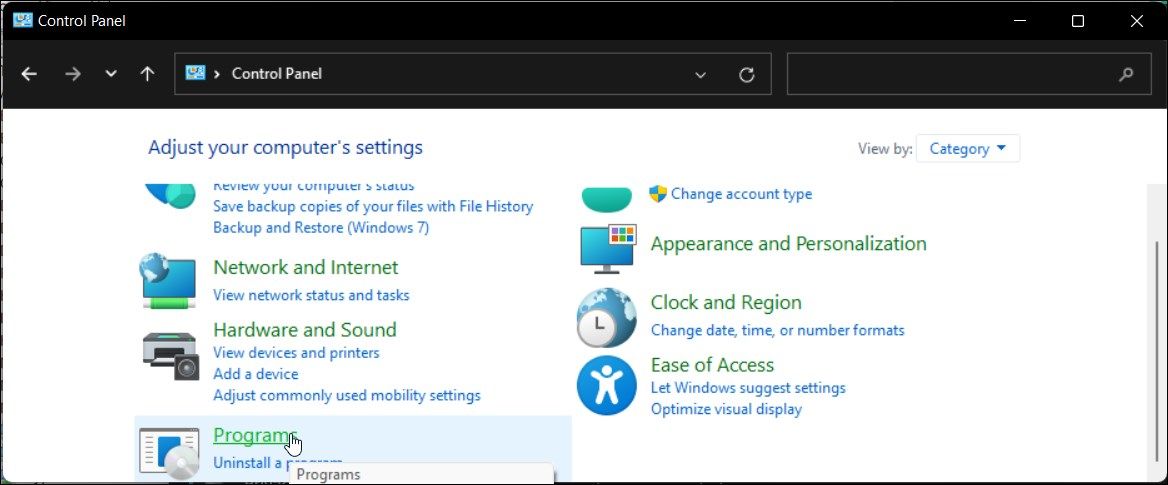
- Type control and click OK to open the Control Panel.
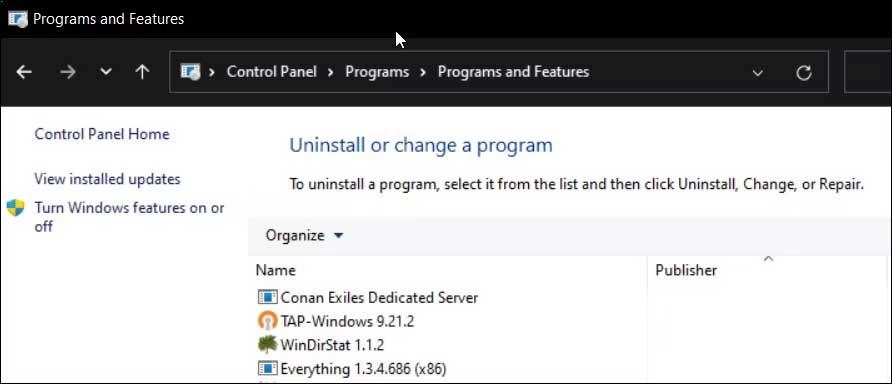
- In the Control Panel, click on Programs.

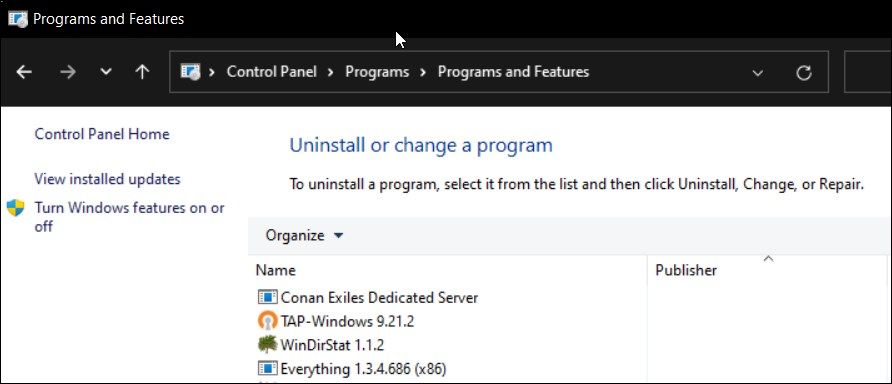
- Next, click on Programs and Features.
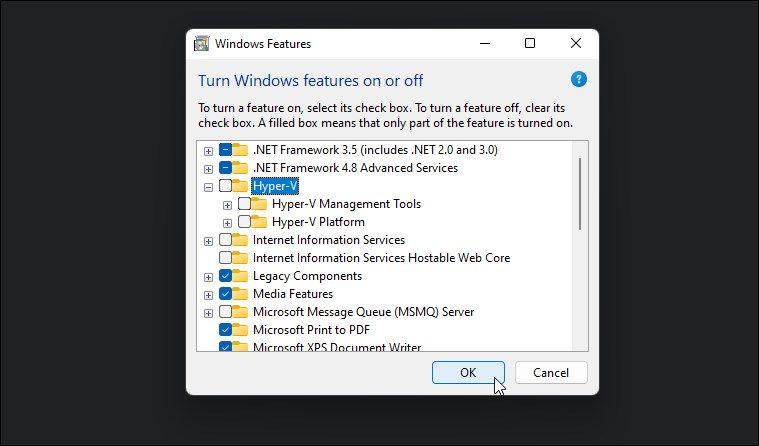
- In the left pane, click on Turn Windows features on or off.

- In the Windows Features dialog, locate Hyper-V.
- Uncheck the Hyper-V option to disable the feature.

- Next, scroll down and locate the Virtual Machine Platform and Windows Hypervisor Platform options.

- Unselect both options and click OK.
- Windows will uninstall Hyper-V and other features from your system.
- Once done, restart your PC to apply the changes.
2. How to Disable Hyper-V Using BCDEDIT

You can disable Hyper-V in boot configuration using the BCDEdit tool. Useful if you only want to deactivate Hyper-V and not uninstall it completely.
To disable Hyper-V using BCDEdit:
- Press the Win key and type cmd.
- Right-click on the Command Prompt and select Run as administrator.
- In the Command Prompt window, type the following command and press Enter:
bcdedit /set hypervisorlaunchtype off - When the success message appears, close the Command Prompt, and restart your PC to apply the changes.
- If you need to activate Hyper-V again, use the following command:
bcdedit /set hypervisorlaunchtype auto - Make sure to restart your PC to apply the changes.
Additionally, you can use the BCDEdit tool to perform other advanced tasks, such as deleting the old boot menu options and adding a safe mode shortcut to Windows 11’s boot menu.
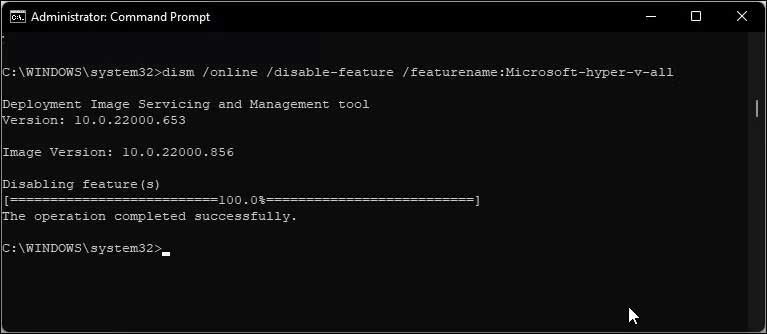
3. How to Uninstall Hyper-V Using the Command Prompt
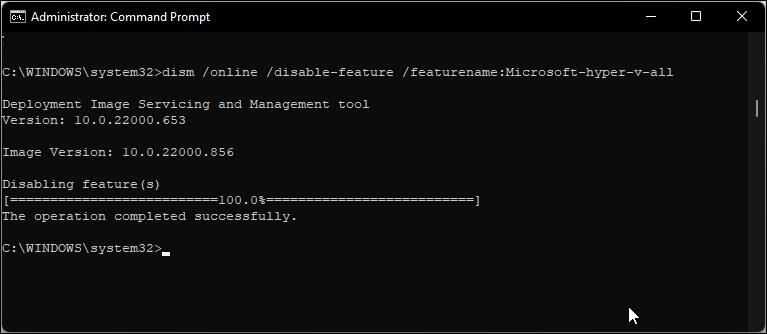
If the Windows Features dialog fails to remove Hyper-V, you can use the Command Prompt to disable the hypervisor. Here’s how to do it.
- Open Command Prompt as administrator.
- In the Command Prompt window, type the following command and press Enter:
dism /online /disable-feature /featurename:Microsoft-hyper-v-all - Upon execution, the DISM tool will disable Hyper-V and show the operation completed successfully message to indicate successful execution.
- Type exit to close the Command Prompt and restart your PC.
After the restart, you should be able to run your games and other hypervisors without the error.
If not, open the Windows Features dialog, disable the Virtual Machine Platform and Windows Hypervisor Platform options and restart your PC.
4. How to Disable Hyper-V Using PowerShell

If you prefer PowerShell, you can use the WindowsOptionalFeature cmdlet to disable Hyper-V in Windows 11. To do this, you need to launch PowerShell with admin privileges and execute the command. Here’s how to do it.
- Press the Win key and type powershell.
- Right-click on PowerShell and select Run as administrator.
- Click Yes when prompted by User Account Control.
- In the PowerShell window, copy and paste the command below and press Enter:
Disable-WindowsOptionalFeature -Online -FeatureName Microsoft-Hyper-V-All - Wait for the process to complete. Once done, close PowerShell and restart your PC to apply the changes.
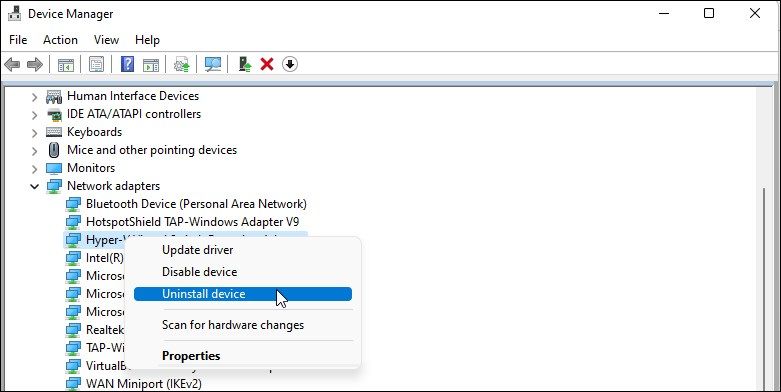
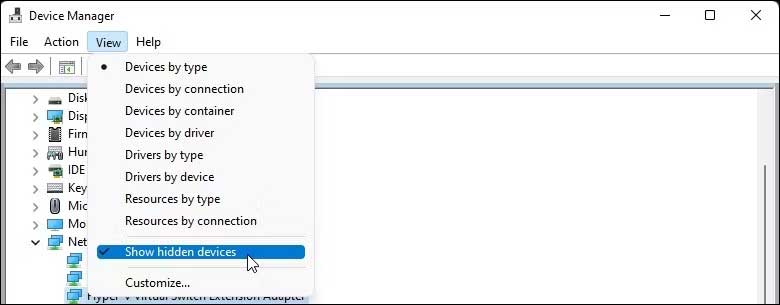
How to Uninstall the Hyper-V Virtual Network Adapter
Often during the restart, after uninstalling Hyper-V, you may encounter the «We couldn’t complete the updates, undoing changes» message.
To resolve this issue, make sure the Hyper-V virtual network adapters are deleted from your PC. You can delete the virtual network adapter from Device Manager.
To delete Hyper-V’s virtual network adapters:
- Press Win + R to open Run.
- Type dvmgmt.msc and click OK to open Device Manager.
- In Device Manager, expand the Network Adapters section to locate the Hyper-V Virtual network adapters.
- If no virtual adapters associated with Hyper-V is listed, then click on View and select Show hidden devices.

- Right-click on the Hyper-V Virtual Ethernet Adapter and select Uninstall device.
Do not remove the Microsoft Wi-Fi Direct Virtual Adapter.
- Click Uninstall to confirm the action.

- Repeat the steps to delete all the virtual network adapters associated with Hyper-V.
- Once done, close Device Manager and restart your PC. Next, uninstall Hyper-V and check for any improvements.

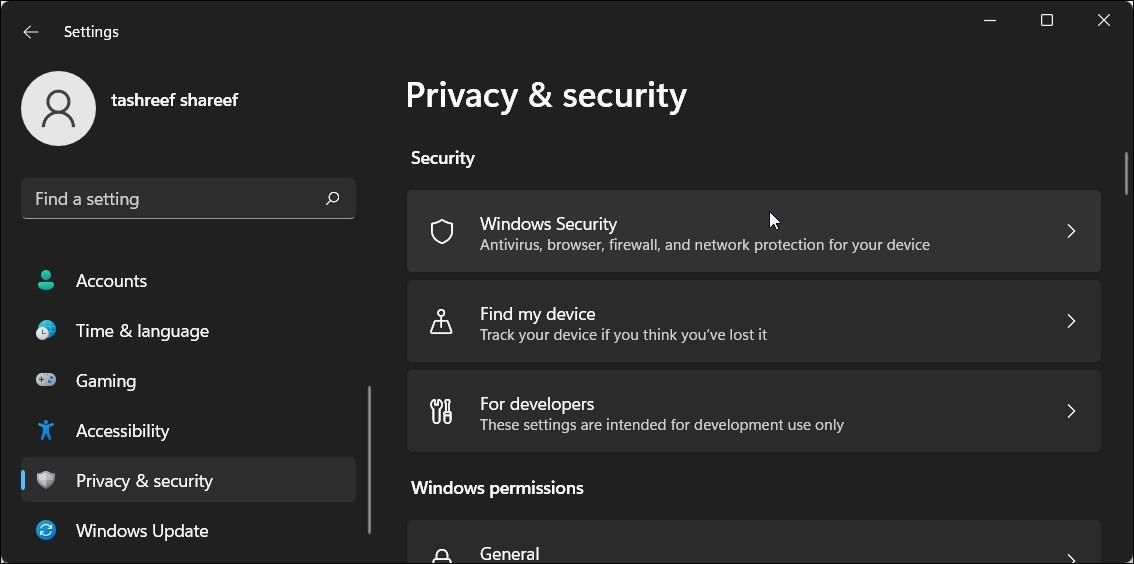
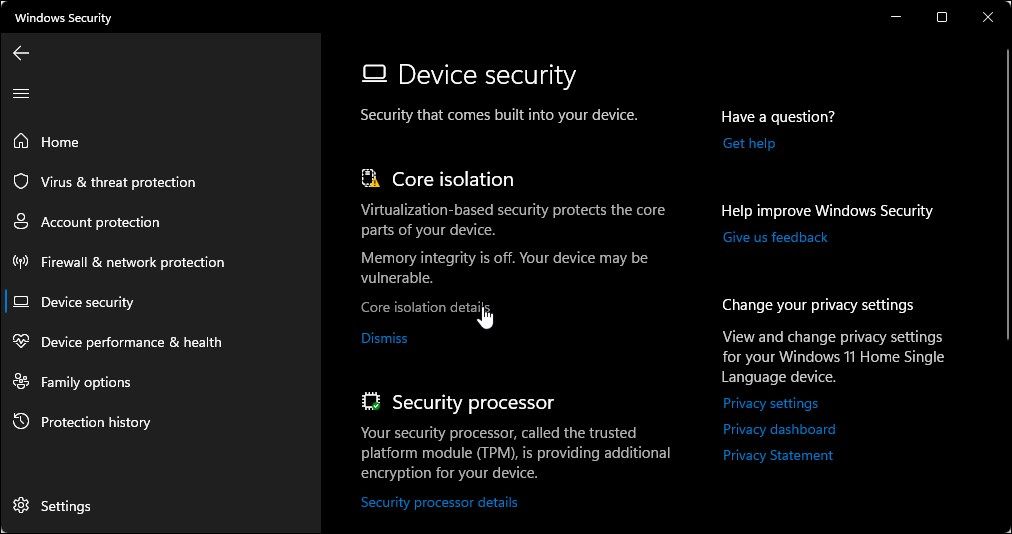
How to Turn Off Virtualization-Based Security (Memory Integrity)
If you encounter the Hyper-V detected issue even after you disable Hyper-V, try to disable the Memory integrity feature in Windows Security.
The Memory integrity feature is part of Core Isolation. It helps prevent threat actors from accessing and infecting high-security processes using malicious code.
By default, Windows disables the Memory integrity feature to avoid conflict with apps and device drivers due to incompatibility issues. This can also cause issues with third-party virtualization tools and programs that need to access your system’s virtualization hardware.
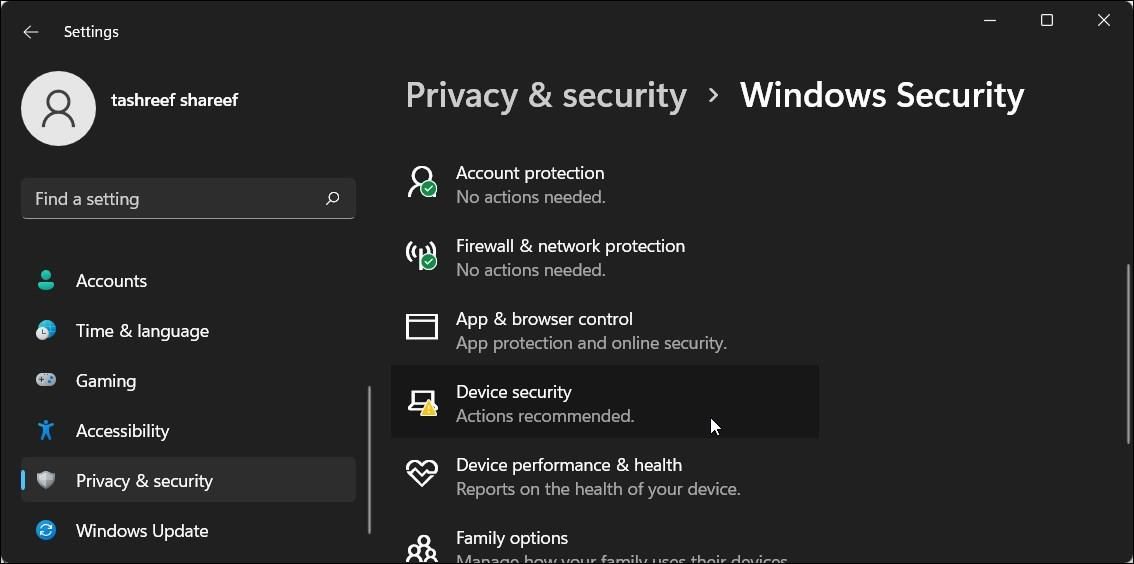
To turn off Memory integrity in Windows Security:
- Press Win + I to open the Settings app.
- In the left pane, click on the Privacy & security tab.

- Next, click on Windows Security.
- Under the Protection areas section, click on Device security.
- Next, click on Core isolation details under the Core isolation section.

- Toggle the switch under Memory integrity to turn it Off.
- Restart your PC to apply the changes.

Hyper-V is an excellent utility if you want an out-of-the-box virtualization solution. However, it is not without its flaws. Many third-party hypervisors, including the major players VirtualBox and WMware Workstations, don’t work with Hyper-V enabled.
If you are unsure of which hypervisor to use, compare the three popular virtualization tools to help you determine the best of the lot.
MACDATA » Windows 11 » Как включить или отключить Hyper-V в Windows 11: подробная инструкция
Hyper-V — это всеобъемлющая виртуализация от Microsoft, позволяющая пользователям запускать несколько операционных систем на одном компьютере, не заботясь о создании разных физических платформ. Это полезно для разработчиков программного обеспечения, тестировщиков и администраторов систем. Однако многие пользователи не знают, как включить или отключить Hyper-V в Windows 11.
В этой статье мы расскажем вам, как можно включить или отключить Hyper-V в Windows 11 без использования дополнительных приложений. Мы также покажем вам, как проверить, включен ли Hyper-V на вашем компьютере, и как работать с ним после включения.
Прежде чем мы начнем, вы должны убедиться в том, что ваш компьютер соответствует требованиям для включения Hyper-V. Он должен иметь процессор с поддержкой виртуализации, а также необходимо проверить, что включенная функция виртуализации в BIOS.
Как включить или отключить Hyper-V в Windows 11
Что такое Hyper-V в Windows 11
Hyper-V — это встроенный гипервизор для Windows, который позволяет запускать несколько виртуальных операционных систем на одном компьютере. Он полезен для разработчиков и тестировщиков, которые могут использовать его для быстрого и удобного создания тестовых окружений.
Как включить Hyper-V в Windows 11
Для включения Hyper-V в Windows 11 необходимо выполнить следующие шаги:
- Открыть Панель управления;
- Выбрать программы и компоненты;
- Выбрать функции Windows;
- Выбрать гипервизор Hyper-V;
- Установить его или отметить галочку, если он уже установлен;
- Перезапустить компьютер.
Как отключить Hyper-V в Windows 11
Если вам не нужен гипервизор Hyper-V в Windows 11, вы можете отключить его, чтобы освободить ресурсы компьютера. Для этого нужно выполнить следующие шаги:
- Открыть Панель управления;
- Открыть программы и компоненты;
- Выбрать функции Windows;
- Снять галочку с Hyper-V;
- Перезапустить компьютер.
Примечание: Для включения или отключения Hyper-V в Windows 11 вам может потребоваться права администратора.
Что такое Hyper-V?
Hyper-V — это система виртуализации, встроенная в операционную систему Windows. Она позволяет создавать и запускать виртуальные машины, на которых могут работать другие операционные системы, такие как Linux или Windows.
Hyper-V является частью облаковых технологий Microsoft и используется в корпоративном и домашнем использовании. С помощью Hyper-V можно настроить изолированные среды для разного рода тестирования программного обеспечения, развертывания приложений и многое другое.
Hyper-V позволяет пользователю создавать и управлять виртуальными средами в одном физическом устройстве. Также позволяет достичь максимальной степени изоляции и безопасности, создавая новые уровни абстракции между программным обеспечением и аппаратной частью.
Hyper-V имеет множество функций, в том числе возможность миграции виртуальных машин, настройка виртуальных сетей, гибкость в настройке и многое другое.
Hyper-V доступен для версий Windows 10 и Windows 11, и может быть включен или выключен через меню управления функонами Windows.
Проверка наличия поддержки технологии в вашем компьютере
Шаг 1: Проверка версии операционной системы
Перед тем, как проверить наличие поддержки технологии Hyper-V, необходимо убедиться, что ваша версия операционной системы Windows 11 поддерживает эту функцию. Сделать это можно следующим образом:
- Нажмите на клавиатуре сочетание клавиш Win + R, чтобы вызвать окно «Выполнить».
- Введите команду winver и нажмите клавишу «ОК».
- Откроется окно «О программе Windows». В верхней части окна вы увидите информацию о версии операционной системы. Убедитесь, что у вас установлена Windows 11.
Шаг 2: Проверка возможности включения Hyper-V
После того, как вы убедились в том, что ваша операционная система поддерживает технологию Hyper-V, вы можете проверить возможность включения этой функции. Сделать это можно следующим образом:
- Откройте меню «Пуск» на вашем компьютере.
- Начните набирать слово «Панель управления» в поле поиска. Когда появится соответствующий результат, нажмите на него.
- В окне «Панель управления» найдите раздел «Программы» и щелкните на нем.
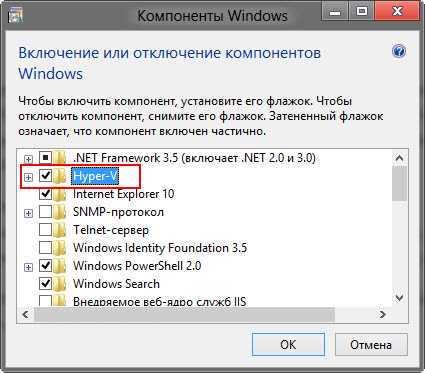
- Нажмите на ссылку «Включение или отключение компонентов Windows».
- В открывшемся окне найдите опцию «Hyper-V» и выберите ее, чтобы поставить галочку.
- Нажмите кнопку «ОК» и дождитесь завершения процесса установки.
После выполнения этих шагов на вашем компьютере будет установлена технология Hyper-V, если, конечно, ваш компьютер поддерживает данную функцию.
Как включить Hyper-V в Windows 11
Шаг 1: Откройте меню «Параметры»
Чтобы начать настройку Hyper-V, необходимо открыть меню параметров Windows 11. Для этого нажмите на значок «Пуск» в нижнем левом углу экрана и выберите «Параметры».
Шаг 2: Выберите раздел «Приложения»
В меню параметров выберите раздел «Приложения». Нажмите на этот раздел, чтобы перейти к настройке приложений.
Шаг 3: Откройте «Опции» Windows
Далее перейдите к разделу «Опции» справа. Нажмите на этот раздел, чтобы вывести список дополнительных параметров Windows.
Шаг 4: Найти и включить «Hyper-V»
На этом этапе вы найдете опцию «Hyper-V» и переведете ее в состояние «Включено». Для этого просто поставьте галочку напротив «Hyper-V».
Шаг 5: Перезагрузите Windows 11

Когда вы включате Hyper-V в Windows 11, система предложит перезапустить компьютер, чтобы внести изменения в работу Windows. Нажмите «Перезагрузить», и когда система перезагрузится, Hyper-V будет готов к использованию.
Как отключить Hyper-V в Windows 11
Шаг 1: Откройте «Панель управления»
Чтобы отключить Hyper-V в Windows 11, вам необходимо открыть «Панель управления». Для этого нажмите на значок «Пуск» в нижнем левом углу экрана и введите в поисковой строке «Панель управления». Нажмите на результат поиска, чтобы открыть «Панель управления».
Шаг 2: Перейдите в «Программы и компоненты»
На открывшейся странице «Панели управления» найдите раздел «Программы» и нажмите на ссылку «Программы и компоненты».
Шаг 3: Выберите «Включение или отключение компонентов Windows»
На странице «Программы и компоненты» найдите ссылку «Включение или отключение компонентов Windows». Нажмите на нее, чтобы открыть соответствующий раздел.
Шаг 4: Снимите флажок с «Гипервизора Microsoft Windows»
В списке компонентов Windows найдите «Гипервизор Microsoft Windows» и снимите флажок с него. Нажмите на кнопку «ОК», чтобы сохранить изменения.
Шаг 5: Перезагрузите компьютер
Для того чтобы изменения вступили в силу, вам необходимо перезагрузить компьютер. Нажмите на кнопку «Пуск» и выберите пункт «Перезагрузить» или выполните команду «shutdown /r /t 0» в командной строке.
Теперь вы успешно отключили Hyper-V в Windows 11 и можете продолжать работу на компьютере без наличия виртуальных машин.
Как добавить компоненты Hyper-V
Шаг 1: Откройте меню «Панель управления»
Для начала необходимо открыть меню «Панель управления». Для этого нажмите на иконку Windows в левом нижнем углу экрана и введите «Панель управления» в строке поиска. Выберите соответствующий пункт в списке результатов.
Шаг 2: Откройте «Программы и компоненты»
В меню «Панель управления» выберите «Программы и компоненты». Это позволит вам просмотреть список всех установленных компонентов Windows.
Шаг 3: Выберите «Включение или отключение компонентов Windows»
В меню «Программы и компоненты» выберите «Включение или отключение компонентов Windows». Откроется окно, в котором вы можете выбрать компоненты, которые вы хотите включить или отключить.
Шаг 4: Выберите Hyper-V и установите его
В списке компонентов найдите Hyper-V. Отметьте его галочкой. После этого нажмите «OK», чтобы начать установку Hyper-V. Этот процесс может занять несколько минут в зависимости от скорости вашего компьютера.
После завершения установки компонентов Hyper-V, вы сможете использовать их для создания виртуальных машин и выполнения других задач.
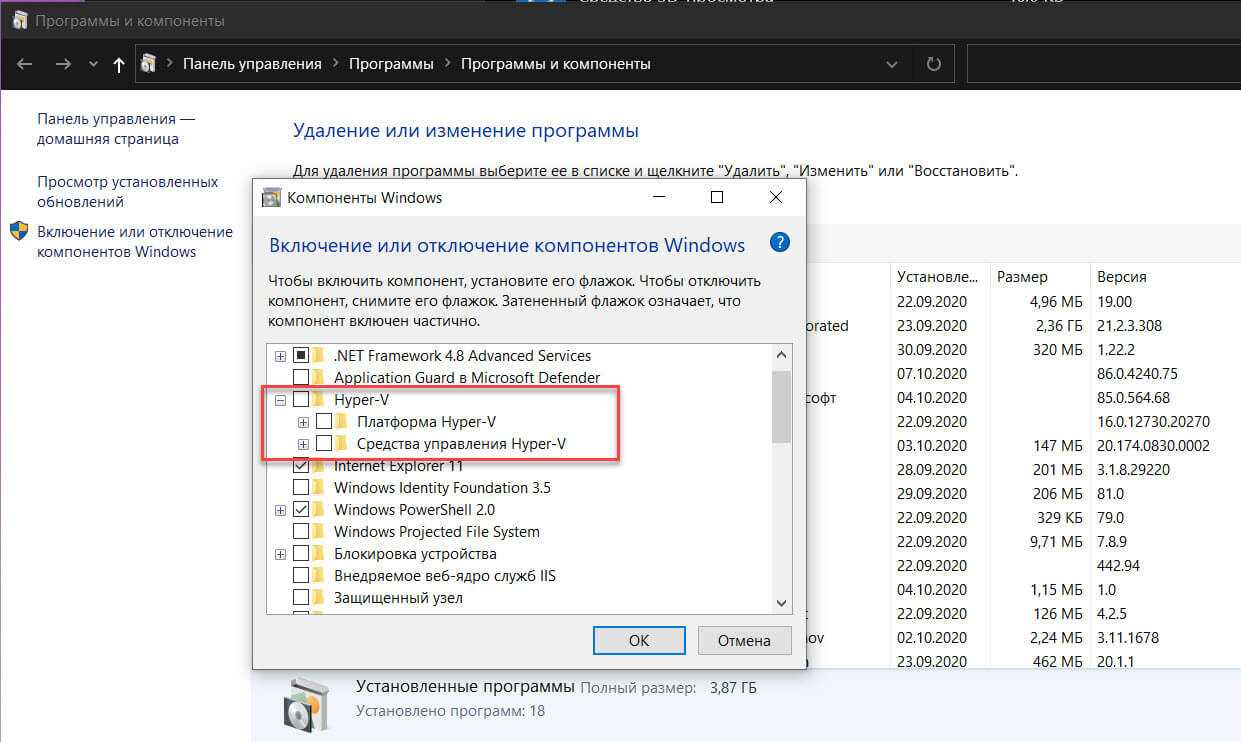
Как удалить компоненты Hyper-V
Если у вас установлен компонент Hyper-V на компьютере, но вы решили отказаться от его использования, вы можете удалить его с помощью командной строки или настроек Windows.
Удаление Hyper-V через командную строку
Для удаления компонентов Hyper-V с помощью командной строки в Windows нужно выполнить следующие действия:
- Откройте командную строку от имени администратора.
- Введите команду:
DISM.exe /Online /Disable-Feature /FeatureName:Microsoft-Hyper-V - Нажмите клавишу «Enter» для запуска команды.
- Подождите, пока команда завершится. После этого компоненты Hyper-V будут удалены с вашего компьютера.
Удаление Hyper-V через настройки Windows
Удаление компонентов Hyper-V можно выполнить также через настройки Windows:
- Откройте «Панель управления» и выберите «Программы и компоненты».
- Выберите «Включение или отключение компонентов Windows».
- Найдите «Hyper-V» в списке компонентов и снимите с него флажок.
- Нажмите «ОК», чтобы сохранить изменения.
- Подождите, пока Windows завершит процесс удаления компонентов Hyper-V.
После выполнения любого из этих способов компоненты Hyper-V будут удалены с вашего компьютера.
Ответы на вопросы
Что такое Hyper-V?
Hyper-V — это ролевой сервис, который позволяет виртуализировать операционные системы на платформе Windows. Он позволяет создавать и управлять виртуальными машинами, а также управлять сами Hyper-V хостами. Это позволяет одному сервису обеспечить корпоративный уровень виртуализации, упрощение процессов и экономию ресурсов.
Hyper-V is virtualization software that comes preinstalled in Windows 11. It allow users to run virtual machine that runs on virtual hardware. You can run multiple operating system on their own virtual machine. There isn’t any limit for OS – users can opt to run Windows, Linux, FreeBSD and other supportive operating systems without any hassle.
With the help of Hyper-V you don’t have rely on third-party hypervisor programs like VMWare Workstation and Virtual machine to create virtual machine on Windows 11 PC.
You can make use of Hyper-V feature of Windows 11 to run and test older version of Windows. For example, if you’re running Windows 11, then you can create separate virtual machine for Windows 10 and Windows 7.
Hyper V feature is available in particular editions of Windows 11 which includes, Pro, Enterprise, and Education. On the other hand, if you’re using Windows 11 Home edition, then you need to take help of workaround to run it.
In case, you want to try Hyper V feature of Windows 11 to create virtual machine, then its disabled out of the box and you need to enable it manually. You can use following two methods:
- Via Control Panel
- Using Windows Terminal (CMD/Powershell)
Before you proceed, we would like to tell you that the steps discussed below are not applicable for Windows 11 Home edition then check out post on How to Enable & Install Hyper-V in Windows 11 Home PC
Enable | Disable Hyper-V using Control Panel in Windows 11
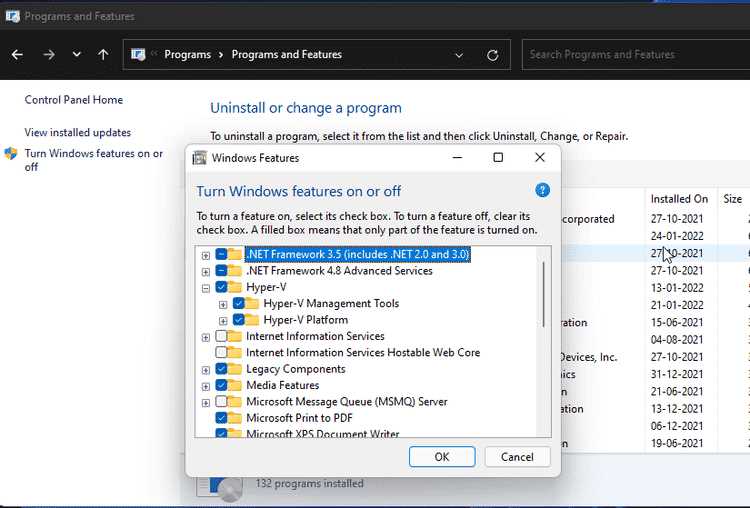
Click on the Search icon and type “Turn Windows feature ON of OFF“, when it appears in search results, click to open it.

The window that open, you need to locate and check box for Hyper-V. Also, make sure that all the option listed under it are also checked.

After Windows feature prompts, navigate to ‘Hyper V’. Now keep this thing in mind:
- Check Hyper-V option to Enable
- Uncheck Hyper-V option to Disable
Next, click on the Apply button. A new window will open and apply the changes. For that, you need to wait for few seconds.

At last, you will be asked to restart your computer to apply the changes.
After successful reboot, depending on your choice, Hyper-V feature will be enabled or disabled on your Windows 11 PC.
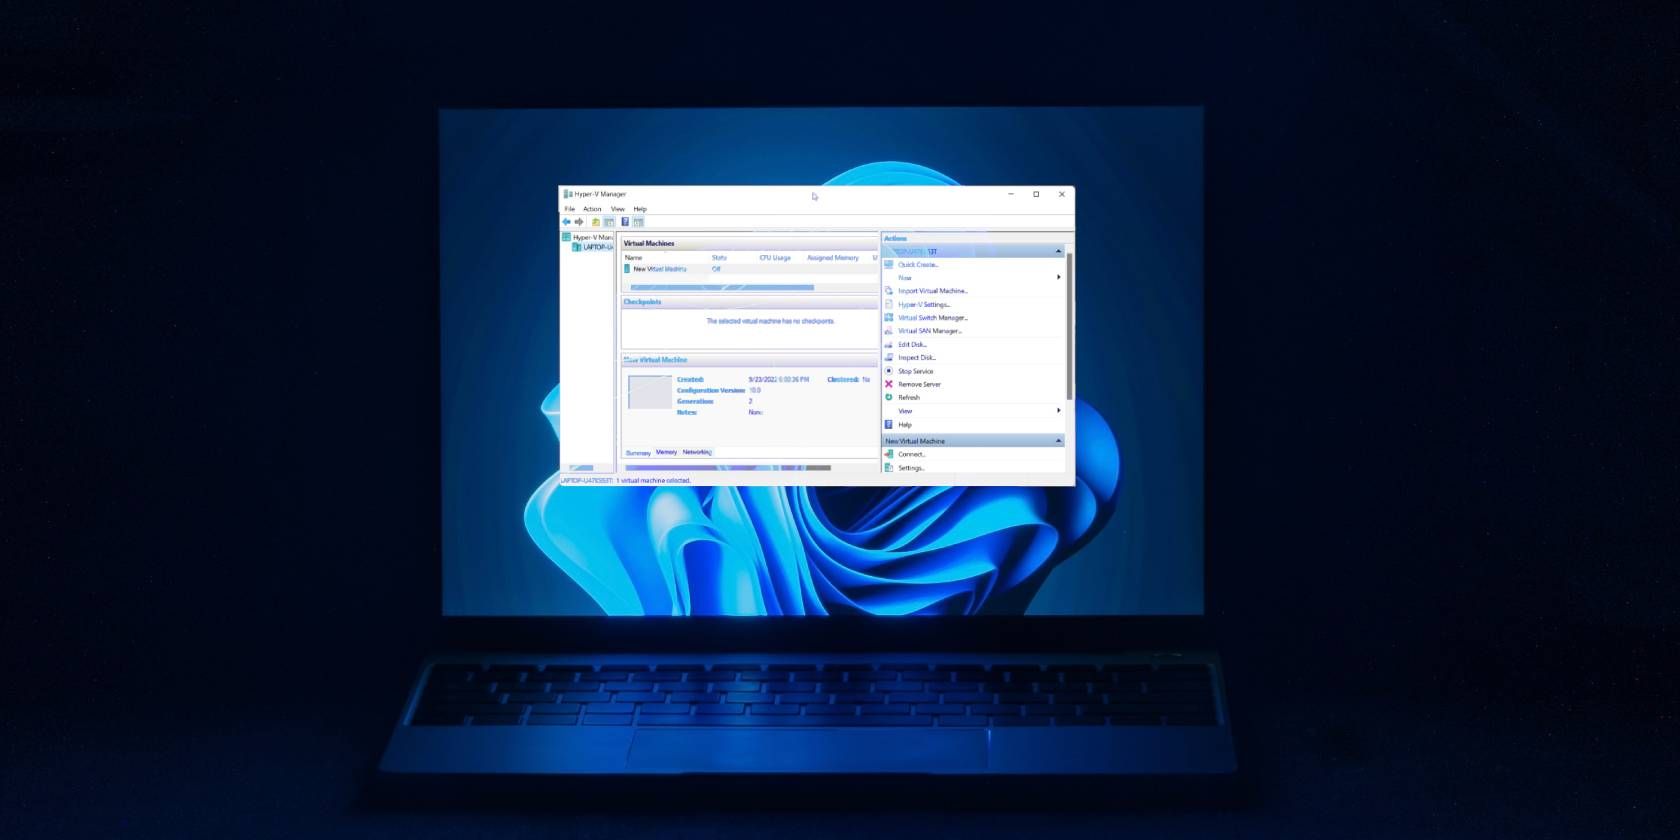
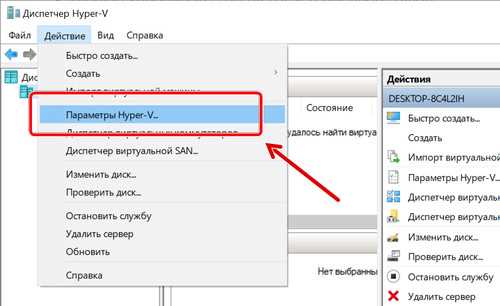
Doing this will add Hyper-V Manager in Windows 11 using which you can run Virtual Machine.

This is how the UI of Hyper-V Manager looks like:

Enable | Disable Hyper-V using CMD/Powershell in Windows 11
Right-click on the Start button and select ‘Windows Terminal (Admin)‘. Here, select default shell profile, it could be Windows PowerShell (Default) or Command Prompt.

To open shell profile of your choice, click on the Down arrow icon and from the menu select PowerShell or Command Prompt

Now type or paste the below-mentioned command in the PowerShell or Command Prompt
To Enable Hyper-V in Windows 11 using CMD DISM /Online /Enable-Feature /FeatureName:"Microsoft-Hyper-V" -All

To Disable Hyper-V in Windows 11 using CMD: DISM /Online /Disable-Feature /FeatureName:"Microsoft-Hyper-V"

To Enable Hyper V in Windows 11 using Powershell: Enable-WindowsOptionalFeature -Online -FeatureName Microsoft-Hyper-V -All

To Disable Hyper-V in Windows 11 using Powershell: Disable-WindowsOptionalFeature -Online -FeatureName Microsoft-Hyper-V -All

If command to enable or disable Hyper-V using CMD and Powershell is executed successfully, you will be asked to reboot your computer, type Y to confirm that action and your computer will reboot automatically.
As an independent platform, it takes a lot of effort to create and curate quality content daily. Our content is totally funded by users like you.
Therefore, if you find information on this website useful, we kindly ask for your support in maintaining the longevity of our platform. If each person who benefits from our website contributes, we can secure a brighter future for our website.
Donate on Paypal or Buy us a coffee if you find the information shared in this blog post useful. Mention ‘Coffee’ in the Subject. So that I can thank you


Viney Dhiman, the mind behind GeekerMag, is a seasoned content writer with over 12 years of experience. Specializing in simplifying complex tech concepts, he covers Windows OS, Android, iOS, web apps, and product reviews. His work can be found on popular tech websites like Gizmodo and The Verge, and he has been interviewed by the Microsoft Edge team.
If Hyper-DRAW is getting in the way of your work, get rid of it on Windows 11 with these simple tips.
Hyper-V comes pre-installed on Windows 11 computers. Although the virtualization tool is not available in the Home edition, you can install it using a batch script.
Unfortunately, Hyper-V can conflict with 3rd party applications on the PC. As a result, you may experience Hyper-V detection errors when trying to open an application, game, or hardware tuning tool.
Fortunately, you can disable or remove Hyper-V in Windows 11 with the help of Windows Features, Command Prompt, and PowerShell.
How to check if Hyper-V is running on Windows 11
You can access the System Information app to determine if Hyper-V virtualization is running on the system. This is useful if you need to verify the state of Hyper-V after disabling it.
To check the current Hyper-V status on the computer:
1. Press Win + CHEAP to open Run.
2. Type msinfo32.exe and click OK to open the application.
3. Next check if the following is available at the bottom of the details tab:
A hypervisor has been detected. Features required for Hyper-V will not be displayed.If so, you’ll need to disable Hyper-V, Memory Integrity, and Credential Guard.
How to disable Hyper-V via Windows Features
Windows Features allows you to add additional features that are disabled by default in Windows 11. You can also use it to disable some advanced features, including Hyper-V.
Note that to fix Hyper-V detection, you need to disable the virtual machine platform and Windows Hypervisor Platform.
To disable Hyper-V using Windows Features:
1. Press Win + CHEAP to open the dialog box Run.
2. Type control and click OK to open Control Panel.
3. In Control Panelclick Programs.
4. Next, click Programs and Features.
5. In the left panel, click Turn Windows features on or off.
6. In the dialog box Windows FeaturesFind Hyper-DRAW.
7. Uncheck Hyper-DRAW to disable this feature.
8. Next, scroll down and find Virtual Machine Platform and Windows Hypervisor Platform options.

9. Uncheck both options and press OK.
10. Windows will uninstall Hyper-V and other features from your system.
11. Then, restart the PC to apply the changes.
How to disable Hyper-V using BCDEDIT

You can disable Hyper-V in the startup configuration using the BCDEdit tool. It is useful when you just want to deactivate Hyper-V and not completely uninstall it.
To disable Hyper-V using BCDEdit:
1. Press the key Win and type cmd.
2. Right click on Command Prompt and choose Run as administrator.
3. In the Command Prompt window, type the following command and press Enter:
bcdedit /set hypervisorlaunchtype off4. When the success message appears, close the Command Prompt and restart the PC to apply the changes.
5. If you need to re-enable Hyper-V, use the following command:
bcdedit /set hypervisorlaunchtype auto6. Restart the PC to apply these changes.
How to Uninstall Hyper-V Using Command Prompt
If Windows Features fails to remove Hyper-V, you can use Command Prompt to disable it. Proceed as follows:
1. Open Command Prompt with admin rights.
2. In the window Command Promptenter the following command and press Enter:
dism /online /disable-feature /featurename:Microsoft-hyper-v-all3. The DISM tool will turn off Hyper-V and notify the operation completed successfully.
4. Type exit to close Command Prompt and restart the PC.
After rebooting, you can run games and other hypervisors without errors.
If not, open Windows Features, disable Virtual Machine Platform and Windows Hypervisor Platform, and restart the PC.
How to disable Hyper-V using PowerShell
If you like PowerShell, you can use WindowsOptionalFeature to disable Hyper-V in Windows 11. For this to work, you need to open PowerShell with admin rights and execute the command. Here’s how this works:
1. Press the Win key and type powershell.
2. Right click and PowerShell and choose Run as administrator.
3. Click Yes when prompted with User Account Control.
4. In the PowerShell window, copy and paste the command below and press Enter:
Disable-WindowsOptionalFeature -Online -FeatureName Microsoft-Hyper-V-AllWait for this process to complete. Then close PowerShell and restart the PC to apply the changes.
How to Uninstall Hyper-Virtual Network Adapter
Usually during reboot, after uninstalling Hyper-V, you may get the message “We couldn’t complete the updates, undoing changes”.
To resolve this issue, make sure the Hyper-V virtual network adapter has been removed from the PC. Follow these steps:
- Press Win + CHEAP to open Run.
- Type dvmgmt.msc and click OK to open Device Manager.
- In Device Manager, expand Network Adapters to find Hyper-V Virtual network adapters.
- If no Hyper-V-linked adapters are listed, click View and choose Show hidden devices.
- Right click on Hyper-V Virtual Ethernet Adapter and choose Uninstall device.
- Click Uninstall to confirm the action.
- Repeat the steps to remove all network adapters associated with Hyper-V.
Once done, close Device Manager and restart the PC. Next, uninstall Hyper-V and check if there are any changes on the system.
Above is how to turn off Hyper-V on Windows 11. Hope the article is useful to you.