Windows 10 forcefully installs Windows updates by default. This includes all updates including Windows device drivers. This article is about disabling automatic driver updates from Windows Update. This setting can be disabled due to several reasons. Some drivers from Microsoft may not be fully compatible with the device driver you have installed. Or the driver which the manufacturer provides can have more features than the basic Microsoft drivers.
In this article, we will share three different ways to disable automatic driver updates in Windows 10. While the focus and screenshots are from Windows 10, the same configurations can be used for Windows 7, Windows 8, and Windows 8.1.
Table of contents
- Disable Automatic Driver Updates
- 1- Using Device Settings
- 2- Using Group Policy
- 3- Using Windows Registry
- Finding and Installing Device Drivers Manually
Disable Automatic Driver Updates
1- Using Device Settings
For changing the device driver’s automatic installation setting in Windows 10, you will need to dig deep into the Control Panel. Just follow the steps below:
- Open Control Panel (Run -> control), click Hardware and Sound, and then click Devices and Printers.
- Right-click the computer icon under Devices and click “Device installation settings” from the context menu.

- Windows will now ask you the following question: “Do you want to automatically download manufacturers’ apps and custom icons available for your devices?” Select “No (your device might not work as expected),” then click Save Changes.

Alternatively, you can also reach the same window and select “No” (as in step 3 above) by typing in sysdm.cpl in Run, switching to the Hardware tab, and then clicking Device Installation Settings.

This should stop Windows from automatically downloading and installing device drivers from Windows Update.
2- Using Group Policy
Windows Group Policy can be a handy tool to change device drivers’ settings. This can be useful especially when you are doing it for multiple systems in the network. Follow the instructions below to disable device driver updates from Windows Updates using Group Policy:
- Opem the Group Policy Editor by typing in gpedit.msc in Run.

- Now navigate to the following from the left pane:
Computer Configuration >> Administrative Templates >> System >> Device Installation >> Device Installation Restrictions - In the right hand pane, double-click “Prevent installation of devices not described by other policy settings.”
- Now select Enabled and then click Apply and Ok.
- Now, for the changes to take effect, type in the following in Command Prompt with administrative rights:
gpupdate /force


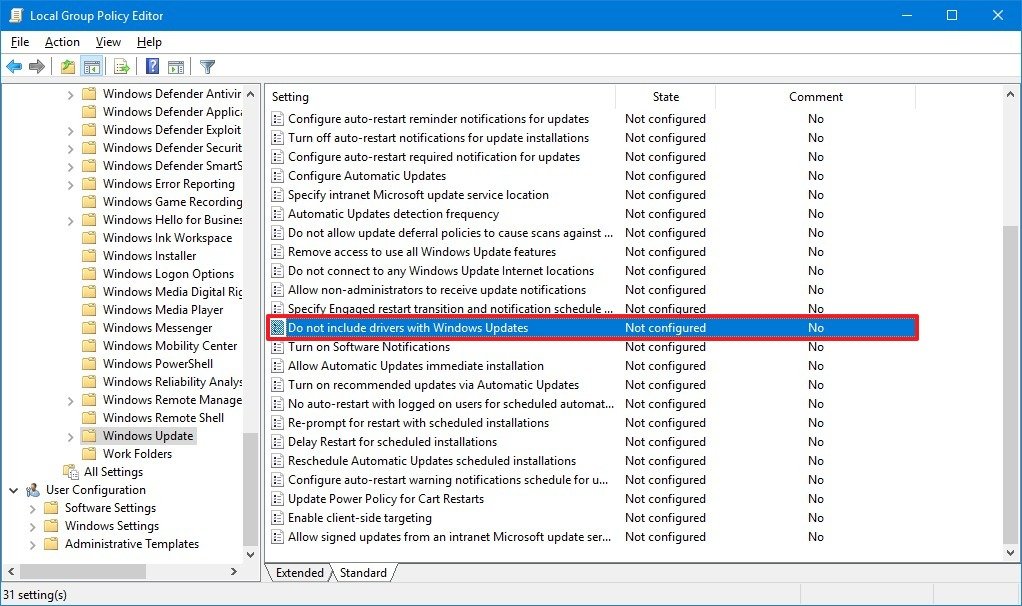
You can also Enable the Group Policy “Do not include drivers with Windows Update” from the following path in the Group Policy Editor to disable automatic driver updates:
Local Computer Policy >> Computer Configuration >> Administrative Templates >> Windows Components >> Windows Update

If you want to dig deeper into controlling every aspect of device driver installation through group policy, read this wonderful TechNet article.
3- Using Windows Registry
You can also disable device driver installation from Windows Update using Windows Registry. It is always recommended to backup your Registry before making changes to the registry.
- Open the Registry Editor by typing in regedit in Run.

- Now paste the following in the address bar for quick navihation:
Computer\HKEY_LOCAL_MACHINE\SOFTWARE\Microsoft\Windows\CurrentVersion\DriverSearching - Double-click “SearchOrderConfig” in the right hand pane and change its Value Data to 0. Then click Ok.
- Now reboot your computer for the changes to take effect.


Finding and Installing Device Drivers Manually
While there are quite a few software to detect unknown devices and automatically download and install their drivers from their respective manufacturers, you can always go to the device manufacturer’s website to download the latest compatible device drivers of your choice.
If you don’t want to take the headache of finding the right device driver, I would highly recommend 3 DP Chip software which automatically downloads the latest compatible device drivers for your basic system devices, like motherboard, graphics card, sound card, and network drivers.
SlimDrivers is another wonderful program that will keep your device drivers updated and the drivers will come from their respective manufacturers.
При подключении нового устройства к вашему компьютеру, планшету или ноутбуку, Windows пытается автоматически установить подходящий драйвер. В дальнейшем операционная система будет автоматически обновлять драйвер устройства через обновления Windows (Windows Update). Такой подход является оптимальным, т.к. гарантирует установку актуальных версий драйверов, прошедших проверку в Microsoft. Однако в некоторых случаях пользователь хочет использовать старые версий драйверов и не хочет, чтобы они автоматически обновлялись через WindowUpdate.
В Windows 10 и 11 вы можете отключить автоматическое обновление драйверов устройств несколькими способами.
Содержание:
- Как в Windows отключить обновления драйвера для конкретного устройства?
- Запретить обновление драйверов в настройках оборудования Windows
- Отключить обновление драйверов устройств через групповые политики
- Отключить автоматическое обновление драйверов с помощью PowerShell
Как в Windows отключить обновления драйвера для конкретного устройства?
В Windows 10 и 11 вы можете заблокировать обновление драйверов для конкретного устройства. Например, вы используете какой-то старый (но стабильный) драйвер видеокарты, который перестает корректно работать после каждого автоматического обновления драйвера компьютеров. Вы хотите, чтобы все драйвера компьютера обновлялись автоматически, кроме драйвера вашего видеоадаптера.
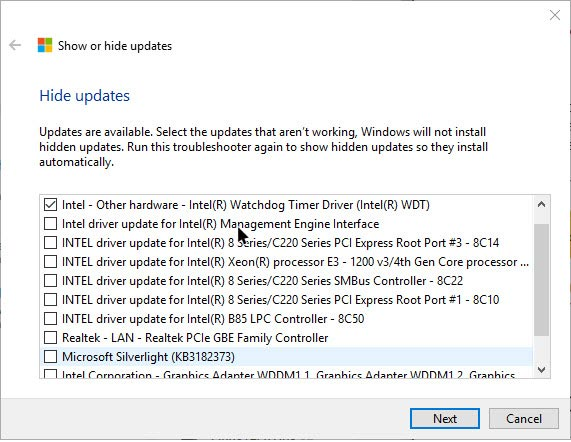
Microsoft предлагает использовать утилиту wushowhide.diagcab (Show or Hide Updates), позволяющую скрыть конкретные обновления или драйвера в Windows 11 и 10.
- Вы можете скачать утилиту wushowhide.diagcab в центре загрузок Microsoft (http://download.microsoft.com/download/f/2/2/f22d5fdb-59cd-4275-8c95-1be17bf70b21/wushowhide.diagcab);
- Запустите утилиту wushowhide.diagcab, выберите опцию «Hide Updates»;
- В списке обновлений Windows и драйверов отметьте драйвера, для которых нужно отключить обновление и нажмите Next;

- После этого выбранные драйвера не будут обновляться автоматически.
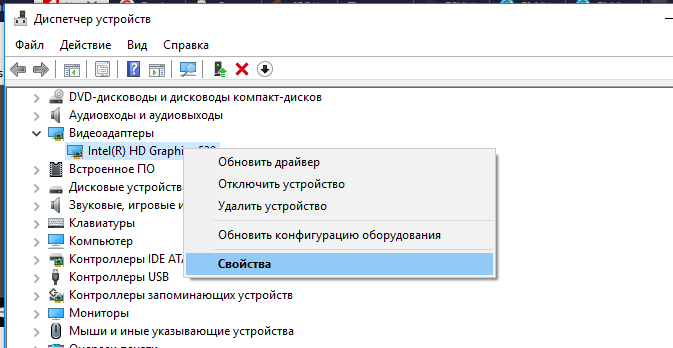
Вы можете отключить обновление конкретного драйвера через групповые политики. В первую очередь вам нужно определить идентификатор устройства, для которого вы хотите отключить обновление драйверов.
- Откройте консоль диспетчера устройств (
devmgmt.msc
), найдите в списке оборудования необходимое устройство и откройте его свойства;
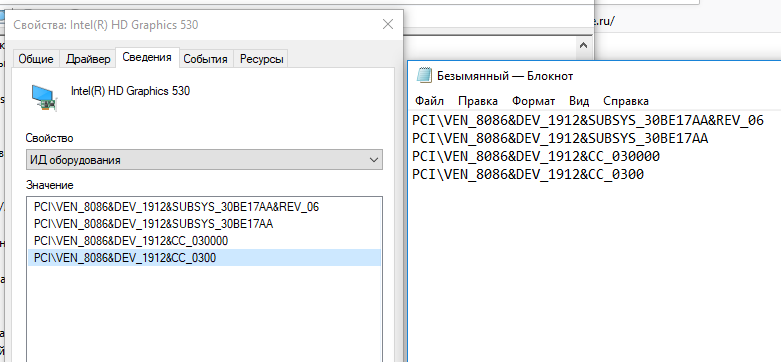
- Перейдите на вкладку «Сведения» и в выпадающем списке выберите пункт ИД оборудования;
- Скопируйте значения идентификаторов оборудования, связанных с устройством (в формате
PCI\VEN_8086&DEV_ ….
) в блокнот (
notepad.exe
);
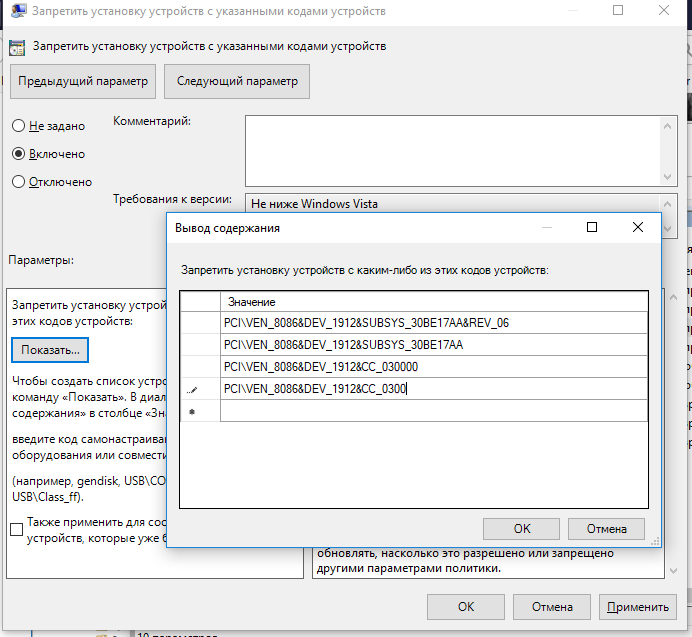
- В редакторе групповых политик (gpedit.msc) перейдите в раздел Конфигурация компьютера -> Административные шаблоны -> Система -> Установка устройства -> Ограничения на установку устройств. Включите политику «Запретить установку устройств с указанными кодами устройств»;
- В политике нажмите кнопку “Показать” и скопируйте в таблицу значений ID вашей видеокарты, полученные ранее;

- Сохраните изменения и обновите настройки групповых политик на клиенте командой:
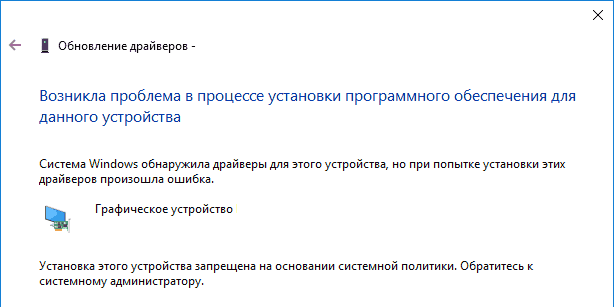
gpupdate /force - Теперь, если компьютер получит и загрузит обновления драйверов для этих устройств через Windows Update, при их автоматической установке появится сообщение об ошибке (Установка этого устройства запрещена на основании системной политики. Обратитесь к системному администратору).

Вы также не сможете обновить драйвер для этого устройства вручную. Для обновления драйвера вам придется удалить идентификатор оборудования из настроек групповых политик.
Вы можете включить эту же политику через реестр. Для этого запустите редактор реестра regedit.exe и перейдите в ветку HKLM\SOFTWARE\Policies\Microsoft\Windows\DeviceInstall\Restrictions\DenyDeviceIDs. Создайте в этом разделе строковые REG_SZ значения с именами по порядку, начиная с 1 и значением ИД оборудования в каждом параметре.

С помощью политики «Запретить установку устройств с использованием драйверов, соответствующим этим классам устройств» вы можете запретить обновление драйверов для конкретных типов устройств. Например, принтеров, звуковых карты, USB контроллеров и т.д. Для этого нужно указать GUID класса устройства. Например, {
4d36e972-e325-11ce-bfc1-08002be10318}
– класс сетевых адаптеров,
{4d36e979-e325-11ce-bfc1-08002be10318}
и
{4658ee7e-f050-11d1-b6bd-00c04fa372a7}
– принтеры и т.д. Полный список GUID классов оборудования перечислен здесь: https://docs.microsoft.com/en-us/windows-hardware/drivers/install/system-defined-device-setup-classes-available-to-vendors
Запретить обновление драйверов в настройках оборудования Windows
Самый простой способ запретить Windows обновлять драйвера – изменить настройки системы на вкладке Оборудование. Для этого:
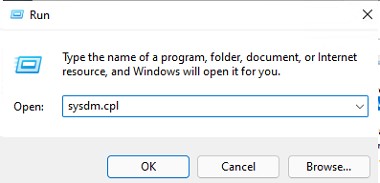
- Нажмите сочетание клавиш Win+R и выполните команду sysdm.cpl;

- Откроется вкладка Оборудование (Hardware) в окне Дополнительных параметров системы (Advanced System Settings);
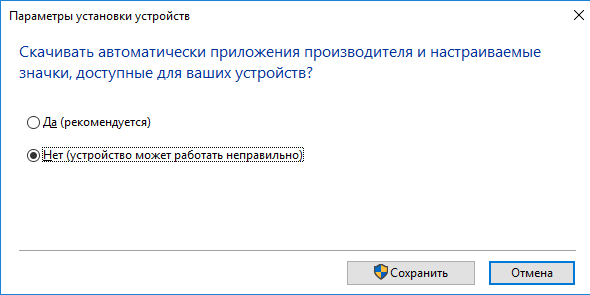
- Нажмите на кнопку Параметры установки устройств (Device Installation Settings);

- В окне «Скачивать автоматически приложения производителя и настраиваемые значки, доступные для ваших устройства» измените значение на Нет (устройство может работать неправильно);

- Сохраните изменения и перезагрузите компьютер.

Эта настройка работает как в Windows 10, так и в Windows 11.
Отключить обновление драйверов устройств через групповые политики
Отключить обновление драйверов устройств в Windows 10 или 11 можно с помощью групповых политик. Вы можете использовать доменный редактор GPO (gpmc.msc) или локальный редактор групповых политик (описано ниже)
- Нажмите сочетание клавиш
Win + R</code >и наберите в появившемся окнеgpedit.msc
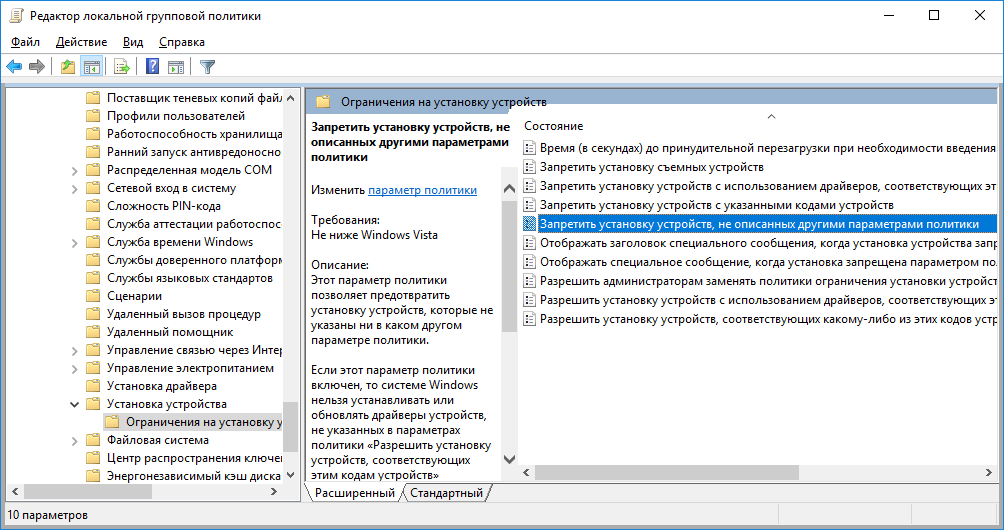
(в домашних редакциях Windows 10 вы можете запустить редактор локальных групповых политик так); - В окне редактора групповых политик перейдите в раздел Computer Configuration -> Administrative Templates -> System-> Device Installation -> Device Installation Restrictions (Конфигурация компьютера -> Административные шаблоны -> Система -> Установка устройств -> Ограничения на установку устройств);
- Найдите политику с именем «Запретить установку устройств, не описанных другими параметрами политики» (Prevent installation of devices not described by other policy);
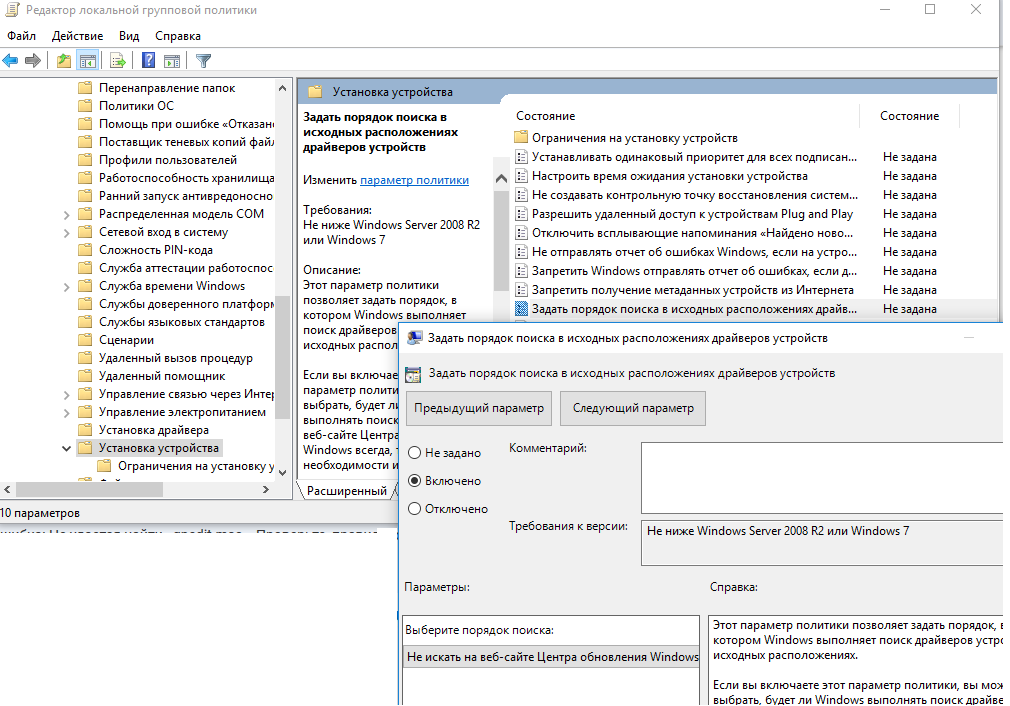
- Затем включите политику “Задать порядок поиска в исходных расположениях драйверов устройств” (Specify search order for device driver source locations ). Эта политика находится в разделе Конфигурация компьютера -> Административные шаблоны -> Система -> Установка устройств (Computer Configuration -> Administrative Templates -> System -> Device Installation). Измените значение политики на “Не искать на веб сайте центра обновления Windows” (Do not search Windows Update). Данная политика позволяет исключить поиск обновлений драйверов на узлах Windows Update (при установке драйвера для любого устройства Windows пытается найти более подходящий драйвера через службу обновлений Windows);
- Включите политику (“Enabled”) и сохраните изменения;
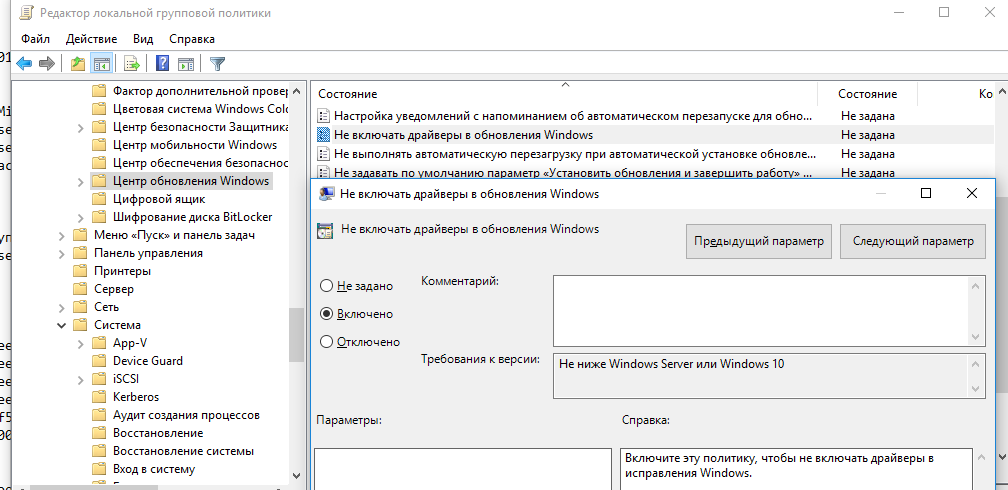
- Перейдите в раздел Конфигурация компьютера -> Административные шаблоны -> Компоненты Windows -> Центр обновлений Windows (Computer Configuration -> Administrative Templates -> Windows Components -> Windows Update -> Manage Updates offered from Windows Update), найдите и включите параметр с именем “Не включать драйверы в обновления Windows” (Do not include drivers with Windows Update policy);
В Windows 11 этот параметр GPO находится в разделе Computer Configuration -> Administrative Templates -> Windows Components -> Windows Update -> Manage Updates offered from Windows Update.
С помощью доменных GPO (настраиваются с помощью консоли
gpmc.msc
) вы можете применить эти настройки на нескольких компьютерах в домене AD. В рабочей группе можно скопировать настройки локальной GPO на другие компьютеры с помощью LGPO.exe.
Отключить автоматическое обновление драйверов с помощью PowerShell
Вы можете использовать простой PowerShell скрипт для отключения автоматического обновления драйверов в Windows. Данный PowerShell скрипт меняет в реестре те же настройки, что и рассмотренные выше параметры GPO. Этот медод удобно использовать на компьютерах с домашней редакцией Windows (на которых отсуствует редактор локальной GPO) и в задачах автоматизации отключения автообновления драйверов.
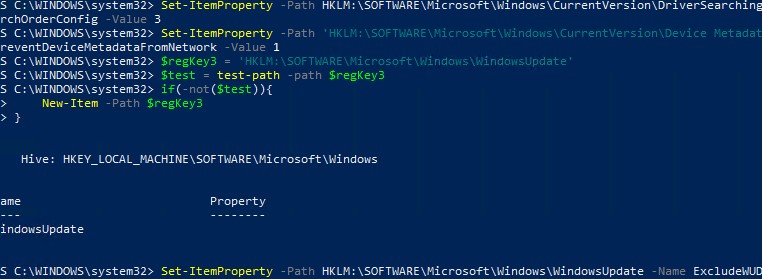
Для отключения обновления драйверов нужно изменить значения следующих параметров реестра
- HKLM\SOFTWARE\Microsoft\Windows\CurrentVersion\DriverSearching –
SearchOrderConfig
=3 (3 — не устанавливать драйвера через Windows Update - HKLM\SOFTWARE\Microsoft\Windows\CurrentVersion\Device Metadata –
PreventDeviceMetadataFromNetwork
= 1 - HKLM\SOFTWARE\Microsoft\Windows\WindowsUpdate –
ExcludeWUDriversInQualityUpdate
= 1
Откройте консоль PowerShell с правами администратора и выполните следующий скрипт:
Set-ItemProperty -Path HKLM:\SOFTWARE\Microsoft\Windows\CurrentVersion\DriverSearching\ -Name SearchOrderConfig -Value 3
Set-ItemProperty -Path 'HKLM:\SOFTWARE\Microsoft\Windows\CurrentVersion\Device Metadata\' -Name PreventDeviceMetadataFromNetwork -Value 1
# Проверить что ветка реестра существует и создать ее, если нужно
$regKey3 = 'HKLM:\SOFTWARE\Microsoft\Windows\WindowsUpdate'
$test = test-path -path $regKey3
if(-not($test)){
New-Item -Path $regKey3
}
Set-ItemProperty -Path $regKey3 -Name ExcludeWUDriversInQualityUpdate -Value 1
После перезагрузки автоматическое обновление драйверов в Windows будет заблокировано.
В последнем билде Windows 10 21H1 и в Windows 11 параметр ExcludeWUDriversInQualityUpdate находится в нескольких местах реестра:
- HKLM\SOFTWARE\Microsoft\PolicyManager\current\device\Update
- HKLM\SOFTWARE\Microsoft\PolicyManager\default\Update
- HKLM\SOFTWARE\Microsoft\WindowsUpdate\UX\Settings
- HKLM\SOFTWARE\Policies\Microsoft\Windows\WindowsUpdate
Нужно установить значение параметра ExcludeWUDriversInQualityUpdate = 1 во всех указанных ветках реестра. Дополните скрипт таким кодом PowerShell:
$regkeys =
'HKLM:\SOFTWARE\Policies\Microsoft\Windows\WindowsUpdate',
'HKLM:\SOFTWARE\Microsoft\PolicyManager\default\Update',
'HKLM:\SOFTWARE\Microsoft\WindowsUpdate\UX\Settings',
'HKLM:\SOFTWARE\Microsoft\PolicyManager\current\device\Update'
foreach ($regkey in $regkeys){
$test = test-path -path $regkey
if(-not($test)){
New-Item -Path $regKey
}
Set-ItemProperty -Path $regkey -Name ExcludeWUDriversInQualityUpdate -Value 1
}
foreach ($regkey in $regkeys){write-host $regkey}
Несколько раз я видел, как администраторы отключают обновлений драйверов уже после развертывания образа Windows 10 и установки необходимых драйверов. Для этого можно запретить установку драйверов политикой «Запретить установку устройств, не описанных другими параметрами политики» (рассмотрено выше) или командой:
reg add "HKLM\SOFTWARE\Policies\Microsoft\Windows\DeviceInstall\Restrictions" /v DenyUnspecified /t REG_DWORD /d 1 /f
On Windows 10, the automatic update mechanism is a convenient system that provides maintenance and security patches as well as updates for Microsoft products and device drivers.
Although drivers available through Windows Update usually work pretty well, they’re not always the most up to date, and sometimes getting driver updates automatically are known to cause issues on specific hardware configurations.
In previous versions, you’re able to exclude drivers using the Windows Update settings, but that option is no longer available in the Settings app. However, it’s still possible to prevent Windows 10 from downloading driver updates using the Local Group Policy Editor and Registry.
In this Windows 10 guide, we’ll walk you through the steps to prevent Windows Update from including driver updates during automatic maintenance.
- How to stop updates for drivers with Windows Update using Group Policy
- How to stop updates for drivers with Windows Update using Registry
How to stop updates for drivers with Windows Update using Group Policy
If you’re running Windows 10 Pro, the easiest way to stop getting driver updates from Windows Update is using the Local Group Policy Editor with these steps:
- Use the Windows key + R keyboard shortcut to open the Run command.
- Type gpedit.msc and click OK to open the Local Group Policy Editor.
- Browse the following path:
Computer Configuration > Administrative Templates > Windows Components > Windows Update - On the right side, double-click the Do not include drivers with Windows Update policy.
- Select the Enabled option.
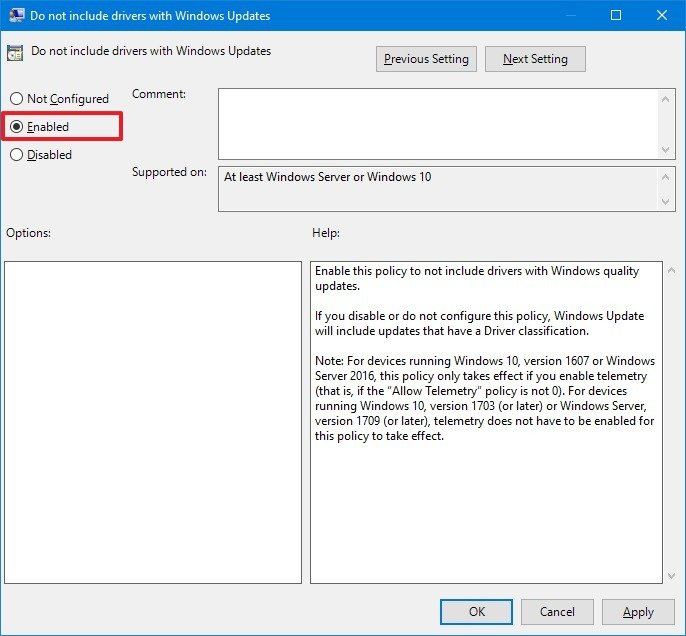
- Click Apply.
- Click OK.
After completing the steps, your device will continue to receive security and other patches, but drivers will be excluded.
If you need help downloading and installing device drivers manually, we have you covered with everything you need to know in this guide.
In the case you change your mind, you can roll back the previous settings using the same instructions, but on step No. 5, select the Not Configured option.
How to stop updates for drivers with Windows Update using Registry
On Windows 10 Home, you won’t have access to the Local Group Policy Editor, but you can still exclude driver updates by modifying the Registry with these steps:
Warning: This is a friendly reminder that editing the Registry is risky, and it can cause irreversible damage to your installation if you don’t do it correctly. It’s recommended to make a full backup of your PC before proceeding.
- Use the Windows key + R keyboard shortcut to open the Run command.
- Type regedit, and click OK to open the Registry.
- Browse the following path:
HKEY_LOCAL_MACHINE\SOFTWARE\Policies\Microsoft\WindowsQuick Tip: On Windows 10, you can now copy and paste the path in the Registry’s address bar to quickly jump to the key destination. - Right-click the Windows (folder) key, select New, and click on Key.
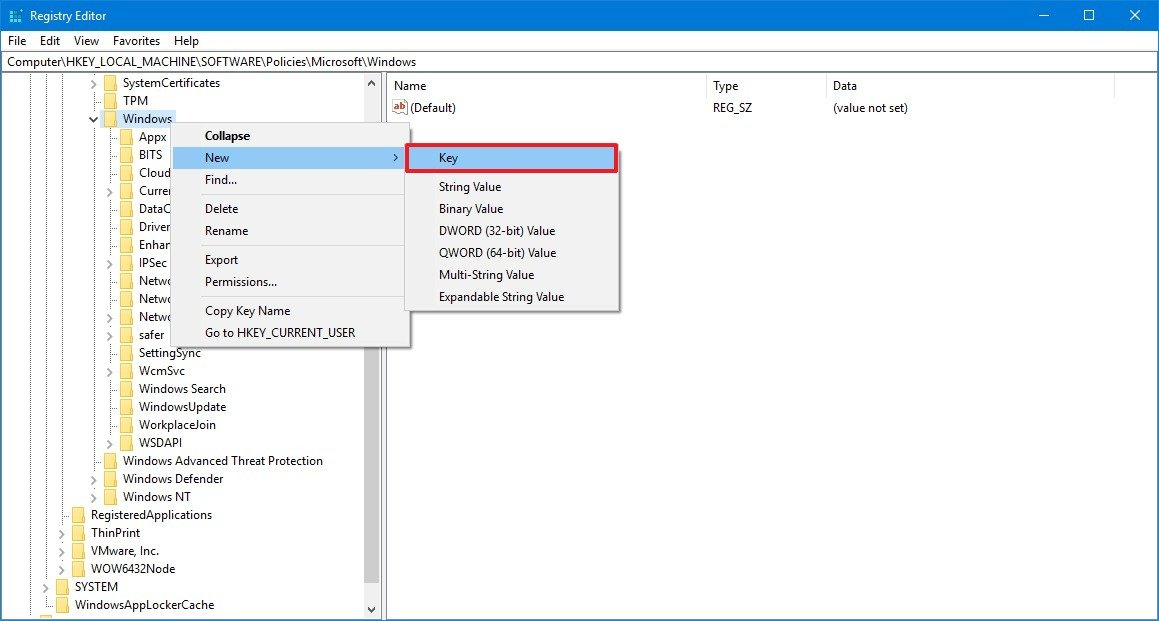
- Name the key WindowsUpdate and press Enter.
- Right-click the newly created key, select New, and click on DWORD (32-bit) Value.
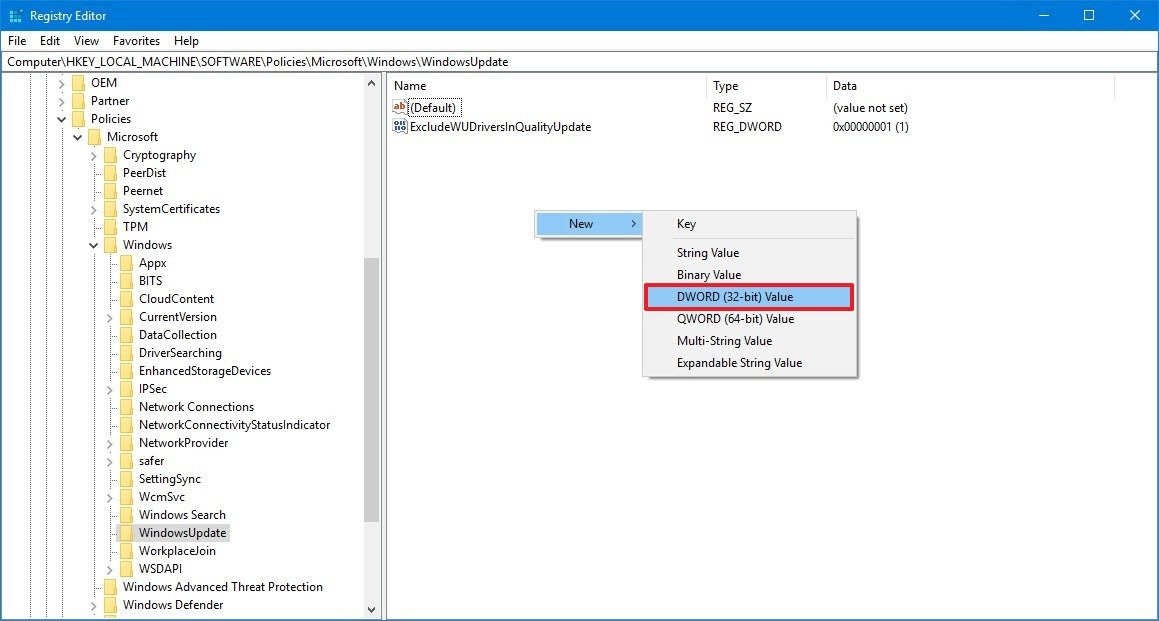
- Name the key ExcludeWUDriversInQualityUpdate and press Enter.
- Double-click the newly created DWORD and set the value from 0 to 1.
- Click OK.
Once you’ve completed the steps, cumulative updates will continue to download, but you won’t receive updates for drivers.
At any time you can revert the changes using the same instructions, but on step No. 4, inside the WindowsUpdate (folder) key, make sure to right-click the ExcludeWUDriversInQualityUpdate DWORD and select the Delete option.
Wrapping things up
While we’re outlining the steps to disable driver updates, we’re not saying that you should block this type of updates as they’re required for hardware to work correctly. However, there are special cases when you may need to use custom drivers or drivers provided by your manufacturer, instead of those available through Windows Update, and in these situations, this guide can come in handy.
If you’re having problems with a single driver update, it’s recommended to temporarily block that update using the Show or hide updates tool.
More Windows 10 resources
For more helpful articles, coverage, and answers to common questions about Windows 10, visit the following resources:
- Windows 10 on Windows Central – All you need to know
- Windows 10 help, tips, and tricks
- Windows 10 forums on Windows Central
All the latest news, reviews, and guides for Windows and Xbox diehards.
Mauro Huculak is technical writer for WindowsCentral.com. His primary focus is to write comprehensive how-tos to help users get the most out of Windows 10 and its many related technologies. He has an IT background with professional certifications from Microsoft, Cisco, and CompTIA, and he’s a recognized member of the Microsoft MVP community.
Whenever you attach a new device to your Windows machine, Windows tries to install the device driver automatically, and whenever possible it even tries to update your device driver through the regular Windows update.
This is convenient most of the time as you don’t have to manually search the drivers for each and every device you attach to your Windows machine. However, it can also be frustrating at times when you specifically installed an older version of a device driver, and Windows automatically updated it disregarding your requirements.
So, if you ever need to, here is how you can disable driver updates through Windows update.
1. Disable Driver Updates Through Hardware Settings
Disabling driver updates using the regular Windows hardware settings is one of the easiest ways. To start, press «Win + X» and select the option «System.» If you are on Windows 7, search for it in the Start menu.

This action will open the System window. Here, click on the link «Advanced System Settings.»

Once the System Properties window has been opened, navigate to the «Hardware» tab and click on the «Device Installation Settings» button.

In the Device Installation Settings window, select the «No, let me choose what to do» radio button and again select the «Never install driver software from Windows update» radio button. Click on the «Save changes» button to save the changes.

Restart your system and you are good to go.
2. Disable Driver Updates Through Group Policy
If you are managing multiple systems, then using Group Policy Editor is a good thing to do. To start, press «Win + R,» type gpedit.msc and press the Enter button to open the Group Policy Editor.

Navigate to the following folder: «Computer Configuration -> Administrative Templates -> System -> Internet Communication Management -> Internet Communication settings.»

Now, find the «Turn off Windows update device driver searching» option and double click on it.

The above action will open the additional settings window. Simply select the «Enabled» option and click on the «Ok» button to save the changes.

Restart your system and you are good to go. If you ever want to revert back, select either the «Disabled» or «Not configured» option.
3. Disable Driver Updates Through Registry Editor
The other way to disable driver updates is by using the Windows Registry Editor. First, press «Win + R,» type regedit and press the Enter button to open the Windows registry.

Once the Windows registry has been opened, navigate to the following key.
HKEY_LOCAL_MACHINE\SOFTWARE\Microsoft\Windows\CurrentVersion\DriverSearching

Here on the right pane you can see the «SearchOrderConfig» key. The default value data is set to «1,» which simply means that the automatic updates are enabled. To change the value, double click on it.
The above action will open the «Edit DWORD Value» window. Here, enter the new value data as «0» and click on the «Ok» button to save the changes.

The above action will completely disable the driver updates through Windows update.
As you can see, disabling the driver updates through Windows update is just a matter of a few clicks. But, only follow this tutorial if you know what you are doing, as disabling automatic driver updates may sometimes interfere with how the device works.
Do comment below sharing your thoughts and experiences about disabling driver updates through Windows update.

Vamsi is a tech and WordPress geek who enjoys writing how-to guides and messing with his computer and software in general. When not writing for MTE, he writes for he shares tips, tricks, and lifehacks on his own blog Stugon.
Subscribe to our newsletter!
Our latest tutorials delivered straight to your inbox
Windows 10 is renowned for its user-friendly approach, particularly when it comes to automating tasks that were once manual. One such feature is the system’s capability to automatically fetch and install the latest drivers. Drivers, being integral to the seamless functioning of hardware, need periodic updates to optimize performance. However, while having outdated drivers might impair your system’s efficiency, the auto-update feature may not always serve users’ best interests. For some, these automated updates could lead to compatibility issues, disrupt system stability, or simply become a nuisance if they’re accustomed to manual updates. In scenarios like these, turning off the auto-update becomes imperative. This risewindows guide is curated to help you navigate through the process, elucidating the techniques to disable automatic driver updates on Windows 10. We’ll shed light on three prominent methods: the Local Group Policy Editor, the Registry Editor, and the Settings app. Let’s set the course for a more controlled update environment.
How to Disable Automatic Driver Updates on Windows 10 using Local Group Policy Editor?
Group Policy (gpedit. MSc) may be the best way to disable the automatic driver update on Windows 10. However, it is not part of the Windows 10 Home edition. So, you’ll need to enable the Group Policy Editor on your computer first. After that, you can also use the following steps:-
Step 1. Open Local Group Policy Editor.
For that, click the Start button and type group policy. In the search results, select the Edit group policy.

Alternatively, press the Windows + R keys on the keyboard to open the Run dialog box. Then, type gpedit.msc in the Run box. Finally, hit the Enter key on the keyboard or click the OK button.

Step 2. After that, browse the following path in the Local Group Policy Editor window:-
Computer Configuration > Administrative Templates > Windows Components

Step 3. On the right side of the “Windows Components” folder, double-click on Windows Update to open it.
Step 4. Next, find the policy name “Do not include drivers with Windows Updates.” When you see it, double-click the policy to open its settings.

Step 5. Choose the Enabled option in the following window. Then, click the Apply and OK button.

Step 6. Reboot your computer or laptop to see the changes.
If you want to revert the change, update drivers through Windows Update automatically; on step 5 above, select the option “Not Configured” or “Disabled.” Then, click the Apply and OK buttons.
How to Disable Automatic Driver Updates via Registry Editor on Windows 10?
Before editing the Windows Registry, we recommend creating a system restore point. If something goes wrong on your computer, you can quickly revert your PC to its previous working state using that System restore point.
Step 1. Open the Registry Editor.
To do that, type Regedit in the Start/taskbar search field and then select the Registry Editor from the available search results.

Alternatively, press the Windows + R keys on the keyboard to open the Run command box. Type regedit and hit the Enter key on the keyboard to open the Registry Editor.

Step 2. When the Registry Editor window opens, browse the following key:-
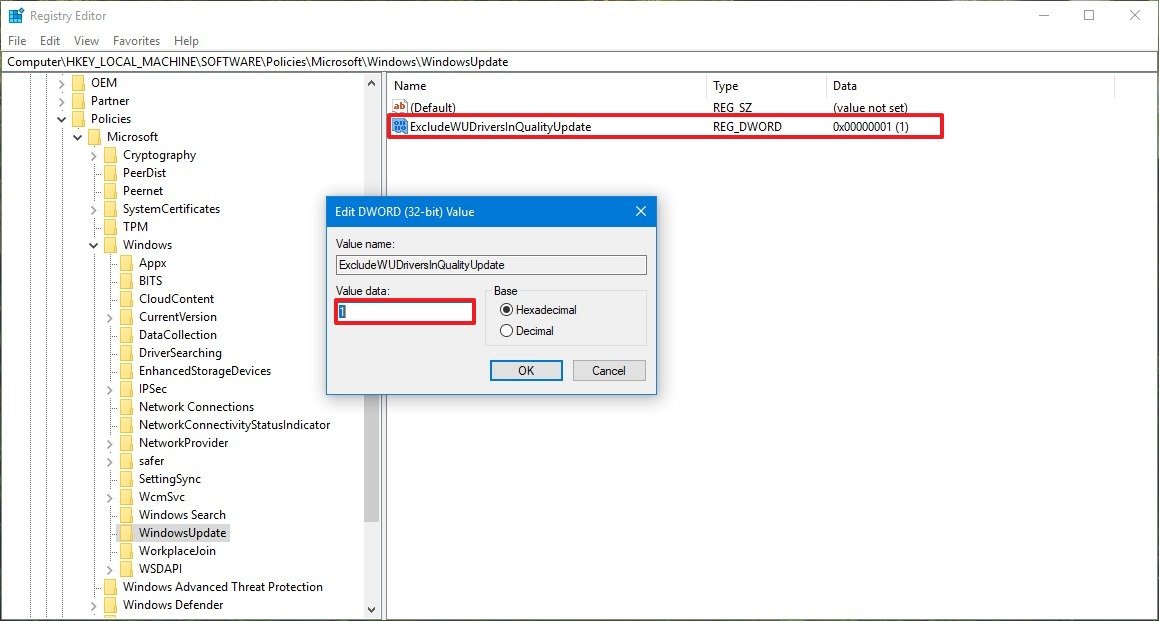
HKEY_LOCAL_MACHINE\SOFTWARE\Policies\Microsoft\Windows

Step 3. Next, right-click the Windows folder and select New > Key. Name the newly created key as WindowsUpdate.

 Step 4. Then, select the Windows Update key and right-click on the blank area on the right side. Select New > DWORD (32-bit) Value. Rename the newly created DWORD (32-bit) as ExcludeWUDriversInQualityUpdate.


Step 5. Then, double-click on the ExcludeWUDriversInQualityUpdate and change its Value data from 0 to 1 to turn off automatic driver updates in Windows 10.

If you want to enable automatic driver updates again, set the value back to 0 or delete ExcludeWUDriversInQualityUpdate.
How to Disable Automatic Driver Updates Using the Setting?
Windows 10 Settings also allows you to disable automatic driver updates through Windows Update. These are the steps:-
Step 1. Press Windows + I hotkeys to open Settings App in Windows 10.
Step 2. Then, click the System.

Step 3. Under System, select “About.”

Step 4. Then, scroll down on the right-side pane and click the link “Advanced system settings.”

Step 5. When you’re done, the System Properties dialog will appear. Navigate to the Hardware tab, and then click on the “Device Installation Settings” button.

Step 6. Next, select the radio button “No (your device might not work as expected)” in the “Device installation settings” window. Finally, click the “Save Changes” button.

Now, Windows Update will stop downloading the driver’s software for your Windows 10 computer or laptop.
Since you have stopped the driver’s update through Windows Update, you must manually update the drives or use a third-party freeware application like Double Driver or DriversBackup to automate the driver’s update process. This way, you can keep your PC components updated.
Conclusion
Ensuring your device drivers are up-to-date is crucial for the smooth running of your system. However, there might be instances when you need to disable automatic updates, perhaps due to compatibility issues or personal preferences. Using any of the methods mentioned above, you can have control over your driver updates in Windows 10. But remember, if you choose to disable automatic updates, make a point to occasionally check for essential driver updates manually or use third-party tools to keep your system optimized.