Explore tested solutions to solve Realtek HD Audio Driver errors
by Vlad Turiceanu
Passionate about technology, Windows, and everything that has a power button, he spent most of his time developing new skills and learning more about the tech world. Coming… read more
Updated on
- The Realtek HD Audio Driver can stop working properly if it isn’t updated regularly.
- After updating the driver, make sure to restart the Audio service.
- Another solution is to reinstall the Realtek driver altogether.
XINSTALL BY CLICKING THE DOWNLOAD
FILE
The Realtek HD Audio Driver is one of the most common pieces of software for changing and tweaking audio settings on your PC. However, there are some difficulties that might cause Windows 11’s Realtek audio driver to stop functioning properly.
A variety of factors might contribute to Realtek HD Audio Driver issues. The majority of the challenges may be addressed by taking the steps outlined in this guide. Keep up with us!
Is Realtek audio driver compatible with Windows 11?
Realtek HD Audio Driver is the most user-friendly audio driver software that enhances sound quality and provides Dolby or Surround sound support via a sound card.
This driver is completely compatible with Windows 11, and this is not the cause of different issues with the driver. Here are the most common causes:
- Outdated drivers – Driver updates go hand in hand with OS ones. Thus, if your OS will update but your drivers won’t, it might cause miscommunications across your device. In this case, it is advised to update your Realtek audio driver.
- Enhancement audio settings – There are multiple audio enhancement software and settings that may cause issues with the driver. Thus, we will show you below how to disable them.
- Corrupted drivers – Corrupted drivers are another reason which causes your OS to unsuccessfully communicate with your driver. By reinstalling the driver or installing another one, you will be able to fix this issue.
- Wrong port connections – Make sure that you connect the audio cable to the right port and not the one for an audio input, which is usually pink.
How do I fix my Realtek audio driver in Windows 11?
- Is Realtek audio driver compatible with Windows 11?
- How do I fix my Realtek audio driver in Windows 11?
- 1. Check the audio output
- 2. Restart the Audio service
- 3. Update the driver
- 4. Reinstall the Realtek driver or use your manufacturer’s
- 5. Disable Audio Enhancements
- 6. Run the Audio Troubleshooter
- 7. Run System Restore
- 8. Update Windows
- What to do if there’s no sound at all?
Before moving on to more complex troubleshooting solutions, make sure to do the following:
How we test, review and rate?
We have worked for the past 6 months on building a new review system on how we produce content. Using it, we have subsequently redone most of our articles to provide actual hands-on expertise on the guides we made.
For more details you can read how we test, review, and rate at WindowsReport.
- Check the audio output, unplug and reconnect the device, then connect it to another system to test its functionality.
- Remove any third-party antivirus software and opt for a better one that’s optimized for Windows 11 and won’t interfere with your audio.
1. Check the audio output
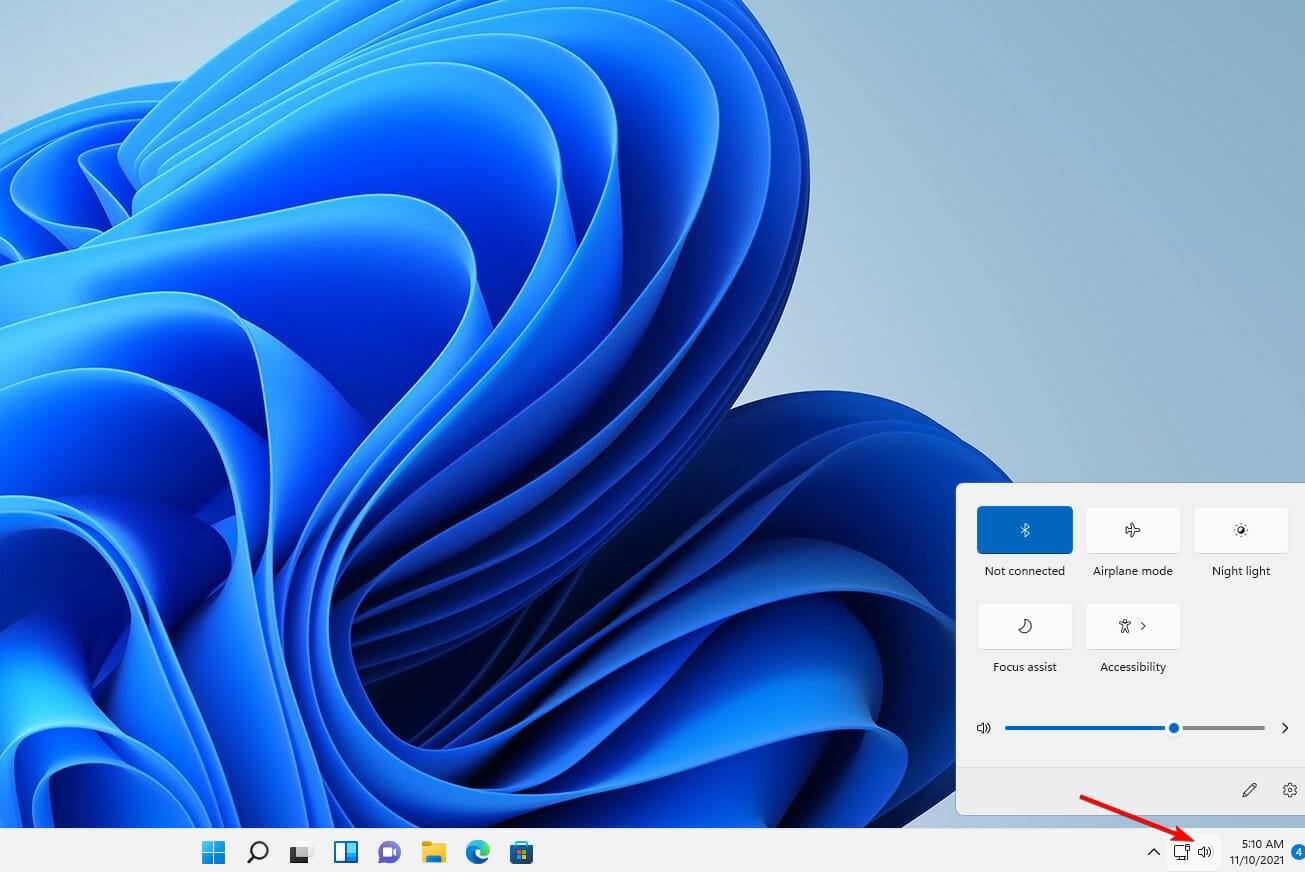
- Click on the Volume icon in the Taskbar. Alternatively, you can press Windows + A to launch it.

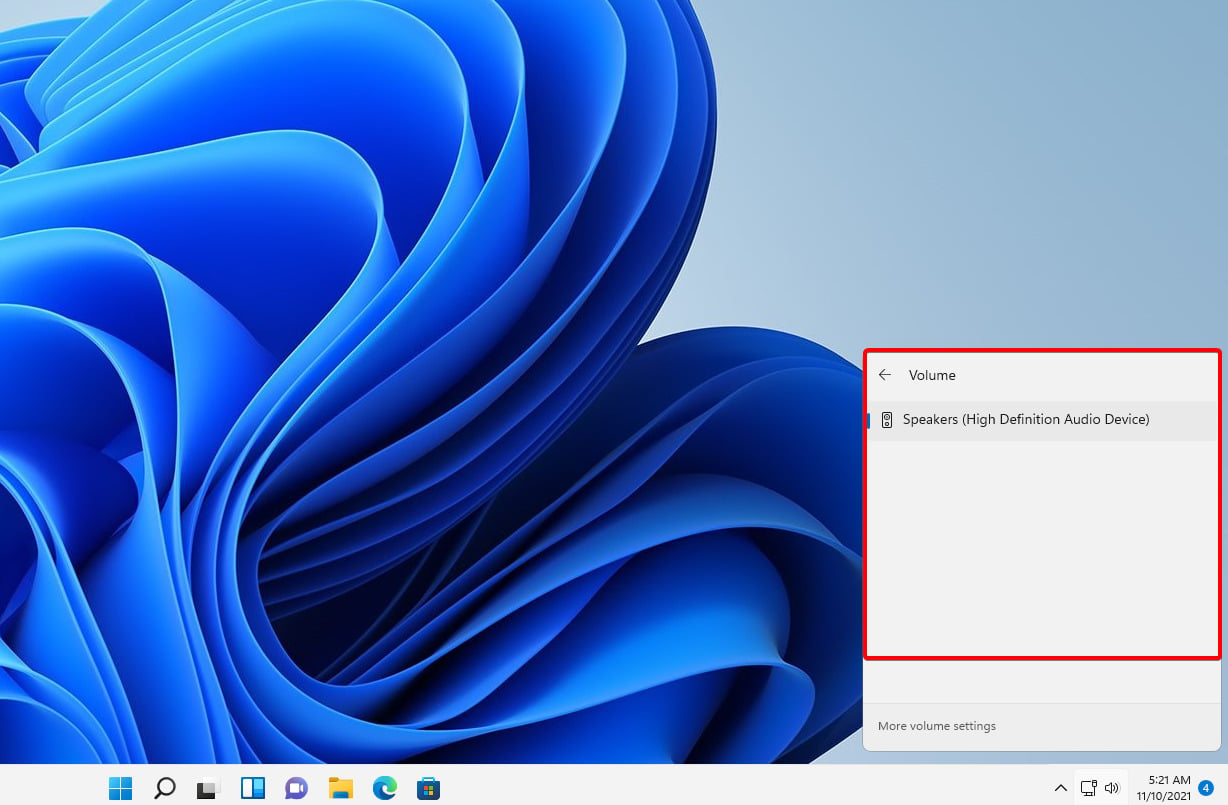
- In the Quick Menu, click on the carrot arrow icon next to the volume level.
- It will prompt you with a list of audio devices connected to the system. Select the desired device.

If selecting the desired device did not resolve the audio issue, it is possible that other system faults, for which we have provided alternative solutions, were the source of the problem.
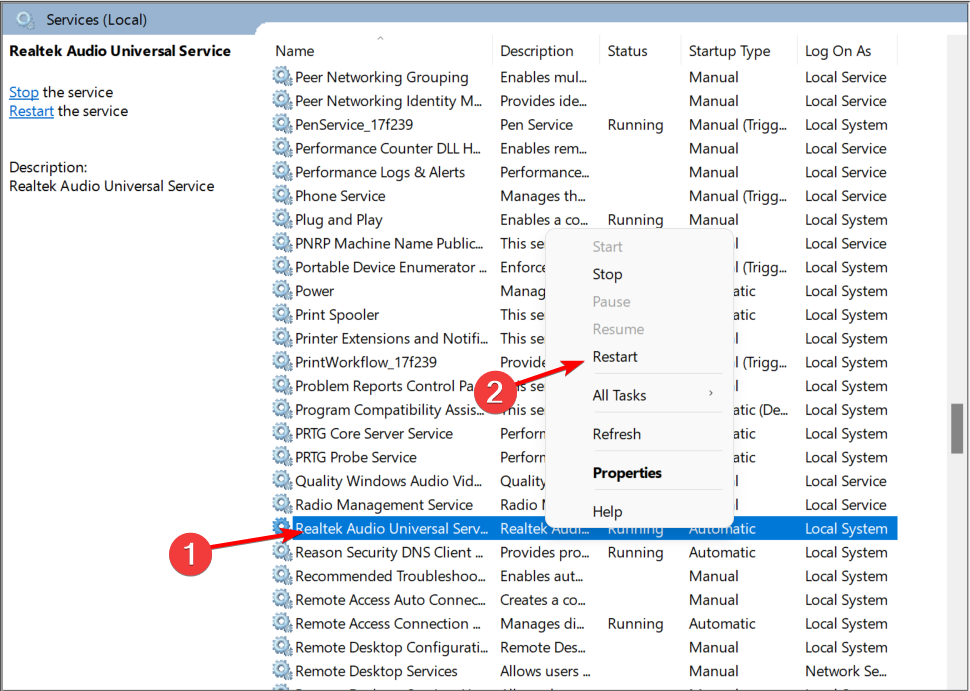
2. Restart the Audio service
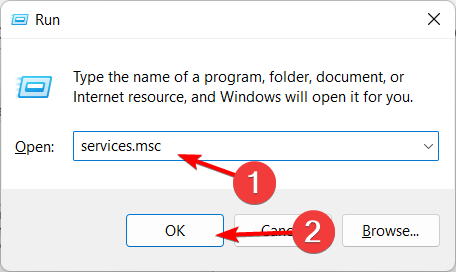
- Press the Windows key + R, which opens Run. Then enter services.msc in the open box, and click the OK button.

- Find the Realtek audio service, right-click it and select Restart.

3. Update the driver
If it isn’t constantly updated, the Realtek HD Audio Driver may stop functioning correctly. Follow these easy steps to correctly update the driver and fix the issue!
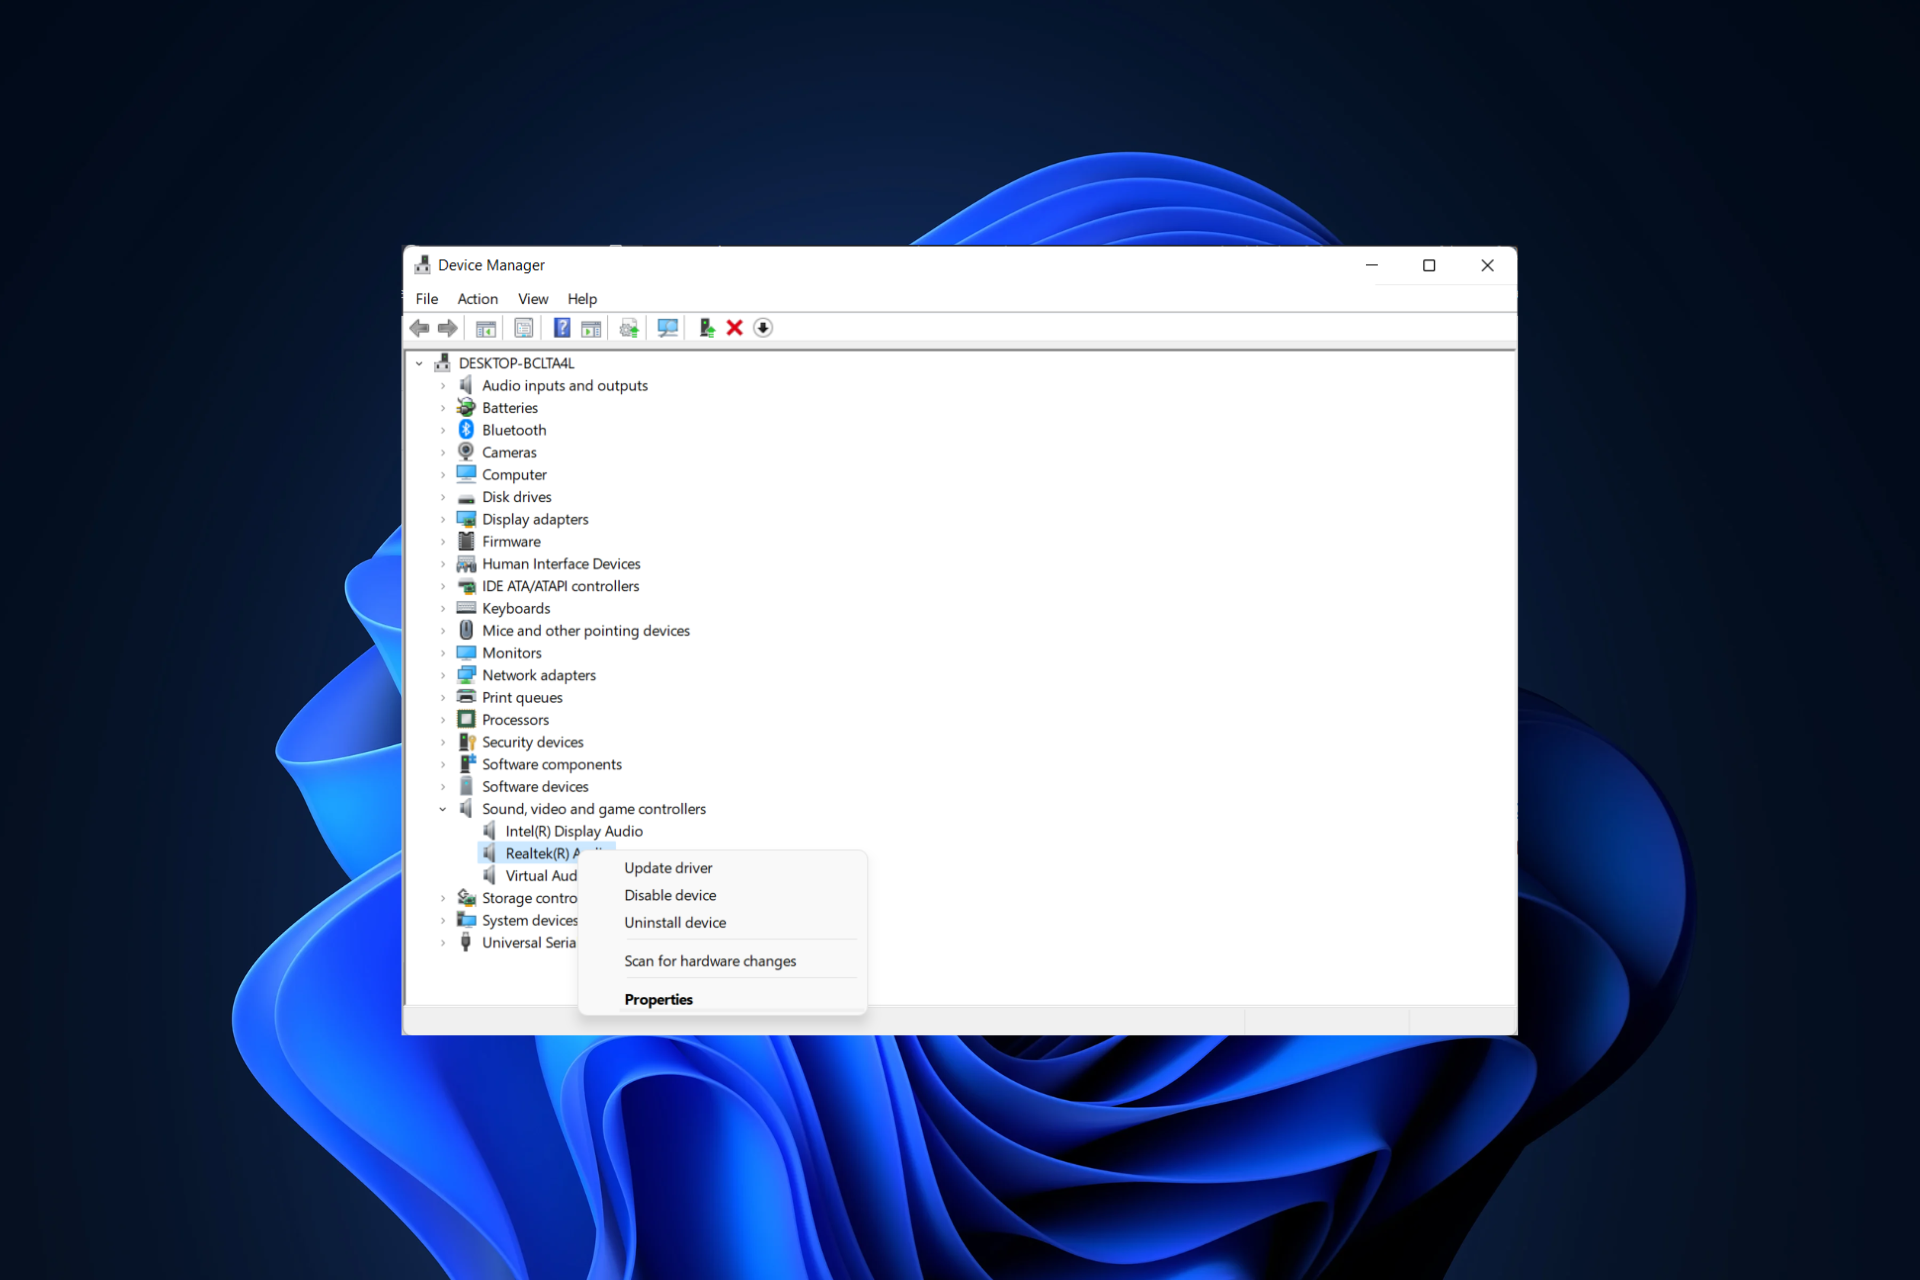
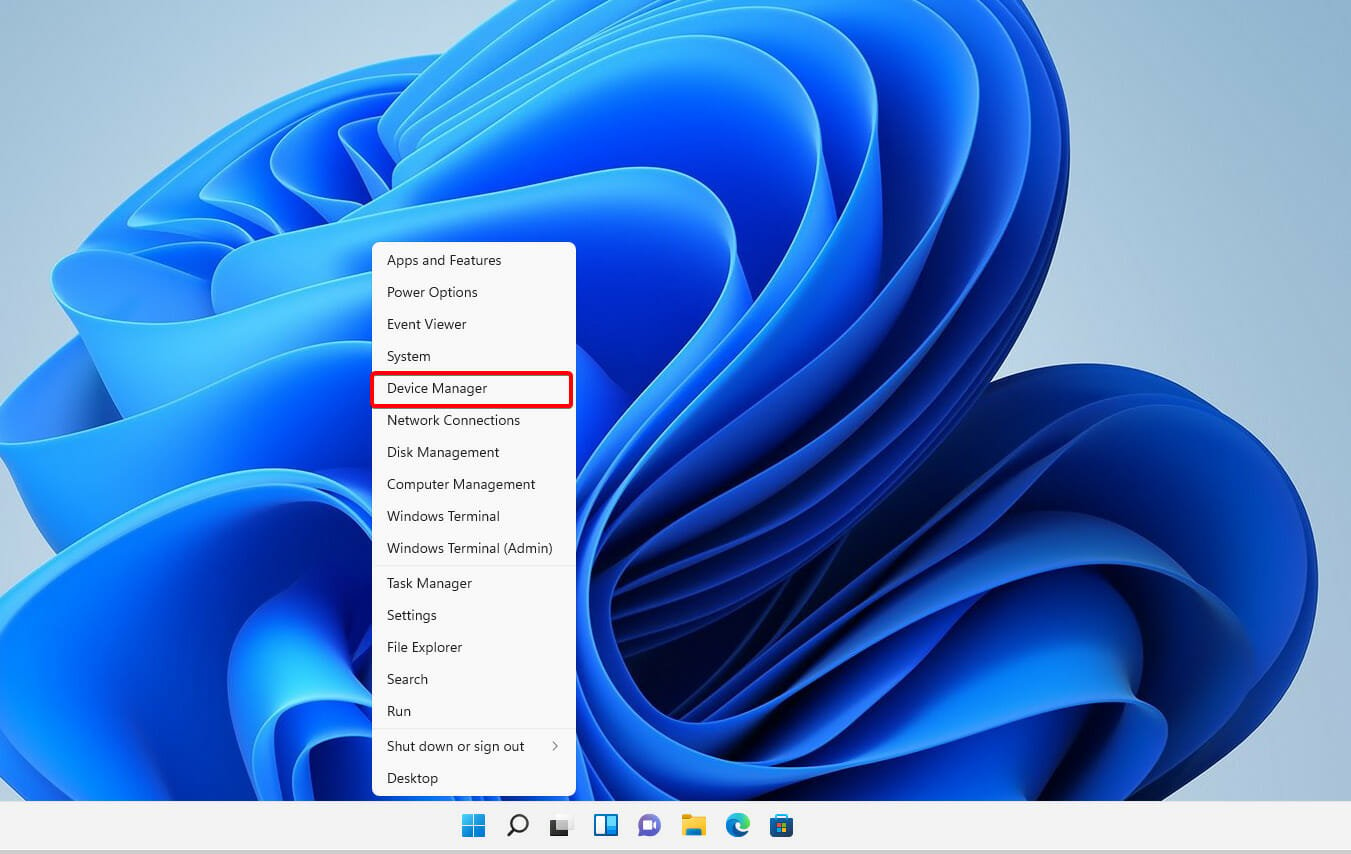
1. Right-click on the Start icon in the Taskbar or press Windows + X to launch the Quick Access menu then select Device Manager.
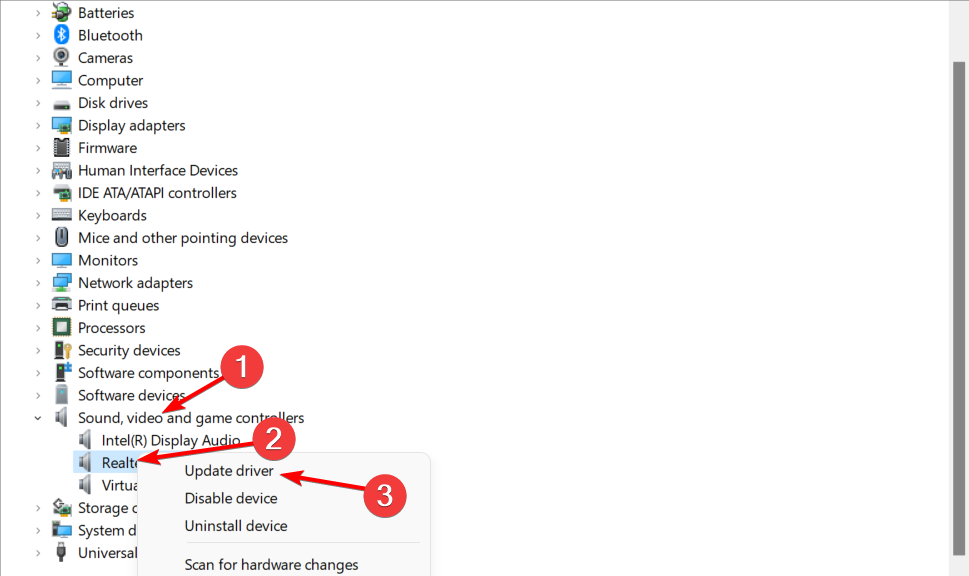
2. Locate and double-click the Sound, video, and game controllers option. Right-click on the Realtek Audio device and select Update driver from the context menu.
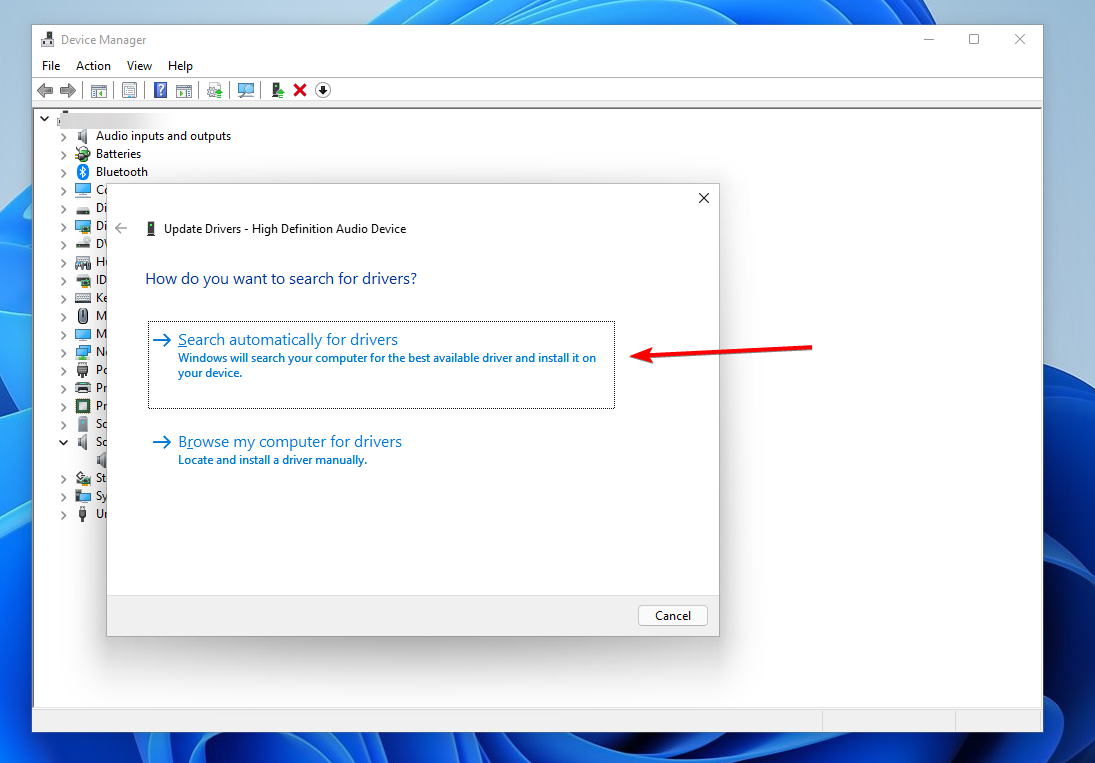
3. Select the Search automatically for drivers option as Windows will find the best drivers on your system. Reboot your PC afterward.
We strongly advocate using a specialist program such as Outbyte Driver Updater to do automatic scans for out-of-date drivers.

Outbyte Driver Updater
Safely update the Realtek driver as well as all other outdated drivers on your system.
4. Reinstall the Realtek driver or use your manufacturer’s
- Right-click on the Start icon in the Taskbar or press Windows + X to launch the Quick Access menu. Select Device Manager from the list of options displayed.

- Locate and double-click on the Sound, video, and game controllers option. Right-click on the Realtek Audio device and select Uninstall device from the context menu.

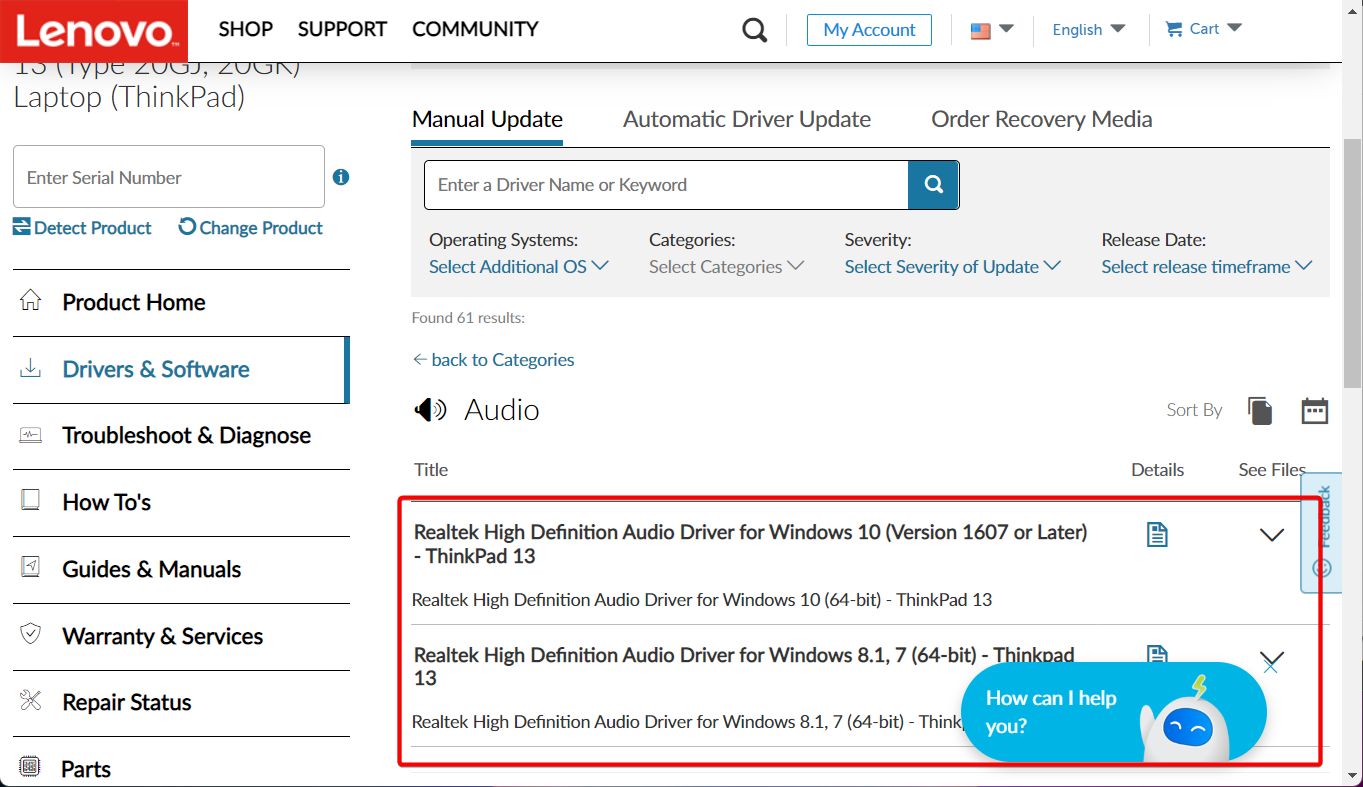
- You can now either reboot your PC to automatically reinstall the Realtek driver, or head to your manufacturer’s website and search for an audio driver and download it. For example, here is Lenovo’s support page where you can find all drivers.


After you have completed the procedures outlined above, restart your computer. Windows will automatically update the driver to the most recent version available. It will also remove any corrupted driver files that may have been present.
- Realtek HD Audio Manager is missing [Solved]
- Fix: No speaker or headphones are plugged in [Full Guide]
- Headphones not detected in Windows 10 or 11 [Easy Fix]
5. Disable Audio Enhancements
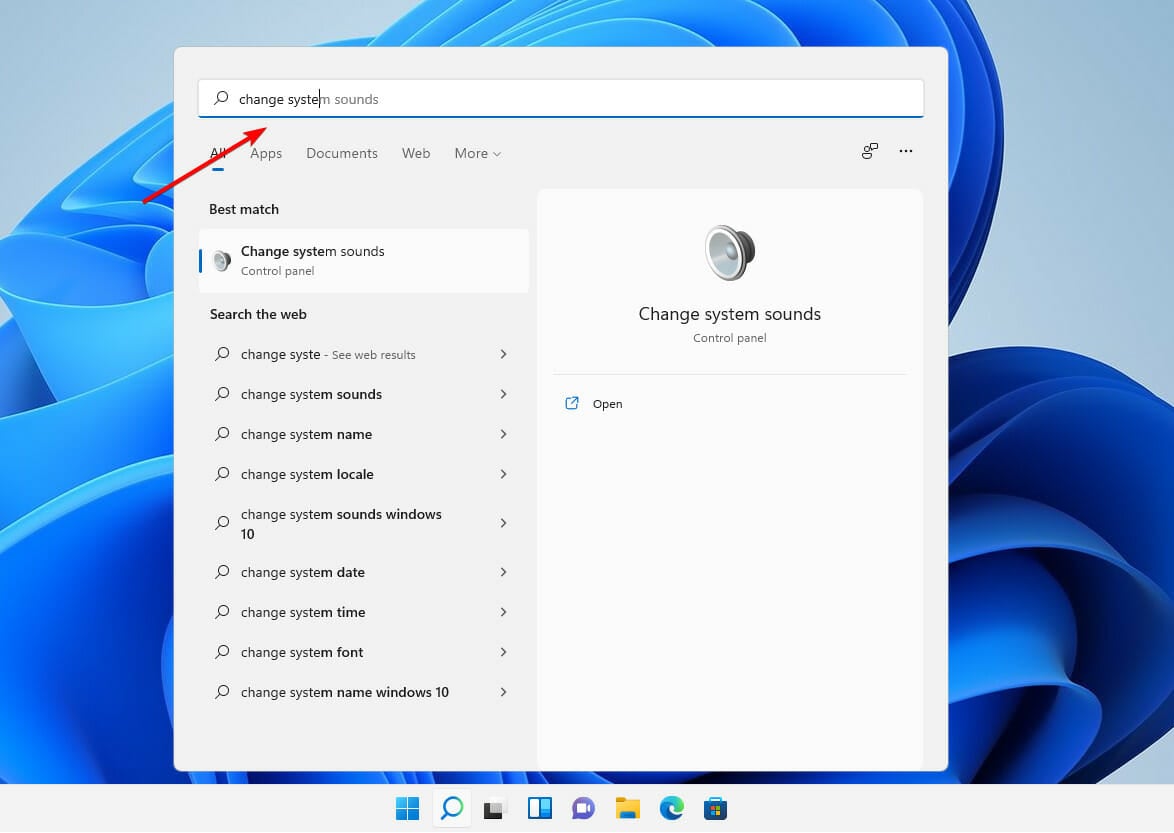
- Press on the Windows key + S, and search for Change system sounds.

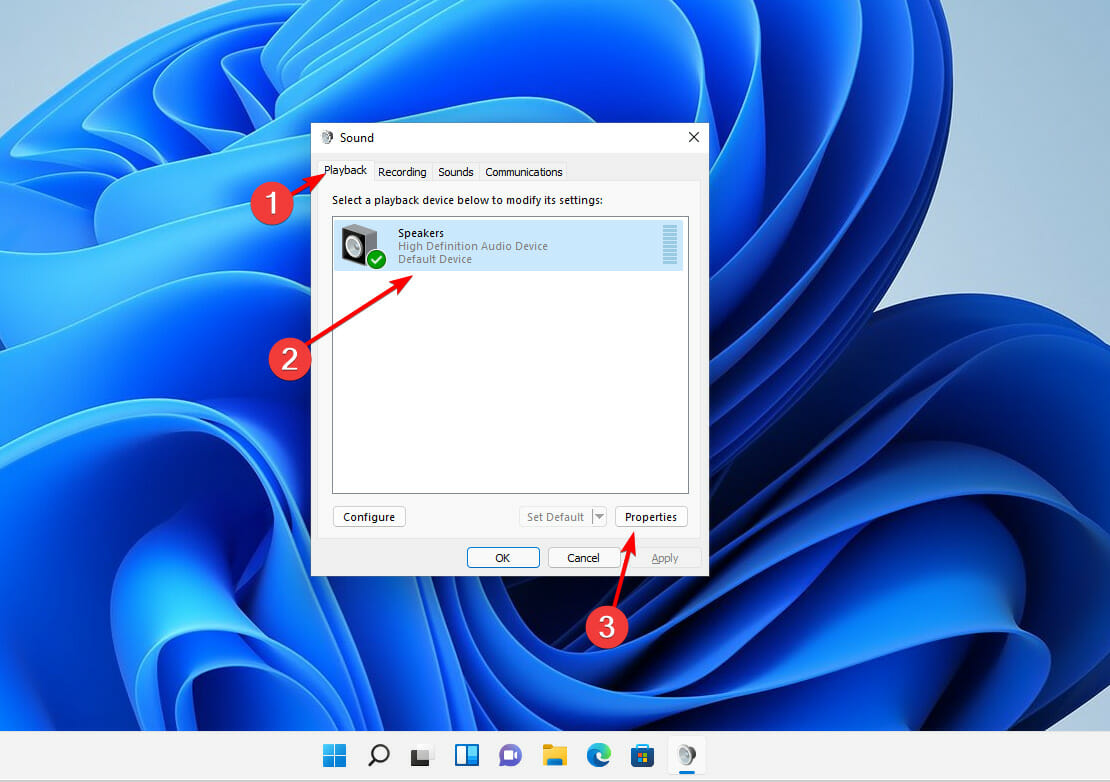
- Inside the Sound panel, navigate to the Playback tab, then select the speaker you are having trouble with, and click on Properties at the bottom.

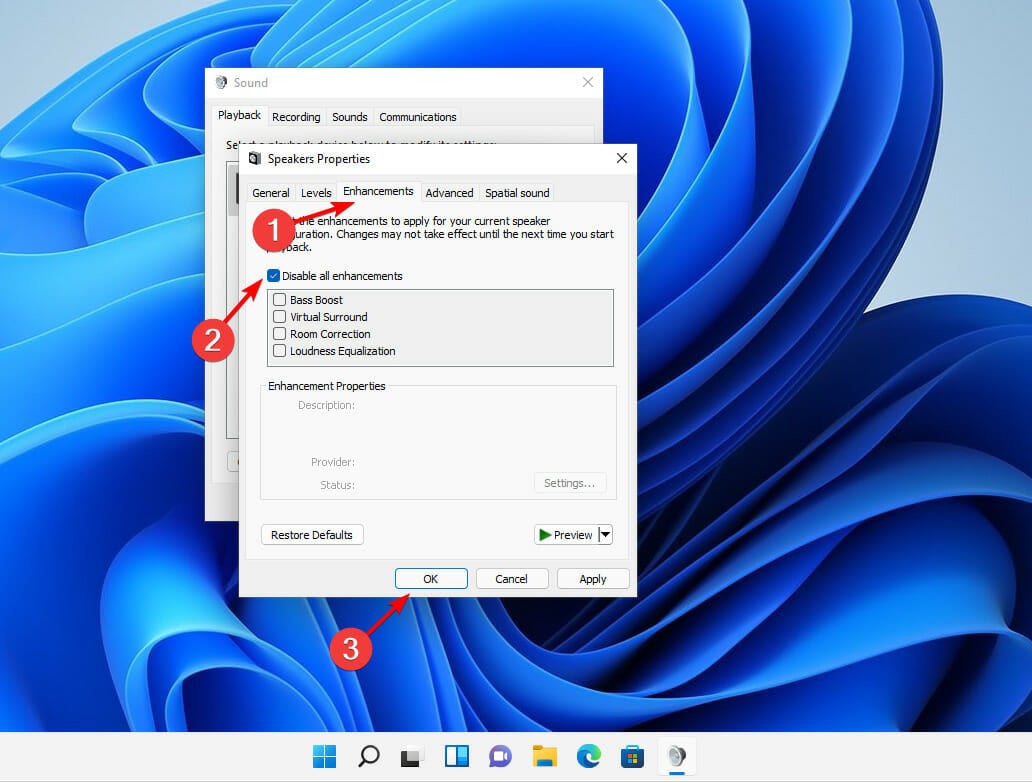
- Click on the Enhancements tab, then tick the checkbox for Disable all enhancements, and click the OK at the bottom to save the changes and close the window.

6. Run the Audio Troubleshooter
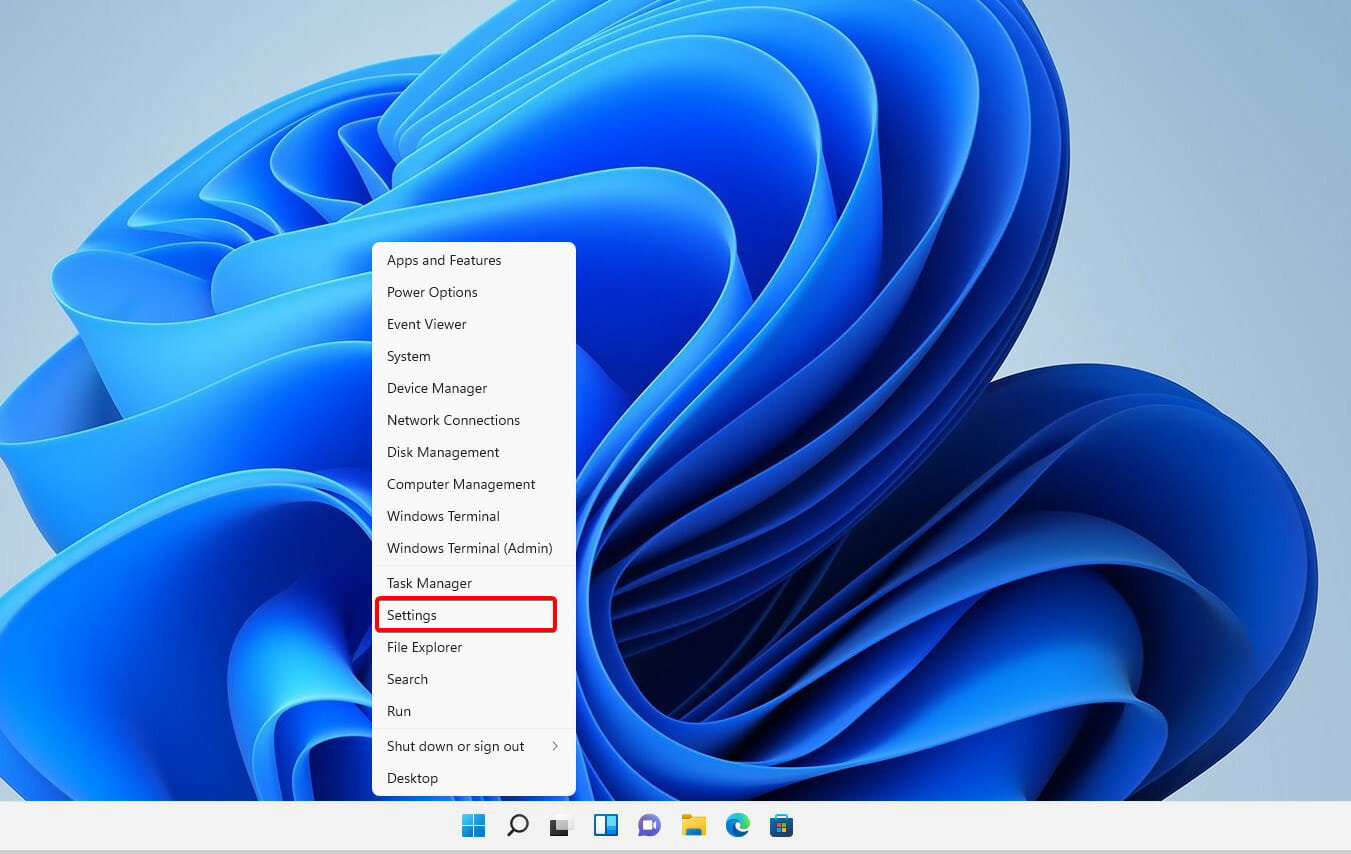
- Right-click on the Start icon in the Taskbar or press Windows + X to launch the Quick Access menu. From the list of options, select Settings.
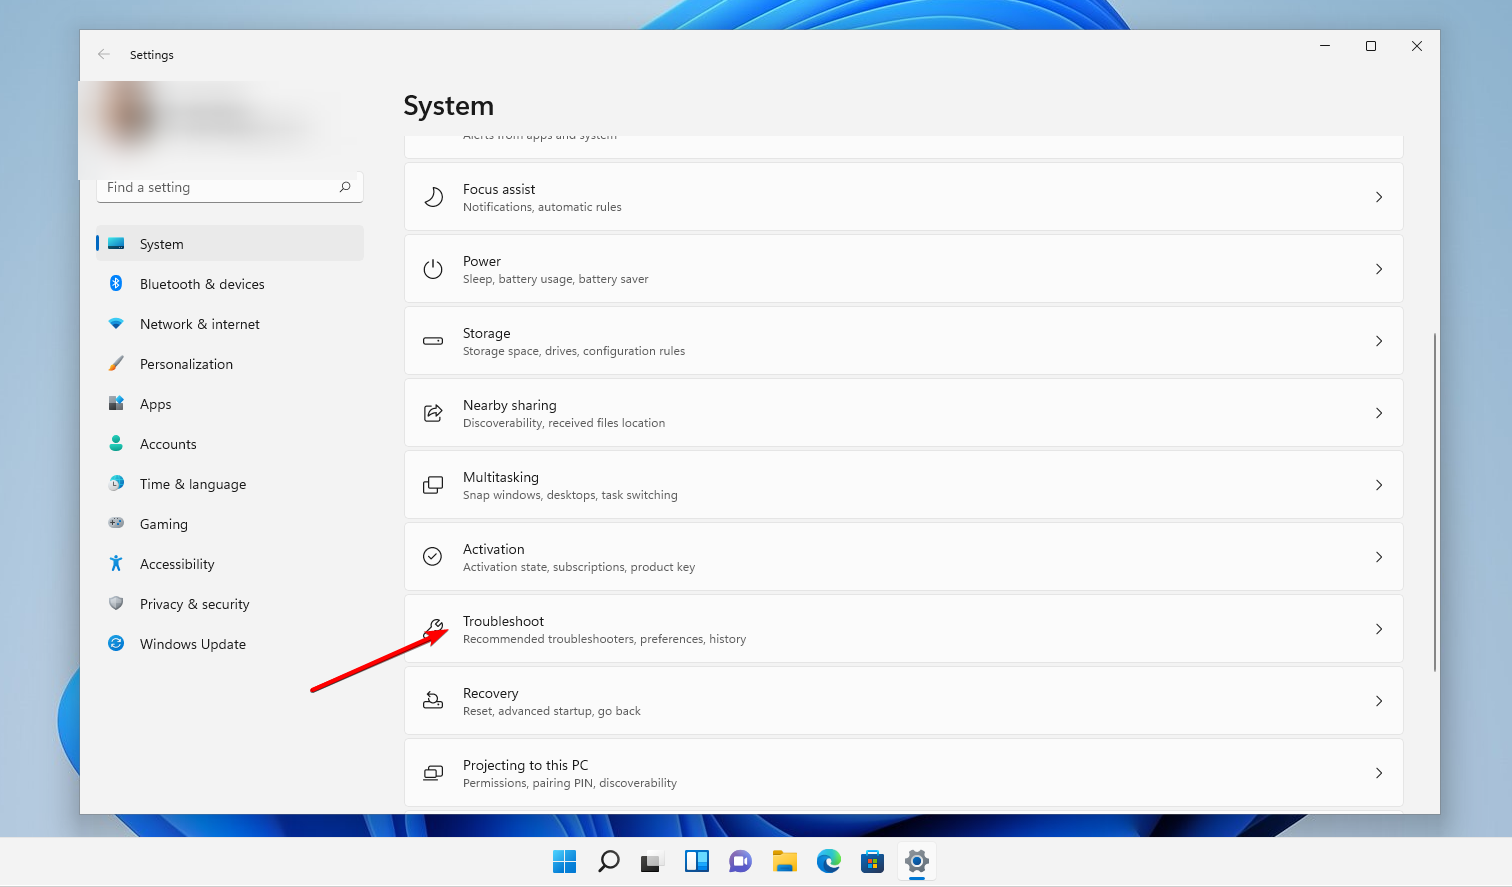
- The System tab will be open by default. Scroll down on the right side of the window and select Troubleshoot from the list of options.

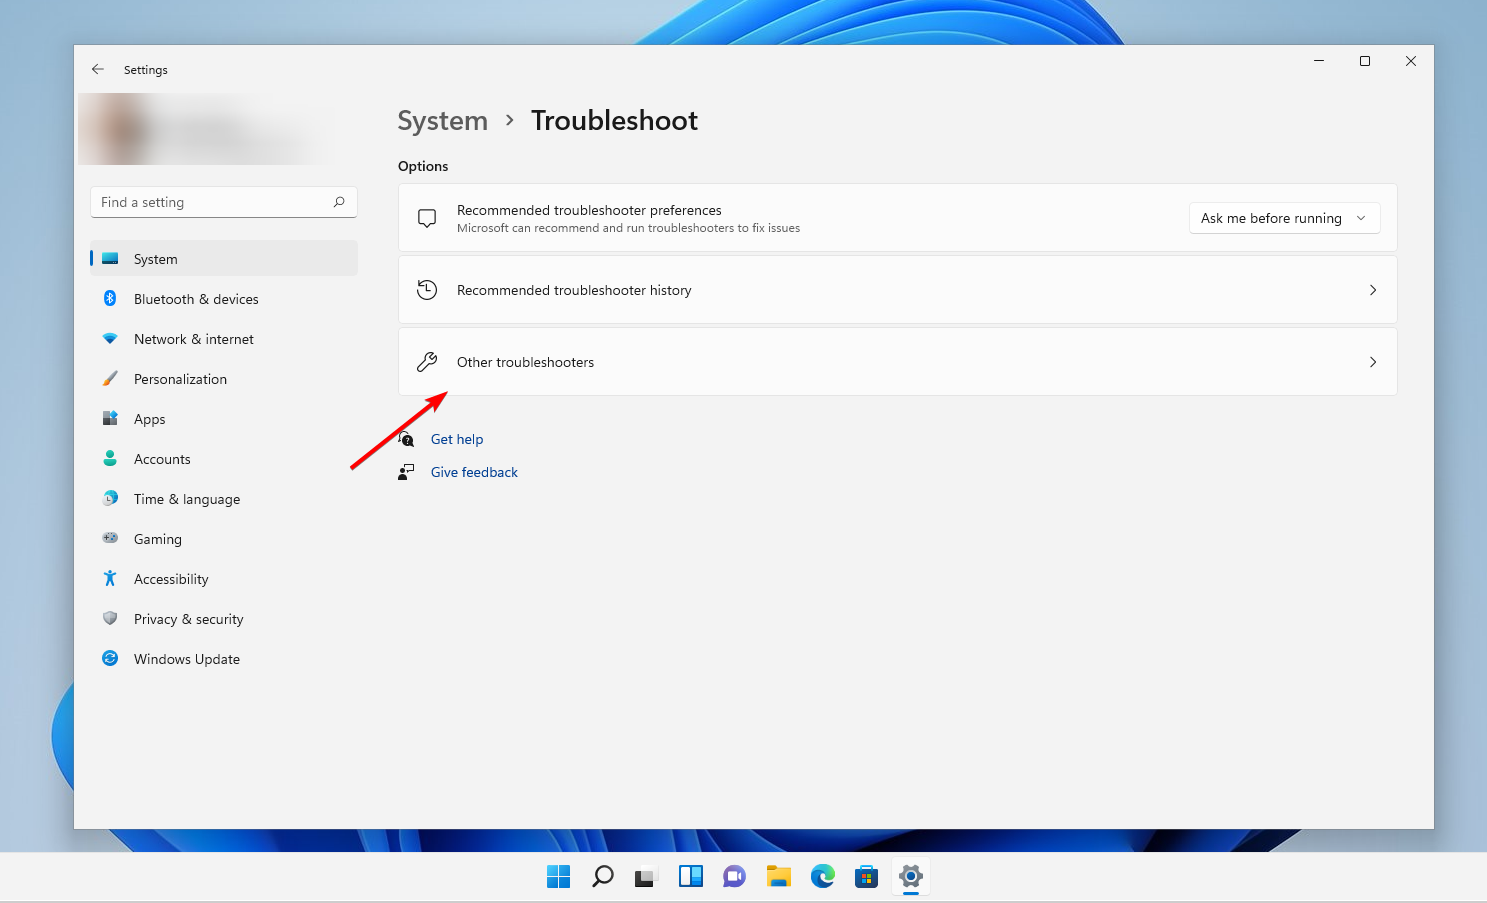
- Tap on Other troubleshooters.

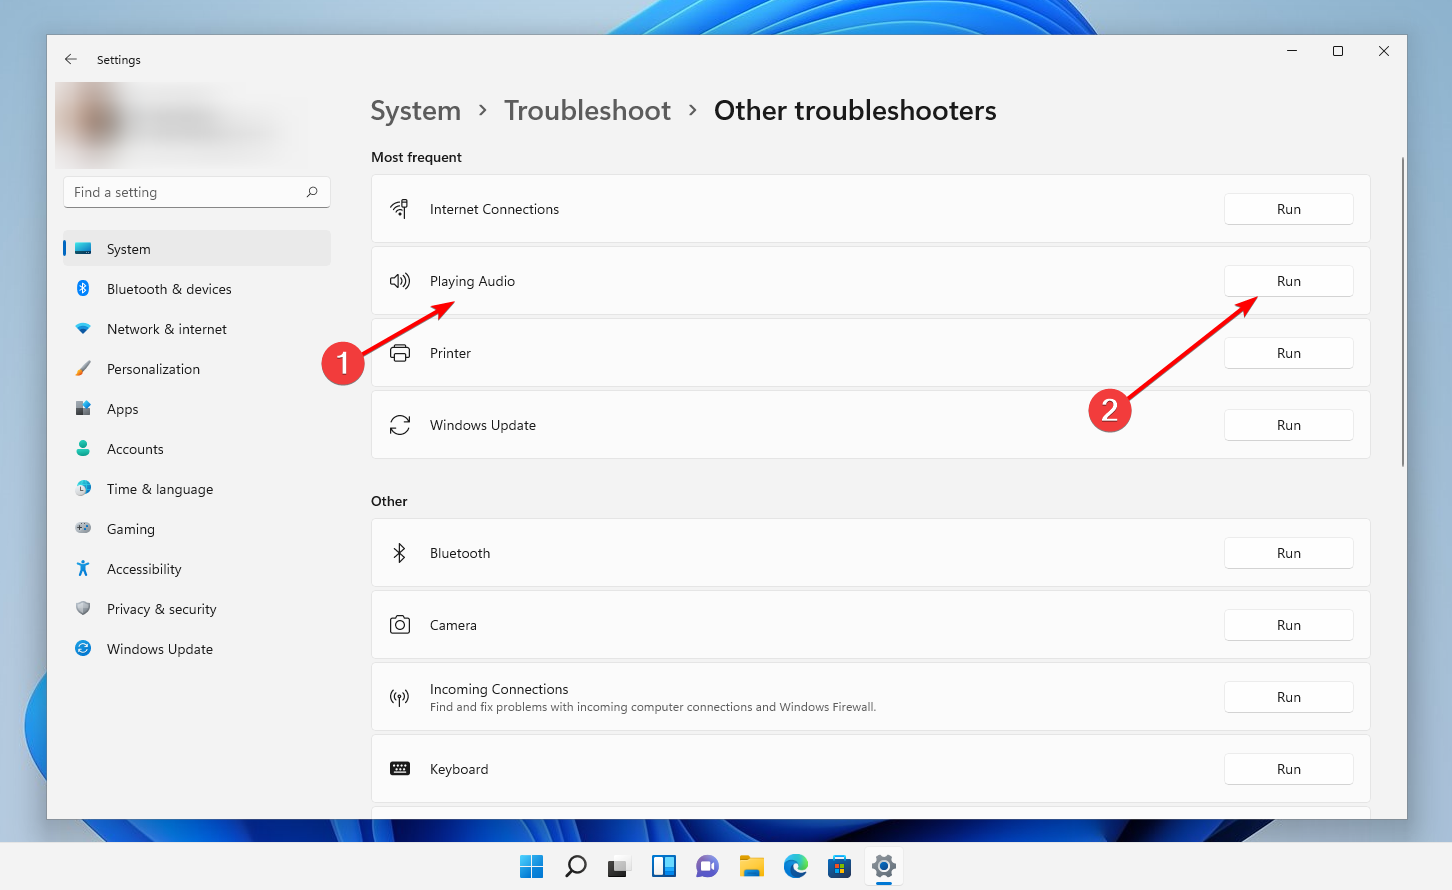
- Locate the Playing Audio troubleshooter and click on Run next to it.

- Select the audio output device you are having issues with and click on Next at the bottom.
Windows will now identify any issues with the device or configured settings and fix them. Instructions will be displayed once the errors are found, so make sure to follow them carefully.
7. Run System Restore

NOTE
System Restore will not delete any files on the system, however, recently installed applications, changes in settings, and driver updates may be removed.
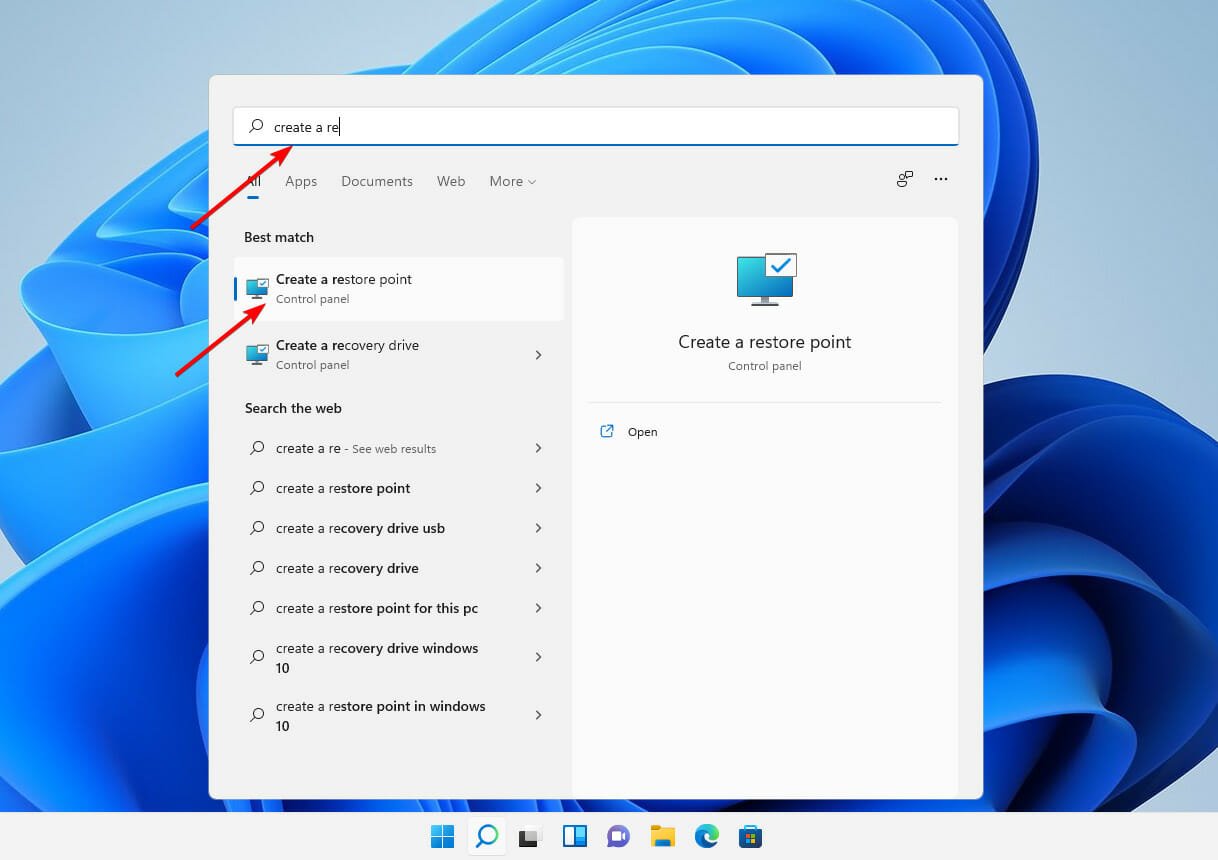
- Press on the Windows key + S, search for Create a restore point, and click on the relevant search result.

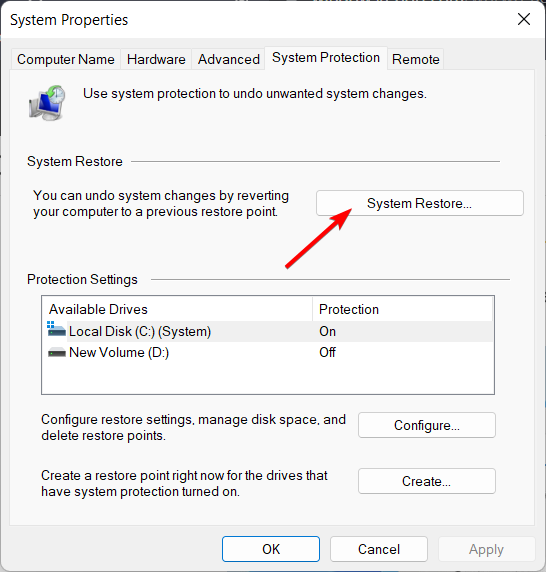
- The System Protection tab will automatically open. Click on System Restore under it.

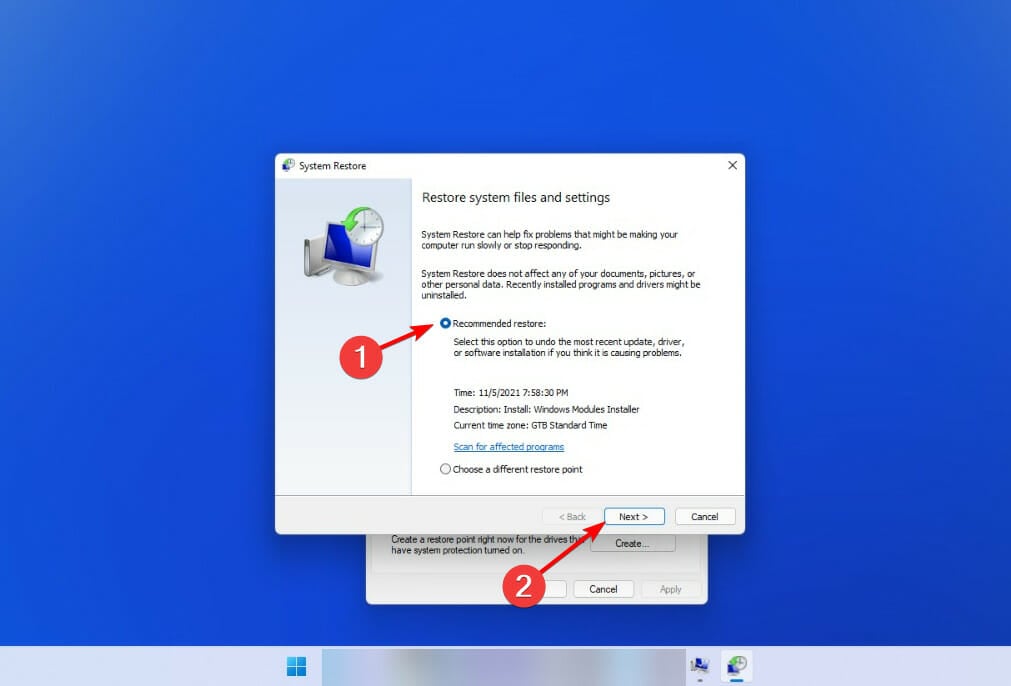
- The Recommended restore point will be selected by default, but you can select another one by clicking on the Choose a different restore point option. After this, click on Next at the bottom.

- If everything looks fine, click on Finish at the bottom.
After your system has been successfully restored, the Realtek audio problem will be immediately repaired by the operating system. In case you don’t have a restore point created, check our guide on how to create a restore point in Windows 11.
8. Update Windows
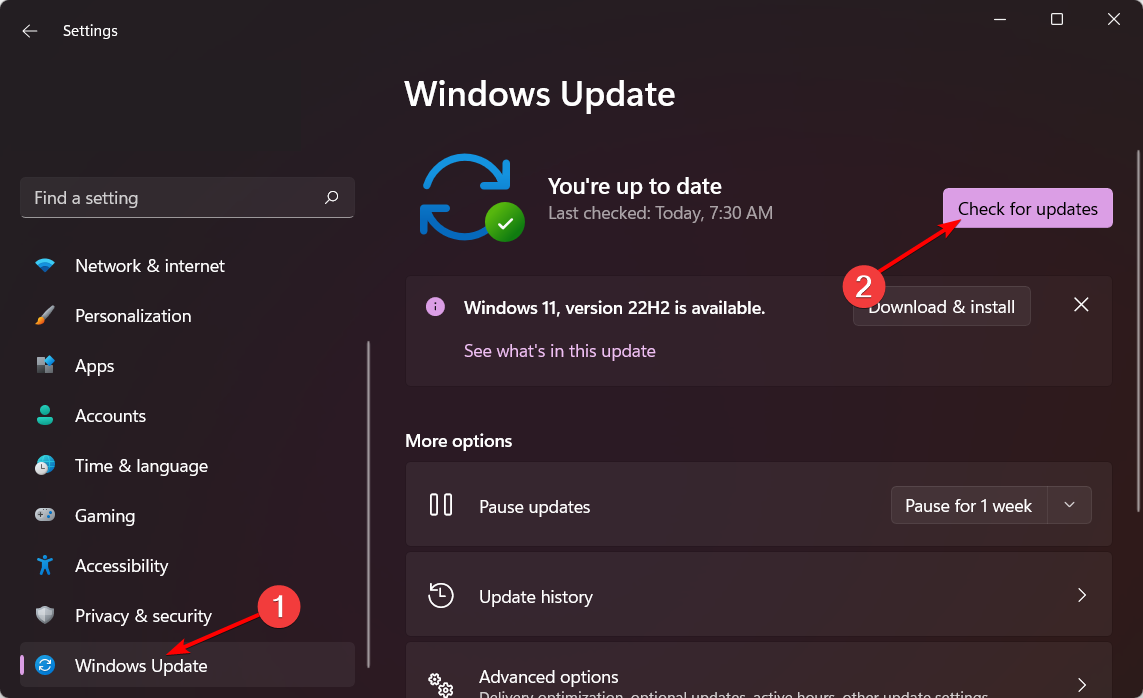
- Press Windows + I to open the Settings app. Click the Windows Update section then click Check for updates on the right.

- Reboot your PC afterward. The Realtek audio driver not working in Windows 11 issue will be fixed.
What to do if there’s no sound at all?
If you notice your sound has been missing altogether after installing Windows 11, you might want to check in with Microsoft’s help center.
The help service will offer you more actions to take in order to solve the sound issues at hand. To talk with its support team, click the Get support link on the Contact Microsoft Support page. Thereafter, click the Contact Support button after entering a description.
We hope that these methods were helpful in resolving your Realtek HD Audio Driver issues. Let us know what you think in the comment section below, and which solution worked best for you!
![]()
 Одна из самых частых проблем пользователей всех версий Windows, и 11-я здесь не исключение — отсутствие звука: простое его исчезновение без видимых причин, нет звука после обновления системы или чистой установки, в колонках или наушниках.
В этой инструкции пошагово о том, что делать, если нет звука в Windows 11, независимо от того, в какой момент он пропал, способы от простых к более сложным.
Первое, что стоит проверить если нет звука
Некоторые пренебрегают простыми шагами для первоначальной проверки причин отсутствия звука на ПК или ноутбуке, будучи уверенными, что проблема не в этом.
Я бы настойчиво рекомендовал начать со следующих шагов, чтобы не потерять время:
- Проверьте подключение коннектора ваших колонок к соответствующему (и правильному) выходу на звуковой плате: иногда он может сидеть не плотно и отключаться при простом перемещении системного блока.
- Подключение кабеля к колонкам тоже стоит проверить: ситуация здесь аналогична, а с учетом того, что часто используются «тюльпаны», даже более вероятна.
- Нажмите правой кнопкой мыши по значку динамика в области уведомлений и выберите «Микшер громкости». Убедитесь, что выбрано правильное устройство вывода, а громкость не равна нулю (в том числе и для отдельных приложений). Здесь может оказаться что устройств вывода нет в списке, либо ни одно не соответствует нужной звуковой плате: это нормально и далее в статье попробуем решить эту проблему.

- Про питание колонок и регулятор громкости на них тоже не забывайте.

Если в этой части всё в полном порядке, можно переходить к следующим шагам.
Драйверы аудио для звуковой карты
Самая распространенная причина проблем со звуком в Windows 11 — отсутствие или установка не тех драйверов аудио, что и приводит к проблемам со звуком. В некоторых случаях может случиться, что система сама обновила их, после чего звук пропал.
Рекомендую следующие шаги, чтобы решить проблему:
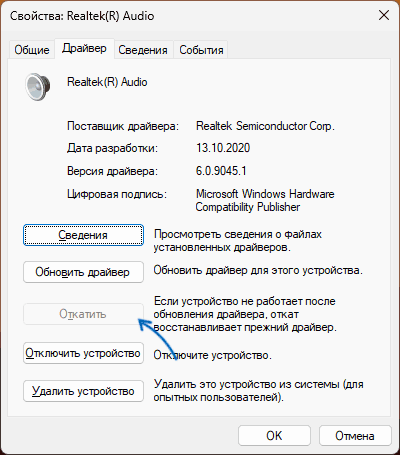
- Если до недавнего времени звук работал, система не переустанавливалась, может помочь откат драйвера: откройте диспетчер устройств (через меню по правому клику на кнопке «Пуск» или с помощью клавиш Win+R и ввода devmgmt.msc), дважды нажмите по вашей звуковой карте в разделе «Звуковые, игровые и видеоустройства», проверьте: есть ли кнопка «Откатить» на вкладке «Драйвер», если есть — используйте её.

- Обновите драйвер. Речь не об обновлении в диспетчере устройств: там вы увидите стандартное сообщение «Наиболее подходящие драйверы для данного устройства уже установлены», хотя с большой вероятностью это не так. Оптимальный метод: найти страницу поддержки вашей модели материнской платы ПК или ноутбука на официальном сайте производителя и скачать драйвер аудио оттуда, затем установить его. Внимание: на официальном сайте может не быть драйверов для Windows 11, но в большинстве случаев драйверы для предыдущих версий системы исправно работают (но их может потребоваться запустить в режиме совместимости). На изображении — пример, как драйвер звука может выглядеть на официальном сайте.

- При обновлении и установке драйверов учитывайте, что, если в диспетчере устройств вы видите «Устройство с поддержкой High Definition Audio» в списке — драйвер не установлен, точнее установлен стандартный драйвер Windows, который она устанавливает на все звуковые карты, для которых не может найти более подходящих драйверов. А звуковые устройства NVIDIA и AMD, которые вы также можете увидеть там — это не звуковая карта, они относятся к выводу звука по HDMI.

- При отсутствии звуковой карты в диспетчере устройств, но наличии «Неизвестных устройств», учитывайте, что и они также могут быть ею. Здесь может помочь: Как установить драйвер неизвестного устройства.
- Может иметь смысл проверить наличие драйверов в Центре обновлений: зайдите в Параметры — Центр обновления Windows — Дополнительные параметры — Необязательные обновления. Раскройте пункт «Обновления драйверов» и посмотрите, нет ли среди доступных драйвера аудио.

- В крайнем случае, если вы не можете найти драйверы самостоятельно, можно попробовать использовать Snappy Driver Installer.


И ещё один вариант, если скачать какие-либо драйверы не получается:
- Нажмите правой кнопкой мыши по звуковой карте в диспетчере устройств и выберите «Обновить драйвер».

- Нажмите «Найти драйверы на этом компьютере».

- Нажмите «Выбрать драйвер из списка доступных драйверов на компьютере».
- Если в списке совместимых драйверов помимо установленного сейчас драйвера (отображается вверху) есть другие, попробуйте установить их и проверить, решило ли это проблему со звуком.


Если ваша звуковая карта в диспетчере устройств отображается с восклицательным знаком, дважды нажмите по ней и посмотрите код ошибки, а затем выполните поиск именно по этому коду (в том числе в поиске на этом сайте), чтобы найти варианты решения.
Устройства записи и воспроизведения
Если правильный драйвер установлен, при этом звука всё так же нет, можно проверить настройки в старом интерфейсе устройств записи и воспроизведения, который сохранен в Windows 11:
- Нажмите правой кнопкой мыши по кнопке «Пуск», выберите пункт «Выполнить», введите mmsys.cpl и нажмите Enter.
- Убедитесь, что нужное вам устройство используется как устройство по умолчанию и устройство связи по умолчанию (нажимаем правой кнопкой мыши по устройству и если там есть пункты «Сделать устройством по умолчанию — выбираем). Например, если одно устройство сделать устройством по умолчанию, а второе — устройством связи по умолчанию, то звук из первого может пропадать при использовании мессенджеров и других инструментов общения на компьютере.

- Выберите нужное устройство вывода звука и нажмите кнопку «Настроить». Окно настройки может отличаться для разных звуковых плат и подключенной аудио аппаратуры, но иногда в этом окне можно исправить воспроизведение, например, выбрав стереозвук вместо многоканального.

- Выбрав нужное устройство вывода, нажмите кнопку «Свойства». В следующем окне на разных вкладках вы можете попробовать отключить пространственный звук и эффекты, отключить дополнительные средства звука, запретить приложениям использовать устройство в монопольном режиме — иногда это помогает решить проблему. Также может помочь снижение разрядности и частоты дискретизации в пункте «Формат по умолчанию».

- На вкладке «Связь» в окне управления устройствами записи и воспроизведения попробуйте выбрать отметку «Действие не требуется» и применить настройки.


Параметры звуковой карты в БИОС/UEFI
На некоторых компьютерах и ПК есть возможность отключения звуковой карты в БИОС/UEFI. Зайдите в БИОС и проверьте, присутствует ли где-либо возможность переключения звука AC97, HD Audio, On Board Audio Device, Realtek HD Audio и, при наличии, установите его в Enabled (включено).

Сам пункт может располагаться в разных разделах: Configuration, Onboard devices, Peripherals, Advanced.
На некоторых старых ПК в БИОС может настраиваться режим работы звуковой карты — AC97 или HD Audio: если при выбранном режиме возникают проблемы с воспроизведением звука, попробуйте его изменить на другой.

Если предложенные выше способы не вернули звук в Windows 11, далее — ещё несколько вариантов, которые могут сработать:
- Откройте «Службы» — нажмите клавиши Win+R и введите services.msc. Проверьте состояние службы Windows Audio в списке служб: она должна выполняться, а тип запуска — «Автоматически». Если это не так, дважды нажмите по службе, измените тип запуска, примените настройки, а затем запустите её.

- Зайдите в Параметры — Система — Звук, нажмите по нужному устройству вывода звука (например, Динамики) и внизу окна настроек проверьте, чтобы не были включены какие-то дополнительные средства звука, такие как «Пространственный звук».

- Зайдите в Параметры — Система — Устранение неполадок — Другие средства устранения неполадок или нажмите правой кнопкой мыши по значку динамика и выберите пункт «Устранение неполадок со звуком». Запустите средство устранения неполадок при воспроизведении звука.

- Если недавно звук работал, теперь перестал, при этом система не переустанавливалась, можно использовать точки восстановления системы на дату, когда проблем не наблюдалось.
- При наличии ПО от производителя звуковой карты или компьютера (Realtek Audio Console, Nahimic, Maxx Audio и другие), проверьте настройки звука в соответствующей утилите: попробуйте изменить количество каналов, отключить эффекты выполнить другие настройки, проверяя результат.


Также могут помочь дополнительные инструкции (написанные для Windows 10, но подойдут и для 11), если у вас возникла описанная в них ситуация:
- Что делать, если нет звука по HDMI
- Устройства вывода не найдены — как исправить
- Выходное аудио устройство не установлено
- Пропал звук в браузере — возможные решения
- Это устройство уже используется при выводе звука по HDMI
Realtek Audio is a driver that allows your computer to communicate with audio devices such as speakers and sound cards. It is important to have updated Realtek audio drivers to ensure that your computer can properly communicate with your audio devices.
There is no official word from Realtek on Windows 11 compatibility at this time. However, users have reported issues with Realtek audio drivers on Windows 11, including problems with sound quality, audio cutting out, and the audio not working entirely even.
If you’re having trouble with your Realtek audio not working in Windows 11, don’t worry! There are a few easy ways to fix this problem.
Table of Contents
There are several reasons for the Realtek audio not working in Windows 11. We have listed the most common causes below.
- Outdated audio driver
- Incompatible audio enhancements
- Faulty audio settings
- Conflict between Realtek and windows driver
Fixes for Realtek Audio Not Working in Windows 11
Just as there are many causes for this issue, there are several fixes as well. Here are a couple of ways to resolve Realtek audio not working in Windows 11.
Update Your Audio Drivers
One way to fix this problem is to update your audio drivers. Outdated or corrupt audio drivers can cause problems with your sound card. You may update your drivers manually by visiting your sound card manufacturer’s website. Additionally, you can automatically update your audio driver as well. To do so follow these steps.
- Search for Device Manager from the search bar in the taskbar.
- Double click Audio input and outputs.
- Then, right-click on Speakers and select Update Driver.

- Click on Search automatically for drivers.


Adjust Your Audio Settings
Another way to fix the no audio problem is to adjust your audio settings. In some cases, the problem may be caused by incorrect audio settings. To adjust your audio settings, follow these steps.
- Press the Windows and R keys simultaneously.
- Type ‘control’ in the search bar and hit enter.
- Go to Hardware and Sound.

- Go to Sound.

- From here, you can change a number of settings, including your speakers and microphone.


Disable Enhancements
Another way to fix this problem is to disable audio enhancements. These enhancements can cause problems with your sound card, in a few cases. To disable enhancements, follow these steps.
- Press the Windows and R keys simultaneously to open Run.
- Type ‘control’ in the search bar and hit enter.
- Go to Hardware and Sound.
- Go to Sound. Under Playback, select your active speaker.
- Click on the Enhancements tab.

- From here, you can disable any enhancements that are causing problems.

Uninstalling and Reinstalling the Realtek Audio Drivers
If updating does not fix the issue, you can further try uninstalling and reinstalling the Realtek audio drivers. To uninstall the Realtek audio drivers, follow these steps.
- Right-click on the Start menu.
- Go to Device Manager.

- Click on Sound, video, and game controllers.
- Right-click on Realtek High Definition Audio.
- Click on the Uninstall device option.

- Checkmark Delete the driver software for this device option.
- Click on Uninstall.


To reinstall the Realtek audio drivers, follow these steps.
- Visit product’s official website and Download.
- After the setup file has been successfully downloaded, run the installation program.
- Follow the instructions and wait for the driver to be installed.
Restart Windows Audio Service
Restarting Windows audio service is one of the easiest ways to fix audio not working in Windows 11. To restart Windows audio service, follow these steps.
- Launch the Run app by pressing the Windows + R hotkeys.
- Type
services.mscin the Run app, and press the Enter hotkey.
- Locate the Windows Audio service in the list and double-click on it.
- Then, click on the Stop button to stop the Windows audio service.

- Close the Windows Audio Service Properties window and double-click on the Windows audio service again.
- Now, click on the Start button to start the Windows audio service.
- Click on the OK button to close the Windows audio service Properties window.


Checking and Resetting the Audio Device
Checking and resetting the audio device is also a way to fix Realtek audio not working in Windows 11. To check and reset the audio device, follow these steps:
- Launch the Device Manager program by pressing the Windows + R hotkeys.
- Type
devmgmt.mscin the Run app, and press the Enter hotkey.
- Expand the Sound, video, and game controllers section in the Device Manager.
- Right-click on the audio device, select the Disable device option, and select the Enable device option after that.

- Close the Device Manager program.


Restart Your Computer
If all else fails, restarting your computer can sometimes fix this problem. In some cases, the problem may be caused by a temporary glitch. Restarting your computer will clear any temporary problems and allow your sound card to work properly.
Related Questions
Why Is My Realtek Audio Control Not Working?
There is no fixed answer for this issue but some of the most common causes include, corrupt system files (Realtek files), incompatible OS, outdated audio drivers, OS, and Realtek program, bugs, etc.
To fix this issue, you can re-install Realtek, and update your audio drivers, OS, and Realtek program. Moreover, you can also try troubleshooting.
Why Does My Speaker Work but Mic Doesn’t?
If the speaker works but the mic doesn’t, then it’s likely that the mic is muted or the volume is turned down too low. Additionally, the speaker and mic have different drives, while you may have updated your audio driver for speakers, you may have missed out on updating drivers for the microphone.
Moreover, the mic can be clogged by dust over time which is not an uncommon phenomenon. This can cause the mic to not work.
Why Is There No Sound After Upgrading to Windows 11?
This is probably caused by incompatibility issues; Windows 11 is fairly new and there are a lot of issues due to its incompatibility. The issue could also be caused by a corrupted Windows registry while updating the OS.
- Включение и выбор устройства воспроизведения по умолчанию
- Запуск средства устранения неполадок со звуком
- Проверка работоспособности «Windows Audio» и связанных с нею служб
- Проверка работоспособности драйвера аудиокарты, его переустановка и обновление средствами Windows 11
- Установка драйверов аудиокарты в Windows 11 от Windows 10/8.1/8/7/Vista
- Принудительная установка драйвера звуковой карты в Windows 11
Если звук на компьютере пропал после обновления Windows 10 до 11, то проблема с вероятностью в 99% связана с драйверами. Звуковая карта просто не обнаруживается операционной системой, т.к. в нее не включены хотя бы какие-нибудь стандартные драйверы для аудиокарты. Обычно в процессе обновления Windows самостоятельно скачивает с серверов Microsoft драйверы для всех опознанных ею устройств. Вывод — если этого не происходит, то причина либо в отсутствии подходящего программного обеспечения, либо в невозможности опознания системой звуковой карты (или все вместе).
Да, возможны и другие причины. Когда проблема касается драйверов, то Windows начинает сильно «капризничать». Впрочем, не только Windows.
Решить проблему со звуком все же можно. Начать стоит со стандартных действий, но если не поможет — переходить к тяжелой артиллерии, а именно — к ручной установке драйвера. И здесь под ручной установкой мы не имеем в виду запуск какого-нибудь файла «Install.exe», что находится в папке с распакованным в нее драйвером. Нет, в данном случае речь идет о попытках «принудительно скормить» системе файлы драйверов.
Включение и выбор устройства воспроизведения по умолчанию
Возможно, что на компьютере вовсе нет никаких проблем со звуком, просто имеют место неправильные настройки операционной системы, связанные с выбором устройства воспроизведения звука по умолчанию.
Чтобы убедиться в наличии или отсутствии данной проблемы, нужно проделать следующее:
- Откройте окно «Параметры» из меню «Пуск», перейдите в нем в раздел «Система», затем в подраздел «Звук»:
 1
1
- Прокрутите открывшийся раздел донизу, затем кликните по элементу «Дополнительные параметры звука»:
- В новом отобразившемся окне будет приведен список доступных на компьютере устройств воспроизведения. Если с драйвером аудиокарты все нормально, среди них должен присутствовать значок «Динамики» или «Наушники». Чтобы это устройство воспроизведения работало, оно должно быть не только включено, но и выбрано по умолчанию.
- Если устройство выключено, кликните по нему правой кнопкой мыши, затем выберите «Включить».
![]()
- Если же оно не выбрано в качестве устройства по умолчанию, кликните по значку правой кнопкой мыши и активируйте соответствующую опцию в контекстном меню.
- Если же в окне «Звук» не отображено вообще ни одного значка, а вместо них присутствует лишь надпись «Звуковые устройства не установлены», возможно, это связано с действующей опцией, скрывающей отключенные и/или отсоединенные устройства. Чтобы включить их отображение, кликните правой кнопкой мыши по пустой области окна и задействуйте опции «Показать отключенные устройства» и «Показать отсоединенные устройства».
Теперь найдите значок «Динамики» и включите устройство воспроизведения по инструкции выше.
Запуск средства устранения неполадок со звуком
Хотя все средства устранения неполадок Windows имеют среди пользователей славу бесполезных, они все же, хоть и не всегда, но помогают. Вообще, это средство запускается автоматически при клике по значку громкости в трее возле часов, если в системе имеются проблемы со звуком. Если же этого не происходит, то его можно запустить и вручную:
- Вновь открываем окно «Параметры», переходим во вкладку «Система», затем идем в раздел «Устранение неполадок»:
- Переходим в подраздел «Другие средства устранения неполадок»:
- Кликаем по кнопку «Запуск» напротив пункта «Воспроизведение звука»:
- Осталось дождаться, пока средство устранения неполадок закончит свою работу:
Проверка работоспособности «Windows Audio» и связанных с нею служб
В Windows 11 имеется несколько служб, отвечающих за функционирование аудиоустройств:
- «Audiosrv». Она же «Windows Audio». Ключевая служба, отвечающая за воспроизведение звука.
- «AudioEndpointBuilder». Средство построения конечных точек Windows Audio. Еще одна ключевая служба, от которой зависит работа предыдущей службы.
- «VacSvc». Служба компоновщика объемного звука. Требуется только в том случае, если к компьютеру подключена гарнитура «Windows Mixed Reality» (шлем смешанной реальности).
- «BTAGService». Служба звукового шлюза Bluetooth. Нужна для работы беспроводных Bluetooth-устройств воспроизведения звука.
Две ключевые службы — «Windows Audio» и «AudioEndpointBuilder» — зависят от службы «RpcSs» (Удаленный вызов процедур RPC). Т.е. если она отключена, то и звука на компьютере, соответственно, не будет. Наша задача — проверить, работают ли три эти названные службы. Проверить «VacSvc» и «BTAGService» не нужно, если к компьютеру не подключены соответствующие гарнитуры.
Чтобы запустить службу «Windows Audio», выполните следующие шаги:
- Нажмите комбинацию клавиш «Win + R», впишите без кавычек в окно «Выполнить» команду «msc» и нажмите «ОК».
- Откроется окно «Службы». Найдите в списке службу «Windows Audio» и кликните по ней два раза мышкой для открытия окна свойств этой службы. Если в графе «Состояние» указано «Остановлена», нажмите на кнопку «Запустить» немного ниже.
- Чтобы данная служба запускалась в автоматическом режиме, в графе «Тип запуска» установите опцию «Автоматически», как это изображено на скриншоте выше.
Проделайте то же самое со службой «AudioEndpointBuilder». Если «Windows Audio» или «AudioEndpointBuilder» не хочет включаться, проверьте, функционирует ли «AudioEndpointBuilder» — средство построения конечных точек Windows Audio. Если нет, включите ее по этой же инструкции.
Проверка работоспособности драйвера аудиокарты, его переустановка и обновление средствами Windows 11
Первым делом нужно проверить состояние звуковой карты в «Диспетчере устройств». Сначала откройте приложение «Выполнить» и введите в него без кавычек команду «devmgmt.msc».
В верхней (обычно) части списка устройств должен присутствовать раздел «Аудиовходы и аудиовыходы». Раскройте его:
В этом разделе должно присутствовать аудиоустройство «Динамики» (может называться иначе). Если на его значке дополнительно изображена стрелка вниз, это означает, что устройство выключено. Кликните по нему правой кнопкой мыши и выберите в контекстном меню пункт «Включить устройство»:
![]()
Если значок «Динамики» отсутствует либо на нем виднеется желтый вопросительный или восклицательный значок, это может означать наличие проблем с драйверов аудиокарты. Например, как в случае с этим «Неизвестным устройством»:
Самым быстрым решением этой проблемы может оказаться банальное удаление устройства с последующей автоматической переустановкой драйвера самой системой (если речь идет о стандартном драйвере, встроенном в систему):
- Кликните правой кнопкой мыши по названию удаляемого устройства в «Диспетчере устройств», выберите пункт «Удалить устройство», затем подтвердите удаление в диалоговом окне:
![]()
- Сразу после — кликните по кнопке с изображением монитора и лупы, чтобы «Обновить конфигурацию оборудования»:
- Список «Диспетчера задач» должен несколько раз моргнуть. О том, что стандартный драйвер был успешно переустановлен, будет сигнализировать появление названия устройства в списке:
![]()
Еще один вариант — обновление драйвера стандартным инструментом Windows:
- Кликните по значку проблемного устройства два раза мышкой для открытия окна его свойств, затем перейдите во вкладку «Драйвер» и нажмите кнопку «Обновить драйвер»:
- Откроется новое окно. Кликните в нем по элементу «Автоматический поиск обновленных драйверов».
- Если драйвер, что называется «слетел» (т.е. он установлен, просто Windows по каким-то причинам не распознает его), то система сама найдет его и повторно установит. В противном случае отобразится сообщение о наличии последней версии драйвера на компьютере. Но здесь стоит иметь в виду, что система может «ошибаться», принимая за работоспособный драйвер аудиокарты какой-нибудь стандартный драйвер:
![]()
- Если же драйвера вообще не обнаружено, то и ошибка будет соответствующей. В любом случае, стоит попробовать другой подход. Кликните в последнем окне по кнопке «Назад» в верхнем левом углу:
- Далее выберите «Найти драйверы на этом компьютере»:
- Затем — «Выбрать драйвер из списка доступных драйверов на этом компьютере» (забегая вперед, скажем, что это окно нам пригодится в случае неудачи установки):
- В следующем окне будет приведен список стандартных типов оборудования — это драйверы, которые интегрированы в систему (идут с ней в комплекте). Здесь нужно будет найти пункт, связанный со звуком или аудио, и таковых может быть несколько. В нашем случае удалось обнаружить «Аудиовходы и аудиовыходы». Выделим этот пункт и кликнем «Далее»:
- В следующем окне будет предложен выбор уже самих драйверов. У нас здесь всего один пункт, но их могло быть больше. Выделяем предложенную системой «Конечную точку Audio» и жмем «Далее». На экране также может отобразиться окно с предупреждением, что Windows не удалось проверить совместимость драйвера с системой — жмем в нем «Да»:
- В случае успеха система сообщит, что драйвер для устройства был установлен (если звука по-прежнему нет, попробуйте перезагрузить компьютер)
![]()
- В случае неудачи можно будет вернуться на несколько шагов назад, чтобы выбрать другой драйвер из числа тех, что доступны в списке стандартных типов оборудования.
Установка драйверов аудиокарты в Windows 11 от Windows 10/8.1/8/7/Vista
Первым делом стоит попробовать скачать драйвер аудиокарты с сайта производителя устройства, материнской платы или ноутбука. Вполне вероятно, что там не окажется программного обеспечения именно для Windows 11. Однако для Windows 10, скорее всего, окажется — их и нужно попробовать скачать и установить. Если нет и для 10-ки — используем софт для 8-ки. Установку драйвера от предыдущих версий ОС следует осуществлять в крайних случаях, если ничего другое не помогает. И, конечно, стоит предварительно создать точку восстановления. Как это сделать в Windows 11 — читайте здесь.
Однако в момент установки драйвера от прошлых версий Windows может возникнуть закономерная проблема и не одна. Например, программа-установщик сразу же завершит свою работу, сославшись на несовместимость с установленной на компьютере операционной системой Windows. Но об этом чуть позже. Пока же, нам нужно выяснить, от какой именно аудиокарты искать драйвер. В этом нам поможет «Диспетчер устройств»:
- Найдите в списке «Диспетчера устройств» звуковую карту по инструкции выше и кликните по ней два раза мышкой.
- В открывшемся окне перейдите во вкладку «Сведения», затем выберите в списке «Свойство» пункт «ИД оборудования», выделите и скопируйте строчку с буквами «VEN» и «DEV».
- Возможно также, что вместо«VEN» и «DEV» будет указано что-то вроде этого:
- Что там ни было указано, скопируйте, а затем вставьте текст в поисковую строку любой поисковой системы, чтобы определить название аудиокарты или даже найти сайт, откуда можно будет скачать драйвер.
Пробуем установить скачанный драйвер. Если установщик выдает ошибку о несовместимости с операционной системой, выполните следующие действия:
- Если скачанный драйвер сжат в архив, распакуйте его в любом месте на диске. Если же это исполнимый EXE-файл, то нужно будет найти на диске папку, куда тот распаковал файлы драйвера. Например, при установке драйвера Realtek на третьем шаге указывается путь распаковки драйвера:
![]()
- А в самом конце распаковки предлагается сразу приступить к установке драйвера:
- В данном случае нужно просто снять галочку и нажать «Finish» для закрытия этого окна.
Теперь, когда у нас имеется распакованный драйвер на диске, вновь открываем «Диспетчер устройств» и окно свойств аудиокарты. Переходим в нем во вкладку «Драйвер» и кликаем по кнопке «Обновить драйвер». Но на этот раз вместо опции «Автоматический поиск драйверов» выбираем «Найти драйверы на этом компьютере» (ранее мы говорили, что сюда, возможно, придется вернуться):
Далее нужно будет указать папку, в которую был распакован драйвер. В нашем случае — это «C:\DRIVERS». Останется нажать кнопку «Далее» и дождаться результата — драйвер либо будет установлен, либо нет. И неудача необязательно связана с тем, что был скачан неподходящий для звуковой карты софт. Возможно, что Windows не смогла найти подходящие файлы в указанной папке. Просто вернитесь к предыдущему шагу, чтобы указать другую папку.
Принудительная установка драйвера звуковой карты в Windows 11
В самом начале статьи мы упоминали про «принудительное скармливание» системе файлов драйверов. Этим мы сейчас и займемся. Как и в предыдущем случае, сначала создаем точку восстановления Windows 11. Дальнейшие действия:
- Скачиваем драйвер для аудиокарты и распаковываем его в любое место на компьютере (процесс описан выше).
- Далее нам нужно будет найти в папке, куда распакован драйвер, файлы с расширением «.inf». Если в системе отключено отображение расширений, откройте в верхней части окна «Проводник» вкладку «Вид», кликните по кнопке «Параметры» справа, затем в новом окне откройте еще одну вкладку «Вид», в списке «Дополнительные параметры» снимите галочку с пункта «Скрывать расширения для зарегистрированных типов файлов» и нажмите «ОК»:
- Теперь легче будет найти файлы с расширением «.inf». Все, что требуется — кликнуть по такому файлу правой кнопкой мыши и выбрать в контекстном меню пункт «Установить»:
- В случае успешной установки никаких окон в процессе установки файлов «.inf» открываться не должно. И только при ошибке установки на экране будет отображаться ошибка о том, что «Выбранный INF-файл не поддерживает этого метода установки». Если возникла подобная ошибка, просто переходите к следующему INF-файлу в папке с драйвером.
Пока на этом все. Рекомендуем время от времени проверять наличие драйвера на сайте производителя аудиокарты, материнской платы или мобильного компьютера. Также можете попробовать установить его, используя менеджер драйверов DriverHub.
No sound after updating Windows! Don’t be upset; follow the best fixes listed below & troubleshoot Realtek HD audio manager problems.
For Windows users, encountering audio issues is not new. After each Windows update, some or the other user faces audio-related issues. This leaves users with no sound; if you can relate to it and are looking for ways to fix the Realtek audio driver problem, you are right.
Quick Tip- When manually downloading the latest Realtek audio driver from the official website, ensure your operating system’s correct name and version is selected.
Realtek high-definition audio comes preinstalled on Windows 11 and 10, but this doesn’t mean Realtek audio is not working issue cannot be encountered. If you are facing the issue, here are the best ways to fix sound and not working issues.
Common Realtek Audio Issues
- Missing Audio Manager Icon
- Conflicts with preinstalled Microsoft Drivers
- Windows 11, 10, no audio devices are installed
- The audio service is not responding
- No sound
Besides, there are other sound problems that Windows users face. This troubleshooting guide will cover all this and the best ways to fix these issues.
Download and Install Advanced Driver Updater.

Why is there a Realtek High Definition Audio on My PC?
The Realtek HD Definition Audio is the popular sound driver for Windows. It helps choose the audio configuration for the speaker system, and the software also allows adjusting the volume for individual speakers.
However, due to certain reasons, you may face issues with Realtek High Definition Audio.
6 Common Reasons That Cause Realtek Audio Problems
1. Outdated Realtek audio driver.
2. There is a conflict between installed Microsoft and Realtek audio drivers.
3. Audio service is either not running or responding.
4. Misconfigured audio settings.
5. Incorrect output device for audio is selected.
6. Disable audio service.
How to Fix Realtek Audio Issues in Windows 11, 10
Whether you face audio problem issues after installing the latest Windows update or uninstalling a driver, try these 8 ways to troubleshoot the issue.
Basic Troubleshooting
You should always check the device and cable connections before updating the drivers and trying other technical fixes.
- Check the output audio device whether working or not.
- Ensure the output device is receiving power.
- Correct output should be selected on Windows 11 and 10.
- Use the volume controls to ensure the sound is not muted.
- Disconnect and reconnect the output device, and also use the alternate port to ensure the connection is proper.
After following these steps, try the following methods if the audio is still not there.
1. Update Realtek High-Definition Audio on Windows 11 and 10
Common sound problems on Windows are outdated, corrupt, or missing drivers. To fix this issue, downloading and installing the latest driver is recommended. This can be done either manually or automatically.
To download and update the latest driver manually, visit the sound card manufacturer and look for the right driver download. Before this, you must collect information about the operating system’s version, your motherboard’s model, or the sound card. Once you have, only then can you download the correct driver.
Suppose this sounds like too much work, or you don’t have the technical expertise to collect all this information. In that case, you can try Advanced Driver Updater, a third-party driver updating utility.
This tool lets you download and install compatible drivers without collecting system or device information. Not only this, but Advanced Driver Updaters also keep a backup of old drivers for security reasons. It is easier to use as you have to click Start Scan Now, wait for the scanning to finish, and update the driver.
Also Read: Advanced Driver Updater Review
Here are the detailed steps on how to use Advanced Driver Updater
1. Download and install Advanced Driver Updater
2. Run the professional tool and click Start Scan Now to perform the scanning for outdated Realtek sound drivers.

3. Wait for the scanning to finish.

4. After that, click the Update driver option and update the driver.

Note : If you are using a trial version of the product, you will have to update each driver by clicking the Update driver option. However, if you want to update all drivers in a go, you need to upgrade to the Pro version as it offers an Update All feature. Not only this, but the excellent driver updating utility also comes with a money-back guarantee.
Read more at the official website
5. After updating the driver, restart the system to apply changes.
Now try to play a video or song; the Realtek sound not working issues should not be fixed.
See This- How To Update And Download Realtek 802.11 N WLAN Adapter Driver- Windows 11, 10
Method 2. Disable Audio Enhancement
Changes made to Audio Enhancements might conflict with sound on Windows 11 and 10. Therefore, it is recommended to disable audio enhancement. To do so, follow the steps below:
1. Right-click the Volume icon present in System Tray.
2. Select Open Sound settings > Device properties > Additional device properties.
3. This will open a new window; click the Enhancements tab and uncheck the box next to Disable all enhancements > Apply > Ok

This should troubleshoot Realtek audio problems on your PC.
3. Enable/ Restart Windows Audio Service
Ensure Windows Audio service is enabled to fix high-definition audio devices not working. To do so, follow the steps below:
1. Press Windows + R to open the Run window
2. Type services.msc > Ok
3. Look for Windows Audio service > right-click > Properties

4. Click the down arrow next to Startup type and select Automatic > Start > Apply > Ok
Note: If the service is already running and set to Automatic, you need to restart it. To do so, look for Windows Audio service > right-click > Restart.

Now try to play the sound; this should fix Realtek audio speakers’ not working issues.
Also, Read- How To Update Realtek Bluetooth Driver – Windows 11,10
Method 4. Disable Microsoft UAA Bus Driver
Usually, when two high-definition audio drivers run on the system, a conflict occurs. Therefore, to fix the issues with Realtek audio speakers not working, we must disable Microsoft UAA Bus Driver. To do so, follow the steps below:
1. In the Windows search bar, type Device Manager
2. Look for System Devices > double click to expand it
3. Select Microsoft UAA Bus Driver for High Definition Audio.
Note: If it is not on the list, it is already disabled. This means you can skip this step and move to the next one.
4. If you see it > right-click > Disable device.

5. Restart the system to apply changes; now, try to play the sound. Realtek audio driver issues should be fixed.
Method 5. Use a Generic high-definition Audio Device Driver
You can fix Realtek audio driver issues by switching to a generic driver. To learn how to do that, follow the steps below:
1. In the Windows search bar, type Device Manager
2. Search for Audio inputs and outputs
3. Double-click to expand all the audio drivers
4. Right-click the Realtek audio device > select Update driver from the list

5. Next, select Browse my computer for driver software

6. After that, choose Let me pick from a list of available drivers on my computer

7. Select High Definition Audio driver from the list > Next > follow on-screen instructions.
This will load the default sound driver, and the problem with the Realtek audio driver will be solved.
Check This- How to Download Realtek Ethernet Controller Driver
Method 6. Change Default Sound Format
By altering the default sound format, you can fix high-definition audio devices not working. To do so, follow the steps below:
1. Right-click the sound icon present in the system tray.

2. Select Open Sound settings
3. In the new window that opens, click Device Properties.

4. Click the Additional device properties option

5. This will open a new pop-up window here; click the Advanced tab
6. Next, click the down arrow and select the following depending on the speaker configuration:
24bit/44100 Hz
24bit/192000Hz

7. Click Apply > Ok to save changes.
This should fix Realtek audio speakers not working problems. If this doesn’t work, let’s move to the next step.
Method 7. Reinstall Sound Driver
1. Type Device Manager in the Windows search bar
2. Look for audio inputs and outputs. Double-click to expand it.
3. Right-click the sound driver > select Uninstall device from the context menu

4. Once done, click the computer icon with lens (Scan for hardware changes)

5. Now, restart the system. Windows will automatically install the default driver.
This should fix the issue, and the speaker Realtek audio not working problem should be resolved.
Method 8. Select the Correct Output Device
When an incorrect output device is selected, you might face Realtek audio driver problems. We need to switch to the correct output device to fix it. To do so, follow the steps below:
1. Right-click the volume icon present in System Tray.

2. Select Open Sound settings from the context menu.
3. Set Speakers or Headphones as the output device

Now, check your system, the Realtek audio speakers are not working, and the problem should be resolved. If you still face the issue, try updating Windows. If you are using an older version, there are chances that you are facing the issue due to some bug. Updating Windows will help resolve it. Press Windows + I to open Windows Settings > Click Windows Update > Check for updates > Download & Install and restart the PC.
See Also-How to Fix Microsoft Teredo Tunneling Adapter Missing
Frequently Asked Questions
Q1. How do I fix Realtek’s no sound?
To fix Realtek’s no sound issue, set the speakers as default. To do so, follow these steps:
1. Press Windows + R and open the Run window.
2. Type mmsys.cpl > press enter.
3. Click the Playback tab > right-click Speakers > Set as Default Device > Apply > Ok.

4. Exit the Sound Settings window and reboot the PC.
Now check you should not face an audio issue.
If this doesn’t help, automatically update the Realtek Audio driver using Advanced Driver Updater.
Q2. How do I repair and fix Realtek audio driver Windows 10?
To repair and fix Realtek Audio Driver try the following fixes:
1. Check cables, volume, speaker, and headphone connections
2. Update Realtek High-Definition Audio.
3. Disable Audio Enhancement.
4. Enable/Restart Windows Audio Service.
5. Disable Microsoft UAA Bus Driver.
6. Use a Generic High-Definition Audio Device Driver.
7. Change Default Sound Format.
8. Reinstall Sound Driver.
9. Select Correct Output Device.
10. Run the Audio Troubleshooter.
Q3. How do I get my sound back on Windows 10?
Use a generic driver to get the sound back and fix Realtek audio driver issues.
1. Right-click the Windows Start icon,> select Device Manager
2. Go to Audio inputs and outputs> double-click on it.
3. Right-click the Realtek audio device > select Update driver from the list
5. Choose the second option, “Browse my computer for driver software.”
6. Select, “Let me pick from a list of available drivers on my computer.”
7. Select High Definition Audio driver from the list > and follow on-screen instructions.
Q4. Why is there no sound on my Windows 10?
There are chances that the audio device is muted, has been disabled, or the driver is outdated. To fix the problem, unmute the audio device, enable it and update the driver through Device Manager or Advanced Driver Updater.
Q5. How do I fix a corrupted Realtek driver?
The easiest way to fix a corrupted Realtek driver is to reinstall and update the driver. You can do it manually through Device Manager or use Advanced Driver Updater, a driver updating tool, to update corrupt and problematic drivers.
Q6. How do I fix my Realtek audio?
To fix issues with Realtek audio, you can try the following techniques:
1. Update Realtek driver
2. Disable Audio-Enhancement
3. Restart Windows Audio Service
4. Disable Microsoft UAA Bus Driver
5. Modify Default Sound Format
Fix – Realtek Audio Driver Problems
You can quickly troubleshoot Realtek audio problems on your system using these fixes. Alongside these fixes, we suggest checking whether the speakers are correctly connected. Also, ensure that the speaker is not muted. This will help resolve Realtek speakers not working.
We hope using these steps, you can fix the problem with sound. To keep drivers updated and avoid facing such issues in the future, use Advanced Driver Updater, the best driver updater to update outdated drivers in a go. We’d love to hear from you; please share your feedback in the comments section. If you have any product-related queries, contact the support team.
Recommended :
12 Best (Free & Paid) Driver Updater Software To Fix Driver Issues on Windows
How to Download & Update Realtek PCIe GbE Family Controller Driver
How To Download & Update Realtek Audio Driver on Windows 11/10