Читайте, как настроить Wi-Fi роутер на примере TP-Link AC750 Archer C20. Расскажу, как осуществить базовые настройки роутера для доступа к Интернет, а также создать и настроить Wi-Fi сеть. Рассмотрим настройку роутера с помощью компьютера, но таким же образом это можно сделать и со смартфона или планшета.

Это двухдиапазонный Wi-Fi роутер, но его настройки более или менее стандартны и по
данной инструкции вы сможете настроить практически любой роутер.
Содержание
- Как подключить роутер?
- Как зайти в настройки роутера?
- Как настроить Интернет соединение роутера?
- Привязка Интернет соединения к MAC-адресу устройства
- Настройка Wi-Fi сети
- Как изменить логин и пароль панели настроек роутера
- Меню «Быстрая настройка»
- Функция роутера DHCP
- Вопросы и ответы
- Комментарии
Перейти к просмотру
Базовая настройка WiFi роутера TP Link AC 750 Archer C20 в 2019: Интернет, WiFi, DHCP, пароль
Как подключить роутер?
Итак, вам только-что провели Интернет или возникла необходимость замены старого роутера, и вы приобрели новый.
Прежде чем перейти к настройкам – подключите его. Все как обычно:
-
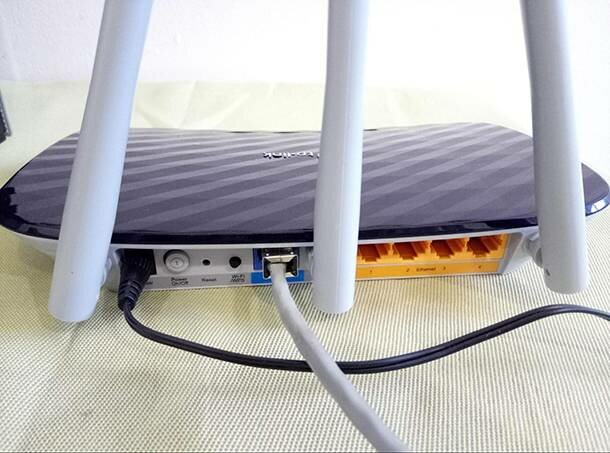
Подключите Wi-Fi роутер к электросети и включите его. В результате, должный загореться индикаторы на передней панели.
-
После этого, в Internet порт синего цвета подключите кабель, который приходит от провайдера или от ADSL модема. В зависимости от того, каким способом предоставляет Интернет ваш провайдер.
-
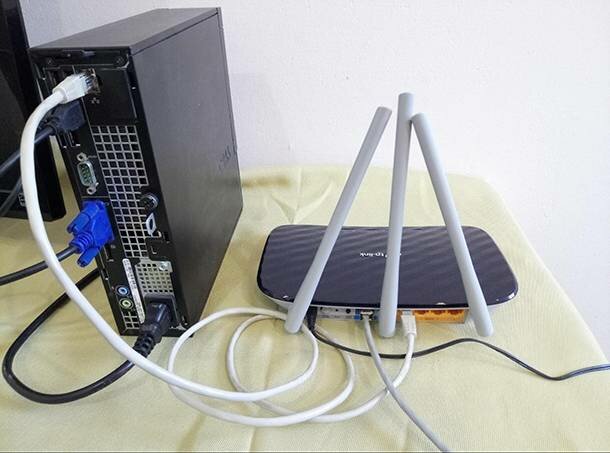
Если вы планируете настраивать роутер по сетевому кабелю, подключив его к компьютеру или ноутбуку, то возьмите сетевой кабель, который идет в комплекте с роутером, и соедините им компьютер с роутером. Для этого, воткните его в один из Ethernet разъёмов желтого цвета роутера и в сетевой вход компьютера.
Если есть возможность, то рекомендуется настраивать именно по кабелю. Так надежнее.
-
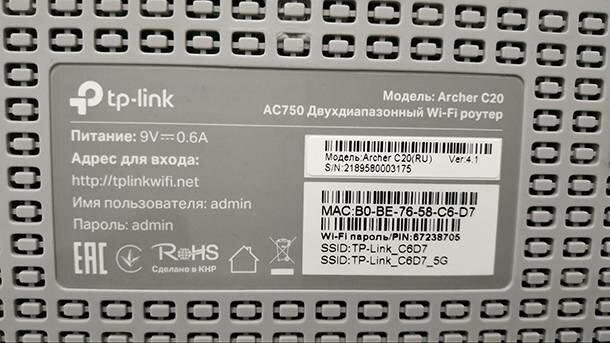
Также, к роутеру можно подключится и по Wi-Fi. После включения, ваши устройства должны обнаружить Wi-Fi сеть с заводским названием. Для подключения к этой сети нужно использовать пароль (PIN), который указан на наклейке снизу роутера. Там же указаны и установленные производителем по умолчанию названия Wi-Fi сетей. Если наклейки по каким-то причинам нет, то эти данные обязательно будут указаны в инструкции к роутеру.
Как зайти в настройки роутера?
Чтобы зайти в настройки роутера TP-LINK, подключитесь к роутеру сетевым кабелем или по Wi-Fi, после чего откройте любой браузер и перейти по адресу tplinkwifi.net (иногда, это tplinklogin.net).
Адрес для входа в панель настроек и другие заводские параметры, указаны на наклейке с обратной стороны роутера. Как правило, на всех роутерах в настройки также можно попасть по IP-адресу: 192.168.1.1 или 192.168.0.1.
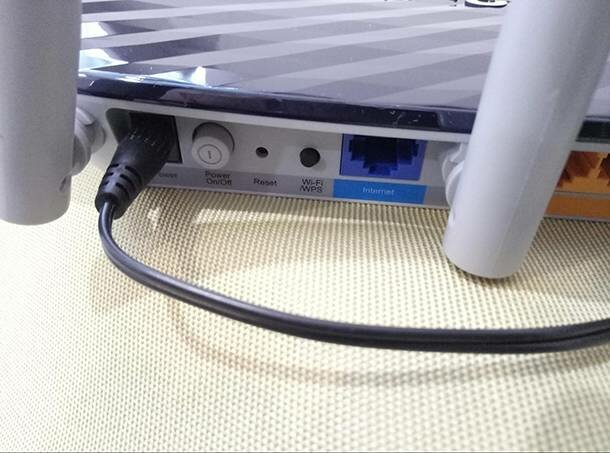
Если, вводя адрес страницы настроек роутера вы не попадаете на неё, то сбросьте его настройки к заводским. Для этого нажмите кнопку на роутере с названием «Reset» и удерживайте её около 5-10 секунд. Роутер начнёт перезагружаться, о чём вы поймёте по мигающим диодам-индикаторам. После перезагрузки пробуйте перейти к роутеру описанным способом снова.
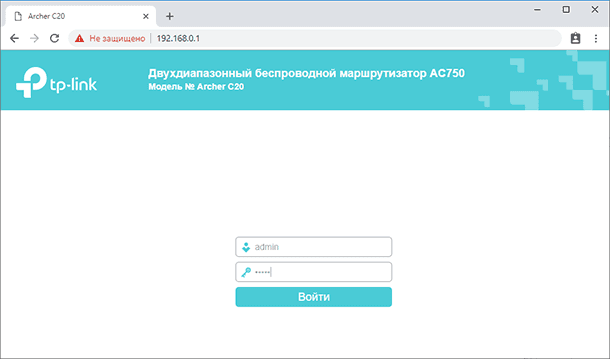
В результате появится страница авторизации, где нужно указать имя пользователя и пароль. По умолчанию, это «admin» и «admin».
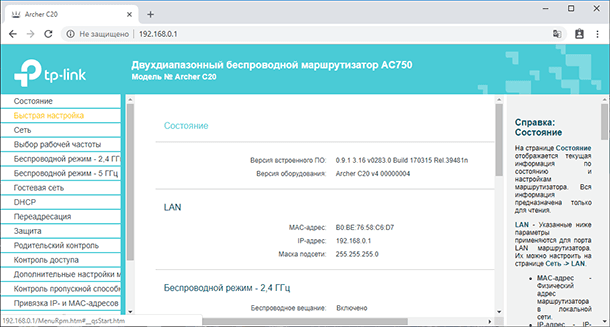
После этого должна открыться страница с настройками роутера. Здесь мы и зададим все необходимые параметры.
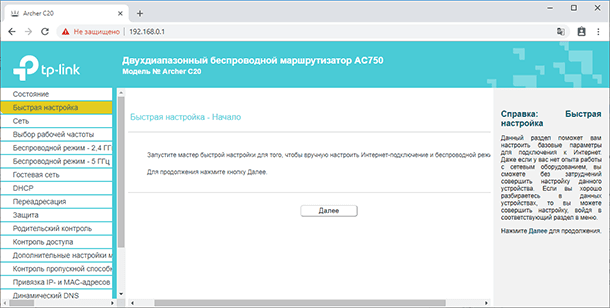
Обратите внимание на присутствие пункта «Быстрая настройка». Но не путайте его с автоматической настройкой, и я предлагаю вернуться к нему позже.
Как настроить Интернет соединение роутера?
Итак, в настройках перейдите на вкладку “Сеть” – “WAN”.
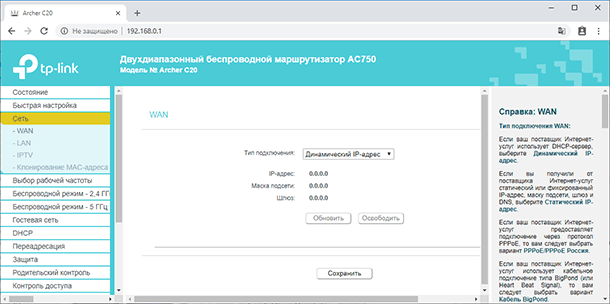
Выберите тип подключения: в нашем случае – это «Динамический IP». Если у вас такой же способ подключения, то выбирать ничего не нужно, он будет установлен по умолчанию. В результате, Интернет через роутер уже должен быть.
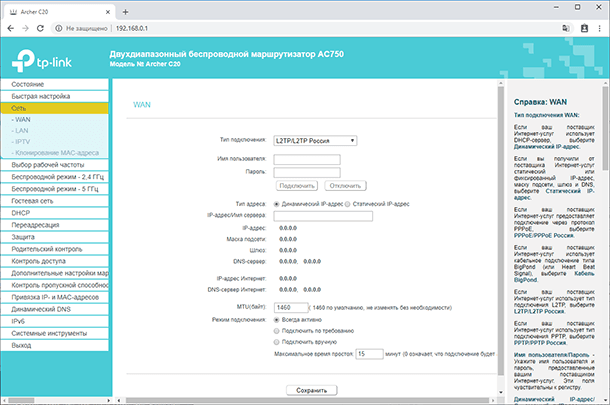
А если у вас PPPoE или L2TP подключение, то выберите соответствующий тип подключения в меню и задайте необходимые параметры, которые вам должен предоставить провайдер. Свяжитесь и уточните у него всю информацию по настройке:
- Имя пользователя;
- Пароль;
- IP-адрес или Имя сервера, и т.д.
На некоторых роутерах есть еще кнопка “Определить” напротив типа подключения, нажав на которую роутер попробует сам определить тип вашего подключения к Интернет. Нажмите её, если тип подключения вам неизвестен.
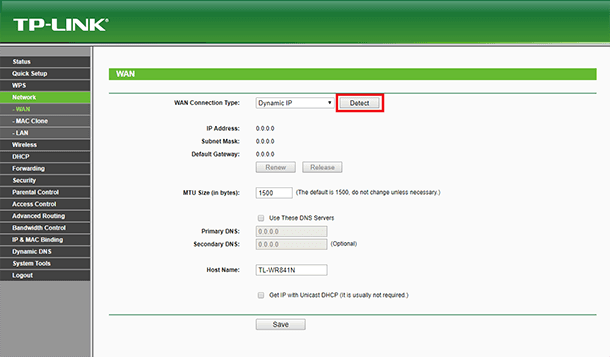
Не забудьте после изменения настроек нажать кнопку «Сохранить» (или «Save»).
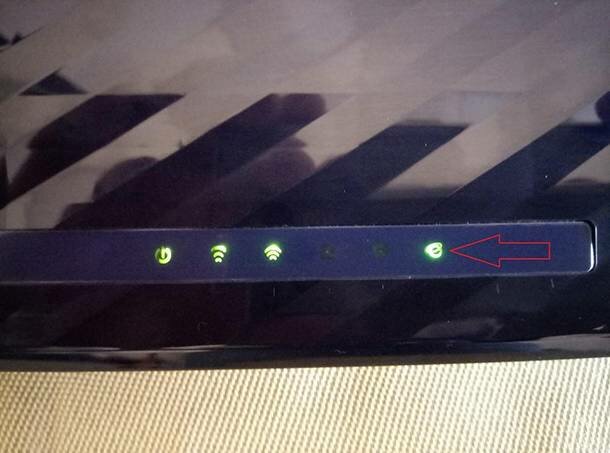
Чтобы Интернет заработал через наш TP-LINK Archer C20, индикатор “Internet” в виде кружочка с кольцом, должен гореть зелёным цветом. В других роутерах индикатор может быть другим, но он в любом случае будет присутствовать.
Привязка Интернет соединения к MAC-адресу устройства
Но имейте ввиду, если у вас “Динамический IP”, то провайдер может делать привязку предоставляемого Интернет соединения к MAC-адресу устройства или роутера. Если роутер не подключается к Интернет, то уточните этот вопрос у провайдера, возможно потребуется ему сообщить ваш MAC-адрес.
Это связано с тем, что некоторые Интернет-провайдеры делают привязку по MAC-адресу клиента. В таком случае предоставляемый Интернет привязан к какому-то одному устройству: компьютеру, ноутбуку или роутеру. А если Интернет привязан к MAC-адресу сетевой карты компьютера, то после подключения кабеля к сетевой карте ноутбука, или к роутеру, Интернет работать не будет. Потому что MAC-адрес у роутера и ноутбука будет другим, то есть не совпадать с зарегистрированным у провайдера MAC-адресом.
Если провайдер делает привязку по MAC-адресу, то есть два варианта:
- Задать роутеру MAC-адрес, к которому привязан Интернет у провайдера.
- Или сообщить провайдеру MAC-адрес вашего роутера, чтобы Интернет привязали к нему.
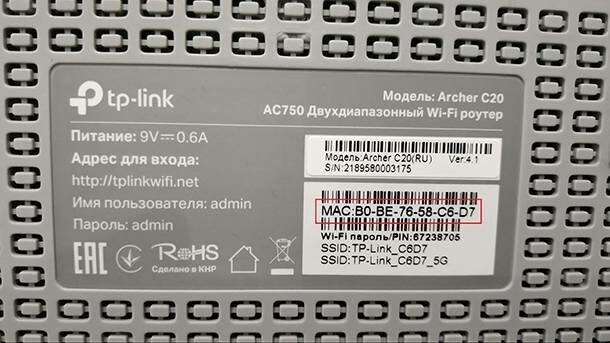
Заводской MAC-адрес роутера всегда указан на наклейке, в нижней его части.
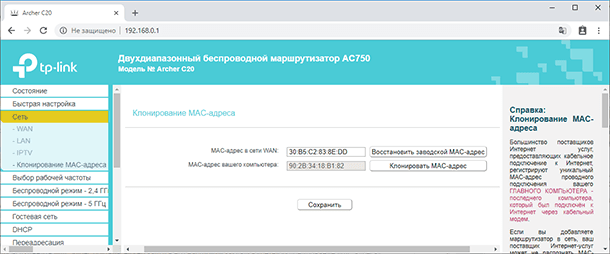
Чтобы изменить MAC-адрес роутера, зайдите в его настройки – закладка «Сеть» / «Клонирование MAC-адреса».
Здесь также есть два варианта:
- можно вручную прописать новый MAC-адрес в поле «MAC-адрес в сети WAN»,
- или же клонировать его с компьютера, который подключен к роутеру по кабелю (с которого вы настраиваете подключение).
Если вы хотите клонировать MAC-адрес с компьютера, то по сетевому кабелю подключите к роутеру тот компьютер, к которому был привязан Интернет. И с него выполняйте настройку. Это важно.
Не забудьте сохранить настройки и перезагрузить роутер после изменения настроек MAC-адреса.
В результате, Интернет соединение с компьютером уже должно быть установлено. Чтобы понять, что Интернет подключен посмотрите на соответствующий значок индикации на роутере – он должен светится зелёным или синим, а не желтым или красным.
Или проверьте значок сетевого соединения на Панели задач вашего ПК – на нём не должно быть желтого восклицательного знака или красного крестика.

Настройка Wi-Fi сети
Если вы всё сделали правильно и Интернет уже работает, то можно переходить к настройке Wi-Fi сети.
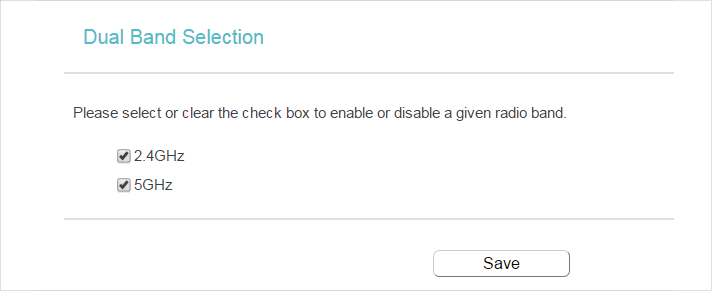
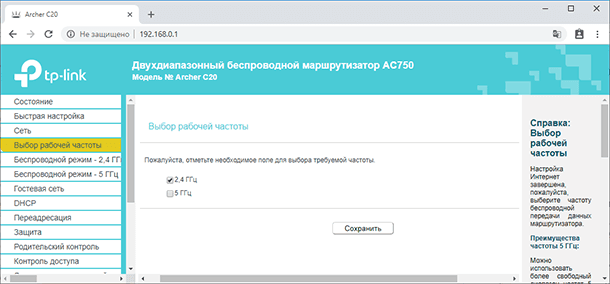
Так как настраиваемый TP-Link Archer C20 – это двухдиапазонный роутер, то он транслирует две Wi-Fi сети. Одну на частоте 2.4 ГГц, а вторую на 5 ГГц. Если вам не нужна какая-то сеть, то перейдите на вкладку “Выбор рабочей частоты”, и отключите сеть на той частоте, которая вам не нужна. Достаточно просто убрать галочку напротив неё, и сохранить настройки. Но можете оставить и обе сети. Например, старые устройства подключать к 2.4 ГГц, а новые, которые поддерживают, к Wi-Fi 5 ГГц.
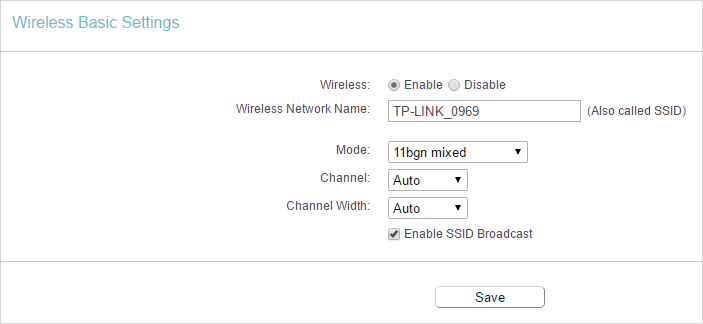
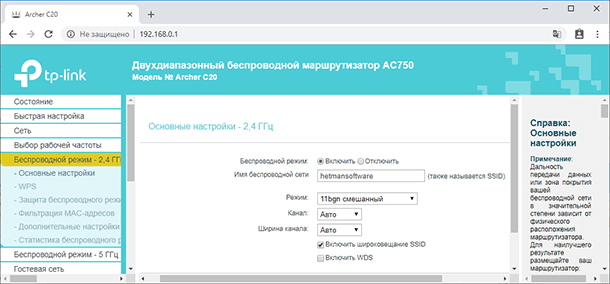
Дальше перейдите на вкладку беспроводного режима Wi-Fi сети, который необходимо настроить и задайте Имя беспроводной сети в меню «Основные настройки». Не забудьте сохранить настройки.
Не забудьте установить пароль на вашу Wi-Fi сеть. Для этого перейдите на вкладку “Защита беспроводного режима”.
Здесь вы можете выбрать одну из следующих опций защиты:
- «Отключить защиту». Если она отключена, беспроводные станции могут подключаться к маршрутизатору без шифрования и пароля. Настоятельно рекомендуется выбрать один из представленных ниже вариантов защиты беспроводной сети.
- «WPA/WPA2 – Personal». Защита на основе WPA с использованием общего ключа.
- «WPA/WPA2 – Enterprise». Защита на основе WPA через Radius-сервер.
- «WEP». Защита 802.11 WEP.
Выберите рекомендуемую опцию защиты «WPA/WPA2 – Personal» и в поле “Пароль беспроводной сети” задайте пароль, который будет использоваться для подключения к вашему Wi-Fi. Сохраните настройки, и перезагрузите роутер.
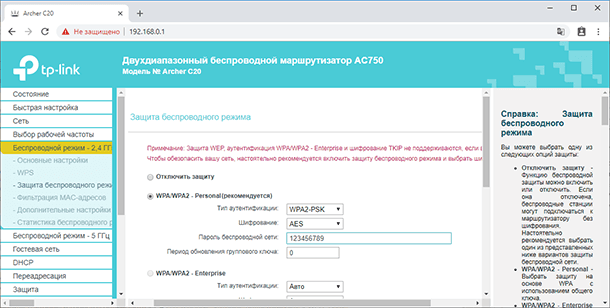
Важно! Если вы оставили трансляцию сетей на частоте 2.4 ГГц и 5 ГГц, то задайте настройки для обоих сетей, и установите для подключения к ним пароль. Настройки у них одинаковы.
Если вы до изменения названия Wi-Fi сети и пароля к ней уже подключали к беспроводной сети какие-то устройства, то после смены пароля и перезагрузки роутера, нужно будет подключить их заново, уже указав новый пароль – перелогиниться. В результате изменения каких-либо настроек Wi-Fi, все подключаемые раннее к данной сети устройства, отключаться.

Как изменить логин и пароль панели настроек роутера
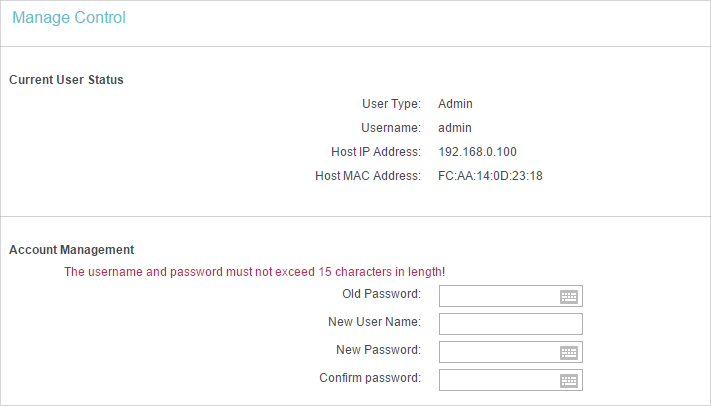
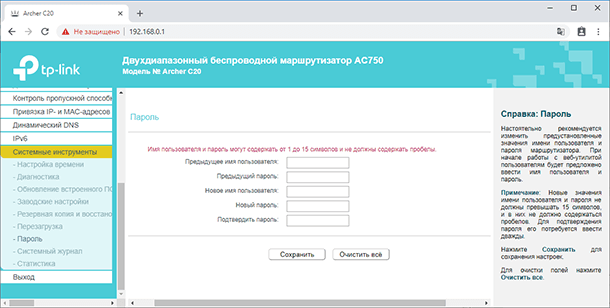
Это почти все базовые настройки роутера. Но, также настоятельно рекомендуется сменить заводской логин и пароль «admin», которые используется для входа в меню настроек роутера.
Сделать это можно меню “Системные инструменты” – “Пароль”. Укажите старый пароль и имя пользователя, и внесите новые данные. Сохраните настройки.
Запомните новые логин и пароль. Если забудете, то не сможете зайти в настройки вашего роутера, и придется делать их сброс к состоянию по умолчанию, после чего настраивать всё заново.
Меню «Быстрая настройка»
Теперь, когда мы разобрались во всех необходимых для работы, базовых настройках роутера, я хочу вернуться к меню «Быстрая настройка». В данном меню собраны все базовые настройки роутера, которые мы уже осуществили, переходя по соответствующим пунктам меню. Но только в одном месте.
Чтобы осуществить быструю настройку:
-
Перейдите в соответствующий раздел и нажмите «Далее».
-
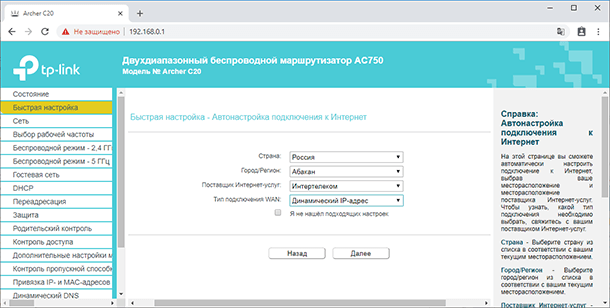
Укажите вашу страну, городи и поставщика Интернет услуг.
Здесь производитель попытался собрать основных поставщиков услуг и используемые им типы подключения.
-
Если вам повезло и ваш провайдер есть в списке – выберите его.
-
Если нет – поставьте галочку напротив «Я не нашел подходящих настроек».
-
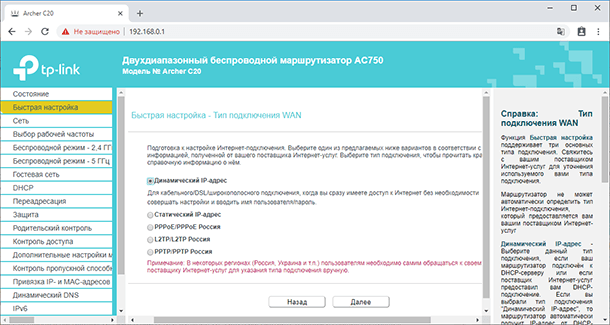
А далее собраны фактически те же настройки, которые мы только-что осуществили. Выберите используемый вашим провайдером тип подключения.
-
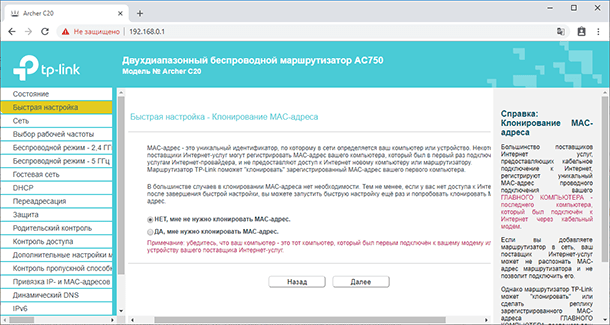
Укажите необходимость клонирования МАС-адреса (для чего и как это делается, я уже объяснил).
-
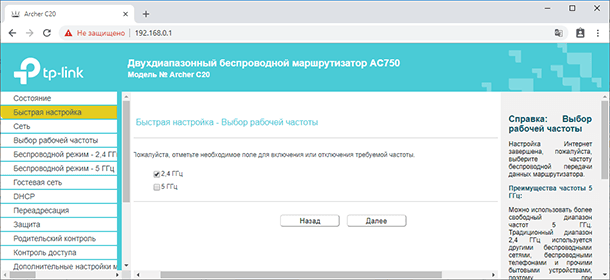
Укажите используемые частоты Wi-Fi подключения.
-
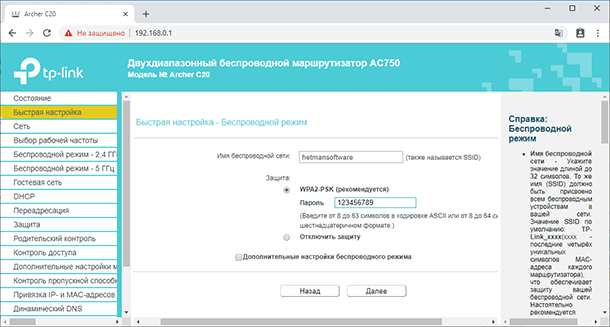
Задайте имя и пароль Wi-Fi сети.
-
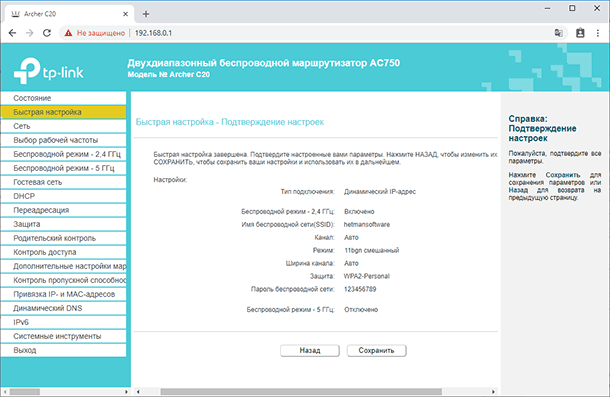
Подтвердите настроенные параметры. Нажмите «Назад», чтобы изменить их, или «Сохранить», чтобы сохранить настройки и использовать их в дальнейшем.
Это выглядит очень просто, так как мы разобрались в каждом пункте по-отдельности. Но поверьте, если бы вы это делали впервые, вам бы так не показалось.
Более детально о настройках Wi-Fi, гостевой сети и функции WPS роутера, смотрите в одном из наших роликов: https://www.youtube.com/user/hetmansoftware/videos
Функция роутера DHCP
В этом видео я также хочу описать ещё одну функцию роутера, которая не совсем базовая – это DHCP. Хотя она по умолчанию включена и работает – я постараюсь объяснить принцип её работы и доступные настройки.
Маршрутизатор действует как DHCP-сервер (DHCP – протокол динамической конфигурации сетевого узла), который обеспечивает конфигурацию TCP/IP для всех подключённых к нему компьютеров локальной сети.
Как правило, по умолчанию данная опция на сетевом устройстве включена, но в силу разных причин у некоторых пользователей она находится не в активном состоянии. Чтобы включить или настроить её перейдите в настройках роутера в меню «DHCP» / «Настройки DHCP».
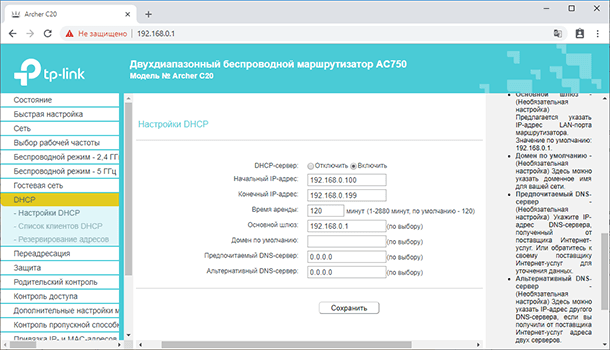
На этой странице вы можете включить DHCP-сервер и задать начальный и конечный IP-адрес в одноименных полях для локальной сети.
Начальный IP- нужно задавать с учетом сетевого узла маршрутизатора, и присваивать следующий за ним. Например, если основной шлюз установлен как 192.168.0.1, то начальный IP-адрес может быть 192.168.0.2; 192.168.0.3 или как в нашем случае 192.168.0.100.
Задавая конечный IP-адрес, вы задаете количество выдаваемых роутером подключаемым устройствам адресов. Так, задав 192.168.0.199 – я позволяю роутеру выдавать адреса 99-ти устройствам. Причём адреса у них будут в промежутке от 192.168.0.100 до 192.168.0.199.
Все остальные настройки не являются обязательными, но если нужно, то можно уменьшить время аренды адреса – это промежуток времени, в течение которого сетевой пользователь сможет подключаться к маршрутизатору, используя текущий DHCP-адрес.
По окончанию срока, устройство которому был выдан IP попросит его продлить. Диалог происходит незаметно для вас и если в сети очень много клиентов, то в этом случае опция актуальна, поскольку не забивает таблицу. Срок действий адреса, имя, MAC- и IP-адрес вы можете посмотреть в списке подключенных к сети клиентов.
С помощью DHCP, роутер присваивает подключенным к его сети устройствам IP-адреса. Каждый раз он будет выдавать их по очереди. В нашем случае первому подключившемуся 192.168.0.100, потом, 101, 102 и так далее.
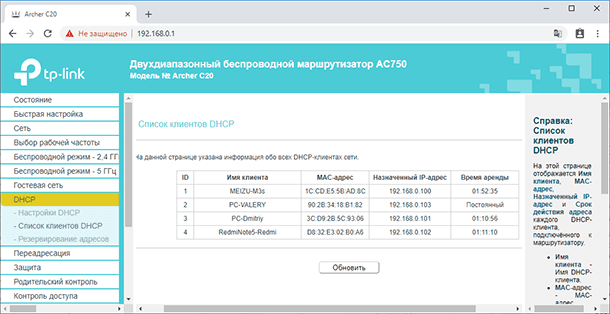
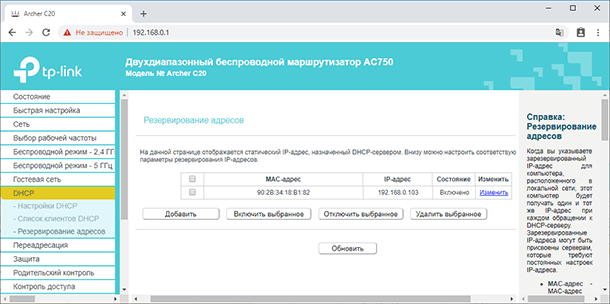
Но есть возможность зарезервировать за клиентом постоянный IP-адрес. Таким образом, при подключении к сети, сетевое устройство будет выдавать подключаемому устройству один и тот же IP. Для этого:
-
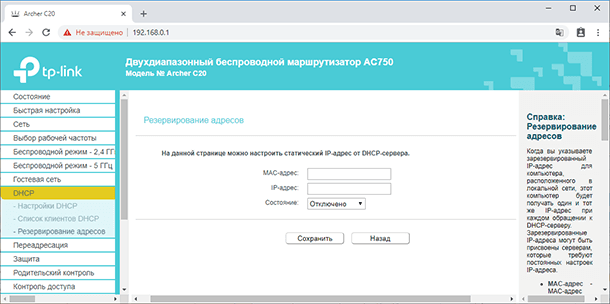
Нужно перейти на вкладку “Резервирование адресов” и нажать кнопку “Добавить”.
-
Пропишите MAC-адрес устройства и задайте свободный IP-адрес из имеющегося диапазона.
- Увидеть их можно в «Списке клиентов DHCP», если настраиваемое устройство подключено к роутеру на данный момент.
- Или в настройках устройства – если оно не подключено.
-
В выпадающем списке «Состояние» поставьте «Включено» и нажмите кнопку «Сохранить».
-
Теперь указанное устройство будет всегда подключаться к сети только по этому IP-адресу.
Тех настроек, которые мы задали, достаточно для того, чтобы пользоваться роутером на базовом уровне.
Ну и если в процессе настройки роутера у вас возникли какие-то вопросы, то можете задавать их в комментариях.
Chapter 4 Configure the Router
This chapter presents how to configure the various features of the router.
It contains the following sections:
•Status
•Quick Setup
•Operation Mode
•Network
•Dual Band Selection
•Wireless(2.4GHz or 5GHz)
•Guest Network
•DHCP
•Forwarding
•Security
•Parental Controls
•Access Control
•Advanced Routing
•Bandwidth Control
•IP & MAC Binding
•Dynamic DNS
•IPv6
•System Tools
•Log Out
1. Status
1.Visit http://tplinkwifi.net, and log in with the username and password you set for the router.
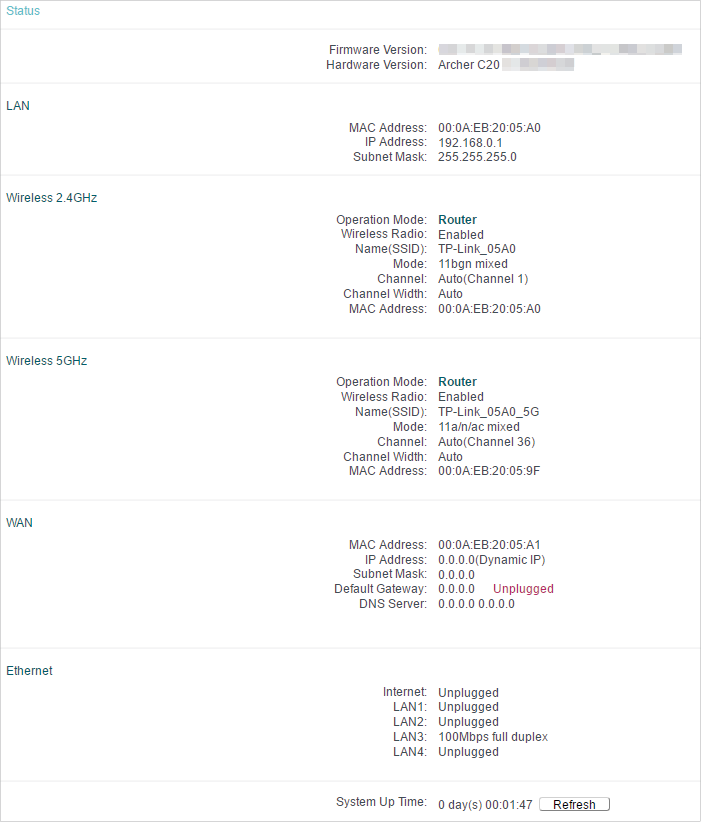
2.Go to Status. You can view the current status information of the router.
•Firmware Version — The version information of the router’s firmware.
•Hardware Version — The version information of the router’s hardware.
•LAN — This field displays the current settings of the LAN, and you can configure them on the Network > LAN page.
•MAC address — The physical address of the router.
•IP address — The LAN IP address of the router.
•Subnet Mask — The subnet mask associated with the LAN IP address.
•Wireless 2.4GHz/5GHz — This field displays the basic information or status of the wireless function, and you can configure them on the Wireless > Basic Settings page.
•Operation Mode — The current wireless working mode in use.
•Wireless Radio — Indicates whether the wireless radio feature of the router is enabled or disabled.
•Name(SSID) — The SSID of the Router.
•Mode — The current wireless mode which the router works on.
•Channel — The current wireless channel in use.
•Channel Width — The current wireless channel width in use.
•MAC Address — The physical address of the router.
•WAN — This field displays the current settings of the WAN, and you can configure them on the Network > WAN page.
•MAC Address — The physical address of the WAN port.
•IP Address — The current WAN (Internet) IP Address. This field will be blank or 0.0.0.0 if the IP Address is assigned dynamically and there is no internet connection.
•Subnet Mask — The subnet mask associated with the WAN IP Address.
•Default Gateway — The Gateway currently used is shown here. When you use Dynamic IP as the internet connection type, click Renew or Release here to obtain new IP parameters dynamically from the ISP or release them.
•DNS Server — The IP addresses of DNS (Domain Name System) server.
•Ethernet — Displays the current status of the Ethernet ports.
•System Up Time — The length of the time since the router was last powered on or reset.
Click Refresh to get the latest status and settings of the router.
2. Quick Setup
1.Visit http://tplinkwifi.net, and log in with the username and password you set for the router.
2.Go to Quick Setup.
3.Click Next to start. Then follow the step-by-step instructions to connect your router to the internet.
3. Operation Mode
The router supports three operation modes: Wireless Router mode, Access Point mode and Range Extender.
3.1. Wireless Router Mode
The default Wireless Router mode is required most commonly. In this mode, the device enables multiple users to share the internet connection via ADSL/Cable Modem.
For hardware connection, refer to Connect Your Router.
3.2. Access Point Mode
In this mode, the device can be connected to a wired network and transform the wired access into wireless one. If you already have a wired router, you can use this mode. Refer to Configure the Router in Access Point Mode session for detailed information.
3.3. Range Extender Mode
In this mode, the device can copy and reinforce the existing wireless signal to extend the coverage of the signal, especially for a large space to eliminate signal-blind corners. Refer to Configure the Router in Range Extender Mode session for detailed information.
4. Network
4.1. WAN
1.Visit http://tplinkwifi.net, and log in with the username and password you set for the router.
2.Go to Network > WAN.
3.Configure the IP parameters of the WAN and click Save.
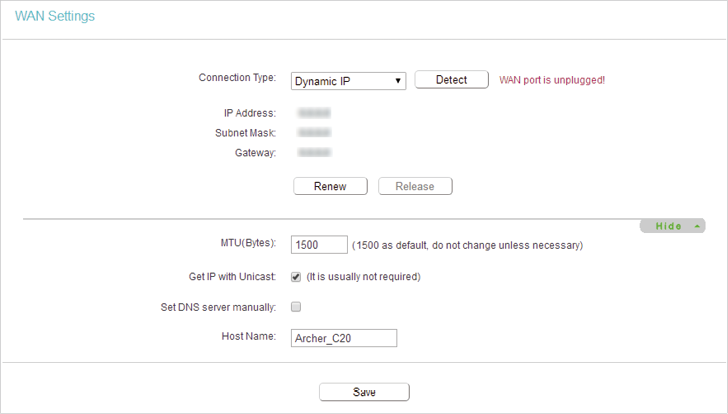
Dynamic IP
If your ISP provides the DHCP service, please select Dynamic IP, and the router will automatically get IP parameters from your ISP.
Click Renew to renew the IP parameters from your ISP.
Click Release to release the IP parameters.
•MTU(Bytes) — The normal MTU (Maximum Transmission Unit) value for most Ethernet networks is 1500 Bytes. It is not recommended that you change the default MTU size unless required by your ISP.
•Get IP with Unicast — A few ISPs’ DHCP servers do not support the broadcast applications. If you cannot get the IP address normally, you can choose this option. (It is rarely required.)
•Set DNS server manually — If your ISP gives you one or two DNS addresses, select Set DNS server manually and enter the primary and secondary addresses into the correct fields. Otherwise, the DNS servers will be assigned automatically from your ISP.
•Host Name -This option specifies the name of the router.
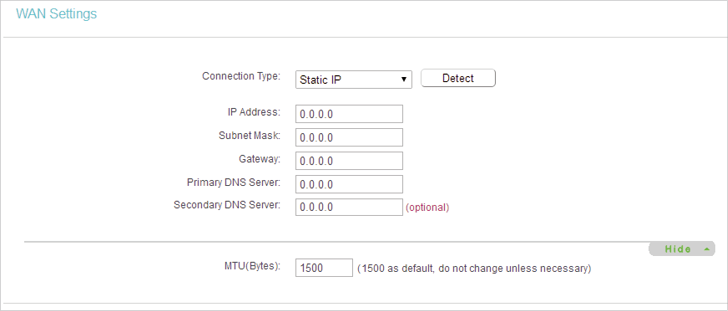
Static IP
If your ISP provides a static or fixed IP address, subnet mask, default gateway and DNS setting, please select Static IP.
•IP Address — Enter the IP address in dotted-decimal notation provided by your ISP.
•Subnet Mask — Enter the subnet mask in dotted-decimal notation provided by your ISP. Normally 255.255.255.0 is used as the subnet mask.
•Gateway — Enter the gateway IP address in dotted-decimal notation provided by your ISP.
•Primary/Secondary DNS Server — Enter one or two DNS addresses in dotted-decimal notation provided by your ISP. For the Secondary DSN Server, it is optional.
•MTU (Bytes) — The normal MTU (Maximum Transmission Unit) value for most Ethernet networks is 1500 Bytes. It is not recommended that you change the default MTU size unless required by your ISP.
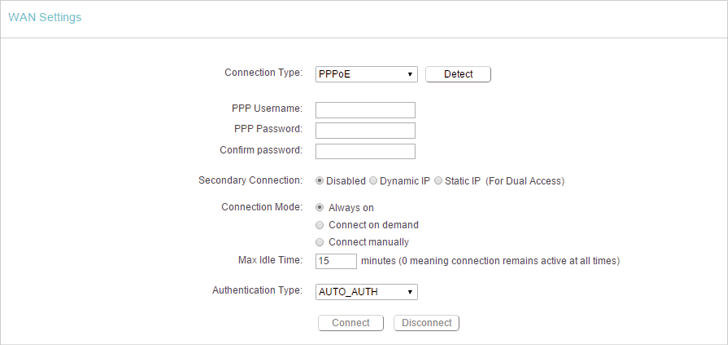
PPPoE
If your ISP provides PPPoE connection, select PPPoE.
•PPP Username/Password — Enter the user name and password provided by your ISP. These fields are case-sensitive.
•Confirm Password — Enter the Password provided by your ISP again to ensure the password you entered is correct.
•Secondary Connection — It’s available only for PPPoE connection. If your ISP provides an extra connection type, select Dynamic IP or Static IP to activate the secondary connection.
•Connection Mode
•Always On — In this mode, the internet connection will be active all the time.
•Connect on Demand — In this mode, the internet connection can be terminated automatically after a specified inactivity period (Max Idle Time) and be re-established when you attempt to access the internet again. If you want to keep your internet connection active all the time, please enter 0 in the Max Idle Time field. Otherwise, enter the number of minutes you want to have elapsed before your internet access disconnects.
•Connect Manually — You can click Connect/Disconnect to connect/disconnect immediately. This mode also supports the Max Idle Time function as Connect on Demand mode. The internet connection can be disconnected automatically after a specified inactivity period (Max Idle Time) and not be able to re-establish when you attempt to access the internet again.
•Authentication Type — Choose an authentication type.
Note:
•Sometimes the connection cannot be terminated although you have specified the Max Idle Time because some applications are visiting the internet continually in the background.
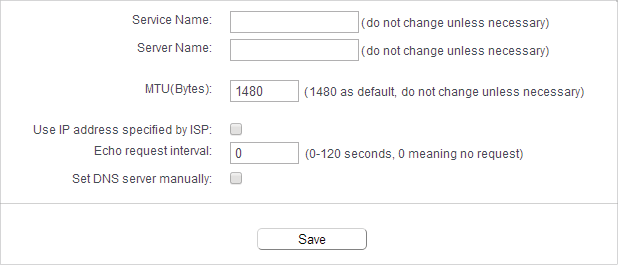
If you want to do some advanced configurations, please click Advanced.
•Service Name/Server Name — The service name and server name should not be configured unless you are sure it is necessary for your ISP. In most cases, leaving these fields blank will work.
•MTU(Bytes) — The default MTU size is 1480 bytes. It is not recommended that you change the default MTU size unless required by your ISP.
•ISP Specified IP Address — If your ISP does not automatically assign IP addresses to the router, please select Use IP address specified by ISP and enter the IP address provided by your ISP in dotted-decimal notation.
•Echo request interval — The router will detect Access Concentrator online at every interval. The default value is 0. You can input the value between 0 and 120. The value 0 means no detect.
•DNS Server/Secondary DNS Server — If your ISP does not automatically assign DNS addresses to the router, please select Set DNS server manually and enter the IP address in dotted-decimal notation of your ISP’s primary DNS server. If a secondary DNS server address is available, enter it as well.
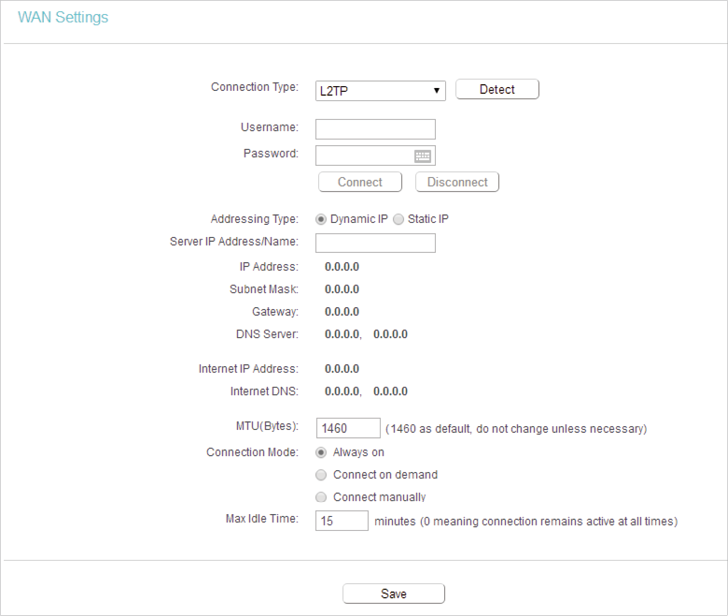
L2TP
If your ISP provides L2TP connection, please select L2TP.
•Username/Password — Enter the user name and password provided by your ISP. These fields are case-sensitive.
•Addressing Type — Choose the addressing type given by your ISP, either Dynamic IP or Static IP. Click the Connect button to connect immediately. Click the Disconnect button to disconnect immediately.
•Server IP Address/Name — Enter server IP address or domain name provided by your ISP.
•MTU(Bytes) — The default MTU size is “1460” bytes, which is usually fine. It is not recommended that you change the default MTU Size unless required by your ISP.
•Connection Mode
•Always On — In this mode, the internet connection will be active all the time.
•Connect on Demand — In this mode, the internet connection can be terminated automatically after a specified inactivity period (Max Idle Time) and be re-established when you attempt to access the internet again. If you want to keep your internet connection active all the time, please enter 0 in the Max Idle Time field. Otherwise, enter the number of minutes you want to have elapsed before your internet access disconnects.
•Connect Manually — You can click Connect/Disconnect to connect/disconnect immediately. This mode also supports the Max Idle Time function as Connect on Demand mode. The internet connection can be disconnected automatically after a specified inactivity period (Max Idle Time) and not be able to re-establish when you attempt to access the internet again.
Note:
Sometimes the connection cannot be terminated although you have specified the Max Idle Time because some applications are visiting the internet continually in the background.
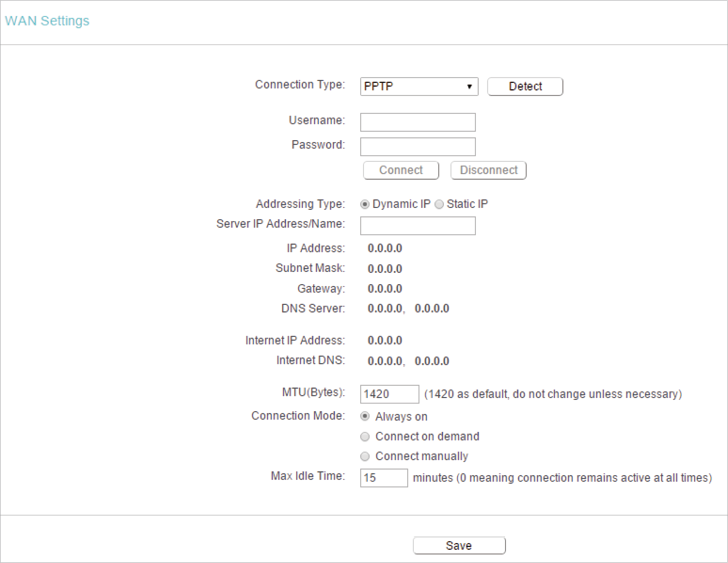
PPTP
If your ISP provides PPTP connection, please select PPTP.
•Username/Password — Enter the user name and password provided by your ISP. These fields are case-sensitive.
•Addressing Type — Choose the addressing type given by your ISP, either Dynamic IP or Static IP. Click the Connect button to connect immediately. Click the Disconnect button to disconnect immediately.
•Server IP Address/Name — Enter server IP address or domain name provided by your ISP.
•MTU(Bytes) — The default MTU size is “1420” bytes, which is usually fine. It is not recommended that you change the default MTU Size unless required by your ISP.
•Connection Mode
•Always On — In this mode, the internet connection will be active all the time.
•Connect on Demand — In this mode, the internet connection can be terminated automatically after a specified inactivity period (Max Idle Time) and be re-established when you attempt to access the internet again. If you want to keep your internet connection active all the time, please enter 0 in the Max Idle Time field. Otherwise, enter the number of minutes you want to have elapsed before your internet access disconnects.
•Connect Manually — You can click Connect/Disconnect to connect/disconnect immediately. This mode also supports the Max Idle Time function as Connect on Demand mode. The internet connection can be disconnected automatically after a specified inactivity period (Max Idle Time) and not be able to re-establish when you attempt to access the internet again.
Note:
Sometimes the connection cannot be terminated although you have specified the Max Idle Time because some applications are visiting the internet continually in the background.
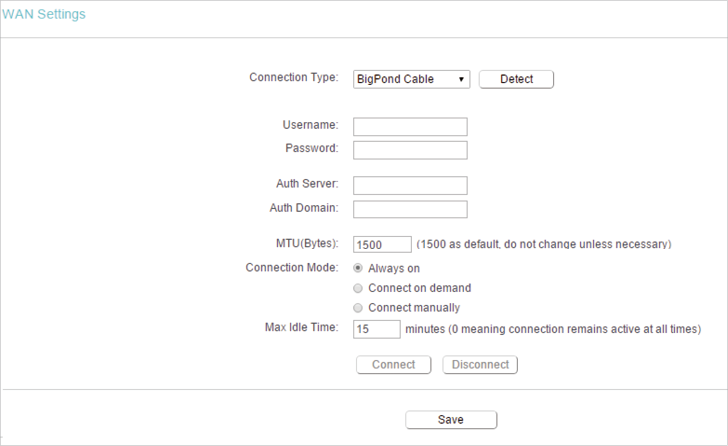
BigPond Cable
If your ISP provides BigPond cable connection, please select BigPond Cable.
•Username/Password — Enter the use name and password provided by your ISP. These fields are case-sensitive.
•Auth Server — Enter the authenticating server IP address or host name.
•Auth Domain — Type in the domain suffix server name based on your location.
•MTU(Bytes) — The default MTU size is 1500 bytes. It is not recommended that you change the default MTU size unless required by your ISP.
•Connection Mode
•Always On — In this mode, the internet connection will be active all the time.
•Connect on Demand — In this mode, the internet connection can be terminated automatically after a specified inactivity period (Max Idle Time) and be re-established when you attempt to access the internet again. If you want to keep your internet connection active all the time, please enter 0 in the Max Idle Time field. Otherwise, enter the number of minutes you want to have elapsed before your internet access disconnects.
•Connect Manually — You can click Connect/Disconnect to connect/disconnect immediately. This mode also supports the Max Idle Time function as Connect on Demand mode. The internet connection can be disconnected automatically after a specified inactivity period (Max Idle Time) and not be able to re-establish when you attempt to access the internet again.
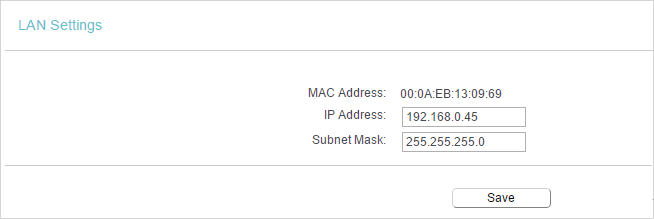
4.2. LAN
1.Visit http://tplinkwifi.net, and log in with the username and password you set for the router.
2.Go to Network > LAN.
3.Configure the IP parameters of the LAN and click Save.
•MAC Address — The physical address of the LAN ports. The value can not be changed.
•IP Address — Enter the IP address in dotted-decimal notation of your router (factory default — 192.168.0.254).
•Subnet Mask — An address code that determines the size of the network. Normally 255.255.255.0 is used as the subnet mask.
Note:
•If you have changed the IP address, you must use the new IP address to log in.
•If the new IP address you set is not in the same subnet as the old one, the IP address pool in the DHCP Server will be configured automatically, but the Virtual Server and DMZ Host will not take effect until they are re-configured.
4.3. IPTV
1.Visit http://tplinkwifi.net, and log in with the username and password you set for the router.
2.Go to Network > IPTV.
3.Configure the IPTV settings and click Save.
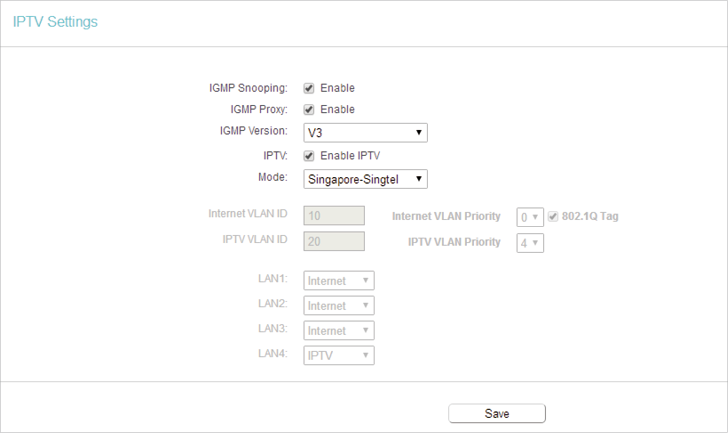
•IGMP Snooping — IGMP snooping is designed to prevent hosts on a local network from receiving traffic for a multicast group they have not explicitly joined. IGMP snooping is especially useful for bandwidth-intensive IP multicast applications such as IPTV.
•IGMP Proxy — Select to enable IGMP Proxy.
•IGMP Version — Select the IGMP(Internet Group Management Protocol) Proxy Version, either V2 or V3, according to your ISP.
•IPTV — Select to enable the IPTV feature.
•Mode — Select the appropriate mode according to your ISP.
•LAN 1/2/3/4 — Assign your LAN port to whether function as the Internet supplier or as the IPTV supplier.
4.4. MAC Clone
1.Visit http://tplinkwifi.net, and log in with the username and password you set for the router.
2.Go to Network > MAC Clone.
3.Configure the WAN MAC address and click Save.
•WAN MAC Address — This field displays the current MAC address of the WAN port. If your ISP requires you to register the MAC address, please enter the correct MAC address in this field. Click Restore Factory MAC to restore the MAC address of WAN port to the factory default value.
•Your PC’s MAC Address — This field displays the MAC address of the PC that is managing the router. If the MAC address is required, you can click Clone MAC Address and this MAC address will be filled in the WAN MAC Address field.
Note:
•You can only use the MAC Address Clone function for PCs on the LAN.
•If you have changed the WAN MAC address when the WAN connection is PPPoE, it will not take effect until the connection is re-established.
5. Dual Band Selection
1.Visit http://tplinkwifi.net, and log in with the username and password you set for the router.
2.Go to Dual Band Selection.
3.Select the working radio band as needed and click Save.
6. Wireless(2.4GHz or 5GHz)
6.1. Wireless Settings
1.Visit http://tplinkwifi.net, and log in with the username and password you set for the router.
2.Go to Wireless > Basic Settings.
3.Configure the basic settings for the wireless network and click Save.
•Wireless — Enable or disable wireless network.
•Wireless Network Name — Enter a value of up to 32 characters. The same Name (SSID) must be assigned to all wireless devices in your network.
•Mode — You can choose the appropriate “Mixed” mode.
•Channel — This field determines which operating frequency will be used. The default channel is set to Auto. It is not necessary to change the wireless channel unless you notice interference problems with another nearby access point.
•Channel Width — This field determines which operating frequency will be used. It is not necessary to change the wireless channel unless you notice interference problems with another nearby access point. If you select auto, then AP will choose the best channel automatically.
•Enable SSID Broadcast — If enabled, the router will broadcast the wireless network name (SSID).
6.2. WPS
WPS (Wi-Fi Protected Setup) can help you to quickly and securely connect to a network. This section will guide you to add a new wireless device to your router’s network quickly via WPS.
Note:
The WPS function cannot be configured if the wireless function of the router is disabled. Please make sure the wireless function is enabled before configuration.
1.Visit http://tplinkwifi.net, and log in with the username and password you set for the router.
2.Go to Wireless > WPS.
3.Follow one of the following three methods to connect your client device to the router’s Wi-Fi network.
Method ONE: Press the WPS Buttons on the Router and Client Device
For details, refer to Method 3: Use the WPS button of Connect Your Router.
Method TWO: Press the WPS Button on Your Client Device
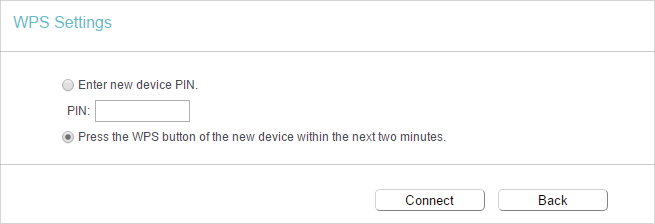
1.Keep the WPS Status as Enabled and click Add Device.
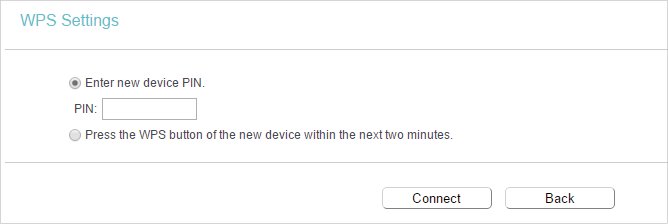
2.Select Press the WPS button of the new device within the next two minutes and click Connect.
3.Within two minutes, press the WPS button on your client device.
4.A success message will appear on the WPS page if the client device has been successfully added to the router’s network.
Method THREE: Enter the Client’s PIN
1.Keep the WPS Status as Enabled and click Add Device.
2.Select Enter new device PIN, enter your client device’s current PIN in the PIN filed and click Connect.
3.A success message will appear on the WPS page if the client device has been successfully added to the router’s network.
Method FOUR: Enter the Router’s PIN
1.Keep the WPS Status as Enabled and get the Current PIN of the router.
2.Enter the router’s current PIN on your client device to join the router’s Wi-Fi network.
6.3. Wireless Security
1.Visit http://tplinkwifi.net, and log in with the username and password you set for the router.
2.Go to Wireless > Wireless Security.
3.Configure the security settings of your wireless network and click Save.
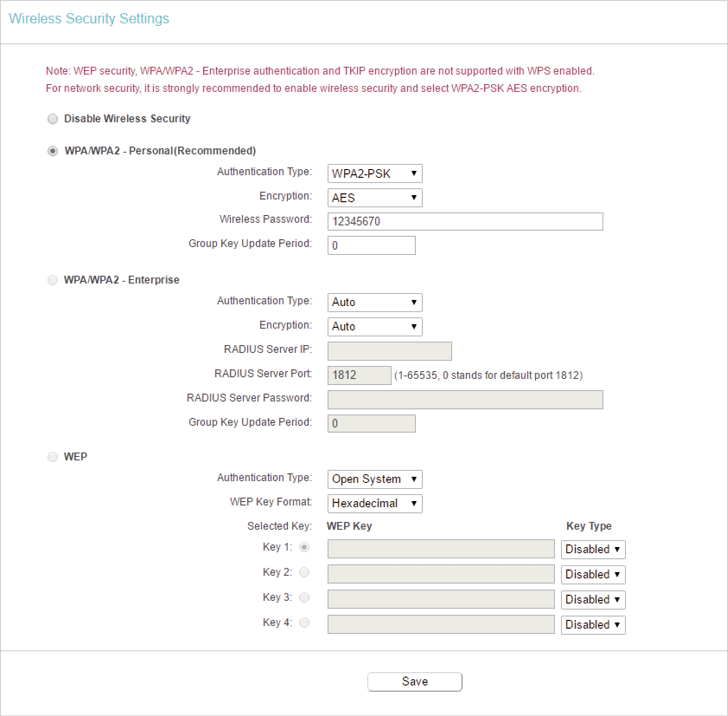
•Disable Wireless Security — The wireless security function can be enabled or disabled. If disabled, wireless clients can connect to the router without a password. It’s strongly recommended to choose one of the following modes to enable security.
•WPA-PSK/WPA2-Personal — It’s the WPA/WPA2 authentication type based on pre-shared passphrase.
•Authentication Type — Select Auto, WPA-PSK or WPA2-PSK.
•Encryption — Select Auto, TKIP or AES.
•Wireless Password — Enter ASCII or Hexadecimal characters. For Hexadecimal, the length should be between 8 and 64 characters; for ASCII, the length should be between 8 and 63 characters.
•Group Key Update Period — Specify the group key update interval in seconds. The value can be 0 or at least 30. Enter 0 to disable the update.
•WPA /WPA2-Enterprise — It’s based on Radius Server.
•Authentication Type — Select Auto, WPA or WPA2.
•Encryption — Select Auto, TKIP or AES.
•Radius Server IP — Enter the IP address of the Radius server.
•Radius Server Port — Enter the port that Radius server used.
•Radius Server Password — Enter the password for the Radius server.
•Group Key Update Period — Specify the group key update interval in seconds. The value should be 30 or above. Enter 0 to disable the update.
•WEP — It is based on the IEEE 802.11 standard.
•Authentication Type — The default setting is Auto, which can select Shared Key or Open System authentication type automatically based on the wireless client’s capability and request.
•WEP Key Format — Hexadecimal and ASCII formats are provided here. Hexadecimal format stands for any combination of hexadecimal digits (0-9, a-f, A-F) in the specified length. ASCII format stands for any combination of keyboard characters in the specified length.
•WEP Key (Password) — Select which of the four keys will be used and enter the matching WEP key. Make sure these values are identical on all wireless clients in your network.
•Key Type — Select the WEP key length (64-bit or 128-bit ) for encryption. Disabled means this WEP key entry is invalid.
•64-bit — Enter 10 hexadecimal digits (any combination of 0-9, a-f and A-F. Null key is not permitted) or 5 ASCII characters.
•128-bit — Enter 26 hexadecimal digits (any combination of 0-9, a-f and A-F. Null key is not permitted) or 13 ASCII characters.
6.4. Wireless MAC Filtering
Wireless MAC Filtering is used to deny or allow specific wireless client devices to access your network by their MAC addresses.
I want to:
Deny or allow specific wireless client devices to access my network by their MAC addresses.
For example, you want the wireless client A with the MAC address 00-0A-EB-B0-00-0B and the wireless client B with the MAC address 00-0A-EB-00-07-5F to access the router, but other wireless clients cannot access the router
How can I do that?
1.Visit http://tplinkwifi.net, and log in with the username and password you set for the router.
2.Go to Wireless > Wireless MAC Filtering.
3.Click Enable to enable the Wireless MAC Filtering function.
4.Select Allow the stations specified by any enabled entries in the list to access as the filtering rule.
5.Delete all or disable all entries if there are any entries already.
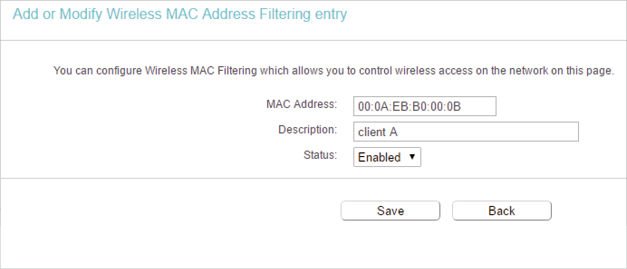
6.Click Add New and fill in the blank.
1 )Enter the MAC address 00:0A:EB:B0:00:0B or 00:0A:EB:00:07-5F in the MAC Address field.
2 )Enter wireless client A/B in the Description field.
3 )Select Enabled in the Status drop-down list.
4 )Click Save and click Back.
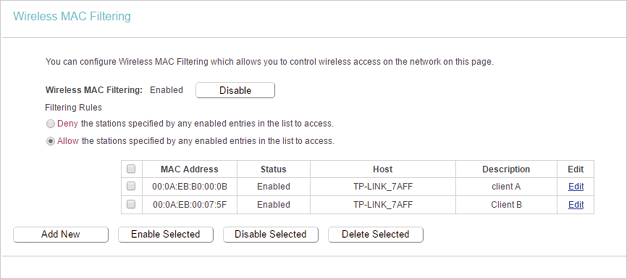
7.The configured filtering rules should be listed as the picture shows below.
Done!
Now only client A and client B can access your network.
6.5. Wireless Advanced
1.Visit http://tplinkwifi.net, and log in with the username and password you set for the router.
2.Go to Wireless > Wireless Advanced.
3.Configure the advanced settings of your wireless network and click Save.
Note:
If you are not familiar with the setting items on this page, it’s strongly recommended to keep the provided default values; otherwise it may result in lower wireless network performance.
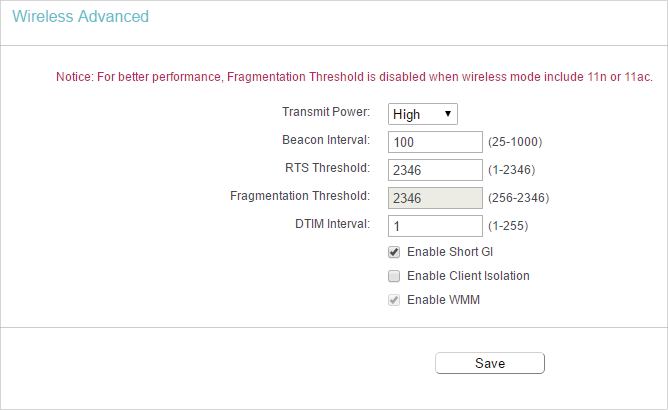
•Transmit Power — Select High, Middle or Low which you would like to specify for the router. High is the default setting and recommended.
•Beacon Interval — Enter a value between 40-1000 milliseconds for Beacon Interval here. Beacon Interval value determines the time interval of the beacons. The beacons are the packets sent by the router to synchronize a wireless network. The default value is 100.
•RTS Threshold — Here you can specify the RTS (Request to Send) Threshold. If the packet is larger than the specified RTS Threshold size, the router will send RTS frames to a particular receiving station and negotiate the sending of a data frame. The default value is 2346.
•Fragmentation Threshold — This value is the maximum size determining whether packets will be fragmented. Setting a low value for the Fragmentation Threshold may result in poor network performance because of excessive packets. 2346 is the default setting and is recommended.
•DTIM Interval — This value determines the interval of the Delivery Traffic Indication Message (DTIM). A DTIM field is a countdown field informing clients of the next window for listening to broadcast and multicast messages. When the router has buffered broadcast or multicast messages for associated clients, it sends the next DTIM with a DTIM Interval value. You can specify the value between 1-255 Beacon Intervals. The default value is 1, which indicates the DTIM Interval is the same as Beacon Interval.
•Enable Short GI — It is recommended to enable this function, for it will increase the data capacity by reducing the guard interval time.
•Enable Client Isolation — This function isolates all connected wireless stations so that wireless stations cannot access each other through WLAN.
•Enable WMM — WMM function can guarantee the packets with high-priority messages being transmitted preferentially. It is strongly recommended to enable this function.
6.6. Wireless Statistics
1.Visit http://tplinkwifi.net, and log in with the username and password you set for the router.
2.Go to Wireless > Wireless Statistics to check the data packets sent and received by each client device connected to the router.
•MAC Address — The MAC address of the connected wireless client.
•Current Status — The running status of the connected wireless client.
•Received Packets — Packets received by the wireless client.
•Sent Packets — Packets sent by the wireless client.
•SSID — SSID that the station associates with.
7. Guest Network
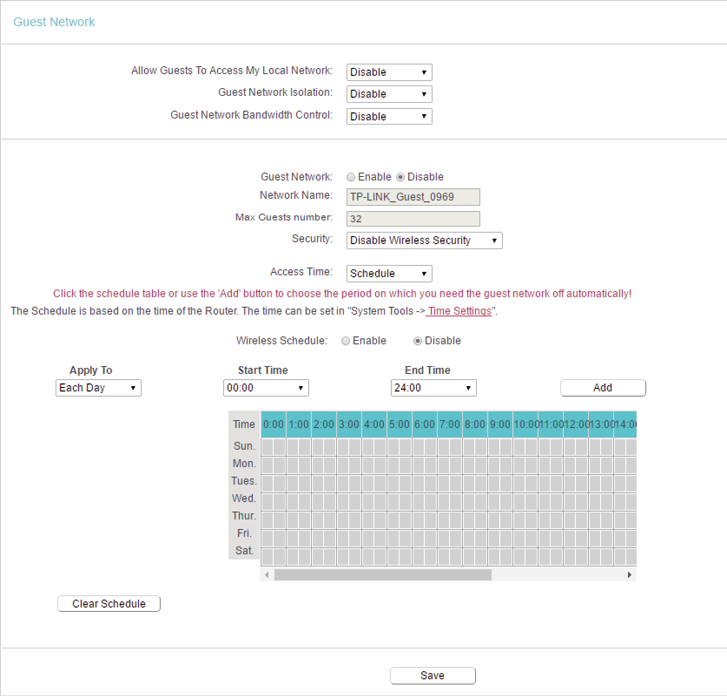
Guest Network allows you to provide Wi-Fi access for guests without disclosing your host network. When you have guests in your house, apartment, or workplace, you can create a guest network for them. In addition, you can customize guest network settings to ensure network security and privacy.
1.Visit http://tplinkwifi.net, and log in with the username and password you set for the router.
2.Go to Guest Network.
3.Enable the Guset Network function.
4.Create a network name for your guest network.
5.Select the Security type and create the Password of the guest network.
6.Select Schedule from the Access Time drop-down list and customize it for the guest network.
7.Click Save.
•Allow Guest To Access My Local Network — If enabled, guests can access the local network and manage it.
•Guest Network Isolation — If enabled, guests are isolated from each other.
•Enable Guest Network Bandwidth Control — If enabled, the Guest Network Bandwidth Control rules will take effect.
Note: The range of bandwidth for guest network is calculated according to the setting of Bandwidth Control on the Bandwidth Control page.
8. DHCP
By default, the DHCP (Dynamic Host Configuration Protocol) Server is enabled and the router acts as a DHCP server; it dynamically assigns TCP/IP parameters to client devices from the IP Address Pool. You can change the settings of DHCP Server if necessary, and you can reserve LAN IP addresses for specified client devices.
8.1. DHCP Settings
1.Visit http://tplinkwifi.net, and log in with the username and password you set for the router.
2.Go to DHCP > DHCP Settings.
3.Specify DHCP server settings and click Save.
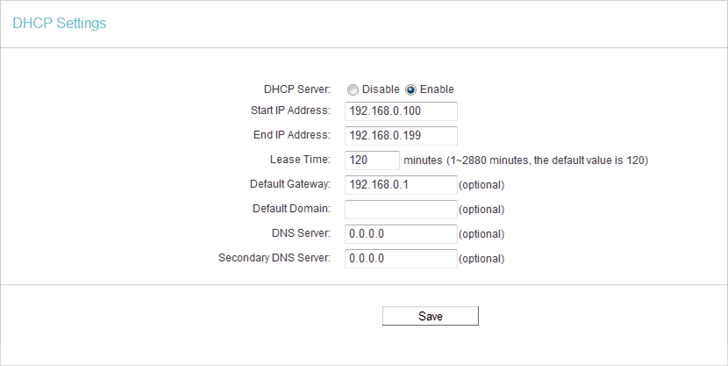
•DHCP Server — Enable or disable the DHCP server. If disabled, you must have another DHCP server within your network or else you must configure the computer manually.
•Start IP Address — Specify an IP address for the DHCP Server to start with when assigning IP addresses. 192.168.0.100 is the default start address.
•End IP Address — Specify an IP address for the DHCP Server to end with when assigning IP addresses. 192.168.0.199 is the default end address.
•Address Lease Time — The Address Lease Time is the amount of time a network user will be allowed to connect to the router with the current dynamic IP Address. When time is up, the user will be automatically assigned a new dynamic IP address. The range of the time is 1 ~ 2880 minutes. The default value is 120.
•Default Gateway (Optional) — It is suggested to input the IP address of the LAN port of the router. The default value is 192.168.0.1.
•Default Domain (Optional) — Input the domain name of your network.
•DNS Server (Optional) — Input the DNS IP address provided by your ISP.
•Secondary DNS Server (Optional) — Input the IP address of another DNS server if your ISP provides two DNS servers.
Note:
•To use the DHCP server function of the router, you must configure all computers on the LAN as Obtain an IP Address automatically.
8.2. DHCP Client List
1.Visit http://tplinkwifi.net, and log in with the username and password you set for the router.
2.Go to DHCP > DHCP Client List to view the information of the clients connected to the router.
•Client Name — The name of the DHCP client.
•MAC Address — The MAC address of the DHCP client.
•Assigned IP — The IP address that the outer has allocated to the DHCP client.
•Lease Time — The time of the DHCP client leased. After the dynamic IP address has expired, a new dynamic IP address will be automatically assigned to the user.
You cannot change any of the values on this page. To update this page and show the current attached devices, click Refresh.
8.3. Address Reservation
You can reserve an IP address for a specific client. When you specify a reserved IP address for a PC on the LAN, this PC will always receive the same IP address each time when it accesses the DHCP server.
1.Visit http://tplinkwifi.net, and log in with the username and password you set for the router.
2.Go to DHCP > Address Reservation.
3.Click Add New and fill in the blank.
1 )Enter the MAC address (in XX:XX:XX:XX:XX:XX format.) of the client for which you want to reserve an IP address.
2 )Enter the IP address (in dotted-decimal notation) which you want to reserve for the client.
3 )Leave the Status as Enabled.
4 )Click Save.
9. Forwarding
The router’s NAT (Network Address Translation) feature makes the devices on the LAN use the same public IP address to communicate in the internet, which protects the local network by hiding IP addresses of the devices. However, it also brings about the problem that external hosts cannot initiatively communicate with the specified devices in the local network.
With the forwarding feature, the router can traverse the isolation of NAT so that clients on the internet can reach devices on the LAN and realize some specific functions.
The TP-Link router includes four forwarding rules. If two or more rules are set, the priority of implementation from high to low is Virtual Servers, Port Triggering, UPNP and DMZ.
9.1. Virtual Server
When you build up a server in the local network and want to share it on the internet, Virtual Servers can realize the service and provide it to internet users. At the same time virtual servers can keep the local network safe as other services are still invisible from the internet.
Virtual Servers can be used to set up public services in your local network, such as HTTP, FTP, DNS, POP3/SMTP and Telnet. Different service uses different service port. Port 80 is used in HTTP service, port 21 in FTP service, port 25 in SMTP service and port 110 in POP3 service. Please verify the service port number before the configuration.
I want to:
Share my personal website I’ve built in local network with my friends through the internet.
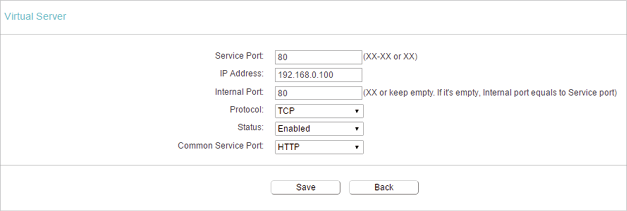
For example, the personal website has been built in my home PC (192.168.0.100). I hope that my friends on the internet can visit my website in some way. My PC is connected to the router with the WAN IP address 218.18.232.154.
How can I do that?
1.Set your PC to a static IP address, for example 192.168.0.100.
2.Visit http://tplinkwifi.net, and log in with the username and password you set for the router.
3.Go to Forwarding > Virtual Server.
4.Click Add New. Select HTTP from the Common Service Port list. The service port, internal port and protocol will be automatically filled in. Enter the PC’s IP address 192.168.0.100 in the IP Address field.
5.Leave the status as Enabled and click Save.
Note:
•It is recommended to keep the default settings of Internal Port and Protocol if you are not clear about which port and protocol to use.
•If the service you want to use is not in the Common Service Port list, you can enter the corresponding parameters manually. You should verify the port number that the service needs.
•You can add multiple virtual server rules if you want to provide several services in a router. Please note that the Service Port should not be overlapped.
Done!
Users on the internet can enter http:// WAN IP (in this example: http:// 218.18.232.154) to visit your personal website.
Note:
•If you have changed the default Service Port, you should use http:// WAN IP: Service Port to visit the website.
•Some specific service ports are forbidden by the ISP. If you fail to visit the website, please use another service port.
9.2. Port Triggering
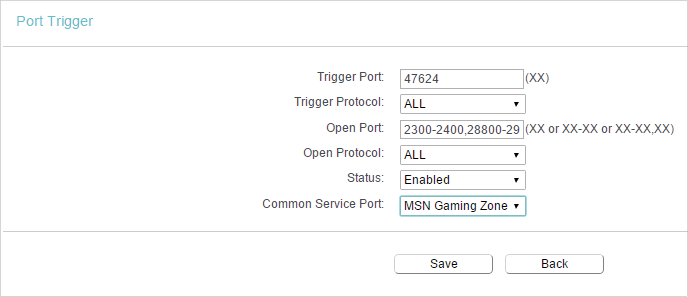
Port triggering can specify a triggering port and its corresponding external ports. When a host in the local network initiates a connection to the triggering port, all the external ports will be opened for subsequent connections. The router can record the IP address of the host. When the data from the internet return to the external ports, the router can forward them to the corresponding host. Port triggering is mainly applied to online games, VoIPs, video players and common applications including MSN Gaming Zone, Dialpad, Quick Time 4 players and more.
Follow the steps below to configure the port triggering rules:
1.Visit http://tplinkwifi.net, and log in with the username and password you set for the router.
2.Go to Forwarding > Port Triggering.
3.Click Add New. Select the desired application from the Common Applications list. The trigger port amd incoming ports will be automatically filled in. The following picture takes application MSN Gaming Zone as an example.
4.Leave the status as Enabled and click Save.
Note:
•You can add multiple port triggering rules as needed.
•The triggering ports can not be overlapped.
•If the application you need is not listed in the Common Applications list, please enter the parameters manually. You should verify the incoming ports the application uses first and enter them in Open Port field. You can input at most 5 groups of ports (or port sections). Every group of ports must be set apart with “,”. For example, 2000-2038, 2050-2051, 2085, 3010-3030.
9.3. DMZ
When a PC is set to be a DMZ (Demilitarized Zone) host in the local network, it is totally exposed to the internet, which can realize the unlimited bidirectional communication between internal hosts and external hosts. The DMZ host becomes a virtual server with all ports opened. When you are not clear about which ports to open in some special applications, such as IP camera and database software, you can set the PC to be a DMZ host.
Note:
DMZ is more applicable in the situation that users are not clear about which ports to open. When it is enabled, the DMZ host is totally exposed to the internet, which may bring some potential safety hazards. If DMZ is not in use, please disable it in time.
I want to:
Make the home PC join the internet online game without port restriction.
For example, due to some port restriction, when playing the online games, you can log in normally but cannot join a team with other players. To solve this problem, set your PC as a DMZ host with all ports opened.
How can I do that?
1.Assign a static IP address to your PC, for example 192.168.0.100.
2.Visit http://tplinkwifi.net, and log in with the username and password you set for the router.
3.Go to Forwarding > DMZ.
4.Select Enable and enter the IP address 192.168.0.100 in the DMZ Host IP Address filed.
5.Click Save.
Done!
You’ve set your PC to a DMZ host and now you can make a team to game with other players.
9.4. UPnP
The UPnP (Universal Plug and Play) protocol allows the applications or host devices to automatically find the front-end NAT device and send request to it to open the corresponding ports. With UPnP enabled, the applications or host devices on the local network and the internet can freely communicate with each other realizing the seamless connection of the network. You may need to enable the UPnP if you want to use applications for multiplayer gaming, peer-to-peer connections, real-time communication (such as VoIP or telephone conference) or remote assistance, etc.
Tips:
•UPnP is enabled by default in this router.
•Only the application supporting UPnP protocol can use this feature.
•UPnP feature needs the support of operating system (e.g. Windows Vista/ Windows 7/ Windows 8, etc. Some of operating system need to install the UPnP components).
For example, when you connect your Xbox to the router which is connected to the internet to play online games, UPnP will send request to the router to open the corresponding ports allowing the following data penetrating the NAT to transmit. Therefore, you can play Xbox online games without a hitch.
If necessary, you can follow the steps to change the status of UPnP.
1.Visit http://tplinkwifi.net, and log in with the username and password you set for the router.
2.Go to Forwarding > UPnP.
3.Click Disable or Enable according to your needs.
10. Security
This function allows you to protect your home network from cyber attacks and unauthorized users by implementing these network security functions.
10.1. Basic Security
1.Visit http://tplinkwifi.net, and log in with the username and password you set for the router.
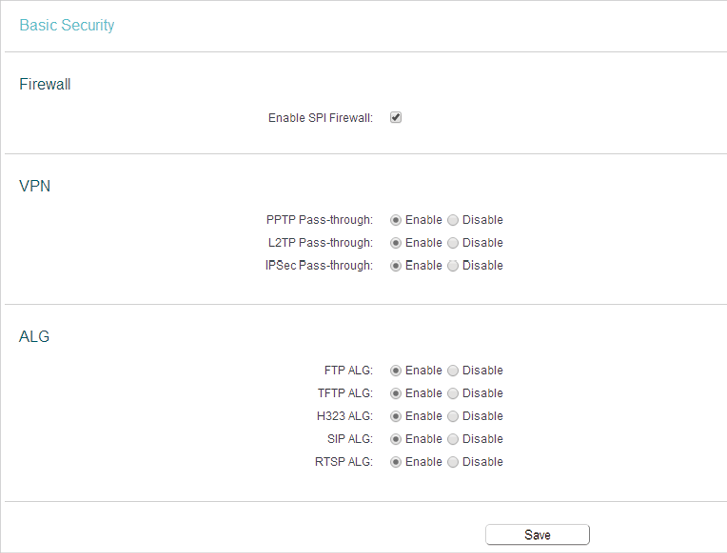
2.Go to Security > Basic Security, and you can enable or disable the security functions.
•Firewall — A firewall protects your network from internet attacks.
•Enable SPI Firewall — SPI (Stateful Packet Inspection, also known as dynamic packet filtering) helps to prevent cyber attacks by tracking more state per session. It validates that the traffic passing through the session conforms to the protocol. SPI Firewall is enabled by default.
•VPN — VPN Passthrough must be enabled if you want to allow VPN tunnels using IPSec, PPTP or L2TP protocols to pass through the router’s firewall.
•PPTP Passthrough — Point-to-Point Tunneling Protocol (PPTP) allows the Point-to-Point Protocol (PPP) to be tunneled through an IP network. If you want to allow PPTP tunnels to pass through the router, you can keep the default (Enabled).
•L2TP Passthrough — Layer 2 Tunneling Protocol (L2TP) is the method used to enable Point-to-Point sessions via the internet on the Layer 2 level. If you want to allow L2TP tunnels to pass through the router, you can keep the default (Enabled).
•IPSec Passthrough — Internet Protocol Security (IPSec) is a suite of protocols for ensuring private, secure communications over Internet Protocol (IP) networks, through the use of cryptographic security services. If you want to allow IPSec tunnels to pass through the router, you can keep the default (Enabled).
•ALG — It is recommended to enable Application Layer Gateway (ALG) because ALG allows customized Network Address Translation (NAT) traversal filters to be plugged into the gateway to support address and port translation for certain application layer “control/data” protocols such as FTP, TFTP, H323 etc.
•FTP ALG — To allow FTP clients and servers to transfer data across NAT, keep the default Enable.
•TFTP ALG — To allow TFTP clients and servers to transfer data across NAT, keep the default Enable.
•H323 ALG — To allow Microsoft NetMeeting clients to communicate across NAT, keep the default Enable.
•SIP ALG — To allow some multimedia clients to communicate across NAT, click Enable.
•RTSP ALG — To allow some media player clients to communicate with some streaming media servers across NAT, click Enable.
3.Click Save.
10.2. Advanced Security
1.Visit http://tplinkwifi.net, and log in with the username and password you set for the router.
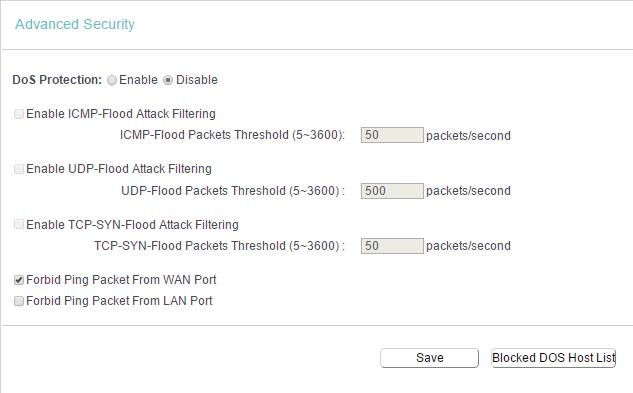
2.Go to Security > Advanced Security, and you can protect the router from being attacked by ICMP-Flood, UDP Flood and TCP-SYN Flood.
•DoS Protection — Denial of Service protection. Select Enable or Disable to enable or disable the DoS protection function. Only when it is enabled, will the flood filters be enabled.
Note:
Dos Protection will take effect only when the Statistics in System Tool > Statistics is enabled.
•Enable ICMP-FLOOD Attack Filtering -Check the box to enable or disable this function.
•ICMP-FLOOD Packets Threshold (5~3600) — The default value is 50. Enter a value between 5 ~ 3600. When the number of the current ICMP-FLOOD packets is beyond the set value, the router will startup the blocking function immediately.
•Enable UDP-FLOOD Filtering — Check the box to enable or disable this function.
•UDP-FLOOD Packets Threshold (5~3600) — The default value is 500. Enter a value between 5 ~ 3600. When the number of the current UPD-FLOOD packets is beyond the set value, the router will startup the blocking function immediately.
•Enable TCP-SYN-FLOOD Attack Filtering -Check the box to enable or disable this function.
•TCP-SYN-FLOOD Packets Threshold (5~3600) — The default value is 50. Enter a value between 5 ~ 3600. When the number of the current TCP-SYN-FLOOD packets is beyond the set value, the router will startup the blocking function immediately.
•Forbid Ping Packet From WAN Port — The default setting is enable. If disabled, the ping packet from the internet can access the router.
•Forbid Ping Packet From LAN Port — The default setting is disabled. If enabled, the ping packet from LAN cannot access the router. This function can be used to defend against some viruses.
3.Click Save.
4.Click Blocked DoS Host List to display the DoS host table by blocking.
11. Parental Controls
Parental Controls allows you to block inappropriate and malicious websites, and control access to specific websites at specific time for your children’s devices.
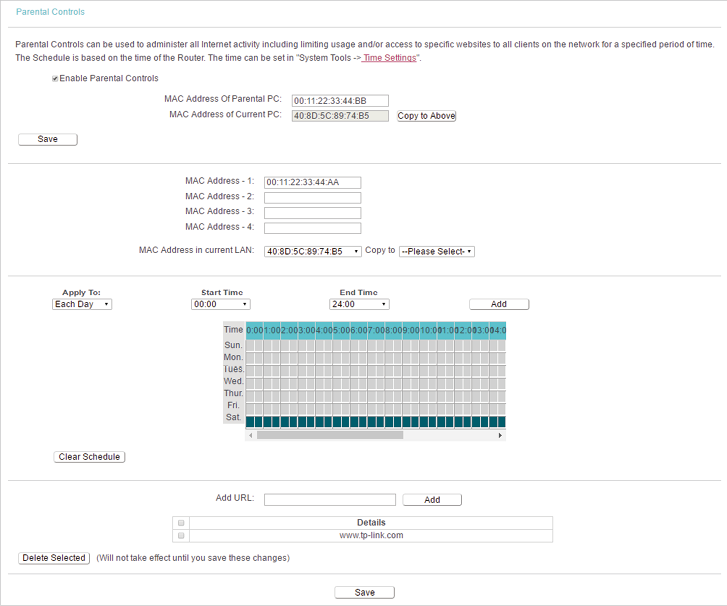
For example, you want the children’s PC with the MAC address 00-11-22-33-44-AA can access www.tp-link.com on Saturday only while the parent PC with the MAC address 00-11-22-33-44-BB is without any restriction.
1.Visit http://tplinkwifi.net, and log in with the username and password you set for the router.
2.Go to Parental Controls.
3.Check the Enable Parental Controls box and enter the MAC address 00:11:22:33:44:BB in the MAC Address of Parental PC field.
4.Enter 00:11:22:33:44:AA in the MAC Address 1 field.
5.Create a new schedule with Day is Sat and Time is all day-24 hours. Click Add
6.Enter www.tp-link.com in the Add URL field. Click Add.
7.Click Save.
Then you will see the page as shown in figure below.
12. Access Control
Access Control is used to deny or allow specific client devices to access your network with access time and content restrictions.
I want to:
Deny or allow specific client devices to access my network with access tiem and content restrictions.
For example, If you want to restrict the internet activities of host with MAC address 00-11-22-33-44-AA on the LAN to access www.tp-link.com only, please follow the steps below:
How can I do that?
1.Visit http://tplinkwifi.net, and log in with the username and password you set for the router.
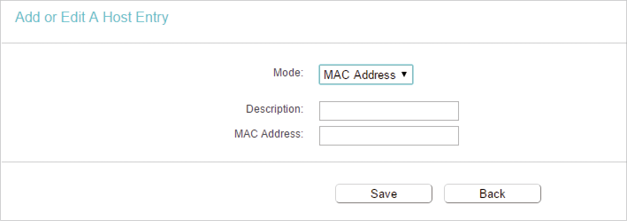
2.Go to Access Control > Host and configure the host settings:
1 )Click Add New.
2 )Select MAC Address as the mode type. Create a unique description (e.g. host_1) for the host in the Description field and enter 00-11-22-33-44-AA in the MAC Address filed.
3 )Click Save.
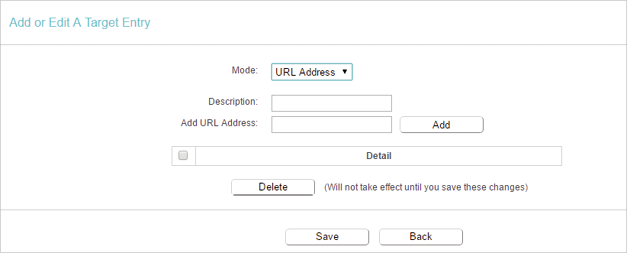
3.Go to Access Control > Target and configure the target settings:
1 )Click Add New.
2 )Select URL Address as the mode type. Create a unique description (e.g. target_1) for the target in the Target Description field and enter the domain name, either the full name or the keywords (for example TP-Link) in the Add URL Address field.
Note:
Any URL address with keywords in it (e.g. www.tp-link.com) will be blocked or allowed.
3 )Click Save.
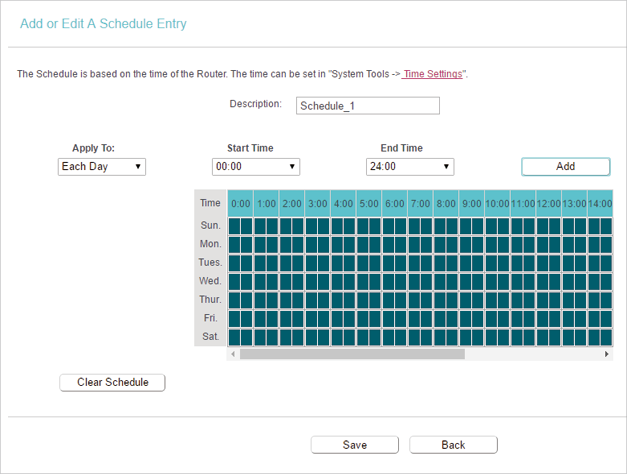
4.Go to Access Control > Schedule and configure the schedule settings:
1 )Click Add New.
2 )Create a unique description (e.g. schedule_1) for the schedule in the Schedule Description field and set the day(s) and time period.
3 )Click Save.
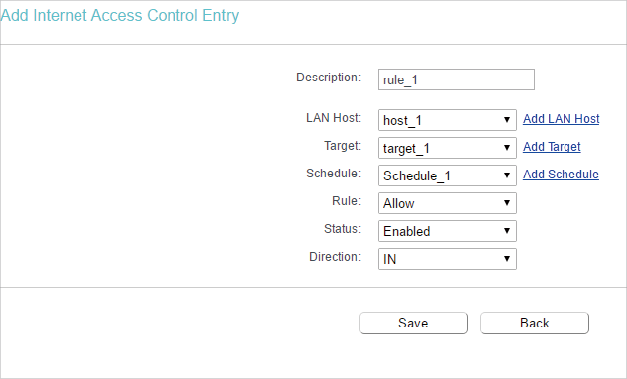
5.Go to Access Control > Rule and add a new access control rule.
1 )Click Add New.
2 )Give a name for the rule in the Description field. Select host_1 from the LAN host drop-down list; select target_1 from the target drop-down list; select schedule_1 from the schedule drop-down list.
3 )Leave the status as Enabled as click Save.
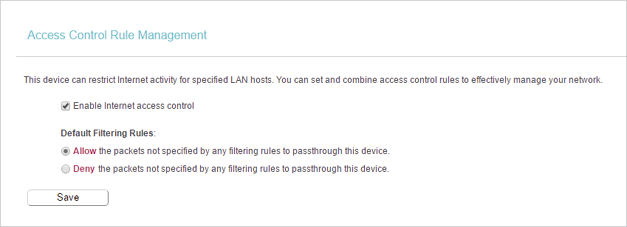
6.Select Enable Internet Access Control to enable Access Control function.
7.Select Allow the packets specified by any enabled access control policy to pass through the Router as the default filter policy and click Save.
Done!
Now only the specific host(s) can visit the target(s) within the scheduled time period.
13. Advanced Routing
Static Routing is a form of routing that is configured manually by a network administrator or a user by adding entries into a routing table. The manually-configured routing information guides the router in forwarding data packets to the specific destination.
13.1. Static Route List
1.Visit http://tplinkwifi.net, and log in with the username and password you set for the router.
2.Go to Advanced Routing > Static Route List.
•To add static routing entries:
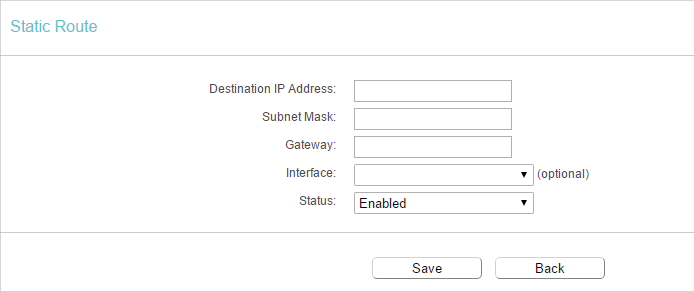
1. Click Add New.
2.Enter the following information.
•Destination IP Address — The Destination Network is the address of the network or host that you want to assign to a static route.
•Subnet Mask — The Subnet Mask determines which portion of an IP address is the network portion, and which portion is the host portion.
•Gateway — This is the IP address of the default gateway device that allows the contact between the router and the network or host.
3.Select Enabled or Disabled for this entry on the Status drop-down list.
4.Click Save.
You can also do the following operations to modify the current settings.
•Click Delete to delete the entry.
•Click Enable Selected to enable all the entries.
•Click Disable Selected to disable all the entries.
•Click Delete Selected to delete all the entries.
13.2. System Routing Table
1.Visit http://tplinkwifi.net, and log in with the username and password you set for the router.
2.Go to Advanced Routing > System Routing Table, and you can view all the valid route entries in use.
•Destination Network — The Destination Network is the address of the network or host to which the static route is assigned.
•Subnet Mask — The Subnet Mask determines which portion of an IP address is the network portion, and which portion is the host portion.
•Gateway — This is the IP address of the gateway device that allows for contact between the Router and the network or host.
•Interface — This interface tells you whether the Destination IP Address is on the LAN & WLAN (internal wired and wireless networks), or the WAN (Internet).
•Click Refresh to refresh the data displayed.
14. Bandwidth Control
14.1. Control Settings
1.Visit http://tplinkwifi.net, and log in with the username and password you set for the router.
2.Go to Bandwidth Control.
3.Configure the bandwidth as needed and click Save.
The values you configure for the Egress Bandwidth and Ingress Bandwidth should be less than 100,000Kbps. For optimal control of the bandwidth, please select the right Line Type and consult your ISP for the total egress and ingress bandwidth.
•Enable Bandwidth Control — Check this box so that the Bandwidth Control settings can take effect.
•Egress Bandwidth — The upload speed through the WAN port.
•Ingress Bandwidth — The download speed through the WAN port.
14.2. Rule List
1.Visit http://tplinkwifi.net, and log in with the username and password you set for the router.
2.Go to Bandwidth Control and you can view and configure the Bandwidth Control rules.
•Description — This is the information about the rules such as address range.
•Egress Bandwidth — This field displays the max and min upload bandwidth through the WAN port. The default is 0.
•Ingress Bandwidth — This field displays the max and min download bandwidth through the WAN port. The default is 0.
•Status — This field displays the status of the rule.
•Modify — Click Modify/Delete to edit/delete the rule.
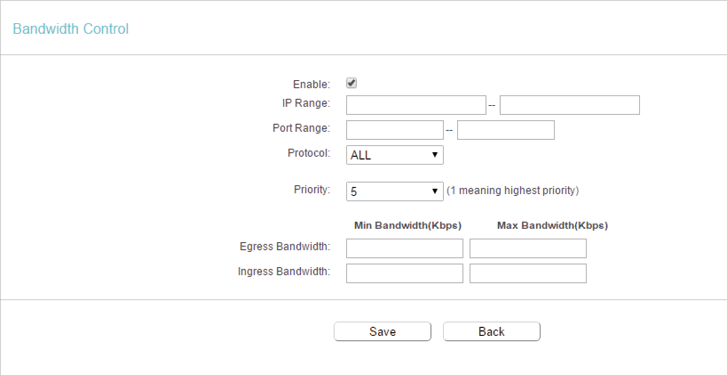
•To add a Bandwidth control rule:
1.Click Add New.
2.Enter the information as the figure shown below.
3.Click Save.
15. IP & MAC Binding
IP & MAC Binding, namely, ARP (Address Resolution Protocol) Binding, is used to bind a network device’s IP address to its MAC address. This will prevent ARP spoofing and other ARP attacks by denying network access to a device with a matching IP address in the ARP list, but with an unrecognized MAC address.
15.1. Binding Settings
1.Visit http://tplinkwifi.net, and log in with the username and password you set for the router.
2.Go to IP & MAC Binding > Binding Settings.
3.Select Enable for ARP Binding.
4.Click Save.
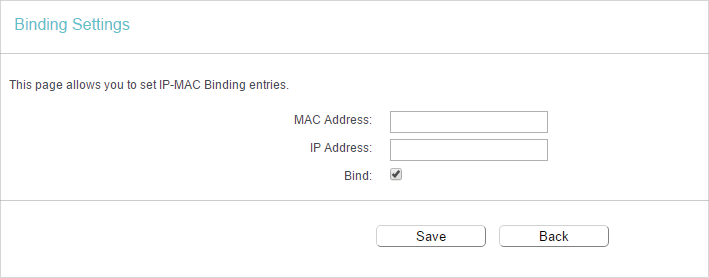
•To add IP & MAC Binding entries:
1.Click Add New.
2.Select the Bind checkbox.
3.Enter the MAC address and IP address.
4.Click Save.
•To modify or delete an existing entry:
1.Select the desired entry in the table.
2.Click Edit or Delete Selected.
15.2. ARP List
To manage a device, you can observe the device on the LAN by checking its MAC address and IP address on the ARP list, and you can also configure the items. This page displays the ARP list which shows all the existing IP & MAC Binding entries.
•MAC Address — The MAC address of the listed computer on the LAN.
•IP Address — The assigned IP address of the listed computer on the LAN.
•Status — Indicates whether or not the MAC and IP addresses are bound.
•Configure — Load or delete an item.
•Load — Load the item to the IP & MAC Binding list.
•Delete — Delete the item.
•Click the Load Selected button to load the selected items to the IP & MAC Binding list.
•Click the Delete Selected button to delete the selected items to the IP & MAC Binding list.
•Click the Refresh button to refresh all items.
Note:
An item can not be loaded to the IP & MAC Binding list if the IP address of the item has been loaded before. Error warning will prompt as well.
16. Dynamic DNS
The router offers the DDNS (Dynamic Domain Name System) feature, which allows the hosting of a website, FTP server, or e-mail server with a fixed domain name (named by yourself) and a dynamic IP address. Thus your friends can connect to your server by entering your domain name no matter what your IP address is. Before using this feature, you need to sign up for DDNS service providers such as www.comexe.cn,
www.dyndns.org, or www.noip.com. The Dynamic DNS client service provider will give you a password or key.
1.Visit http://tplinkwifi.net, and log in with the username and password you set for the router.
2.Go to Dynamic DNS.
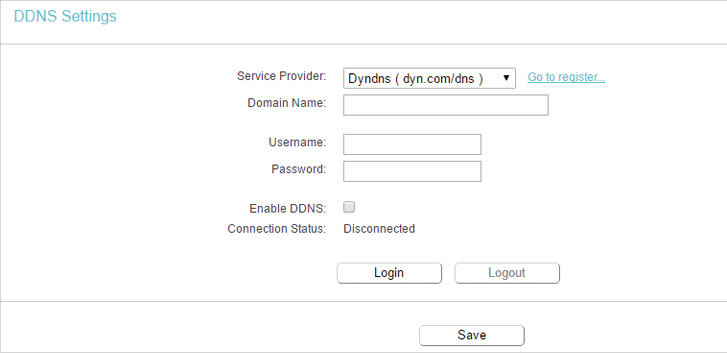
Dyndns DDNS
If the dynamic DNS Service Provider you select is www.dyn.com, the following page will appear.
To set up for DDNS, follow these instructions:
1.Enter the Domain Name you received from dynamic DNS service provider here.
2.Enter the Username for your DDNS account.
3.Enter the Password for your DDNS account.
4.Click Login.
5.Click Save.
•Connection Status — The status of the DDNS service connection is displayed here.
•Logout — Click Logout to log out of the DDNS service.
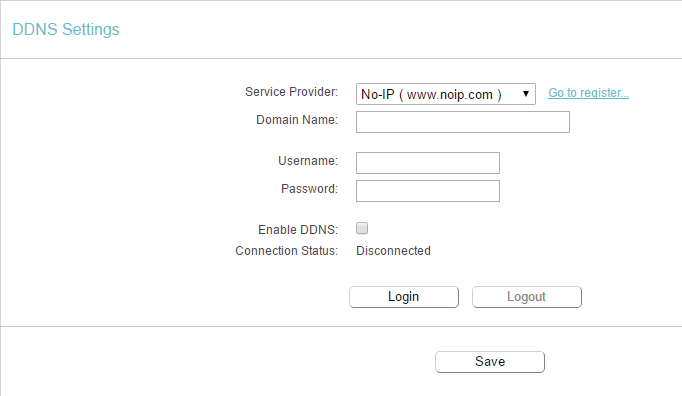
No-ip DDNS
If the dynamic DNS Service Provider you select is www.noip.com, the following page will appear.
To set up for DDNS, follow these instructions:
1.Enter the Domain Name you received from dynamic DNS service provider.
2.Enter the Username for your DDNS account.
3.Enter the Password for your DDNS account.
4.Click Login.
5.Click Save.
•Connection Status — The status of the DDNS service connection is displayed here.
•Logout — Click Logout to log out of the DDNS service.
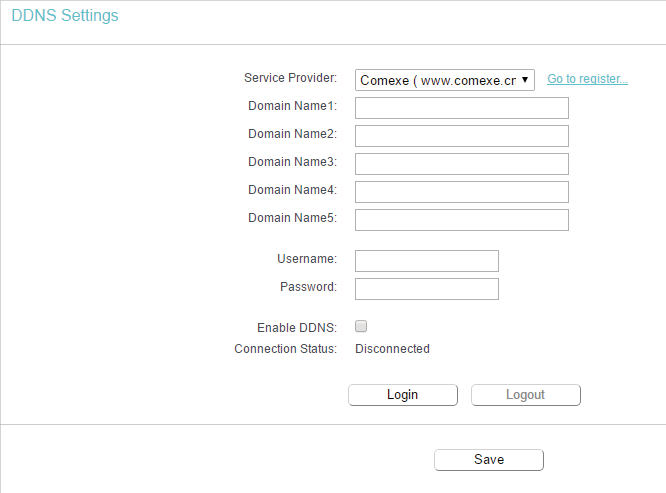
Comexe DDNS
If the dynamic DNS Service Provider you select is www.comexe.cn, the following page will appear.
To set up for DDNS, follow these instructions:
1.Enter the Domain Name received from your dynamic DNS service provider.
2.Enter the Username for your DDNS account.
3.Enter the Password for your DDNS account.
4.Click Login.
5.Click Save.
•Connection Status — The status of the DDNS service connection is displayed here.
•Logout — Click Logout to log out of the DDNS service.
17. IPv6
This function allows you to enable IPv6 function and set up the parameters of the router’s Wide Area Network (WAN) and Local Area Network (LAN).
17.1. IPv6 Status
1.Visit http://tplinkwifi.net, and log in with the username and password you set for the router.
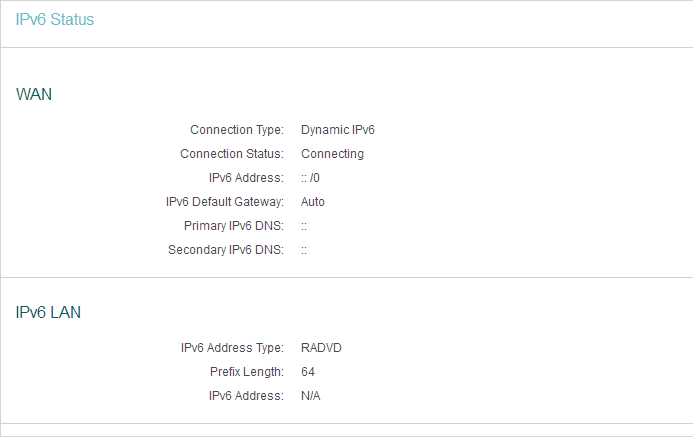
2.Go to IPv6 > IPv6 Status, and you can view the current IPv6 status information of the router.
•WAN — This section shows the current IPv6 information of the router’s WAN port, including Connection Type, IPv6 Address information, IPv6 Default Gateway, Primary IPv6 DNS and Secondary IPv6 DNS.
•IPv6 LAN — This section shows the current IPv6 information of the router’s LAN port, including IPv6 Address Assign Type, IPv6 Address and Link-local Address.
17.2. IPv6 WAN
1.Visit http://tplinkwifi.net, and log in with the username and password you set for the router.
2.Go to IPv6 > IPv6 WAN.
3.Select the WAN Connection Type according to your ISP network topolopy:
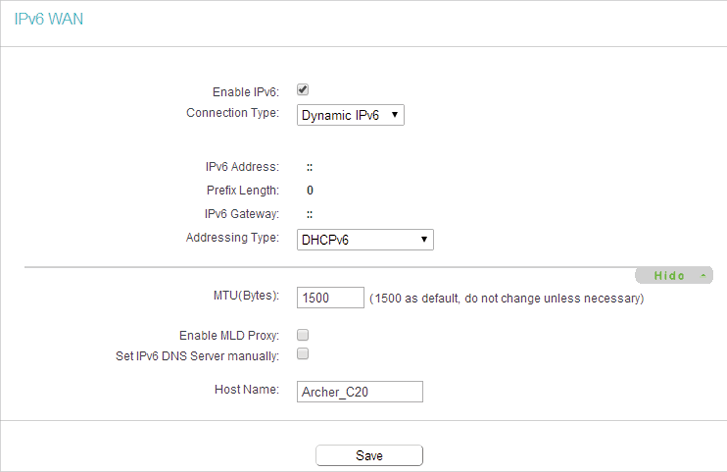
•Dynamic IPv6 — Connections which use dynamic IPv6 address assignment.
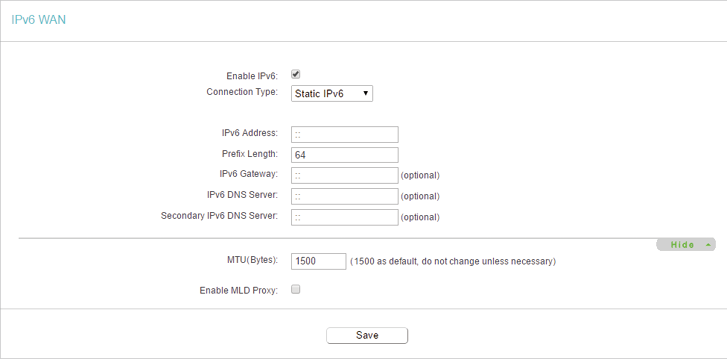
•Static IPv6 — Connections which use static IPv6 address assignment.
•PPPoEv6 — Connections which use PPPoEV6 that requires a username and password.
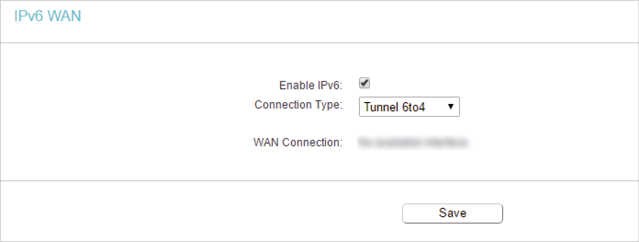
•Tunnel 6to4 — Connections which use 6to4 address assignment.
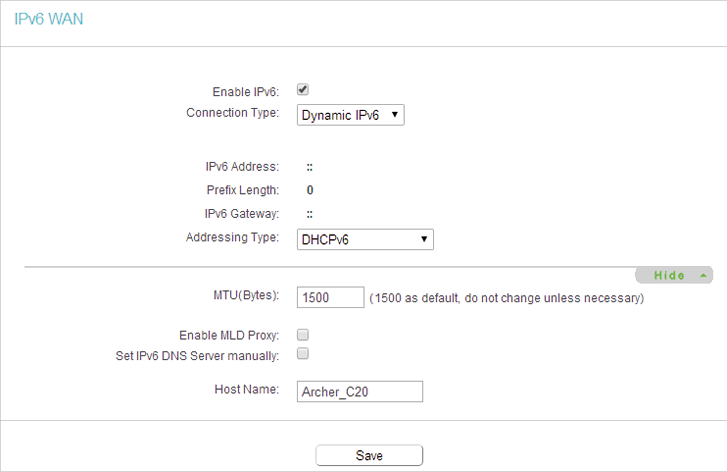
Dynamic IPv6
•IPv6 Address — The IPv6 address assigned by your ISP dynamically.
•Prefix Length — The length of IPv6 address prefix.
•IPv6 Gateway — Enter the default gateway provided by your ISP.
•Addressing Type — There are two types of assignation for IPv6 address: SLAAC (Stateless address auto-configuration) and DHCPv6 (Dynamic Host Configuration Protocol for IPv6) Server.
•MTU(Bytes) — The normal MTU (Maximum Transmission Unit) value for most Ethernet networks is 1500 Bytes. For some ISPs, you may need to modify the MTU. But this is rarely required, and should not be done unless you are sure it is necessary for your ISP connection.
If your ISP gives you one or two DNS IPv6 addresses, select Set IPv6 DNS Server manually and enter the IPv6 DNS Server and Secondary IPv6 DNS Server into the correct fields. Otherwise, the DNS servers will be assigned from ISP dynamically.
•Enable MLD Proxy — Enable the Multicast Listener Discovery (MLD) Proxy function if you need.
•Set IPv6 DNS Server manually — Enter the DNS IPv6 address provided by your ISP.
•Secondary IPv6 DNS Server — Enter another DNS IPv6 address provided by your ISP.
Tips:
If you get Address not found error when you access a website, it is likely that your DNS servers are set up improperly. You should contact your ISP to get DNS server addresses.
Static IPv6
•IPv6 Address — Enter the IPv6 address provided by your ISP.
•Prefix Length — The length of IPv6 address prefix.
•IPv6 Gateway — Enter the default gateway provided by your ISP.
•IPv6 DNS Server— Enter the DNS IPv6 address provided by your ISP.
•Secondary IPv6 DNS Server — Enter another DNS IPv6 address provided by your ISP.
•MTU(Bytes) — The normal MTU (Maximum Transmission Unit) value for most Ethernet networks is 1500 Bytes. For some ISPs, you may need to modify the MTU. But this is rarely required, and should not be done unless you are sure it is necessary for your ISP connection.
•Enable MLD Proxy — Enable the Multicast Listener Discovery (MLD) Proxy function if you need.
PPPoEv6
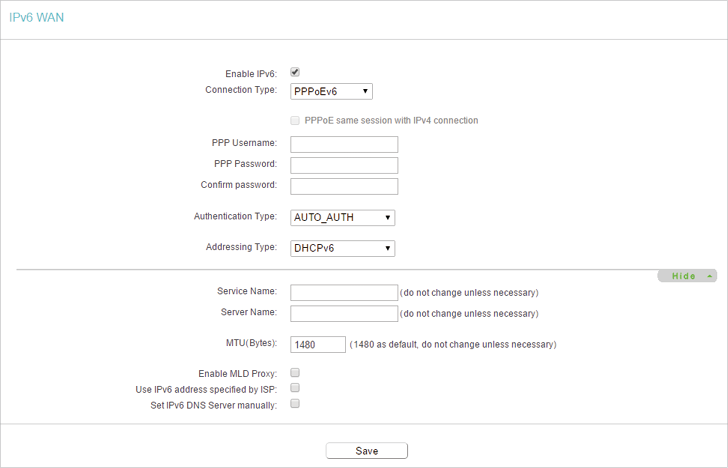
•PPP Username/Password — Enter the User Name and Password provided by your ISP. These fields are case-sensitive.
•Authentication Type – Choose one authentication type from AUTO-AUTH, PAP, CHAP and MS-CHAP.
•Addressing Type — There are two types of assignation for IPv6 address: SLAAC (Stateless address auto-configuration) and DHCPv6 (Dynamic Host Configuration Protocol for IPv6) Server.
•MTU(Bytes) — The normal MTU (Maximum Transmission Unit) value for most Ethernet networks is 1480 Bytes. It is not recommended that you change the default MTU size unless required by your ISP.
•Enable MLD Proxy — Enable the Multicast Listener Discovery (MLD) Proxy function if you need.
•Use IPv6 address specified by ISP — Input a static IPv6 address from the ISP.
•Set IPv6 DNS Server manually — Enter the IP address of the IPv6 DNS server and secondary IPv6 DNS server.
Tunnel 6to4
•WAN Connection — Display the available WAN connection.
4.Click Save.
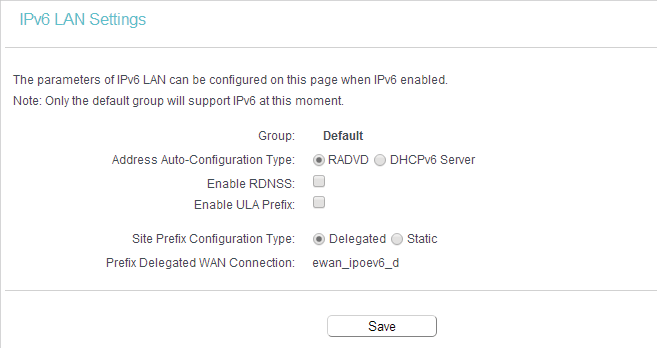
17.3. IPv6 LAN
1.Visit http://tplinkwifi.net, and log in with the username and password you set for the router.
2.Go to IPv6 > IPv6 LAN.
3.Select the Address Autoconfiguration Type which determines the way how the router assigns IPv6 address for PCs on the LAN:
•Address Autoconfiguration Type — RADAD (Router Advertisement Daemon) and DHCPv6 (Dynamic Host Configuration Protocol for IPv6) Server.
•Site Prefix Configuration Type — The type of IPv6 address prefix.
•Delegated — Get the IPv6 address prefix from the ISP automatically, and the device will delegate it to the LAN.
•Static — Configure the Site Prefix and Site Prefix Length manually. Please contact your ISP to get more information before you configure them.
Tips: If your IPv6 wan connection type is “Tunnel 6to4”, the Site Prefix Configuration Type should be “Static” to make sure “Tunnel 6to4” works properly.
4.Click Save.
18. System Tools
18.1. Time Settings
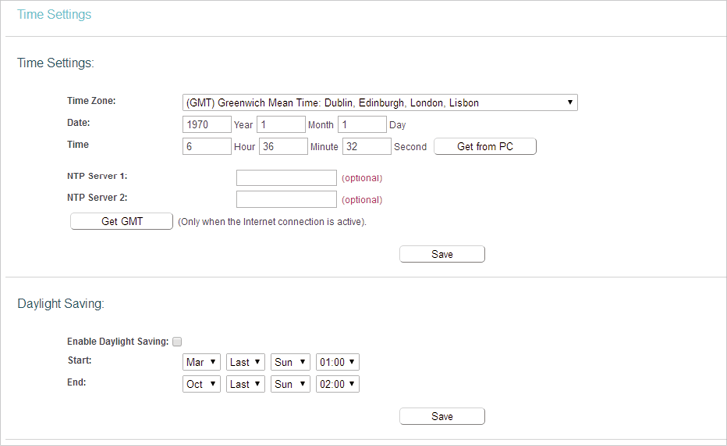
This page allows you to set the time manually or to configure automatic time synchronization. The Router can automatically update the time from an NTP server via the internet.
1.Visit http://tplinkwifi.net, and log in with the username and password you set for the router.
2.Go to System Tools > Time Settings.
•To set time manually:
1.Select your local time zone.
2.Enter the Date in Month/Day/Year format.
3.Enter the Time in Hour/Minute/Second format.
4.Click Save.
•To set time automatically:
5.Select your local time zone.
6.Enter the address or domain of the NTP Server 1 or NTP Server 2.
7.Click Get GMT to get time from the internet if you have connected to the internet.
•To set Daylight Saving:
1.Select Enable DaylightSaving.
2.Select the start time from the drop-down list in the Start field.
3.Select the end time from the drop-down list in the End field.
4.Click Save.
Note:
This setting will be used for some time-based functions such as firewall. You must specify your time zone once you log in to the router successfully; otherwise, time-based functions will not take effect.
18.2. LED Control
The LED Control allows you to turn on or off the LEDs on your device according to a specific time schedule.
1.Visit http://tplinkwifi.net, and log in with the username and password you set for the router.
2.Go to System Tools > LED Control.
3.Enable the Night Mode.
4.Set the LED Off Time and click Save.
18.3. Diagnostic
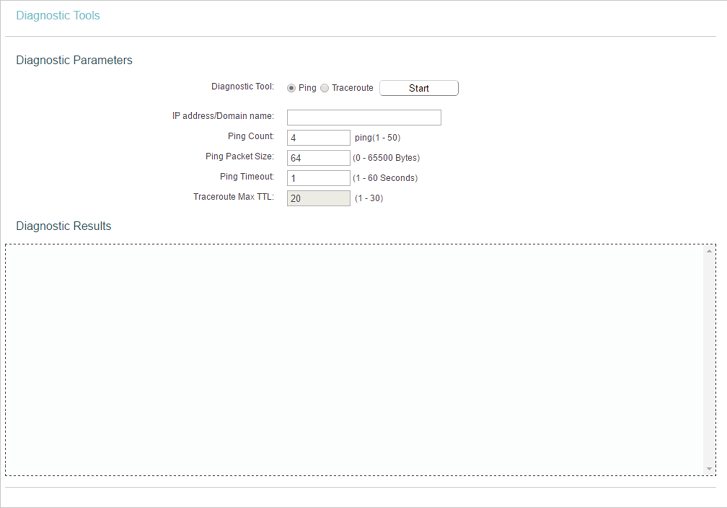
Diagnostic is used to test the connectivity between the router and the host or other network devices.
1.Visit http://tplinkwifi.net, and log in with the username and password you set for the router.
2.Go to System Tools > Diagnostic.
•Diagnostic Tool — Select one diagnostic tool.
•Ping — This diagnostic tool troubleshoots connectivity, reachability, and name resolution to a given host or gateway.
•Tracerouter — This diagnostic tool tests the performance of a connection.
Note:
You can use ping/traceroute to test both numeric IP address or domain name. If pinging/tracerouting the IP address is successful, but pinging/tracerouting the domain name is not, you might have a name resolution problem. In this case, ensure that the domain name you are specifying can be resolved by using Domain Name System (DNS) queries.
•IP Address/Domain Name — Enter the destination IP address (such as 192.168.0.1) or Domain name (such as www.tp-link.com).
•Pings Count — The number of Ping packets for a Ping connection.
•Ping Packet Size — The size of Ping packet.
•Ping Timeout — Set the waiting time for the reply of each Ping packet. If there is no reply in the specified time, the connection is overtime.
•Traceroute Max TTL — The max number of hops for a Traceroute connection.
3.Click Start to check the connectivity of the internet.
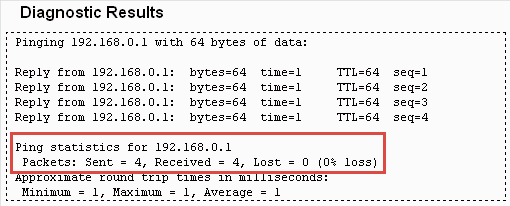
4.The Diagnostic Results page displays the diagnosis result. If the result is similar to the following figure, the connectivity of the internet is fine.
Note: Only one user can use this tool at one time. Options “Number of Pings”, “Ping Size” and “Ping Timeout” are used for the Ping function. Option “Tracert Hops” is used for the Tracert function.
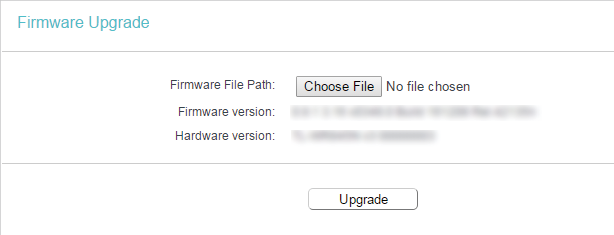
18.4. Firmware Upgrade
TP-Link is dedicated to improving and richening the product features, giving users a better network experience. We will release the latest firmware at TP-Link official website. You can download the latest firmware file from the Support page of our website
www.tp-link.com and upgrade the firmware to the latest version.
1.Download the latest firmware file for the router from our website www.tp-link.com.
2.Visit http://tplinkwifi.net, and log in with the username and password you set for the router.
3.Go to System Tools > Firmware Upgrade.
4.Click Choose File to locate the downloaded firmware file, and click Upgrade.
18.5. Factory Defaults
1.Visit http://tplinkwifi.net, and log in with the username and password you set for the router.
2.Go to System Tools > Factory Defaults. Click Restore to reset all settings to the default values.
•The default Username: admin
•The default Password: admin
•The default IP Address: 192.168.0.1
•The default Subnet Mask: 255.255.255.0
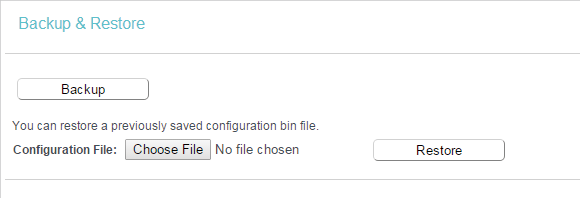
18.6. Backup & Restore
The configuration settings are stored as a configuration file in the router. You can backup the configuration file in your computer for future use and restore the router to the previous settings from the backup file when needed.
1.Visit http://tplinkwifi.net, and log in with the username and password you set for the router.
2.Go to System Tools > Backup & Restore.
•To backup configuration settings:
Click Backup to save a copy of the current settings in your local computer. A “.bin“ file of the current settings will be stored in your computer.
•To restore configuration settings:
1.Click Choose File to locate the backup configuration file stored in your computer, and click Restore.
2.Wait a few minutes for the restoring and rebooting.
Note:
During the restoring process, do not power off or reset the router.
18.7. Reboot
1.Visit http://tplinkwifi.net, and log in with the username and password you set for the router.
2.Go to System Tools > Reboot, and you can restart your router.
3.Enable the auto reboot function as needed.
•Disable — Disable the auto reboot function.
•Timeout — Specify a time period(1-72 hours), then the router will reboot automatically after every this interval.
•Schedule — The router will reboot automatically according to a specific time schedule.
Some settings of the router will take effect only after rebooting, including:
•Change the LAN IP Address (system will reboot automatically).
•Change the DHCP Settings.
•Change the Working Modes.
•Change the Web Management Port.
•Upgrade the firmware of the router (system will reboot automatically).
•Restore the router to its factory defaults (system will reboot automatically).
•Update the configuration with the file (system will reboot automatically).
18.8. Administrator
1.Visit http://tplinkwifi.net, and log in with the username and password you set for the router.
2.Go to System Tools > Administrator, and you can change the factory default username and password of the router, and manage your router from a remote location via the internet.
•To view and change the account settings:
It is strongly recommended that you change the default username and password of the router, for all users that try to access the router’s web management or Quick Setup will be prompted for the router’s username and password.
Note:
The new username and password must not exceed 15 characters and not include any spacing.
•To manage your router via the internet:
1.Specify the management web port number and click Save.
•Port — The default management web port number is 80 for HTTP, 443 for HTTPS. For greater security, you can change the management web port to a number between 1024 and 65535 but do not use the number of any common service port. Tick Enable to enable local or remote management via HTTP or HTTPS.
•Available Host (IP/MAC) — This is the current address you will use when accessing your router from the internet.
•Certificate — A file that provides you with authentication information. Download and install the certificate for Local/Remote Management via HTTPS if you need it. Once the certificate is installed, warnings will not pop up when you access the router via HTTPS.
2.Enter your router’s WAN IP address into your browser’s address bar, followed by a colon and the custom port number you set in the Web Management Port box. For example, if your Router’s WAN address is 202.96.12.8 and you use port number 8080, enter http://202.96.12.8:8080 in your browser.
3.Enter the router’s password to access the web mangement page.
Note:
•Be sure to change the router’s default password to a secure password.
•If the web management port conflicts with the one used for a Virtual Server entry, the entry will be automatically disabled after the setting is saved.
18.9. System Log
1.Visit http://tplinkwifi.net, and log in with the username and password you set for the router.
2.Go to System Tools > System Log, and you can view the logs of the router.
•Loge Type -By selecting the log type, only logs of this type will be shown.
•Log Level — By selecting the log level, only logs of this level will be shown.
•Refresh — Refresh the page to show the latest log list.
•Clear Log — All the logs will be deleted from the router permanently, not just from the page.
18.10. Traffic Statistics
1.Visit http://tplinkwifi.net, and log in with the username and password you set for the router.
2.Go to System Tools > Statistics, and you can monitor the network traffic of each device on the LAN, including total traffic and the value of the last Packets Statistic interval in seconds.
3.Enable Traffic Statistics. If it is disabled, the function of DoS protection in Security settings will be disabled.
•Statistics Interval — The default value is 10. Select a value between 5 and 60 seconds in the pull-down list. The Packets Statistic interval value indicates the time section of the packets statistic.
•IP Address/MAC Address — The IP Address and MAC address are displayed with related statistics.
•Total
•Packets — The total number of packets received and transmitted by the Router.
•Bytes — The total number of bytes received and transmitted by the Router.
•Current
•Packets — The number of packets received and transmitted per second at the specified Packets Statistics interval.
•Bytes — The number of bytes received and transmitted per second at the specified Packets Statistics interval.
•ICMP Tx — The number of ICMP packets transmitted to the WAN per second at the specified Packets Statistics interval. It is shown like “current transmitting rate / Max transmitting rate”.
•UDP Tx — The number of UDP packets transmitted to the WAN per second at the specified Packets Statistics interval. It is shown like “current transmitting rate / Max transmitting rate”.
•TCP SYN Tx — The number of TCP SYN packets transmitted to the WAN per second at the specified Packets Statistics interval. It is shown like “current transmitting rate / Max transmitting rate”.
•Operation
•Reset — Renew the values of the entry to zero.
•Delete — Delete the existing entry in the table.
Click the Refresh button to refresh the page.
Click the Reset All button to reset the values of all entries to zero.
Click the Delete All button to delete all entries in the table.
19. Log Out
Click Logout at the bottom of the main menu, and you will log out of the web page and be directed to the login window.
TP-LINK Archer C6 AC1200 — Configure the DHCP server
TP-LINK Archer C6 AC1200 — Configure the DHCP server
Would you like to learn how to configure the TP-LINK ARCHER C6 AC1200 as a DHCP server? In this tutorial, we are going to configure the DHCP service on the AC1200 router.
• TP-LINK ARCHER C6 AC1200 — Version 2.0
Hardware List:
The following section presents the list of equipment used to create this tutorial.
Every piece of hardware listed above can be found at Amazon website.
TPLINK — Related Tutorial:
On this page, we offer quick access to a list of tutorials related to TP-LINK AC1200.
Archer C6 AC1200 — Configure the DHCP server
Open your browser and enter the IP address of your wireless router.
In our example, the following URL was entered in the Browser:
• http://192.168.0.1
The AC1200 web interface should be presented.
On the login screen, enter the management password.
Access the Advanced tab on the top of the screen.

Access the NETWORK menu and select the DHCP SERVER option.
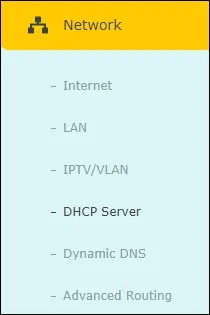
On the DHCP server screen, enter the following configuration.
• DHCP SERVER — Yes.
• IP ADDRESS POOL — Enter the IP address range.
• LEASE TIME — IP address lease time in minutes.
• DEFAULT GATEWAY — Enter the IP address of the default gateway.
• PRIMARY DNS — Enter the IP address of the first DNS server.
• SECONDARY DNS — Enter the IP address of the second DNS server.
Click on the Save button.
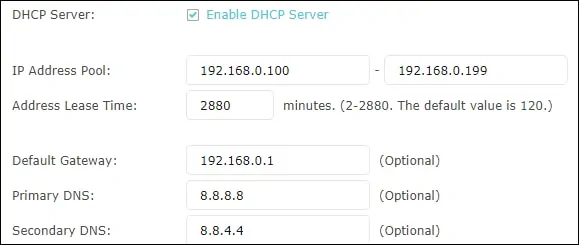
Congratulations, you have finished the DHCP server configuration of the AC1200 router.
VirtualCoin CISSP, PMP, CCNP, MCSE, LPIC22020-11-11T03:25:20-03:00
Related Posts
Page load link
Ok
На чтение 9 мин Просмотров 42к.
Антон Богданов
Инженер-проектировщик сетей связи
DHCP-сервер — до недавнего времени этот термин использовался только среди профессионалов в области информационных систем. Но с появлением интернет-маршрутизаторов практически в каждой квартире разобраться с тем, как работает DHCP, будет нелишним и для простых людей, не связанных с телекоммуникационными сетями.
Содержание
- Что такое DHCP
- Виды
- Принцип действия
- IP адресация
- Проблемы с интернетом и сетью
- Включение в Windows
- Настройка на роутерах
- Asus
- D-Link
- TP-LINK
- Zyxel keenetic
- Netis
- Upvel
Что такое DHCP
Дословно эта аббревиатура (protocol DHCP) означает Dynamic Host Configuration Protocol, что в переводе на русский язык означает «протокол динамической настройки узла». Благодаря этой технологии не требуется прописывать на каждом клиенте сетевые параметры, такие как:
- IP-адрес;
- Маска подсети;
- Основной шлюз;
- Адрес DNS-сервера.
В рамках этой статьи определим термины:
- Клиент (Client) – устройство, с которого происходит выход в интернет;
- Сервер (Server) – устройство, предоставляющее возможность выхода в интернет для клиента.
Простыми словами, DHCP выполняет всю работу по подбору сетевых настроек автоматически, без необходимости присваивать вручную каждому устройству свой IP-адрес. Это очень упрощает работу системного администратора в случае расширения сети.
Виды
Для выхода в интернет используется протокол IPv4. Для своей работы он применяет IP-адреса. IP у каждого компьютера в рамках одной сети должен быть уникальный.
Определение адресов может быть двух типов:
- Статическое (распределение вручную) – IP каждому клиенту присваивается вручную администратором сети;
- Динамическое (DHCP) – IP присваиваются автоматически исходя из заданных условий.
Принцип действия
Если то для чего нужен DHCP, понять довольно просто, то с принципом его работы нужно немного разобраться. Присвоение IP посредством DHCP выполняется в 4 действия:
- Discover (Поиск сервера). Клиент, которому нужно получить сетевой адрес, отправляет сообщение на все компьютеры в сети с запросом на присвоение ему IP. Для своей временной идентификации клиенту присваивается адрес 0.0.0.0;
- Offer (Предложение сервера). Сервер получает запрос от клиента, анализирует его и, исходя из своих настроек, подбирает конфигурацию и отправляет её клиенту;
- Request (Запрос). Получив предлагаемые настройки, клиент отправляет на адрес ответившего ему сервера запрос о предоставлении ему этих настроек;
- Acknowledge (Подтверждение). Сервер получает запрос на уже конкретные настройки, предложенные ранее, создаёт привязку для клиента и отправляет ему их.
Присвоенные настройки выдаются не навсегда, а на какое-то время. Когда срок аренды (lease time) адреса подходит к концу, клиент отправляет на сервер запрос для обновления аренды этого же адреса. Сервер получает запрос, и если никаких причин для отказа нет, обновляет аренду.
Весь этот обмен пакетами происходит в пределах одной подсети, если клиент и сервер находятся в разных подсетях, то нужно использовать DHCP Relay для связи между ними.
IP адресация
Для работы по сети любому устройству требуется IP-адрес. В протоколе IPv4 это числовой идентификатор, состоящий из 4 разрядов, каждый из которых отделяется точкой, без него устройство не может быть определено в сетевой инфраструктуре. Зачастую маршрутизатор имеет IP-адрес 192.168.1.1, а подключённое к нему устройство, например, 192.168.1.2.
Клиенту должна быть присвоена определённая маска подсети, например, 255.255.255.0. Она позволяет определить к какой сети относится данный клиент.
Для связи между интернетом и сетью в любой сети должен быть определён IP-адрес основного шлюза. В роли шлюза выступает маршрутизатор, который предоставляет доступ в сеть всем устройствам в своей сети.
Проблемы с интернетом и сетью
При использовании DHCP могут возникать некоторые проблемы с доступом в интернет:
- Дублирование IP. Когда в пределах одной сети у двух и более устройств прописан один и тот же адрес, то возникнет ошибка «Address Already in Use», что означает, что данный адрес уже используется. В этом случае нужно проверить настройки IP на всех компьютерах и изменить совпадающие. Это может быть из-за того, что на роутере установлена раздача адресов по DHCP или присвоены статические адреса некоторым устройствам, и из-за того, что неправильно задан диапазон IP, раздаваемых динамически, DHCP сервер пытается присвоить уже используемый адрес. Для решения этой проблемы можно посмотреть список клиентов DHCP и передвинуть диапазон динамических адресов далее;
- Исчерпание IP. Это означает, что пул адресов, доступных для динамической раздачи, исчерпан и его нужно расширить, чтобы новые устройства могли получать адреса.
- Неправильная настройка DHCP и клиента. В случае, если изменить на самом клиенте присвоенные ему автоматические настройки, то доступа в сеть не будет. Присваивать адреса клиентам нужно на роутере, и уже после и на клиенте.
Включение в Windows
В случае подключения компьютера напрямую к кабелю от интернет-провайдера, как правило, умения работать с DHCP не требуется. Поскольку в большинстве случаев подключение физических лиц происходит через протокол PPPoE, в котором пользователю нужно лишь создать подключение к сети и ввести там свой логин и пароль. В этом случае компьютеру будет присвоен динамический IP, который через время изменится на другой. И в этот момент пользователь не догадывается, что служба DHCP уже вовсю работает на его компьютере, и позволяет провайдеру предоставить ему любой IP.
Для настройки DHCP сервера в операционной системе Windows нужно зайти в “Центр управления сетями и общим доступом” и выбрать пункт “Изменение параметров адаптера”. В открывшемся окне нужно найти сетевую карту и в контекстном меню выбрать пункт “Свойства”, в новом окне найти пункт “IP версии 4” и нажать на кнопку “Свойства”. В открывшемся окне можно увидеть, что активны настройки получения адреса автоматически.
В случае, если провайдер предоставил вам статический IP, то это означает что для доступа в интернет устройство должно иметь строго тот адрес, который выдал провайдер, для этого в этом же окне нужно указать параметры, выданные провайдером. Проведя соответствующие настройки, вы отключите DHCP на своём компьютере и ему никто не сможет присвоить другой адрес, отличный от того, который был установлен.
Настройка на роутерах
Всё это относилось к настройкам внешнего IP, но что делать, если у пользователя стоит задача обеспечить доступом в интернет несколько устройств? В этом случае нужно использовать маршрутизатор, для настройки которого пригодится умение работать с DHCP.
В зависимости от того, какой тип подключения используется, с выделенным или динамическим IP, так же как и в случае с настройкой подключения в операционной системе, роутер получит либо динамический (DHCP), либо статический IP.
Но это ещё не всё, ведь для каждого устройства, подключённого к сети, требуется собственный адрес, уникальный только в рамках данной сети, чтобы роутер мог «понимать», как ему общаться с тем или иным устройством. Внешний адрес, уникальный в глобальной сети, у всех устройств будет точно такой же, как и у маршрутизатора, а вот с внутренними нужно будет разобраться непосредственно пользователю.
Сам роутер имеет статический внутренний IP, обычно это 192.168.1.1 или 192.168.0.1. На всех роутерах DHCP сервер активирован по умолчанию. Это сделано для того, чтобы можно было подключиться к маршрутизатору с любого устройства, роутер сам определит, какой ему присвоить адрес и даст доступ во внутреннюю сеть. Такой способ подключения клиентов очень удобен, ведь в этом случае не нужно проводить предварительную настройку каждого устройства и присваивать каждому уникальный внутренний адрес. Все новые устройства без проблем получат адреса и доступ в сеть.
Однако это может быть неудобно, если нужно управлять этими устройствами, в этом случае лучше будет отключить динамическое распределение адресов и присвоить каждому устройству свой IP. Принцип настройки DHCP-сервера на роутере разных моделей одинаков, но достигается разными путями.
Итак, всё же как включить DHCP на роутере? Если вкратце, то нужно сначала активировать работу сервера, настроить пул (диапазон адресов, которые выдаются роутером автоматически) задав начальный и конечный IP и время его аренды.
Asus
Настройка роутера этой фирмы происходит следующим образом. В левом краю web-панели есть пункт “Локальная сеть”, нажав на него, нужно выбрать вкладку DHCP-сервер. На открывшейся странице нужно отметить пункт “Да” в графе “Включить DHCP-сервер”.
Здесь можно настроить пул выдаваемых автоматически адресов и время аренды.
D-Link
Настраивать роутеры D-Link чуть сложнее, поскольку у них сильно разнятся варианты исполнения интерфейса. Но обычно пункт настройки DHCP вынесен непосредственно в основное меню на главной странице.
Здесь всё те же настройки, только выглядят несколько иначе.
TP-LINK
Параметры DHCP на устройствах TP-LINK доступны практически с главной страницы интерфейса.
В левом краю есть стэк “DHCP”. Развернув его, можно увидеть ещё три пункта, в которых можно настроить, посмотреть список клиентов и зарезервировать адреса для определённых клиентов. Для настройки нужно выбрать пункт “Настройка DHCP”. Далее нужно активировать сервер и произвести его настройку, задав интервал и время аренды.
Zyxel keenetic
Для настройки роутеров Zyxel нужно зайти в панель Администратора, затем в настройки домашней сети.
Там выбрать вкладку “Параметры IP” и поставить галочку “Включён” в пункте “Сервер DHCP”.
Netis
Настройки роутеров Netis несколько более скудные, здесь можно включить и отключить DHCP на маршрутизаторе и задать диапазон выдаваемых IP.
Попасть в эти настройки можно из стэка “Сеть”, пункт “LAN”.
Upvel
В левом стеке есть пункт “Основные настройки”, там “Интерфейс LAN”, в нём на выбор можно включить DHCP или DHCP Relay (ретранслятор в другие подсети).
Здесь можно установить диапазон адресов, срок аренды и редактировать список зарезервированных клиентов, добавлять и удалять их.
Настройка DHCP (Dynamic Host Configuration Protocol) на роутере TP-LINK позволяет автоматически присваивать IP-адреса и другую сетевую информацию устройствам в сети. DHCP упрощает установку и управление сетевыми устройствами, избавляя пользователей от необходимости вручную настраивать каждое устройство в сети.
По умолчанию DHCP на роутере TP-LINK включен. Однако, возможно, вам потребуется настроить дополнительные параметры DHCP или включить его, если он отключен. В этой подробной инструкции мы расскажем, как настроить DHCP на роутере TP-LINK, чтобы у вас было полное представление о том, как это делается.
Для начала вам понадобится доступ к веб-интерфейсу роутера TP-LINK. Введите IP-адрес роутера TP-LINK в адресную строку вашего браузера и введите свои учетные данные для входа. После успешной авторизации вы увидите основное меню настроек роутера TP-LINK.
Содержание
- Настройка DHCP на роутере TP-Link
- Установка связи с роутером TP-Link
- Переход в веб-интерфейс роутера TP-Link
- Настройка DHCP-сервера на роутере TP-Link
- Проверка работы DHCP на роутере TP-Link
Настройка DHCP на роутере TP-Link
Шаг 1: Подключите компьютер к роутеру TP-Link с помощью кабеля Ethernet. Убедитесь, что роутер включен и работает.
Шаг 2: Откройте веб-браузер и введите IP-адрес роутера TP-Link в строке адреса. Обычно это 192.168.0.1 или 192.168.1.1. Нажмите Enter, чтобы открыть веб-интерфейс роутера.
Шаг 3: Введите имя пользователя и пароль для входа в роутер. Обычно это «admin» для имени пользователя и «admin» для пароля. Если вы не меняли эти настройки, оставьте поля пустыми или используйте указанные значения.
Шаг 4: Найдите веб-интерфейс роутера на странице настроек. Обычно это вкладка «Network» или «LAN». В этой вкладке найдите раздел «DHCP Settings» или «DHCP Server».
Шаг 5: Включите DHCP-сервер, установив соответствующий флажок или переключатель. Если DHCP-сервер уже включен, перейдите к следующему шагу.
Шаг 6: Настройте диапазон IP-адресов, которые будут выделяться клиентам. Укажите начальный и конечный IP-адреса диапазона. Обычно используется диапазон от 192.168.0.2 до 192.168.0.254 или от 192.168.1.100 до 192.168.1.199. Вы можете также установить время аренды IP-адреса, по умолчанию это 1 день.
Шаг 7: Настройте DNS-серверы, которые будут автоматически передаваться клиентам. Обычно вы можете использовать DNS-серверы вашего провайдера или общедоступные DNS-серверы, такие как 8.8.8.8 и 8.8.4.4 (DNS-серверы Google).
Шаг 8: Сохраните изменения, нажав кнопку «Save» или «Apply». Роутер перезагрузится, чтобы применить новые настройки.
Вот и все! Теперь настройка DHCP на роутере TP-Link завершена. Роутер будет автоматически назначать IP-адреса клиентам, подключенным к сети, и предоставлять им другие необходимые сетевые настройки.
Установка связи с роутером TP-Link
Для настройки DHCP на роутере TP-Link сначала необходимо установить связь с ним. В этом разделе рассмотрим, как установить связь с роутером TP-Link по проводу Ethernet.
- Подключите один конец Ethernet-кабеля к порту WAN роутера TP-Link.
- Подключите другой конец Ethernet-кабеля к сетевой карте вашего компьютера.
- Убедитесь, что ваш компьютер подключен к сети, и включите его.
- Откройте веб-браузер и введите IP-адрес роутера TP-Link в адресную строку. Обычно IP-адрес роутера TP-Link — это 192.168.0.1 или 192.168.1.1. Если вы не знаете IP-адрес роутера TP-Link, вы можете найти его в документации к устройству или свяжитесь с вашим провайдером интернета для получения информации о настройках роутера.
- Нажмите клавишу Enter, чтобы перейти на страницу аутентификации роутера.
- Введите имя пользователя и пароль для доступа к роутеру TP-Link. Обычно имя пользователя и пароль по умолчанию можно найти на задней стороне роутера или в документации. Если вы изменили имя пользователя и пароль, введите свои учетные данные.
- После успешной аутентификации вы будете перенаправлены на главную страницу роутера TP-Link.
Теперь у вас есть связь с роутером TP-Link и вы готовы приступить к настройке DHCP.
Переход в веб-интерфейс роутера TP-Link
Для настройки DHCP на роутере TP-Link вам потребуется перейти в его веб-интерфейс. Веб-интерфейс позволяет управлять настройками роутера, включая DHCP.
Чтобы перейти в веб-интерфейс роутера TP-Link, выполните следующие шаги:
- Убедитесь, что ваш компьютер подключен к роутеру с помощью кабеля Ethernet или по беспроводному соединению (Wi-Fi).
- Откройте веб-браузер (например, Google Chrome, Mozilla Firefox или Internet Explorer).
- Введите IP-адрес роутера TP-Link в адресной строке браузера. Обычно IP-адрес роутера TP-Link по умолчанию — 192.168.0.1.
- Нажмите клавишу Enter на клавиатуре или нажмите кнопку «Перейти».
После выполнения этих шагов вы должны увидеть страницу веб-интерфейса роутера TP-Link.
Если вы не можете войти в веб-интерфейс, возможно, IP-адрес роутера был изменен или у вас есть другая сетевая конфигурация. Вы можете попробовать следующие действия для решения проблемы:
- Проверьте правильность ввода IP-адреса роутера в адресной строке браузера.
- Убедитесь, что ваш компьютер и роутер подключены к одной сети.
- Попробуйте перезагрузить роутер и компьютер.
- Если ничего не помогает, обратитесь к документации по вашему конкретному модели роутера TP-Link или обратитесь в службу поддержки TP-Link для получения помощи.
Как только вы успешно войдете в веб-интерфейс роутера TP-Link, вы сможете настроить DHCP и другие параметры сети.
Настройка DHCP-сервера на роутере TP-Link
Для обеспечения автоматического назначения IP-адресов клиентам в вашей сети, роутер TP-Link предлагает функционал DHCP-сервера. DHCP (Dynamic Host Configuration Protocol) позволяет автоматически настраивать сетевые настройки, такие как IP-адрес, маска подсети, шлюз и DNS-серверы на клиентских устройствах. Настройка DHCP-сервера на роутере TP-Link достаточно проста и позволяет упростить управление сетью.
- Войдите в интерфейс маршрутизатора TP-Link.
Обычно для доступа к интерфейсу маршрутизатора необходимо ввести IP-адрес веб-интерфейса веб-браузера. По умолчанию IP-адрес доступа к интерфейсу указан в руководстве пользователя или на задней панели роутера.
- Настройте DHCP-сервер.
После входа в интерфейс маршрутизатора выполните следующее:
- Откройте вкладку «DHCP».
- Включите функцию DHCP-сервера, выбрав соответствующий флажок или радиокнопку.
- Установите пул IP-адресов, который будет использоваться для назначения клиентам. Укажите начальный и конечный IP-адреса пула.
- Установите время аренды IP-адреса, то есть период времени, в течение которого клиентское устройство может использовать назначенный IP-адрес без переназначения.
- Настройте другие параметры DHCP.
Помимо базовых настроек, в интерфейсе маршрутизатора TP-Link также могут быть доступны различные дополнительные настройки DHCP:
- Укажите маску подсети, шлюз и DNS-серверы, которые будут назначены клиентам.
- Настройте режим обратимого прокси-ARP для поддержки нескольких DHCP-серверов в сети.
- Ограничьте количество клиентских устройств, которым будет предоставлен IP-адрес.
- Выделите статические IP-адреса для определенных устройств в сети, что позволит им всегда получать один и тот же IP-адрес.
- Сохраните и примените настройки.
После завершения настройки DHCP-сервера не забудьте сохранить и применить изменения. Обычно для этого нужно нажать кнопку «Сохранить» или «Применить». После этого DHCP-сервер будет готов к работе.
Настройка DHCP-сервера на роутере TP-Link позволит автоматически назначать IP-адреса клиентам и упростит управление сетью. С DHCP-сервером устройства в вашей сети смогут автоматически получать все необходимые сетевые настройки, что позволит упростить процесс подключения и настройки устройств в сети.
Проверка работы DHCP на роутере TP-Link
После настройки DHCP на роутере TP-Link необходимо выполнить проверку его работы. Для этого можно использовать следующие методы:
- Подключите устройство к роутеру TP-Link, которому будет выделен IP-адрес через DHCP.
- Убедитесь, что настройки сетевого подключения устройства установлены на автоматическое получение IP-адреса через DHCP.
- Перезагрузите роутер TP-Link.
- Подождите некоторое время (обычно не более минуты) для того, чтобы роутер присвоил IP-адрес устройству.
После выполнения этих действий можно проверить работу DHCP на роутере TP-Link:
- Откройте командную строку на устройстве, подключенном к роутеру.
- Введите команду ipconfig /all.
- Найдите строку с IP-адресом и другой информацией о сетевом подключении, полученной от роутера через DHCP.
- Убедитесь, что IP-адрес, указанный в этой строке, соответствует ожидаемому адресу сети.
- Также вы можете проверить работу DHCP, открыв веб-браузер и вводя в адресной строке IP-адрес роутера TP-Link, после чего автоматически будет осуществлен вход на страницу управления роутером.
Если вы получили IP-адрес через DHCP и успешно вошли на страницу управления роутером TP-Link, это означает, что DHCP настроен и работает корректно.
В случае, если IP-адрес не был получен через DHCP или возникли проблемы с подключением устройства к роутеру, следует повторить настройку DHCP на роутере согласно инструкции и проверить еще раз работу DHCP с помощью вышеуказанных методов.

