![]() Приветствую!
Приветствую!
Если в предыдущих версиях Windows добраться до системного окна «Устройства и принтеры» можно было интуитивно быстро, благо его пункт находился в меню Пуск, то в Windows 10 разработчики усложнили данную процедуру. Складывается впечатление, что разработчики поступательно усложняют доступ к некогда привычным системным элементам, в угоду их урезанным собратьям, в которых представлены далеко не все возможности, что можно посмотреть, настроить или использовать в операционной системе Windows.
Но мы оставим это на совести текущего руководства в Microsoft, что курирует разработку Windows 10. В нашу же задачу входит информирование о том, как всё-таки открыть весьма актуальное для многих пользователей окно «Устройства и принтеры», в котором не только представлены подключенные к компьютеру устройства, но и имеется возможность настройки и управления некоторыми из них.
![]()
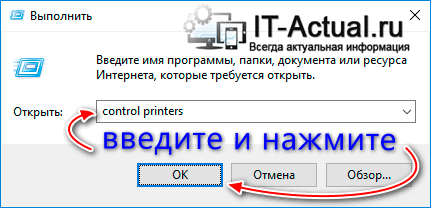
- Мы рассмотрим открытие необходимого нам окна через системную команду. Сама команда вводится в специальное окно «Выполнить», которое можно вызвать через соответствующий пункт в общем списке приложений, в папке Служебные – Windows, или же просто нажав на клавиатуре комбинацию клавиш Win + R (как её нажать).

- Далее следует в окне, которое было вызвано на предыдущем шаге, вписать короткую команду:
И нажать по клавише OK (или Enter на клавиатуре).
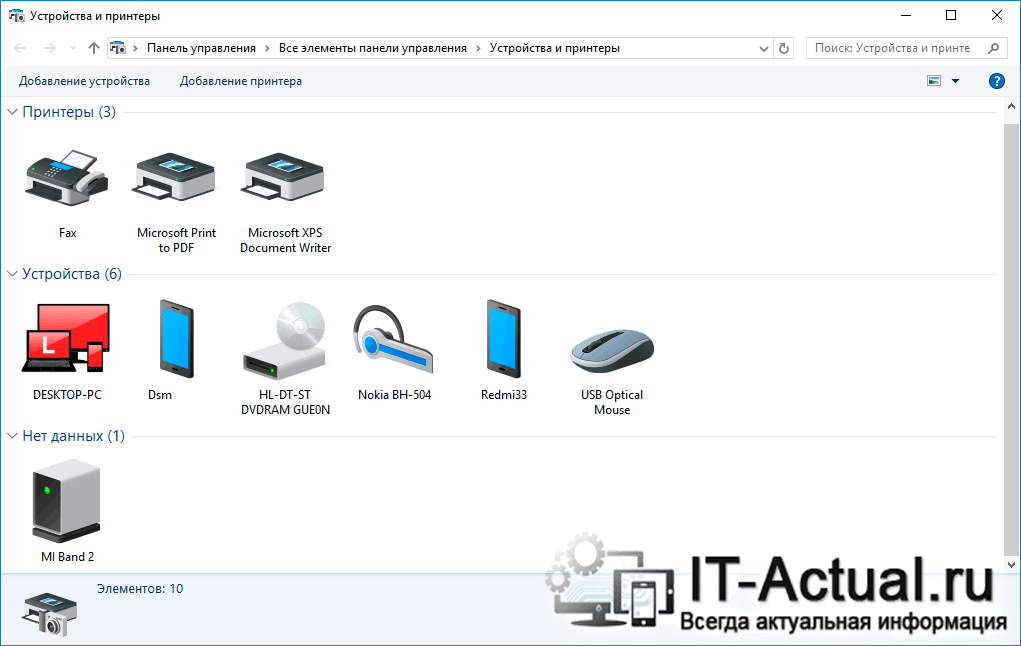
- Команда будет тут же отработана, и вы увидите желанное окно «Устройства и принтеры» в Виндовс 10, в котором вы уже непосредственно сможете просмотреть подключенные к вашему компьютеру устройства и при желании произвести необходимые дополнительные манипуляции.

Видеоинструкция
![]()
Всего пару описанных шагов достаточно для того, чтобы открыть важный системный элемент, в котором отображаются как подключенные принтеры, так и любые другие устройства: телефоны, смартфоны, клавиатуры, мышки, приводы, гарнитуры и так далее.
Если же вам достаточно часто необходимо обращаться к данному окну, то имеет смысл создать на рабочем столе соответствующий ярлык, дабы максимально оперативно осуществлять его открытие. Более подробно о данной возможности вы сможете узнать из материала «Как создать ярлык с нужной командой в Windows».
![]()
Пожертвование сайту IT-Actual.ru (cбор пожертвований осуществляется через сервис «ЮMoney»)
На что пойдут пожертвования \ реквизиты других платёжных систем
Привет.
Не секрет, что в экономике ныне дела обстоят не лучшим образом, цены растут, а доходы падают. И данный сайт также переживает нелёгкие времена 
Если у тебя есть возможность и желание помочь развитию ресурса, то ты можешь перевести любую сумму (даже самую минимальную) через форму пожертвований, или на следующие реквизиты:
Номер банковской карты: 5331 5721 0220 5546
Кошелёк ЮMoney: 410015361853797
Кошелёк WebMoney: Z812646225287
PayPal: paypal@it-actual.ru
BitCoin: 1DZUZnSdcN6F4YKhf4BcArfQK8vQaRiA93
Оказавшие помощь:
Сергей И. — 500руб
<аноним> — 468руб
<аноним> — 294руб
Мария М. — 300руб
Валерий С. — 420руб
<аноним> — 600руб
Полина В. — 240руб
Деньги пойдут на оплату хостинга, продление домена, администрирование и развитие ресурса. Спасибо.
С уважением, создатель сайта IT-Actual.ru
If you are wondering about how to access the Devices & Printers section on your computer, you can find below different ways to Open Devices and Printers in Windows 11 and Windows 10.

As the name suggests, the “Devices and Printers” section in Windows 10/11 provides access to Printers and Devices connected to your computer, so that you can manage them.
When you land on “Devices and Printers” section, you will be able to see all the Devices plugged-in to your computer and also devices wirelessly connected to your computer.
Also, you will see the options to Add a Device, add a Printer and a Search bar that can be used to search for devices connected to your computer.
1. Open Devices & Printers Using Settings in Windows 11
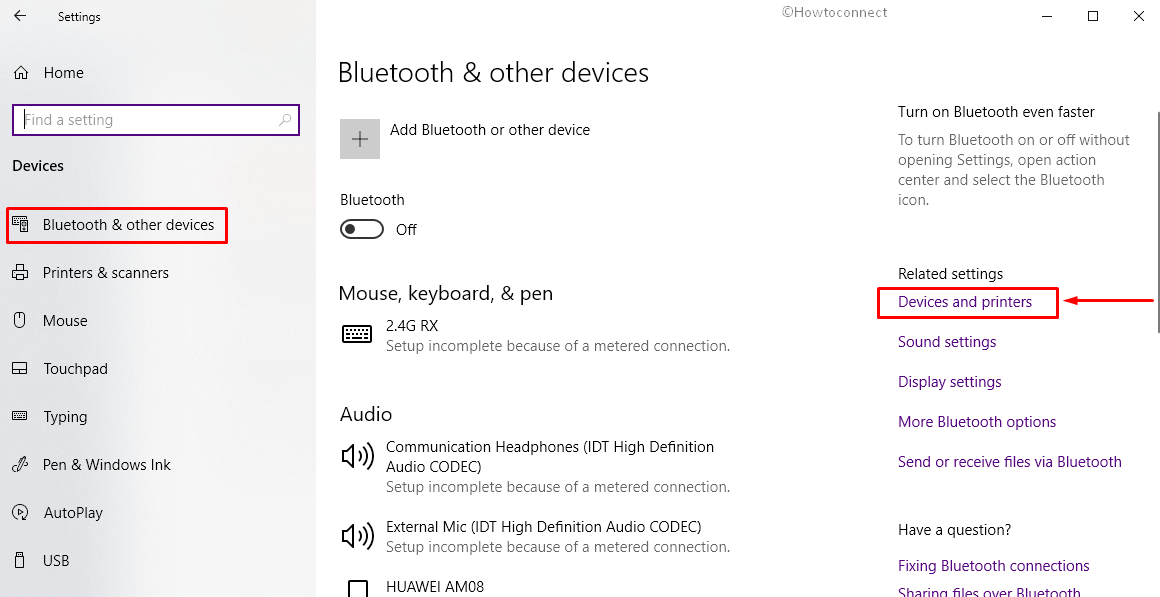
Click on Start button > Settings Icon > select Bluetooth & Devices in the left-pane. In the right-pane, click on the Devices tab.

On the next screen, scroll down to “Related Settings” section and click on Devices & Printers tab.

This will take you to the familiar Devices and Printers screen.
2. Open Devices and Printers Using Settings in Windows 10
Go to Settings > Devices > scroll down and click on Devices and printers link located under “Related Settings” section.

This will immediately take you to Devices & Printer section on your computer.
3. Open Devices & Printers Using Control Panel in Windows 11/10
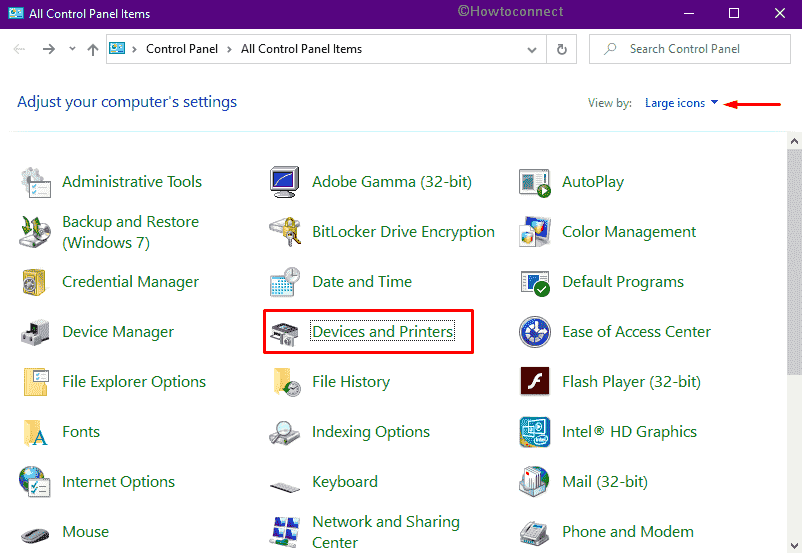
Right-click on the Start button and click on Run. In Run Command window, type Control Panel and click on OK.

On Control Panel screen, switch to Category view and click on View Devices and Printers link to reach Devices & Printers screen on your computer.

Note: If you are in Large Icons View, click on Devices and Printers link between Device Manager and Ease of Access Center.
4. Open Devices and Printers Using Device Manager in Windows 11/10
Right-click on Start button and click on Device Manager. On Device Manager Screen, click on the Action tab and select Devices and Printers option.

Note: You need to be logged in as Admin to see Devices and Printers option.
Add Desktop Shortcut to Printers
From the Devices and Printers screen, you can create a Desktop Shortcut that can provide an immediate access to the Printer attached to your computer.
Simply, right-click on the Printer attached to your computer and select Create Shortcut option.

On the pop-up, click on the Yes option to place a Shortcut to this printer on the Desktop of your computer.
- How to Change Default Printer in Windows 10
- How to Open Registry Editor In Windows 11/10
Devices and Printers is a part of classic control panel that allows you to add and manage peripherals on Windows 10. Furthermore, The platform provides information about pending documents in the queue for printing, size of the paper in use and lets you adjust the settings. So we are going to discuss all possible ways to open Devices and Printers (Control Panel) in Windows 10 here.
The Devices and Printers applet includes every setting and option for Mouse, Fax, printing machines added via bluetooth or USB ports. Moreover, you can see how each of them is working, share over network, troubleshoot errors with specific tools, and check necessary information.
Here is how to open Devices and Printers (Control Panel) in Windows 10 –
1] With help of Control Panel
- Click on Windows logo on keyboard and write control panel.
- Hit Enter.
- Set the View by option to Large icons.
- From the available links, select Devices and Printers.
2] Using Windows Settings app
- Press Win and I hotkey together.
- From the Settings interface, click Devices.
- When the next page appears with Bluetooth & other devices unveiled, move to the right surface.
- Click the link Devices and Printers located in the extreme right column.
3] Making use of Command Prompt
- Press Win+R to invoke Run command.
- Put cmd in the available empty field and click OK button.
- Once in the black panel, insert control printers.
- Finally, hit Enter key to open Devices and Printers.
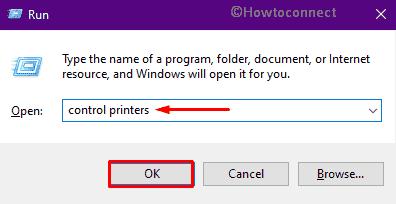
4] Open Devices and Printers via Run
- Right-click on Start icon and select Run.
- Type control printers in the command box.
- Finally, Click on OK.
5] Through Windows PowerShell
- Press Win+S altogether to invoke taskbar search.
- Type powerShell and hit Enter key.
- Let the utility to activate to execute a command.
- Hereafter put control printers after the blinking cursor.
- Press Enter to open Devices and Printers.
6] Pin Devices and Printers
- Open Control Panel first.
- Make sure the View by option is set as Large icons.
- Right-click on Devices and Printers.
- Choose Pin to Start.
- Similarly, you can opt for Pin to Quick access.
7] Create Desktop shortcut
- Right-click on any void space and choose New => Shortcut.
- When a wizard shows up, type in control printers in the available box.
- Click Next button to continue.
- On the consequent wizard, provide the shortcut a name such as Devices and Printers.
- In the end, click on Finish.
- The system will create a desktop shortcut immediately and from now on, you just need to double-click the same.
8] Generate hotkey to open Devices and Printers
- First of all, create a shortcut for Devices and Printers by following the above method.
- Once created, right-click on the same and choose Properties.
- When a wizard makes an appearance, click the bar set aside Shortcut key.
- Press a key you prefer.
- You will notice the system has added Ctrl+Alt before the pressed key.
- Therefore, the hotkey will look like Ctrl+Alt+key you entered.
- Click Apply followed by OK.
- Now onward, press the keyboard shortcut at one go to open Devices and Printers.
9] Add Devices and Printers in the context menu
- Open Run Dialog box and put regedit in the text field available there.
- Hit the OK button.
- If a UAC prompts for permission, click Yes to provide your consent.
- When Registry Editor becomes visible, navigate the following directory –
HKEY_CLASSES_ROOT\DesktopBackground\Shell
- Right-click on Shell present in the left column and choose New => key.
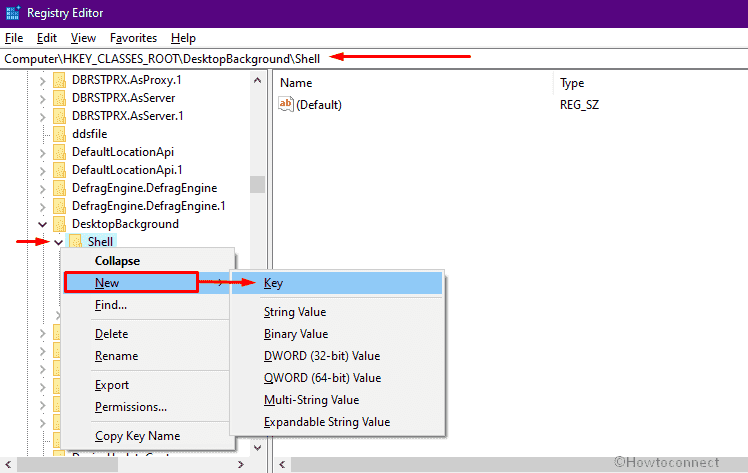
- Name the subkey as DevicesAndPrinters.
- Move to the adjacent right.
- After that, right-click on an empty space and select New first followed by String Value.
- Name the value MUIVerb.
- Double-click on MUIVerb thereafter set its value to Devices and printers.

- Similarly, create another String Value named Icon and set %systemroot%\system32\DeviceCenter.dll,-1 as value data.
![]()
- Later on, right-click on DevicesAndPrinters from the left column and choose New => Key.
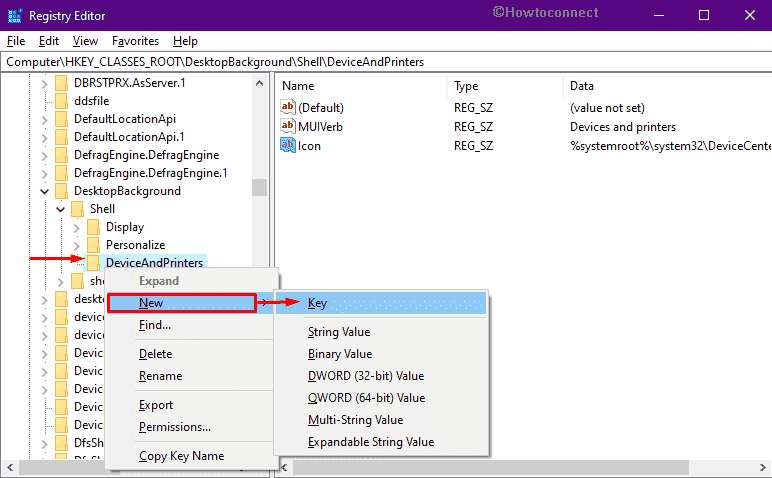
- Put Command as name.
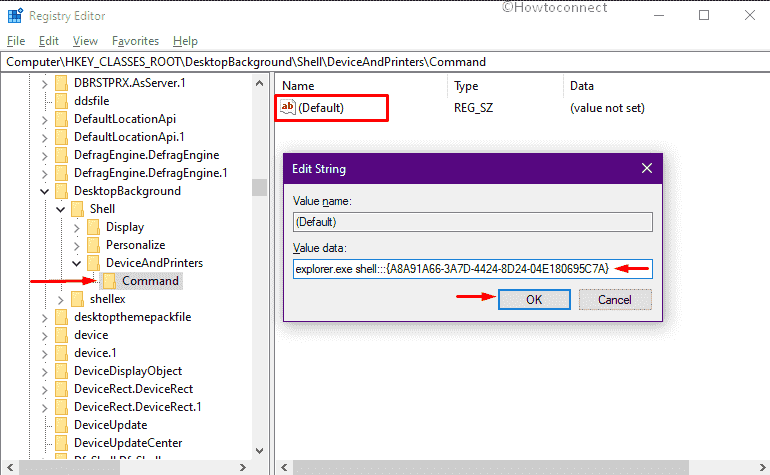
- Now, shift yourself to the right-hand side and double-click the string key named Default.
- Copy the following and paste it in the Value data box –
explorer.exe shell:::{A8A91A66-3A7D-4424-8D24-04E180695C7A}
- Click the OK button to save the changes.
- Finally, go to the desktop screen and right-click on a void space.
- Opt for Devices and Printers from the context menu.
Methods:
1] With help of Control Panel
2] Using Windows Settings app
3] Making use of Command Prompt
4] Via Run Command
5] Through Windows PowerShell
6] From Pined Devices and Printers shortcut
7] Using Desktop shortcut
8] By means of hotkey
9] From context menu
That’s all!!
If you’re a Windows 10 user, there are a few ways to open devices and printers. The easiest way is to use the Start Menu. To open a printer, click the printer name in the left pane of the Start Menu and then click the Printers & Scanners icon. To open a device, click its name in the left pane of the Start Menu and then click its Properties button.
After you have clicked on the “Devices and Printers” section, you’ll be prompted to choose a device or printer from the list. You can also adjust the settings for your device, change paper size and add or remove printers. After you have chosen the device or printer, you can select it and click on “Manage” or “Add or remove devices” to get started.
Devices and Printers is the main interface of Windows. From here, you can manage, configure, and remove all the connected devices. This window also displays details about each device’s driver and hardware. Some of the devices may not be listed in the “Devices and Printers” section. If this is the case, you need to install the appropriate driver. You may also need to download software for the printers and scanners if you don’t already have them installed.
How Do I Access Devices And Printers?
If you are wondering how to access devices and printers on Windows 10, it is simple to do so. You can right-click on an empty space on your desktop and click the Devices and Printers shortcut. A pop-up box called User Account Control (UAC) may appear, so you need to grant permission to open Devices and Printers. Once you grant permission, you will have access to Devices and Printers.
How Do I Access Devices And Printers?Where is Devices And Printers Icon?What is Devices And Printers in Control Panel?How Can I See All Devices on My Computer?Where Do I Find Printers in My Settings?How Do I Find My Printers Control Panel?How Do I Fix Devices And Printers Not Showing?
Using the Devices and Printers section of Control Panel, you can easily manage your external devices. These devices include printers, scanners, fax machines, cameras, and even external drives. From here, you can customize the paper size for a particular printer, delete a printer, or add another printer. After selecting a printer, open the Control Panel and choose Large icons. After selecting this option, you can now access the settings for that device.
If Devices and Printers won’t load in Windows 10, try booting in safe mode. Doing so will allow you to manage the devices in Windows 10, and it can also be helpful if you’re not sure where to find them. Try disabling Bluetooth services if they are the culprit. If this does not solve the problem, try disabling the Bluetooth service and restart your computer. You may have to reinstall the driver to access your printer.
Where is Devices And Printers Icon?
The Devices and Printers section is the place to manage external devices on your PC, such as printers, scanners, faxes, cameras, and other peripherals. Here, you can control the paper size of your printer, print to different locations, and set default paper sizes. There are also additional settings you can access through this section. Explore the options to find the right one for your needs.
If you’re experiencing printing problems, the Devices and Printers window will be of the utmost importance. You can use this window to check your printer’s properties or clear print jobs. Microsoft is slowly moving the printer controls to the Settings menu, but the time spent there is frustrating. Luckily, there’s a way to open the Devices and Printers page without waiting five minutes.
One way to fix this problem is to change your Bluetooth settings. In Windows 10, you can do this in the Settings menu. By default, you should be able to find Bluetooth devices. You can also enable Bluetooth in the Control Panel. However, if you want to use Bluetooth on your PC, you need to enable it. Once you have enabled it, Windows 10 will prompt you to choose the device.
What is Devices And Printers in Control Panel?
The Devices and Printers section of Windows allows you to interact with all the devices connected to your computer. The options available depend on the type of driver installed on each device. For example, if you need to install a driver for a printer, you need to click “Add a printer.”
You can find Devices and Printers in the Hardware and Sound section of the Control Panel. If you don’t want to go through the steps to find the section, just click on the “View devices and printers” link. It will bring up a Window with all of the items in this category. Click the “Devices and Printers” subcategory. Click “Add or Remove Devices” to find the printer you want to add.
If you are experiencing problems with your Bluetooth connections, check the Bluetooth services. Make sure they are set to Automatic. Otherwise, you can disable them. In some cases, turning on the display for hidden devices will help. If you cannot find a solution for this problem, you can try uninstalling the devices that don’t work. If you’ve tried these steps, you should find a solution for your Bluetooth problem.
How Can I See All Devices on My Computer?
How Can I see all devices connected to my computer? The device management screen in Windows lets you view and manage all connected devices. It’s especially useful if you’ve recently added a printer or other device to your computer. From this window, you can manage your devices as well as view the queue. You can also view the device’s properties and change its settings. To do so, follow the steps below.
First, open the USB Device Manager to view a list of all connected USB devices. It’s easy to use, and it’s free. Just run the utility and choose ‘Show all devices’ in the left-hand pane. Once you’ve opened it, you’ll be able to enable or disable devices and sort them into groups. You can also double-click an entry to view more information.
Where Do I Find Printers in My Settings?
To find your printer, you can access the Settings menu under Start -> Settings -> Devices -> Printers & Scanners. In the Printers and Scanners section, you can open the properties of your printer by clicking the corresponding link. Then, click the Print button to select the desired size. If you are using a Mac, you can also click the Print icon.
To find printers in Windows 10, navigate to the Settings interface. Select the Start button, which is located in the bottom left corner of the screen. Click on the Settings icon, which is located just above the power button. Next, select Printers & Scanners, and click the Advanced button. From here, you can choose the printing preferences, which affect all jobs sent to the printer. If you want to change the settings of a specific printer, you can also visit the website of the manufacturer.
Once you’ve added the printer to your system, you should see the Printers tab in the Settings window. This is where you can control the size of your printed documents, set a default paper size, and select a paper layout. You can also open the Printer settings page from applications. Microsoft Word, for example, uses this feature. Once you’ve added your printer, Windows 10 will search for nearby printers and add them to the system.
How Do I Find My Printers Control Panel?
To find your printer’s control panel in Windows 10, first open the Start menu, then select Settings. Next, choose Devices, Printers, and Scanners. In the Printing Preferences page, click on Advanced to change the advanced settings for your printer. For example, you can change the Paper Size, Color, and Resolution for your printer. After changing these settings, you can choose to print a test page to see whether your printer is functioning properly.
To access the printer control panel in Windows 10, press the Windows key + R on your keyboard. Then, type C:WindowsSystem32spoolPRINTERS in the Run box. Click Yes on the UAC prompt to edit the folder. Once you have deleted the printer, restart your computer to force the changes to take effect. If you’ve removed a printer from your computer, you can’t find it in the printer list anymore.
Then, press the Windows button on your PC’s Start menu and select Settings. Click Devices and Printers. Then, click Printers. Select the printer you want to manage. If you don’t see a device listed here, click the Help button to open a help menu. You can also press the Back button to return to the previous screen. In the Devices and Printers section, you can choose the printer you want to manage.
How Do I Fix Devices And Printers Not Showing?
When a device or printer fails to show up on your Windows 10 computer, you may not know what to do. One way to solve the problem is to open the Control Panel and go to the Devices and Printers applet. Then, click on the printer or device that’s not showing up and click the “Open in Safe Mode” button. The process may take anywhere from 90 seconds to five minutes, depending on the severity of the error. If your printer or device isn’t showing up in the Control Panel, the problem may be with the system’s user profile. If this happens, your printer or device may be missing.
Another solution is to run a system scan. The Start Scan tool will identify and fix any Windows errors that are causing your PC to show the Devices and Printers applet. Alternatively, you can use a third-party tool, such as Restoro by Patented Technologies, to fix this problem. The software has been downloaded more than 782,294 times this month, so it’s worth trying.
When you want to manage your external devices, you’ll need to open Devices and Printers in Windows 10. This section in Windows gives you access to the settings of all your peripherals. This includes printers, scanners, faxes, cameras, and more. Once there, you can change settings and add or remove printers. You can also view any pending printing jobs. To bring up Devices and Printers, open the Control Panel and click the Large Icons tab.
The Devices and Printers window shows the list of all your printers and other connected devices. From here, you can also view the properties of each device, such as the hardware model and manufacturer. You can also select the Help button to view a help menu if you have any questions about your printer. Once you’ve found the right list of devices and printers, you can then troubleshoot any issues.
Where Did Devices And Printers Go?
Where Did Devices And Printers Go in Window 10? is the section where users can manage external devices and printers. These devices can be a printer, scanner, fax machine, or camera. Users can control the size of paper when printing, as well as add and remove printers. This section is accessed from the Control Panel. Large icons are a helpful way to navigate this section.
The “Devices and Printers” section of the Control Panel is located in the Hardware and Sound category. Clicking on the “View devices and printers” link will open the window listing all items under this category. To add a printer, click on the arrow next to the printer. To remove a printer, click the minus sign. You will need to click on it again to delete it.
To fix this problem, you can use a third-party tool or run the Start Scan tool. Restoro by Patented Technologies has been downloaded 782,294 times this month. If you’re still unable to access the Devices and Printers applet, try using a third-party program. If nothing works, a free version of the program can be downloaded.
What is Devices And Printers in Control Panel?
Windows’ Devices and Printers folder displays a list of all connected peripheral devices. It also contains quick actions that can be performed on a specific device’s context menu. You can click on an icon to open the context menu for that device. Depending on the support and driver, you may find additional options here. Once you have a list of your connected peripherals, you can navigate through them and manage them.
The first step in troubleshooting a printer issue is to open the Devices and Printers window. This window is a helpful place to check printer properties, change paper size, and clear print jobs. However, Microsoft is slowly moving printer controls to the Settings menu. The long wait for this screen is annoying. You may want to move on to the Settings menu instead. If this is the case, you can add or remove devices from the Devices and Printers menu.
Another option is to create a shortcut to Devices and Printers. The shortcut can be created by right-clicking the desired device and pressing the short-cut key. The Windows system adds Ctrl-Alt before the key, so the shortcut will look like Ctrl+Alt+key. Once you have your shortcut set, you can type a shortcut to open Devices and Printers by pressing a key on the keyboard. Be sure to grant permission first before you can do so.
Where is the Printer Control Panel on Windows 10?
The first step to access the Printer Control Panel on Windows 10 is to open the Settings app and choose the category Printers & Scanners. You will see a list of connected printers and scanners. Select one of them to customize its settings. Once you have chosen a printer, click the Change button and click Save. You can also use the Search Control Panel button to find a specific setting.
Another useful option in Windows 10 is the Devices and Printers panel. The Devices and Printers window is the place to go to control external devices, adjust paper sizes, and add or remove printers. This window opens immediately. Click on the Control Panel icon and choose Large icons. Once you’re in Device and Printers, click on the name of the printer you wish to manage. You’ll find its settings here.
Next, click on the printer icon to access its settings. Right-clicking on the printer icon will open the Printing Preferences page. Here, you can change the Paper Size, Color, and Paper Layout. Some settings may be different depending on your printer model and driver version. You can also select the orientation of the paper. If you’d like to view more detailed settings, click the Advanced button.
How Can I See All Devices on My Computer?
How do I see all devices on my computer without opening the device manager? The Device Manager window is an essential tool for troubleshooting USB devices and printers. In this window, you can view the queue, manage your device, and view printer properties. However, you must first install the appropriate USB driver before using the USB device. In Windows 8 or later, you can locate Device Manager by searching for “Device Manager” and selecting it.
Once you’ve opened this window, click on the Network and Sharing Center tab. The Network and Sharing Center shows all of the connected devices to your PC. If your computer has Bluetooth, you’ll see a list of devices in this section. If you don’t, you can use the list to install Bluetooth. Otherwise, go to the Printers & Scanners section of the Network and Sharing Center and select the device that you’d like to manage.
How Do I Add a Shortcut to Devices And Printers?
To add a shortcut to Devices and Printer in Windows 10, you can right-click the device’s icon in the taskbar and select “Add a shortcut.” Then, select “Devices and Printers” from the context menu. Type a name for your shortcut (such as Devices and Printers) and click “OK.” Double-click the icon to open it.
To add a shortcut to a printer, you need to know its name. Open the Settings app and click on Devices and Printers. Click on the printer icon and choose “Add a shortcut to this device.”
In Windows 10, you can add a device shortcut to your taskbar to access the device properties window. The device properties window shows the manufacturer, drivers, and hardware for each attached device. You can also customize a printer’s properties by right-clicking on it. The device’s name is displayed in bold on the shortcut. It is even easier to access this section of the Control Panel if you use the search feature.
Where is Devices on Windows 10?
Managing your hardware is easy with the Device Manager. This Windows 10 feature lists all your devices, including USB drives, printers, and sound cards. The Device Manager also shows you what hardware you don’t have drivers for. Double-clicking on a device will give you more information about its capabilities. It can be used to debug errors, install new hardware, and more. In this guide, we’ll show you where to find Devices.
Open the Control Panel and select Devices. You’ll see a list of your connected printers, USB devices, and other devices. Click on the ‘Devices’ tab to access the Device Manager. Click on the ‘Printers & Scanners’ tab and then click on the ‘Devices and Bluetooth’ option. You’ll also see your monitor, speakers, keyboard, and mouse. You can also view devices you’ve shared with other users.
Next, click the Control Panel icon. Click on the “Administrative Tools” tab. In the Control Panel, select “Device Manager.” This icon will be displayed in a new window. You can also use the ‘View by Category’ option to see the icons. Alternatively, you can also access the Device Manager through the Start Menu by right-clicking it. The device manager will be listed as a shortcut.
How Do I Find Devices?
The Devices and Printers panel is one of the main windows interfaces. The device panel lists details about every connected device. If your device doesn’t appear, you may have to install the appropriate driver or download software to access it. There are several ways to access this panel, including using the Start Menu. Listed below are a few ways to locate your devices and printers in Windows 10.
First, open the Control Panel and find the Devices and Printers tab. Under this tab, click the Advanced tab. In the Advanced tab, you can change the Paper Size, Color, and Resolution. Click Add or remove devices to view and change your printer settings. If the device is not listed in the Advanced tab, try selecting a different printer. If you are unsure of what settings you need, you can print a test page to see how they are configured.
To add wireless or wired devices, click the Add Devices button on the Start Menu. Select Devices and Printers. A list of connected devices will be displayed. You can also use the help menu to troubleshoot any problems. To add printers, click the ‘Add a printer’ button on the Devices and Printers section. If you don’t see your printer in the list, click the Help button to view the help menu.
Learn More Here:
1.) Windows Help Center
2.) Windows – Wikipedia
3.) Windows Blog
4.) Windows Central