В некоторых случаях при попытку скопировать файлы на USB диск / флешку, пользователь может получить уведомление, что его флешка защищена от записи ‘The disk is write protected‘. В этой инструкции разберемся, как снять защиту от записи на USB диск / флешку в Windows 10 (методики применимы и для предыдущих версий Windows).
Причин, по которым USB флешка может оказаться защищенной от записи может быть несколько: начиная от настроек безопасности системы, заканчивая физическим повреждением носителя.
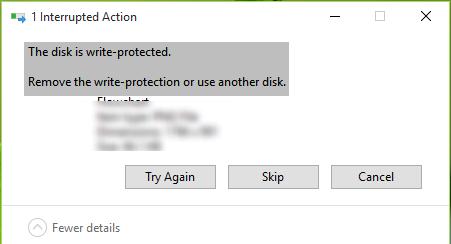
Как, собственно, выглядит проблема: попытке записать файлы на USB флешку или SD карту памяти появляется ошибка
The disk is write protected.
Remove the write-protection or use another disk
Диск защищен от записи.
Снимите защиту или воспользуйтесь другим диском.
В результате скопировать что-то на такую флешку или создать новые файлы / папки становится невозможным.
Рассмотрим наиболее распространенные варианты отключения защиты от записи.
Содержание:
- Lock переключатель
- Ключ WriteProtect в реестре
- Атрибут Readonly USB диска
- Защита от записи на диск через групповые политики
- Повреждение файловой системы
- Утилита для флешек Transcend
- Флешка физически испорчена
Lock переключатель
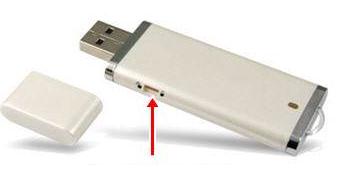
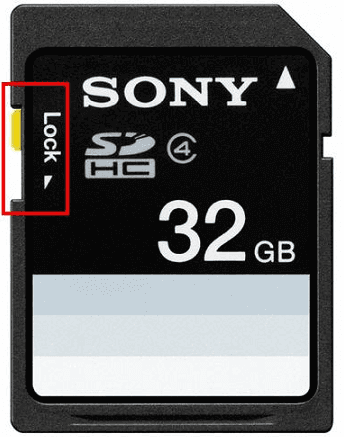
На некоторых флешках или SD картах памяти (как правило, на старых) есть специальный физический переключатель, позволяющий заблокировать возможность записи на устройство. Смысл этого переключателя – предоставление возможности пользователю заблокировать запись на флешку при использовании ее на публичных компьютерах, защищаясь тем самым от проникновения вирусов. Проверьте, есть ли на вашем USB диске такой переключатель и переведите его в состояние Off (Unlock).
Ключ WriteProtect в реестре
Еще один механизм, позволяющий включить защиту от записи на USB устройства, управляется через системный реестр. Чтобы отключить защиту от записи:
- Запустите редактор реестра: exe
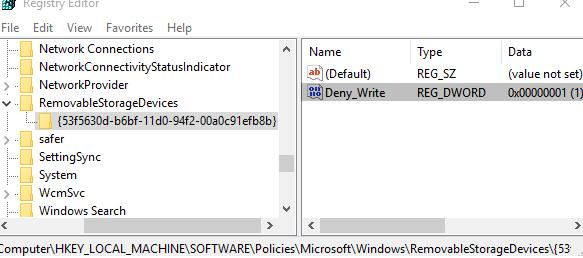
- Перейдите в раздел HKEY_LOCAL_MACHINE\SOFTWARE\Policies\Microsoft\Windows\RemovableStorageDevices\{53f5630d-b6bf-11d0-94f2-00a0c91efb8b}

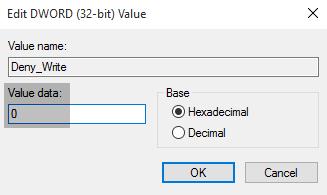
- Найдите параметр с именем Deny_Write (тип DWORD) и измените его значение на 0.

- Затем перейдите в раздел HKEY_LOCAL_MACHINE \ SYSTEM \ CurrentControlSet\Control\StorageDevicePolicies
- Найдите параметр WriteProtect и также измените его значение на 0.
Совет. Если указанная ветка или параметр отсутствует, создайте их вручную.
- Перезагрузите компьютер и проверьте, удастся ли записать данные на USB диск
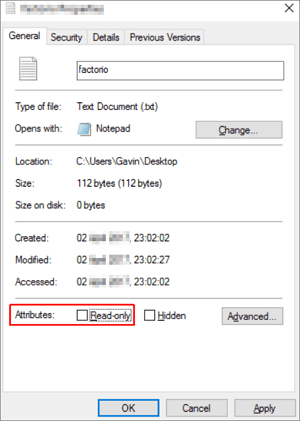
Атрибут Readonly USB диска
Если предыдущие способы не помогли, проверьте, не установлен ли для USB диска атрибут readonly. Для этого:
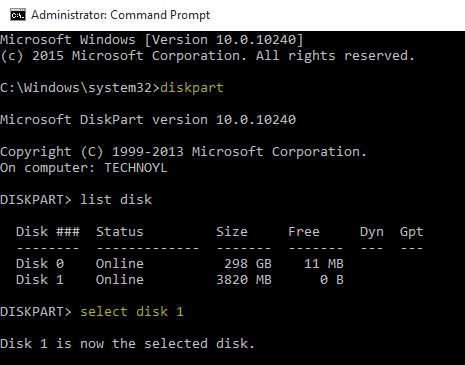
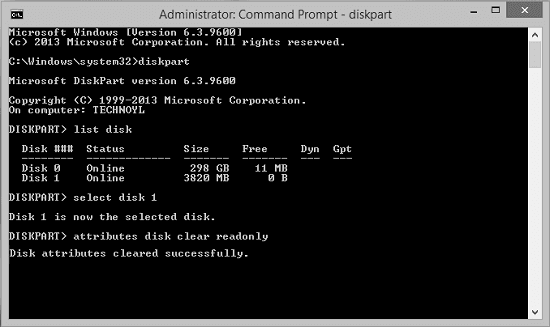
- Откройте командную строку с правами администратора
- Выполните команду:
Diskpart - Выведите список дисков командой:
list disk - Найдите в списке свой USB диск и запомните его номер. В нашем примере: Disk 1
- Выберем его командой:
select disk 1
.Примечание. Если появится ошибка “DiskPart has encountered an error: The request could not be performed because of an I/O device error. See the System Event Log for more information», это скорее всего говорит о том, что флешка физически повреждена, и программно что-то сделать с ней не удастся.

- Проверим текущие атрибуты диска:
attributes disk
. В нашем случае результат команды:Current Read-only State : Yes
Read-only : Yes
Boot Disk : No
Pagefile Disk : No
Hibernation File Disk : No
Crashdump Disk : No
Clustered Disk : No - Строки Current Read-only State : Yes и Read-only : Yes говорят о том, что для диска установлен атрибут «Только на чтение». Очистим его:
attributes disk clear readonly

- Завершите сеанс Diskpart (exit) и проверьте, что при записи ошибка защиты от записи не возникает.

Защита от записи на диск через групповые политики
Если ваш компьютер состоит в домене Active Directory, возможно запись на USB устройства заблокирована с помощью групповых политик Вашим системным администратором.
Повреждение файловой системы
Также вероятно наличие ошибки «The disk is write protected» говорит о том что, файловая система на вашем USB устройстве повреждена. В этом случае можно попробовать воспользоваться специальными утилитами для восстановления файловой системы или просто отформатировать флешку (можно воспользоваться инструкциями из статьи Windows не удается завершить форматирование флешки.
Утилита для флешек Transcend
Если проблема с запретом на копирование возникла с USB флешкой от Transcend, попробуйте воспользоваться специальной утилитой JetFlash Recovery, позволяющей проверить состояние и файловую систему на флешке, и исправить найденные ошибки, в том числе «Диск защищен от записи».
Флешка физически испорчена
Если все предыдущие методики не помогли, скорее всего, ваша USB флешка или SD карта физически повреждены, или имеют какие-то проблемы с контроллером. В этом случае стоит обратиться в специализированный сервисный центр или просто приобрести новый USB диск.
What will you do if prompted by the media is write protected when trying to write data on internal or external storage devices? If you have no idea at the moment, the solutions given in this guide on MiniTool Website will help you out.
Some of you might be bothered by the operation did not complete because the media is write protected (ERROR_WRITE_PROTECT) when you attempt to edit, copy, or delete files on a hard drive, USB flash drive, SD card, or other storage devices. This indicates that your Windows device refuses to work with this drive and you are unable to make any changes on it.
There are various reasons why this error might crop up are listed as follows:
- The file system is corrupted.
- Your storage device is infected with viruses or malware.
- The disk is corrupted or damaged.
- Some system files are faulty, damaged or missing.
- The registry key is set to enable write protection.
- The files you intend to read or edit are set to read-only.
- The USB flash drive, SD card, or other external storage devices are pushed into the write protection position.
In this article, we will offer you clear and easy instructions about how to get rid of the media is write protected both on internal drives and external storage devices. Without wasting more time, let’s jump into it.
Fix 1: Check the Disk for Errors
To tackle the media is write protected, another solution is to perform a full disk scan of the problematic drive. Here are two ways on how to check the status of the disk:
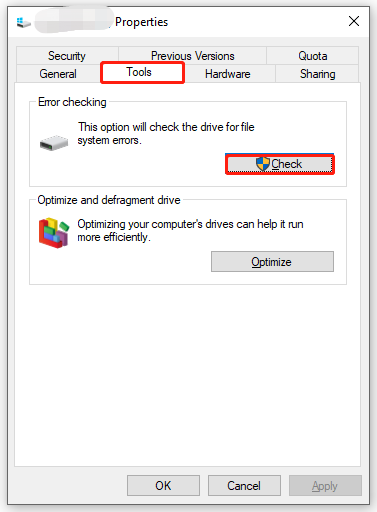
Way 1: Run a Disk Scan in Windows Properties
Step 1. Press Win + E to open File Explorer.
Step 2. Right-click on the drive you want to scan and select Properties.
Step 3. Under the Tools section, click on Check > Scan and Repair Drive. Then, the scan will detect and repair any problem on the drive.
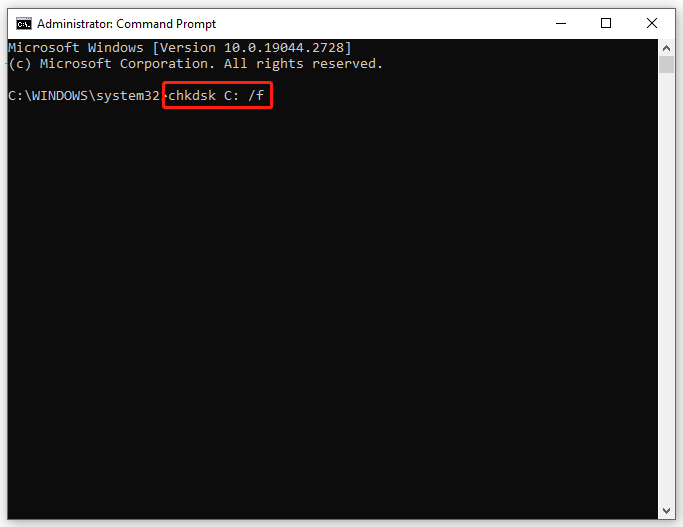
Way 2: Run CHKDSK Scan in Command Prompt
Step 1. Type cmd in the search bar to locate Command Prompt and right-click on it to choose Run as administrator.
Step 2. Type chkdsk C: /f and tap on Enter. Remember to replace C: with the letter of your target partition.
Fix 2: Run SFC Scan
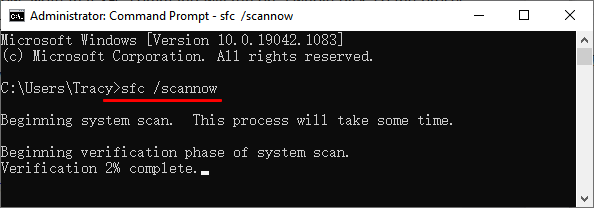
Corrupted system files can also be a potential culprit of the media is write protected. You can run the SFC (System File Checker) scan to check & fix the damaged system files and then use DISM (Deployment Imaging and Servicing Management) commands to repair the corrupted system image. Here’s how to do it:
Step 1. Run Command Prompt as an administrator.
Step 2. Type sfc/ scannow followed by Enter.

Step 3. After the process is complete, reboot your computer and then run CMD with administrative rights again. Run the following commands one by one and don’t hit Enter after each command.
Dism /Online /Cleanup-Image /CheckHealth
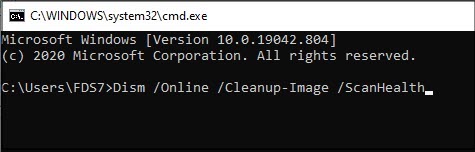
Dism /Online /Cleanup-Image /ScanHealth
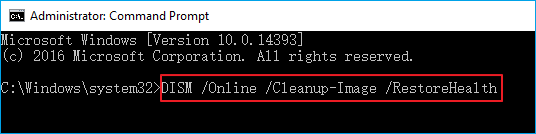
Dism /Online /Cleanup-Image /RestoreHealth
Related article: fix-dism-online-cleanup-image-restorehealth-stuck
Fix 3: Perform a Full Scan
Maybe your device is infected by malware or viruses, causing issues like the media is write protected. In this case, you can perform a full scan to detect any malware running on your computer.
Step 1. Press Win + I to launch Windows Settings.
Step 2. In the settings menu, scroll down to find Update & Security and press it.
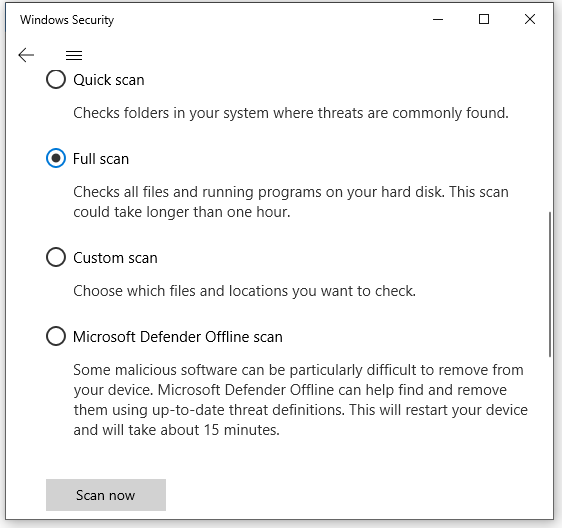
Step 3. In Windows Security, go to Virus & threat protection > Scan options.
Step 4. Windows Defender offers you 4 types of scans: Quick scan, Full scan, Custom scan, and Microsoft Defender Offline Scan. Here, we check Full scan and then hit Scan now to start scanning.
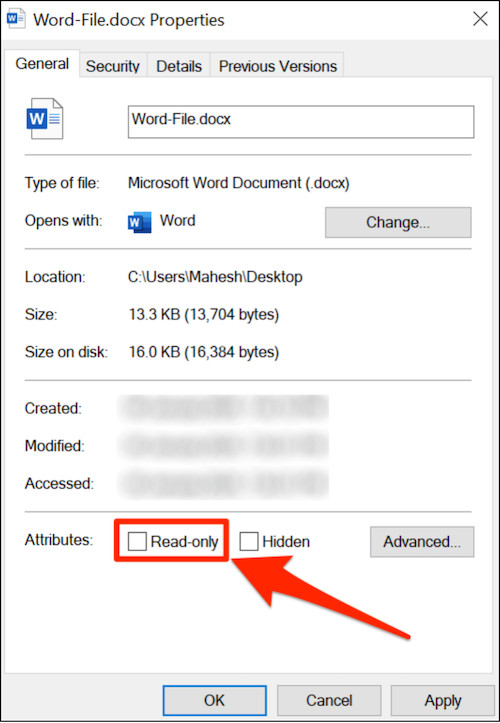
Fix 4: Untick the Read-Only Attribute
Some specific files are probably set to read-only, so they can be read but not modified. In this case, it is a good option to disable the read-only attributes from the Properties menu of the file or folder.
Step 1. Press Win + E to open File Explorer.
Step 2. Right-click on the file or folder and select Properties from the drop-down menu.
Step 3. Under the General tab, uncheck Read-only.

Tips:
If you select a folder that contains other files or folders, the system will ask you to confirm the attribute change so that this change will also be applied to all the contents inside the primary folder.
Step 4. Click on Apply & OK to apply and save the changes.
Fix 1: Check the Physical Switch
There is a physical write protection switch on the USB flash drive or SD card. If the switch is pushed into the write protection position, the media will be unable to write or read. To check the physical switch, you need to:
Step 1. Eject the drive from your computer.
Step 2. Find the physical write protection switch on the device. Usually, it is located on the side or bottom of the storage device. If the switch is on, move it to the off position.
Fix 2: Run DiskPart
Also, if your external drive or USB flash drive is marked as read-only, you can remove the attribute via DiskPart.
Step 1. Launch Command Prompt as an administrator.
Step 2. Type diskpart and hit Enter.
Step 3. Type list disk and press Enter to see a list of disks. You can recognize the external or USB drive according to their size. Note down the disk number of your removable disk.
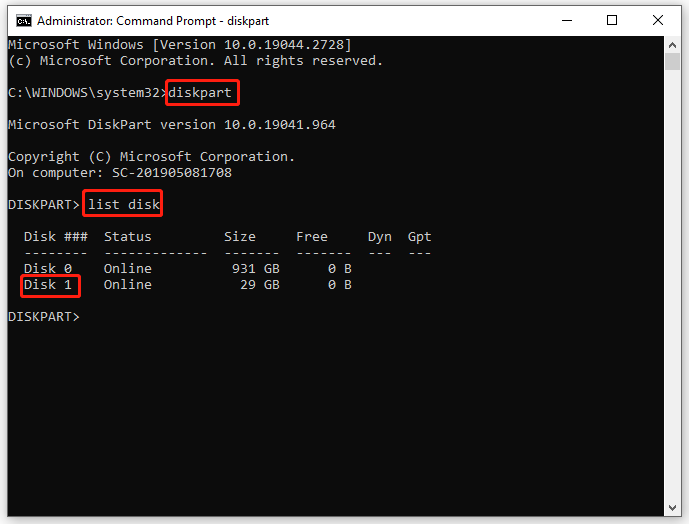
Step 4. Type select disk 1 (replace 1 with the disk number you noted down in the last step) and hit Enter.
Step 5. Type attributes disk clear readonly and hit Enter.
Step 6. After receiving Disk attributes cleared successfully, type exit and hit Enter.
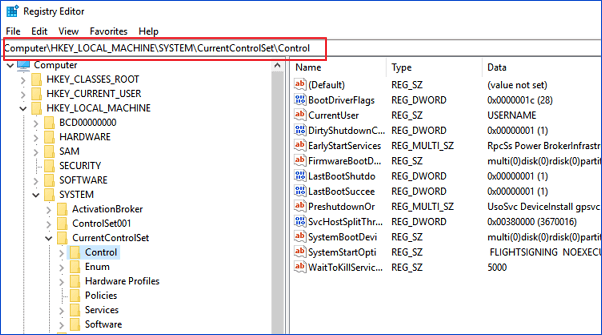
Fix 3: Modify the StorageDevicePolicies Key
You will get the media is write protected when the corresponding value in Windows registry is incorrect. Therefore, you can remove the write protection by tweaking the value of StorageDevicePolicies.
Warning:
In case something goes wrong with the registry, please back up the registry database in advance. See this guide — How to Backup and Restore Registry in Windows 10.
Step 1. Press Win + R to evoke the Run dialog.
Step 2. Type regedit and tap on Enter to open Registry Editor.
Step 3. Navigate to the following path:
HKEY_LOCAL_MACHINE\SYSTEM\CurrentControlSet\Control
Step 4. Right-click on Control > select New > hit Key > rename the new key as StorageDevicePolicies.
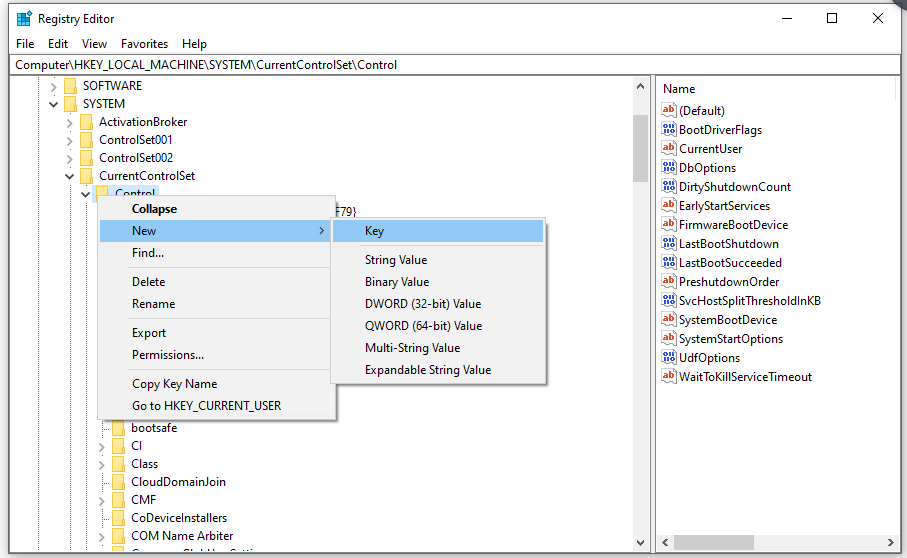
Step 5. Right-click on the StorageDevicePolicies folder > select New > hit DWORD (32-bit) Value > rename it as WriteProtect.
Step 6. Right-click on WriteProtect > select Modify > change the value data to 0.
Step 7. Quit Registry Editor and reboot the computer to make the changes effective.
Fix 4: Format the Drive
Corrupted file system can also lead to the media is write protected. If it is the case, you need to format your external hard drive, USB flash drive or removable drive. Here’s how to format the target drive to make it editable:
Step 1. Run MiniTool Partition Wizard and select the partition that needs formatting.
MiniTool Partition Wizard FreeClick to Download100%Clean & Safe
Step 2. Scroll down in the left panel to find Format Partition and click on it.
Step 3. Set the partition label, file system, and cluster size and hit OK.

Step 4. Then, you will be allowed to preview the formatted partitions. If you are sure to apply this change, hit Apply.
Although you can remove write protection and make your storage device work properly again with the solutions mentioned above, what if you are in a hurry to edit the files and finish your work? Everything will be easier if you have created a backup of your important files before hand.
If you have a backup copy in hand, you can restore the files easily and quickly rather than spending a long time trying the solutions one by one until the problem is fixed. Among a wide selection of backup tools in the market to choose from, MiniTool ShadowMaker can satisfy your need for file backup.
Apart from backing up files or folders, this free and reliable backup software can also supports making a backup for systems, selected partitions, and even the whole disk on Windows 11/10/8/7. At the same time, full backup, incremental backup, differential backup, and automatic backup are also available in MiniTool ShadowMaker. Let’s see how to back up files in just a few clicks with it:
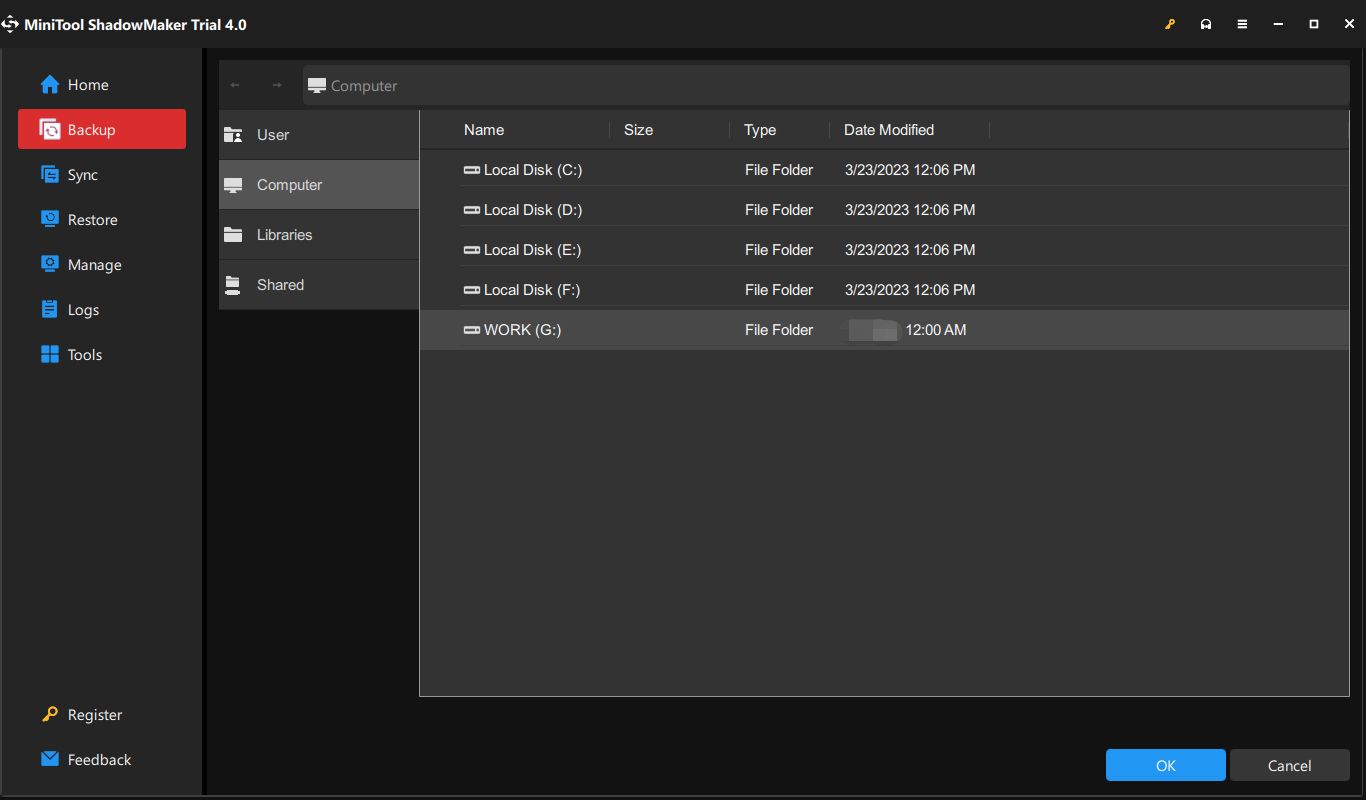
Step 1. Run MiniTool ShadowMaker and move to the Backup page.
MiniTool ShadowMaker TrialClick to Download100%Clean & Safe
Step 2. Go to SOURCE > Folders and Files, and then you can choose the files you want to back up (checking several files or folders at one time is permitted). As for selecting a storage path for the backup image files, go to DESTINATION (an external hard drive or USB flash disk is preferred).
Step 3. Click on Back Up Now to start the backup right now.
Tips:
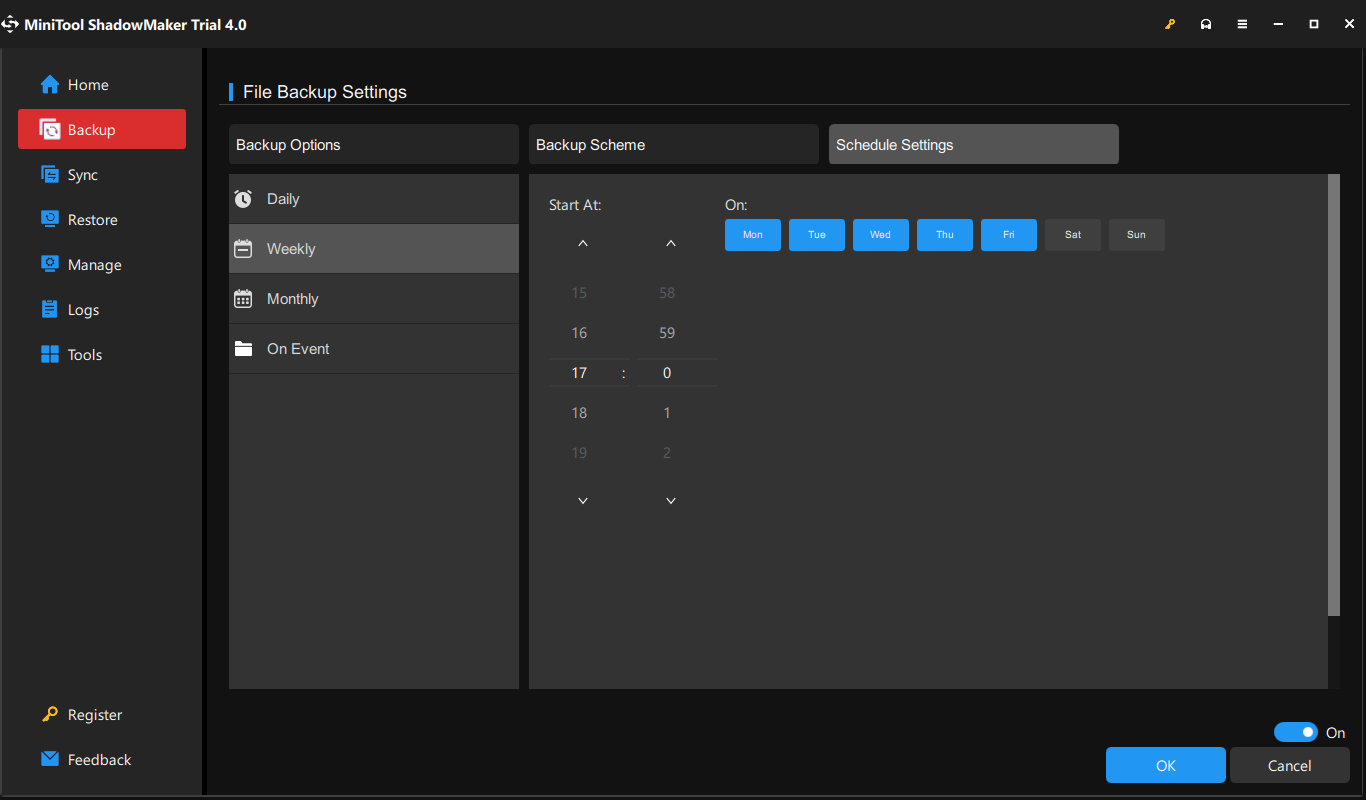
It is highly recommended to develop a habit of backing up regularly. If you desire to do that, you can click on Options > Schedule Settings > turn it on manually to customize to back up your files automatically at a specific time point of a day, week, or month.
The media is write protected also occurs when creating a system image. The complete error message is – The backup failed. The media is write protected. (0x80070013)
If you are facing this problem currently, you can try the two solutions below to deal with it.
Fix 1: Optimize Drives for Better Performance
In Windows 10 version 1809, Quick Removal is the default removal policy for external storage devices. To address The backup failed. The media is write protected, you can switch to the Better Performance option.
Step 1. Open File Explorer and right-click on your USB flash drive or external hard drive to select Properties.
Step 2. Under the Hardware tab, select your target drive and click on Properties.

Step 3. In General, press Change settings.
Step 4. Go to the Policies tab, tick Better performance or Optimize for performance and then hit OK.
Warning:
Before unplugging the external storage device, you need to use the Safely Remove Hardware option, or else it may lead to data loss.

Fix 2: Disable OneDrive Files on Demand
If you are using OneDrive to store files, you can try turning off the Files on Demand feature to solve The backup failed. The media is write protected.
Step 1. Launch OneDrive and go to Settings.
Step 2. Under the Settings tab, uncheck Save space and download files as you use them.
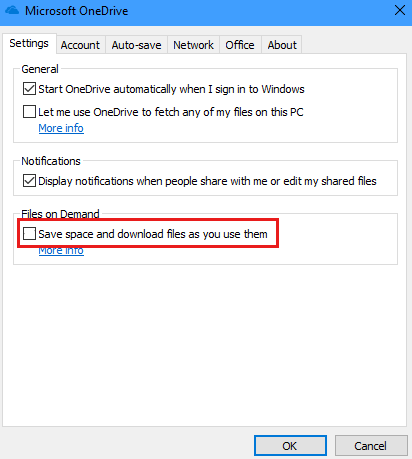
Step 3. Click on OK to save the changes.
We Need Your Voice
This guide shows you several solutions on how to fix the media is write protected on the internal hard drive and external hard drive ( or USB flash disk) respectively. No matter which method you choose, make sure to follow the guidelines carefully.
Most importantly, it is always good to create a backup of your files on a regular basis so that the file copy can meet an urgent need when your files become inaccessible or uneditable. Any opinion about our product is welcomed! You can share your idea in the comment zone or send us an email to [email protected].
Топ 6 Способов Решения Проблемы Диск Защищен от Записи в Windows 11/10/8/7
Когда ваша карта USB/ SD, внутренний или внешний жесткий диск защищены от записи, то вы не можете ни получить доступ к сохраненным данным, ни внести какие-либо изменения на устройство. Так, как снять защиту от записи? Ошибка с защитой от записи на 99,9% связана с физическими проблемами устройства, но вы все равно можете попробовать кое-что предпринять:
| Рабочие Способы | Пошаговое Устранение Неполадок |
|---|---|
| Исправление 1. Смена Положения Физического Переключателя | Найдите физический переключатель на USB-накопителе или SD-карте. Удалите физический переключатель…Все шаги |
| Исправление 2. Проверка & Удаление Вирусов | Загрузите и запустите Avira. Откройте эту программу и нажмите «Быстрое сканирование»…Все шаги |
| Исправление 3. Снимите Флажок ‘Только для чтения’. | Щелкните правой кнопкой мыши файл с защитой от записи и выберите ‘Свойства’. Проверьте настройки…Все шаги |
| Исправление 4. Запустите Командную Строку | Одновременно нажмите ‘Windows + R’, введите cmd и запустите ‘Командную Строку’ от имени Администратора…Все шаги |
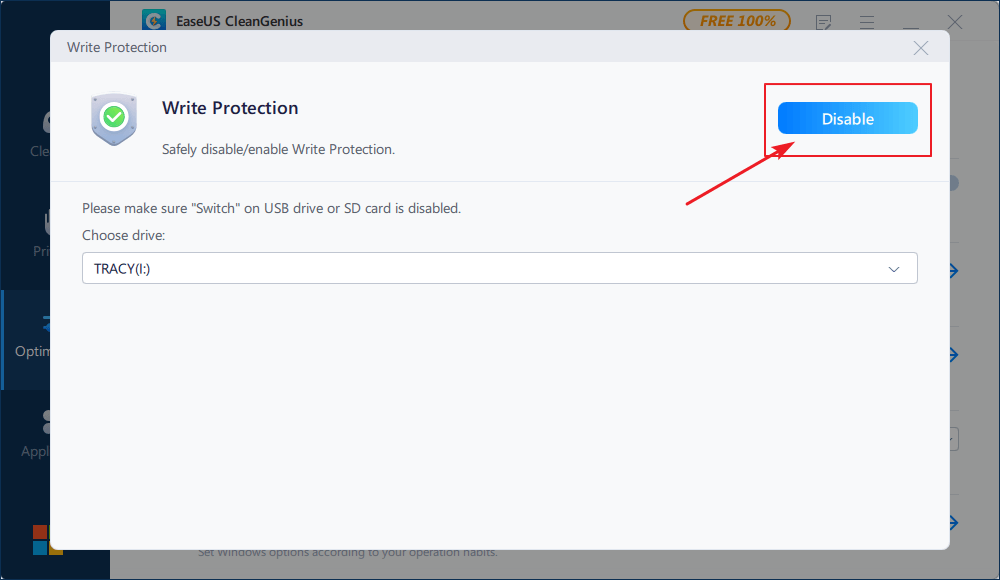
| Исправление 5. Альтернатива CMD | СКАЧАЙТЕ и установите EaseUS CleanGenius бесплатно. Выберите ‘Защита от Записи’…Все шаги |
| Исправление 6. Отредактируйте Реестр | Нажмите Win+R, затем введите Regedit, чтобы открыть Редактор Реестра…Все шаги |
Как Снять Защиту От Записи в Windows 11, 10, 8 и 7
Вы когда-нибудь получали сообщение об ошибке ‘диск защищен от записи ‘при попытке отформатировать съемный диск, например, USB-накопитель, SD-карту, компакт-диск или флешку? Из-за ошибки ‘диск защищен от записи’ в Windows 11/10/8/7 не получится отформатировать диск и записать данные, т. е. скопировать & вставить файлы на флешку. Крайне важно снять защиту от записи с диска. Изучите наше пошаговое руководство по устранению ошибки ‘диск защищен от записи, снимите защиту от записи или используйте другой диск, съемный диск’.

Исправление 1. Снимите Защиту от Записи с Помощью Физического Переключателя (SD-карта/USB)
Мы часто используем съемные устройства хранения данных на компьютере с Windows, и некоторые из вас могут столкнуться с проблемой неисправности диска, которая часто связана с ошибкой ‘диск защищен от записи’. Когда Windows начнет защищать ваш диск от записи, например, USB-накопитель SanDisk объемом 4ГБ, вы больше не сможете его использовать, пока не удалите защиту от записи. Но вы можете легко решить эту проблему, если там есть физический переключатель.
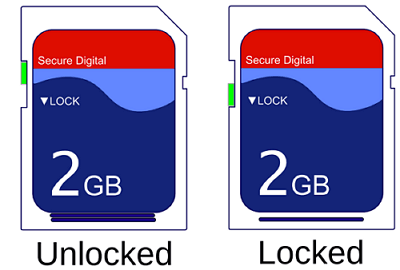
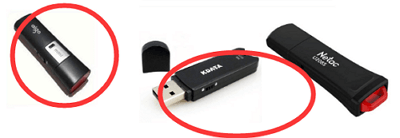
Некоторые USB-накопители и SD-карты имеют сбоку физические переключатели для защиты данных. Если переключатель USB-накопителя или SD-карты в положении блокировки, то устройство станет защищенным от записи на всех ПК и устройствах. Вы можете устранить эту проблему, сдвинув переключатель.
Шаг 1. Найдите физический переключатель на USB-накопителе или SD-карте.
Шаг 2. Передвиньте переключатель с положения ON в OFF чтобы разблокировать устройство.
- Разблокировка SD-карты с помощью физического переключателя
- Разблокировка USB-флешки с помощью физического переключателя
Исправление 2. Удалите Вирусы Чтобы Снять Защиту от Записи
Следующее, что нужно сделать, — это проверить и уничтожить вирусы на USB-накопителе, SD-карте или жестком диске. Когда вы подключаете носитель к компьютеру, он может быть легко заражен и атакован вирусами. Флешки и SD-карты могут быть заблокированы или атакованы после скачиваний программ с подозрительных веб-сайтов. Данные будут заблокированы или станут недоступными, и это может привести к ошибке «диск защищен от записи».
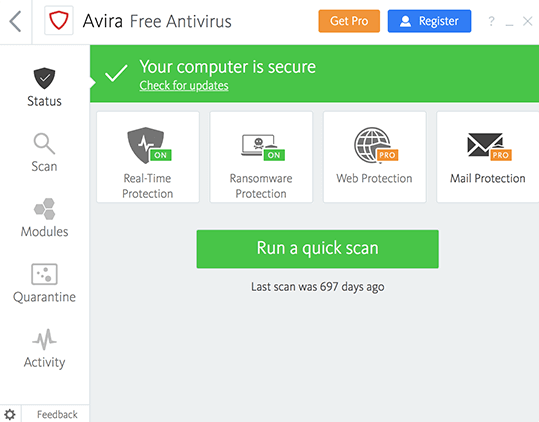
В этом случае, вам нужно найти надежное антивирусное программное обеспечение для проверки и удаления вирусов. Если у вас его нет, вы можете скачать или перенести антивирусную программу на свой компьютер чтобы сделать это. Возьмем, в качестве примера, Avira:
Шаг 1. Скачайте и запустите Avira.
Шаг 2. Откройте эту программу и нажмите ‘Запустить быстрое сканирование’.
Шаг 3. Дождитесь завершения процесса.
Исправление 3. Снимите Флажок Только Для Чтения Чтобы Удалить Защиту от Записи
Иногда, всего один файл может испортить планы. Если вы хотите внести изменения в один файл, но не можете, этот файл может быть защищен от записи. В этом случае, вы должны убедиться, что галочка ‘только для чтения’ не отмечена.
Шаг 1. Щелкните правой кнопкой мыши файл с защитой от записи и выберите ‘Свойства’.
Шаг 2. Обратите внимание на параметры внизу, и убедитесь, что галочка ‘Только для чтения’ снята. Затем нажмите ‘Применить’, чтобы изменения вступили в силу.
Исправление 4. Запустите CMD Чтобы Снять Защиту от Записи
Еще один эффективный способ снять защиту от записи и устранить ошибку «диск защищен от записи» — использовать Командную Строку. Если вы знакомы с CMD, выполните следующие действия:
Шаг 1. Нажмите одновременно Windows + R, введите CMD и запустите «Командную Строку» от имени Администратора.
Шаг 2. Введите поочерёдно следующие команды, нажимая «Enter» после ввода каждой из них.
- diskpart
- list disk
- select disk #
- attributes disk clear readonly
# — номер защищенной от записи флешки или карты памяти.
Шаг 3. Выйдите из Командной Строки.
Исправление 5. Удалите Защиту от Записи с Помощью Альтернативы CMD
Если вы не считаете себя профессиональным пользователем компьютера и не знакомы с командными строками, не волнуйтесь. Существуют графические решения, которые помогут вам удалить защиту от записи с жестких дисков, USB-накопителей и даже SD-карт.
EaseUS CleanGenius — один из этих инструментов, который поможет вам исправить вышеупомянутые проблемы на ваших дисках, ничего не зная о командной строке.
Вот простое руководство о том, как использовать этот инструмент для решения ваших проблем.:
Шаг 1: ЗАГРУЗИТЕ и установите EaseUS CleanGenius (бесплатно) на свой компьютер.
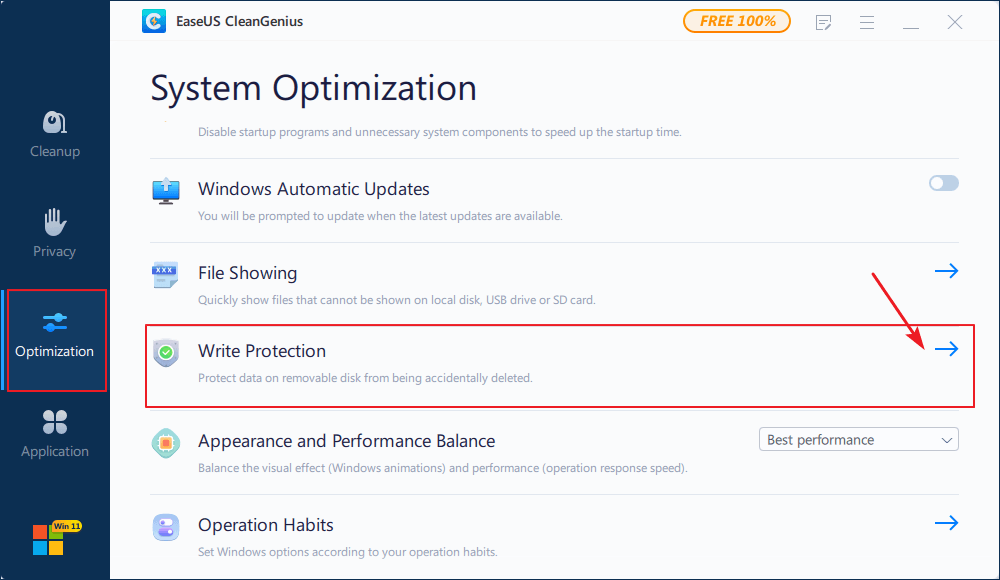
Шаг 2: Запустите EaseUS CleanGenius на своем ПК, выберите «Оптимизация» и выберите режим «Защита от записи».

Шаг 3: Выберите устройство, защищенное от записи, и нажмите «Отключить», чтобы снять защиту.
Исправление 6. Отредактируйте Реестр Чтобы Удалить Защиту от Записи
Существует множество способов удаления защиты от записи с USB-накопителей в Windows. Одним из популярных методов является редактирование Реестра. Ниже приведены шаги по удалению защиты от записи с USB-накопителя. Перед началом работы подключите USB-накопитель с защитой от записи к компьютеру.
Шаг 1. Нажмите Win+R и введите Regedit чтобы открыть Редактор Реестра
Шаг 2. Перейдите по указанному пути и найдите ключ с именем WriteProtect:
HKEY_LOCAL_MACHINE\SYSTEM\CurrentControlSet\Control\StorageDevicePolicies
Шаг 3. Если этот ключ существует, щелкните его правой кнопкой мыши и выберите «Изменить», и поменяйте его значение с 1 на 0.
Дополнительный Совет: Форматирование USB-флешки/SD-карты
После того как вы испробовали 6 решений, описанных выше, ошибка ‘диск защищен от записи’ должна быть исправлена. Чтобы избежать этой ситуации и обеспечить хорошую работу внешних устройств, вы можете отформатировать их. Если решить проблему так и не удалось, тогда попробуйте отформатировать устройство.
Для решения вашей проблемы воспользуйтесь мощным ПО для форматирования USB-дисков — программой для работы с разделами от EaseUS. Она может отформатировать ваш жесткий диск, SSD, USB, карту памяти, SD-карту или удалить раздел чтобы сделать его доступным для повторного использования. Выполните следующие действия, чтобы отформатировать USB-накопитель.
Посмотрите видеоурок по форматированию SD-карт/USB в FAT32/NTFS:
Step 1. Select the USB drive to format.
Connect the USB drive or pen drive to your computer. Download and launch EaseUS partition software. Right-click the USB drive you intend to format and choose «Format».
Step 2. Set the drive letter and file system on USB.
Assign a new partition label, file system (NTFS/FAT32/EXT2/EXT3), and cluster size to the selected partition, then click «OK».
Step 3. Check «OK» to confirm formatting USB.
Click «OK» if you see the Warning window. If you have important data on it, back up the data in advance.
Step 4. Apply the changes.
Click the «Execute operation» button first, and then click «Apply» to format the USB drive.
Если вы потерянные данные после форматирования, вы можете запустить программное обеспечение для восстановления данных EaseUS. Оно может восстановить данные с SD-карты, корзины, жесткого диска, USB-накопителя и др. Независимо от того, как вы потеряли данные, вы всегда можете вернуть файлы с помощью простых действий.
Заключение
Надеюсь, мы смогли помочь вам найти правильное решение. Любой, из приведенных выше способов, поможет эффективно устранить ошибку ‘диск защищен от записи’. Попробуйте использовать эти решения, чтобы получить доступ к данным на вашем устройстве и иметь возможность изменять их. Для меня, Исправление 1 работает отлично, так как большинство проблем с защитой от записи вызваны физическими проблемами. Мы будем признательны, если вы свяжетесь с нами по электронной почте или отправите свой отзыв на Facebook.
FAQ: Этот Диск Защищен от Записи.
Мы собрали некоторые часто задаваемые вопросы про защиту от записи на диск. Ознакомьтесь с вопросами и ответами, если хотите получить дополнительную информацию.
Что означает защита от записи?
Защита от записи — это способность аппаратного устройства или программного обеспечения предотвращать запись новой или изменение старой информации.
Почему моя карта micro SD, вдруг, стала защищена от записи?
Блокировочный переключатель обычно находится в верхней левой части SD-карт и адаптеров. Если он сломан, вы его не увидите. SD-карта будет защищена от записи по умолчанию.
Как снять защиту от записи на USB-накопителе?
Вы можете избавиться от этой проблемы, выключив переключатель:
- Найдите физический переключатель на вашем USB-накопителе.
- Переместите физический переключатель из положения ON в положение OFF и разблокируйте устройство.
Как снять защиту от записи на карте micro SD?
Вы можете избавиться от этой проблемы, выключив переключатель:
- Найдите физический переключатель на своей SD-карте.
- Переместите физический переключатель из положения ON в положение OFF и разблокируйте SD-карту.
Читайте, что делать если при попытке форматирования флешки, карты памяти или жесткого диска вы получаете сообщение: “Диск защищен от записи” (The disk is write-protected). А также, как правильно снять защиту и разблокировать любое устройство, если вы не можете создать или скопировать файлы на флешку или карту памяти, потому что устройство защищено от записи.

Содержание
- Ошибку выдает компьютер, телефон, планшет, телевизор или автомагнитола
- Разблокируйте устройство от записи
- Поведите поиск и лечение вирусов
- Проверьте возможности файловой системы
- Очистка с помощью Diskpart
- Разблокировка с помощью реестра
- Разблокировка с помощью групповой политики Windows
- Вопросы и ответы
- Комментарии
Ошибку выдает компьютер, телефон, планшет, телевизор или автомагнитола
Подобное сообщение вы можете получить не только на компьютере, но и на мобильном телефоне, планшете, телевизоре или автомобильной магнитоле. Для решения проблемы следуйте нашим указаниям.
Перейти к просмотру

Как снять защиту от записи с USB флешки, карты памяти SD, Micro SD или диска 👨💻🛠️🖥️
Перейти к просмотру
Как исправить флешку: не видит компьютер, неправильный размер, система RAW, вставьте диск 🛠️👨💻🤔
Разблокируйте устройство от записи
Некоторые модели флешек, карт памяти и внешних дисков могут быть оснащены переключателям для блокировки устройства от записи. Наиболее распространены такие переключатели на SD картах. Внимательно осмотрите устройство и проверьте положение переключателя, если такой имеется.

Поведите поиск и лечение вирусов
Возможно ваше устройство заражено вирусом, который блокирует запись или форматирование диска. Проверьте его антивирусом и проведите лечение при необходимости.

Проверьте возможности файловой системы
Возможно ошибка записи возникает по причине переполнения флешки. Проверьте наличие необходимого свободного места и файловую систему на флешки. На FAT32 не получится записать файл размером более 4 ГБ.
")
Очистка с помощью Diskpart
Проведите разблокировку флешки с помощью командной строки:

- Запустите командную строку от имени администратора, введите команду Diskpart и нажмите Enter.
- Введите list disk и нажмите Enter.
- Найдите номер диска, который соответствует вашей флешке. Для выбора ориентируйтесь по размеру диска. Введите select disk N (где N это номер диска, который соответствует флешке) и нажмите Enter.
- Введите attributes disk clear readonly и нажмите Enter. Это разблокирует вашу флешку для записи. Мы также рекомендуем очистить и отформатировать флешку для дальнейшей работы. Выполняйте следующие действия только если на флешке нет важной информации.
- Ведите clean и нажмите Enter – это удалит всю информацию на флешке, включая служебную.
- Ведите create partition primary и нажмите Enter, это создаст новый раздел.
- Затем введите select partition 1 и нажмите Enter.
- Затем введите active и нажмите Enter, новый раздел станет активным.
- Затем введите format fs=fat32 quick и нажмите Enter, это отформатирует устройство в системе FAT32.
- Затем введите assign и нажмите Enter, для присвоения флешке буквы диска.
Разблокировка с помощью реестра
Проведите разблокировку флешки в реестре Windows:

- Запустите команду выполнить, введите regedit и нажмите Enter.
- Перейдите в раздел HKEY_LOCAL_MACHINE \ SYSTEM \ CurrentControlSet \ Control \ StorageDevicePolicies. Если у вас нет такого раздела, то создайте его.
- Установите значение параметра WriteProtect равное 0. Создайте этот параметр если его нет на вашей системе.
Разблокировка с помощью групповой политики Windows
Если во время копирования или создания файлов на устройстве вы видите сообщение: Вам необходимо разрешение на выполнение этой операции.

Или при попытке форматирования вы получаете сообщение: Для выполнения этой операции у вас недостаточно полномочий.

Значит необходимо удалить защиту от записи устройства в редакторе локальной групповой политики Windows:

- Запустите команду выполнить, введите gpedit.msc и нажмите Enter.
- Перейдите в раздел «Конфигурация компьютера» — «Административные шаблоны» — «Система» — «Доступ к съемным запоминающим устройствам».
- Отключите свойство «Съемные диски: запретить запись». Для этого дважды кликните по нему, установите значение Отключено и нажмите Ок.
- Повторите эти действия для раздела «Конфигурация пользователя» — «Административные шаблоны» — «Система» — «Доступ к съемным запоминающим устройствам».
После проведенных действий попробуйте создать на флешке файл или папку. Если данное руководство не помогло вам, смотрите наши предыдущие видео об исправлении ошибок на флешке.
| Workable Solutions | Step-by-step Troubleshooting |
|---|---|
| #1. Check the Physical Switch | Step 1: Locate the physical write protection switch on the device. The location of the switch will vary depending on the…Full steps |
| #2. Uncheck Read-only | Step 1: Open «File Explorer» and select the write-protected files. Step 2: Right-click the file and click «Properties»…Full steps |
| #3. Run CMD | Step 1: Press Windows + R key simultaneously and type «cmd». Step 2: Type «sfc /scannow» and press Enter…Full steps |
| #4. Scan Virus | Step 1: Click «Update & Security» in Windows Settings. Step 2: Click on «Windows Security». Step 3: Click…Full steps |
| #5. Use EaseUS CleanGenius | Step 1: DOWNLOAD and install EaseUS CleanGenius (free) on your computer. Step 2: Run EaseUS CleanGenius…Full steps |
| Bonus Tip: Format Device after Removing Write Protection | Step 1: Right-click the external drive or USB you intend to format and choose «Format». Step 2: Set the Partition label…Full steps |
What Does It Mean «The Media is Write-protected»?
The media is write-protected means that the media (usually a disk) cannot be written. Several things may cause this error, including physical write-protection switches or software protections. In order to fix this problem, the write-protection must be disabled. Write-protection can be a helpful tool in preventing accidental writing or malware infections. However, it can also be irritating if you need to write to the media and don’t know how to disable the protection.
Have you ever been annoyed by the message «the media is write-protected» when you try to copy, edit or delete files on a USB drive, SD card, or other removable storage devices? This error can be frustrating, especially if you’re in a hurry and need to get work done.
There are a few different reasons why this «the media is write-protected «error might occur. It could be due to a corrupted file system, incorrect permissions, or physical damage to the storage device. Whatever the cause, don’t worry; in this article, we’ll show you some quick and easy fixes that will help you remove write protection and get your storage device working again in no time.
Relate articles about removing write protection:
#1. Check the Physical Switch when the Media is Write-protected
This error message may be caused by the physical write protection switch on the device. If the physical write protection switch is on, writing to the media will not be possible. To check the physical write protection switch, please follow the instructions below:
Step 1: Locate the physical write protection switch on the device. The location of the switch will vary depending on the make and model of the device. The switch is located on the side or the bottom of many devices.
Step 2: Check the switch position. If the switch is in the «on» position, it will be necessary to move the switch to the «off» position in order to write to the media.
Step 3: Once the switch has been moved to the «off» position, try writing to the media again. Please contact your device manufacturer for further assistance if you still cannot write to the media. You can also try the following fixes in our article.
#2. Uncheck Read-only in Properties when the Media is Write-protected
«The media is write-protected» error typically occurs because the file or drive is set to read-only, which means that it can only be read and not modified. The read-only setting can be disabled in the properties menu for the file or drive. Once it has been disabled, the users should be able to copy, delete, or move the files without any issues.
Step 1: Open «File Explorer» and select the write-protected files.
Step 2: Right-click the file and click «Properties».
Step 3: You can uncheck the «Read-Only» option under the «General» tab.
#3. Run CMD to Remove Write Protection
Corrupted system files can also cause «the media is write-protected». If this is the case, you can try running the System File Checker (SFC) scan and Deployment Image & Servicing Management (DISM) scan. The SFC checks and fixes corrupted system files while the DISM scan will repair the Windows image. Share the detailed tutorial by clicking the buttons below since CMD commands are difficult to understand for an inexperienced user.
To run the SFC and DISM scan, follow the steps given below:
Step 1: Press Windows + R key simultaneously and type «cmd».
Step 2: Type «sfc /scannow» and press Enter. It may take 20-30 minutes to scan. Do not close the Command Prompt during this process.
Step 3: Restart your computer and repeat step 1 to open the command prompt.
Step 4: Type the following command and press Enter after typing each command.
- Dism /Online /Cleanup-Image /CheckHealth
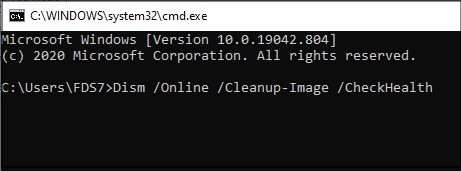
- Dism /Online /Cleanup-Image /ScanHealth
- Dism /Online /Cleanup-Image /RestoreHealth
#4. Scan Virus to Remove Write Protection
In some instances, the «media is write-protected» error may be caused by malware that has infected your computer. Malware can cause various issues on your computer, including errors. Some malware can write-protect drives to prevent their own deletion. If you suspect that malware is the cause of the error, you should scan your system with an antivirus program. You can choose the Windows built-in Windows Defender antivirus to scan.
Step 1: Click «Update & Security» in Windows Settings.
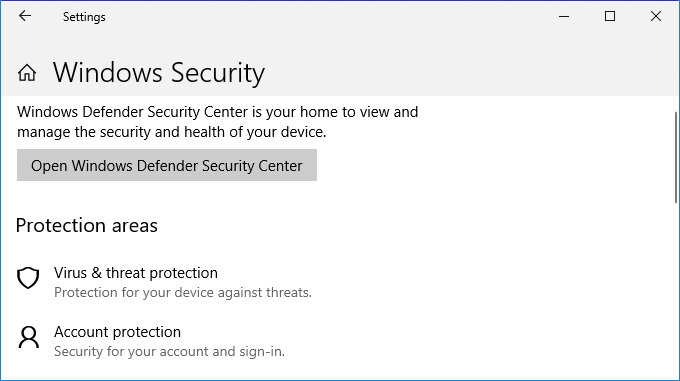
Step 2: Click on «Windows Security».
Step 3: Click «Virus & threat protection» under the «Protection area».
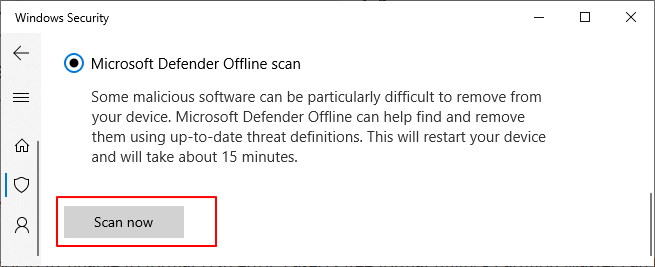
Step 4: Click «Scan options». We recommend you to choose «Microsoft Defender Offline» here.
Step 5: Click «Scan now».
#5. Use Software to Remove Write Protection
A straightforward way to remove write protection is using EaseUS Clean Genius. This software is designed to clean up your drives and can also remove write protection. To use it, download and install the software, then launch it. The software will then scan the drive and remove any present write protection.
If you don’t consider yourself a pro-computer user and you’re not familiar with command-lines, don’t worry. There are graphical-based solutions to help you remove write-protection from your hard drives, USB drives, and even SD cards.
EaseUS CleanGenius is one of these tools that helps you fix aforementioned issues on your drives without knowing a thing about command-line.
Here’s an easy-to-follow guide on how to use this tool to get your issues sorted:
Step 1: DOWNLOAD and install EaseUS CleanGenius (free) on your computer.
Step 2: Run EaseUS CleanGenius on your PC, select Optimization and choose the Write Protection mode.
Step 3: Select the device that is write-protected and click Disable to remove the protection.

Bonus Tip: Format Device after Removing Write Protection
The media is write-protected error can be fixed by following the methods above. Once write protection is removed, users can format their device with EaseUS Partition Master.
- Right-click the external drive or USB you intend to format and choose «Format».
- Set the Partition label, File system (NTFS/FAT32/EXT2/EXT3/EXT4/exFAT), and Cluster size, then click «OK».
- Click «Yes» to continue.
- Click the «Execute 1 Task(s)» button and click «Apply» to format the hard drive partition.
EaseUS Partition Master has many advantages, such as resizing, moving, copying, merging, splitting, and converting partitions without data loss. It is also compatible with Windows 10/8.1/8/7 and XP.
Conclusion
When the media is write-protected, it means that the data on the media cannot be modified. This can be incredibly annoying for users, especially if they don’t know how to fix the problem. In our article, we have shown you some solutions to remove write protection. Whichever method you choose, be sure to follow the instructions carefully so that you don’t cause any damage to your computer. With a little bit of effort, you should be able to get rid of the write protection and reaccess your files.