July 21, 2022 updated by
Leave a reply »
Windows Update keeps installing the same driver every day? How can I stop Windows from automatically overwriting drivers? If you want to prevent Windows Update from downloading and installing driver updates for devices installed on the computer, you need to change device installation settings.
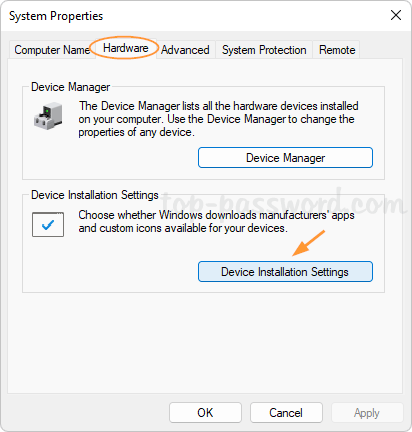
Method 1: Change Device Installation Settings from System Properties
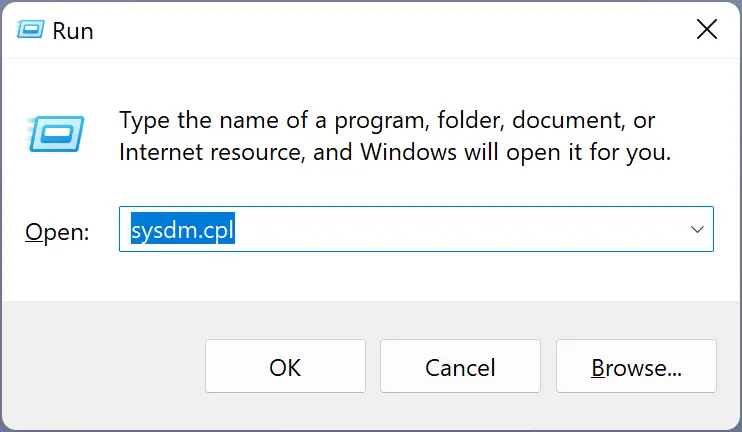
- Press the Windows key + R together to bring up the Run box, type sysdm.cpl and press Enter to open the System Properties window.

- Switch to the Hardware tab, and then click the “Device Installation Settings” button.

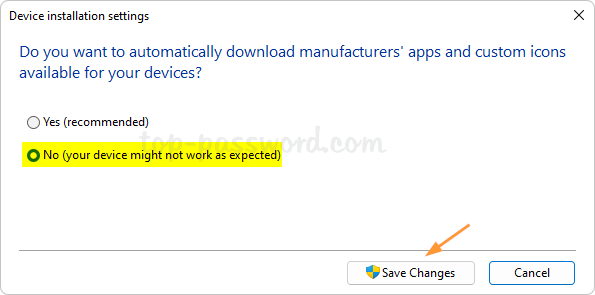
- The pop-up dialog will ask whether you want to automatically download manufacturers’ apps and custom icons available for your devices. Choose the “No (your device might not work as expected)” option and click Save Changes.

- This will disable automatic driver installation on your Windows 11 / 10 PC.

Method 2: Change Device Installation Settings from Registry Editor
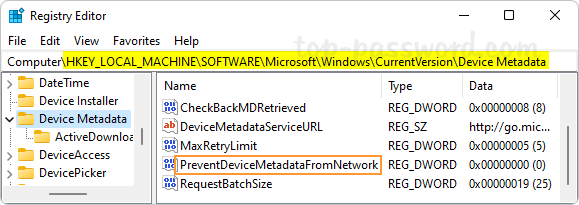
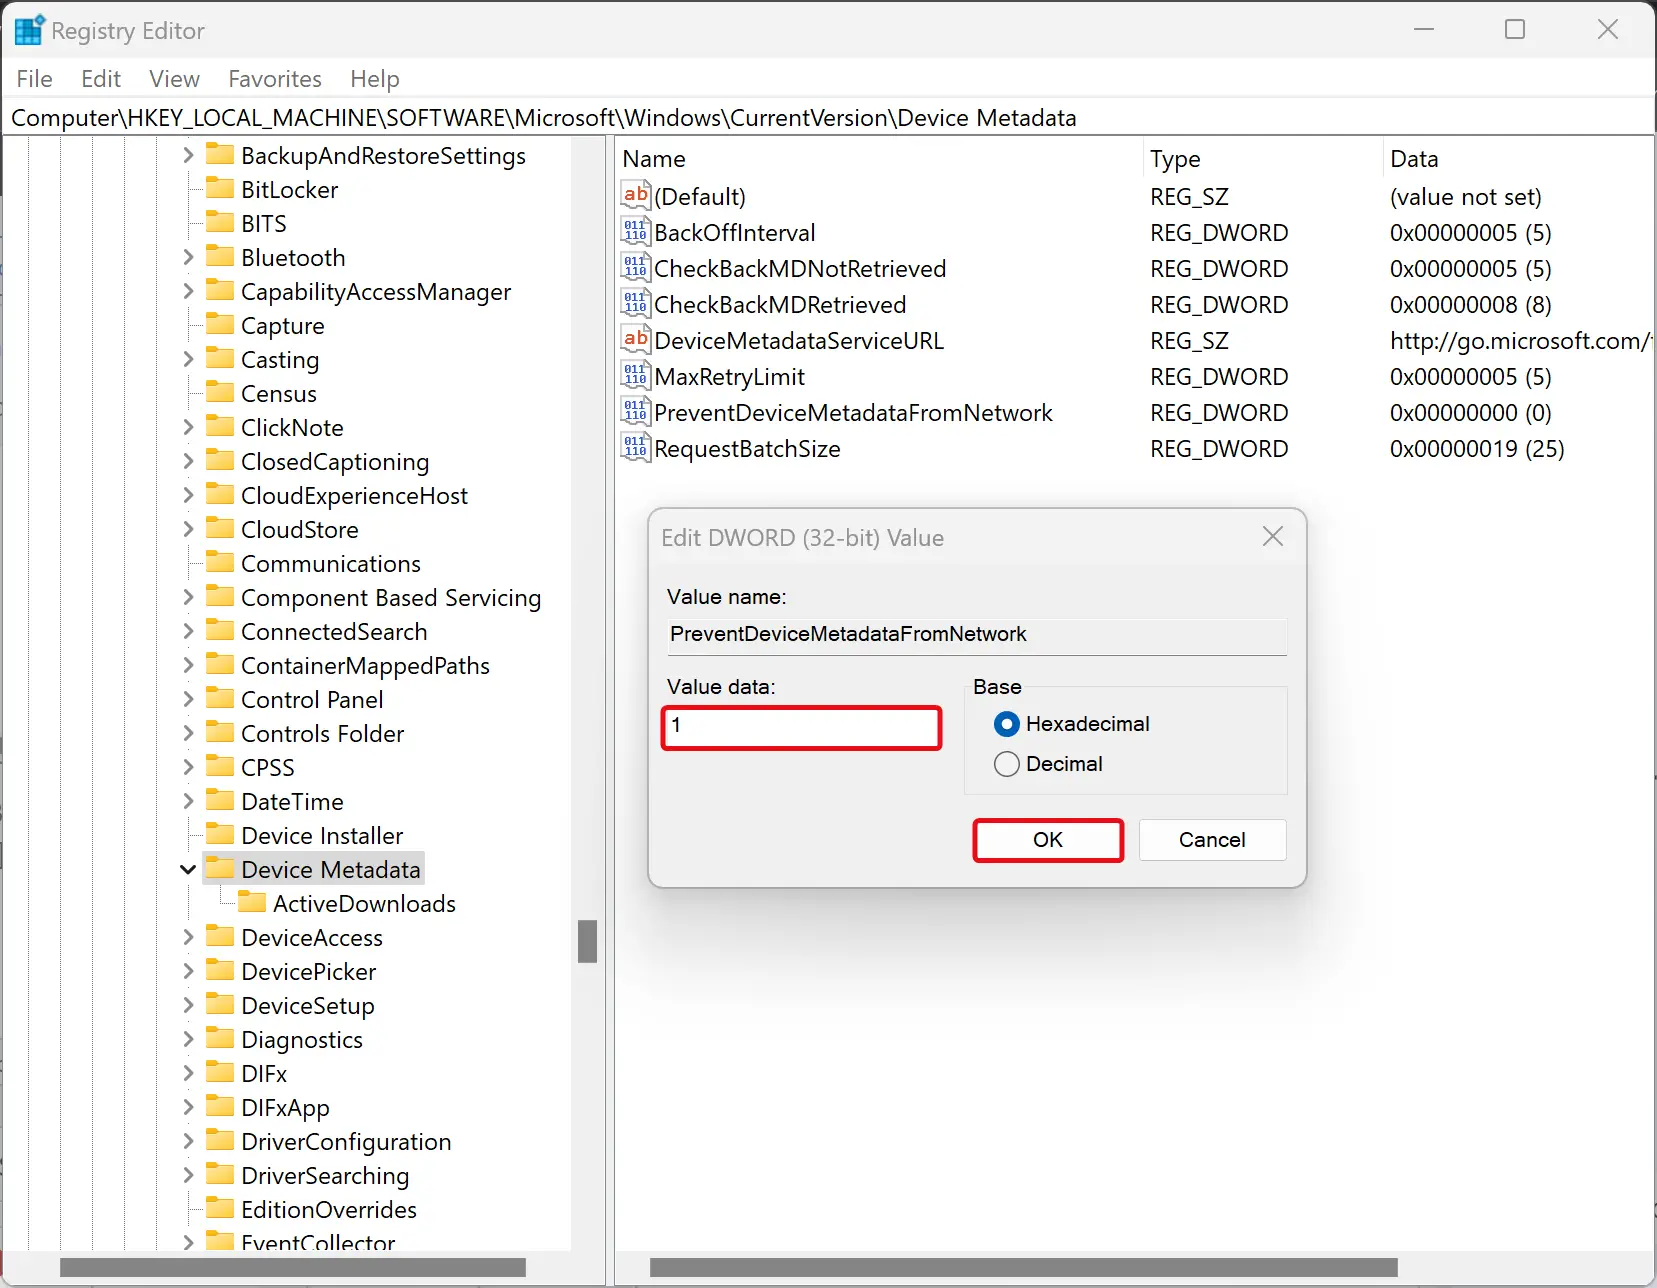
- Open Registry Editor and navigate to the location:
HKEY_LOCAL_MACHINE\SOFTWARE\Microsoft\Windows\CurrentVersion\Device Metadata. Double-click the DWORD PreventDeviceMetadataFromNetwork on the right pane.
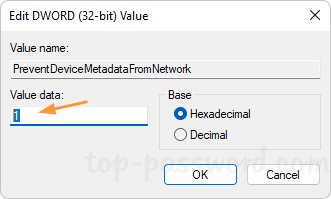
- Change its value data from 0 to 1. Click OK.

- Windows will no longer automatically download and install the latest drivers for devices on your computer.
That’s it!
- Previous Post: Reset Touchpad Settings and Gestures to Defaults in Windows 11
- Next Post: Configure Word to Create Automatic Backup Copy of a Document (2 Methods)
For optimal performance, computers rely on the right drivers to communicate effectively with their hardware components. By default, Windows 11 and 10 are programmed to handle these drivers for you, automatically sourcing and updating them via Windows Update. This process ensures that even after uninstalling a driver, Windows will quickly replace it upon the next system restart. However, there might be instances where users want to retain specific driver versions without Windows replacing them. Fortunately, there’s a solution: by tweaking the device installation settings, one can block Windows from auto-updating these drivers. This guide from risewindows will walk you through the steps to modify these settings using either the System Properties or the Registry Editor.
What is Device Installation Settings?
Device Installation Settings in Windows allows users to specify how the system deals with hardware drivers. By adjusting these settings, one can determine whether Windows should automatically search and download the best drivers or if they’d prefer to do it manually. This feature gives users greater control over the drivers installed on their system, ensuring compatibility and preventing unforeseen software clashes.
How to Change Device Installation Settings using System Properties?
These steps will alter device installation settings via System Properties:-
Step 1. Open the System Properties window.
To do that, press the Windows + R keyboard shortcut to bring up the Run dialog box. Next, type sysdm.cpl in the Run box and hit the Enter key on the keyboard.

Step 2. Switch to the Hardware tab in the “System Properties” window.

Step 3. Select the Device Installation Settings button.
Step 4. When you’re done, a pop-up dialog will ask whether you want to automatically download manufacturers’ apps and custom icons available for your devices. Select the No (your device might not work as expected) option.

Step 5. Pick Save Changes.
Step 6. Then, click on the OK.
Windows 11 or 10 will now turn off automatic driver installation on your PC after you complete the above steps.
How to Change Device Installation Settings from Windows 11 or 10 Registry Editor?
Use these steps to alter device installation settings using Windows 11 or 10 Registry Editor:-
Step 1. Open Registry Editor.
Step 2. Navigate to the following key in the left sidebar of Registry Editor:-
HKEY_LOCAL_MACHINE\SOFTWARE\Microsoft\Windows\CurrentVersion\Device Metadata

Step 3. Double-click on the PreventDeviceMetadataFromNetwork REG_DWORD on the right side of the “Device Metadata” folder.

Step 4. Set the “Value data” to 1.
Step 5. Pick OK.
Your Windows 11 or 10 will no longer automatically download and install the latest device drivers after you complete the above steps.
Conclusion
For those wanting more control over driver installations on Windows 11 or 10, the operating system provides options to alter device installation settings. Whether one chooses to make changes via System Properties or the Registry Editor, these methods effectively block Windows from automatically updating specific drivers. By following the steps outlined by risewindows, users can ensure that their desired driver versions remain intact, safeguarding them from potential compatibility issues or software clashes.
By default, Windows 11 and 10 downloads and install drivers for most of the components automatically with every Windows Update. Also, when you uninstall a driver from your PC, Windows Update will install it automatically the next time you restart your computer.
However, if you want to stop or prevent Windows from automatically overwriting drivers, you need to change device installation settings.
In this gearupwindows article, we will guide you on changing the device installation settings in Windows 11 and 10. To do this, you can either use System Properties or Registry Editor.
How to Change Device Installation Settings using System Properties?
To change or alter device installation settings through System Properties, do these steps:-
Step 1. Open the System Properties window.
To do that, press the Windows + R keyboard shortcut to bring up the Run dialog box. In the Run box, type sysdm.cpl and press Enter key on the keyboard.
Step 2. In the “System Properties” window, switch to the Hardware tab.
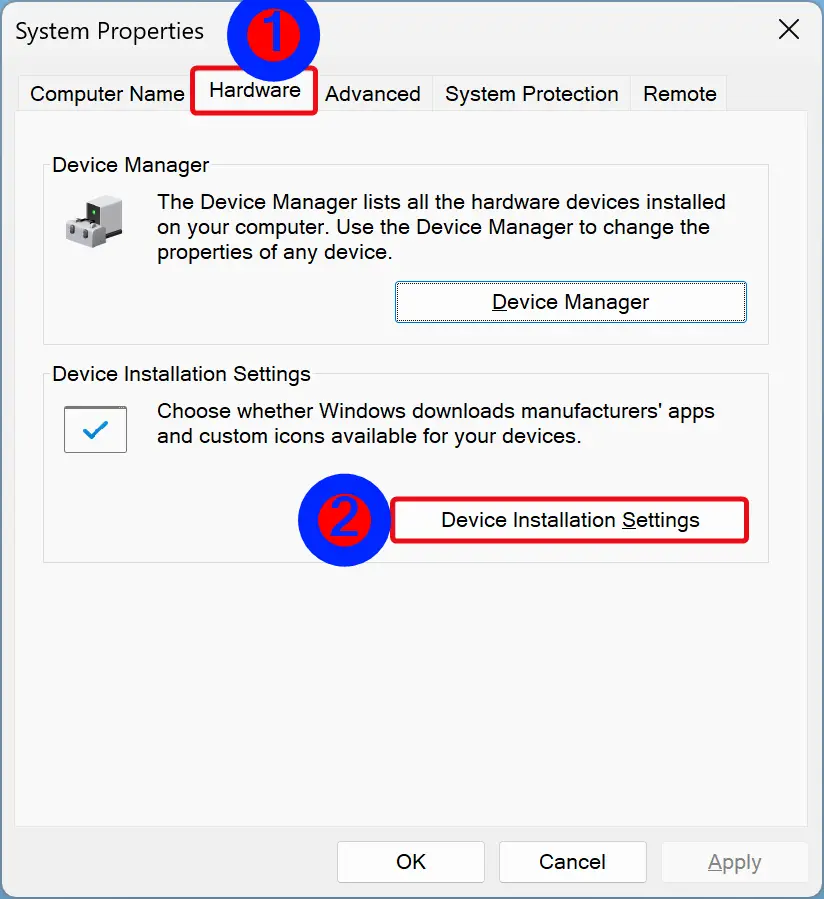
Step 3. Click the Device Installation Settings button.
Step 4. When you’re done, a pop-up dialog will ask whether you want to automatically download manufacturers’ apps and custom icons available for your devices. Choose the No (your device might not work as expected) option.
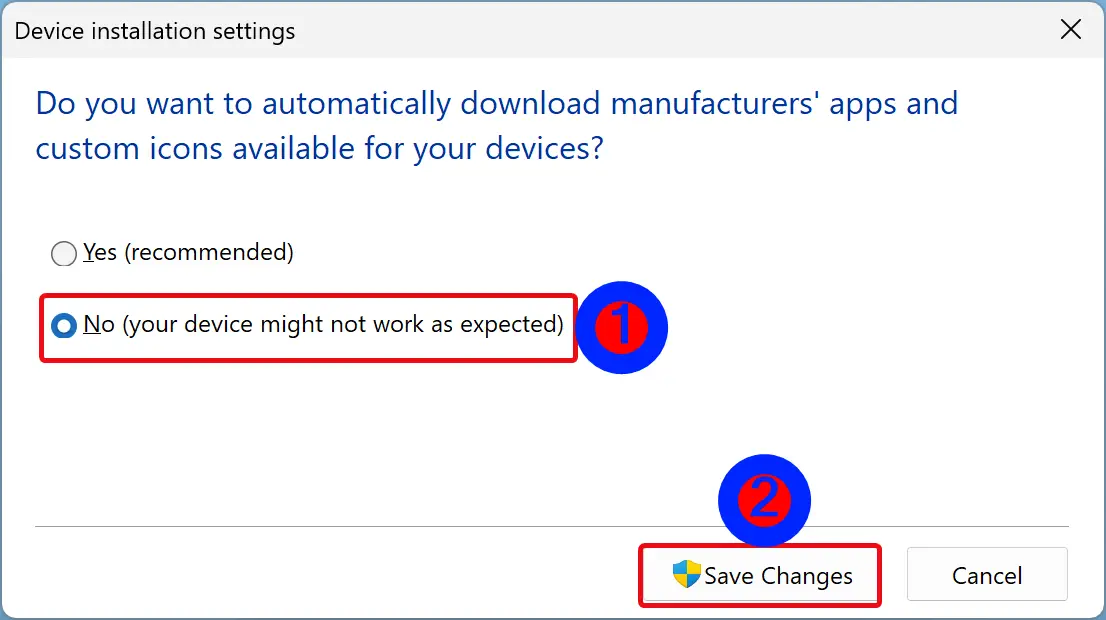
Step 5. Click Save Changes.
Step 6. Click OK.
Once you complete the above steps, Windows 11 or 10 will disable automatic driver installation on your PC.
How to Change Device Installation Settings from Windows 11 or 10 Registry Editor?
To change device installation settings using Windows 11 or 10 Registry Editor, use these steps:-
Step 1. Open Registry Editor.
Step 2. Then, browse or navigate to the following key in the left sidebar of Registry Editor:-
HKEY_LOCAL_MACHINE\SOFTWARE\Microsoft\Windows\CurrentVersion\Device Metadata
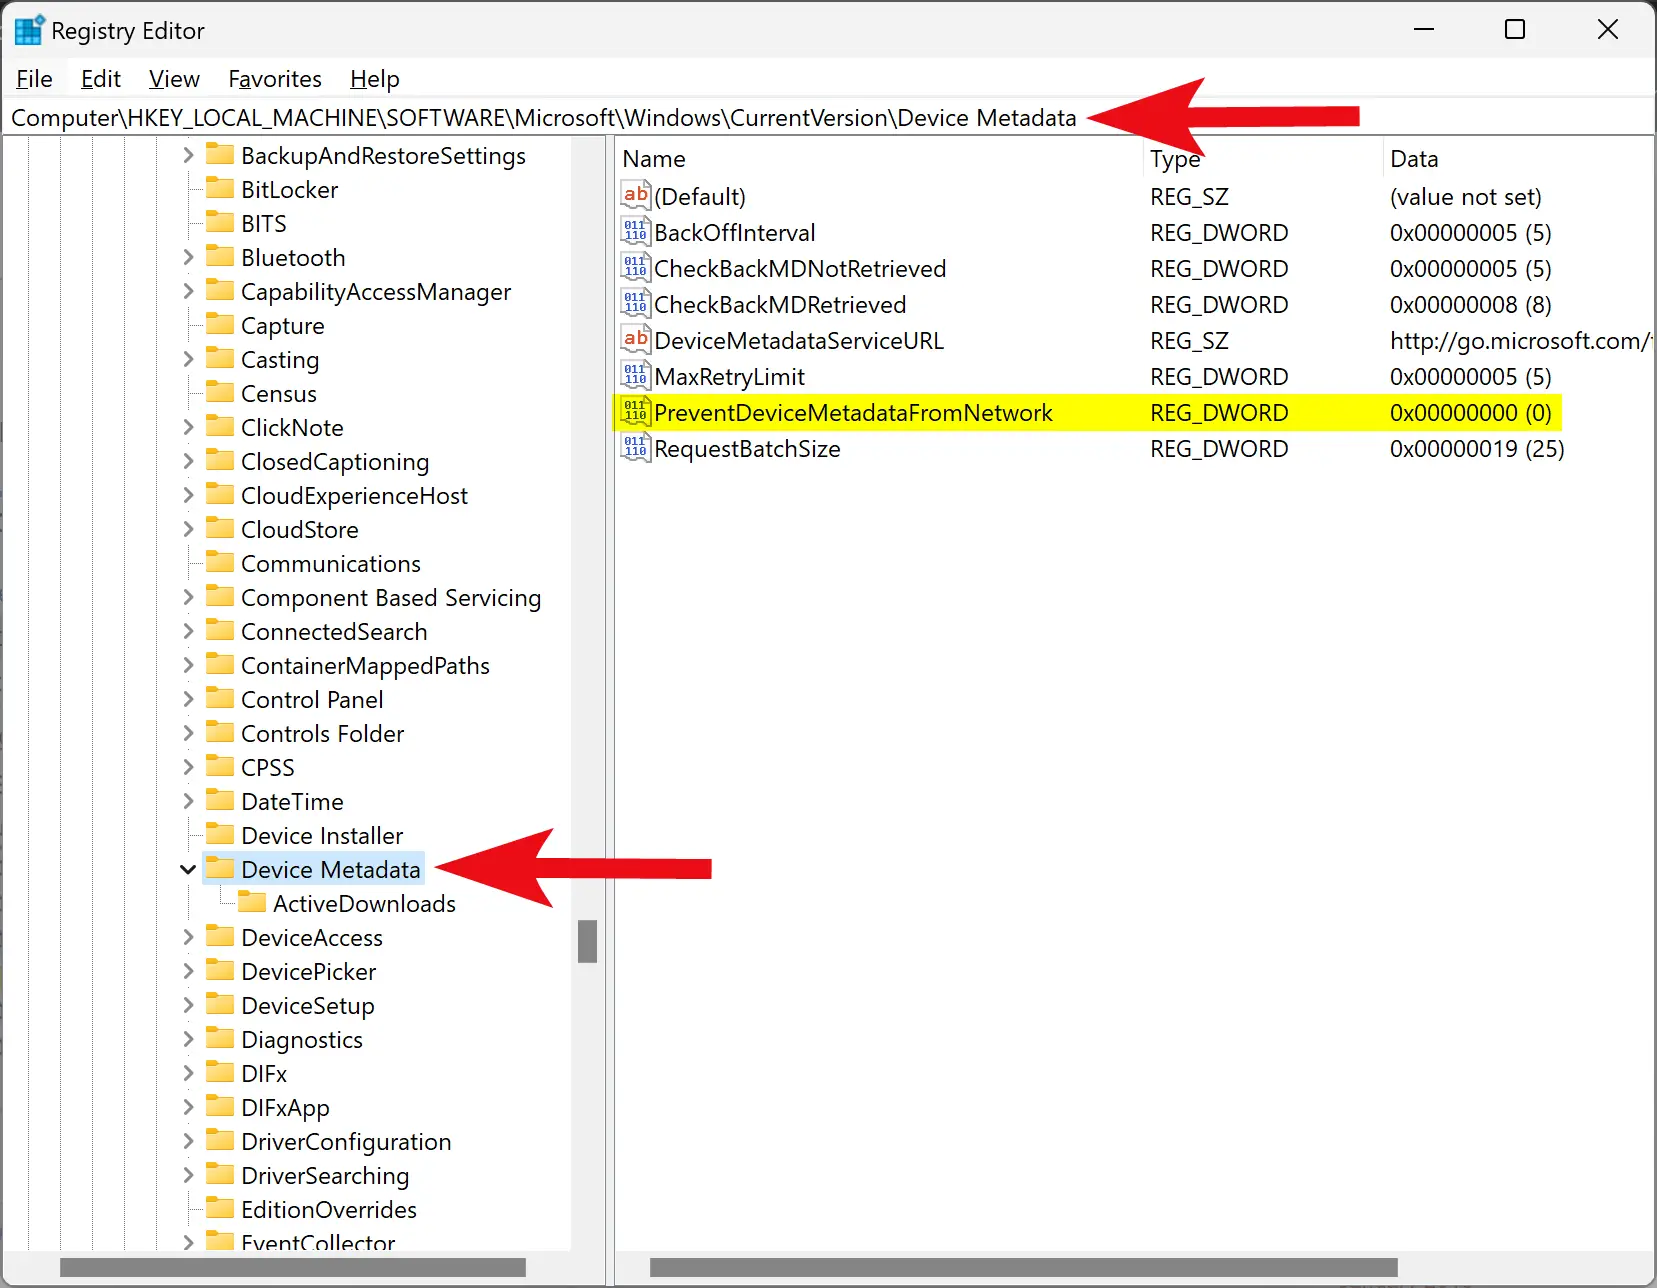
Step 3. On the right side of the “Device Metadata” folder, double-click on the PreventDeviceMetadataFromNetwork REG_DWORD.
Step 4. Set the “Value data” to 1.
Step 5. Click OK.
When you complete the above steps, your Windows 11 or 10 machine will no longer automatically download and install the latest device drivers.
Conclusion
In conclusion, changing device installation settings in Windows 11 or 10 can be done through System Properties or Registry Editor. By default, Windows automatically downloads and installs drivers for most components with every update. However, you can prevent Windows from overwriting drivers automatically by changing device installation settings. In System Properties, you can choose not to automatically download manufacturers’ apps and custom icons available for your devices, while in Registry Editor, you can set the PreventDeviceMetadataFromNetwork value to 1 to stop automatic driver installation.
How to Change Device Installation Settings in Windows 10
- Step 1: Press Windows+Pause Break to open System in Control Panel, and click Advanced system settings.
- Step 2: Select Hardware and tap Device Installation Settings to move on.
What is device installation?
Installation (or setup) of a computer program (including device drivers and plugins), is the act of making the program ready for execution. Installation refers to the particular configuration of a software or hardware with a view to making it usable with the computer.
How do I stop automatic device drivers installing?
How to Disable Automatic Driver Downloads on Windows 10
- Right click the Start button and select Control Panel.
- Make your way to System and Security.
- Click System.
- Click Advanced system settings from the left sidebar.
- Select the Hardware tab.
- Press the Device Installation Settings button.
How do I get to Device installation settings?
Here’s How:
- Open Devices and Printers, and right click or press and hold on the Computer icon with your computer name on it, then click/tap on Device installation settings. (
- Do step 3, 4, or 5 for how you would like to set the settings.
- To Allow Device Drivers and Information to be Installed Automatically.
What is Windows device installation settings?
Device Installation Settings allow you to change if Windows is to automatically download recommended drivers and detailed information for your hardware and devices via Windows Update.
What are the steps of installing a device driver?
How to install the driver
- Go to Device Manager.
- Find the device that need to install a driver.
- Right-click on the device and select Update Driver Software…
- Select Browse my computer for driver software.
- Select Let me pick from a list of device drivers on my computer.
- Click Have Disk…
- Click Browse…
How do I stop Windows from automatically updating drivers?
To stop Windows from doing automatic driver updates, navigate to Control Panel > System & Security > System > Advanced System Settings > Hardware > Device Installation Settings. Then choose “No (your device might not work as expected).”
How do I stop Windows from updating my AMD drivers?
How can I stop AMD drivers from updating automatically?
- Press Windows Key + S and type advanced.
- Open the Hardware tab and click on the Device Installations Settings button.
- Choose No (your device might not work as expected) option.
- Click the Save Changes button.
When to use prevent device from being installed policy?
If you disable or do not configure this policy setting, and no other policy setting describes the device, the “Prevent installation of devices not described by other policy settings” policy setting determines whether the device can be installed. Peripherals can be specified by their device instance ID.
How to prevent the installation of removable devices?
Prevent installation of removable devices: This ‘catch all’ policy setting forbids any device driver that lists itself as “removable” from being installed. This policy will forbid a device from being installed even if the specific device ID is configured as ‘allowed’ in other policies.
How to enable or disable device installation restrictions?
Prevent installation of removable devices Prevent redirection of USB devices Prevent redirection of devices that match any of these device Ids Time (in seconds) to force reboot when required for policy changes to take effect ‹ Configure device installation time-out upAllow administrators to override Device Installation Restriction policies ›
What happens if I enable CSP-deviceinstallation-Windows client?
If you enable this policy setting, Windows is prevented from installing or updating the device driver for any device that is not described by either the “Allow installation of devices that match any of these device IDs” or the “Allow installation of devices for these device classes” policy setting.

Contents
- 1 How To Change Device Installation Settings In Windows 10
- 2 How To Change Device Installation Settings In Windows 10
- 2.1 Conclusion
- 2.1.1 Related image with how to change device installation settings in windows 10
- 2.1.2 Related image with how to change device installation settings in windows 10
- 2.1 Conclusion
Journey Through Literary Realms and Immerse Yourself in Words: Lose yourself in the captivating world of literature with our How To Change Device Installation Settings In Windows 10 articles. From book recommendations to author spotlights, we’ll transport you to imaginative realms and inspire your love for reading. And click tap and tap settings computer open 1 panel icon- control on press name right the under devices see click and screenshot hold and or 2 control with the devices below- icons installation view close device printers your the click on pc icon panel- on
How To Change Device Installation Settings In Windows 10 Youtube
How To Change Device Installation Settings In Windows 10 Youtube
Steps to change device installation settings in windows 10: step 1: press windows pause break to open system in control panel, and click advanced system settings. step 2: select hardware and tap device installation settings to move on. 1 open the control panel (icons view), and click tap on the devices and printers icon. 2 under devices, right click or press and hold on your pc icon with computer name, click tap on device installation settings, and close the control panel. (see screenshot below).

How To Change Device Installation Settings In Windows 10
How To Change Device Installation Settings In Windows 10
Channel ucmv5uzqcaxuw7s4j7rm0pog?sub confirmation=1 how to change device installation settings in windows 10. Method 1: change device installation settings from system properties press the windows key r together to bring up the run box, type sysdm.cpl and press enter to open the system properties window . switch to the hardware tab, and then click the “ device installation settings ” button. Introduction general this step by step guide describes how you can control device installation on the computers that you manage, including designating which devices users can and can’t install. this guide applies to all windows versions starting with windows 10, version 1809. the guide includes the following scenarios:. We recommend that you first try to » reset windows 11 ,» then, if needed, » reinstall windows 11 using installation media ,» and then, if needed, try a » clean install of windows 11 using installation media .» notes:.

How To Change Device Installation Settings In Windows 11 Or 10 Gear Up Windows
How To Change Device Installation Settings In Windows 11 Or 10 Gear Up Windows
Introduction general this step by step guide describes how you can control device installation on the computers that you manage, including designating which devices users can and can’t install. this guide applies to all windows versions starting with windows 10, version 1809. the guide includes the following scenarios:. We recommend that you first try to » reset windows 11 ,» then, if needed, » reinstall windows 11 using installation media ,» and then, if needed, try a » clean install of windows 11 using installation media .» notes:. Click start, type gpedit.msc in the search box, and then press enter. this step opens the local group policy editor. (click yes if you are prompted.) expand computer configuration, expand administrative templates, expand system, expand driver installation, and then double click turn off windows updates device driver search prompt in the right. To install these optional updates, go to windows update in control panel, check for updates, and then view and install driver updates that are available for your computer. information. windows can download high resolution icons for many hardware devices that you connect to your computer, along with detailed information about them, such as.

Change Device Installation Settings Windows 10 Rightmultifiles
Change Device Installation Settings Windows 10 Rightmultifiles
Click start, type gpedit.msc in the search box, and then press enter. this step opens the local group policy editor. (click yes if you are prompted.) expand computer configuration, expand administrative templates, expand system, expand driver installation, and then double click turn off windows updates device driver search prompt in the right. To install these optional updates, go to windows update in control panel, check for updates, and then view and install driver updates that are available for your computer. information. windows can download high resolution icons for many hardware devices that you connect to your computer, along with detailed information about them, such as.
How To Change Device Installation Settings In Windows 10
How To Change Device Installation Settings In Windows 10
channel ucmv5uzqcaxuw7s4j7rm0pog?sub confirmation=1 how to change device installation this tutorial helps to how to change device installation settings in windows 10 thanks friends for watching this video, kindly how to install unknown apps in windows 11: disable installing apps only from windows store. to help protect your pc and keep have you been letting windows manage your drivers? do not leave this as default! here is how i manage my drivers and install how to change device installation settings in windows 8 technolect.org how to identify and install unknown device drivers on windows how to find unknown device drivers on windows 7 8 10 #tech how to create a device installation settings shortcut on windows 10 hindi urdu in windows 10 how to create a device how to update device drivers in windows 10 what is a device driver? on windows 10, a device driver is an essential piece of below are several topics available for discussion today. you can request your favorite(s) from this list in the chat room or request if you are not able to install software that is not part of the windows store, check the video and you will see step by step what you disabling windows 10 driver updates both automatically and through windows update. this tutorial will apply for computers, how to install and update windows drivers manually in windows 10 7. ever had trouble of installing drivers or have drivers with
Conclusion
After exploring the topic in depth, there is no doubt that article delivers valuable insights concerning How To Change Device Installation Settings In Windows 10. Throughout the article, the writer presents a deep understanding on the topic. Notably, the section on Z stands out as a key takeaway. Thank you for the article. If you have any questions, feel free to reach out through email. I am excited about hearing from you. Additionally, below are a few similar content that might be useful: