Debloat Windows 10
ATTENTION!
Apparently there is an issue where running the scripts results in a broken user account / system.
So far, there is only little information what actually causes this.
See the corresponding issue.
Note about Windows 11:
This project does not directly support Windows 11.
Things might work, or might not work — find out if you are brave.
Do not expect this project to transition to Windows 11 as the maintainer lacks the time to do so.
This project collects PowerShell scripts which help to debloat Windows 10,
tweak common settings and install basic software components.
I test these scripts on a Windows 10 Professional 64-Bit (English) virtual
machine. Please let me know if you encounter any issues. Home Edition and
different languages are not supported. These scripts are intended for
tech-savvy administrators, who know what they are doing and just want to
automate this phase of their setup. If this profile does not fit you, I
recommend using a different (more interactive) tool — and there are a lot of
them out there.
Also, note that gaming-related apps and services will be removed/disabled. If
you intend to use your system for gaming, adjust the scripts accordingly.
There is no undo, I recommend only using these scripts on a fresh
installation (including Windows Updates). Test everything after running them
before doing anything else. Also, there is no guarantee that everything will
work after future updates since I cannot predict what Microsoft will do next.
Translations
- Fork with German version
Interactivity
The scripts are designed to run without any user interaction. Modify them
beforehand. If you want a more interactive approach check out
DisableWinTracking from
10se1ucgo.
Download Latest Version
Code located in the master branch is always considered under development, but
you’ll probably want the most recent version anyway.
- Download [zip]
Execution
Enable execution of PowerShell scripts:
PS> Set-ExecutionPolicy Unrestricted -Scope CurrentUser
Unblock PowerShell scripts and modules within this directory:
PS> ls -Recurse *.ps*1 | Unblock-File
Usage
Scripts can be run individually, pick what you need.
- Install all available updates for your system.
- Edit the scripts to fit your need.
- Run the scripts you want to apply from a PowerShell with administrator privileges (Explorer
Files > Open Windows PowerShell > Open Windows PowerShell as administrator) PS > Restart-Computer- Run
disable-windows-defender.ps1one more time if you ran it in step 3 PS > Restart-Computer
Start menu
In the past I included small fixes to make the start menu more usable, like
removing default tiles, disabling web search and so on. This is no longer the
case since I am fed up with it. This fucking menu breaks for apparently
no reason, is slow, is a pain to configure / script and even shows ads out of
the box!
Please replace it with something better, either use Open Shell or Start
is Back, but stop using that shit.
Known Issues
Start menu Search
After running the scripts, the start menu search-box may no longer work on newly
created accounts. It seems like there is an issue with account initialization
that is triggered when disabling the GeoLocation service. Following workaround
has been discovered by BK from Atlanta:
- Delete registry key
HKEY_LOCAL_MACHINE\SYSTEM\CurrentControlSet\Services\lfsvc\TriggerInfo\3 - Re-enable GeoLocation service (set startup type to
Automatic) - Reboot
- Login with the account having the stated issue
- Start Cortana and set your preferences accordingly (web search and whatnot)
You may now disable the GeoLocation service again, the search box should remain
functional.
Sysprep will hang
If you are deploying images with MDT and running these scripts, the sysprep
step will hang unless dmwappushservice is active.
Xbox Wireless Adapter
Apparently running the stock remove-default-apps script will cause Xbox
Wireless Adapters to stop functioning. I suspect one should not remove the Xbox
App when wanting to use one. But I haven’t confirmed this yet, and there is a
workaround to re-enable it afterwards. See
#78.
Issues with Skype
Some of the domains blocked by adding them to the hosts-file are required for
Skype. I highly discourage using Skype, however some people may not have
the option to use an alternative. See the
#79.
Fingerprint Reader / Facial Detection not Working
Ensure Windows Biometric Service is running. See
#189.
Liability
All scripts are provided as-is and you use them at your own risk.
Contribute
I would be happy to extend the collection of scripts. Just open an issue or
send me a pull request.
Thanks To
- 10se1ucgo
- Plumebit
- aramboi
- maci0
- narutards
- tumpio
License
"THE BEER-WARE LICENSE" (Revision 42):

As long as you retain this notice you can do whatever you want with this
stuff. If we meet someday, and you think this stuff is worth it, you can
buy us a beer in return.

This project is distributed in the hope that it will be useful, but WITHOUT
ANY WARRANTY; without even the implied warranty of MERCHANTABILITY or
FITNESS FOR A PARTICULAR PURPOSE.
This goes over debloating and slimming down Windows 10 and 11 so you get maximum performance from your PC.
I made a guide going over the debloat process two years ago https://christitus.com/debloat-windows-10/ — The guide has evolved and the github project I was using has also improved. I’ve also made a newer post going over the all the changes @ https://christitus.com/windows-tool
April 2022 Update
- Added new options to get Windows 10/7 Options in Windows 11
- Service optimizations to reduce process count
- Added more tweak settings and misc. fixes
- GUI Redesign
- new Github https://github.com/ChrisTitusTech/winutil
New command!
iwr -useb https://christitus.com/win | iex
July 2021 Update
If you are coming here from the YouTube video I have taken all the scripts below and a system admin script I used a lot in the past to make a streamlined debloat script. This script will optimize Windows and can be run multiple times if you have an update ruin all the optimizations. I have also made it very easy to launch. Here is the source files: https://github.com/ChrisTitusTech/win10script
If you want to just run this on any system, you can easily copy and paste this into a Admin Powershell prompt and watch it do everything for you. It does have two prompts based on user feedback. Let me know what you think below!
OLD PROJECT — DEPRECATED
iex ((New-Object System.Net.WebClient).DownloadString('https://git.io/JJ8R4'))
What this script can do
- Installs any program listed that you click on using WinGet
- Removed Telemetry
- Disables Cortana
- Deletes various schedules tasks that rebloat the system
- Fixes problems that other scripts causes (lock screen and personalization options restricted)
Based on User feedback Microsoft Store and Windows Defender is no longer touched.
Toolbox Walkthrough Video
User Requested Restore Scripts
iex ((New-Object System.Net.WebClient).DownloadString('https://git.io/JTbKD'))
This restore script pops up a GUI that lets you restore what you want to FACTORY DEFAULTS!
Current Lineup:
- Cortana
- Tray Icons
- Action Center
Old Methods from Prior Videos that I no longer use
The project I use has been developed for many years now and is extremely good. Here is the source github project I use:
https://github.com/Sycnex/Windows10Debloater
This is a new project that was brought to my attention, but has quickly made a name for itself. It works very well and is typically more up to date than the above project.
https://github.com/farag2/Windows-10-Setup-Script
I recommend running this tool under the following conditions:
- Before User Profile is Created
- Empty Desktop and Downloads (Past versions has deleted files from Desktop and Downloads)
- After installing New Feature Updates
Recommended Options:
- Disable Cortana
- Uninstall OneDrive
- Run Essential Tweaks
I generally always enable Dark Mode and Install 3.5 .NET but that is entirely my personal preference.
 Число программ для настройки и очистки или «твикеров» Windows исчисляется десятками, о многих о них уже было написано на сайте, например, в статье Лучшие программы для настройки Windows 10.
В этом кратком обзоре о ещё одной такой программе — Windows 11 Debloater и её же варианте для предыдущей версии ОС — Windows 10 Debloater, функциях и использовании.
Использование Windows 11 Debloater и Windows 10 Debloater
На сайте разработчика представлены две версии Windows Debloater — для Windows 11 и Windows 10, обе имеют русский язык интерфейса и очень похожи по функциям, за исключением отдельных пунктов, применимых лишь к одной из версий системы. Скачать каждую из версий можно с официального сайта:
- Windows 11 Debloater
- Windows 10 Debloater
После запуска язык интерфейса будет выбран автоматически, если потребуется его изменить — используйте пункт «Language» в главном меню программы. Как и для других подобных инструментов, перед началом использования рекомендую создать точку восстановления системы.
Интерфейс программы разбит на несколько вкладок, на каждой из которых доступны те или иные настройки или действия. В описании далее — Windows 11 Debloater, но и в версии для Windows 10 всё аналогично.
- EZ Debloater — основные действия по отключению функций и элементов Windows или их включению. Здесь же производится запуск применения выбранных базовых настроек с помощью кнопки «Запустить скрипт».

- Advanced Debloater — отключение некоторых системных функций с предустановленными профилями, оптимизированных для ПК, ноутбука, минимального использования ресурсов или виртуальной машины.

- 3-я сторона — установка и удаление популярных сторонних программ.
- Приложения Windows — установка и удаление встроенных приложений Windows 11/10.
- Пользовательский интерфейс и персонализация — настройка поведения элементов пользовательского интерфейса, скрытие и показ системных значков, расположения панели задач и другие. Пункты на английском языке, но если задержать указатель мыши, появится всплывающая подсказка с описанием на русском (актуально и для других разделов программы).
- Конфиденциальность и Телеметрия — отключение или включение соответствующих функций Windows.
- Один диск — пункт для удаления или установки OneDrive.
- Система — настройки системных функций, таких как сетевое обнаружение, гибернация, планы электропитания, показ или скрытие кодов BSoD, автоматическая очистка диска и другие.
- Стартовое меню — настройки меню Пуск, в частности: показ или скрытие недавно установленных приложений, запуск PowerShell от имени администратора из меню Пуск.
- UWP-приложения — отключение или включение автозагрузки встроенных UWP-приложений Teams и Cortana.
- Игры — пара настроек, имеющих отношение к играм: подсказки Xbox и планирование GPU.
- Защитник и безопасность — настройки функций защиты Microsoft Defender, без полного отключения. Если требуется, вы можете полностью отключить Microsoft Defender другими способами.
- Контекстное меню — скрытие и показ стандартных пунктов в контекстном меню Windows.

- Другой — другие параметры, в частности — размер панели задач и изменение некоторых других её параметров.
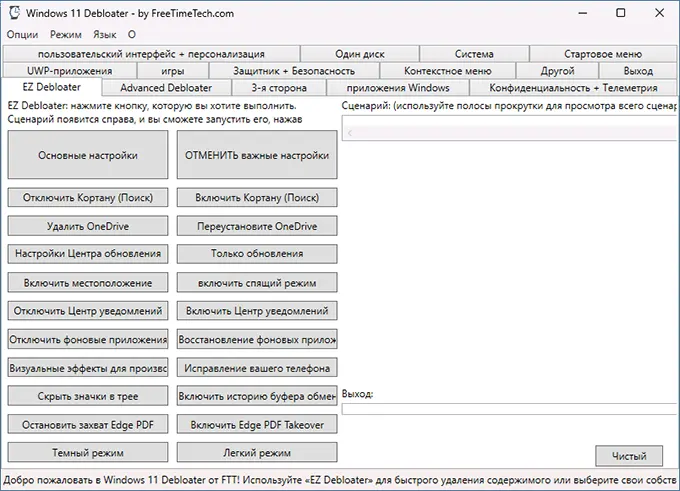


Чтобы применить настройки, сделанные во всех вкладках, кроме первой, перейдите на вкладку «Выход» и нажмите кнопку «Вывод PowerShell».

Это выведет скрипт PowerShell, выполняющий все запрошенные операции, который можно либо сохранить на компьютере, либо запустить прямо с этой вкладки.
Подводя итог:
- Windows 11 Debloater и Windows 10 Debloater — интересный продукт, есть полезные настройки, которые часто востребованы.
- Набор доступных настроек кажется не полным: многие другие общеизвестные и часто используемые опции можно было бы добавить в уже имеющиеся категории (к тому же механизм их применения тот же), но по какой-то причине они отсутствуют.
- Функция вывода всех примененных действий в свой скрипт PowerShell — хорошо и может быть полезным для тех, кто постоянно использует собственный набор твиков системы.
When it comes to making your Windows 10 computer run quickly and efficiently, there is only so much temporary cleaning you can do. While you can uninstall applications that you do not use, or do a clean wipe of Windows 10, there is still going to be bloat. By bloat, we mean preinstalled applications and settings that the average computer user doesn’t know how to remove. In this guide, we will explain what tools you can use to debloat Windows 10, and show you how to safely use a Windows 10 debloater tool. Ready for an increase in performance and privacy? Keep reading!
A Brief Background of What is PowerShell
The PowerShell application on your Windows 10 computer is a cross-platform task automation solution that combines a command-line shell, scripting language, and a configuration management framework for accepting and returning .NET objects. PowerShell has quite a robust command-line history, a pipeline for chaining commands together, in-console help system, and more.
The PowerShell language used for scripting is a high-level proprietary programming syntax that was created by Microsoft to allow system administrators (you) to automate certain actions and configurations. Though PowerShell can be used for a wide variety of functions, most beginners use it to handle large batches of files, set up new machines in a network, and automate processes for updating security, granting new user access to shared files, or creating backups. In our case, we are going to use one of the available PowerShell scripts to debloat Windows 10.
What Windows 10 Debloater PowerShell Scripts Do
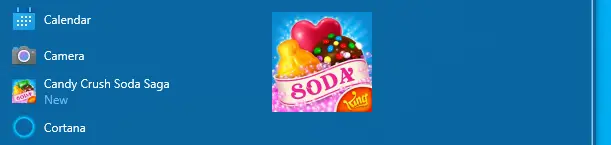
The PowerShell scripts you are going to read about below are designed to uninstall and remove pre-installed applications on Windows 10 that are not useful to you. For instance, maybe you absolutely loathe Cortana, hate that OneDrive always tries to connect, or don’t want that Candy Crush Soda Saga from King on your Windows Start Menu Tiles. And when you went to uninstall these, you found that you couldn’t, right? A PowerShell script can get rid of these for you.
These scripts can also disable telemetry functions, which is data that includes information about system diagnostics. For instance, your Windows 10 computer will track how frequently you use certain features, applications, system files, and collect information on security data from Windows Defender. While you do have some say over what telemetry data is collected, you cannot turn it off completely; unless you use a PowerShell script.
Now that we know the basics of what these PowerShell scripts can do, let’s jump into a few that are available for download.
3 Windows 10 Debloater PowerShell Scripts
1. Windows10Debloater – Sycnex
This is a PowerShell script that debloats Windows 10 by removing pre-installed applications, ceasing some telemetry functions, disabling unnecessary scheduled tasks, and it stops Cortana from being used as your default search index. It can remove files such as: 3D Builder, Alarms, Microsoft News, Microsoft Sticky Notes, OneNote, Skype for Desktop, XboxApp, and much more. This particular script does have the option for a GUI (graphical user-interface) which makes it a lot easier to use for those who are new to PowerShell. You can view the GitHub repository here.
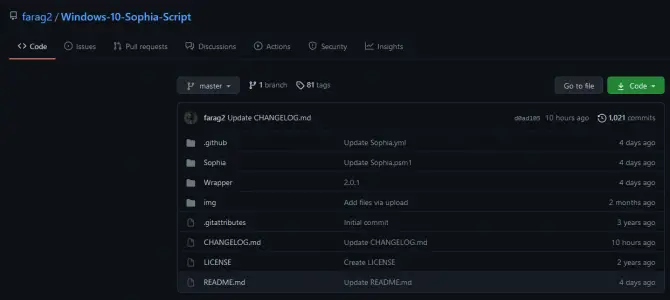
2. Windows 10 Sophia Script – Farag2
This is another powerful PowerShell module script that is designed for fine-tuning and tweaking Windows 10. If you are looking for a much more robust option than the Windows 10 Debloater tool above, this is the one. It includes over 150 functions, is routinely updated, and comes in a “GUI wrapper” for easier use. It allows you to set up Windows security, privacy, telemetry, uninstall unnecessary programs, change the location of default folders, and even create scheduled tasks for cleaning up unused files and updates. You can view the GitHub repository here. It is recommended that you use this after a fresh installation of Windows 10. An alternative option can be found here.
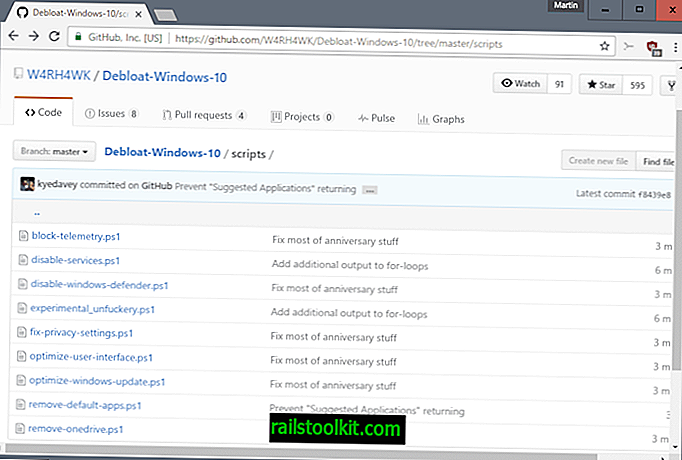
3. Debloat-Windows-10 by W4RH4WK
This is a collection of PowerShell scripts that can be used to disable or remove Windows 10 features and applications. It only works on Windows 10 Professional 64-bit and not Home Edition and only in English. In running this script, basic software components will remain installed, but all gaming-related applications and services will be disabled/removed. It is recommended that you use this after a fresh installation of Windows 10. You can view the GitHub repository here.
How to Safely Install and Use Windows 10 Sophia Script to Debloat Windows 10
In the steps below, we will explain how to install Windows 10 Sophia Script and provide a few basic steps for uninstalling apps.
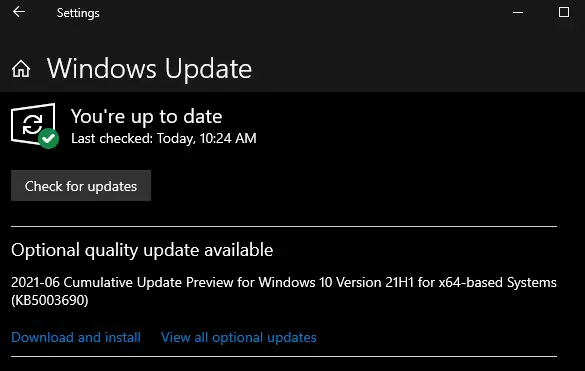
Step 1: Install the Latest Windows Updates.
Make sure that your Windows 10 PC is up to date with the latest updates. To check, type in “Windows Updates” into your computer search bar and click on the System Settings option under best results. Click the “Check for updates” button to see if there are any you need to download and install. If there aren’t, move on to the next step.
Step 2: Create a Restore Point.
When messing around with powerful command lines, it is always recommended to create a restore point first. This way, if you make any mistakes, you have the option to revert back to the previous state.
- In your computer’s search menu, type in Create a Restore Point.
- Click into the option it gives you under best results.
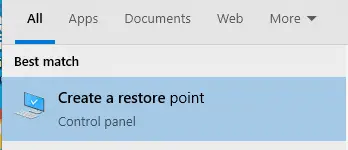
- Head to the System Protection tab and hit configure.
- Turn on system protection and choose your max usage.
- Click the create button and name it aptly. “Before debloat” or something similar.

Step 3: Check Your Windows Version.
In order to download the right version of the Windows 10 debloater tool, you need to know which version of Windows you are using. In your computer’s search menu, type in “WINVER” and a small window will pop-up. This will tell you which Windows version you are on – match it with the one on the GitHub repository.

Step 4: Download the Sophia Script and Extract.
Once you’ve matched up the right Sophia Script version with your Windows 10 version, download the script!

After it has downloaded, click on the download to “show in folder” and extract the file to your desktop by dragging it from the download window to your desktop. I have downloaded the Sophia.Script.LTSC.v5.2.8.zip as this works with 21H1 of Windows 10.

Step 5: Download NotePad++ [Optional]
If you plan on editing the preset file with your own command functions, then you will need to download NotePad Plus Plus to open the Sophia.ps1 file. If you are planning on just using the script to debloat Windows 10 of basic features and functions, you do not need to do this step. You can find NotePad ++ download here.
Step 6: Open Sophia.ps1 Preset File to Edit [Optional]
Once you have NotePad Plus Plus downloaded, you can edit the preset file. Just right-click the file and open it with NotePad.
Warning: Editing the preset file requires advanced knowledge of using command lines and editing the PowerShell scripting language, so only do this if you are confident in either a) following scripting instructions or b) fluent in PowerShell language.
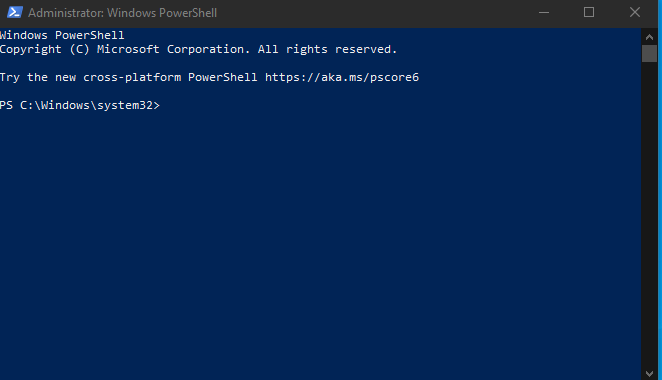
Step 7: Run PowerShell As Administrator in the Sophia Script Folder.
In your Sophia Folder is on your desktop, there will be a “File” option in the top left-hand corner. Click it and choose to open Windows PowerShell as an administrator.

Step 8: Set Execution Policy Using the Command Line.
If this is your first time running a script, your Windows computer isn’t going to recognize this as a valid action. So, you may get an error that warns you about running the script.

You can bypass this with an execution policy command line. In the PowerShell tab that has opened up, type in: “Set-ExecutionPolicy -ExecutionPolicy Bypass – Scope Process -Force” and hit Enter.

Step 9: Run the Windows 10 Debloater Script.
Now, on the next line down in the PowerShell window, type in “.\Sophia.ps1” and hit Enter. This command line will run the preset script for you.
Step 10: How to Disable Scheduled Tasks You Do Not Need.
If you want to disable scheduled tasks, run the command line:
.\Sophia.ps1 -Function “ScheduledTasks -Disable”
Hit Enter.
This will pull up the scheduled tasks menu to the right of the PowerShell. Choose which tasks you want to disable by checking them, and then hit the big Disable button.

Step 10: How to Disable Windows Features You Do Not Need with the Debloater.
You would run the same kind of command line as in step eight, but for all of the Windows features you do not want. Let’s run this for 1 feature and then for multiple.
Let’s say you don’t want the Cortana button on your taskbar, you would type in: .\Sophia.ps1 -Function “CortanaButton -Hide”
Hit Enter.
This will hide the Cortana Button from your taskbar. No more accidental clicking on it!
Now, let’s say you do not want telemetry tracking and you want the gathered diagnostic data level to be minimal, you would type in:
.\Sophia.ps1 -Functions “DiagTrackService -Disable”, “DiagnosticDataLevel -Minimal”
Hit Enter.
Alternatively, you can use the “WindowsFeatures -Disable” command line to bring up a pop-up box that allows you to checkmark all the ones you want to disable.
Step 12: Debloat Background Apps, Main Folders, and Universal Windows Platform Packages.
Repeat the process for all of the above. We do highly recommend using the GUI version for this step, since it is much easier to move around within, for those who are completely new to PowerShell.
Note: Steps 8-11 show you how to disable features using the “old” command line way rather than the “tab” way. If you would prefer auto-completing tabs, you can view how to do this here, by scrolling down to the “how to run specific functions” section.
Wrapping It Up
And, that’s how you use a PowerShell script to debloat Windows 10.
If you are interested in using the GUI version of the Sophia Script, download the Sophia Script Wrapper.exe program from the repository, copy and paste the folders within it over to your original Sophia Script folder.
Rename the Sophia.ps1 (preset file) to Sophia-Original.ps1 so that it does not get overwritten by the new GUI version. Then run the Sophia Script Wrapper.exe program.

Now, instead of running command lines, you can use the radial buttons to choose what you want to disable or uninstall.
Debloat Windows 10 — это набор сценариев Powershell, которые блокируют, отключают, изменяют или оптимизируют различные функции Windows 10, которые пользователи могут счесть раздражающими или, по крайней мере, не очень полезными для начала.
Слово предупреждения : эти сценарии не имеют функции отмены. Автор предлагает вам запустить их на новой установке Windows 10. Я предлагаю вам создать полную резервную копию системы, прежде чем запускать их, чтобы вы могли восстановить систему в случае сбоя.
Вы можете открыть любой из скриптов Powershell в текстовом редакторе или непосредственно в GitHub, чтобы узнать, что они делают в деталях.
Вам, наверное, интересно, что делают эти сценарии. Всего вы найдете девять сценариев в репозитории Debloat для windows 10 GitHub. Они есть:
- Block Telemetry — добавляет список доменов телеметрии в файл hosts, чтобы заблокировать их. Кроме того, для параметра Allow Telemetry установлено значение 0 и блокируется несколько IP-адресов телеметрии с помощью брандмауэра.
- Отключить службы — отключает более десятка служб, включая службу отслеживания диагностики, службу геолокации, удаленный реестр и службы Xbox Live.
- Отключить Защитник Windows — отключение задач Защитника Windows и установка нескольких значений реестра.
- Experimental Unfuckery — удаляет системные приложения, такие как обратная связь, служба поддержки или BioEnrollment.
- Fix Privacy Settings — Устанавливает довольно много связанных с конфиденциальностью значений в Реестре, которые связаны с конфиденциальностью.
- Оптимизация пользовательского интерфейса. Опять же, значения реестра, по большей части изменяющие визуальные элементы, интерфейс и элементы доступности, включая исправление ускорения мыши, функции легкого доступа к клавиатуре, изменение параметров просмотра папок и т. Д.
- Оптимизировать Центр обновления Windows — отключает автоматическую загрузку и установку обновлений Windows, отключает сообщение «обновления доступны» и автоматические обновления драйверов.
- Удалить приложения по умолчанию — удаляет большинство приложений, которые поставляются с Windows 10.
- Удалить OneDrive — отключает OneDrive и удаляет следы OneDrive из системы.
Вам нужно открыть окно Powershell с повышенными правами, чтобы запустить эти сценарии:
- Нажмите на клавишу Windows, введите powershell, удерживайте нажатой клавишу Shift и клавишу Ctrl и нажмите клавишу Enter.
- Сначала запустите команду Set-ExecutionPolicy Unrestricted, чтобы включить выполнение сценариев Powershell. Выберите Y, когда на экране появится подсказка, если вы хотите продолжить.
- Затем запустите любой из сценариев, используя. \ Scriptname.ps1 из каталога, в который вы их сохранили.
- После этого запустите Set-ExecutionPolicy Restricted, параметр политики по умолчанию.
Это все, что нужно сделать. Вы можете запустить столько скриплетов Powershell, сколько захотите. Я не могу не подчеркнуть важность создания резервной копии вашей системы перед запуском любого из сценариев. (через внутренние окна)