Debian является одним из самых популярных дистрибутивов Linux и предоставляет множество возможностей. Если у вас возникла необходимость установить Debian вместе с Windows на вашем компьютере, то вы попали по адресу. В этой подробной инструкции мы расскажем вам, как это сделать.
Перед установкой Debian рекомендуется выполнить несколько важных шагов. Прежде всего, необходимо создать резервную копию важных данных на вашем компьютере. Это позволит избежать потери информации в случае возникновения проблем в процессе установки. Кроме того, перед установкой Debian следует убедиться, что ваш компьютер соответствует требованиям системы и имеет достаточно свободного места на жестком диске.
Следующим шагом является загрузка образа установочного диска Debian с официального сайта. Вы можете выбрать подходящую для вас архитектуру (32-битную или 64-битную) и версию Debian. После загрузки образа диска необходимо записать его на USB-флешку или DVD-диск при помощи специального программного обеспечения для записи образов.
Теперь, когда у вас есть загрузочный диск Debian, вы можете перезагрузить компьютер и выбрать загрузку с этого диска. После загрузки вы увидите экран выбора языка установщика Debian. Выберите язык и следуйте инструкциям на экране. В процессе установки вам будет предложено выбрать партицию для установки Debian, распределить свободное место и настроить загрузчик, который позволит выбирать операционную систему при запуске компьютера.
После завершения установки вам останется только настроить операционную систему по своему вкусу и переключать между Debian и Windows при запуске компьютера. Установка Debian вместе с Windows может быть сложной задачей, но при следовании этой подробной инструкции вы сможете успешно справиться с этим заданием.
Содержание
- Подготовка к установке
- Создание резервной копии данных
- Создание раздела для Debian
- Скачивание и запись образа Debian
- Установка Debian на раздел
- Настройка загрузчика и завершение установки
Подготовка к установке
Перед началом установки Debian вместе с Windows важно выполнить ряд подготовительных шагов:
1. Создайте резервную копию данных:
Перед установкой Debian рекомендуется создать резервную копию всех важных данных, хранящихся на компьютере. Это поможет избежать потери информации в случае непредвиденных ситуаций в процессе установки или настройки.
2. Выделите свободное место на жестком диске:
Для установки Debian вместе с Windows необходимо иметь свободное место на жестком диске компьютера. Проверьте, есть ли у вас достаточно места для установки новой операционной системы.
3. Скачайте установочный образ Debian:
Перейдите на официальный сайт Debian и скачайте последнюю стабильную версию установочного образа. Рекомендуется загружать образ с официальных зеркал, чтобы быть уверенным в его целостности и актуальности.
4. Подготовьте загрузочный USB-накопитель или DVD-диск:
Установочный образ Debian можно записать на USB-накопитель или DVD-диск с помощью специальной программы, такой как Rufus или Etcher. Это позволит запустить установку Debian с загрузочного носителя.
5. Создайте раздел для установки Debian:
С помощью утилиты для разбиения диска, например, Диспетчера дисков в Windows, создайте новый раздел на жестком диске, где будет установлена Debian. Оставьте достаточно места для установки и развития системы.
6. Отключите Secure Boot (при необходимости):
Если ваш компьютер использует технологию Secure Boot, возможно, вам придется отключить ее в BIOS или UEFI перед установкой Debian. Secure Boot может предотвратить загрузку и установку других операционных систем, в том числе Debian.
После выполнения всех необходимых подготовительных действий можно начинать процесс установки Debian вместе с Windows.
Создание резервной копии данных
Перед установкой Debian вместе с Windows рекомендуется создать резервную копию всех важных данных на компьютере. Это позволит избежать потери информации в случае неожиданных проблем или ошибок в процессе установки.
Для создания резервной копии данных можно воспользоваться различными методами:
- Внешний жесткий диск: подключите внешний жесткий диск к компьютеру и скопируйте на него все необходимые файлы и папки.
- Облачное хранилище: воспользуйтесь услугами облачных сервисов, таких как Google Drive, Dropbox или Яндекс.Диск, чтобы сохранить ваши данные в интернете.
- USB-флешка: скопируйте важные файлы на USB-накопитель.
Перед копированием данных убедитесь, что вы не забыли сохранить ни один важный файл или папку. Также рекомендуется проверить, что резервная копия прошла успешно и все файлы сохранены корректно.
Создание раздела для Debian
Прежде чем установить Debian, необходимо создать отдельный раздел на жестком диске, где будет размещена операционная система.
1. В первую очередь, создайте резервную копию данных на компьютере, чтобы в случае чего можно было восстановить информацию.
2. Откройте программу для работы с дисками (например, «Диспетчер дисков» в Windows) и найдите свободное место на вашем жестком диске.
3. Щелкните правой кнопкой мыши на свободном месте и выберите опцию «Создать новый объем».
4. В открывшемся окне выберите размер раздела для Debian. Рекомендуется выделить не менее 20 ГБ свободного пространства для установки операционной системы.
5. Выберите файловую систему для раздела Debian. Рекомендуется использовать ext4. Также, установите метку для раздела, чтобы его можно было легко идентифицировать.
6. Когда раздел создан, нажмите кнопку «Применить» или «ОК», чтобы сохранить изменения.
Теперь у вас есть отдельный раздел, готовый для установки Debian. В следующем разделе мы рассмотрим процесс установки операционной системы.
Скачивание и запись образа Debian
После скачивания образа Debian, вам необходимо создать загрузочную флешку или DVD с этим образом. Для этого вам понадобится специальная программа для записи образов, например, Rufus или Etcher.
Запустите выбранную программу и выберите загружаемый образ Debian. Убедитесь также, что правильно выбран устройство, на которое будет записан образ.
После выбора образа и устройства, вам нужно будет нажать на кнопку «Записать» или «Start», чтобы начать процесс записи образа на флешку или DVD. Пожалуйста, будьте внимательны, так как весь контент на выбранном устройстве будет удален во время этого процесса.
После завершения процесса записи, вы получите загрузочную флешку или DVD с образом Debian, готовую к установке на ваш компьютер.
Теперь вы готовы перейти к следующему шагу — установке Debian на компьютер вместе с Windows.
Установка Debian на раздел
Процесс установки Debian на отдельный раздел включает несколько шагов:
1. Подготовка раздела
Перед установкой Debian необходимо создать отдельный раздел на жестком диске. Вам потребуется утилита для разбиения диска, такая как FDISK или GParted, чтобы создать новый раздел. Убедитесь, что раздел имеет достаточно места для установки Debian.
2. Загрузка образа Debian
После создания раздела загрузите образ Debian с официального сайта Debian и сохраните его на внешний носитель, такой как USB-накопитель или DVD-диск.
3. Загрузка Debian
Перезагрузите компьютер с загрузочного носителя, на котором находится образ Debian. Выберите опцию «Установка графического интерфейса» или «Установка в текстовом режиме» в зависимости от ваших предпочтений.
4. Выбор раздела для установки
В процессе установки выберите опцию «Пользовательский раздел» или «Удаление диска и установка Debian на новый раздел». Выберите созданный ранее раздел для установки Debian.
5. Настройка учетной записи
Следуйте инструкциям мастера установки, чтобы настроить учетную запись пользователя и пароль. Убедитесь, что вы запомнили пароль, так как он потребуется для входа в систему Debian.
6. Завершение установки
По завершении установки система будет перезагружена. После перезагрузки вам будет предложено войти в систему Debian с помощью учетной записи, настроенной в предыдущем шаге.
Теперь у вас установлена Debian на отдельном разделе рядом с операционной системой Windows. При загрузке компьютера вы сможете выбрать нужную операционную систему для работы.
Обратите внимание, что установка Debian на отдельный раздел может изменить загрузчик операционной системы, поэтому рекомендуется создать резервную копию важных данных перед началом установки.
Настройка загрузчика и завершение установки
После завершения установки Debian вам потребуется настроить загрузчик операционной системы, чтобы иметь возможность выбирать между Debian и Windows при каждой загрузке компьютера.
1. Перезагрузите компьютер и выберите Debian из меню загрузчика GRUB. Если вы не видите такого меню, возможно, вам нужно нажать клавишу Esc или F12 (зависит от производителя вашего компьютера) для вызова меню загрузчика.
2. После загрузки Debian откройте терминал и выполните команду sudo update-grub. Это обновит конфигурацию загрузчика GRUB и добавит Windows в список доступных операционных систем.
3. После завершения выполните команду sudo reboot для перезагрузки компьютера.
4. Теперь при каждой загрузке компьютера вы увидите меню GRUB, в котором можно выбрать операционную систему для загрузки. Используйте стрелки на клавиатуре для выбора операционной системы и нажмите Enter для загрузки выбранной системы.
Поздравляю! Теперь у вас установлены и настроены Debian и Windows, и вы можете выбирать между ними при каждой загрузке компьютера.
Do you need to dual boot Windows 10 and Debian? In this post, MiniTool Partition Wizard shows you how to do that from scratch. It also tells you some information about Debian versions and downloads.
Introduction to Debian
Debian is one of the oldest operating systems based on the Linux kernel. The first version of Debian (0.01) was released on September 15, 1993. Since its founding, Debian has been developed openly and distributed freely according to the principles of the GNU Project.
When it comes to Linux systems, many people will think of Ubuntu. But do you know that Debian is the basis for Ubuntu and many other distributions? Compared with other Linux distros, Debian mainly has the following advantages:
- It takes up less disk space and memory.
- It is more stable than many other Linux distros.
Because of its excellent performance and stability, Debian is the most popular edition for personal computers and servers, especially for VPS users.
Debian Versions
Some people may want to install Debian. To do that, they should get the Debian ISO download first. But before downloading Debian, you should know that Debian offers three versions: Stable, Testing, and Unstable.
Which version should you choose? You should know their differences first.
- Stable: This version is very stable. It doesn’t have major issues and has full security support. But it may not support the latest hardware.
- Testing: The software in this version is newer than that in the Stable version and the bug probability of this version is smaller than that of the Unstable version. But once something goes wrong, it can take a long time to fix. Nor will it have ongoing security support.
- Unstable: It has the latest software and changes frequently. As a consequence, it can go wrong at any time. However, fixes are often completed within days.
In general, if you are a Debian beginner or you require system stability very much (eg, you are running a server), please choose the Stable version. If you are a very experienced Linux user and don’t mind encountering some strange problems occasionally, or even the system crashes, please choose the Unstable version.
Debian Download
Debian only offers the ISO download for the Stable and Testing versions. If you want to install Debian Unstable version, you should install the Stable or Testing first and then make some changes to make it receive the latest updates. Click here to get details.
Tip: You can go from Stable > Testing > Unstable. But the reverse is “impossible”.
If you want to get the Debian Testing download, please go to this page. If you want to get the Debian Stable download, please go to this page. Currently, the latest Debian version is Debian 11 (bullseye). I recommend you get the latest Debian download.
Debian System Requirements
If you want to install Debian on your PC, you should make sure your PC meets the Debian install requirements.
If you want a Debian with no desktop, you need the minimum 128MB RAM or 512MB RAM (for the recommendation), and 2GB hard drive space.
If you want a Debian with a desktop, you need the minimum 256MB RAM or 1GB RAM (for the recommendation), and 10GB hard drive space.
How to Check PC Full Specs Windows 10 in 5 Ways
How to Dual Boot Windows 10 and Debian
Sometimes, you may want to dual boot Windows 10 and Debian. If you don’t know how to do that, follow the steps below.
Stage 1. Make the USB Installation Drive
To install Debian alongside Windows, the first thing you should do is to get the Debian ISO download and then burn it into a USB drive using software like Rufus. Here is the guide on how to burn the ISO file into a USB drive:
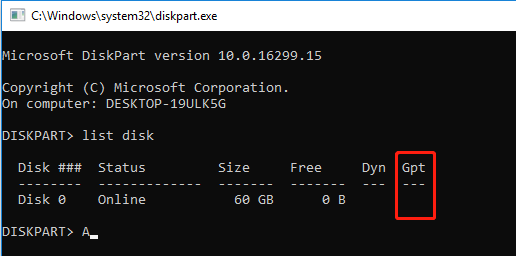
Step 1: Does the disk where Windows 10 is installed use GPT or MBR style? You should check that first. This will be helpful when you make the installation disk.
- Press the “Windows + R” keys to open the Run box.
- Type “diskpart” into the Run box and press the Enter key to open the exe tool.
- Type the “list disk” command and press Enter.
- Check the GPT If there is an asterisk mark (*) behind the disk, it means that the disk is GPT style. Otherwise, the disk is MBR style.
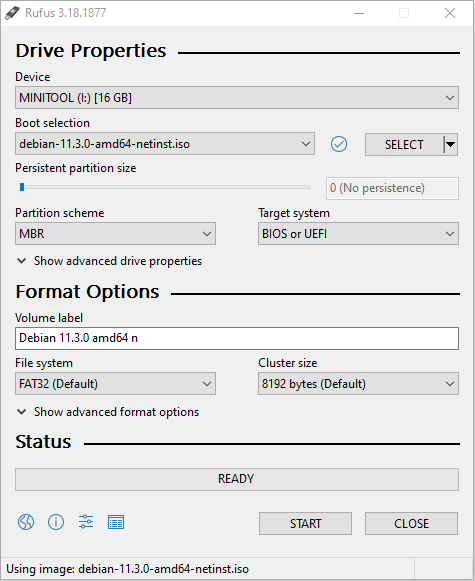
Step 2: Use Rufus to burn the Debian ISO file into a USB drive.
- Insert a USB drive to your PC.
- Download Rufus and launch it. It will detect the USB drive automatically.
- Under the Boot selection section, click the Select button and choose the Debian ISO file.
- Under the Partition Scheme section, choose MBR or GPT according to the target disk style (you have gotten the result in the above step). Then, the target system will be changed automatically.
- Keep other parameters to the default and then click the Start button to burn the ISO. Some windows may pop up, you just need to click the OK or Yes button.
- After the burning process is completed, click the Close button.
Stage 2. Repartition the PC
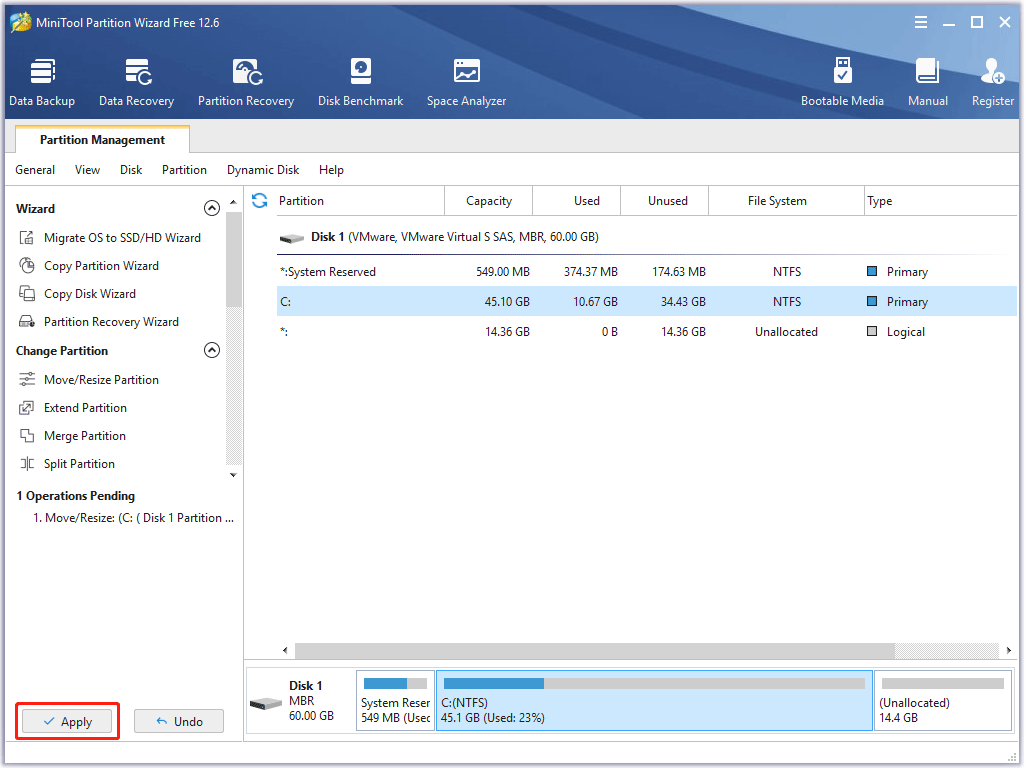
After the Debian USB installation drive is created, you should repartition your PC to make room for Debian’s installation. I recommend you use MiniTool Partition Wizard because it can take space from multiple partitions when one partition doesn’t have enough free space. Here is the guide:
MiniTool Partition Wizard FreeClick to Download100%Clean & Safe
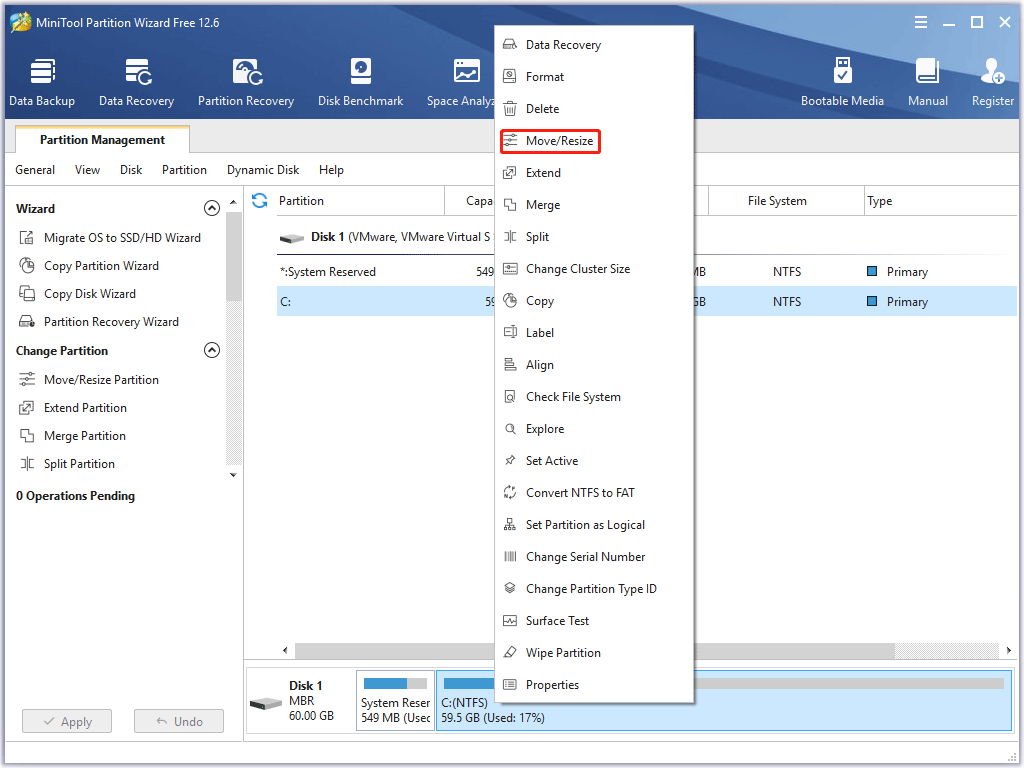
Step 1: Launch MiniTool Partition Wizard and go to its main interface. Right-click a partition and choose Move/Resize.
Step 2: Drag the two arrows on the two sides of the partition to shrink the partition, and then drag the block to move the location of the partition. Then, click the OK button. In the same way, you can take unallocated space from multiple partitions and then put the unallocated space together by moving the location of partitions.
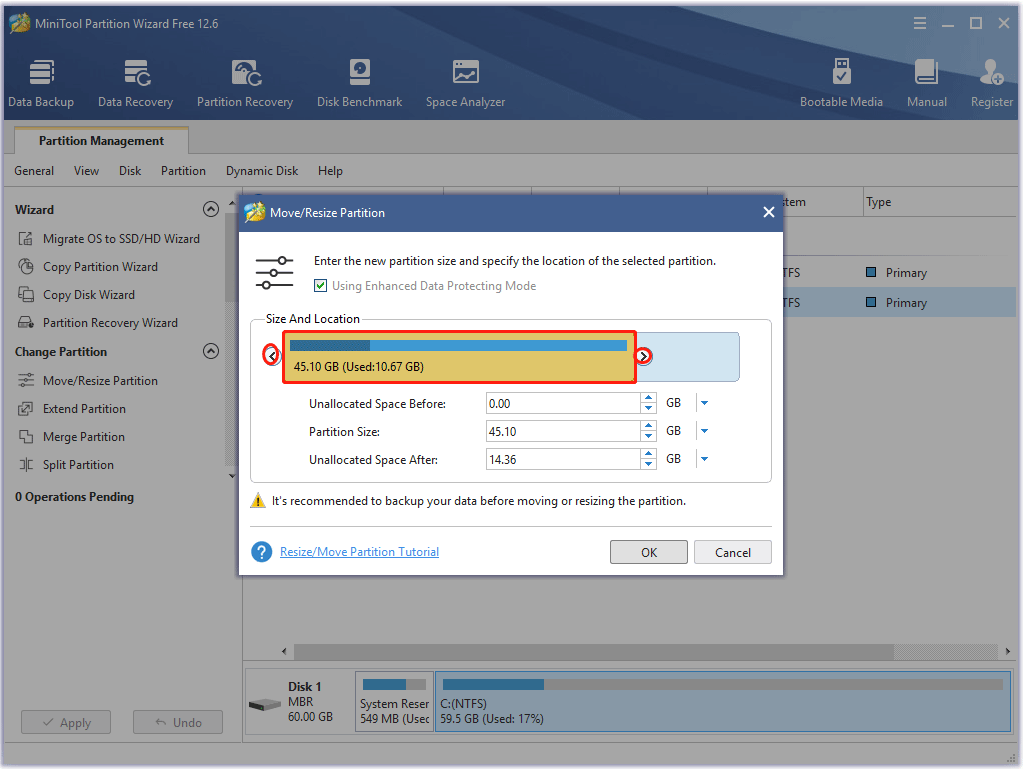
Step 3: Click the Apply button to execute the pending operations.
Stage 3. Install Debian Alongside Windows 10
Now, we will begin to dual boot Windows 10 and Debian. You just need to follow the steps below:
Step 1: Insert the Debian USB installation drive into the PC. Shut down the PC completely. Power on the PC and press the BIOS key when the PC logo appears to enter the firmware. The BIOS key varies depending on different PC models.
Step 2: Set the USB drive as the first boot device. Press F10 and choose Yes to save changes and exit the firmware. The PC will boot from the USB drive.
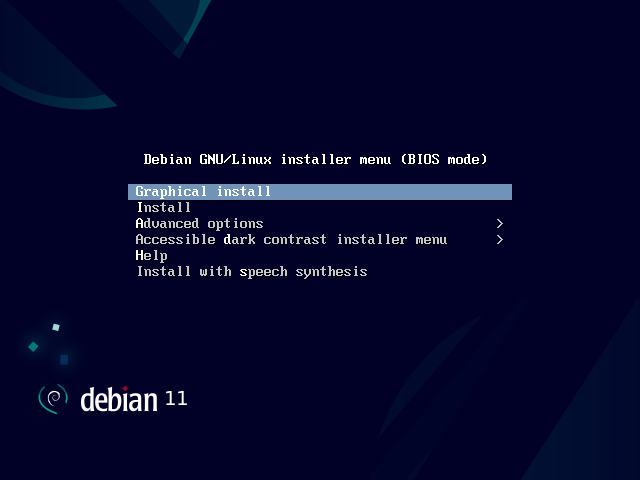
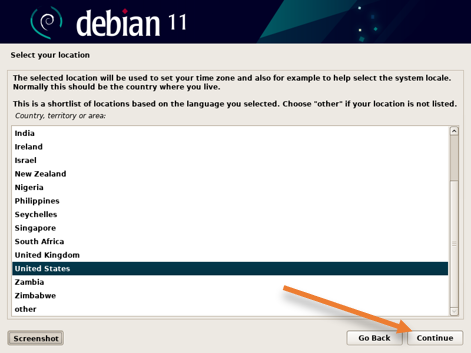
Step 3: Choose Graphical install. Select English as the language. Select your location (United States for example). Configure the keyboard (American English for example).
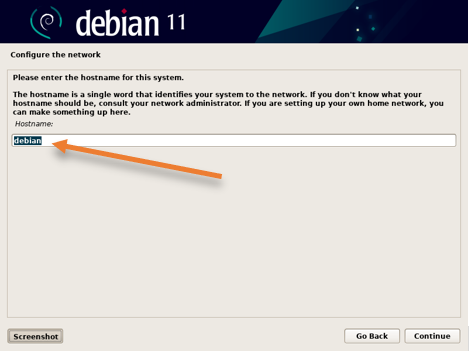
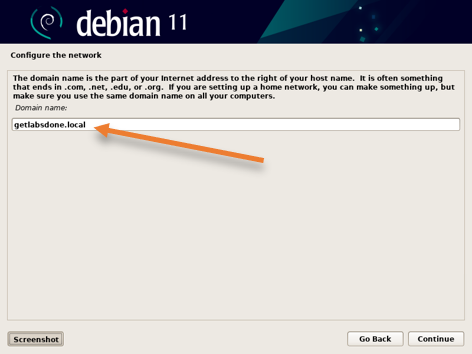
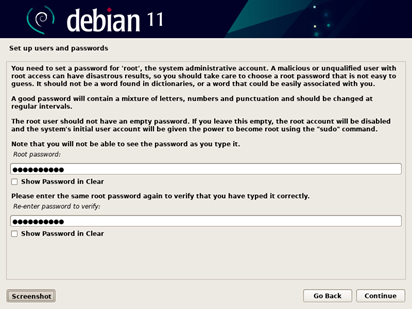
Step 4: Configure the hostname for the system. Enter the domain name (if you are not in a domain environment, you can skip this). Set the root password. Create a new user account and set the password. Then, choose the time zone.
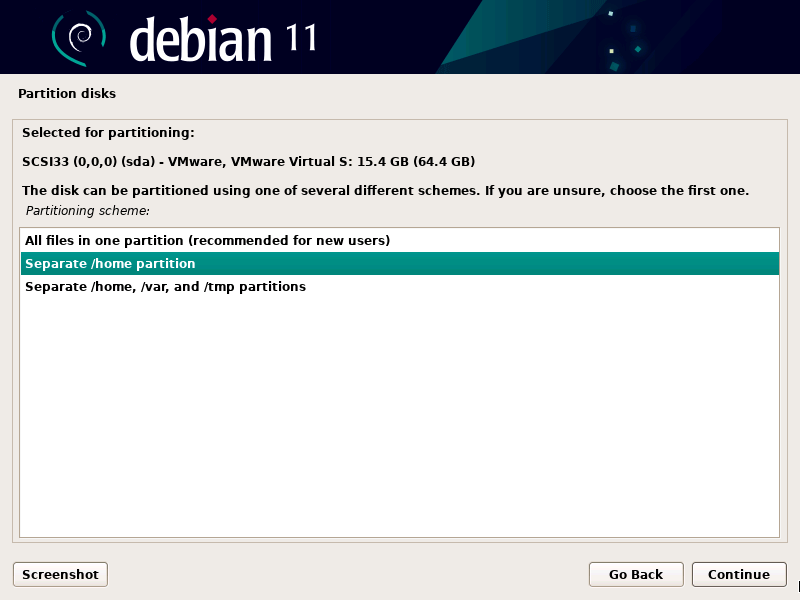
Step 5: Partition the disk. If you are a Linux beginner and don’t know how to partition a disk for Linux systems, you can choose the Guided – use the largest continuous free space option. If you are a seasoned Linux user, you can choose the Manual option.

Step 6: If you choose the Guided – use the largest continuous free space option in the above step, you need to choose a partitioning scheme. In this step, the “All files in one partition” or the “Separate /home partition” option is recommended.
- The “/home” partition is used to store user files.
- The “/var” partition is used to store files that change often. These files include cache files, log files, and some files generated when the software runs. These files need to be cleared manually. If you want to make a server, this partition should be created.
- The “/tmp” partition is also used to store temporary/cache files generated by the system or software, but these files will be deleted automatically and regularly.
Tips:
No matter which option you choose, the “/” partition and the “swap” partition will be created automatically. The «/» partition is used to store system files, while the «swap» partition is used as virtual memory.
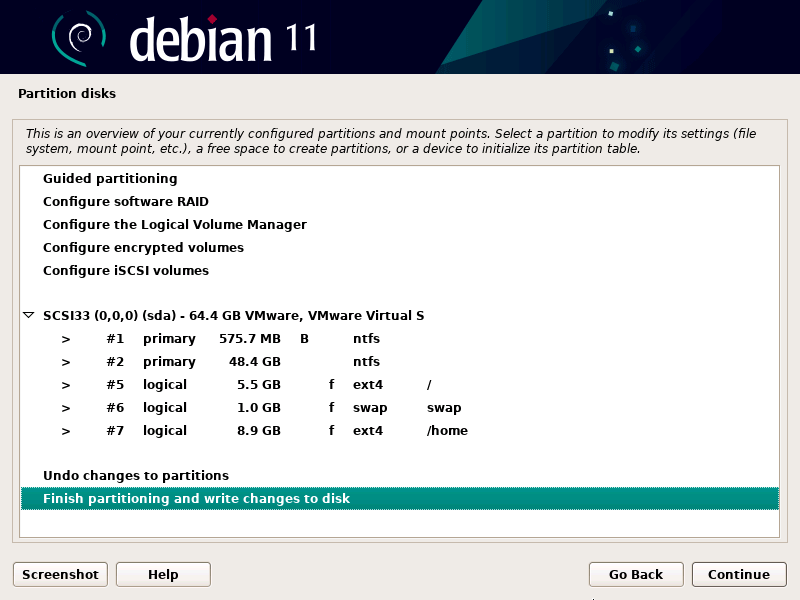
Step 7: Check the disk partition layout and then click the Continue button directly if the disk layout is OK. Then, when it asks you whether to write the changes to disks, choose Yes and click the Continue button.
Step 8: After the partitions are written, you need to configure the package manager.
- When it asks you whether to scan extra installation media, choose No.
- Select the Debian archive mirror country (United States for example).
- Select the Debian archive mirror. In this step, debian.org is recommended.
- Set the HTTP proxy server. If you don’t use the proxy server, you can keep it blank.
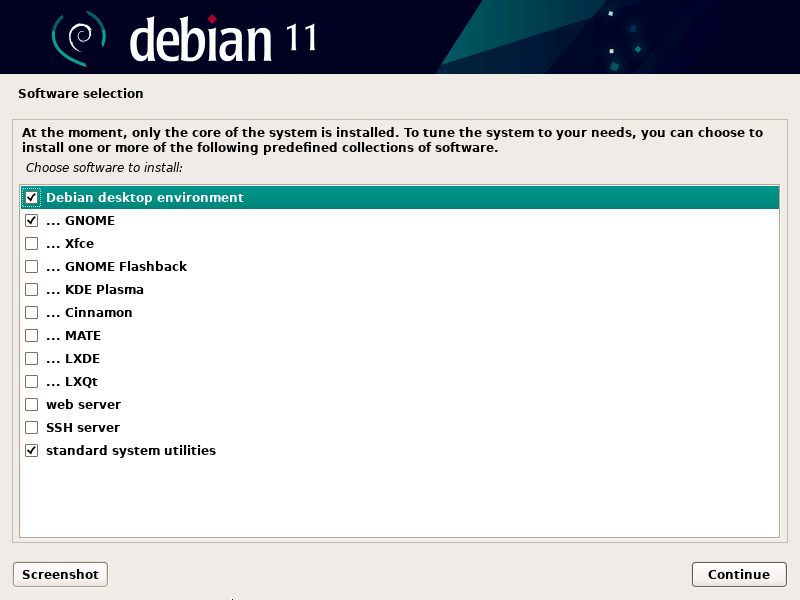
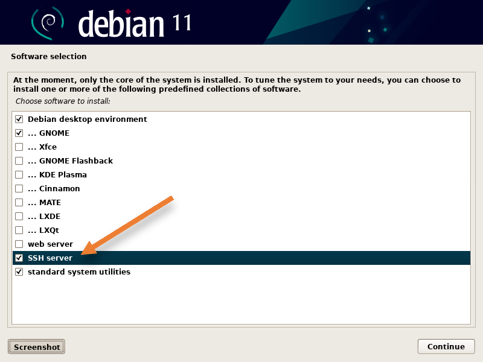
Step 9: When it asks you whether to participate in the package usage survey, choose No. Then, you need to choose which software to install.
Step 10: After the software is installed, it will ask you whether to install the GRUB boot loader to the master boot record. You should choose Yes. Then, select the disk on which you want to install the GRUB boot loader and click the Continue button.
Step 11: After the installation is complete, click the Continue button and you can enter the GRUB menu. Select Debian to enter the system.
Further reading:
If you want to create partitions for Debian manually, here are some tips for you:
- If your disk is MBR style, choose Logical for new partitions. If your disk is GPT style, choose Primary for new partitions.
- When you create the “swap” partition, set its file system as swap area (click Use as and change it from Ext4 journaling file system to swap area). As for other partitions, keep the Ext4 journaling file system for them.
Here is a post showing you how to dual boot Windows 10 and Debian. If you have this need, you can follow this guide.Click to Tweet
Bottom Line
Is this post useful to you? Do you have other ideas about how to dual boot Windows 10 and Debian? Please leave comments in the following zone. In addition, if you encounter problems when using MiniTool Partition Wizard, please feel free to contact us via [email protected]. We will get back to you as soon as possible.
The other day, I was planning to install the Proxmox server on my laptop, and the problem with the Proxmox is that you cannot install Proxmox alongside windows 11. When you try to dual boot, the Proxmox ends up taking all the hard disk space deleting the windows files, and you end up with the Proxmox server. So I decided to install Debian 11 on my windows 11 machine as dual boot. So anytime I want to play games, work with office 365 I could use my windows 11 machine and if I want to accomplish some Linux-related stuff, I could shut down the windows 11 operating system and switch to Debian 11.
In this blog, let’s look at the installation of Debian 11 alongside windows 11 using dual boot.
Before you begin, you need to have;
- Debian 11 iso image – we need to create Debian 11 USB bootable image with the iso file. Click here to download it. Make sure to choose the AMD64 DVD iso image.
- Rufus software- click here to get it. This tool will make the USB a bootable drive.
- USB drive with at least 4GB of storage to make the Debian 11 bootable.
- A machine with windows 11/10 – The steps mentioned here are identical to Windows 10, so either windows 11 or 10 would work fine.
1. Make Debian 11 bootable USB.
We have already downloaded Debian 11 on my machine. Let’s go ahead and make the bootable USB out of it.
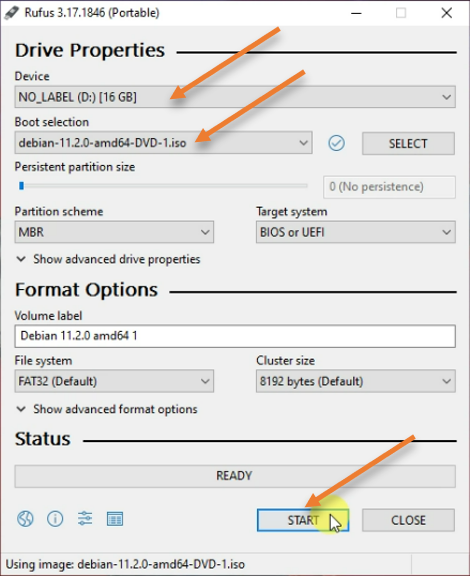
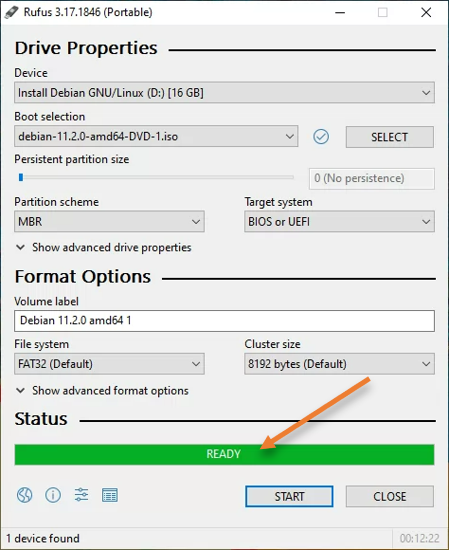
Plugin the USB thump drive and open the Rufus software.
- Select the device – Under device, make sure you choose the right USB drive to make it bootable.
Note: All the files in the USB drive will be deleted upon creating a bootable drive. So please take a backup before you proceed.
- Boot selection – This is where you need to attach the Debian 11 iso image to the rufus software. Click on select, and choose the ISO file you downloaded.
- Click on Start.
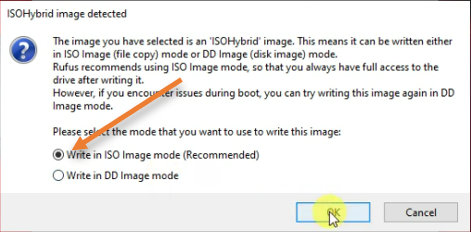
You will get a prompt that says ISOHybrid image detected, so from the list, choose Write in ISO image mode and click on Ok.
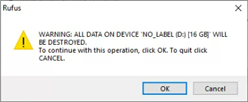
After a few seconds, you will get a warning, which says all the data in the drive will be formatted, so ensure that you have taken the backup of all your files from the USB drive and then click on Ok.
After this, the USB drive will be formatted, and the Debian ISO image will be copied to the USB drive and convert it as bootable.
Depending on your machine hardware and the USB speed, this process will take some time
Once it is completed, you will see the status changed to Ready, and you may safely remove the USB drive now from your machine.
2. Allocated drive space for Debian 11.
I have a machine with 500GB of storage, completely used by windows 11 OS. We are now going to split the Drive into two, in which on the second partition, we would give about 200 GB out of 500GB for the Debian storage.
Click on Start and type computer management, and open it.
The computer management windows would now open up.
Click on Device management.
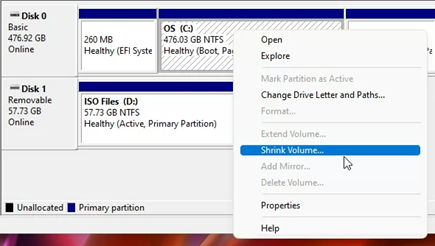
In the disk management, you will see the OS is occupied mostly by the SSD hard disk, we are going to shrink the volume and get 200GB out from windows 11 and assign it to Debian.

Right-click on the OS Partition, and click on Shrink Volume.
In the shrink volume pop-up, under Enter the amount of space to shrink in MB, we enter 204800, equivalent to 200GB.
After that, click on Shrink.
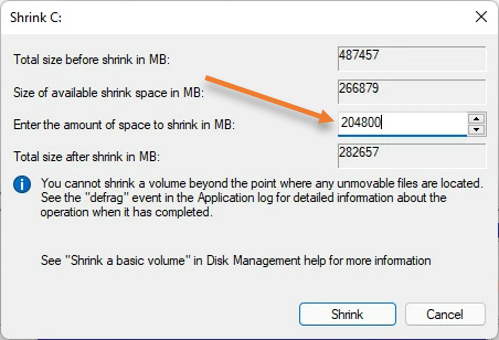
After a few seconds, you will see the windows hard disk size reduced to 276Gb and you have free unallocated space of 200GB, which you can use to install the Debian in it.
During installation, ensure to select the newly created bootable media.

3. Change the bootable media from HDD to the new USB drive.
On the machine where we are going to do dual boot with Debian 11 and windows 11. plugin the bootable USB device. Your windows 11 operating system will boot from the hard disk storage where you have installed the operating system. So we need to tell the bios that, instead of booting into the hard disk where you have installed the windows 11 OS. Choose a USB bootable drive instead.
You may start the machine and press f2 to get into the bios.
I am using an Asus machine, and I could get into the bios by long-pressing the f2 key during the system startup.
Each vendor has a different way to get into the bios.
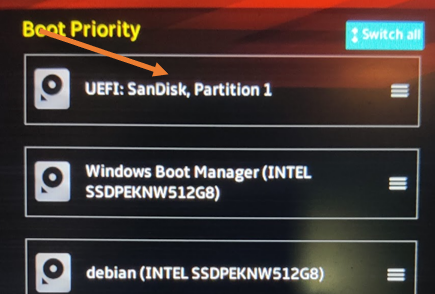
Under boot selection, choose the newly created USB drive as the bootable location and save it in the bios. My USB drive name is Sandisk and as you can see, I changed the priority of the boot by moving up.
The system will now boot into USB drive, and the Debian 11 installation will now progress.
4. Start the Debian 11 installation.
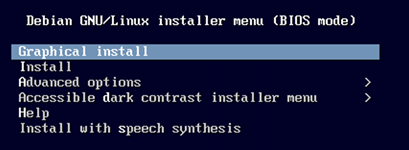
On the Debian installation screen, choose Graphical install.
Select a language of your choice.

Specify your location.
Configure the keyboard language.
In the Detect network hardware windows you will see some of the wifi drivers are missing, you may choose no here, which we can take care of it later.
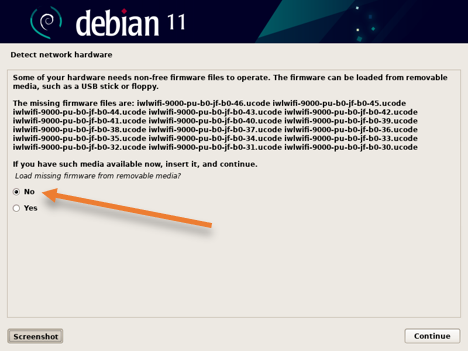
You need to make sure that you are connected to the LAN cable. After few seconds you will see the network is configured on the Debian 11 machine and it will get an IP address from the DHCP service.
5. Configure the hostname and DNS.
By default, the installer would choose Debian as the hostname, and you may change it according to your environment.
Enter the domain name.
If you have a domain name in your network, you may enter it here and click on Next.
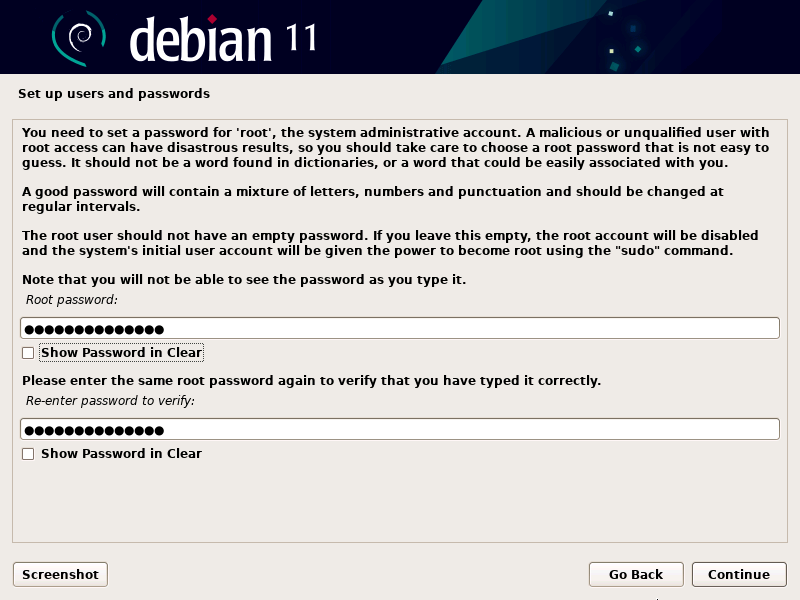
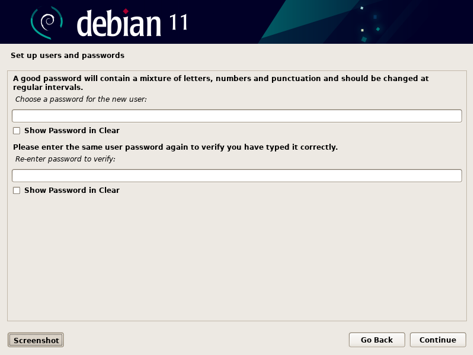
6. Configure the Root password.
In Debian, you will create two accounts; one is for the root and another for a regular user. Let’s go ahead and set up a password for the root account.
7. Setup user account.
We have set the password for the root account. Let’s set up the normal user account.
Enter the user’s full name that you will create and click on Continue.
Set the username.
You will require to set the username of the normal account and click on Continue.
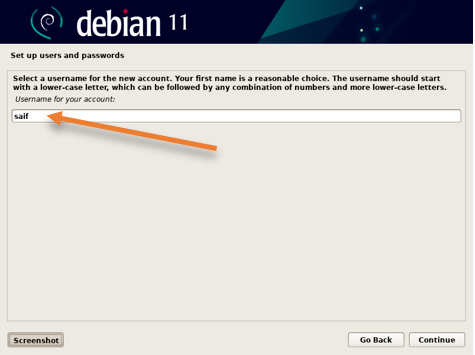
Set the password for the newly created account.
8. Set the timezone.
We now have to set the time for your Debian machine, and it is done using the NTP service.
In the configure clock section, choose the desired time zone. And click on continue
9. Configure the hard disk.
The disk partitioner wizard will now open up. Here we need to configure the hard disk that we allocated in the Windows disk manager for the Debian 11, which is 200GB.
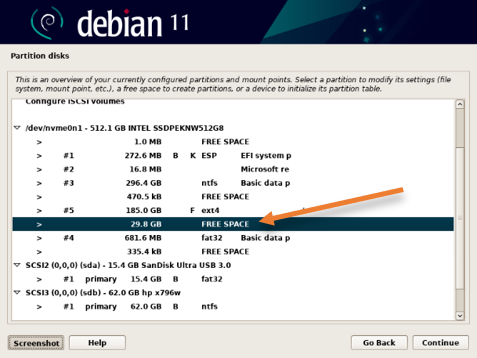
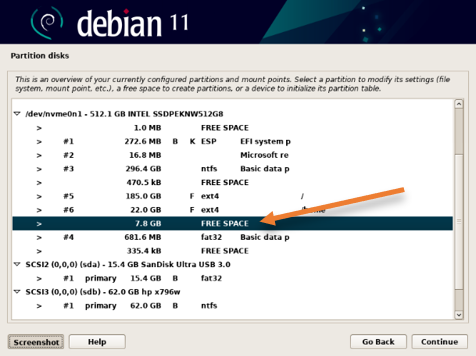
In the partition disks,
Choose Manual and continue.
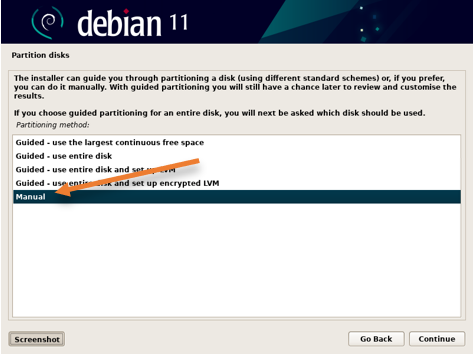
As you can see, we have 214.7 GB available for free, where we can install Debian 11.
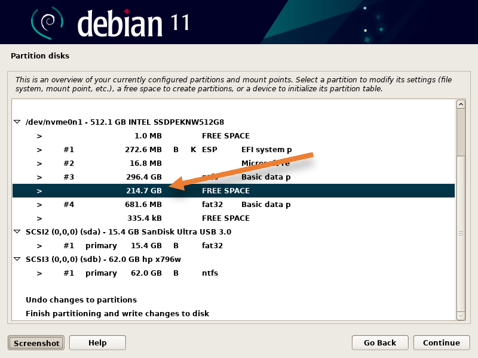
We will give 185GB for the ROOT and 22GB for HOME rest for the swap memory in our setup.
Setup Root storage.
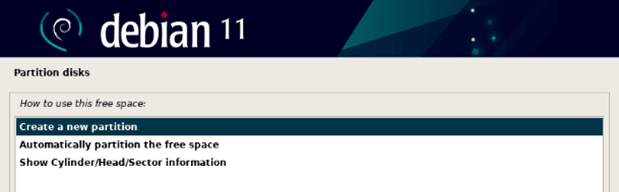
By selecting the free space, click on Continue.
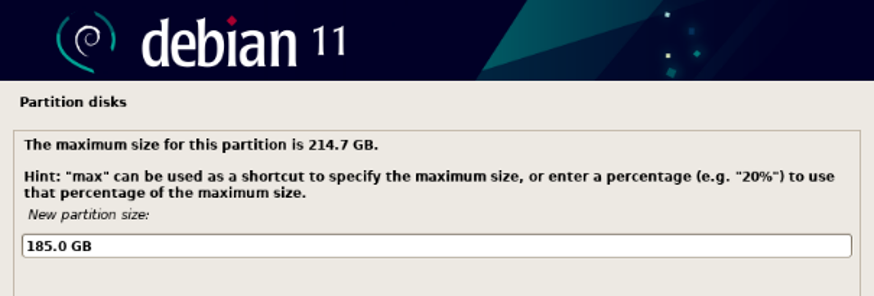
Create a new partition and click on Continue.

In the new partition size, enter 185.0 GB and click on Continue.
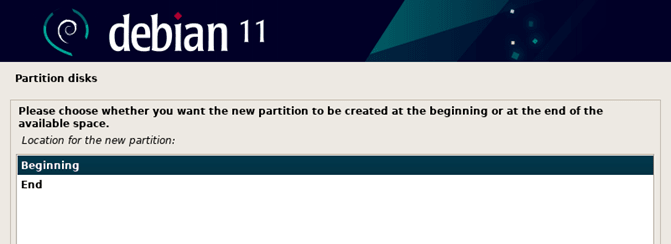
Choose Beginning, for the location for the new partition. And click on Continue.

You can see, the new hard disk size allocated to the root directory, you may now click on Done setting up the partition.
If you would like you can resize the partition based on your requirement.

Configure the home storage.
The home directory creates all the user accounts, and the user files are saved. Since it will be a single user on this machine, I will allocate only 22GB for the home directory. Which is more than enough.
As you can see, still we have 29.8 GB of storage available to use, select the free space and click on Continue.
Choose create a new partition and continue.
I have given 22.0GB of storage, and click on Continue.

Choose Beginning for the new partition location and continue.
You can see, by default the newly added partition mapped to the home directory.
You may click on Done setting up the partition.
Configure the SWAP memory.
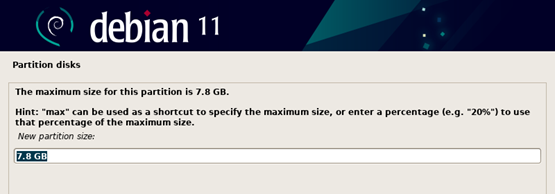
You are now left with 7.8GB of free space, which we will allocate to the swap memory.
Select the free space and click on Continue.
Choose create a new partition and click on Continue.
Select the new partition’s size as 7.8GB, which is left in our hard disk, and click con continue.
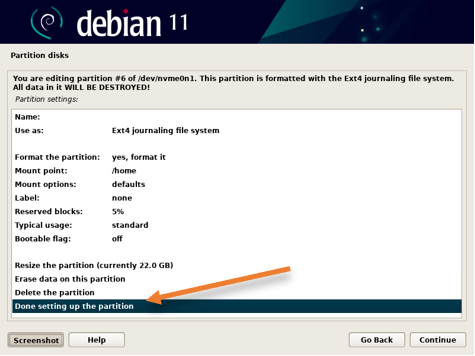
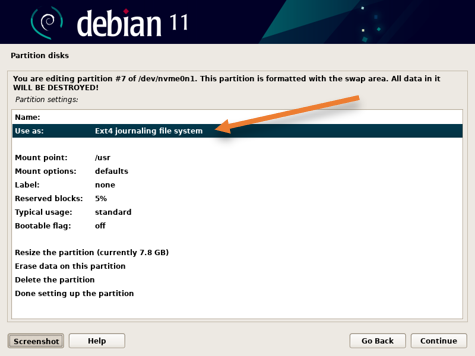
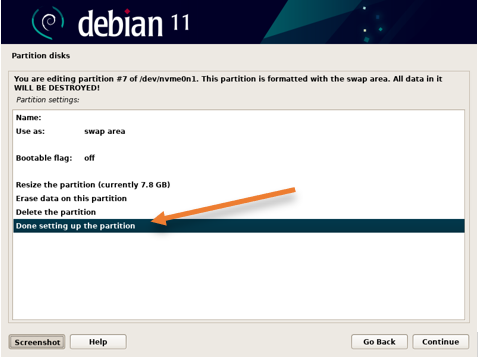
In the partition summary, you can see the newly added partition mapped to /usr directory. We need to tell Debian to use the new partition as a swap area.
Choose the Use as Ext4 jounaling file system and click on Continue.
In the how to use this partition, choose the SWAP area from the list and click on Continue.
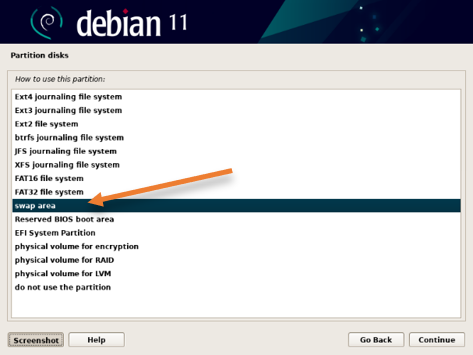
In the swap area partition summary, choose done setting up the partition and click on Continue.
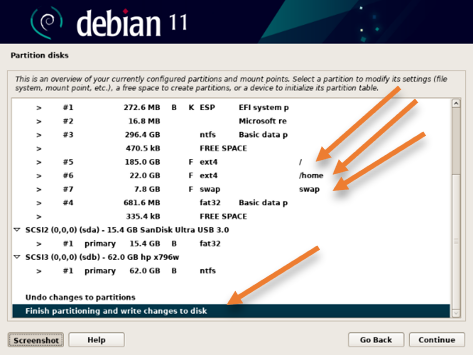
We configured the storage for the Debian 11 machine, and you now have the hard disk configured with root, home, and swap directories.
Scroll down and select Finish partitioning and write changes to disk, and Continue.
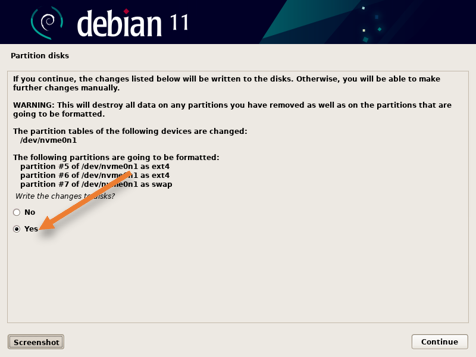
You will be asked that the hard disk will be formatted. You may choose yes here.
The partition formatting will start now, after which the installation will continue.
10. Continue with the Debian installation.
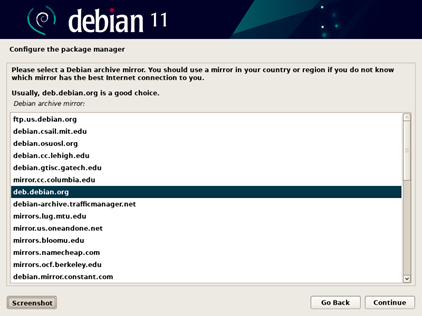
The installation is now started. You will be asked to configure the package manager, which is required to install the software packages and dependencies.
Choose yes, and continue.
Choose the mirror nearest to you.
Select db.debian.org, which is the good choice.
In the proxy configuration, enter the proxy address if you are using a proxy; else just leave blank and click on Continue.
In the popularity contest, choose no, unless you want to participate.
The installation will continue, and you will be required to choose what packages you would like to install.
Apart from the default selection, I have also selected the SSH server, which required for me to ssh into the Debian machine.
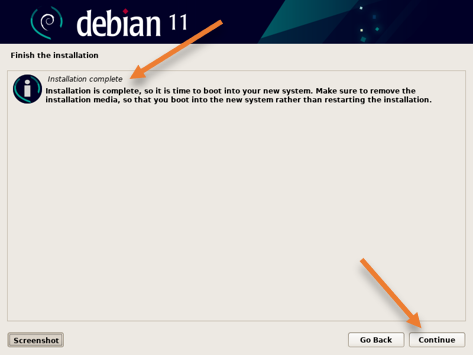
After a few seconds, you will get the installation is complete message, and when you click on Continue, it will reboot the machine.
When the Debian system is restarted, it will use its bootloader and ask you which operating system to load.
If you choose Debian GNU/Linux you will get the Debian operating system. If you choose windows boot manager, then it will take you to the windows operating system.
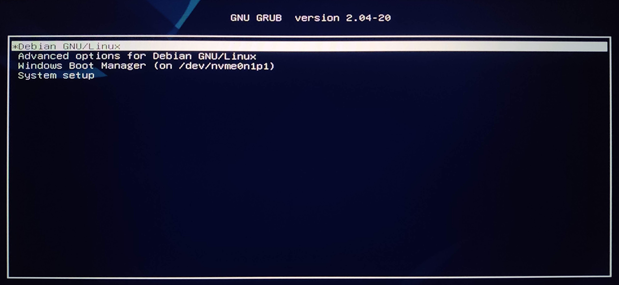
If you don’t choose after a few seconds, it will auto-select the Debian11.
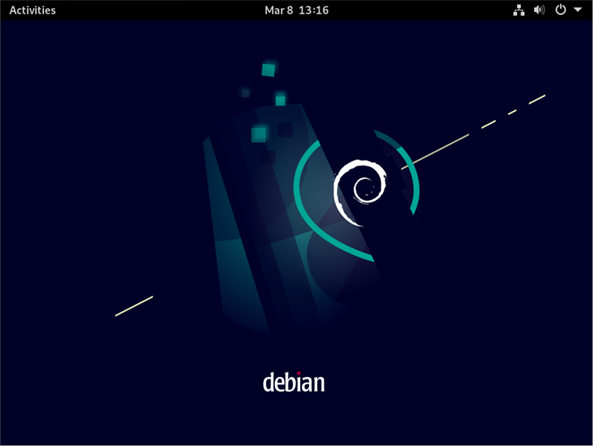
Congrats! You have successfully installed Debian 11 on your machine using the dual boot. Anytime you want to switch to windows11, you just reboot the Debian operating system and choose windows boot manager at the boot screen.
Введение
Установка Linux Debian совместно с Windows на одном диске может быть полезной для тех, кто хочет иметь доступ к обоим операционным системам на одном компьютере. Совместная установка позволяет использовать преимущества обеих ОС в одном устройстве. В этой статье будет представлено подробное объяснение процесса установки Linux Debian на ряде Windows и рекомендации по настройке.
Проверка совместимости и подготовка к установке
Перед установкой Linux Debian необходимо выполнить некоторые предварительные шаги для проверки совместимости и подготовки:
- Проверьте, имеется ли достаточно свободного места на диске для установки Debian. Рекомендуется иметь не менее 20 ГБ свободного места.
- Создайте резервную копию всех важных данных с вашего компьютера. Установка Linux Debian может потребовать изменений на диске, поэтому важно сохранить данные в безопасном месте.
- Убедитесь, что ваш компьютер отвечает требованиям для установки Debian. Эту информацию можно найти на официальном веб-сайте Debian.
Создание разделов на диске
Прежде чем установить Linux Debian, вам необходимо создать дополнительный раздел на вашем жестком диске. Вот пошаговая инструкция по созданию раздела:
- Откройте меню «Управление дисками» в вашей операционной системе Windows.
- Выберите свободное пространство на диске и нажмите правой кнопкой мыши.
- Выберите «Создать новый объем» или «Раздел».
- Укажите размер раздела и файловую систему (рекомендуется выбрать Ext4 для Linux Debian).
- Создайте раздел и установите метку для него.
Установка Linux Debian
После создания раздела на вашем диске вы готовы к установке Linux Debian. Вот пошаговая инструкция по установке:
- Загрузите образ установочного диска или USB-накопителя Linux Debian с официального веб-сайта Debian.
- Подключите установочный носитель к вашему компьютеру и перезагрузите его.
- Запустите установку Linux Debian и выберите язык и регион.
- Выберите «Установить Debian» и приступите к выбору типа установки. Если вы хотите установить Debian совместно с Windows, выберите опцию «Вместе с другими системами (подробно)».
- Выберите раздел, созданный на предыдущем этапе, и установите его в качестве раздела для Debian.
- Выберите район и часовой пояс, а затем укажите имя компьютера и имя пользователя.
- Установите пароль для вашего пользователя и настройте шифрование, если необходимо.
- Дождитесь завершения установки и перезагрузите компьютер.
Настройка загрузчика
После перезагрузки вам необходимо настроить загрузчик, чтобы иметь возможность выбирать между Linux Debian и Windows при запуске компьютера. Вот инструкция по настройке загрузчика GRUB:
- Откройте терминал в Linux Debian и введите команду
sudo update-grub. Эта команда обновит список операционных систем в GRUB. - Перезагрузите компьютер и убедитесь, что появилось меню GRUB с опциями для запуска Linux Debian или Windows.
Рекомендации
После установки Linux Debian совместно с Windows есть несколько рекомендаций, которые помогут вам получить от обеих операционных систем максимальную пользу:
- Регулярно обновляйте обе операционные системы. Это поможет вам получить последние функции, улучшения безопасности и исправления ошибок.
- Создайте общий раздел, на который можно будет обращаться из обеих ОС. Это позволит вам обмениваться файлами и данными между системами.
- Изучите и настройте систему двойной загрузки по своим потребностям. Например, вы можете настроить временные интервалы автоматического запуска операционных систем или изменить порядок загрузки.
- Используйте виртуальные машины для тестирования новых операционных систем или приложений, чтобы избежать нежелательных последствий для вашей рабочей системы.
Заключение
Установка Linux Debian совместно с Windows на одном диске — это отличный способ получить доступ к функциям обеих операционных систем. В этой статье мы рассмотрели детальную инструкцию по установке и некоторые полезные рекомендации. Следуя этим рекомендациям, вы сможете успешно настроить совместную установку и наслаждаться возможностями обеих систем.
0
1
Здравствуйте у меня возникла то ли проблема толи вопрос. Не когда раньше не устанавливал 2 системы рядом (у меня стоит виндовс 10 рядом с ним я решил установить дебиан 12) открыл биос все как обычно с разметкой дисков я справился нормально. Когда дебиан 12 установился настало время перезагрузки. После этого просто загрузился виндовс 10 и линукса как будто бы и не было. Груб не появился хотя я все устанавливал правильно! Все нормально с компом работает хорошо. Я первый раз устанавливаю две системы раньше устанавливал только одну. Вроде бы если я не ошибаюсь у меня UEFI (кроме биоса) про эту штуку я узнал недавно когда гуглил.
У меня линукс на 2 диске а виндовс на первом
но загружается только виндовс повторюсь линукса как будто нет
я и пишу с компа на который устанавливал (с 10 винды 64 бит)
!!!!!!!!!!!!!!Отредактировано 10.07.2023!!!!!!!!!!!!!!!!!!!
Я решил свою проблему очень просто. Я это узнал из форума по дебиану!
нужно устанавливать через Advanced options (Graphical expert install) многое не скажу так как поймет любой человек(я про то что многое там понятно и нужно лишь нажать да в одном из пунктов) но скажу то что в пункте Установка системного загрузчика Grub нужно сделать его принудительную загрузку на съемных носителей uefi ответив да
и все