From DD-WRT Wiki
Jump to: navigation, search
Wiki Path: DD-WRT Wiki Main / Tutorials / Linking Routers / Switch
[edit] Introduction
You can configure most DD-WRT capable routers as a simple 4 or 5 port switch. A switch is similar to a hub in that all devices connected to it will be in the same broadcast domain and can communicate freely with each other.
The configuration is nearly identical to that of a Wireless Access Point. The only real difference is that we will be disabling the radio. One of the main benefits of using a Switch over a WAP is that the throughput between wired machines (100-1000mbps) is usually far greater than wireless (~22mbps actual for 802.11g).
[edit] Instructions
- Hard reset or 30/30/30 the router to dd-wrt default settings
- Connect to the router @ http://192.168.1.1 using a wired client
- Note: If this router is wired to another router, there may be conflicts (both routers could have the same IP address). For the time being, disconnect this router from the main one or create a static ARP entry.
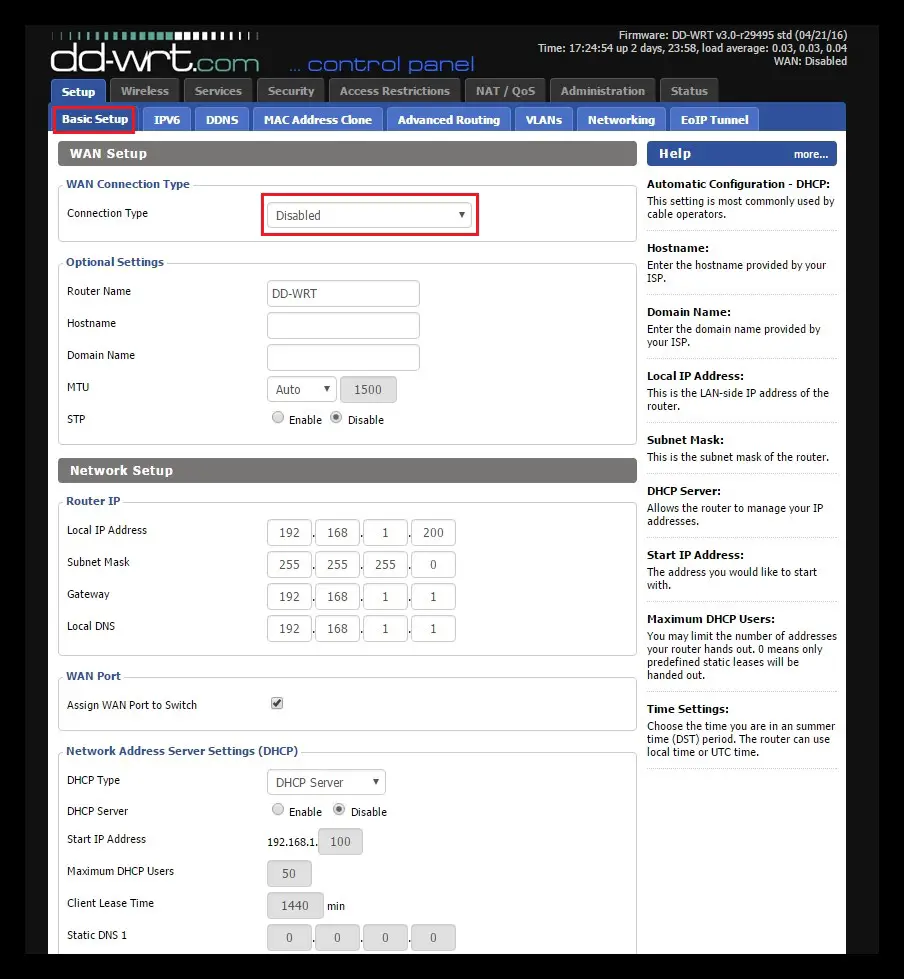
- Open the Setup -> Basic Setup tab
- WAN Connection Type : Disabled
- Local IP Address : 192.168.1.2 (i.e. different from primary router and out of DHCP pool)
- Subnet Mask : 255.255.255.0 or /24 (i.e. same as primary router)
- NOTE: Builds after 45229 use CIDR netmask format
- DHCP Server : Disable (also uncheck DNSmasq options)
- Gateway : IP address of primary router
- (Optional) Local DNS : IP address of primary router or local DNS server
- (Optional) Assign WAN Port to Switch : Enable this if you want to use WAN port as a switch port
- NOTE: Builds after 46750 do not have the «Assign WAN Port to Switch» feature.
- NTP Client : Enable
- Save
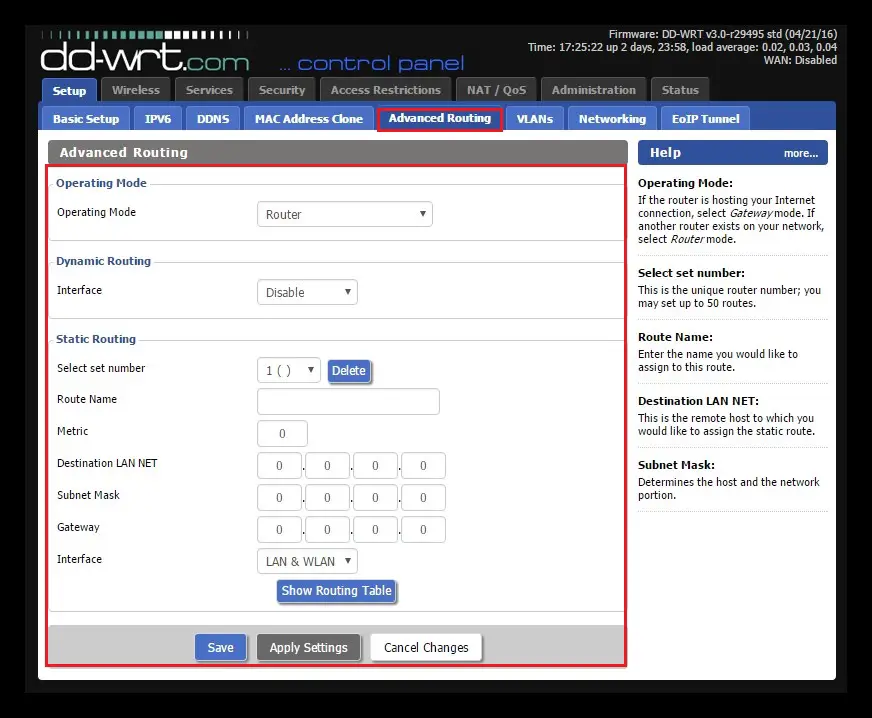
- Open the Setup -> Advanced Routing tab
- Operating Mode : Router
- Save
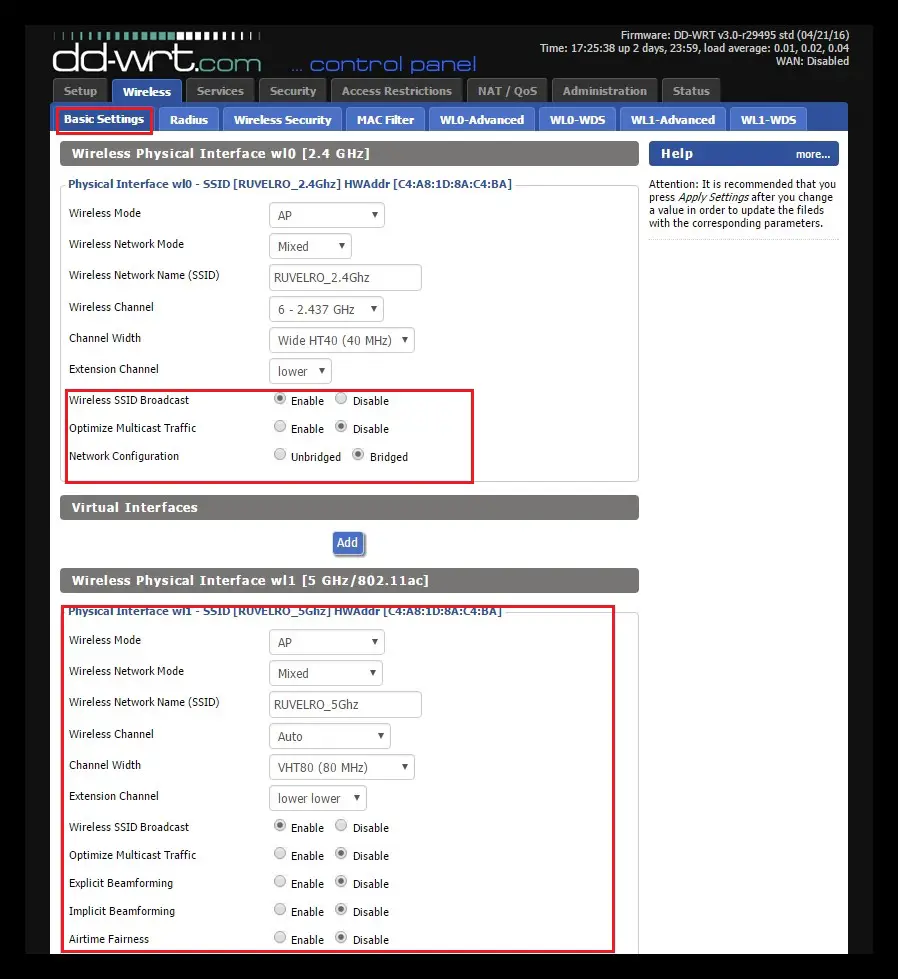
- Open the Wireless -> Basic Settings tab
- (Optional) Wireless Network Mode : Disabled*
- (Optional) Wireless Network Name (SSID) : «Custom»
- (Optional) Wireless SSID Broadcast : Disable
- Save
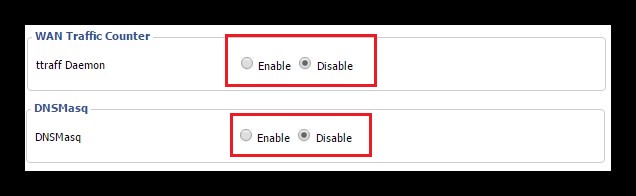
- Open the Services -> Services tab
- DNSMasq : Disable
- ttraff Daemon : Disable
- (Recommended) Telnet : Disable
- (Recommended) SSHd : Enable
- (Recommended) Syslogd / Klogd : Enable
- Save
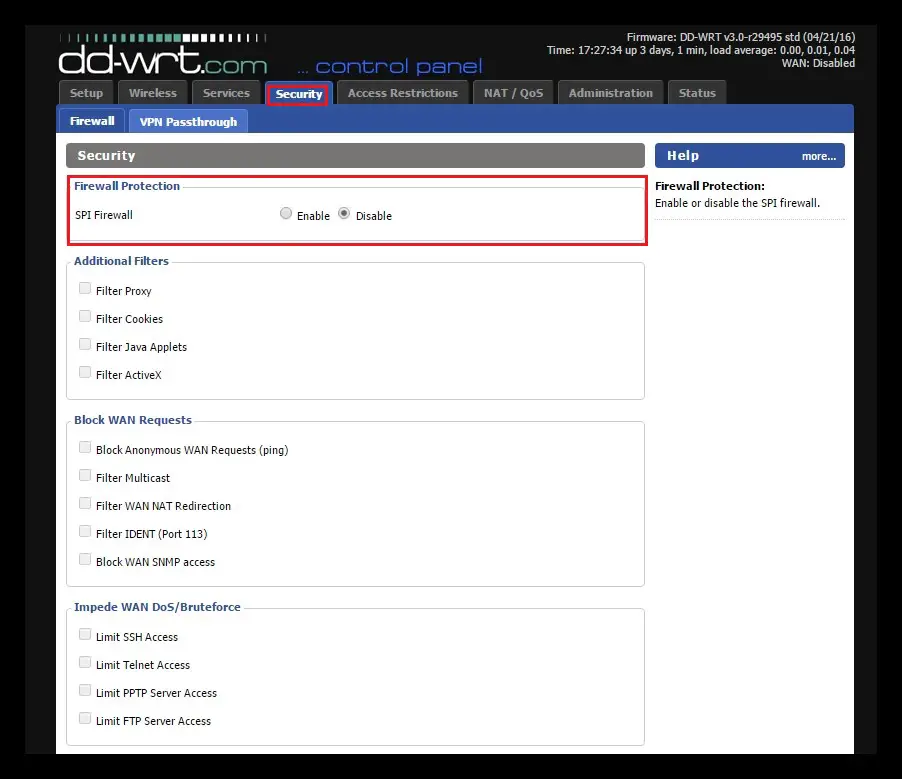
- Open the Security -> Firewall tab
- Disable SPI firewall, then Save
- Check «Filter Multicast», then Save
- Open the Administration -> Management tab
- (Recommended) Info Site Password Protection : Enable
- (Optional) Info Site MAC Masking : Disable
- (Optional) Cron : Disable
- (Optional) 802.1x : Disable
- (Optional) Routing : Disable
- Apply Settings and connect ethernet cable to main router via LAN-to-LAN uplink*
[edit] Notes
-
- You may wish to set up some WPA passphrase on the Wireless SSID, just in case the radio was to turn on briefly or re-enable itself for some odd reason. You can also navigate to Advanced Wireless settings and lower the TX power to 5mW or so. It may help keep your hardware temps cooler.
- To connect the switch to the main router, you can probably use either a patch cable, straight-thru, or a crossover cable. As far as I know, most dd-wrt capable devices can do autosensing (at least mine do) so the cable type doesn’t really matter.
- You can connect the switch to the main router via LAN-to-WAN so long as you have assigned the WAN port to switch (see step 3). Although some problems have been reported when doing so…maybe not all routers support it?
0
1
Один роутер не справляется с покрытием дома вафлей. Решила достать из старых запасов linxys, перепрошитый под dd-wrt. Обнулила до заводских настроек, отрубила в Administration штуку Routing — интернетов на подключенном кампе не появилось.
До попадания на linxys все идет с другого роутера, который подключается по vpn к сетке и уже раздает интернеты всюду и везде.
Итого надо: на входе интернеты без паролей и т.п., на выходе — свич и ретранслятор вайфая. Что делать?
- Ссылка
Вы не можете добавлять комментарии в эту тему. Тема перемещена в архив.
This is a post at ddwrt forum by x1st. Original like here
5th time is a charm!
This time rather than following the wiki, i went with the intuitive method and now have a working solution.
The primary DHCP router is located at 192.168.1.254. I left the dd-wrt secondary router at 192.168.1.1 (I had done this on the original attempt but it still wouldn’t find the router.)
I suspect the settings in the GUI that are defaulted to off/disabled may have been an issue and I don’t remember if on the first time I had changed these.
Either way here is what I did in-case anyone else finds this post and is having the same problem.
This is for a wired connection to my primary router which handles DHCP. I also was wired into the router for the setup (don’t plug into the WAN port on the router for upstream connections, only use the PC/LAN ports for both upstream and then to the individual computers)
For reference: DD-WRT v24-sp2 (08/07/10) std (SVN revision 14896)
Setup -> Basic Setup
Connection Type – Disabled
Router IP – 192.168.1.1/255.255.255.0 (Same subnet as my primary router and not within the DHCP range. Primary router is a DSL/WAP modem/router in one and I can’t control the DHCP range which is 192.168.1.65-254)
Gateway & Local DNS – left empty
DHCP Server – Disabled (radio button)
DNSMasq options – Deselect both
SAVE
Setup -> Advanced Routing
Operating Mode – Router
SAVE
Wireless – configure this later after getting a working solution.
Services -> Services
DNSMasq – Disabled
Secure Shell – SSHd – enable
Telnet – Enable
traff Daemon – Disabled
SAVE
Security -> Firewall (I left everything default)
SPI Firewall – I left enabled
SAVE
Administration -> Management
Web Access
– Enable info Site – Enable
– Info Site Password Protection – Enabled
– Info Site MAC Masking – Enable
Remote Access
– Web GUI Management – Enable
– SSH Management- Enable
– Telnet Management – Enable
– Allow Any Remote IP – Enable
SAVE
APPLY SETTINGS
Hope that helps.
Если вы попали в этот пост, значит, у вас нужно знать, как настроить свой routeur с DD-WRT , и это не для нас, но вы находитесь в лучшем месте, чтобы научиться это делать. Прежде мы расскажем немного больше о это офигенная прошивка.
Во-первых, мы чувствуем необходимость вы предупреждать что вам нужно работать с этим деликатно, потому что вы собираетесь изменить конфигурация маршрутизатора , и если вы не будете в совершенстве следовать инструкциям, которые мы оставим здесь, вы определенно можете повредить устройство.
Но при правильной настройке у него будут новые функции, которыми вы можете воспользоваться с помощью своего маршрутизатора, поскольку большинство из них сосредоточиться на улучшении связь вашего Сеть Wi-Fi .
DD-WRT — это прошивка что позволяет нам улучшить характеристики нашего роутера, хотя должно быть ясно, что это можно сделать только на определенных устройствах Wi-Fi, потому что не у всех есть один compatibilité Достаточно по вине производителя, а принудительная установка может полностью вывести маршрутизатор из строя.
Этот тип программного обеспечения позволяет нам расширять несколько способов (стабильность сети, информация о подключении, полный мониторинг…) возможности нашего роутера. Он основан на бесплатном программном обеспечении Линукс/ГНУ , поэтому мы понимаем, что это бесплатно и Open Source , что позволяет нам изменять их и при желании перезаписывать коды.
Какова цель настройки маршрутизатора DD-WRT в качестве коммутатора и точки доступа?
Это великолепное, но деликатное программное обеспечение предлагает нам различные функции, которые улучшат наш опыт .
Наиболее важные из них:
Вы можете создавать точки доступа
Благодаря тому, что позволяет нам создавать новые точки доступа, нам не нужно будет давать ключ от нашей сети каждому если мы хотим, чтобы они подключились, поскольку они могут сделать это из новой точки, созданной с помощью DD-WRT , что больше, чем просто гостевая сеть . Это своего рода точка, которая позволяет получить доступ к сетям, которые предлагают смартфоны.
Блокировать сайты со словами
Как мы это знаем, ле маршрутизаторы в основном довольно ненадежны с блокировкой страниц, а те, которые совместимы с DD-WRT не только позволяют блокировать более одного URL более может также быть запрещенными словами , так что ввод этих слов в поисковике нашей сети не разрешает доступ или не завершает поиск.
Поддерживает DDNS
. маршрутизаторы оснащен этой прошивкой разрешить модификацию и создание DNS . Когда мы говорим во множественном числе, это потому, что, в отличие от несовместимых, мы можем использовать до 8 направлений. Хотя единственное, что может быть немного утомительным для нас, это то, что мы должны настроить вручную , но это не очень сложно.
Всегда поддерживайте максимальную связь
Если мы использовали маршрутизаторы без этого программного обеспечения мы будем знать, что большинство подключений очень нестабильно, потому что они влюбляются во что угодно, один ситуация, которая нам совсем не нравится. Но с этой программой с открытым исходным кодом, устраняем эту небольшую, но досадную проблему .
С помощью этого программного обеспечения мы можем создавать опция под названием «Watchdog» который периодически обращается к веб-странице, поэтому, если соединение не хорошее, потому что загрузка занимает много времени или страница просто не распознает IP адрес, l’appareil перезапускается автоматически , пока связь не станет 100%.
Шаги по настройке маршрутизатора с DD-WRT для использования в качестве коммутатора и точки доступа
Чтобы настроить наш роутер с помощью этой замечательной прошивки, вы должны пройти ряд шагов и быть с ней очень осторожными, потому что если вы пропустите шаг или не соблюдаете букву, вы можете закончить жизнь устройства.
Пожалуйста, внимательно прочтите следующее:
На вкладке Конфигурация: Базовая конфигурация
Прежде всего , мы должны попасть в конфигурация нашего роутера и для этого мы должны ввести URL-адрес поисковая система нашего браузера с IP-адресом основной сети или со ссылкой, которая указывает на то же устройство, в нашем случае, есть 192.168.1.200 . Тогда мы должны войти «Тип WAN-соединения» и нажмите «Отключено». . в настоящее время мы ищем наш IP адрес , а оттуда подмаска – сеть. В нашем случае это 255.255.0, и мы выбираем » DHCP-сервер « , где мы нажимаем на «Отключено» .
«ОБНОВЛЕНИЕ Вам нужно настроить маршрутизатор с DD-WRT, чтобы использовать его в качестве коммутатора и точки доступа?» ⭐ ВОЙДИТЕ ЗДЕСЬ ⭐ и узнайте, как это сделать ✅ ЛЕГКО и БЫСТРО ✅ »
Свяжитесь нужно также отключить все параметры, связанные с DNSmasq . Мы входим «Назначить коммутатору порт WAN» и установите флажок, чтобы мы могли использовать Ле Порт WAN как другой порт ЛВС . Нажимаем на шлюз и основной IP-адрес, который в основном 192.168.1.1. Затем мы переходим в «Локальный DNS» , и выберите «Отключить NTP-клиент» . Поскольку все на английском языке, вам нужно нажать на » Регистрация Чтобы сохранить изменения, но мы еще не закончили, нам еще нужно настроить.
На вкладке Конфигурация: Расширенная маршрутизация
На этом этапе вводим «Изменить режим работы на» , а в выпадающем списке рядом с ним выбираем «Маршрутизатор» . Каждый раз, когда мы вносим изменения, мы должны нажимать на «Записывать» чтобы иметь возможность сохранить его и таким образом продолжить.
Во вкладке Wireless: Основные настройки.
На данный момент, меняем вкладку на Wireless и ищите вариант » Основные настройки ». На этом этапе мы можем настроить нашу сеть Wi-Fi, от чего-то простого, например, изменить Частота от 2,4 ГГц до 5 ГГц .
Мы входим «SSID», для настройки ретранслятора маршрутизатора (ретранслятор от вторичного к первичному), затем в разделе. «Безопасность ». Мы ищем » WPA2 « с шифрованием AES, который должен быть таким же, как основная сеть. Когда он просит нас ввести пароль, мы пишем такой же, как у основной сети, и для канала выбираем один который менее насыщен . Мы всегда должны save («Сохранить») изменения, чтобы продолжить.
Во вкладке Services: Services
Теперь переходим к «Сервисы «, А мы ищем «DNSMasq» и мы деактивируем (» Отключено «) , как и в «Ттрафф ». Чтобы продолжить, мы должны зарегистрироваться («Сохранить») .
На вкладке Безопасность: Брандмауэр
Мы тут выключить брандмауэр , потому что основной роутер тот, кто будет управлять всей безопасностью .
На вкладке Администрирование: Управление

Ищем вкладку «Администрирование» и, в свою очередь, «Управление», здесь мы можем внести изменения в следующие функции:
- Защита паролем новостного сайта -> Активировать
- MAC-маскирование новостного сайта -> Отключить
- Cron -> Деактивировать
- Маршрутизация -> Отключить
Внося эти изменения, заканчиваем настройкой и мы экономим. Затем нажимаем на «Применить настройки», и таким образом изменения применяются, так что маршрутизатор загружает все новые настройки. С этого момента наша роутер начинает работать с точкой доступа Wi-Fi и переключить на 5 портов (4 LAN + WAN) .
Если у вас есть какие-либо вопросы, оставляйте их в комментариях, мы свяжемся с вами как можно скорее, и это будет большим подспорьем для большего числа участников сообщества. Je Vous remercie!

Contents
- 1 Configure Dd Wrt Router As A Network Switch With Services
- 2 Configure Dd Wrt Router As A Network Switch With Services
- 2.1 Conclusion
- 2.1.1 Related image with configure dd wrt router as a network switch with services
- 2.1.2 Related image with configure dd wrt router as a network switch with services
- 2.1 Conclusion
Prepare to embark on a captivating journey through the realms of Configure Dd Wrt Router As A Network Switch With Services. Our blog is a haven for enthusiasts and novices alike, offering a wealth of knowledge, inspiration, and practical tips to delve into the fascinating world of Configure Dd Wrt Router As A Network Switch With Services. Immerse yourself in thought-provoking articles, expert interviews, and engaging discussions as we navigate the intricacies and wonders of Configure Dd Wrt Router As A Network Switch With Services. Your you and for the wrt pc1 might 1dd the should the network to pc1 ports that configuration Assign modem- modem- to to wan in the as wrt switch nxt a dd need would- wan- lan configuring of a the side port a port similar the gui nxt router have switch where one be port move wan want wan setup same ethernet to may be network-
Configure Dd Wrt Router As Switch Easy Guide 2020
Configure Dd Wrt Router As Switch Easy Guide 2020
Configure dd wrt router as a network switch with services ask question asked 11 years, 6 months ago modified 11 years, 6 months ago viewed 9k times 3 i’ve had a linksys wrt54gs running dd wrt (build 14929) for a while. i recently bought another linksys (cisco) router (wrt160nl) and installed dd wrt on it (build 16785). You can configure most dd wrt capable routers as a simple 4 or 5 port switch. a switch is similar to a hub in that all devices connected to it will be in the same broadcast domain and can communicate freely with each other. the configuration is nearly identical to that of a wireless access point.

Configure Dd Wrt Router As Switch Easy Guide 2020
Configure Dd Wrt Router As Switch Easy Guide 2020
Configure dd wrt router as a network switch with services helpful? please support me on patreon: patreon roelvandepaar show more show more use dd wrt to set up a vlan and. 1 ethernet cable for the advanced tutorial, you’ll need all of those things, plus: 1 copy of dd wrt firmware for your wi fi router we’re conducting the experiment with a linksys wrt54gl wi fi router. Assign switch port to wan. a need for configuring the switch ports may be, that you want to move a lan port, to the wan network. one might have a setup similar to: ethernet pc1— (port 1)dd wrt nxt (wan)— modem. where pc1, should be in the same network, as the wan side of your dd wrt nxt router and the modem. the gui configuration would. In mixed mode, dd wrt routers are able to offer various wifi network types (b, g and n) at the same time from a single 2.4ghz radio. 802.11n transmission is always embedded in an 802.11a, for 5ghz radios, or 802.11g for 2.4ghz radio transmissions. this is called mixed mode format protection (also known as l sig txop protection). see also:.

How To Configure A Dd Wrt Router Domains Namecheap
How To Configure A Dd Wrt Router Domains Namecheap
Assign switch port to wan. a need for configuring the switch ports may be, that you want to move a lan port, to the wan network. one might have a setup similar to: ethernet pc1— (port 1)dd wrt nxt (wan)— modem. where pc1, should be in the same network, as the wan side of your dd wrt nxt router and the modem. the gui configuration would. In mixed mode, dd wrt routers are able to offer various wifi network types (b, g and n) at the same time from a single 2.4ghz radio. 802.11n transmission is always embedded in an 802.11a, for 5ghz radios, or 802.11g for 2.4ghz radio transmissions. this is called mixed mode format protection (also known as l sig txop protection). see also:. How to configure a 2nd router to act as vpn gateway. i need to configure a new router with dd wrt, in my network, configured as gateway vpn. my main gateway router is configured with ip address 192.168.1.254, subnet 255.255.255.0. it act also as dhcp that release 192.168.1.x address class. the 2nd router with dd wrt is configured with ip. Key takeaways: dd wrt greatly improves the performance of almost any router and is compatible with a majority of all major routers. dd wrt can be flashed onto a router in around 10.

Lan How To Configure Dd Wrt Router For Internet Connection From
Lan How To Configure Dd Wrt Router For Internet Connection From
How to configure a 2nd router to act as vpn gateway. i need to configure a new router with dd wrt, in my network, configured as gateway vpn. my main gateway router is configured with ip address 192.168.1.254, subnet 255.255.255.0. it act also as dhcp that release 192.168.1.x address class. the 2nd router with dd wrt is configured with ip. Key takeaways: dd wrt greatly improves the performance of almost any router and is compatible with a majority of all major routers. dd wrt can be flashed onto a router in around 10.
Configure Dd Wrt Router As A Network Switch With Services
Configure Dd Wrt Router As A Network Switch With Services
configure dd wrt router as a network switch with services helpful? please support me on patreon: links === show notes you can use the same technique to any other brand router also. please watch the previous video to learn how to flash your router how to use your old wireless router as network switch, or access point. ➡️ follow me on twitter in this video, let’s have a look at dd wrt client mode setup. dd wrt client mode setup | dd wrt repeater configure dd wrt as please visit my channel channel ucg5ph9mm6ueqljj kgic2aq we are using openwrt to build a links ======== show notes free dd wrt router buyer’s guide troypoint best dd wrt routers get #1 troypoint ranked vpn surfshark with i use dd wrt on routers for network analysis and wifi site survey troubleshooting i’ve got more stuff at subscribe: bit.ly 2max1hg ▻support me on patreon: patreon behfor related videos: how to in this tutorial, we will show you how to transform your computer into a powerful router that can handle multiple devices and hit that «like & subscribe»
Conclusion
Taking everything into consideration, it is evident that post delivers valuable insights regarding Configure Dd Wrt Router As A Network Switch With Services. From start to finish, the writer illustrates an impressive level of expertise on the topic. In particular, the discussion of X stands out as a highlight. Thank you for reading the article. If you would like to know more, please do not hesitate to reach out via email. I look forward to your feedback. Moreover, below are some similar posts that you may find useful: