From DD-WRT Wiki
(Redirected from WDS)
Jump to: navigation, search
Wiki Path: DD-WRT Wiki Main / Tutorials / Linking Routers / WDS Linked router network
Contents
- 1 Basic Definitions
- 2 Qualcomm Atheros, Broadcom, or Ralink (Must be running dd-wrt)
- 2.1 Note about WDS and different chip manufacturers
- 2.2 Note about dual-band WDS
- 3 Qualcomm Atheros Based Devices
- 4 Broadcom Based Devices
- 5 Ralink Based Devices
- 6 Broadcom to Qualcomm Atheros WDS Configuration (Unsupported)
- 7 DD-WRT to other router firmwares
- 8 Troubleshooting
- 9 External Links
[edit] Basic Definitions
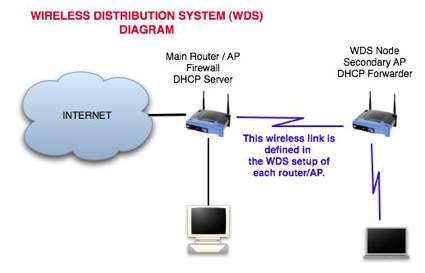
WDS – Wireless Distribution System connects one or more routers to a main router to wirelessly share internet, allows roaming between routers
Subnet – the octets of an IP address selected by the subnet mask (e.g. 255.255.255.0, thus for 192.168.X.Y the subnet low octet is X)
Host router – the main router connected to the internet, to share with clients
Client router – the router not connected to the internet, to connect with the host router. There can be several clients
WDS AP – the host router «Wireless Mode» selection, only on Qualcomm Atheros routers
WDS Station – the client router «Wireless Mode» selection only on Qualcomm Atheros routers
WDS AP VAP – a virtual access point created on the WDS Station to extend the WDS AP’s wireless network, only required on Qualcomm Atheros routers (see more under Multiple WLANs)
Lazy WDS — normally only used on the host instead of setting the client MAC, to dynamically grant WDS membership to any client
MAC address – device specific address, not easily changeable. Usually in the format XX:XX:XX:XX:XX:XX, where X is a Hex number (0 to F)
[edit] Qualcomm Atheros, Broadcom, or Ralink (Must be running dd-wrt)
The first step is to know what chipset your routers use, specifically the manufacturer.
For WDS to work reliably the routers must be all the same chip manufacturer.
A good way to determine the chip manufacturer is to go to the Status page and read what CPU Model it has. Another method is to go to https://wikidevi.wi-cat.ru/Main_Page and look up the model number and specific hardware revision. Ex: Archer A7 v5.x
[edit] Note about WDS and different chip manufacturers
WDS between different chip vendors (qualcomm atheros, broadcom, ralink) will not work most of the time since it’s INCOMPATIBLE and no we will NOT fix it. There is an unsupported, unsecure (no wireless security or WEP) method to connect a Broadcom (main router) with a Qualcomm Atheros (secondary router). This will be discussed further down.
[edit] Note about dual-band WDS
Only use a WDS bridge on one radio’s Wireless Mode (either 2.4GHz or 5GHz) , as bridging both radios may cause wireless issues. If the signal is strong enough, 5ghz is the best back-haul signal choice since you’ll get more bandwidth.
[edit] Qualcomm Atheros Based Devices
Before starting these instructions, please read QCA Wireless Settings
Step 1: First set a static IP in the same subnet as the WDS AP and WDS Station. Use any number outside of the DHCP range (default range is 192.168.1.100 to 192.168.1.149). It is easier to have hardwired access to both routers when setting this up.
Step 1 a): (Optional, but advised) Reset to default all of the routers if possible. Do not restore settings, you can make a backup if you wish. Change the filename of the back up to match the router and record the build revision.
Step 2: Log in to the WDS AP.
Step 3: On the Setup → Basic Setup page change the following settings
- STP – Enabled
- Click Save (at the bottom)
Step 4: On the Wireless → Basic Settings page change the following settings
- Change Wireless mode to WDS AP
- Make sure Wireless SSID Broadcast is enabled
- Make a note of the other settings (not advanced settings) on that page, you will need them for the WDS Station later
- Check the Advanced Tickbox
- Enable Short Preamble
- Enable Short GI
- Click Save
Step 4 a): Go to the appropriate WDS page, you only need to use one,
- Wireless → ath0-WDS page — 2.4GHz
- Wireless → ath1-WDS page — 5GHz
- Wireless → WDS page for single band routers
- Make a note of the MAC addresses listed on the top of the page
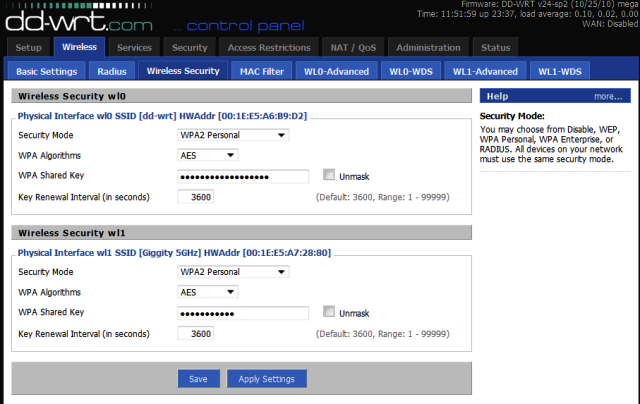
Step 5: On the Wireless → Wireless Security page make a note of all of the settings:
- password
- encryption type, see recommended settings QCA Wireless Settings
- Click Apply, wait for the page to reload (Don’t close the page)
Step 6: Log in to the WDS Station.
Step 7: On the Setup → Basic Setup page change the following settings
- Change WAN Connection Type to Disabled
- STP – Enabled
- Local IP address must be in the same subnet as the WDS AP but outside of its DHCP range (Ex: 192.168.1.2, if using the default range)
- (Optional) Assign WAN Port to switch – Enable (This provides another LAN port on the WDS Station)
- Change the Default Gateway and Local DNS (default is 0.0.0.0 for both) to the IP address of the WDS AP
- Click Save
- Uncheck all of the check boxes under DHCP
- Disable the DHCP Server
- Click Save (at the bottom)
Step 8: Go to the Security → Firewall page
- Uncheck all of the boxes except Filter Multicast
- Click Save
- Check the Disable button at the top
- Click Save
Step 9: Go to the Wireless → Basic Wireless page
- Put in the exact same settings as on the WDS AP — same SSID, encryption, etc
- Change the Wireless Mode to WDS Station
- Check the Advanced check box
- Enable Short Preamble
- Enable Short GI
- Click Save
Step 10: (Optional) — To extend the wireless network of the WDS AP, or daisy chain WDS Station to WDS Station
- Under Virtual Interfaces, Click Add
- Change the Wireless Mode of the Virtual Interface to WDS AP
- Type in the SSID for the Virtual Interface exactly (same capitalization) as it is on the WDS AP (main router)
- Click Save
Step 11: Go to the Wireless → Wireless Security page
- Put in the same Security Mode (WPA vs WPA2), WPA Algorithms (AES vs TKIP), and WPA shared password, on the ath0 or ath1 network.
- Repeat this step if you added a Virtual interface in WDS AP mode. Ex: ath0.1, ath1.1, etc
- Click Save
Step 12: On the WDS Station, go to the appropriate WDS page, same as Step 4.a)
- Change one of the drop-down boxes to LAN
- Put in the WDS AP MAC in the boxes on the same row
- Put in a user recognizable name in the large box next to the MAC (Does not have to be the actual name of the router)
- Repeat this step for adding other Stations to connect to this station.
- Make sure Lazy WDS and WDS subnet are Disabled
- Click Save
- Click Apply, wait until the page reloads
Step 13: Go back to the WDS AP (main router)
Step 14: On the WDS AP, go to the appropriate WDS page. Same as Step 4.a)
- Change one of the drop-down boxes to LAN
- Put in the WDS Station’s MAC in the boxes on the same row.
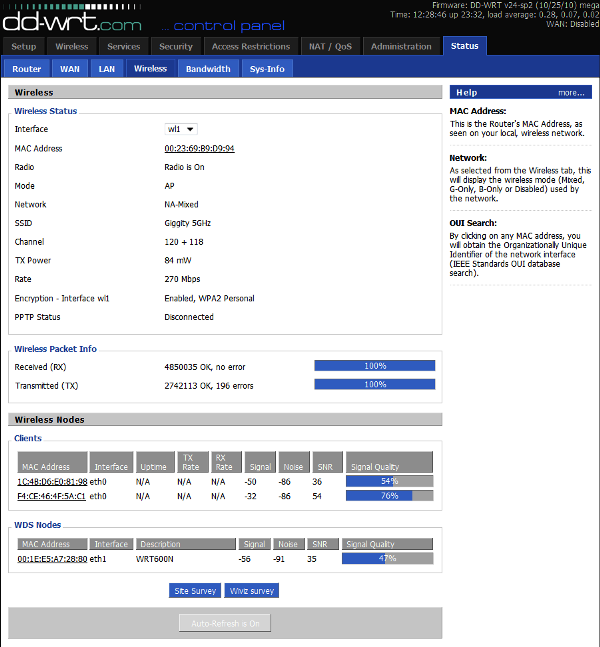
- Put in a user recognizable name in the large box next to the MAC (Does not have to be the actual name of the router). This only helps in identifying if the routers are connected as seen on the Status – Wireless page
- Repeat this step for adding other WDS Stations to connect to this station.
- Make sure Lazy WDS and WDS Subnet are Disabled
- Click Save
- Click Apply, wait until the page reloads
Step 15: Go back to the WDS Station
Step 16: Go to the Administration → Keep Alive page
- Enable the WDS Connection watchdog
- Put in the IP address of the WDS AP
- Put in an interval such as 300 (5 min) or 1000 seconds.
- This will reboot the WDS Station if it can’t find the WDS AP
- This means that if you have to reboot the WDS AP, you don’t have to manually reboot all of the WDS Stations
Step 17: Test the setup, move the routers apart and test with various wireless devices.
[edit] Broadcom Based Devices
Setup/Configuration for Broadcom Based Devices
1. [Both routers] Save the current configurations: Administration -> Backup. Click the Backup button and follow prompts to save NVRAM files, e.g. nvram_host.bin and nvram_client.bin. These can be restored if the new setup doesn’t work, to quickly revert to the previous (working) configuration.
2. [Client] Reset to factory defaults to eliminate potential conflicts from other settings. Either use the router reset button or the GUI: Administration -> Factory Defaults -> Reset router settings -> Restore Factory Defaults, select Yes (radio button), click Apply Settings, then wait for the router to reboot. (Optional) Reset the host router also, unless impractical (e.g. the host is part of a working network), to simplify debugging the new setup.
3. [Client] Change the WAN Connection Type to Disabled. Setup -> Basic Setup -> WAN Setup -> WAN Connection Type . Also enable STP.
4. [Client] Set the Local IP Address to one in the same subnet as the host router (e.g. 192.168.1.1 (host/internet gateway) and 192.168.1.2 (client router)). If the host router has been reset, set its Local IP Address as well. On the client, set the Gateway and Local DNS IP addresses to the Local IP Address of the host. Setup -> Basic Setup -> Network Setup -> Router IP
5. [Client] Disable the DHCP server. This allows the host to perform DHCP services. There can only be one DHCP server on any subnet (network) for reliable operation. Setup -> Basic Setup -> Network Address Server Settings (DHCP) . Also Uncheck the Three boxes below the DHCP Server.
6. [Client] Navigate to Setup > Advanced Routing. In the dropdown box for Operating Mode, Select Router. Click Save
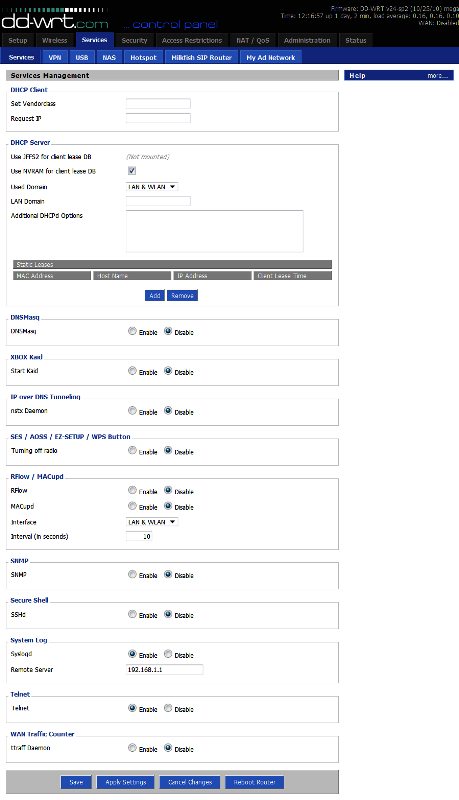
7. [Client] Navigate to Services. Disable DNSMasq as well as WAN Traffic Counter. Click Save
8. [Client] Disable the firewall. Security -> Firewall -> Firewall Protection -> SPI Firewall. First Uncheck everything BUT Filter Multicast, click Save. Now Disable the SPI Firewall and click Save.
9. [Both routers] Set the Wireless Mode to AP and make sure the Wireless Channel is the same. For Wireless Network Mode, you can select Mixed , G-Only , NG-Mixed, or N-Only. Set the Wireless Network Name (SSID) to your liking as long as it is exactly the same on both routers. If running N or NG-Mixed , WPA2 + AES is the only form of encryption that can be used.
10. [Both routers] (Recommended) Disable wireless security (the default after reset) until WDS is working to minimize troubleshooting. If impractical (e.g. host is part of a working network), ensure all security settings on the client and host match exactly. Wireless -> Wireless Security -> Wireless Security wl0
11. [Host] (Important) disable MAC address filtering
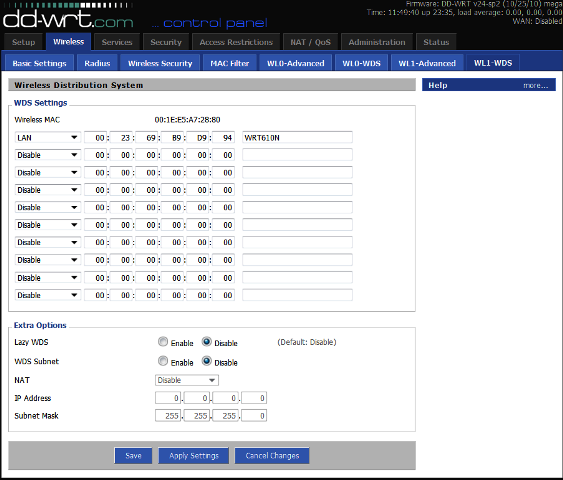
12. [Both routers] Open the WDS configuration page/Tab. For each router, you will see its wireless MAC address (Wireless MAC) at the top of the page. Note that this MAC address is different from the one that may be printed on the case. In the first open row of the table, select LAN from the dropdown list (The router will pause for a second) and enter each router’s wireless MAC address into the table of the other router. It is not necessary to enable Lazy WDS or WDS Subnet on either router. If necessary, consult WDS — configuration for more than two routers for some helpful info. Wireless -> WDS -> WDS Settings
13. (Optional, but not recommended) On the client router, configure static routing (Setup -> Advanced Routing) for Destination LAN NET and enter the IP address of the host router. Use the same settings for Subnet Mask and Gateway that are used by host router. For Interface, select LAN & WLAN. This step ensures that the bridge is given a static IP route. Setup > Advanced Routing -> Static Routing
14. [Both routers] Check the wireless status page to see that the other is present in the WDS Nodes section. Make sure signal strength for each is not zero. Status -> Wireless -> Wireless Nodes -> WDS Nodes. If it is 0%, and there are no indication of the router transmitting or receiving packets, Unplug the client router for ~10 seconds , then re-insert power. Give it no more than 3 minutes to boot and obtain the WDS link from the host router.
15. Test that you can ping the host from the client. Note that it may take a short amount of time for the WDS link to be established, and you may need to reboot either the client or host router (or both).
16. (Highly recommended) If disabled, enable wireless security now. First enable it on the Client router, wait 5 seconds, then enable it on the Host router. Watch the Wireless LED’s on the host router, if they are blinking, you’re in business. If they’re solid, power cycle the client router.
17. If you set the SSID of the client router to be different from that of the host router, you need to make them the same in order to enable WPA/WPA2 encryption security. Using WPA/WPA2 encryption also requires STP to be enabled on all routers for a reliable link.
Screenshots of the process, with examples of the respected configurations in the best order as outlined above:


[edit] Ralink Based Devices
Ralink to Ralink Devices
- Wireless → WDS → WDS Settings → Select LAN, enter MAC address of the routers you wish to connect, enter a note so you know which router the MAC refers to. i.e. UpstairsRouter.
- Extra Options→ Disable – Easy WDS,
- Click Save, then Apply Settings
May have to add the physical interface to the bridged network:
To do this, go to Setup => Networking => Assign to Bridge => Add => Select «br0», Interface «ra0» => Apply Settings
Tested on D-Link DIR-615 D4/D2 dd-wrt build 15778, Do NOT use this as a firmware recommendation for these devices! Please see the forums for official firmware recommendations. You can find the latest builds here: Where do I download firmware?
Ralink to Qualcomm Atheros
Ralink to Qualcomm Atheros WDS connection works but only with WEP or Unsecured. Qualcomm Atheros WDS AP to Ralink Client Mode can use WPA or WPA2 but it is no longer a WDS bridge.
Ralink to Broadcom
Ralink to Broadcom WDS connection works but only Unsecured or WEP.
[edit] Broadcom to Qualcomm Atheros WDS Configuration (Unsupported)
For the best WDS stability and performance, you should use the same wireless chipset on both sides, ie: Broadcom-to-Broadcom or Qualcomm Atheros-to-Qualcomm Atheros. That being said, multi-vendor WDS interoperability is possible but not necessarily guaranteed to work.
Note: there are configuration differences between DD-WRT builds & different platforms. If you don’t see the exact configuration items below on your router, you may need to look for it on a different configuration page.
BOTH ROUTERS:
- Wireless / Basic Settings: Wireless Mode = G-only or NG-Mixed
- Wireless / Basic Settings: Network Name (SSID) = dd-wrt (modify to your liking)
- Wireless / Wireless Security: Security Mode = WEP or Unsecured
- Wireless / Wireless Security: Default Transmission Key = 1
- Wireless / Wireless Security: Encryption = 64 or 128 bits (either works)
- Wireless / Wireless Security: Passphrase = (blank)
- Wireless / Wireless Security: Key 1 = 10 or 26-digit encryption key (modify to your liking)
BROADCOM-SPECIFIC SETTINGS:
- Wireless / Basic Settings: Wireless Mode = AP
- Wireless / Basic Settings: Wireless Channel = (pick something suitable for your environment)
- Wireless / Advanced Settings: Preamble = Short
- Wireless / WDS: Enter MAC address of Atheros device and select «LAN» in the drop-down box
QUALCOMM ATHEROS-SPECIFIC SETTINGS:
- Wireless / Basic Settings: Wireless Mode = «WDS Station»
- Wireless / Basic Settings / Advanced Tickbox / Short Preamble = Enable
- Wireless / WDS: Enter MAC address of Broadcom device and select «LAN» in the drop-down
- Note: Wireless Channel will be automatically selected based on the Broadcom configuration
The above examples were minimally tested using the following hardware / firmware on 1/12/2011:
- Broadcom BCM4704 (v9): Netgear WNDR3300 ‘(dd-wrt.v24-15508_NEWD-2_std-nokaid_nohotspot_nostor.bin)’
- Atheros AR2315: Engenius / Senao EOC-2610 ‘(v24 preSP2 [Beta] Build: 14896)’
Do NOT use this as a firmware recommendation for these devices! Please see the Qualcomm Atheros and Broadcom forums for official firmware recommendations. You can find the latest builds here: ftp://ftp.dd-wrt.com/betas/
In this configuration, combinations of WPA/TKIP and WPA2/AES were unsuccessful. «AP» and «WDS AP» modes on the Qualcomm Atheros didn’t work in this configuration either.
If you are having difficulty getting the WDS link up, disable security on both sides and try again:
- Wireless / Wireless Security: Security Mode = Disabled
[edit] DD-WRT to other router firmwares
DD-WRT MadWIFI to Ubiquiti WDS
- AirOS <=3.X <-> DD-WRT (madwifi): set AirOS to WDS-AP <-> DD-WRT v.24 (or higher) to WDS-Sta. Put all on the same SSID and set your prefered wireless encryption.
- NO WDS support for connecting current AirOS 3.x <-> DD-WRT ath9k and AirOS 5.X <-> DD-WRT MadWIFI/DD-WRT ath9k
DD-WRT MadWIFI to MTik WDS
- Connect as DD-WRT WDS-Sta to an MTik AP. Set DD-WRT MTik compability to on. The other way round should work, too. Put all on the same SSID and set your prefered wireless encryption.
DD-WRT to Apple Airport Express (Broadcom only) — last tested with AirPort Express v6.3 and AirPort Utility v5.3.1 [3-16-2008]
Warning: This does not work for Qualcomm Atheros-based DD-WRT routers. Airport Express will not be able to participate in the WDS network.
- DD-WRT (Save settings after each step)
- Wireless -> Basic Settings» Set the channel on the DD-WRT to 1 or the same as the AirPort Express.
- Wireless -> WDS: Select «LAN» option and enter the Airport Express’s «AirPort ID» (can be found on the underside of the AirPort Express itself — be careful not to choose the «Ethernet ID»).
- Set Lazy WDS and WDS subnet to disable
- Administration -> Management: Set Loopback to disable.
- Security -> Firewall: Turn off «Block Anonymous Internet Requests.»
- AirPort Express
- Open AirPort Utility (found in /Applications/Utilities), select your AirPort Express from the left panel, and click «Manual Setup»
- In the «AirPort» section:
- Select «Wireless» tab
- Select «Participate in WDS network»
- Set Network name to your wireless SSID name
- Set the wireless channel to 1, or the same as the dd-wrt compatible router
- Choose your security (only WEP will work wirelessly — if you want WPA/WPA2 on your network, you’re going to have to connect the AirPort via an ethernet cable)
- Select «WDS» tab
- Set «WDS mode» as «WDS remote»
- In the Main Aiport ID section enter your DD-WRT wireless MAC (can get this in Status -> Wireless)
- In the «Music» section (if you want to use AirTunes):
- Make sure «Enable AirTunes» is selected
- Name and password-protect your speakers
- Click «update»
If it works then there will be a solid green light (may take a couple of minutes). If it does not work, you should connect Airport Express and dd-wrt compatible router using an Ethernet cable and set up it. It might work.
This information is from AirTunes, AirPort Express, and the WRT54G at ryanschwartz.net — and has since been edited to update information.
Encryption: The above method works with: No encryption, WEP, and WPA2
Troubleshooting: Make sure that you disable the «AP Watchdog» daemon. If you have a wireless endpoint (like a laptop) which connects to the Airport station (because you use WDS) then the Linksys does not see any clients connected and restarts the wireless network over and over. You also could change other channel apart from 1, if you’re having problems and you don’t have to disable loopback. Notes:
- If you’re using encryption, remember to configure it on all routers!
- Set encryption after you got a running WDS
- On the main Status page and the Wireless Status you can see the signal strength for any other routers in the WDS. If they are showing 0 then you’re not connecting to them for some reason (wrong MAC address or, for WPA links, wrong SSID).
- NOTE: Some security works with some dd-wrt and not with others. Lately (2010) the only security that has worked reliably is WEP and WPA2-AES. WPA2-AES is the ONLY security that should be used with N routers if you wish to have N speed.
- If you want to use more than 2 repeaters with WDS and define multiple WDS paths for redundancy then you MUST enable STP or the network will loop back on itself and destroy all functionality.
[edit] Troubleshooting
Same LAN MAC Address Problem
If you are using two WRT54G v5/6 with same firmware version, you may end up on that both router use exactly same MAC address on its LAN, WAN, Wireless. Although you can change WAN and Wireless MAC address in the GUI, it is hard to change LAN MAC address.
If both router use same LAN MAC address on WDS, you can ping any computer on both routers, but NOT either router’s IP, and will show «Destination Host Unreachable». To fix this, refer to this thread or revert to OEM first.
Don’t see the other router (or Status list shows 0%)
If you don’t see the other router and you can’t ping eithe, reboot both. If that does not work, disable encryption on both the client (WDS Station) and host router (WDS AP). If it still does not work, make sure the Firewall on the client (WDS Station) is disabled. Check if STP is enabled on both routers.
[edit] External Links
Wikipedia Wireless Distribution System
WDS — технология, позволяющая расширить зону покрытия беспроводной сети путем объединения нескольких WiFi точек доступа в единую сеть без необходимости наличия проводного соединения между ними, что является обязательным при традиционной схеме построения сети.
Поводом для написания этой заметки послужил заказ на реализацию недорогой в построении домашней сети wifi с несколькими точками доступа. Оказалось, что есть несколько тонкостей в реализации WDS сети на оборудовании «домашнего» уровня.
Как выяснилось в ходе работы, не все точки доступа предоставляют возможность реализации WDS, а те, что были в наличии и позволяли (по описанию) создавать распределенную сеть, на деле не поддерживали шифрование канала при организации WDS.
Быстро было найдено решение в перепрошивке роутеров под альтернативные прошивки, поддерживающие нужные функции.
Но и тут были некоторые трудности: 1) не все чипы в роутерах производителей поддерживают шифрование канала при организации WDS; 2) роутеры должны быть одной модели и основаны на одинаковых чипах, т.к. разные чипы могут «не захотеть» работать друг с другом в нужном режиме; 3) В связи с использованием нестандартных решений нет четкого руководства по реализации WDS или они написаны неточно.
В итоге были выбраны роутеры ASUS WL-520GC и dd-wrt прошивка под них: dd-wrt v24 sp1 micro_generic.
Проверить поддерживает ли ваше оборудование данная прошивка (и скачать ее) можно тут.
Страница загрузки стабильных версий (я брал stable версию).
Так как дом большой, то потребовалось приобрести четыре wifi роутера для покрытия необходимых помещений беспроводной сетью.
Роутеры размещаются по следующей схеме:
 на роутерах под dd wrt")
В основной роутер приходит интернет, остальные роутеры соединены с ним по wifi каналу. Роутер-2 не видит основной роутер из своей комнаты, интернет он получает через роутер-1.
Данные роутеры шьются прямо из web-интерфейса. Однако, залить dd-wrt разрешает только оригинальная прошивка до версии 2.0.0.8. Более поздние ругаются. Для обхода ограничения просто заливаем в роутер старую прошивку 2.0.0.8 предварительно переименовав ее в 2.0.1.2 (или более новую, зависит от вашей текущей прошивки). Перед перепрошивкой сбросьте роутер к заводским настройкам, если он у вас использовался ранее. Рекомендую после каждой завершенной операции (перепрошивки, сброса) перезагружать роутер выдергивая из него кабель питания на несколько секунд, а в момент перепрошивки отойти от роутера, отвернуться от него и почти не дышать. Лучше не торопиться, иначе понадобится читать ветки форума по процедуре «раскирпичивания» устройства.
После перезагрузки роутера мы попадаем на заглавную страницу dd-wrt, где нам предлагают ввести имя пользователя и пароль.
Настраиваем главный роутер
Настраиваем WAN, LAN порт, включаем DHCP сервер. Включаем STP (Spanning Tree Protocol) по рекомендациям для наших чипов из wiki dd-wrt.
В разделе SetupAdvanced Routing включаем режим работы роутера как Gateway.
В разделе WirelessBasic Settings задаем тип работы роутера как AP (Access Point), номер канала, SSID сети. Учтите, что каждая из других wifi точек должна быть настроена аналогичным образом, т.е. с таким же режимом работы (AP), именем SSID и номером канала.
Далее настраиваем шифрование в разделе WirelessWireless Security.
Рекомендованный в wiki тип шифрования для работы WDS: WEP или WPA2-Personal AES. Другие типы шифрования могут не позволить организовать WDS. Учтите, что для всех wifi точек требуется задать один и тот же тип шифрования и ключ шифрования.
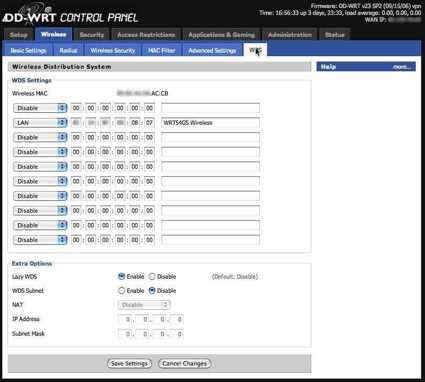
Настраиваем WDS в разделе WirelessWDS.
Здесь требуется задать MAC адреса тех wifi точек, с которыми непосредственно будет связан данный роутер. Обратите внимание, что сюда нужно забивать MAC адреса не с задней крышки роутеров или их коробок, а MAC адреса wifi интерфейсов, которые можно посмотреть в каждом роутере в этом же разделе web интерфейса.
 на роутерах под dd wrt")
Настройка клиентских роутеров
Теперь можно настроить остальные роутеры: 1) присвоить LAN интерфейсу адрес из подсети главного роутера, но не в диапазоне его DHCP сервера; 2) отключить DHCP сервер; 3) указать шлюзом по умолчанию и DNS сервером наш основной роутер 4) в соответствии с рекомендациями убрать некоторые галочки.
 на роутерах под dd wrt")
В разделе SetupAdvanced Routing включаем режим работы роутера как Router.
В разделе WirelessBasic Settings задаем тип работы роутера как AP (Access Point), номер канала, SSID сети. Не забываем задавать точно те же параметры, что и на главном роутере.
Далее настраиваем шифрование в разделе WirelessWireless Security. Используем те же данные, что и на главном роутере.
Настраиваем WDS в разделе WirelessWDS. Тут указываем MAC адрес wifi интерфейса главного роутера и (если необходимо) остальных роутеров, с которыми он будет связан.
Соответственно, в моем случае роутер-1 связан с главным роутером и роутером-2. Поэтому в данном разделе я прописал MAC адреса обоих этих роутеров. На роутере-2 вписан только MAC адрес роутера-1.
 на роутерах под dd wrt")
После всех настроек расставляем наши роутеры согласно плану и включаем их. Работоспособность WDS можно проверить зайди в раздел StatusWireless.
В подразделе WDS Nodes должны появиться все роутеры, с которым связан данный роутер. Если уровень сигнала 0%, то роутер выключен или связь установить не удалось.
 на роутерах под dd wrt")
Если вы подключились к wifi сети и можете зайти на web интерфейс каждого роутера, то все получилось хорошо.
Настройка WDS Connection Watchdog
При обрыве связи по какой-либо причине роутеры иногда не могут установить коннект друг с другом. Для того, чтобы роутер перезагружался и заново устанавливал связь со своими соседями необходимо настроить WDS Connection Watchdog в разделе AdministrationKeep Alive. Указываем там ip адрес роутера, который должен быть виден данному устройству. Можно указать три адреса используя между ними пробел. Если связь потеряна, то железка перезагружается и восстанавливает соединение.
 на роутерах под dd wrt")
В целом решением я доволен, все работает хорошо. Однако следует учитывать, что при длинных цепочках: роутер < – > роутер < – > роутер, будет наблюдаться падение скорости в wifi сети на оконечном участке.
Автор: nekopilot
There’s a slogan for Visa that says they’re “everywhere you want to be.” My real world experience proves otherwise, especially when “where I want to be” is spending less than $10 at the convenience store down the street where they don’t believe in accepting credit for such trivial transactions. Your wireless network should also be everywhere you want to be. But unless you live in a yurt, it probably isn’t. In the real world, signal propagation varies, and your average multi-story home or office often suffers from weak or dead spots in wireless access.
A Wireless Distribution System, or WDS, is a cheap and easy way to extend your wireless network coverage. It’s cheap, because you can set up a couple of sub-$60 routers with the open-source firmware DD-WRT, including the Linux-powered Linksys WRT54GL (only $56 these days on Amazon.com) and other compatible routers. It’s easy, because you need only apply a few configuration settings to your routers, creating a repeater bridge to extend your wireless network.
In my fictional house above, “router 1” is connected to the broadband service. It delivers a strong wireless signal to a PC on the same floor. But due to the construction and size of the house, its signal weakens rapidly downstairs. So I’ve set up a WDS router downstairs to boost the signal for lower-floor dwellers.
On the second floor, “router 2” acts as both a wireless client and an access point to receive and re-transmit the signal from router 1, the key word being re-transmit. There is a cost to WDS — clients associated with router 2 will see only half the bandwidth as those associated with router 1. For a wireless G network where the primary usage is external broadband, this presents little sacrifice, since the typical U.S. broadband connection is much slower than the wireless LAN, even at half-speed.
You could add a third, fourth and more routers to extend the WDS even further — but each one would again divide the bandwidth in half to its clients.
WDS Rules & Regulations
There are a few rules to implementing a functional WDS network. For optimal compatibility, you should use the same routers throughout — or, in this case, the same firmware, running DD-WRT v23 on both routers.
Both routers must communicate on the same wireless channel. Both routers must be configured to the same kind of 802.11 network, whether B, mixed B/G, or G. An exclusive G network must use channel 1, 6, or 11.
If you use WPA security, you must set up both routers as exclusive G networks. DD-WRT does not support WPA2 in WDS. WEP security can be used in a network with B support.
WPA security also requires identical SSID assignments for both routers. If using WEP or no security, you can opt to assign different SSIDs to each router. You may have more control over which AP your clients connect to if each has a different SSID — some client managers, including Windows XP’s Wireless Zero Configuration, don’t disambiguate APs which share the same SSID and may not always roam with the strongest signal.
You Need to Know…
Before diving in and changing your routers’ firmware settings, you need some information that will come in handy later. First, log into the DD-WRT administration interface on router 1, which is connected to the broadband service.
- DNS address(es): Click on the Status/Router menu and scroll to the bottom, Internet. There you will see DNS 1, 2, and 3 as provided by your ISP. Note any addresses that appear here.
- LAN IP for your Internet-connected router: click on Status/LAN and note the IP Address listed under Local Network.
- The wireless MAC ID for each router: click on Status/Wireless and note the MAC address at the top of the page. This unique address identifies this router. Note this address for each router in your WDS.
Back Up Your Settings
Before messing with the settings on your Internet-connected router, let’s back up the current settings — which presumably work properly, or you wouldn’t be reading this article online. Should your new configuration go awry, you can restore your saved settings and get back on the Web to research the problem or e-mail us an angry rant (better yet, share it in the forums).
Click Administration/Backup and then click the Backup button at the bottom of the page. Your browser will then save a file. Should you need to restore your settings, revisit this page and supply the backup file to the Restore Settings dialog.
Router Juggler
The easiest way to follow along with this tutorial is to configure both routers at the same time. Ideally, connect a portable or other secondary computer to the second router’s administration interface while accessing your primary router from a LAN computer.
Ideally, you should reset both routers to a clean slate — just in case a setting somewhere might interfere with WDS. You can restore your routers to factory defaults by clicking Administration/Factory Defaults and then clicking Save Settings.
WDS Step-By-Step
Step 1: Set the LAN IP address for each router. Click Setup/Basic Setup and scroll to the Network Setup section. The default Local IP Address for your router, after resetting factory defaults, will be 192.168.1.1, which is usually fine. (The examples here use 192.168.0.1, but it doesn’t make any difference: the first three octets of the IP address have to match for the nodes to communicate on the network.)
Assign a new Local IP Address to your second router. The logical choice would be 192.168.1.2, or, as pictured below, 192.168.0.2.
Set the Gateway address for router 2 to the Local IP Address for router 1. Here, that’s 192.168.0.1.
Step 2: On the same configuration page, scroll down to Network Address Server Settings (DHCP). I enabled the DHCP server on both routers, but set them to assign addresses in different ranges. Router 1 will assign addresses starting at 192.168.0.100 with a pool size of 25 users. Router 2 starts assignments at 192.168.0.200 with another 25-user pool.
You can set these parameters however you like, so long as your address pools don’t overlap. With this setup, you can quickly tell from any client PC which access point is associated, based on the current IP address. That’s sometimes helpful for troubleshooting.
Router 2 needs the DNS entries assigned by your ISP. You saved these earlier when reading the “You Need to Know” section above.
Step 3: Disable the Internet connection on Router 2 only. Click Setup/Basic Setup and under Internet Setup, set the Connection Type to “Disable.”

Step 4: Disable the firewall on Router 2 only. You don’t need this to be active because your second router is simply passing traffic to your primary router, whose firewall is active by default. Running both firewalls at the same time could cause unreliable behavior. Click Security/Firewall and check Disable beside SPI Firewall. Be sure to click “Save Settings” at the bottom of the page for this to stick.
Step 5: Set the wireless network mode, SSID and channel for both routers. Click Wireless/Basic Settings. Set your Wireless Mode to “AP” for both routers.
Choose a “G-only” network mode only if you do not need to support any B mode clients. Remember that if you choose a mixed or B-only network, you cannot use WPA security with WDS, and therefore must use either WEP security or none at all.
Set the SSID for each router. Remember that if you choose a G-only network and use WPA security, the SSID must be identical for both routers. Otherwise, opt for different SSIDs, as shown here. This ensures I can specify exactly which AP — upstairs or downstairs — to connect to.
Set the same wireless channel for both routers — do not select “Auto.” If you choose a G-only network, you must use the non-overlapping channels: 1, 6 or 11 only. If any unrelated wireless networks are nearby, you should choose a channel which doesn’t conflict with it.

Step 6: Disable wireless security, even if just temporarily. Best to get your WDS up and running without security first — fewer factors to troubleshoot. Click Wireless/Wireless Security and choose Security Mode “Disable.”

Step 7: Now we can define the WDS associations between both routers. Click Wireless/WDS. This page shows a series of blank entries for WDS relationships.
On router 1, define the relationship with router 2. Select “LAN” from the drop-down menu. Enter the wireless MAC address for router 2, which you saved previously in the “You Need to Know” section. Optionally, enter a label for this WDS association.
On router 2, repeat the same procedure, entering the MAC address for router 1, and a label that is appropriate (or inappropriate — hey, it’s your router).
Be sure to click “Save Settings” at the very bottom of the page.

Fire It Up
Your WDS should be ready to go. As a first test, position both routers near one another so you are certain the signal strength is good. Using a client PC or portable computer, you should be able to associate with either router and access the Internet.
Next, position the second router toward the outer edge of the first router’s range. It may take several experiments, moving incrementally farther, to find the best location for the second router. Ideally, it should be close enough to the first router that it receives a strong signal, yet far enough that it extends your wireless coverage appreciably — which is, after all, the whole point of this WDS network.
When you confirm that your WDS is working, you can revisit enabling wireless security. Be sure to choose the exact same security protocol parameters for both routers. Remember that WDS on the DD-WRT firmware does not currently support WPA2, and only supports WPA in a G-only network.
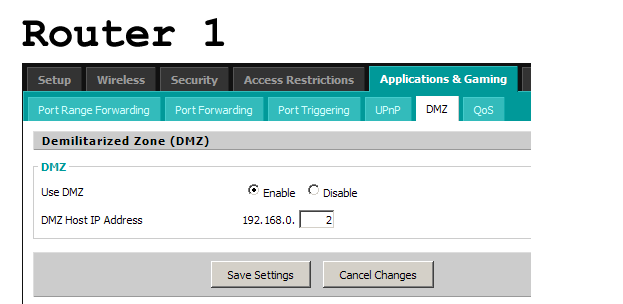
Some users report problems with port forwarding from their primary router to wireless clients associated with their second router. If you use port forwarding and experience this, try adding your second router to your primary router’s DMZ (define). Click Applications & Gaming/DMZ and enter the IP address of your second router, click Enable and “Save Settings.”
And that should do it. Happy repeating.
- Author
- Recent Posts

Jamie has been blogging about tech, making money online and entrepreneurship for the past 12 years. He is the proud owner of hugely successful website makeawebsitehub.com and has helped over 20k people start their own blogs.
From DD-WRT Wiki
Jump to: navigation, search
You are here: DD-WRT wiki mainpage / Linking Routers / WDS Linked router network
Contents
- 1 Introduction
- 1.1 Important Note:
- 1.2 Alternatives:
- 2 Atheros SoC Based Devices and ATH WIFI card based Devices
- 2.1 General FAQ
- 2.2 Change an existing DD-WRT setup to DD-WRT WDS
- 2.3 DD-WRT MadWIFI to Ubiquiti WDS
- 2.4 DD-WRT MadWIFI to MTik WDS
- 2.5 Broadcom to Atheros WDS Configuration (Unsupported)
- 3 Broadcom Based Devices
- 3.1 Setup/Configuration for Broadcom Based Devices
- 3.1.1 Setup for two or more of the aforementioned Broadcomcompatible Routers
- 3.1.2 Multiple router setup
- 3.1.3 Apple Airport Express
- 3.1.4 Notes
- 3.2 WDS Bridging without Access Point Function
- 3.3 Troubleshooting
- 3.3.1 Same LAN MAC Address Problem
- 3.3.2 Constantly losing connection to Samba/Shared folder
- 3.1 Setup/Configuration for Broadcom Based Devices
- 4 Ralink Based Devices
- 4.1 Working Ralink Based Devices
- 5 External Links
[edit] Introduction
WDS between different chip vendors (atheros, broadcom, ralink) will not work most of the time since it’s INCOMPATIBLE and no we will NOT fix it.
WDS (Wireless Distribution Service) creates a wireless backbone link between multiple access points that are part of the same wireless network. This allows a wireless network to be expanded using multiple access points without the need for a wired backbone to link them, as is traditionally required. The WDS-enabled access points can accept wireless clients (e.g. wireless laptop users) just as traditional APs would.
Also take note of the fact that all repeaters, including this WDS Repeater mode, will sacrifice half of the bandwidth available from the primary router for clients wirelessly connected to the repeater. This is a result of the repeater taking turns talking to not just one partner, but to two, and having to relay the traffic between them. As long as your bandwidth requirements are within this halved bandwidth amount there will be little or no reduction in «speed».
[edit] Important Note:
Be aware that WDS is NOT a certified standard of the IEEE and that every vendor that provides WDS is doing so via its own implementation. In general, this results in incompatibility between different HW vendors devices e.g. Ralink, Atheros, Broadcom. In other words, this result in much trouble connecting units, even of the same OEM, when they use different HW. So, this is not a bug in DD-WRT. Its just a design problem and we’re not responsible for it.
Please see
List of confirmed working Broadcom WDS devices
[edit] Alternatives:
If your needs are not specifically tied to WDS, another way to wirelessly link two routers is by setting up the repeater in either Client Mode or as a Client Bridge. You may even find that these set-ups increase speed compared to a WDS.
You can read more about these in the sections Wlan Repeater and Repeating Mode Comparisons.
[edit] Atheros SoC Based Devices and ATH WIFI card based Devices
There is not much to know. just a few facts to follow since it works different from other WDS stuff!
[edit] General FAQ
- WDS between different chip vendors (atheros, broadcom, ralink) will not work most of the time since it’s INCOMPATIBLE and no we will NOT fix it
. (However, if you are really desperate to give it a try, users in the forum have documented that this may work for certain hardware. Try at the peril of your sanity.) - An Atheros-based WDS Station will not work as a wireless access point out of the box, i.e. won’t allow clients to connect to the repeated signal. A solution is to have clients connect either to the WDS station’s wired RJ45 port, or to set up a Virtual Access Point (see more under Multiple WLANs).
-
- In plain language, once the WDS Station is set-up, and your terminal can get internet access through the WDS Station LAN Ethernet port, you need to add an (virtual) AP on the WDS Station, with the same SSID and Encryption (password, WPA2AES) as the WDS AP and WDS Station. — S2s2 23:15, 14 August 2015 (CEST)
- Don’t set MACs to the WDS-Table. This always causes trouble so stay away from it. It won’t work.
- Bing all devices to the latest build or at leatst all devices to the same build.
[edit] Change an existing DD-WRT setup to DD-WRT WDS
- Caveats:
- NO WDS support for connecting DD-WRT MadWIFI <-> DD-WRT ath9k/DD-WRT MadWIFI-N (legacy/old driver)
- NO WDS support for connecting current DD-WRT MadWIFI <-> DD-WRT MadWIFI-N <-> DD-WRT ath9k
- Overview:
- Set the router/AP Type to «WDS AP» and the all the client stations to «WDS Station«. All on the same SSID and and same encryption — Either NONE or WPA2AES. (Wireless N only supports those two)
- On the WDS tab, make note of the AP Mac address. You will need to enter it into the WDS Station. (Type LAN, not bridge)
- WDS Station: Under Basic Setup —> Network Setup —-> Local IP Address, use an IP in the same subnet as the WDS AP router but outside the WDS AP router’s DHCP range.
- Make note of the MAC on the WDS Station WDS tab. You will need to enter it on the WDS AP. (LAN, not bridge)
- Disable DHCP server on the WDS STATION.
- Important Write down the WDS AP’s IP as the gateway and DNS on the WDS STATION.
- S2s2 23:49, 14 August 2015 (CEST) The above step does not seem to be needed on currect 27506 builds.
Save and Apply Settings
- How to setup an Atheros WDS AP and one or more WDS Stations: (build 27506, 2015/7/9, atheros radios) S2s2 23:49, 14 August 2015 (CEST)
- This includes the setup where the WLAN/Wireless is separated from the LAN, a typical business/guest setup. And how to extend the Guest WLAN network with WDS. You can skip those additional steps if you want.
- First of all, your WDS Station will not have internet connectivity through the Wireless portion to wireless clients (smartphones, tablets etc) until you make a virtual AP with the same SSID and Encryption as the AP/STA. This is mentioned before in this page and elsewhere, it bears repeating. Keep that in mind.
- Your first radio needs to be changed from an AP to a WDS AP. Your encryption SHOULD be WPA2AES or NONE. So if your Guest WiFi was called Guest, change the type setting from AP to WDS AP.
- Suggested to fix the radio channel here, and set the same fixed channel on the WDS Stations, although it may not matter. Try it either way, first with fixed channel then auto-channel. The WDS Station should ‘lock’ to the WDS AP channel automatically.
- Click on WDS and enter the MAC of the WDS Station for each WDS Station.
- Now, if you have already followed guides to separate WLAN from the rest of the router (well documented), set your unbridged WLAN back to Default (bridged). We will change this later. So the Guest WPA AP should be set normally. Leave your additional DHCP range alone. Here I will use the example 192.168.240.x for Guests/WLAN, with a LAN router range of 192.168.0.x, based on actual experience.
- Create a bridge, br1. Name it Guests-Bridge. Name the Guests ath0 (WLAN) GuestsWiFi. Name the ath0.wdsx to GuestsWDS. All of these need to be added to the br1 bridge, which will remove them from the br0 default bridge. They are NOT unbridged in their individual settings. Adding them to br1 will move them to br1 and remove them from br0. Set the IP for br1 to be 192.168.240.1 255.255.255.0. (Or whatever your old Guest subnet range was before you started making these modifications).
- Again, a major key to getting the Guest WiFi WDS working is to make sure the ath0.wdsx is part of the br1.
- ath0.wds0 appears when you begin choosing LAN and filling out the MAC field under WDS tab in Wireless.
- Likewise an ath0.wds1 will appear if you input a second WDS Station on the WDS tab in Wireless. That should also be added under the br1.
- Any ath0.stax that appear as the actual WDS Stations connect, will automatically fall under the same bridge as the ath0.wdsx they are associated with. You do not need to worry about these. You can see the results under this bridging page once the WDS Station is connected.
These commands had to be added to the firewall in order for the br1 to work:
#Allow guest bridge access to Internet
 iptables -I FORWARD -i br1 -m state --state NEW -j ACCEPT
 iptables -I FORWARD -p tcp --tcp-flags SYN,RST SYN -j TCPMSS --clamp-mss-to-pmtu
#Block access between br0 and br1 and vs vs
#I added the next line in hopes br0 could reach br1. It's just a guess...
iptables -I FORWARD -i br0 -o br1 -m state --state NEW -j ACCEPT
#These next two specifically block traffic between br1 and br0
#iptables -I FORWARD -i br0 -o br1 -m state --state NEW -j DROP
iptables -I FORWARD -i br1 -o br0 -m state --state NEW -j DROP
#NAT to make Internet work
 iptables -t nat -I POSTROUTING -o br0 -j SNAT --to `nvram get lan_ipaddr`
#Enable NAT on the WAN port to correct a bug in builds over 17000
iptables -t nat -I POSTROUTING -o `get_wanface` -j SNAT --to `nvram get wan_ipaddr`
#Deny access to local router services from Guest (240.x br1) network
iptables -I INPUT -i br1 -p tcp --dport telnet -j REJECT --reject-with tcp-reset
iptables -I INPUT -i br1 -p tcp --dport ssh -j REJECT --reject-with tcp-reset
#iptables -I INPUT -i br1 -p tcp --dport www -j REJECT --reject-with tcp-reset
iptables -I INPUT -i br1 -p tcp --dport https -j REJECT --reject-with tcp-reset
Note the hashtag in front of the last iptables command. I need to temporarily access the Webpage on the WDS AP. If you want the Guests to have NO access to the main router webpage (which you should block for security purposes in production), remove the hashtag.
Also there is a hashtag where the br0 LAN business network can access the br1, not visa versa. Again, this is for testing purposes. I left it in so you could see how to do it. In production you might remove the hashtag.
[edit] DD-WRT MadWIFI to Ubiquiti WDS
- AirOS <=3.X <-> DD-WRT (madwifi): set AirOS to WDS-AP <-> DD-WRT v.24 (or higher) to WDS-Sta. Put all on the same SSID and set your prefered wireless encryption.
- NO WDS support for connecting current AirOS 3.x <-> DD-WRT ath9k and AirOS 5.X <-> DD-WRT MadWIFI/DD-WRT ath9k
[edit] DD-WRT MadWIFI to MTik WDS
- Connect as DD-WRT WDS-Sta to an MTik AP. Set DD-WRT MTik compability to on. The other way round should work, too. Put all on the same SSID and set your prefered wireless encryption.
[edit] Broadcom to Atheros WDS Configuration (Unsupported)
For the best WDS stability and performance, you should use the same wireless chipset on both sides, ie: Broadcom-to-Broadcom or Atheros-to-Atheros. That being said, multi-vendor WDS interoperability is possible but not necessarily guaranteed to work.
Note: there are configuration differences between DD-WRT builds & different platforms. If you don’t see the exact configuration items below on your router, you may need to look for it on a different configuration page.
BOTH ROUTERS:
- Wireless / Basic Settings: Wireless Mode = G-only
- Wireless / Basic Settings: Network Name (SSID) = dd-wrt (modify to your liking)
- Wireless / Wireless Security: Security Mode = WEP
- Wireless / Wireless Security: Default Transmission Key = 1
- Wireless / Wireless Security: Encryption = 64 or 128 bits (either works)
- Wireless / Wireless Security: Passphrase = (blank)
- Wireless / Wireless Security: Key 1 = 10 or 26-digit encryption key (modify to your liking)
BROADCOM-SPECIFIC SETTINGS:
- Wireless / Basic Settings: Wireless Mode = AP
- Wireless / Basic Settings: Wireless Channel = (pick something suitable for your environment)
- Wireless / Advanced Settings: Preamble = Short
- Wireless / WDS: Enter MAC address of Atheros device and select «LAN» in the drop-down box
ATHEROS-SPECIFIC SETTINGS:
- Wireless / Basic Settings: Wireless Mode = «WDS Station»
- Wireless / Basic Settings / Advanced Tickbox / Short Preamble = Enable
- Wireless / WDS: Enter MAC address of Broadcom device and select «LAN» in the drop-down
- Note: Wireless Channel will be automatically selected based on the Broadcom configuration
The above example was minimally tested using the following hardware / firmware on 1/12/2011:
- Broadcom BCM4704 (v9): Netgear WNDR3300 ‘(dd-wrt.v24-15508_NEWD-2_std-nokaid_nohotspot_nostor.bin)’
- Atheros AR2315: Engenius / Senao EOC-2610 ‘(v24 preSP2 [Beta] Build: 14896)’
Do NOT use this as a firmware recommendation for these devices! Please see the Atheros and Broadcom wiki’s and forums for official firmware recommendations.
In this configuration, combinations of WPA/TKIP and WPA2/AES were unsuccessful. «AP» and «WDS AP» modes on the Atheros didn’t work in this configuration either.
If you are having difficulty getting the WDS link up, disable security on both sides and try again:
- Wireless / Wireless Security: Security Mode = Disabled
[edit] Broadcom Based Devices
In regards to integration with DD-WRT, it is confirmed working with WEP, WPA, and WPA2.
[edit] Setup/Configuration for Broadcom Based Devices
Standard terminology for a two router setup:
- The host router is the router is connected to the internet. Its connection will be shared with clients.
- The client router is the router not connected to the internet. It will connect to the host router.
[edit] Setup for two or more of the aforementioned Broadcomcompatible Routers
- (Recommended) On both routers, save the current configurations: Administration -> Backup. Click the Backup button and follow prompts so save NVRAM backup files, i.e. nvram_host.bin, and nvram_client.bin. These configurations can be restored if the new setup doesn’t work and you need to quickly revert to the previous (working) configuration.
- On the client router, reset to its factory default state to eliminate the potential of conflict from other settings. Either use the router’s reset button or reset via the GUI: Administration -> Factory Defaults -> Reset router settings -> Restore Factory Defaults — select Yes (radio button), then click Apply Settings button and wait for the router to reboot. (Optional) On the host router, unless it is impractical (e.g. the host is part of a working network) reset to its factory default state, too, to simplify debugging the new setup.
- On the client router, change the WAN Connection Type to Disabled. Setup -> Basic Setup -> WAN Setup -> WAN Connection Type . Also enable STP.
- On the client router, set the Local IP Address to one in the same subnet as the host router (e.g. 192.168.1.1 (host/internet gateway) and 192.168.1.2 (client router)). If the host router has been reset, set its Local IP Address as well. On the client, set the Gateway and Local DNS IP addresses to the Local IP Address of the host. Setup -> Basic Setup -> Network Setup -> Router IP
- On the client, disable the DHCP server. This allows the host to perform DHCP services. There can only be one DHCP server on any subnet (network) for reliable operation. Setup -> Basic Setup -> Network Address Server Settings (DHCP) . Also Uncheck the Three boxes below the DHCP Server.
- On the client router, Navigate to Setup > Advanced Routing. In the dropdown box for Operating Mode, Select Router. Click Save
- Again, client router; Navigate to Services. Disable DNSMasq as well as WAN Traffic Counter. Click Save
- On the client, disable the firewall. Security -> Firewall -> Firewall Protection -> SPI Firewall. First Uncheck everything BUT Filter Multicast, click Save. Now Disable the SPI Firewall and click Save.
- On both the host and client, set the Wireless Mode to AP and make sure the Wireless Channel is the same. For Wireless Network Mode, you can select Mixed , G-Only , NG-Mixed, or N-Only. Set the Wireless Network Name (SSID) to your liking as long as it is exactly the same on both routers. If running N or NG-Mixed , WPA2 + AES is the only form of encryption that can be used.
- On both routers, disable wireless security (this should already be done if you reset both routers to factory defaults). Security can be re-enabled after all other steps are complete, but in order to minimize troubleshooting, it’s best to get things set up with no security active. If this is impractical, e.g. the host is part of a working network, make certain that all security settings on the client match those of the host exactly. Wireless -> Wireless Security -> Wireless Security wl0
- Important: On the host, disable MAC address filtering
- On both routers, open the WDS configuration page/Tab. For each router, you will see its wireless MAC address (Wireless MAC) at the top of the page. Note that this MAC address is different from the one that may be printed on the case. In the first open row of the table, select LAN from the dropdown list (The router will pause for a second) and enter each router’s wireless MAC address into the table of the other router. It is not necessary to enable Lazy WDS or WDS Subnet on either router. If necessary, consult WDS — configuration for more than two routers for some helpful info. Wireless -> WDS -> WDS Settings
- (Optional, but not recommended) On the client router, configure static routing (Setup -> Advanced Routing) for Destination LAN NET and enter the IP address of the host router. Use the same settings for Subnet Mask and Gateway that are used by host router. For Interface, select LAN & WLAN. This step ensures that the bridge is given a static IP route. Setup > Advanced Routing -> Static Routing
- On both routers, check the wireless status page to see that the other is present in the WDS Nodes section. Make sure signal strength for each is not zero. Status -> Wireless -> Wireless Nodes -> WDS Nodes. If it is 0%, and there are no indication of the router transmitting or receiving packets, Unplug the client router for ~10 seconds , then re-insert power. Give it no more than 3 minutes to boot and obtain the WDS link from the host router.
- Test that you can ping the host from the client. Note that it may take a short amount of time for the WDS link to be established, and you may need to reboot either the client or host router (or both).
- If disabled, enable wireless security now (highly recommended). First enable it on the Client router, wait 5 seconds, then enable it on the Host router. Watch the Wireless LED’s on the host router, if they are blinking, you’re in business. If they’re solid, power cycle the client router.
- If you set the SSID of the client router to be different from that of the host router, you need to make them the same in order to enable WPA/WPA2 encryption security. Using WPA/WPA2 encryption also requires STP to be enabled on all routers for a reliable link.
I decided that the amount of information can be intimidating for some novice users, therefore I have added screenshots of the process with examples of the respected configurations in the best order as outlined by the Wiki text.


[edit] Multiple router setup
See WDS multiple router setup
[edit] Apple Airport Express
Verified with DD-WRT v2.3 (12/25/05) and AirPort Express v6.20 [1-21-2006]
Information updated for AirPort Express v6.3 and AirPort Utility v5.3.1 [3-16-2008]
DD-WRT (Save settings after each step)
- Wireless -> Basic Settings» Set the channel on the DD-WRT to 1.
- Wireless -> WDS: Select «LAN» option and enter the Airport Express’s «AirPort ID» (can be found on the underside of the AirPort Express itself — be careful not to choose the «Ethernet ID»).
- Set Lazy WDS and WDS subnet to disable
- Administration -> Management: Set Loopback to disable.
- Security -> Firewall: Turn off «Block Anonymous Internet Requests.»
AirPort Express
- Open AirPort Utility (found in /Applications/Utilities), select your AirPort Express from the left panel, and click «Manual Setup»
- In the «AirPort» section:
- Select «Wireless» tab
- Select «Participate in WDS network»
- Set Network name to your wireless SSID name
- Set the wireless channel to 1
- Choose your security (only WEP will work wirelessly — if you want WPA on your network, you’re going to have to connect the AirPort via an ethernet cable)
- Select «WDS» tab
- Set «WDS mode» as «WDS remote»
- In the Main Aiport ID section enter your DD-WRT wireless MAC (can get this in Status -> Wireless)
- Select «Wireless» tab
- In the «Music» section (if you want to use AirTunes):
- Make sure «Enable AirTunes» is selected
- Name and password-protect your speakers
- Click «update»
If it works then there will be a solid green light (may take a couple of minutes) . If it does not work, you should connect Airport Express and WRT54G/GS using a CAT-5 cable and set up it. It might work.
This information is from AirTunes, AirPort Express, and the WRT54G at ryanschwartz.net — and has since been edited to update information.
Also note that the above configuration with the Airport Express works with either no encryption or WEP encryption. When using WEP encryption, make sure you enter your WEP key into the Airport Express exactly how it is entered into the WRT54G, but add a $ to the beginning of the key. $ key is meant for hex (WEP). If you’re not using hex, then you can leave it blank as normal.
In addition, also note that the wireless channel does not need to be 1, but it must be the same for both the DD-WRT and Airport Express. I have both units set to channel 11 and WDS works perfectly.
WPA/WPA2 encryption does not appear to work over WDS (but will work when the Airport Express is configured in client mode — but in client mode, the RJ45 connection is not usable). The error that the WRT54G reports back when the Airport Express is trying to associate via WPA over WDS is: eapol_sup_dispatch wds0.49153: unknown EPOL type 3 . EPOL has to do with WPA, so perhaps if this issue can be resolved, then the two devices could associate. [EDIT: WPA2 seems to work just fine with the above configuration, as of March 16 2008.]
Warning: This guide does not work for Atheros-based DD-WRT routers, such as the D-Link DIR-300. Airport Express will not be able to participate in the WDS network.
Troubleshooting: Make sure that you disable the «AP Watchdog» daemon. If you have a wireless endpoint (like a laptop) which connects to the Airport station (because you use WDS) then the Linksys does not see any clients connected and restarts the wireless network over and over. You also could change other channel apart from 1, if you’re having problems and you don’t have to disable loopback.
[edit] Notes
- In some cases it may help to put the IP of the client router as a DMZ’d machine in the host router. Of course, this only works with a WDS between 2 routers.
- http://www.dd-wrt.com/phpBB2/viewtopic.php?t=669&highlight=dmz
- The source material for this list comes primarily from the following DD-WRT forum posts:
- http://www.dd-wrt.com/phpBB2/viewtopic.php?t=124
- If you’re using encryption, remember to configure it on all routers!
- Set encryption after you got a running WDS.
- On the main Status page and the Wireless Status you can see the signal strength for any other routers in the WDS. If they are showing 0 then you’re not connecting to them for some reason (wrong MAC address or, for WPA links, wrong SSID).
- NOTE: Some security works with some dd-wrt and not with others. Lately (2010) the only security that has worked reliably is WEP and WPA2-AES. WPA2-AES is the ONLY security that should be used with N routers if you wish to have N speed.
- If you want to use more than 2 repeaters with WDS and define multiple WDS paths for redundancy then you MUST enable STP or the network will loop back on itself and destroy all functionality. [Quote from GeeTek]
- Make sure you use a proper forum recommended build for broadcom. See the announcements in the broadcom forum and read this thread: http://www.dd-wrt.com/phpBB2/viewtopic.php?t=51486
[edit] WDS Bridging without Access Point Function
(NOTE: This appears to be broke with v24 Final. It will brick a WAP54G v3.1.)
Sometimes you just want to bridge two points together. WDS has the advantage of correctly passing MAC addresses so either end could be the host (Internet connection on the LAN side).
- Set up your WDS routers as you wish
- Turn off the AP function using the following commands in the shell
nvram set wl0_mode=wds
nvram commit
reboot
You may also need to issue an additional command of
nvram set wl_mode=wds
to turn off the AP.
- After it reboots you’ll have a WDS bridge which doesn’t allow wireless clients.
[edit] Troubleshooting
WDS between DD-WRT v23 and DD-WRT v24 is imposible, thats a broadcom driver issue!
by Meex
info by BrainSlayer
[edit] Same LAN MAC Address Problem
If you are using two WRT54G V5V6 with same firmware version, you may end up on that both router use exactly same MAC address on its LAN, WAN, Wireless. Although you can change WAN and Wireless MAC address at WEB interface, it is hard to change LAN MAC address.
If both router use same LAN MAC address on WDS, you will see that: you can Ping any computer on both router, but you can NOT ping either router’s IP, it will show «Destination Host Unreachable».
To fix this, please refer thread:
https://www.dd-wrt.com/phpBB2/viewtopic.php?p=174925&highlight=&sid=4b806e3de8e572f678c8526ccf9ae5f6
I have to revert one of my router back to Linksys version, then flash it again with custom build killer file.
Info by Victor
[edit] Constantly losing connection to Samba/Shared folder
If you notice that you constantly lose connection to your machine while streaming a video or transferring a file from a Samba/Shared folder over your WDS, you might want try underclocking your routers to the same CPU speed. Some Linksys WRT54G/GS are set as 216mhz (factory default), even after flashing dd-wrt. Try underclocking them to 200mhz under Administration -> Management -> Overclocking, in the dd-wrt administrative console. For a detailed list of which versions of Linksys WRT54G/GS run at what speed, please check the Wikipedia link to Linksys WRT54G Series
Note: This may not be necessary, if you experience this problem it might be worth trying but don’t do it unless you have a problem. Changing the clock speed is somewhat of a risk and could damage your router.
[edit] Ralink Based Devices
—This section could use some work—
DIR-600 b1 to DIR-600 b2: Use encryption and the wlan WDS table freely.
Also, Atheros <-> Ralink and Broadcom <-> Ralink works in WDS (not use wpa/wpa2 between Atheros and Ralink, it does’t work); (Ralink to Broadcom works but only «open», until you use Kernel 2.6 in broadcom -Ralink is k2.6-).
Also (maybe it’s not to be mentiond here, but someone have’s to write it…):
Atheros at WDS AP -> Ralink in Client Mode (not bridged), works using wpa/wpa2 Mix/g/ng-mix/n-only. I only get G Speeds, but any encryption worked. Just set NG-Mix / 40 Mhz and turn short preamble on at atheros, and set Ralink to mixed or N-Only, 40 mhz and turn short preamble on. Use any encryption you desire.
[edit] Working Ralink Based Devices
- Buffalo WHR-G300N^
^This does not work through the Physical interface (wireless), BUT it does work through the Virtual interface (for me anyway — Just followed all the other instructions as written, and added a virtual Interface). Perhaps someone with more network savy can explain why and avoid the extra SSID. The other router used was a non-buffalo/non-dd-wrt router, the WDS mode set to «Repeater Mode». Obviously I hid the extra SSID. Hope this helps someone. So Can’t be sure it works with other Buffalo WHR-G300N routers (I only have one).
- D-Link DIR-615^
^As with the Buffalo, you have to create a virtual wireless interface on the client, too. In my setup, I was using 2 DIR-615.
Note: 01/12/2010: The above information is not entirely correct
I’ve got it working on multiple DIR-615’s without needing to use the virtual interface. However, if using the «physical» interface, you will need to manually add the wireless interface (ra0) to the network bridge. Even though it claims ra0 is already part of the bridge, you still need to add it again, otherwise you will have no connectivity when connecting to it (which may be the problem the two users above describe). This seems to be a bug as of build 14929.
To do this, go to Setup => Networking => Assign to Bridge => Add => Select «br0», Interface «ra0» => Apply Settings
With the DIR-615’s WDS works in full 300 mbps mode up to and including build 14929 (after this, 40Mhz (HT) breaks). You can get at least 160mbps throughput under good conditions.
With DIR-615 (D4/D2 tested), Firmware 15778, Wireless => WDS => WDS Settings => Select LAN, enter MAC address of the routers you wish to connect, enter a note so you know which router the MAC refers to. i.e. UpstairsRouter.
=> Extra Options => Disable — Eazy WDS, Save, then Apply Settings,
DIR-615 (D4/D2 tested), Firmware 15778 works in 300Mbps mode. With 1 Host (Gateway) and 2 Client routers.
[edit] External Links
Wikipedia’s WDS entry
DD-WRT: Setting up a home Wireless Distribution System (WDS)
INTRODUCTION:
I’ve been a fan of the DD-WRT router firmware for some time. I’ve even done a couple of post about installing and upgrading a Linksys WRT54G with DD-WRT firmware. DD-WRT firmware runs on a number of wireless Linux based routers and provides capabilities far beyond factory firmware, such as VOIP, VPN and advanced traffic control.
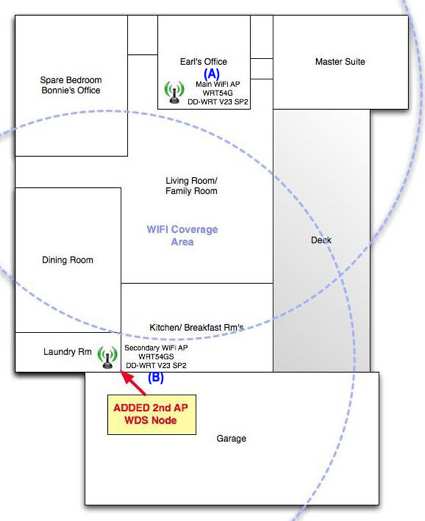
Our home is single level with a fairly long floor plan from end-to-end. My office, where the main wireless router (Linksys WRT54G) resides, is in one end of the house and there is a brick chimney between it and the main living area and kitchen. As such the wireless signal strength at the other end of the house, is often weak.
OVERVIEW:
Here’s a rough draft of our home’s floor plan. It’s absolutely NOT to scale and doesn’t show all areas. You will see on this diagram the location of the primary AP (A) and of the second AP (B) that I added as a WDS node. More on that follows below.
I’d picked up a Linksys WRT54GS wireless router on Ebay some time ago and had put it away as a spare if anything should happen with my main router.
This weekend I decided to use it to set up a Wireless Distribution System (WDS) in my home to fuller home wireless coverage. Plus, I love doing projects like this!
First things first, by definition a WDS is a system that enables the interconnection of access points wirelessly. It allows a wireless network to be expanded using multiple access points without the need for a wired backbone to link them, as is traditionally required. WDS may also be referred to as repeater mode because it appears to bridge and accept wireless clients at the same time (unlike traditional bridging). It should be noted, however, that throughput in this method is inversely proportional to the number of “hops”, as all traffic uses the same channel. For example, client traffic going through one relay station before it reaches the main access point will see at most half the maximum throughput that a directly connected client would experience.
For the point of this discussion I’m going to refer to my main access point as “WRT54G (A)” and the new WDS node access point as “WRT54GS (B)”.DETAILS:
If you have two wireless routers with the DD-WRT firmware installed it’s simple setting up a WDS. I chose to set up a LAN-type WDS, although the options also allow you to set up a point-to-point WDS. A LAN type WDS is the easiest and most common as it requires no extra routing protocols or knowledge of networking, it is simply network bridging.
Below are the steps for setting up the WDS:
1. First you should make sure you’re using the same wireless settings on both routers and initially not any type of Wireless Security. If you have WEP or WPA security currently setup, disable it for the time being. You should also have the ability to access the web interface for each router. This access should not be via a wireless link but by an ethernet link.
2. On your main router, in my case the WRT54G (A), navigate to the Wireless/WDS section, select any row that says “Disable” and change it to “LAN” then enter the wireless MAC Address of the other router (B) on the row you changed to “LAN”.
Note: I’ve blurred out the MAC Addresses and some IP Addresses for security reasons.
3. On your secondary router, in my case WRT54GS (B), navigate to the Wireless/WDS section, select any row that says “Disable” and change it to “LAN” then enter the wireless MAC Address of the main router (A) on the row you changed to “LAN”.
Steps 2 & 3 tie the two routers together into one LAN.
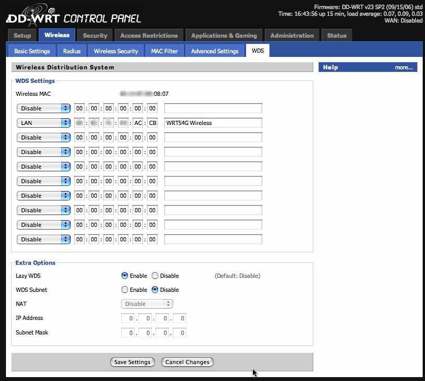
Make sure you typed these MAC Address numbers correctly then save your settings.
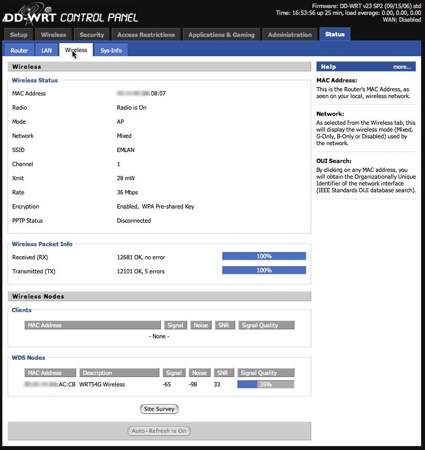
4. Go to the Wireless Status Page of each router. You should see WDS Link and the Wireless MAC of the other router listed, with a signal reading. If the signal is “0dBm” then there may be something wrong. Check your antenna connections and configuration settings, and try again.
WRT54G (A) Wireless Status Page:
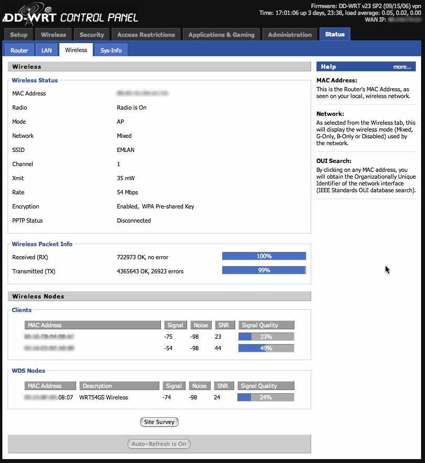
WRT54GS (B) Wireless Status Page:
5. Once you have a decent signal, you can change the Internet Connection Type on the Basic Setup page of the second router to Disabled and set the Gateway to the LAN IP Address of the first router. This will route all traffic to your main wireless router/AP (A).
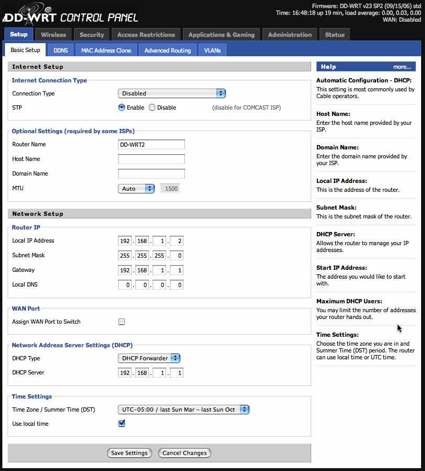
My secondary router/AP is IP Address 192.168.1.2 while my main router/AP is 192.168.1.1. Since I also use DHCP to assign IP Addresses on my home network I set the DHCP Type on my secondary router/AP (B) to “DHCP Forwarder” which will forward all request for IP Addresses to my main router. I entered the IP Address of my main router (A), 192.168.1.1, as the DHCP Server.
6. You can now run normal test to check if you are connected (ping).
7. Once you are sure you are connected and that everything is working, then you can set up Security. It is strongly recommended to use WPA Pre-shared Key with AES and TKIP as it is secure and easy.
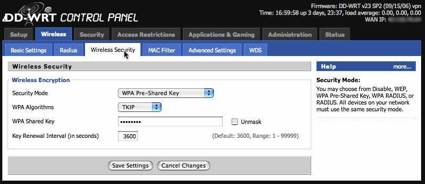
You should not use WEP security with WPS!
SUMMARY:
This project was a fun and successful. I now have great wireless coverage over my whole home. If you already have a Linksys or other supported wireless router this project is very inexpensive. You can get a second router for about $40-50 USD. Also the DD-WRT v23 SP2 firmware is free.
I’ve listed a number of related resources below.
RELATED RESOURCES:
DD-WRT Firmware: V23 SP2 Update – Blog Post – Dec. 2006
DD-WRT Firmware: v23 SP1 update – Blog Post – Jul. 2006
LinkSys WRT54G Firmware DD-WRT Upgrade – Blog Post – Mar. 2006
DD-WRT Home site – dd-wrt home web site
DD-WRT Download – dd-wrt download web page
List of Routers Supported by DD-WRT – Blog Post
Like This Post? Share It With Others!
Comments are closed.
Page load link
Go to Top