From DD-WRT Wiki
Jump to: navigation, search
Wiki Path: DD-WRT Wiki Main / Tutorials / Linking Routers / Repeater Bridge
Contents
- 1 Introduction
- 2 Difference between Client Bridge and Repeater Bridge
- 3 Assumptions
- 4 Broadcom
- 4.1 Instructions
- 4.2 Troubleshooting
- 5 Ralink
- 6 Qualcomm Atheros
- 7 Notes
- 7.1 SSIDs
- 7.2 The «half bandwidth» misunderstanding
- 7.3 Security
- 7.4 Accessing Both Routers?
- 7.5 MAC Filtering
- 7.6 Site Survey Adjustment
- 8 See Also
[edit] Introduction
A wireless bridge connects two LAN segments with a wireless link. The two segments are in the same subnet and look like two Ethernet switches connected by a cable to all computers on the subnet. Since the computers are on the same subnet, broadcasts reach all machines. DHCP clients in one segment can get their addresses from a DHCP server in the other segment.
Use a wireless bridge to transparently connect computers in one room to computers in a different room when you cannot—or don’t want to—run an Ethernet cable between the two rooms.
[edit] Difference between Client Bridge and Repeater Bridge
A standard wireless bridge (Client Bridge) connects wired clients to a secondary router as if they were connected to your main router with a cable. Secondary clients share the bandwidth of a wireless connection back to your main router. Of course, you can still connect clients to your main router using either a cable connection or a wireless connection.
The limitation with standard bridging is that it only allows wired clients to connect to your secondary router. Wireless clients cannot connect to your secondary router configured as a standard bridge. Repeater Bridge allows wireless AND wired clients to connect to a the Repeater Bridge router, and through that device wirelessly to a primary router. You can still use this mode if you only need to bridge wired clients; the extra wireless repeater capability comes along for free; however, you are not required to use it.

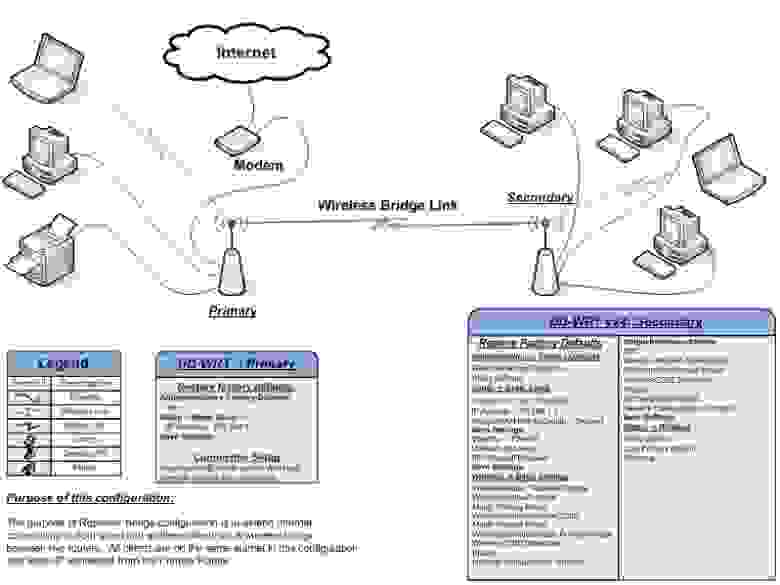
![]()
Reference Image
In the case in which we are interested, a secondary router running DD-WRT v24 is configured as a Repeater Bridge between a Primary wireless router (of any make/brand/FW) allowing the above configuration.
[edit] Assumptions
Primary router is configured in a 192.168.1.X subnet and leases DHCP address in the same pool.
Secondary router is running DD-WRT.
If using a multi-band router, do not set more than one band to RB. The other radio(s) would normally be set as AP. For example, the 2.4GHz radio can a CB while the 5GHz is an AP, or vice versa.
Note: If you are unsure of what you are doing, it is advisable to practice by setting up the router first in Client Bridge mode and get it working correctly. Client Bridge mode is simpler, but most of the settings are the same. Once you understand how to set up a client bridge and have it working, then proceed to setting up Repeater Bridge
[edit] Broadcom
This is a simple step-by-step guide to connect a router running current (2017) firmware in Repeater Bridge (RB) Mode. You do not need DD-WRT on the primary router for this to work, however, your primary router must be able to support encryption that works with DD-WRT (use WPA2-AES, not TKIP).
- Read and understand the Firmware FAQ and (especially for MIPS) Peacock announcement before doing anything else.
- Repeater Bridge with WPA2-AES is broken for k2.6 builds after 25974, though some models might work through 26125
- Broadcom dhd driver models (e.g. AC5300 routers) cannot support RB (nor client bridge) modes since the driver is controlled by wireless firmware internal to the chipset. This makes it impossible to implement fake bridge modes, and is not fixable. While it can sometimes work without encryption, there is no guarantee nor official support. The driver will usually crash in these modes.
This mode is for a wireless bridge, where the SSID is repeated and the second router’s ethernet ports provide wired connections to the main router, as if plugged into the main router.
For a secondary router running DD-WRT, the wireless mode must be configured as Repeater Bridge. It will connect to a primary router in AP mode (DD-WRT default) with DHCP Server enabled. Any type of VAP (Virtual Access Point) on the host should work, including a WDS-AP (Atheros) or any VAP including on another RB, but can depend on the host router.
[edit] Instructions
Make sure to click Save and not Apply between steps, as Save will commit the changes to NVRAM withough activating them (which Apply does), to prevent access problems, such as changing the IP address.
- Reset to Factory Defaults on secondary DD-WRT router
- Optional (but suggested if having issues): Perform a hard reset
- DO NOT 30-30-30 ARM routers. See your model wiki; some reset using the WPS button at power-up
- Hold the reset button until lights flash (10-30sec) or 30-30-30 if appropriate for your router
- Optional (but suggested if having issues): Perform a hard reset
- Hook up to the secondary router with an ethernet cable or as a wireless client.
- The dd-wrt default wireless SSID is «dd-wrt»
- Open the GUI address http://192.168.1.1 in your web browser
- Open the Wireless -> Basic Settings tab
- Physical Interface Section (for multi-band routers, only use Repeater on one radio)
- Wireless Mode: Repeater Bridge
- Wireless Network Mode: Match Primary Router
- Usually N*-Mixed (or G-Only for pre-N routers), as Mixed may not work)
- Wireless Network Name SSID: Must Match Primary Router EXACTLY including case
- Note: some devices may not properly handle special characters, spaces, etc.
- Wireless Channel: Usually leave at Auto for DD-WRT to determine the channel
- Sensitivity Range (ACK Timing): 0 is recommended (this setting is not available for all routers)
- Save (not Apply)
- Virtual Interfaces Section: Click «Add»
- Wireless Network Name(SSID): Same as Primary SSID. If having problems, try a different one.
- k2.4 (broadcom folder) builds may require using a different SSID from the Primary
- Save (not Apply)
- Wireless Network Name(SSID): Same as Primary SSID. If having problems, try a different one.
- Physical Interface Section (for multi-band routers, only use Repeater on one radio)
- Open the Wireless -> Wireless Security tab
- Physical Interface section (WPA2-AES strongly advised)
- Security Mode, WPA Algorithms & Shared Key: Must Match Primary Router
- Virtual Interfaces Section
- Security Mode, WPA Algorithms & Shared Key: Must Match Physical Interface for k2.4
- WPA2-AES should be able to use a different password on k2.6 and newer
- WEP (with any password) or Open (disabled) should work on any kernel
- Save (not Apply)
- Security Mode, WPA Algorithms & Shared Key: Must Match Physical Interface for k2.4
- Physical Interface section (WPA2-AES strongly advised)
- Open the Security -> Firewall tab
- Uncheck all boxes…except Filter Multicast (see why here)
- Disable SPI Firewall (workaround for issues)
- Save (not Apply)
- Open the Services -> Services tab: disable DNSMasq, then Save (not Apply)
- Open the Setup -> Basic Setup tab
- WAN Connection Type: Disabled
- IP Address: 192.168.1.2 (if not in use and assuming Primary Router IP is 192.168.1.1)
- Mask: 255.255.255.0
- Gateway: 192.168.1.1 (or Primary Router IP if not 192.168.1.1)
- DHCP Server: Disable
- Local DNS: 192.168.1.1 (or Primary Router IP if not 192.168.1.1)
- Assign WAN Port to Switch: use WAN port as another LAN port (also allows access after a reset)
- Change the Router Name (e.g. «DD-RB1») and set the Time Zone
- Save (not Apply)
- Go to the (Setup ->) Advanced Routing tab: Change the Mode to Router
- Save and then APPLY settings: allow router to reboot
- Log back into the router GUI at its new IP address: http://192.168.1.2 (or the chosen IP Address above)
- Check internet connectivity: try to ping the second router from a client plugged into the ethernet port, then try to ping the primary router, and finally try the internet.
- Reboot the router if not working
You should now be able to connect wired and wireless clients to the newly configured Secondary Router. It will receive IP addresses from the Primary Router via DHCP, and access the internet connection through it’s gateway.
NOTES:
- All repeaters including Repeater Bridge mode will sacrifice half of the bandwidth available from the primary router for clients wirelessly connected to the repeater. This is a result of the repeater talking in turn to the Primary Router and client, relaying the traffic between them. As long as your internet bandwidth requirements are within this halved bandwidth there will be little observed reduction in speed.
- Repeater Bridge on Broadcom [also Atheros Client Bridge (routed)] is generally not a good solution, as it is not a true bridge (BS from the .de forum). It should be fine for internet access with few clients, but more clients or more complicated networking is likely to cause trouble, since MAC addresses will not transverse its bridge. In contrast, WDS is a transparent bridge and useful for these things. Also, the primary host router’s log can be full of arp spoofing attempts if it has ARP Spoofing Protection enabled in its security. Repeater (Broadcom) [or Client (QCA/Atheros)] is much more suitable to use for extending wireless; if WDS is not available.
[edit] Troubleshooting
Encryption type and key must be the same on both the primary and secondary router. The first thing to do when running into problems is to remove all encryption and see if the routers can connect. This is the single most common reason that bridged routers don’t work
- Wireless Clients cannot connect to Repeater:
Disable security and try again. Delete and recreate your profile on the wireless computer. Check to make sure you have set security properly and that the key you used matches the key in the primary router. If one security type doesn’t work try another on all routers. eg. try WEP or WPA2-AES [Mera Pakistan]
- NAT: Open the Setup->Advanced Routing tab and change the mode to «router» instead of «gateway».
- Wireless Clients have no Internet:
Ensure the Gateway IP is specified in the repeater bridge router, and that it is the primary router’s address.
[edit] Ralink
Many in the forums were having issues with getting this to work with v24-sp2 on the DIR-615 rev D4.
- Restore Factory Defaults on Secondary (DD-WRT) Router
- Do a proper HARD 30-30-30 Reset on the router.
- Go to 192.168.1.1 and log in.
- Go to the wireless tab.
- Choose Repeater Bridge under wireless mode.
- Match your SSID and channel settings exactly to the main router you will be connecting to.
- Make sure bridged is selected.
- Click Save.
- Go to the Wireless Security tab.
- Match these settings to your main router exactly.
- Click Save.
- Go to setup>basic setup.
- Choose a local IP in the same subnet that is not being used as your main router. If your main router is 192.168.1.1 then as long as it is not in use 192.168.1.2 will work. Assuming your ip is in this range the subnet will be 255.255.255.0 and the gateway and local dns will be 192.168.1.1.
- Click Save
- Click Apply
- Check that the wireless is extended, and also with working LAN ports and internet
[edit] Qualcomm Atheros
Use build 32170 or newer. Do not follow the Broadcom instruction, as Qualcomm Atheros units set up a Repeater Bridge by using Client Bridged with an added VAP.
- Follow the instructions in the Client Bridged wiki to set up the client bridge, then follow the steps for adding a VAP below.
- If you only have devices connected to the repeater via ethernet, click apply settings now. If you have both ethernet & wireless, or just wireless clients, continue below.
- Open the Wireless -> Basic Settings tab
- Go to Virtual Interfaces (ath0.1, ath1.1, etc.)
- Click Add Virtual AP
- Wireless Network Mode: AP
- Wireless Network Name (SSID): Same as the host router if you want a repeater, or different from the host router if you want your own separate network or for other advanced configurations.
- Wireless SSID Broadcast: Enable
- Click Save
- Open the Wireless -> Wireless Security tab
- All parameters must match the host router, exactly including capitals & security algorithm. EX: host using WPA2 Personal AES will still work if the repeater is set to WPA2 Personal Mixed AES, as it includes the algorithm in use (WPA2-AES).
- Click Save
- Network Configuration: Bridged if you want a repeater to extend the current network of the host router.
- Click Apply Settings
[edit] Notes
[edit] SSIDs
Under «Wireless -> Basic Settings», you must use only the primary router’s SSID for the physical interface to connect wireless clients and create a new SSID for the virtual interface. You will be able to tell which you are connected to as the two ssids MUST be different. (The only way to have one seamless network with the same ssid is to use WDS which almost always requires routers to support WDS AND have at least the same chipsets)
[edit] The «half bandwidth» misunderstanding
Too many people make a big deal out of the half bandwidth oversimplification of the repeater bridge setup. It’s not that big of a deal, and not that complicated. A router can only talk to one device at a time. So if the router is set up as a repeater bridge AND it has active clients, the repeater bridge router must talk to two devices- the client computer and then to the primary router. This will effectively half the bandwidth available to the client computer, but it is no different than having two computers on a single primary router. The router can only talk to one at a time, so if both are active, it will only be able to talk to one at a time, effectively cutting the available bandwidth in half. So it really is no big deal. I see people all the time who are concerned about the «half bandwidth» issue, but are not at all concerned when there are two devices on their network. It’s the same thing. And only matters at all when the device is active (transferring data to or from the wan).
[edit] Security
Dd-wrt will often not work unless BOTH the primary router and the secondary router use wpa2-aes security ONLY. Wep will also often work, but it is not secure.
Keep in mind any security settings will need to be configured including MAC filtering in order for the Secondary Router to connect to the Primary Router and also for clients connecting to the Secondary Router to gain full access to the connectivity of the Primary Router. There are some factors to consider when setting up Security for Client Bridge mode that may or may not be factors when setting up Repeater Bridge mode. I simply have not experimented with this.
[NOTE {Montrealmike}]Also when your adding WEP,WPA,WPA2 etc… between the AP and the repeater bridge you have to start with the AP first; then the repeater bridge.When you enable security on the repeater click save not apply, then click on the administration tab scroll down to the bottom and click apply settings. You will then have to power cycle the repeater twice ( unplug and plug back in twice ) in order for the repeater bridge and AP to synchronize. This has worked for four repeater bridges for me.
Edit — pmiller — I can also confirm the power cycling to sync the repeater to the AP. You can confirm that the repeater has syncronized with the AP by going to the Status>Wireless tab on the AP and viewing the MAC address of the repeater with some % signal quality value. Before doing 2 power cycles on the repeater, the MAC address would display on the AP’s Status>Wireless tab, but with 0% signal quality. After the power cycles the % quality displayed around 30%. I played around with other security settings later on the AP and found the 2 power cycles to be unnecessary after the 2 had originally sync’ed- no idea why this would work, but it did. I had some difficulty at first because I had security enabled on the AP as WPA2-Personal Mixed, which is basically WPA2-AES or WPA-TKIP simultaneously. The repeater is unable to connect with the AP in this mixed mode; rather you must choose between WPA2-AES or WPA-TKIP . I have now switched both my wireless security settings to WPA-TKIP (physical and virtual) just for simplicity, though in theory the virtual need not match the physical. Your security is as good as the weakest link. For those having trouble, I would turn off all security and turn on SSID broadcast first, then once you get a good sync turn on security on the AP first, then
Edit — crandler — WPA2 personal mixed with Linksys WAG160N as DSL uplink with original firmware and WRT160N with dd-wrt v24 std in repeater bridge mode does not function. Had do switch both devices to WPA2 personal.
Edit — ytal — Using encryption for the bridged connection only works if I either use the same encryption data (incl. ESSID) on the other (virtual) interface or do not use any encryption on the virtual interface at all. If set differently, the wireless link to the base station fails. Base station is a Speedport W500V / Targa WR 500 VoIP (http://forum.openwrt.org/viewtopic.php?id=5774) with the original Telekom firmware.
Edit — RamonBuckland — I found that setting the security to off worked first. But WPA2 Personal did not. I then lowered the key refresh to 15 seconds (same Wireless Security settings tab) on both routers and applied. They then found each other. One would figure if I were patient enough (to wait 3600 seconds, 1 hour) then it would have worked. So .. I think the key renewal is what throws them. I have it now working WPA2 Personal (AES) with a key renewal of 15 seconds. Perhaps upping it now to an hour and walking away (from the house) they will work  logically. Good work peoples.
Edit — MikeMaven — I’d just like to add my own confirmation. I was having problems with WPA2 at first. I think it was a result of the key refresh not occuring. I set it to 15 seconds, reconnected, and everything seems to be working great! For the record, I’m connecting to a 2wire AP using WPA2-Personal and the same key on both the physical and virtual interface.
[edit] Accessing Both Routers?
Since all routers are on the same subnet, you will be able to access both of the routers when connected to either of them.
[edit] MAC Filtering
For those of you who have enabled MAC filtering on your Primary router, you need to add the WLAN MAC address of your Secondary router to the permitted MAC filter list of the Primary router. This is different than the MAC address printed on the bottom of the case, you can find it by going to Status->Wireless and the top line will list the internal MAC address. Of course, you will want to add the MAC filter list to the Secondary router. This should be setup prior configuring your WPA, WPA2, etc. settings otherwise you will spend some time pondering why the bridge isn’t working.
[EDIT — Redhawk] — The wording here was a little confusing. Once I used the Wireless MAC address then all worked correctly….the MAC filter address on the Primary router needs to be the «Wireless MAC» address listed on the Router Status page and not the LAN MAC address . (Use Router MAC +2) — Yes…I know it says WLAN but for an noob doing this procedure it could be confused.
Special thanks to Griminal for providing a basic graphic which I modified for this Wiki Entry.
IF YOUR ROUTER WIRELESS KEEPS DISCONNECTING PLEASE CHOOSE REPEATER AND NOT REPEATER BRIDGE
[edit] Site Survey Adjustment
Site Survey does NOT create any connection. It only fills in the name of the primary router, which you must save for site survey to have any use. You can fill in the primary SSID simply by typing it in on the secondary router instead of using site survey to type it for you.
You can verify that the Bridge is using correct settings by looking at the Status -> Wireless page on the Bridge where it will show details of the SSID, channel, and encryption in use. The real indicator of proper association is on the Access Point, where the Bridge’s MAC should appear on AP’s list of active clients (also Status -> Wireless if the AP is running dd-wrt).
[edit] See Also
DD-WRT — это популярная альтернативная прошивка для беспроводных маршрутизаторов, которая предлагает больше функций и возможностей, чем стандартные прошивки. Она позволяет использовать маршрутизатор в качестве репитера Wi-Fi, что может быть полезно в случаях, когда существующая беспроводная сеть не обеспечивает достаточную площадь покрытия.
Настройка DD-WRT в режиме репитера Wi-Fi несложна, но требует некоторых знаний и времени. В этой подробной инструкции мы расскажем о основных шагах, чтобы помочь вам выполнить эту задачу успешно. Но прежде чем приступить к настройке, убедитесь, что ваш маршрутизатор поддерживает DD-WRT и у вас есть его последняя версия.
Первый шаг — это установка DD-WRT на ваш маршрутизатор. Подключите компьютер к маршрутизатору с помощью электронного кабеля и загрузите файл прошивки DD-WRT с официального сайта. Затем зайдите в настройки маршрутизатора и найдите раздел обновления прошивки. Загрузите файл DD-WRT и дождитесь, пока прошивка будет успешно установлена. После этого перезагрузите маршрутизатор.
Теперь, когда DD-WRT установлен, приступим к настройке репитера Wi-Fi. Войдите в интерфейс маршрутизатора, набрав его IP-адрес в адресной строке браузера. Войдите в систему с помощью имени пользователя и пароля, которые вы настроили при установке DD-WRT. Затем перейдите в раздел «Wireless» и выберите «Wireless Security». Здесь установите тот же самый режим безопасности, который используется в вашей основной беспроводной сети, и введите тот же самый пароль.
Теперь перейдите в раздел «Wireless» и выберите «Basic Settings». Включите режим репитера и введите SSID основной беспроводной сети, к которой вы хотите подключиться. Затем выберите «Site Survey» и выберите свою основную сеть из списка доступных Wi-Fi сетей. Нажмите «Connect» и дождитесь, пока маршрутизатор подключится к основной сети. После этого сохраните настройки и перезагрузите маршрутизатор.
Вот и все! Теперь ваш DD-WRT настроен как репитер Wi-Fi и будет усиливать сигнал вашей основной беспроводной сети. Убедитесь, что ваш маршрутизатор размещен таким образом, чтобы он мог обеспечить наилучшее покрытие.
Содержание
- Установка и настройка DD-WRT
- Выбор режима репитера
- Подключение к основной Wi-Fi сети
- Настройка безопасности
- Проверка и исправление проблем
Установка и настройка DD-WRT
Прежде чем приступить к установке и настройке DD-WRT, убедитесь, что ваш маршрутизатор поддерживает эту прошивку. Вы можете проверить список поддерживаемых моделей на официальном сайте DD-WRT.
- Скачайте соответствующую прошивку для вашей модели маршрутизатора с сайта DD-WRT.
- Зайдите в веб-интерфейс вашего маршрутизатора. Обычно это делается с помощью браузера, введя IP-адрес маршрутизатора (например, 192.168.1.1) в адресную строку.
- Войдите в систему с помощью учетных данных администратора.
- В настройках маршрутизатора найдите раздел, отвечающий за обновление прошивки.
- Выберите скачанную прошивку DD-WRT и нажмите кнопку «Обновить прошивку».
- Дождитесь окончания процесса обновления прошивки. Это может занять несколько минут.
- После завершения обновления прошивки, маршрутизатор автоматически перезагрузится.
- Подключите компьютер или ноутбук к маршрутизатору с помощью Ethernet-кабеля.
- Вернитесь в веб-интерфейс маршрутизатора и войдите в систему снова.
- В настройках маршрутизатора найдите раздел, отвечающий за настройку Wi-Fi.
- Произведите необходимые настройки Wi-Fi сети, включая SSID, пароль и безопасность.
- Сохраните изменения и выйдите из веб-интерфейса маршрутизатора.
Теперь ваш маршрутизатор DD-WRT готов к использованию в качестве репитера Wi-Fi. Вы можете подключить его к основному маршрутизатору и настроить режим репитера для расширения диапазона Wi-Fi сигнала.
Выбор режима репитера
Прежде чем начать настройку DD-WRT в качестве репитера Wi-Fi, необходимо выбрать соответствующий режим работы. DD-WRT поддерживает несколько режимов, и выбор зависит от вашей конкретной ситуации.
Самый распространенный режим для использования DD-WRT в качестве репитера — это «Repeater Bridge» (мост-репитер). В этом режиме роутер DD-WRT подключается к основной точке доступа Wi-Fi и передает сигнал дальше, расширяя зону покрытия Wi-Fi. Это удобно, если вы хотите усилить сигнал Wi-Fi в доме или на участке, не заменяя основной роутер.
Однако, если вы хотите использовать DD-WRT в качестве полноценного репитера, то можете выбрать режим «Client Bridge» (мост-клиент). В этом режиме DD-WRT будет подключаться к основной точке доступа Wi-Fi и предоставлять доступ к интернету через свои Ethernet-порты.
Если вы хотите использовать DD-WRT только в качестве моста, без проводного доступа к интернету, можно выбрать режим «Wireless Repeater» (беспроводной репитер). В этом режиме DD-WRT будет работать только по беспроводному интерфейсу, пересылая пакеты между основной точкой доступа Wi-Fi и подключенными устройствами, но не будет предоставлять доступ к интернету через Ethernet-порты.
Выбор режима репитера в DD-WRT осуществляется через веб-интерфейс роутера. После выбора режима репитера можно переходить к настройке самого репитера Wi-Fi.
Подключение к основной Wi-Fi сети
После установки DD-WRT на вашем маршрутизаторе и настройки его в режиме репитера Wi-Fi, вы должны подключиться к основной Wi-Fi сети, чтобы он мог повторять ее сигнал. Вот как это сделать:
| Шаг | Действие |
|---|---|
| 1. | Войдите в веб-интерфейс вашего DD-WRT маршрутизатора, введя его IP-адрес в адресную строку браузера. |
| 2. | Войдите во вкладку «Wireless» или «Беспроводное соединение». |
| 3. | Настройте параметры вашей основной Wi-Fi сети (SSID, тип защиты, пароль и т. д.), чтобы ваш DD-WRT маршрутизатор мог подключиться к ней. |
| 4. | Нажмите кнопку «Сохранить» или «Применить», чтобы сохранить внесенные изменения. |
| 5. | Подождите несколько секунд, пока маршрутизатор подключится к основной Wi-Fi сети. |
| 6. | Проверьте статус подключения, чтобы убедиться, что ваш DD-WRT маршрутизатор успешно подключен к основной Wi-Fi сети. |
Теперь ваш DD-WRT маршрутизатор подключен к основной Wi-Fi сети и готов повторять ее сигнал для расширения покрытия Wi-Fi. Вы можете разместить его в нужном месте, чтобы получить лучший сигнал в желаемой зоне покрытия.
Настройка безопасности
Правильная настройка безопасности вашего репитера Wi-Fi может помочь защитить вашу сеть от несанкционированного доступа. Вот несколько шагов для улучшения безопасности вашей сети:
1. Измените пароль для административной панели DD-WRT.
По умолчанию, пароль для административной панели DD-WRT является открытым и может быть легко угадан или использован злоумышленниками. Измените пароль на что-то сложное и уникальное, чтобы обеспечить дополнительную защиту.
2. Включите шифрование Wi-Fi.
Включение шифрования Wi-Fi помогает защитить вашу сеть от несанкционированного доступа. Рекомендуется использовать протокол WPA2, так как он считается самым безопасным. Установите сложный пароль шифрования, чтобы предотвратить взлом.
3. Отключите функцию SSID Broadcast.
Отключение функции SSID Broadcast помогает скрыть вашу сеть от неавторизованных пользователей. Таким образом, пользователи должны знать ваш SSID и вручную вводить его для подключения к сети.
4. Включите фильтрацию MAC-адресов.
Включение фильтрации MAC-адресов позволяет разрешать только определенным устройствам подключаться к вашей сети. Вы можете добавить MAC-адреса своих устройств в список разрешенных, и только эти устройства смогут подключиться к вашей сети.
5. Отключите удаленный доступ к административной панели.
По умолчанию, удаленный доступ к административной панели DD-WRT включен, что может создавать уязвимости в безопасности. Лучше отключить эту функцию и получать доступ к административной панели только через локальную сеть.
Следуя этим рекомендациям, вы сможете значительно улучшить безопасность вашей сети Wi-Fi, делая ее более защищенной от потенциальных угроз.
Проверка и исправление проблем
При настройке DD-WRT в качестве репитера Wi-Fi могут возникнуть некоторые проблемы. В этом разделе представлены основные проблемы и способы их исправления.
1. Отсутствие подключения к основной сети Wi-Fi: Если вы не можете подключиться к основной сети Wi-Fi после настройки DD-WRT в качестве репитера, проверьте следующие шаги:
- Убедитесь, что вы правильно настроили репитер, указав правильное имя сети (SSID) и пароль.
- Проверьте, включена ли функция «Wireless Ethernet Bridge» в настройках DD-WRT.
- Попробуйте перезагрузить роутер и устройства для подключения.
- Убедитесь, что репитер находится в пределах действия основной Wi-Fi сети.
2. Низкая скорость интернета: Если скорость интернета на репитере DD-WRT низкая, решите эту проблему, выполнив следующие действия:
- Убедитесь, что репитер настроен на правильную частоту и ширину канала Wi-Fi.
- Измените настройки антенны, чтобы улучшить сигнал Wi-Fi.
- Проверьте, нет ли других радиоустройств вблизи, которые могут влиять на качество сигнала.
- Установите последнюю доступную версию DD-WRT на репитер, чтобы получить все возможные улучшения.
3. Неправильная работа репитера: Если репитер DD-WRT не работает должным образом, выполните следующие действия:
- Перезагрузите репитер и основной роутер.
- Убедитесь, что репитер настроен на режим репитера, а не режим клиента или точки доступа.
- Проверьте настройки маршрутизации и сетевых параметров репитера.
- Попробуйте сбросить репитер до заводских настроек и выполнить настройку заново.
Следуя этим рекомендациям, вы сможете проверить и исправить основные проблемы при настройке DD-WRT в качестве репитера Wi-Fi. Если проблемы сохраняются, обратитесь за помощью к производителю роутера или вспомогательному форуму DD-WRT.
Overview
This article is intended to be a guide for the steps on how to setup a DD-WRT WifI repeater bridge.
DD-WRT is really a powerful router firmware and one of many cool things you can do with it is – to setup a WiFi repeater bridge. Why do that? To effortlessly extend your WiFi’s signal range. DD-WRT is an open source universal router firmware. And it’s free. It’s packed with many features and various tools which can be quite useful. It supports many commercial grade routers(ASUS, Tp-Link, D-Link, Linksys etc…).
Basically what it does – once you install it on your router, your router is then equipped with many tools that can often be found on enterprise grade routers. We already covered the installation process of DD-WRT on TP-Link routers, which you can check out here. And on this post we are going to cover the process how to setup a DD-WRT wifi repeater bridge.
Necessary information to acquire before configuration
There are couple of parameters that are necessary to acquire in order for this to work:
- Primary IP address of your current router which provides WiFi,
- From your primary router, you need to know the starting IP address from it’s DHCP server – some routers start their IP pool from 192.168.1.100 or something like that,
- WiFi name(SSID) and it’s password,
- Encryption type of the password for the WiFi,
- WiFi network mode and channel width.
All these information can be acquired once you login in your router and check for LAN or DHCP section and WLAN or Wireless section.
WiFi repeater configuration
Once you gather all that info and you installed DD-WRT on your router, login to the DD-WRT router. It’s default IP address to access is – 192.168.1.1. Router will prompt you to change the admin user name and password. Make sure to write it down so you can access it later and to avoid reseting it to factory defaults.

Open the Wireless tab and under that, navigate to the basic settings. First option – Wireless mode, change it to – Client bridge(Routed). For – Default GW mode, check the option – Manual. Next, Gateway field. For gateway field enter the primary address of your primary router of which we need to extend the WiFi. Wireless network mode and chanel width needs to be exact as on the primary router. Example – my primary router works only in N mode and has channel width of 20 Mhz.
Your router can have the same setup or it can have – a mixed Wireless network mode(B+G+N) or just two Network modes. Anyways, set those parameters to match your primary router. Wireless network name(SSID) field – in there, enter the WiFi of your primary router, the WiFi you use and which we need to extend.
On the bottom of the page, there is a section – Virtual interfaces. Click on the Add button. Wireless mode set to – AP. Wireless Network Name SSID – Set the name for the new extended WiFi. You can set a new WiFi name or you can set the name of the primary WiFi. Once you entered all the parameters, click on the – Save changes button.
WiFi repeater configuration – WiFi security
Next switch to the Wireless security tab. Here we need to provide the security parameters of our primary WiFi network and the new one. Example shown in the image bellow.

Like stated in the previous heading, for the WiFi security also, the security parameters in the first field must be the same as on our primary router. Otherwise, our DD-WRT repeater won’t be able to establish the connection. My primary router has WPA2 network authentication type with AES encryption.Check the options for your WiFi security settings, enter the passwords for both WiFi networks – from the primary router and for the repeater WiFi. Click on the – Save changes.
Finishing the setup
Go to the setup tab and you’ll get a window like in the image bellow. The first option – Connection type, leave it as – Disabled. Router name can be whatever you like. The important part is the – Network setup field.

The first field – Local IP address, that’s gonna be the IP address of our DD-WRT repeater. By default, it will be – 192.168.1.1. But that needs to be changed. The local IP address must be in the same IP pool range that our primary router has. And it must be in the range that the DHCP of the primary router is providing. At the beginning of the post I mentioned that we need to check the DHCP server on our primary router and to see what’s the first starting IP address.
The DHCP on my router provides the IP addresses starting from 192.168.100.10, and that’s the first IP address it provides in that IP range. Meaning, I cannot put the IP in the Local IP address lower than 192.168.100.10, otherwise, the setup will not work. As on image bellow, for the Local IP address, I entered the IP – 192.168.100.200. You can leave the subnet mask field as is, no need to change it. For the Gateway and Local DNS – enter the primary IP address of the primary router. Example on the image bellow.

Save the settings. Last thing to do is – Switch to the security tab and just disable the firewall. Save the changes and then go ahead and click on the – Apply the settings button. DD-WRT will take a minute to save changes and reboot. After that, your new extended WiFi should be up and running.

Summary
To be sure that the setup is working properly, you can test it by running ping command on your PC once you connect on the repeater or straight from the DD-WRT command interface. Ping your primary router – it’s primary IP to be precise to be sure that there’s a connection between DD-WRT repeater and your router. Then you can ping IP of Google to make sure that the DD-WRT is having internet access.
We use the Client bridge method to setup our DD-WRT as a repeater. By default, DD-WRT will have that mode for most of routers. On some routers, depending on the chipset they have, it will have the – repeater mode by default, which you can use that as well. And this was a process how to setup a DD-WRT WiFi repeater bridge.
Thank you for your time. I hope the post is useful to you.
Время на прочтение
5 мин
Количество просмотров 286K
Доброго времени суток.
В моем доме пока нет возможности подключить интернет. Если вывесить Wi-Fi адаптер за окно можно поймать несколько сетей кафе с бесплатным интернетом. Однако хочется чтобы Интернет был по всей квартире. Можно из Wi-Fi роутера сделать репитер, но тогда домашняя сеть оказывается открытой для других. В результате копаний Интернета и бесед на форуме было найдено решение как брать Интернет из открытой беспроводной сети и раздавать его в закрытой сети с шифрованием.
Всё началось с покупки легендарного ASUS WL500g Premium второй редакции (V2).
Вначале я установил прошивку Олега от энтузиастов. Решил попробовать подключить свой wi-fi адаптер к роутеру (благо 2 usb на нем). Обсуждение на форуме Олеговской прошивки натолкнуло на идею что можно использовать прошивку OpenWRT в которой есть возможно добавления виртуальных адаптеров. То есть, физический беспроводной адаптер подключаем к открытой сети с Интернетом (назовем ее CafeAP) и раздавать этот Интернет в закрытой домашней сети (HomeAP). Я начал копать, и наткнулся на сообщение что в DD-WRT это можно просто сделать. Отлично. С выбором прошивки я определился теперь ставим.
Это достаточно тривиальная задача и вполне доступно ее решение описано здесь, так что не буду тратить символы.
Только ни в коем случае не ставьте SP1 прошивку – она не поддерживает то что нам нужно.
Установил я DD-WRT v24-sp2 (08/07/10) mega (благо 8мб флеш-памяти позволяют; тем у кого флеш-памяти на роутере меньше придется ставить standart). Дальше начались копания по DD-WRT WIKI. Она очень богата, но… только если вы способны читать английский. Русская вики пока почти бесполезна.
Repeater или берем интернет из Wi-Fi сети кафе
Алгоритм действий после установки прошивки такой (мой роутер изъясняется на английском поэтому и инструкция на нем).
1. Сделайте
30/30/30
2. Подключите к роутеру кабель (можно без провода, для чего есть открытая беспроводная сеть под названием dd-wrt). Зайдите на него набрав в браузере 192.168.1.1. Вас попросят сменить логин и пароль — сделайте это.
Во вкладке
Wireless -> Basic Settings
:
— Wireless mode: выставите режим «Repeater»
— Wireless Network mode: установите такую же как на CafeAP. Хотя возможно и не обязательно я оставил смешанный режим (mixed) и все прекрасно работает
— Wireless Network Name (SSID): SSID сети к которой мы подключаемся (в моем случае это «CafeAP»)
Сохраните нажав
Save
.
Добавьте виртуальный адаптер нажав кнопочку
Add
— Введите имя отличное от сети к которой подключаемся (в моем случае HomeAP)
Save
(Советуют применять изменения, нажатием Apply Settings, после заполнения каждой страницы, а не после того как вы заполнили все).
3.
Wireless -> Wireless Security:
Physical Interface wl0:
Здесь вам надо будет ввести настройки защиты сети. Если вы подключаетесь к открытой сети кафе ничего менять не нужно. Если к зашифрованной сети, то вам нужно будет выбрать алгоритм шифрования, который она использует, и ввести пароль
Save
Virtual Interface wl0.1:
А это ваша сеть (HomeAP). Я выбрал WPA2 Personal, tkip + aes и ввел пароль
Примечание: В инструкции пишут, что если используется шифрование есть на обеих сети, и на обеих разное, то может не работать. Попробуйте в таком случае настройки шифрования сделать одинаковыми.
Save
4. Вкладка
Setup -> Basic Setup:
Network Setup:
Здесь нужно указать настройки подсети нашего роутера.
Например: если подсеть точки доступа, к которой мы подключаемся (CafeAP), имеет вид 192.168.1.x, то адрес роутера должен быть 192.168.2.1 (я поставил 192.168.77.1)
Save
5. Вкладка
Security:
Снимите все галочки в секции «Block WAN Request» (исключая Filter Multicast), а затем выключите SPI firewall (Я параноик — я не выключал. Все вроде работает.)
Save
6. Вкладка
Administration:
Измените то что посчитаете нужным. Я например сделал, чтобы страница статистики неавторизированным пользователям не показывалась (Enable info site меняем на disable)
Нажимаем
Apply Settings
Затем
Reboot Router
Теперь если все указано правильно, то роутер обретет WAN IP (см. справа в углу; он должен быть отличным от 0.0.0.0), а вы — доступ в интернет.
Если вам захочется подключиться к другой сети, то можно зайти в вкладку Status -> Wireless. В самом низу нужно найти кнопку Site Survey. Откроется окошко в котором можно увидеть список сетей. Кнопка Refresh – обновит список. Выбираете понравившуюся и нажимаете Join. Роутер скажет, что он успешно подключился к выбранной сети и перенесет нас на вкладку Wireless. Вам останется поменять настройки как вы это делали в пунктах 2-3, нажать Apply Settings и вы подключены к другой сети.
Repeater Bridge или подключиться к сети друга
Инструкция c Repeater подойдет, если мы подключаемся к недоверенным сетям. А если мы хотим подключиться, например, к сети друга (FriendAP), то нужно использовать режим Repeater Bridge
При этом мы будем иметь полный доступ к ресурсам сети друга (включая принтеры), а он к ресурсам нашей.
Для этого нам нужно выполнить следующие действий
1. Восстановите
Factory Defaults
(Administration -> Factory Defaults) на вашем роутере
2. Сделайте роутеру
30-30-30
3.
Подключитесь к роутеру
по проводной или беспроводной сети и зайдите на него.
Вкладка
Wireless -> Basic Settings tab
Physical Interface Section
— Wireless Mode: Repeater Bridge
— Wireless Network Mode: оставьте mixed или установите как у FriendAP-роутера
— Wireless Network Name(SSID): такой же как сеть друга — FriendAP
— Wireless SSID Broadcast: Enable
— Network Configuration: Bridged
Save
Virtual Interfaces Section
— Add
— Wireless Network Name(SSID): SSID отличный от FriendAP (HomeAP)
— Wireless SSID Broadcast: если выставите Disable то сеть будет скрытая
— AP Isolation: Disable
— Network Configuration: Bridged
Save
4. Вкладка
Wireless -> Wireless Security tab
Physical Interface Section
— Security Mode: Такой же как у FriendAP (говорят, что DD-WRT работает в подобном режиме, только если на FriendAP wep или WPA2AES)
— WPA Algorithms: такой же как у FriendAP
— WPA Shared Key: так же как и FriendAP
— Key Renewal Interval (in seconds): оставьте как есть
Virtual Interfaces Section
— Security Mode: лучше всего WPA2
— WPA Algorithms: я поставил tkip + aes
— WPA Shared Key: выдумайте пароль
— Key Renewal Interval (in seconds): оставьте как есть
Save
5. Вкладка
Setup -> Basic Setup tab
— Connection Type: Disabled
— Поменяйте галочку STP на Disabled (Если оставить Enabled это может создать проблемы с соединением)
— IP Address: 192.168.1.2 (В случае если FriendAP-роутер имеет IP 192.168.1.1)
— Mask: 255.255.255.0 (В случае если такая маска сети у FriendAP)
— Gateway: 192.168.1.1 (В случае если FriendAP-роутер имеет IP 192.168.1.1)
— DHCP Server: Disable
— Local DNS: 192.168.1.1 (В случае если FriendAP-роутер имеет IP 192.168.1.1)
— Assign WAN Port to Switch: Если хотите использовать WAN-порт как обычный LAN — ставьте галочку
Save
— Если применили изменения, зайдите снова на роутер по новому адресу 192.168.1.2
6.
Setup -> Advanced Routing tab
— Operating mode поменяйте на «Router»
Save
7.
Services
— Отключите сервис Dnsmasq
Save
8.
Security -> Firewall tab
— Снимите везде галочки кроме Filter Multicast
— Отключите SPI firewall
Примените изменения и перезагрузите роутер
(Administration -> Reboot router)
После этих действий вы должны иметь доступ к сети FriendAP так, как будто вы подключены к ней напрямую.
Ссылки:
wl500g.info
Перепрошивка_WL-500W_на_DD-WRT_в_картинках
Repeater
Repeater Bridge
DD WRT — это альтернативная прошивка для различных моделей роутеров на базе чипов Atheros, BroadCom, Ralink, XScale, которая находится в свободном доступе у всех желающих. Среди множества возможностей этой прошивки, в статье рассматривается настройка роутера в режиме повторителя в DD WRT.
Содержание
- Варианты использования репитера
- Настройка моста репитера
- Заключение
Варианты использования репитера
Вы можете использовать ретранслятор в различных сценариях. Чаще всего используется для усиления Wi-Fi или подключения второй сети LAN к первой, для которой открыт доступ в Интернет.

Давайте посмотрим поближе:
Решением таких проблем станет использование беспроводного моста в режиме повторителя между двумя маршрутизаторами, соединяющего два сегмента локальной сети по Wi-Fi. По сути, второй маршрутизатор будет передавать сигнал от первого, усиливая его. Вам не нужен кабель для подключения маршрутизаторов.
Эта функция недоступна в режиме клиентского моста, который поддерживается стандартной прошивкой многих маршрутизаторов. После установки клиентского моста второй маршрутизатор может подключать только компьютеры, подключенные к сети с помощью кабеля Ethernet. Соединение Wi-Fi недоступно.
Конфигурация в режиме повторителя с DD WRT позволяет подключить второй роутер в качестве моста Wi-Fi, а также раздавать интернет по Wi-Fi и LAN без ограничений.
Настройка моста репитера
Для наглядности и лучшего понимания посмотрите следующее видео, где представлена русскоязычная версия прошивки:
Для работы бриджа установите первый роутер в режим AP с включенным DHCP и возьмите второй роутер с прошивкой DD WRT.

Потом:


Если вы выберете другой тип ключа от первого роутера (например, WPA вместо WPA2), он может просто не дать вам войти в локальную сеть через точку Wi-Fi.
Заключение
Настройка репитера с прошивкой DD WRT не представляет сложности. Плюсы в этом: второй роутер раздает интернет от первого на проводные и беспроводные устройства. При этом второй роутер (повторитель) находится на расстоянии от первого и подключен к нему по Wi-Fi.