From DD-WRT Wiki
Jump to: navigation, search
Вы можете управлять настройками DD-WRT двумя способами:
- через графический интерфейс пользователя (веб-интерфейс панели управления), который описан на этой странице.
- используя интерфейс командной строки в стиле Linux. См. SSH, Telnet и командная строка для более подробной информации.
Contents
- 1 Доступ через веб-браузер
- 2 Имя пользователя и пароль
- 3 Элементы веб-интерфейса
- 4 Карта меню
- 5 Настройка веб-интерфейса
- 6 Восстановление доступа
- 6.1 Локально
- 6.2 Удаленно
- 7 Симуляция
[edit] Доступ через веб-браузер
После установки прошивки DD-WRT вы можете получить доступ к веб-интерфейсу панели управления DD-WRT, используя веб-браузер, указывающий на тот же IP-адрес, что и до установки DD-WRT. Некоторые из наиболее распространенных IP-адресов по умолчанию: 192.168.1.1 (чаще всего используется в маршрутизаторах Linksys и Asus), 192.168.2.1 (некоторые устройства Belkins), 192.168.11.1 (Buffalos), 192.168.10.1 или 192.168.30.1 (Motorolas). IP-адрес по умолчанию может быть другим. Часто производители маршрутизаторов указывают IP-адрес по умолчанию на самом устройстве.
[edit] Имя пользователя и пароль
В последних версиях DD-WRT вам потребуется указать свое имя пользователя и пароль при первом доступе к веб-интерфейсу. Поскольку при доступе по SSH вход всегда выполняется с учетной записью администратора root, очень важно использовать надежный пароль. Рекомендуется использовать пароль длиной не менее 12 символов, содержащий цифры и символы алфавита. 12 символов значительно снижают вероятность успешной случайной атаки и требуют значительных вычислительных ресурсов и временных затрат для осуществления атаки.
Имя пользователя по умолчанию — root, а пароль по умолчанию — admin (в версии прошивки v23 SP1). Некоторые более ранние версии DD-WRT не требовали имени пользователя.
[edit] Элементы веб-интерфейса
Веб-интерфейс имеет пять основных элементов:
- 1. Меню с вкладками
- 2. Основная часть
- 3. Кнопки действий
- 4. Справочная информация
- 5. Некоторая общая информация о системе
Нажатие этих текстовых ссылок дает доступ к дополнительной информации:
- 1. Дополнительная справка (More…)
- 2. Подробная информация о прошивке (Firmware)

Несколько заметок об элементах экрана.
- Начальный экран, появляющийся при открытии IP-адреса маршрутизатора в браузере, совпадает с выбором меню Status → Sys-Info.
- Чтобы сохранить внесенные в настройки изменения нужно нажать кнопку Save. Переход на другую вкладку меню без сохранения, удалит настройки в текущей вкладке меню.
- Время в правом верхнем углу (элемент Time группы 5) отсчитывается с момента включения маршрутизатора до тех пор, пока маршрутизатор не получит доступ к глобальной сети. По умолчанию DD-WRT автоматически пытается получить время с сервера времени.
[edit] Карта меню
Выберите один из пунктов меню ниже для получения информации о настройках на этой странице меню.
(Структура меню по состоянию на июнь 2012 г. из прошивки svn19342 Mega).
- Setup
- Basic Setup
- DDNS
- MAC Address Clone
- Advanced Routing
- VLANs
- Networking
- EoIP Tunnel
- Wireless
- Basic Settings
- Radius
- Wireless Security
- MAC Filter
- Advanced Settings
- WDS
- Services
- Services
- VPN
- USB
- NAS
- Hotspot
- SIP Proxy
- My Ad Network
- Security
- Firewall
- VPN Passthrough
- Access Restrictions
- WAN Access
- NAT/QoS
- Port Forwarding
- Port Range Forwarding
- Port Triggering
- UPnP
- DMZ
- Quality of Service — QoS
- Administration
- Management
- Keep Alive
- Commands
- WOL
- Factory Defaults
- Firmware Upgrade
- Backup
- Status
- Router
- WAN
- LAN
- Wireless
- Bandwith
- Sys-Info
- My Page
[edit] Настройка веб-интерфейса
В разделе Administration → Management вы можете задать различные настройки веб-интерфейса, например:
- сменить имя пользователя и пароль;
- контролировать доступ к веб-интерфейсу локально / удаленно;
- выбрать между различными визуальными стилями интерфейса;
- и многое другое.
[edit] Восстановление доступа
[edit] Локально
Если по какой-либо причине вы полностью потеряли доступ к веб-интерфейсу панели управления маршрутизатора, причиной может быть остановленный веб-сервер (служба / демон HTTP). Чтобы восстановить доступ, попробуйте запустить веб-сервер. Подключитесь к маршрутизатору по протоколу SSH или Telnet и введите следующие команды:
httpd -h /www
Чтобы использовать безопасный протокол HTTPS для подключения к веб-интерфейсу маршрутизатора, добавьте опцию -S в конце команды. См. справу веб-сервера httpd для получения дополнительной информации по этой команде.
Вы можете использовать эту функцию, чтобы усилить безопасность маршрутизатора, активируя веб-интерфейс только тогда, когда вам нужно его настроить, а затем закрывая веб-сервер, когда вы закончите.
Чтобы выключить (остановить) веб-сервер, запустите команду ‘kill `cat /tmp/var/run/httpd.pid` (обратите внимание на обратные кавычки) или kill `cat /tmp/var/run/httpsd.pid`, если вы запустили веб-сервер с опцией -S.
[edit] Удаленно
Способ 1: См. Enable Web Interface Over SSH?
Способ 2: Если вы подключены к маршрутизатору удаленно по протоколу SSH или Telnet, но хотите включить удаленный доступ к веб-интерфейсу, следующая команда разрешает доступ с одного удаленного IP-адреса:
-
- iptables -I INPUT -p tcp -s <Удаленный_IP-адрес> —dport 80 -j ACCEPT
Этот временный удаленный доступ к веб-интерфейсу будет отключен при перезагрузке маршрутизатора (если только вы не включили удаленное администрирование Remote Administration в настройках веб-интерфейса или не сохранили его как скрипт в разделе Administration → Commands).
[edit] Симуляция

![]()
Старый интерфейс прошивки DD-WRT v22
На сайте проекта доступны специальные страницы, на которых работает симуляция веб-интерфейса панели управления прошивок DD-WRT разных версий. На этих страницах можно ознакомиться с интерфейсом и его доступными опциями, чтобы иметь представление о прошивке.
- V22-DD-WRT;
- V23-DD-WRT;
- V24beta-DD-WRT.
DD-WRT Router Login: To setup & configure the DD-WRT router, it is very important to access the DD-WRT router default login page. Kindly check the router bottom area to find the DD-WRT Router IP Address & DD-WRT default password or refer to the below table.
DD-WRT IP Address
The Above IPs are supported on DD-WRT. Pick any one of the DD-WRT IP address to access the router admin interface to setup, configure and change router settings.
DD-WRT Router Default Login is required to set, enable/disable, change necessary router settings such as., change the username/password, enable/disable network connectivity, upgrade firmware software, reset the router to factory setting, and more. There are several models in DD-WRT for consumers. But the login procedure remains the same throughout any DD-WRT model.
DD-WRT Default Password
In order to get access to the router admin interface, refer to the above table to find the DD-WRT router ip. Now here is the default DD-WRT login password.
DD-WRT Router Login Instruction Guide
Got a new router? The very first thing required to do is, setting up the router. To do that, log in to the DD-WRT router is required. We want to help the user with a detailed guide.
The below instructions will help the user on how to login to my DD-WRT router:
- The first step is to connect the router with the computer PC /laptop using the LAN cable or use DD-WRT wifi and connect to the router through the wireless network.
- After connecting, use the preferred browser (Google Chrome, Mozilla Firefox, Opera, Safari, or Internet explorer of user choice and type the DD-WRT router address in the browser address bar. Can’t find it? Kindly check the back-side of the router.
- After accessing the router admin panel, fill the username and password from the above table. Users can find in the default username and password for DD-WRT on the back-side of the router.
NOTE: The best way to connect with the router is through a wired connection using a LAN Cable which avoids uninterrupted connection whenever any settings are saved.
The above instructions are very simple and easy to follow. We hope this tutorial was really helpful with DD-WRT login. After getting access to router admin, the user can do any of the above options:
- Setting up the Router
- Router Configuration
- Change DD-WRT password
- Reset to Factory settings
- Upgrade Firmware
DD-WRT Router Setup:
We will show users how exactly they can setup DD-WRT for internet connection.
Follow the steps given below to setup DD-WRT:
- Connect to the router and access the router admin interface.
- Enter the default open source credentials in the field given and log into the router.
- Click on the Quick Setup option and choose the necessary settings to configure the network connection.
- Complete the setup and save the necessary option.
- Click on Save to complete the setup.
DD-WRT Router Configuration:
The procedure is relatively simple, like the instructions that have already been provided.
Follow the steps given below to configure DD-WRT settings:
- Connect to the router and access the router admin page.
- Log in to the router by filling in the login details in the given field.
- Now, the user will be able to access several router settings.
- Enable DNS setting, configure tri-band settings,
- Click on the required section, and enable or change the settings as per user convenience and requirement.
Change the DD-WRT Router Password:
After validating the DD-WRT admin interface with the default password and login, follow the below steps to change the DD-WRT password.
To change the router default password:
- Navigate to System Tools/Settings.
- Select the Password option from the sub-menu.
- Verify old username & password.
- Enter the new username and password.
- Save the settings & restart the router.
To change the Wireless security password:
- Click on the Wireless tab and then click on the Wireless Security sub-menu.
- Several security options are available to pick from. Select the WPA/WPA2 – Personal option.
- Now type the wireless password in the respective field box. This will be the user’s wi-fi password.
- Click on Save to save the new wifi password.
Reset DD-WRT to Factory Settings:
Follow the steps given below to factory reset your DD-WRT:
- Locate the Reset button present on the router. It is usually present at the back of the router. Use a pen or a paper clip to press and hold it for about 30 seconds.
- Observe the LED light on the router. If it blinks or flashes, that means your router is resetting.
- Unplug the router from the power supply for 30 seconds and plug it back in to complete the reset network process.
Update DD-WRT Router Firmware Software:
Firmware upgrades are basically for bug fixes and general improvements.
Here the steps are given below to perform a firmware upgrade for DD-WRT:
- Check the model number and version of DD-WRT so that the user can download the right firmware.
- Go to the DD-WRT Support Site, accept the license agreement, and download the firmware file.
- Connect the router to the PC computer.
It is recommended to upgrade firmware through wired connections only. - Access the routers web-based setup page from any web browser.
- Enter the login credentials in the space provided.
- Click on Administration Tab and then click on Firmware Upgrade.
- Click the browse button present there.
- Locate the file that the user downloaded from the support site and then click Open.
- Click the Start Upgrade option and Continue when it prompts that the Upgrade has been successful.
- Now TURN OFF and then TURN ON the router to complete the upgrade.
DD-WRT Router Support:
If the user can’t log in to the DD-WRT router or any problem while connecting the router, we would recommend checking the below solution for any common router problems.
Here are some of the common problems users might experience while setting up DD-WRT.
- IP Address issue: Check the DD-WRT IP address carefully, whether you had entered it correctly. It should not contain any alphabet.
Wanna help? Refer to our article on how to find default router login ip.
- Forgot Router password: The only way to restore the password is router reset or reset to factory settings. To do the hard resetting, find a small hole on the sides of the router. Using a blunt pin, press and hold on the hole. This process will reset the DD-WRT back to its factory settings.
- Router Admin not loading: This can be due to the connection problem. Check the cable or router wifi connection or wireless network, whether the router is connected to a laptop or computer, or PC. Try disconnecting the cable and restart the router and connect again.
Available DD-WRT Models
NO other models are available for this brand.
Still if you experience any problem while connecting, we request you to contact the DD-WRT support team or customer care. They will be available 24/7 through live chat.
Do comment below, we will take a look and could solve it.
DD-WRT can be used to replace the firmware on your standard router. It is practically an open-source firmware alternative designed for specific routers. It helps us remove the limitations of the default router firmware and unlocks some advanced options and improves their performance.
If you are sure your router is using the DD-WRT firmware you may want to know how to access its settings. But before you try that you need to make sure you have the following:
What You Need:
- Wireless router with DD-WRT firmware installed
- A device to access the router settings (PC, tablet, or mobile phone)
- Access to the network over WiFi or the Network cable
- DD-WRT login IP address, admin username and password
What Are The DD-WRT Default Login Details?
Generally, routers flashed with the DD-WRT firmware use the following login details that allow the user to access the router settings:
IP Address: 192.168.1.1
Username: root
Password: admin
If you haven’t modified these login details before, you will be able to use them when you want to log in to your DD-WRT router.
In case the default login details don’t work and you don’t know the custom ones you can gain access to the router settings again after you reset the router to factory settings. When the factory reset is completed, you will be able to log in using the default login details.
How To Login To A DD-WRT Router?
Well, here is a short step-by-step guide that will show you the exact steps to access the DD-WRT router settings.
STEP 1 – Connect To The Network
We have mentioned this before, but it is really important to connect your device to the DD-WRT router network. Depending on the device you are using you can do that over WiFi or using the network cable. In case you don’t have access to the network, the router login process will be unsuccessful.
STEP 2 – Launch Your Preferred Web Browser
In order to see the router’s web-based interface we need a web browser. Please remember that you don’t need an active internet connection. So, open the browser on the device you are using and move to the next step.
STEP 3 – Enter The DD-WRT IP Address In The URL Bar
The default IP used to access the DD-WRT router settings is 192.168.1.1.

Enter this IP into the browser’s URL bar and press Enter if you are using a PC, or tap on Go if you are using a tablet or a mobile phone. The DD-WRT control panel should appear. This means that the IP address is correct.
In case the IP is wrong, you can try to find the router’s default IP on your own. Follow the steps explained here, just choose your device and you will have to correct IP in a minute.
STEP 4 – Enter The Username And Password
When you click on any of the horizontal tabs you will be asked to enter a username and a password.
When asked to enter these login details type root in the username field and admin in the password field.
Then click OK and you should see the DD-WRT control panel.

Now you can go through the settings and make the changes you need. While you are there we recommend making a few security tweaks that will significantly improve your network security. At a basic level these include changing the:
- Admin password
- WiFi name
- Wireless password
Each one represents an additional layer of security and we recommend you to take some time and apply them if you haven’t done that already.
How To Change The DD-WRT Admin Username And Password?
When you login to the router, look at the top row and select the Administration tab.
The Management tab in the second row will be selected automatically. Take a look at the Router Password section and enter the new login details:
Router Username – enter the new router admin username if you want to change it
Router Password – enter the new router admin password
Re-enter to Confirm – enter the new admin password again just to make sure you didn’t make any typing errors the first time
Now scroll down to the bottom of the page and click Apply Settings to save the changes.
You should be logged out of the session after a few seconds. When that happens just login with the new DD-WRT admin login details.
How To Change The DD-WRT Wifi Name?
After you login to your DD-WRT router click on the Wireless tab. The Basic tab will be selected automatically.
If your router has two wireless bands you can choose to make the settings in both the 2.4 and 5Ghz networks. Scroll down to the Wireless Physical Interface sections for the 2.4GH and 5GH networks.
Now in the Wireless Network name (SSID) fields enter the new Network names. We recommend using a different network name for the 2.4 and 5GHz networks. Simply add “5G” or “5GHz” at the end of the name of the 5GHz network and you are good to go.
How To Change The DD-WRT Wireless Password?
Now let’s change the wireless password. With the wireless tab selected at the top, now select the Wireless Security tab in the second row.
Here you can change the wireless passwords for both the 2.4 and 5GH networks.
Make sure that WPA2 personal is selected as a Security Type.
You can check the Unmask checkbox next to the WPA Shared key to see the current wireless password and in the appropriate fields enter the new password(s).
Make sure to come up with a strong and unique password and feel free to add numbers and special characters to boost the strength of the password.
We recommend using the same password for both the 2.4 and 5GH networks, but you can set up different ones if you like.
After you make the changes click on Apply Settings.
When you change the WiFi login details make sure to connect your wireless devices again using the new password.
Final Words
DD-WRT is an amazing firmware that will help you unlock some advanced settings on your router and even improve its performance. All those settings will be available when you login to your DD-WRT router.
The security tweaks we have recommended are just a few of the many other options you can modify so make sure to apply them as soon as possible, you really don’t want anyone to access your network and modify your router settings without you knowing. So, take your time and you will have a secured network in just a few minutes.

Hey, I’m David. I’ve been working as a wireless network engineer and a network administrator for 15 years. During my studies, I also worked as an ISP field technician – that’s when I met Jeremy.
I hold a bachelor’s degree in network engineering and a master’s degree in computer science and engineering. I’m also a Cisco-certified service provider.
In my professional career, I worked for router/modem manufacturers and internet providers. I like to think that I’m good at explaining network-related issues in simple terms. That’s exactly what I’m doing on this website – I’m making simple and easy-to-follow guides on how to install, set up, and troubleshoot your networking hardware. I also review new network equipment – modems, gateways, switches, routers, extenders, mesh systems, cables, etc.
My goal is to help regular users with their everyday network issues, educate them, and make them less scared of their equipment. In my articles, you can find tips on what to look for when buying new networking hardware, and how to adjust your network settings to get the most out of your wi-fi.
Since my work is closely related to computers, servers, and other network equipment, I like to spend most of my spare time outdoors. When I want to blow off some steam, I like to ride my bike. I also love hiking and swimming. When I need to calm down and clear my mind, my go-to activity is fishing.
CONTENTS
- What You Need:
- What Are The DD-WRT Default Login Details?
- How To Login To A DD-WRT Router?
- STEP 1 – Connect To The Network
- STEP 2 – Launch Your Preferred Web Browser
- STEP 3 – Enter The DD-WRT IP Address In The URL Bar
- STEP 4 – Enter The Username And Password
- How To Change The DD-WRT Admin Username And Password?
- How To Change The DD-WRT Wifi Name?
- How To Change The DD-WRT Wireless Password?
- Final Words
Для начала работы скачайте c сайта dd-wrt.com файл прошивку factory-to-ddwrt.bin соответствующий вашей модели роутера и его аппаратной версии.
Рекомендуем использовать программное обеспечения DD-WRT релиза r25697 от 22.12.2014г. Если в данной ветке не найдется ваша модель роутера, попробуйте последнюю версию в разделе beta. О настройке beta версии читайте ниже.
Загрузите прошивку DD-WRT в маршрутизатор. О том как это сделать для роутеров TP-Link написано здесь. Инструкцию по замене прошивки для иных производителей маршрутизаторов, можно найти на сайте разработчика DD-WRT или на их форуме.
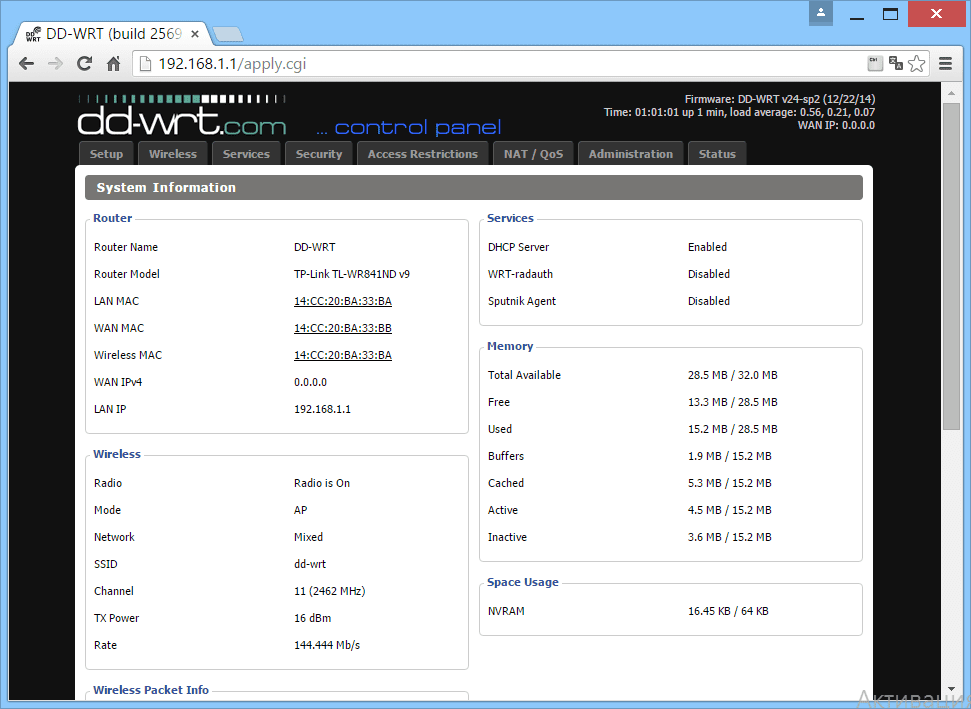
После обновления прошивки введите в браузер адрес 192.168.1.1. Вы увидите страницу с просьбой ввести новое имя пользователя и пароль. Введите их и обязательно запишите.

Далее вы попадете на страницу состояния роутера.
Перейдем к настройке роутера. В меню выберите Setup — Basic Setup. В разделе Network Setup в поле Local IP Addressпропишите 192.168.99.1 , это будет новый адрес вашего маршрутизатора. Меняем его для того, чтобы в будущем исключить возможные сетевые конфликты с другими роутерами в вашей сети. Которые с большой вероятностью у вас есть.
В Local DNS прописываем ip адрес DNS сервера — 8.8.8.8
На той же странице в разделе Network Address Server Settings (DHCP) выключите 3 опции Use DNSMasq for DHCP, Use DNSMasq for DNS, DHCP-Authoritative
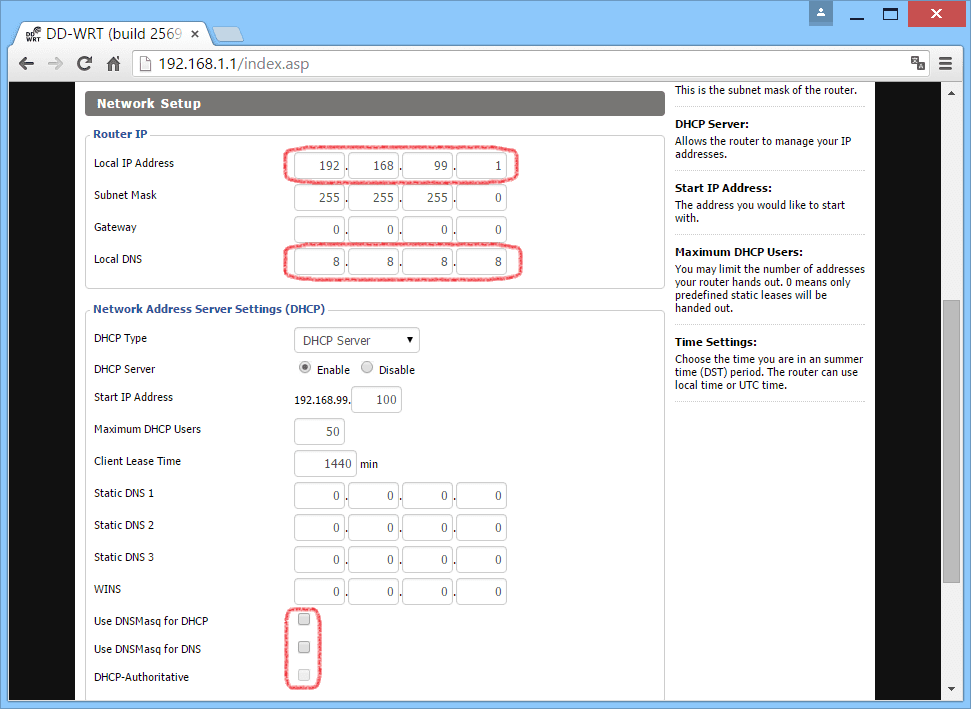
Внимание, после применения параметров адрес роутера сменится на 192.168.99.1
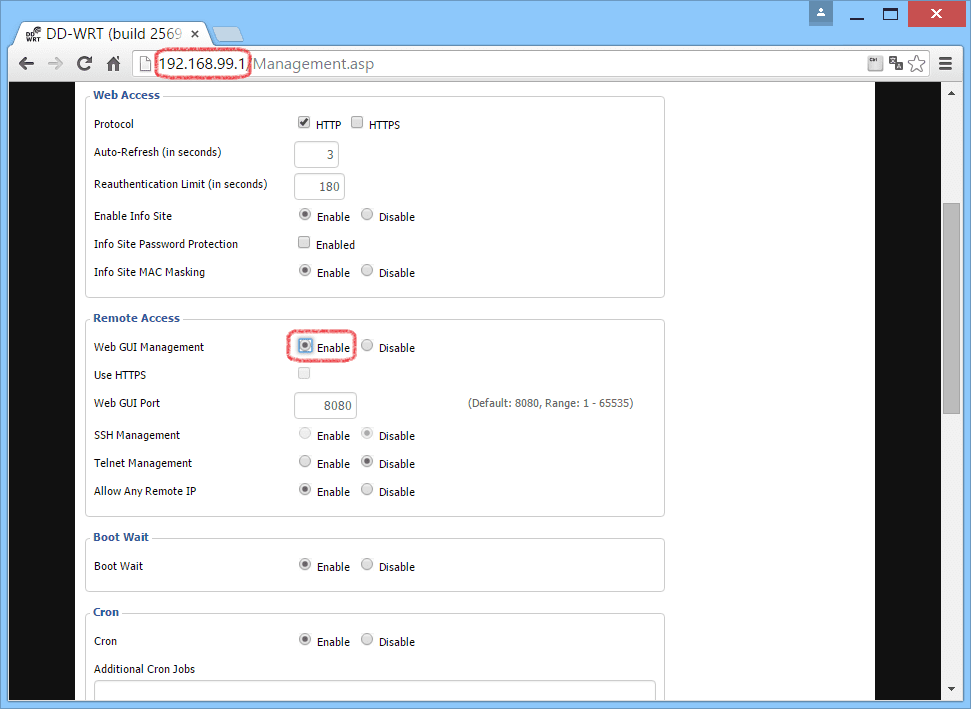
Чтобы не потерять контроль над роутером настроим удаленный доступ из внешней сети через WAN порт. Перейдите на страницу Administration — Management. В разделе RemoteAccess включите в опции Web GUI Management отметку HTTP. После этого роутер будет доступен по его внешнему ip адресу и порту 8080.
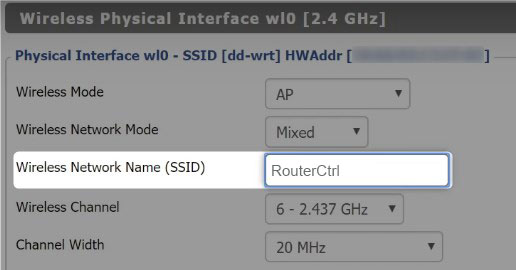
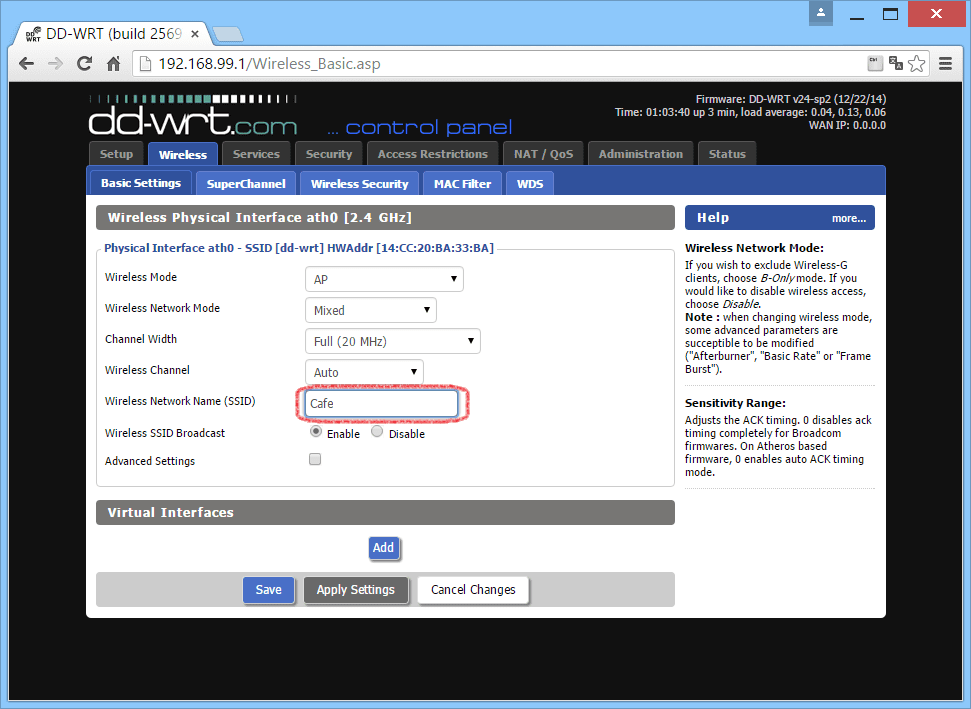
Перейдем к настройке WiFi точки доступа. Откройте страницу Wireless — Basic settings. В поле Wireless Network Name (SSID) введите название своего WiFi хотспота, например название вашего заведения.
В названии хотспота возможно использовать только английские буквы, цифры и символы. Буквы кириллицы использовать нельзя.
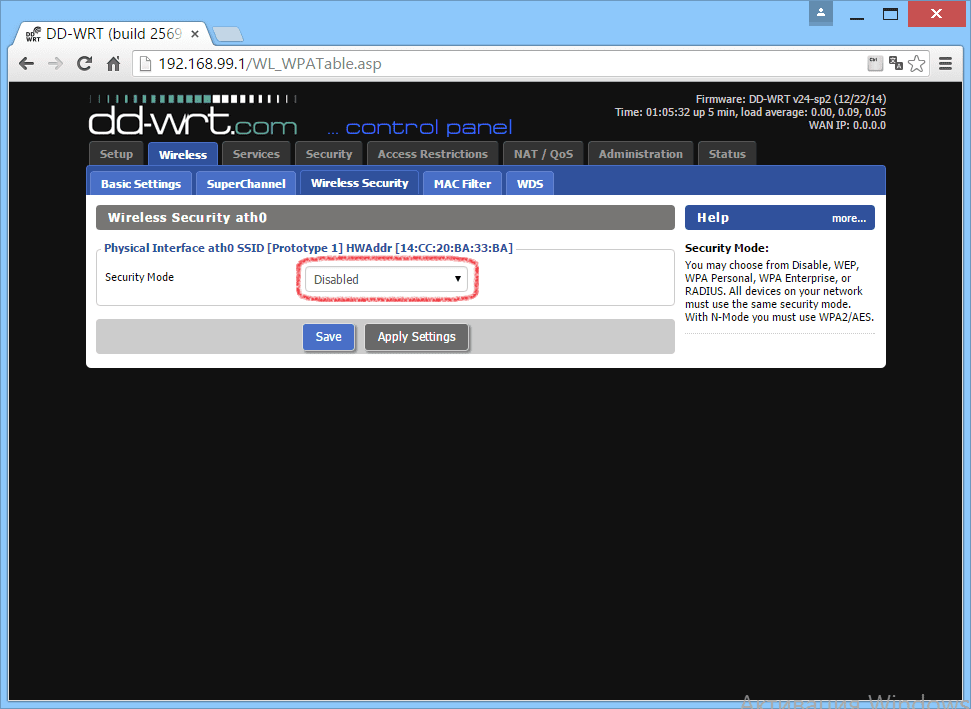
 Перейдите на страницу Wireless — Wireless Security, убедитесь, что опция Security Mode находится в состоянии Disabled.
Теперь непосредственно перейдем к настройке самого хотспота.
-
- Откройте страницу Services — Hotspot
- в разделе Chillispot активируйте опцию Chillispot установив отметку Enable
- в поле Primary Radius Server IP/DNS введите radius.wi-fi.click
- в поле Backup Radius Server IP/DNS введите radius2.wi-fi.click
- в DNS Server IP введите 8.8.8.8
- в Redirect URL введите https://login.wi-fi.click
- в Shared Key введите ключ wfs123
- в Radius NAS ID введите Идентификатор вашего хостпота из личного кабинета
- в поле UAM Secret введите пароль вашего хотспота из личного кабинета
- в поле UAM Allowed введите
95.167.165.64/27,195.14.118.0/23,91.229.116.0/22,213.59.200.64/28,91.200.28.0/24,91.227.52.0/24,198.241.128.0/17,66.211.128.0/17,216.113.128.0/17,paypal.com,paypalobjects.com,paymaster.ru,wi-fi.click,www.paymaster.ru,www.paypal.com,www.paypalobjects.com,www.wi-fi.click,auth.wi-fi.click,support.wi-fi.click,lk.wi-fi.click,account.wi-fi.click,s1.wi-fi.click,s2.wi-fi.click,s3.wi-fi.click,s4.wi-fi.click,s5.wi-fi.click,s6.wi-fi.click,s7.wi-fi.click,s8.wi-fi.click,s9.wi-fi.click,s10.wi-fi.click,s11.wi-fi.click,s12.wi-fi.click,s13.wi-fi.click,s14.wi-fi.click,s15.wi-fi.click,s16.wi-fi.click,s17.wi-fi.click,s18.wi-fi.click,s19.wi-fi.click,s20.wi-fi.click
- в поле UAM Domains введите
wi-fi.click paymaster.ru paypal.com paypalobjects.com
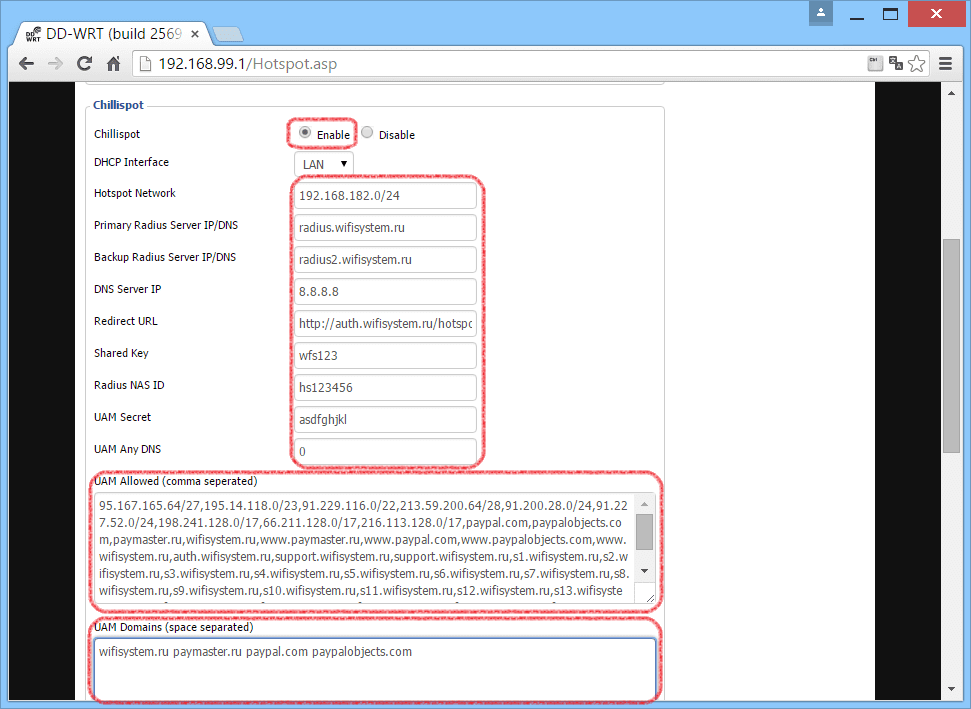
Возможные проблемы
Убедитесь, что вы нечаянно не ввели лишние пробелы в поле UAM Allowed, иначе что-то может не заработать.
На этом настройку WiFi хотспота можно считать законченной.
DD WRT — это прошивка для маршрутизаторов, созданная на основе Unix. Она используется для моделей, работающих на процессорах BroadCom, Atheros, Xscale и PowerPC, и расширяет их стандартный функционал. Опытному пользователю, которому нужно создать и настроить локальную сеть, почти всегда не хватает обычных настроек роутера для реализации всех задач, потому эта прошивка отлично подойдёт тем, кому нужная тонкая настройка функций и параметров домашней сети.

Установка прошивки позволяет расширить возможности маршрутизатора
Возможности прошивки
Помимо обычных настроек, предлагаемых официальным программным обеспечением роутера, DD WRT обеспечивает следующий функционал:
- доступ по Telnet и SSH;
- настройка планировщика задач Cron;
- удалённый запуск (Wake-on-Lan);
- настройка Samba;
- виртуальные точки Wi-Fi;
- PPTP, VPN — сервер и клиент;
- другие варианты гибкой настройки роутера.
Порядок настройки маршрутизатора с DD-WRT
Для открытия страницы настроек маршрутизатора, прошитого DD WRT, нужно настроить автоматическое назначение IP и других значений на сетевом адаптере ПК, с которого будете настраивать. Затем нужно зайти в настройку роутера по IP, изначально указанному в инструкции. Здесь система предложит вам поменять админские логин и пароль на более надёжные. Придумайте новые данные для входа, введите и запомните их — они ещё не раз пригодятся при работе с другими функциями роутера.
При желании можно поменять язык пользовательского интерфейса. Дальнейшие инструкции мы приводим на примере русского. На странице «Administration» — «Management» нужно найти пункт «Enable Info Site» и поставить метку Disabled. Здесь же в пункте Language Selection выбрать русский язык. Нажать Save.

После этого начинается непосредственно настройка.
Статический IP
- На вкладке «Установка» — «Основные установки» выбрать «Тип соединения» — «Статический IP».
- Внести IP и другие данные, предоставленные поставщиком услуг.
- Снять отметки в пунктах «Использование DNSMasq для DHCP» и «… для DNS». Сохранить параметры.
- Перейти на вкладку «Службы», отключить «DNSMasq». Сохранить параметры.

Маршрутизация
Далее — настройка маршрутизации:
- Перейти на страницу «Установка» — «Маршруты».
- Назначить название и номер маршрута (своё для каждой из созданных подсетей).
- «Сеть назначения» — 172.17.0.0 (или ваш диапазон подсети).
- «Маска подсети» — 255.255.0.0
- «Шлюз» — IP-шлюза, выданный провайдером.
- «Интерфейс» — WAN.
- Сохранить введённые значения, повторить действия для создания следующего маршрута.

Подключение по VPN (PPTP)
- Открыть вкладку «Службы» — «PPTP».
- Включить «Опции клиента PPTP».
- «IP или имя DNS-сервера» — ввести цифровой или буквенный адрес.
- «MPPE-шифрование» — пустое.
- Пользовательское имя и пароль — из договора.
- Сохранить.
")
Подключение PPPoE
В DD WRT есть некоторые сложности с реализацией протокола PPPoE, поэтому понадобится прописать некоторые параметры вручную:
- На вкладке «Службы» — «PPTP» отключить «Опции клиента PPTP».
- На вкладке «Установка» — «Основные установки» выбрать тип подключения «PPPoE».
- Логин-пароль взять из договора.
- «Имя службы» —
- «Статический DNS1» — 172.17.0.2.
- Снять отметки напротив «DNSMasq для DHCP» и «DNSMasq для DNS».
- Сохранить.

Чтобы внешняя и локальная сети роутера под DD WRT корректно работали одновременно, необходимо настроить PPPoE Dual Access. Это делается в виде текстовых команд:
- Зайти на страницу «Тех. обслуживание» — «Команды».
- В текстовое поле ввести (vlan2 — имя интерфейса, выделенного для локалки):
ifconfig vlan2 [ip-адрес] netmask [маска подсети] up
route add -net 172.17.0.0 netmask 255.255.0.0 gw [адрес шлюза]
Повторить для 172.18.0.0 и 172.24.0.0
Нажать «Сохранить параметры запуска».
- В текстовое поле «Команды» ввести:
iptables -t nat -A POSTROUTING -o vlan2 -j MASQUERADE
iptables -t nat -A POSTROUTING -o vlan2 -j SNAT —t WAN_IP
Далее — «Сохранить брандмауэр».

- После перезагрузки устройство соединится по PPPoE.
Сеть Wi-Fi
Последний штрих — настройка вай-фай-сети:
- Вкладка «Wi-Fi» — «Основные настройки».
- Тип беспроводной сети — Точка доступа.
Режим беспроводной сети — Смешанный.
Ширина канала — 20 Мгц.
SSID передаётся в эфир — Включить.
Конфигурация сети — В мосте.

- Чтобы назначить пароль на Wi-Fi-сеть, нужно перейти на вкладку «Безопасность», выбрать Режим безопасности — WPA Personal и ввести новый ключ в «Общий ключ WPA».
- Сохранить параметры и перезагрузить роутер.

Заключение
Опытному пользователю, которого не удовлетворяют стандартные функции роутера для удобной работы домашней сети, мы предлагаем попробовать поработать с роутерами, прошитыми DD WRT. Широкий функционал и правильная настройка этой прошивки позволит вам использовать функции маршрутизатора гораздо шире, чем со стандартным ПО. Попробуйте наше пошаговое руководство по настройке DD WRT и поделитесь своим результатом в комментариях. Там же можно задать нам вопросы по теме статьи.