Table of Contents
- 1 How to create ODBC data source in Windows XP?
- 2 Do you need ODBC driver for SQL Server?
- 3 How to create ODBC connection for Windows 11?
- 4 What does ODBC stand for in SQL Server?
Open Administrative Tools and select Data Sources (ODBC). You should be presented with the following dialog. Select the User DSN tab or the System DSN tab depending on weather you wish the SQL data to be made available to only the current user (User DSN) or all users (System DSN).
How to install ODBC driver on Windows Informatica?
Before you connect to an SQL data service through an ODBC client tool on Windows, install the ODBC driver on the client machine using the Informatica Data Services JDBC/ODBC driver installer. Install a 32-bit or 64-bit ODBC driver depending on the version of the third-party client tool you are using.
Do you need ODBC driver for SQL Server?
You always have to specify the ODBC driver. For a server-based data source like SQL Server, you typically need Server, Database, and login information. In the sample DSN, you don’t need TrustServerCertificate, WSID, or APP.
How to build a connection string for ODBC driver?
To build and test the connection string for your ODBC driver on your own computer, you can use the ODBC Data Source Administrator applet in the Control Panel. Create a File DSN for your connection, then copy settings out of the File DSN to assemble the connection string.
How to create ODBC connection for Windows 11?
So, we are selecting the ODBC Driver 11 for SQL Server (any DBMS that supports ODBC Connection). You can also select the SQL Server Native Client 11.0 (Only for SQL Server) Step 4: Once you click on the Finish button, a new pop up window called Create a New Data Source to SQL Server will open. Here we have to fill the required details:
You always have to specify the ODBC driver. For a server-based data source like SQL Server, you typically need Server, Database, and login information. In the sample DSN, you don’t need TrustServerCertificate, WSID, or APP.
How to open ODBC data source administrator in Windows 10?
To open the ODBC Data Source Administrator in Windows 10. On the Start page, type ODBC Data Sources. The ODBC Data Sources Desktop App should appear as a choice.
What does ODBC stand for in SQL Server?
The Open Database Connectivity, shortly called as ODBC is a standard API (Application Programming Interface) for accessing the DBMS (Database management Systems). Let us see the step by step approach to Create ODBC Connection for SQL Server in Windows 10.
Creating ODBC Connections in Microsoft Windows
Click on the Start Menu .
Select Control Panel.
Select Administrative Tools and double click the Data Sources ODBC icon.
Click on the System DSN tab.
Click the Add button.
Select SQL from the drivers list and click the Finish button.
How do I Set up an ODBC Connection?
Click Start and select Settings > Control Panel > Administrative Tools.
Doubleclick Data Sources ODBC to open the ODBC Data Source Administrator.
Select the System DSN tab.
Click Add.
Select SQL Server and click Finish.
Complete the DSN Configuration wizard see example screen shots below
How do I Create an ODBC Connection String?
Standard Security. Driver={ SQL Server };Server=myServerAddress;Database=myDataBase;Uid=myUsername;Pwd=myPassword;
Trusted connection. Driver={SQL Server};Server=myServerAddress;Database=myDataBase;Trusted_Connection=Yes;
Using a nonstandard port.
How do I Create a DSN for ODBC?
From the Control Panel, access Administrative Tools and then either ODBC Data Sources 64bit or ODBC Data Sources 32bit.
Click the User DSN, System DSN, or File DSN tab, and then click Add.
Click SQL Server, and then click Finish.
How do I Access ODBC Connection?
Click the Windows «Start» button and then click «Control Panel.» Click «System and Security.» Click «Administrative Tools» in the list of utilities. Double-click the icon labeled «Data Sources (ODBC).» A list of DSNs display.
Creating an ODBC Data Source
3.3.1.Configuring Your ODBC Data
Sources
Before you can link a table into Virtuoso, you need to configure
an ODBC datasource. It is quite likely that you already have ODBC
data sources defined. If so, you can skip this part of the
tour.
If you do not have any data sources defined, you should
configure your datasource using an appropriate ODBC driver. The
ODBC driver may come from the database vendor or a third-party
middleware vendor, such as OpenLink Software. You will need to
configure your ODBC datasource in accordance with the directions
from your driver vendor.
In this part of the tour, we show sample DSN configuration
information for some database vendor drivers. These examples of
working data sources are not meant to replace the instructions from
the driver vendor. In your specific installation other parameters
may be necessary.
To define ODBC data sources on Windows XP/95/98/NT, in the
Control Panel go to Administrative Tools and then click the Data
Sources (ODBC) icon.
This first datasource uses OpenLink Generic ODBC Driver V6.0 to
create DSN to a MySQL 5.x database.
Figure3.7.OpenLink Mutli Tier
DSN Configuration with database MySQL 5.x

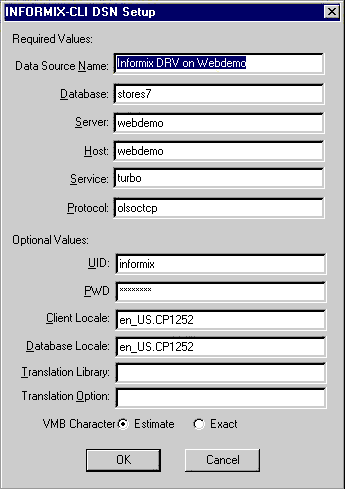
The next example is an Informix 7 datasource using the driver
from Informix Software, Inc.
Figure3.8.Informix Driver DSN
Configuration
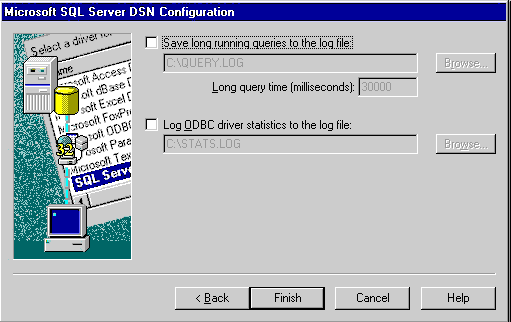
The next few images show a Microsoft SQL Server 6.5 datasource
using the Microsoft Corporation SQL Server driver.
Figure3.9.MS SQL Server DSN
Configuration
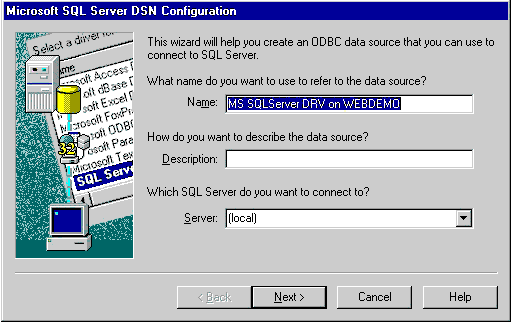
Figure3.10.MS SQL Server DSN
Configuration
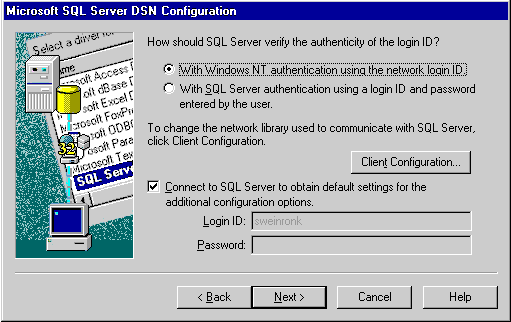
Figure3.11.MS SQL Server DSN
Configuration
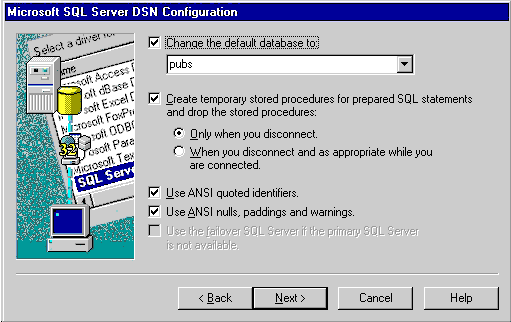
Figure3.12.MS SQL Server DSN
Configuration
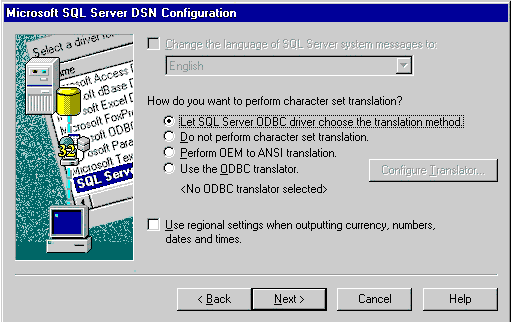
Figure3.13.MS SQL Server DSN
Configuration
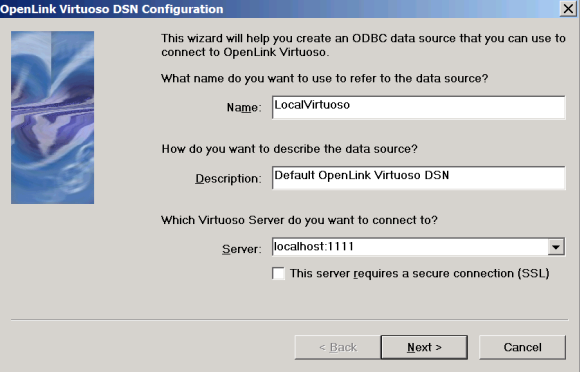
Finally, review the configuration information for your default
local Virtuoso datasource, named «Local
Virtuoso «.
Figure3.14.OpenLink Virtuoso
DSN Configuration
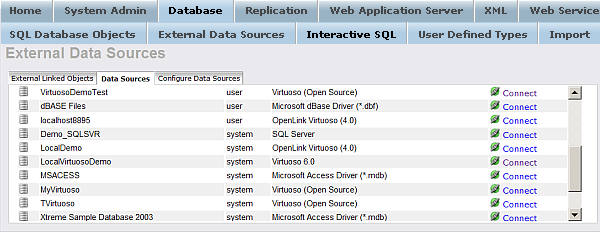
DSNs can be created and configured within the Virtuoso
Conductor. Go to «Database», then to «External Data Sources» and
then go to «Configure Data Sources» tab. Click the «Add System
DSN», or «Add User DSN», or «Add File DSN» button.
Figure3.15.Creating a new
DSN
An ODBC connection can be created on a Windows XP machine using a method called a DSN. A data source name (DSN) saves the ODBC setting on the computer, so you don’t need to continually reset the configurations. This is beneficial for programmers and administrators who need the computer to consistently connect to the same connection for a particular application. The settings for an ODBC connection is accomplished from the Windows control panel.
Click the Windows «Start» button and select «Control Panel.» This opens a window with a list of configuration options. Double-click the «Administrative Tools» icon to open a list of admin tasks.
Double-click the «Data Sources(ODBC)» icon. This opens a new window where you configure a new ODBC connection on the computer.
Click the «System» tab. This displays a window with a list of configurations for a system ODBC connection. In this window, click the «Add» button.
Select the database driver you wish to add. For instance, if the ODBC connection is being used for Microsoft Access, choose this option and click the «Finish» button.
Enter a friendly name for the ODBC connection that will display in your list of connections. Click the «OK» button to finalize the settings.
References
Tips
- You can select «User» instead of «System» tab in Step 3 to create a user specific ODBC connection.
Writer Bio
Lysis is the pen name for a former computer programmer and network administrator who now studies biochemistry and biology while ghostwriting for clients. She currently studies health, medicine and autoimmune disorders. Lysis is currently pursuing a Ph.D. in genetic engineering.
In this article, we will explore the process of repairing and configuring the ODBC settings in Windows XP, allowing for seamless access to databases and data sources.
Check for any updates or patches for your ODBC driver and install them before attempting any repairs.
Overview of ODBC and Windows XP compatibility issues
Windows XP users may encounter compatibility issues with ODBC drivers, which can cause error messages when trying to access a data source. To repair and configure ODBC on Windows XP, users should open the Data Sources Administrator through Programs > Administrative Tools > Data Sources. From there, select the System DSN or User DSN tab, depending on the problem. To add a new data source, users should click Add, select the appropriate driver (such as MySQL Connector ODBC or Oracle ODBC Driver), and fill out the necessary details, including the data source name and database information. If encountering an error message related to the Oracle TNS Service or TNS Names, users should check their TNSNames.ora file or use the Oracle ODBC driver’s “Oracle TNS-less Connection” form.
The ODBC driver provides connectivity to a wide range of databases, and repairing it can resolve many database-related issues on Windows XP.
Common causes of ODBC errors in Windows XP
Repair Method 2: Check ODBC Driver
Repair Method 3: Check ODBC Services
- Open Services
- Ensure the ODBC Data Source Administrator service is running

- If the service is not running, right-click on it and select Start
- If the service is disabled, right-click on it and select Properties
- Set the Startup type to Automatic
- Click OK to apply the changes

Steps to repair ODBC errors in Windows XP
1. Open Administrative Tools from Programs in the Start menu.
2. Select Data Sources (ODBC) to launch the Data Sources Administrator.
3. Select the User DSN tab and choose the data source name (DSN) that needs repairing.
4. Click the Configure button and check the form for details.
5. If the default driver specified is incorrect, choose the correct driver.
6. Check the Description and Name fields for accuracy.
7. If the problem persists, try running the WIN XP Home edition Command Prompt and type “\odbcad32.exe” to open the ODBC Data Sources Administrator.
8. If there are still issues, try reinstalling the database management system data, such as MySQL Connector/ODBC or Oracle Database.
9. For Oracle Database users, make sure the TNSNames.ora file is correctly configured with the Oracle TNS service.
10. If all else fails, seek help from online resources such as microsoft.public.windowsxp.help_and_support or contact the manufacturer of the database management systems or applications in question.
The ODBC Data Source Administrator can be accessed by navigating to Control Panel > Administrative Tools > Data Sources (ODBC).
Tips for troubleshooting ODBC issues in Windows XP
| Tips for Troubleshooting ODBC Issues in Windows XP |
|---|
| 1. Check the ODBC data source name |
| 2. Verify the ODBC driver is installed |
| 3. Ensure the ODBC driver version is compatible with the operating system |
| 4. Confirm the database server is running and accessible |
| 5. Check for firewall or security settings that may be blocking the connection |
| 6. Test the ODBC connection with a different application |
| 7. Check for ODBC connection string errors |
| 8. Try creating a new ODBC data source |
| 9. Reinstall the ODBC driver |
| 10. Restart the computer and try again |
Was this article helpful?
YesNo