Настройки роутеров для VPN-соединения D-Link DIR-615/655/855
Список рекомендуемых роутеров находиться здесь!
Роутер подходит для тарифов до — Мбит/сек с VPN соединением протокола PPtP, по LAN подключению
Wi-Fi скорость очень сильно зависит от посторонних помех и определяется в конкреттных случаях отдельно.
Скорость передачи данных по Wi-Fi (беспроводная) отличаеться от LAN подключения. Подробности здесь.
Перед настройкой рекомендуется прошить роутер последней версией прошивки. Описание для прошивки роутера можно найти в соответствующей ветке форума. Для полноценной работы роутера необходимо выполнить все пункты руководства!
Измените параметры TCP/IP сетевой карты у компьютера на автоматическое получение значений (DHCP). Затем необходимо включить адаптер питания роутера в электро-розетку.
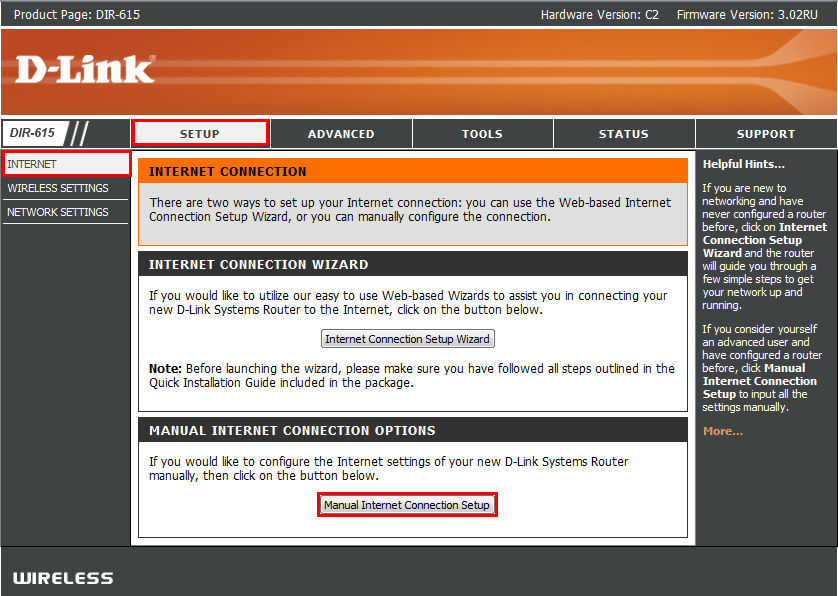
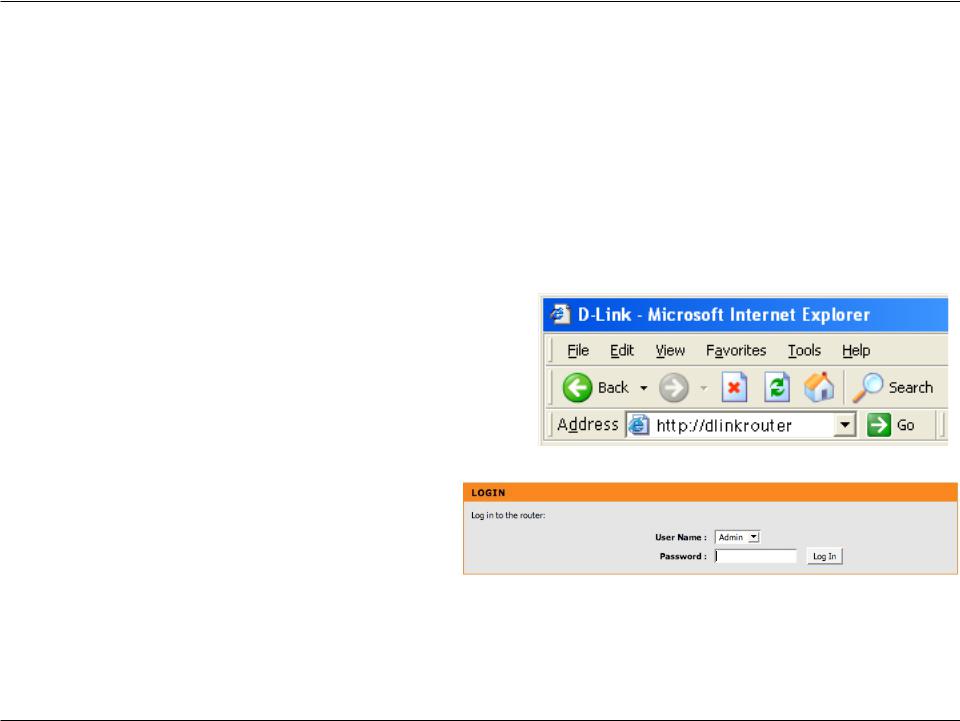
1. Подключаете устройство к компьютеру проводом, поставляющимся в комплекте. Открываете браузер и набираете в строке адреса 192.168.0.1. Возможно, при этом потребуется привести настройки TCP/IP в автоматического получения ip-адресов (DHCP). Подключение по беспроводной связи к устройству или попытка открытия настроек через любой другой Интернет-браузер не всегда могут быть успешными.
Login: admin
Password: (оставьте поле пустым)
После этого попадаем в Web-интерфейс роутера. Выберите в меню Setup -> Internet. В резделе Manual Internet Connection Options нажимаем на кнопку Manual Internet Connection Setup.
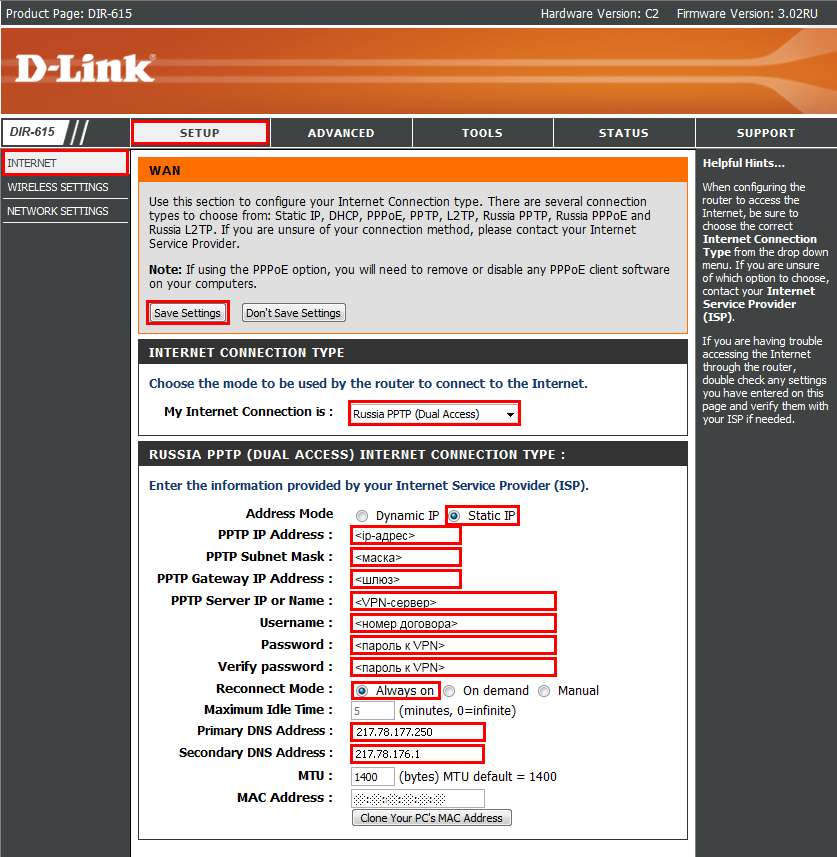
2. В разделе Internet Connection Type выставляем режим Russia PPTP (Dual Access). Затем переходим в раздел Russia PPTP (Dual Access) Internet Connection Type выставляем Static IP и заполняем поля PPTP IP Address, PPTP Subnet Mask и PPTP Gateway IP Address используя данные из договора, соответственно <ip-адрес>, <маска>, <шлюз>.
PPTP Server IP or Name : vpn.koptevo.net. Для тарифов с ограничением трафика имя сервера: lvpn.koptevo.net (первая буква — английская маленькая «эль»).
Username: <номер договора> в формате 0/0000
Password: <пароль к VPN>
Verify Password: <пароль к VPN>
Reconnect mode: выставить Always On
Primary DNS server: 217.78.177.250 — первичный DNS сервер (из договора)
Secondary DNS server: 217.78.176.1 — вторичный DNS сервер (из договора)
Подтверждаем правильность настроек нажав кнопку Save Settings
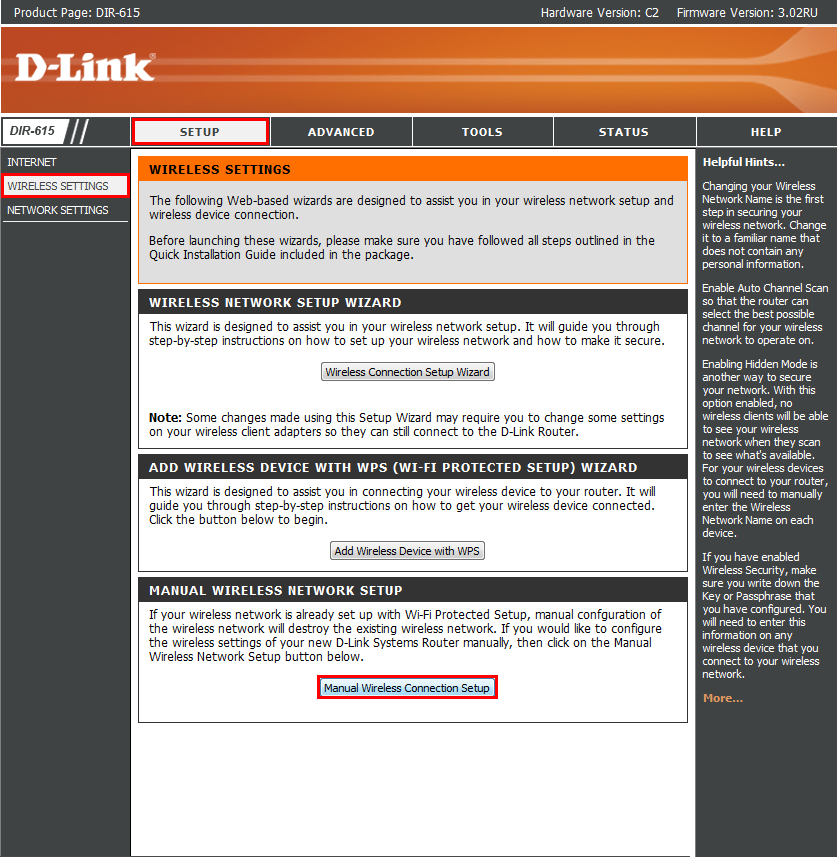
3. Выберите в меню Setup -> Wireless Settings. В резделе Manual Wireless Network Setup нажимаем на кнопку Manual Wireless Connection Setup.
4. В разделе Wireless Network Settings.
В разделе Wi-Fi Protected Setup
Enable: снимаем галочку
В разделе Wireless Network Settings
Enable Wireless: ставим галочку.
Wireless Network Name: Имя точки доступа. В дальнейшем точка доступа будет отображаться именно с этим значением. Не оставляйте имя сети по умолчанию.
Enable Auto Channel Selection : ставим галочку.
Переходм к разделу Wireless Security Mode. Выбираете Security Mode : WPA Personal
Появляется раздел WPA с настройками выбранного вами типа шифрования.
Сipher Type: Оба
PSK/EAP: PSK
Network Key: пароль к точке доступа (задается латинскими букавами и/или цифрами от 8 до 64 символов)
Подтверждаем правильность настроек нажав кнопку Save Settings

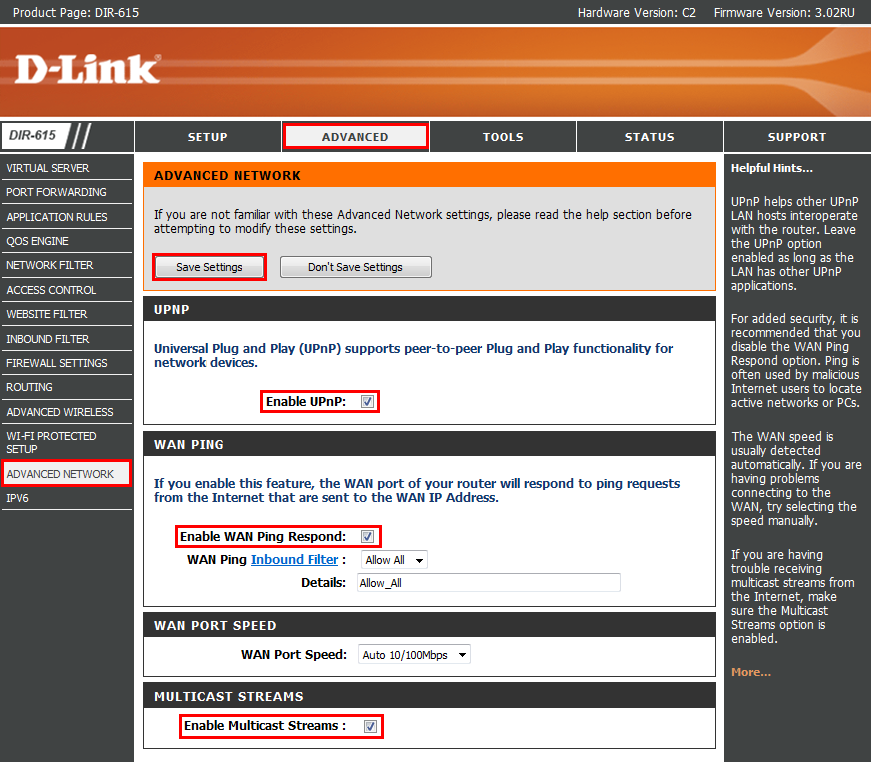
5. Выберите в меню Advanced -> Advanced Network
Enable UPnP: поставить галочку
Enable WAN Ping Responding: поставить галочку
Enable multicust streams: поставить галочку
Подтверждаем правильность настроек нажав кнопку Save Settings
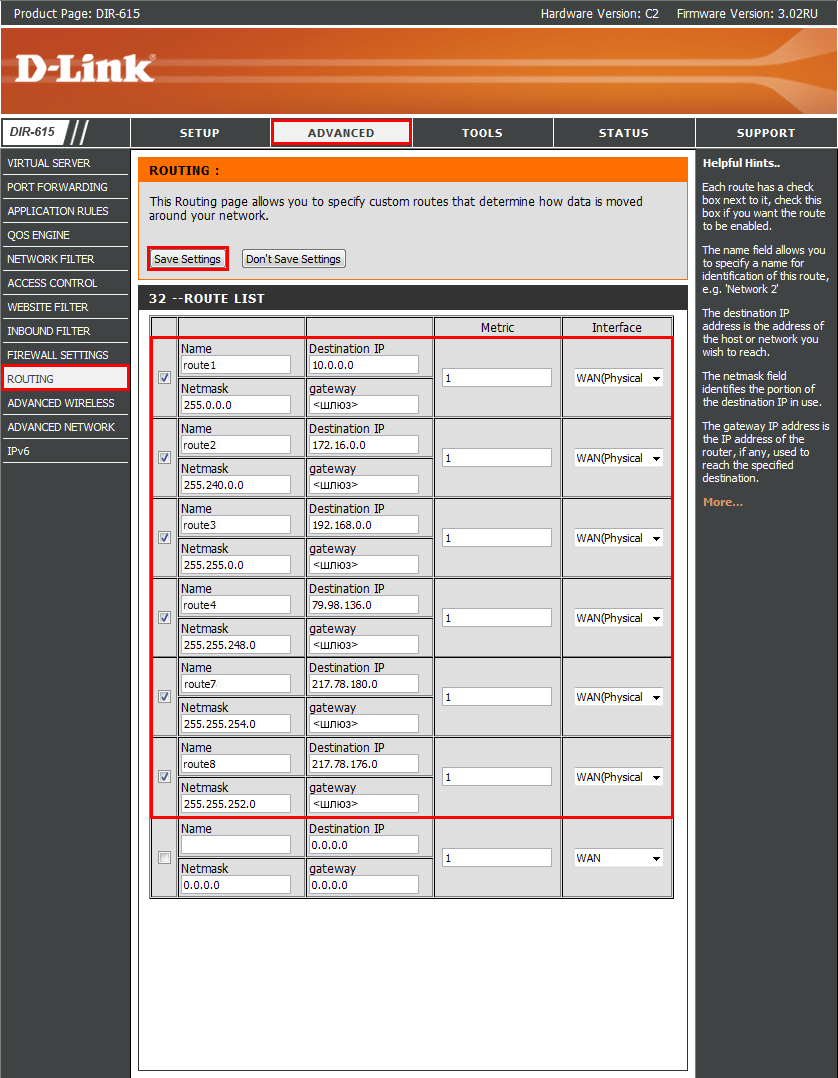
6. Перейдем к настройке маршрутизации, чтобы стали доступны ресурсы локальной сети.
Внимание! Без настроек маршрутизации этот роутер не будет работать через VPN. Настраивать обязательно!
Выберите в меню Advanced -> Routing
Interface — Интерфейс, на котором будет работать правило WAN(Phisical Interface).
Name — задаем любое имя для маршрута (должно начинаться с буквы латинского алфавита, может содержать цифры).
Metric — Везде ставим 1.
Официальный список требуемых локальных маршрутов:
Destination IP: 10.0.0.0 Netmask: 255.0.0.0 gateway : <шлюз>
Destination IP : 172.16.0.0 Netmask: 255.240.0.0 gateway : <шлюз>
Destination IP : 192.168.0.0 Netmask: 255.255.0.0 gateway : <шлюз>
Destination IP : 79.98.136.0 Netmask: 255.255.248.0 gateway : <шлюз>
Destination IP : 217.78.180.0 Netmask: 255.255.254.0 gateway : <шлюз>
Destination IP : 217.78.176.0 Netmask: 255.255.252.0 gateway: <шлюз>
где <шлюз> — обязательно свериться с договором. (основной шлюз)
Подтверждаем правильность настроек нажав кнопку Save Settings
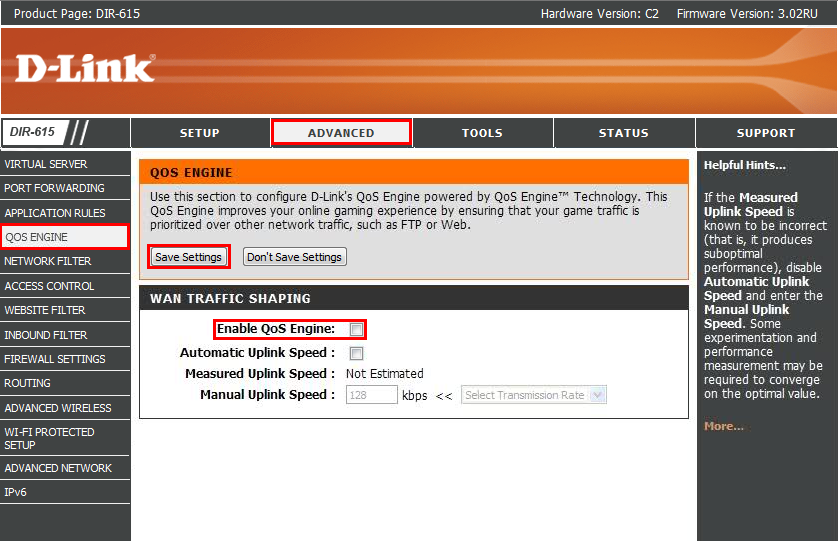
7. Для нормального функционирования роутеров этой серии необходимо отключить поддержку QOS/
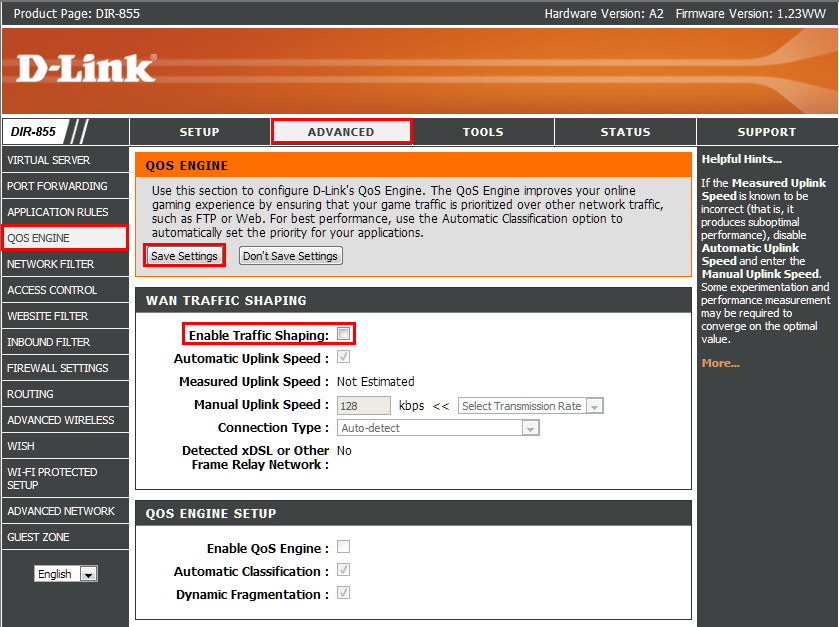
Выберите в меню Advanced -> QOS Engine.
Обязательно снимите галочку с Enable QOS Engine
Подтверждаем правильность настроек нажав кнопку Save Settings
Для модели DIR-855 нужно снять галочку с Enable Traffic Shaping
8. Подключите кабель провайдера в порт WAN (Internet) на задней панели маршрутизатора.
Вы здесь
Основные свойства роутера DIR-855
Логин IP:192.168.0.1
Имя пользователя:Admin
Пароль:[none]
Системный процессор:800 MHz
Системная память:128 MiB
Подключение Wi-Fi:54mbps (bg)
Возможности подключения Wi-Fi диапазоны:2.4GHz
Более подробная информация о маршрутизаторе DIR-855 приведена ниже для справки.
- Как войти в роутер D-Link?
- Как сделать так, чтобы ваше устройство и роутер находились в одной локальной сети?
- Как узнать логин и пароль роутера?
- Как изменить пароль WIFI роутера D-Link?
- Как связаться с D-Link router после продажи?
Как войти в роутер D-Link?
Шаги для входа в роутер через компьютер следующие:
①Прежде всего убедитесь, что компьютер и маршрутизатор находятся в одной локальной сети. Вы можете найти «Выполнить» в меню «Пуск» компьютера (или нажать Win + R), ввести cmd и нажать Enter, отобразится интерфейс, показанный ниже.

Введите ping192.168.0.1в этом интерфейсе и нажмите Enter. Если возвращаемый результат отображается, как показано на рисунке ниже, это означает, что он находится в той же локальной сети, в противном случае он не находится в той же локальной сети. ( Как сделать ваше устройство и маршрутизатор в одной локальной сети )

②Введите192.168.0.1в адресной строке браузера вашего компьютера, нажмите Enter, откроется интерфейс входа в систему маршрутизатора по умолчанию, введите имя пользователя и пароль для входа в систему. ( Как найти пароль маршрутизатора )
Шаги для входа через мобильный телефон следующие:
①Подключите свой телефон к WIFI маршрутизатора, который вы хотите войти первым
②Откройте браузер на своем мобильном телефоне, введите192.168.0.1в адресной строке, затем вы увидите интерфейс входа в систему маршрутизатора, введите имя пользователя и пароль для входа.
🔝 Вернуться наверх
Как сделать так, чтобы ваше устройство и роутер находились в одной локальной сети?
Мобильные телефоны или другие мобильные устройства должны подключаться только к WIFI вашего маршрутизатора D-Link через беспроводную сетевую карту; ниже мы сосредоточимся на том, как подключить компьютер к той же локальной сети, что и роутер, через сетевой кабель:
①Подключите сетевой кабель компьютера к порту LAN маршрутизатора. Теперь многие маршрутизаторы D-Link также поддерживают подключение вслепую;
2 Возьмем в качестве примера WINDOWS 10, щелкните правой кнопкой мыши «Сеть», выберите «Свойства», щелкните «Изменить параметры адаптера», щелкните правой кнопкой мыши «Ethernet», выберите «Свойства», щелкните левой кнопкой мыши «Протокол Интернета версии 4», выберите «Получить IP-адрес». автоматически.


🔝 Вернуться наверх
Как узнать логин и пароль роутера?
Начальное имя пользователя и пароль маршрутизатора можно посмотреть на заводской табличке в нижней части маршрутизатора. На паспортной табличке указаны адрес входа в систему маршрутизатора по умолчанию, имя пользователя и пароль по умолчанию; если вы изменили пароль по умолчанию и потеряли его, вы можете только сбросить настройки маршрутизатора. Чтобы восстановить заводские настройки, выполните следующие действия:
① Найдите кнопку сброса маршрутизатора. Вообще говоря, кнопка сброса маршрутизатора находится в небольшом отверстии, и ее нужно использовать скрепкой. Некоторые маршрутизаторы представляют собой обычную кнопку, а некоторые маршрутизаторы интегрированы с кнопкой WPS. вместе.
②Убедитесь, что маршрутизатор подключен к сети, нажмите и удерживайте кнопку сброса не менее 7 секунд и отпустите кнопку сброса, когда индикатор маршрутизатора начнет мигать. После того, как индикатор маршрутизатора вернется в нормальное состояние, вы можете попытаться войти в свой маршрутизатор, используя имя пользователя и пароль по умолчанию.
🔝 Вернуться наверх
Как изменить пароль WIFI роутера D-Link?
Войдите в интерфейс настройки роутера ( как войти в роутер ), введите имя пользователя и пароль для входа в интерфейс роутера ( как узнать имя пользователя и пароль роутера ), найдите и откройте настройки WIFI (настройки беспроводного интернета ), а затем вы можете сбросить пароль беспроводной сети Интернет.
🔝 Вернуться наверх
Как связаться с D-Link router после продажи?
📚 маршрутизатор Комментарий
Поиск
- VPN
- router
- password
- маршрутизатор
- Пароль
- Wifi
- IP
- Netgear
- Huawei
- 5G
- Мобильный
- Компьютер
Статьи
-

Является ли IP-адрес персональными данными?
2022/11/10
-
Как скрыть свой IP-адрес?
2022/11/10
-
Как изменить свой IP-адрес?
2022/11/10


![]()

Preface
D-Link reserves the right to revise this publication and to make changes in the content hereof without obligation to notify any person or organization of such revisions or changes.
Manual Revisions
|
Revision |
Date |
Description |
1.0November 13, 2007 DIR-855 A2 Revision A1 with Firmware 1.10
|
1.1 |
April 23, 2008 |
Updated warranty information |
Trademarks
D-Link and the D-Link logo are trademarks or registered trademarks of D-Link Corporation or its subsidiaries in the United States or other countries. All other company or product names mentioned herein are trademarks or registered trademarks of their respective companies.
Copyright © 2008 by D-Link Systems, Inc.
All rights reserved. This publication may not be reproduced, in whole or in part, without prior expressed written permission from D-Link Systems, Inc.
|
D-Link DIR-855 User Manual |

Table of Contents
Table of Contents
|
Preface………………………………………………………………… |
i |
|
Manual Revisions……………………………………………… |
i |
|
Trademarks……………………………………………………… |
i |
|
Product Overview………………………………………………… |
1 |
|
Package Contents……………………………………………. |
1 |
|
System Requirements………………………………………. |
2 |
|
Introduction……………………………………………………… |
3 |
|
Features…………………………………………………………. |
4 |
|
Hardware Overview………………………………………….. |
5 |
|
Connections………………………………………………. |
5 |
|
LEDs…………………………………………………………. |
6 |
|
Installation………………………………………………………….. |
7 |
|
Before you Begin……………………………………………… |
7 |
|
Wireless Installation Considerations.………………….. |
8 |
|
Network Diagram……………………………………………… |
9 |
|
Connect to Cable/DSL/Satellite Modem…………….. |
10 |
|
Connect to Another Router………………………………. |
11 |
|
Getting Started………………………………………………. |
13 |
|
Configuration…………………………………………………….. |
14 |
|
Web-based Configuration Utility……………………….. |
14 |
|
Setup Wizard……………………………………………. |
15 |
|
Manual Configuration.……………………………….. |
19 |
|
Dynamic (Cable)……………………………………. |
19 |
|
PPPoE (DSL)………………………………………… |
20 |
|
PPTP…………………………………………………… |
21 |
|
L2TP.…………………………………………………… |
23 |
|
Static (assigned by ISP)…………………………. |
25 |
|
Wireless Settings………………………………………. |
26 |
|
802.11n/g (2.4GHz).………………………………. |
26 |
|
802.11n/a (5GHz).…………………………………. |
28 |
|
Network Settings.……………………………………… |
30 |
|
LAN Settings…………………………………………. |
30 |
|
DHCP Server Settings……………………………. |
31 |
|
DHCP Reservation………………………………… |
32 |
|
Virtual Server……………………………………………. |
33 |
|
Port Forwarding………………………………………… |
35 |
|
Application Rules………………………………………. |
36 |
|
QoS Engine……………………………………………… |
37 |
|
Network Filters………………………………………….. |
38 |
|
Access Control.………………………………………… |
39 |
|
Access Control Wizard…………………………… |
39 |
|
Website Filters………………………………………….. |
42 |
|
Inbound Filters………………………………………….. |
43 |
|
Firewall Settings……………………………………….. |
44 |
|
Application Level Gateway (ALG) |
|
|
Configuration……………………………………………. |
45 |
|
Router Settings…………………………………………. |
46 |
|
Advanced Wireless Settings……………………….. |
47 |
|
802.11n/g (2.4GHz).………………………………. |
47 |
|
802.11n/a (5GHz).…………………………………. |
48 |
|
WISH Settings………………………………………….. |
49 |
|
Advanced Network Settings.………………………. |
51 |
|
D-Link DIR-855 User Manual |
ii |

Table of Contents
|
UPnP…………………………………………………… |
51 |
|
Internet Ping Block…………………………………. |
51 |
|
Internet Port Speed………………………………… |
51 |
|
Multicast Streams.…………………………………. |
51 |
|
Administrator Settings.………………………………. |
52 |
|
Change Password…………………………………. |
52 |
|
Remote Management.……………………………. |
52 |
|
Time Settings…………………………………………… |
53 |
|
SysLog……………………………………………………. |
54 |
|
Email Settings………………………………………….. |
55 |
|
System Settings……………………………………….. |
56 |
|
Update Firmware………………………………………. |
57 |
|
DDNS.…………………………………………………….. |
58 |
|
System Check.…………………………………………. |
59 |
|
Schedules………………………………………………… |
60 |
|
Device Information……………………………………. |
61 |
|
Log…………………………………………………………. |
62 |
|
Stats.………………………………………………………. |
63 |
|
Internet Sessions………………………………………. |
64 |
|
Wireless…………………………………………………… |
65 |
|
WISH………………………………………………………. |
65 |
|
Support……………………………………………………. |
66 |
|
Wireless Security………………………………………………. |
67 |
|
What is WPA?……………………………………………….. |
67 |
|
Wireless Security Setup Wizard……………………….. |
68 |
|
Add Wireless Device with WPS Wizard.……………. |
70 |
|
Configure WPA-Personal (PSK)……………………….. |
71 |
|
Configure WPA-Enterprise (RADIUS)……………….. |
72 |
|
Connect to a Wireless Network………………………….. |
74 |
|
Using Windows Vista®…………………………………….. |
74 |
|
Configure Wireless Security……………………….. |
75 |
|
Connect Using WCN 2.0 in Windows Vista® .…….. |
77 |
|
Using Windows® XP.………………………………………. |
78 |
|
Configure WPA-PSK.………………………………… |
79 |
|
Troubleshooting………………………………………………… |
81 |
|
Wireless Basics…………………………………………………. |
85 |
|
What is Wireless?…………………………………………… |
86 |
|
Tips………………………………………………………………. |
88 |
|
Wireless Modes……………………………………………… |
89 |
|
Networking Basics…………………………………………….. |
90 |
|
Check your IP address……………………………………. |
90 |
|
Statically Assign an IP address………………………… |
91 |
|
Technical Specifications……………………………………. |
92 |
|
D-Link DIR-855 User Manual |
iii |
Section 1 — Product Overview
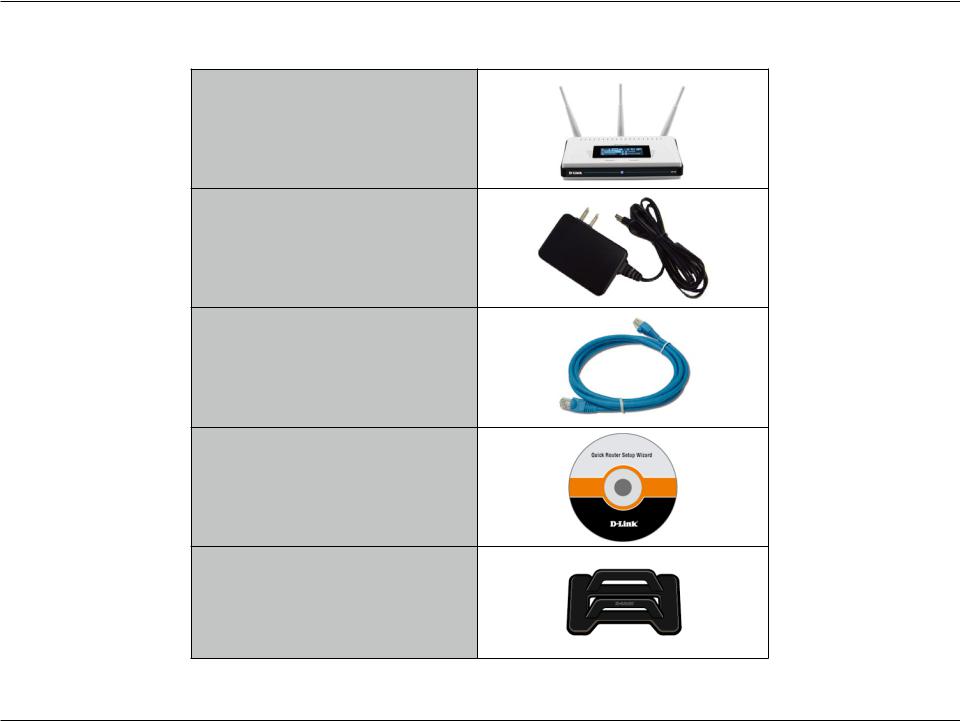
ProductPackageOverviewContents
D-Link DIR-855 Media Router
Power Adapter
Ethernet Cable
CD-ROM
Stand
Note: Using a power supply with a different voltage rating than the one included with the DIR-855 will cause damage and void the warranty for this product.
|
D-Link DIR-855 User Manual |

Section 1 — Product Overview
System Requirements
|
• An Ethernet-based Cable or DSL modem |
||
|
Network Requirements |
• IEEE 802.11n-draft or 802.11g wireless clients |
|
|
• IEEE 802.11a wireless clients |
||
|
• 10/100/1000 Ethernet |
||
|
Computer with the following: |
||
|
• Windows®, Macintosh, or Linux-based operating |
||
|
system |
||
|
• An installed Ethernet adapter |
||
|
Browser Requirements: |
||
|
Web-based Configuration |
• Internet Explorer 6.0 or higher |
|
|
• Mozilla 1.7.12 or higher |
||
|
Utility Requirements |
• Firefox 1.5 or higher |
|
|
• Safari 3.0 or higher (with Java 1.3.1 or higher) |
||
|
• Flock 0.7.14 or higher |
||
|
• Opera 6.0 or higher |
||
|
Windows® Users: Make sure you have the latest version |
||
|
of Java installed. Visit www.java.com to download the |
||
|
latest version. |
||
|
CD Installation Wizard |
Computer with the following: |
|
|
• Windows® XP with Service Pack 2 or Vista® |
||
|
Requirements |
• An installed Ethernet adapter |
|
|
• CD-ROM drive |
||
|
D-Link DIR-855 User Manual |

Section 1 — Product Overview
Introduction
TOTAL PERFORMANCE
Combines award winning router features and IEEE 802.11a/Draft 802.11n wireless technology to provide the best wireless performance
TOTAL SECURITY
The most complete set of security features including Active Firewall and WPA2 to protect your network against outside intruders
TOTAL COVERAGE
Provides greater wireless signal rates even at farther distances for best-in-class Whole Home Coverage.
ULTIMATE PERFORMANCE
The D-Link Wireless N Quadband Gigabit router (DIR-855) is a draft 802.11n/802.11a compliant device that delivers real world performance of up to 14x faster than an 802.11g wireless connection (also faster than a 100Mbps wired Ethernet connection).
Create a secure wireless network to share photos, files, music, video, printers, and network storage throughout your home.
Connect the DIR-855 router to a cable or DSL modem and share your high-speed Internet access with everyone on the network. In addition, this Router includes a Quality of Service (QoS) engine that keeps digital phone calls (VoIP) and online gaming smooth and responsive, providing a better Internet experience.
EXTENDED WHOLE HOME COVERAGE
Powered by Wireless N Quadband technology, this high performance router provides superior Whole Home Coverage while reducing dead spots. The router is designed for use in bigger homes and for users who demand higher performance networking. Add a Wireless N notebook or desktop adapter and stay connected to your network from virtually anywhere in your home.
TOTAL NETWORK SECURITY
The Wireless N Quadband router supports all of the latest wireless security features to prevent unauthorized access, be it from over the wireless network or from the Internet. Support for WPA and WEP standards ensure that you’ll be able to use the best possible encryption method, regardless of your client devices. In addition, this router utilizes dual active firewalls (SPI and NAT) to prevent potential attacks from across the Internet.
*MaximumwirelesssignalratederivedfromIEEEStandard802.11a,802.11gandDraft802.11nspecifications.Actualdatathroughputwillvary.Networkconditionsand environmental factors, including volume of network traffic, building materials and construction, and network overhead, lower actual data throughput rate. Environmental conditions will adversely affect wireless signal range.
|
D-Link DIR-855 User Manual |

Section 1 — Product Overview
Features
•Faster Wireless Networking — The DIR-855 provides up to 300Mbps* wireless connection with other 802.11n wireless clients. This capability allows users to participate in real-time activities online, such as video streaming, online gaming, and real-time audio. The performance of this 802.11n wireless router gives you the freedom of wireless networking at speeds 650% faster than 802.11g.
•Compatible with 802.11a/g Devices — The DIR-855 is still fully compatible with the IEEE 802.11g and 802.11a standards, so it can connect with existing 802.11g and 802.11a PCI, USB, and Cardbus adapters.
•Advanced Firewall Features — The Web-based user interface displays a number of advanced network management features including:
•Content Filtering — Easily applied content filtering based on MAC Address, URL, and/or
Domain Name.
•Filter Scheduling — These filters can be scheduled to be active on certain days or for a duration of hours or minutes.
•Secure Multiple/Concurrent Sessions — The DIR-855 can pass through VPN sessions. It supports multiple and concurrent IPSec and PPTP sessions, so users behind the DIR-855 can securely access corporate networks.
•User-friendly Setup Wizard — Through its easy-to-use Web-based user interface, the DIR-855 lets you control what information is accessible to those on the wireless network, whether from the Internet or from your company’s server. Configure your router to your specific settings within minutes.
* Maximum wireless signal rate derived from IEEE Standard 802.11g, 802.11a, and Draft 802.11n specifications. Actual data throughput will vary. Network conditions and environmental factors, including volume of network traffic, building materials and construction, and network overhead, lower actual data throughput rate.
Environmental conditions will adversely affect wireless signal range.
|
D-Link DIR-855 User Manual |
Section 1 — Product Overview
Hardware Overview
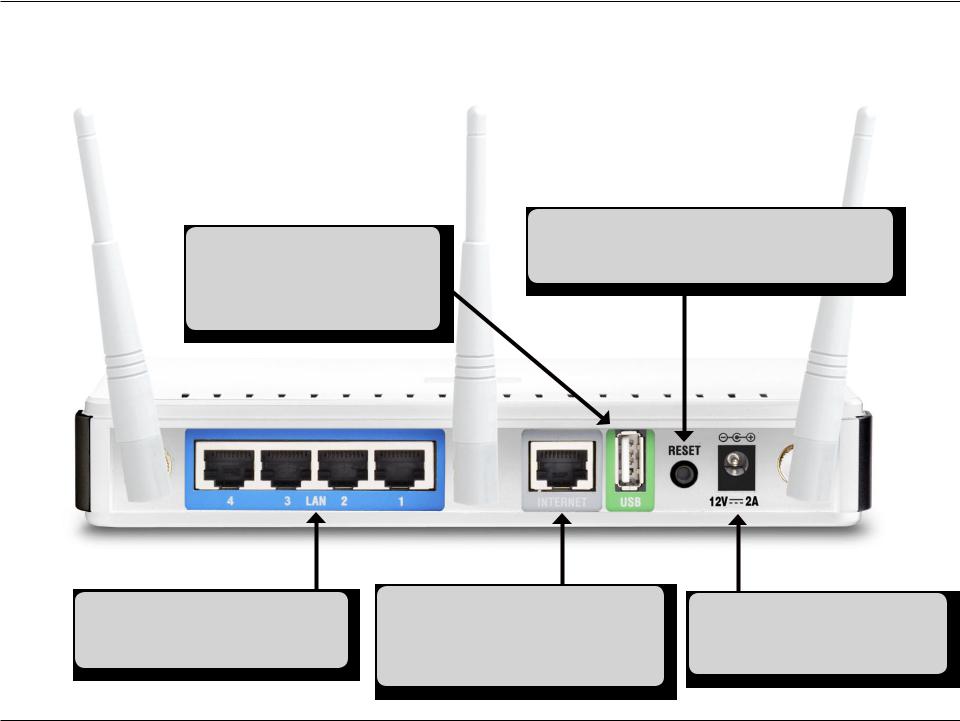
Connections
USB
Connect a USB 1.1 or 2.0 flash drive to configure the wireless settings using WCN.
Reset
Pressing the Reset button restores the router to its original factory default settings.
LAN Ports (1-4)
Connect Ethernet devices such as computers, switches, and hubs.
Internet Port
The auto MDI/MDIX Internet port is the connection for the Ethernet cable to the cable or DSL modem.
Power Receptor
Receptor for the supplied power adapter.
D-Link DIR-855 User Manual
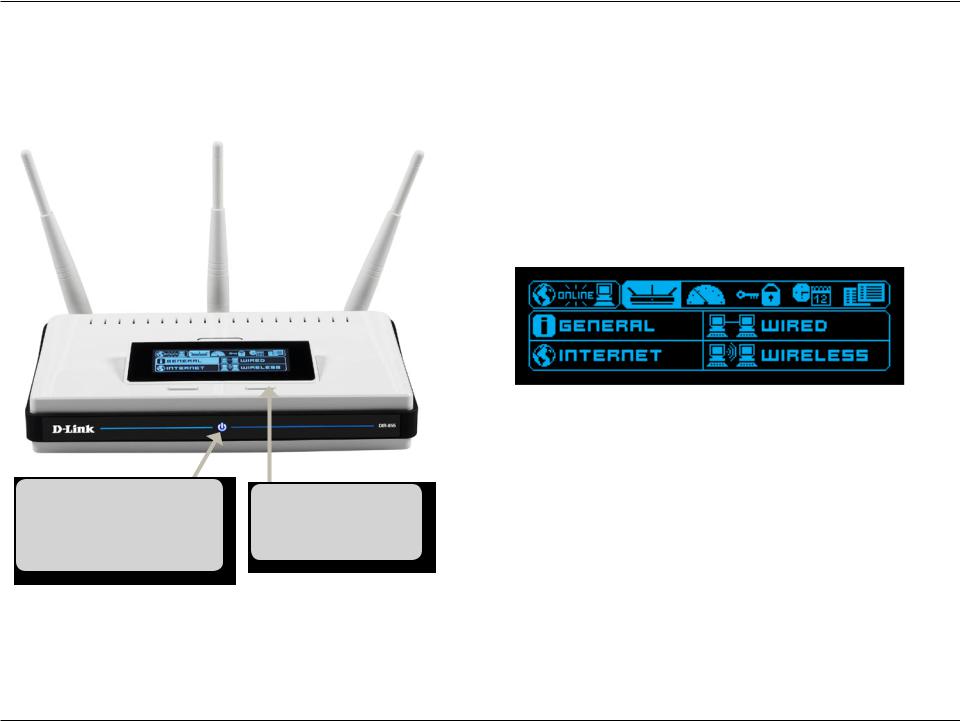
Section 1 — Product Overview
Power LED
A solid light indicates a proper connection to the power supply.
OLED Screen
Displays information regarding the router.
1 2 3 4 5 6
|
OLED Screen |
|||
|
1 |
WAN |
Displays Internet connectivity. |
|
|
2 |
Menu |
Select to display the OLED main menu. |
|
|
3 |
Performance |
Select to display statistics of the LAN, WAN, |
|
|
and wireless connections. |
|||
|
4 |
WPS |
Displays the WPS status. |
|
|
5 |
Date/Time |
Displays the routers date and time. |
|
|
6 |
DHCP |
Displays the DHCP status. |
|
|
D-Link DIR-855 User Manual |
![]()
Section 2 — Installation
Installation
This section will walk you through the installation process. Placement of the router is very important. Do not place the router in an enclosed area such as a closet, cabinet, or in the attic or garage.
Before you Begin
•Please configure the router with the computer that was last connected directly to your modem.
•You can only use the Ethernet port on your modem. If you were using the USB connection before using the router, then you must turn off your modem, disconnect the USB cable and connect an Ethernet cable to the Internet port on the router, and then turn the modem back on. In some cases, you may need to call your ISP to change connection types (USB to Ethernet).
•If you have DSL and are connecting via PPPoE, make sure you disable or uninstall any PPPoE software such as WinPoet, Broadjump, or Enternet 300 from your computer or you will not be able to connect to the Internet.
•When running the Setup Wizard from the D-Link CD, make sure the computer you are running the CD from is connected to the Internet and online or the wizard will not work. If you have disconnected any hardware, re-connect your computer back to the modem and make sure you are online.
|
D-Link DIR-855 User Manual |

Section 2 — Installation
Wireless Installation Considerations
The D-Link wireless router lets you access your network using a wireless connection from virtually anywhere within the operating range of your wireless network. Keep in mind, however, that the number, thickness and location of walls, ceilings, or other objects that the wireless signals must pass through, may limit the range. Typical ranges vary depending on the types of materials and background RF (radio frequency) noise in your home or business. The key to maximizing wireless range is to follow these basic guidelines:
1.Keep the number of walls and ceilings between the D-Link router and other network devices to a minimum — each wall or ceiling can reduce your adapter’s range from 3-90 feet (1-30 meters.) Position your devices so that the number of walls or ceilings is minimized.
2. Be aware of the direct line between network devices. A wall that is 1.5 feet thick (.5 meters), at a 45-degree angle appears to be almost 3 feet (1 meter) thick. At a 2-degree angle it looks over 42 feet (14 meters) thick! Position devices so that the signal will travel straight through a wall or ceiling (instead of at an angle) for better reception.
3. Building Materials make a difference. A solid metal door or aluminum studs may have a negative effect on range. Try to position access points, wireless routers, and computers so that the signal passes through drywall or open doorways. Materials and objects such as glass, steel, metal, walls with insulation, water
(fish tanks), mirrors, file cabinets, brick, and concrete will degrade your wireless signal.
4.Keep your product away (at least 3-6 feet or 1-2 meters) from electrical devices or appliances that generate RF noise.
5. If you are using 2.4GHz cordless phones or X-10 (wireless products such as ceiling fans, lights, and home security systems), your wireless connection may degrade dramatically or drop completely. Make sure your 2.4GHz phone base is as far away from your wireless devices as possible. The base transmits a signal even if the phone in not in use.
D-Link DIR-855 User Manual
Section 2 — Installation
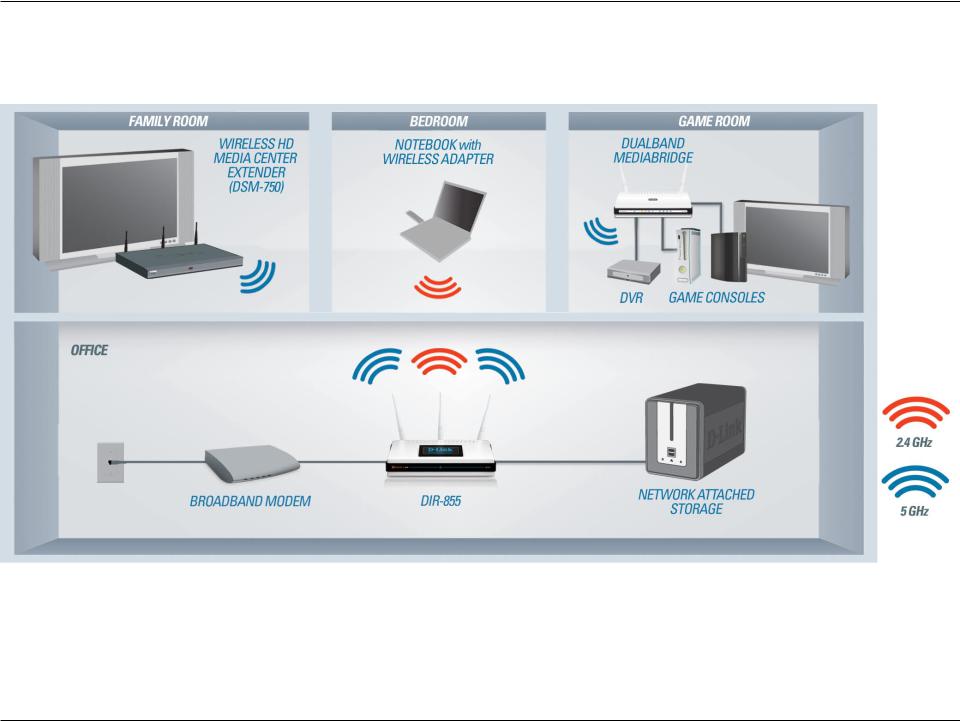
Network Diagram
|
D-Link DIR-855 User Manual |

Section 2 — Installation
Connect to Cable/DSL/Satellite Modem
If you are connecting the router to a cable/DSL/satellite modem, please follow the steps below:
1.Place the router in an open and central location. Do not plug the power adapter into the router.
2.Turn the power off on your modem. If there is no on/off switch, then unplug the modem’s power adapter. Shut down your computer.
3.Unplug the Ethernet cable (that connects your computer to your modem) from your computer and place it into the Internet port on the router.
4.Plug an Ethernet cable into one of the four LAN ports on the router. Plug the other end into the Ethernet port on your computer.
5.Turn on or plug in your modem. Wait for the modem to boot (about 30 seconds).
6.Plug the power adapter to the router and connect to an outlet or power strip. Wait about 30 seconds for the router to boot.
7.Turn on your computer.
8.Refer to page 13 to configure your router.
|
D-Link DIR-855 User Manual |
10 |

Section 2 — Installation
Connect to Another Router
If you are connecting the D-Link router to another router to use as a wireless access point and/or switch, you will have to do the following before connecting the router to your network:
•Disable UPnP™
•Disable DHCP
•Change the LAN IP address to an available address on your network. The LAN ports on the router cannot accept a DHCP address from your other router.
To connect to another router, please follow the steps below:
1.Plug the power into the router. Connect one of your computers to the router (LAN port) using an Ethernet cable. Make sure your IP address on the computer is 192.168.0.xxx (where xxx is between 2 and 254). Please see the NetworkingBasicssection for more information. If you need to change the settings, write down your existing settings before making any changes. In most cases, your computer should be set to receive an IP address automatically in which case you will not have to do anything to your computer.
2.Open a web browser and enter http://dlinkrouter or http://192.168.0.1 and press Enter. When the login window appears, set the user name to Admin and leave the password box empty. Click Log In to continue.
3.Click on Advanced and then click Advanced Network. Uncheck the Enable UPnP checkbox. Click Save Settings to continue.
4.Click Setup and then click Network Settings. Uncheck the Enable DHCP Server checkbox. Click Save Settings to continue.
5.Under Router Settings, enter an available IP address and the subnet mask of your network. Click Save Settings to save your settings. Use this new IP address to access the configuration utility of the router in the future. Close the browser and change your computer’s IP settings back to the original values as in Step 1.
|
D-Link DIR-855 User Manual |
11 |

Section 2 — Installation
6.Disconnect the Ethernet cable from the router and reconnect your computer to your network.
7.Connect an Ethernet cable in one of the LAN ports of the router and connect it to your other router. Do not plug anything into the Internet port of the D-Link router.
8.Youmaynowusetheother3LANportstoconnectotherEthernetdevicesandcomputers.Toconfigureyourwireless network, open a web browser and enter the IP address you assigned to the router. Refer to the Configuration and Wireless Security sections for more information on setting up your wireless network.
|
D-Link DIR-855 User Manual |
12 |
Section 2 — Installation
Getting Started
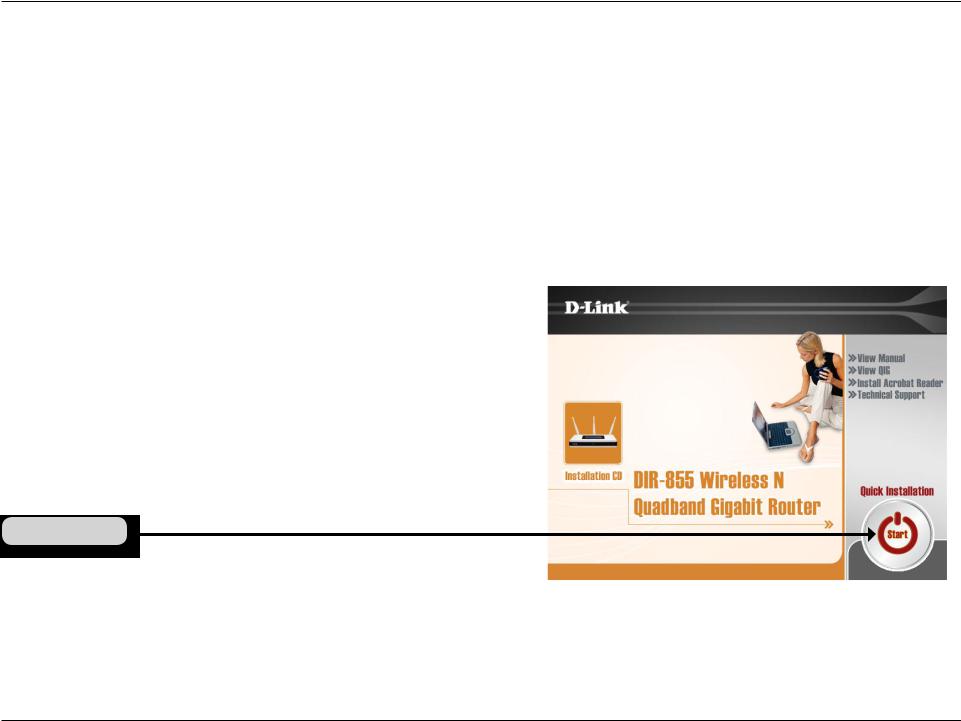
The DIR-855 includes a Quick Router Setup Wizard CD. Follow the simple steps below to run the Setup Wizard to guide you quickly through the installation process.
Insert the Quick Router Setup Wizard CD in the CD-ROM drive. The step-by-step instructions that follow are shown in Windows® XP. The steps and screens are similar for the other Windows operating systems.
If the CD Autorun function does not automatically start on your computer, go to Start > Run. In the run box type “D:\DIR855.exe” (where D: represents the drive letter of your CD-ROM drive).
When the autorun screen appears, click Start.
Click Start
Note: It is reccomended to write down the SSID and Security Key, followed by the login password on the provided CD holder.
|
D-Link DIR-855 User Manual |
13 |
Section 3 — Configuration
Configuration
This section will show you how to configure your new D-Link wireless router using the web-based configuration utility.
Web-based Configuration Utility
To access the configuration utility, open a web-browser such as Internet Explorer and enter http://dlinkrouter or http://192.168.0.1
Select Admin from the drop-down menu and then enter your password. Leave the password blank by default.
If you get a Page Cannot be Displayed error, please refer to the Troubleshooting section for assistance.
|
D-Link DIR-855 User Manual |
14 |
Section 3 — Configuration
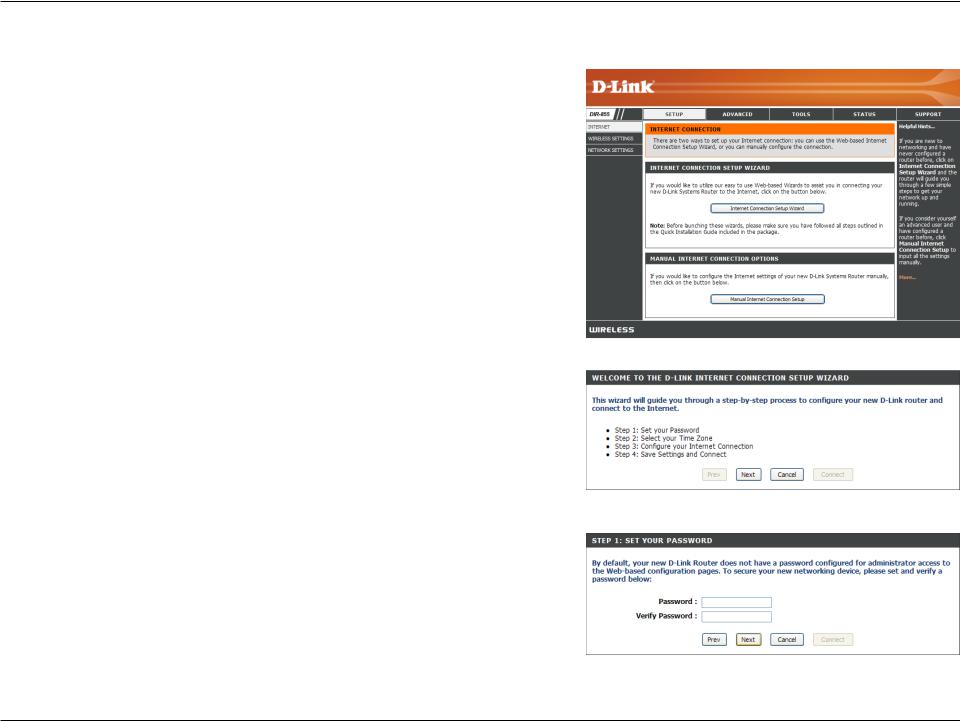
Setup Wizard
Click Launch Internet Connection Setup Wizard to begin.
If you want to enter your settings without running the wizard, click
Manual Configuration and skip to page 19.
Click Next to continue.
Create a new password and then click Next to continue.
|
D-Link DIR-855 User Manual |
15 |

Section 3 — Configuration
Select your time zone from the drop-down menu and then click Next to continue.
Select the type of Internet connection you use and then click Next to continue.
If you selected Dynamic, you may need to enter the MAC address of the computer that was last connected directly to your modem. If you are currently using that computer, click Clone Your PC’s MAC Address and then click Next to continue.
The Host Name is optional but may be required by some ISPs. The default host name is the device name of the router and may be changed.
|
D-Link DIR-855 User Manual |
16 |
![]()
Section 3 — Configuration
If you selected PPPoE, enter your PPPoE username and password. Click Next to continue.
Select Static if your ISP assigned you the IP address, subnet mask, gateway, and DNS server addresses.
Note: Make sure to remove your PPPoE software from your computer. The software is no longer needed and will not work through a router.
If you selected PPTP, enter your PPTP username and password. Click Next to continue.
If you selected L2TP, enter your L2TP username and password. Click Next to continue.
|
D-Link DIR-855 User Manual |
17 |
Section 3 — Configuration
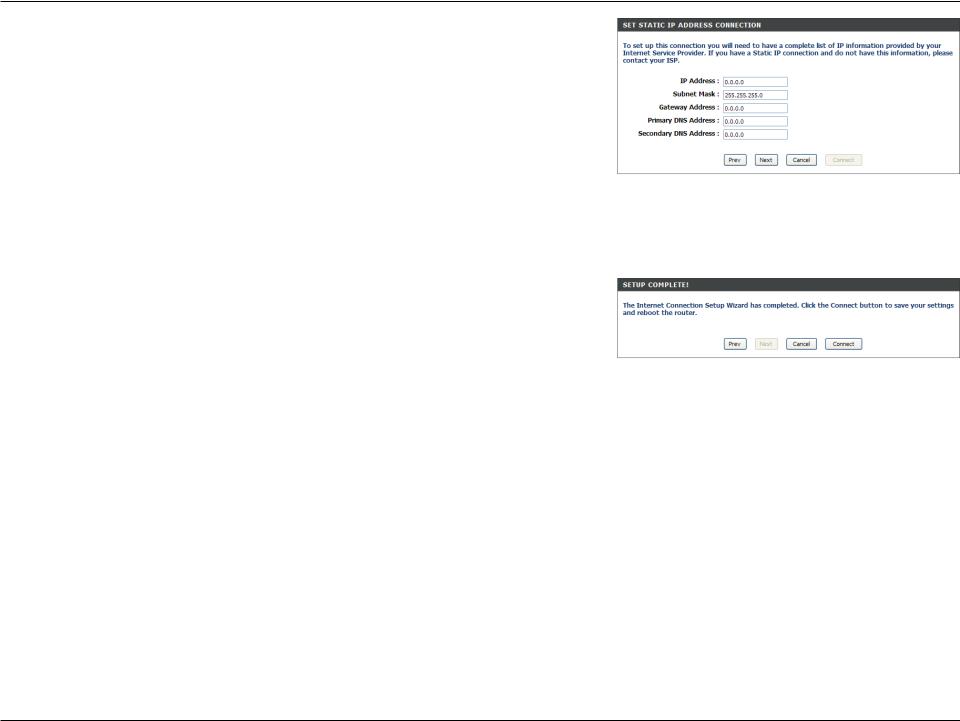
If you selected Static, enter your network settings supplied by your Internet provider. Click Next to continue.
Click Connect to save your settings. Once the router is finished rebooting, click Continue. Please allow 1-2 minutes to connect.
Close your browser window and reopen it to test your Internet connection. It may take a few tries to initially connect to the Internet.
|
D-Link DIR-855 User Manual |
18 |

Section 3 — Configuration
Manual Configuration
Dynamic (Cable)
My Internet Select Dynamic IP (DHCP) to obtain IP Address Connection: information automatically from your ISP. Select this option if your ISP does not give you any IP numbers to use. This option is commonly used
for Cable modem services.
Host Name: The Host Name is optional but may be required by some ISPs.
Use Unicasting: Check the box if you are having problems obtaining an IP address from your ISP.
DNS Addresses: Enter the Primary DNS server IP address assigned by your ISP.
MTU: Maximum Transmission Unit — you may need to change the MTU for optimal performance with your specific ISP. 1500 is the default MTU.
MAC Address: The default MAC Address is set to the Internet port’s physical interface MAC address on the Broadband Router. It is not recommended that you change the default MAC address unless required by your ISP. You can use the Clone Your PC’s MAC Address button to replace the Internet port’s MAC address with the MAC address of your Ethernet card.
|
D-Link DIR-855 User Manual |
19 |
Section 3 — Configuration
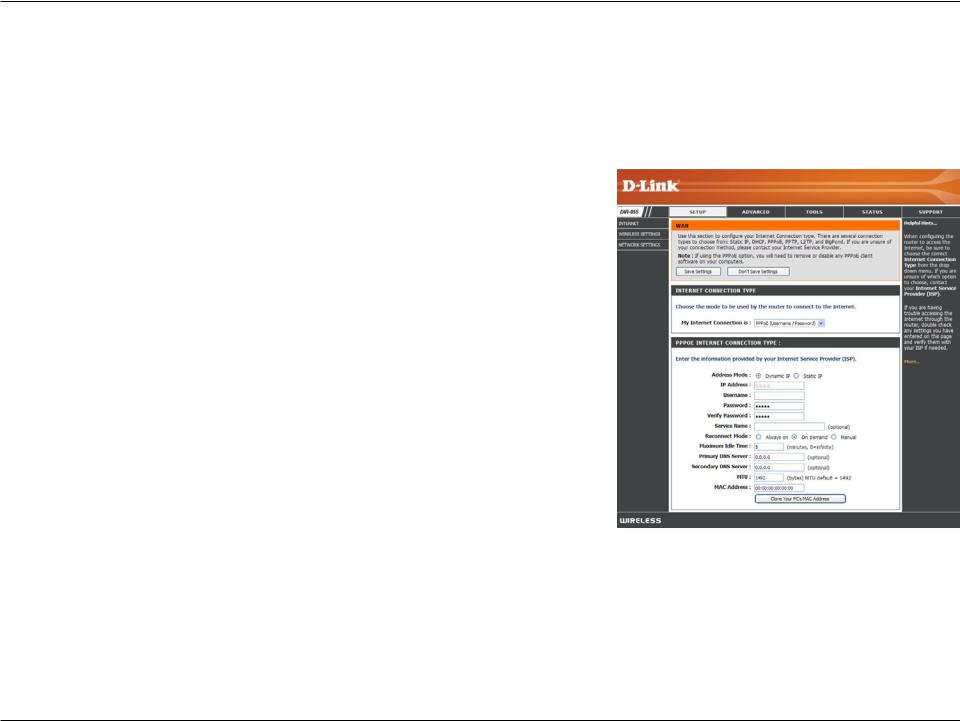
Internet Setup
PPPoE (DSL)
Choose PPPoE (Point to Point Protocol over Ethernet) if your ISP uses a PPPoE connection. Your ISP will provide you with a username and password. This option is typically used for DSL services. Make sure to remove your PPPoE software from your computer. The software is no longer needed and will not work through a router.
My Internet Select PPPoE (Username/Password) from the drop-down menu.
Connection:
Address Mode: Select Static if your ISP assigned you the IP address, subnet mask, gateway, and DNS server addresses. In most cases, select Dynamic.
IP Address: Enter the IP address (Static PPPoE only).
User Name: Enter your PPPoE user name.
Password: Enter your PPPoE password and then retype the password in the next box.
Service Name: Enter the ISP Service Name (optional).
Reconnection Mode: Select either Always-on, On-Demand, or Manual.
Maximum Idle Enter the Primary and Secondary DNS Server Addresses (Static PPPoE
Time: only).
DNS Addresses: Enter a maximum idle time during which the Internet connection is maintained during inactivity. To disable this feature, enable Auto-reconnect.
MTU: Maximum Transmission Unit — you may need to change the MTU for optimal performance with your specific ISP. 1492 is the default MTU.
MAC Address: The default MAC Address is set to the Internet port’s physical interface MAC address on the Broadband Router. It is not recommended that you change the default MAC address unless required by your ISP. You can use the Clone Your PC’s MAC Address button to replace the Internet port’s MAC address with the MAC address of your Ethernet card.
|
D-Link DIR-855 User Manual |
20 |
Section 3 — Configuration
Internet Setup
PPTP
Choose PPTP (Point-to-Point-Tunneling Protocol ) if your ISP uses a PPTP connection. Your ISP will provide you with a username and password. This option is typically used for DSL services.
Address Mode: Select Static if your ISP assigned you the IP address, subnet mask, gateway, and DNS server addresses. In most cases, select Dynamic.
PPTP IP Address: Enter the IP address (Static PPTP only).
PPTP Subnet Mask: Enter the Primary and Secondary DNS Server
Addresses (Static PPTP only).
PPTP Gateway: Enter the Gateway IP Address provided by your
ISP.
PPTP Server IP: Enter the Server IP provided by your ISP (optional).
Username: Enter your PPTP username.
Password: Enter your PPTP password and then retype the password in the next box.
Reconnect Mode: Select either Always-on, On-Demand, or
Manual.
Maximum Idle Time: Enter a maximum idle time during which the
Internet connection is maintained during inactivity. To disable this feature, enable Auto-reconnect.
|
D-Link DIR-855 User Manual |
21 |

Section 3 — Configuration
DNS Servers: The DNS server information will be supplied by your ISP (Internet Service Provider.)
MTU: Maximum Transmission Unit — you may need to change the MTU for optimal performance with your specific ISP. 1400 is the default MTU.
MAC Address: The default MAC Address is set to the Internet port’s physical interface MAC address on the Broadband Router. It is not recommended that you change the default MAC address unless required by your ISP. You can use the Clone Your PC’s MAC Address button to replace the Internet port’s MAC address with the MAC address of your Ethernet card.
|
D-Link DIR-855 User Manual |
22 |

Section 3 — Configuration
Internet Setup
L2TP
Choose L2TP (Layer 2 Tunneling Protocol) if your ISP uses a L2TP connection. Your ISP will provide you with a username and password. This option is typically used for DSL services.
Address Mode: Select Static if your ISP assigned you the IP address, subnet mask, gateway, and DNS server addresses. In most cases, select Dynamic.
L2TP IP Address: Enter the L2TP IP address supplied by your ISP (Static only).
L2TP Subnet Mask: Enter the Subnet Mask supplied by your ISP (Static only).
L2TP Gateway: Enter the Gateway IP Address provided by your ISP.
L2TP Server IP: Enter the Server IP provided by your ISP (optional).
Username: Enter your L2TP username.
Password: Enter your L2TP password and then retype the password in the next box.
Reconnect Mode: Select either Always-on, On-Demand, or Manual.
Maximum Idle Time: Enter a maximum idle time during which the Internet connection is maintained during inactivity. To disable this feature, enable Auto-reconnect.
DNS Servers: Enter the Primary and Secondary DNS Server Addresses (Static L2TP only).
|
D-Link DIR-855 User Manual |
23 |

Section 3 — Configuration
MTU: Maximum Transmission Unit — you may need to change the MTU for optimal performance with your specific ISP. 1400 is the default MTU.
Clone MAC The default MAC Address is set to the Internet port’s physical interface MAC address on the Broadband Router. It is not Address: recommended that you change the default MAC address unless required by your ISP. You can use the Clone Your PC’s MAC Address button to replace the Internet port’s MAC address with the MAC address of your Ethernet card.
|
D-Link DIR-855 User Manual |
24 |
Section 3 — Configuration
Internet Setup
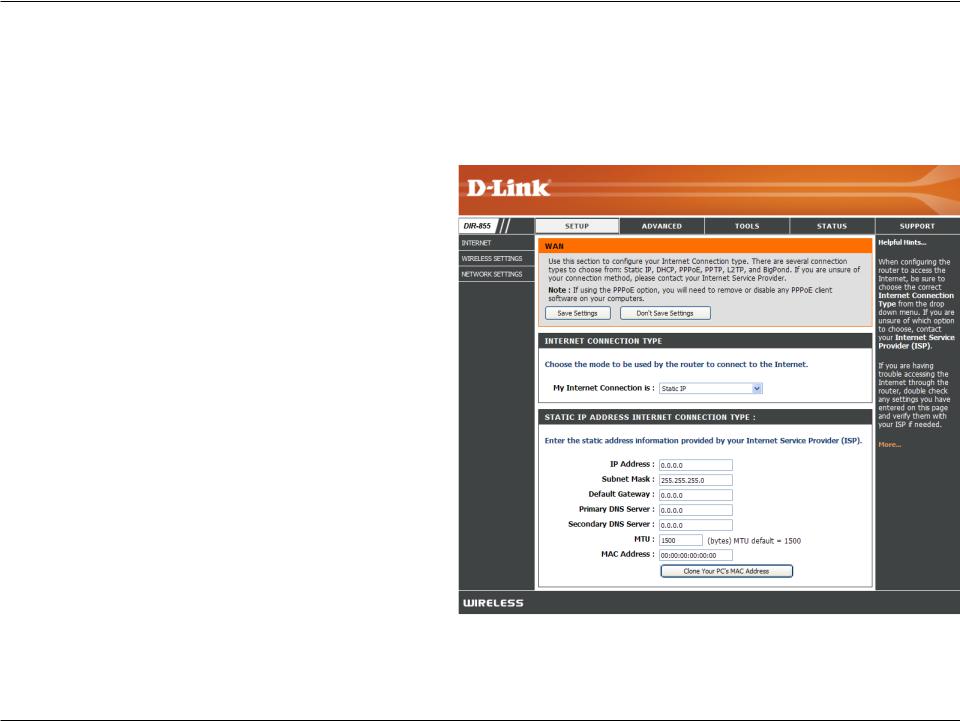
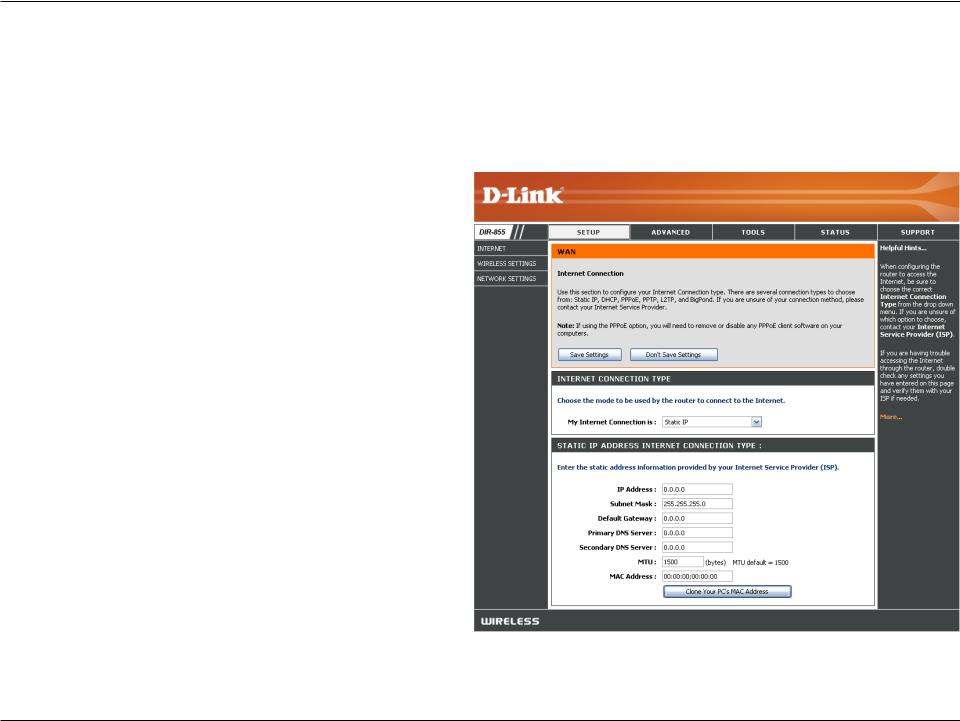
Static (assigned by ISP)
Select Static IP Address if all the Internet port’s IP information is provided to you by your ISP. You will need to enter in the IP address, subnet mask, gateway address, and DNS address(es) provided to you by your ISP. Each IP address entered in the fields must be in the appropriate IP form, which are four octets separated by a dot (x.x.x.x). The Router will not accept the IP address if it is not in this format.
IP Address: Enter the IP address assigned by your ISP.
Subnet Mask: Enter the Subnet Mask assigned by your ISP.
Default Gateway: Enter the Gateway assigned by your ISP.
DNS Servers: The DNS server information will be supplied by your
ISP (Internet Service Provider.)
MTU: Maximum Transmission Unit — you may need to change the MTU for optimal performance with your specific ISP. 1500 is the default MTU.
MAC Address: The default MAC Address is set to the Internet port’s physical interface MAC address on the Broadband
Router. It is not recommended that you change the default MAC address unless required by your ISP. You can use the Clone Your PC’s MAC Address button to replace the Internet port’s MAC address with the MAC address of your Ethernet card.
|
D-Link DIR-855 User Manual |
25 |
 Loading…
D-Link DIR-855 — Xtreme N Duo Media Router Wireless Wireless Router Manual (24 pages)
Specifications:2049/2049222-dir855.pdf file (23 May 2023) |
Accompanying Data:
D-Link DIR-855 — Xtreme N Duo Media Router Wireless Network Router, Wireless Router PDF Quick Installation Manual (Updated: Tuesday 23rd of May 2023 06:16:57 AM)
Rating: 4.2 (rated by 21 users)
Compatible devices: DIR-900L, DIR-853, DSR-150, DSL-2500U, DIR-450 — 3G Mobile Router Wireless, DI-804V, DHP-1220AV, DXS-1210-16TC.
Recommended Documentation:
Quick Installation Manual (Text Version):
(Ocr-Read Summary of Contents of some pages of the D-Link DIR-855 — Xtreme N Duo Media Router Wireless Document (Main Content), UPD: 23 May 2023)
-
18, 18 快速安裝手冊 DIR-855 XTREME N TM DUO MEDIA ROUTER 極速寬頻路由器 包裝清單 假如有缺少何任配件請於您購買的經銷商聯繫。 DIR-855 XTREME N TM DUO MEDIA ROUTER 光碟 (內含軟體與手冊) Ethernet (CAT5e UTP) Cable 電源供應器 預設IP: http://192.168.0.1 預設使用者名稱:Admin 預設…
-
20, 20 D-Link 友訊科技 台灣分公司 技術支援資訊 如果您還有任何本使用手冊無法協助您解決的產品相關問題,台灣 地區用戶可以透過我們的網站、電子郵件或電話等方式與D-Link台灣 地區技術支援工程師聯絡。 D-Link 免付費技術諮詢專線 0800-002-615 服務時間:…
-
6, 6 Руководство по быстрой установке DIR-855 МАРШРУТИЗАТОР XTREME N TM DUO MEDIA ROUTER Комплект поставки Если что-либо из содержимого отсутствует, пожалуйста, обратитесь к поставщику. DIR-855 МАРШРУТИЗАТОР XTREME 802.11 …
-
8, 8 Техническая поддержка Обновления программного обеспечения и документация доступны на Интернет-сайте D-Link. D-Link предоставляет бесплатную поддержку для клиентов в течение гарантийн…
-
12, 12 SOPORTE TÉCNICO Usted puede encontrar actualizaciones de softwares o firmwares y documentación para usuarios a través de nuestro sitio www.dlinkla.com SOPORTE TÉCNICO PARA USUARIOS EN LATINO AMERICA Soporte técnico a través de los siguientes teléfonos de D-Link PAIS NUMERO HORARIO Argentina 0800 — 12235465 Lunes a Viernes 08:00am a 21:…
-
11, D-Link DIR-855 — Xtreme N Duo Media Router Wireless 11 Solución de Problemas 1. ¿Cómo puedo configurar mi Router DIR-855 sin el CD, o revisar el nombre de mi Red Inalámbrica (SSID) y Clave de Encriptación? • Conecte su PC al Router usando un Cable Ethernet • Abra un navegador y digite la siguiente dirección IP http://192.168.0.1 or http://dlinkrouter El nombre de Usuario por defecto es ‘Admin’. La contr…
-
19, 19 Troubleshooting 1. 我該如何直接設定 DIR-855 的網路組態而不使用光碟,或是檢示我的無線網路名稱 (SSID) 與無 線加密金鑰 ? • 請使用網路線將您的電腦與 DIR-855 無線寬頻路由器 LAN 埠連接。 • 開啟電腦的網頁瀏覽器並在網址欄位輸入 http://192.168.0.1 or http://dlinkrouter • 預設的使用者名稱為�…
-
4, 4 Technical Support You can find software updates and user documentation on the D-Link website. Tech Support for customers in Australia: Tel: 1300-766-868 24/7(24Hrs, 7days a week) technical support http://www.dlink.com.au e-mail: [email protected] India: Tel: 1800-222-002 9.00 AM to 9.00 PM. All days http://www.dlink.co.in/support/productsupport.aspx Indone…
-
5, 5 Technical Support You can find software updates and user documentation on the D-Link website. Tech Support for customers in Egypt: Tel: +202-2919035 or +202-2919047 Sunday to Thursday 9:00am to 5:00pm http://support.dlink-me.com Email: [email protected] Iran: Te: +98-21-88880918,19 Saturday to Thursday 9:00am to 5:00pm http://support.dlink-me.com Ema…
-
3, 3 Troubleshooting 1. How do I configure my DIR-855 router without the CD, or check my Wireless Network Name (SSID) and Wireless Encryption Key? • Connect your PC to the router using an Ethernet cable. • Open a web browser and enter the address http://192.168.0.1 or http://dlinkrouter The default username is ‘admin’. The default password …
-
D-Link DIR-855 — Xtreme N Duo Media Router Wireless User Manual
-
D-Link DIR-855 — Xtreme N Duo Media Router Wireless User Guide
-
D-Link DIR-855 — Xtreme N Duo Media Router Wireless PDF Manual
-
D-Link DIR-855 — Xtreme N Duo Media Router Wireless Owner’s Manuals
Recommended:
CRUISER PRO -, nForce 3 250, KNC-Xi210HD, Gxr4.1 Bike
Operating Impressions, Questions and Answers:
- Home
- D-Link
- DIR-855
Dlink DIR-855 router setup & security
- To login to Dlink DIR-855 Router, Open your web browser and type the default IP Address 192.168.0.1 in the address bar
- You should now see the router login page with 2 text fields where you can type a username and a password
- The default username for your Dlink DIR-855 router is admin and the default password is blank
- In the login page of the router’s web user interface, type-in the username & password, hit «Login» and now you should see the Dlink DIR-855 router control panel

(Remember, you must be at home and connected to home WiFi to do this)
And no need to get your breathing rates high in case you have changed the username / password of Dlink DIR-855 and forgot them, as you can just reset the Dlink DIR-855 router by press-and-hold the reset button with a clip for about 15 seconds.
Dlink DIR-855 Quick links:
| Default username for Dlink DIR-855: | admin | COPY |
| Default password for Dlink DIR-855: | blank |
2.Change Dlink DIR-855 Default Login and Password
Since, security of a network is vital, the first and foremost task is to change the Dlink DIR-855 router Default Login and Password to something more personal and secure.
Dlink DIR-855 Router Password Tips:
Choose a complex and hard-to-guess password for your D-Link which only you can remember
It should be something personal, like &ilostmyvirginity@30, so that you’ll never forget it. Ever
Protect it
The amount of protection directly depends on the password complexity, and the effort taken to protect that password on your Dlink DIR-855 router.
Usability first
Give Password for your Dlink DIR-855 router that you can remember (usability first). Of course, you can build a strong hash password with special characters, numbers, Greek, and Latin. But ultimately you’ll end up writing it on a sticky and putting it on the router, which defeats the purpose. Here is an example $lasttriptovegas0916
You did good so far. Now consider ⭐ Bookmarking this page. It always helps.
3.Change Dlink DIR-855 Default WiFi name (SSID) and WiFi Password and enable Network Encryption
Another small suggestion (as it has no impact on security), is to change the Dlink DIR-855 Default WiFi name (SSID) as it will make it more obvious for others to know which network they are connecting to.
Steps:
- Look for — SETUP (found in the menu bar at the top of the page) , and click on it
- Look for — WIRELESS SETTINGS (found in the left hand side menu bar), and click on it
Look for Network Name (SSID), this is the WiFi name of your Dlink DIR-855 Router. Do not use your name, home address, or other personal information (since this isn’t a Facebook status!) in the SSID name. (No Mr.Paul&Princy) A few funny WiFi name suggestions: I’m cheating on my WiFi!, FBI Surveillance Van #594 (scares away stupid criminals), Lord of the Pings …
Once you enter the name for your network, you have to enable WPA2-PSK encryption on your Dlink DIR-855 router. That’s the strongest encryption standard available for home networks.
Enter a new WPA Pre-Shared Key / WiFi Password – this is the password that you will use to connect to your home WiFi. Keep it to 16-20 characters (please!) don’t use the same password that you used for Dlink DIR-855 router login!
🤓 Geek out your guests. Print a Free WiFi QR Code Sticker for your fridge now
4.Update router firmware in Dlink DIR-855 and turn on Automatic Updates
Router software often contains critical bugs and security vulnerabilities; Check if your router has known vulnerabilities
Check — Dlink DIR-855
Its important that you turn on Automatic Firmware updates and always keep your Dlink DIR-855 router up-to-date. To turn on Automatic updates, Login to your Dlink DIR-855 router and look for the section which contains Automatic updates and turn it «ON»
And even if the router has auto-update, check every now and then to make sure it is actually working, and the router firmware is up-to-date. If your router manufacturer hasn’t released any updates to the firmware in the past 3-5 years, consider upgrading to a «newer» router
5.Security is a continuous process
Just keep in mind to change the passwords often or at least once in every 6 months! on your Dlink DIR-855 You don’t want the safety you have worked so hard for to fail just because of ignorance, negligence, or casual laziness! Time for a bulletin on the fridge, folks! We can remind you though? Enter your email below! Nope, we are not spammers!
Dlink DIR-855 Router Reset instructions
How to Reset the Dlink DIR-855 Router To Factory Default
To reset Dlink DIR-855 router,
- Turn on the Dlink DIR-855 router
- Look for the reset button. Few routers have a tiny hole and few others have a reset button.
- Press the Factory reset button with a straightened paperclip pin or something that gets through the tiny hole, and hold it for about 15 seconds! (till you see all the lights flashing)
- The Dlink DIR-855 router will reboot automatically. the unit has been reset and is ready to use. You can start from Step 1 in this guide to set it up.
Dlink DIR-855 Password Does not Work
Passwords find a way to not work! Or, in most cases, users find a way to forget them! In either case, look up the How to Reset the Dlink DIR-855 Router To Default Settings section
Forgot Password for Dlink DIR-855 Router
Incase if you have changed the default username and password of Dlink DIR-855 and forgot it, please see How to Reset the Dlink DIR-855 Router To Default Settings section
How to boost Dlink DIR-855 WiFi and overcome connectivity issues
1.Place the Dlink DIR-855 in a perfect spot
The perfect spot does it all; be it romance or your router! To avail the best signal and network connectivity, make sure you keep your Dlink DIR-855 router visible and not facing the wall or behind the curtains
2.Find a Good Wireless Channel Instead of Auto on your Dlink DIR-855 router
Auto-channels might fail you once in a while; believe that you’re smarter than the D-Link router! Find a seamless wireless channel instead of what the router finds automatically. This would ensure that your signal doesn’t interfere with that of your neighbors.
If you’re running a Windows-based PC, you can see what channels neighboring Wi-Fi networks are using.
- Press Start > type “cmd”. Open Command prompt
- In command prompt type netsh wlan show all
You will see a list of all wireless networks and the channels being used in your vicinity. instead of using “Auto” for the control channel, Pick the channel that has the lowest interference
3.Check the frequency of Dlink DIR-855
Check if Dlink DIR-855 has dual-band, the most commonly used band would be 2.4GHz; however, switching to 5GHz would bring out better results! It depends on your device though; if you’re running an old lad, you might have to switch back to the conventional
4.Hardwire gaming consoles / media streamers into your Dlink DIR-855 instead of WiFi
Gaming consoles/media streamers work better when connected through Ethernet cable of Dlink DIR-855; in fact, as you might not be moving your TV all over the house, why connect it to the Wi-Fi at all? The Gaming consoles / video streaming devices flood the network with data. This means that if possible, you should consider hardwire (using Ethernet cable) the devices that tend to consume a lot of bandwidth. Although this can sort of defeat the purpose of having wireless networks, it can actually help your overall network speed of Dlink DIR-855 if you can hardwire the bandwidth hogs.
5. Reboot Dlink DIR-855 on schedule
Here’s something important to note! On schedule, folks, reboot your Dlink DIR-855 router! Though routers are built to constantly be running at all times, simple tweaks like regular power cycling (a fancy way of saying, unplugging the power cord and shoving it back up) helps with most issues. Rebooting your Dlink DIR-855 can fix Internet connection problems, improve slow moving connections, and resolve wireless issues altogether. Try unplugging your D-Link modem on a quarterly basis to stay proactive (Never reset; always reboot router)