Егор Кадгар
Автор
Вот эта кнопка обновления просто не реагирует на нажатия (правый верхний угол)
Ответить
Развернуть ветку
alex petrov
А, у меня подобное было, у тебя просто скрыты эти параметры. Вот, через regedit HKEY_LOCAL_MACHINE\SOFTWARE\Microsoft\Windows\CurrentVersion\Policies\Explorer
ключ SettingsPageVisibility и удаляешь всё содержимое этого ключа
Ответить
Развернуть ветку
Егор Кадгар
Автор
слушай, я в глаза долблюсь, или у меня нет explorerkey ?
Ответить
Развернуть ветку
Егор Кадгар
Автор
да, оказалось долблюсь)
все заработало, гигантское спасибо!
Ответить
Развернуть ветку
TheDaveSnork
блин чел спасибо тебе огромное!!! если б не ты, я бы с этой фигней не справился
Ответить
Развернуть ветку
Илья Михайлов
Да! Спасибо чувак! =) Все помогло! Долго искал проблему а тут ты))
Ответить
Развернуть ветку
alex petrov
Тебе кстати повезло что на меня напоролся, а то бы много времени потратил на решение проблемы
Ответить
Развернуть ветку
ANoXII
Зачем тебе W11 на ryzen сейчас? Ты не в курсе что ль, что там не починили кэш L3 процессоров ryzen?
Ответить
Развернуть ветку
Street Art
у меня ryzen 2600x , RX 5600, и интеловский ссд на sata, скорость загрузки и ОСи и быстродействие уже заметны сильно (у меня предрелизная, ставил полтора месяца назад) и даже не в курсе о том что кэш урезанный, разницу и так чувствую)
Ответить
Развернуть ветку
8 комментариев
Раскрывать всегда
![]()
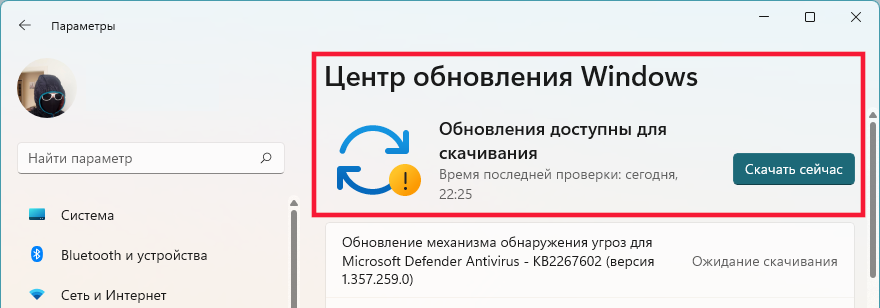
На многих компьютерах под управлением Windows 11 стала наблюдаться проблема с запуском центра обновления. В системных настройках висит уведомление, что требуется обратить внимание на обновления, но открыть настройки не удаётся. Ничего не происходит и при нажатии на пункт в системных настройках.
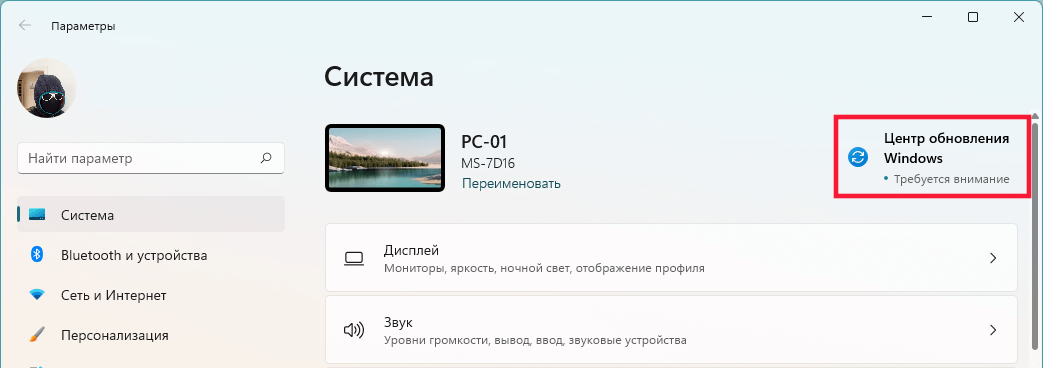
Для исправления потребуется изменить конфигурацию локальной групповой политики.
-
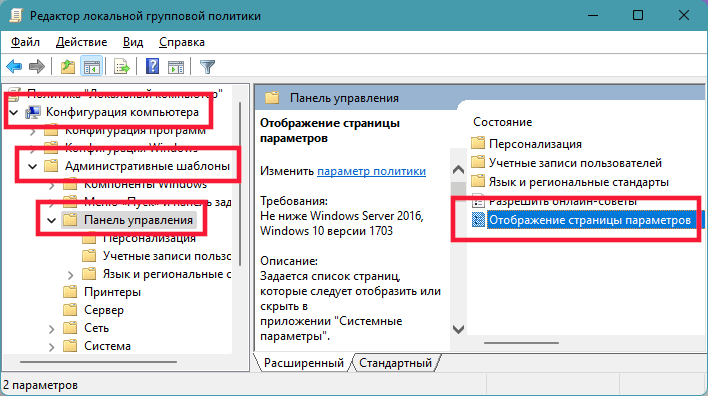
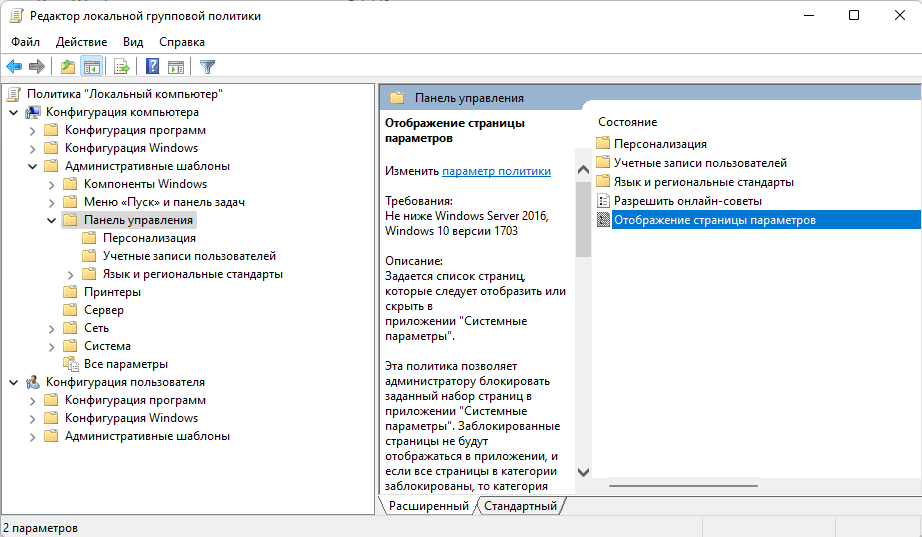
Открываем редактор локальной групповой политики. Проще всего это сделать через стандартный поиск Windows. Вводим запрос «Локальная политика безопасности» или часть «Редактор локальной групповой политики».

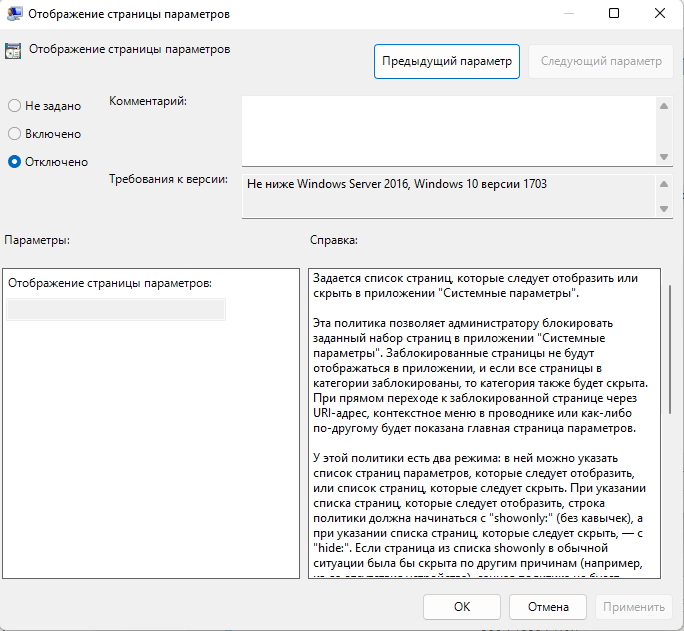
В левом окне выбираем «Конфигурация компьютера» — «Административные шаблоны» — «Панель управления». В правом окне — «Отображение страницы параметров».
-
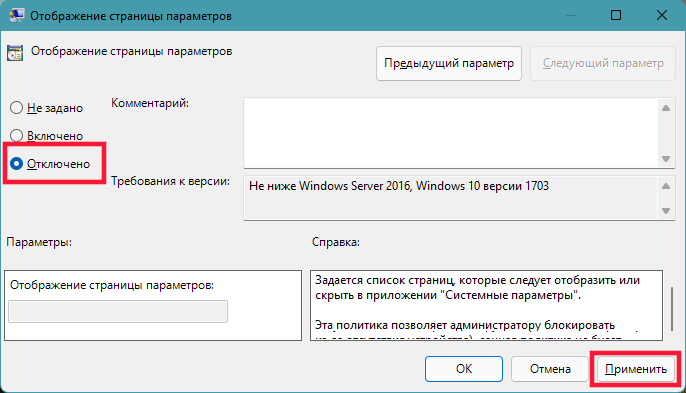
Отключим настройку. Не забываем нажать кнопку «Применить».
-
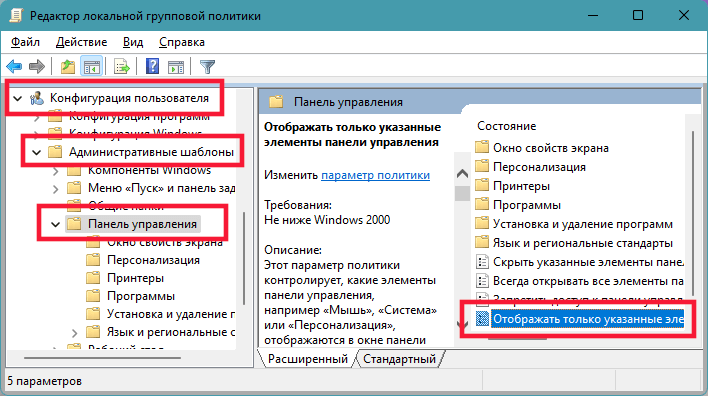
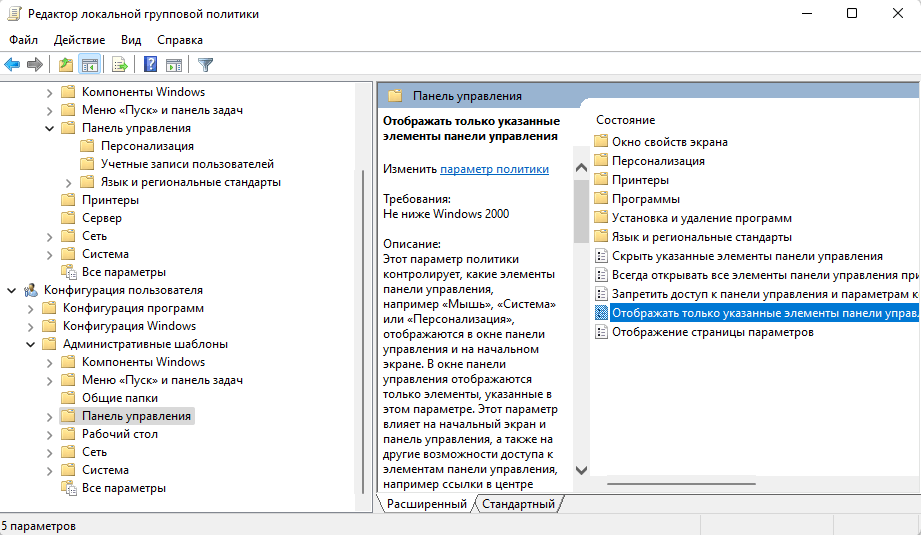
Теперь находим аналогичную настройку в «Конфигурация пользователя» — «Административные шаблоны» — «Панель управления».
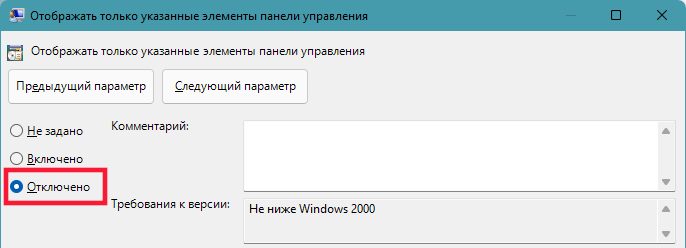
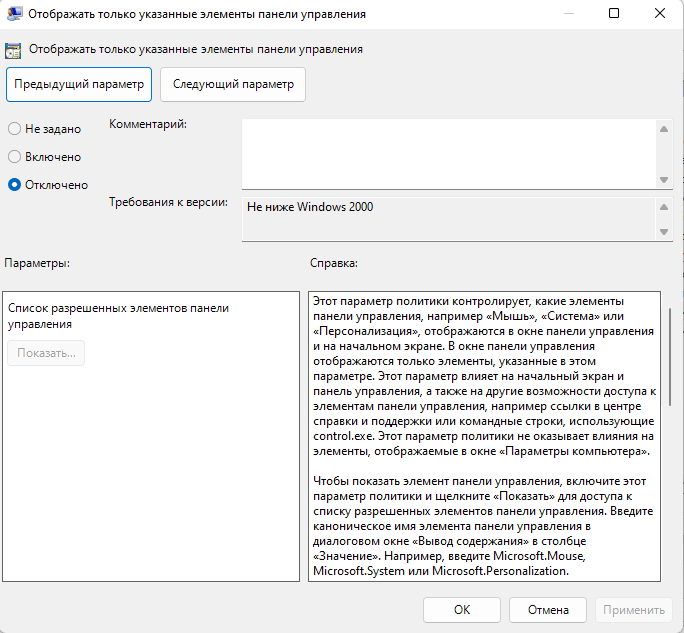
В правом окне — «Отображать только указанные элементы панели управления».
-
Отключаем.
-
Перезагружаем компьютер.
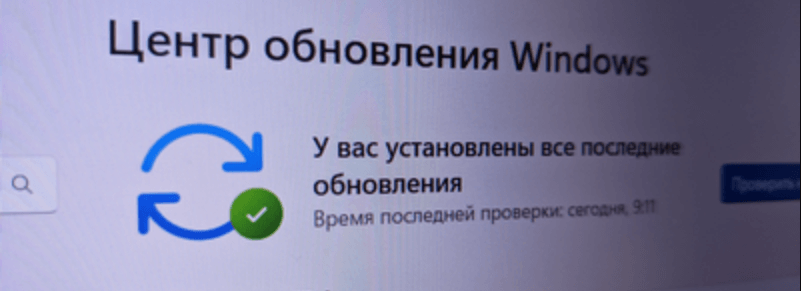
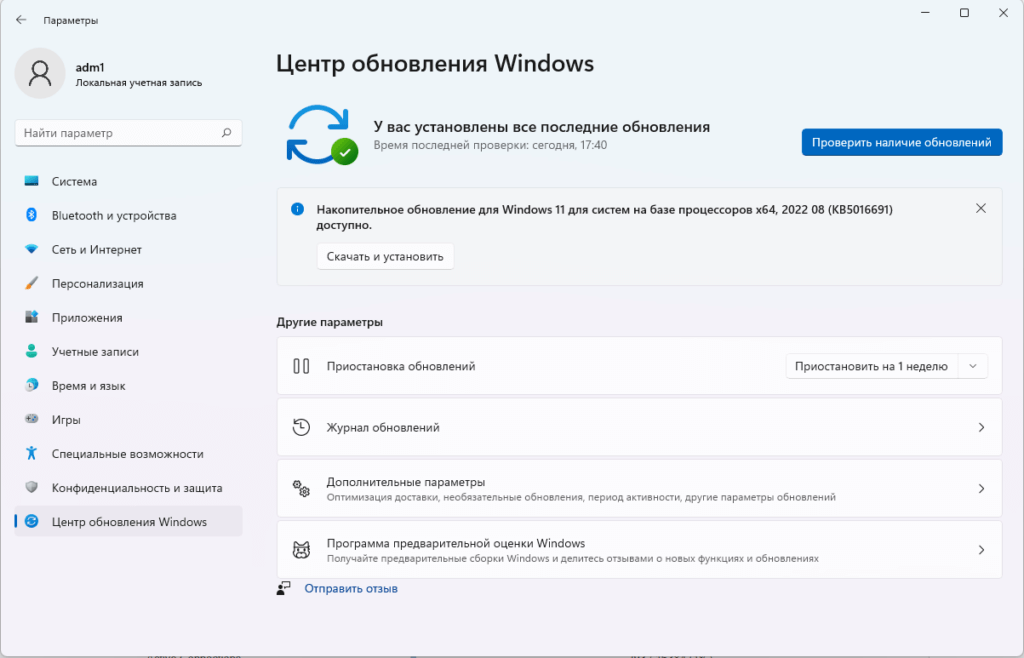
После перезагрузки можно открыть центр обновления.
На чтение 5 мин Опубликовано Обновлено
Центр обновления является важной частью операционной системы Windows 11, предназначенной для обеспечения стабильной и безопасной работы компьютера. Но что делать, если Центр обновления перестает функционировать?
Одна из основных причин неработоспособности Центра обновления в Windows 11 заключается в конфликте с другими программами или службами, установленными на компьютере. Например, антивирусное ПО или сторонние утилиты могут блокировать обновления системы, чтобы предотвратить возможные проблемы совместимости.
Кроме того, проблемы с подключением к сети могут привести к неработоспособности Центра обновления. Нестабильное или медленное подключение к интернету может препятствовать загрузке и установке обновлений.
Если Центр обновления не работает, важно предпринять несколько действий, чтобы исправить ситуацию. Во-первых, проверьте активность антивирусного ПО и других программ, которые могут блокировать обновления. Возможно, вам придется временно отключить некоторые программы или настроить их таким образом, чтобы они не мешали работе Центра обновления.
Содержание
- Почему Центр обновления не работает в Windows 11
- Отсутствие необходимых обновлений
- Неправильные настройки Центра обновления
Почему Центр обновления не работает в Windows 11
В Windows 11 может возникнуть ряд причин, по которым Центр обновления может стать неработоспособным. Некоторые из наиболее распространенных проблем и их возможные решения:
- Проблемы с подключением к Интернету: если у вас нет подключения к Интернету, Центр обновления не сможет загрузить и установить обновления. Убедитесь, что ваше подключение работает исправно и что у вас есть доступ к сети.
- Сбои в службе Центра обновления: иногда файлы и службы, отвечающие за работу Центра обновления, могут быть повреждены или неправильно настроены. В этом случае можно попробовать перезапустить службу Центра обновления или выполнить восстановление системы.
- Недостаточное место на жестком диске: если на вашем компьютере осталось мало свободного места на жестком диске, Центр обновления не сможет скачать и установить обновления. Очистка диска или добавление нового пространства может помочь решить эту проблему.
- Конфликты с третьесторонними программами: некоторые программы могут блокировать работу Центра обновления или приводить к сбоям. Попробуйте временно отключить антивирусные программы, брандмауэры или другие приложения и проверьте, работает ли Центр обновления после этого.
- Ошибки реестра или системных файлов: некоторые ошибки в реестре или поврежденные системные файлы могут мешать Центру обновления работать правильно. Использование инструментов проверки и восстановления системных файлов, таких как «sfc /scannow» или «DISM», может помочь исправить эти проблемы.
Если вы сталкиваетесь с проблемами в работе Центра обновления в Windows 11, рекомендуется попробовать вышеуказанные решения. Если эти методы не помогают, рекомендуется обратиться за поддержкой к специалисту или посетить официальный форум поддержки Windows для получения более подробной информации и инструкций.
Отсутствие необходимых обновлений
Одной из причин неработоспособности Центра обновления в операционной системе Windows 11 может быть отсутствие необходимых обновлений. Чтобы система могла обновиться и работать корректно, необходимо установить все доступные обновления.
Отсутствие необходимых обновлений может быть вызвано различными факторами, такими как отключенная автоматическая установка обновлений, проблемы с загрузкой и установкой обновлений или просто нежелание пользователя устанавливать обновления.
Для исправления этой проблемы, вам необходимо выполнить следующие шаги:
- Откройте Центр обновления, нажав на кнопку «Пуск» и введя «Центр обновления» в поисковую строку.
- Нажмите на кнопку «Проверить наличие обновлений».
- Если обновления доступны, нажмите на кнопку «Установить обновления».
- Дождитесь завершения установки обновлений и перезагрузите компьютер.
Кроме того, вы можете настроить автоматическую установку обновлений, чтобы система самостоятельно загружала и устанавливала все доступные обновления. Чтобы сделать это, выполните следующие действия:
- Откройте «Настройки» путем нажатия на кнопку «Пуск» и выбора пункта «Настройки».
- Выберите «Обновление и безопасность».
- Перейдите на вкладку «Обновление Windows».
- Нажмите на кнопку «Расширенные параметры».
- В разделе «Автоматические обновления» выберите опцию «Включено».
После выполнения этих действий ваш Центр обновления должен заработать и вы сможете устанавливать все необходимые обновления для вашей операционной системы Windows 11.
Неправильные настройки Центра обновления
Неправильные настройки Центра обновления могут быть одной из причин его неработоспособности в Windows 11. В этом случае рекомендуется проверить и скорректировать следующие настройки:
- Проверьте наличие активной интернет-связи. Центр обновления требует интернет-соединения для работы, поэтому убедитесь, что ваше устройство подключено к сети.
- Убедитесь в правильности настроек времени и даты на вашем устройстве. Неправильные настройки времени могут вызвать проблемы с Центром обновления.
- Проверьте, что у вас установлена последняя версия операционной системы Windows 11. Если у вас установлена устаревшая версия, центр обновления может не работать правильно. Выполните обновление до последней доступной версии Windows 11.
- Убедитесь, что не установлены нежелательные программы-блокировщики или антивирусные программы, которые могут препятствовать работе Центра обновления. В некоторых случаях, такие программы могут блокировать доступ к обновлениям операционной системы.
- Проверьте настройки безопасности в центре безопасности Windows. Некоторые настройки могут блокировать работу Центра обновления. Убедитесь, что все необходимые службы и компоненты разрешены для работы Центра обновления.
- Попробуйте выполнить очистку кэша Центра обновления. Некорректные данные в кэше могут вызывать проблемы с его работой. Для выполнения очистки кэша можно воспользоваться стандартными средствами операционной системы.
После проверки и корректировки указанных настроек Центр обновления может начать функционировать корректно, и вы сможете получать и устанавливать обновления операционной системы без проблем.
Что делать если не открывается Центр обновления Windows? С такой проблемой я недавно столкнулся. Решается она достаточно просто: через пуск открываем Изменение групповой политики.

Выбираем Конфигурация компьютера > Административные шаблоны > Панель управления, справа жмем два раза по Отображение страницы параметров и в открывшемся окне выбираем Отключено.
Далее аналогично переходим в Конфигурация пользователя > Административные шаблоны > Панель управления. Справа нажимаем два раза по Отображать только указанные элементы панели управления и точно также выбираем Отключено.
После этих манипуляций даже без перезагрузки Центр обновления Windows должен открываться как обычно.
This issue prevents the installation of the new OS
by Kazim Ali Alvi
Kazim has always been fond of technology, be it scrolling through the settings on his iPhone, Android device, or Windows. And at times, unscrewing the device to take… read more
Updated on
- A lot of users have reported being the Windows 11 update not showing in Windows 10 on the Windows Update tool.
- If you using a PC that meets that minimum requirement, you should receive the update in a while since the roll-out is in a phased manner. However, there are ways to make the jump even sooner.
- Check for any issues with the Windows Update, namely, if they are paused, stuck, or the presence of conflicting programs.
- Also, learn how to install Windows 11 on unsupported PCs.
XINSTALL BY CLICKING THE DOWNLOAD
FILE
Windows 11 has been rolled out for users, though in a phased manner. PCs that are compatible should receive an update in the days to follow. However, many users have reported Windows 11 not showing up in Windows Update.
The Windows 11 update not showing up issue could be due to a bunch of reasons, some related to your computer’s compatibility while others to the phased rollout. Whatever the case, there are ways you can get your hands on the latest Windows iteration from Microsoft.
If you have been checking the Windows Update section time and again to upgrade but to no avail, read ahead to find out the various ways you can install Windows 11 on your computer.
Why don’t I see the Windows 11 update?
A large number of computers wouldn’t be able to upgrade to Windows 11 owing to the strict system requirements. And Microsoft has its reasoning for that.
Can my PC run Windows 11?
To check whether a computer can run Windows 11, Microsoft has released the PC Health Check app. Just download and install the app, run it, and you will find out whether or not your system is compatible.
If you get the message This PC meets Windows 11 requirements, your computer is compatible. Head over to the next section to find out ways to make the upgrade even if Windows 11 is not showing up in Windows Update.
For those of you who see This PC doesn’t currently meet the Windows 11 system requirements, you wouldn’t be receiving the upgrade via Windows Update. Head over to the end to find out how you can install Windows 11 on an unsupported PC.
What can I do if the Windows 11 update is not showing up?
- Why don’t I see the Windows 11 update?
- Can my PC run Windows 11?
- What can I do if the Windows 11 update is not showing up?
- 1. Resume Windows Update
- 2. Reboot the computer
- 3. Run the Windows Update troubleshooter
- 4. Repair Windows Update components
- 5. Restart the Windows 11 update
- 6. Disable or uninstall conflicting apps
- 7. Use the Installation Media
- Can I use the Windows 11 Installation Assistant to upgrade?
- What do I do if my PC doesn’t meet the system requirements for Windows 11?
1. Resume Windows Update
- Press Windows + I to launch the Settings app.
- Select Update & Security from the various options listed here.

- In the Windows Update tab that opens by default, check if there is a Resume Updates button on the right. If there’s one, click on it to start receiving updates.

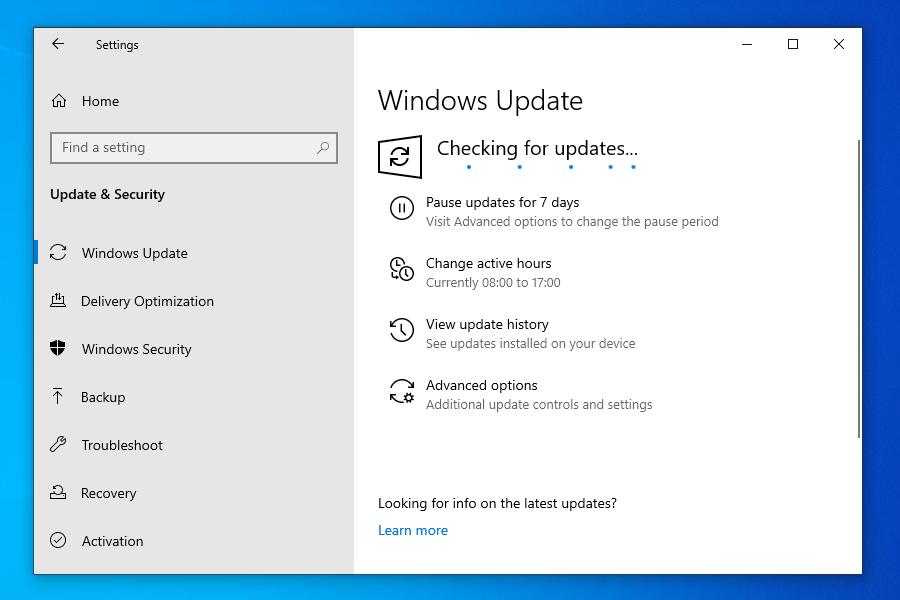
- Your system will now automatically start scanning for any available update including those for Windows 11.

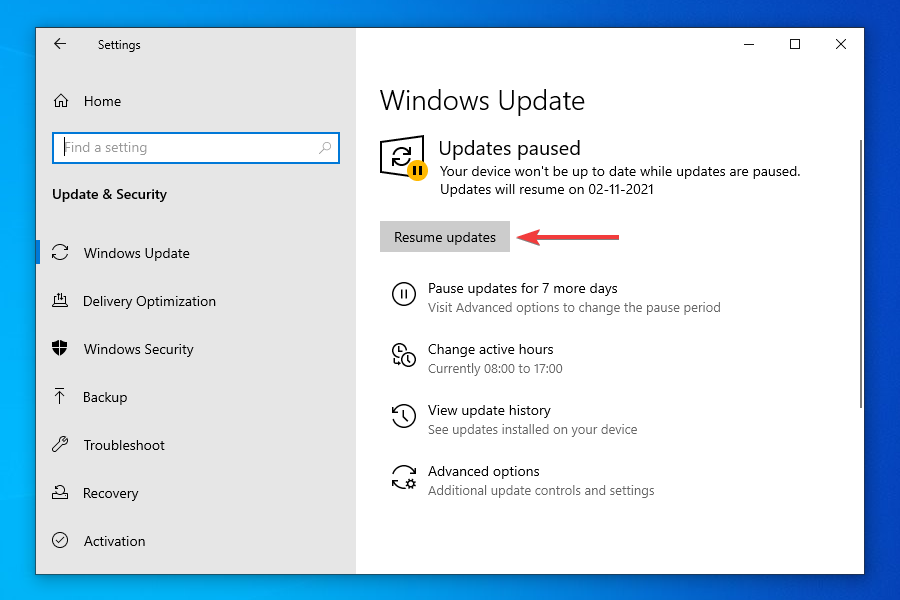
If you have paused updates, you wouldn’t be receiving any, including the one for Windows 11. Even if you don’t remember doing it, there’s no harm in cross-checking before we proceed further.
After you enable updates, if an upgrade for Windows 11 is available, it would be shown in Windows Update, and subsequently, downloaded and installed on your computer.
How we test, review and rate?
We have worked for the past 6 months on building a new review system on how we produce content. Using it, we have subsequently redone most of our articles to provide actual hands-on expertise on the guides we made.
For more details you can read how we test, review, and rate at WindowsReport.
2. Reboot the computer
- Navigate to the desktop and press Alt + F4 to launch the Shut Down Windows box.
- Click on the dropdown menu and select Restart from the list of options.
- Click on OK to restart the computer.
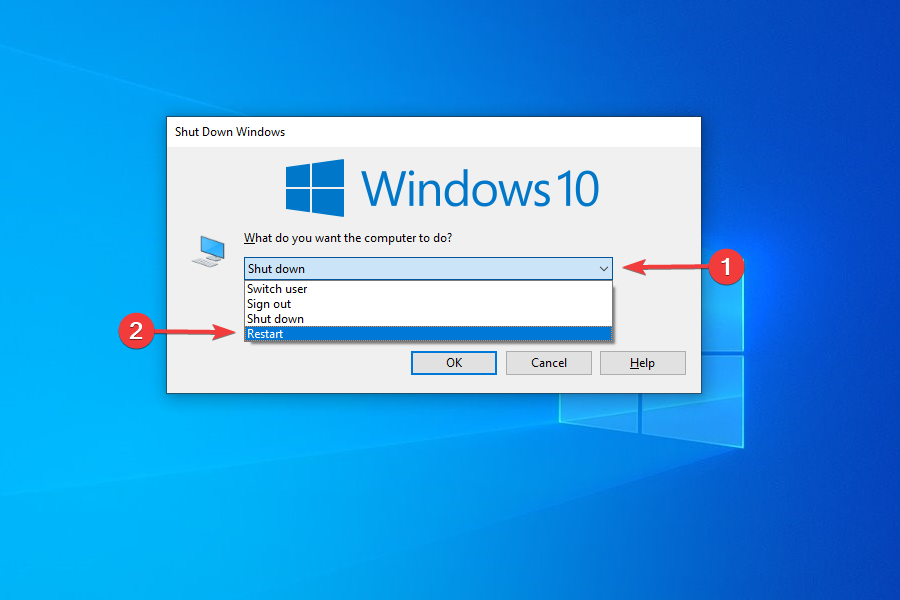
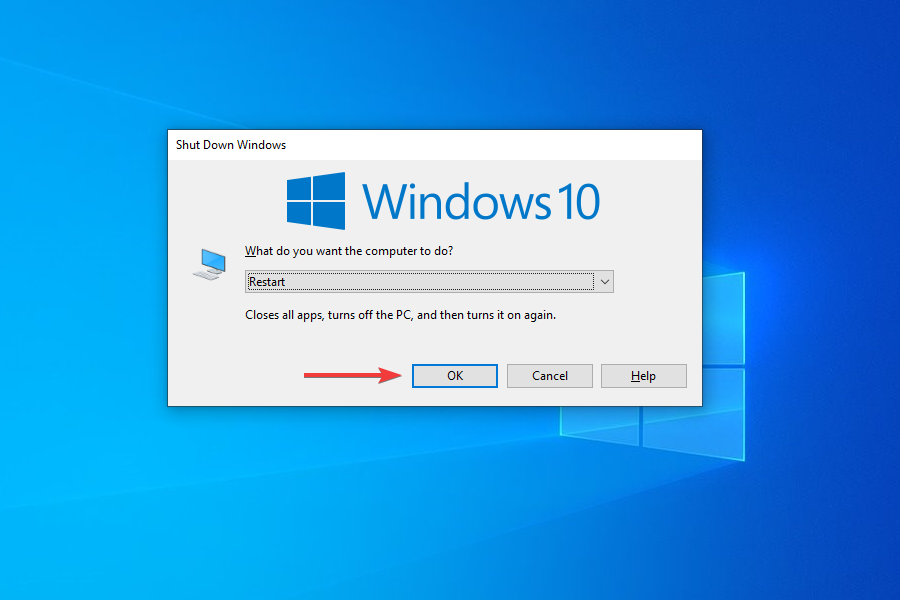
Before restarting, make sure to save any open files to avoid data loss. Rebooting the computer restarts the OS and fixes any trivial bugs that may be interfering with the Windows 11 update.
3. Run the Windows Update troubleshooter
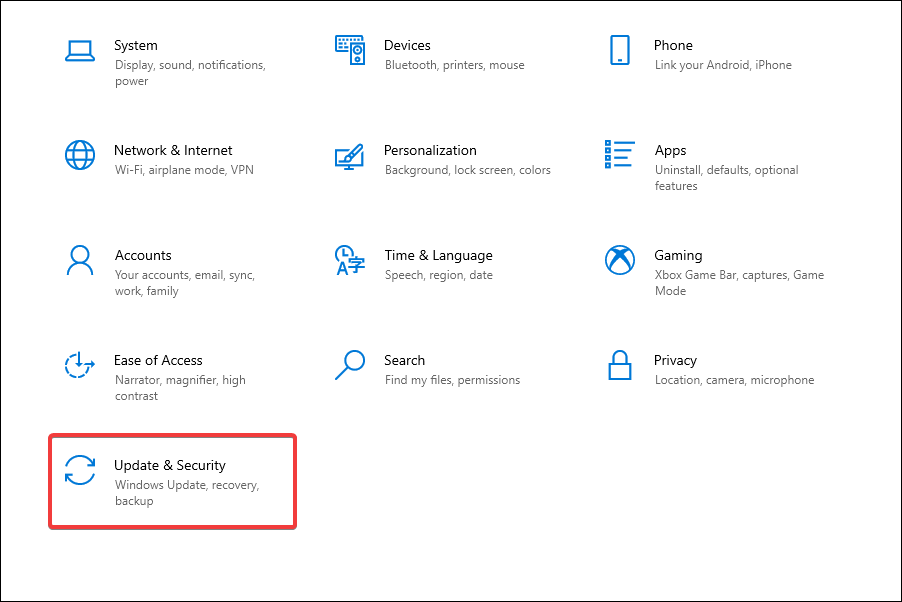
- Press Windows + I to launch the Settings app.
- Select Update & Security from the list of options listed in the Settings.
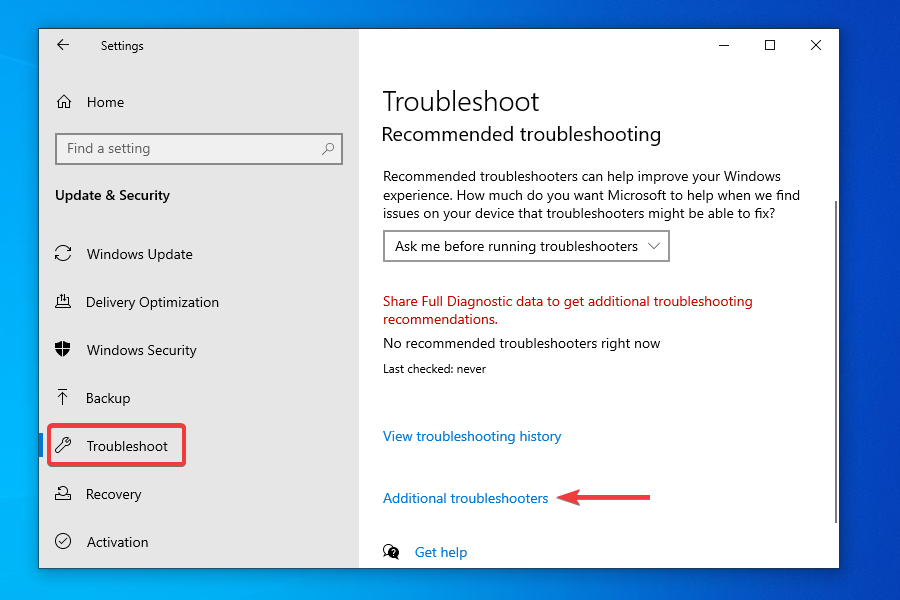
- Select Troubleshoot from the tabs listed in the navigation pane and click Additional troubleshooters on the right.
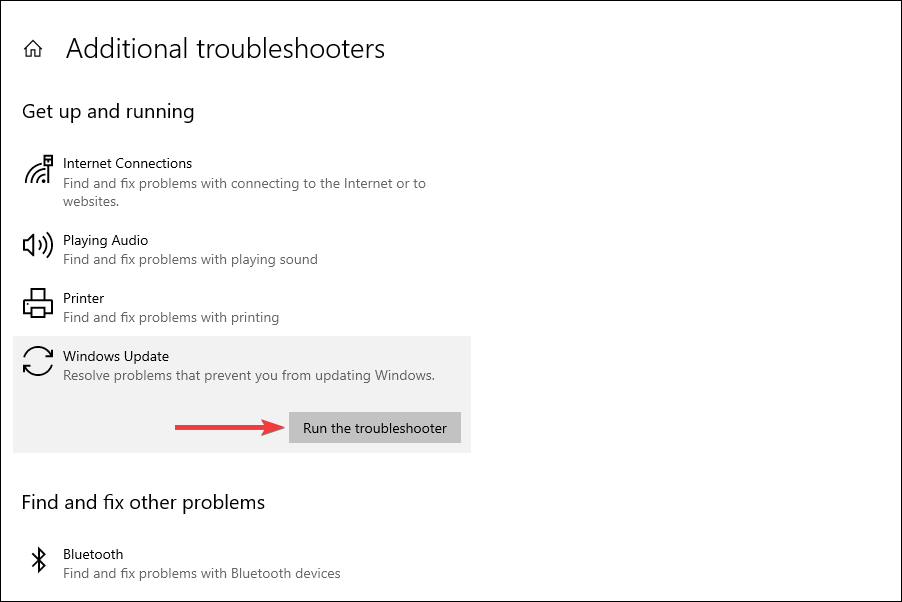
- Click on Windows Update.
- Click Run troubleshooter to diagnose and fix issues preventing your PC from receiving the update for Windows 11.
- The troubleshooter will now start running. Follow the instructions and choose the appropriate response, if and when prompted, to complete the process.

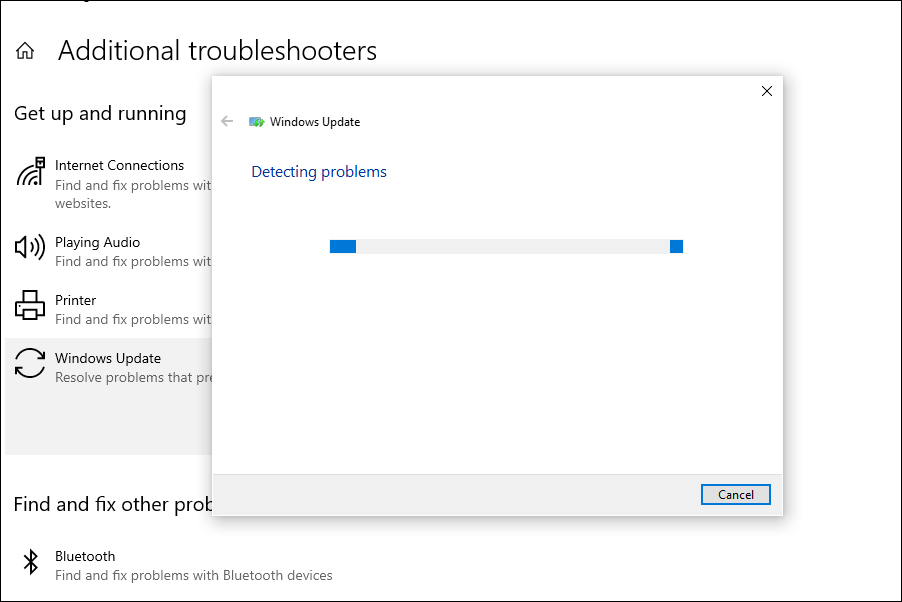
The built-in troubleshooters offered by Microsoft are excellent in identifying and fixing small bugs, misconfigured settings, and other issues. After the troubleshooter is done running, check if Windows 11 is now showing up in Windows Update.
4. Repair Windows Update components
Although you are required to repair or reset Windows Update components when encountering an error, it may also help you get the Windows 11 update in this case.
If they have become corrupt or have run into a bug that is leading to the Windows 11 not showing up in Windows update issue, repairing or resetting them should come in handy.
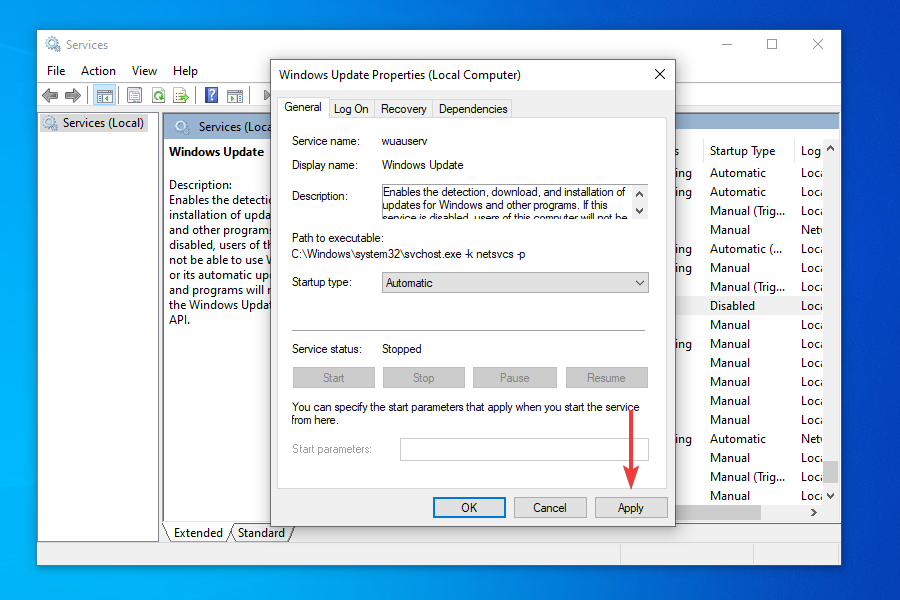
5. Restart the Windows 11 update
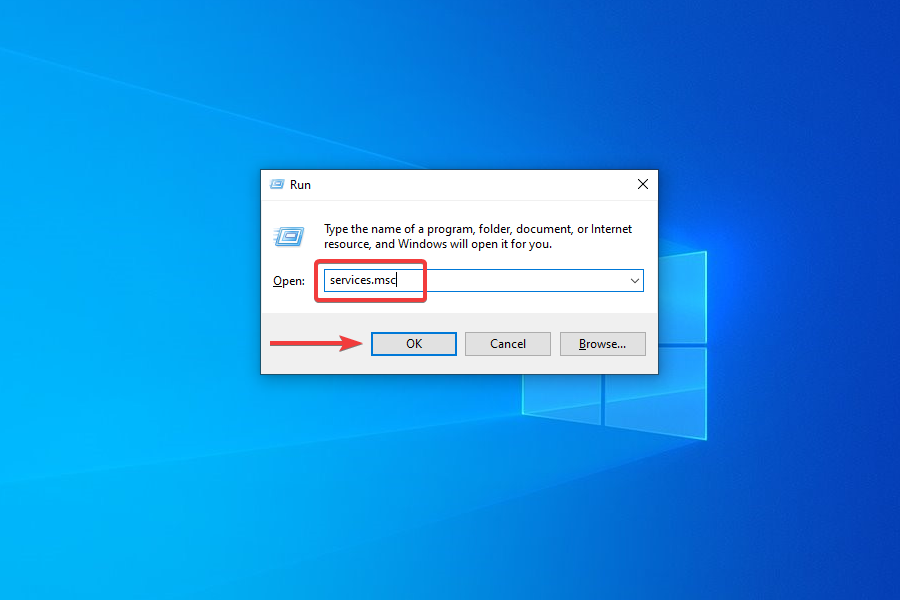
- Press Windows + R to launch the Run command.
- Type services.msc in the text field, and either click on OK or press Enter to launch the Services app.
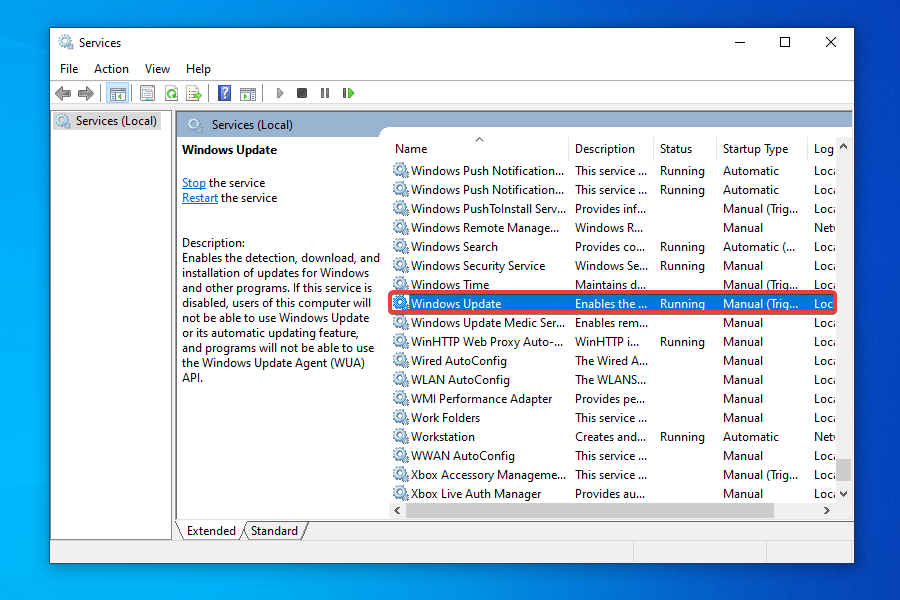
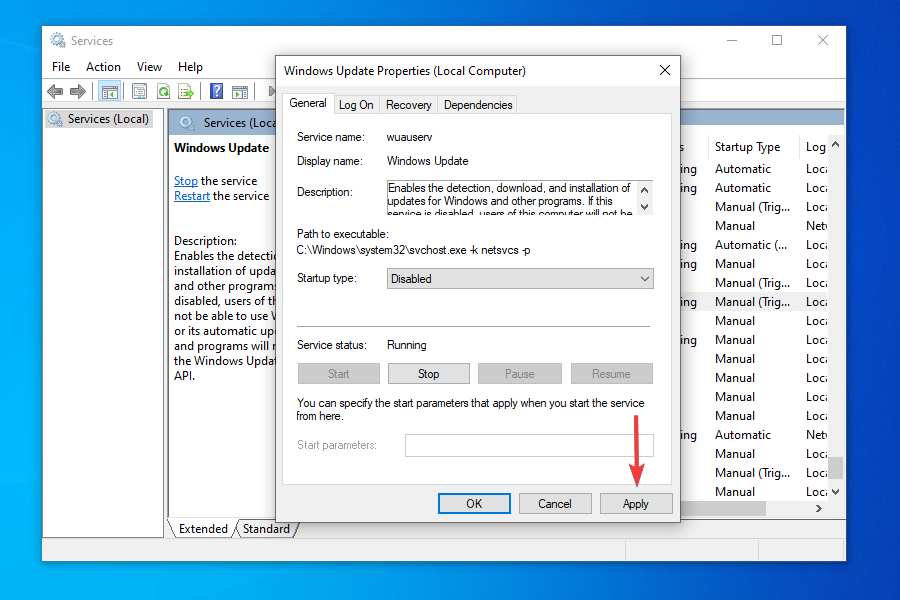
- Locate and double-click on the Windows Update service.
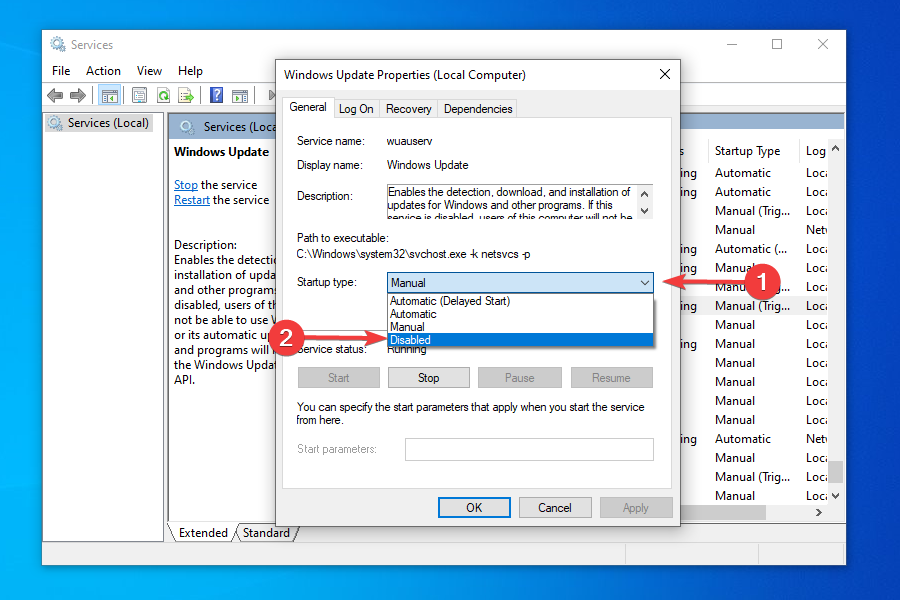
- Click on the Startup type dropdown menu and select Disabled from the list of options that appear.
- Click on Apply to save the changes.
- Next, click OK to close the properties window.
- Close the Services app.
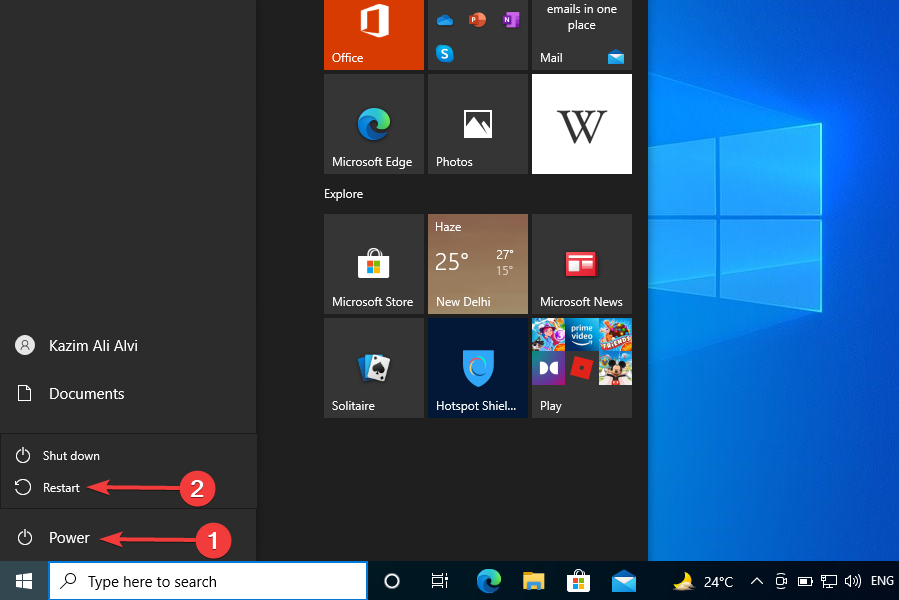
- Now, you need to reboot the computer. To do that, press the Windows key, click on the Power button, and select Restart from the menu that appears.

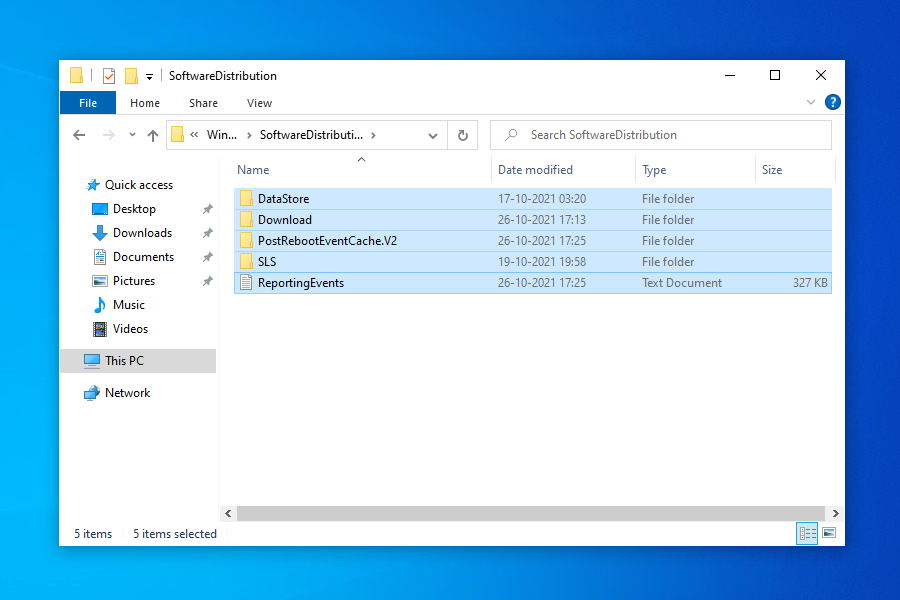
- Press Windows + E to launch the File Explorer, and navigate to the following path or paste it in the addressbar at the top and hit Enter.
C:\Windows\SoftwareDistribution - Press Ctrl + A to select all the files saved here, and hit the Del key to delete them.
- Choose the appropriate response in case a confirmation box pops up.
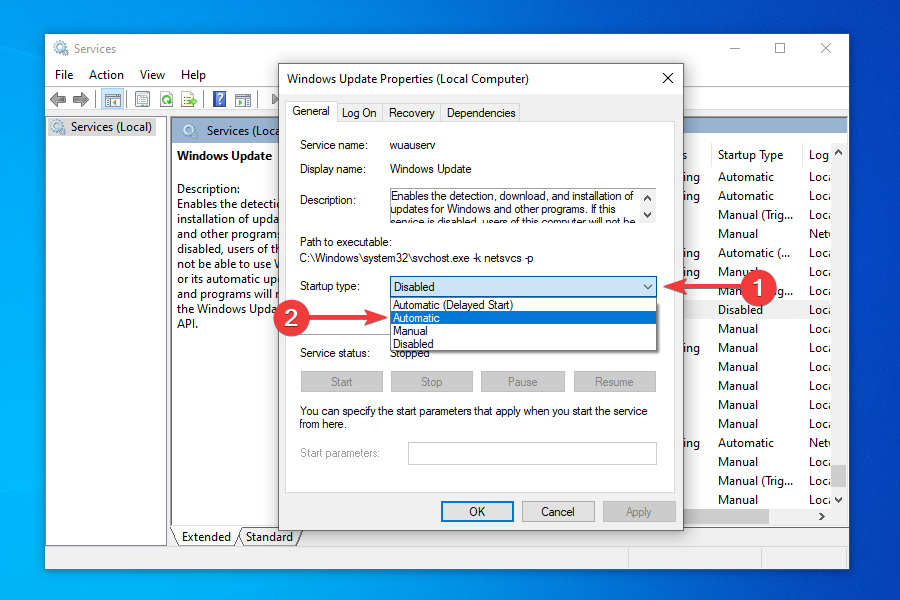
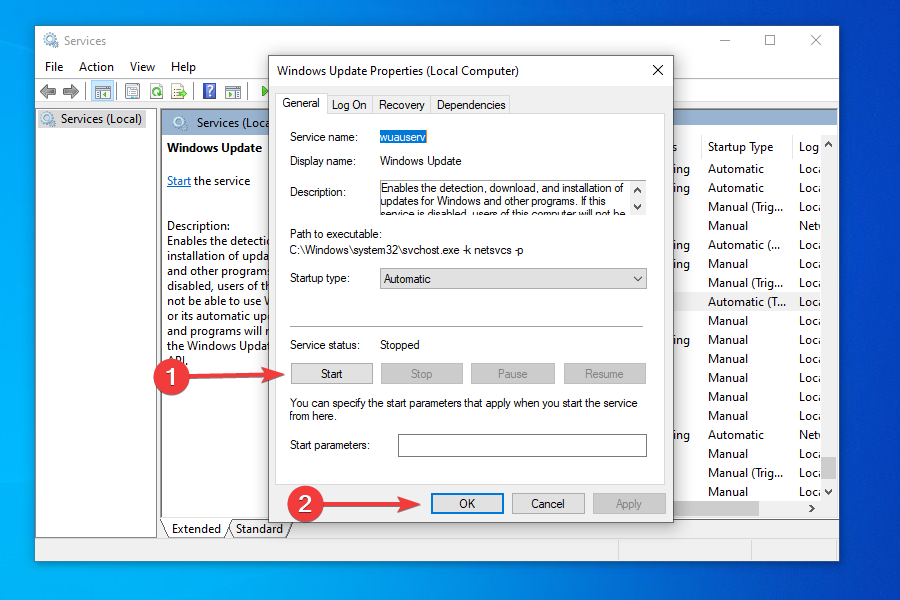
- Now, again launch the Services app as you did earlier, and double-click on the Windows Update service.
- Select Automatic from the Startup type dropdown menu this time.
- Click on Apply to save the changes.
- Click on Start under Service status to run the service, and then click on OK at the bottom.
- Go to the Windows Update section in Settings and check if you can now install Windows 11.

In some cases, the update for Windows 11 may seem stuck at 100% for hours without any progress. In such cases, following the steps mentioned here will get things up and running and allow you to upgrade.
6. Disable or uninstall conflicting apps
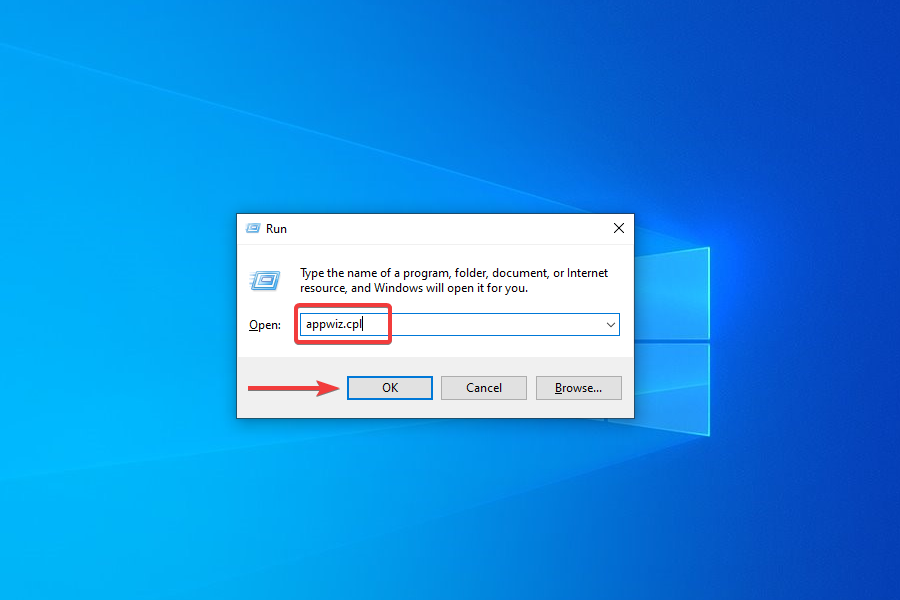
- Press Windows + R to launch the Run command.
- Enter appwiz.cpl in the text field and click on OK or hit Enter to launch the Programs and Features window.
- Locate and select the app you want to remove, and click on Uninstall at the top.
- Choose the appropriate response in case a confirmation box pops up.

To disable an app, you can go to its built-in Settings and turn on/off the required toggle or choose the appropriate response.
The method to disable each app is different and there should be an option for it somewhere in the app’s built-in Settings. Search the FAQ section on the official website for the program to find out the exact steps.
If disabling the app didn’t work or you couldn’t find the option for it, follow the steps above to uninstall the app.
Certain programs are known to block the Windows Updates, thus leading to the current issue.
You should look out for third-party firewalls and disable or uninstall them. Also, apps like Pi-hole or other similar ones, have been found to be the culprit, and uninstalling them fixed the problem.
Once you are done disabling or uninstalling the problematic apps, check if you are able to find and install Windows 11 from Windows Update.
7. Use the Installation Media

NOTE
For this method, you will require a USB flash drive with more than 8 GB of storage to create a bootable USB for installing Windows 11.
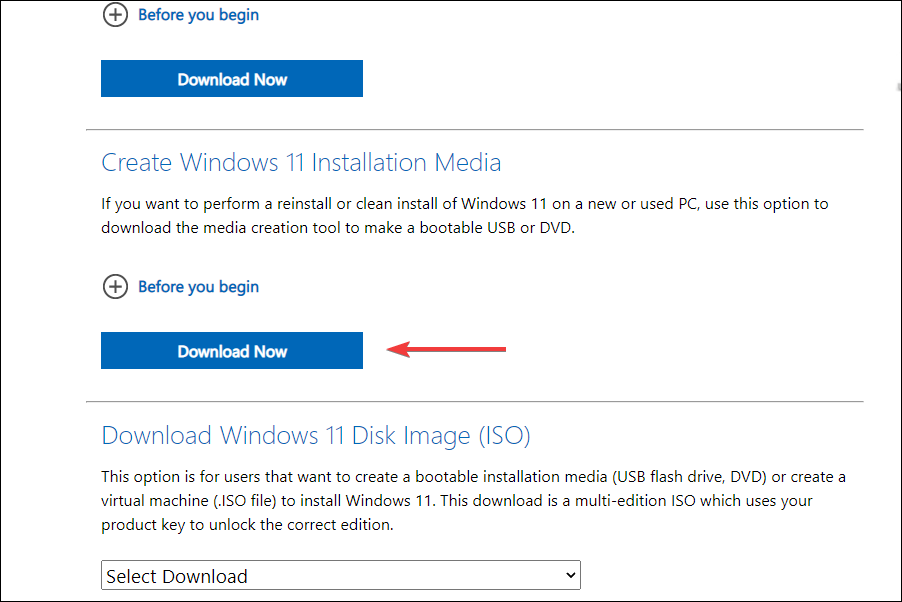
- Plug in the flash drive to your sytem.
- Go to the download page for Windows 11 and click on Download Now under Create Windows 11 Installation Media.
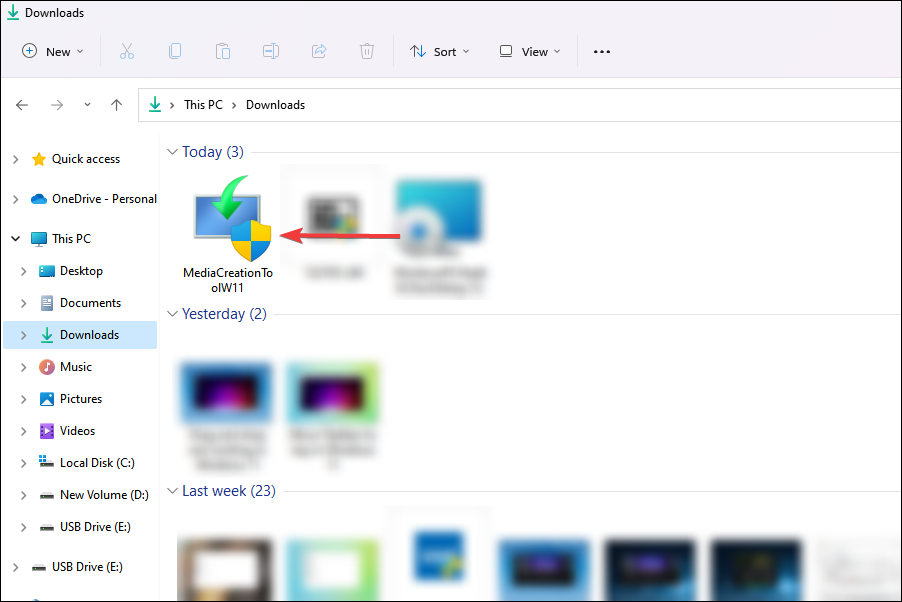
- Navigate to the location where the downloaded file is saved and double-click on it.
- Click Yes on the UAC prompt that appears.
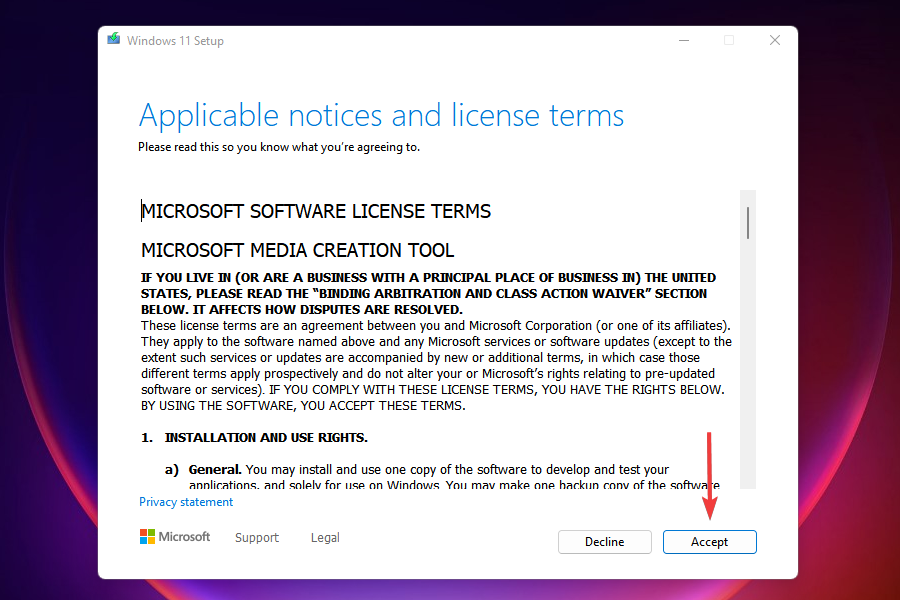
- The setup will take a few moments to get things ready.
- Click on Accept to agree to the license terms.
- Now, you will find the recommended language and edition already selected. In case you want to make any changes, untick the checkbox for Use the recommended options for this PC and choose the appropriate settings. Finally, click on Next.
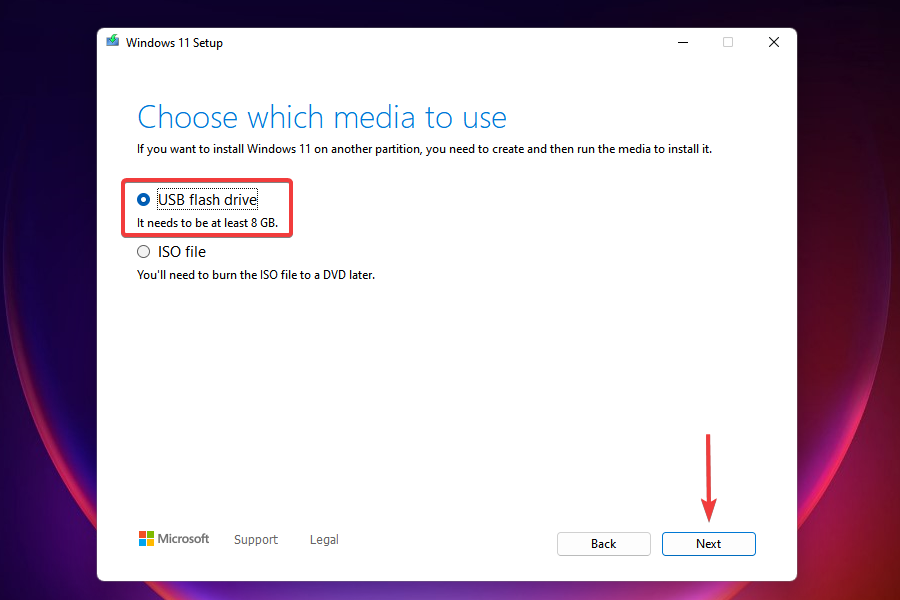
- Choose the USB flash drive option and click Next.
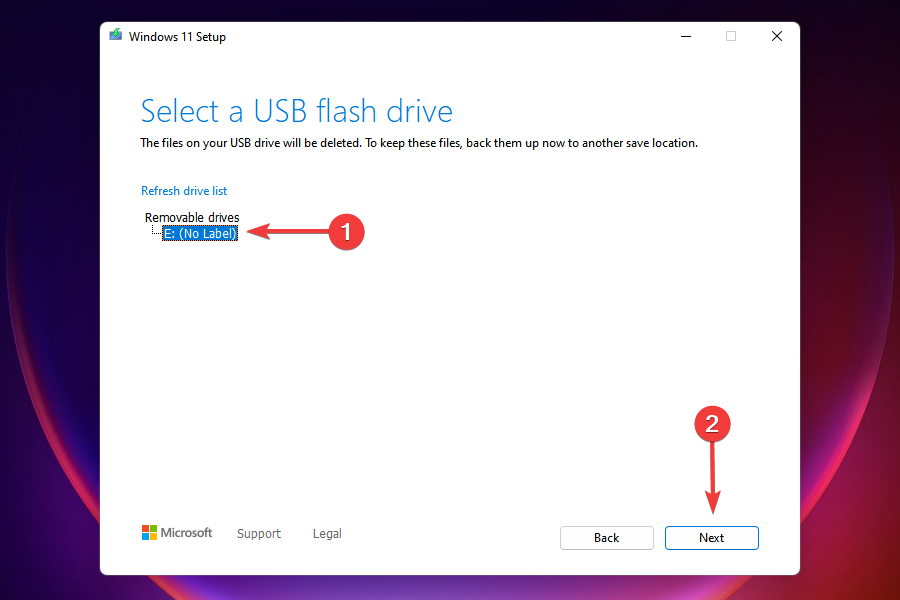
- Select the removable drive that you earlier plugged in from the list and click on Next.
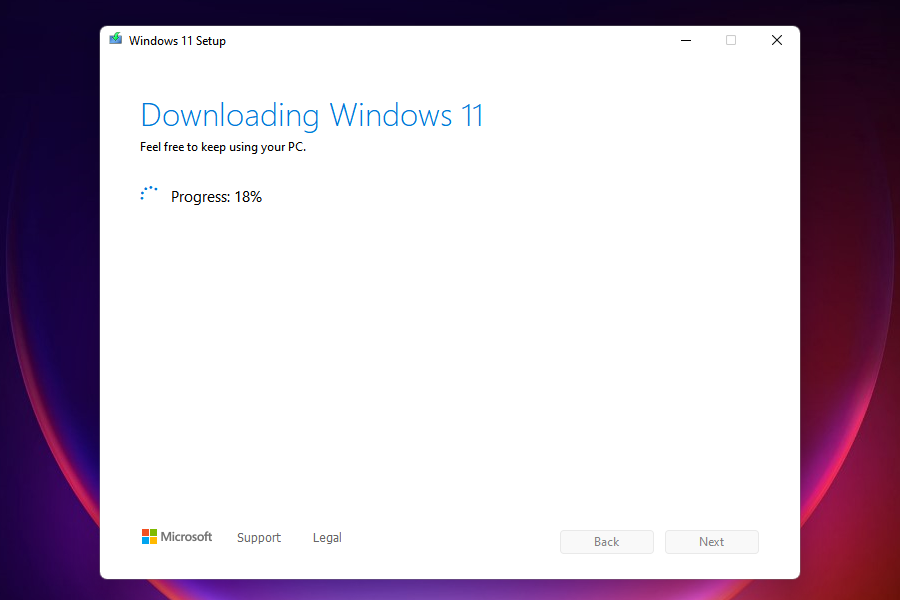
- Wait for the setup to create a bootable USB drive. You can monitor the progress in this window.
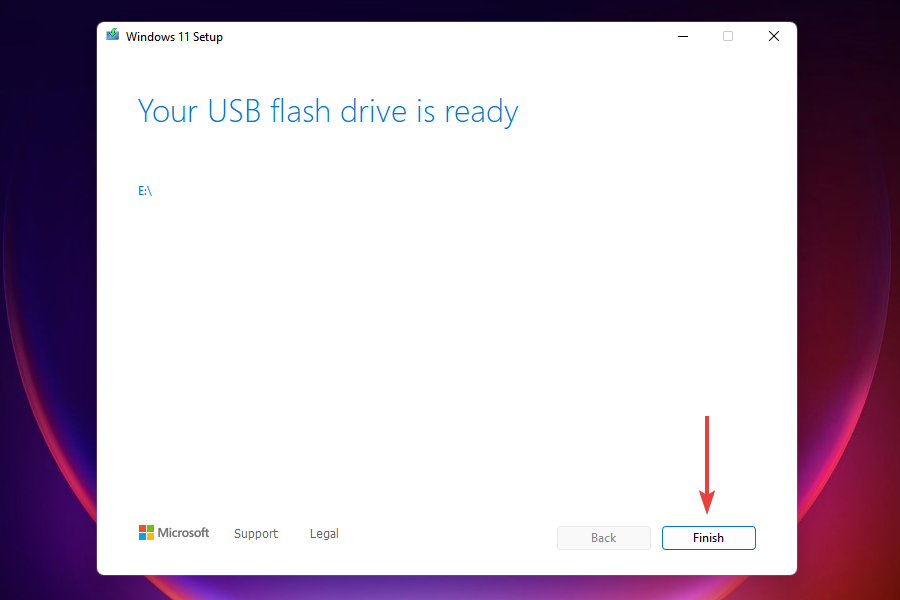
- After the bootable flash drive is created, click on Finish to close the setup.

Once done, you can now easily install the OS from the bootable USB drive. Although the guide is for Windows 10, it would assist you when installing Windows 11 as well, since the process remains the same.
After the flash drive is booted, follow the on-screen instructions to complete the installation process.
A major advantage of this method is that you will always have a bootable USB at your disposal, which would make things a lot easier in case you have to reinstall Windows 11.
We’ve written extensively around the issue of people either not being able to complete the upgrade process to Windows 11 or not seeing the option, at all. Here are some resources we’re suggesting for you to check out:
- How to fix Windows 11 Windows Update errors
- How to fix Windows 11 errors after update from Windows 10
- How to make Windows 11 update after restart
- How to fix Windows Update troubleshooter in Windows 11
- How to fix a stuck Windows 11 download
- How to solve Windows 11 installation woes
Can I use the Windows 11 Installation Assistant to upgrade?
Yes, the Windows 11 Installation Assistant is another tool at your disposal to upgrade to the latest iteration. However, you cannot use it if the PC doesn’t meet the minimum system requirements, since the Installation Assistant wouldn’t run.
You can download and use the Windows 11 Installation Assistant with the help of our guide. Simply, go to the How to use the Windows 11 Installation Assistant? heading and follow the steps listed there.
What do I do if my PC doesn’t meet the system requirements for Windows 11?
As promised earlier, we would now list out the ways you can install Windows 11 on an unsupported PC. However, Microsoft has stated that such PCs may have compatibility issues and might not receive updates, including those for security. You will thus be exposing the system to a major risk.
Though if you have made up your mind, you can install Windows 11 after bypassing SecureBoot and TPM checks. This would require making some minor changes to the Registry.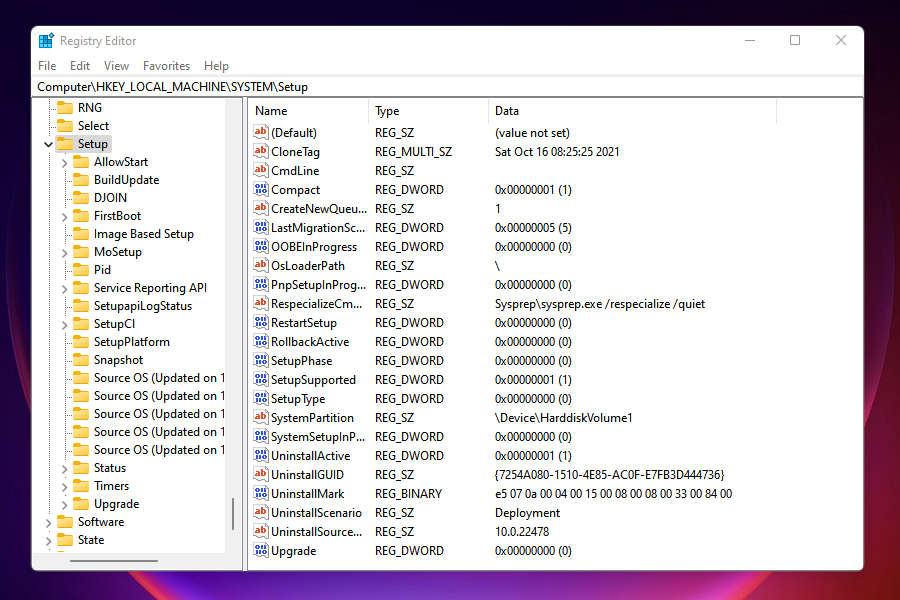
It’s also possible to install Windows 11 without TPM, another workaround users had been looking for due to the TPM 2.0 requirement.
If you are still unsure, learn how to install Windows 11 on a Virtual Machine, try it out and then make the upgrade. Nevertheless, if you have already made the jump, it’s easy to roll back from Windows 11 to Windows 10.
By the time you reach the end of this article, you know a bunch of ways to install the latest iteration from Microsoft on both supported and unsupported PCS. Also, the Windows 11 not showing up in Windows Update issue would be fixed.
Let’s know which method worked for you and your experience thus far with Windows 11.
![]()