В очередной раз после переустановки Windows осознал, что надо накатить драйвера, CUDA, cuDNN, Tensorflow/Keras для обучения нейронных сетей.
Каждый раз для меня это оказывается несложной, но времязатратной операцией: найти подходящую комбинацию Tensorflow/Keras, CUDA, cuDNN и Python несложно, но вспоминаю про эти зависимости только в тот момент, когда при импорте Tensorflow вижу, что видеокарта не обнаружена и начинаю поиск нужной страницы в документации Tensorflow.
В этот раз ситуация немного усложнилась. Помимо установки Tensorflow мне потребовалось установить PyTorch. Со своими зависимостями и поддерживаемыми версиями Python, CUDA и cuDNN.
По итогам нескольких часов экспериментов решил, что надо зафиксировать все полезные ссылки в одном посте для будущего меня.
Краткий алгоритм установки Tensorflow и PyTorch
Примечание: Установить Tensorflow и PyTorch можно в одном виртуальном окружении, но в статье этого алгоритма нет.
Подготовка к установке
- Определить какая версия Python поддерживается Tensorflow и PyTorch (на момент написания статьи мне не удалось установить PyTorch в виртуальном окружении с Python 3.9.5)
- Для выбранной версии Python найти подходящие версии Tensorflow и PyTorch
- Определить, какие версии CUDA поддерживают выбранные ранее версии Tensorflow и PyTorch
- Определить поддерживаемую версию cuDNN для Tensorflow – не все поддерживаемые CUDA версии cuDNN поддерживаются Tensorflow. Для PyTorch этой особенности не заметил
Установка CUDA и cuDNN
- Скачиваем подходящую версию CUDA и устанавливаем. Можно установить со всеми значениями по умолчанию
- Скачиваем cuDNN, подходящую для выбранной версии Tensorflow (п.1.2). Для скачивания cuDNN потребуется регистрация на сайте NVidia. “Установка” cuDNN заключается в распакове архива и заменой существующих файлов CUDA на файлы из архива
Устанавливаем Tensorflow
- Создаём виртуальное окружение для Tensorflow c выбранной версией Python. Назовём его, например,
py38tf - Переключаемся в окружение
py38tfи устанавливаем поддерживаемую версию Tensorflowpip install tensorflow==x.x.x - Проверяем поддержку GPU командой
python -c "import tensorflow as tf; print('CUDA available' if tf.config.list_physical_devices('GPU') else 'CUDA not available')"
Устанавливаем PyTorch
- Создаём виртуальное окружение для PyTorch c выбранной версией Python. Назовём его, например,
py38torch - Переключаемся в окружение
py38torchи устанавливаем поддерживаемую версию PyTorch - Проверяем поддержку GPU командой
python -c "import torch; print('CUDA available' if torch.cuda.is_available() else 'CUDA not available')"
В моём случае заработала комбинация:
- Python 3.8.8
- Драйвер NVidia 441.22
- CUDA 10.1
- cuDNN 7.6
- Tensorflow 2.3.0
- PyTorch 1.7.1+cu101
Tensorflow и PyTorch установлены в разных виртуальных окружениях.
Итого
Польза этой статьи будет понятна не скоро: систему переустанавливаю я не часто.
Если воспользуетесь этим алгоритмом и найдёте какие-то ошибки – пишите в комментарии
Если вам понравилась статья, то можете зайти в мой telegram-канал. В канал попадают небольшие заметки о Python, .NET, Go.
CUDA Install Guide
This is a must-read guide if you want to setup a new Deep Learning PC. This guide includes the installation of the following:
- NVIDIA Driver
- CUDA Toolkit
- cuDNN
- TensorRT
Recommendation
Debian installation method is recommended for all CUDA toolkit, cuDNN and TensorRT installation.
For PyTorch, CUDA 11.0 and CUDA 10.2 are recommended.
For TensorFlow, up to CUDA 10.2 are supported.
TensorRT is still not supported for Ubuntu 20.04. So, Ubuntu 18.04 is recommended
Install NVIDIA Driver
Windows
Windows Update automatically install and update NVIDIA Driver.
Linux
Update first:
sudo apt update
sudo apt upgrade
Check latest and recommended drivers:
sudo ubuntu-drivers devices
Install recommended driver automatically:
sudo ubuntu-drivers install
Or, Install specific driver version using:
sudo apt install nvidia-driver-xxx
Then reboot:
Verify the Installation
After reboot, verify using:
Install CUDA Toolkit
Installation Steps
- Go to https://developer.nvidia.com/cuda-toolkit-archive and choose your desire CUDA toolkit version that is compatible with the framework you want to use.
- Select your OS.
- Select your system architecture.
- Select your OS version.
- Select Installer Type and Follow the steps provided. (.exe on Windows and .run or .deb on Linux)
Post-Installation Actions
Windows exe CUDA Toolkit installation method automatically adds CUDA Toolkit specific Environment variables. You can skip the following section.
Before CUDA Toolkit can be used on a Linux system, you need to add CUDA Toolkit path to PATH variable.
Open a terminal and run the following command.
export PATH=/usr/local/cuda-11.1/bin${PATH:+:${PATH}}
or add this line to .bashrc file.
In addition, when using the runfile installation method, you also need to add LD_LIBRARY_PATH variable.
For 64-bit system,
export LD_LIBRARY_PATH=/usr/local/cuda-11.1/lib64${LD_LIBRARY_PATH:+:${LD_LIBRARY_PATH}}
For 32-bit system,
export LD_LIBRARY_PATH=/usr/local/cuda-11.1/lib${LD_LIBRARY_PATH:+:${LD_LIBRARY_PATH}}
Note: The above paths change when using a custom install path with the runfile installation method.
Verify the Installation
Check the CUDA Toolkit version with:
Install cuDNN
The NVIDIA CUDA Deep Neural Network library (cuDNN) is a GPU-accelerated lirbary of primitives for deep neural networks. cuDNN provides highly tuned implementations for standard routines such as forward and backward convolution, pooling, normalization and activation layers.
- Go to https://developer.nvidia.com/cudnn and click «Download cuDNN».
- You need to sing in to proceed.
- Then, check «I Agree to the Terms…».
- Click on your desire cuDNN version compatible with your installed CUDA version. (If you don’t find desire cuDNN version, click on «Archived cuDNN Releases» and find your version. If you don’t know which version to install, latest cuDNN version is recommended).
Windows
-
Choose «cuDNN Library for Windows (x86)» and download. (That is the only one available for Windows).
-
Extract the downloaded zip file to a directory of your choice.
-
Copy the following files into the CUDA Toolkit directory.
a. Copy
<extractpath>\cuda\bin\cudnn*.dlltoC:\Program Files\NVIDIA GPU Computing Toolkit\CUDA\vx.x\bin.b. Copy
<extractpath>\cuda\include\cudnn*.htoC:\Program Files\NVIDIA GPU Computing Toolkit\CUDA\vx.x\include.c. Copy
<extractpath>\cuda\lib\x64\cudnn*.libtoC:\Program Files\NVIDIA GPU Computing Toolkit\CUDA\vx.x\lib\x64.
Linux
Download the 2 files named as:
- cuDNN Runtime Library for …
- cuDNN Developer Library for …
for your installed OS version.
Then, install the downloaded files with the following command:
sudo dpkg -i libcudnn8_x.x.x...deb
sudo dpkg -i libcudnn8-dev_x.x.x...deb
Install TensorRT
TensorRT is meant for high-performance inference on NVIDIA GPUs. TensorRT takes a trained network, which consists of a network definition and a set of trained parameters, and produces a highly optimized runtime engine that performs inference for that network.
- Go to https://developer.nvidia.com/tensorrt and click «Download Now».
- You need to sing in to proceed.
- Click on your desire TensorRT version. (If you don’t know which version to install, latest TensorRT version is recommended).
- Then, check «I Agree to the Terms…».
- Click on your desire TensorRT sub-version. (If you don’t know which version to install, latest version is recommended).
Windows
- Download «TensorRT 7.x.x for Windows10 and CUDA xx.x ZIP package» that matches CUDA version.
- Unzip the downloaded archive.
- Copy the DLL files from
<extractpath>/libto your CUDA installation directoryC:\Program Files\NVIDIA GPU Computing Toolkit\CUDA\vx.x\bin
Then install the uff, graphsurgeon and onnx_graphsurgeon wheel packages.
pip install <extractpath>\graphsurgeon\graphsurgeon-x.x.x-py2.py3-none-any.whl
pip install <extractpath>\uff\uff-x.x.x-py2.py3-none-any.whl
pip install <extractpath>\onnx_graphsurgeon\onnx_graphsurgeon-x.x.x-py2.py3-none-any.whl
Linux
Download «TensorRT 7.x.x for Ubuntu xx.04 and CUDA xx.x DEB local repo package» that matches your OS version, CUDA version and CPU architecture.
Then install with:
os="ubuntuxx04"
tag="cudax.x-trt7.x.x.x-ga-yyyymmdd"

sudo dpkg -i nv-tensorrt-repo-${os}-${tag}_1-1_amd64.deb
sudo apt-key add /var/nv-tensorrt-repo-${tag}/7fa2af80.pub

sudo apt update
sudo apt install -y tensorrt
If you plan to use TensorRT with TensorFlow, install this also:
sudo apt install uff-converter-tf
Verify the Installation
For Linux,
You should see packages related with TensorRT.
Upgrading TensorRT
Download and install the new version as if you didn’t install before. You don’t need to uninstall your previous version.
Uninstalling TensorRT
sudo apt purge "libvinfer*"
sudo apt purge graphsurgeon-tf onnx-graphsurgeon
sudo apt autoremove
sudo pip3 uninstall tensorrt
sudo pip3 uninstall uff
sudo pip3 uninstall graphsurgeon
sudo pip3 uninstall onnx-graphsurgeon
PyCUDA
PyCUDA is used within Python wrappers to access NVIDIA’s CUDA APIs.
Install PyCUDA with:
If you want to upgrade PyCUDA for newest CUDA version or if you change the CUDA version, you need to uninstall and reinstall PyCUDA.
For that purpose, do the following:
- Uninstall the existing PyCUDA.
- Upgrade CUDA.
- Install PyCUDA again.
References
- Official CUDA Toolkit Installation
- Official cuDNN Installation
- Official TensorRT Installation
ПРОГРАММИРОВАНИЕ:
Как установить драйвер NVIDIA CUDA, CUDA Toolkit, CuDNN и TensorRT в Windows
Хорошие и простые руководства с пошаговыми инструкциями

Резюме:
В этой статье устанавливаются драйверы и программы, необходимые для использования графических процессоров NVIDIA для обучения моделей и выполнения пакетных выводов. Он загружает и устанавливает драйверы CUDA, CUDA Toolkits и обновления CUDA Toolkit. Он загружает, распаковывает и перемещает файлы CuDNN и TensorRT в каталог CUDA. Он также настраивает, создает и запускает образец BlackScholes для тестирования графического процессора.
Оглавление:
- Установить требования
- Установить драйвер CUDA
- Установить CUDA Toolkit 10
- Установить CUDA Toolkit 11
- Установить библиотеку CuDNN
- Установить библиотеку TensorRT
- Протестируйте GPU на образце CUDA
Приложение:
- Учебники: настройка искусственного интеллекта
- Учебники: курс искусственного интеллекта
- Учебники: репозитории искусственного интеллекта
Установите требования:
В этом разделе загружается и устанавливается Visual Studio с поддержкой C и C ++.
# open the powershell shell
1. press “⊞ windows”
2. enter “powershell” into the search bar
3. right-click "windows powershell"
4. click “run as administrator”
# download the visual studio 2019 installer
invoke-webrequest -outfile "$home\downloads\vsc.exe" -uri https://download.visualstudio.microsoft.com/download/pr/45dfa82b-c1f8-4c27-a5a0-1fa7a864ae21/9dd77a8d1121fd4382494e40840faeba0d7339a594a1603f0573d0013b0f0fa5/vs_Community.exe
# open the visual studio 2019 installer
invoke-item "$home\downloads\vsc.exe"
# install visual studio 2019
1. check “desktop development with c++”
2. click "install"
Установите драйвер CUDA:
В этом разделе загружается и устанавливается последняя версия драйвера CUDA на тот момент.
# download the cuda driver installer
invoke-webrequest -outfile "$home\downloads\cuda_driver.exe" -uri https://us.download.nvidia.com/Windows/471.68/471.68-desktop-win10-win11-64bit-international-nsd-dch-whql.exe
# open the cuda driver installer
invoke-item "$home\downloads\cuda_driver.exe"
# install the cuda driver
1. select “nvidia graphics driver”
2. click "agree & continue"
3. click "next"
Установите CUDA Toolkit 10:
В этом разделе загружается и устанавливается CUDA Toolkit 10 и обновления.
# download the cuda toolkit 10 installer
invoke-webrequest -outfile "$home\downloads\cuda_toolkit_10.exe" https://developer.download.nvidia.com/compute/cuda/10.2/Prod/network_installers/cuda_10.2.89_win10_network.exe
# open the cuda toolkit 10 installer
invoke-item "$home\downloads\cuda_toolkit_10.exe"
# install cuda toolkit 10
1. click "agree & continue"
2. click "next"
3. select custom (advanced)
4. click "next"
5. uncheck “nvidia geforce experience components”
6. uncheck “driver components”
7. uncheck “other components”
8. click "next"
# download the cuda 10 update 1installer
invoke-webrequest -outfile "$home\downloads\cuda_10_update_1.exe" https://developer.download.nvidia.com/compute/cuda/10.2/Prod/patches/1/cuda_10.2.1_win10.exe
# open the cuda 10 update 1 installer
invoke-item "$home\downloads\cuda_10_update_1.exe"
# install the cuda 10 update 1
1. click "agree & continue"
2. click "next"
# download the cuda 10 update 2 installer
invoke-webrequest -outfile "$home\downloads\cuda_10_update_2.exe" https://developer.download.nvidia.com/compute/cuda/10.2/Prod/patches/2/cuda_10.2.2_win10.exe
# open the cuda 10 update 2 installer
invoke-item "$home\downloads\cuda_10_update_2.exe"
# install the cuda 10 update 2
1. click "agree & continue"
2. click "next"
Установите CUDA Toolkit 11:
В этом разделе загружается и устанавливается CUDA Toolkit 11.
# download the cuda toolkit 11 installer
invoke-webrequest -outfile "$home\downloads\cuda_toolkit_11.exe" https://developer.download.nvidia.com/compute/cuda/11.4.1/network_installers/cuda_11.4.1_win10_network.exe
# open the cuda toolkit 11 installer
invoke-item "$home\downloads\cuda_toolkit_11.exe"
# install cuda toolkit 11
1. click "agree & continue"
2. click "next"
3. select custom (advanced)
4. click "next"
5. uncheck “nvidia geforce experience components”
6. uncheck “driver components”
7. uncheck “other components”
8. click "next"
Установите библиотеку CuDNN:
Этот раздел присоединяется к Программе разработчика NVIDIA и загружает библиотеку CuDNN, распаковывает и перемещает файлы в каталог CUDA.
# join the nvidia developer program
start-process iexplore "https://developer.nvidia.com/developer-program"
# download the cudnn library for cuda toolkit 10
start-process iexplore https://developer.nvidia.com/compute/machine-learning/cudnn/secure/8.2.2/10.2_07062021/cudnn-10.2-windows10-x64-v8.2.2.26.zip
# unzip the cudnn library for cuda toolkit 10
expand-archive "$home\downloads\cudnn-10.2-windows10-x64-v8.2.2.26.zip" -destinationpath "$home\downloads\cudnn_cuda_toolkit_10\"
# move the dll files
move-item "$home\downloads\cudnn_cuda_toolkit_10\cuda\bin\cudnn*.dll" "c:\program files\nvidia gpu computing toolkit\cuda\v10.2\bin\"
# move the h files
move-item "$home\downloads\cudnn_cuda_toolkit_10\cuda\include\cudnn*.h" "c:\program files\nvidia gpu computing toolkit\cuda\v10.2\include\"
# move the lib files
move-item "$home\downloads\cudnn_cuda_toolkit_10\cuda\lib\x64\cudnn*.lib" "c:\program files\nvidia gpu computing toolkit\cuda\v10.2\lib\x64"
# download the cudnn library for cuda toolkit 11
start-process iexplore https://developer.nvidia.com/compute/machine-learning/cudnn/secure/8.2.2/11.4_07062021/cudnn-11.4-windows-x64-v8.2.2.26.zip
# unzip the cudnn library for cuda toolkit 11
expand-archive "$home\downloads\cudnn-11.4-windows-x64-v8.2.2.26.zip" -destinationpath "$home\downloads\cudnn_cuda_toolkit_11\"
# move the dll files
move-item "$home\downloads\cudnn_cuda_toolkit_11\cuda\bin\cudnn*.dll" "c:\program files\nvidia gpu computing toolkit\cuda\v11.4\bin\"
# move the h files
move-item "$home\downloads\cudnn_cuda_toolkit_11\cuda\include\cudnn*.h" "c:\program files\nvidia gpu computing toolkit\cuda\v11.4\include\"
# move the lib files
move-item "$home\downloads\cudnn_cuda_toolkit_11\cuda\lib\x64\cudnn*.lib" "c:\program files\nvidia gpu computing toolkit\cuda\v11.4\lib\x64"
Установите библиотеку TensorRT:
Этот раздел загружает библиотеку TensorRT, распаковывает и перемещает файлы в каталог CUDA и устанавливает несколько необходимых программ на Python.
# downloadthe tensorrt library for cuda toolkit 10 start-process iexplore https://developer.nvidia.com/compute/machine-learning/tensorrt/secure/8.0.1/zip/tensorrt-8.0.1.6.windows10.x86_64.cuda-10.2.cudnn8.2.zip # unzip the tensorrt library for cuda 10 expand-archive "$home\downloads\tensorrt-8.0.1.6.windows10.x86_64.cuda-10.2.cudnn8.2.zip" "$home\downloads\tensorrt_cuda_toolkit_10\" # move the dll files move-item "$home\downloads\tensorrt_cuda_toolkit_10\tensorrt-8.0.1.6\lib\*.dll" "c:\program files\nvidia gpu computing toolkit\cuda\v10.2\bin\"# downloadthe tensorrt library for cuda toolkit 11 start-process iexplore https://developer.nvidia.com/compute/machine-learning/tensorrt/secure/8.0.1/zip/tensorrt-8.0.1.6.windows10.x86_64.cuda-11.3.cudnn8.2.zip # unzip the tensorrt library for cuda 11 expand-archive "$home\downloads\tensorrt-8.0.1.6.windows10.x86_64.cuda-11.3.cudnn8.2.zip" "$home\downloads\tensorrt_cuda_toolkit_11\" # move the dll files move-item "$home\downloads\tensorrt_cuda_toolkit_11\tensorrt-8.0.1.6\lib\*.dll" "c:\program files\nvidia gpu computing toolkit\cuda\v11.4\bin\" # install graph surgeon python -m pip install "$home\downloads\tensorrt_cuda_toolkit_11\tensorrt-8.0.1.6\graphsurgeon\graphsurgeon-0.4.5-py2.py3-none-any.whl" # install onnx graph surgeon python -m pip install "$home\downloads\tensorrt_cuda_toolkit_11\tensorrt-8.0.1.6\onnx_graphsurgeon\onnx_graphsurgeon-0.3.10-py2.py3-none-any.whl" # install universal framework format python -m pip install "$home\downloads\tensorrt_cuda_toolkit_11\tensorrt-8.0.1.6\uff\uff-0.6.9-py2.py3-none-any.whl"
Протестируйте графический процессор на примере CUDA:
В этом разделе настраивается, строится и запускается образец BlackScholes.
# open the visual studio file
start-process "c:\programdata\nvidia corporation\cuda samples\v11.4\4_finance\blackscholes\blackscholes_vs2019.sln"
# edit the linker input properties
1. click the "project" menu
2. click "properties"
3. double-click "linker"
4. click "input"
5. click "additional dependencies"
6. click the "down arrow" button
7. click "edit"
# add the cudnn library
1. type "cudnn.lib" at the bottom of the additional dependencies
2. click "ok"
# add the cuda toolkit 11 directory
1. click "cuda c/c++"
2. double-click "cuda toolkit custom dir"
3. enter "c:\program files\nvidia gpu computing toolkit\cuda\v11.4"
4. click "ok"
# build the sample
1. click the “build” menu
2. click “build solution”
# run the sample
cmd /k "c:\programdata\nvidia corporation\cuda samples\v11.4\bin\win64\debug\blackscholes.exe"
«Наконец, не забудьте подписаться и удерживать кнопку хлопка, чтобы получать регулярные обновления и помощь».
Приложение:
Этот блог существует, чтобы предоставить комплексные решения, ответить на ваши вопросы и ускорить ваш прогресс в области искусственного интеллекта. В нем есть все необходимое, чтобы настроить компьютер и пройти первую половину курса fastai. Он откроет вам самые современные репозитории в подполях искусственного интеллекта. Он также будет охватывать вторую половину курса фастая.
Учебники: настройка искусственного интеллекта
В этом разделе есть все, что нужно для настройки вашего компьютера.
# linux
01. install and manage multiple python versions
02. install the nvidia cuda driver, toolkit, cudnn, and tensorrt
03. install the jupyter notebook server
04. install virtual environments in jupyter notebook
05. install the python environment for ai and machine learning
06. install the fastai course requirements
# wsl 2
01. install windows subsystem for linux 2
02. install and manage multiple python versions
03. install the nvidia cuda driver, toolkit, cudnn, and tensorrt
04. install the jupyter notebook home and public server
05. install virtual environments in jupyter notebook
06. install the python environment for ai and machine learning
07. install ubuntu desktop with a graphical user interface
08. install the fastai course requirements
# windows 10
01. install and manage multiple python versions
02. install the nvidia cuda driver, toolkit, cudnn, and tensorrt
03. install the jupyter notebook home and public server
04. install virtual environments in jupyter notebook
05. install the programming environment for ai and machine learning
# mac
01. install and manage multiple python versions
02. install the jupyter notebook server
03. install virtual environments in jupyter notebook
04. install the python environment for ai and machine learning
05. install the fastai course requirements
Учебники: курс искусственного интеллекта
Этот раздел содержит ответы на анкету в конце каждого урока.
# fastai course
01. chapter 1: your deep learning journey q&a
02. chapter 2: from model to production q&a
03. chapter 3: data ethics q&a
04. chapter 4: under the hood: training a digit classifier q&a
05. chapter 5: image classification q&a
06. chapter 6: other computer vision problems q&a
07. chapter 7: training a state-of-the-art model q&a
08. chapter 8: collaborative filtering deep dive q&a
Учебники: репозитории искусственного интеллекта
Этот раздел содержит современные репозитории в различных подполях.
# repositories related to audio
01. raise audio quality using nu-wave
02. change voices using maskcyclegan-vc
03. clone voices using real-time-voice-cloning toolbox
# repositories related to images
01. achieve 90% accuracy using facedetection-dsfd
qaa-engineer.ru > Data Science > Как установить графический процессор CUDA для Visual Studio 2022 для Windows 10?
Как установить графический процессор CUDA для Visual Studio 2022 для Windows 10?
В мире Data Science графический процессор (GPU) является незаменимым инструментом для ускорения вычислений. Он позволяет значительно ускорить выполнение операций над данными и обработку высоконагруженных задач. Одним из наиболее популярных фреймворков, использующих GPU для улучшения производительности, является CUDA.
CUDA (Compute Unified Device Architecture) — это программная платформа и API, разработанные компанией NVIDIA, которые позволяют использовать графический процессор для распараллеливания вычислений. Если вы работаете с Visual Studio 2022 и хотите использовать графический процессор CUDA, вам потребуется правильно установить и настроить его.
В этой статье я расскажу вам, как установить графический процессор CUDA для Visual Studio 2022 на операционной системе Windows 10. Процесс установки включает несколько шагов, но я постараюсь объяснить их максимально подробно.
Шаг 1: Проверьте совместимость вашей видеокарты с CUDA
Перед тем, как приступить к установке CUDA, убедитесь, что ваша видеокарта совместима с этой технологией. Для этого вам потребуется знать модель и производителя вашей видеокарты. Вы можете найти эту информацию, открыв Панель управления NVIDIA.
Шаг 2: Установите необходимые компоненты
Для установки CUDA вам потребуется установить ряд дополнительных компонентов. Первым делом, убедитесь, что у вас установлена последняя версия драйверов NVIDIA для вашей видеокарты. Вы можете скачать их с официального сайта NVIDIA.
После установки драйверов перезагрузите компьютер. Затем установите Visual Studio 2022, если вы еще не сделали этого.
Шаг 3: Скачайте и установите CUDA Toolkit
Перейдите на официальный сайт NVIDIA и найдите раздел CUDA Toolkit. Скачайте соответствующую версию CUDA Toolkit для вашей операционной системы и Visual Studio 2022.
После завершения загрузки запустите установочный файл CUDA Toolkit и следуйте инструкциям мастера установки. Убедитесь, что вы выбрали правильную версию Visual Studio во время установки.
Шаг 4: Настройте переменные среды
После установки CUDA Toolkit вам потребуется настроить переменные среды для указания пути к установленным файлам и библиотекам CUDA. Чтобы это сделать, откройте меню Пуск, введите «переменные среды» и выберите соответствующий результат.
В открывшемся окне выберите кнопку «Переменные среды». В разделе «Пользовательские переменные» нажмите на кнопку «Создать» и добавьте следующие переменные:
— CUDA_PATH: путь к установленной директории CUDA Toolkit (например, «C:\Program Files\NVIDIA GPU Computing Toolkit\CUDA\vX.X»).
— Path: добавьте путь к бинарным файлам CUDA (например, «%CUDA_PATH%\bin»).
Шаг 5: Проверьте установку
Чтобы убедиться, что CUDA успешно установлен и настроен для работы с Visual Studio 2022, вам потребуется создать простой проект и запустить его на GPU.
Откройте Visual Studio 2022 и создайте новый проект. В раскрывающемся меню выберите «CUDA Projec» и следуйте инструкциям мастера создания проекта.
После создания проекта откройте файл с расширением .cu и напишите простой CUDA-код. Например, вы можете написать код для сложения двух векторов:
#include <iostream>

__global__ void addVectors(int* a, int* b, int* c, int size) {
int tid = blockIdx.x * blockDim.x + threadIdx.x;

if (tid < size) {
        c[tid] = a[tid] + b[tid];
    }
}

int main() {
    int size = 1000;
    int* a, * b, * c;

    cudaMallocManaged(&a, size * sizeof(int));
    cudaMallocManaged(&b, size * sizeof(int));
    cudaMallocManaged(&c, size * sizeof(int));

    for (int i = 0; i < size; i++) {
        a[i] = i;
        b[i] = size - i;
    }

    int block_size = 256;
    int num_blocks = (size + block_size - 1) / block_size;

    addVectors<<<num_blocks, block_size>>>(a, b, c, size);

cudaDeviceSynchronize();

for (int i = 0; i < size; i++) {
        std::cout << c[i] << " ";
    }
    std::cout << std::endl;

    cudaFree(a);
    cudaFree(b);
    cudaFree(c);

    return 0;
}
Запустите проект и убедитесь, что результаты сложения векторов выводятся в консоль.
Поздравляю! Вы успешно установили графический процессор CUDA для Visual Studio 2022 на Windows 10. Теперь вы можете использовать его для ускорения вычислений в вашем проекте Data Science.
Эта статья рассмотрела основные шаги установки, однако существуют и другие возможности настройки CUDA для Visual Studio 2022. Если вы хотите изучить их подробнее, рекомендуется ознакомиться с документацией NVIDIA и руководствами по CUDA.
Надеюсь, эта статья помогла вам понять процесс установки графического процессора CUDA для Visual Studio 2022 на Windows 10. Удачи в ваших проектах Data Science с использованием GPU!
If you are learning machine learning / deep learning, you may be using the free Google Colab. But you might wonder if the free version is adequate.
If you can afford a good Nvidia Graphics Card (with a decent amount of CUDA cores) then you can easily use your graphics card for this type of intensive work.
A lot of developers use Linux for this. But, I do not like Linux as a desktop operating system (do not get offended, as it is my personal preference. And yes, Linux is the best for server-related stuff).
Also, if you own the latest Nvidia GPU, then you’re probably already familiar with the hassle regarding the graphics driver and so on.
For all these reasons, I was thinking about trying something different: utilizing the new Windows 11 operating system to use the CUDA cores from my Graphics Card.
I followed a lot of videos but couldn’t implement it after trying many times, unfortunately. There was some gap in the latest version of PyTorch with the Windows 11 kernel in CUDA. Still, after researching a lot, I have found out that WSL2 should work just fine.
After trying for more than a few days, I have successfully managed to set up everything necessary and can use my graphics card’s CUDA cores in my Windows machine! An interesting thing is, in this process, you do not need to download or use Microsoft Visual Studio 2022 and download huge 30/35GB files just to install the recommended compilers and so on.
Because of this, I wrote a complete handbook on my GitHub (here’s the repo: CUDA-WSL2-Ubuntu, and here’s the website: fahimfba.github.io/CUDA-WSL2-Ubuntu).
I am writing the same handbook here as well. So, here we go! 🎉
My Computer Specification
For this guide, I have used my Desktop workstation. If you are also interested in the current specification that I used for this task, here you go:
- Processor: Ryzen 5 3500X 6 Core and 6 Threads
- RAM: 32GB DDR4 3200MHz (16 GB + 8 GB + 8 GB)
- GPU: Zotac Nvidia GeForce RTX 3050 8GB GDDR6
- Motherboard: Gigabyte B450M Aorus Elite
- Storage: Gigabyte 240GB SATA SSD
- Monitor: MSI Optix G24 Gaming Curved 75Hz
I will be using Windows 11 Pro (Version 22H2) and WSL2 (of course!).
Step 1: Make Sure You Have Solid Internet and Electricity
This whole process can take a lot of time. So make sure you’re properly connected to the internet and have consistent electricity. For me, it took almost 7 hours in total. You will also need to download some pretty huge packages along the way.
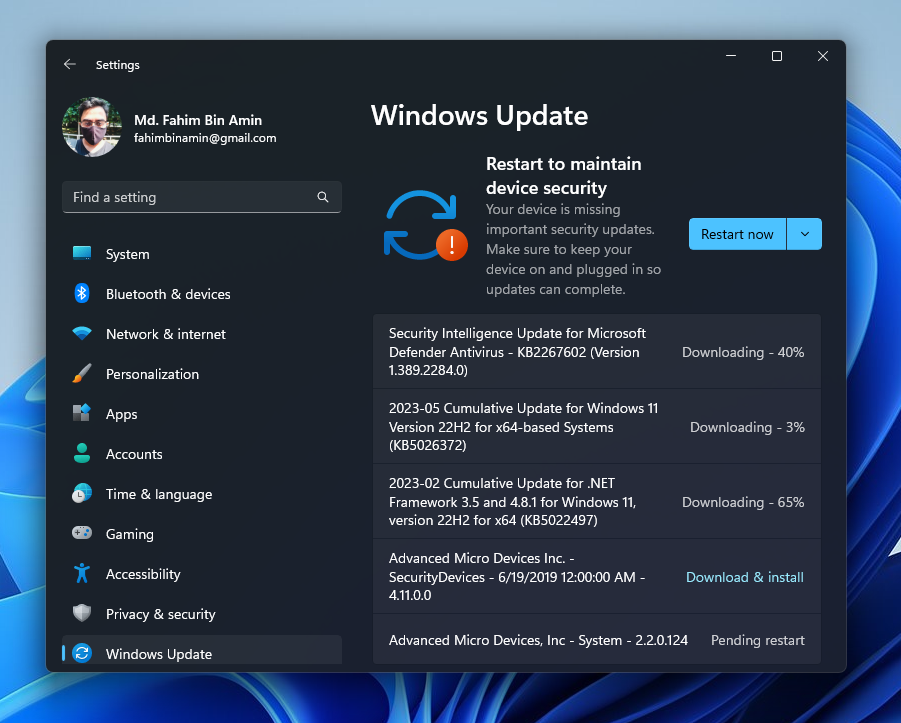
Also, make sure that you have installed the latest Nvidia driver after downloading the official driver from the official website of Nvidia. Make sure that you have installed all the updates of your Windows 11.
Step 2: Download Latest PowerShell
I will be using the latest PowerShell. You can download that from the Microsoft store, but I will download it from the official website as the store might create some problems later.
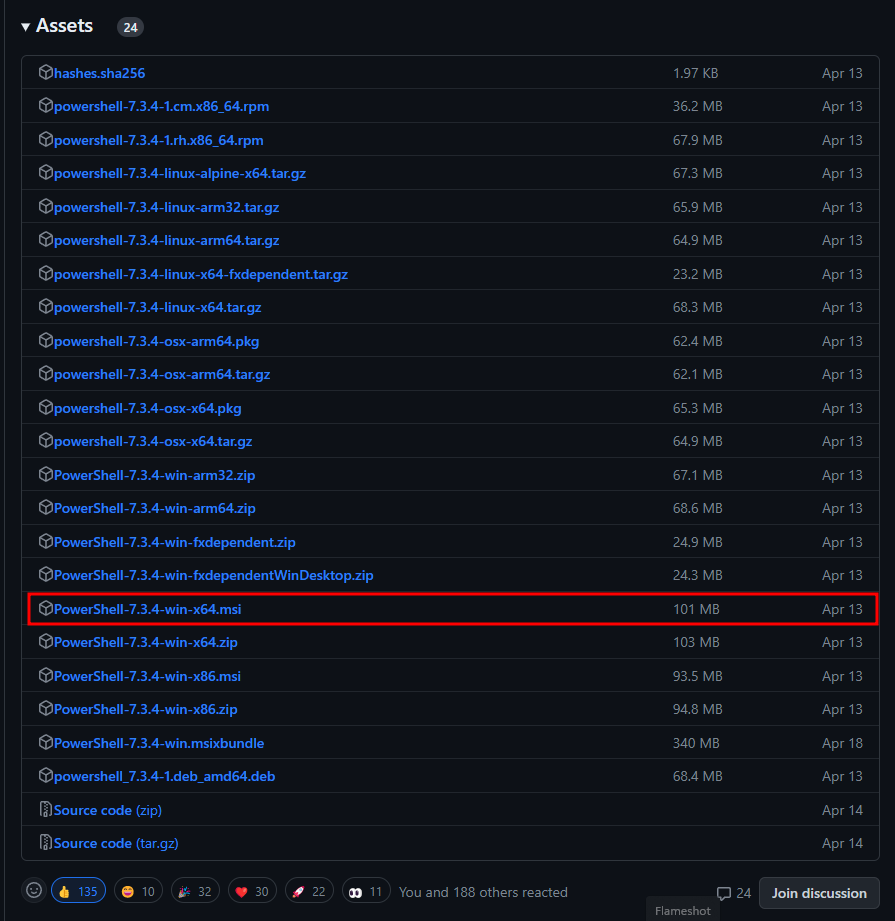
Go to the official website. This normally redirects you to the latest version of PowerShell available at that moment. For me, the latest version is 7.3 (24 May 2023). For you, it might be the updated version. Don’t worry about that. Simply download the latest stable version.
- Click on the Download PowerShell button.

2. Find the latest PowerShell of win-x64.msi. Download that.
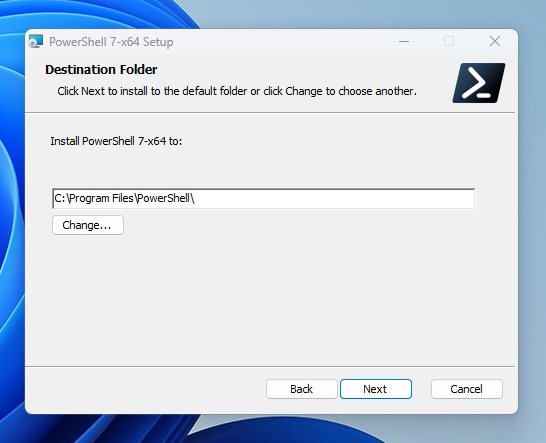
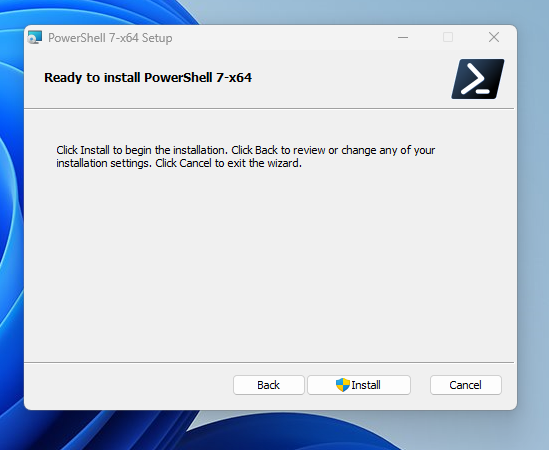
3. The installation process is pretty straightforward. But I will be guiding you throughout the entire process. Double click on the downloaded file. Then click Next.

4. Keep everything as it is and click Next.
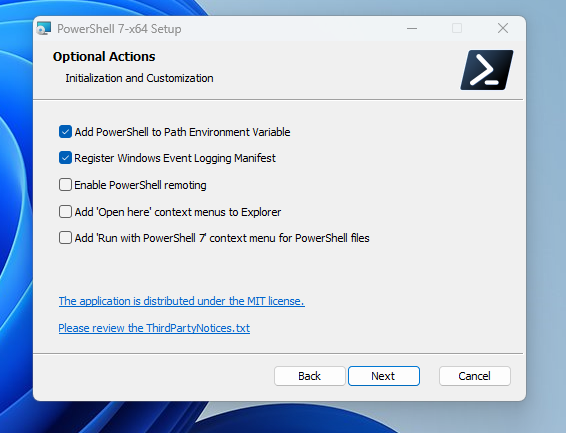
5. I still prefer to keep everything as it is and simply click Next.
6. I still prefer to keep everything as it is and simply click Next.

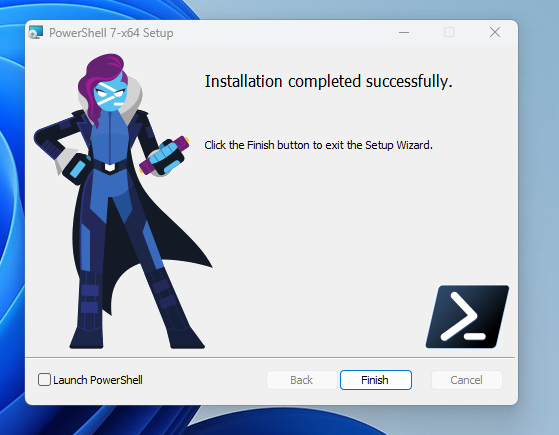
7. Click Install.
8. Now click Finish.
Step 3: Check Your Windows Terminal
I really like the Windows Terminal, as I can simply switch to any other WSL OSes (Ubuntu, Kali, Git Bash, and so on) whenever I want. But before proceeding further, I have to make sure that my current Windows Terminal is the updated one.
- Open the Microsoft Store and search for
Windows Terminal.

2. Click on Update if it needs an update.
3. Make sure that you are on the latest updated Windows Terminal already.
4. Now open the Windows Terminal, because we have to change some settings first. Click on Open Settings.

5. If you do not see the Open Settings prompt, then simply click the drop-down arrow, and click on Settings.
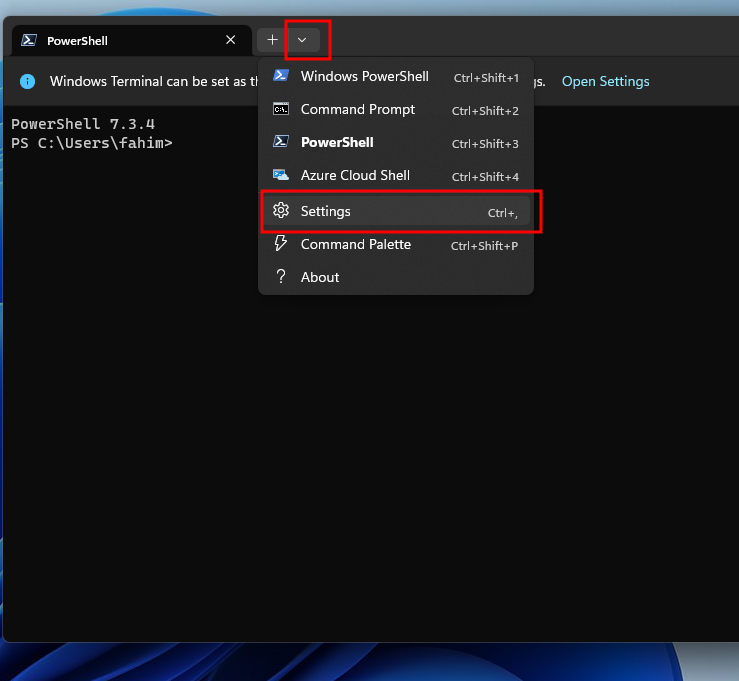
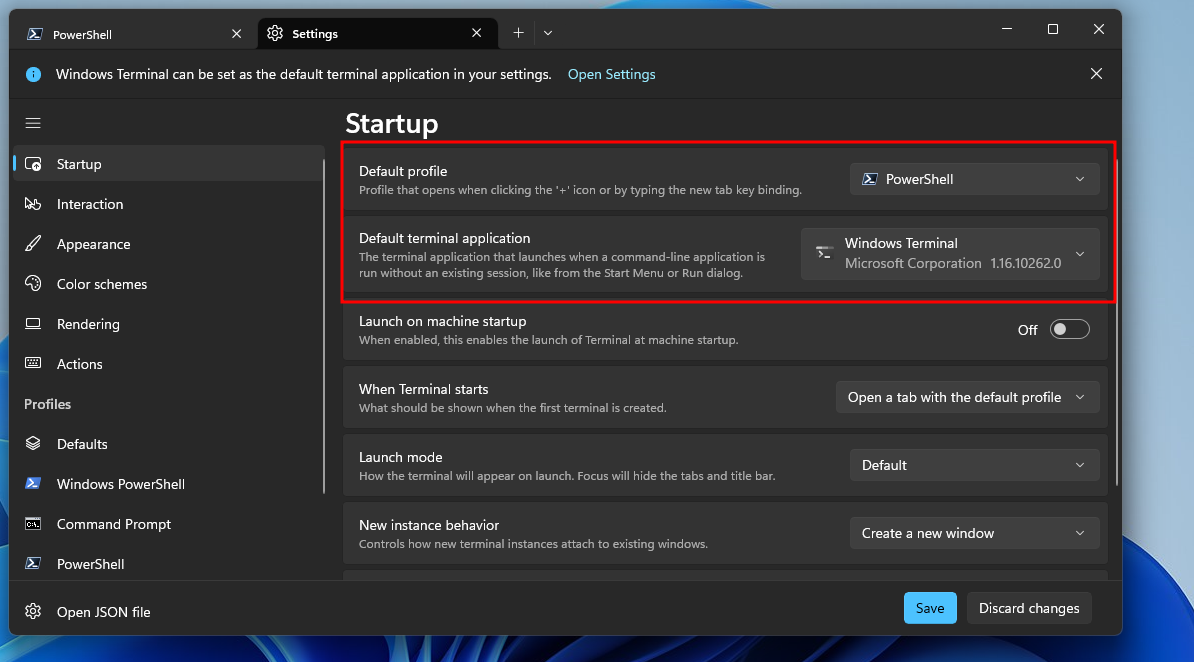
6. From Startup, make sure that the Default profile is set on PowerShell (the new PowerShell we installed in Step 2). The Default terminal application should be set on Windows Terminal.
7. Then click Save and exit the terminal.

Step 4: Hardware Virtualization
In order to use WSL, we have to make sure that our CPU virtualization is enabled. You can check the status through your task manager. If it is disabled, then make sure to enable the virtualization through BIOS.
You will find a lot of YouTube videos about this, but make sure that you are following the correct one that matches your motherboard brand and model.

Step 5: Install WSL and Ubuntu LTS
Now we need to install the WSL2 and Ubuntu LTS.
- Open the Windows Terminal as an Administrator.
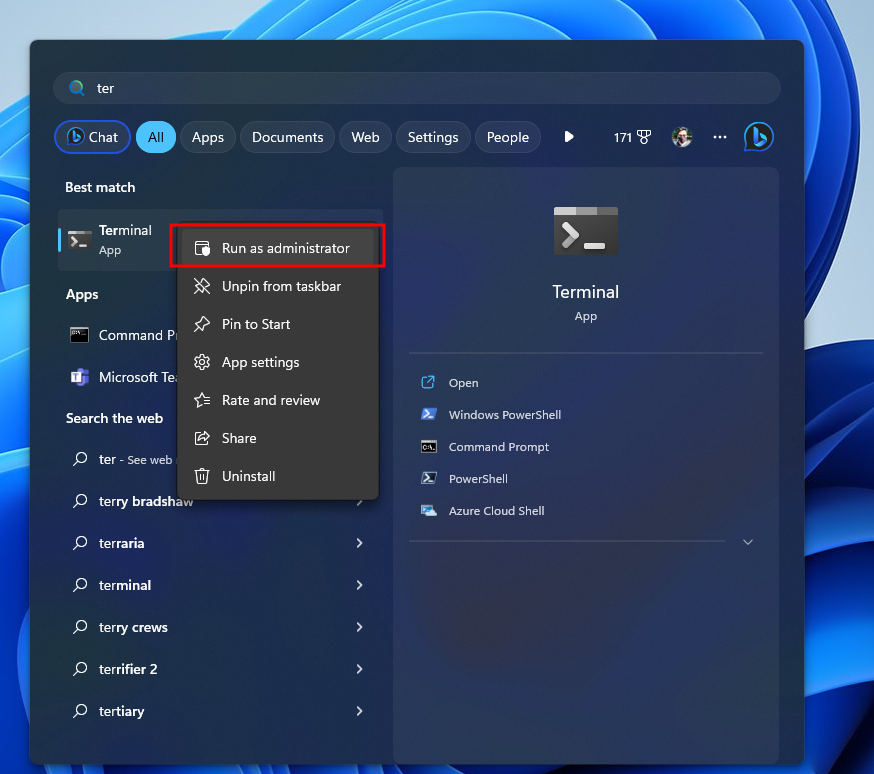
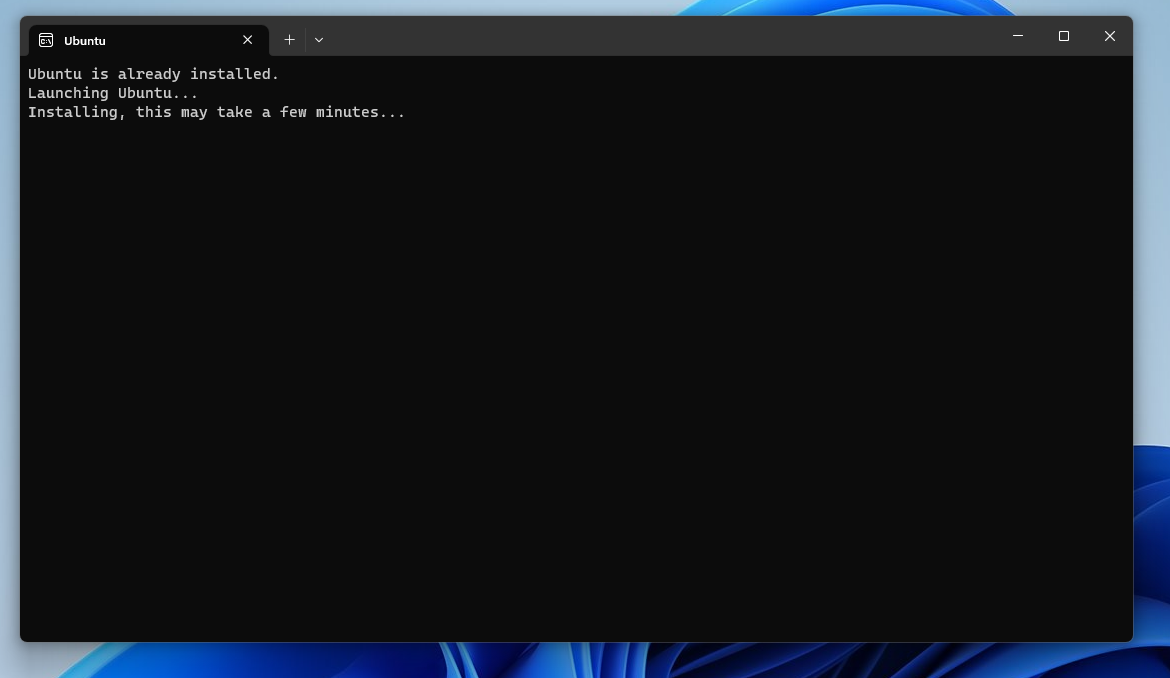
2. For installing WSL, use the command wsl --install.

3. Then, it would automatically install the latest LTS version of Ubuntu.

4. After the tasks get finished, it will prompt you for rebooting your PC. Save other work and simply restart your computer.

5. After restarting the PC, it would automatically open the terminal and ask you for the username and password for your Linux OS.
6. Give the Username and Password. Make sure to use the same Password on Retype Password!
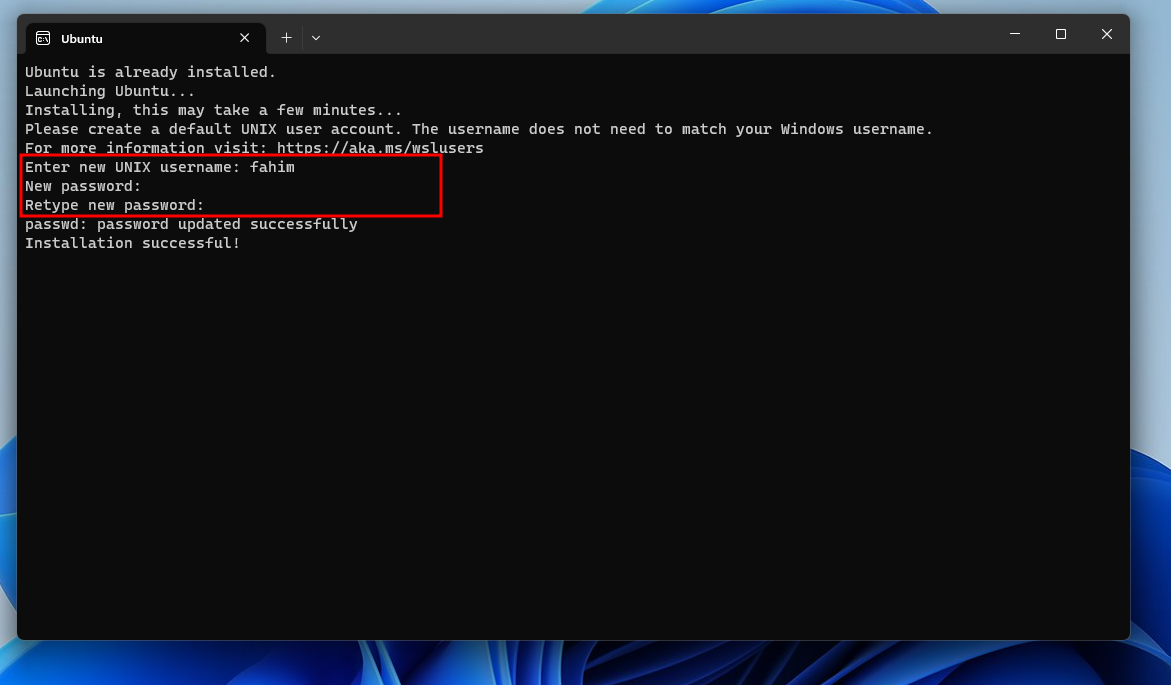
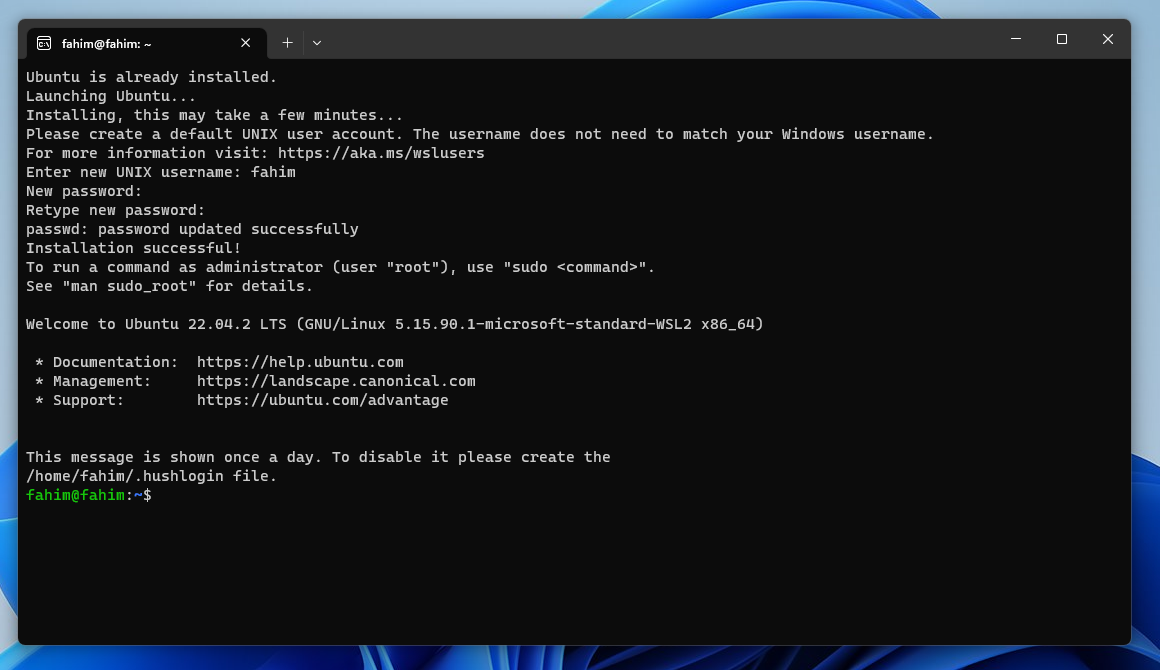
7. After a while, it will install the necessary components.
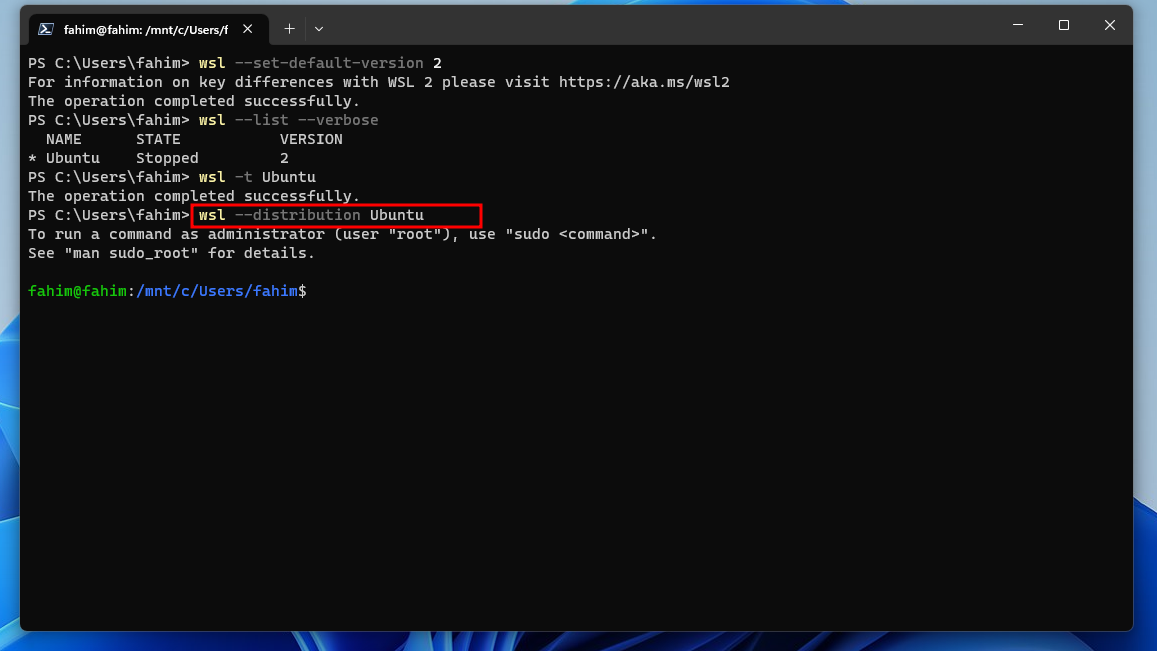
8. Now, make sure that WSL2 becomes the default WSL in this terminal. Apply the command, wsl --set-default-version 2.

9. If you want to check the WSL OSes status (how many OSes are available, how many of them are running or stopped), use the command, wsl --list --verbose.

Here, it is telling me that I have Ubuntu installed on my WSL version 2 and it is currently stopped.
10. However, after working on a WSL OS, if you want to shut down the OS, then you can use the command wsl -t distro_name. For me, it is Ubuntu, so I used wsl -t Ubuntu. t represents the termination command here.

11. If you have multiple OSes in WSL, and if you want to run any specific distribution, then use the command wsl --distribution distribution_name. For example, if I want to run Ubuntu specifically, the command would be wsl --distribution Ubuntu. If you only have one distribution, then you do not necessarily need to worry about this at all.
12. You can simply use exit to exit a distro from the terminal. It might not necessarily shut down the distribution. You can specifically use the termination command for that. But some regularly used commands are here.

13. After installing a distribution, you would also be able to see and go there by using the drop-down menu from the Windows Terminal.

Step 6: Configure Ubuntu LTS
We need to update and install some apps now.
- Open Ubuntu by using any method inside the Windows Terminal. You can obviously use the dedicated Ubuntu App. But I always prefer the Terminal as I can use multiple different distributions and command line applications here altogether.

2. Update the system by using the command sudo apt update.

3. If you get errors in updating/upgrading saying it can’t reach the server then change the nameserver with the command echo "nameserver 8.8.8.8" | sudo tee /etc/resolv.conf > /dev/null.
4. After updating, upgrade the system using sudo apt upgrade.


You can clear the terminal by using the clear command.
5. CUDA works with C. So we need to install the gcc compiler first. Use the command sudo apt install gcc --fix-missing.


Step 7: Install CUDA
Now it is time to install CUDA from the official website of Nvidia.
Make sure to select the following:
- Operating System: Linux
- Architecture: x86_64
- Distribution: WSL-Ubuntu
- Version: 2.0
- Installer Type: deb(local)

This will provide the necessary commands.

Now your task is to apply each command serially in the WSL Ubuntu terminal. Make sure to use the first command twice. It normally resolves the problem of keyring later.
Also, keep in mind that these commands might get changed later. So always follow the official website. For this guideline, I will be using the exact command I used to set up the CUDA in my machine.
wget https://developer.download.nvidia.com/compute/cuda/repos/wsl-ubuntu/x86_64/cuda-wsl-ubuntu.pin

I used the same command again after finishing the previous transactions.
2. wget https://developer.download.nvidia.com/compute/cuda/repos/wsl-ubuntu/x86_64/cuda-wsl-ubuntu.pin

3. sudo mv cuda-wsl-ubuntu.pin /etc/apt/preferences.d/cuda-repository-pin-600

4. wget https://developer.download.nvidia.com/compute/cuda/12.1.1/local_installers/cuda-repo-wsl-ubuntu-12-1-local_12.1.1-1_amd64.deb

This normally takes a lot of time as it downloads a large file (above 2GB file size).
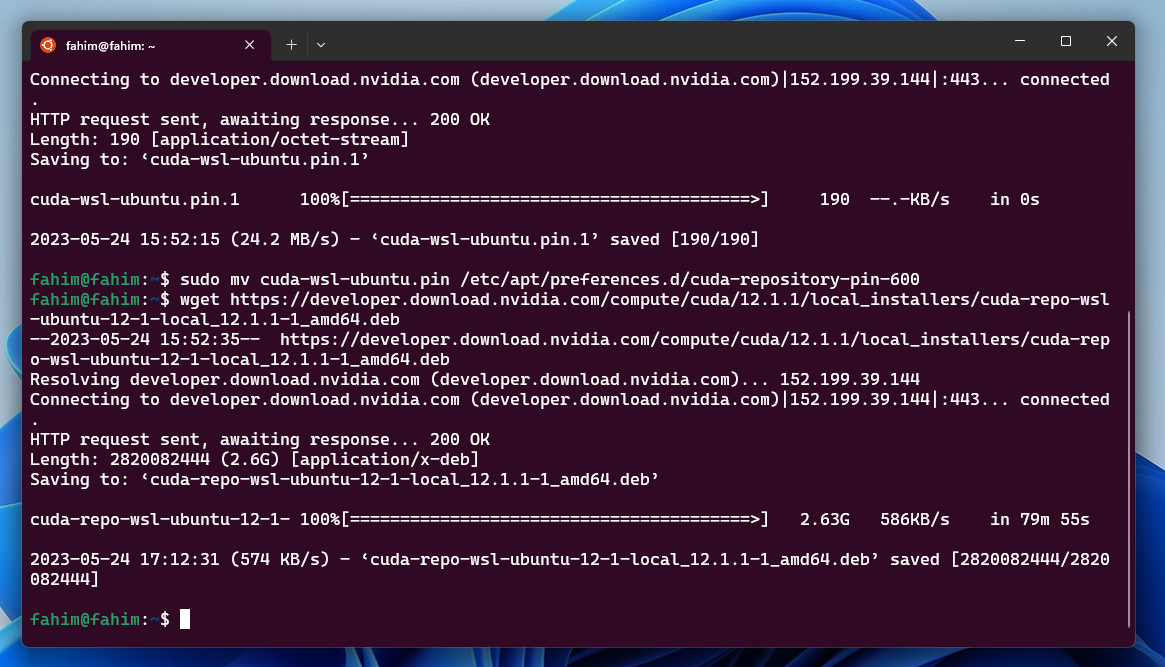
5. sudo dpkg -i cuda-repo-wsl-ubuntu-12-1-local_12.1.1-1_amd64.deb

6. sudo cp /var/cuda-repo-wsl-ubuntu-12-1-local/cuda-*-keyring.gpg /usr/share/keyrings/

7. Then update the system using sudo apt-get update.


8. sudo apt-get -y install cuda


Step 8: Post Installation
The official CUDA installation guide from Nvidia tells us to add export PATH=/usr/local/cuda-12.1/bin${PATH:+:${PATH}} to the PATH variable.

I have changed the CUDA version cuda-12.1 according to my installed CUDA version. Make sure to do the same for your updated CUDA version.
Do the following to do that:
- Open Ubuntu in the Windows Terminal.
- Go to the root directory using
cd ~. Then open thebashrcin nano usingnano .bashrc

3. Go to the end of the file and copy-paste the path there. For me, the path is export PATH=/usr/local/cuda-12.1/bin${PATH:+:${PATH}}.

Then use Ctrl + X to close. Make sure to use Y to save in the same file.
4. To apply the changes, use source ~/.bashrc. You can check the path using echo $PATH.

Install the Nvidia Cuda Toolkit using sudo apt install nvidia-cuda-toolkit.


You can check the Driver and CUDA versions using nvidia-smi.

Also, make sure to check whether the Nvidia Cuda Compiler Driver has been installed or not by using nvcc -V.

Step 9: Confirm that Python is Installed
Now, make sure that you have Python 3 installed in your system. You can check the version using python3 --version. If that says that «python3 is not found» or something like that, then install Python.
Install PIP using sudo apt-get install python3-pip.

Step 10: Install PyTorch
For installing PyTorch, go to the official website of PyTorch. Then make sure to select the relevant sections. After that, it will provide you with a command. You have to use the command in your Ubuntu terminal.
For me, the selections were:
- PyTorch Build: Stable (2.0.1) — Make sure to select the latest stable version always
- Your OS: Linux
- Package: Pip
- Language: Python
- Computer Platform: CUDA 11.8 — Make sure to select the latest available CUDA version
After that, I got the command pip3 install torch torchvision torchaudio --index-url https://download.pytorch.org/whl/cu118.

I simply used that exact command in my Ubuntu terminal.

It also downloads a large file that can take a lot of time if you have a slower internet connection like I do!

Step 11: CUDA Availability
You can directly check whether your CUDA has been installed or not by running two lines of Python code in the terminal.
- Run Python in the terminal using
python3. - Import torch using
import torch. - Check the CUDA availability using
torch.cuda.is_available().
If it returns True, then you have successfully finished installing CUDA on your system!

Step 12: Nvidia Developer Settings
You have to enable the Nvidia Developer Settings for using CUDA via WSL. Simply follow this process:
- Open the Nvidia Control Panel.
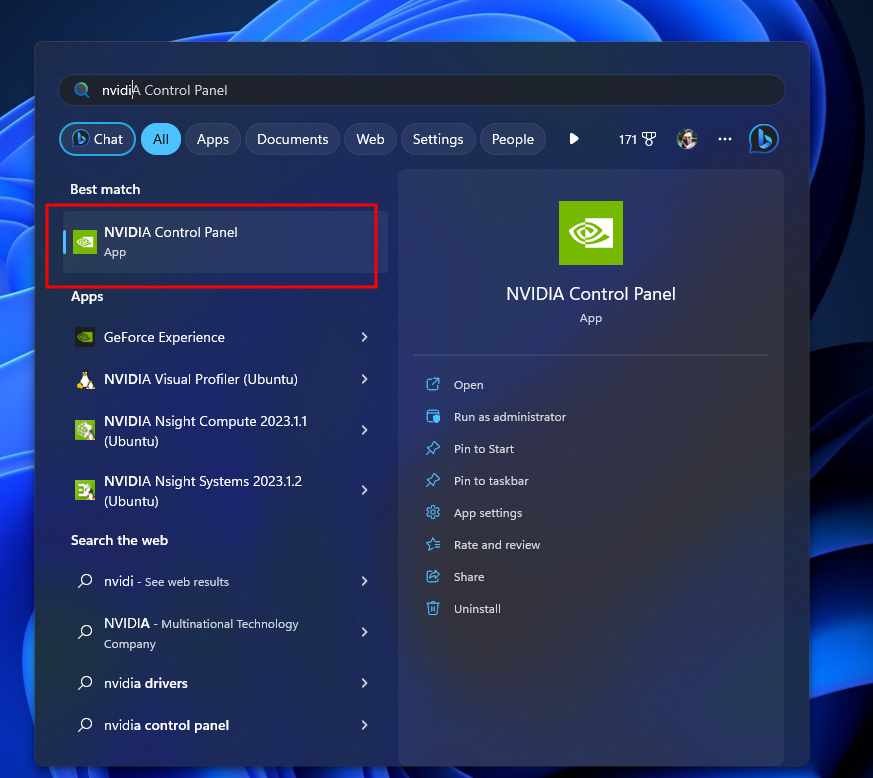
2. Click «Agree and Continue».

3. In the Nvidia Control Panel, Click Desktop > Enable Developer Settings. If the «Enable Developer Settings» does not have any check mark, then click on that to enable that feature.


4. The Developer section will be visible. Click on Manage GPU Performance Counters.

5. Check the radio button on «Allow access to the GPU performance counters to all users».

6. Click «Apply» and «Yes» to approve the changes permanently.

7. At the end, it should look like this.

8. You can again check the CUDA availability like earlier.

Step 12: Install Jupyter Notebook
I normally prefer the Jupyter Notebook. You can install it in various ways, like pip install notebook.


But I prefer the command pip install jupyter notebook.

To open a Jypyter Notebook, you can simply use jupyter notebook in the terminal.

The notebook will open instantly and you can use the given URL to open that in your web browser:

Step 13: Run Some Tests
I ran two codes to check the performance of my CUDA.
- Open a Python3 script in the notebook.

2. I used the following code to check whether it is using my CPU or CUDA from my GPU:
import torch

if torch.cuda.is_available():
    device = torch.device("cuda")
else:
    device = torch.device("cpu")
print("using", device, "device") 
3. For the performance comparison between my CPU and GPU (CUDA), I used the following code:
import time

matrix_size = 32*512

x = torch.randn(matrix_size, matrix_size)
y = torch.randn(matrix_size, matrix_size)

print("************* CPU SPEED *******************")
start = time.time()
result = torch.matmul(x, y)
print(time.time() - start)
print("verify device:", result.device)

x_gpu = x.to(device)
y_gpu = y.to(device)
torch.cuda.synchronize()

for i in range(3):
    print("************* GPU SPEED *******************")
    start = time.time()
    result_gpu = torch.matmul(x_gpu, y_gpu)
    torch.cuda.synchronize()
    print(time.time() - start)
    print("verify device:", result_gpu.device)
I also made side by side comparisons between the Google Colab and my computer. You can check them as well.
| Try | Google Colab | My Computer |
|---|---|---|
| 1 | Google Colab | My PC |
| 2 | Google Colab | My PC |
The result already states that my PC is working better than the Google Colab.
Step 14: Remove the CUDA Deb File
If you think that you do not need the CUDA deb file anymore, then you can remove that using the following command:
rm filenameFor me it was this:
rm cuda-repo-wsl-ubuntu-12-1-local_12.1.1-1_amd64.debIt does not remove the CUDA from your system. It just removes the deb file from your system.

Conclusion
I hope that you have successfully installed CUDA on your Windows 11 system using WSL2. If you have any questions, feel free to reach out to me using Twitter or LinkedIn.
Also, make sure to follow me on GitHub and star (⭐) the repository!
You can also subscribe to my YouTube channel for more helpful video content.
If you are interested then you can also check my website: https://fahimbinamin.com/
Thank you for reading the entire article till now. Have a great day! 😊
Cover image: Photo by Arseny Togulev on Unsplash
Learn to code for free. freeCodeCamp’s open source curriculum has helped more than 40,000 people get jobs as developers. Get started