1. Overview
While WSL’s default setup allows you to develop cross-platform applications without leaving Windows, enabling GPU acceleration inside WSL provides users with direct access to the hardware. This provides support for GPU-accelerated AI/ML training and the ability to develop and test applications built on top of technologies, such as OpenVINO, OpenGL, and CUDA that target Ubuntu while staying on Windows.
What you will learn:
- How to install a Windows graphical device driver compatible with WSL2
- How to install the NVIDIA CUDA toolkit for WSL 2 on Ubuntu
- How to compile and run a sample CUDA application on Ubuntu on WSL2
What you will need:
- A Windows 10 version 21H2 or newer physical machine equipped with an NVIDIA graphics card and administrative permission to be able to install device drivers
- Ubuntu on WSL2 previously installed
- Familiarity with Linux command line utilities and interacting with Ubuntu on WSL2
Prerequisites
The following steps assume a specific hardware configuration. Although the concepts are essentially the same for other architectures, different hardware configurations will require the appropriate graphics drivers and CUDA toolkit.
Make sure the following prerequisites are met before moving forward:
- A physical machine with Windows 10 version 21H2 or higher
- NVIDIA’s graphic card
- Ubuntu 20.04 or higher installed on WSL 2
- Broadband internet connection able to download a few GB of data
2. Install the appropriate Windows vGPU driver for WSL
Specific drivers are needed to enable use of a virtual GPU, which is how Ubuntu applications are able to access your GPU hardware, so you’ll need to follow this step even if your system drivers are up-to-date.
Please refer to the official WSL documentation for up-to-date links matching your specific GPU vendor. You can find these in Install support for Linux GUI apps > Prerequisites . For this example, we will download the NVIDIA GPU Driver for WSL.

Note: This is the only device driver you’ll need to install. Do not install any display driver on Ubuntu.
Once downloaded, double-click on the executable file and click Yes to allow the program to make changes to your computer.


Confirm the default directory and allow the self-extraction process to proceed.


A splash screen appears with the driver version number and quickly turns into the main installer window. Read and accept the license terms to continue.


Confirm the wizard defaults by clicking Next and wait until the end of the installation. You might be prompted to restart your computer.


This step ends with a screen similar to the image below.

3. Install NVIDIA CUDA on Ubuntu
Normally, CUDA toolkit for Linux will have the device driver for the GPU packaged with it. On WSL 2, the CUDA driver used is part of the Windows driver installed on the system, and, therefore, care must be taken not to install this Linux driver as previously mentioned.
The following commands will install the WSL-specific CUDA toolkit version 11.6 on Ubuntu 22.04 AMD64 architecture. Be aware that older versions of CUDA (<=10) don’t support WSL 2. Also notice that attempting to install the CUDA toolkit packages straight from the Ubuntu repository (“cuda”, “cuda-11-0”, or “cuda-drivers”) will attempt to install the Linux NVIDIA graphics driver, which is not what you want on WSL 2. So, first remove the old GPG key:
sudo apt-key del 7fa2af80
Then setup the appropriate package for Ubuntu WSL:
wget https://developer.download.nvidia.com/compute/cuda/repos/wsl-ubuntu/x86_64/cuda-wsl-ubuntu.pin
sudo mv cuda-wsl-ubuntu.pin /etc/apt/preferences.d/cuda-repository-pin-600
sudo apt-key adv --fetch-keys https://developer.download.nvidia.com/compute/cuda/repos/wsl-ubuntu/x86_64/3bf863cc.pub
sudo add-apt-repository 'deb https://developer.download.nvidia.com/compute/cuda/repos/wsl-ubuntu/x86_64/ /'
sudo apt-get update
sudo apt-get -y install cuda
Once complete, you should see a series of outputs that end in done.:

Congratulations! You should have a working installation of CUDA by now. Let’s test it in the next step.
4. Compile a sample application
NVidia provides an open source repository on GitHub with samples for CUDA Developers to explore the features available in the CUDA Toolkit. Building one of these is a great way to test your CUDA installation. Let’s choose the simplest one just to validate that our installation works.
Let’s say you have a ~/Dev/ directory where you usually put your working projects. Navigate inside the directory and git clone the cuda-samples repository:
cd ~/Dev
git clone https://github.com/nvidia/cuda-samples
To build the application, go to the cloned repository directory and type make:
cd ~/Dev/cuda-samples/Samples/1_Utilities/deviceQuery
make
A successful build will look like the screenshot below. Once complete, run the application:

./deviceQuery
You should see a similar output to the following detailing the functionality of your CUDA setup (the exact results depend on your hardware setup):

5. Enjoy Ubuntu on WSL!
That’s all folks! In this tutorial, we’ve shown you how to enable GPU acceleration on Ubuntu on WSL 2 and demonstrated its functionality with the NVIDIA CUDA toolkit, from installation through to compiling and running a sample application.
We hope you enjoy using Ubuntu inside WSL for your Data Science projects. Don’t forget to check out our blog for the latest news on all things Ubuntu.
Further Reading
- Setting up WSL for Data Science
- Ubuntu WSL for Data Scientists Whitepaper
- NVIDIA’s CUDA Post Installation Actions
- Install Ubuntu on WSL2 on Windows 10 and Windows 11 with GUI Support
- Microsoft WSL Documentation
- WSL on Ubuntu Wiki
- Ask Ubuntu
Was this tutorial useful?
Thank you for your feedback.
Компания Microsoft, откликаясь на многочисленные просьбы пользователей, представила в мае 2020 года на конференции Build новую возможность подсистемы Windows для Linux 2 (Windows Subsystem for Linux 2, WSL 2) — поддержку видеоускорителей. Это позволит запускать в WSL 2 приложения, занимающиеся специализированными вычислениями. Поддержка GPU откроет дорогу профессиональным инструментам, поможет решать в WSL 2 задачи, которые в настоящее время можно решать только в Linux. Теперь подобные задачи можно будет решать и в Windows, пользуясь возможностями GPU.
Крайне важно тут и то, что в WSL приходит поддержка программно-аппаратной архитектуры параллельных вычислений NVIDIA CUDA.
Материал, перевод которого мы публикуем, подготовлен специалистами NVIDIA. Здесь речь пойдёт о том, чего можно ожидать от CUDA в Public Preview-версии WSL 2.

Запуск AI-фреймворков, используемых в Linux, в WSL 2-контейнерах
Что такое WSL?
WSL — это возможность Windows 10, которая позволяет использовать инструменты командной строки Linux непосредственно в Windows без необходимости сталкиваться со сложностями применения конфигурации двойной загрузки. WSL представляет собой контейнеризованное окружение, которое тесно интегрировано с ОС Microsoft Windows. Это позволяет запускать Linux-приложения вместе с традиционными Windows-приложения и с современными приложениями, распространяемыми через Microsoft Store.
WSL — это, преимущественно, инструмент для разработчиков. Если вы работаете над некими проектами в контейнерах Linux, это значит, что вы можете заниматься теми же делами локально, на Windows-компьютере, используя привычные инструменты Linux. Обычно, чтобы запустить подобные приложения на Windows, нужно потратить много времени на настройку системы, нужны какие-то сторонние фреймворки, библиотеки. Теперь, с выходом WSL 2, всё изменилось. Благодаря WSL 2 в мир Windows пришла полная поддержка ядра Linux.
WSL 2 и технология паравиртуализации GPU (GPU Paravirtualization, GPU-PV) позволили Microsoft вывести поддержку Linux в Windows на новый уровень, сделав возможным запуск вычислительных нагрузок, рассчитанных на GPU. Ниже мы подробнее поговорим о том, как выглядит использование GPU в WSL 2.
Если вас интересует тема поддержки видеоускорителей в WSL 2 — взгляните на этот материал и на этот репозиторий.
CUDA в WSL
Для того чтобы воспользоваться возможностями GPU в WSL 2, необходимо, чтобы на компьютере был бы установлен видеодрайвер, поддерживающий Microsoft WDDM. Подобные драйверы создают производители видеокарт — такие, как NVIDIA.
Технология CUDA позволяет заниматься разработкой программ для видеоускорителей NVIDIA. Эта технология поддерживается в WDDM, в Windows, уже многие годы. Новый контейнер WSL 2 от Microsoft даёт возможности по GPU-ускорению вычислений, которыми может воспользоваться технология CUDA, что позволяет выполнять в среде WSL программы, рассчитанные на CUDA. Подробности об этом можно узнать в руководстве пользователя по работе с CUDA в WSL.
Поддержка CUDA в WSL включена в драйверы NVIDIA, рассчитанные на WDDM 2.9. Эти драйверы достаточно просто установить в Windows. Драйверы пользовательского режима CUDA в WSL (libcuda.so) автоматически становятся доступными внутри контейнера, их может обнаружить загрузчик.
Команда NVIDIA, занимающаяся разработкой драйверов, добавила в драйвер CUDA поддержку WDDM и GPU-PV. Сделано это для того чтобы эти драйверы могли бы работать в среде Linux, запущенной на Windows. Эти драйверы всё ещё находятся в статусе Preview, их релиз состоится только тогда, кода состоится официальный релиз WSL с поддержкой GPU. Подробности о выпуске драйверов можно найти здесь.
На следующем рисунке показана схема подключения драйвера CUDA к WDDM внутри гостевой системы Linux.
WDDM-драйвер пользовательского режима с поддержкой CUDA, выполняющийся в гостевой системе Linux
Предположим, вы — разработчик, который установил дистрибутив WSL на последнюю сборку Windows из Fast Ring (сборка 20149 или старше) Microsoft Windows Insider Program (WIP). Если вы переключились на WSL 2 и у вас есть GPU NVIDIA, вы можете испытать драйвер и запустить свой код, выполняющий GPU-вычисления, в WSL 2. Для этого достаточно установить драйвер в хост-системе Windows и открыть WSL-контейнер. Здесь вам, без дополнительных усилий, будет доступна возможность работы с приложениями, использующими CUDA. На следующем рисунке показано, как в WSL 2-контейнере выполняется TensorFlow-приложение, использующее возможности CUDA.
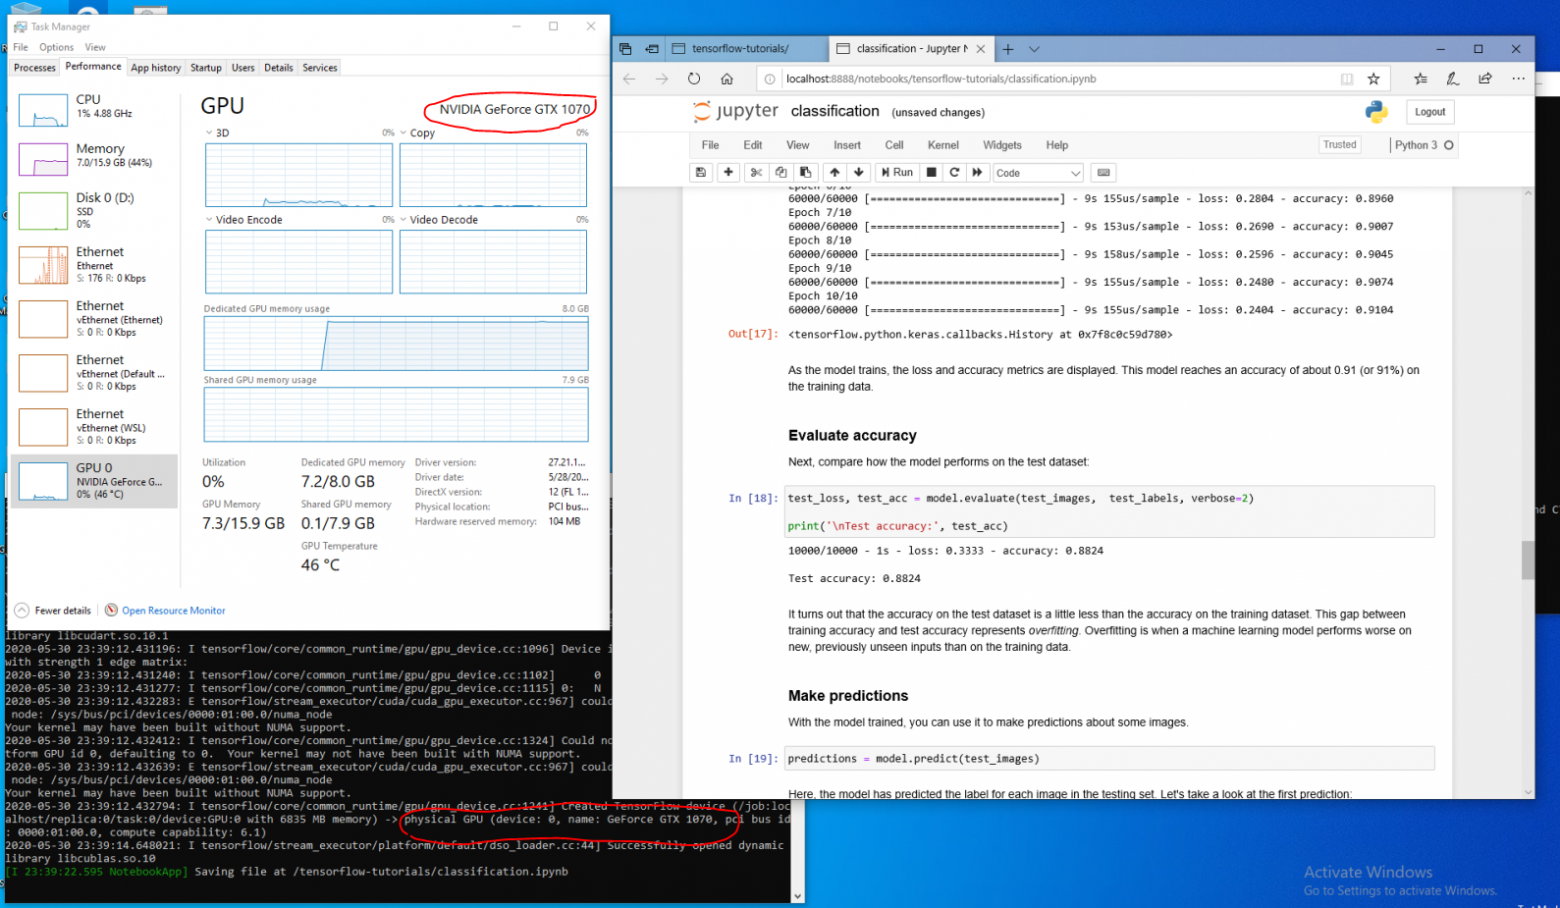
TensorFlow-контейнер, выполняющийся в WSL 2
То, что в WSL теперь доступна технология CUDA, позволяет выполнять в WSL приложения, которые раньше можно было выполнять только в обычном Linux-окружении.
NVIDIA всё ещё активно работает над этим проектом и вносит в него улучшения. Мы, кроме прочего, работаем над добавлением в WDDM API, которые раньше были рассчитаны исключительно на Linux. Это приведёт к тому, что в WSL, без дополнительных усилий со стороны пользователя, сможет работать всё больше и больше приложений.
Ещё один интересующий нас вопрос — это производительность. Как уже было сказано, поддержка GPU в WSL 2 серьёзно использует технологию GPU-PV. Это может плохо повлиять на скорость выполнения небольших задач на GPU, в ситуациях, когда не будет использоваться конвейеризация. Прямо сейчас мы работаем в направлении как можно более сильного сокращения подобных эффектов.
NVML
В исходный пакет драйвера не включена технология NVML, мы стремимся это исправить, планируя добавить в WSL поддержку NVML и поддержку других библиотек.
Мы начали работу с основного драйвера CUDA, что позволит пользователям запускать большую часть существующих CUDA-приложений даже на ранней стадии появления поддержки CUDA в WSL. Но, как оказалось, некоторые контейнеры и приложения используют NVML для получения информации о GPU даже до загрузки CUDA. Именно поэтому добавление поддержки NVML в WSL — это одна из наших первоочередных задач. Вполне возможно то, что скоро мы сможем поделиться хорошими новостями по поводу решения этой задачи.
GPU-контейнеры в WSL
В дополнение к поддержке в WSL 2 DirectX и CUDA, NVIDIA работает над добавлением в WSL 2 поддержки NVIDIA Container Toolkit (раньше эта технология называлась nvidia-docker2). Контейнеризованные GPU-приложения, которые дата-сайентисты создают в расчёте на запуск в локальной или облачной среде Linux, теперь могут, без внесения в них каких-либо изменений, запускаться в WSL 2, на компьютерах, работающих под управлением Windows.
Каких-то особых пакетов WSL для этого не требуется. Библиотека времени выполнения NVIDIA (libnvidia-container) может динамически обнаруживать библиотеку libdxcore и пользоваться ей в ситуации, когда код выполняется в WSL 2-среде с поддержкой GPU-ускорения. Это происходит автоматически, после установки пакетов Docker и NVIDIA Container Toolkit, так же, как и на Linux. Это позволяет, без дополнительных усилий, запускать в WSL 2 контейнеры, в которых используются возможности GPU.
Мы настоятельно рекомендуем тем, кто хочет пользоваться опцией --gpus, установить последнюю версию инструментов Docker (19.03 или свежее). Для того чтобы включить поддержку WSL 2, следуйте инструкциям для вашего дистрибутива Linux и установите самую свежую из доступных версий nvidia-container-toolkit.
Как это работает? Все задачи, характерные для WSL 2, решаются средствами библиотеки libnvidia-container. Теперь эта библиотека может, во время выполнения, обнаруживать присутствие libdxcore.so и использовать эту библиотеку для обнаружения всех GPU, видимых этому интерфейсу.
Если эти GPU нужно использовать в контейнере, то, с помощью libdxcore.so, выполняется обращение к месту хранения драйверов, к папке, которая содержит все библиотеки драйверов для хост-системы Windows и WSL 2. Библиотека libnvidia-container.so отвечает за настройку контейнера таким образом, чтобы можно было бы корректно обратиться к хранилищу драйверов. Эта же библиотека отвечает за настройку базовых библиотек, поддерживаемых WSL 2. Схема этого показана на следующем рисунке.
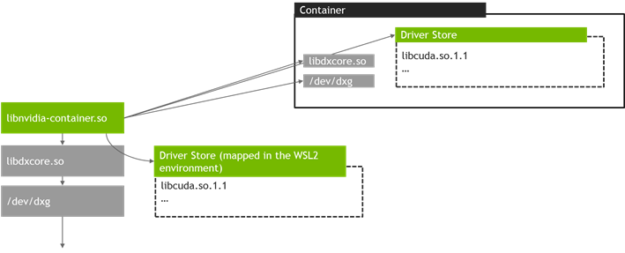
Схема обнаружения и отображения в контейнер хранилища драйверов, используемая libnvidia-container.so в WSL 2
Кроме того, это отличается от логики, используемой за пределами WSL. Этот процесс полностью абстрагирован с помощью libnvidia-container.so и он, для конечного пользователя, должен быть как можно прозрачнее. Одно из ограничений этой ранней версии заключается в невозможности выбора GPU в окружениях, в которых имеется несколько GPU. В контейнере всегда видны все GPU.
В WSL-контейнере можно запустить любые Linux-контейнеры NVIDIA, с которыми вы уже знакомы. NVIDIA поддерживает самые интересные инструменты и рабочие процессы, характерные для Linux и используемые профессионалами. Загрузите интересующий вас контейнер из NVIDIA NGC и испытайте его.
Сейчас мы расскажем о том, как запускать в WSL 2 контейнеры TensorFlow и N-body, рассчитанные на использование GPU NVIDIA для ускорения вычислений.
Запуск контейнера N-body
Установим Docker, воспользовавшись скриптом установки:
user@PCName:/mnt/c$ curl https://get.docker.com | sh
Установим NVIDIA Container Toolkit. Поддержка WSL 2 доступна, начиная с nvidia-docker2 v2.3 и с библиотеки времени выполнения libnvidia-container 1.2.0-rc.1.
Настроим репозитории stable и experimental и GPG-ключ. Изменения в коде времени выполнения, рассчитанные на поддержку WSL 2, доступны в экспериментальном репозитории.
user@PCName:/mnt/c$ distribution=$(. /etc/os-release;echo $ID$VERSION_ID)

user@PCName:/mnt/c$ curl -s -L https://nvidia.github.io/nvidia-docker/gpgkey | sudo apt-key add -

user@PCName:/mnt/c$ curl -s -L https://nvidia.github.io/nvidia-docker/$distribution/nvidia-docker.list | sudo tee /etc/apt/sources.list.d/nvidia-docker.list

user@PCName:/mnt/c$ curl -s -L https://nvidia.github.io/libnvidia-container/experimental/$distribution/libnvidia-container-experimental.list | sudo tee /etc/apt/sources.list.d/libnvidia-container-experimental.list
Установим пакеты времени выполнения NVIDIA и их зависимости:
user@PCName:/mnt/c$ sudo apt-get update
user@PCName:/mnt/c$ sudo apt-get install -y nvidia-docker2
Откроем WSL-контейнер и запустим в нём демон Docker. Если всё сделано правильно — после этого можно будет увидеть служебные сообщения dockerd.
user@PCName:/mnt/c$ sudo dockerd
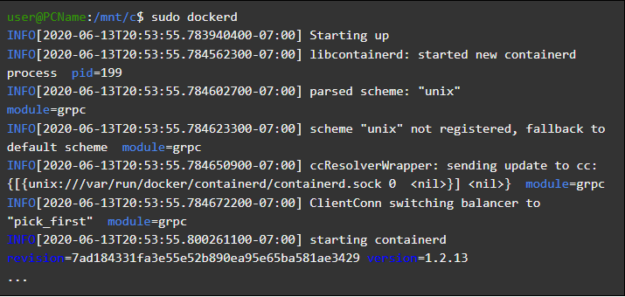
Запуск демона Docker
В другом окне WSL загрузим и запустим контейнер симуляции N-body. Нужно, чтобы у пользователя, выполняющего эту задачу, было бы достаточно полномочий для загрузки контейнера. Следующие команды может потребоваться запустить с использованием sudo. В выводимых данных можно увидеть сведения о GPU.
user@PCName:/mnt/c$ docker run --gpus all nvcr.io/nvidia/k8s/cuda-sample:nbody nbody -gpu -benchmark
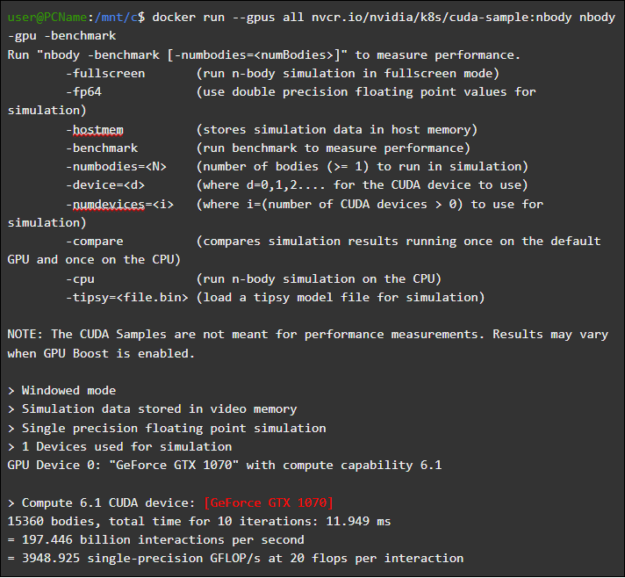
Запуск контейнера N-body
Запуск контейнера TensorFlow
Испытаем в Docker, в среде WSL 2, ещё один популярный контейнер — TensorFlow.
Загрузим Docker-образ TensorFlow. Для того чтобы избежать проблем с подключением к Docker, выполним следующую команду в режиме sudo:
user@PCName:/mnt/c$ docker pull tensorflow/tensorflow:latest-gpu-py3
Сохраним немного изменённую версию кода из 15 урока руководства по TensorFlow, посвящённого использованию GPU, на диск C хост-системы. Этот диск, по умолчанию, монтируется в контейнере WSL 2 как /mnt/c.
user@PCName:/mnt/c$ vi ./matmul.py
import sys
import numpy as np
import tensorflow as tf
from datetime import datetime

device_name = sys.argv[1]  # Choose device from cmd line. Options: gpu or cpu
shape = (int(sys.argv[2]), int(sys.argv[2]))
if device_name == "gpu":
    device_name = "/gpu:0"
else:
    device_name = "/cpu:0"

tf.compat.v1.disable_eager_execution()
with tf.device(device_name):
    random_matrix = tf.random.uniform(shape=shape, minval=0, maxval=1)
    dot_operation = tf.matmul(random_matrix, tf.transpose(random_matrix))
    sum_operation = tf.reduce_sum(dot_operation)

startTime = datetime.now()
with tf.compat.v1.Session(config=tf.compat.v1.ConfigProto(log_device_placement=True)) as session:
        result = session.run(sum_operation)
        print(result)

# Вывод результатов
print("Shape:", shape, "Device:", device_name)
print("Time taken:", datetime.now() - startTime)
Ниже показаны результаты выполнения этого скрипта, запущенного со смонтированного в контейнере диска C. Скрипт выполнялся, сначала, с использованием GPU, а потом — с использованием CPU. Для удобства объём представленных здесь выходных данных сокращён.
user@PCName:/mnt/c$ docker run --runtime=nvidia --rm -ti -v "${PWD}:/mnt/c" tensorflow/tensorflow:latest-gpu-jupyter python /mnt/c/matmul.py gpu 20000

Результаты выполнения скрипта matmul.py
При использовании GPU в WSL 2-контейнере наблюдается значительное ускорение выполнения кода в сравнении с его выполнением на CPU.
Проведём ещё один эксперимент, рассчитанный на исследование производительности GPU-вычислений. Речь идёт о коде из руководства по Jupyter Notebook. После запуска контейнера вы должны увидеть ссылку на сервер Jupyter Notebook.
user@PCName:/mnt/c$ docker run -it --gpus all -p 8888:8888 tensorflow/tensorflow:latest-gpu-py3-jupyter

Запуск Jupyter Notebook
Теперь у вас должна появиться возможность запускать демонстрационные примеры в среде Jupyter Notebook. Обратите внимание на то, то, что для подключения к Jupyter Notebook с использованием браузера Microsoft Edge, нужно, вместо 127.0.0.1, использовать localhost.
Перейдите в tensorflow-tutorials и запустите блокнот classification.ipynb.
Для того чтобы увидеть результаты ускорения вычислений с помощью GPU, перейдите в меню Cell, выберите Run All и посмотрите журнал в WSL 2-контейнере Jupyter Notebook.

Журнал Jupyter Notebook
Этот демонстрационный пример, да и некоторые другие в данном контейнере, позволяют увидеть проблемы со слоем виртуализации, относящиеся к неоправданно высокой дополнительной нагрузке на систему при решении небольших задач. Выше мы уже говорили об этом. Так как мы запускаем тут очень маленькие учебные модели, время их выполнения на GPU меньше времени, необходимого на решение задач синхронизации. При решении таких вот «игрушечных» задач в WSL 2, CPU может оказаться эффективнее GPU. Мы занимаемся решением этой проблемы, стремясь ограничить её проявления лишь совсем небольшими рабочими нагрузками, к которым не применяется конвейеризация.
Обзор WSL
Для того чтобы понять то, как поддержка GPU была добавлена в WSL 2, сейчас мы поговорим о том, что собой представляет запуск Linux на Windows, и о том, как контейнеры видят аппаратное обеспечение.
Компания Microsoft представила технологию WSL на конференции Build в 2016 году. Эта технология быстро нашла широкое применение и стала популярной в среде Linux-разработчиков, которым нужно было запускать Windows-приложения, вроде Office, вместе с инструментами разработки для Linux и соответствующими программами.
Система WSL 1 позволяла запускать немодифицированные исполняемые файлы Linux. Однако здесь использовался слой эмуляции ядра Linux, который был реализован в виде подсистемы ядра NT. Эта подсистема обрабатывала вызовы, поступающие от Linux-приложений, перенаправляя их соответствующим механизмам Windows 10.
Система WSL 1 была полезным инструментом, но она не была совместима со всеми Linux-приложениям, так как ей требовалось эмулировать абсолютно все системные вызовы Linux. Кроме того, медленными были операции по работе с файловой системой, что приводило к недопустимо низкой производительности некоторых приложений.
Учитывая это, Microsoft решила пойти другим путём и выпустила WSL 2 — новую версию WSL. Контейнеры WSL 2 выполняют полные Linux-дистрибутивы в виртуализованном окружении, но при этом используют все полезные возможности новой системы контейнеризации Windows 10.
В то время как WSL 2 использует Hyper-V-сервисы Windows 10, это — не традиционная виртуальная машина, а, скорее, легковесный вспомогательный механизм виртуализации. Этот механизм отвечает за управление виртуальной памятью, связанной с физической памятью, позволяя WSL 2-контейнерам динамически выделять память, обращаясь к хост-системе Windows.
Среди основных целей создания WSL 2 можно отметить увеличение производительности работы с файловой системой и обеспечение совместимости со всеми системными вызовами. Кроме того, WSL 2 создавали, стремясь улучшить уровень интеграции WSL и Windows. Это позволяет удобно работать с Linux-системой, выполняемой в контейнере, пользуясь средствами командной строки Windows. Это, кроме того, повышает удобство работы с файловой системой хоста, автоматически монтируемой в выбранные директории файловой системы контейнера.
WSL 2 была представлена в Windows Insider Program в виде Preview-возможности и была выпущена в самом свежем обновлении Windows 10, в версии 2004.
В WSL 2 из самой свежей версии Windows внесено ещё больше улучшений, которые затрагивают много всего — от сетевых стеков, до базовых VHD-механизмов системы хранения данных. Описание всех новых возможностей WSL 2 выходит за рамки этого материала. Подробнее о них можно узнать на этой странице, где приводится сравнение WSL 2 и WSL 1.
Linux-ядро WSL 2
Ядро Linux, применяемое в WSL 2, собрано Microsoft на основе самой свежей стабильной ветки, с использованием исходного кода, доступного на kernel.org. Это ядро было специально настроено для WSL 2, оптимизировано с точки зрения размеров и производительности с целью обеспечения работы Linux в среде Windows. Ядро поддерживается через механизм Windows Update. Это значит, что пользователю не нужно заботиться о том, чтобы загружать последние обновления безопасности и улучшения ядра. Всё это делается автоматически.
Microsoft поддерживает в WSL несколько дистрибутивов Linux. Компания, следуя правилам опенсорс-сообщества, опубликовала в GitHub-репозитории WSL2-Linux-Kernel исходный код ядра WSL 2 с модификациями, необходимыми для интеграции с Windows 10.
Поддержка GPU в WSL
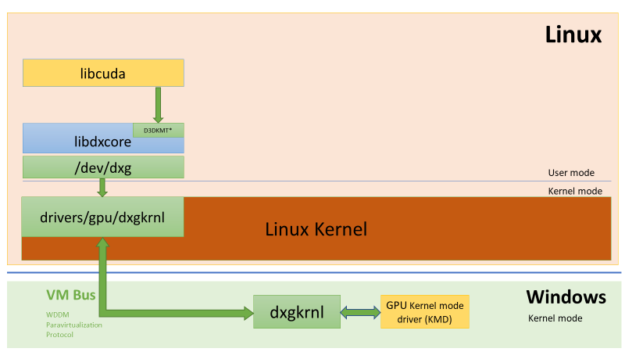
Разработчики Microsoft добавили в WSL 2-контейнеры поддержку реальных GPU с использованием технологии GPU-PV. Здесь графическое ядро операционной системы (dxgkrnl) маршалирует драйверу режима ядра, который находится на хосте, вызовы от компонентов пользовательского режима, выполняемых в гостевой виртуальной машине.
Компания Microsoft разработала эту технологию в виде возможности WDDM, с момента её появления вышло уже несколько релизов Windows. Эта работа была проведена с привлечением независимых производителей аппаратного обеспечения (Independent Hardware Vendor, IHV). Графические драйверы NVIDIA поддерживали GPU-PV начиная с ранних дней появления этой технологии в Preview-версиях продуктов, доступных в Windows Insider Program. Все GPU NVIDIA, поддерживаемые в настоящий момент, могут быть доступны ОС Windows, выполняемой в гостевом режиме, в виртуальной машине, использующей Hyper-V.
Для того чтобы в WSL 2 можно было бы пользоваться возможностями GPU-PV, Microsoft пришлось создать базу своего графического фреймворка для гостевой системы Linux: WDDM с поддержкой протокола GPU-PV. Новый драйвер Microsoft находится за dxgkrnl, за системой, отвечающей за поддержку WDDM в Linux. Код драйвера можно найти в репозитории WSL2-Linux-Kernel.
Ожидается, что dxgkrnl обеспечит поддержку GPU-ускорения в контейнерах WSL 2 в WDDM 2.9. Microsoft говорит о том, что dxgkrnl — это GPU-драйвер Linux, основанный на протоколе GPU-PV, и о том, что у него нет ничего общего с Windows-драйвером, имеющим похожее имя.
В настоящее время вы можете загрузить Preview-версию драйвера NVIDIA WDDM 2.9. В ближайшие несколько месяцев этот драйвер будет распространяться через Windows Update в WIP-версии Windows, что делает ненужными ручную загрузку и установку драйвера.
Основные сведения о GPU-PV
Драйвер dxgkrnl делает доступным, в пользовательском режиме гостевой системы Linux, новое устройство /dev/dxg. Сервисный слой ядра D3DKMT, который был доступен в Windows, тоже был портирован, как часть библиотеки dxcore, на Linux. Он взаимодействует с dxgkrnl, используя набор частных IOCTL-вызовов.
Гостевая Linux-версия dxgkrnl подключаются к ядру dxg на Windows-хосте, используя несколько каналов шины VM. Ядро dxg на хосте обрабатывает то, что ему приходит от Linux-процесса, так же, как то, что приходит от обычных Windows-приложений, использующих WDDM. А именно, ядро dxg отправляет то, что получило, KMD (Kernel Mode Driver, драйверу режима ядра, уникальному для каждого HIV). Драйвер режима ядра подготавливает то, что получил, для отправки аппаратному графическому ускорителю. На следующем рисунке показана упрощённая схема взаимодействия Linux-устройства /dev/dxg и KMD.
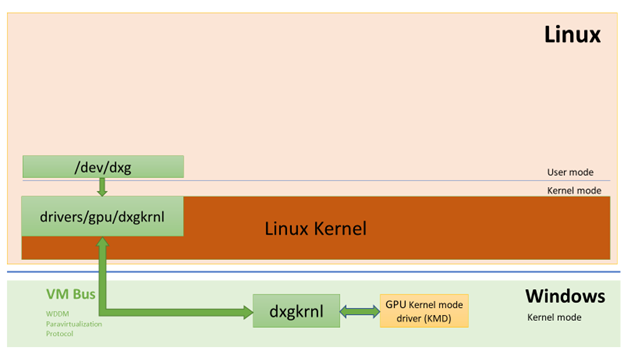
Упрощённая схема, иллюстрирующая то, как компоненты Windows-хоста обеспечивают работу устройства dxg в гостевой системе Linux
Если говорить об обеспечении подобной схемы работы в гостевых системах Windows, то можно сказать, что драйверы NVIDIA поддерживают GPU-PV в Windows 10 уже довольно давно. GPU NVIDIA могут быть использованы для ускорения вычислений и вывода графики во всех Windows 10-приложениях, использующих слой виртуализации Microsoft. Использование GPU-PV позволяет и работать с vGPU. Вот несколько примеров подобных приложений:
- Windows Sandbox
- Microsoft Defender Application Guard
- Эмулятор Microsoft HoloLens 2
Вот как выглядит запуск DirectX-приложения в контейнере Windows Sandbox с применением видеоускорителя NVIDIA GeForce GTX 1070.

В контейнере Windows Sandbox ускорение графики выполняется средствами NVIDIA GeForce GTX 1070
Поддержка пользовательского режима
Для того чтобы добавить в WSL поддержку вывода графики, соответствующая команда разработчиков из Microsoft, кроме того, портировала на Linux компонент пользовательского режима dxcore.
Библиотека dxcore предоставляет API, который позволяет получать сведения об имеющихся в системе графических адаптерах, совместимых с WDDM. Эту библиотеку задумывали как кросс-платформенную низкоуровневую замену для средства работы с DXGI-адаптерами в Windows и Linux. Библиотека, кроме того, абстрагирует доступ к сервисам dxgkrnl (IOCTL-вызовы в Linux и GDI-вызовы в Windows), используя слой API D3DKMT, который используется CUDA и другими компонентами пользовательского режима, полагающимися на поддержку WDDM в WSL.
По сведениям Microsoft, библиотека dxcore (libdxcore.so) будет доступна и в Windows, и в Linux. NVIDIA планирует добавить в драйвер поддержку DirectX 12 и API CUDA. Эти дополнения нацелены на новые возможности WSL, доступные благодаря WDDM 2.9. Обе библиотеки, представляющие API, будут подключены к dxcore для того чтобы они могли бы давать dxg указания по поводу маршалирования их запросов к KMD на хост-системе.
Попробуйте новые возможности WSL 2
Хотите использовать свой Windows-компьютер для решения настоящих задач из сфер машинного обучения и искусственного интеллекта, и при этом пользоваться всеми удобствами Linux-окружения? Если так, то поддержка CUDA в WSL даёт вам отличную возможность это сделать. Среда WSL — это то место, где Docker-контейнеры CUDA показали себя как самое популярное среди дата-сайентистов вычислительное окружение.
- Для того чтобы получить доступ к Preview-версии WSL 2 с поддержкой GPU-ускорения, вы можете присоединиться к Windows Insider Program.
- Загрузите свежие драйверы NVIDIA, установите их и попробуйте запустить в WSL 2 какой-нибудь CUDA-контейнер.
Здесь можно узнать подробности о применении технологии CUDA в WSL. Здесь, на форуме, посвящённом CUDA и WSL, вы можете поделиться с нами вашими впечатлениями, наблюдениями и идеями об этих технологиях.
А вы уже пробовали CUDA в WSL 2?

Running CUDA on the Windows Subsystem for Linux (WSL) is not a trivial task seeing that it requires the GPU to be available on a Virtual Machine. In this article I go in more detail how you can get your GPU working in WSL through something NVIDIA calls «Paravirtualization»
💡 It is quite straightforward to utilize our Graphic Card, but at this moment of writing, a lot of dependencies are not out of the box for everyone.
Prerequisites
- A working WSL environment with Python installed
- Windows Insider Build >= 20150- Dev Channel
- WSL 2 Kernel >= 4.19.121 (check with
uname -r) - An NVIDIA Graphic Card
Installing Docker on WSL
Once our WSL environment is setup, we can get started with setting up Docker. Installing Docker is quite trivial, but we should make sure not to utilize the apt packages, but the installer provided by docker.
curl https://get.docker.com | sh
Installing NVIDIA for Docker
Once Docker is installed, we need to install Nvidia their toolkit for it. Do this by running the commands below
# Enable Nvidia for Docker
distribution=$(. /etc/os-release;echo $ID$VERSION_ID)
curl -s -L https://nvidia.github.io/nvidia-docker/gpgkey | sudo apt-key add -
curl -s -L https://nvidia.github.io/nvidia-docker/$distribution/nvidia-docker.list | sudo tee /etc/apt/sources.list.d/nvidia-docker.list
curl -s -L https://nvidia.github.io/libnvidia-container/experimental/$distribution/libnvidia-container-experimental.list | sudo tee /etc/apt/sources.list.d/libnvidia-container-experimental.list
sudo apt update
sudo apt install -y nvidia-docker2
sudo apt install nvidia-container-toolkit

# Finally restart the docker service
sudo service docker restart
Testing
If the above was done correctly, we should now be able to test our graphic card by starting a benchmarking container:
sudo docker run --rm -it --gpus=all nvcr.io/nvidia/k8s/cuda-sample:nbody nbody -benchmark
Which should show something like the below:

Conclusion
It’s quite trivial to run NVIDIA with its paravirtualization support, but we should make sure that we meet the prerequisites.
Working with machine-learning code in Windows can be quite a hassle. Often I run into problems with my tools not working properly on Windows. Recently, I even decided to convert my laptop to Ubuntu 22.04 for the time being. Which is really nice for data sciency stuff, but not great for my Powerpoint and Excel since LibreOffice sucks big time. Needless to say, I needed another solution. Especially for my deep learning setup.
In this quick post I’ll show you how I configured my Ubuntu 22.04 installation on Windows 11 to run CUDA and PyTorch.
Configuring Ubuntu with WSLg on Windows 11
The key to running deep learning frameworks like PyTorch on Windows 11 is the WSLg extension. This extension allows WSL2 to use your GPU. This works for Intel, AMD, and Nvidia GPUs. It’s still in preview so it may contain bugs. So far though I haven’t experienced anything blocking to be honest.
To install the WSLg extension, you can follow the instructions in the WSLg repository on Github.
After installing WSLg, you can go ahead and install Ubuntu 22.04 from the Windows store.
With WSL configured and Ubuntu installed, let’s move on to installing the CUDA toolkit
Installing CUDA on Ubuntu 22.04 in WSL2
You maybe tempted to head on over to the Nvidia developer site and download CUDA directly. If you do that, I can assure you that you will have to reinstall Ubuntu. I’ve broken my installation with this trick.
The key here is to get the right CUDA installation.
WSLg maps your GPU driver from Windows in the Ubuntu installation. There’s a specific libcuda version installed in the OS that routes all commands to the GPU in your host system. If you install the regular CUDA toolkit in Ubuntu on WSL2 you’ll overwrite the libcuda file with one that isn’t routed. That’ll break the installation.
The correct way to install CUDA on WSL can be found in the Nvidia manual.
I’m using PyTorch 1.13 which needs CUDA 11.7, so I downloaded the CUDA toolkit for WSL-Ubuntu from the developer site. The website provides neat instructions on how to install the toolkit. It takes, depending on your connection, a few minutes to download all the files.
After installing the CUDA toolkit, you can now download PyTorch.
Installing PyTorch
There are several ways to install PyTorch. I’ve found that Anaconda is rather broken these days, so I prefer to install PyTorch using pip.
A clean installation of Ubuntu 22.04 doesn’t have Python 3.x installed yet. You’ll need to install it using the following command:
sudo apt install -y python3
sudo apt install -y python3-pip
After you’ve configured python and pip, you can install pytorch using the following command:
pip3 install torch torchvision torchaudio
If all went well, you should have a working PyTorch installation.
Testing your installation
To verify your pytorch installation, you can run the following script in python:
import torch
print(torch.cuda.is_available())
This should print true to the terminal and exit normally. You should see no error messages.
Summary
Installing CUDA and Pytorch tools in WSL2 turns out to be perfectly viable. I’m quite happy to have this working as I can now combine my normal Windows workload with all the goodness that comes with Linux for my data science work.
Enjoy!
What’s New (as of 2021-10-12)
I’m Sasaki from Nvidia.
Since writing this article in June 2020, I’ve been updating the article to include when new builds of Windows Insider Preview and NVIDIA drivers are coming out, but the annotations here and there are getting harder to read, so I’ll try to aggregate new information in this What’s New section. Also, I sent the update history to the end of the article.
See also: Release Notes in the CUDA on WSL User Guide
Version I have confirmed works
- Windows Build: 22000.194 (Windows 11 is now available)
- NVIDIA driver: 510.06 (this driver is still in preview)
- There is a problem that the GPU-util column of the nvidia-smi command becomes «N/A». Checking with the development team.
- Executed NGC container image
- nvcr.io/nvidia/tensorflow:21.09-tf2-py3
You can now use it normally in Windows 11!
On October 5, 2021, Windows 11 was officially released. CUDA on WSL 2 is now available on «normal Windows». Good!
About the WSL 2 backend of Docker Desktop for Windows
I previously showed you how to use Docker Desktop and its WSL 2 backend as the container execution environment in WSL 2. While this certainly works, the NVIDIA Container Toolkit does not yet officially support it.
The CUDA on WSL 2 documentation also lists the following, so we’ve updated this document to introduce only the supported methods:
Note that NVIDIA Container Toolkit has not yet been validated with Docker Desktop WSL 2 backend. Use Docker-CE for Linux instead inside your WSL 2 Linux distribution.
Main story from here
* From here, some of the old contents as of June 2020 remain.
As announced at the May 2020 BUILD conference, CUDA is now available in WSL 2, so we gave it a try. The procedure is so simple that there’s no point in me putting it together in such a pun, but the documentation is distributed across both Microsoft and Nvidia, so I used to run Services for UNIX (SFU)/Subsystem for UNIX-based Applications (SUA) at Microsoft, and now GPUs at Nvidia It can be said that it is one of my roles to try to write something while selling. Eh, isn’t it?
Building the CUDA on WSL 2 Environment (Windows Side)
Let’s create an environment right away. A summary of the procedure can be found in the CUDA on WSL User Guide . The following content I’ve tried also follows this guide.
Install Windows 10 Insider Preview Build 20150 (or later)
* When using Windows 11, you do not need to build Windows Insider Preview. Skip this section and proceed to Installing the Driver.
If you’re a well-trained Windows user, you’re probably part of Insider Preview’s Fast Ring, so when you woke up this morning (June 18, 2020 in Japan), Build 20150.1000 should have already rained down. Let’s install it.
※ Insider Preview is a bit … If so, please also see «Try Windows Insider Preview Safely with Boot from VHD Features».
For users who are not part of Insider Preview, it may be the most time-consuming process to join and install it. As shown in the picture below, join the «Fast» of Windows Insider Preview from «Settings» in Windows 10.
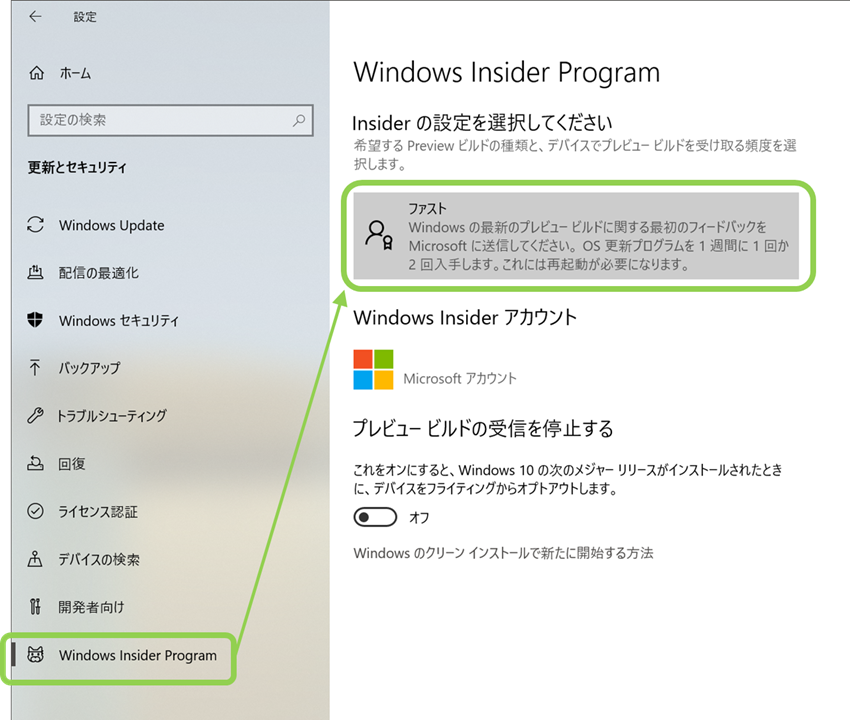
Downloading and installing takes a decent amount of time. Once you’ve managed to do that, run the ver command at the command prompt to make sure you have 20150 (or later) installed.
C:\\WINDOWS\\system32>ver

Microsoft Windows [Version 10.0.21301.1000]
Installing NVIDIA Drivers for CUDA on WSL
When the host Windows is ready, the next step is to install the NVIDIA driver. Install this driver on the Windows host instead of the Linux kernel side of WSL 2. From the CUDA on Windows Subsystem for Linux (WSL) — Public Preview page, follow the Get CUDA Driver to the driver download page and download either the GeForce Driver or the Quadro Driver for your environment.
When you see «NVIDIA Developer Program Membership Required,» click «Login.»

Eh, don’t have an account?! «Join now» please.
The installation process itself is no different from the usual procedure for installing NVIDIA drivers on Windows, so I will omit details. I went from one to the next with all the default choices.
After the installation is complete, you must restart Windows.
Installing WSL 2
Previously, we introduced the steps «Enabling Virtual Machine Platform» and «Installing Linux Distribution» here, but starting with build 20262, WSL 2 is much easier to install.
For example, if you are installing Ubuntu-18.04, simply run the following command in Power Shell or a command prompt launched with administrator privileges:
wsl --install -d Ubuntu-18.04
This command performs the following tasks:
- Enable Windows Subsystem for Linux (WSL) and Virtual Machine Platform
- Download and install the latest Linux kernel
- Setting WSL 2 as the default value
- Download and install the specified Linux distribution (in this case, Ubuntu 18.04)
That’s all there is to Windows. You can now use WSL 2. From the Windows Start menu, click the icon of the Linux distribution you just installed to launch the shell, and you will find a familiar Linux environment.
After that, you can use the GPU in the same way as a normal Linux environment (roughly), but the necessary preparation will change depending on which method you use below, so I will explain it briefly.
- Run the CUDA program directly on WSL 2.
- Use the GPU in a Docker container using Docker and the NVIDIA Container Toolkit on WSL 2.
Installing the CUDA Toolkit
If you want to run CUDA programs directly without using containers, you can install the CUDA Toolkit on Linux on WSL 2, but there are important caveats.
Do not install the nvidia driver for linux
As usual, you will almost do sudo apt-get install cuda or something, but please specify the cuda-toolkit- package. The following is an example of installing CUDA-11.2 on Ubuntu-18.04.
sudo apt-key adv --fetch-keys http://developer.download.nvidia.com/compute/cuda/repos/ubuntu1804/x86_64/7fa2af80.pub
sudo sh -c 'echo "deb http://developer.download.nvidia.com/compute/cuda/repos/ubuntu1804/x86_64 /" > /etc/apt/sources.list.d/cuda.list'
sudo apt-get update
sudo apt-get install -y cuda-toolkit-11-2
Since version 11.1 of the CUDA Toolkit, «WSL-Ubuntu» has been added as a distribution choice. If you are using Ubuntu with WSL 2, you can select this option. In this case, you can install the «cuda» package as you would on native Linux.
In CUDA 11.4.1, if you specify «WSL-Ubuntu» as the distribution and «dev (local)» as the Installer type, the command is as follows:
wget https://developer.download.nvidia.com/compute/cuda/repos/wsl-ubuntu/x86_64/cuda-wsl-ubuntu.pin
sudo mv cuda-wsl-ubuntu.pin /etc/apt/preferences.d/cuda-repository-pin-600
wget https://developer.download.nvidia.com/compute/cuda/11.4.1/local_installers/cuda-repo-wsl-ubuntu-11-4-local_11.4.1-1_amd64.deb
sudo dpkg -i cuda-repo-wsl-ubuntu-11-4-local_11.4.1-1_amd64.deb
sudo apt-key add /var/cuda-repo-wsl-ubuntu-11-4-local/7fa2af80.pub
sudo apt-get update
sudo apt-get -y install cuda
After the CUDA Toolkit installation is complete, you may want to build and run the sample program under /usr/local/cuda/samples as a means of checking its operation. The figure below shows how I ran the deviceQuery program on my PC.
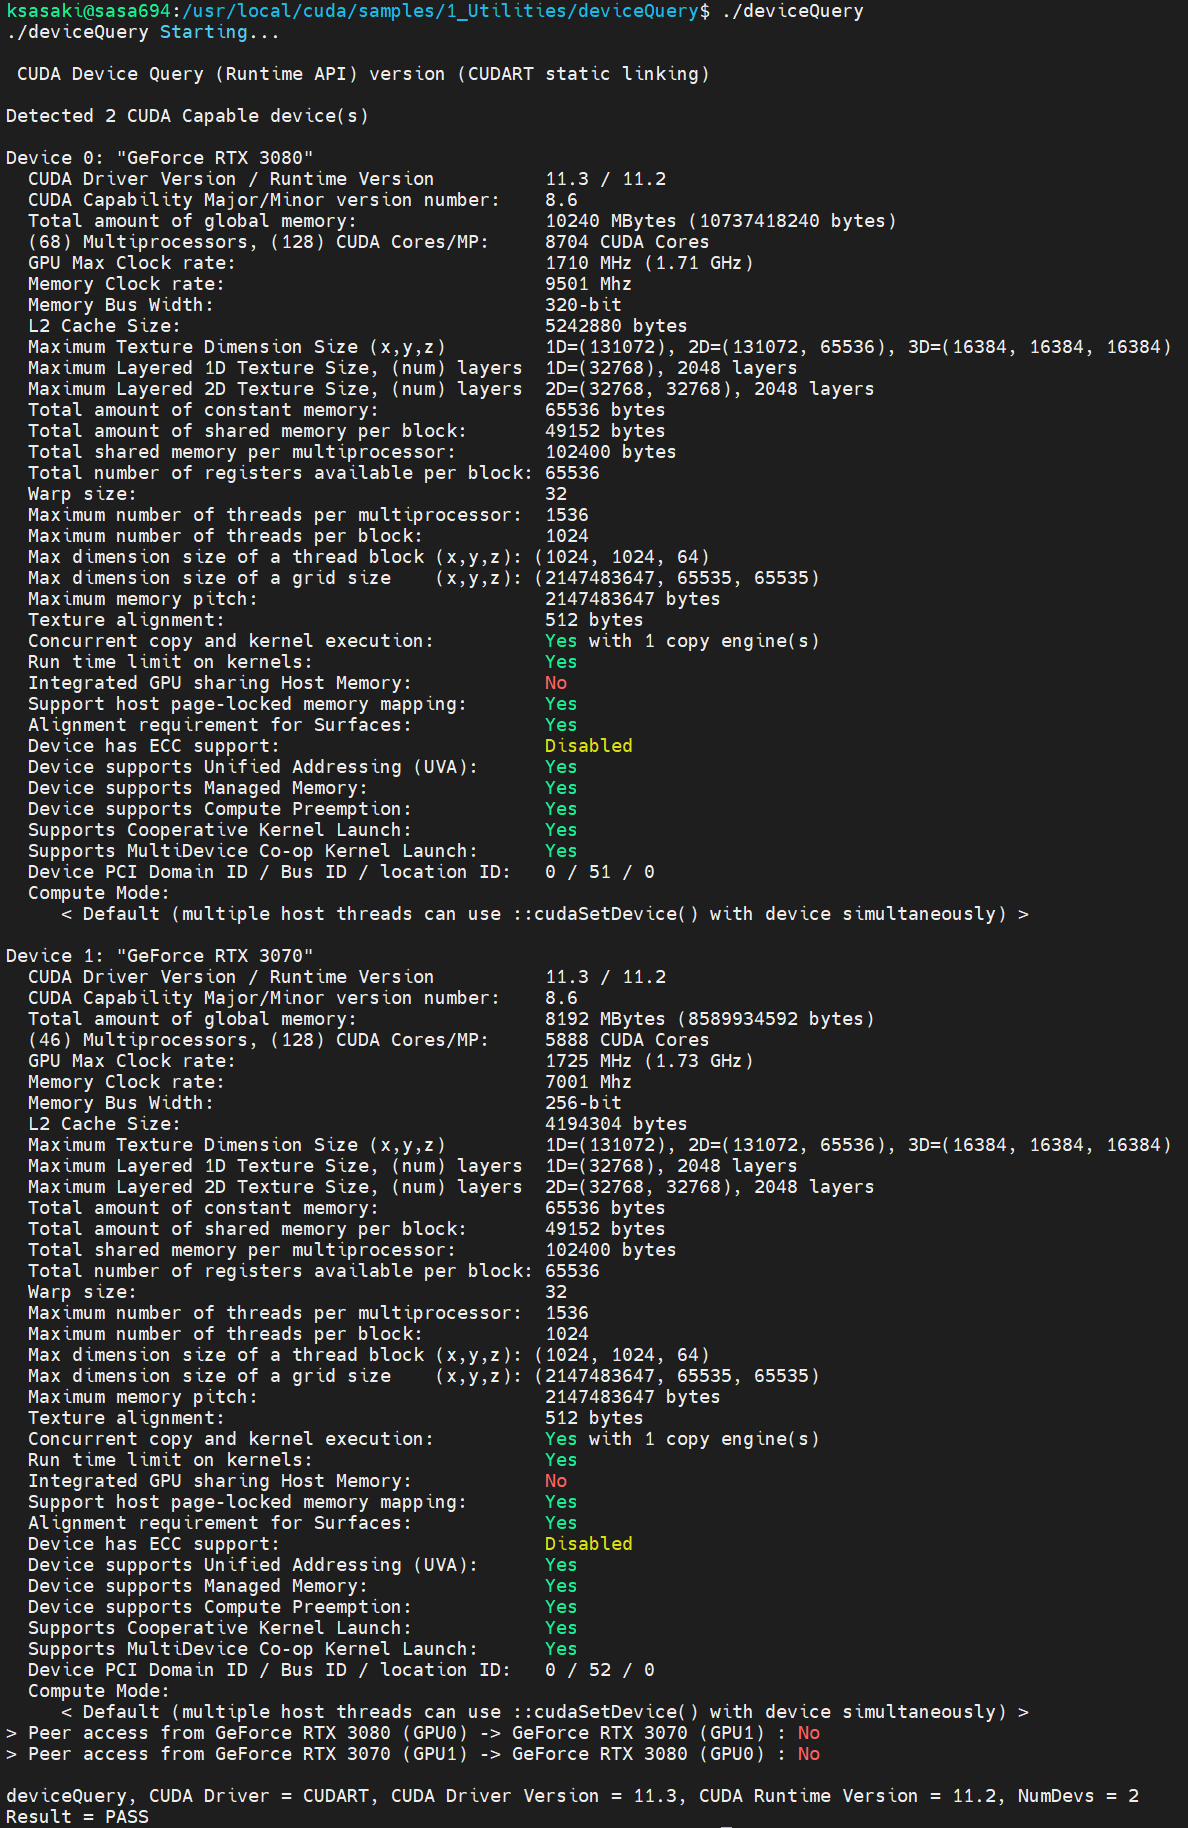
You’re well recognized!
Building a container execution environment
The reason I was waiting for CUDA on WSL 2 in the first place is because I want to make it easy to run NGC container images on Windows. The PC I usually use is dual-booted from Windows 10 and Ubuntu, but there are quite a few cases where it is troublesome to boot back to Ubuntu to use the GPU in a container.
So we’re going to build a container execution environment in WSL 2, but there are currently two ways to do it.
- Install Docker and NVIDIA Container Toolkit on Linux on WSL 2
- Use Docker Desktop and its WSL 2 backend (not supported)
The latter works, but is not officially supported at this time (September 2021). Therefore, we will introduce only the former here.
Installing Docker on Linux on WSL 2
Docker’s official handy script lets you install the latest stable version right away.
curl https://get.docker.com | sh
This time
WSL DETECTED: We recommend using Docker Desktop for Windows.
You will be warned, but ignore this message and proceed.
Installing the NVIDIA Container Toolkit to Linux on WSL 2
Since it is also difficult to type the commands in the user guide one by one, I made it into a shell script like the following and executed it.
#!/bin/sh

distribution=$(. /etc/os-release;echo $ID$VERSION_ID)
curl -s -L https://nvidia.github.io/nvidia-docker/gpgkey | sudo apt-key add -
curl -s -L https://nvidia.github.io/nvidia-docker/$distribution/nvidia-docker.list | sudo tee /etc/apt/sources.list.d/nvidia-docker.list
curl -s -L https://nvidia.github.io/libnvidia-container/experimental/$distribution/libnvidia-container-experimental.list | sudo tee /etc/apt/sources.list.d/libnvidia-container-experimental.list

sudo apt-get update
sudo apt-get install -y nvidia-docker2
sudo usermod -aG docker $USER
Finally, let’s restart the Docker daemon.
sudo service docker restart
This completes the work on the Linux side. Since there is no work to install drivers, it is easier than setting up a GPU-enabled container environment on normal Linux.
The NVIDIA Container Toolkit installed here was once called NVIDIA Docker, and it is a module necessary to use the GPU in containers. For more information, see this article.
Try moving the NGC container image
Let’s try NGC’s container image now. My PC has a GPU with Ampere architecture, so to take advantage of its Tensor core, I ran the TensorFlow image I wrote earlier in «Trying out AMP with NGC container images».
Start WSL 2 Ubuntu and run the following command to start the container:
docker run --shm-size=1g --ulimit memlock=-1 --ulimit stack=67108864 --gpus all --rm -it nvcr.io/nvidia/tensorflow:21.08-tf2-py3
※ One caution here. When starting the container, the following warning is output, but this is an incorrect message and will be fixed. In fact, the GPU is properly recognized.
WARNING: The NVIDIA Driver was not detected.  GPU functionality will not be available.
   Use 'nvidia-docker run' to start this container; see
   https://github.com/NVIDIA/nvidia-docker/wiki/nvidia-docker .
Once the container is started, run ResNet-50 in training benchmark mode (which generates training data on the fly). To enable AMP (Automatic Mixed Accuracy、— precision=fp16 is also added.
/workspace/nvidia-examples/cnn/resnet.py \\
  --export_dir=/tmp \\
  --display_every=10 \\
  --num_iter=100 \\
  --iter_unit=batch \\
  --batch_size=128 \\
  --precision=fp16
As shown in the figure below, it moves normally. Also, in the past, CUDA on WSL 2 performed poorly than native Linux in this simple benchmark test, but NVIDIA driver 465.42 has significantly improved performance and is now close to a level comparable to native.

* Although WSL can be accessed by various software other than the standard console, I am using MobaXterm in this example. Not only does it support WSL, but it also has a built-in X server. Both remote and local are OK with this one.
nvidia-smi command
Starting with NVIDIA driver 465.42, CUDA on WSL 2 supports NVIDIA Management Library (NVML). Now, the familiar nvidia-smi commands are finally available in WSL 2! (nvidia-smi uses NVML to get information about the GPU.)
However, the nvidia-smi command is not currently located in /usr/bin, so you need to prepare the following to execute it.
$ sudo cp /usr/lib/wsl/lib/nvidia-smi /usr/bin
$ sudo chmod +x /usr/bin/nvidia-smi
And unfortunately at the moment there is a bit of a problem with the operation of nvidia-smi. The GPU usage rate in question is «ERR!» and cannot be obtained.
$ nvidia-smi
+-----------------------------------------------------------------------------+
| NVIDIA-SMI 465.00       Driver Version: 465.42       CUDA Version: 11.3     |
|-------------------------------+----------------------+----------------------+
| GPU  Name        Persistence-M| Bus-Id        Disp.A | Volatile Uncorr. ECC |
| Fan  Temp  Perf  Pwr:Usage/Cap|         Memory-Usage | GPU-Util  Compute M. |
|                               |                      |               MIG M. |
|===============================+======================+======================|
|   0  GeForce RTX 3080    Off  | 00000000:33:00.0  On |                  N/A |
| 30%   34C    P8    24W / 320W |    595MiB / 10240MiB |    ERR!      Default |
|                               |                      |                  N/A |
+-------------------------------+----------------------+----------------------+
|   1  GeForce RTX 3070    Off  | 00000000:34:00.0 Off |                  N/A |
|  0%   34C    P8     6W / 220W |    149MiB /  8192MiB |    ERR!      Default |
|                               |                      |                  N/A |
+-------------------------------+----------------------+----------------------+

+-----------------------------------------------------------------------------+
| Processes:                                                                  |
|  GPU   GI   CI        PID   Type   Process name                  GPU Memory |
|        ID   ID                                                   Usage      |
|=============================================================================|
|  No running processes found                                                 |
+-----------------------------------------------------------------------------+
The development team is aware of this issue and will fix it, but the workaround for the time being is to continue running nvidia-smi.exe on the Windows side. A common method I use is to use the --loop and --query-gpu options to keep logging line by line. It’s primitive, but it’s practical.
C:\\WINDOWS\\system32>nvidia-smi --loop=2 -i 0  --format=csv --query-gpu=timestamp,utilization.gpu,clocks.sm,power.draw,temperature.gpu
2021/01/31 00:11:48.294, 92 %, 1949 MHz, 278.93 W, 58
2021/01/31 00:11:50.306, 88 %, 1949 MHz, 283.70 W, 59
2021/01/31 00:11:52.317, 87 %, 1950 MHz, 280.65 W, 59
2021/01/31 00:11:54.329, 78 %, 1952 MHz, 277.86 W, 59
2021/01/31 00:11:56.342, 84 %, 1948 MHz, 277.33 W, 60
2021/01/31 00:11:58.354, 89 %, 1949 MHz, 283.92 W, 61
It’s different from «raw Linux»
As in the previous example, if you just run the CUDA sample or NGC container image, it doesn’t feel too strange, and it’s indistinguishable from logging in and running on another Linux machine. However, there are some strange things that make it different from Linux in general.
For instance
lspci But I can’t find the GPU…
# lspci
8375:00:00.0 SCSI storage controller: Red Hat, Inc. Virtio filesystem (rev 01)
86cb:00:00.0 SCSI storage controller: Red Hat, Inc. Virtio filesystem (rev 01)
a609:00:00.0 SCSI storage controller: Red Hat, Inc. Virtio filesystem (rev 01)
b246:00:00.0 SCSI storage controller: Red Hat, Inc. Virtio filesystem (rev 01)
b7b6:00:00.0 3D controller: Microsoft Corporation Device 008e
bd73:00:00.0 SCSI storage controller: Red Hat, Inc. Virtio filesystem (rev 01)
There are no device files that always exist.
# ls -l /dev/nvidia*
ls: cannot access '/dev/nvidia*': No such file or directory
# ls -l /proc/driver/nvidia
ls: cannot access '/proc/driver/nvidia': No such file or directory
Yes, in WSL 2 Linux, the GPU as a PCI device is not directly visible. As you can see from installing the NVIDIA driver only on Windows, the GPU is managed as a Windows device, and from Linux in WSL 2, it is consumed through a device called /dev/dxg. This /dev/dxg is a so-called paravirtualized device. The host’s Windows and WSL’s lightweight utility VMs are connected by a virtual bus called VMBus, and operations on the Linux side to /dev/dxg are propagated to the host’s GPU via VMBus by a paravirtualized driver called dxgkrnl.

Announcing CUDA on Windows Subsystem for Linux 2
This Guest Paravirtualized Device — [VMBus]-[Host Device] mechanism is an early feature of Hyper-V, the Windows hypervisor, that is used to implement devices such as disks and NICs as paravirtualized devices optimized for virtual environments, rather than fully emulating them. But this time, you’re using the Windows GPU to use it on the WSL side.
* The dxgkrnl in the Linux kernel that appeared here has the same name as the existing Windows DirectX graphics kernel, but it seems that it is newly implemented for Linux.
The source code is here: WSL2-Linux-Kernel/drivers/gpu/dxgkrnl/
As you can see below, it is emphasized that «it has nothing in common with Windows». There is no concern about IP contamination, I suppose.
Although they share a name, the version of dxgkrnl inside of the Linux kernel is a clean room implementation of a Linux GPU driver based on our GPU-PV protocol and doesn’t share anything else in common with its similarly named Windows counterpart.
Source: DirectX is coming to the Windows Subsystem for Linux
restriction
Now, now that you can actually try CUDA on WSL 2,
- Powered by Windows Insider Preview
- NVIDIA Driver also in preview
Because it is at that stage, there are still rough parts and unimplemented parts. Here are a few things that go from the limitations of the user guide:
- Debugger or profiler not supported
- The NVIDIA Container Toolkit only supports —gpus all when docker run. If you have multiple GPUs, you can’t narrow down to a few of them and let the container use them.
And so on. Compared to when I first wrote this article, there are fewer limitations!
Summary
- WSL 2 on Windows 10 finally makes CUDA available. (Began to be)
- NGC’s TensorFlow container image works normally.
- Register for Windows Insider Preview and the NVIDIA Developer Program.
- NVML implemented in 465.42. As a result, the nvidia-smi command can also be operated!
- There are still some limitations, but please give it a try and give us feedback.
Enjoy CUDA!
See also
Announcing CUDA on Windows Subsystem for Linux 2CUDA on WSL User GuideNVIDIA Drivers for CUDA on WSLDocker Desktop WSL 2 backend Announcing Windows 10 Insider Preview Build 20150The Windows Subsystem for Linux BUILD 2020 SummaryWindows Subsystem for Linux Documentation Speed up neural network training with Automatic Mixed Precision (AMP), a safe test of Windows Insider Preview with Boot from VHD capabilitiesWhat’s up with NVIDIA Docker now? (20.09 Version)
Changelog
* 2021/10/12 Added information about the official release of Windows 11.
* 2021/09/04 Added information for NVIDIA driver 510.06 and WIP build 22000.176.
* 2021/07/30 NVIDIA driver 471.21 and WIP build 22000.100 have been added.
* 2021/06/30 NVIDIA driver 471.11 and WIP build 22000.51 have been added.
* 2021/06/07 Added NVIDIA driver 470.76 and WIP build 21390.
* 2021/04/08 NVIDIA driver 470.14 has added that nvidia-smi does not work and has been reported.
* 2021/03/12 Updated for Windows Insider Preview build 21332 and NVIDIA driver 470.05. (The update history has been moved to the end of the article.)
* 2021/02/05 Added that the WSL 2 backend of Docker Desktop is GPU-enabled.
* 2021/01/31 Build 21292 or later and NVIDIA driver 465.42 support CUDA 11.2, performance improvements, NVML support, support for nvidia-smi commands, etc.
* 2021/01/03 CUDA 11.2 has confirmed that CUDA on WSL 2 does not work properly.
* 2020/10/15 Added points such as «WSL-Ubuntu» can now be selected when installing CUDA Toolkit.
* 2020/07/27 Notes when installing CUDA Toolkit on WSL 2 have been added.