Как можно отключить или убрать нажатие CTRL+ALT+DEL сразу после загрузки Windows 7 или 10
Чтобы запрос CTRL ALT DEL не мешалось нам при загрузке Windows 7 или Windows 10 нужно сделать следующее:
Нажимаем “Пуск”. Заходим в “Панель управления” – “Администрирование” – “Локальная политика безопасности” – “Локальные политики” – “Параметры безопасности”
Находим пункт “Интерактивный вход в систему: не требовать нажатия CTRL + ALT + DELETE” щелкаем на нем два раза и выбираем пункт “Включен”
Отключить окно ввода пароля
Нажимаем “Пуск” – “Выполнить”> вводим команду “Regedit”
В системном реестре переходим по следующему пути: [HKEY_LOCAL_MACHINE\SOFTWARE\Microsoft\Windows NT\CurrentVersion\Winlogon]
Создаём текстовый ключ AutoAdminLogоn = “1”,
Создаём текстовый ключ DefaultUserName = “Имя пользователя”,
Создаём текстовый ключ DefaultDomainName = “Имя домена”,
Создаём текстовый ключ DefaultPassword = “Ваш пароль”,
Отключить окно, которое появляется при попытке выйти/выключить/перегрузить компьютер
Отключить Shutdown Event Tracker
Запускаем редактор групповых политик. Нажимаем “Пуск” – “Выполнить” – команда “gpedit.msc”
Находим событие “Отображать диалог слежения за завершением работы” (“Display Shutdown Event Tracker”)
Переходим “Конфигурация компьютера” – “Административные шаблоны” – “Система”
В свойствах в качестве параметра ставим «Отключен»
Готово.
by Milan Stanojevic
Milan has been enthusiastic about technology ever since his childhood days, and this led him to take interest in all PC-related technologies. He’s a PC enthusiast and he… read more
Updated on
- The function of the CTRL+ALT+DELETE differs depending on the context. Most of the time, it interrupts or facilitates interrupting a function.
- When dealing with a computer stuck on the CTRL+ALT+DELETE screen, a hard reset may do wonders.
- To avoid similar issues and boost your productivity, use the best shortcut software for Windows 10.
- Bypass all bugs and technical glitches by using the tips from our Windows 10 Troubleshooting Hub.
Are you getting stuck on the login or CTRL+ALT+DEL screen when using your Windows 10 computer?
If so, have you tried unplugging any devices connected to the computer? Or maybe you’ve tried to restart your computer and nothing happens?
At this point, you could try clicking on Ease of Access on the lower-left corner of the login screen if your mouse is working.
Select Type without the keyboard (on-screen keyboard) and use the mouse to press the CTRL+ALT+DEL keyboard shortcut.
Sometimes the issue is with your keyboard, which could be dead or has come loose so you can check the keyboard’s connection to the PC.
If it’s a wireless keyboard, check the batteries. If you don’t get any lights coming on when pressing Caps Lock, or Num Lock, then your keyboard is most likely shot.
How we test, review and rate?
We have worked for the past 6 months on building a new review system on how we produce content. Using it, we have subsequently redone most of our articles to provide actual hands-on expertise on the guides we made.
For more details you can read how we test, review, and rate at WindowsReport.
Should none of these quick fixes work, you can go ahead and try the suggested solutions here.
What can I do if my PC is stuck on the CTRL+ALT+DEL screen?
- Roll back graphics/video card driver
- Perform a hard reset
- Perform a startup repair
- Disable fast boot/startup
1. Roll back graphics/video card driver
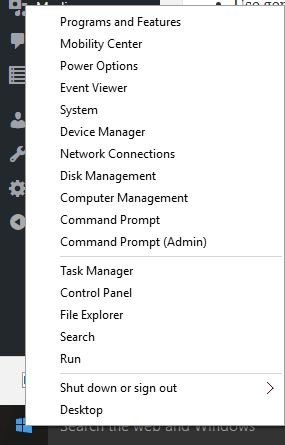
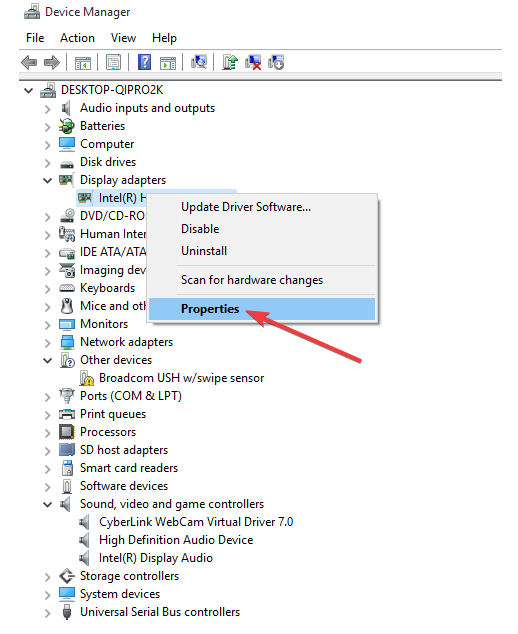
- Right-click Start.

- Select Device Manager.
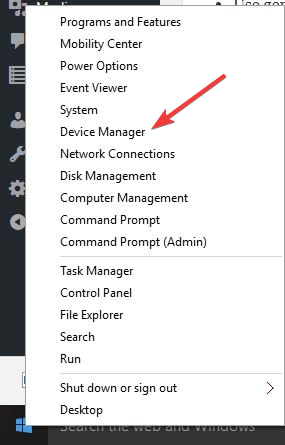
- Select Display Adapters and click to expand the list then choose the card.

- Right-click the on the card, and then select Properties.

- In Properties, select the Driver tab.

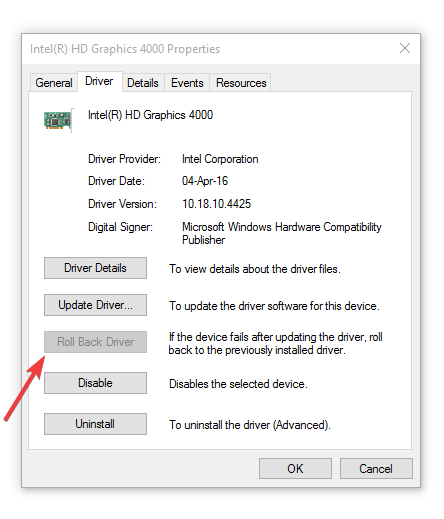
- Select Roll Back Driver, then follow the prompts.
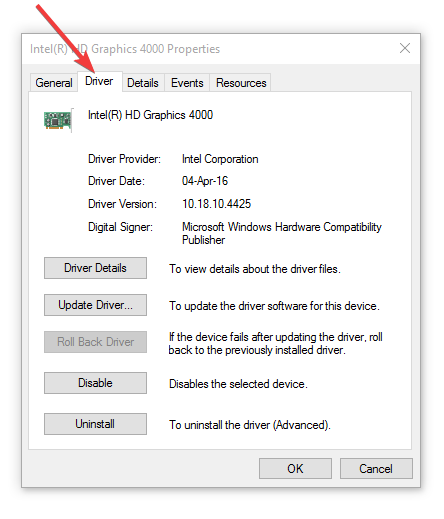
Your PC doesn’t natively know how to take advantage of all video card features. It needs a driver to do that and not just any driver – an updated one.
When applying the above procedure, if the button is unavailable, that means there’s no driver to roll back to.
If Windows can’t find a new driver for your graphics/video card, you can visit your computer manufacturer’s website to download the latest driver.
However, there’s an even better option to take into consideration. Instead of wasting time scattering between countless graphics/video card versions, install Outbyte Driver Updater and let it handle this task.
Besides solving the CTRL+ALT+DELETE issue by updating your graphics/video card, this lightweight tool will keep all your drivers updated for your PC to work properly.
And if you’re not a big fan of tech changes, keep in mind that the interface is kept relatively simple, so you’ll get used to it in no time.
2. Perform a hard reset

- Remove the battery from its compartment, and then press and hold the Power button on your computer for about 15 seconds to drain any residual electrical charge from its capacitors.
- Insert the battery and power adapter back to the computer but don’t connect any other devices just yet.
- Press the Power button to turn on your computer. You’ll see the startup menu opening, so use the arrow keys to select Start Windows Normally and press Enter.
- You can now reconnect the devices one at a time, and you’re good to go. Remember to run Windows Update and update all device drivers.
This will be different depending on whether your computer has a removable battery or a sealed (non-removable) battery.
For a removable battery computer, switch off the computer and remove any plugged devices, disconnect all externally connected peripherals, and then unplug the power adapter from the computer.
For a computer with a sealed or non-removable battery, don’t try to remove it as this can void your warranty. Do the following instead:
- Turn off the computer and remove any plugged devices or peripherals, and unplug the power adapter from the computer.
- Most laptops can be reset by pressing and holding the Power button for 15 seconds. So do this, then plug back the power adapter but not any other devices.
- Press the Power button and start your computer, then select Start Windows Normally and press Enter.
- Reconnect other devices and peripherals, one at a time, and run Windows Update as well as updating all device drivers after the reset.
3. Perform a startup repair
- Start your computer from the installation media by inserting the disk or USB drive stick. If you get a message asking you to press any key to boot from DVD, press any key on your laptop or computer’s keyboard. If you don’t see such a message, change the boot order in your BIOS settings so that it starts from the disk or USB.
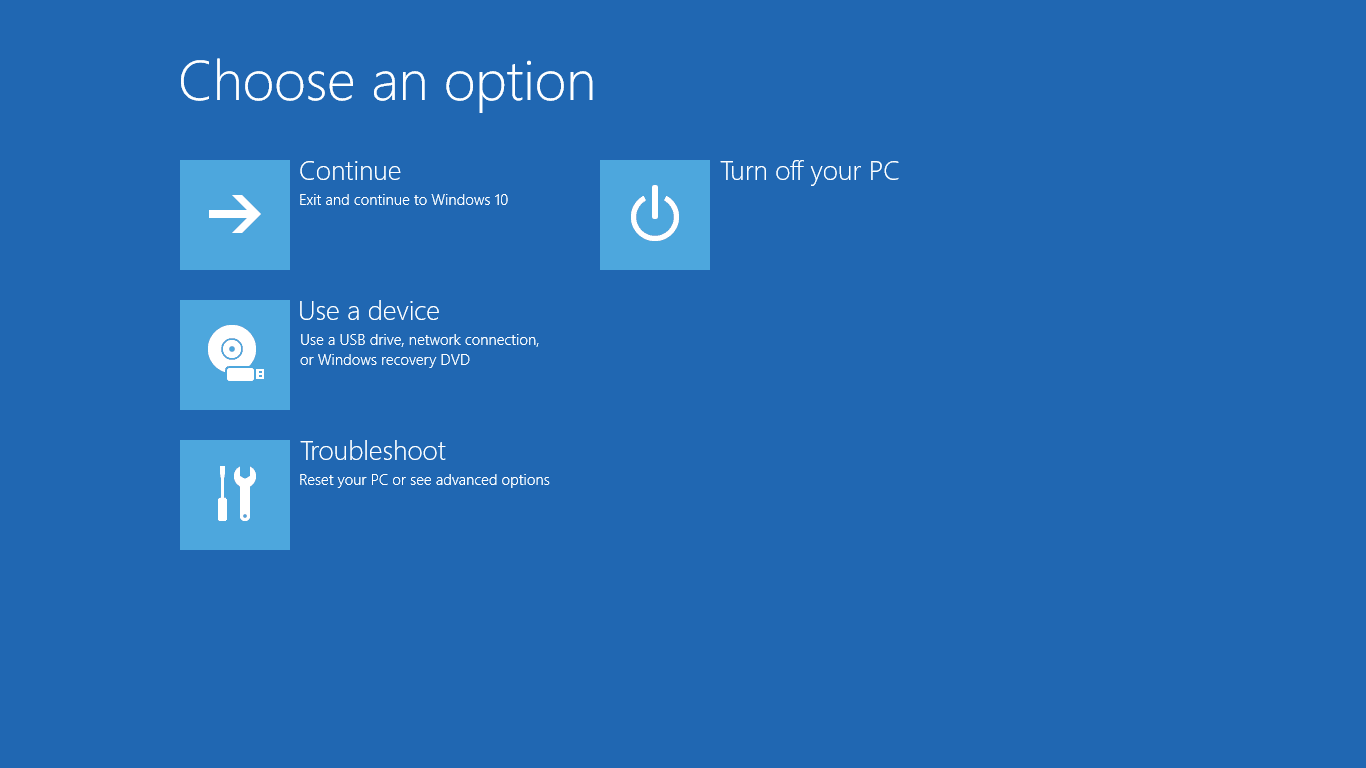
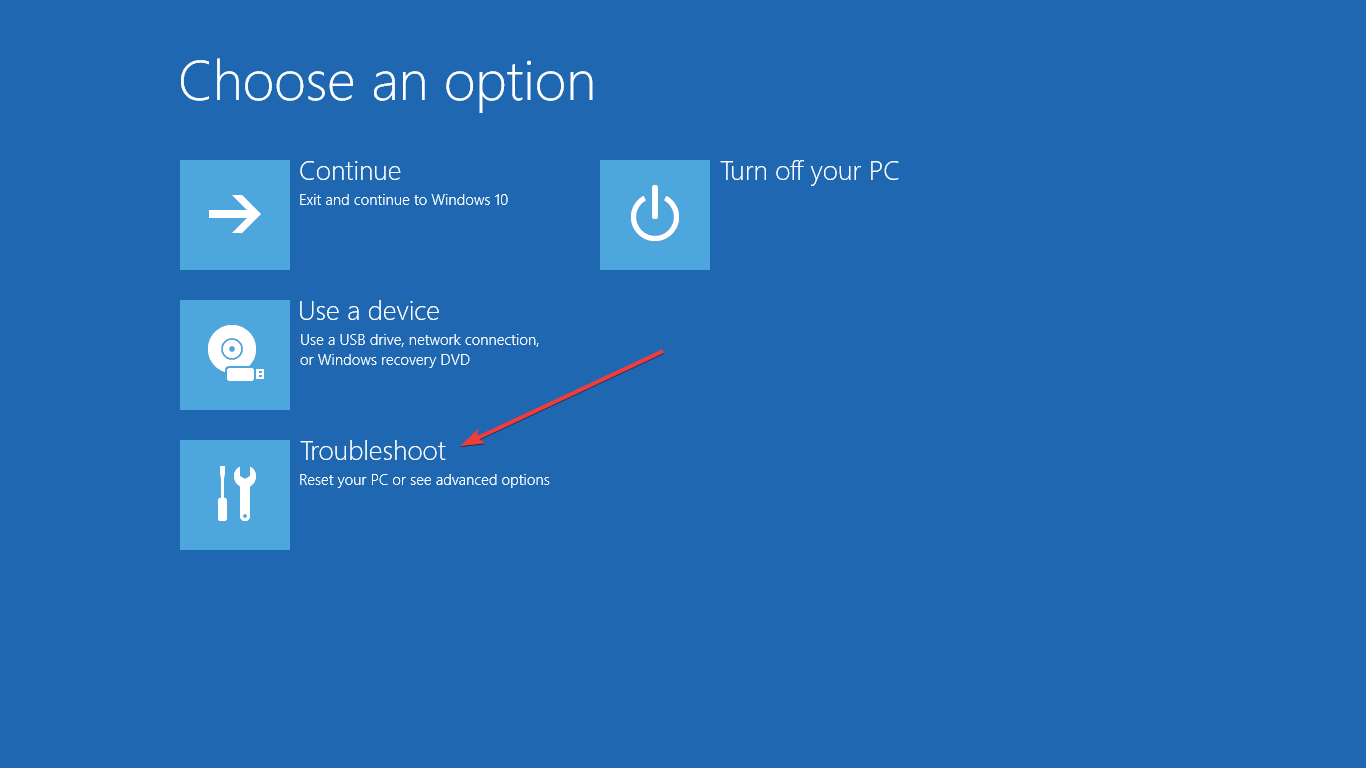
- When you see the Install Windows page, click Repair your computer to start the Windows Recovery (WinRE) environment
- Go to Choose an option screen.

- Click Troubleshoot.
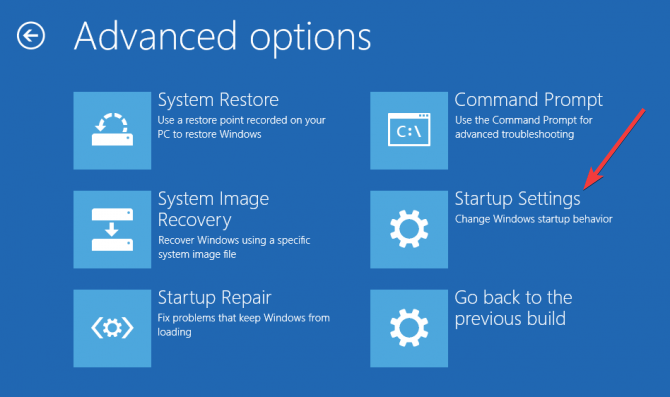
- Select Advanced Options.
- Click Startup Settings and then click Restart.

- Once this is done, complete the repair and check if you can start your computer again.
You can do this by first downloading the Windows 10 ISO and creating a media creation tool, then performing a startup repair.
Once you have the installation media, do as described above.
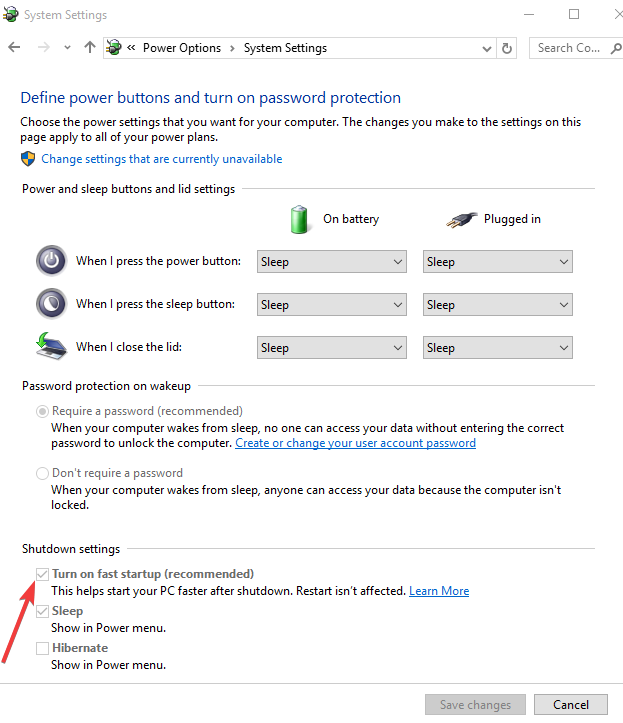
4. Disable Fast Boot
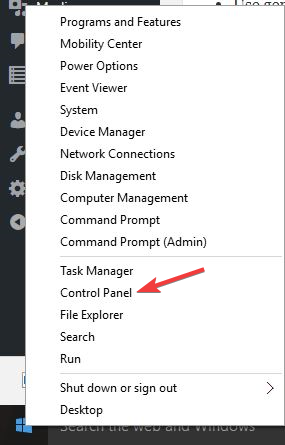
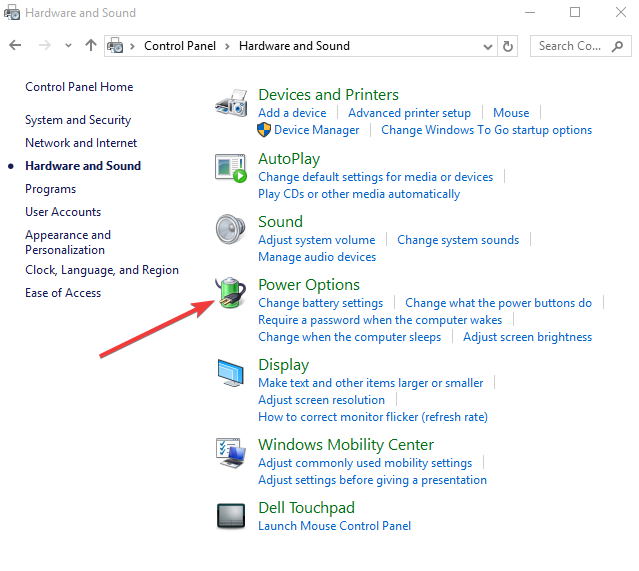
- Right-click Start.
- Select Control Panel.
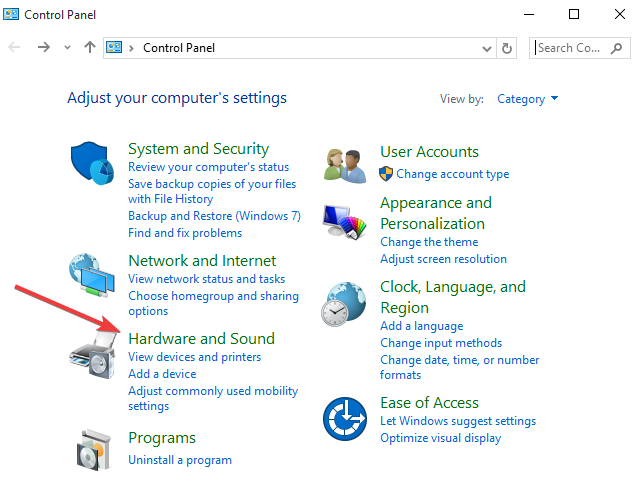
- Click Hardware and Sound.

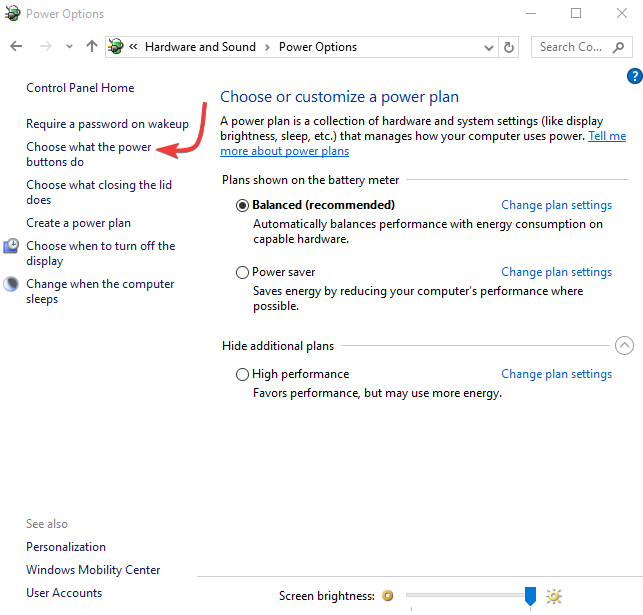
- Click Power Options.

- Click Choose what the power buttons do.

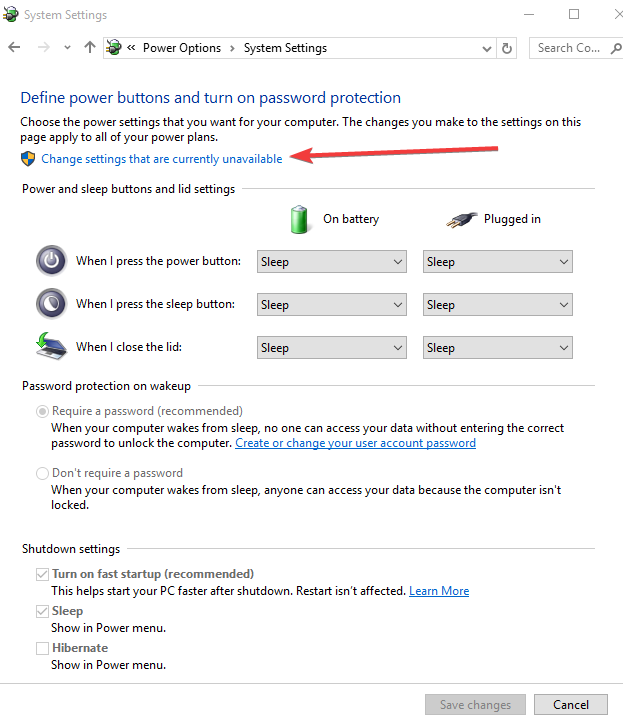
- Click Change settings that are currently unavailable.

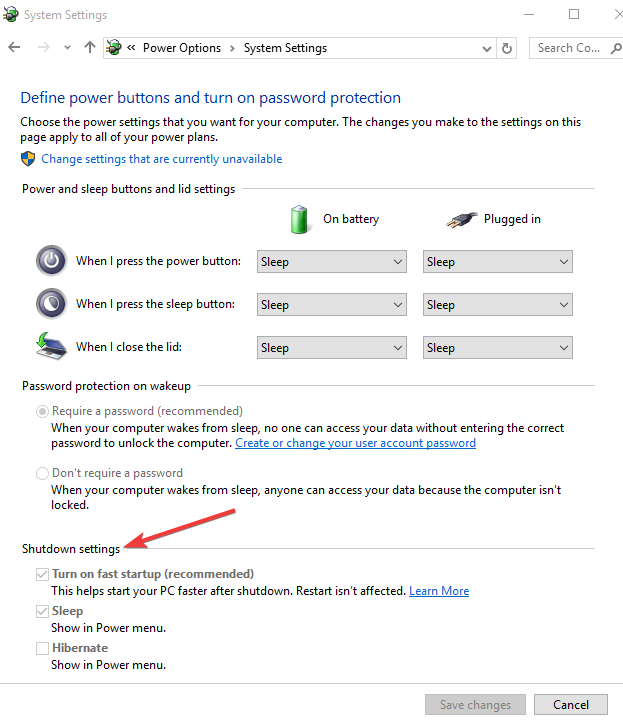
- Scroll down to Shutdown settings.
- Uncheck Turn on fast startup.
- Click Save changes.
Some users have raised concerns over the Fast Boot setting in BIOS that hinders the booting and fast loading of the desktop, creating many problems in Windows 10.
You could try and disable this in your computer’s BIOS and see if it fixes the problem.
Did any of these solutions help you fix the ‘computer stuck on CTRL+ALT+DELETE screen problem? Let us know by leaving a comment in the section below.
![]()
Чтобы отключить запрос комбинации клавиш «Ctrl+Alt+Del» при загрузке Windows 10, следуйте этим шагам:
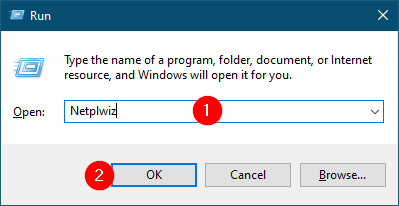
1. Нажмите клавиши «Win+R» на клавиатуре.
2. В появившемся окошке «Запустить» введите «netplwiz» и нажмите «ОК».
3. В окне «Пользователи» снимите флажок «Пользователь должен ввести имя пользователя и пароль» и нажмите «ОК».
4. Появится окно «Введите имя пользователя и пароль», в котором необходимо ввести имя пользователя и пароль, после чего нажать «ОК».
После выполнения этих шагов запрос сочетания «Ctrl+Alt+Del» при загрузке Windows 10 будет отключен. Обратите внимание, что это может ухудшить безопасность вашей системы, поэтому следует включать парольную защиту вашего компьютера.
Кроме того, если вы хотели бы включить запрос сочетания клавиш Ctrl+Alt+Del при входе в систему, вы можете вернуться к этим настройкам и снова поставить флажок рядом с «Пользователь должен ввести имя пользователя и пароль». Это поможет усилить безопасность вашего компьютера и защитить его от несанкционированного доступа.
Кроме того, в Windows 10 есть множество других настроек безопасности, которые могут быть полезными для защиты вашей системы. Например, вы можете включить двухфакторную аутентификацию для своей учетной записи Microsoft, чтобы обеспечить дополнительный уровень защиты. Вы также можете использовать антивирусное программное обеспечение, брандмауэры и другие инструменты для защиты вашего компьютера от вредоносных программ и других угроз.
Независимо от того, какие настройки безопасности вы выберете, важно помнить о значении безопасности при работе с компьютером. Защита вашей системы может помочь вам избежать потери данных, кражи личной информации и других проблем, связанных с безопасностью. Поэтому не забывайте обновлять и настраивать свои настройки безопасности, чтобы ваш компьютер был защищен в любое время.
В данной статье показаны действия, с помощью которых можно включить безопасный вход в систему в операционной системе Windows 10.
Для обеспечения дополнительной безопасности операционной системы можно включить функцию «Безопасный вход в систему». Использование безопасного входа в систему предоставит вам еще один уровень безопасности, который позволяет удостовериться, что отображается подлинный экран входа в Windows. Если безопасный вход в систему включен, то вредоносные программы имитирующие вход в систему не могут перехватить имя пользователя и пароль во время их ввода.
Если функция безопасного входа в систему включена, то настоящий экран входа в систему будет появляться только после нажатия клавиш CTRL + ALT + DELETE.
«Безопасный вход в систему» может быть включен пользователями, которые относятся к группе Администраторы и применяется сразу ко всем учетным записям компьютера.
Содержание
- Как включить безопасный вход в систему используя оснастку «Учетные записи пользователей» (netplwiz)
- Как включить безопасный вход в систему используя редактор локальной групповой политики
- Как включить безопасный вход в систему используя файл реестра (reg-файл)
Как включить безопасный вход в систему используя оснастку «Учетные записи пользователей» (netplwiz)
Чтобы включить безопасный вход в систему, нажмите сочетание клавиш ![]() + R, в открывшемся окне Выполнить введите (скопируйте и вставьте) netplwiz и нажмите кнопку OK.
+ R, в открывшемся окне Выполнить введите (скопируйте и вставьте) netplwiz и нажмите кнопку OK.

В открывшемся окне «Учетные записи пользователей», перейдите на вкладку Дополнительно, в разделе Безопасный вход в систему установите флажок опции Требовать нажатия CTRL + ALT + DELETE и нажмите кнопку OK.

Изменения вступают в силу сразу. Теперь заблокируйте компьютер нажав сочетание клавиш ![]() + L, и на экране блокировки вы увидите сообщение о необходимости нажать клавиши CTRL + ALT + DELETE для разблокировки.
+ L, и на экране блокировки вы увидите сообщение о необходимости нажать клавиши CTRL + ALT + DELETE для разблокировки.

Как включить безопасный вход в систему используя редактор локальной групповой политики
Редактор локальной групповой политики доступен в Windows 10 редакций Pro, Enterprise, Education.
Чтобы включить безопасный вход в систему, откройте редактор локальной групповой политики, для этого нажмите сочетание клавиш ![]() + R, в открывшемся окне Выполнить введите (скопируйте и вставьте) gpedit.msc и нажмите кнопку OK.
+ R, в открывшемся окне Выполнить введите (скопируйте и вставьте) gpedit.msc и нажмите кнопку OK.

В открывшемся окне редактора локальной групповой политики, разверните следующие элементы списка:
Конфигурация компьютера ➯ Конфигурация Windows ➯ Параметры безопасности ➯ Локальные политики ➯ Параметры безопасности
Далее, в правой части окна дважды щелкните левой кнопкой мыши по параметру политики с названием Интерактивный вход в систему: не требовать нажатия CTRL+ALT+DEL

В окне «Интерактивный вход в систему: не требовать нажатия CTRL+ALT+DEL» установите переключатель (радиокнопку) в положение Отключен и нажмите кнопку OK.

Изменения вступают в силу сразу.
Как включить безопасный вход в систему используя файл реестра (reg-файл)
Данный способ также позволяет включить безопасный вход с помощью внесения изменений в системный реестр Windows посредством файла реестра.
Прежде чем вносить какие-либо изменения в реестр, настоятельно рекомендуется создать точку восстановления системы
Все изменения производимые в реестре отображены ниже в листингах файлов реестра.
Чтобы включить безопасный вход в систему, создайте и примените файл реестра следующего содержания:
Windows Registry Editor Version 5.00.
[HKEY_LOCAL_MACHINE\\SOFTWARE\\Microsoft\\Windows\\CurrentVersion\\Policies\\System].
«DisableCAD»=dword:00000000
Чтобы отключить безопасный вход в систему, создайте и примените файл реестра следующего содержания:
Windows Registry Editor Version 5.00.
[HKEY_LOCAL_MACHINE\\SOFTWARE\\Microsoft\\Windows\\CurrentVersion\\Policies\\System].
«DisableCAD»=-
После применения файлов реестра, изменения вступают в силу сразу.
Используя рассмотренные выше действия, можно включить или отключить безопасный вход в систему в операционной системе Windows 10.
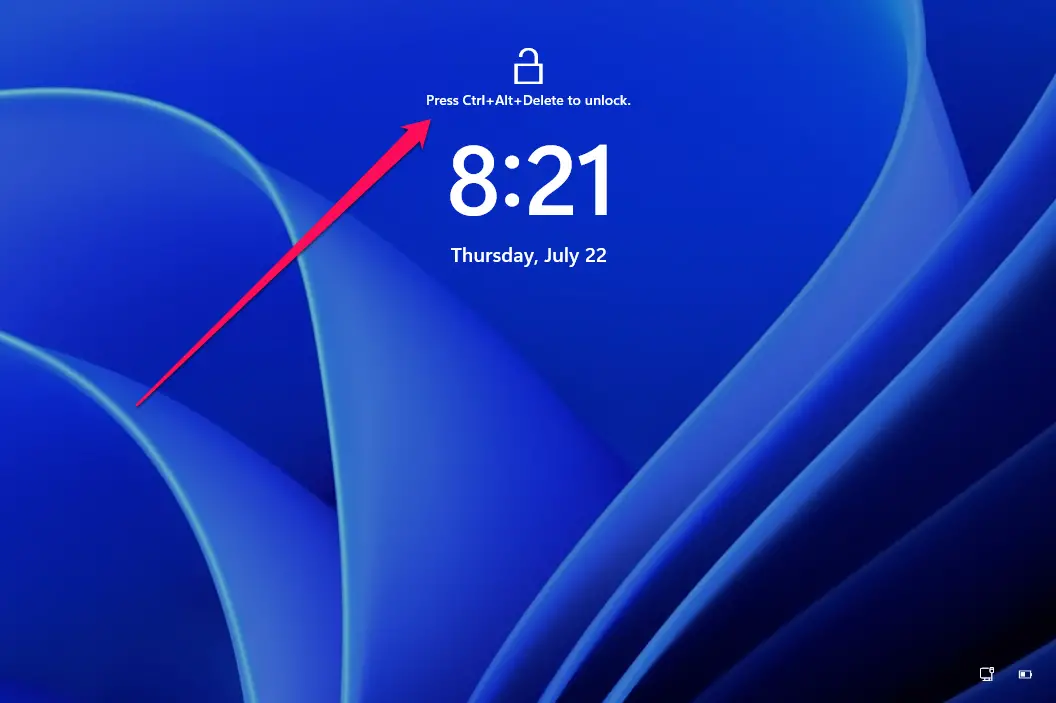
If you are using Windows 11/10, Windows takes you up to the Lock Screen once you start your PC. After clicking on the Lock Screen, you are prompted for a password if you have set it for your user account. It is a good option, and Windows lets you enter into your PC quickly. However, the classic Ctrl+Alt+Del logon prompt is still part of Windows 11/10, and you can activate it on your PC.
The Ctrl+Alt+Del is an additional layer of security for your computer or laptop. If you enable secure login, users on your PC must press the Ctrl+Alt+Del keys combination before entering their credentials and logging on. However, according to your convenience, you can enable or disable this feature on your computer or laptop.
Microsoft provides a few ways through which you can enable or disable Ctrl+Alt+Del to Log on to your PC. In this gearupwindows article, we will review all these methods so that you can use any method according to your convenience.
How to Disable or Enable Secure Logon in the User Accounts Applet?
For added security, you can force users to press Ctrl+Alt+Delete before signing in. This guarantees that the authentic Windows sign-in screen appears, protecting the system from programs that mimic a sign-in to retrieve password info.
Step 1. Press Windows + R keys from the keyboard to bring up the Run dialog box. Type Netplwiz or Control Userpasswords2 and press Enter from the keyboard.
Step 2. In the User Accounts window, navigate to the Advanced tab and then check the checkbox labeled Require users to press Ctrl+Alt+Delete. Now, click on the Apply and then the OK button.
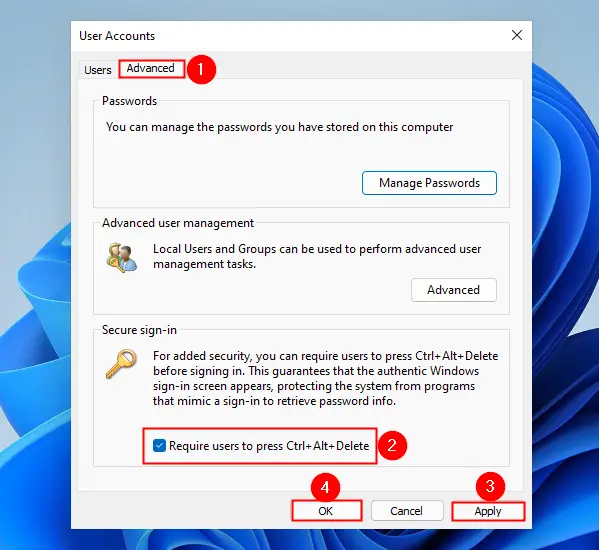
Once you complete the above steps, you will only be allowed to log in to your Windows 11/10 machine when you press Ctrl+Alt+Delete from the keyboard. After pressing the required keys combination, you will get the screen to enter the username and password.
If you want to allow, all users on your computer to log in without pressing Ctrl+Alt+Del, repeat the above steps and uncheck the checkbox labeled “Require users to press Ctrl+Alt+Delete.”
In case the “Require users to press Ctrl+Alt+Delete” checkbox is disabled, i.e., you are unable to click on this checkbox, you can use the alternate method to enable this function on your Windows 11/10/8.1/7 PC.
How to Disable or Enable “Press Ctrl+Alt+Del to Log on” using Local Security Policy?
Follow these steps to turn on or ff “Press Ctrl+Alt+Del to Log on” using Local Security Policy:-
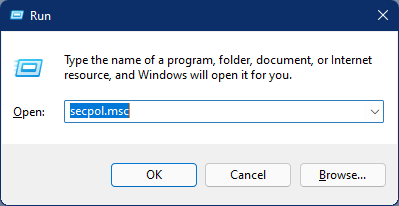
Step 1. Bring up the Run command box by pressing Windows + R keys from the keyboard.
Step 2. In the Run box, type in the following and hit Enter from the keyboard:-
secpol.msc
Step 3. In the Local Security Policy window, navigate to the following path from the left side pane:-
Security Settings > Local Policies > Security Options
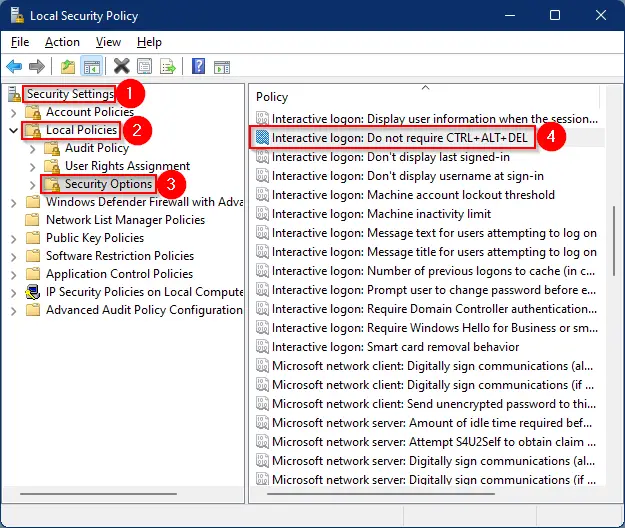
Step 4. On the right side of the Security Options folder, look for the policy name Interactive logon: Do not require CTRL+ALT+DEL and double-click on it to open its settings.
This security setting determines whether to audit the access of global system objects. If this policy is enabled, it causes system objects, such as mutexes, events, semaphores, and DOS devices, to be created with a default system access control list (SACL). Only named objects are given a SACL; SACLs are not given to objects without names. If the Audit object access audit policy is also enabled, access to these system objects is audited.

Note: When configuring this security setting, changes will not take effect until you restart Windows.
Step 5. Select the Enabled or Disabled option according to your requirement. Finally, click on the “Apply/OK” button.
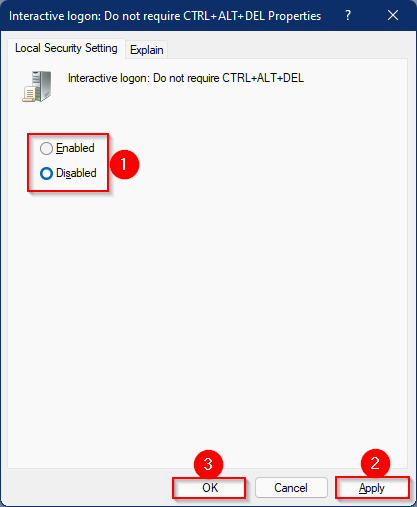
After executing the above steps, “Press Ctrl+Alt+Del to Log on” is enabled or disabled on your PC, depending on the selection.
By default, the policy is enabled on Windows 11/10/8 domain computers and disabled on Windows 7 and earlier versions of Windows. This policy is disabled by default on stand-alone Windows 11/10 computers.
How to Turn On or Turn Off the “Press Ctrl+Alt+Del to Log on” feature using Registry Editor?
Follow these steps to enable or disable the “Press Ctrl+Alt+Del to Log on” feature using Registry Editor:-
Step 1. Open the Registry Editor window.
To launch the Registry Editor, press the Windows + R keys from the keyboard to bring up the Run dialog box. In the Run box, type regedit and hit Enter from the keyboard.
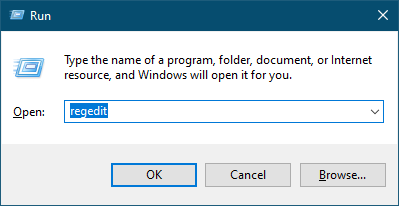
Step 2. In the Registry Editor, navigate or browse for the following key:-
HKEY_LOCAL_MACHINE\SOFTWARE\Microsoft\Windows NT\CurrentVersion\Winlogon
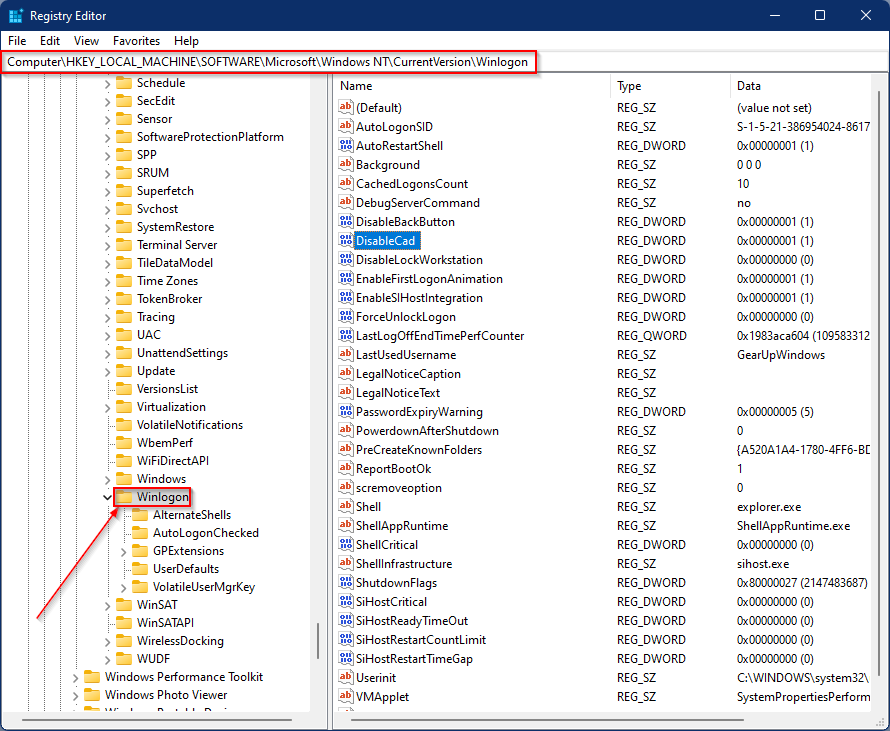
Step 3. On the right side window of the Winlogon folder, look for DisableCAD DWORD (32-bit) Value and double-click on it to modify. Now type in the following value in the Value data field:-
- 1 – Disable Secure Logon
- 0 – Enable Secure Login
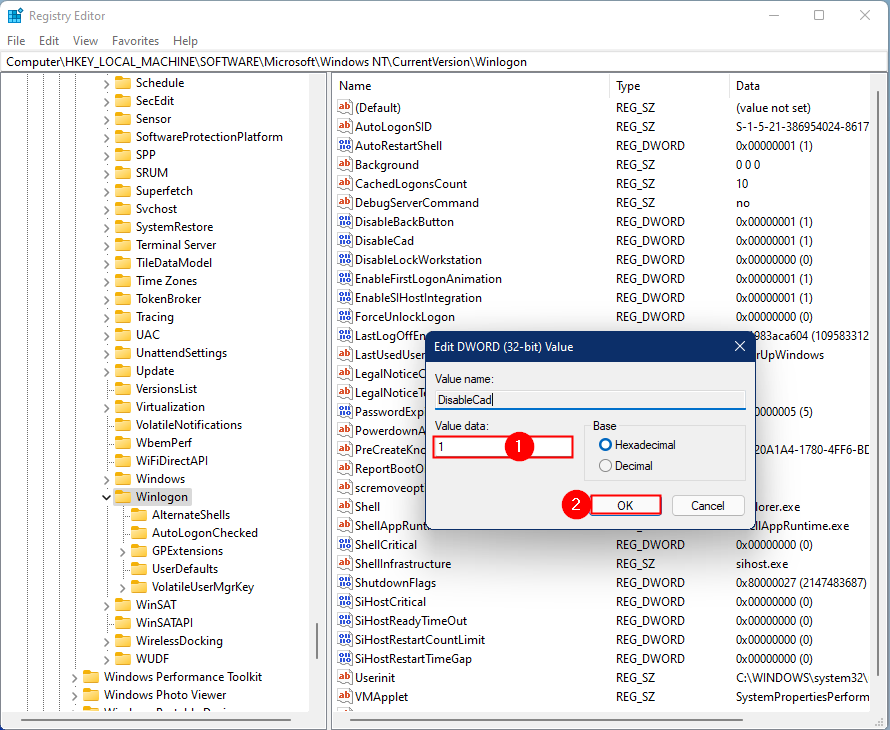
Step 4. Click OK.
Once you complete the above steps, you should be able to enable or disable Secure Logon on your Windows 11/10/8/7 PC.
Conclusion
In conclusion, Windows provides various methods to enable or disable the Ctrl+Alt+Del logon prompt, which is an additional layer of security for your computer or laptop. Enabling this feature ensures that the authentic Windows sign-in screen appears, protecting the system from programs that mimic a sign-in to retrieve password information. You can use the User Accounts Applet, Local Security Policy, or Registry Editor to turn on or off the Ctrl+Alt+Del logon prompt. Depending on your requirement and convenience, you can choose any of these methods to manage the Secure Logon feature on your Windows 11/10/8.1/7 PC.