Скоро будет выпущена Windows 11, и все спешат исправить свои системы, чтобы они были совместимы с грядущей ОС. Windows 11 предъявляет определенные требования к безопасности, которые затрудняют установку ОС в старых системах с устаревшими компонентами. Хорошим примером этого может быть необходимость в TPM, Secure Boot и UEFI. Все это настройки меню загрузки, которые повышают конфиденциальность и безопасность вашей системы, позволяя дополнительным функциям безопасности Windows 11 правильно работать в вашей системе. Если вы используете устаревшее оборудование, возможно, вы столкнулись с CSM. Что это? А стоит ли его отключить? Давайте разберемся!
Что такое CSM в BIOS?
CSM или модуль поддержки совместимости является частью вашей системы UEFI. UEFI – это современная форма взаимодействия вашего оборудования с вашей ОС через BIOS. UEFI является довольно новым, и если у вас есть CSM в вашей системе, вы, вероятно, используете устаревшую ОС, которая в настоящее время не поддерживается вашей системой UEFI.
Следовательно, CSM помогает эмулировать среду BIOS, совместимую с вашей текущей ОС. Отключение CSM позволит вам включить UEFI в вашей системе, который необходим для установки самых современных совместимых операционных систем.
Вам нужно будет получить доступ к меню BIOS вашей системы, чтобы вы могли отключить CSM в своей системе. Используйте приведенные ниже руководства в зависимости от вашего производителя, чтобы начать работу. Если вашего производителя нет в списке ниже, вы можете использовать общие термины в следующем разделе. Это часто используемые термины в меню BIOS, которые позволяют отключить CSM. Вы можете найти то же самое в своем конкретном BIOS и отключить их по своему усмотрению. Давайте начнем.
Гигабайт
Найдите CSM в меню BIOS или Security, в зависимости от вашей материнской платы, и дважды щелкните по нему.
Щелкните “Отключено”.
Теперь CSM будет отключен на вашей материнской плате Gigabyte.
Вы также увидите вариант безопасной загрузки. Но подождите, вы пока не можете включить его. Итак, сохраните и выйдите из своих изменений, а затем снова войдите в BIOS при перезагрузке системы.
Перейдите в меню Power и выберите Save & Exit setup.
Нажмите Да, чтобы сохранить настройки и перезагрузить систему. Не забудьте снова нажать нужную клавишу, чтобы снова перезагрузиться в настройки BIOS.
Итак, снова загрузитесь в настройки BIOS, нажав клавишу удаления или клавишу F12, которую использует ваш компьютер.
Теперь снова перейдите в настройки BIOS и дважды щелкните Безопасная загрузка.
Выберите Включено.
Экран BIOS теперь покажет безопасную загрузку как включенную.
Вернитесь в меню Power и выберите Save & Exit setup.
Нажмите Да, чтобы сохранить настройки и перезагрузить систему. Не забудьте снова нажать нужную клавишу, чтобы снова перезагрузиться в настройки BIOS. Да, опять же, поскольку нам тоже нужно включить TPM.
Дайте компьютеру перезагрузиться, но снова загрузитесь в BIOS. Перейдите в Периферийные устройства (это то, что есть на нашем ПК) и дважды щелкните Intel Platform Trust Technology (PTT). Вы можете видеть, что он отключен прямо сейчас.
Примечание. TPM может быть под тем же именем, если вы используете материнскую плату, произведенную недавно от Gigabyte. Кроме того, если вы не нашли вариантов, вы можете попробовать поискать общие термины, упомянутые в следующем разделе.
Во всплывающем окне нажмите «Включено».
Теперь PTT тоже будет отображаться как включенная. Это означает, что теперь TPM 2.0 доступен для вашего ПК.
Когда вы сейчас проверяете приложение для проверки работоспособности Windows 11, оно должно показать совместимость с Windows 11.
Вот наш экран управления TPM, который вы получаете с помощью команды TPM.msc. Теперь он показывает, что теперь доступен TPM 2.0. Вы можете
Теперь мы в порядке. Давайте сохраним и перезапустим, и теперь вы сможете установить Windows 11.
Asus
Пользователи Asus могут воспользоваться следующим руководством. Если у вас есть готовая система, вы можете использовать вместо нее материнскую плату ASRock. В этом случае мы рекомендуем вам проверить производителя вашей материнской платы, прежде чем переходить к руководству, приведенному ниже.
Загрузитесь в среду восстановления и войдите в BIOS на своем ПК. Вы также можете перезагрузить систему и нажать соответствующую клавишу, чтобы загрузиться в BIOS. В системах Asus обычно используется клавиша F2 или F8 для загрузки в BIOS.
После загрузки BIOS перейдите в «Расширенный» режим, нажав F7 на клавиатуре.
Перейдите на вкладку Boot вверху.
Прокрутите вниз и выберите «CSM (модуль поддержки совместимости»).
Теперь установите «Launch CSM» на «Disabled».
Перейдите на последнюю вкладку и выберите «Сохранить и выйти».
Подтвердите свой выбор и дайте компьютеру перезагрузиться. Теперь вы можете снова загрузиться в BIOS и включить безопасную загрузку в своей системе. Выполните следующие действия, чтобы включить безопасную загрузку, или используйте это руководство позже, когда будет выпущена Windows 11, чтобы включить безопасную загрузку в вашей системе.
Биостар
Если у вас есть материнская плата Biostar, вы можете использовать следующее руководство, чтобы отключить CSM в вашей системе.
Войдите в меню BIOS на вашем ПК. Материнские платы Biostar обычно используют клавишу F12 для входа в меню BIOS.
Перейдите на вкладку «Загрузка» после входа в меню BIOS.
Выберите «Загрузка UEFI».
Установите его как Включено.
После включения перезагрузите систему и нажмите клавишу F9, чтобы войти в меню загрузки. Теперь вы можете выбрать совместимую ОС для загрузки. На материнских платах Biostar нет специального переключателя для CSM. Вместо этого вы можете включить режим UEFI. Включение UEFI автоматически отключает устаревшую поддержку, что отключает CSM в вашей системе. Если вы не можете найти опцию UEFI на вкладке «Загрузка», мы рекомендуем вам вместо этого проверить вкладку «Дополнительно».
ASRock
Перезагрузите систему и загрузитесь в меню BIOS. Материнские платы ASRock используют клавишу F2 для входа в меню BIOS во время теста POST.
Как только вы окажетесь в меню загрузки, переключитесь на вкладку «Загрузка», щелкнув ее в верхней части экрана.
Прокрутите вниз и выберите «CSM».
Установите его как «Отключено».
Выберите “Выход” вверху.
Нажмите «Сохранить и выйти» и позвольте вашему компьютеру перезагрузиться с примененными изменениями.
После перезагрузки загрузитесь в совместимую ОС, чтобы продолжить процесс установки.
MSI
Пользователи MSI могут использовать следующее руководство, чтобы отключить CSM в своих системах. Давайте начнем.
Войдите в меню BIOS вашей системы MSI. Материнские платы MSI обычно используют клавишу «Del» во время POST для входа в меню BIOS.
Как только вы войдете в меню BIOS, перейдите на вкладку «Загрузка» в верхней части экрана.
Перейдите в «Выбор режима загрузки».
Теперь выберите «Только UEFI».
Примечание. Legacy включает CSM, а UEFI + Legacy позволяет материнским платам MSI определять и автоматически использовать оптимальные настройки для вашей ОС.
Нажмите F10 на клавиатуре, чтобы сохранить изменения и выйти из BIOS. Ваш компьютер автоматически перезагрузится в этот момент. Теперь вы можете выбрать желаемую ОС или диск восстановления в меню загрузки. В меню загрузки можно войти в системах MSI с помощью клавиши F11 во время процесса POST.
Отключить на других платах и устройствах: общие настройки, которые вы можете найти, чтобы отключить CSM
Если вашего производителя не было в списке выше, не беспокойтесь, вход в BIOS и отключение CSM – довольно упрощенный процесс. Вы должны иметь в виду, что включение UEFI автоматически отключит CSM и наоборот. Это означает, что если вы не найдете специальный переключатель для CSM, вы можете вместо этого поискать возможность включить UEFI в своей системе. Кроме того, производитель вашей материнской платы может использовать другие термины для обозначения CSM в вашей системе в зависимости от даты производства. Вот некоторые общие настройки, которые по сути относятся к CSM на вашей материнской плате. Когда вы найдете любой из этих вариантов, вам нужно будет выбрать для них «Выкл.», «Отключено», «UEFI», «Только UEFI» или «Без поддержки старых версий». Обратитесь к приведенному ниже списку, чтобы найти нужные настройки CSM в меню BIOS.
- Устаревшая поддержка
- Управление загрузочным устройством
- Устаревший CSM
- Запустить CSM
- CSM
- Загрузка UEFI
- Устаревшая загрузка
- Режим загрузки
- Фильтр параметров загрузки
- Приоритет UEFI
- Устаревший приоритет загрузки
Мы надеемся, что это руководство легко помогло вам отключить CSM в вашей системе. Если у вас возникнут какие-либо проблемы, не стесняйтесь оставлять комментарии ниже.
Почему я не могу найти CSM? Что мне нужно?
Вам необходимо получить доступ к BIOS и иметь совместимую ОС, готовую к установке в вашей системе, чтобы отключить CSM. CSM обычно имеет удобный переключатель в настройках BIOS, который может помочь вам отключить его. После выключения на вашей материнской плате будет включена поддержка UEFI, и вам потребуется совместимая версия ОС и BIOS для управления вашей системой. Кроме того, убедитесь, что вы выполнили следующие проверки, чтобы убедиться, что вы не столкнетесь с какими-либо проблемами после отключения CSM.
Убедитесь, что у вас установлена совместимая ОС: если вы используете устаревшую ОС, вероятно, вам нужен CSM. Мы рекомендуем вам установить совместимую ОС, например: Windows Vista или более позднюю версию в вашей системе, чтобы вы могли правильно выйти из загрузочной среды после отключения CSM.
Убедитесь, что у вас есть совместимое оборудование: вы можете использовать все современные компоненты в своей системе и все же столкнуться с проблемами при отключении CSM. Периферийные устройства имеют большое значение при отправке вашего ПК, поэтому убедитесь, что вы не используете устаревшие компоненты или периферийные устройства с вашей системой.Если вы используете старую видеокарту, монитор, процессор, мышь или клавиатуру, то это также может быть причиной почему ваш компьютер использует CSM вместо UEFI, несмотря на то, что он работает под управлением Windows 10. Возможно, вам потребуется обновить периферийные устройства, прежде чем вы сможете отключить CSM на своем ПК, не нарушая его функциональность.
Убедитесь, что на ваших дисках используется таблица разделов GPT вместо MBR: UEFI и CSM идут рука об руку. Если один из них отключен, другой автоматически включается (с исключениями). Это означает, что когда вы отключите CSM, ваш BIOS автоматически перейдет к UEFI. Однако UEFI совместим только с таблицами разделов GPT. Это означает, что вам нужно будет преобразовать ваш жесткий диск в MBR, если вы хотите отключить CSM. Не имеет значения, установлена ли у вас совместимая ОС на диске MBR. Вам нужно будет отформатировать диск в большинстве случаев при его преобразовании, поэтому мы рекомендуем вам выполнить полное резервное копирование, прежде чем продолжить работу с руководством.
Убедитесь, что ваши диски настроены правильно: если вы пытаетесь установить новую версию Windows на другой диск или хотите выполнить двойную загрузку, убедитесь, что вы устанавливаете совместимую ОС на свой диск с разделом «Загрузчик». Это предотвратит возникновение в вашей системе проблем с несовпадающей таблицей разделов, когда один диск имеет MBR, а другой – GPT.
Используйте приведенные ниже руководства, чтобы отключить CSM в вашей системе. Это поможет вам подготовиться к предстоящему выпуску Windows 11.
СВЯЗАННЫЕ С:
Published August 2021
This article is intended for users who are not able to upgrade to Windows 11 because their PC is not currently Secure Boot capable. If you are unfamiliar with this level of technical detail, we recommend that you consult your PC manufacturer’s support information for more instructions specific to your device.
Secure Boot is an important security feature designed to prevent malicious software from loading when your PC starts up (boots). Most modern PCs are capable of Secure Boot, but in some instances, there may be settings that cause the PC to appear to not be capable of Secure Boot. These settings can be changed in the PC firmware. Firmware, often called BIOS (Basic Input/Output System), is the software that starts up before Windows when you first turn on your PC.
To access these settings, you can consult your PC manufacturer’s documentation or follow these instructions: Run Settings > Update & Security > Recovery and select Restart now under Advanced startup. From the next screen, select Troubleshoot > Advanced options > UEFI Firmware Settings > Restart to make changes.
To change these settings, you will need to switch the PC boot mode from one enabled as “Legacy” BIOS (also known as “CSM” Mode) to UEFI/BIOS (Unified Extensible Firmware Interface). In some cases, there are options to enable both UEFI and Legacy/CSM. If so, you will need to choose for UEFI to be the first or only option. If you are unsure how to make any necessary changes to enable the UEFI/BIOS, we recommend that you check your PC manufacturer’s support information on their website. Here are a few links to information from some PC manufacturers to help get you started:
-
Dell
-
Lenovo
-
HP
While the requirement to upgrade a Windows 10 device to Windows 11 is only that the PC be Secure Boot capable by having UEFI/BIOS enabled, you may also consider enabling or turning Secure Boot on for better security.
See also
Windows 11 System Requirements
Ways to install Windows 11
Windows help & learning
Need more help?
Want more options?
Explore subscription benefits, browse training courses, learn how to secure your device, and more.
Communities help you ask and answer questions, give feedback, and hear from experts with rich knowledge.
When it comes to booting options, UEFI is the preferred firmware for modern computers with large drives.
UEFI comes with an integrated feature called CSM mode which offers legacy BIOS compatibility for older operating systems. However, there’s a catch as to whether you should use it or not.
Recently, my cousin was having trouble booting into Windows on his PC. When I checked, he had a non-UEFI capable operating system. All we had to do was enable CSM and his computer started booting like normal.
Don’t worry if it’s getting too confusing right now!
I’ll explain everything in this article, including the difference between CSM Boot Mode vs. UEFI Boot Mode, and the exact scenarios you should be using them.
Keep reading!
Contents
CSM VS UEFI: At A Glance
Check out this side-by-side comparison table to know the key differences between CSM and UEFI BIOS modes.
| Attribute | CSM | UEFI |
|---|---|---|
| Maximum Disk Capacity | 2.2 terabytes (TB) | 9.4 zettabytes (ZB) |
| OS Configuration | 32-bi | 64-bit |
| Secure Boot Support | No | Yes |
| Disk Partition Type | Master Boot Record (MBR) | GUID Partition Table (GPT) |
| TPM Compatibility | No | Yes |
| Multi-Boot Support | No | Yes |
UEFI and Legacy BIOS Mode Explained
Before we dive into UEFI and CSM boot mode, let’s briefly discuss the fundamentals of BIOS.
The traditional BIOS (Basic Input/Output System) can be seen as the «firmware» of your PC. It’s the first piece of code that runs on the computer when it’s powered on.
What it does is execute the OS boot loader, which then starts all the operating system’s programs and processes. The BIOS initializes all the hardware components in your PC, such as microchips and peripherals.
Now, UEFI (Unified Extensible Firmware Interface) is nothing but a modern replacement for the legacy BIOS system. It began to replace BIOS around 2007 due to its severe limitations.
For example, legacy BIOS works on a system called MBR (Master Boot Record) which can only handle partitions up to 2TB. Nowadays, most modern computers use UEFI boot mode rather than legacy BIOS mode.
Along with this transition, a new component called «CSM (Compatibility Support Module)» was introduced.
What Is CSM?
CSM stands for Compatibility Support Module. It’s a utility included with the UEFI firmware that offers backward compatibility for modern computers.
Using CSM boot, you can perform legacy BIOS style booting on a modern UEFI-based system. This can come in handy if you’re using an older operating system or want to boot from an old storage drive that doesn’t support UEFI BIOS mode.
Remember, BIOS and UEFI are two types of computer firmware. However, CSM is just a feature provided in the UEFI setup menu.
If you’re using a new computer with a recent version of the Windows operating system, it likely has CSM disabled by default.
Now let’s look at the significant differences between CSM and UEFI, and understand which one is the right choice for you.

CSM VS UEFI: Hardware and OS Compatibility
CSM is compatible with legacy hardware and software since it’s based on the old-school BIOS. If you have a PC with very old components, you probably need to use legacy BIOS booting.
On the other hand, UEFI is a modern standard designed to take advantage of newer computer hardware. To use it, your motherboard needs to be compatible with UEFI mode.
Also, the UEFI BIOS usually runs on 64-bit systems, so you’ll need CSM BIOS mode to boot 32-bit systems. For instance, Windows versions older than Vista SP1 (Windows XP, Windows 2000, Windows 95, etc.) don’t work with UEFI mode.
UEFI mode also supports native multi-boot, so you can install more than one operating system on a single hard drive. You can then choose which one to boot from within the UEFI boot menu.
CSM VS UEFI: Which Has The Better User Interface?
UEFI clearly wins when it comes to interface and overall user experience.
This is because CSM is a Character User Interface (CUI), meaning it works only with keyboard input. It’s also not as intuitive and feature-rich as a UEFI interface.
UEFI, on the other hand, is a Graphical User Interface system (GUI) that looks more refined and is simpler to use. It adds support for mouse input, shortcut keys, scrollbars, icons, etc.
CSM VS UEFI: Disk Partition Format
The CSM BIOS Mode uses MBR (Master Boot Record) disk partition table format, while the UEFI BIOS mode uses GPT (GUID Partition Table).
The difference between these disk partition formats is that MBR only allows 4 primary partitions on your hard disk and supports drives up to 2TB. In contrast, GPT format paired with UEFI BIOS supports 128 partitions and drives going up to 9ZB.
Also note that some operating systems like Windows require you to boot MBR disks exclusively with legacy/CSM BIOS mode and GPT disks with UEFI BIOS boot mode.
This isn’t an issue with Linux systems with GRUB bootloader, where you can boot MBR disks in UEFI mode and GPT disks in legacy mode.
CSM VS UEFI: Speed and Power Management
UEFI boot mode can be almost twice as fast as Legacy CSM boot mode because of «Fast Boot» support. It minimizes the number of devices required to begin the boot process.
In addition to that, UEFI boots almost instantly from power-saving modes like sleep, reboot, and hibernation. It contains features that bypass the power-on self-test (POST) process, which slows down a CSM boot system.
Not that these speed differences only apply to the boot time and not the general OS performance.

CSM or UEFI: Which Has Better Security System?
CSM is based on the traditional BIOS mode, which means it loses out on some of the security features of the updated UEFI mode.
On the other hand, UEFI offers all the modern security features, such as secure boot modes and disk encryption.
Depending on your needs, you may or may not want to use secure boot. However, having an additional security check at the firmware level can be beneficial against rootkits and ransomware.
The only scenario where UEFI BIOS can have bugs and flaws is when the operating system tries to load a wrong driver or remove the firmware configuration.
Verdict: Which One Is Better For You?
There’s no definite answer to this question. Both CSM and UEFI have their place depending on your needs and requirements. But here’s the take:
Use CSM BIOS booting mode if you:
- Want to install older operating systems (32-bit ones).
- Frequently use hard drives that don’t support UEFI booting.
- Think your PC’s firmware has bugs or glitches.
Use UEFI BIOS mode if you:
- Are running a modern computer with a 64-bit OS.
- Need increased security against ransomware and rootkits.
- Won’t be using legacy hardware or software on your computer.
CSM boot mode is being slowly phased out and replaced by UEFI BIOS mode due to the latter’s enhanced security and better compatibility with newer machines.
As mentioned above, only use CSM BIOS mode if you want to use old legacy software or hardware that isn’t compatible with UEFI mode. For most users today, you want to stick to UEFI as your default firmware.
How to Enable or Disable CSM in UEFI BIOS Mode?
The exact method to enable CSM mode is different for different motherboard brands. Generally, you’ll find the setting by accessing the BIOS settings while booting up.
In most cases, you’ll see an option called «Launch CSM» or «CSM Support» under the «Boot» tab. All you need to do is enable or disable the CSM boot system, then save and exit the UEFI booting screen.
Once enabled, your PC will automatically reboot with the desired legacy mode. If you can’t find the setting, your motherboard likely doesn’t support CSM.
How to Know Whether Your PC Is Using CSM Or UEFI Mode?
Here’s how to check which of the two boot modes your PC is booting through.
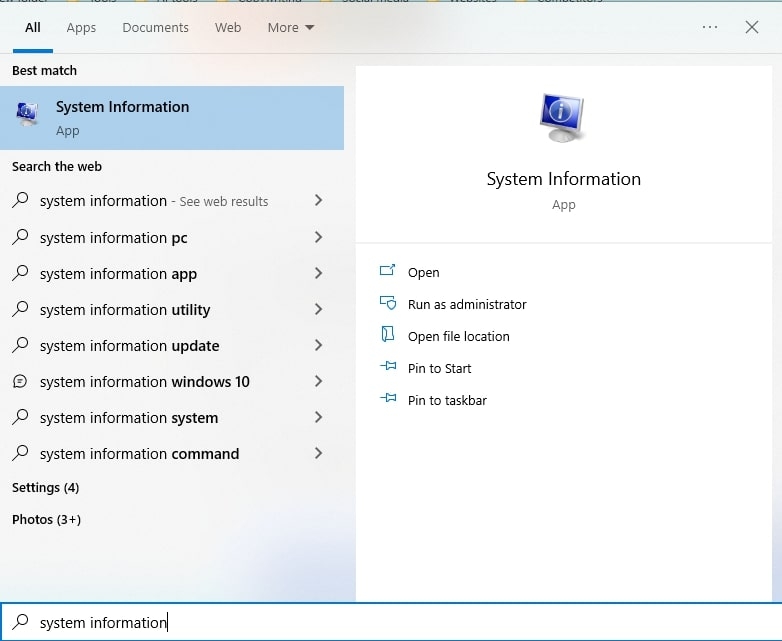
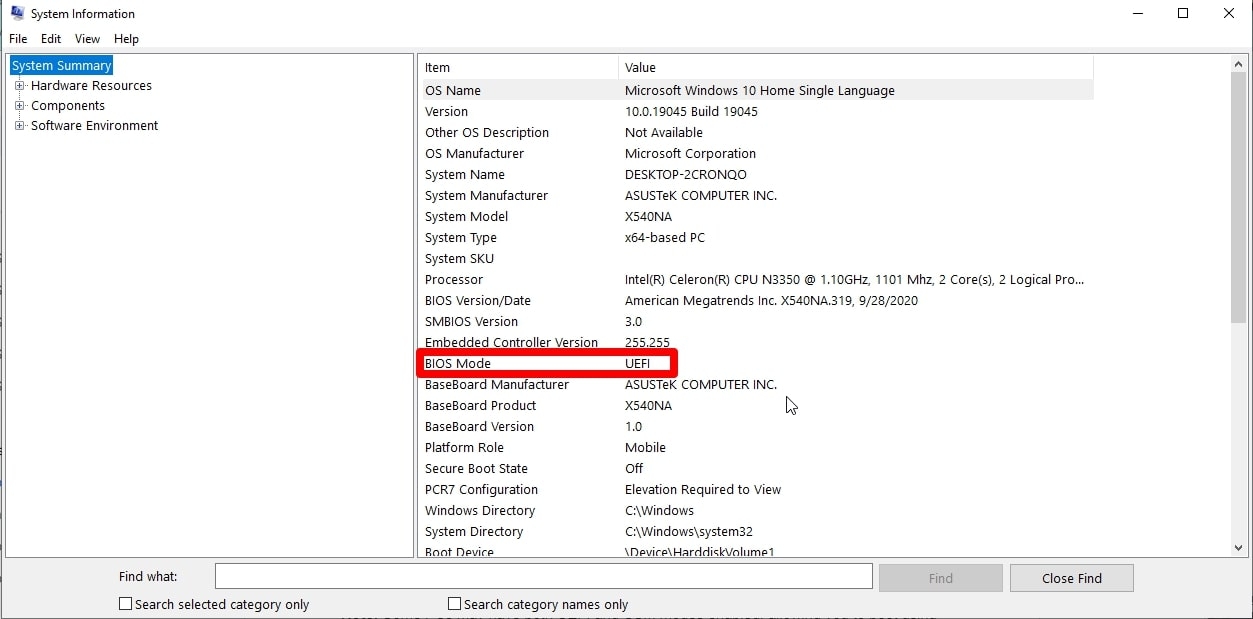
Tap on the Windows Search icon on your computer (or press the Windows key on your keyboard). Now type «System Information» and hit enter.
Find the entry that says BIOS Mode and check the value mentioned next to it. It will either say UEFI or Legacy.
- If it says UEFI, then you’re usingthe UEFI BIOS mode and the «Boot with CSM» option is disabled in the UEFI features menu.
- If it says Legacy, then either you’re using the older BIOS boot process, or have the CSM mode enabled.

FAQs
Should I Enable or Disable CSM in UEFI BIOS?
Use CSM mode only if you want to boot an old 32-bit operating system on a 64-bit machine, or if you’re booting from an old hard disk with MBR disk partitioning. Other than that, it’s recommended to keep CSM legacy boot disabled.
Does CSM Mode Affect Performance?
Enabling CSM mode won’t affect the general performance of your operating system. However, it might slightly increase the boot time because of the POST process and lack of Fast boot.
Hence, unless you really care about a few extra seconds spent during the boot process, it hardly makes any difference.
Does Windows 11 Need CSM or UEFI?
Windows 11 won’t work with CSM enabled. Your computer should support secure boot to install Windows 11 which means it’ll run only on UEFI BIOS mode.
However, you can still use Windows 11 with Secure Boot disabled, however, Microsoft doesn’t recommend it since it can cause stability issues and lack of Windows updates.
Is CSM Secure Boot?
No. Secure Boot is a feature available in the Unified Extensible Firmware Interface, or UEFI mode. However, it doesn’t work with CSM enabled, or any legacy BIOS environment in general.
Since newer Windows OSes like Windows 8, 10 and 11 require you to have Secure Boot available, you can’t use them with CSM or Legacy BIOS systems.
Read more resources
Conclusion
I hope you’ve learned everything there is to know about the CSM and UEFI system and the difference between the two boot modes.
To reiterate, CSM is nothing but a UEFI configuration that emulates legacy BIOS systems and offers backward compatibility. It’s useful if you want to run old operating systems or storage devices that don’t work on the UEFI system.
For most newer operating systems and computers, UEFI mode is the way to go. It’s generally faster, more functional, and offers better security.
На чтение 8 мин Просмотров 2.7к.
В последней версии Виндовс 11 обязательным требованием для установки стало наличие прошивки UEFI с безопасной загрузкой и процессор с поддержкой модуля защиты информации TPM 2.0. Если возраст процессора с момента выпуска не более 5 лет, то он точно поддерживает данный модуль, но еще не факт, что функция быстрой загрузки включена в UEFI.
В этой статье разберемся, как включить безопасную загрузку для Виндовс 11, как ее отключить и какие требования для этого нужны.
Содержание
- Что такое безопасная загрузка в Windows 11
- Проверка состояния функции
- Конвертация диска с MBR в GPT
- Вход в BIOS
- Через параметры
- При включении
- Расположения опции у популярных производителей МП
- Asus
- Gigabyte
- ASRock
- Acer
- Lenovo
- MSI
- Отключение
Безопасная загрузка (Secure Boot) в Windows 11 – это часть UEFI, протокола, который занимается предотвращением внедрения хакерского кода и вирусов в момент загрузки системы. Он занимается проверкой цифровых подписей у ОС и драйверов в момент включения ПК. При отсутствии нужной подписи компьютер попросту не включится, а выдаст ошибку.
В 2017 году очень много компьютеров было атаковано вредоносным кодом, вирусом-вымогателем по имени Petya. При загрузке компьютера он маскировался под драйвер.
Поддержка Secure Boot в Виндовс появилась еще с восьмерки и актуальна по сей день. Не прошли и мимо популярных дистрибутивов на Linux: CentOS. Fedora, Ubuntu, Debian и других.
Для установки Windows 11 компьютер должен поддерживать безопасную загрузку.
Однако можно обойти это ограничение командой в консоли или создать загрузочную флешку под Windows 11 через Rufus, отключив проверку требований.
Проверка состояния функции
Прежде всего необходимо проверить, в каком статусе находится функция. Эта информация находится в приложении «Сведения о системе».
Открываем приложение вводом названия в поиске пуска или вызываем окно «Выполнить» кнопками Win+R и вводим команду msinfo32.
В новом окне стоит обратить внимание на строчку «Состояние безопасной загрузки» и «Режим Bios».
Опишем несколько возможных сценариев:
- Bios в режиме UEFI и загрузка «Вкл» означает, что вам повезло, уже все включено и ничего делать не нужно.
- У Bios режим UEFI, но состояние загрузки в положении «Выкл». В этом случае достаточно зайти в UEFI и включить только безопасную загрузку.
- Хуже всего, если режим Bios – (Legacy support) «устаревший», а состояние безопасной загрузки Windows 11 – «не поддерживается».
В последнем случае есть два варианта:
- Ваш ПК морально устарел и не поддерживает UEFI. В отличие от устаревшего Bios, режим UEFI имеет более отзывчивый и привычный интерфейс. Чаще всего в нем есть управление мышкой. В этом случае безопасную загрузку включить не получится.
- У вас современный компьютер, но он запущен в режиме совместимости CSM (эмуляция устаревшего режима Биос). Чтобы исправить устаревший режим Биос для Windows 11, нужно будет в первую очередь выключить режим совместимости, а потом уже переходить к пункту Secure Boot.
Важный момент! Для работы Secure Boot у вас должен быть диск с разметкой GPT. Жесткий диск со стилем разделов MBR при включении безопасной загрузки нельзя будет выбрать в качестве загрузочного, так как его не будет в списке.
Посмотреть разметку можно, открыв управление дисками в Windows 11:
- Жмем правой кнопкой мыши на Пуск и выбираем «Управление дисками».

- Далее выбираем нужный диск, жмем правой кнопкой и выбираем «Свойства».

- Открываем вкладку «Тома» и смотрим строчку «Стиль раздела».


В случае MBR поможет только конвертация в GPT. Это можно сделать при установке Windows 11 или в уже установленной Виндовс 10. Нужна только консоль.
Конвертация диска с MBR в GPT
Рассмотрим инструкцию на примере установленной системы.
Для конвертации нужно загрузиться с помощью командной строки:
Теперь пробежимся по командам, которые нужно будет ввести по порядку.
- mbr2gpt /validate – проверка возможности конвертации. В случае успеха будет надпись «Validation completed successfully».
- mbr2gpt /convert – команда запускает процесс конвертации.
При вводе первой команды возможен другой статус – «Failed». Это означает, что установлено несколько дисков и нужно уточнить его номер. Или диск разбит на много разделов и конвертация невозможна.
В этом случае нам поможет утилита Diskpart:
- Сначала запускаем ее командой diskpart.
- Вводим list disk, чтобы отобразить список дисков.
- Определяем нужный по размеру и запоминаем номер.

- Теперь выходим из дискпарта командой exit.

Возвращаемся к первой команде, сюда нужно добавить номер диска, на примере диска 1 это выглядит так: mbr2gpt /disk:1 /validate.
Далее остается вписать вторую команду, тоже с номером диска – mbr2gpt /disk:1 /convert.
После конвертации остается сперва отключить режим совместимости CSM и затем включить безопасную загрузку.
Вход в BIOS
Включение режима безопасной загрузки для Windows 11 или 10 происходит в самом UEFI (Bios).
Читайте подробную статью, как зайти в BIOS на Windows 11. Ниже приведу краткую инструкцию для нескольких способов входа в среду Bios.
Через параметры
- Открываем окно одновременным нажатием кнопок Win+I.
- Переходим по пути «Центр обновления Windows» — «Дополнительные параметры» -«Восстановление» и выбираем «Перезагрузить сейчас».
- После перезагрузки кликаем на «Поиск и устранение неисправностей», далее «Дополнительные параметры» — «Параметры встроенного ПО UEFI».


При включении
Классический способ зайти в Биос — это нажать определенную кнопку при включении компьютера.
Для настольных компьютеров чаще всего это Del, для ноутбуков могут быть и вариации F2-F10.
Обычно кнопку, которую нужно нажать, пишут снизу при появлении первого экрана с логотипом производителя материнской платы.
Если не нашли кнопку, воспользуйтесь перебором клавиш F или зайдите в UEFI первым способом.
Расположения опции у популярных производителей МП
Теперь в настройках Биоса нужно включить secure boot. Ниже приведем инструкции, как включить состояние безопасной загрузки Windows 11/10 для Asus, Gigabyte, MSI и других популярных марок материнских плат.
Пункты могут быть расположены и в других местах, все зависит от модели платы и версии Биоса. Если не нашли нужную опцию, попробуйте воспользоваться поиском. После смены настроек не забудьте их сохранить.
Asus
Настройки находятся в расширенном меню Advanced mode, оно открывается кнопкой F7.
- Открываем раздел Boot и переходим в «CSM (Compatibility Support Module)», в «Launch CSM» выбираем «Disabled».

- Возвращаемся обратно в этот же раздел и выбираем «Secure boot», в пункте «OS Type» ставим «Windows UEFI Mode» и пункт ниже ставим в «Enabled».

- Сохраняем изменения кнопкой F10.


Gigabyte
Как и у Asus, нужно включить продвинутое меню кнопкой F7.
- В разделе Bios/Boot ищем строчку «CSM Support» и переводим в положение «Disabled».

- В самом низу заходим в раздел «Secure boot» и в пункте «Secure boot Enable» выставляем «Enabled».


ASRock
- В разделе Boot находим пункт «CSM» выбираем его и переводим в положение «Disabled».

- «Secure Boot» находится в разделе Security, тут ставим «Enabled».

Acer
Переходим в раздел Boot и в нем как раз два нужных нам пункта:
- «Boot mode» ставим «UEFI».
- «Secure Boot» переводим в «Enabled».


Lenovo
- В разделе Boot переводим строчку «Boot mode» в режим «UEFI».
- Далее переходим в Security и тут «Secure Boot» переводим в «Enabled».


MSI
У MSI последовательность действий следующая:
- В разделе «Settings» переходим в «Advanced», «Windows 10WHQL Support» или «Bios CSM/UEFI mode» переводим в «UEFI».

- Выбираем верхний раздел слева «Settings», «Boot mode select» ставим в положение «UEFI».

- Тут же снизу выбираем пункт «Secure boot» и включаем «Secure boot support». Возможно нахождение функции в разделе «Security».


Не забываем сохранить изменения перед выходом.
Отключение
Выключать функцию целесообразно, если планируется установка старых операционных систем, или тех, которые не поддерживают безопасную загрузку. Включенная функция будет попросту мешать загрузке операционной системы.
Чтобы отключить безопасную загрузку для Windows 10, нужно зайти в Биос и найти там пункт «Secure boot», обычно находится в разделах Загрузка или Безопасность устройства («Boot» или «Security») и перевести его в положение «Disabled».

Дмитрий Елисеев
Инженер в сфере информационных технологий. Занимается настройкой, сборкой ПК на заказ.
When it comes to booting up a computer, two different types of firmware can be used: UEFI and CSM.
If you’re building or upgrading a system, you need to decide whether to use UEFI or CSM as your system firmware. While both CSM and UEFI offer excellent features and share many similarities, they have some key differences.
UEFI, or Unified Extensible Firmware Interface, is a modern replacement for the older BIOS firmware that has been the default in computers for decades. UEFI offers some compelling advantages, like faster boot times, better security, and larger storage than CSM.
But which one should you use? Don’t worry if you’re torn between the two boot modes!
In this blog post, we’ll dive deeper into the differences between UEFI vs. CSM boot mode and help you decide which is right for your system.
So keep reading to learn more!
UEFI vs. Legacy BIOS Mode: Quick Overview
Before we dive into UEFI and CSM boot modes, we need to know what these terms mean individually. So let’s take a quick look at the fundamentals of BIOS!
What is BIOS?
BIOS stands for Basic Input/Output System. It is a firmware interface that is responsible for initializing and configuring various computer hardware components during boot-up. It also provides a runtime environment for apps and operating systems.
Furthermore, BIOS provides a bunch of services, like power management, input/output device support, and support for booting from storage devices. Typically, the BIOS is stored in read-only memory (ROM) on the motherboard.
In order to check the hardware status, the BIOS performs a POST (power-on self-test) when the computer is turned on. If everything functions correctly, the BIOS will load the bootloader from the storage device and begin executing it.
What is CSM BIOS Mode?
CSM (Compatibility Support Module) BIOS mode is the legacy boot mode that emulates a traditional BIOS environment.
CSM mode provides backward compatibility with old operating systems and hardware devices that do not support the newer UEFI (Unified Extensible Firmware Interface) standard. This lets you run older operating systems like Windows 7 or Linux on your computer.
However, it’s important to note that CSM BIOS mode can also cause compatibility issues with newer hardware and software. For example, you can’t boot from a GPT partitioned disk or use Secure Boot. Therefore, it’s generally recommended to use UEFI mode instead if your computer supports it.
What is UEFI BIOS Mode?
UEFI (Unified Extensible Firmware Interface) BIOS mode is the modern boot mode that offers better performance, security, and compatibility features than the old BIOS mode. UEFI firmware provides a graphical user interface for users to interact with system settings and boot options.
Your computer’s motherboard must support UEFI mode to use it. One of the biggest advantages of UEFI is that it supports larger hard drives than BIOS and drives with a GPT partitioning scheme. UEFI also offers better security features than BIOS, making malware more difficult to spread.
In addition, UEFI supports features like Secure Boot and Fast Boot, so it starts faster than BIOS. It’s the future of BIOS, and it’s slowly becoming the standard. I highly recommend using it if your computer supports it.
UEFI vs. CSM: A Detailed Comparison (2023)
Now that we know what UEFI and CSM (Legacy) are, let’s compare them point by point to see which one is best for you!
Take a look at this comparison table to see the key differences between CSM and UEFI:
| Features | UEFI | CSM |
| OS Configuration | 64-bit | 32-bit |
| Maximum Disk Capacity | Up to 9.4 zettabytes (ZB) | Up to 2.2 terabytes (TB) |
| Secure Boot Support | Yes | No |
| Disk Partition Type | GPT (GUID Partition Table) | MBR (Master Boot Record) |
| Work Mode | Graphical User Interface system | Character User Interface system |
| Booting Speed | Fast | Slow |
| TPM Compatibility | Yes | No |
| Multi-Boot Support | Yes | No |
Now let’s compare them in more detail!
CSM vs. UEFI: Security
One of the most significant differences between UEFI and CSM firmware is the level of security they provide.
Since CSM uses the traditional BIOS mode, meaning it lacks some of the security features of modern UEFI mode. Meanwhile, UEFI offers all the modern security features, including secure boot modes and disk encryption.
Secure Boot is a feature that checks the digital signature of the operating system and bootloader before allowing the system to boot. This prevents malware from loading during the boot process, which can be particularly useful for enterprise and government organizations.
Additionally, UEFI supports Trusted Platform Module (TPM), a chip that provides hardware-level security by storing cryptographic keys and other sensitive data.
Conversely, CSM does not have this feature and is more vulnerable to attacks during the boot process. As a result, CSM boot mode is less secure than UEFI.
But UEFI has a couple of downsides. First, some older systems may not support it. Second, it can be more difficult to configure than CSM.
So which boot mode is more secure? The answer depends on your needs. If you require maximum security, UEFI is your best bet. But if you want backward compatibility or ease of configuration, CSM might be a better option.
CSM vs. UEFI: Compatibility
CSM (Compatibility Support Module) is compatible with older hardware and software since it’s based on traditional BIOS. You may need to use the legacy BIOS booting mode if you have an older PC with outdated components.
In contrast, UEFI is a modern standard that takes advantage of newer computer hardware. If you want to use UEFI, your computer motherboard must be compatible with UEFI mode.
UEFI usually runs on 64-bit systems, so you’ll need CSM BIOS mode to boot on 32-bit systems. Windows versions older than Vista SP1, like Windows XP, Windows 2000, and Windows 95, don’t work with UEFI.
Additionally, UEFI supports native multi-booting, meaning you can install multiple operating systems on a single hard drive. After that, you can select which one you want to boot from the UEFI boot menu.
As a result, UEFI has more compatibility with modern hardware and software.
CSM vs. UEFI: Disk Partition Format
UEFI uses the GPT (GUID Partition Table) partitioning scheme, while CSM uses MBR (Master Boot Record). GPT allows for larger disk sizes and more partitions than MBR.
MBR limits partitions to four and supports hard drives up to 2TB. In contrast, the GPT format paired with UEFI BIOS supports 128 partitions and up to 9 ZB drives.
Additionally, GPT has a backup partition table at the end of the disk, which provides redundancy and helps protect against data loss.
Also, note that some operating systems, such as Windows, require you to boot MBR disks in legacy/CSM BIOS mode and GPT disks with UEFI BIOS. This isn’t a problem if you’re using Linux with a GRUB bootloader. You can boot GPT disks in legacy mode and MBR disks in UEFI mode.
CSM vs. UEFI: Speed and Power Management
UEFI firmware provides faster boot times and better power management features than CSM mode. UEFI firmware initializes the hardware components in parallel, reducing the boot time significantly.
Because of “Fast Boot” support, UEFI boot mode is almost twice as fast as Legacy CSM boot mode. It minimizes the number of devices needed to boot.
Additionally, UEFI instantly boots from power-saving modes like sleep, reboot, and hibernation. In addition, it includes a feature that bypasses the power-on self-test (POST) process, which slows down CSM boot times.
Remember, these speed differences only apply to boot time, not OS performance.
Furthermore, UEFI offers advanced power management features like ACPI (Advanced Configuration and Power Interface) that are not available in CSM mode. This feature allows for more precise control over power consumption.
CSM vs. UEFI: Drives
As mentioned earlier, UEFI has support for larger drives than CSM. CSM can only support hard drives up to 2 TB in size, while UEFI can support drives up to 9.4 zettabytes (ZB), which is an enormous amount of storage.
Also, UEFI has support for newer storage technologies, such as NVMe (Non-Volatile Memory Express), which can significantly increase storage performance. NVMe drives offer better performance than traditional SATA SSDs or hard drives.
Because of this, if you have a large drive, you must use UEFI mode to access it. But if your drive is small, you can use either CSM or UEFI mode. Ultimately, the choice between CSM and UEFI BIOS comes down to your computer compatibility and drive size support.
UEFI vs. CSM: Which One Should You Choose?
So which BIOS mode is best for you? That really depends on your specific needs and requirements.
For your convenience, here’s a quick summary of why you should pick one over the other:
Use UEFI BIOS mode if:
- You have a modern computer running a 64-bit operating system.
- Your computer won’t run legacy software or hardware.
- You need more security against ransomware and rootkits.
Use CSM (Legacy) BIOS booting mode if:
- You want to install older operating systems that only support 32-bit architecture
- You often use hard drives that don’t support UEFI.
- You think your computer’s firmware has bugs or glitches.
In the end, it’s up to you to choose which boot mode works best. While both CSM and UEFI have their advantages and disadvantages, UEFI has several security features that are not available in CSM, and it has more compatibility with modern hardware and software.
Also, UEFI has several other advantages, such as faster boot times, better power management, and support for larger drives and newer storage technologies. As a result, UEFI is becoming the preferred firmware option for most modern computers.
Frequently Asked Questions
How to Check Whether My PC is Using CSM or UEFI Mode?
To check whether your PC is using CSM or UEFI mode, follow these steps:
- Tap on the Windows Search icon on your computer and type “System Information” in the search box. Then hit Enter. This will open the System Information window.
- Alternatively, press the Windows key + R on your keyboard to open the Run dialog box. Type “msinfo32” in the Run dialog box and click OK.
- In the System Information window, look for the “BIOS Mode” item under the “System Summary” section.
- If the value of “BIOS Mode” is “UEFI”, then your PC is using UEFI mode. If the value is “Legacy”, then your PC is using CSM mode.
Note: Some PCs may have both UEFI and CSM modes enabled, allowing you to boot using either mode. In such cases, you may need to change the boot mode settings in your BIOS to switch between the two modes.
Can I Switch from CSM to UEFI?
Yes, you can switch from CSM to UEFI if your PC system has an option for UEFI mode. But you need a GPT disk partition to enable UEFI.
To switch from CSM to UEFI, you’ll need to access your computer’s BIOS settings and look for an option to enable UEFI mode. Depending on your system, this option may be under the “Boot” or “Security” tab. Then change the boot mode from Legacy/CSM to UEFI.
Remember that switching from CSM to UEFI may require you to reinstall your operating system and all your applications.
So before making any changes to your BIOS settings, it’s best to back up all of your essential data in case something goes wrong.
Does Windows 7 Support UEFI?
Yes, Windows 7 does support UEFI, but the support is limited. To access UEFI in your Windows, you need to browse the boot file.
You must ensure that your UEFI-based system is configured to use UEFI mode instead of the old BIOS mode before installing Windows 7. You may also need to enable Secure Boot in the UEFI firmware settings to protect the system against unauthorized boot loaders.
Does Windows 11 Need CSM or UEFI?
Windows 11 requires UEFI firmware instead of CSM to boot. Microsoft has stated that Windows 11 will only support systems that are capable of running UEFI firmware with Secure Boot, which means CSM will not be supported.
Therefore, if you plan to upgrade to Windows 11, you should ensure that your computer’s BIOS is configured for UEFI mode. If your PC does not support UEFI firmware, then it will not be able to run Windows 11.
Final Words
I hope our UEFI vs. CSM comparison post has explained everything you need to know about CSM and UEFI boot modes and how they differ. Each of these firmware types has its own unique features and characteristics that make it suitable for different scenarios.
UEFI is an excellent choice if you’re using newer hardware and do not need to worry about compatibility issues. But if you’re using older hardware or need maximum compatibility, CSM may be the right choice.
Ultimately, the choice between CSM vs. UEFI depends on your needs and requirements.
Have you used UEFI or CSM before? What’s your experience? Please share your opinions in the comments below!
Further Reading:
- Radiator Push vs. Pull vs. Push-Pull Configuration – Which is Better for You?
- What’s My Motherboard? 5 Easy Ways to Find Out Your Motherboard
- Full Tower vs. Mid Tower: Which PC Case is Best for Your PC Build?