You can create a local user account (an offline account) for anyone who will frequently use your PC. The best option in most cases, though, is for everyone who uses your PC to have a Microsoft account. With a Microsoft account, you can access your apps, files, and Microsoft services across your devices.
If needed, the local user account can have administrator permissions; however, it’s better to just create a local user account whenever possible.
Caution: A user with an administrator account can access anything on the system, and any malware they encounter can use the administrator permissions to potentially infect or damage any files on the system. Only grant that level of access when absolutely necessary and to people you trust.
As you create an account, remember that choosing a password and keeping it safe are essential steps. Because we don’t know your password, if you forget it or lose it, we can’t recover it for you.
Create a local user account
-
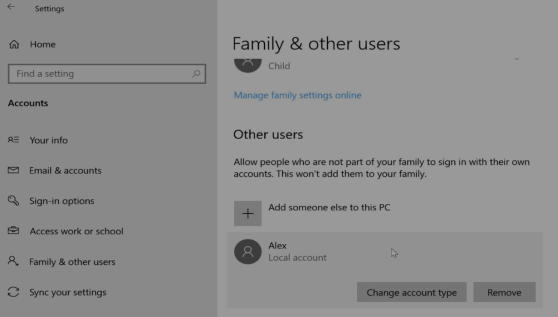
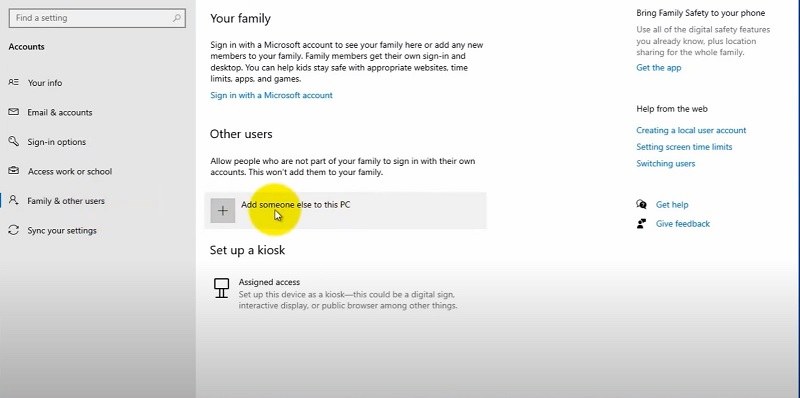
Select Start > Settings > Accounts and then select Family & other users. (In some versions of Windows you’ll see Other users.)
-
Next to Add other user, select Add account.
-
Select I don’t have this person’s sign-in information, and on the next page, select Add a user without a Microsoft account.
-
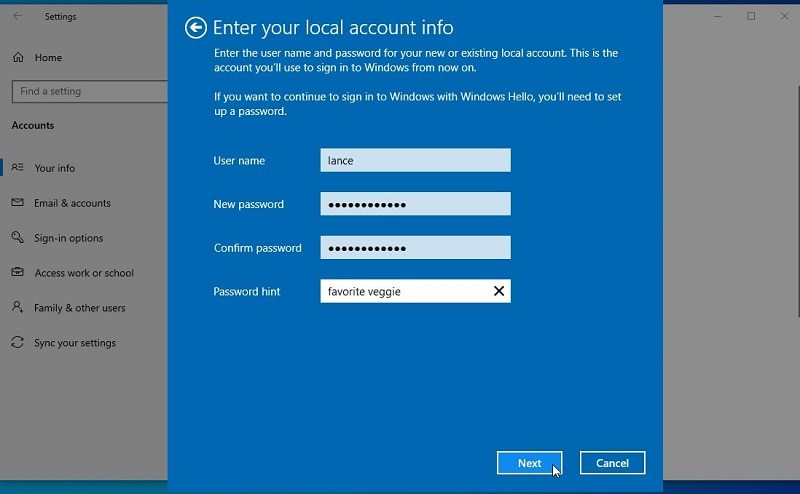
Enter a user name, password, or password hint—or choose security questions—and then select Next.
Open Settings and create another account
Change a local user account to an administrator account
-
Select Start > Settings > Accounts .
-
Under Family & other users, select the account owner name (you should see «Local account» below the name), then select Change account type.
Note: If you choose an account that shows an email address or doesn’t say «Local account», then you’re giving administrator permissions to a Microsoft account, not a local account.
-
Under Account type, select Administrator, and then select OK.
-
Sign in with the new administrator account.
If you’re using Windows 10, version 1803 and later, you can add security questions as you’ll see in step 4 under Create a local user account. With answers to your security questions, you can reset your Windows 10 local account password. Not sure which version you have? You can check your version.
Create a local user account
-
Select Start > Settings > Accounts and then select Family & other users. (In some versions of Windows you’ll see Other users.)
-
Select Add someone else to this PC.
-
Select I don’t have this person’s sign-in information, and on the next page, select Add a user without a Microsoft account.
-
Enter a user name, password, or password hint—or choose security questions—and then select Next.
Open Settings and create another account
Change a local user account to an administrator account
-
Select Start > Settings > Accounts .
-
Under Family & other users, select the account owner name (you should see «Local Account» below the name), then select Change account type.
Note: If you choose an account that shows an email address or doesn’t say «Local account», then you’re giving administrator permissions to a Microsoft account, not a local account.
-
Under Account type, select Administrator, and then select OK.
-
Sign in with the new administrator account.
Related topics
Microsoft account help
How to reset your Microsoft account password
Get help with Windows activation errors
Need more help?
Want more options?
Explore subscription benefits, browse training courses, learn how to secure your device, and more.
Communities help you ask and answer questions, give feedback, and hear from experts with rich knowledge.
Вы можете создать локализованную учетную запись пользователя (автономную учетную запись) для всех пользователей, которые часто используют ваш компьютер. Однако в большинстве случаев рекомендуется создать для всех пользователей компьютера учетные записи Майкрософт. С помощью учетной записи Майкрософт вы можете получить доступ к приложениям, файлам и службам Майкрософт на всех своих устройствах.
При необходимости учетная запись локального пользователя может иметь разрешения администратора; однако лучше по возможности просто создать учетную запись локального пользователя.
Внимание: Пользователь с учетной записью администратора может получить доступ ко всем данным в системе, а любые вредоносные программы, с которыми они сталкиваются, могут использовать разрешения администратора для потенциального заражения или повреждения любых файлов в системе. Предоставляйте этот уровень доступа только при абсолютной необходимости и только людям, которым вы доверяете.
При создании учетной записи помните, что выбор пароля и его сохранение являются очень важными шагами. Поскольку мы не знаем вашего пароля, если вы забудете или потеряете его, нам не удастся его восстановить для вас.
Создание учетной записи локального пользователя
-
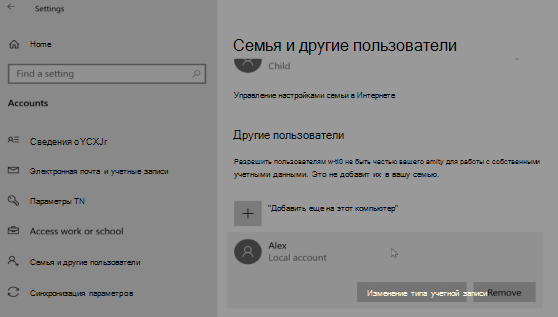
Выберите Пуск > Параметры > Учетные записи а затем Семья и другие пользователи. (В некоторых версиях Windows вы увидите пункт Другие пользователи.)
-
Рядом с пунктом Добавить другого пользователя выберите Добавить учетную запись.
-
Выберите пункт У меня нет учетных данных этого пользователя и на следующей странице нажмите Добавить пользователя без учетной записи Майкрософт.
-
Введите имя пользователя, пароль, подсказку о пароле или выберите секретные вопросы, а затем нажмите Далее.
Откройте «Параметры» и создайте другую учетную запись
Изменение учетной записи локального пользователя на учетную запись администратора
-
Выберите Пуск > Параметры > Учетные записи .
-
В разделе Семья и другие пользователи щелкните имя владельца учетной записи (под ним должно быть указано «Локальная учетная запись») и выберите Изменить тип учетной записи.
Примечание: Если вы выбрали учетную запись, в которой указан адрес электронной почты или не помечено «Локализованная учетная запись», вы даете разрешения администратора для учетной записи Майкрософт, а не локальной учетной записи.
-
В разделе Тип учетной записи выберите Администратор, и нажмите OK.
-
Войдите в систему с новой учетной записью администратора.
Если вы используете Windows 10 версии 1803 или более поздней, можно добавить секретные вопросы, как описано в шаге 4 раздела Создание учетной записи локального пользователя. С помощью ответов на секретные вопросы можно сбросить пароль к вашей локальной учетной записи Windows 10. Все еще не знаете, какая версия вам нужна? Проверьте, какая версия у вас сейчас.
Создание учетной записи локального пользователя
-
Выберите Пуск > Параметры > Учетные записи , затем Семья и другие пользователи. (В некоторых версиях Windows вы увидите пункт Другие пользователи.)
-
Выберите Добавить пользователя для этого компьютера.
-
Выберите пункт У меня нет учетных данных этого пользователя и на следующей странице нажмите Добавить пользователя без учетной записи Майкрософт.
-
Введите имя пользователя, пароль, подсказку о пароле или выберите секретные вопросы, а затем нажмите Далее.
Откройте «Параметры» и создайте другую учетную запись
Изменение учетной записи локального пользователя на учетную запись администратора
-
Выберите Пуск > Параметры > Учетные записи .
-
В разделе Семья и другие пользователи щелкните имя владельца учетной записи и нажмите Изменить тип учетной записи.
Примечание: Если вы выбрали учетную запись, в которой указан адрес электронной почты или не помечено «Локализованная учетная запись», вы даете разрешения администратора для учетной записи Майкрософт, а не локальной учетной записи.
-
В разделе Тип учетной записи выберите Администратор, и нажмите OK.
-
Войдите в систему с новой учетной записью администратора.
Родственные темы
Справка по учетной записи Майкрософт
Как сбросить пароль учетной записи Майкрософт
Получить помощь по устранению ошибок активации Windows
Нужна дополнительная помощь?
Нужны дополнительные параметры?
Изучите преимущества подписки, просмотрите учебные курсы, узнайте, как защитить свое устройство и т. д.
В сообществах можно задавать вопросы и отвечать на них, отправлять отзывы и консультироваться с экспертами разных профилей.
What happens when you want to share your computer with someone else, but you’re really not in a charitable mood? Create a new user, of course. I know that it sounds like a no-brainer, yet, truth be told, following Windows 10’s account-creation walkthroughs are not what you might call ‘on point’. So, how to create a new user on Windows 10?
So, if you’re still searching for other UAC-creation step-by-steps guides, look no further because I got you covered. This not-so-small guide will walk you through the entire process. Here you will learn all about the user account GUI, how to enable ‘God mode’ on your PC, and how to turn your machine into a kiosk computer. So, without further ado, here’s how account-creation works in Windows 10.
How to create a new user on Windows 10 (Easy Way)
Compared to older Windows builds (XP, Windows 7 or Vista), it’s quite easy to create a new user on Win 10. Now, why would someone do that? Well, creating one or several users on the same machine isn’t some whim, but a very ‘hygienic’ cybersecurity practice.Even if you’re the one and only owner of the PC, it’s still a good idea to use a non-administrative account in case you wind up on the wrong side of the Internet (best time to wonder about how to create a Windows 10 account).
Doesn’t matter what kind of malware your computer picks up – running your PC on a typical, non-admin account, ensures that the ‘nastinesses’ can’t gain a foothold in the system and start messing around with functions and processes (i.e. boot. ini, msdos.sys, autoexec.bat, io.sys, svchost.exe).
Heimdal™ Threat Prevention Home makes sure that link is safe!
Your parents and friends will click any suspicious link, so make sure they’re protected.

Heimdal™ Threat Prevention Home provides:
Automatic and silent software updates
Smart protection against malware
Compatibility with any traditional antivirus.
SECURE YOUR ONLINE BROWSING!
Try it FREE
30-day Free Trial
Adding a new user through Accounts’ GUI
Now, the fastest way to create a new user account on Windows 10 is through Settings. Here’s what you’ll need to do:
Step 1. Hit or tap the Start button.
Step 2. Click or tap on the Settings button (that would be the “gear” icon). You can also access Settings by hitting the Windows key on your keyboard and writing “Settings” in the search bar.
Step 3. In Settings, click or tap on Accounts (the icon should be right under Network & Internet).
Step 4. Under Accounts, click or tap on Family & other users.
Step 5. Look under Other users and click on the “+” (plus sign) next to Add someone else to this PC to create a new account on your machine.
Step 6. Choose how the new user will log in his account: Xbox, Office Online, OneDrive, Office, or Skype. Type the address in the bar and hit the Next button.
Step 7. Review the details and press the Finish button to complete the registration process.
That’s it – the new user can log in by typing in his Microsoft username and password. Now, you should keep in mind that this method can only be used in conjunction with one of the above-mentioned accounts. If you want to create a local account (no online account verification required), follow the steps below.
How to create a local account with Windows 10
Source: onMSFT
Step 1. Click or tap on the Start button.
Step 2. Head to Settings.
Step 3. Click or tap on Accounts.
Step 4. Go to Family & other users.
Step 5. Under Other users, click or tap on Add someone else to this PC.
Step 6. In the bottom part of the page, click or tap the hyperlink reading I don’t have this person’s sign-in information.
Advice: If the user you’re about to add doesn’t have a Microsoft account, don’t mess around with the email and passwords fields located in the upper part of the screen.
Step 7. Click or tap on the hyperlink reading Add a user without a Microsoft account.
Step 8. In the account registration window, enter the name of the person who’s going to use the computer and choose a password (hint: don’t use “1234” or “qwerty”, wink-wink). Reconfirm your password and set a hint. When you’re done, press the Next button to complete the registration process.
Okay, I have to admit that all of these steps seem basic enough, but the good news is that Windows 10’s account-managing platform allows the user (that’s you) to ‘mess’ around with privileges. Let’s assume that the account you’re about to create is for a family member.
If you’re not too comfortable with the idea of letting him or her mess around with certain applications, you can easily restrict access. How to do that, you ask? Easy – just turn the computer in a kiosk, and everything will be hunky-dory.
How to add a user to kiosk
A kiosk-like machine works, more or less, like those public info booths – they can be used to check a destination, look up information about certain tourist traps, etc. Well, you can do the same with a computer if you’re looking to curb an account’s activity. Just follow the steps below to link an account to a kiosk – best answer to how to create a new user on Windows 10 question.
Step 1. Create a new user on your Windows 10 machine using one of the featured methods.
Step 2. When you’re done, head to the Family & other people section.
Step 3. On the right side of the screen, click or tap on the Set up assigned access hyperlink (it’s right at the bottom, right on top of the Set up an account for taking tests at your school feature).
Step 4. In the next screen, link your new user account to the kiosk. Just hit the “+” (plus sign) under the choose an account section and, well, choose.
Step 5. After selecting your “kiosk” account, choose the apps that the new user will be allowed to access. You will find this under the account selection section.
That’s about it on how to turn a newly-created account into a kiosk-like user. Sure, you can always sign out from all your online accounts, but why bother when you can select which apps the new user can access. Several clicks later, the account’s ready to be used. And yes, you can stop worrying about someone messing up your Netflix playlist and preferences.
How to set up a test/school user account
Of course, you can always take the restriction game to the next level literally turning your computer into a tech version of Hotel California (such a lovely place, indeed). Remember the “Set up an account for taking tests at your school” feature I mentioned earlier?
FYI: it also works for cases when you really don’t want someone to visit non-educational (ahem!) websites. Here’s what you need to know in order to create a test or school account.
Step 1. Go to Accounts.
Step 2. Head to Access work or school.
Step 3. Click or tap on Set Account for taking tests.
Step 4. Select a test-taking account from the drop-down box.
Step 5. Enter the test’s web address.
Hint: if you want to set up an account for your kid, type in the address of an educational website (i.e. National Geographic, Discovery, Sparknotes, Brightstorm). Bear in mind that once the user logs in, he will be unable to access web content other than the website written in this field.
Step 6. Enforce additional restrictions (i.e. require printing, allow screen monitoring and allow text suggestions).
(Optional) You can use Microsoft’s Set up an account for taking tests to feature in conjunction with a lockdown API which basically clamps down the account when the time’s up.
Going Super Saiyan with Your New Account
Source: YouTube
If you want to step up your account-creation game, there’s a way to create a super user. Yes, I know that there shouldn’t be anything else above sysadmin, but Microsoft managed to prove us wrong.
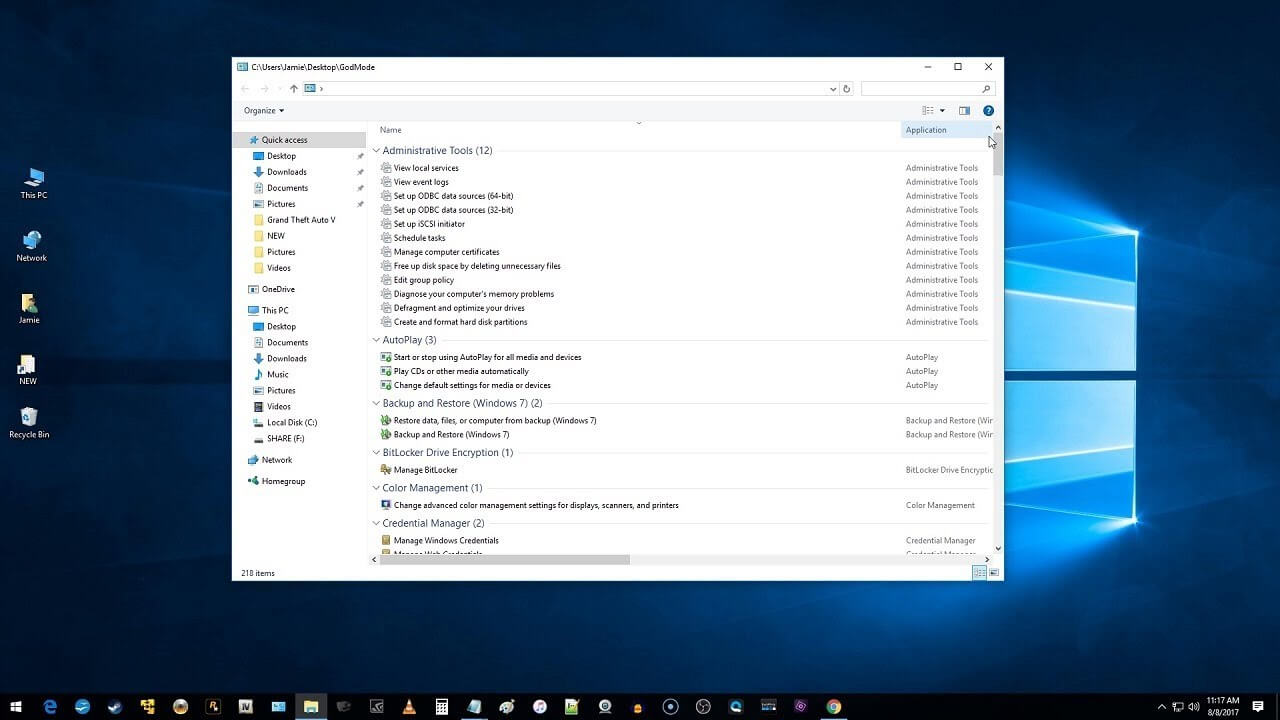
Called the ‘God Mode’, this type of user is not exactly what one might expect, given the name (a gateway to the birthplace of the Internet or something). It’s actually just a regular admin account, but with a couple of nifty twists. Remember when you had to call up the administrative tools menu from control panel each time you wanted to format a disk partition or manage your computer’s certificates?
Well, with ‘God mode’ you will be able to perform these tasks directly from Win Explorer’s quick access wheel or from the desktop. Still wondering about what tools you’ll be able to mess around with while in ‘God Mode’? Here’s a quick rundown.
- Fonts.
- Indexing Options.
- Administrative tools.
- AutoPlay.
- Color Management.
- Date & Time.
- Credential Manager.
- Infrared.
- Internet Options.
- Keyboard + mouse.
- Pen & Touch.
- Phone & Modem.
- Network & Sharing Center.
- Power Options.
- Tablet PC setting.
- Taskbar & navigation.
- System.
- Region.
- User Accounts.
- Windows Defender Firewall.
- Windows Mobility Center.
- Work Folders.
- Speech recognition & more.
Word of advice: before attempting to activate Win10’s ‘Super Saiyan’ mode, keep in mind that having a single user account, supercharged with privileges, makes you an easy target for hackers.
What it all boils down to is this – if a single malware manages to bypass your security, it will have access to everything. And when I say “everything”, I really mean every single and sensitive function of your PC. So, as the saying goes: “tread softly and carry a big gun” (which in this case is a top-notch antimalware software).
How to enable ‘God Mode’ on your PC.
Step 1. Create a new account using one of the methods listed in this guide.
Step 2. Right-click anywhere on your desktop.
Step 3. Highlight and left-click on Folder.
Step 4. Right-click on the newly created folder and hit Rename.
Step 5. In the text field, copy & paste or write the following line:
GodMode. {EDBA470-465E-825C-99712043E01C}
N.B. if you don’t like how “GodMode” sounds, you can replace it with anything you like. Just be sure to write the alpha-numerical string after the name exactly as it is. Otherwise, you will receive an error message reading :“you must type a file name.”
Step 6. Hit Enter or click anywhere on the desktop to continue. If everything’s right, the folder icon will change to a control panel-like icon.
Step 7. Double-clicking on it will take you to Win Explorer’s quick access wheel.
Step 8. Profit and tweak like a boss! The ‘God Mode’ gives you access to over 200 functions, some of them being on the more exotic side (set up iSCSI initiator, set up ODBC data sources for x86 and x64 etc.).
Adding a new user account to your PC (Geek Way)
Source: Microsoft Visual Studio Blog
Win10’s account menu is, indeed, the fastest way to create a new user, but not the only one. If you’re up for writing some code lines, I’m going to show you how to do the same thing from CMD (Command Prompt). Let’s dig right into it.
How to create a local account with CMD
Step 1. Fire up the Start menu.
Step 2. Type in “command prompt”.
Step 3. Right-click on the “command prompt” icon and select the Run as administrator option.
Note: it’s required to run CMD in admin mode to create new accounts.
Step 4. When the UAC splash appears, click Yes to continue.
Step 5. Add a new user and assign a password. To do this, type in the following character string:
C:\Windows\system32\net user John newnumberwhodis /add
Note: you can change the name and password with anything you like. Just be sure to type in the “net user” command at the beginning of the code line, and the “/add” at the end.
Step 6. Hit Enter. If done correctly, you will receive the following prompt: “The command completed successfully”. Check your Accounts menu to review the new user’s details.
Note: although I would advise against it, you can create a ‘passwordless’ user (a person can log in without a password). To do that just type in the line above but omit the password string.
Here’s a quick example:
C:\Windows\system32\net user Smith /add
How to grant admin privileges with CMD to a newly created account
Here’s what to do in order to grant admin privileges to the newly made account.
Step 1. Hit the Start menu.
Step 2. Search for “command prompt”.
Step 3. Run CMD (command prompt) as administrator.
Step 4. Type in the following string:
C:\WINDOWS\system32\net localgroup administrators John /add
Note: you can’t directly create an admin account. You’ll first need to create a local user and then update it to admin.
Advanced tweaks and features
- Add new user account to a domain: C:\Windows\system32\net user John newpcwhodis /ADD /DOMAIN.
- Assign a full name to new UAC: C:\Windows\system32\net user John newpcwhodis /ADD /FULLNAME:”John_Delaware”
- Allow new user to change password: C:\Windows\system32\net user John newpcwhodis /ADD /PASSWORDCHG:Yes
- Deny password change request to the new user: C:\Windows\system32\net user John newpcwhodis /ADD /PASSWORDCHG: NO
5 Security Tips to Safeguard Your Newly Created Account
Congrats on creating a new account on your machine! Now, as one good turn deserves another, let’s see what you can do about your account’s cybersecurity. Here are five awesome tips on how to make your PC safe again.
#1. Deploy antimalware/antivirus software on your PC.
Probably the most painless way to ensure that your PC is protected. Now, if you haven’t already deployed an antimalware and antivirus solution on your machine, don’t forget to install it for all users. It’s of no use having an AV/AM on your device if it’s set to protect a single account.
Sure, hackers always gun for accounts with elevated privileges but do keep in mind that an unsecured local account can also become a breaching point. So, as always, if you want to save a couple of bucks, give Starbucks a rest; don’t settle for an inefficient AM/AV solution because that’s how every malware ‘love affair’ begins.
The easy way to protect yourself against malware
Here’s 1 month of Heimdal™ Threat Prevention Home, on the house!
Use it to:
Block malicious websites and servers from infecting your PC
Auto-update your software and close security gaps
Keep your financial and other confidential details safe
#2. Careful with Plug-and-Play devices
Yes, I know that nowadays it’s all about cloud storage, but there are still a few of us who carry ‘obsolete’ external storage devices such SD cards, flash pens, and portable hard-drives. As one of my colleagues noted in her article on actionable cybersecurity tips, never, ever, should you plug a USB device that came from an unverifiable source.
#3. Need a bathroom/cig break? LOCK UP YOUR PC!
If you’re a slob just like yours truly, then you most certainly don’t lock up the computer each time you go on a lunch break or for a little smoke. Bad decision! By not locking up your PC, you basically tell everyone: “Hey! My computer’s up for grabs. Get it while it’s hot!”.
So, if you want to prevent someone from tampering with your PC (or wake up with Nicholas Cage’s face set as the desktop background), do yourself a favor and lock up your station every time you feel like leaving the room.
#4. Keep tabs on your account
It doesn’t matter if you’re using your brother’s/sister’s/SO’s computer; that account is your responsibility and yours alone! If you come across any activity that may qualify as suspicious, run a quick malware scan, and get in touch with the admin ASAP.
On that note, you should definitely refrain from opening suspicious email attachments, using an unsecured network, or downloading pirated content (i.e. games, movies, software).
#5. Revamp your default password
In most cases, the person creating your account will ask you to change it to something else. Take your cybersecurity game up a notch and choose a strong password. Remember that a solid passkeys should have at least 8 characters. Try a combo of upper- and lowercase letters, symbols, and numbers. You know what they say: there’s safety in numbers; and yes, the longer the password, the harder it will be for someone to crack it open.
Wrap-up
It has certainly been a long trip getting from “how do I create a new UAC?” to “let me add a string in CMD to prevent the user from changing his password”. Always remember that using an account other than admin is a very good call since it prevents most malware from messing around with your device’s sensitive functions. As always, if you have any questions or rants, do shoot me a comment. Cheers!
If you liked this post, you will enjoy our newsletter.
Get cybersecurity updates you’ll actually want to read directly in your inbox.
![]() В следующей инструкции рассмотрим несколько способов, позволяющих добавить нового пользователя в Windows 10, присвоив, при необходимости, вновь созданной учётной записи права администратора.
В следующей инструкции рассмотрим несколько способов, позволяющих добавить нового пользователя в Windows 10, присвоив, при необходимости, вновь созданной учётной записи права администратора.

Создание нового пользователя посредством командной строки
После того как команда будет выполнена в системе появится новый пользователь. Если вам потребуется наделить его правами администратора, то необходимо дополнительно использовать такую команду: net localgroup Администраторы Имя_Пользователя /add (если не сработало, то вместо «Администраторы» введите administrators).
Используя параметры Windows 10
На этом создание нового пользователя можно считать завершённым, но если требуется задать для пользователя права администратора, то выполните следующее:
- Параметры → Учётные записи → Семья и другие люди → выберите имя пользователя, которого надо сделать администратором → «Изменить тип учетной записи» → в выпадающем списке «Администратор» → ОК.


Создаём пользователя с помощью «Локальные пользователи и группы»
В дальнейшем, для авторизации в новой учётной записи достаточно кликнуть по пиктограмме пользователя в меню Пуск и выбрать нового пользователя.
После перезагрузки операционной системы на экране входа также будут отображаться варианты входа с той или иной учётной записью.
А вдруг и это будет интересно:
- Исправляем ошибку запуска VMware в Windows 10: VMware Player and Device/Credential Guard are not compatible
- Windows 10: отображение информации о предыдущих попытках входа
- Раздаём Wi-Fi c компьютера (ноутбука): как настроить мобильный хот-спот в Windows 10
- Что делать, если появляется сообщение «iPhone отключен подключитесь к iTunes»
- Как включить поддержку DNS-over-HTTPS в Google Chrome
- SSD Mini Tweaker – оптимизируем Windows под твердотельный накопитель
Дата: 2016-11-10 | Размещено в Статьи
Adding a new local user account on Windows 10/11 opens up a world of benefits and opportunities. Creating a separate user account gives you privacy, security, and productivity advantages. For context:
- With a new user account, you can ensure privacy and security on Windows 10/11. A new user account lets you keep personal files private, customize your desktop, and safeguard sensitive information from unauthorized access.
- You will have a separate digital realm for enhanced privacy and peace of mind, even when multiple users are using the computer.
- Even if you’re the sole user of your computer, managing multiple accounts boosts efficiency. You will have dedicated accounts for personal projects, work, or school assignments. This lets you stay organized, switch seamlessly between accounts, and enhance productivity.
Discover six effortless methods to create local user accounts on Windows 10/11 in this comprehensive guide.
Way 1. Create A Local User Account on Windows 10/11 via Settings
The Settings app is the most convenient and user-friendly method for creating a local user account on Windows 10/11.
Step 1. Press “Windows key + I” or click the Start option and select the gear icon to open Settings on Windows 10/11.
Navigate to the “Accounts” option in the Settings app.
Step 2. On the left-hand side of the Accounts settings page, click on the “Family & other users” tab.
In the “Other users” section, you’ll notice a nifty little option: “Add someone else to this PC.”
Step 3. Select the “I don’t have this person’s sign-in information” link to create a new local user account.
On the next screen, opt for the “Add a user without a Microsoft account” option to create a local user account.

Step 4. Provide the necessary details for the new user account — the username, password (optional), and password hint. You can grant administrative privileges to the account by clicking the “Change account type” option.
Click the “Next” option once you have provided the necessary information.
You will see a confirmation message. Simply click the “Finish” option to complete the account creation process.
The above steps show how to create a local user account on Windows 10. There is a slight difference in steps when creating a local user account on Windows 11. For context, in Windows 11 — you need to select “Family & other users” and choose “Add account” next to “Add other user.” The remaining steps remain the same for both versions, such as selecting “I don’t have this person’s sign-in information” and providing the necessary account details.
Way 2. Create A Local User Account on Windows 10/11 via CMD
The Settings app provides a convenient and user-friendly method to create a local user account. However, there are situations where Command Prompt (CMD) can offer unique advantages. For instance, you have more control and flexibility over the account-creating process — such as setting specific user permissions, configuring group memberships, or assigning complex password policies.
Step 1. Press “Windows key + X” on your keyboard and select “Command Prompt (Admin).”
Step 2. In the Command Prompt window, type the following command and press Enter:
net user <username> <password> /addNote: Replace <username> with the desired username for the local account and <password> with the password you want to set.
Close the Command Prompt window. You can also create a local admin account on Windows 10/11 via CMD via the following command:
net localgroup administrators <username> /addNote: Replace <username> with the username of the account you created in the previous step.
Using CMD to create a local account requires administrative privileges and should be done with caution to ensure security and proper account management.
Way 3. Create A New User on Windows 10/11 via Powershell
Powershell, similar to Command Prompt, is a command-line shell. So, creating a new user on Windows 10/11 via Powershell is similar to the above Command Prompt method.
Step 1. Type “PowerShell” in the search bar next to the Start option. From the search results, click on “Windows PowerShell (Admin).”
In the elevated Powershell window, type the following command and press Enter:
$password = Read-Host -AsSecureString

New-LocalUser -Name "Username" -Password $password -FullName "Username" -Description "Test user"Note: Replace <username> with the desired username for the local account and <password> with the password you want to set.
You can give administrative privileges to the new account by using the following command:
Add-LocalGroupMember -Group "Administrators" -Member "<username>"Note: Replace <username> with the username of the account you created in the previous step.
Once you execute the first command, the new local user account will be created on Windows 10/11. The second command in the above method allows you to grant Administrators privileges.
Also Read: How to Reset Local User Password Using Powershell
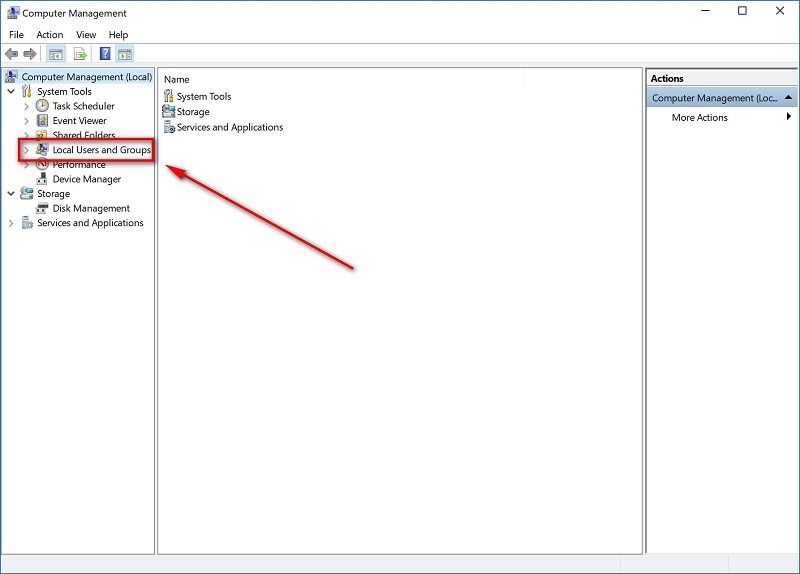
Way 4. Create A New User on Windows 10/11 from Computer Management
Creating a new user account via the Computer Management app has several benefits. For context, it provides more extensive control over user configuration and management, like setting specific permissions, automating tasks, and managing multiple accounts simultaneously.
Step 1. Type “Computer Management” in the search bar. And double-click on the “Computer Management” app to open it.
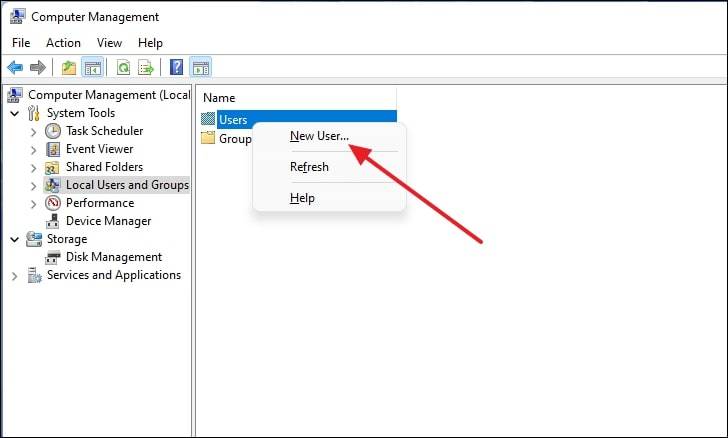
In the Computer Management window, navigate to “System Tools” > “Local Users and Groups” > “Users.”
Step 2. Right-click on an empty area in the Users folder and select “New User.”
- In the New User dialog box, type the desired username and fill in the necessary details, including the full name and description.
- You can also set an initial password and specify permission to users to change the password at the next login.
- And then click “Create.”
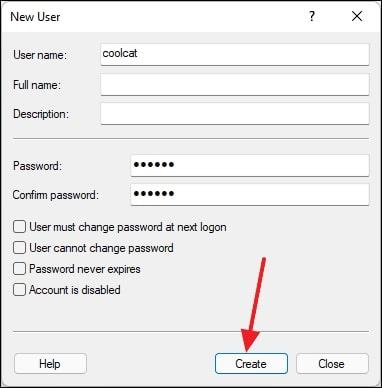
Step 3. You will find the new user account in the “Users” folder.
You can further configure the account by right-clicking on it and selecting “Properties.” You will find options for group membership, assign user rights, and configure other account settings.
Way 5. Create A New Local Account on Windows 10 via Netplwiz
Netplwiz is a powerful Windows utility that simplifies creating a local user account. Like Computer Management, Netplwiz offers the advantage of creating a user account without requiring a Microsoft account.
Additionally, Netplwiz’s ability to manage user authentication settings, such as automatic logins, is another reason to use this method for creating a new local user account on Windows 10.
Step 1. Press the “Windows key + R” to open the Run dialog box.
Type “netplwiz.exe” in the Run dialog box and press Enter.
Step 2. The User Accounts window will appear. Click on the “Add…” option.
- Click on the “Sign in without a Microsoft account (not recommended)” option in the next window.
- Click on the “Local account” option.

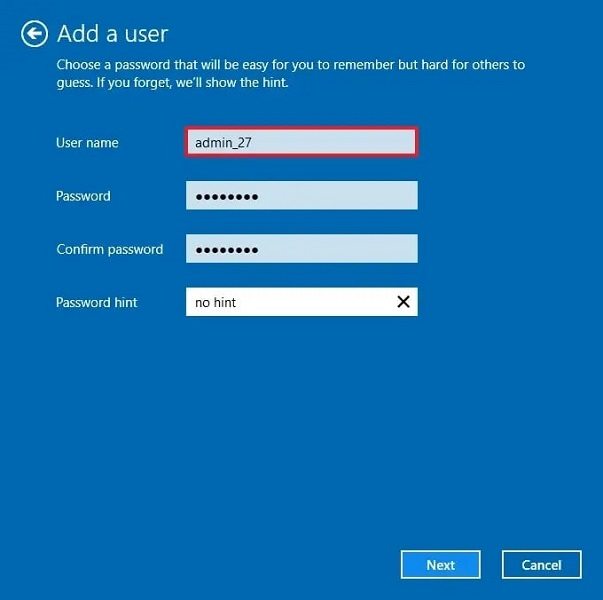
Step 3. Fill in the required information for the new local account, including the username, password (optional), and password hint (recommended for account recovery).
- Click on the “Next” option.
- Click on the “Finish” option to create the new local account on the next page.
The User Accounts window will close, and you will return to the main netplwiz window. The newly created local account will be listed in the Users for this computer section.
Way 6. How to Create A New User on Windows 10 without Logging In
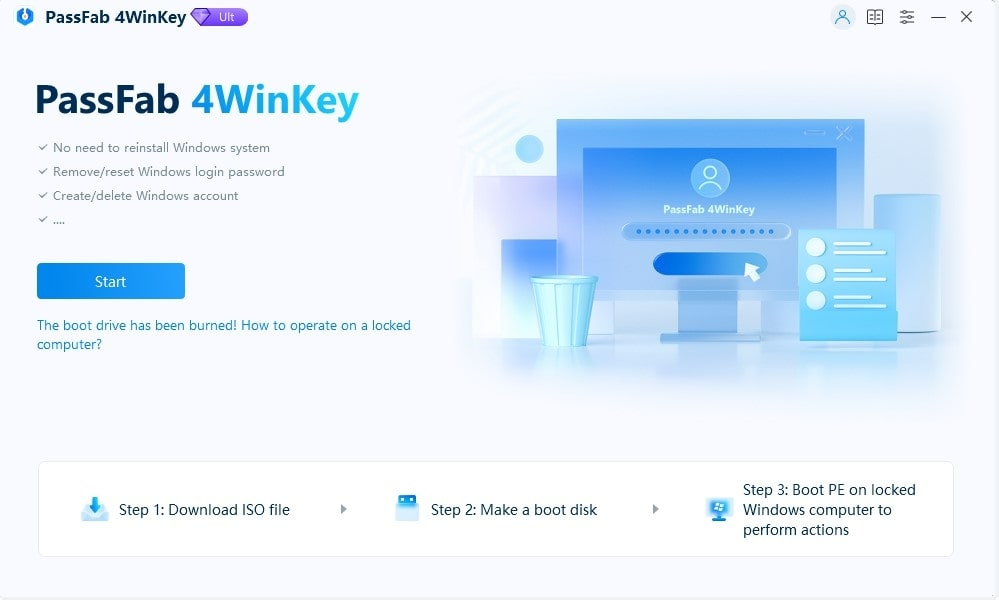
You can create a local user account on Windows 10 without logging in using Windows password recovery software like PassFab 4WinKey. This tool lets you make a new account directly from a bootable USB or CD/DVD without needing an existing user account.
>> Get PassFab 4WinKey <<
There are a few reasons why you might want to create a new local user account without logging in:
- Forgot login credentials: If you need help remembering your password or username, PassFab 4WinKey can help. So, you can bypass the login screen and create a new user account to gain access to your system.
- Troubleshooting issues: If your current user account is corrupted or causing problems, creating a new account can help. It isolates the issue, giving you a stable environment to troubleshoot and fix problems.
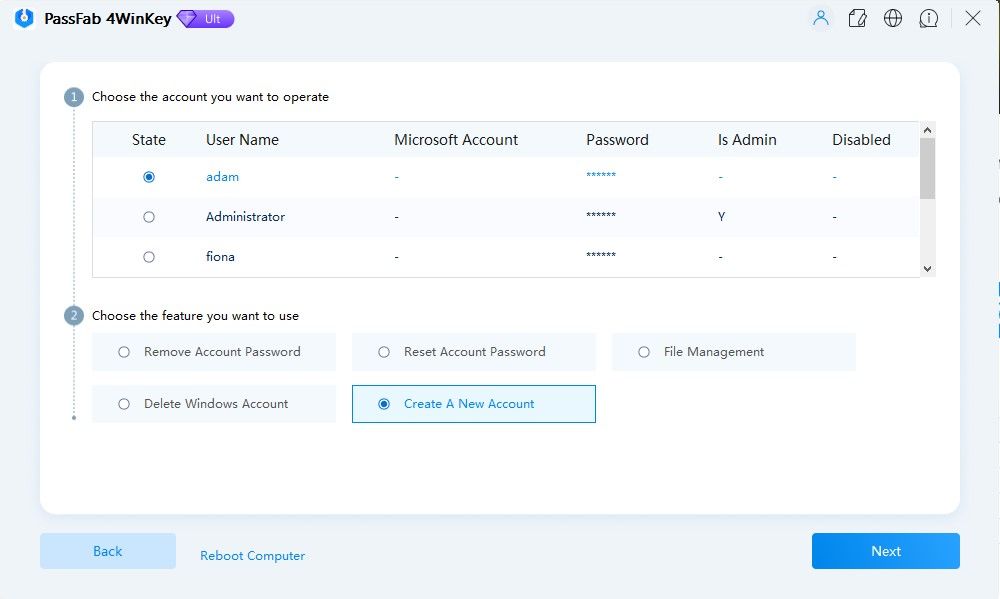
Whatever the reason may be, PassFab 4WinKey makes it easy to create a new user account without logging in. 4WinKey offers a user-friendly interface that simplifies the process, making it accessible even for tech novices to easily create a local user account on Windows 10 without logging in.
Frequently Asked Questions About Local User Account
1. How can I change the username of an existing local user account?
- Open the “Settings” app.
- Choose the “Accounts” option.
- Click on “Family & other users” to see the list of user accounts on your device.
- Locate the desired user account and select it. This will bring up options related to that account.
- Click on the “Rename” option. This will prompt a text field where you can enter the new username for the account.
- Type in the new username and press Enter.
2. How can I delete a local user account on Windows 10/11?
To delete a local user account:
- Go to the “Settings” app.
- Navigate to “Accounts” > “Family & other users.”
- Select the desired user account you want to delete. And click on the “Remove” button.
Confirm the deletion when prompted.
3. How can I switch between user accounts on Windows 10/11?
To switch between user accounts on Windows 10/11:
- Navigate to the Start button.
- You will see your account name or picture displayed at the top. Click on it.
- A menu will appear showing all the user accounts on your system — select the desired one.
- If the selected user account has a password — type in the password and press Enter or click on the arrow button to proceed.
Windows will now switch to the selected user’s desktop environment, and you can start using that account.
Alternatively, to switch user accounts on the login screen, choose the desired user account from the bottom-left corner and enter the password.
4. How can I change the account type of an existing user account?
- Go to the “Settings” app.
- Navigate to “Accounts” > “Family & other users.”
- Click on the desired user account and click on the “Change account type” option.
- Choose the desired account type (e.g., Standard User, Administrator).
5. How can I create a new user account on Windows 10/11 without an internet connection?
You can use any of the above methods described in the article to add new users on Windows 10/11 without an internet connection.
Conclusion
Hopefully, you have learned how to create a new local user account on Windows 10/11. Following the various methods described, you can experience enhanced privacy, security, and productivity benefits.