1. Overview
With a bootable Ubuntu USB stick, you can:
- Install or upgrade Ubuntu
- Test out the Ubuntu desktop experience without touching your PC configuration
- Boot into Ubuntu on a borrowed machine or from an internet cafe
- Use tools installed by default on the USB stick to repair or fix a broken configuration
This tutorial will show you how to create a bootable USB stick on Microsoft Windows using Rufus.
For most users we recommend balenaEtcher instead of Rufus which is simpler to use and also available on MacOS and Ubuntu. Instructions are now included in the primary Install Ubuntu Desktop tutorial.
Creating a bootable Ubuntu USB stick from Microsoft Windows is very simple and we’re going to cover the process in the next few steps.
Alternatively, we also have tutorials to help you create a bootable USB stick from both Ubuntu and Apple macOS.

2. Requirements
You will need:
- A 4GB or larger USB stick/flash drive
- Microsoft Windows XP or later
- Rufus, a free and open source USB stick writing tool
- An Ubuntu ISO file. See Get Ubuntu for download links

Take note of where your browser saves downloads: this is normally a directory called ‘Downloads’ on your Windows PC. Don’t download the ISO image directly to the USB stick! If using Windows XP or Vista, download version 2.18 of Rufus.
3. USB selection
Perform the following to configure your USB device in Rufus:
- Launch Rufus
- Insert your USB stick
- Rufus will update to set the device within the Device field
- If the Device selected is incorrect (perhaps you have multiple USB storage devices), select the correct one from the device field’s drop-down menu

You can avoid the hassle of selecting from a list of USB devices by ensuring no other devices are connected.
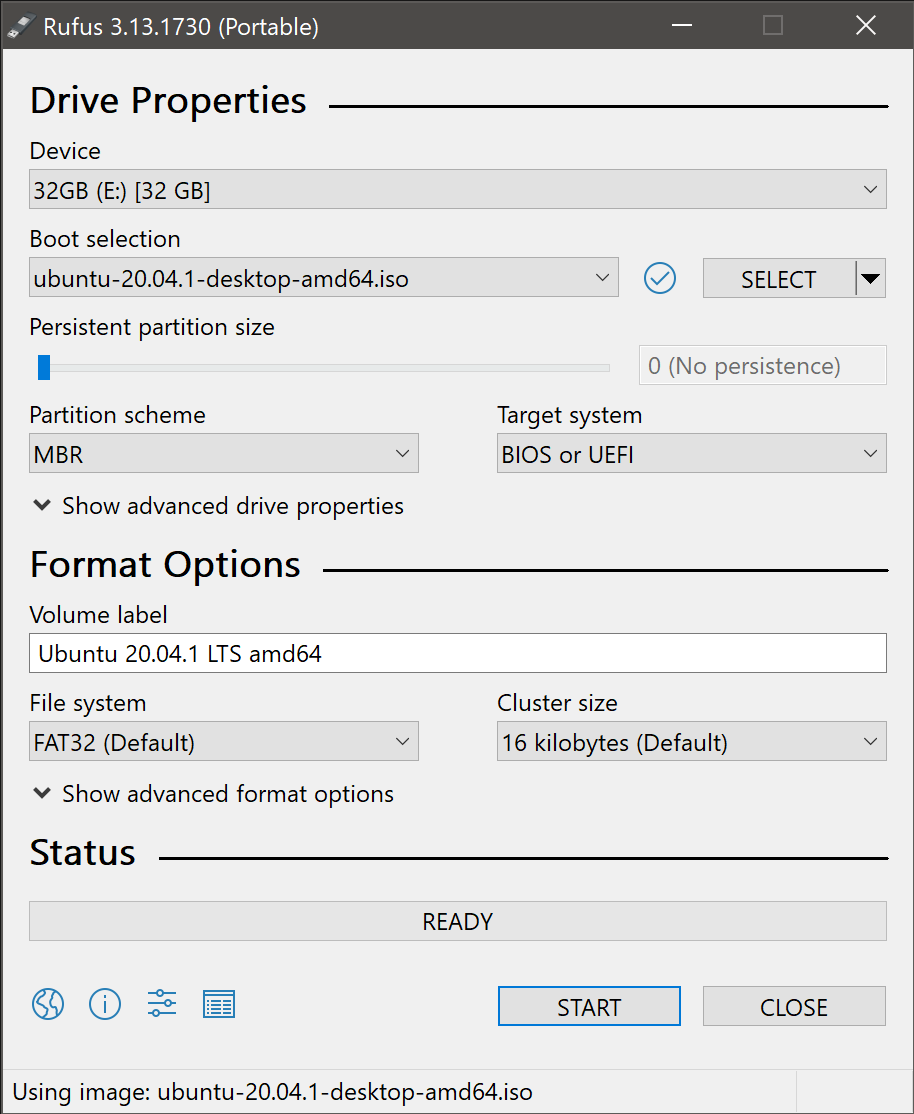
4. Select the Ubuntu ISO file
To select the Ubuntu ISO file you downloaded previously, click the SELECT to the right of “Boot selection”. If this is the only ISO file present in the Downloads folder you will only see one file listed.
Select the appropriate ISO file and click on Open.

5. Write the ISO
The Volume label will be updated to reflect the ISO selected.
Leave all other parameters with their default values and click START to initiate the write process.
6. Additional downloads
You may be alerted that Rufus requires additional files to complete writing the ISO. If this dialog box appears, select Yes to continue.

7. Write warnings
You will then be alerted that Rufus has detected that the Ubuntu ISO is an ISOHybrid image. This means the same image file can be used as the source for both a DVD and a USB stick without requiring conversion.
Keep Write in ISO Image mode selected and click on OK to continue.

Rufus will also warn you that all data on your selected USB device is about to be destroyed. This is a good moment to double check you’ve selected the correct device before clicking OK when you’re confident you have.
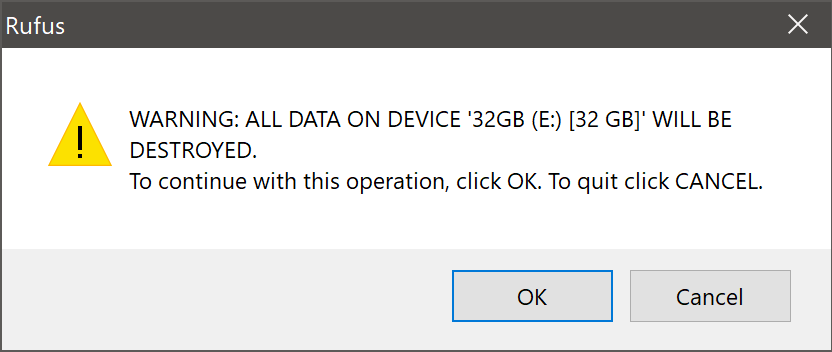
If your USB stick contains multiple partitions Rufus will warn you in a separate pane that these will also be destroyed.
8. Writing the ISO
The ISO will now be written to your USB stick, and the progress bar in Rufus will give you some indication of where you are in the process. With a reasonably modern machine, this should take around 10 minutes. Total elapsed time is shown in the lower right corner of the Rufus window.

9. Installation complete
When Rufus has finished writing the USB device, the Status bar will be filled green and the word READY will appear in the center. Select CLOSE to complete the write process.

Congratulations! You now have Ubuntu on a USB stick, bootable and ready to go.
To use it you need to insert the stick into your target PC or laptop and reboot the device. It should recognise the installation media automatically during startup but you may need to hold down a specific key (usually F12) to bring up the boot menu and choose to boot from USB.
For a full walkthrough of installing Ubuntu, take a look at our install Ubuntu desktop tutorial.
Finding help
If you get stuck, help is always at hand:
- Ask Ubuntu
- Ubuntu Forums
- IRC-based support
Was this tutorial useful?
Thank you for your feedback.
The share link has been copied to clipboard
How to Create Bootable Ubuntu USB in Windows 10
Creating bootable Ubuntu USB in Windows is a simple task. By creating a live USB of Ubuntu, you can try Linux without installing. And when you have a good feel about it, you can use the same bootable USB to install it.

Download Rufus:: https://rufus.ie/
Download Ubuntu: https://ubuntu.com/download/desktop
Show More
Comments
loading text loading
loading text loading
loading text
loading text loading
loading text
loading text loading
loading text
loading text loading
loading text
Table of Contents
1
Ubuntu is one of the most popular Linux-based operating system distributions in the world. Bootable Ubuntu USB is an effective way to install Ubuntu on your computer without using a DVD drive. Installing Ubuntu from a USB drive is faster and more convenient than installing it from a DVD. This blog post will guide you through creating a bootable Ubuntu USB on Windows 10.
Video Tutorial:
What’s Needed
Before you start creating a bootable Ubuntu USB, you need to have a few things in hand. The items you will need are:
1. A USB flash drive with at least 4GB capacity
2. Ubuntu ISO file
3. Rufus – a reliable software to create bootable USB
What Requires Your Focus?
The process of creating a bootable Ubuntu USB requires attention to detail to prevent errors. Also, you need to ensure that you have a reliable internet connection to download Rufus and Ubuntu ISO File. Lastly, it is essential to ensure that you follow the steps carefully to avoid creating corrupt Ubuntu installation drives.
Different Methods to Create Bootable Ubuntu USB on Windows 10
Method 1: Using Rufus to Create a Bootable Ubuntu USB on Windows 10
Before we start with the steps, let’s have a look at the pros and cons of using Rufus.
Pros:
– Supports multiple file systems
– Easy to use interface
– Creates bootable media with fewer steps
– Lightweight and free
Cons:
– Not guaranteed to work for all devices
– May delete important files if not used correctly
Steps:
1. Download and Install Rufus on your computer.
2. Launch the Rufus software and insert the USB flash drive on your computer.
3. Rufus will automatically recognize the USB drive.
4. Find the Ubuntu ISO file by clicking on the select button under the “Boot selection” option.
5. Under “Partition scheme,” choose MBR if the onboard ROM runs on BIOS or UEFI-CSM or GPT if it runs on UEFI Only.
6. Next, choose the file system as FAT32.
7. Lastly, click on Start to create the bootable Ubuntu USB.
8. Wait for Rufus to complete its task, and your bootable Ubuntu USB is ready to use.
FAQs
Q1: Can I use Rufus for other operating systems?
A: Yes, Rufus supports multiple operating systems, including Linux, Windows, and macOS.
Method 2: Using UNetbootin to Create a Bootable Ubuntu USB on Windows 10
Before we start with the steps, let’s have a look at the pros and cons of using UNetbootin.
Pros:
– Supports multiple file systems
– Easy to use interface
– Lightweight and free
Cons:
– Risk of creating corrupt installation drives
– Not compatible with all computers
Steps:
1. Download and Install UNetbootin on your computer.
2. Launch the UNetbootin software and insert the USB drive to your computer.
3. Next, select the Ubuntu ISO file by clicking on the ellipsis icon.
4. Choose the target USB flash drive by selecting the “Disk Type” option.
5. Lastly, click on the “OK” button to start the process of creating a bootable Ubuntu USB.
6. Wait for UNetbootin to complete its task, and your bootable Ubuntu USB is ready to use.
FAQs
Q1: Can I use UNetbootin to install Ubuntu on multiple computers?
A: Yes, you can use the same bootable Ubuntu USB on multiple computers, provided that the device’s hardware specifications meet the minimum requirements of Ubuntu.
Method 3: Using Etcher to Create a Bootable Ubuntu USB on Windows 10
Before we start with the steps, let’s have a look at the pros and cons of using Etcher.
Pros:
– Intuitive user interface
– Cross-platform compatibility with Windows, macOS, and Linux
– Creates bootable drive with fewer steps
– Supports multiple file formats
Cons:
– Large file size
– May not work with older versions of Windows
Steps:
1. Download and install Etcher software on your computer.
2. Extract the Ubuntu ISO file on your computer.
3. Launch the Etcher software and insert the USB drive to your computer.
4. Under “Select image,” choose the Ubuntu ISO file.
5. Verify that the USB drive you intend to use is detected under “Select drive.”
6. Lastly, click on “Flash!” to start the process of creating the bootable Ubuntu USB.
7. Wait for Etcher to complete its task, and your bootable Ubuntu USB is ready to use.
FAQs
Q1: Can I use Etcher on Linux or macOS?
A: Yes, Etcher supports multiple operating systems, including Linux, Windows, and macOS.
1. Incorrect BIOS settings
-Fix: Confirm if the USB should be set to UEFI or Legacy mode
2. Defective USB drive
-Fix: Try reformatting the USB drive using other software or try a different USB drive.
3. Incorrectly Extracted Ubuntu ISO file
-Fix: Extract the Ubuntu ISO file correctly using reliable software.
Implications and Recommendations
Creating a bootable Ubuntu USB from Windows 10 can be an essential tool for installing Ubuntu. Understanding the steps and potential risks can make the process easier and minimize errors. Ensure that you download software from trusted sources and handle USB flash drives with care.
FAQs
Q1: Can I use a 2GB USB drive to create a bootable Ubuntu USB?
A: No, you need at least a 4GB USB drive to create a bootable Ubuntu USB.
Final Words
Creating a bootable Ubuntu USB on Windows 10 is essential but requires attention to detail and precision. Using reliable software, extracting the ISO file accurately, and being aware of potential risks can make the process smoother. We hope that this blog post has provided useful insights into creating bootable Ubuntu USB. Good luck with your Ubuntu installation!
![]()
Download Article
![]()
Download Article
Whether you want to install Linux on your PC from a flash drive or just boot into a portable version of Linux, you can easily create a bootable Linux USB flash drive in Windows 10. We’ll show you how to download the software you’ll need to create your Linux USB drive, how to make the drive bootable, and how to make your PC boot from the flash drive instead of your hard drive.
-

1
Download an ISO image of Ubuntu (or your preferred Linux flavor). To boot into Linux from a USB drive, you’ll need to download a file that contains an «image» of the Linux installation media. You can download the ISO for any flavor of Linux you want to install, including Debian and Linux Mint, and the process to create a bootable USB drive will be similar.
- To download an ISO of Ubuntu, head over to https://ubuntu.com/download/desktop and click the Download link next to the latest stable version. Ubuntu is a good option if you want to try out Linux without installing it—once you boot from the flash drive, you’ll be able to choose an option to try before you install.[1]
- To download a Debian ISO, go to https://www.debian.org/download. The download will start automatically.
- You can get the Linux Mint ISO from https://linuxmint.com/download.php. Just click the Download button next to the version you want to install.
- If you just want to try out Linux without installing it on your hard drive, try Puppy Linux, which allows you to boot right into a functional Linux desktop. You can download a Puppy Linux ISO from https://puppylinux.com/index.html#download.
- To download an ISO of Ubuntu, head over to https://ubuntu.com/download/desktop and click the Download link next to the latest stable version. Ubuntu is a good option if you want to try out Linux without installing it—once you boot from the flash drive, you’ll be able to choose an option to try before you install.[1]
-
2
Install Rufus on your PC. Rufus is free software that allows you to create bootable USB drives from ISO images.[2]
Go to https://rufus.ie and click the Rufus link under «Download» toward the bottom of the page to download the installer.- When the download is complete, double-click the file that begins with «rufus» and ends with «exe» and follow the on-screen instructions to install.
- Once Rufus is installed, you’ll find it in your Windows menu. Launch Rufus if it doesn’t start automatically after the installation.
Advertisement
-
3
Insert your USB flash drive into an available USB port. You’ll want to use a blank USB drive, as everything on the drive will be deleted. Back the drive up before you continue if necessary.
-
4
Open Rufus and select your USB flash drive in Rufus. If multiple external drives are connected to your PC, Rufus may select the wrong drive. Click the proper drive in the «Device» menu if it’s not accurate.
-
5
Select FreeDOS from the «Boot selection» menu. It’s just under the Device selector. This tells Rufus to make the drive bootable.[3]
- The default options for «Partition scheme» and «Target system» are filled in automatically and you won’t need to change them.
-
6
Click the Select button and choose the ISO you downloaded. This button is to the right of the «Boot selection» menu. You should find the ISO in your default download folder, which is usually called Downloads.
-
7
Leave the other parameters in place and click START. This begins the process of writing the ISO image to the flash drive.
- If Rufus prompts you to download an additional file to write the ISO, click Yes to continue.[4]
- If Rufus prompts you to download an additional file to write the ISO, click Yes to continue.[4]
-
8
Select «Write in ISO image mode (Recommended)» and click OK. This option will appear when the «ISOHybrid image detected» window appears. This just means you can use the same ISO on a bootable DVD or USB drive as needed.
-
9
Click OK to create your bootable USB drive. This involves erasing the data on the drive and copying the necessary files for making the drive bootable. You’ll see a Status bar at the bottom of the window once the process begins.
- When the drive is ready, the status bar will say «READY.» At this point, you’ll have a bootable Linux USB drive.


Advertisement
-
1
Reboot your PC with the USB drive attached. If you’ve already set your PC to boot from USB, your computer will immediately boot into Linux once it comes back up.
- If your PC boots back into Windows 10 instead, continue with this method.
- skip to step 5. Otherwise, the steps to get to the BIOS are going to be different depending on your motherboard—you’ll usually press a key immediately after the PC restarts, which is usually F2, F10, or Del. Search for your PC model and «BIOS setup key» to find your key. Alternatively, try the following steps to boot into the BIOS from Windows 10:
- Press Windows key + i to open Settings.
- Click Update & Security.
- Click Recovery in the left panel.
- Click Restart now under «Advanced startup.»
- On the «Choose an option» screen, click Troubleshoot.
- Click UEFI Firmware Settings and then click Restart. The PC will boot into the BIOS or UEFI.
-
2
Locate the Boot menu. Once the computer boots into the BIOS, look for a menu called Boot, Boot Order, or Boot Options. You might have to enter a menu called Advanced, System, Storage, or Configuration to find it. What you’re looking for a list of boot devices, such as «Hard Drive» and «Removable Device» in order.
-
3
Set the USB drive or «Removable Storage» to be first in the boot order. You may have to select an item called «1st boot device» or similar to bring up a list of options. The goal is to make your USB drive or removable media the first item in the list so your PC tries to boot from devices that are connected to it.
-
4
Save and exit the BIOS. You’ll usually do this by pressing the F10 key or by selecting an option called Save & Exit. Once saved, your PC will reboot.
-
5
Install and run Linux. When your PC boots from the flash drive, you’ll be prompted to choose some regional and keyboard settings. If you made an Ubuntu drive, you can choose Try Ubuntu without installing to use the live version of Ubuntu, or install it on your hard drive. Regardless of the version of Linux you want to install, the remaining steps will be simple—follow the on-screen instructions to get started!
- If you’re installing Puppy Linux, you’ll boot right into a functional Linux desktop without having to install.


Advertisement
Ask a Question
200 characters left
Include your email address to get a message when this question is answered.
Submit
Advertisement
-
Any time the flash drive is connected to your PC upon reboot, your PC will try to boot from it before it boots from your hard drive. If you don’t want to boot from the USB drive the next time you reboot, remove the drive before rebooting.
Thanks for submitting a tip for review!
Advertisement
About This Article
Article SummaryX
1. Download the ISO image.
2. Install Rufus.
3. Insert a blank USB drive.
4. Use Rufus to flash the ISO to the drive.
5. Go into the BIOS and set the USB drive as first in the boot order.
6. Reboot into Linux.
Did this summary help you?
Thanks to all authors for creating a page that has been read 86,731 times.
Is this article up to date?
This tutorial will help you to create a bootable USB drive of Ubuntu in Windows 8/8.1 or Windows 10. After creating a bootable USB you can use this as Live USB or install it on disk.
Requirements
You are required following things to create Ubuntu bootable USB in Windows systems.
- An USB Drive
- Ubuntu ISO Image
- Universal USB Installer application
- A Windows System to create boot disk
Step 1 – Download Ubuntu ISO
You can easily download the Ubuntu ISO image from its official website. Download the Ubuntu Desktop or server edition as per your requirements.
Download Ubuntu ISO Image
Step 2 – Install Universal USB Installer
For this tutorial, I am going to use the Universal USB Installer utility on Windows to create a bootable USB drive. Use the below link to download this tool and install it on your Windows system.
Download Universal USB Installer
At this stage, You have installed Universal USB Installer on your system. Also have downloaded the Ubuntu ISO image. Now start the process of creating an Ubuntu bootable USB.
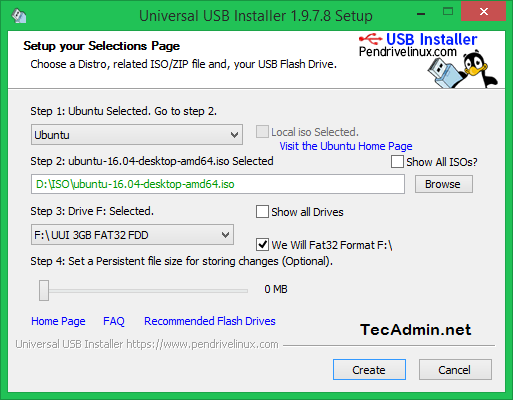
Start Universal USB Installer and select following options.
- Step 1: Select Ubuntu
- Step 2: Browse and select Ubuntu ISO image from your system.
- Step 3: Select the USB drive
Now click on Create button:
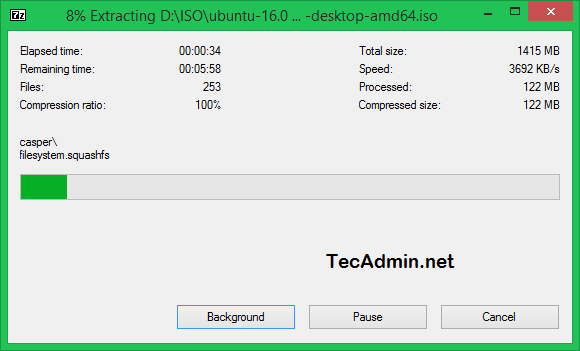
The installation process is in progress.
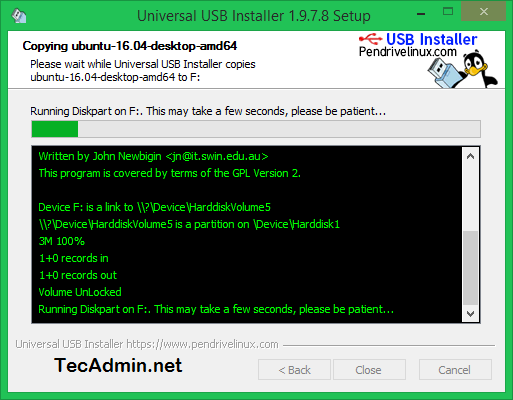
Wait for the installer to complete the process. This process will take time as per your operating system speed.
After completing the process, You will see a screen like this.
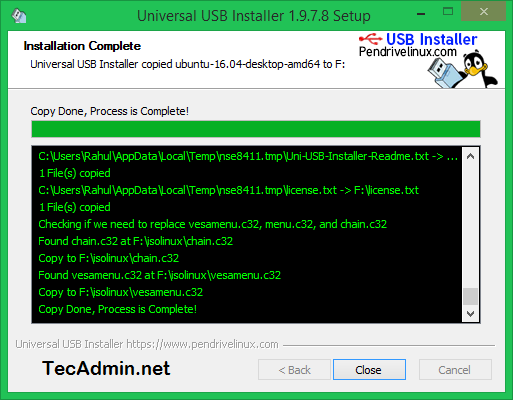
Your Ubuntu bootable USB is ready to use. Use this USB to use as live Ubuntu media or install Ubuntu operating system on your system.