На чтение 10 мин. Просмотров 111 Опубликовано 10.08.2021
Как исправить ошибку: Установка Windows на данный диск невозможна. Возможно, оборудование компьютера не поддерживает загрузку с данного диска при установке ОС.
Содержание
- Почему не удаётся подключить виртуальный оптический диск в VirtualBox
- Причины дисфункции можно свести к следующему:
- Как установить на виртуальный диск Windows 8
- About Linuxys
- Ошибка VMware Workstation and Device/Credential Guard are not compatible
- Как исправить
- Не получается установить Windows на диск GPT или MBR. Исправляем
- Не получается поставить ОС на GPT-диск. Решения, которые помогут
- Настоящее (UEFI и GPT) и прошлое (BIOS и MBR)
- Сторонние драйвера контроллера дисков AHCI, SCSI, RAID
- Если у вас Mac ОС X и вы поставили Ubuntu
- Используйте специальный набор команд
- Чаще всего не получается установить Windows 7
- Преобразование GPT в MBR
- Как обойтись без преобразования
Как известно, «VirtualBox» от «Oracle» является программным продуктом для осуществления виртуализации операционных систем. Он позволяет создать на вашем ПК виртуальную машину, установить виртуальную операционную систему и удобно переключаться между действующей и виртуальной ОС. Последняя может понадобиться главным образом для тестинга различных программных инструментов, которые нельзя выполнить на основной операционной системе.
Создав такую виртуальную машину, вам может понадобиться подключить к ней диск с дополнениями — VirtualBox Guest Additions. Последний существенно расширяет возможности гостевой операционной системы по взаимодействию с хост-системой и системой виртуализации. При попытке подключения диска вы можете получить ошибку «Не удалось подключить виртуальный оптический диск» и предложение принудительно подключить такой диск. При нажатии на «Желаю» каких-либо изменений не происходит.
Причины дисфункции можно свести к следующему:
- В виртуальном приводе уже установлен какой-то образ;
- Ваша версия VB устарела;
- Вы работаете на системе Mac OS X и установили «Ubuntu» как гостевую операционную систему;
- Вы пробует добавить guest additions, которые не соответствуют установленной на ПК версии VirtualBox (не идут в комплекте с программой);
Давайте разберёмся, как исправить ошибку подключения виртуального оптического диска в вашем VirtualBox.
Читайте также: как обновить Налогоплательщик ЮЛ до актуальной версии.
Источник: http://sdelaicomp.ru/programmy/ne-udalos-podklyuchit-virtualnyj-opticheskij-disk-virtualbox.html
Как установить на виртуальный диск Windows 8
- Как установить на виртуальный диск Windows 8 ? Привет админ! Сначала хотел установить Windows 8 на виртуальную машину, а потом раздумал, слишком много телодвижений. В первую очередь нужно скачать и установить виртуальную машину, затем настроить её правильно и только потом инсталлировать в неё Windows 8. А что если установить Windows 8 на виртуальный диск, ведь это можно сделать практически сразу. Есть ли какие сложности в установке и дальнейшем удалении восьмёрки из меню загрузки? Vlad84.
- Здравствуйте админ, создал в Windows 7 виртуальный диск и установил на него Windows 8 и теперь только она и загружается, как можно при запуске компьютера восстановить выбор операционных систем, ведь Windows 7 мне тоже нужна.
Источник: http://a174.ru/could-not-mount-the-virtual-disk-ustanovka-windows-chto-delat/
About Linuxys
Linuxys is a private online Publication that complies the technology stuff going around in the world which is helpful for you. The main purpose of this site is to share tips, tricks and experience of new gadget, tools and software.
Источник: http://linuxys.blogspot.com/2014/02/virtualbox-could-not-mount-mediadrive.html
Ошибка VMware Workstation and Device/Credential Guard are not compatible
При включении VMware Workstation на Windows 10 может возникнуть ошибка со следующим текстом:
VMware Workstation and Device/Credential Guard are not compatible. VMware Workstation can be run after disabling Device/Credential Guard. Please visit http://www.vmware.com/go/turnoff_CG_DG/ for more details
Чаще всего эта ошибка возникает из-за того, что включено ПО Device Guard — оно помогает защитить систему от вредоносных файлов. Device Guard позволяет настроить список файлов, которые Windows будет считать безопасными. Если на компьютер попадут файлы, которые не входят в список, система автоматически удалит их. Работе VMware в таких случаях мешает компонент Hyper-V.
Как исправить
Обратите внимание
Чтобы отключить Hyper-V, необходимо внести изменения в реестр Windows. Перед отключением Hyper-V обязательно создайте резервную копию ОС.
Чтобы исправить ошибку, отключите Hyper-V с помощью функционала «Выполнить».
- 1.
Нажмите сочетание клавиш Win + R.
- 2.
В поисковую строку введите «gpedit.msc» и нажмите Ок.
- 3.
Перейдите в раздел «Политика Локальный компьютер» — «Конфигурация компьютера» — «Административные шаблоны» — «Система» — «Device Guard». Дважды кликните на строку «Включить средство обеспечения безопасности на основе виртуализации».
- 4.
В новом окне выберите пункт «Отключено» и нажмите Ok.
- 5.
Перейдите в раздел «Панель управления» — «Программы и компоненты» — «Включение или отключение компонентов Windows». Отключите Hyper-V и нажмите Ок. Если система предложит перезагрузить компьютер, откажитесь от перезагрузки.
- 6.
Откройте командную строку от имени администратора. Поочередно выполните команды:
bcdedit /create {0cb3b571-2f2e-4343-a879-d86a476d7215} /d «DebugTool» /application osloader
bcdedit /set {0cb3b571-2f2e-4343-a879-d86a476d7215} path «EFIMicrosoftBootSecConfig.efi»
bcdedit /set {bootmgr} bootsequence {0cb3b571-2f2e-4343-a879-d86a476d7215}
bcdedit /set {0cb3b571-2f2e-4343-a879-d86a476d7215} loadoptions DISABLE-LSA-ISO,DISABLE-VBS
bcdedit /set hypervisorlaunchtype off
Затем перезагрузите компьютер.
Источник: http://reg.ru/support/vydelennyye-servery-i-dts/virtualnyj-datatsentr-vmware/sozdanie-i-nastrojka-virtualnyh-mashin/ne-zapuskayetsya-virtualnaya-mashina-v-vmware-workstation
Не получается установить Windows на диск GPT или MBR. Исправляем
Поскольку ПК приобретается раз в несколько лет, а его комплектующие периодически заменяются, программные и аппаратные компоненты порой плохо соответствуют друг другу. Сам ПК может быть достаточно старым, но вы укомплектовали его современным SSD. Уже не первый год доступна Windows 10, а вы до сих пор отдаете предпочтение привычной «семерке».
Помимо таких заметных каждому вещей, как производительность процессора и интерфейс ПО, есть значимые характеристики, которые начинают представлять интерес только в тех случаях, когда становятся причиной сбоев.
К ним относится и формат таблиц разделов HDD или SSD. Вы могли и не слышать о существовании характеристики накопителя, которая неожиданно огорчила, препятствуя установке Windows 7, 10 или 8.
ПК «говорит», что установка Windows невозможна. Причина: таблица разделов диска — GPT или MBR. Увы, технологии прошлого не всегда «дружат» с современными. К счастью, это легко исправимо.

Источник: http://a174.ru/could-not-mount-the-virtual-disk-ustanovka-windows-chto-delat/
Не получается поставить ОС на GPT-диск. Решения, которые помогут
Существуют две возможности:
- Установка ОС на диск GPT.
- Преобразование в MBR.
Источник: http://a174.ru/could-not-mount-the-virtual-disk-ustanovka-windows-chto-delat/
Настоящее (UEFI и GPT) и прошлое (BIOS и MBR)
Раньше материнская плата ПК оснащалась ПО BIOS. Оно осуществляло диагностику и анализ железа, а затем загружало ОС, опираясь на загрузочную запись раздела MBR.

В более современных моделях роль BIOS выполняет UEFI. Загружается быстрее и поддерживает:
- Безопасную загрузку.
- HDD, зашифрованные на аппаратном уровне.
- Драйвера UEFI.
- GPT-диски.

GPT превосходит MBR по важным параметрам:
- Работает с HDD большего объема.
- Большее число разделов на HDD.
Источник: http://a174.ru/could-not-mount-the-virtual-disk-ustanovka-windows-chto-delat/
Сторонние драйвера контроллера дисков AHCI, SCSI, RAID
В некоторых случаях проблема вызвана специфичностью оборудования пользователя. Наиболее распространенный вариант — наличие кэширующих SSD на ноутбуке, многодисковые конфигурации, RAID-массивы и SCSI карты.
Эта тема затронута у меня в статье Windows не видит жесткий диск при установке, а суть сводится к тому, что, если у вас есть основания предполагать, что особенности оборудования являются причиной ошибки «Установка Windows не данный диск невозможна», первым делом следует зайти на официальный сайт производителя ноутбука или материнской платы, и посмотреть, а есть ли там какие-то драйвера (как правило, представленные в виде архива, а не установщика) для SATA-устройств.
Если есть — загружаем, распаковываем файлы на флешку (там обычно присутствуют inf и sys файлы драйвера), а в окне выбора раздела для установки Windows нажимаем «Загрузить драйвер» и указываем путь к файлу драйвера. А уже после его установки, становится возможной и установка системы на выбранный жесткий диск. 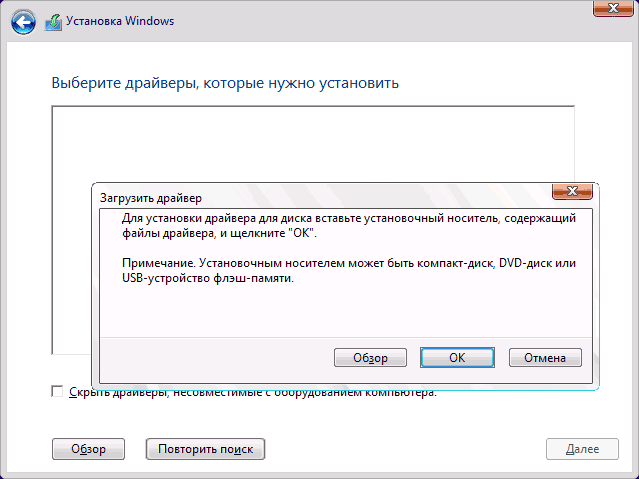
Если предложенные решения не помогают, пишите комментарии, будем пробовать разобраться (только упоминайте модель ноутбука или материнской платы, а также какую ОС и с какого накопителя устанавливаете).
Источник: http://remontka.pro/cannot-install-windows-to-disk/
Если у вас Mac ОС X и вы поставили Ubuntu
Если вы используете Мак ОС Х, и вы установили Ubuntu как гостевую операционную систему, вам нет необходимости монтировать виртуальный диск «guest addition» и выполнять инсталляцию с него.
Вместо этого откройте терминал и наберите там следующее:
Это позволит установить guest addition и более-менее равноценно его установки с помощью ISO.
Источник: http://sdelaicomp.ru/programmy/ne-udalos-podklyuchit-virtualnyj-opticheskij-disk-virtualbox.html
Используйте специальный набор команд
Также может помочь следующий набор команд, предложенный одним из зарубежных пользователей (можно задействовать в качестве ориентира):
Источник: http://sdelaicomp.ru/programmy/ne-udalos-podklyuchit-virtualnyj-opticheskij-disk-virtualbox.html
Чаще всего не получается установить Windows 7
Сложности с установкой системы на GPT-диск с большей вероятностью возникают у пользователей, которые предпочитают Windows 7.
Для установки Windows на диск со стилем разделов GPT необходимо соблюсти два условия:
- 64-битная ОС.
- Загрузка в режиме EFI.
Исхожу из того, что вы устанавливаете 64-битную версию Windows. Это означает, что сообщение об ошибке появляется по причине несоответствия второму требованию.
Не исключено, что будет достаточно поменять настройки BIOS. Зайдите в него, нажав предусмотренную для этого клавишу. Вы увидите, какую клавишу нажимать в процессе загрузки компьютера. В ноутбуках чаще всего применяется F2, в настольных моделях — Delete.
Поменяйте загрузку CSM (Compatibility Support Mode) на UEFI.
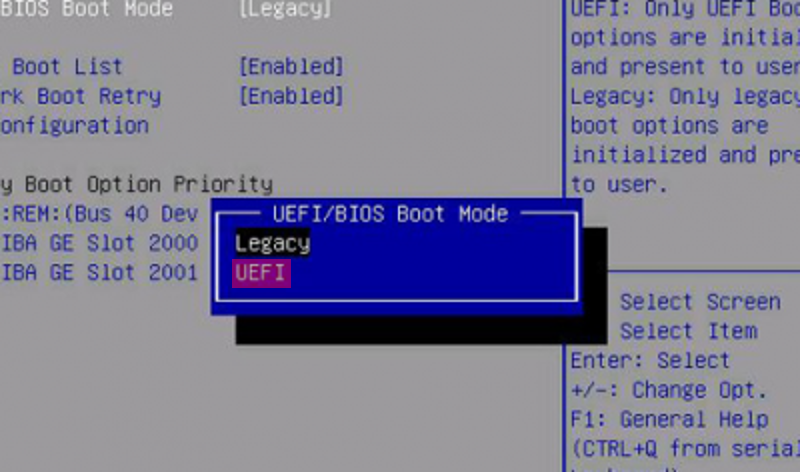
Ищите в разделах «BIOS Setup», «BIOS Features» или подобных по смыслу. В SATA определите режим AHCI, а не IDE.

Для седьмой (и еще более древних) версий Windows нужно также выключить Secure Boot.

BIOS вашей модели компьютера может выглядеть иначе. Названия пунктов меню также могут быть другими. Но смысл всегда сохраняется.
После изменения и сохранения вами новых параметров BIOS у вас появится возможность установки системы на GPT-диск. Если вы устанавливаете ОС с DVD, то сообщение об ошибке при повторной попытке установки, скорее всего, не появится.
В случае установки с USB-накопителя сообщение может отобразиться опять. В этой ситуации необходимо пересоздать установочную флешку таким образом, чтобы она поддерживала загрузку UEFI.
Если накопителем поддерживаются два метода загрузки, удалите файл «bootmgr» в корневой директории флешки. Тем самым вы предотвратите возможность загрузки в режиме BIOS. Если нужна загрузка в режиме BIOS, удалите каталог «efi». Не делайте этого в тех случаях, когда есть хоть малейшие сомнения. Можно повредить дистрибутив.
Источник: http://a174.ru/could-not-mount-the-virtual-disk-ustanovka-windows-chto-delat/
Преобразование GPT в MBR
Если вы располагаете ПК с классическим BIOS и собираетесь поставить Windows 7, этот вариант будет лучшим (и, возможно, единственным). В процессе преобразования вся информация с накопителя будет удалена.
Во время работы мастера установки ОС нажмите F10 и Shift. В некоторых моделях ноутбуков — F10, Fn и Shift. В открывшейся командной строке последовательно введите такие команды:
— diskpart
— list disk (запишите номер подлежащего преобразованию диска)
— select disk N (вместо N — записанный номер)
— clean (команда очистит диск)
— convert mbr
— create partition primary
— active
— format fs=ntfs quick (быстрое форматирование в файловой системе NTFS)
— assign
— exit

Источник: http://a174.ru/could-not-mount-the-virtual-disk-ustanovka-windows-chto-delat/
Как обойтись без преобразования
Зайдите в BIOS и установите режим загрузки CSM (Compatibility Support Mode) или Legacy, отключив EFI. Отключите «Secure Boot».
Ранее я подробно рассмотрел процессы чистой установки Windows 10 и Windows 7.
Какие другие затруднения возникали у вас при установке Windows?
Авторизуясь, вы даете согласие на обработку персональных данных.
Источник
Источник: http://a174.ru/could-not-mount-the-virtual-disk-ustanovka-windows-chto-delat/
 Не получается загрузиться с флешки, чтобы установить windows либо запустить программу с bios? Есть решения этой проблемы. Давайте определим почему не запускается загрузочная флешка с bios и подберем решение либо настройки. Также узнаем что такое UEFI BIOS и как это влияет на запуск с флешки.
Что делать если не устанавливается Windows
Очень часто начинающие пользователи могут столкнуться с проблемой переустановки Windows, когда решают сэкономить свои денежные средства и выполняют эту задачу самостоятельно.
Данная ОС пользуется большой популярностью, а потому было достаточно в общем разобраться с тем, почему именно не устанавливается Windows.
Что делать если не устанавливается Windows
В первую очередь нужно проверить настройку BIOS. Проблемы могут возникнуть, если считка не настроена с диска или же флешки. В этом случае нужно будет поставить галочку на DVD/CD привод, USB HDD, соответственно.
В БИОСе может быть написано несколько иначе, ведь это будет зависеть от версии и модели материнской платы ПК. Перед тем, как выходить из БИОСа, стоит сохранить все измененные настройки и отключить флоппи дисковод для старых ПК.
Во время установки ОС могут быть проблемы с типом использования компьютерного жесткого диска. На наших ПК винчестеры работают в режимах RAID и IDE AHCI.
Зайдите в раздел IDE configuration, использовать лучше режим AHCI. Только если установка будет проходить со старой флеш-карты, то вероятнее всего появится надпись об отсутствии нужного драйвера, тогда стоит перейти в режим IDE.
Еще одна причина сбоя в установке Виндовс – повреждение аппаратного устройства компьютера. К примеру, пострадать может жесткий диск, материнская плата, оперативную память, видеокарта, блок питания, даже сам процессор.
В таком случае нужно провести полную диагностику ПК, найти поврежденную часть и отремонтировать ее, а может и вовсе нужно будет заменить деталь. Чтобы проверить устройство, использовать нужно такие утилиты: для процессора и видеокарты, материнской платы — PC Test; винчестера — HDD Regenerator, оперативную память – MemTest.
С помощью БИОСа можно проверить блок питания устройства.
И, конечно же, не забывайте, что аппаратная часть может устареть, если она не будет отвечать минимальным требованиям системы для установки Windows, то успешно загрузить ОС не выйдет.
Дата: 2018-09-28 ПК — без проблем!
Рейтинг: 2.5 из 5
Голоса: 10
Комментарии и отзывы: 22
1. Саня •
все в биосе у меня правильно, но последняя версия винды 1803 не хочет загружаться с флешки. записывал образ как через оф утилиту от майков так и сторнними ,все бестолку, при запуске долго висит лого виндовс, потом БСОД и перезагрузка П С, предыдущии версии грузились норм, ..при установке с рабочего стола виндовс установилась, тоесть образ если что не кривой . РЕД.. вобщем решилось все так, в моем ноутбучном БИОС АМИ, отключил Легаси Юсб или как там его ).. сохранил настройки. после этого конечно же в Бут меню флешка вобще пропала, затем заново ее включил, и АЛИЛУЯ, пошла загрузка с флешки ) видать перезапуск нужен был какой то, правда винда перестала запускаться ))) ну это не страшно. я ее собирался начисто ставить, и поставил
2. IT •
Мне 13 , собрал топ ПК на свои деньги , хотел задать вопрос почему для образа диска нужно 8гб на флешке (Windows 10 x64) , сейчас у меня есть флешка 4гб и там установлен образ диска скачанный с торрента , так как оффициалы пишут для установки виндовс нужно иметь 8гб на флешке , сейчас сижу , воткнул флешку а комп , выставил приоритеты и загружается , сначала все норм , иконка виндовс , белые точки крутятся , а потом либо белый экран , либо синий экран и все , дальше нету окна где можно выбрать язык , установку и т.д , подскажите это связанно в том что у меня 4гб флешка?
3. Orhidejafairytale81 •
Не работает твой метод , виндовс 10 не могу поставить , завизает на логотиме и дальше ничего не происходит. с диска всё видит и установка возможна , флешку тоже видит , поставил а приоретет и первую загрузке с неё — но дальше логотипа ничего не происходит , ставил всякие режимы , usb- zip / usb- fdd / usb- cdrom / usb- hdd , везде одинакого и вешается на логотипе , что делать — решения не нашёл комп наверно выкину на помойку- это не возможно
4. Smad •
ха, да это и так все знают. Ты лучше бы сказал почему работающая винда на винчестере подключенном к материнке без UEFI работает а вот если винчестер перенести на комп с этой долбаной UEFI на материнке уже не загружается винда. Тупо появляется значок винды идёт загрузка и через пару сек на перезагрузку.
5. KinF#1337 •
Установил флешку самую первую в БИОС,сохраняю запускаю,а включается обычный виндовс мой…
Потом вообще убрал жетский диск из списка и осталась только флешка. Сохраняю запускаю,темный экран,и заново включается БИОС. Что делать?
Поставил все назад и работает,но переустановить не могу
6. Александр •
А что это значит
перезагрузите и выберите Правильное загрузочное устройство или вставьте загрузочный носитель в выбранное загрузочное устройство и нажмите клавишу.
reboot and Select Proper Boot Device or insert Boot Media in selected Boot Device and Press а key
Диск с образом в приводе , загрузка с привода.Что еще?
7. Отец •
Ноутбук digma, версия uefi 2.4.Диск ssd, размечен в GPT. При этом винда стоит 32-bit-ная. Хочу переустановить на 64 битную. Secure boot отключил, флешку с uefi видит в биосе, но не загружается, грузит винду. флешка в FAT32, использовал «Rufus» для создания флешки. Что может быть не так?
8. Галина •
при выборе раздела диска,в который хочу установить систему пишет, что это невозможно,тк раздел имеет стиль GPT:причем все пять И новый раздел не могу создать,тк звездочка не подсвечивается. Форматирование и обновление разделов ничего не дают)))))КАК БЫТЬ???
9. Alex •
Посмотрел множество видеороликов, «перелапатил» кучу статей, но именно из этого видеоролика наконец-то получил полезную информацию. Мучения закончились… Спасибо p.s. Чтобы руки отсохли у тех кто запилил в биос эту муть с UEFI и GPT…
10. Minion •
Спасибо огромнейшее,все что сказал хоть и не дало мне нечего,но благодаря тебе я зашёл в биосе в адвантер (или как там) и нашел там приоритет запуска) Спасибо) А то везде не тот Биос который у меня,про бот меня вообще молчу…
11. VladikPiratik •
Может ли ноутбук поддерживать только XP?
не давно подкинули старый ноут HP шведский,решил пере прошить и поставить 7 но флешки тупо не видно в биосе,вроде настройки в порядке а флешки все равно не видно.
12. Максим •
У меня winsetupusb 10 и 7 на одном компе работает грузится, на другом ошибка такая cold not mount the virtual disk. Cannot continue, press ok to reboot подскажите что делать? Комп который все работает старее, а где не работает x58 1366 поновее.
13. Rey •
Все сделал как на видео. Началась загрузка, но на финальной стадии «Завершение установки» прерываются, комп перегружается и предлагает начать с начала. Это продолжается бесконечно. что посоветуете?
14. Arina •
Спасибо, проблема решилась (правда, пришлось немного потрудиться, чтобы у себя найти переключение на CMS), а то совсем идей не было, почему не могу загрузиться с флешки, ведь раньше делала это без проблем.
15. Rastko •
В одном случае, спрашивает и говорит что BOOTMGR нет, а когда формат делаю и выбираю флешку после БИОС говорит Remove disks or other media, что только не пробовал, видит флешку в БИОСЕ но грузить с нее не может.
16. BLACK_RAVEN •
У меня показывает знавек чин 10 при установке но нет загрузочного меню постоянно перезапускается установка токо знавек виндовс выскакивает и все потом перезагружается что делать
17. Вячеслав •
Хотел поставить винду через dell мать. Хотел через флеху, но ничего не получилось раз 20. Потом поменял флеху 8 класса и все получилось оказалось что флешку 10 просто не видело.
18. hrach •
Привет, у меня есть мультизагрузочная флешка, который на других компьютерах открывается без проблем. А возможно uefi вообще не может открывать образы из multiboot флешки?
19. Artyom •
а если у тебя компу 11 лет,винда 6 лет не менялась вовсе,некоторые usb не работают,дисковод тоже диски не видит,вместо usb в bios стоит cd/rom,то как переустановить винду?
20. Олег •
Подскажи пожалуйста, что делать если в биосе тупо нету функции чтобы выбрать что будет запускаться первое (CMOS SETUP UTILITY — COPYRIGHT 1985-2005 AMERICAN MEGATRENDS)
21. god •
Просто нужно launch csm поставить в положение enabled и поставить порядок запуска, сначало флэшку потом вин и тогда все норм будет Не благодарите))
22. Анна • 31.03.2021
Не работает..
Пишет could not install imdisk virtual disk driver cannot continue press ok to reboot..
Добавить отзыв, комментарий
Simple yet effective fixes to regain access to Disk Management
by Ola-Hassan Bolaji
A Computer Engineering graduate, he has spent most of his life reading and writing about computers. He finds joy in simplifying complex topics into simple solutions for PC… read more
Updated on
- If you are getting the Disk Management could not start Virtual Disk error, it might be because of corrupt system files.
- A quick and effective solution to this issue is to disable Windows Defender temporarily.
- You can also fix this issue by running the DISM and SFC scans.
Disk Management is the go-to Windows tool for drive partitioning and related functions. However, you can get errors, like Disk Management could not start Virtual Disk service once in a while trying to launch the tool.
Different factors like disabled service and firewall interference can cause this issue. To help you regain access to Disk Management, we have gathered tested and proven solutions to help you fix this issue, irrespective of the cause.
Why is Disk Management not starting the Virtual Disk service?
Listed below are some of the potential causes of the Disk Management could not start virtual disk service error message:
- Disabled service – While you can disable some Windows services, the Virtual Disk service is not one of them. So, you need to keep it enabled.
- Corrupt system files – If some crucial system files are missing or broken, you will likely get this error. The solution is to run a couple of simple CMD commands to repair and restore the files.
- Interference from security software – At times, Windows Defender or Firewall might be preventing the Virtual Disk Service from starting. You need to disable your anti-virus application temporarily to fix this.
Taking these common causes for the Disk Management could not start Virtual Disk service error into account, let’s fix the problem using the solutions below.
How can I fix Disk Management to start the Virtual Disk service?
1. Enable the Virtual Disk Service on both local and remote computers
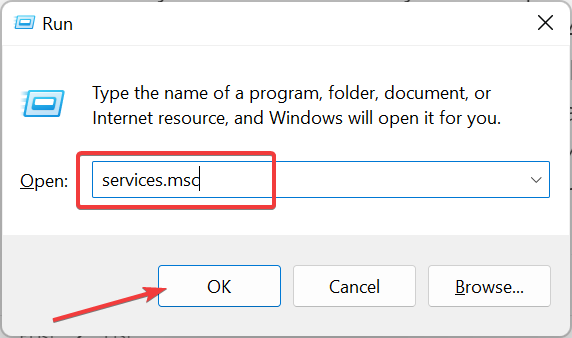
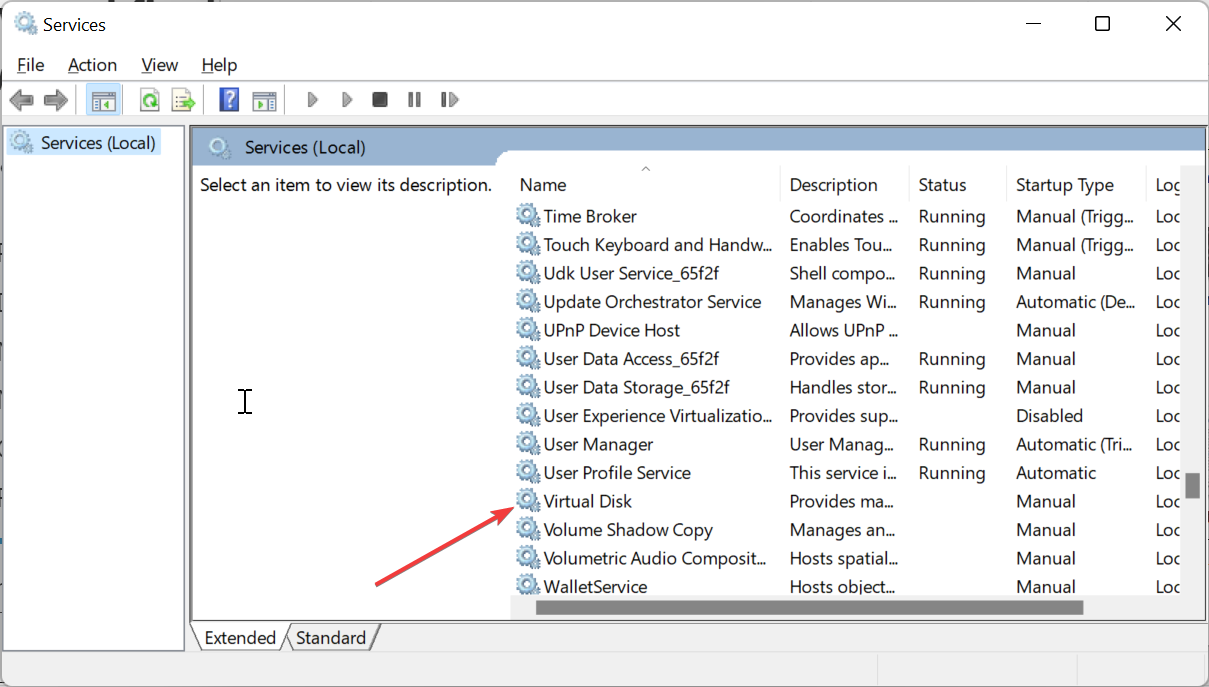
- Press the Windows key + R to open the Run dialog box, type services.msc, and click the OK button.

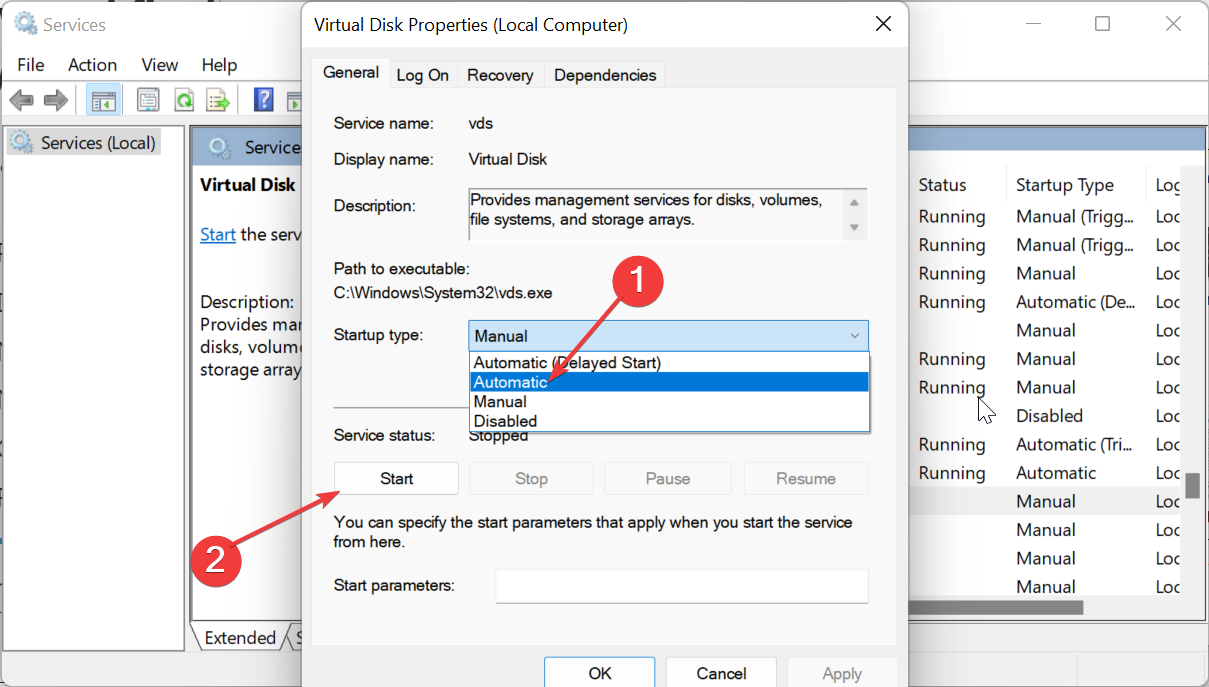
- Double-click the Virtual Disk service to open its properties.

- Now, set its Startup type to Automatic and click the Start button.
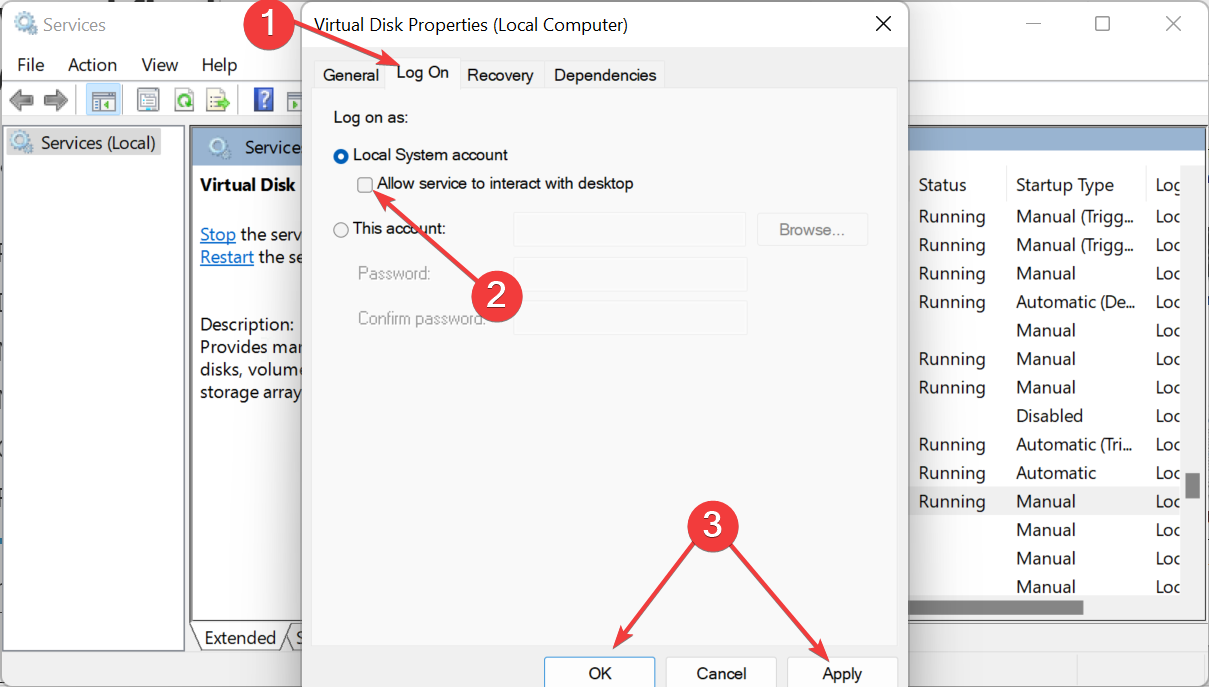
- Next, click the Log On tab at the top.
- Check the box for Allow service to interact with desktop.
- Finally, click the Apply button, followed by OK.
The first thing to do if you are getting the Disk Management could not start Virtual Disk service error is to check if the service is disabled. If it is, you need to enable it.
How we test, review and rate?
We have worked for the past 6 months on building a new review system on how we produce content. Using it, we have subsequently redone most of our articles to provide actual hands-on expertise on the guides we made.
For more details you can read how we test, review, and rate at WindowsReport.
2. Enable the Remote Volume Management through Windows Firewall
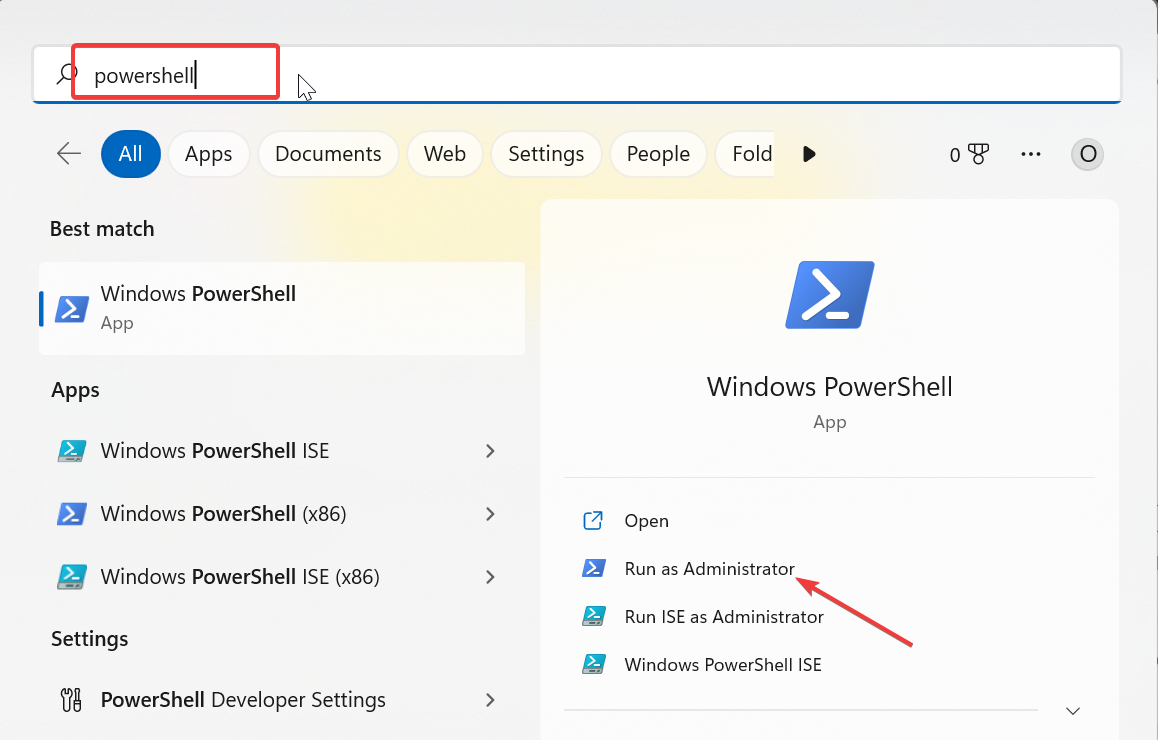
- Press the Windows key + S to open the search box, type powershell, and click Run as administrator under Windows PowerShell.

- Now, type the command below and hit Enter on your local and remote systems to enable Remote Volume Management:
netsh advfirewall firewall set rule group="Remote Volume Management" new enable=yes
- Finally, wait for the process to finish running.
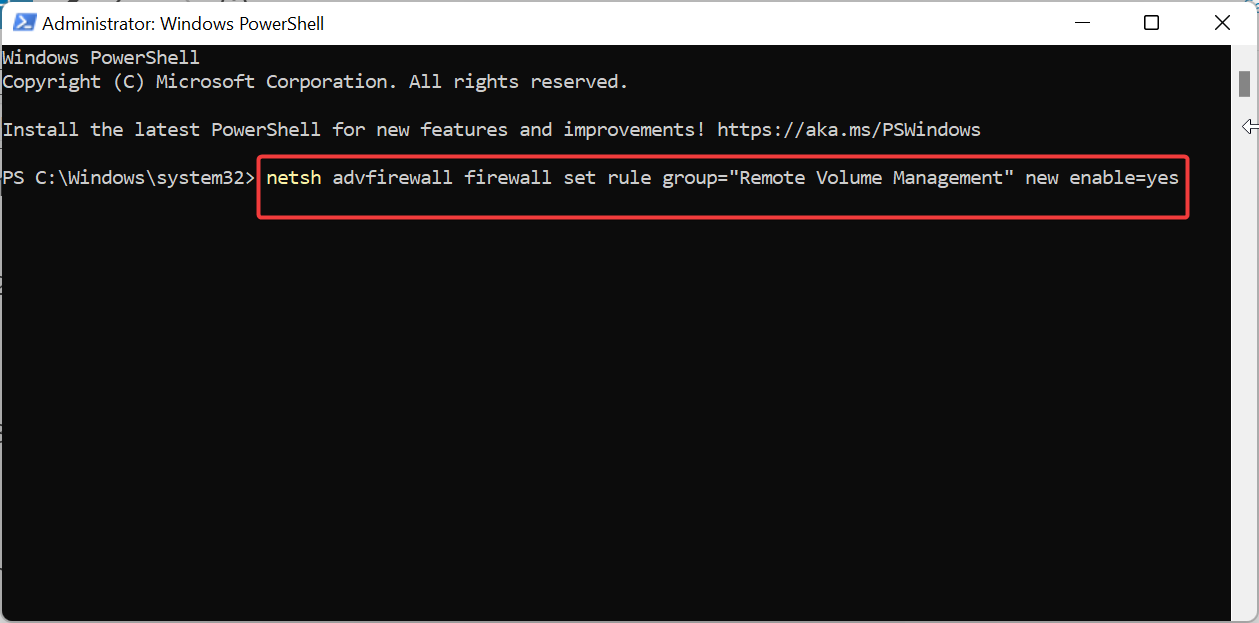
If the Windows Firewall is blocking Remote Volume Management, you are likely to get the Disk Management could not start Virtual Disk service error.
The only way to prevent and fix this is to allow the tool through your built-in firewall on both the local and remote systems.
- Fix: Set Time Zone Automatically Defaults to Wrong Time Zone
- 0X8007013 Install Error: How to Quickly Fix it
3. Temporarily disable Windows Defender
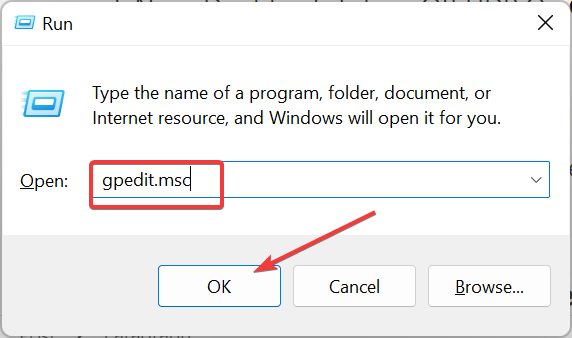
- Press the Windows key + R, type gpedit.msc, and click OK.
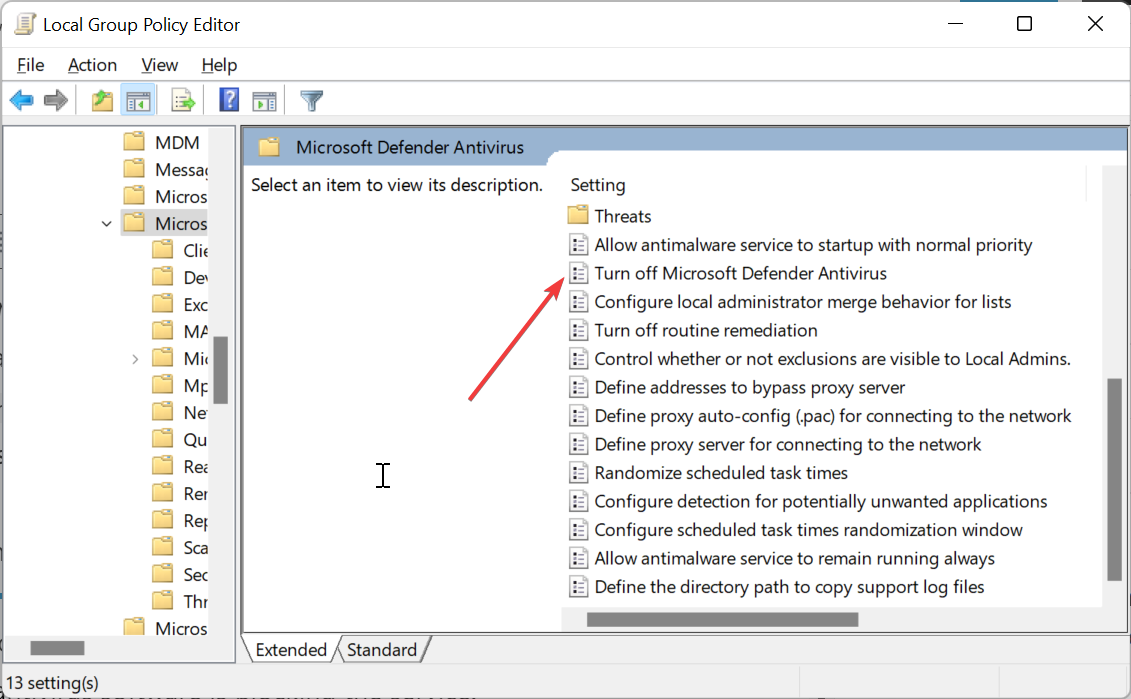
- Navigate to the path below in the left pane:
Computer Configuration > Administrative Templates > Windows Components > Microsoft Defender Antivirus > Turn off Microsoft Defender Antivirus - Now, double-click the Turn off Windows Defender Antivirus option.

- Tick the Enabled radio button.
- Finally, click Apply and OK to save the changes.


If you are still getting the Disk Management could not start Virtual Disk service error after allowing the Remote Volume Management, it means your antivirus software is blocking the service.
4. Run the SFC and DISM scans
- Press the Windows key, type cmd, and select the Run as administrator option under Command Prompt.

- Type the DISM command below and hit the Enter key to run it:
DISM /online /cleanup-image /restorehealth
- Wait for the command to finish running. Now, run the command below:
sfc /scannow - Finally, wait for the scanning process to complete and restart your PC.


Sometimes, this error is simply caused by corrupted system files. This can also cause the Disk Management not loading issue.
You can restore normalcy here by running the SFC and DISM scans.
How do I fix Disk Management stuck on connecting to virtual disk service?
If Disk Management is stuck on connecting to the Virtual disk service, the effect is the same, and the service won’t start.
While you can fix the issue with some of the fixes above, the causes of the issues are still different. So, to fix the Disk Management stuck on connecting to Virtual Disk service issue, check our detailed guide on the topic.
The Disk Management could not start Virtual Disk service issue is one of the common issues users encounter, and you have nothing to worry about.
The problem is often caused by interference from your antivirus and firewall or a disabled service. But with the list of solutions in this guide, fixing it should be effortless.
In the same vein, if you are getting a Virtual Disk object not found error, we have a detailed guide to help you fix that too.
![]()
Do you frequently receive prompts showing «unable to connect to virtual disk service» on Windows 10 or 11? Also, When attempting to access Disk Management in Windows 7, it may become stuck in «connecting to the virtual disk service» or «loading disk configuration information.»
Here, we outline the steps you can take to solve this issue, as it is a Windows service that controls and makes information available on the virtual disk.
Why Unable to Connect to Virtual Disk Service
You are wondering why your Disk Management cannot connect to the virtual disk service. Here are some of the reasons why.
- The remote computer does not support VDS.
A computer won’t connect to a virtual disk service if it doesn’t support it. So always check to know if the laptop supports it before connecting.
- The connection is blocked by Windows Firewall.
The Windows Firewall monitors network traffic into and out of the computer and determines which network traffic to block or allow based on the security rules. So, the Windows Firewall may be responsible for the coming errors.
- Other reasons, such as faulty devices.
You could check on external storage devices like an external hard drive, a card reader, or a USB drive, as they could be faulty and responsible for the errors. These devices could also be incompatible with Disk Management.
To get this virtual disk service error fixed, look at the next part of this article. The fixes would help with the error on either a Windows PC or a Windows Server.
How Do I Fix the «Unable to Connect to Virtual Disk Service» Error
Outlined here are the possible ways you can get the «unable to connect to virtual disk service» prompt fixed. We present to you six ways to fix the error. They are as follows:
Fix 1. Use Alternative Software for Disk Management
Fix 2. Disable Windows Defender
Fix 3. Enable Virtual Disk Service
Fix 4. Use SFC or DISM to Fix the Error
Fix 5. Unblock Windows Firewall
Fix 6. Check All External Storage Devices
Now, let’s learn the fixes in detail and start with the first one.
Fix 1. Use Alternative Software for Disk Management
What if I told you that you could use an alternative software for Disk Management that would serve the same purpose without any issues? Interesting right? EaseUS Partition Master Free serves this purpose well, and yes, it can completely replace disk management in all aspects.
It is more efficient and safer than disk management and has other exciting features. Here are some reasons why it is an ideal alternative.
- Create/Delete partition: You can delete/create partitions on USB drive, SD cards, and other drives.
- Resize/Move partition: This tool can resize encrypted partition or move unallocated space to C drive
- Extend system partition: You can make the most of available or unallocated space. To speed up the PC, use the «Extend» feature.
- Merge partitions: With its help, it is easy to merge partitions on SSD or a USB.
- Format/Wipe Partition: You can format a disk or delete a partition using the free EaseUS Partition Manager.
You can’t wait to try it out with the features listed. You can click the button below to download.
Fix 2. Disable Windows Defender
Sometimes disabling the built-in Windows Defender antivirus can prevent the error from occurring.
To disable them, follow these steps.
Step 1: Press the «Windows + R» keys and type in «gpedit.msc» in order to open Local Group Policy Editor.
Step 2: Navigate to Computer Configuration > Administrative Templates > Windows Components > Windows Defender Antivirus.
Step 3: Highlight Windows Defender Antivirus and double click Turn off Windows Defender Antivirus.
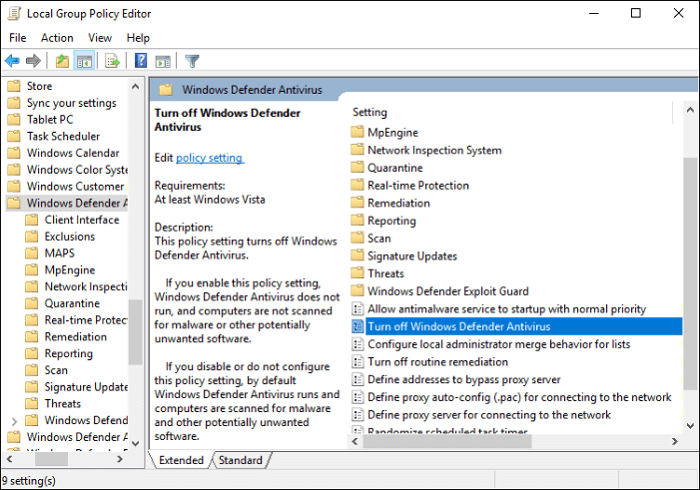
Step 4: Mark «Enabled,» then «Apply,» and «OK» to save the changes.
Step 5: Reboot the computer to effect the changes.
Fix 3. Enable Virtual Disk Service
The virtual disk services might not be enabled; to enable them, follow this guide.
Step 1: Press the «Windows + R» keys simultaneously to call out the Run box.
Step 2: Type «services.msc» in the Run box, and after, press Enter to open Windows Services Manager.
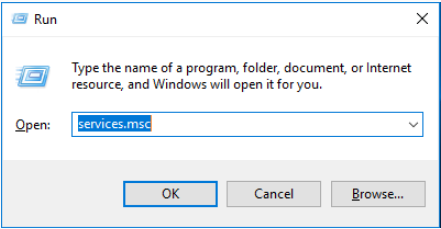
Step 3: Scroll down to find the Virtual Disk Service. Double-click this service to open it.
Step 4: Choose Automatic/Manual for the startup type. Then, click «OK» to save the changes.
Fix 4. Use SFC or DISM to Fix the Error
Step 1: Open the Command Prompt window. Enter «command prompt» in Search. Right-click the Command Prompt icon and Run as administrator.
Step 2: Type «sfc /scannow» and press the Enter key. Then, wait until the procedure ends.
You can start Disk Management to see if it can be loaded as usual. If the SFC command fails to fix this problem, you can try the DISM command.
The steps for running the DISM command are given below.
- Similarly, launch Command Prompt as an administrator.
- Type this:
exe /Online /Cleanup-image /Scanhealth
exe /Online /Cleanup-image /Restorehealth
- Close the Command Prompt window after the procedure ends and test whether the error is solved.
Fix 5. Unblock Windows Firewall
Based on its security rules, the Windows Firewall often acts as an obstacle. Follow the steps below to unblock the Windows Firewall.
Step 1: Select the Start button > Settings > Update & Security > Windows Security and then Firewall & network protection
Step 2: Select «Windows Defender» and click «Open Windows Defender Security Center.»
Step 3: Click «Firewall & network protection» and «Allow an app through firewall.»
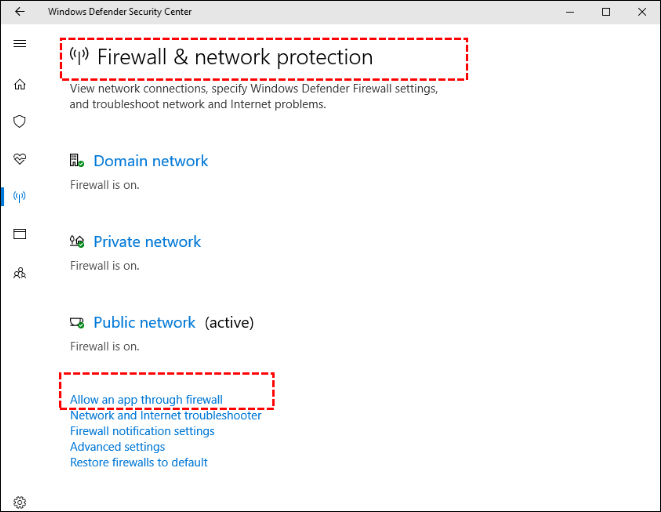
Step 4: In the new window, click «Change settings.»
Step 5: Find «Remote Volume Management» and tick both squares, then click the «OK» button to save changes.
Fix 6. Check All External Storage Devices
Troubleshooting external storage devices can sometimes fix this. removing all external devices one by one to determine if any are defective. The external storage devices can be a card reader, a USB drive, or a hard drive. Also, the universal serial bus drivers should be updated.
Conclusion
With the virtual disk service, it is possible to execute management functions for disks, file systems, volumes, and storage arrays, and mistakes would be prevalent.
The causes of this have been covered in this article; now, we need to determine whether the remote computer is capable of using it, whether any external storage devices are broken, or whether the Windows firewall has blocked the connection. There are six ways to resolve the issues, regardless of whether a Windows PC or Windows Server is involved.
There are some other disk partition issues you may run into when you use Disk Management. Click the links to help:
FAQs Related to Unable to Connect to Virtual Disk Service
Some of the frequently asked questions with answers related to being unable to connect to virtual disk service are provided here.
1. What is the Virtual Disk Service?
This Microsoft Windows service performs queries, configuration tasks, and volume and disk management functions as end users, scripts, and programs are requested.
2. How do I enable virtual disk services?
Information on how to enable virtual disk services has been given in this article.
3. Can I restart the virtual disk service?
Yes, you can. Below are a few steps to do this.
Step 1. Press the Windows key + R on the Keyboard.
Step 2. Type services.MSC and hit Enter.
Step 3. In the Services Window, look for Virtual Disk service and stop it.
Step 4. Restart the computer, Start the Virtual Disk Service, and set it to Automatic.
Disk Management could not start Virtual Disk Service (VDS) error occurs when users are trying to partition or rename drivers on their Windows computers. The same error message has a variation which is ‘Unable to connect to Virtual Disk Service’. There are a number of reasons why you get this error but the common cause is Firewall or your security programs blocking and interfering with the connection between the remote computer and Virtual Disk Service.

In this article, we will look at other causes of the Disk Management could not start Virtual Disk Service error and different ways to resolve it. The error blocks users from accessing and using Disk Management. Below is the exact error message that the users get:
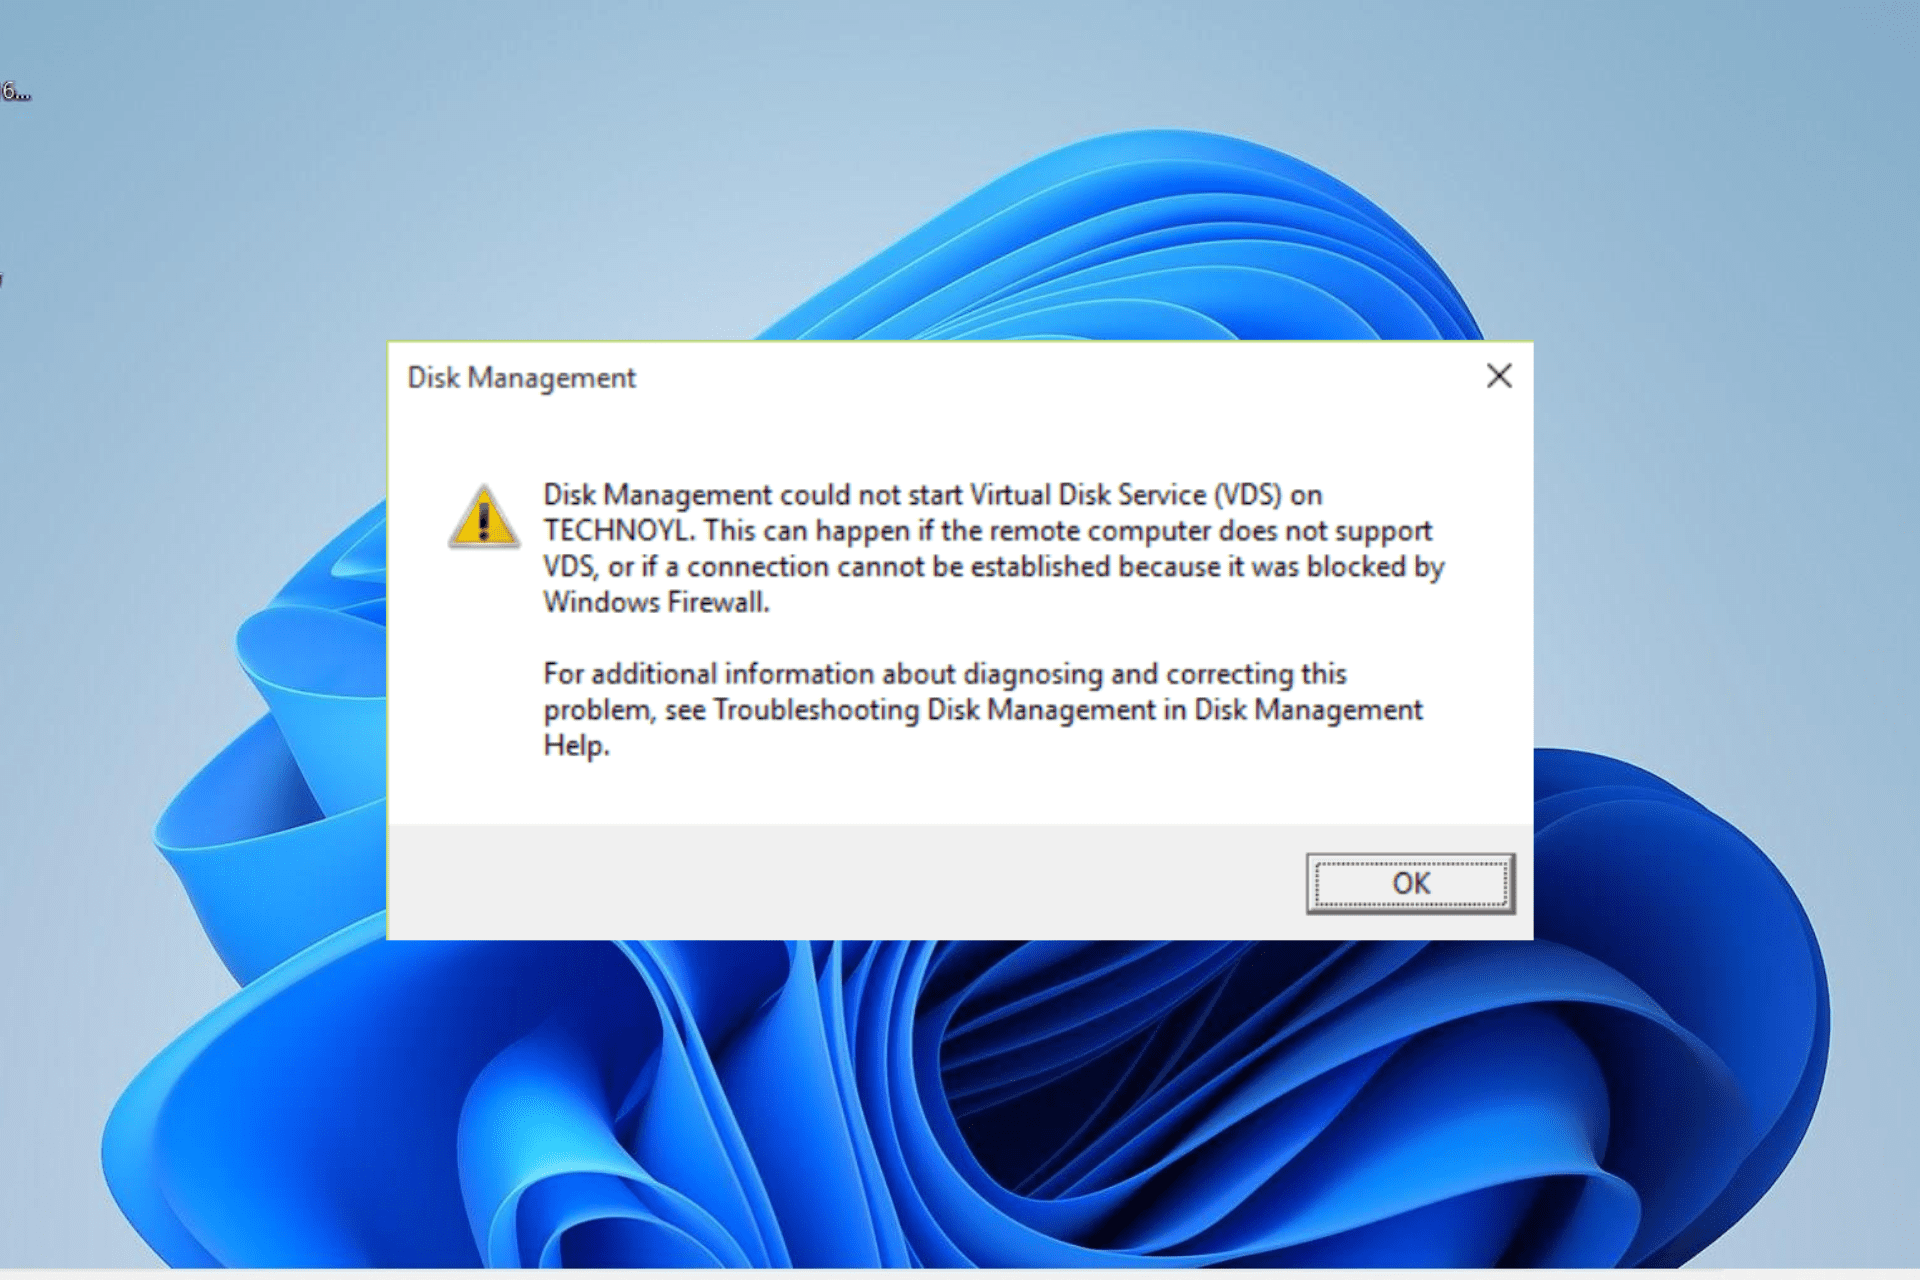
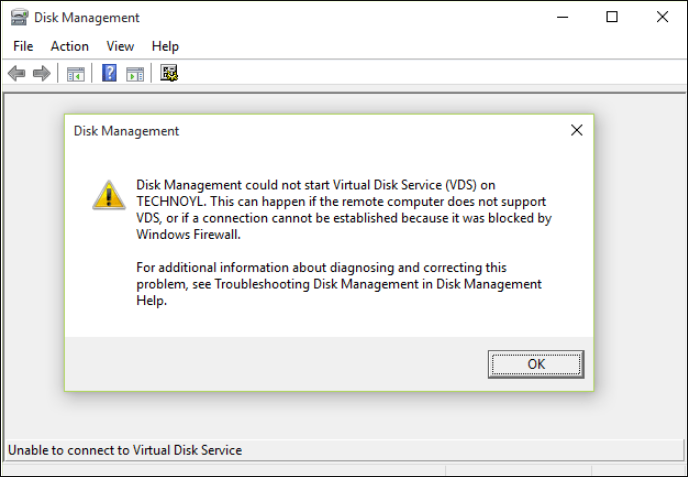
Disk Management could not start Virtual Disk Service (VDS) on SRV2. This can happen if the remote computer does not support VDS, or if a connection cannot be established because it was blocked by Windows Firewall.
For additional information about diagnosing and correcting this problem, see Troubleshooting Disk Management in Disk Management Help.
What causes the Disk Management could not start Virtual Disk Service error?
The causes of the Disk management error can include several issues. As we said earlier, the common cause is firewall and antivirus software blocking the connection. However, there are other possible reasons that could trigger this error. They include the following:
- Temporary technical hitch: Sometimes, a bug or a glitch can affect the connection between the computer and VDS. This is a temporary issue and can be fixed by performing several preliminary steps such as restarting your computer and disconnecting the hard drives.
- Corrupted system files: If there are corrupted files in your computer, especially those Disk Management and VDS depend on, there will be faulty connections between the two components leading to the error. Fixing these files should be the priority.
- Virtual Disk Service stopped running: Disk Management relies on the VDS to facilitate the partitioning or renaming of hard disks in your computer. If the service is not running, there will be no communication and hence you get the error.
- Hardware problems: Last but not least, if there are hardware issues like faulty connecting cables, damaged ports, CPU issues, etc., the Disk Management might have an issue connecting to the service triggering the error.
Having looked at the possible reasons why the Disk Management could not start Virtual Disk Service error occurs, we can now look at different ways to resolve them. Let us now get started.
If your Disk Management is not connecting to the Virtual Disk Service on your Windows PC, disconnect cables and hard drive, and then restart your computer. This should fix any temporary technical issues that are resolved by restarting the PC and resetting the connection. If these preliminary steps don’t work for you, then you can try the following solutions:
- Run SFC and DISM scan. To repair and check the integrity of your system files, you need to run the System File Checker (SFC) and Deployment Image Servicing and Management (DISM) command line tools. These tools automatically find, scan, and repair any files that are broken, missing, or corrupted. Run these tools and see if you will fix the Disk Management issue.
- Disable Microsoft Defender Temporarily. As the error message indicates, firewall issues could be the first culprit. You need to turn off Windows Defender temporarily. Note that Windows Defender is an important tool for your PC and you should turn it on immediately after you are through with this solution.
- Manually enable and run Virtual Disk Service. Enabling the Virtual Disk Service in the Services console, ensure that the connection is established between the service and Disk Management. The services may have stopped after an issue or a user stopped or disabled it knowingly or unknowingly. So check it and if it’s not running, enable and run it.
- Allow Remote Volume Management in Windows Firewall. Windows Firewall can block the connection between Disk Management and Virtual Disk. To fix this, you need to allow Remote Volume Management for both remote computers and local ones. The procedure is straightforward and we will loot that shortly.
- Disable other third-party security programs. Some third-party antivirus software can interfere with either Disk Management or Virtual Disk Service. If that is the case, disabling them temporarily will be the best option to resolve the issue.
1. Run SFC and DISM scan
- Press the Windows button + R, type cmd in the Run dialog box, and press Ctrl + Shift + Enter to open Command Prompt as an administrator.
 error")
Run SFC and DISM scans - Run the following command line to initiate the SFC scan:
Sfc /scannow
- After that, copy the following command line and press Enter after each to run the DISM scan:
DISM /Online /Cleanup-Image /CheckHealth
DISM /Online /Cleanup-Image /ScanHealth
DISM /Online /Cleanup-Image /RestoreHealth
 error")
2. Disable Microsoft Defender Temporarily
- Search Windows Security in the search box and click it in the results list.
- Choose Virus & threat protection when Windows Security opens.
- Locate and click Manage settings.
- Toggle off the button next to Real-time protections.

Disable Windows Defender

NOTE: After you are done with this method, turn on Windows Defender to continue enjoying security against malicious attacks.
3. Manually enable and run Virtual Disk Service
- Press the Windows button + R, type services.msc in the Run dialog box, and press Enter to open the Services app.
- Look for Virtual Disk towards the end of the Services window and double-click it.
- Click the drop-down menu next to Startup type and select Automatic.
- Click Start under the Service status and then go to the Log on tab at the top,
- Tick the box next to Allow service to interact with desktop.

Enable and run VDS - Finally, click Apply and then OK to save the changes.

4. Allow Remote Volume Management in Windows Firewall
- Search Windows Defender Firewall in the Windows search box and open it.
- On the left side, click Allow an app or feature through Windows Defender Firewall and then select Change settings.
- Now, scroll down on the Allowed apps and features section and locate Remote Volume Management; tick the box next to it.

Allow Remote Volume Management - Finally, select OK to save the changes.

Still Stuck?
We hope one of the solutions will help you fix Disk Management could not start Virtual Disk Service (VDS) error. If that is not the case, you may contact the Windows support team through the Help app or through official support pages online. Some issues are specific to certain devices and need personalized support. Alternatively, you can leave a message in the comment box below and one of our experts will get back to you.
Disk Management could not start Virtual Disk Service (VDS) error — FAQs
Why is Disk Management not opening?
The Disk Management cannot open if there is no complete connection between VDS and Disk Management in a remote or local computer. It may also fail to open if the remote computer does not support Virtual Disk Service. Other possible reasons are Firewall blocking connection between the two components or VDS not running and needing to be enabled.
How do I fix stuck on Virtual Disk Service?
To fix stuck on Virtual Disk Services, run the SFC scan or temporarily disable Windows Defender or any other third-party antivirus software. Also, manually enable and run Virtual Disk Service in the Services app. If nothing works, allow Remote Volume Management in the Windows Defender settings. We have given more details on how to conduct these steps in this article.

Hamza Mohammad Anwar
Hamza Mohammad Anwar is an intermediate JavaScript web developer with a focus on developing high-performance applications using MERN technologies. His skill set includes expertise in ReactJS, MongoDB, Express NodeJS, and other related technologies. Hamza is also a Google IT Certified professional, which highlights his competence in IT support. As an avid problem-solver, he recreates errors on his computer to troubleshoot and find solutions to various technical issues.