Transfer photos from an iPhone to your PC.
First, connect your iPhone to a PC with a USB cable that can transfer files.
-
Turn your phone on and unlock it. Your PC can’t find the device if the device is locked.
-
On your PC, select the Start button and then select Photos to open the Photos app.
-
Select Import > From a USB device, then follow the instructions. You can pick the items you want to import and select where to save them. Allow a few moments for detection and transfer.
Make sure the photos you want to import are actually on the device rather than in the cloud. Then, follow the steps for your type of device.
For more info, see Import photos and videos from phone to PC
Need more help?
Want more options?
Explore subscription benefits, browse training courses, learn how to secure your device, and more.
Communities help you ask and answer questions, give feedback, and hear from experts with rich knowledge.
File transfer between an iPhone and a computer is often needed in our daily lives. We may find ourselves needing to transfer files from iPhone to PC or transfer files from PC to iPhone at one time or another due to reasons like making a backup of precious data, enriching device content, or purely file sharing. The files we want to transfer may be photos, videos, contacts, messages, PDFs, Excel files, Word documents, or other items.
Six proven ways to help you transfer data from iPhone to PC. Whether you want to transfer photos, videos, music, PDFs, or documents, you can get things done using one of the tips below. The ways to transfer files from PC to iPhone are also provided.
To help you learn all the methods quickly, we made this comparison table. Have a look at them before diving into the detailed information.
| Methods | Effectiveness | Difficulty |
|---|---|---|
| EaseUS MobiMover | High — Selectively transfer data from iPhone to PC. | Super easy |
| iCloud | Medium — Feasible, but only 5GB of free storage is offered. | Easy |
| iCloud Drive | Medium — Works for Word, Excel, and PowerPoint files. | Moderate |
| Dropbox | Medium — Efficient, but only 2GB of free storage is offered. | Easy |
| iTunes File Sharing | Medium — Only transfer files that are associated with an app to your PC. | Moderate |
| File Explorer | Medium — Mainly transfer videos and photos | Easy |
📖Also Read: How to Transfer Files Between iPhone and Mac
1. Easiest Way to Transfer Data from iPhone to PC
Applies To: Photos, Videos, Audio Files, Contacts, Messages, Podcasts, Books…
The easiest way to transfer data from iPhone to Windows laptop or Mac is probably a third-party tool called EaseUS MobiMover Pro. With it, you can not only transfer files from your iPhone to a PC but also add content to your iPhone from a computer. Surely, you are also able to transfer data from one iOS device to another using this tool.
Unlike the inbuilt tools, this iPhone data transfer to PC software allows users to selectively transfer files between an iPhone and a computer, be it a Windows PC or a Mac. But to use it, you will need to download and install it first. If you are OK with that, you may have a try.
- 📝What to prepare
- A USB cable to connect your iPhone and PC
- Stable Internet connection and enough power on both devices
- MobiMover app from EaseUS
To transfer files from iPhone to PC:
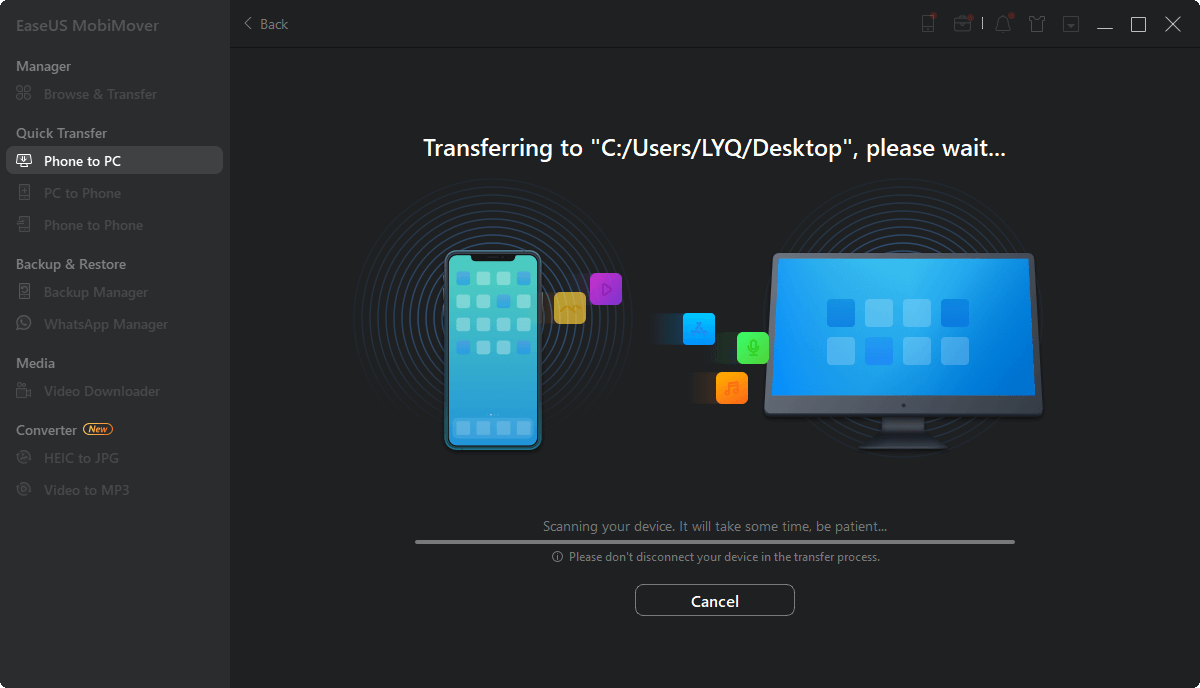
Step 1. Connect your iPhone to your PC with a USB cable. Then launch EaseUS MobiMover and go to «Phone to PC» > «Next».

Step 2. Check the types of files you want to transfer and click «Transfer». You can specify a location to keep the transferred items in advance. Otherwise, they will be placed on Desktop by default.

Step 3. Wait for the transfer process to finish. When it has done, go to the selected folder to check the items.
If transferring files from iPhone to PC without iTunes is what you want, don’t hesitate to try EaseUS MobiMover. It’s a versatile tool that supports Apple devices like iPhone, iPad, and iPod and has extra amazing features like video download and iPhone unlock.
🍎Check a video tutorial here:
- 00:00 — introduction
- 00:21 — transfer files with EaseUS MobiMover
- 01:40 — transfer files via File Sharing
- 02:36 — transfer files Using File Explorer
LEARN MORE
If you’re interested in how to transfer voice memos from iPhone to PC, you can click here for more information.
Second Choices of Transferring Data From iPhone to Windows PC
1. iCloud
Applies To: Photos, Contacts, Calendars, Reminders, Notes, and more
The best thing about iCloud is that you can transfer files from iPhone to computer wirelessly. The requirements for using iCloud include the same Apple ID on the devices, a stable network connection, and enough iCloud storage space.
However, iCloud only offers 5GB of free storage space, so you need to buy more if your files are larger than that. Anyway, make sure the requirements are met, and then follow the steps below to transfer files from your photo library, contact list, and more to the computer using iCloud.
- 📝What to prepare
- Stable Internet connection and enough power on both devices
- Enough storage space in iCloud
- An iCloud account logged in on both devices
To download files from iPhone to PC:
If you have installed iCloud for Windows:
Step 1. Open «Settings» on your iPhone and go to [your name] > «iCloud».
Step 2. Toggle on the option accordingly. For example, if you want to transfer photos from iPhone to PC, select the «Photos» option and turn on «iCloud Photos».
Step 3. Open iCloud for Windows on your computer and turn on the corresponding option. Then you can access the files on your iPhone from PC.

If you didn’t install iCloud for Windows:
Step 1. Open «Settings» on your iPhone, go to [your name] > «iCloud» and turn on the option according to the file you want to transfer.
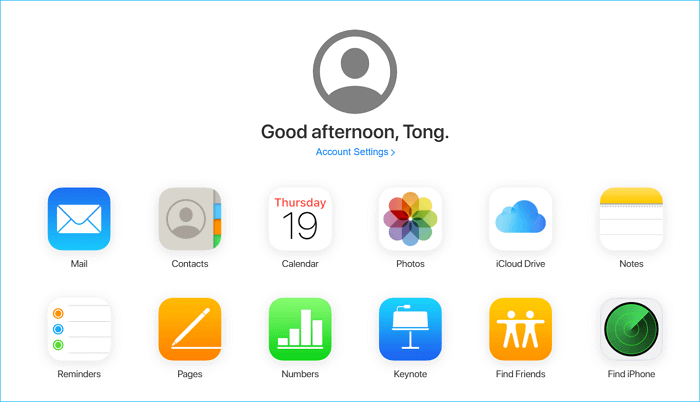
Step 2. On your PC, go to iCloud.com and sign in with the Apple ID you use on the iPhone.
Step 3. Select the category you intend to copy.
Step 4. Choose the items you want to transfer and then download them to your PC.
LEARN MORE
iCloud can only be used on a PC running Windows 10 system or later. So, click here to learn how to transfer photos from iPhone to PC Windows 7.
2. iCloud Drive
Applies To: Excel, Word, PowerPoint Files
As you may know, iCloud Drive is an option in iCloud and is helpful for syncing documents across your devices on which iCloud Drive is enabled. To transfer files from iPhone to PC using iCloud Drive, you first need to add the items to iCloud Drive on your iPhone and then access or download them on the computer. Here are the details:
- 📝What to prepare
- Download iCloud on Windows PC
- Stable Internet connection
- Open iCloud Drive on File Explore
To copy files from iPhone to PC with iCloud Drive:
Step 1. On the iOS device, go to the «Settings» app and select [your name] > «iCloud».
Step 2. Scroll down to enable «iCloud Drive».
Step 3. Open the «Files» app and select «Browse» > «iCloud Drive». Search for the files you attempt to copy to your PC and upload them to iCloud Drive.
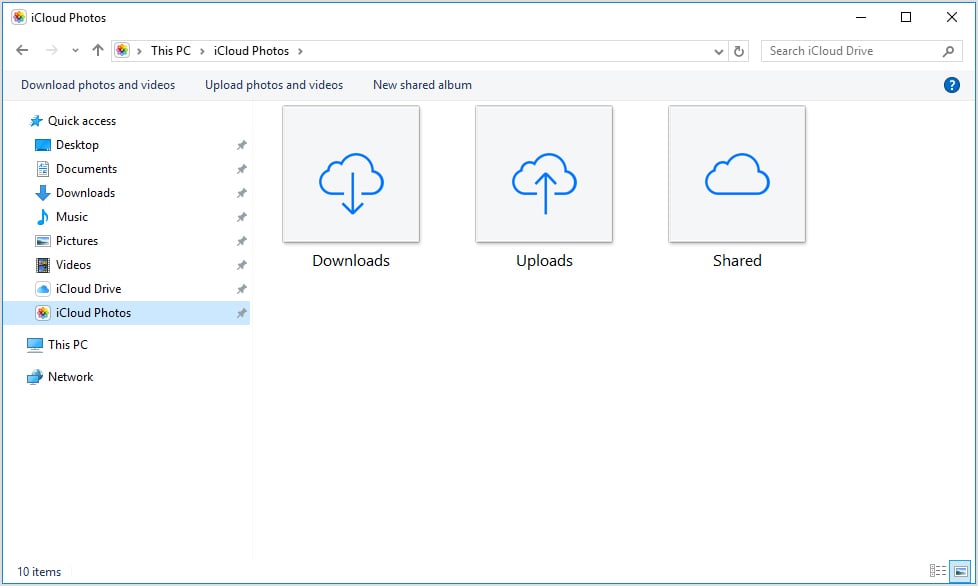
Step 4. If you have downloaded and set up iCloud for Windows, go to the iCloud Drive folder in File Explorer to access the files from your iPhone. If not, go to iCloud.com, sign in with your Apple ID, choose «iCloud Drive» among the options and then select and download the files to your PC.
While using iCloud services, you may encounter issues like «iCloud Drive not syncing». If you do, stay calm and follow the troubleshooting guide to solve the problem.
3. Dropbox
Applies To: Photos, Videos, Audios, Documents…
Dropbox, like iCloud, is a cloud service that helps you transfer files without using a USB cable. Instead, you need to download and install the Dropbox app on both your source device and target device to upload and download the files you want to share.
- 📝What to prepare
- A Dropbox account
- Stable WiFi connection
- Sign in the same Dropbox account on both iPhone and PC
To move files from iPhone to PC with Dropbox:
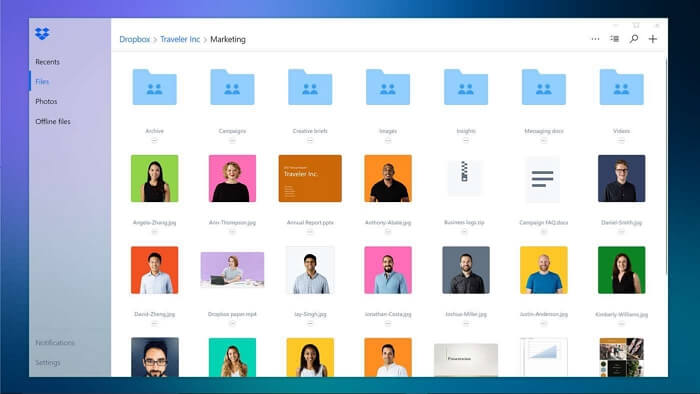
Step 1. Download and install Dropbox on your devices and sign in with the same account.
Step 2. To transfer files from iPhone to PC, upload the items to Dropbox on your iOS device first. If you transfer a file from PC to iPhone, upload the file to Dropbox from your PC.
Step 3. Go to Dropbox on your PC, and then you can see the files you just uploaded. Select the items and download them to your computer.
LEARN MORE
Both iCloud Drive and Dropbox enable a wireless data transfer from iPhone to PC. If you want to know more information about it, click here to learn How to Transfer Photos from iPhone to Computer Without USB.
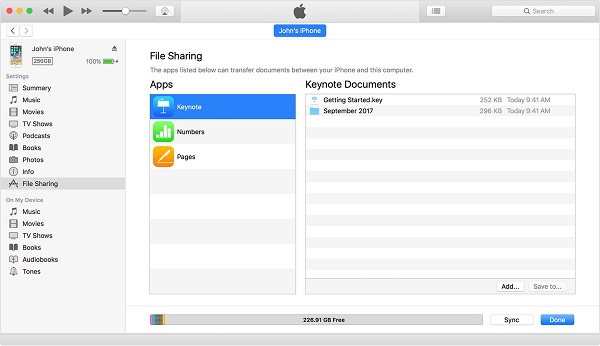
4. iTunes File Sharing
Another way is to use iTunes to transfer iPhone data to a PC. It is mainly designed to share files between your computer and a supported app on your iPhone/iPad. If you are sure the files you want to transfer are created by an app that is compatible with File Sharing, you can transfer content from your iPhone to a PC or laptop using this feature.
With iTunes, you can freely choose to transfer files iPhone files to PC via a USB cable or Wi-Fi connection. If you prefer to send files over Wi-Fi, you need to set up Wi-Fi syncing first according to the guide provided by Apple.
- 📝What to prepare
- A USB cable
- A PC running Windows 7 or later version
- Sufficient storage space on your PC
- Download iTunes and ensure it is the latest version
Steps to transfer data from iPhone to PC via iTunes:
Step 1. Connect your iPhone your computer and launch iTunes if it doesn’t run automatically.
Step 2. In the iTunes window, click the «Device» tab and select «File Sharing».
Step 3. Select the app shown in the list from which you want to transfer files to PC.
Step 4. Select the files you want to move to the computer and click «Save to».
Step 5. Select a location to save the items and click «Save to» to start transferring files from your iPhone to the computer.
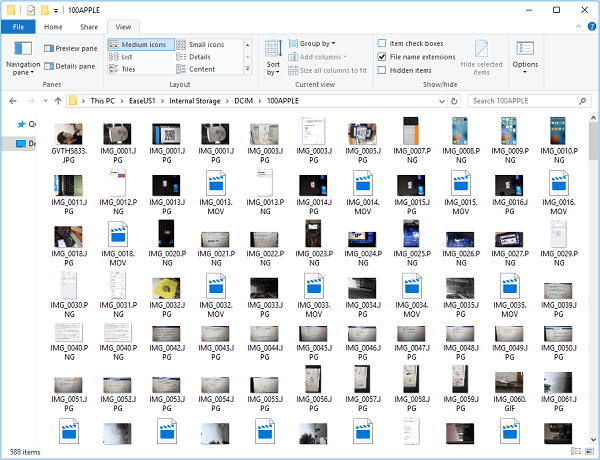
5. File Explorer
If the content you are looking to copy is photos and videos in your iPhone camera roll, the easiest way to transfer data from iPhone to PC is to use Windows File Explorer. It allows you to transfer photos and videos from iPhone to PC using USB directly. No third-party software is needed.
- 📝What to prepare
- An iPhone
- A USB cable
- A PC with a USB port running Windows 7 or later, including Windows 10
Here is how to transfer iPhone data to Windows PC:
Step 1. Connect the iOS device to the PC with a USB cable.
Step 2. Unlock the iPhone and trust the computer.
Step 3. Go to «This PC» > «[your iPhone name]» > «Internal Storage» > «DCIM» > «100APPLE».
Step 4. Manually copy the photos and videos you want to transfer from your iPhone to PC.
Troubleshooting: Issues You May Encounter While Data Transferring
#1. Why is my iPhone not showing up on Windows Explore?
🙋♂️I can no longer access the photos on my iPhone via windows explorer. I did all the usual BS restarting the iPhone, checking to make sure that the device was in Device Manager properly etc.
If you pull up iTunes, it works fine, I just can’t see it in Windows Explorer anymore. I plugged my iPhone into my computer… the same deal. Did anyone get any ideas? — Reddit
There are several potential reasons why you cannot access the iPhone through Windows Explorer:
- Outdated or faulty Apple Mobile Device USB driver: If the Apple Mobile Device USB driver on the computer is outdated or faulty, it can cause issues with accessing files on the iPhone.
- Settings issues on the iPhone: If the location and privacy settings on the iPhone are not set correctly, it can prevent access to files.
- Cable or connection issues: If the cable connecting the iPhone to the computer is faulty or the USB port is not working properly, it can cause issues with accessing files.
- Compatibility issues: If there are compatibility issues between the version of Windows on the computer and the version of iOS on the iPhone, it can cause problems with accessing files.
- Software bugs or glitches: Occasionally, software bugs or glitches can cause issues with accessing files on the iPhone through Windows Explorer.
#2. Why can’t I transfer photos from iPhone to PC?
🙋♂️After connecting my phone to the computer, I immediately get a «something went wrong» error message where it reminds me to make sure that my device actually has files on it and stuff. Usually after trying again, it realises that I do have photos and gives me options to import. I create a file on my desktop for them, click to import all and opt to delete photos after importing.
I tried importing the rest (using the «since last import» option) and a few hundred made it onto my computer before failing with another error message saying that «my files may not have been imported» and all other attempts since then have just failed immediately without importing anything. I uninstalled then reinstalled iTunes which this time came with Apple Mobile Device Service, still no luck.
TL,DR: I want to import all of my iPhone photos to my Windows PC and delete the originals but it fails every time. — Reddit
The reasons why you can’t transfer photos from iPhone to PC can be caused by several factors, such as outdated software, insufficient storage space, or a corrupted file. Here are some specific reasons and solutions to help the user resolve this issue:
- Outdated Software: The user should check if their iPhone and Windows PC have the latest software updates. If not, they should update their devices and try importing the photos again.
- Insufficient Storage Space: The user should ensure that their Windows PC has enough storage space to accommodate the photo files. They can check the available storage space and delete unnecessary files to create more space.
- Corrupted File: If the import process terminates abruptly, it could be due to a corrupted file. The user should try importing the photos in batches instead of importing all at once. This will help identify the corrupted file and allow the user to skip it during the import process.
- Try Different Methods: The user can try using different methods to import their photos, such as iCloud or Google Photos. Alternatively, they can use third-party software such as iExplorer or AnyTrans.
- Restart Devices: The user should restart their iPhone and Windows PC before proceeding with the import process. This will help refresh the devices and may resolve any connection issues causing the import process to fail.
By following these solutions, the user can troubleshoot and resolve any issues preventing them from importing all their iPhone photos to their Windows PC and deleting the original files.
#3. Can you AirDrop from iPhone to PC?
🙋♂️I always use AirDrop to transfer my files, like photos, to other iPhones and Macs. For some reason, now, I still want to Airdrop from iPhone to my PC, but I failed. Why? — from Quora.
Sadly no. AirDrop is a feature available on Apple devices that allows for seamless file sharing between compatible devices using Wi-Fi and Bluetooth. However, it is specifically designed for sharing files between Apple devices and does not have native support for transferring files directly from an iPhone to a PC.
While AirDrop is not available for PC, there are alternative methods to transfer files between an iPhone and a PC, such as using cloud storage services like iCloud or Dropbox, or using a USB cable and software like iTunes or File Explorer.
#4. Why does it take so long to transfer data from iPhone to PC?
🙋♂️I am transferring files from my iPhone to PC. It’s been 30 minutes, but I haven’t finished the task. Why does it take so long? — Reddit
Actually, there are many factors that will lead to the slow transfer of data from an iPhone to PC, including the file size and quantity, USB port and cable, background process and apps, file encryption, storage space, etc.
To speed up your transfer, you can check out the below tips:
- Use a USB 3.0 Port instead of 2.0 port
- Close the background apps and process before starting your transferring
- Transfer files in batches
- Find a professional iPhone transfer software
The Bottom Line
I believe you are so clear about the answers now. If you are an iPhone user, learning these tips will do great help whenever iOS data transfer is needed. Whether you want to transfer data from iPhone to PC or vice versa, these solutions are applicable.
For the simplest and most efficient method, we recommend using EaseUS MobiMover — the easiest way to transfer data from iPhone to PC. It is also worth noting that these tips can be applied for transferring files from iPhone to Mac or from iPad to computer. Choose the solution that best fits your needs and make data transfer a breeze.
For more information about how to transfer files from iPhone to PC, check the frequently asked questions below.
1. Why can’t I see my iPhone files on my computer with a USB cable?
The problem could be with your computer, its USB port, or the USB cord that connects it to your device. Try a different computer, USB port, or USB cord if possible. Check the charging port on the bottom of your iPhone or iPad for any trash.
2. Can you sync iPhone to computer wirelessly?
To start to configure Wi-Fi syncing, connect your device to your Mac via a USB or USB-C cable. Then you enable Wi-Fi syncing and customize the settings. When your device connects to your Mac through Wi-Fi, you can sync it from the sidebar.
3. Can I transfer photos from my iPhone directly to my PC?
You may transfer photographs and movies to your computer using the Photos app and a USB cord. You may also use iCloud Photographs to make your photos available on all of your devices.
Отправить фото с iPhone на Mac можно мгновенно через беспроводную опцию AirDrop, а вот с компьютерами на Windows она не работает. Но это не значит, что вариантов совсем нет. Вот четыре рабочих способа.
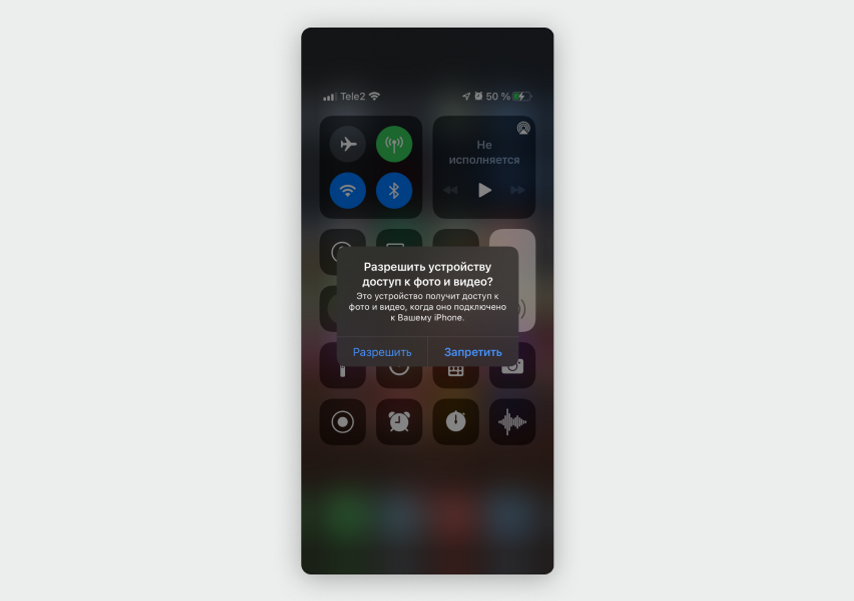
1. По проводу
Если нужно сохранить много фотографий, лучше сделать это с помощью кабеля — будет быстрее, чем передавать файлы через облако или мессенджер.
Когда вы подключите iPhone к компьютеру через USB, на телефоне появится уведомление с вопросом, стоит ли доверять этому устройству, нажмите «Разрешить».
Когда компьютер распознает iPhone, в Windows появится уведомление с вопросом, как открыть новое устройство. Вы можете выбрать один из двух вариантов — «Импорт фотографий и видео» или «Открыть устройство для просмотра файлов».
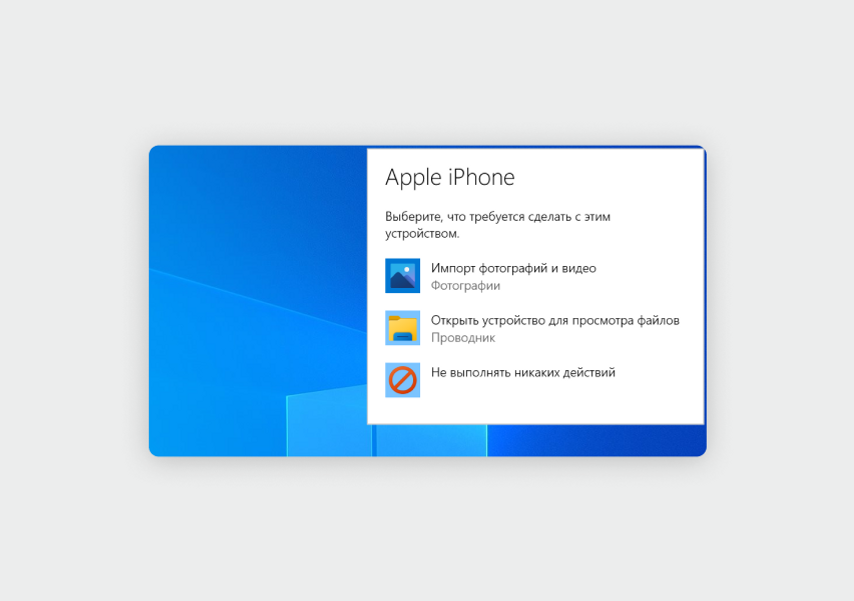
«Импорт фотографий и видео». Фотографии с iPhone появятся в виде галереи. Нужно только выбрать снимки и нажать на кнопку «Импорт» в нижней части экрана.
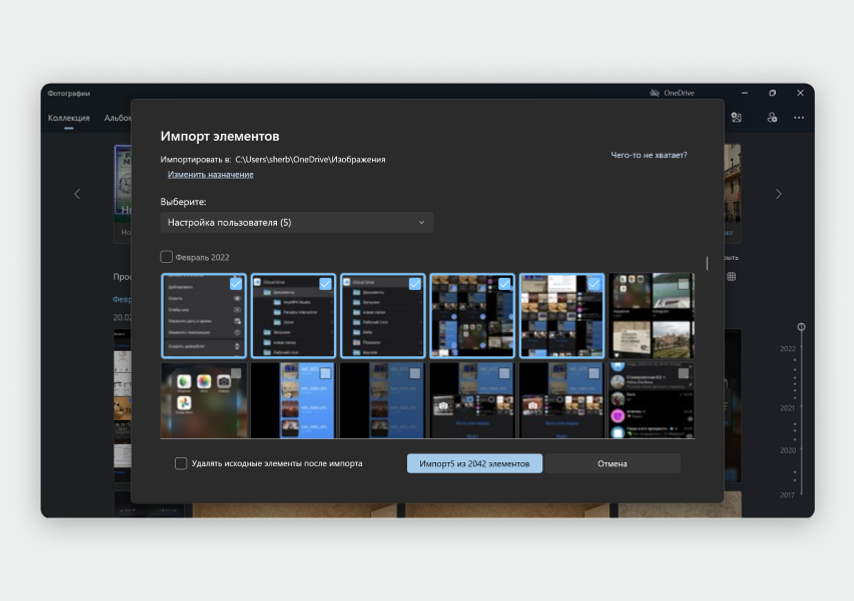
По умолчанию фотографии с iPhone сохранятся в папку «Изображения». Для выбора другой папки в верхнем левом углу меню импорта нажмите на кнопку «Изменить назначение».
«Открыть устройство для просмотра файлов». Этот способ не так удобен, потому что все фотографии и видео с iPhone будут разбросаны в папках по месяцам.
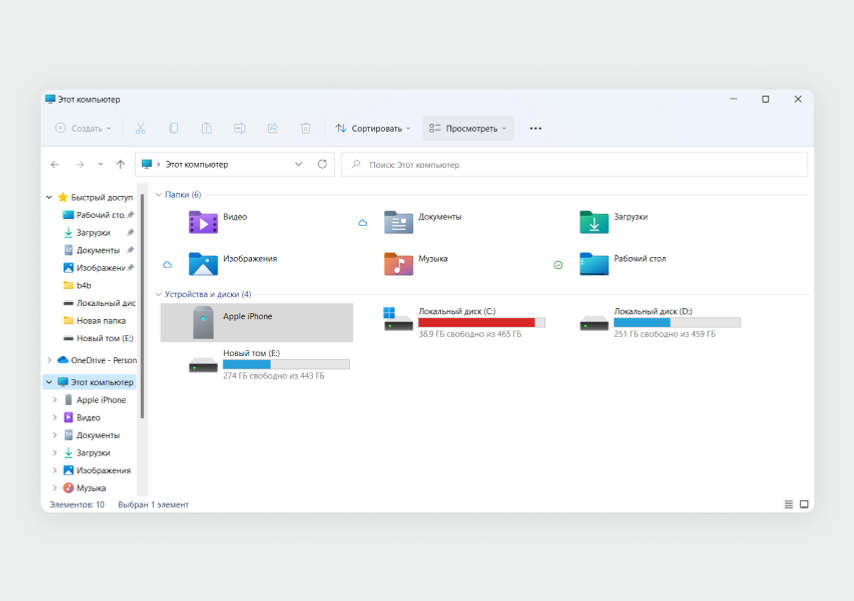
Откройте «Мой компьютер» — он еще может называться «Этот компьютер» или просто «Компьютер» в зависимости от версии Windows. В списке устройств появится Apple iPhone — откройте его и перейдите в папку Internal Storage → DCIM.
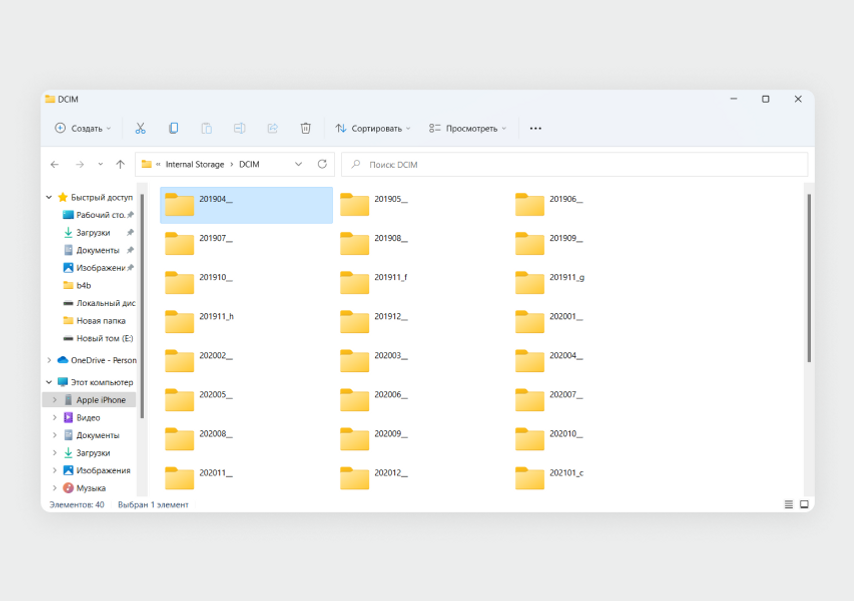
Галерея iPhone в Windows будет разбросана по папкам: первые четыре цифры в названии — это год, а следующие две — это месяц.
В каждой папке находится все, что вы сохраняли в галерею за месяц: фото, видео, скриншоты.
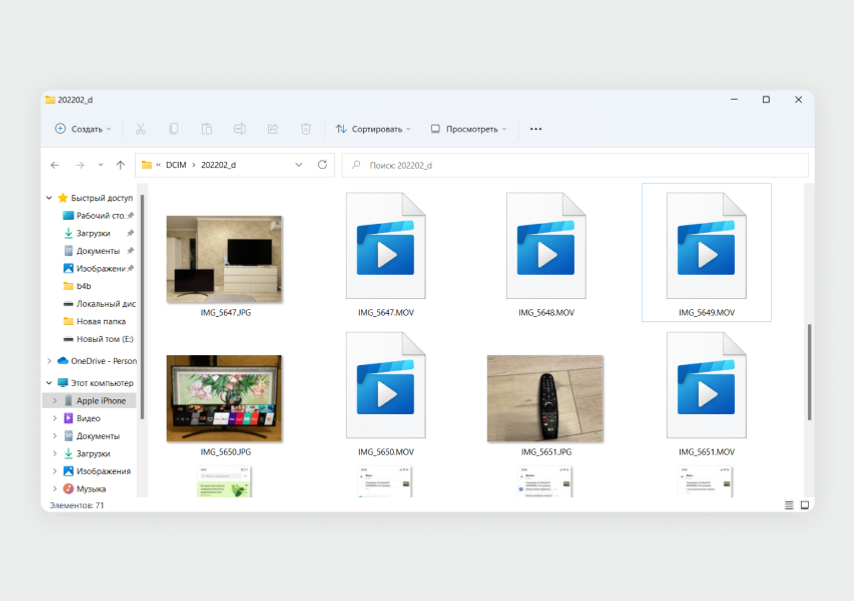
Выберите нужные фотографии и скопируйте в любую папку на компьютере.
2. Через облако
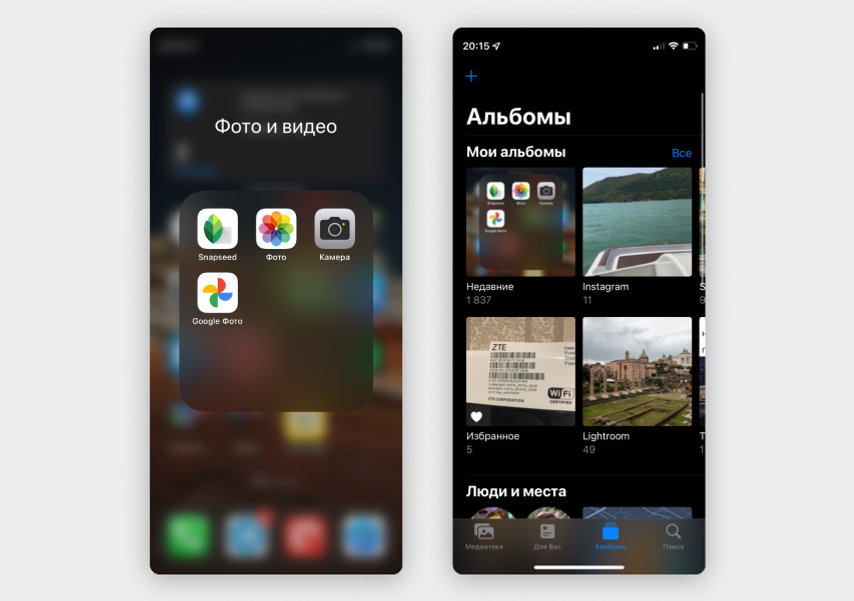
Для этого подойдет стандартное облачное хранилище iCloud или любой другой сервис, например Яндекс Диск или Google Диск. В материале рассмотрим пример с iCloud. Загрузить в него снимки можно с помощью функции «Поделиться». Откройте приложение «Фото» на iPhone → «Мои альбомы» → «Недавние».
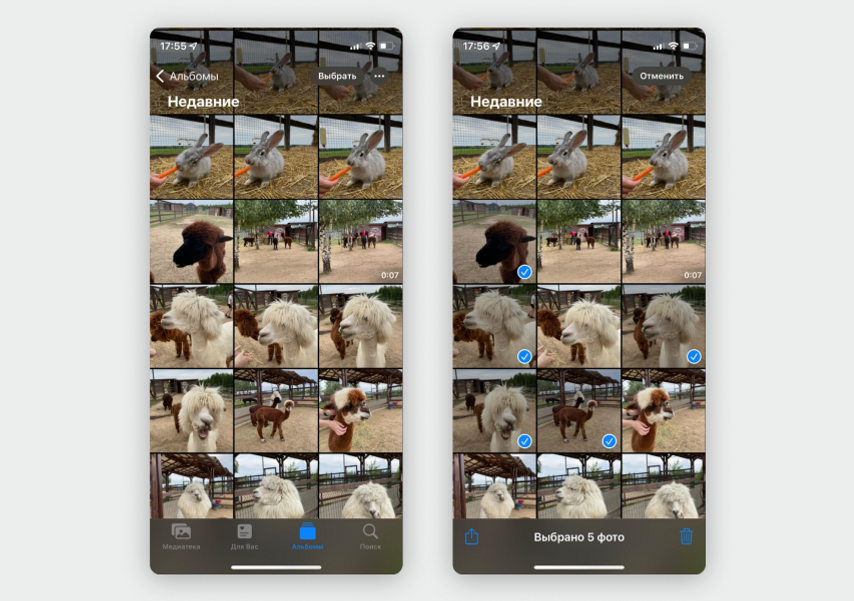
В правом верхнем углу найдите кнопку «Выбрать» и нажмите на все фотографии в галерее, которые хотите скинуть на компьютер.
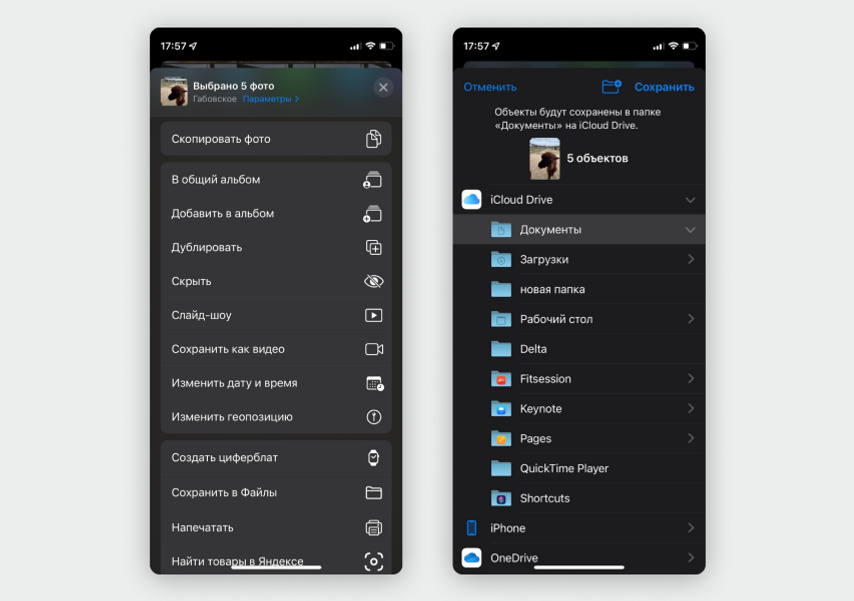
В левом нижнем углу нажмите на кнопку «Поделиться» — иконку со стрелкой вверх. Пролистайте меню вниз и нажмите на пункт «Сохранить в Файлы». В открывшемся меню нажмите на строчку iCloud Drive и выберите любую папку — например, «Документы». В правом верхнем углу нажмите «Сохранить».
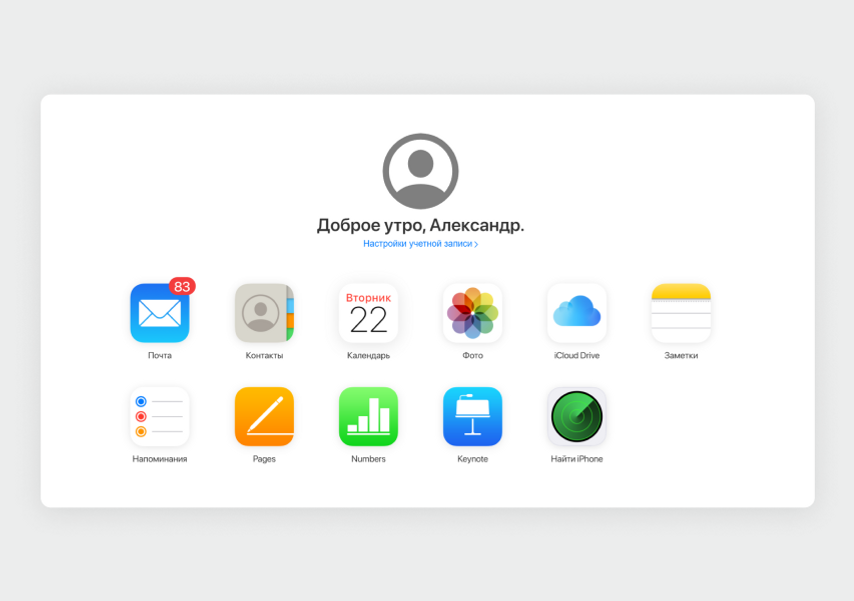
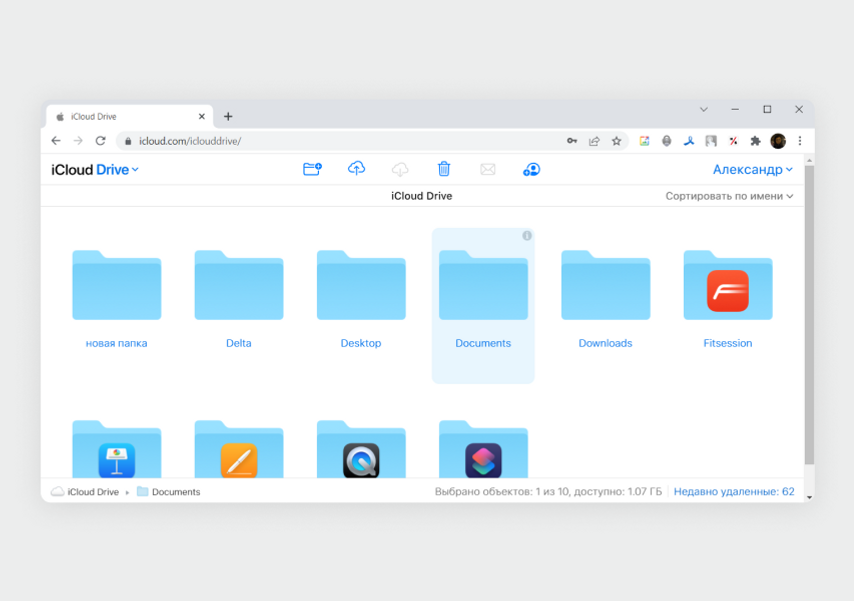
Теперь на Windows-компьютере в любом браузере вбейте адрес icloud.com и введите логин и пароль от своего Apple ID. На экране откроется список функций облачного сервиса. Выберите iCloud Drive.
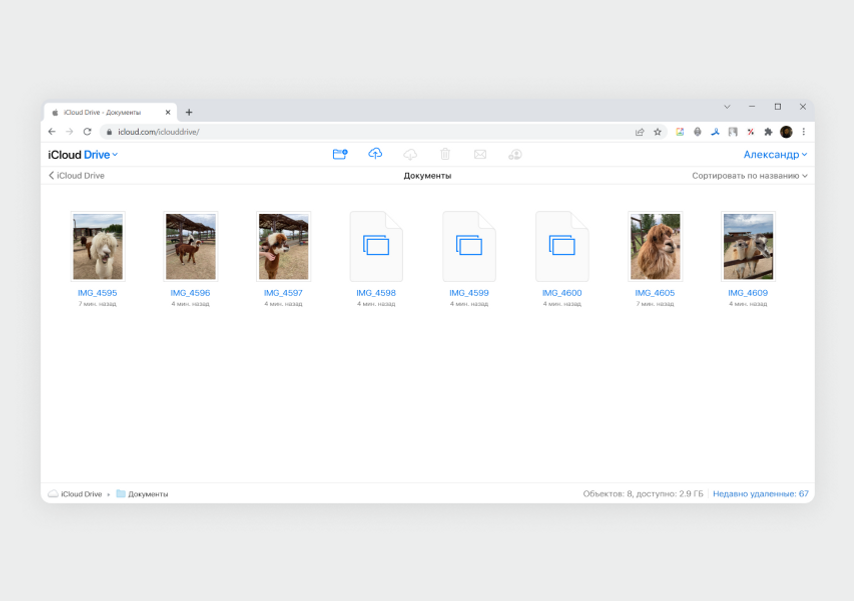
Найдите папку, в которую вы сохранили фотографии со смартфона. Учтите, что в браузере они могут называться на английском — вместо «Документы» будет Documents.
Чтобы скачать сразу несколько фотографий, зажмите клавишу Ctrl и кликните на все нужные файлы. В верхнем меню нажмите на кнопку «Загрузить» — иконка с облачком и стрелкой вниз.
В зависимости от настроек браузера вам будет предложено выбрать папку для сохранения или фотографии скачаются автоматически в папку для загрузок браузера.
Облако iCloud бесплатно дает только 5 ГБ памяти. Если место закончится, придется вручную удалять ненужные фото и видео. Расширить объем облачного хранилища можно по подписке — например, 50 ГБ стоят 59 ₽ в месяц.
3. Через мессенджер
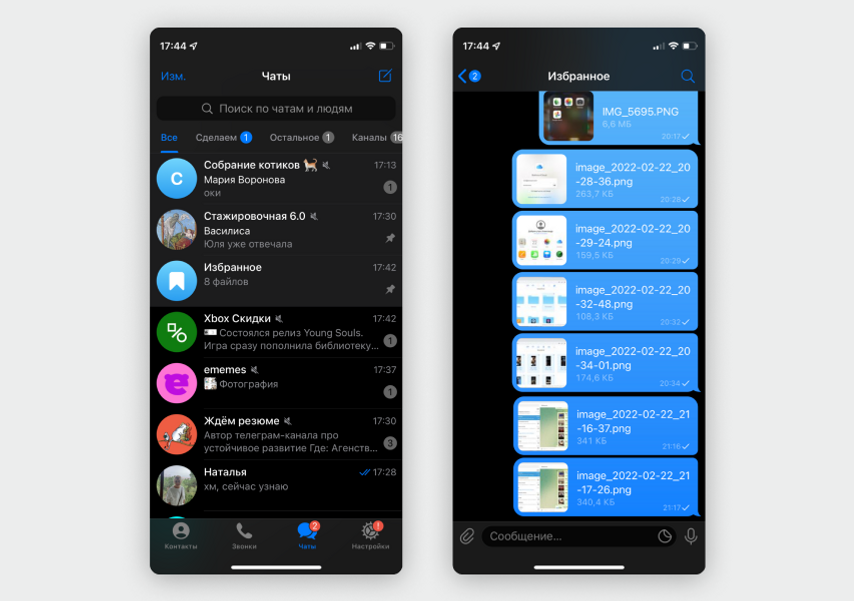
Для этого лучше всего подходит Telegram, потому что в нем уже есть готовый чат «Избранное», в котором можно хранить сколько угодно фотографий или документов. Есть только одно ограничение — нельзя загрузить файл весом больше 2 ГБ.
Важно загружать фотографии в Telegram не как картинки, а именно файлами (иначе к ним будет применен алгоритм сжатия и качество упадет).
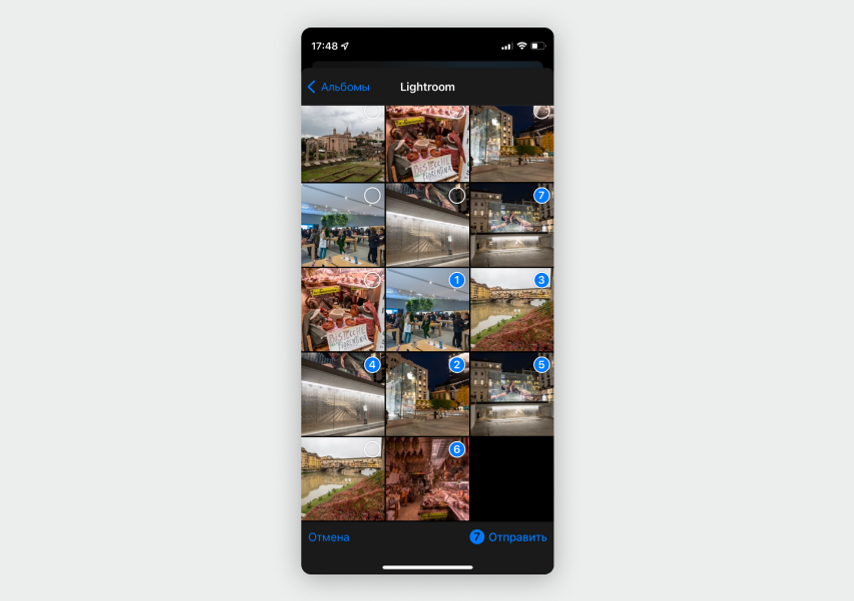
Откройте Telegram на iPhone, найдите в списке слева или через поиск чат «Избранное» (в английском интерфейсе он называется Saved Messages). В нижнем левом углу экрана нажмите на кнопку «Прикрепить» с иконкой в виде скрепки.
В открывшемся меню выберите «Файл» → «Фото или видео».
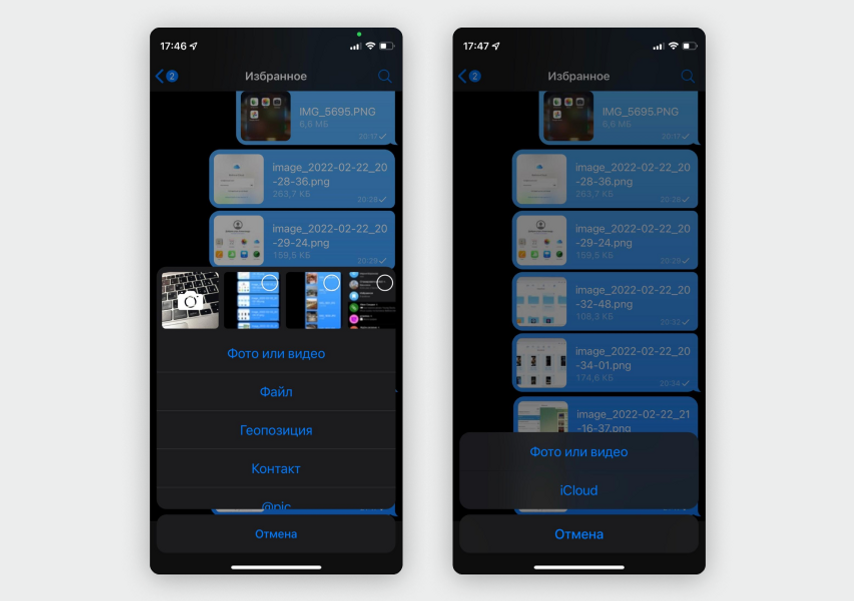
На экране откроется галерея с последними картинками из iPhone. Выберите фотографии, которые хотите сохранить, и нажмите «Отправить». За один раз можно отправить сколько угодно фотографий.
Когда все фотографии со смартфона загрузятся, откройте Telegram-web в браузере на компьютере или установите официальное приложение, в обоих случаях найдите чат «Избранное».
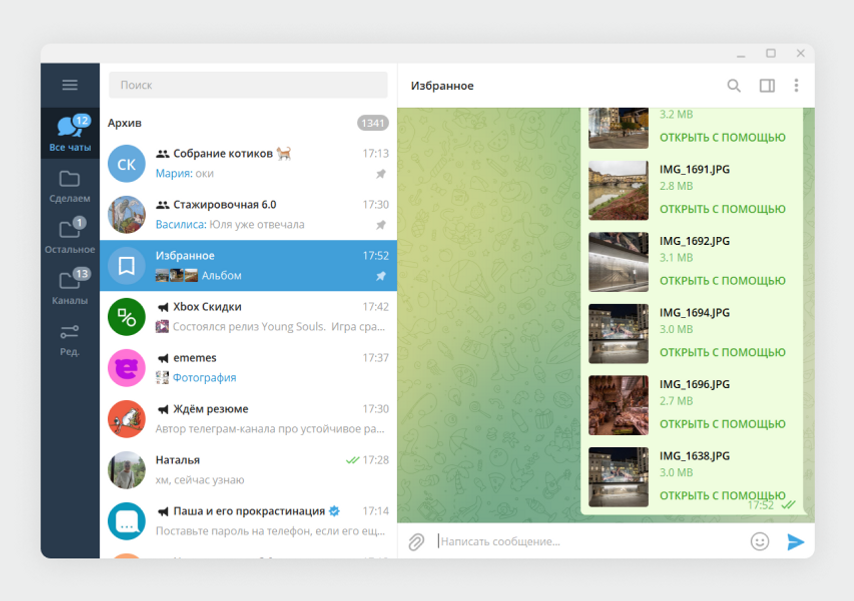
Если вы не меняли заводские настройки Telegram, фотографии автоматически скачаются в папку «Загрузки» → Telegram Desktop. Чтобы быстро найти ее, нажмите правой кнопкой мыши на любой из снимков в чате и выберите пункт «Открыть папку с файлом».
Если вам нужно сохранить фото в другую папку, нажмите на снимок правой кнопкой мыши и в контекстном меню выберите «Сохранить как…» — откроется «Проводник», в котором вы сможете выбрать любую папку для сохранения. Но таким образом придется сохранить отдельно каждый файл.
Резюмируем
- Через мессенджер или облако удобно перекинуть на Windows-компьютер пачку из 10–20 фотографий — не нужно искать кабель. А сохранить так весь архив будет сложно, придется долго ждать загрузки через интернет или доплачивать за место в облаке.
- По проводу удобно перекинуть на компьютер все фотографии со смартфона — архив за 3–5 лет может весить десятки гигабайт, через Wi-Fi такой объем будет грузиться слишком долго. Чтобы не искать нужные фотографии среди множества папок, при подключении iPhone в Windows запустите стандартную функцию «Импорт фотографий и видео».
У нас ещё много всего интересного
Оставьте почту и получайте подборку лучших материалов от главного редактора
раз в две недели.
Семь бесплатных способов для разных ОС и на все случаи жизни.

1. Как перекинуть фото и видео с iPhone на компьютер по AirDrop
- Подходит для macOS.
Быстрый и очень простой способ передачи данных. Благодаря отсутствию ограничений на размер файлов одинаково хорош как для фото, так и для видео. iPhone, как и все iOS‑устройства, поддерживает функцию AirDrop, однако совместимость с этой технологией должен иметь и компьютер. Поэтому перекинуть медиафайлы так можно только на Mac.

Отметьте нужные фото и видео в стандартной галерее iOS, а затем тапните по кнопке «Поделиться». Выберите свой компьютер в списке предложенных или в меню AirDrop.
Через пару секунд (или минут, если файлов много) фото и видео появятся в папке «Загрузки» на Mac.
2. Как перенести фото и видео с iPhone на компьютер через «iCloud Фото»
- Подходит для macOS, Windows и Linux.
Если вы пользователь Apple One или имеете другую подписку, предоставляющую дополнительное место в iCloud, то функция «iCloud Фото» — один из самых удобных способов передачи. После включения синхронизации медиафайлы будут доступны в приложении «Фото» на Mac или в браузере на ПК с Windows и Linux.

Откройте системные настройки и перейдите в Apple ID → iCloud.

В разделе «Фото» включите тумблер «Фото iCloud» и подождите немного. Обратите внимание, что в облаке должно быть достаточно свободного места для выгрузки всех файлов. В противном случае будет доступна только часть из них — те, что поместятся.
В любом браузере на компьютере откройте iCloud, войдите в свой аккаунт и нажмите на «Фото».
Выделите нужные снимки или ролики, кликните по кнопке расширенного меню и выберите «Другие параметры загрузки».
Укажите один из вариантов и кликните «Загрузить». При выборе оригиналов файлы появятся в форматах HEIF и HEVC, при выборе наиболее совместимых форматов произойдёт конвертация в PNG и MP4 H.264.
3. Как перекинуть фото и видео с iPhone на компьютер через импорт изображений в Windows
- Подходит для Windows.
Когда нужно скопировать с iPhone большое количество фото и видео на Windows‑компьютер, удобнее всего воспользоваться встроенной утилитой импорта медиафайлов с цифровых камер и других носителей. Понадобится лишь кабель Lightning.
Подсоедините iPhone к ПК с помощью шнура и одобрите подключение на обоих устройствах.
В меню «Этот компьютер» в разделе «Устройства и диски» выполните правый клик по элементу Apple iPhone и выберите «Импорт изображений и видео».
Откройте «Дополнительные параметры».
Укажите папки, куда следует сохранить фото и видео, при желании задайте шаблон имени и включите опцию удаления файлов с iPhone после импорта.
Кликните «Выделить всё» или отметьте только нужные фото и видео, после чего нажмите «Импорт».
Дождитесь окончания процесса и просмотрите готовые файлы в папке.
4. Как перенести фото и видео с iPhone на компьютер через «Захват изображений»
- Подходит для macOS.
Подобная утилита также входит в состав macOS. Как и Windows‑аналог, она предназначена для импорта фото и видео с камер. Процесс переноса довольно прост и требует лишь кабеля Lightning.
Запустите «Захват изображений» через поиск Spotlight или из папки «Программы» в Finder.
Подключите iPhone к Mac с помощью кабеля, а затем разрешите доступ к данным на обоих устройствах.
Укажите папку, куда следует перенести файлы. При желании включите опцию «Удалить после импорта».
Отметьте нужные фото и видео и кликните «Загрузить» либо просто «Загрузить все». Дождитесь окончания процесса. Обратите внимание: если какие‑то из медиафайлов уже есть на компьютере, они будут помечены зелёной галочкой.
5. Как перекинуть фото и видео с iPhone на компьютер через облачные хранилища
- Подходит для macOS, Windows и Linux.
Ещё один вариант беспроводного способа передачи файлов — облачные хранилища. Практически в каждом из них есть функция автоматической синхронизации галереи, но даже если вам нужно разово перекинуть фото и видео с iPhone, этот способ подходит прекрасно. Можно использовать любой сервис, например Mega с 20 ГБ бесплатного пространства.
Зарегистрируйте бесплатный аккаунт Mega и установите мобильное приложение по ссылке выше.

В Mega на iPhone откройте любую папку, коснитесь кнопки «плюс», а затем «Выбрать из „Фото“».

Укажите необходимые файлы, тапните «Загрузить» и дождитесь окончания процесса.
Откройте облако в браузере на компьютере. Найдите свои фото или видео, выделите их и кликните кнопку загрузки.
Через несколько секунд или минут в зависимости от количества файлов они появятся в папке загрузок.
6. Как перенести фото и видео с iPhone на компьютер через Telegram
- Подходит для macOS, Windows и Linux.
Все современные мессенджеры поддерживают отправку фото и видео без сжатия, поэтому тоже вполне подходят, чтобы перекинуть медиафайлы с iPhone на компьютер. Рассмотрим процесс на примере Telegram, но по сути шаги будут теми же и в других мессенджерах.
Telegram Desktop →
Установите приложение, если у вас его нет.

Зайдите через поиск в «Избранное» в Telegram на iPhone и тапните по иконке со скрепкой.

Отметьте фото и видео, которые нужно перекинуть, а затем коснитесь кнопки расширенного меню и выберите «Отправить как файлы».
Откройте Telegram на компьютере или в браузере и зайдите в «Избранное» из строки поиска.
Кликните по медиафайлам, чтобы загрузить их на диск. Они появятся в папке «Загрузки».
7. Как перекинуть фото и видео с iPhone на компьютер по имейлу
- Подходит для macOS, Windows и Linux.
Если файлов немного, а вам совсем не хочется возиться со сторонними приложениями и сервисами, то старую добрую почту никто не отменял. У вас определённо есть ящик, привязанный к Apple ID. Так что остаётся лишь отправить фото и видео самому себе, после чего открыть их на компьютере и сохранить.

В приложении «Фото» отметьте нужные медиафайлы, а затем откройте меню «Поделиться» и выберите «Почту».

Введите в поле «Кому» свой собственный почтовый адрес, тапните «Отправить» и выберите вариант «Фактически» для передачи оригиналов без сжатия.
Зайдите в почту на компьютере, кликните по кнопке со скрепкой для скачивания вложений и выберите «Сохранить все».
Укажите папку, куда будут загружены файлы, и нажмите «Сохранить».
Читайте также 📲📴
- Что установить на новый iPhone или iPad
- Как посмотреть, сколько памяти осталось на iPhone
- Как скинуть видео с компьютера на iPhone
- Как удалить один, несколько или все контакты на iPhone
- 16 способов очистить Mac от всего лишнего
For quite a long time, finding an answer to how to transfer files from iPhone to PC has been fraught with difficulty. There is some degree of compatibility between the iPhone and PC; nevertheless, in contrast to data syncing with Mac, it is still difficult to transfer files between the iPhone and PC. There are a few different methods by which you may synchronise and transfer data between your Windows computer and your iPhone or iPad.
If you use an iPhone, familiarising yourself with these guidelines will be of great use to you anytime the iOS data transfer is required. It does not matter whether you want to move files from your iPhone to your PC or vice versa; these options will work.
Transfer Up To 5 GB For Free
No-Registration Required

1. Transfer Files From iPhone To PC Using iCloud
Overall, iCloud is one of the simplest methods to transfer data between an iPhone and almost any other device, including a Windows PC. Essentially, you upload your data to iCloud and then retrieve them on another device.
Nevertheless, the free iCloud plan only provides 5GB of storage space. Therefore, if you want to utilise iCloud to transfer larger files, you must subscribe to a premium plan.
- Launch the Files app on your iPhone.
- Locate the files you want to transfer to your computer.
- Long-press the Copy button and touch it for individual files. To copy several files, utilise the Select option from the menu with three dots.
- In the app, go to iCloud Drive and paste the copied files there. Your files have been transferred to iCloud Drive.
- Use iCloud.com or the iCloud Drive application for Windows to download the files to your computer.
2. Transfer Files From iPhone To PC Via Bluetooth
Bluetooth is another simple technique to transfer data from iPhone to PC. However, one aspect you need to remember is that transferring data from iPhone to PC over Bluetooth is only possible for a limited number of different file formats.
Since it is so time-consuming to manually choose files for iPhone to Bluetooth file transfer, you can only transmit a small quantity of data through Bluetooth, which means you can only share a limited amount of information.
Besides, Bluetooth is by no means the most efficient method for transferring data. As a result, in the next paragraph, we will discuss yet another effective strategy.
- Swipe the settings panel on the iPhone’s home screen upward and press and hold the Bluetooth symbol. Permit it to connect to the computer to which you want to transmit the data.
- To begin the transmission, select the Windows “settings” option and then activate the Bluetooth option. Within the windows tab, the “device” option may be found. Turn on Bluetooth from there to enable the Bluetooth device to accept files.
- Select the files you intend to transfer from your iPhone to your computer.
- These files will appear in a pop-up on your computer.

3. Transfer Files From iPhone To PC Using File Explorer On Windows
Now in our article on how to transfer files from iPhone to PC, we’ll take a look at the most dominant and popular operating system; Windows. You may be familiar with File Explorer, the software for managing and transferring files on Windows computers. It makes it simple for you to access the files on your computer and traverse the storage space on it.
If the data you need to transfer is photos and videos from your iPhone’s camera roll, Windows File Explorer is the way to go, as it enables direct picture and video transmission from iPhone to PC through USB connection. No further software is required.
- File Explorer has a graphical user interface for data administration. Using a USB connection, you may connect the iPhone to a computer.
- Unlocking the iPhone Allow the connection to successfully establish by selecting “Trust” on your iPhone. a
- Navigate to “This PC” > “[the name of your iPhone]” > “Internal Storage” > “DCIM” > “100APPLE.”
- Your iPhone images will be neatly organised into date-based folders.
- You may now copy the desired photo(s) to your computer.

4. How To Transfer Files From iPhone To PC With iTunes
The primary purpose of iTunes File Sharing is to facilitate data transfer between your computer and a compatible application running on your iPhone or iPad. If you are certain that the files you wish to transfer were produced by an app compatible with File Sharing, then you may use this function to move material from an iPhone to a PC.
To transfer files from an iPhone to a PC with the help of iTunes File Sharing and USB, follow the subsequent steps:
- Connect your iPhone to your computer and start iTunes if it is not already running automatically.
- In the window for iTunes, go to the “Device” tab, and from there, pick “File Sharing.”
- If you wish to transfer files from one programme to another on your PC, choose that app from the list.
- After deciding which are files you wish to copy to the computer, choose those files and then click the “Save to” button.
- To begin transferring files from your iPhone to the computer, choose a place on your computer where you would want to store the files, and then click the “Save to” button.
5. Transfer Files From iPhone To PC Using FileMail
You may send files from your iOS device to your computer with the help of FileMail. Sending huge films, audio files, high-quality photo collections, and collections of any other sort of media is straightforward.
The iphone file transfer application is easy to use and has a “WiFi only” option in case you want to prevent your mobile data limit from being exceeded while using the app. To get started, download and install the app on your iOS device. You can share up to 5 GB for free, with no need to register.
- Install the Filemail mobile application for ioS on your iPhone
- On your PC, either navigate to Filemail’s home page, or install the Filemail Desktop app for PC. This will enable you to get UDP transfer acceleration for faster transfer rates.
- Launch the FileMail application on your iPhone
- Sign in to your current FileMail account, or if you want, you may skip this step and use our service without paying a dime.
- Simply choose the items you want to send after clicking the “attach files” button.
- Please provide the e-mail addresses of the recipients, the message topic, and the content (optional).
- Click “Send”. If you have a limited mobile data, the application may inquire whether it should deliver your files by simply using WiFi connections.
- The process of uploading your files will now begin. When it is finished, a download link will be sent to your e-mail as soon as it is complete.
- Click on the link, and you will be taken to a page where the files can be downloaded. Or you can take the link into our dedicated Windows-based file transfer app for PC and download from there.

6. How To Transfer Files From iPhone To PC — Pros & Cons Of Different Methods
| Transfer Type | Pros | Cons |
|---|---|---|
|
iTune |
Supports both USB and WiFi connectivity. |
Not all iDevice applications support the iTunes File Sharing function. |
|
iCloud |
All your devices will be synchronised and updated whenever you modify a file. |
Requires an Internet connection. |
|
Bluetooth Sharing |
Very easy process to send files |
Sluggish transmission times, it can take a long while to send files |
|
File Explorer |
Easy to use and with a straightforward user interface |
Sometimes iPhone does not appear in Windows Explorer, preventing them from seeing iPhone images on a PC. |
|
FileMail |
Users may use it without being registered, and it is free |
You will need to have an internet connection. If wanting to share files larger than 5GB, you will need a subscription. |