Categories
- Transfer Programs from C Drive to D Drive
- Transfer Installed Software to New PC
- Transfer Files from Old PC to New PC
- Transfer Microsoft Office
- Find Office Product Key
- Move User Folder
- Move Google Chrome Bookmarks
Overview
Are you considering copying or transferring files from one server to another? For you, we have the best solution. Many servers desire to migrate their files to get better performance and more scalability. On the other hand, some server users move their data to another server because they want to change providers.
Copying files from one server to another is a common operation for server administrators. There are various methods to complete this work, and we will discuss the best way to perform this task. So, let’s discuss how robocopy can help you to copy your files to another server easily.
Robocopy is a popular command-line utility that enables copying huge amounts of data under Windows. Its strong performance makes it a handy tool, and it dates back to Windows NT. It allows you to copy or move files from a command prompt by specifying a disc path or server location.
Robocopy employs the date stamp and timestamp concepts for partial transferring files, and it aids in the tolerance of network disruptions. Robocopy reduces the risk of failure by skipping NTFS junction points, which can lead to endless loops.
Robocopy’s Features on Windows
- Allow for network outages and continue copying.
- It avoids NTFS junction nodes, which might result in copying errors due to indefinite loops.
- Utilizing the /COPY ALL or /COPY: command-line options, you may copy data files and properties accurately while preserving original timestamps, owner information, NTFS ACLs, and audit information.
- Enforce the Windows NT «backup right» so that an operator can copy a full directory, especially files that aren’t accessible to him.
- Resilience is enabled by default, with several automatic retries that may be set if a file cannot be duplicated.
- It is a «mirror» mode that maintains synced trees by removing files that don’t exist in the destination source.
- It can skip files with the same size and date that are already in the target folder.
Steps to copy files with Robocopy
Now that you know its beneficial features, it’s undoubtedly useful to utilize Robocopy to copy a few data, files, and folders to a server. It is an extremely strong tool that has been present from the Windows Server 2003. You can execute Robocopy from the desktop by providing the sending and receiving file servers.
For illustration, if you try to copy the DATA folder from Server1 to Server2, you might use the following command:
Robocopy \\server1\data \\server2\data /mir /copyall /dcopy:T
It will copy the original file structure, along with all access and time stamps. As it’s producing a mirror, everything in the endpoint that does not reflect the origin will be deleted. It is great for transferring to empty folders, but it might be dangerous if there’s already information there.
You may use the respective command prompt to duplicate a whole folder without keeping the access or deleting any file or data from the folder location:
Robocopy \\server1\data \\server2\data /e
Robocopy is not merely a copying program, and it is, as previously said, a highly strong instrument. You may tell it to keep an eye on the root directory (/mon) and replicate it over if it alters. To see outcomes without effectively transferring anything, configure it to list only (/I). You can specify whether it should only copy folders from the hidden set of attributes (/ia:H) or if it needs to exclude hidden files (/xa:H).
Easier Solution: Run EaseUS Todo PCTrans to Transfer Files Between Servers
For many server users, the prospect of purchasing a new computer is unappealing since they will have to move their data from one PC to another. While it may appear to be a simple procedure, it may quickly consume a significant amount of efforts if you are not attentive. The good news is that you can simplify the issue for yourself by using smart technology solutions.
EaseUS PCTrans is the best data migrating technology for its convenience of use and efficacy. It is a one-click PC transfer program that allows transferring data without losing any data from one PC to another. You may effortlessly load photographs, audio, and movies one by one using this transfer tool. Moreover, it allows moving applications between two PCs.
Its necessary steps of EaseUS Todo PCTrans help you to transfer files from server to server. It is also a great way to send huge files, specifically ones to take up a lot of disc space, such as applications or server file types. Two PCs can be readily linked to share data, the network, and a printer. The procedure is typically straightforward, requiring only a few hardware components and some software skills.
EaseUS Todo PCTrans Technician
- ☆ Deploy & install Todo PCTrans on multiple PCs.
- Transfer unlimited files, programs, apps between Servers.
- Transfer account, domain account, and settings.
- Data rescue, find product key of installed programs.
- One license for multiple PCs.
EaseUS is the ideal option for file transfer that ensures a seamless transition. Nothing is lost or destroyed during this entire procedure. There are three distinct editions of the program available, and the user can select the option that best meets their needs and expectations. One version is free, while the other two are charged.
Step 1. Open EaseUS Todo PCTrans on both of your server computers. Choose «PC to PC» to go to the next step.

Step 2. Choose the transfer direction — New PC or Old PC.
«New» — Transfer files from old Server to current new Server.
«Old» — Transfer files from current old Server to a new Server.

Step 3. Connect the current PC to the target PC by entering the target computer’s account password or its verification code. You can turn on the «Connection Verification»on the right top of the «PC to PC» mainscreen on the target computer.

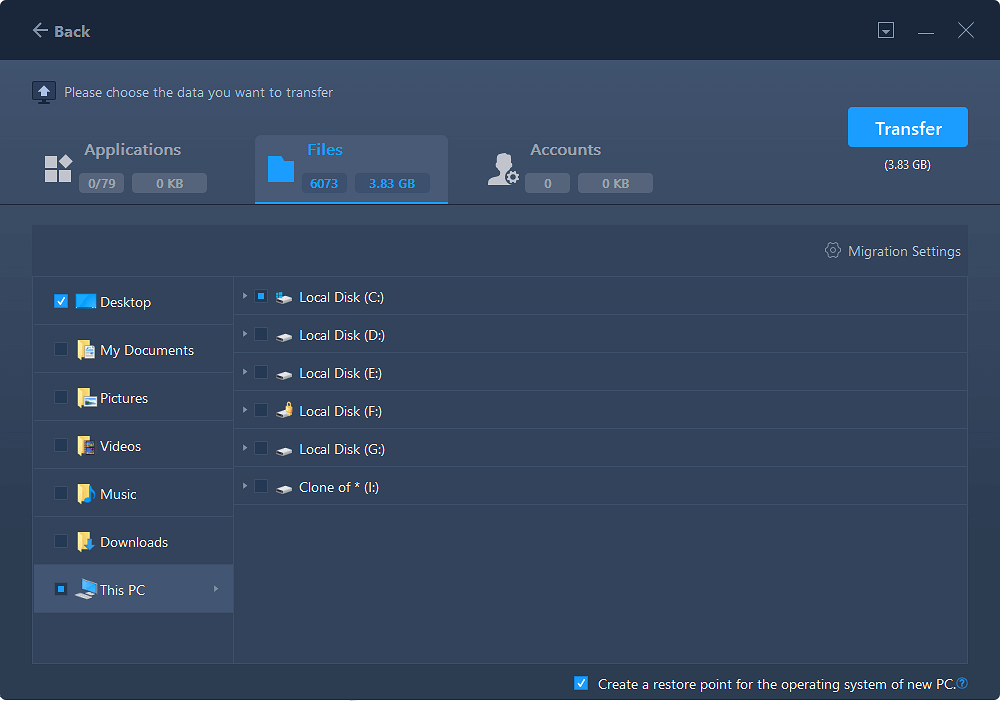
Step 4. Click «Files» > «Transfer» to check all the files you want to transfer to another Server computer. Then click «Transfer» to migrate specific data you have chosen.
Step 5. Wait for the process finishes. PCTrans will transfer files at a fast speed. It won’t take too long.

Essential Features of EaseUS Todo PCTrans
EaseUS Todo PCTrans Professional is a cost-effective way for businesses to deploy large PCs and decrease complications. Some of the most essential features of this software are as follows:
-
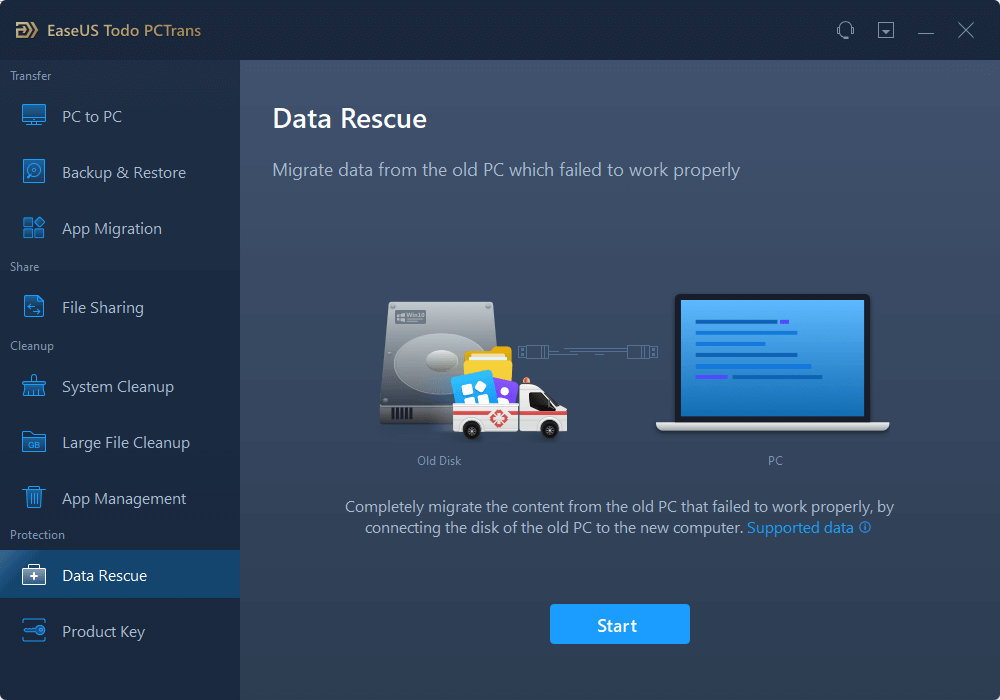
Data Rescue: Rescue data from a dead computer
When the pc or laptop doesn’t turn on, either the software or hardware is likely malfunctioning. Even if the data is not saved on the cloud, you can get the data back. Furthermore, if you have a damaged laptop, there are chances that you’ll lose everything. EaseUS Todo PCTrans Pro helps quickly move your data, applications, and information from a damaged or dead PC to a new one.
-
Drive to Drive: Move programs from one drive to another
Users may transfer applications directly without installing additional software that can help them work more efficiently. EaseUS Todo PCTrans can easily retrieve files and programs. Moreover, this tool can flawlessly transfer all of the system configurations to a new PC without losing anything. It can easily resolve your program reinstallation issue.
1. Free Technical Support
You can get 24/7 professional tech assistance for free. Moreover, there are seminars available over the call and online for any difficulty. This assistance and support are available at no cost at any time.
2. Simple and practical
EaseUS Todo PCTrans is a fully automated and user-friendly system. You will not have to possess any professional skills to run this tool. According to the clear instructions of the device, users may securely and reliably recover the data from dead machines with a few easy clicks.
Final Words
In Windows, there are two options for transferring data from one server to another or from one PC to another. Please study them carefully before deciding which one to use to share your data.
Utilizing EaseUS Todo PCTrans to transfer data from one computer to another is the simplest method. Its easy procedures, easy interface, and scheduling sync enable the computer to share data from dead PCs.
Copying files from one server to another is a frequently used task for any system administrator. There are several ways to copy files from one location to another.
You can use GUI to drag and drop files, use PowerShell copy command and also use robocopy command-line tool to perform the copying process.
If you want to copy a lot of files faster, you must use Robocopy to migrate files extremely fast. It is a very powerful tool that also prints a detailed report of the copy operation. With Robocopy, you can copy a single file, stripping all permissions, mirror an entire drive, and also delete anything in the destination that doesn’t match the source.
In this article, we will show you how to copy files from one location to another with Robocopy on Windows.
Requirements
- Two systems running Windows server 16.
- An administrator password set on both systems.
Robocopy Features
Robocopy provides a rich set of features you can leverage to perform efficient and fast file copies and moves.
The basic syntax of the Robocopy command is as shown below:
robocopy SOURCE DESTINATION FILE OPTIONS
A brief explanation of each feature is shown below:
- /Z : It is used to copy files in restartable mode.
- /S : It is used to copy subdirectories without empty ones.
- /E : It is used to copy subdirectories with empty ones.
- /ZB : Uses restartable mode. If access is denied, this option uses Backup mode.
- /B : It is used to copy files in backup mode.
- /MT:16 : It is used to copy files in multithreaded mode. With this option, you can copy multiple files at the same time.
- /MOV : It is used to moves files, and deletes them from the source after they are copied.
- /MOVE : It is used to moves files and directories, and deletes them from the source after they are copied.
- /R:N : Specifies the number of retries on failed copies.
- /W:N : Specifies the wait time between retries, in seconds. The default value of N is 30.
- /TBD : Specifies that the system will wait for share names to be defined.
- /NP : Specifies that the progress of the copying operation will not be displayed.
- /V : Used to display verbose output, showing skipped files.
Copy Files and Directories on Local System
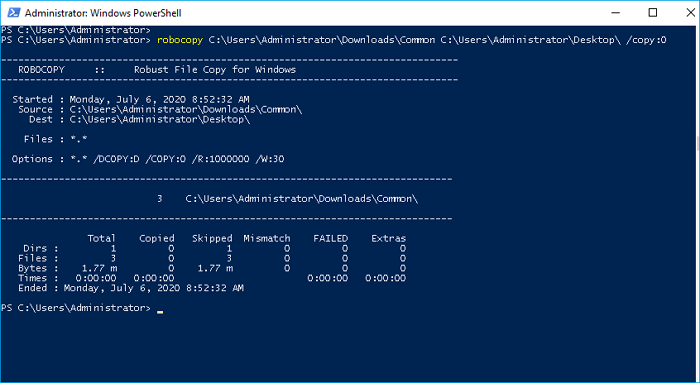
To copy all files in the specified directory without including sub-directories or the files stored in those, use the following command:
robocopy C:\Users\Administrator\Downloads\Common C:\Users\Administrator\Desktop\

To copy all directories, sub-directories and all files stored in those directories, run the following command:
robocopy /S /E C:\Users\Administrator\Downloads\Common C:\Users\Administrator\Desktop\

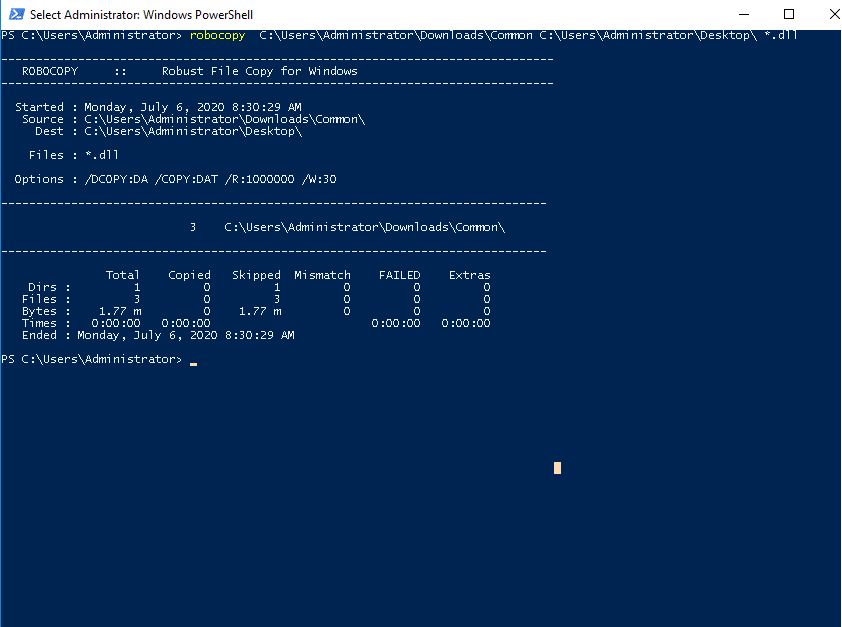
You can also specify the filenames and extensions that you want to copy which will skip other file names and extensions.
For example, if you want to copy only files with DLL extension, use the following command:
robocopy C:\Users\Administrator\Downloads\Common C:\Users\Administrator\Desktop\ *.dll
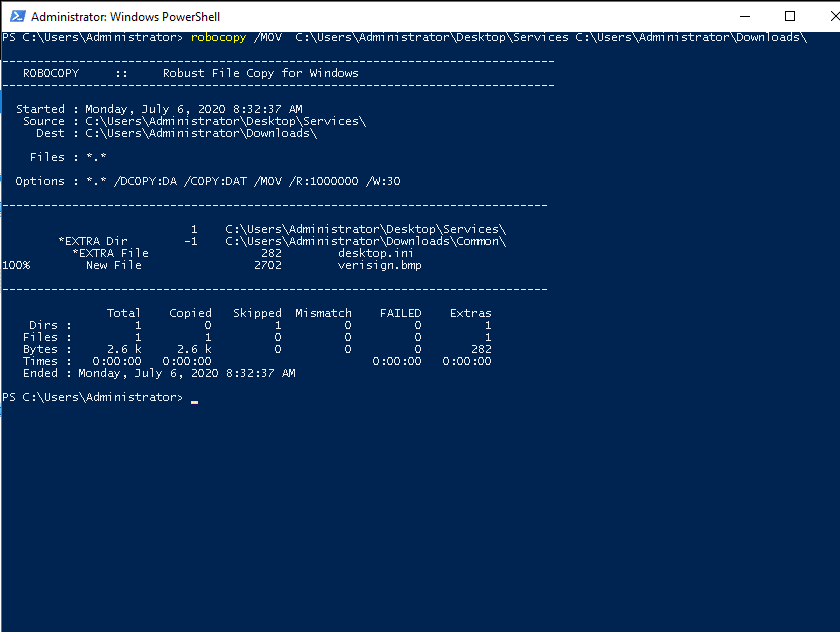
Move Files and Directories on Local System
You can use the option /MOV to move files from one location to another.
robocopy /MOV C:\Users\Administrator\Desktop\Services C:\Users\Administrator\Downloads\
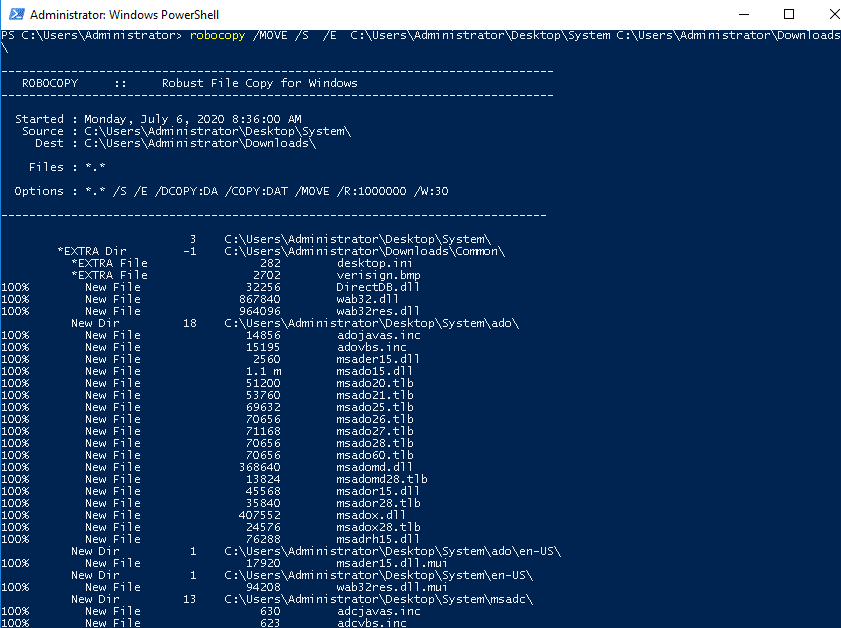
You can also use the option /MOVE to move files and directories from one location to another.
robocopy /MOVE /S /E C:\Users\Administrator\Desktop\System C:\Users\Administrator\Downloads\
Mirror a Directory
You can create an exact copy of the source folder in the specified destination folder using the option /MIR:
For example, create a mirror copy of the directory named Common with the following command:
robocopy /MIR C:\Users\Administrator\Downloads\Common C:\Users\Administrator\Desktop\
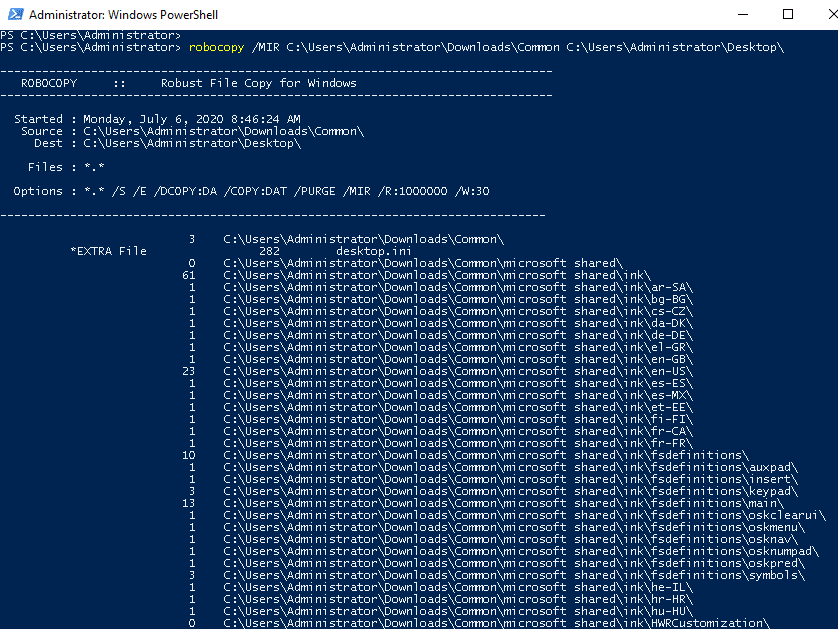
The above command will also delete any extra files that are present in the destination and are not present in the source.
Copy Files with Specific Size
Robocopy allows you to specify the size of files that you want to copy.
For example, to copy all files that are lower than 2K, run the following command:
robocopy C:\Users\Administrator\Downloads\Common C:\Users\Administrator\Documents\ /S /MAX:2000
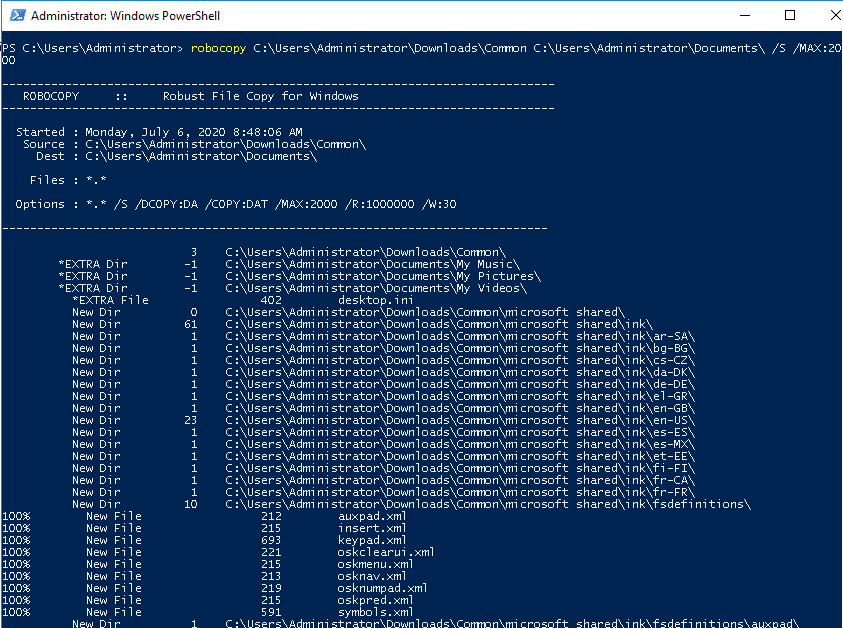
To copy all files larger than 1K, run the following command:
robocopy C:\Users\Administrator\Downloads\Common C:\Users\Administrator\Documents\ /S /MIN:1000

Copy File with Specific Attributes
All files and folders have different attributes that can be used for different purposes such as, listing owner, audit information, timestamps.
You can copy specific attributes with the robocopy command by specifying the /copy option.
A brief explanation of different attributes are shown below:
A : Used for attributes.
T : Used for time stamps.
D : Used to copy data properties.
S : Used for NTFS access control list.
O : Used for the owner information.
U : Used for Auditing information.
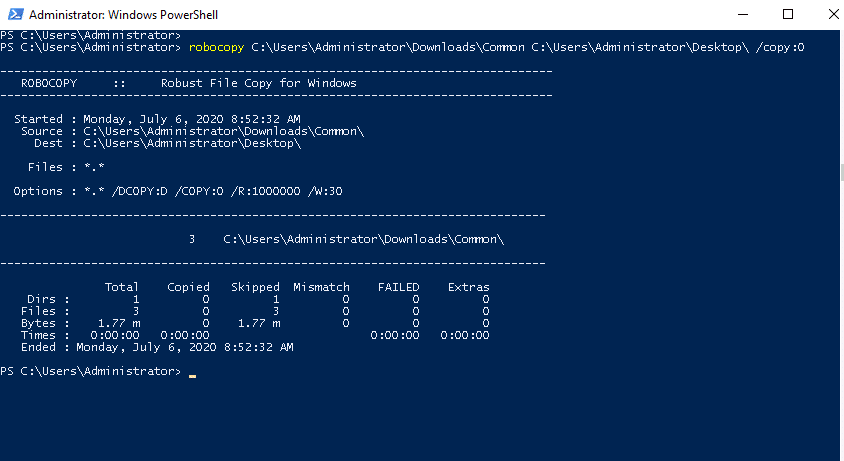
For example, to copy the owner information attributes, run the following command:
robocopy C:\Users\Administrator\Downloads\Common C:\Users\Administrator\Desktop\ /copy:O
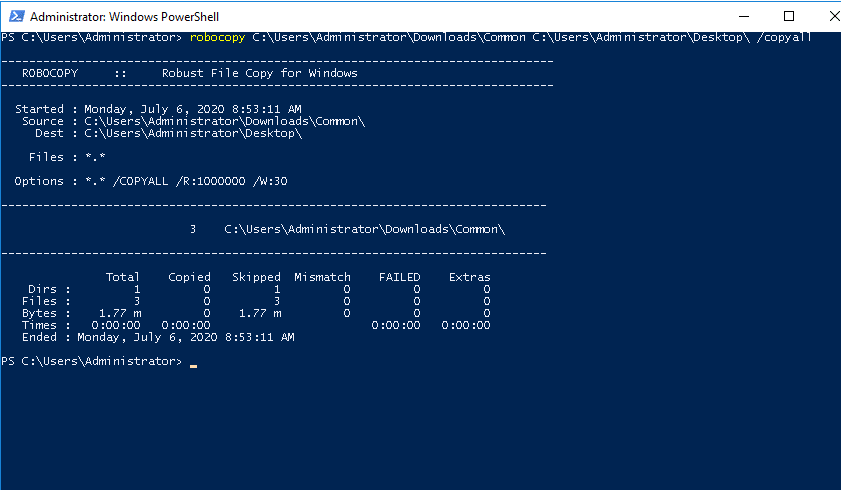
If you want to copy files with all attributes, run the following command:
robocopy C:\Users\Administrator\Downloads\Common C:\Users\Administrator\Desktop\ /copyall
Copy File From Local System To Remote System/Computer/Server
To copy files from the local system to the remote system, you will need to enable file sharing in the source device to allow Robocopy access to copy the files from the destination device.
You can share files by following the below steps:
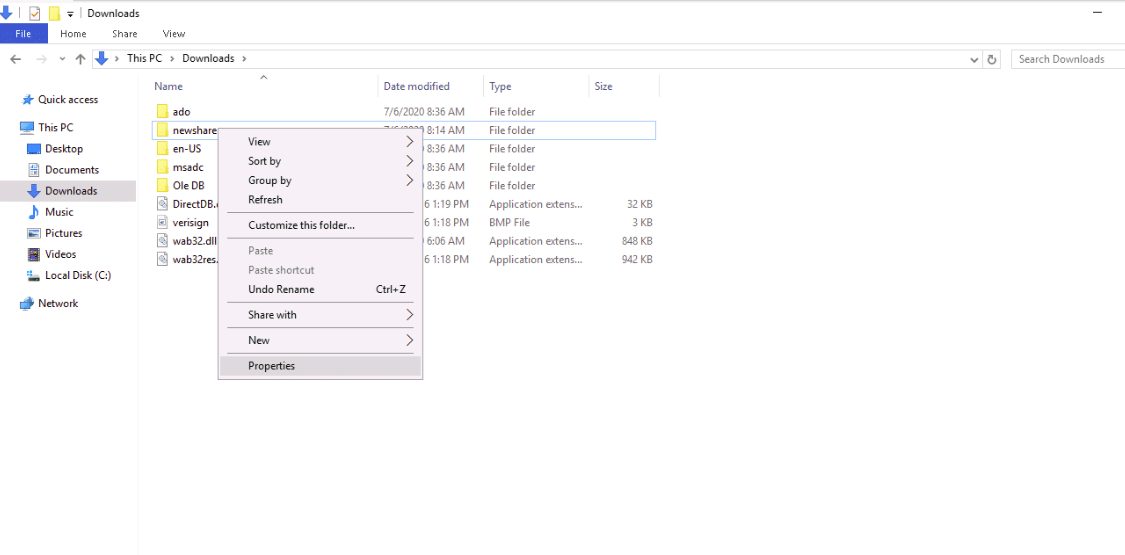
1. Open File Explorer as shown below:
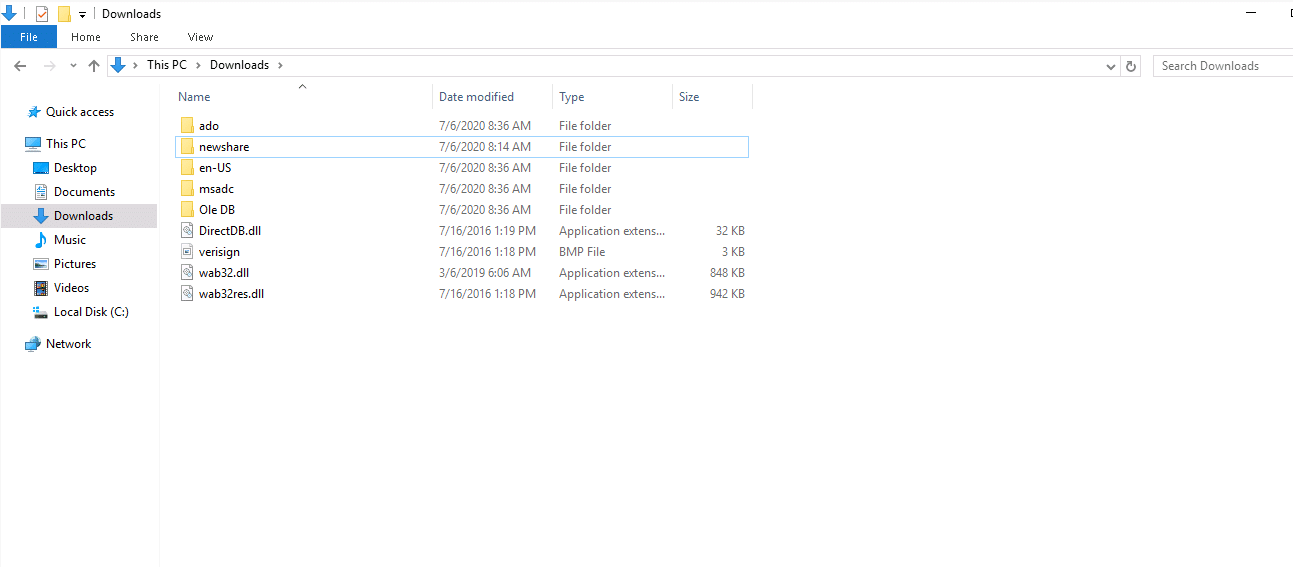
2. Right-click on the folder that you want to share and click on the Properties button as shown below:

3. Click on the Sharing tab. You should see the following page:
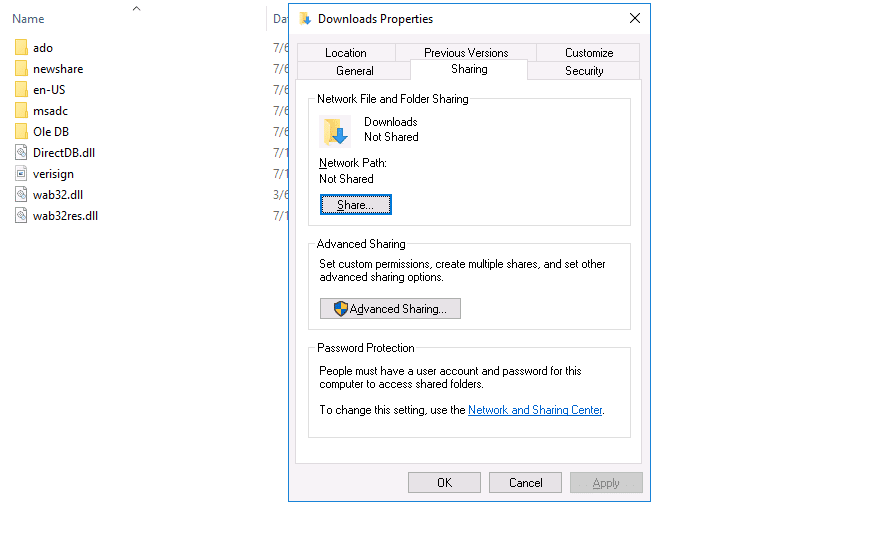
4. Click on the Share button. You should see the following page:
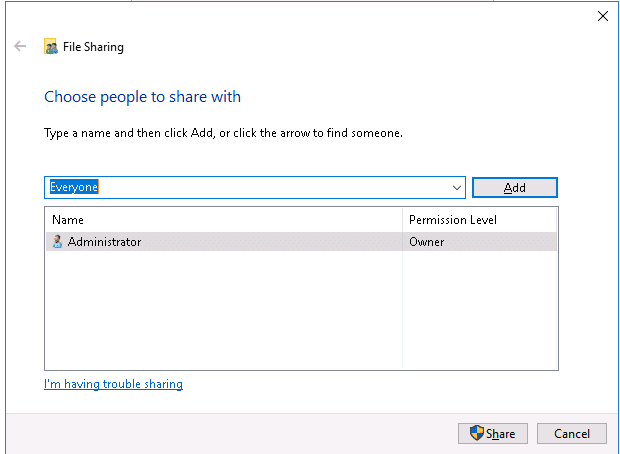
5. Select the Everyone group and click on the Add button. You should see the following page:
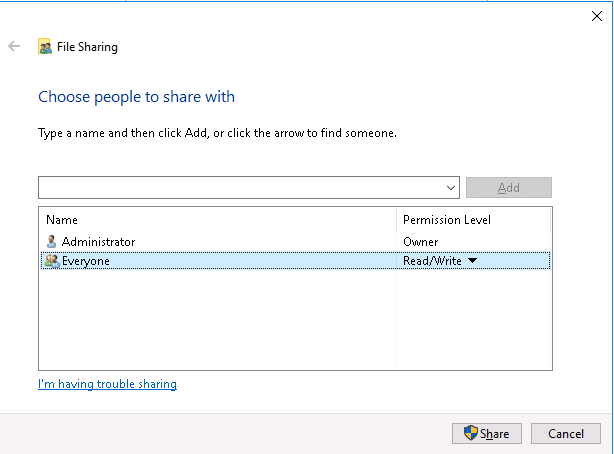
6. Select the Permission Level and click on the Share button. You should see the following page:

7. Click on the Done and Close button.
Note : Please remember the network path and IP address of the source computer.
Now lets login to the Destination computer and copy files from the Source computer using the robocopy command.
You can follow the below steps to copy files from the source computer to the destination computer.
1. Open Windows PowerShell from the Windows start menu:
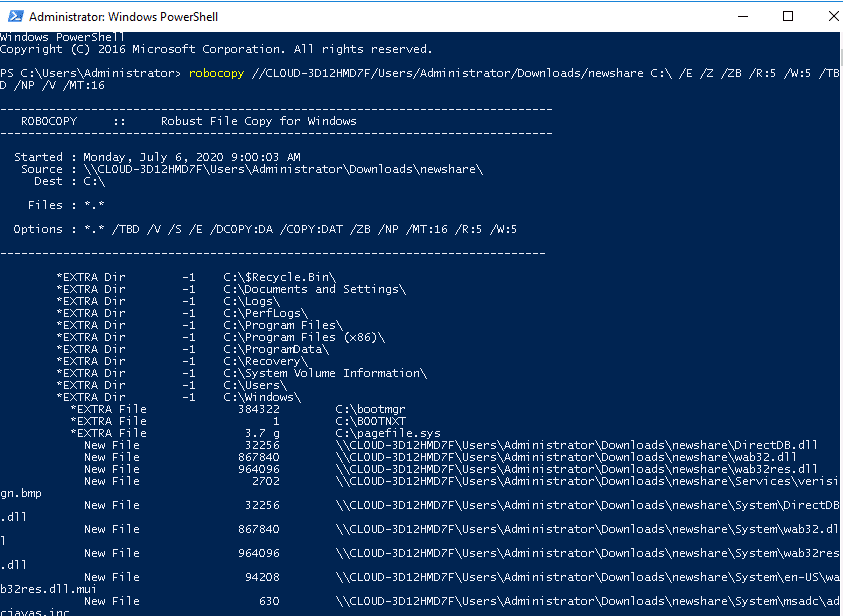
2. Type the robocopy command with the IP address and path of the shared folder of the source computer as shown below:
robocopy //CLOUD-3D12HMD7F/Users/Administrator/Downloads/newshare C:\ /E /Z /ZB /R:5 /W:5 /TBD /NP /V /MT:16
Conclusion
In the above guide, you learned how to copy files and folders using the Robocopy command with several different examples.
You can now use this command to perform your day-to-day tasks. Feel free to ask any questions in the comments below!
Robocopy (Robust File Copy) is an aging command-line tool that comes preinstalled on MicrosoftWindows servers. It can be used to copy files on Windows and non-windows file systems.
However, Robocopy suffers from several shortcomings, including:
- Creating complex or specific sync jobs requires implementing complex command prompts.
- Because of its limited transfer topology (i.e., point-to-point transfer), and limited tool set, copying using Robocopy to sync large files and copying files to multiple endpoints takes a long time and is error prone.
- Robocopy will only copy files if the source file and destination file have different timestamps.
- Robocopy doesn’t support real-time file sync.
- Errors encountered during the file copy process are both hard to diagnose and can cause the entire sync process to fail.
In this article, we’ll discuss how to synchronize files using Robocopy from one server to another, including the command prompts you can use to create specific file sharing parameters. We’ll also discuss our own file synchronization solution, Resilio Connect, and how creating sync jobs with Resilio is much easier and more reliable.
Resilio Connect is a P2P (peer-to-peer) file synchronization solution that’s used by leading companies in tech (Match.com, Kaspersky), gaming (Blizzard, Wargaming.com), media (Mixhits Radio, Turner Sports), and more. It delivers the fastest transfer speeds in the industry (10+ Gbps per server), uses UDP-based WAN transfer technology to optimize file transfer across high-latency and lossy networks, and scales organically to easily handle large sync jobs (tested at 250+ million files in a single job) and replication to many endpoints.
If you’re interested in learning more about Resilio as a Robocopy alternative, please check out this blog.
To learn more about syncing your company’s files with Resilio Connect, schedule a demo.
How to Create a Robocopy Sync Command
Let’s start by breaking down the basic syntax of the robocopy command.
Robocopy C:\[source] C:\[destination] [sync parameters]“robocopy”: Initiates the robocopy command.
C:\[source]: The first folder in the command is always the source folder.
C:\[destination]: The second folder in the command is always the destination folder.
[sync parameters]: This is where you enter commands that govern how your folder sync occurs. The sync parameters don’t need to be in any particular order.
Sync parameter commands include:
/copyall — This command copies all source file information, including file names, security permissions, auditing information, and more.
/s — This command copies subdirectories, excluding empty subdirectories.
/e — This command copies subdirectories, including empty subdirectories.
/z — This command copies files in restartable mode.
/b — This command copies files in backup mode.
/zb — This command uses restartable mode, and switches to backup mode if access is denied.
/PURGE — This command deletes destination files and folders and subfolders that no longer exist in the source.
/mir — This command copies subdirectories (including empty folders) and deletes destination files that no longer exist in the source server. You should be aware that the NTFS permissions for the files in the destination directory tree will also be overwritten.
/Copy:DAT — This command copies file data, attributes, and timestamps.
/Copy:DATSOU — This command copies file data, attributes, timestamps, security information, owner information, and auditing information.
/dcopy — This command copies directory timestamps.
/MT:16 — This command copies files in multithreaded mode — i.e., multiple files are copied simultaneously.
/mov — This command moves files and deletes them from the source directory after they’re copied.
/MAXage:n — This command excludes files older than a certain time/date. Replace n with the time/date you want to exclude.
/R:N — This command specifies the number of retries Robocopy will perform when a file transfer fails. N should be replaced by the desired number.
/W:N — This command specifies the amount of time Robocopy should wait before retrying a sync (in seconds). N should be replaced with the number of seconds you want Robocopy to wait (the default is 30 seconds).
/tee — This command instructs Robocopy to output what it’s doing to the screen display.
/v — This command instructs Robocopy to display verbose output and show skipped files.
/np — This command instructs Robocopy not to display the progress of the copy operation.
The following command prompt represents an example of what an actual robocopy powershell command might look like:
robocopy C:\sourcefolder\sharename C:\destinationfolder\sharename /e /bThe above command will copy all subdirectories, including empty ones, in backup mode.
Four Reasons Why Resilio Connect Is a Superior File Sync Solution
As stated above, while you can use Robocopy to create highly specific sync jobs, doing so requires knowing and implementing complex command prompts.
It’s also not the best tool for large sync jobs (syncing large files and syncing to multiple endpoints can take a long time). And when it breaks down, identifying and troubleshooting replication issues can be difficult — like most free command-line tools, it doesn’t provide a lot of insight into replication jobs.
But Resilio Connect is a real-time, P2P-based file sync solution that is superior to Robocopy in several key ways, including:
- Resilio is easy to centrally manage. All jobs can be easily controlled, tracked, and monitored through a single pane of glass.
- Resilio provides real-time, organically scalable synchronization. Changes to files and folders are automatically and efficiently synchronized to as many other systems as needed.
- Resilio is optimized to transfer files over WAN networks.
- Resilio offers superior security features.
Note: For smaller sync jobs, you can also use Resilio Sync. At $7-$14 per user per month, Resilio Sync is perfect for:
- Individuals who want to sync files from a personal computer to another computer or remote device can use Resilio Sync.
- Small businesses that need to sync files for collaboration among geographically distributed teams.
1. Creating, Managing, and Automating Sync Jobs with Resilio Is Much Easier
Deploying Resilio Connect and creating synchronization jobs (no matter how complex or specific) is much easier than Robocopy, as Resilio was designed to be easy to use and manage.
Resilio can be easily deployed on your existing infrastructure and begin replicating in as little as 2 hours. It’s an agent-based software that’s more flexible than Robocopy — it can be set up in the cloud, on-prem, or in a hybrid cloud model. Resilio supports a variety of cloud storage services, virtual cloud servers, mobile devices (Resilio offers iOS and Android apps), and desktops. And Resilio can be configured cross-platform on a variety of file servers, including Windows, Ubuntu, Linux, Unix, iOS, MacOS, Android, and more.

Managing sync jobs with Resilio is easy with Resilio’s Management Console, which provides insight into the state of replication via real-time notifications and detailed transfer logs. You can also use it to sync jobs and parameters that suit your needs, such as:
- Adjusting replication parameters. Configure buffer size and disk I/O threads, create bandwidth usage policies on each server (including creating profiles that govern how much bandwidth each server can use at specific times of the day or days of the week), and more.
- Setting up Webhooks.
- Configuring user permissions.
- Allocating bandwidth. It’s easy to centrally control how much bandwidth each job can utilize, and change the policy as needed over time.
Monitoring replication and troubleshooting replication issues is easy with Resilio, as Resilio provides detailed information on replication jobs.

Resilio also gives you all of the automation capabilities that Robocopy provides without any of the complexity, enabling you to easily automate any type of scripting or functionality using the GUI, REST API, and command-line prompts.
2. Real-Time, Organically Scalable Synchronization
Because of its point-to-point topology, Robocopy is slower, less reliable, and less scalable than Resilio Connect.
With point-to-point replication, files can only be transferred to one server at a time (i.e., from one server to another). This transfer methodology is slow (especially when syncing large files and/or syncing to multiple endpoints) and can create bottlenecks. If one server is on a slow network (or file transfer is impeded by some other issue), every other server must wait for that file transfer to complete before they can receive their files.
But Resilio uses real-time file change detection, P2P transfer, and file chunking to deliver fast (up to 10 Gbps per endpoint), reliable file synchronization.
Resilio can detect and immediately replicate file changes using real-time notifications from the host OS and optimized checksum calculations — i.e., it assigns an identification marker to each file that changes whenever a change is made to the file.
And each server in your replication environment is equally privileged and can share files with any other server. This means that there is no single point of failure — if the network is slow or goes down on any server, the necessary files or servers can be provided by any other server.
Resilio also uses a process known as file chunking, where a file is split into several chunks that can transfer independently from each other. With file chunking and Resilio’s P2P transfer topology, file transfer can occur simultaneously across all of the servers in your environment, resulting in transfer speeds that are 3-10x faster than point-to-point solutions.
For example, when replicating a file from Server 1 to the other servers in your environment, Server 1 can split that file into six chunks. Then it can share the first chunk with Server 2 (or any other server). When Server 2 receives the first chunk, it can begin sharing it with Server 3 before it has received the full file.
Innovative Design is a creative print and media marketing agency that uses Resilio to collaborate on projects and sync files across 3 offices.
“We were able to turn around graphic proofs quicker based on our staff’s availability versus forcing it through a bottleneck at a specific office. Connect has made us more efficient.”
Learn more about how Innovative Design syncs over 800,000 files across locations and transfers, consolidates, and restores 4.5TB of data.
3. Superior WAN Transfer
Most point-to-point replication solutions like Robocopy aren’t optimized for copying or synchronizing files across the WAN. For basic WAN transfers, they rely on TCP, which performs poorly over WANs.
But Resilio optimizes transfer over lossy, high-latency WAN networks using a proprietary UDP-based WAN acceleration protocol known as Zero Gravity Transport™ (ZGT).
ZGT uses several methods to optimize WAN transfer, such as:
- Calculating the ideal send rate via a congestion control algorithm.
- Sending interval acknowledgements for a group of packets (that contains information about packet loss), rather than for each individual packet.
- Retransmitting lost packets just once per RTT (Round Trip Time).
Because of Resilio’s WAN optimization technology, it can also sync and transfer files from the edge of the network — i.e., to and from remote locations with poor internet connections. Our client Shifo, for example, uses Resilio to sync files to poor, remote areas in Uganda and other locations.
Shifo is a health data solution company that delivers life saving healthcare solutions to remote communities and uses Resilio Connect to quickly deliver files to over 3,000 remote locations with poor quality networks.
“Resilio Connect reliably runs in the background — and just works. Like a humble, dependable friend… We sleep better because Resilio is there. That’s a critical piece. You can’t imagine how difficult it was for us (prior to Resilio): Delays, nothing being synchronized; now I don’t hear any of those problems. Now we can focus on solving healthcare problems (instead of moving files).”
Learn more about how Resilio delivers reliable file distribution for Shifo across any network connection.
4. Superior Security Features
Robocopy doesn’t encrypt your data at rest or in transit, leaving it vulnerable to interception and malicious activity.
But Resilio uses 3rd-party reviewed, state-of-the art security features to protect your data. It encrypts data at rest and in transit using AES 256 and one-time session encryption keys. And it uses mutual authentication to ensure files are only delivered to secure, approved endpoints and cryptographic integrity validation to ensure files arrive at their destination intact and uncorrupted.
Use Resilio Connect for Fast, Reliable Server Synchronization
While Robocopy can be used for server synchronization, setting up and troubleshooting sync jobs can be difficult. You should use an alternative replication solution like Resilio.
Resilio is a superior alternative to Robocopy for file synchronization because it:
- Uses proven P2P replication topology to sync files faster and in real-time.
- Is organically scalable with no single point-of-failure.
- Uses WAN optimization technology when needed to optimize file transfer over any network, including high-latency networks with varying degrees of packet loss.
- Provides built in security features that protect your data at rest and in transit, and provides encryption end-to-end.
To learn more about syncing with Resilio Connect, schedule a demo.
Copying files from one server to another is a fairly frequent task that system administrators face. As with most things in IT, there are many ways to accomplish this task. The method you choose will depend on your situation and your personal preferences. The information below assumes that both of your servers are on the same domain.
If you don’t like the command line, you could just drag and drop the files to the new server. But Windows Explorer doesn’t have any real error handling or logging, so if anything goes wrong, you end up having to guess what caused the problem. There are several good third-party tools out there to enhance Explorer, but most admins prefer to keep their servers as lean and clean as possible.
In the modern world of Virtual Machines, another option is to just make a copy of the entire VM file and then attach that as a secondary drive to the destination server. This is only viable if you want all of the files and all of the same permission settings. If that is your goal, it’s easy to do and works well.
How to Copy Files to a Server Using Robocopy
If you only want to copy some of the files to a server, you will probably want to use Robocopy. It’s been around since Windows Server 2003 and is a very powerful tool. With Robocopy you can copy a single file, stripping all permissions, mirror an entire drive while keeping all NTFS permissions in place, and pretty much anything in between. You can run Robocopy from your workstation, specifying the source and destination file servers, but running it directly on one of the servers will be faster and will generate less network traffic.
If you want to copy folder DATA on Server1 to Server2, for instance, you could use this command:
- Robocopy \\server1\data \\server2\data /mir /copyall /dcopy:T
This will create an exact copy of the source folder structure, including all permissions and time stamps. Because it’s creating a mirror, it will also delete anything in the destination that doesn’t match the source. It is perfect for copying to blank destinations but is potentially hazardous if there is already data there.
If you want to copy an entire folder, but don’t want to keep the permissions or delete anything from the destination folder, you could use the following command:
- Robocopy \\server1\data \\server2\data /e
But Robocopy doesn’t just do simple copying. As mentioned earlier, it’s a very powerful tool. You can set it to monitor (/mon) the source folder and copy it again if changes are detected. You can set it to list only (/l) to preview results without actually copying anything. You can set it to only copy files with the hidden attribute set (/ia:H) or to exclude (/xa:H) hidden files.
You can also do some things that don’t involve copying files. Perhaps you used the /copyall option because you wanted all permissions copied over but then had to change some of the permissions on the source. You can use /sec /nocopy to update the permissions without having to copy the files from the server again.
There are many other ways you can use this tool, including full logging capabilities. Here is a full list of Robocopy parameters: Robocopy Command Line Reference.

IT professional with more than 25 years of experience. Larry manages Windows networks, moderates an online IT community forum, and shares his experience of handling everyday sysadmin tasks in the most effective and creative ways.

Как копировать и передавать файлы по SSH
В статье мы расскажем, как передать файлы через SSH на разных операционных системах — Windows и Linux.
- Что нужно для подключения
- Как скопировать файл через SSH на Linux
- Как отправить файл по SSH с локального компьютера на сервер
- Как скачать файлы с удаленного сервера на компьютер
- Как скопировать файлы по SSH на Windows
- Как загрузить файл с компьютера на сервер
- Как скачать файл через SSH на локальный компьютер
Для подключения к серверу вам потребуются:
- IP-адрес или имя сервера,
- логин пользователя (в том числе root),
- пароль пользователя,
- порт.
Чаще всего копирование файлов через SSH делают с помощью двух мини-программ:
- scp (Secure Copy) — утилита для Linux. Она позволяет безопасно передать или скачать файл по протоколу SSH. Программа scp входит в комплект OpenSSH и не требует установки.
- pscp.exe — это утилита для Windows. Она используется по тому же назначению, что и scp: подключение к серверу по SSH и работа с файлами. Эта мини-программа входит в состав PuTTY: ее можно скачать на официальном сайте. Процедура настройки SSH-клиента описана в нашей статье.
Важно: если загружаемый файл существует на целевом хосте, он перезапишется.
Работа через SSH предполагает использование консольных команд. Наиболее популярные из них вы можете найти в статье.
Как скопировать файл через SSH на Linux
Копирование файлов по SSH на Linux можно сделать с помощью scp. Эта утилита позволяет:
- передать файл с локального компьютера на удаленный сервер,
- скачать файл с удаленного сервера на локальный компьютер.
Команда scp имеет следующий синтаксис:
scp опция источник получатель
Как отправить файл по SSH с локального компьютера на сервер
Чтобы загрузить файл:
- Подключитесь к серверу по SSH.
- Выполните команду:
scp /home/test.doc username@servername:/directory
Где:
- /home/test.doc — путь к файлу на локальном компьютере;
- username — имя SSH-пользователя;
- servername — имя сервера или его IP-адрес;
- directory — директория на сервере, в которую нужно загрузить файл.
Готово, вы загрузили файл на сервер.
Как скачать файлы с удаленного сервера на компьютер
Чтобы загрузить файл:
- Подключитесь к серверу по SSH.
- Выполните команду:
scp username@servername:/directory/test.doc /home
Где:
- /directory/test.doc — путь к файлу на сервере;
- username — имя SSH-пользователя;
- servername — имя сервера или его IP-адрес;
- home — папка на компьютере, в которую нужно загрузить файл.
Готово, вы скачали файл на компьютер.
Как скопировать файлы по SSH на Windows
Копирование через SSH на ОС Windows выполняется с помощью утилиты pscp.exe из набора PuTTY.
Как загрузить файл с компьютера на сервер
Чтобы загрузить файл:
- Подключитесь к серверу по SSH.
- Выполните команду:
pscp C:/documents/test.doc username@servername:/directory
Где:
- /documents/test.doc — путь к файлу на локальном компьютере;
- username — имя SSH-пользователя;
- servername — имя сервера или его IP-адрес;
- directory — директория на сервере, в которую нужно загрузить файл.
Если название файла или путь содержит пробелы, заключите его в кавычки:
pscp “C:/documents/test 1.doc” username@servername:/directory
Готово, вы загрузили файл на сервер.
Как скачать файл через SSH на локальный компьютер
Чтобы загрузить файл:
- Подключитесь к серверу по SSH.
- Выполните команду:
pscp username@servername:/directory/test.doc C:/documents
Где:
- username — имя SSH-пользователя;
- servername — имя сервера или его IP-адрес;
- directory/test.doc — путь к файлу на сервере;
- /documents — директория на локальном компьютере, в которую нужно загрузить файл.
Если название файла или путь содержит пробелы, заключите его в кавычки:
pscp username@servername:”/directory/test 1.doc” C:/documents
Готово, вы скачали файл на компьютер.