Remote Desktop Connection Broker (RDCB) – это один из компонентов роли терминального сервера (Remote Desktop Services, RDS) в Windows Server. RD Connection Broker позволяет равномерно распределить нагрузку между хостами в ферме RDS (при подключении к RDS ферме пользователя перенаправляет на наименее загруженный сервер), обеспечить доступ пользователям к VDI и RemoteApp, управляет конфигурацией RDS хостов в ферме. Также RDCB позволяет пользователям переподключаться к своим сессиям: при подключении к RDS, RDCB проверяет наличие незавершенной сессии на других серверах фермы, и перенаправляет его в старую сессию.
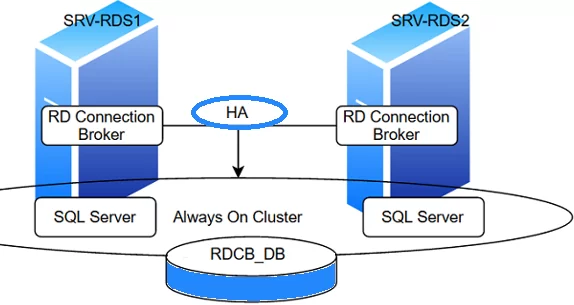
В этой статье мы рассмотрим процесс настройки отказоустойчивого высоко-доступного экземпляра RD Connection Broker, обеспечивающего свой функционал при выходе из строя одного из серверов с ролью RDCB. Для хранения данных RDCB используется БД на MS SQL Server 2019. В целях ухода от одной точки отказа, SQL базу данных RDCB также нужно развернуть в отказоустойчивой конфигурации. В этом примере мы будем использовать два SQL сервера с настроенной группой высокой доступности SQL Always On.
Содержание:
- Подготовка инфраструктуры для Remote Desktop Connection Broker
- Установка ролей Remote Desktop Services
- Настройка высокой доступности для RDS Connection Broker
- Настройка отказоустойчивой конфигурации SQL Server для RD Connection Broker HA
Требования для внедрения отказоустойчивого RDCB:
- Как минимум 2 сервера с ролью RDCB с Windows Server 2019/2022;
- Если вы хотите использовать высокую доступность для SQL базы RDCB, вам понадобится минимум 2 сервера с установленным SQL Server 2014 или выше (с редакцией Standard или Enterprise). В нашем примере на каждый из серверов мы установили standalone экземпляр MS SQL Server 2019 Enterprise. Если вы не планируете создать HA для SQL базы, достаточно одного сервера с SQL Express;
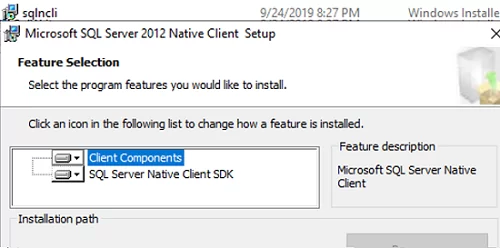
- На серверах с ролями RD Connection Broker нужно установить SQL Server Native Client;
- Предоставить полные права для серверов RD Connection Broker на БД SQL и каталог установки SQL;
- Минимум один сервер с ролью Remote Desktop Session Host в ферме;
Мы создадим отказоустойчивую конфигурацию RDCB их двух серверов. На каждом из них будет установлена роль RD Connection и SQL Server. Высокая доступность базы SQL Server будет достигаться за счет создания группы высокой доступности Always On.
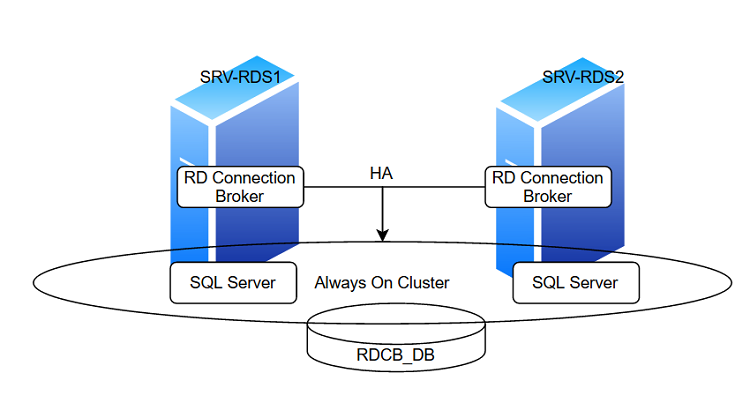
Начиная с Windows Server 2012, RDS Connection Broker обеспечивает высокую доступность в режиме Active/Active. В этом режиме все сервера RDCB являются активным и могут обрабатывает входящие запросы. Это позволяет обеспечить высокую доступность и масштабируемость RDCB в больших фермах Remote Desktop.
Подготовка инфраструктуры для Remote Desktop Connection Broker
Всем серверам, на которых будут установлены роли RD Connection Broker необходимо назначить статические ip-адреса и добавить в домен Active Directory.
- Srv-rds1.winitpro.loc — 192.168.13.20
- Srv-rds2.winitpro.loc — 192.168.13.21
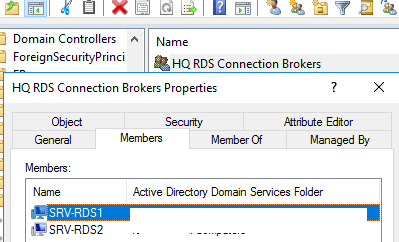
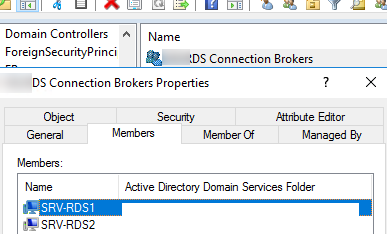
Создайте в Active Directory новую группу безопасности HQ RDS Connection Brokers, и добавьте в нее все сервера RDCB. Можно создать группу из оснастки ADUC (dsa.msc) или с помощью PowerShell:
New-ADGroup "HQ RDS Connection Brokers" -path 'OU=Groups,OU=SPB,OU=RU,DC=winitpro,DC=loc' -GroupScope Global -PassThru –Verbose
Добавьте в группу два сервера:
Add-AdGroupMember -Identity "HQ RDS Connection Brokers" -Members srv-rds1$,srv-rds2$
Создайте в DNS A записи для вашей кластерного имени RDS фермы (в нашем примере это HQRDCB). Все записи должны указывать на IP адреса всех серверов RDCB. Это необходимо для балансировки нагрузки (Round Robin) между серверами RD Connection Broker. Я создал такие записи:
- A — HQRDCB.winitpro.loc 192.168.13.20 (ip адрес первого сервера RDCB — Srv-rds1.domain.ru)
- A — HQRDCB. winitpro.loc 192.168.13.21 (ip адрес второго сервера RDCB — Srv-rds2.domain.ru)
Можно создать A записи в DNS с помощью PowerShell:
Add-DnsServerResourceRecordA -Name HQRDCB -IPv4Address 192.168.13.20 -ZoneName winitpro.loc
Add-DnsServerResourceRecordA -Name HQRDCB -IPv4Address 192.168.13.21 -ZoneName winitpro.loc

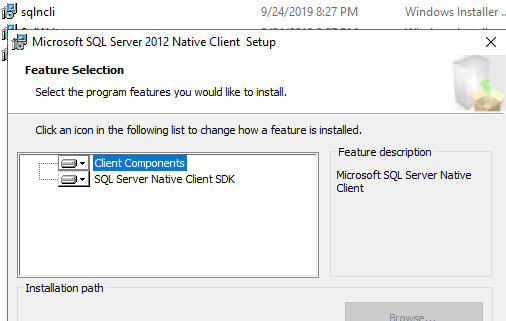
Установите SQL Server Native Client на всех серверах, на которых будет работать роль RDCB. SQL Server Native Client для вашей версии SQL Server можно скачать с сайта Microsoft или скопировать из установочного образа SQL Server (
D:\1033_ENU_LP\x64\Setup\x64\sqlncli.msi
)
Теперь запустите SQL Server Management Studio и подключитесь к вашему первому SQL серверу, на котором будет создана общая база данных Connection Broker (позже мы перенесем ее в группу высокой доступности Always On).
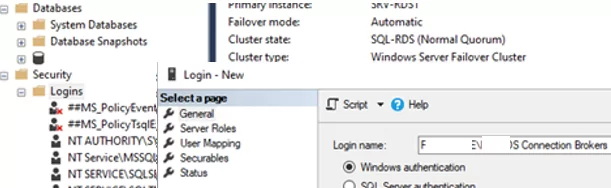
Перейдите в раздел Security -> Logins и добавьте новый login. Нажмите на кнопку Search, в Locations выберите свой домен, установите Object Types = Groups и найдите доменную группу HQ RDS Connection Brokers.
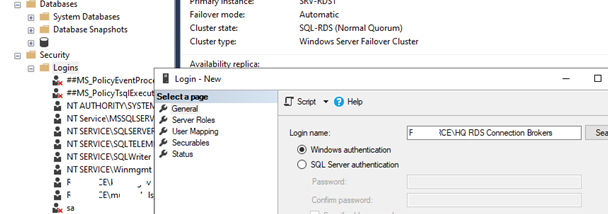
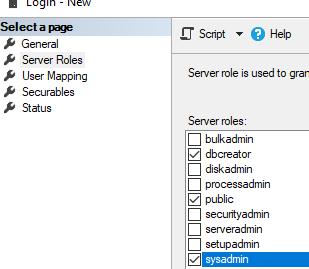
Назначьте этой группе роли
dbcreator
и
sysadmin
.

Откройте необходимые порты в Windows Firewall (по умолчанию для подключения к SQL Server используется
TCP 1433
).
Установка ролей Remote Desktop Services
Теперь нам нужно установить RDS роли на ваших серверах. Запустите консоль Server Manager, выберите Manage -> Add roles and Features -> Remote Desktop Services Installation.

Выберите Standard deployment -> Session-based desktop deployment.

Выберите один сервер, на который вы хотите установить роль RD Connection Broker. Сейчас не нужно ставить роль RDCB на второй сервер.
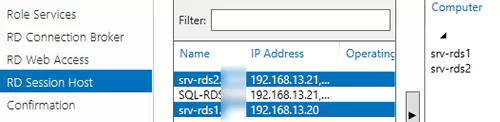
Установите роль RD Web Access на тот же сервер, что и RDCB (если эта роль не нужна, ее потом можно удалить). Установите роль RD Session Host на оба сервера.

Дождитесь окончания установки ролей RDS.

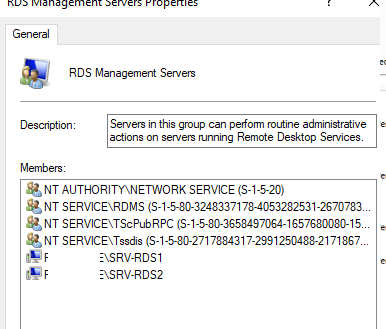
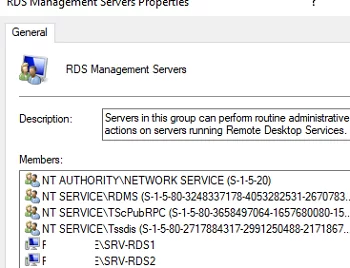
После окончания установки ролей, добавьте в локальную группу RDS Management Servers на обоих серверах учетные записи хостов RDCB и ‘NT AUTHORITY\NETWORK SERVICE’.
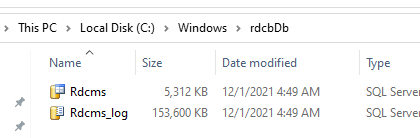
При установке роли RD Connection Broker на первый сервер в ферме он создаст локальную база SQL, хранящаяся на локальном диске сервера RD Connection Broker в каталоге C:\Windows\rdcbDb\.
В этой базе хранится информация о ферме и терминальный сессиях пользователей. Так как она расположена на локальной машине, другие сервера RDCB не смогут ее использовать. Для создания HA для RDCB нужно перенести ее на выделенный SQL сервер, на котором она будет доступна другим серверам.
Настройка высокой доступности для RDS Connection Broker
Прежде чем добавить в ферму второй хост с ролью RD Connection Broker, нужно перенести локальную базу RDCB на внешний SQL сервер.
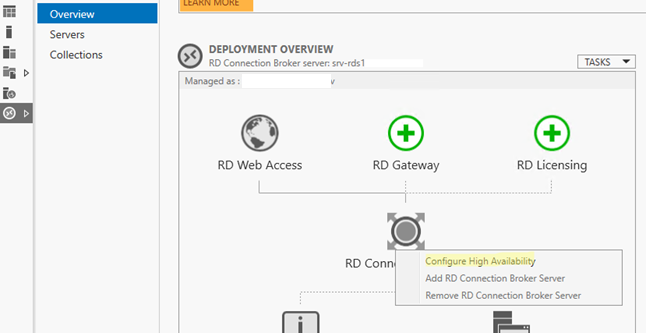
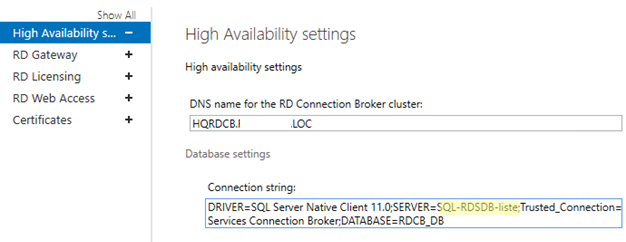
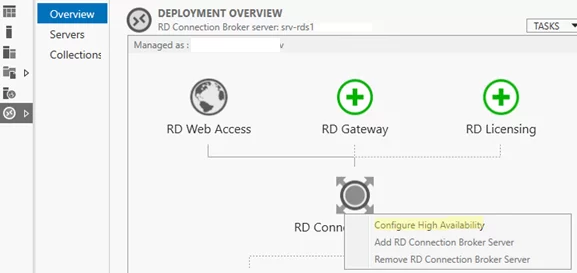
Для переноса БД Connection Broker из локальной базы на выделенный SQL Server нужно перейти в Server Manager -> Remote Desktop Services -> Overview. Чтобы запустить мастер создания отказоустойчивой конфигурации RD Connection Broker, щёлкните по изображению роли RD Connection Broker и выберите пункт Configure High Availability.
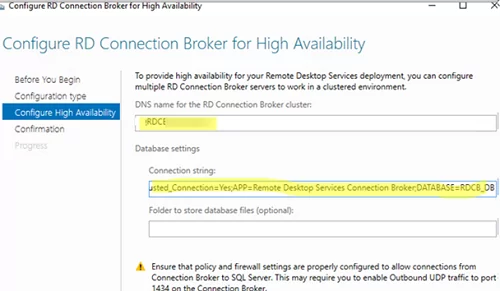
Выберите Dedicated Database Server. Затем нужно указать параметры подключения к SQL Server, на который будет перенесена локальная база RDCB.
Нужно заполнить три поля:
- DNS name for the RD Connection Broker Cluster: FQDN имя фермы RDCB, для которой мы создавали записи в DNS для Round Robin (в нашем примере это
HQRDCB.winitpro.loc
). Именно по этому адресу будут обращаться RDP клиенты при подключении к серверам RD Connection Broker; - Database Connection String – здесь нужно указать строку подключения с базе на SQL сервере. Формат строки такой:
DRIVER=SQL Server Native Client 11.0;SERVER=<SQL Server Name>;Trusted_Connection=Yes;APP=Remote Desktop Services Connection Broker;DATABASE=<DB Name>В данном примере SQL Server Name – имя SQL сервера, где нужно создать базу, а DB Name – имя новой базы данных:
DRIVER=SQL Server Native Client 11.0;SERVER=srv-rds2.resource.loc;Trusted_Connection=Yes;APP=Remote Desktop Services Connection Broker;DATABASE=RDCB_DB
После этого нельзя переключить кластер RD Connection Broker на внутренюю базу Windows Internal Database без полного пересоздания фермы.
На следующем этапе нажмите Configure.
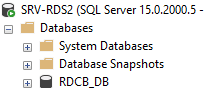
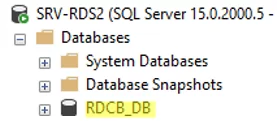
Затем подключитесь к SQL Server с помощью SQL Management Studio и проверьте, что была создана новая база данных RDCB_DB.
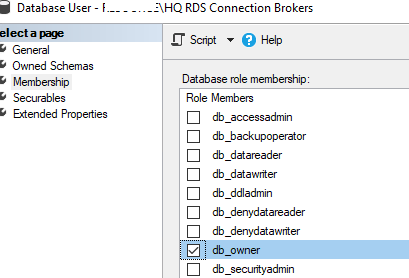
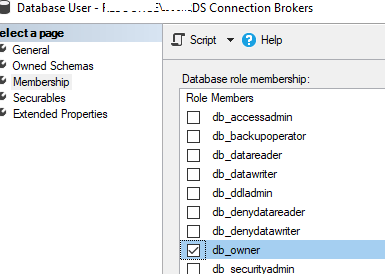
Вам нужно предоставить обоим серверам RD Connection Broker права на запись в эту базу. Перейдите в Database -> RDCB_DB -> Security -> Users -> New user.
Создайте двух новых пользователей
BUILTIN\RDS Management Servers
и
winitpro\HQ RDS Connection Brokers
. Предоставьте этим группам права db_owner и public.
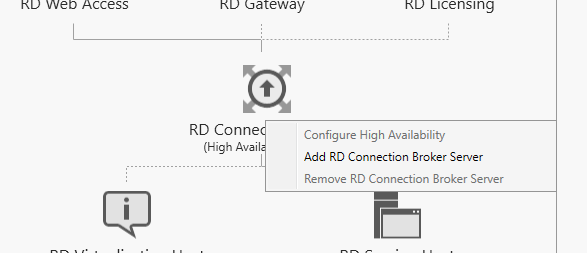
Для обеспечения высокой доступности на случай выхода из строя первого сервера, необходимо в текущую конфигурацию добавить второй сервер RD Connection Broker.
Щелкните по иконке RD Connection Broker, и выберите пункт Add RD Connection Broker Server.
Укажите имя второго сервера, на котором нужно установить роль Connection Broker и нажмите Next. Теперь в списке хостов фермы RDS появится два сервера с ролью RDCB. Также появится надпись RD Connection Broker (High Available Mode).
На этом настройка High Availability конфигурации Connection Broker завершена.

Настройка отказоустойчивой конфигурации SQL Server для RD Connection Broker HA
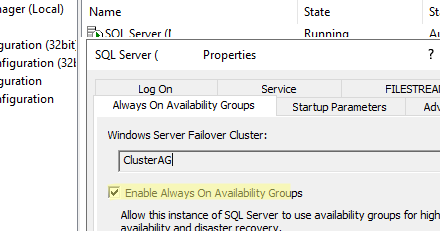
Теперь нужно обеспечить отказоустойчивую конфигурацию для базы данных SQL. Пока она запущена только на одном сервере. Базу данных RD Connection Broker нужно разместить в кластере SQL. Это может быть, как классический Failover Cluster, так и группа высокой доступности SQL Always On.
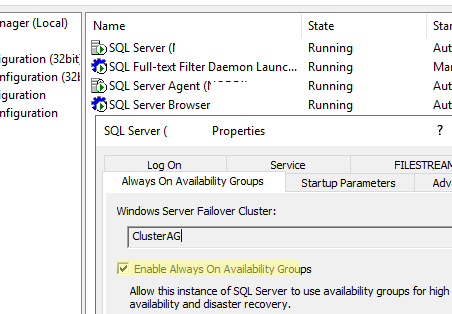
Базовая настройка Always On в SQL Server 2019 рассмотрена в отдельной статье. Здесь мы только вкратце опишем основные особенности:
- Установите роль Failover Clustering и соберите кластер SQL-RDS из двух хостов RDCB со свидетелем с кворумом на любом файловом сервере (описано в статье про Always On кластер чуть выше);
- Включите опцию Enable Always On Availability Groups в настройках SQL Server Configuration Manage на обоих серверах;

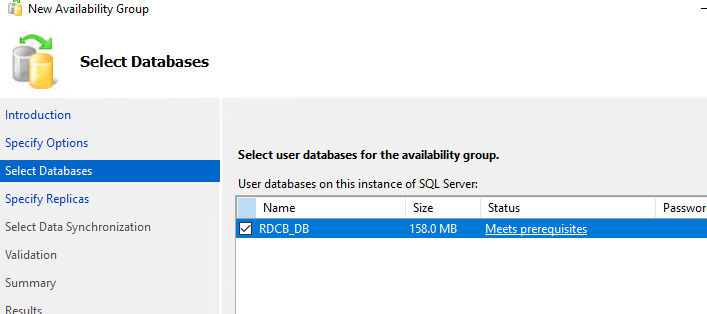
- Запустите New Availability Group Wizard;
- Задайте имя Availability Group (SQL-RDS);
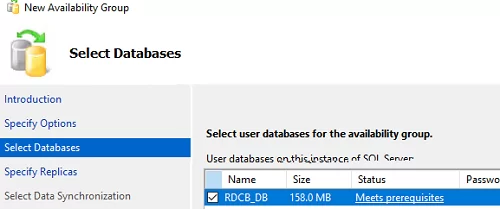
- Выберите базу, которую вы хотите поместить в группу высокой доступности (RDCB_DB);
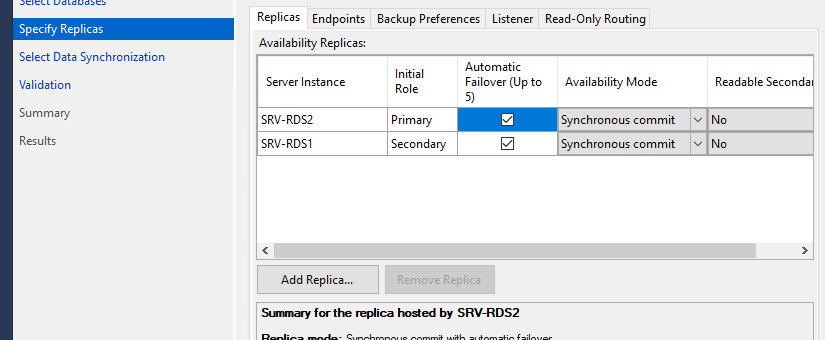
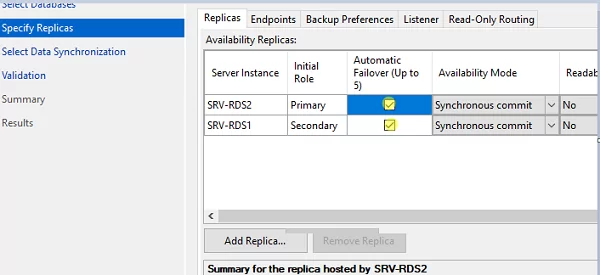
- Добавьте второй сервер SQL в группу высокой доступности, включите опцию Automatic Failover;
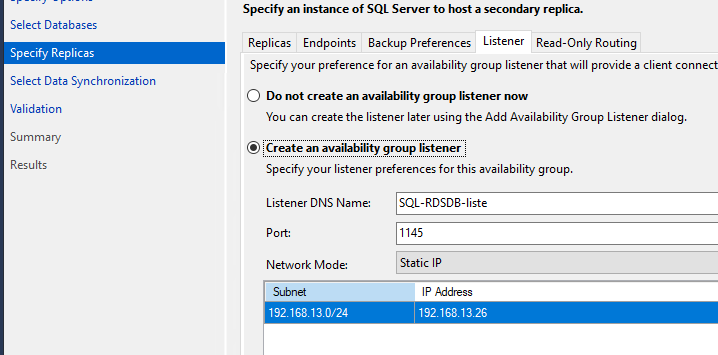
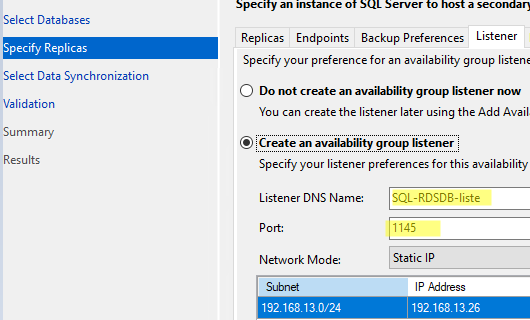
- На вкладке Listener задайте имя и IP адрес, которое будет использоваться клиентами для подключения к базе данных в группе Always on (SQL-RDSDB-liste);
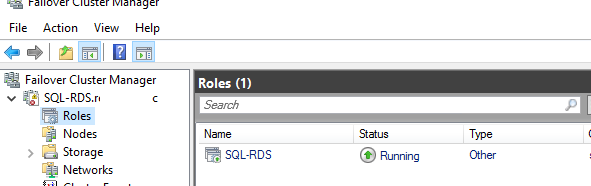
- Запустите консоль Failover Cluster Manager (
FailoverClusters.SnapInHelper.msc
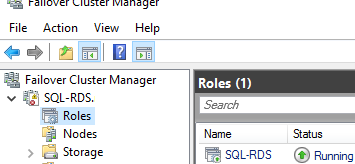
) и проверьте, что в ролях появился новый ресурс.
Теперь нужно изменить строку подключения к SQL серверу с базой данных RDCB в настройках Connection Broker. Изменить строку подключения можно только из PowerShell.
Set-RDDatabaseConnectionString [-DatabaseConnectionString] <String> [[-ConnectionBroker] <String>] [ <CommonParameters>]
В нашем примере команда для переключения фермы RDCB на SQL базу данных в группе высокой доступности выглядит так:
Set-RDDatabaseConnectionString -ConnectionBroker srv-rds1.winitpro.loc -DatabaseConnectionString "DRIVER=SQL Server Native Client 11.0;SERVER=SQL-RDSDB-liste;Trusted_Connection=Yes;APP=Remote Desktop Services Connection Broker;DATABASE=RDCB_DB"

Если команда не вернула ошибки, значит все OK. И теперь ваш кластер RDS Connection Broker настроен на использование SQL в группе высокой доступности Always On.
Откройте настройки ферму RDS и убедитесь, что теперь для HA используется новая строка подключения (Tasks -> Edit Deployment Properties).
Итак, мы создали высоко доступный сервис RDS Connection Broker на Windows Server 2022/2019. Вы можете протестировать доступность RDCB, отключив один из серверов фермы RDS. После этого вы можете продолжить настройку фермы RDS, создать сервер лицензирования RDS, добавить RDSH сервера, настроить коллекции, опубликовать приложения, HTML5 веб клиент RDS и т.д.
A step by step guide to build a Windows Server 2019 Remote Desktop Services deployment.
I posted this before based on Windows Server 2012 R2 RDS and thought it was high time to update this post to a more modern OS version.
I will provide all the steps necessary for deploying a single server solution using the GUI tools.
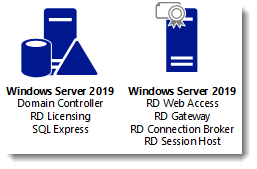
Although it is called a single server installation, we will need 2 servers as shown below.
Software used in this guide:
Windows Server 2019 ISO (evaluation can be downloaded here: https://www.microsoft.com/en-us/evalcenter/evaluate-windows-server-2019).
SQL Server 2017 Express x64 (free version can be downloaded here: https://www.microsoft.com/en-us/download/details.aspx?id=55994).
SQL Server 2016 Native Client (free version can be downloaded here: https://www.microsoft.com/en-us/download/details.aspx?id=52676. After clicking the download button select ENU\x64\sqlncli.msi). Although I’m installing SQL Express 2017, there are no newer client tools available.
SQL Server Management Studio (free, and can be downloaded here: https://docs.microsoft.com/en-us/sql/ssms/download-sql-server-management-studio-ssms).
And a certificate. I got mine for free from https://www.sslforfree.com/. This certificate needs to contain the FQDN you will use as the RD Web Access URL (mine is rds.it-worxx.nl in this guide). It needs to be in .pfx format and you need to have the private key in it.
This guide will not focus on building a domain using a single domain controller and adding the second server as a member server to this domain.
Also some basic knowledge is assumed in this guide. I will not detail how to create a Security Group and adding a computer account to it. I will also not detail how to install SQL Express, or adding logins to a SQL Server Instance security context. If you need extra help with this, Bing it or drop me a mail with details, and I will provide steps to continue.
I will be using Hyper-V on my Windows 10 1809 laptop and I have prepared 2 servers:
ITWDC (1 vCPU, 1024MB memory, dynamic, 60GB Harddisk)
Installed Windows
IPv4 192.168.0.4/24
Added .NET Framework 3.5 as a feature
Added Active Directory Domain Services as a role
Configured this server as a Domain Controller in a new forest: it-worxx.lab
ITWRDS (1 vCPU, 1024MB memory, dynamic, 60GB Harddisk)
Installed Windows
Added .NET Framework 3.5 as a feature
IPv4 192.168.0.10/24, DNS server 192.168.0.4
Configured it as a member server in the it-worxx.lab domain
Installing the Remote Desktop Services Roles
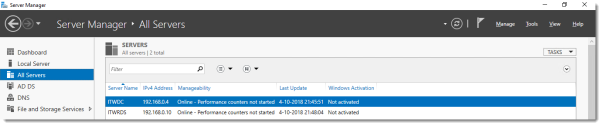
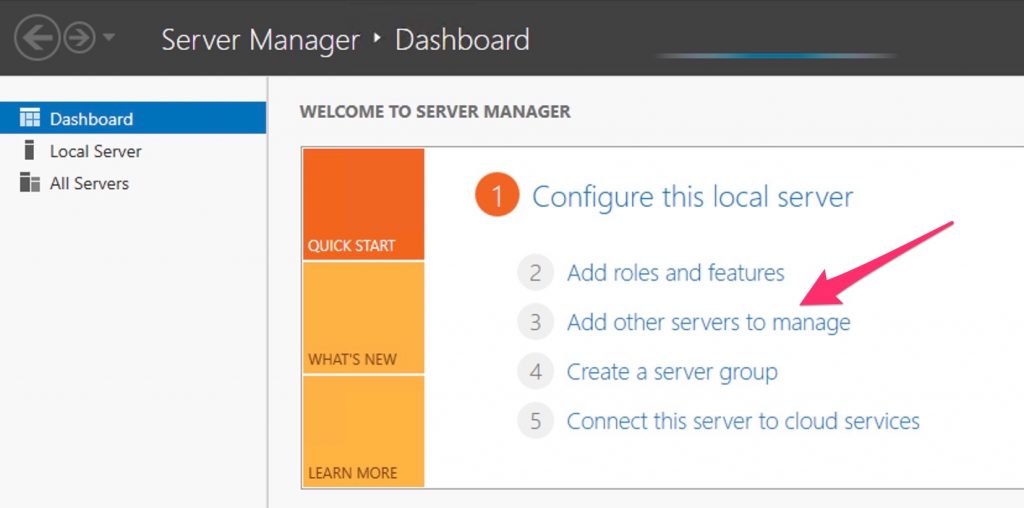
Log on to the Domain Controller, and in Server Manager right-click the All Servers node and add the second server using the Add Servers command (or select the All Servers node, click Manage and click Add Servers).
Now that all servers needed in this deployment scenario are present, click Manage, and click Add Roles & Features.
Before you begin
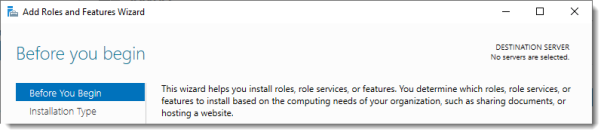
Click Next.
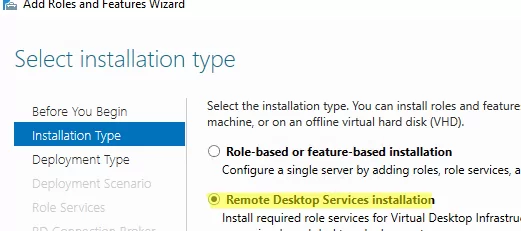
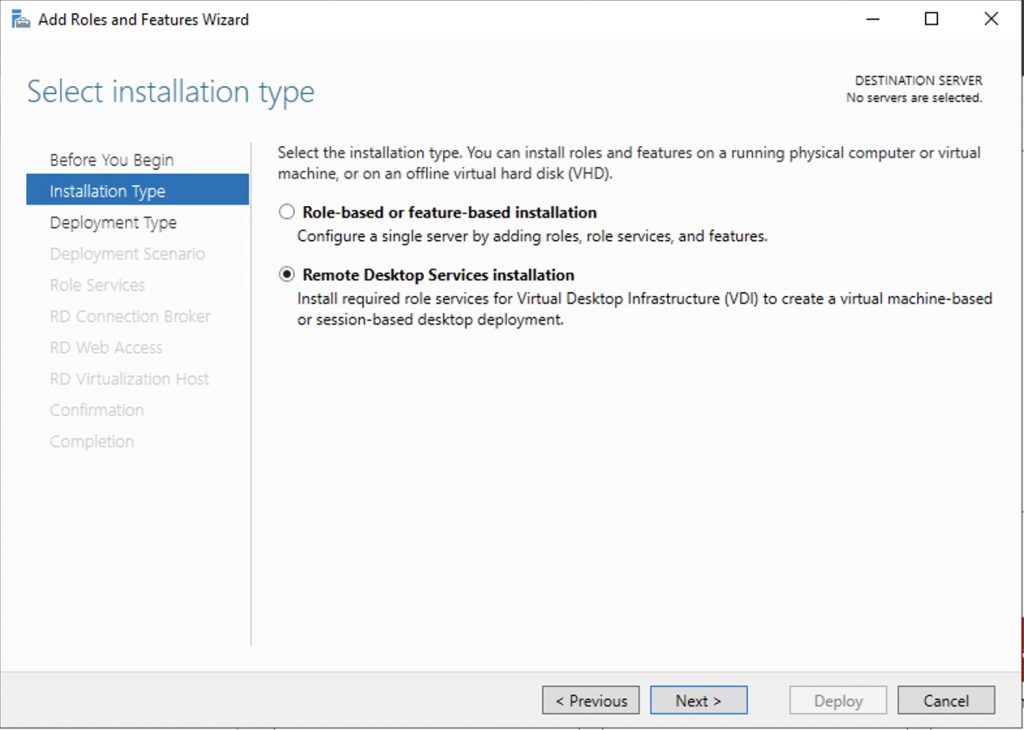
Select Installation Type
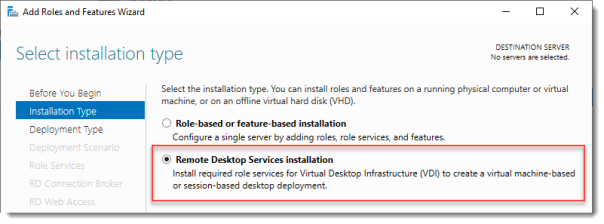
Select Remote Desktop Services installation.
Click Next.
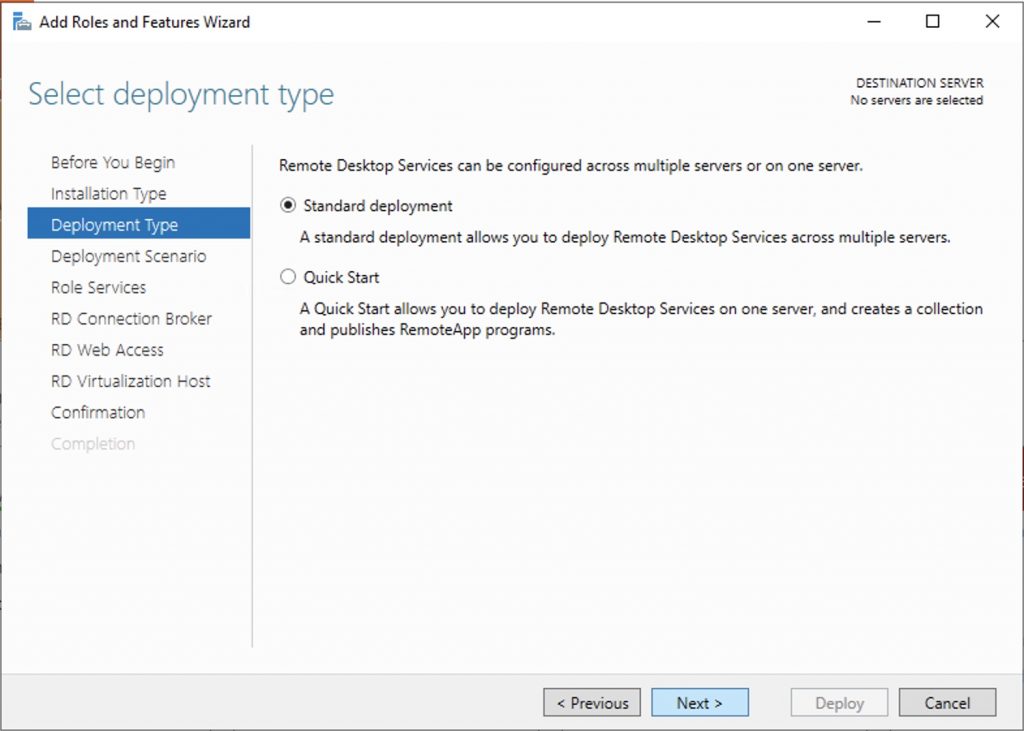
Select Deployment Type

Although Quick Start might be a valid option for a single server deployment, leave the default selected. This will explain the steps necessary to install Remote Desktop Services in greater detail.
Click Next.
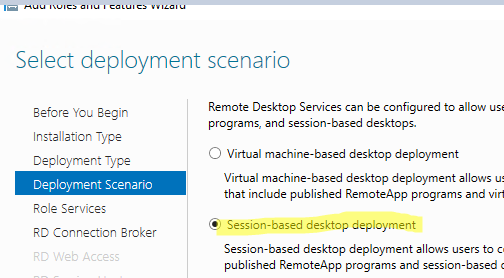
Select Deployment Scenario
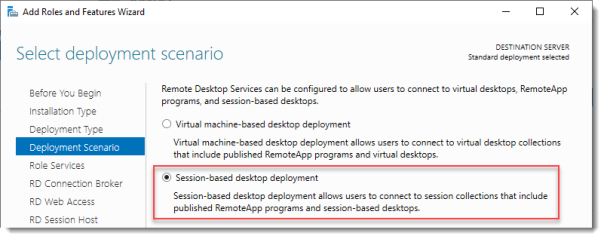
Select Session-based desktop deployment.
Click Next.
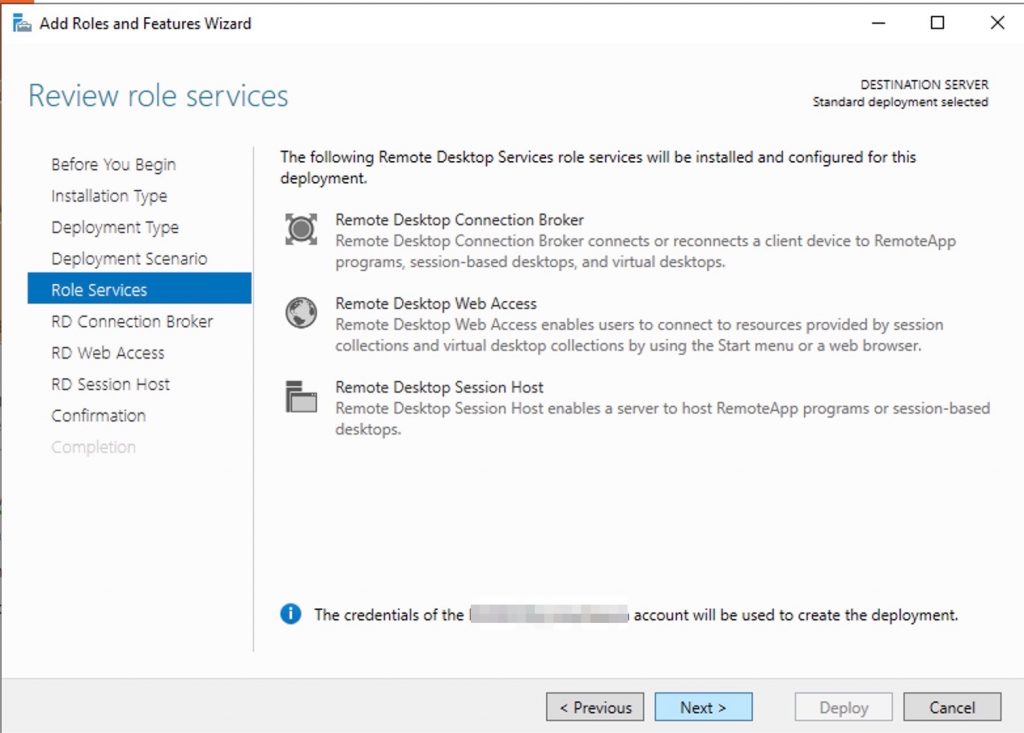
Review Role Services

Review the services that will be installed.
Click Next.
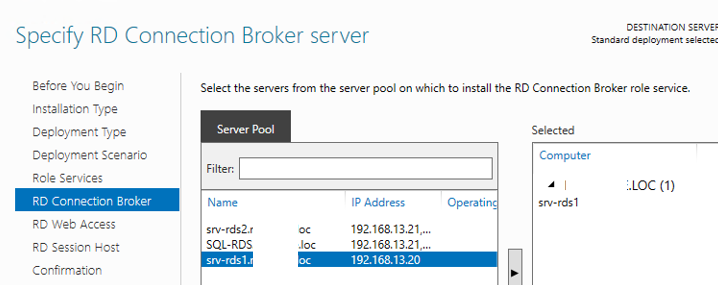
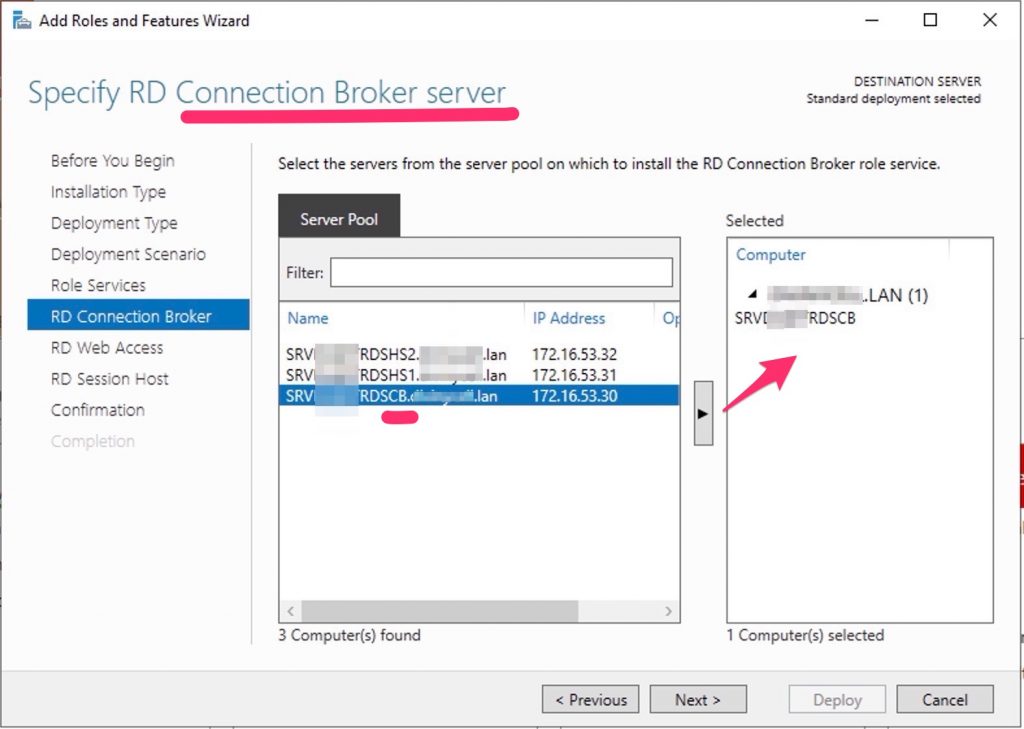
Specify RD Connection Broker server
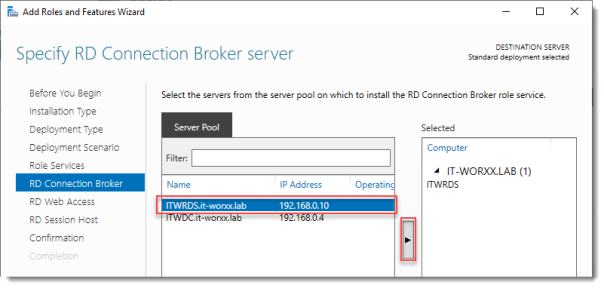
Click the member server and click the Add button.
Click Next.
Specify RD Web Access server
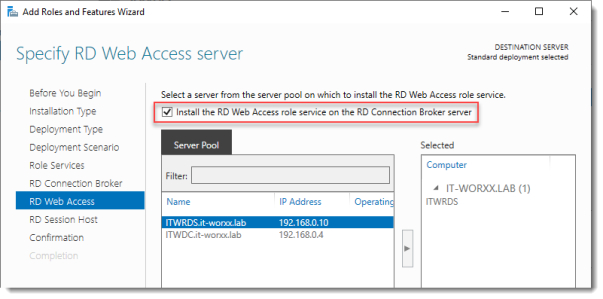
Check Install the RD Web Access role on the RD Connection Broker server.
Click Next.
Specify RD Session Host server
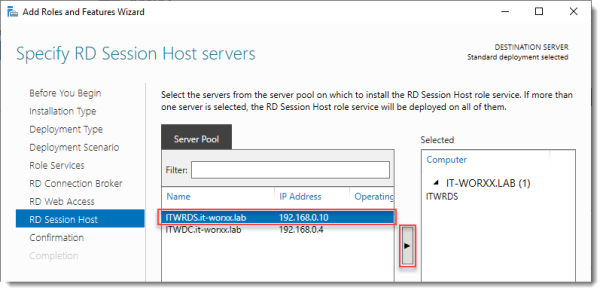
Click the member server and click the Add button.
Click Next.
Confirm selections
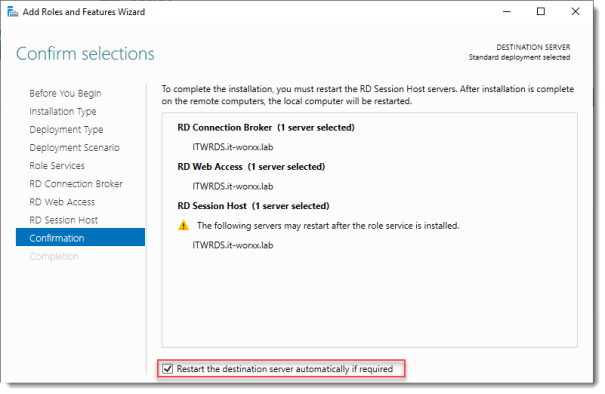
Check Restart the destination server automatically if required.
Click Deploy.
View progress
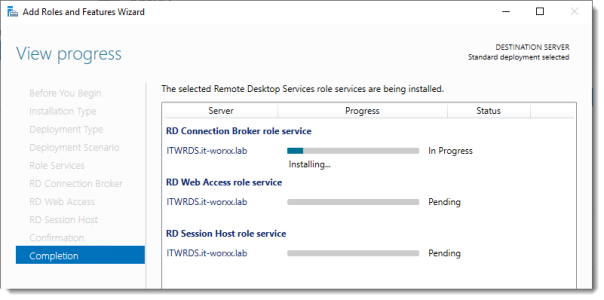
Wait until all role services are deployed and the member server has restarted.
Click Close.
In Server Manager click Remote Desktop Services and scroll down to the overview.
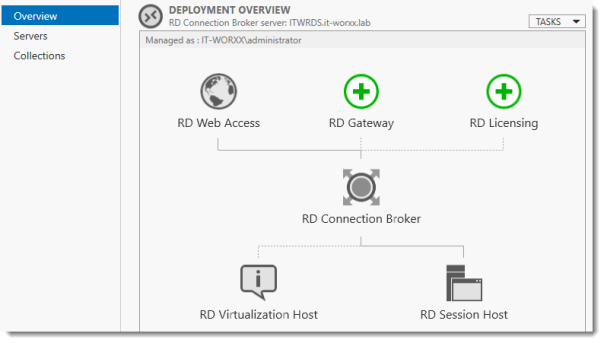
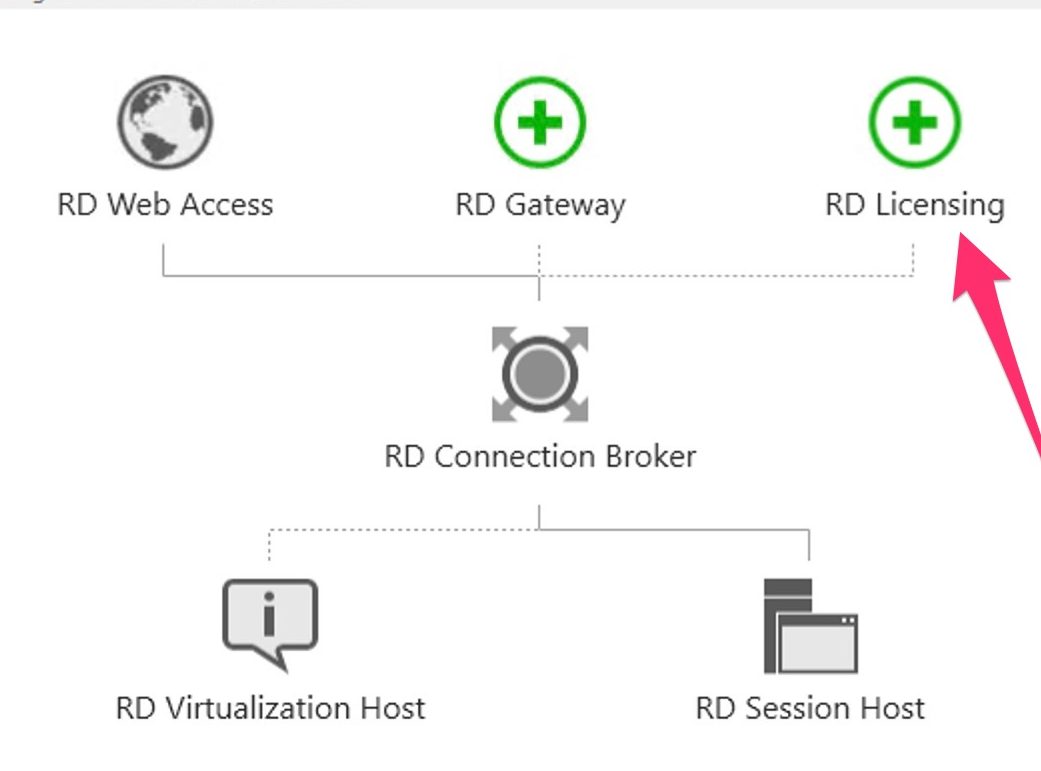
As you can see the deployment is missing a RD Gateway server and a RD Licensing server.
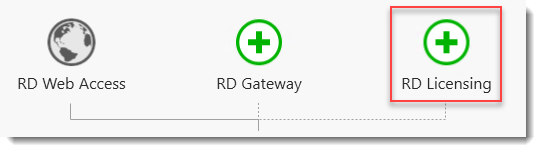
Click the Add RD Licensing server button.
Select a server
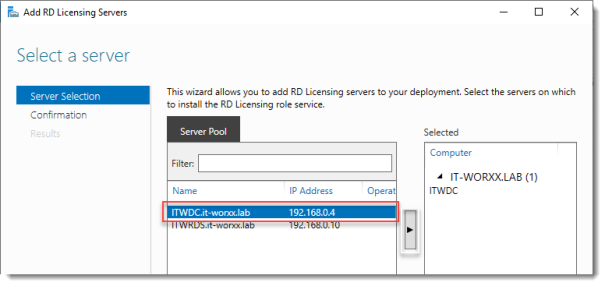
Click the domain controller and click the Add button.
Click Next.
Confirm selections
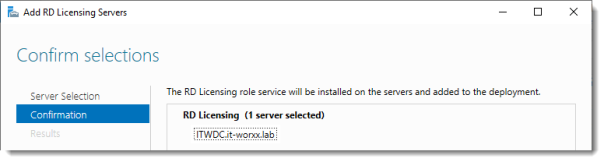
Click Add.
View progress
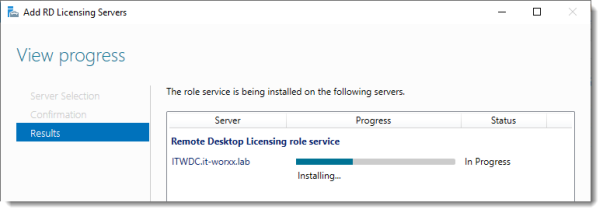
Wait until the role service is deployed. No restart is needed.
Click Close.
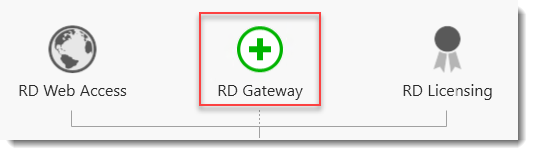
Click the Add RD Gateway server button.
Select a server
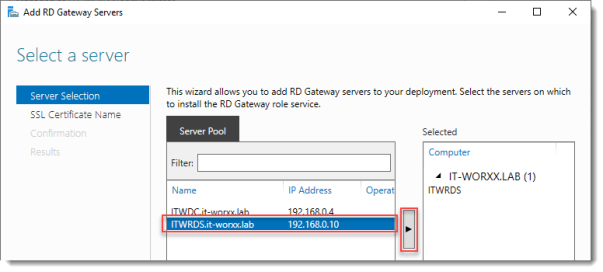
Click the member server and click the Add button.
Click Next.
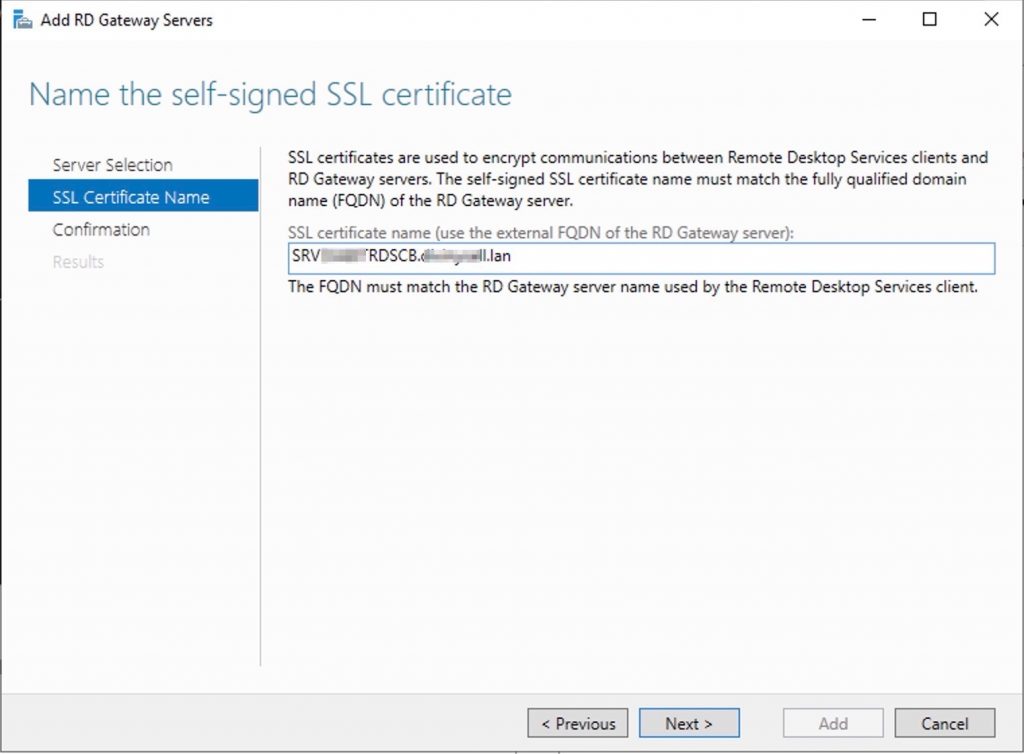
Name the self-signed SSL certificate
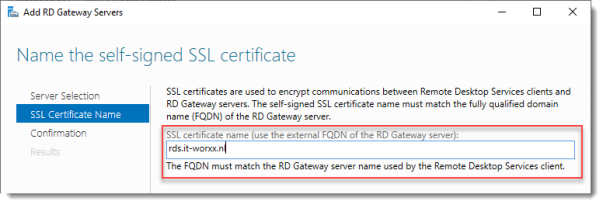
The wizard creates a self-signed certificate. We will deal with certificates in this deployment in a little bit. We will replace the self-signed certificate.
Enter the external Fully Qualified Domain Name which you will also use for the Web Access URL. In my case, for lack of a better name, I used “rds.it-worxx.nl”. I didn’t want to use “remote.it-worxx.nl” or “desktop.it-worxx.nl” or anything else.
Click Next.
Confirm selections
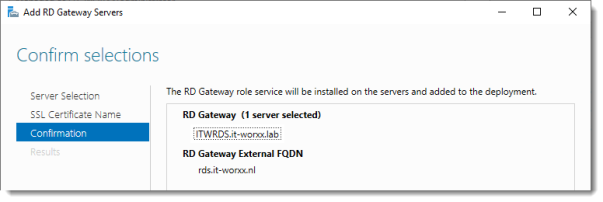
Click Add.
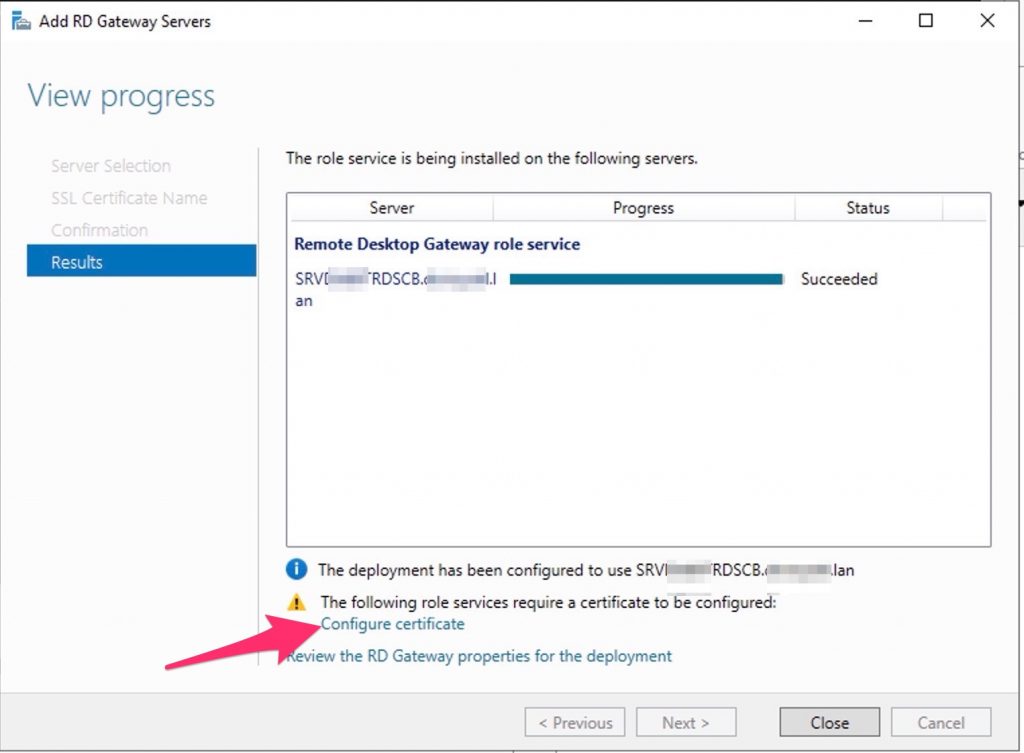
View progress
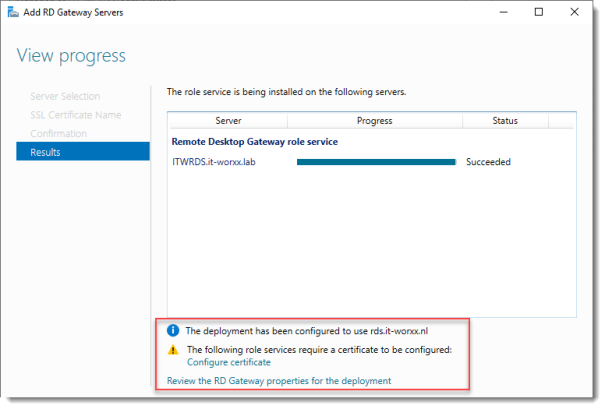
Wait until the role service is deployed. Again, no restart is needed.
Notice that “rds.it-worxx.nl” was configured for the deployment.
Also notice that even more certificate configuring is needed, but we’ll get to that later. Pay no attention to it for now. The same goes for the RD Gateway properties for the deployment. We’ll get to that later.
Click Close.
Review role installation and setting License Mode
Let’s have a quick look at the configuration we have so far.
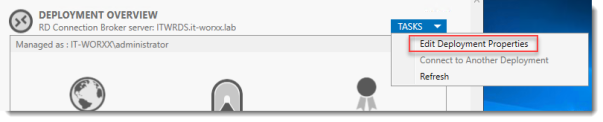
In Server Manager, Remote Desktop Services, Overview, click Tasks and click Edit Deployment Properties.
Configure the deployment
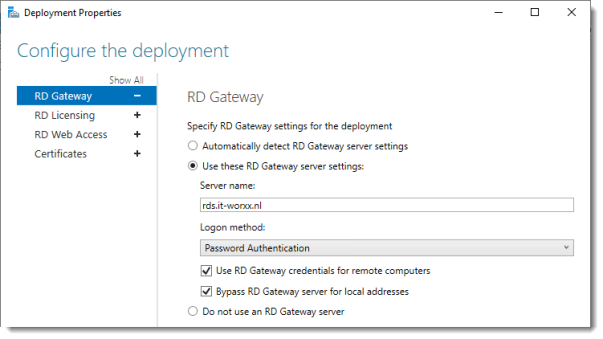
Review the RD Gateway settings and notice what settings are available.
Click RD Licensing.
Configure the deployment
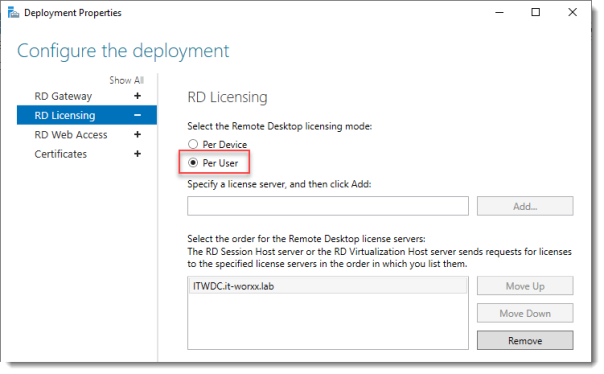
Notice that an RD License server is available, but no license type is selected yet.
I selected Per User, but since this is just a guide setup, it really doesn’t matter.
Click RD Web Access.
Configure the deployment
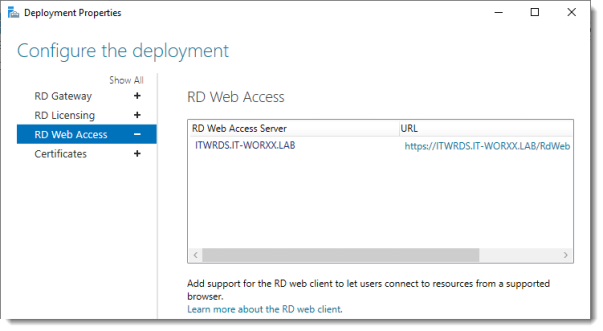
By default the RD Web Access IIS application is installed in /RdWeb.
If you want to know how to change this, check another post: https://msfreaks.wordpress.com/2013/12/07/redirect-to-the-remote-web-access-pages-rdweb/
This is for Windows Server 2012 R2 RDS, but it also works for Windows Server 2019 RDS.
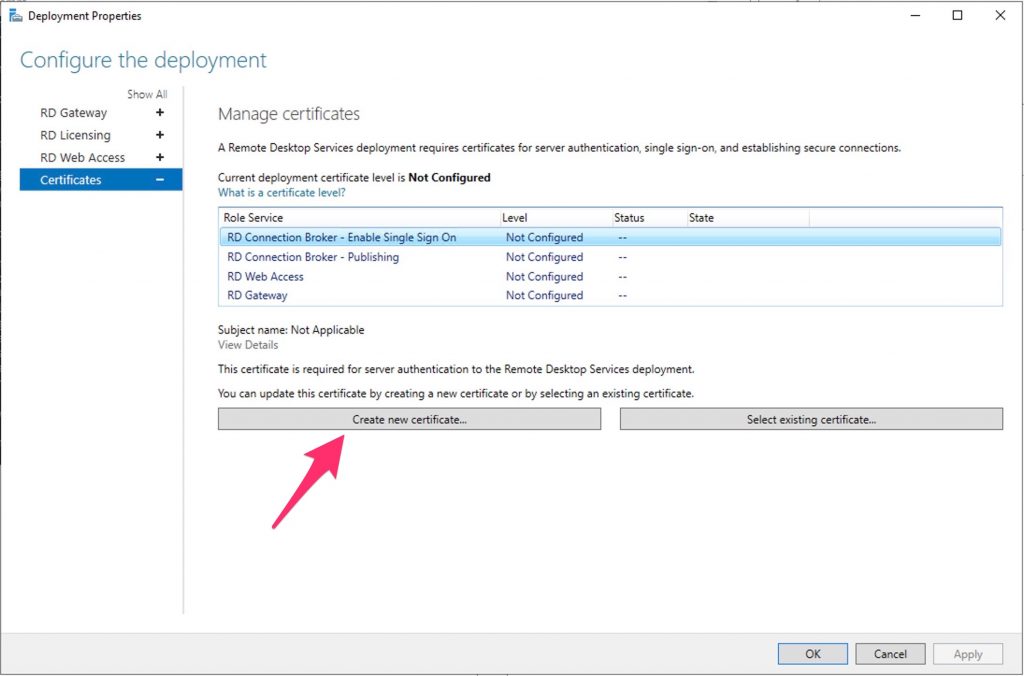
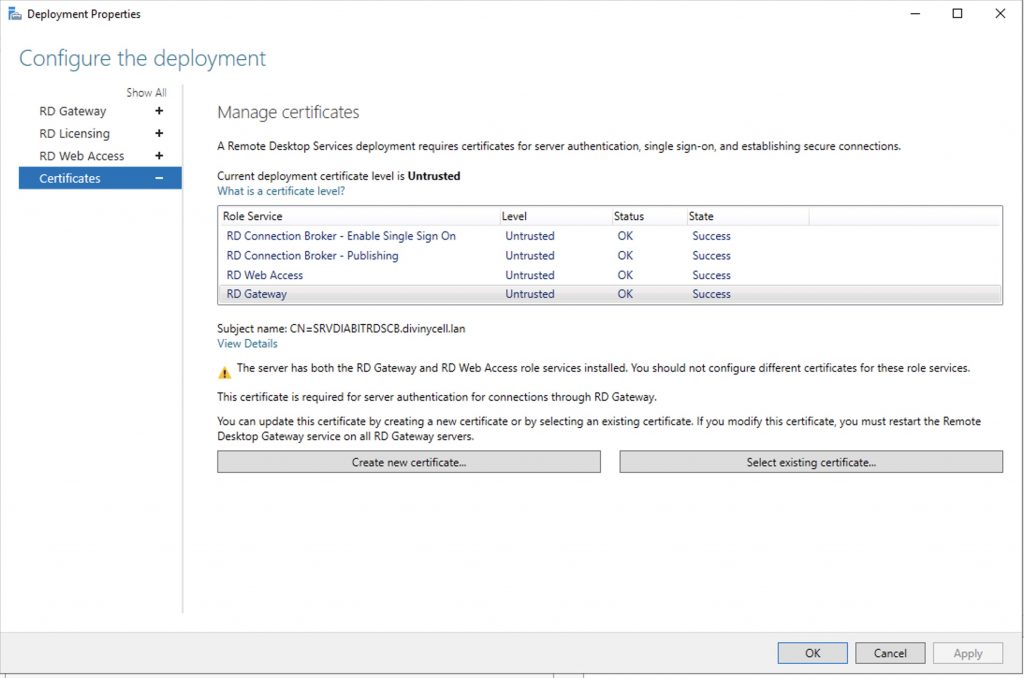
Click Certificates.
Configure the deployment
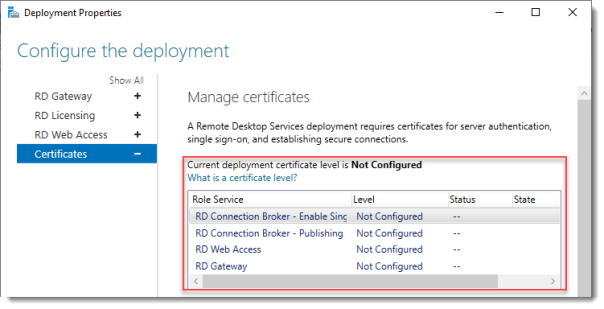
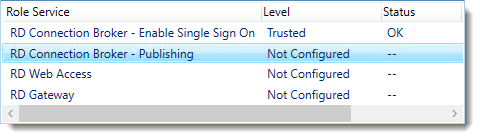
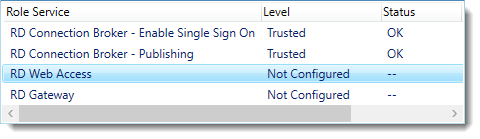
Notice that the certificate level currently has a status of Not Configured.
As you can see, certificates are used for different goals within the deployment.
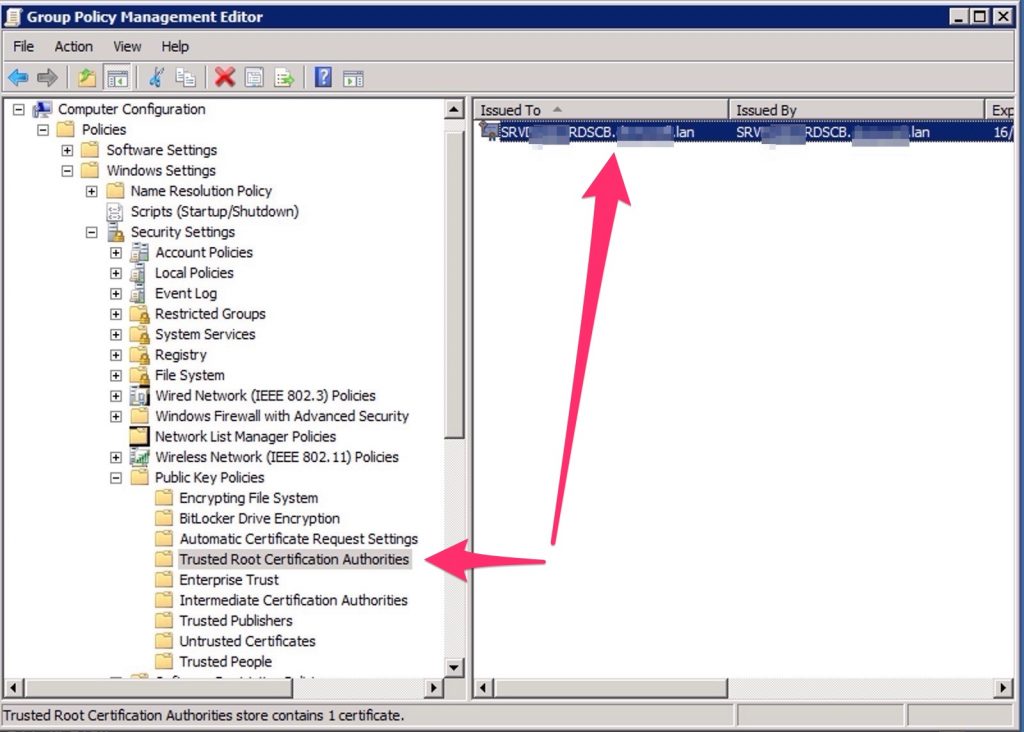
The RD Gateway certificate is used for Client to gateway communication and needs to be trusted by the clients. Either install the self-signed certificate on all clients, or use a certificate for which the complete certificate chain is already trusted by all clients. As it said in the wizard, the external FQDN should be on the certificate.
The RD Web Access certificate is used by IIS to provide a server identity to the browser clients.
The RD Connection Broker actually has two goals for which it needs certificates. To enable single sign on (server to server authentication), and for publishing (signing RDP files). If you look in the deployment you’ll see that the Connection Broker is now configured to use “itwrds.it-worxx.lab”, so we have to change it to use an external FQDN as well.
If we use the same FQDN for all goals described above, we need only 1 certificate, and only 1 external IP address.
We’ll come back to this wizard later to assign the certificate. First order of business is to change the internal FQDN for the Connection Broker to an external FQDN.
Click OK (no reason why we shouldn’t commit the change we made on the licensing tab, remember?)
Changing the Connection Broker FQDN to an externally resolvable FQDN
Open DNS Manager on the domain controller and browse to Forward Lookup Zones.
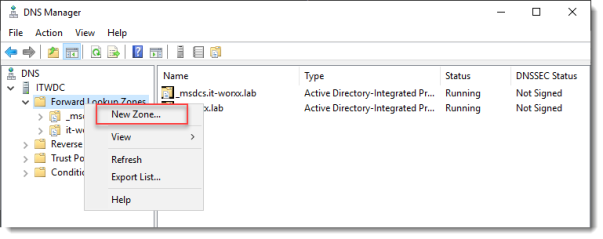
Right click Forward Lookup Zones and click New Zone… Go through this wizard accepting the defaults until you have to enter a Zone Name.
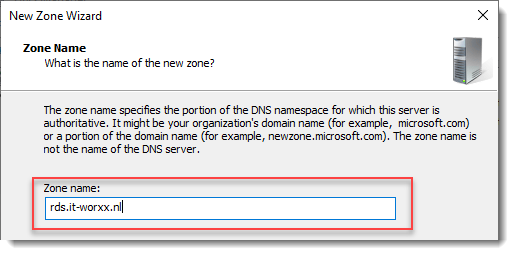
Enter the external FQDN which will also be used by the Connection Broker.
Finish the rest of the wizard accepting the defaults.
Browse to the newly created zone.
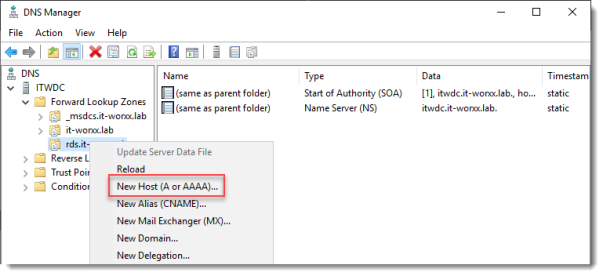
Right click the newly created zone and click New Host (A or AAAA)…
New Host
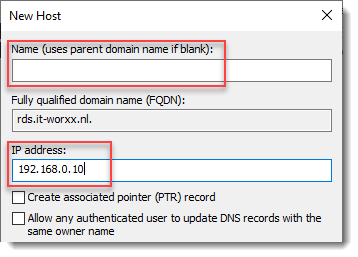
Leave the Name field blank, but enter the member server’s (holding the RD Connection Broker role) IPv4 address.
Click Add Host.
Now the configuration will be able to resolve “rds.it-worxx.nl” to the server holding the Connection Broker role, and this will work because “rds.it-worxx.nl” is also on the certificate that we will configure later.
Create a new Global Security Group called “RD Connection Brokers” and add the computer account for the member server to it as a group member.
We need this group to be able to convert the RD Connection Broker to a highly available RD Connection Broker. You’ll see why we need to do this in a few steps.
Reboot the member server to let it know it’s a member of the RDS Connection Brokers security group.
The next steps in re-configuring the RD Connection Broker depend on an SQL database shared by all Connection Brokers in the deployment. Without this configuration the RD Connection Broker will rely on the Windows Internal Database that was created during the initial deployment of the roles.
Install SQL Express on the Domain Controller (or use an existing SQL Server if you already have one).
It’s not best practice to install SQL onto a Domain Controller, but it’ll do for this guide.
Here’s a list of needed features:

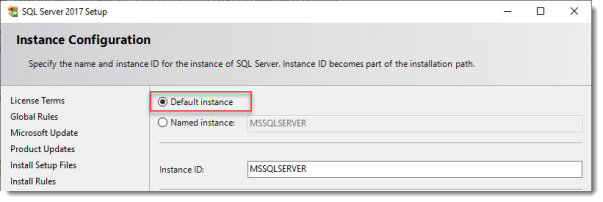
Use the Default Instance (so click Default, and do not leave the wizard’s selection on Named instance: SQLEXPRESS).
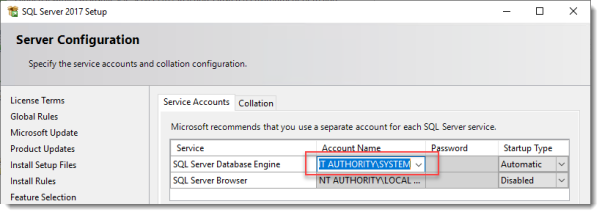
Set the SQL Service to start using SYSTEM because the default account of SQLSERVER cannot be used on a Domain Controller.
When the installation is done open SQL Configuration manager and browse to Client Protocols under SQL Native Client 11.0 Configuration.
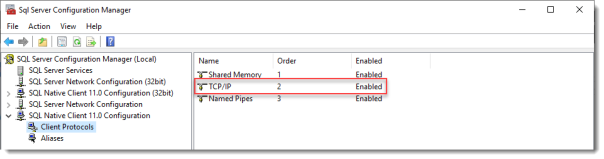
Check if TCP/IP is enabled under Client Protocols. SQL Express install enables this by default, but check it just to be sure, especially if you use an existing SQL Server.
Browse to Protocols for MSSQLSERVER under SQL Server Network Configuration.
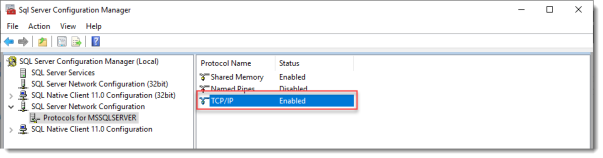
Enable TCP/IP. If this is a new SQL installation, this will be disabled by default.
Restart the SQL Server service if you changed this setting.
On the SQL Server, make sure port 1433 is not being blocked by Windows Firewall.

I added the SQL Server executable to the exception list to allow all inbound traffic, but TCP 1433 inbound should suffice.
If you installed SQL Server using the default folder locations, the sqlservr.exe executable is found in “C:\Program Files\Microsoft SQL Server\MSSQL14.MSSQLSERVER\MSSQL\Binn”.
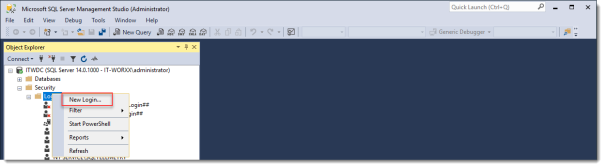
Open SQL Server Management Studio, connect to the default instance on the Domain Controller and browse to Logins under Security.
Remember the Management Studio is no longer available with the SQL Server download, but is a different download.
Right click Logins and click New Login…
Login – New
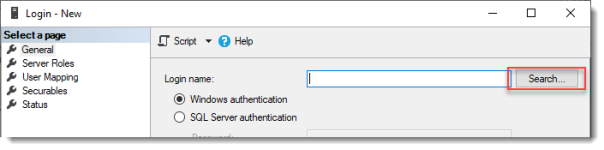
Click Search…
Select User, Service Account, or Group
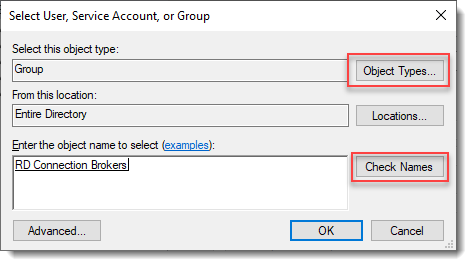
Click Object Types… and select Group.
Type the RDS Connection Brokers security group name and click Check Names.
Click OK.
Login – New
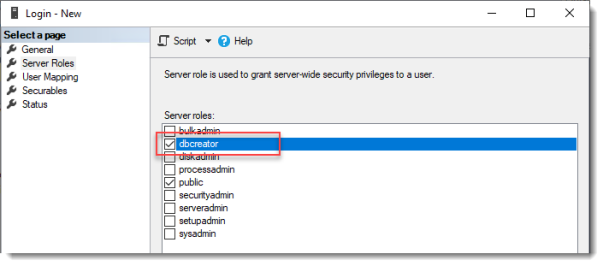
Click Server Roles and select dbcreator.
Click OK.
We have just effectively granted the RDS Connection Broker server the right to create databases.
We need this because the RDS Connection Broker service will try to migrate from WID (Windows Internal Database to a (high available) SQL Server instance when we convert the Broker to a high available broker.
Install the SQL Native Client on the member server (Client Components only). If you used the member server in this setup to install the SQL Management Studio, you can skip this step because the Native Client was installed with installing the Management Studio.
Everything we need is in place to convert the RD Connection Broker, so let’s do just that.
In Server Manager click Remote Desktop Services and scroll down to the overview.
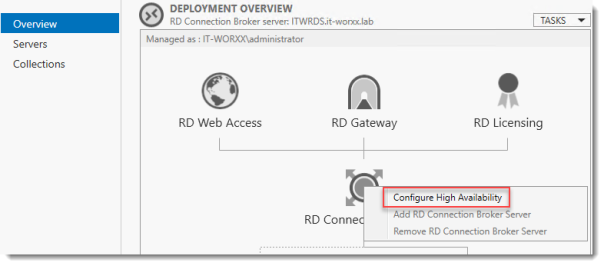
Right click RD Connection Broker and click Configure High Availability.
Before you begin
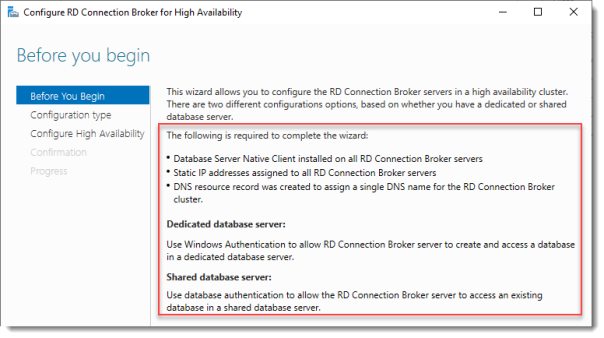
So we’re building a single node cluster here 
Look at the pre-requisites.
If you have more than one RD Connection Broker they need to be configured using DNS Round Robin.
Click Next.
Configure RD Connection Broker for High Availability
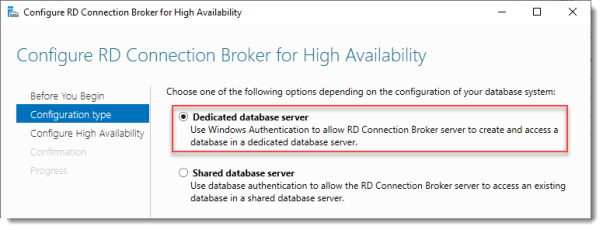
Since we just installed an SQL Server for this, leave the default selected. You’d use the other option for instance if you’d like to use Azure SQL for this deployment.
Click Next.
Configure RD Connection Broker for High Availability
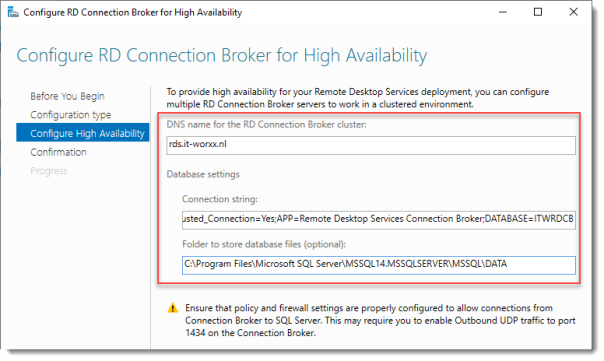
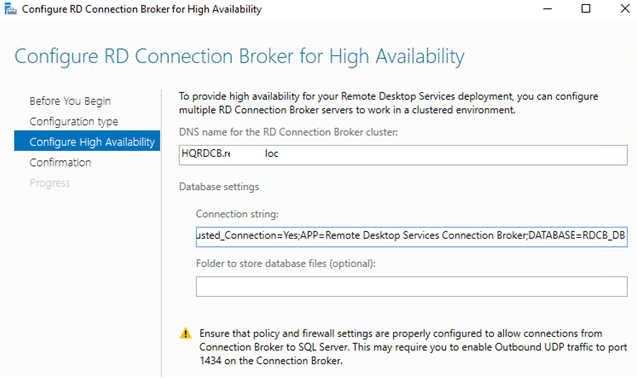
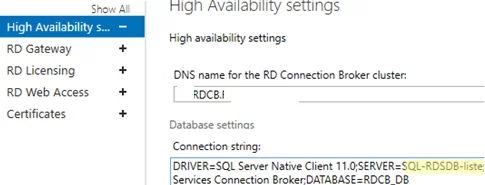
DNS name for the RD Connection Broker cluster:
The DNS Zone name we configured in DNS earlier: rds.it-worxx.nl
Connection string:
DRIVER=SQL Server Native Client 11.0;SERVER=ITWDC;Trusted_Connection=Yes;APP=Remote Desktop Services Connection Broker;DATABASE=ITWRDCB
Folder to store database files:
C:\Program Files\Microsoft SQL Server\MSSQL14.MSSQLSERVER\MSSQL\DATA
I used the instance default folder.
Click Next.
Confirmation
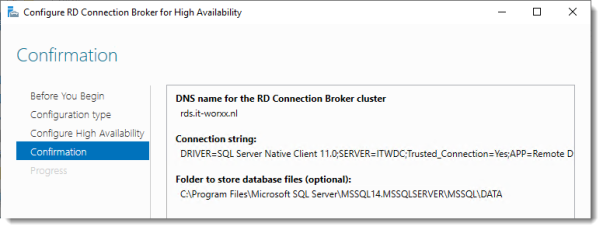
If you get an error before this page:
- Check if TCP/IP is enabled in client protocols and for your instance
- Check if you can reach port 1433 on the SQL Server from the member server
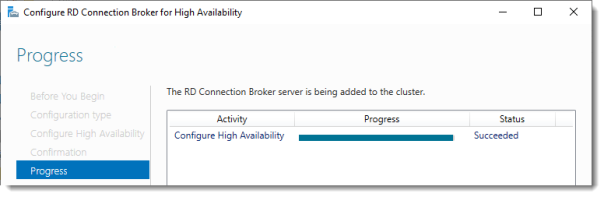
Click Configure.
Progress
If you get an error on this page:
- Check SQL permissions for the security group
- Check if the database path you entered is correct
Click Close.
The RD Connection Broker is now in High Availability Mode, and configured as “rds.it-worxx.nl” and we are finally ready to complete the configuration.
Configuring Certificates

In Server Manager, Remote Desktop Services, Overview, click Tasks and click Edit Deployment Properties, then click Certificates.
Configure the deployment

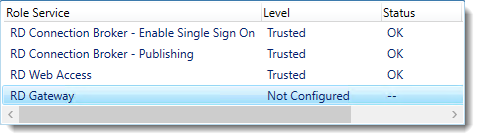
Click RD Connection Broker – Enable Single Sign On and click Select Existing certificate.
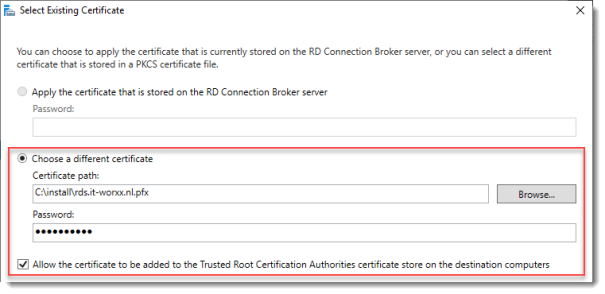
Browse to the .pfx file, enter its password, and check Allow the certificate..
Click OK.

So click Apply. This takes a little while, be patient.
Configure the deployment
Click RD Connection Broker – Publishing and click Select Existing certificate.
Browse to the .pfx file, enter its password, and check Allow the certificate..
Click OK.
Click Apply. This again takes a little while, be a little more patient.
Configure the deployment
Click RD Web Access and click Select Existing certificate.

Note: Did you notice the warning when you select RD Web Access?
Browse to the .pfx file, enter its password, and check Allow the certificate..
Click OK.
Click Apply again. This takes another little while longer, be slightly more patient.
Configure the deployment
Last one. Click RD Gateway and click Select Existing certificate.
Browse to the .pfx file, enter its password, and check Allow the certificate..
Click OK.
Click OK to apply the final certificate step.
Configured all servers, configured certificates..
One thing left to do: Tell our RDS environment exactly what to publish.
Publishing resources to your users
In fact you can use this setup to either provide full desktop sessions on the Session Host, or you can choose to publish only applications on the Session Host.
Let’s publish full desktop sessions.

In Server Manager, Remote Desktop Services, Session Collections, click Tasks and click Create Session Collection.
Before you begin

Review the requirements. This won’t be an issue in this setup, but you could restrict access to this collection by selecting a select group of people.
Click Next.
Name the collection
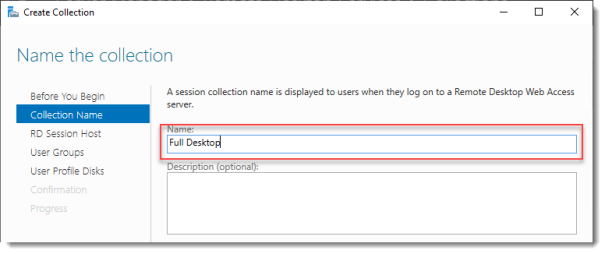
Enter a descriptive name. This name will be displayed under its icon in the Web Access interface.
Click Next.
Specify RD Session Host servers

Click the member server and click the Add button.
Click Next.
Specify user groups
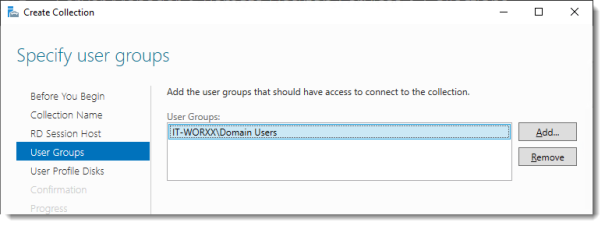
You can limit access to the resource here if you want. Add one or more groups to restrict access to these groups only. In this setup the default selection of Domain Users will do fine. Groups you specify here will be added to the list of groups of users that are allowed to connect using RDP to the Session Host server(s).
Click Next.
Specify user profile disks
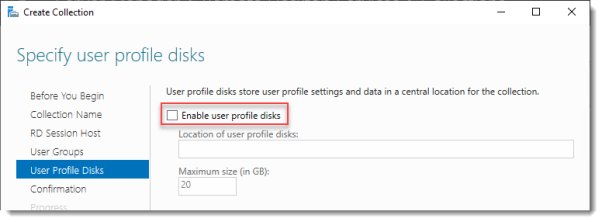
User profile disks are not in focus in this guide. Since I have no file shares configured in this setup, uncheck Enable user profile disks for now.
Click Next.
Confirm selections
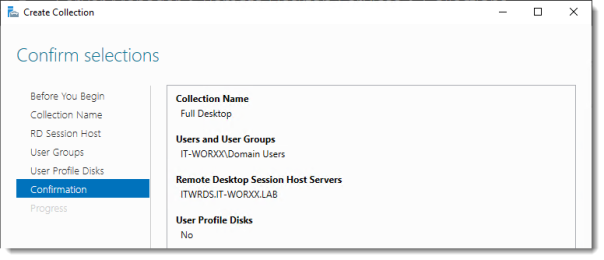
Review the information and click Create.
View Progress
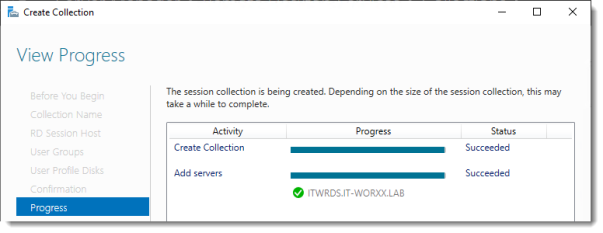
Wait until the collection is created and the server is added to the collection.
Click Close.
Time to test the setup!
Testing the setup
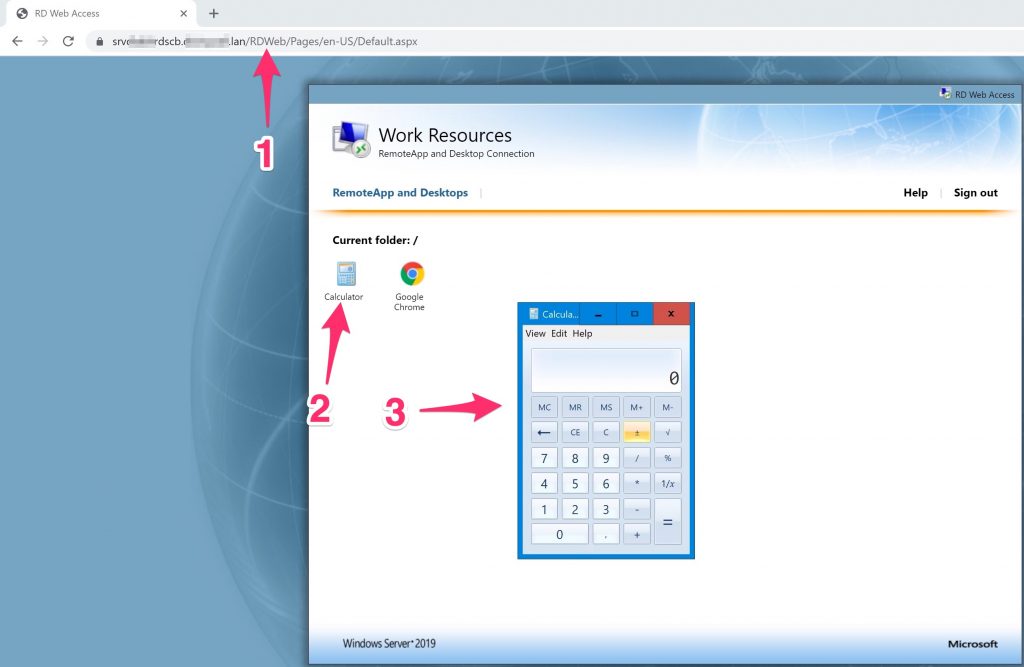
On a machine that has access to your test setup (you may have to add the external FQDN to your hosts file if you didn’t publish it to the internet) open https://rds.it-worxx.nl/rdweb
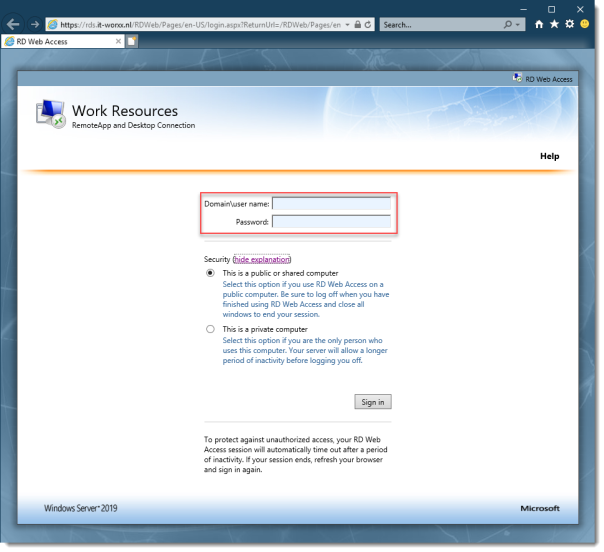
Hey! At least the RD Web Access application works 
Enter a valid username and password (IT-WORXX\username or username@it-worxx.lab).
Create a user for this, or simply use the domain admin account.
Click Sign in.
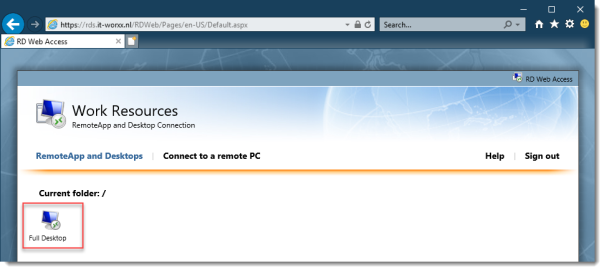
After logging in you are presented with the full desktop session collection we created.
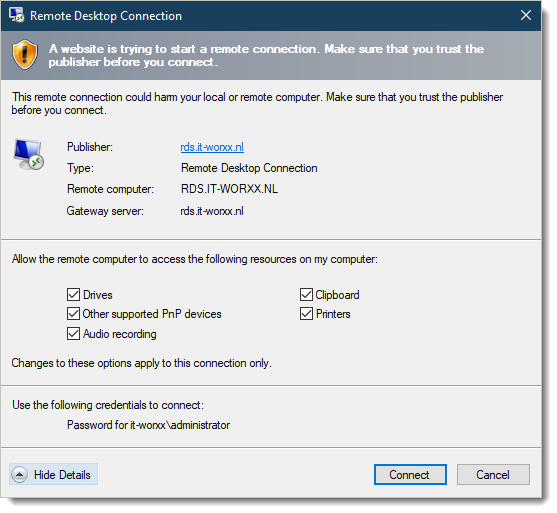
After clicking the Full Desktop icon you get the warning that devices are going to be redirected.
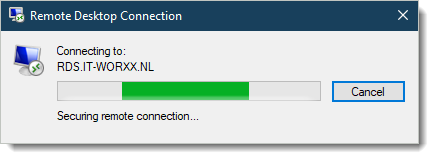
And when you click Connect, you connect
Enjoy.
Arjan
Remote Desktop Connection Broker (RDCB) is a component of the Remote Desktop Services (RDS) role in Windows Server. RD Connection Broker allows you to load-balance the RDS farm servers (when connecting to an RDS farm, the user is redirected to the least loaded RDS host), provides user access to VDI and RemoteApps, manages RDS host configuration in the farm. Also, RDCB allows users to reconnect to their sessions: when connecting to RDS, RDCB checks if there is any incomplete session on other servers of the farm and redirects them to their previous sessions.
In this article, we’ll show how to configure a fault-tolerant high availability RD Connection Broker instance maintaining its features in case one of the servers with the RDCB role fails. A database server running MS SQL Server 2019 will be used to store Remote Desktop Connection Broker data. In order to avoid a single point of failure, an RDCB SQL database should also be deployed in a fault-tolerant configuration. In this example, we will use two SQL Server nodes with the SQL Always On Availability Group configured.
Contents:
- Preparing Infrastructure for Remote Desktop Connection Broker
- Install Remote Desktop Services Roles on Windows Server
- Deploying RD Connection Broker High Availability
- Configuring SQL Server Failover Configuration for RD Connection Broker HA
RD Connection Broker High Availability requirements and supported configurations:
- At least 2 servers with the RD Connection Broker role running Windows Server 2022/2019;
- If you want to use high availability for an RDCB SQL database, you will need at least 2 hosts with SQL Server 2014 or newer (Standard or Enterprise edition). In this example, we have installed a standalone MS SQL Server 2019 Enterprise instance on each of the servers. If you are not going to have an HA SQL database, one server with SQL Express is enough;
- Install SQL Server Native Client on the servers with the RD Connection Broker role;
- Grant full control over your SQL database and SQL installation folder to RD Connection Broker servers;
- At least one server with the Remote Desktop Session Host role in the farm.
We will create a high available RDCB configuration of two servers. Both of them will have the RD Connection role and SQL Server installed. High availability and disaster recovery of the SQL Server database will be provided by the SQL Server Always On Availability group.
In Windows Server 2012 and newer, RDS Connection Broker provides high availability in the Active/Active mode. In this mode, all RDCB servers are active and can process incoming connections. It allows providing high RDCB availability and scalability in large Remote Desktop environments.
Preparing Infrastructure for Remote Desktop Connection Broker
Assign static IP addresses to all servers with the RD Connection Broker role and join them to your Active Directory domain.
srv-rds1.woshub.com—192.168.13.20srv-rds2.woshub.com—192.168.13.21
Create a new security group in Active Directory (MUN_RD_Connection_Brokers) and add all RDCB servers to it. You can create the group with the ADUC snap-in (dsa.msc) or by using PowerShell:
New-ADGroup "MUN_RD_Connection_Brokers" -path 'OU=Groups,OU=Berlin,DC=woshub,DC=com' -GroupScope Global -PassThru –Verbose
Add two RDS hosts to the group:
Add-AdGroupMember -Identity "MUN_RD_Connection_Brokers" -Members srv-rds1$,srv-rds2$
Create A records for the cluster name of your RDS farm (in our example, it is MUNRDCB) in DNS. DNS records must contain the IP addresses of all RDCB servers. It enables load balancing (Round Robin) between RD Connection Broker servers. I have created the following entries:
- A —
MUNRDCB.woshub.com 192.168.13.20(IP address of the first RDCB server — srv-rds1.woshub.com) - A —
MUNRDCB.woshub.com 192.168.13.21( IP address of the second RDCB server — srv-rds2.woshub.com)
You can create A records in DNS using PowerShell:
Add-DnsServerResourceRecordA -Name MUNRDCB -IPv4Address 192.168.13.20 -ZoneName woshub.com
 Add-DnsServerResourceRecordA -Name MUNRDCB -IPv4Address 192.168.13.21 -ZoneName woshub.com

Install the SQL Server Native Client on all servers with the RDCB role. You can download the SQL Server Native Client for your SQL Server version from the Microsoft website or copy it from the SQL Server install image (D:\1033_ENU_LP\x64\Setup\x64\sqlncli.msi).
Then run SQL Server Management Studio and connect to your first SQL server, on which a shared Connection Broker database will be created (later we will move it to the Always On high availability group).
Open Security -> Logins to add a new login. Click Search, select your domain in Locations, set Object Types = Groups, and find the domain group MUN_RD_Connection_Brokers.
Assign dbcreator and sysadmin roles to the group.
Open SQL Server ports in Windows Defender Firewall (by default, TCP 1433 port is used to connect to SQL Server).
Install Remote Desktop Services Roles on Windows Server
Then you have to install RDS roles on your servers. Open the Server Manager console, select Manage -> Add roles and Features -> Remote Desktop Services Installation.
The installation of the RDS role on a standalone host is described in this article.
Select Standard deployment -> Session-based desktop deployment.
Choose one server you want to install the RD Connection Broker role on. You don’t need to install the RDCB role on the second server now.
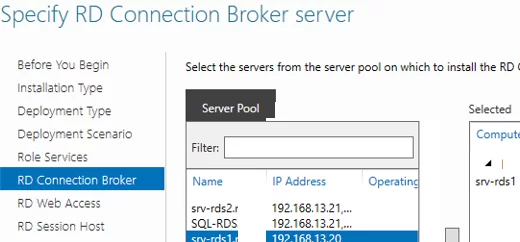
Install the RD Web Access role on the same server. Install the RD Session Host role on both servers.
Wait for the installation of RDS roles to complete. 
When you have finished installing the roles, add the RDCB hosts and ‘NT AUTHORITY\NETWORK SERVICE’ accounts to the local RDS Management Servers group on both servers.
During the installation of the RD Connection Broker role on the first server in the farm, a local SQL database will be created in C:\Windows\rdcbDb\rdcms.mdf on the local drive of the RD Connection Broker server.

This database keeps the information about the farm and terminal user sessions. Since it is located on the local computer, other RDCB servers will not be able to use it. To provide RDCB HA, you have to move it to a dedicated SQL server where other servers can access it.
Deploying RD Connection Broker High Availability
Before you add a second host with the RD Connection Broker role to the farm, you must migrate the local RDCB database to an external SQL Server.
In order to move the Connection Broker database from the local database to the dedicated SQL Server, open Server Manager -> Remote Desktop Services -> Overview. To run the Remote Desktop Connection Broker Failover Configuration Wizard, click the RD Connection Broker role image and select Configure High Availability.
Then select Dedicated Database Server. Specify SQL Server connection settings the local RDCB database will be moved.
Fill in two fields:
- DNS name for the RD Connection Broker Cluster: an FQDN name of your RDCB farm we have created Round Robin DNS records for (in our example, it is
MUNRDCB.woshub.com). This is the address that RDP clients will use when connecting to RD Connection Broker servers; - Database Connection String – specify the connection string to the SQL Server database. Here is the string format:
DRIVER=SQL Server Native Client 11.0;SERVER=<SQL Server Name>;Trusted_Connection=Yes;APP=Remote Desktop Services Connection Broker;DATABASE=<DB Name>In this example, SQL Server Name is the name of the SQL server you want to create a database on, and DB Name is the name of your new database:
DRIVER=SQL Server Native Client 11.0;SERVER=srv-rds2.woshub.com;Trusted_Connection=Yes;APP=Remote Desktop Services Connection Broker;DATABASE=RDCB_DB
Once an RD Connection Broker HA configuration is enabled, you won’t be able to revert back to the internal RDCB database without decommissioning the whole RDS farm configuration.
Click Configure in the next step.
Then connect to your SQL Server instance using SQL Management Studio and make sure that the new database RDCB_DB has been created.
Grant both RD Connection Broker servers write permissions to the database. Open Database -> RDCB_DB -> Security -> Users -> New user.
Create two new users: BUILTIN\RDS Management Servers and woshub\MUN_RD_Connection_Brokers. Grant both db_owner and public privileges.
To provide high availability in case the first server fails, add a second RD Connection Broker server to the current configuration.
Click the RD Connection Broker icon and select Add RD Connection Broker Server.
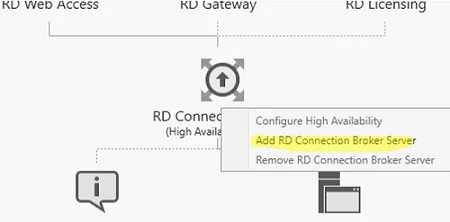
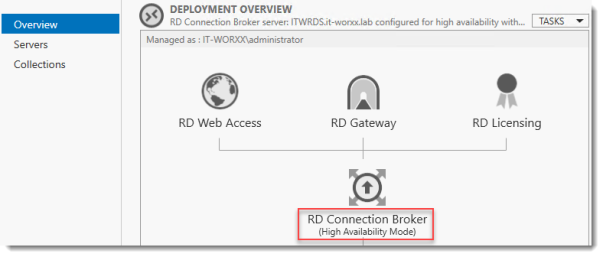
Enter the name of the second server you want to install the Connection Broker role on and click Next. Then two servers with the RDCB role will appear in the list of RDS farm hosts. You will also see the RD Connection Broker (High Available Mode) message.
This completes the High Availability configuration of the Remote Desktop Connection Broker.
Configuring SQL Server Failover Configuration for RD Connection Broker HA
Then set up a failover configuration of your SQL database. Meanwhile, it is running on one server only. Place your RD Connection Broker database in the SQL cluster. It may be either a classic Microsoft Failover Cluster or an SQL Server Always On high availability group.
Basic Always On configuration in SQL Server 2019 is described in this article. We will show only the main steps here:
- Install the Failover Clustering role and build an SQL-RDS cluster of two RDCB hosts with a witness and quorum on any file server (it is described in the article on Always On mentioned above);
- Enable the option Enable Always On Availability Groups in the SQL Server Configuration Manager settings on both servers;
- Run the New Availability Group Wizard;
- Enter a name of the Availability Group (SQL-RDS);
- Select a database you want to place to your high availability group (RDCB_DB);
- Add the second SQL server to the high availability group and check the Automatic Failover option;
- On the Listener tab, enter the name and IP address that clients will use to connect to the database in your Always On group (SQL-RDSDB-liste);
- Open the Failover Cluster Manager snap-in (
FailoverClusters.SnapInHelper.msc) and make sure that the new resource has appeared in the list of roles.
Then change the connection string for the SQL server with the RDCB database in the Connection Broker settings. You can only change the RDCB connection string via PowerShell:
Set-RDDatabaseConnectionString [-DatabaseConnectionString] <String> [[-ConnectionBroker] <String>] [ <CommonParameters>]
In my example, the command to switch the RDCB farm to the SQL database High Availability group looks like this:
Set-RDDatabaseConnectionString -ConnectionBroker srv-rds1.woshub.com -DatabaseConnectionString "DRIVER=SQL Server Native Client 11.0;SERVER=SQL-RDSDB-liste;Trusted_Connection=Yes;APP=Remote Desktop Services Connection Broker;DATABASE=RDCB_DB"

If the command returns no error, then everything is OK. Now your RDS Connection Broker cluster is configured to use SQL Always On availability group.
Open your RDS farm settings and make sure that a new connection string is used for HA (Tasks -> Edit Deployment Properties).
So, we have created a high availability RDS Connection Broker service on Windows Server 2022/2019. You can test RDCB’s high availability by shutting down one of the hosts in the RDS farm.
Then you can go on with the configuration of your RDS farm, deploy an RDS licensing server, add RDSH servers, set up RDS collections, publish RemoteApps, enable HTML5 web client for RDS, etc.

Contents
- 1 Remote Desktop Connection Broker Setup On Windows Server 2019 Part 1
- 2 Remote Desktop Connection Broker Setup On Windows Server 2019 Part 1
- 2.1 Conclusion
- 2.1.1 Related image with remote desktop connection broker setup on windows server 2019 part 1
- 2.1.2 Related image with remote desktop connection broker setup on windows server 2019 part 1
- 2.1 Conclusion
Get ready to delve into a myriad of Remote Desktop Connection Broker Setup On Windows Server 2019 Part 1-related content that will ignite your curiosity, deepen your understanding, and perhaps even spark a newfound passion. Our goal is to be your go-to resource for all things Remote Desktop Connection Broker Setup On Windows Server 2019 Part 1, providing you with articles, insights, and discussions that cater to your every interest and question. In click second the want connection you the see broker will role the the available name broker rds hosts- also mode high to icon list appear servers farm broker connection message- connection select then with install two you role rd Click server- add of and and on rdcb connection enter rd the next- server will of broker the rd the
How To Setup Remote Desktop Connection Broker Load Balancing In Windows Server 2016 Turbofuture
How To Setup Remote Desktop Connection Broker Load Balancing In Windows Server 2016 Turbofuture
Step 1: configure the database for the connection broker step 2: configure load balancing on the rd connection brokers step 3: configure the connection brokers for high availability applies to: windows server 2022, windows server 2019, windows server 2016. Click the rd connection broker icon and select add rd connection broker server. enter the name of the second server you want to install the connection broker role on and click next. then two servers with the rdcb role will appear in the list of rds farm hosts. you will also see the rd connection broker (high available mode) message.

How To Setup Remote Desktop Connection Broker Load Balancing In Windows Server 2016 Turbofuture
How To Setup Remote Desktop Connection Broker Load Balancing In Windows Server 2016 Turbofuture
Installing remote desktop services (rds) on windows server 2019 looks like a lengthy task , but in reality is quite easy. in this article, i will walk you though install these services in a domain environment that requires two servers. prerequisites minimum 2 servers or vm (on same domain network). Article 12 23 2021 7 contributors feedback applies to: windows server 2022, windows server 2019, windows server 2016 use the following steps to deploy the remote desktop servers in your environment. Update rdsh collection (arm template) remote desktop connection broker remote desktop connection broker (rd connection broker) manages incoming remote desktop connections to rd session host server farms. rd connection broker handles connections to both collections of full desktops and collections of remote apps. Remote desktop connection broker setup on windows server 2019 part 1 0:00 7:55 remote desktop connection broker setup on windows server 2019 part 1 binaryexe llc 14.
Remote Desktop Connection Broker Setup On Windows Server 2019 Part 1
Remote Desktop Connection Broker Setup On Windows Server 2019 Part 1
in this video guide, we will see the steps to install and configure remote desktop services (rds) on windows server 2019 using welcome to my channel kaptechpro. description: in this video demonstration of the installation of remote desktop services in in this comprehensive tutorial, we dive into the world of remote desktop services on windows server 2022. learn how to install hi friends, welcome to my channel. windows server 2019 training 24 how to install & configure rds (remote in this tutorial, we will teach you how to install and configure remote desktop services rds on windows server 2019 remoteappprograms #windowsserver #remotedesktopservices. step by step deployment guide with snapshots lecture and demonstration on rd server on windows server 2019 by prof.okhrabo #mcsa #mcse #networkworldinc to join
Conclusion
All things considered, it is clear that the article offers informative knowledge about Remote Desktop Connection Broker Setup On Windows Server 2019 Part 1. From start to finish, the author illustrates a deep understanding on the topic. In particular, the discussion of Y stands out as a key takeaway. Thank you for taking the time to this article. If you need further information, feel free to reach out through email. I am excited about hearing from you. Moreover, here are some similar articles that might be helpful:
The following is a simple guide to implement a Windows 2019 terminal server cluster. In addition to this, I also deal with the activation of the same through the License Service and the setup of a simple Collection.
I hope this guide, even if brief, can be of help to other colleagues!
Let’s start!
1)Setting up a Windows 2019 Remote Desktop Cluster
2)Some Tips
3)Activate the Terminal Services Licensing
1) Setting up a Windows 2019 RDS Cluster
In our environment we have 3 servers :
| Server | Function |
| SRVRDSCB | RD Licensing RD Web Access RD Gateway RD Connection Broker SQL Server Profile Server |
| SRVRDSHS1 | RD Session Host |
| SRVRDSHS2 | RD Session Host |
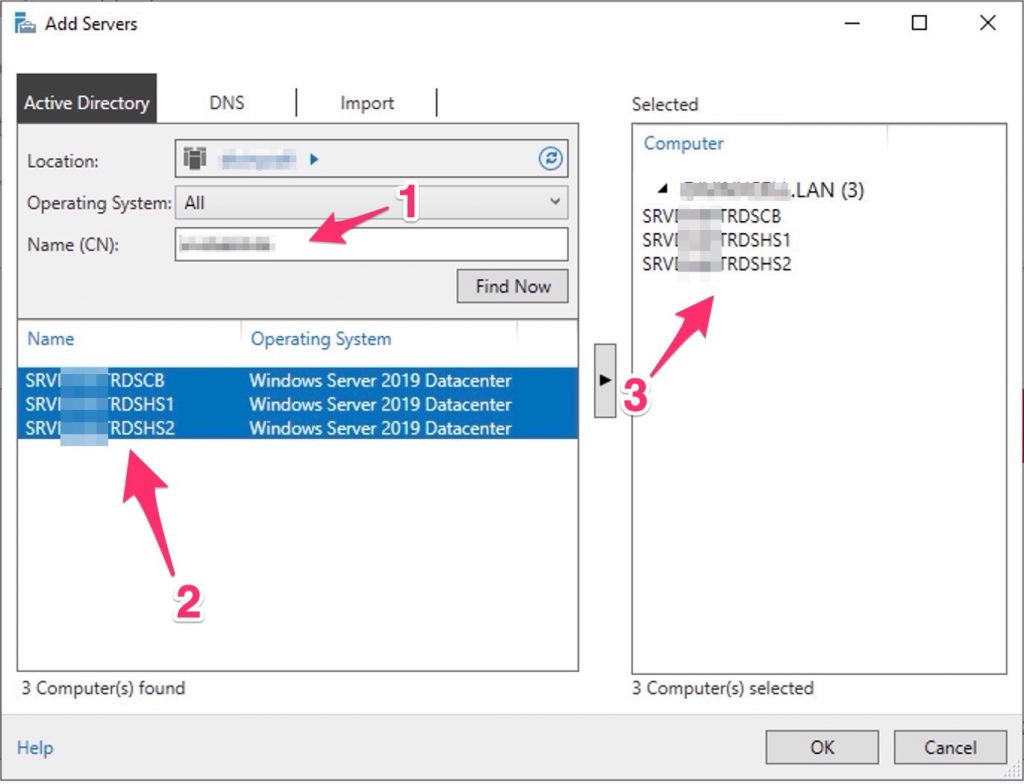
Before start, add all the servers
Now we proceed installing the RDS roles..
Select the “remote desktop services”…
The standard deployment…
In this guide we will set up a session-based environment…

This is a summary…
Select the server that will be the Connection Broker
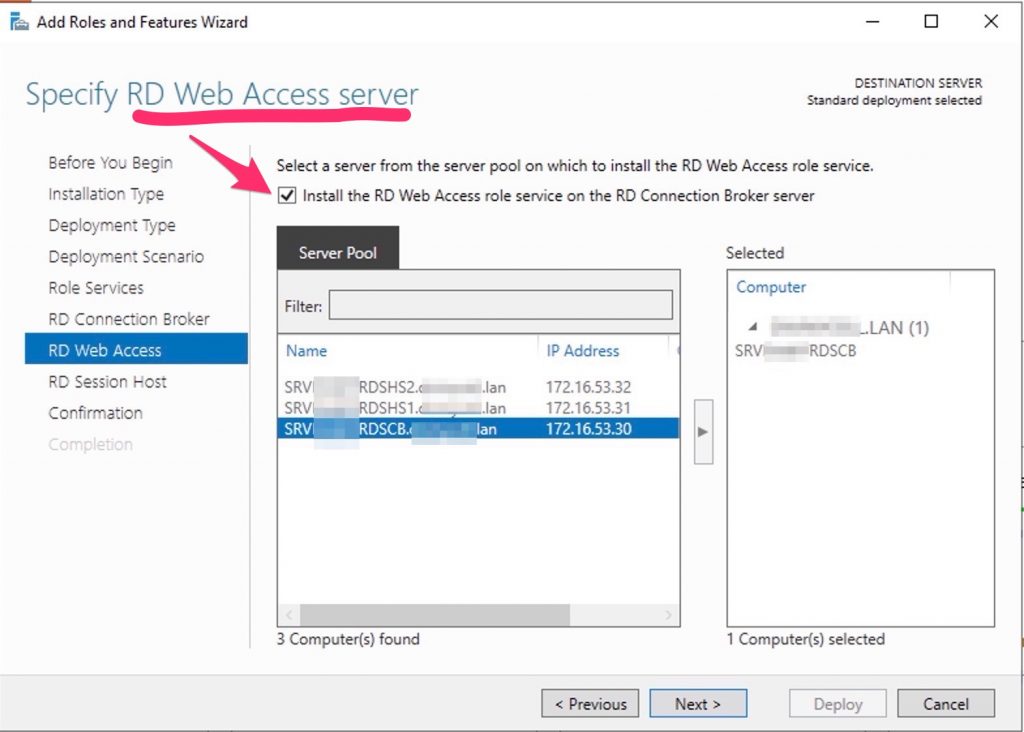
Select the tick to install the RDS Web Gateway in the same server (Connection Broker)
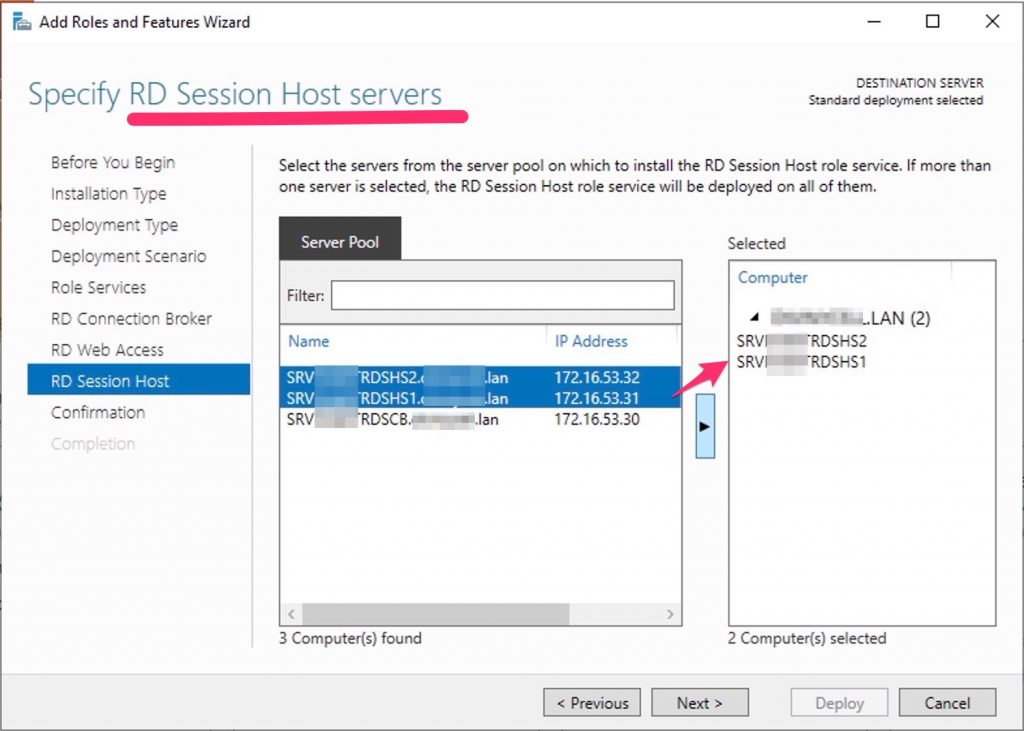
Now, select the server that will act as Host Servers.
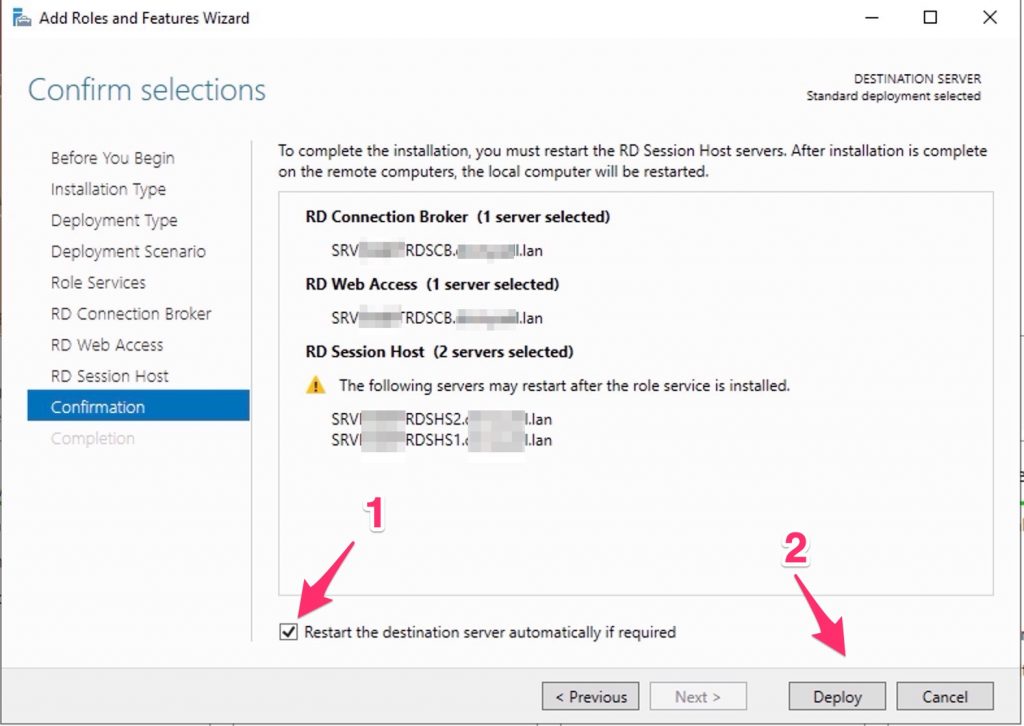
Deploy all and restarts the servers….
Configure the RD Licensing…
Now Configure/enable the RDS Gateway….
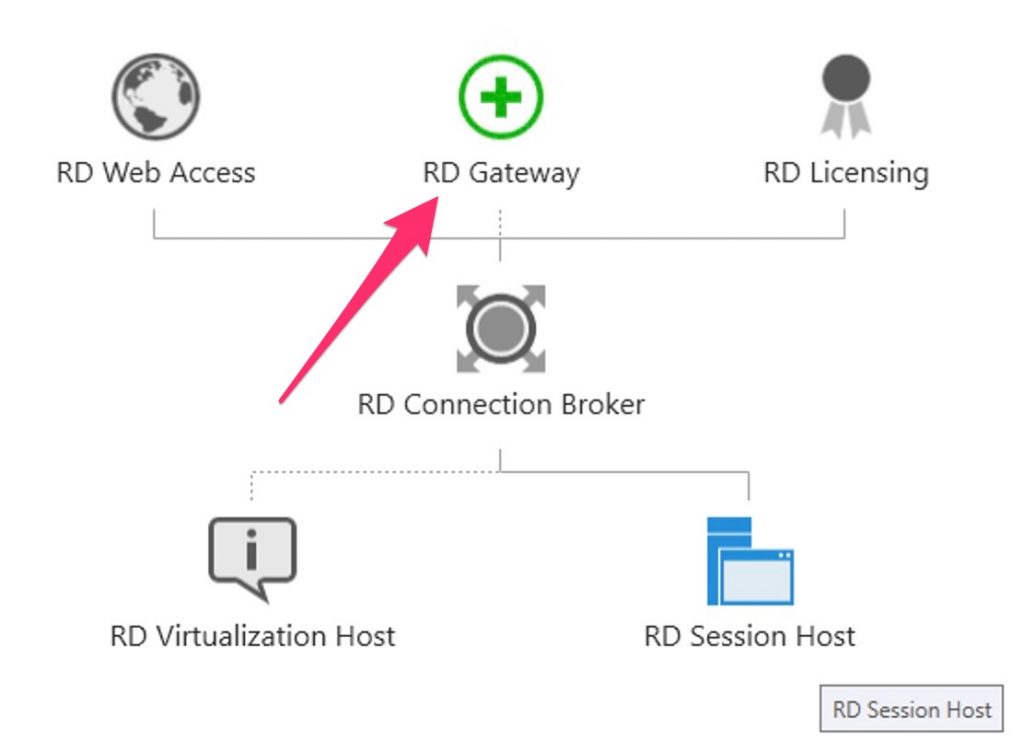
Write down your FQDN
Select “configure certificate” to deploy a self sign..
Create the cert.., write down the password…

Now, assign it to the RDS Gateway..

Don’t forget to distribute the selfsign certificate into your domain trought a GPO
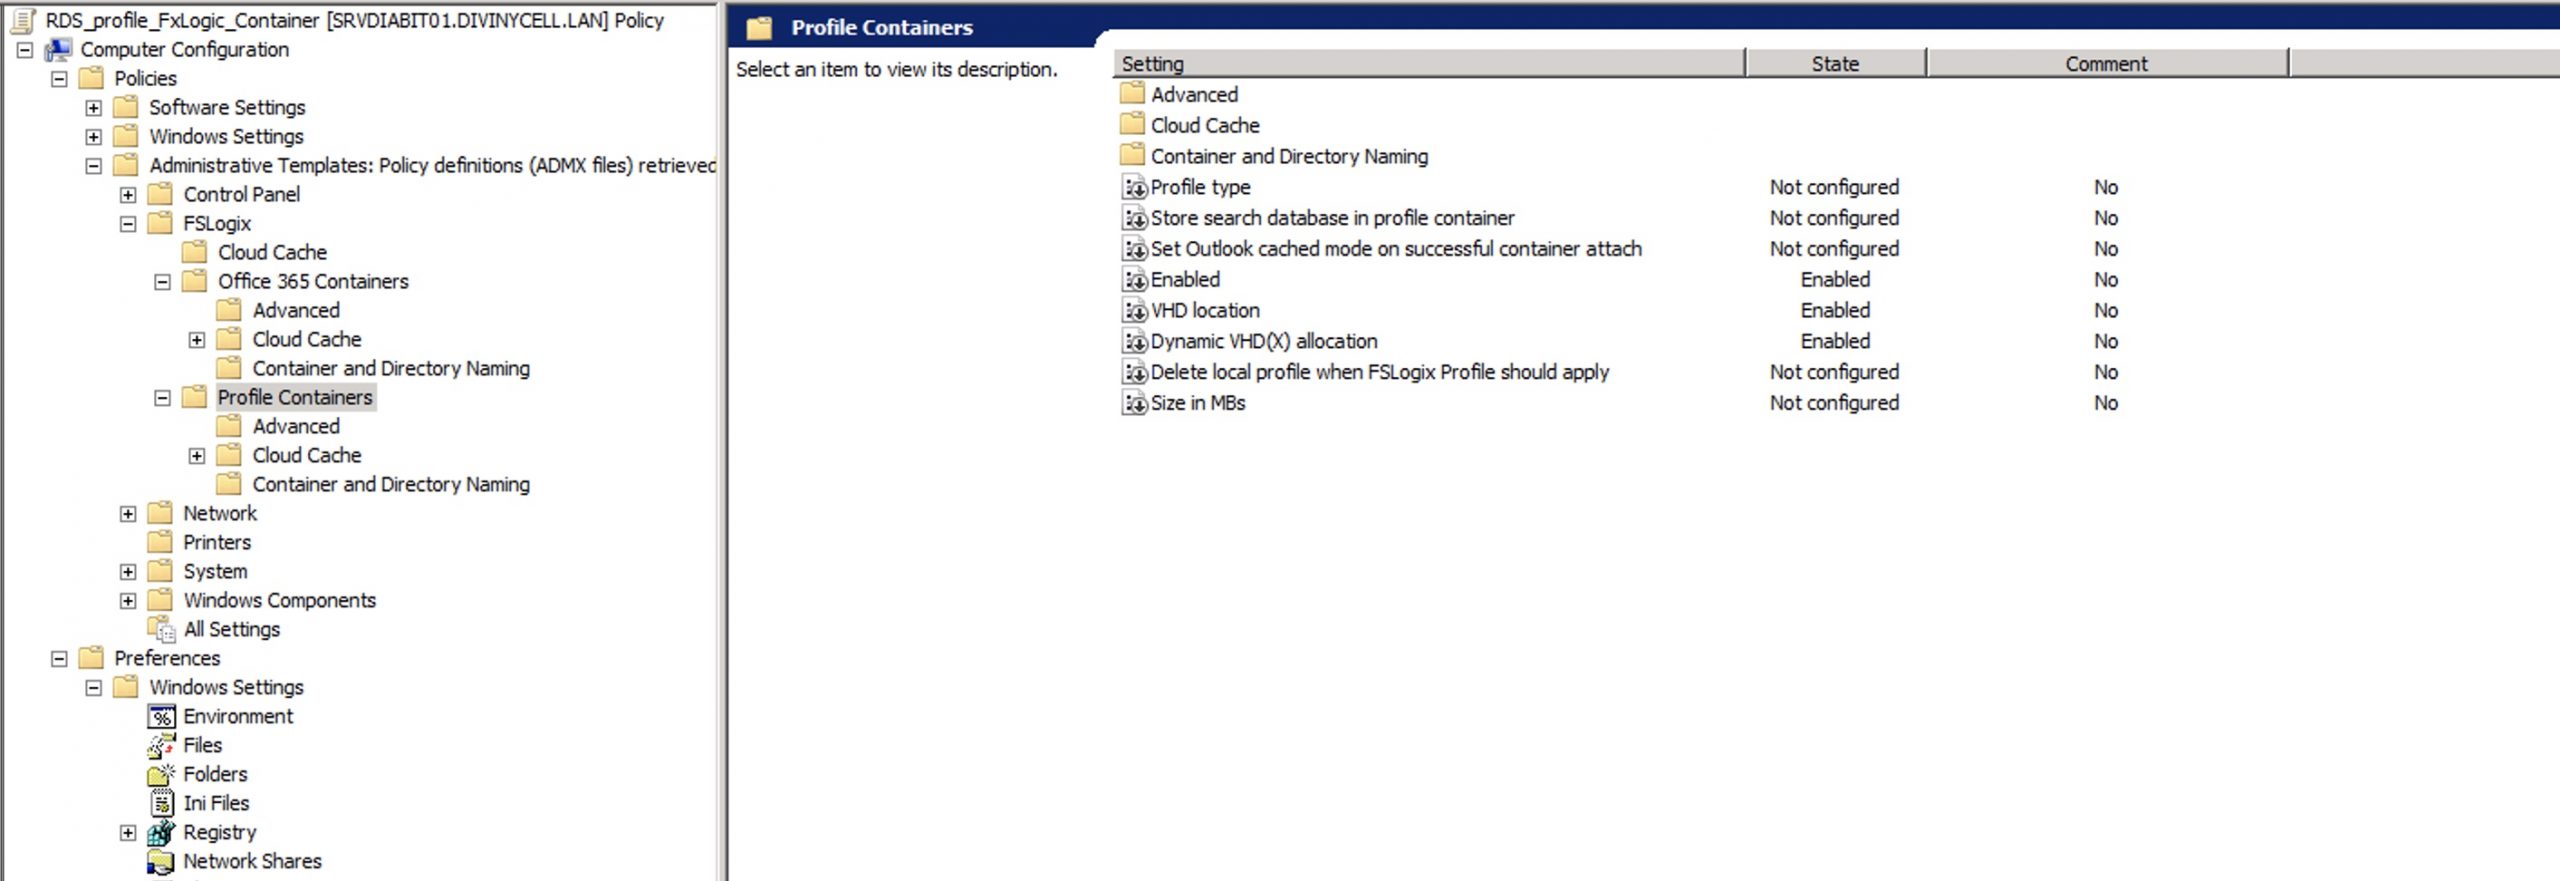
Now we need to setup the FXLogic profile container.
Download it on the Host Session Hosts (SRVRDSHS1 and SRVRDSHS2), install it .
At this point you could set up FXLogic with registry or a GPO. We will import the ADML/ADMX to create the GPO for the Host Session Hosts.
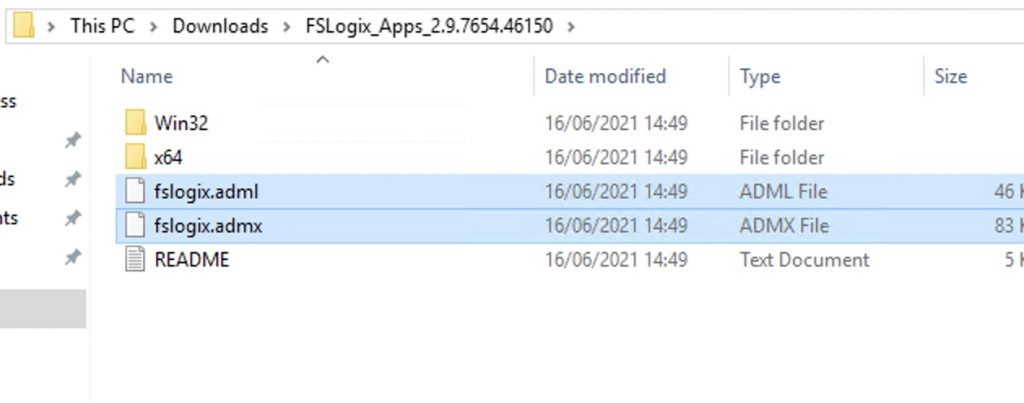
Import them to the folder C:\Windows\PolicyDefinitions of a DC.
C:\Windows\PolicyDefinitions\en-US => the ADML
C:\Windows\PolicyDefinitions\ => the ADMX
On my Connection Broker, where i decided to place the user profile, these are the permission required :
| User | Account | Folder Permissions |
| Users | This Folder | Modify |
| Creator / Owner | Subfolders and Files | Modify |
| Administrator | This Folder, Subfolders, and Files | Full Control |
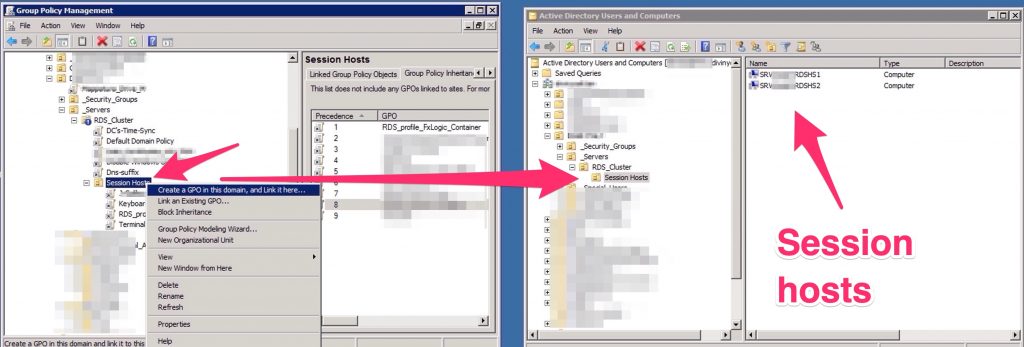
Create a policy and attach it to the OU where resides your Host Session Host
So now, we are almost done…
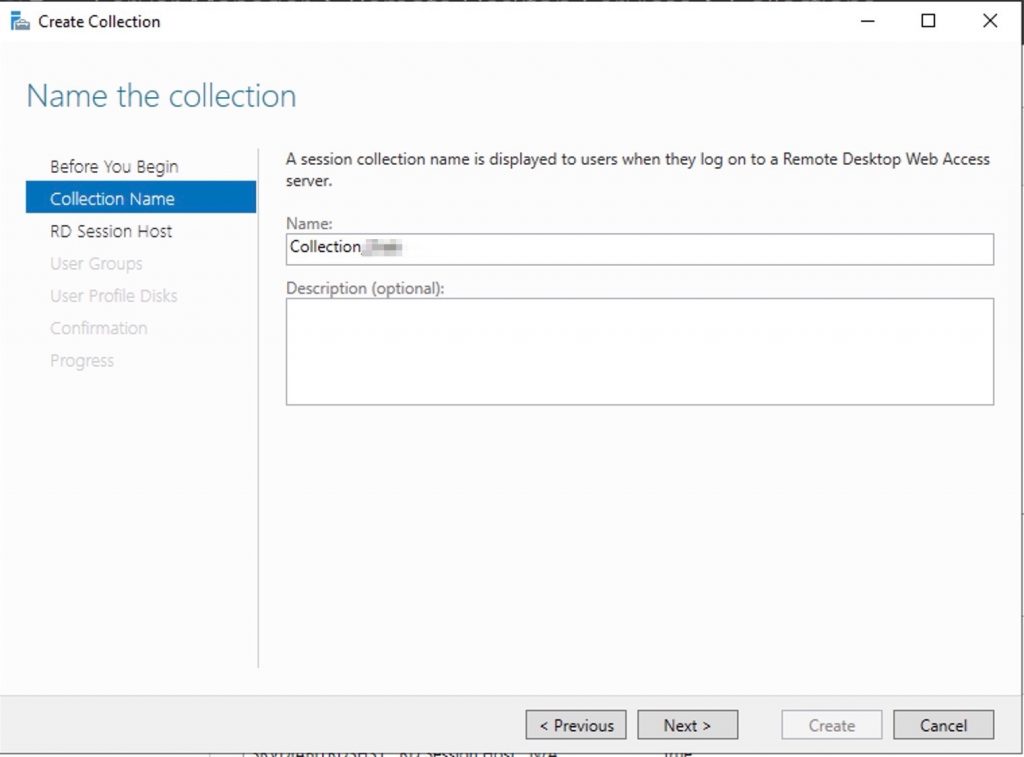
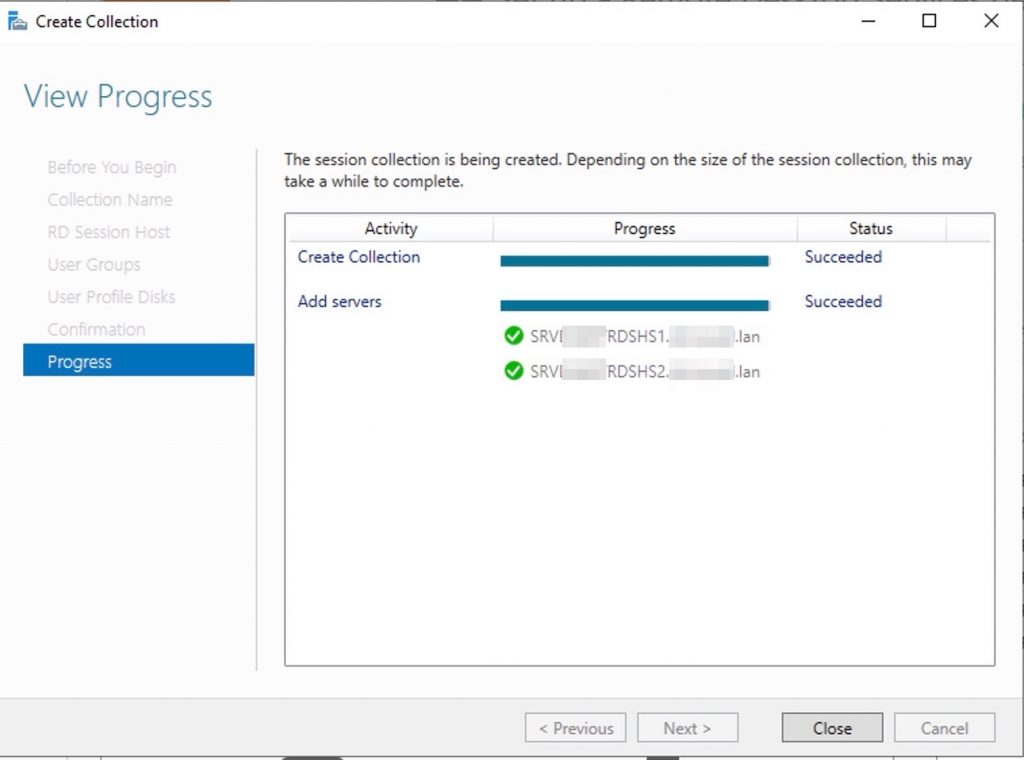
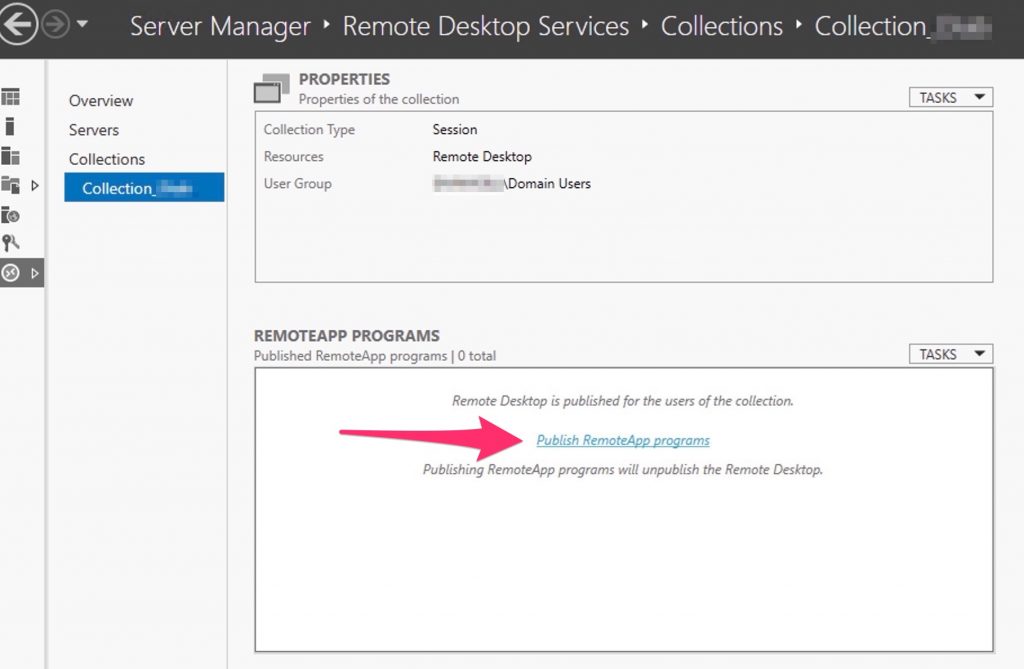
At this point we need to create a “Collection” to publish and RDP access trought the RD Connection broker

Set the name of the App/Session
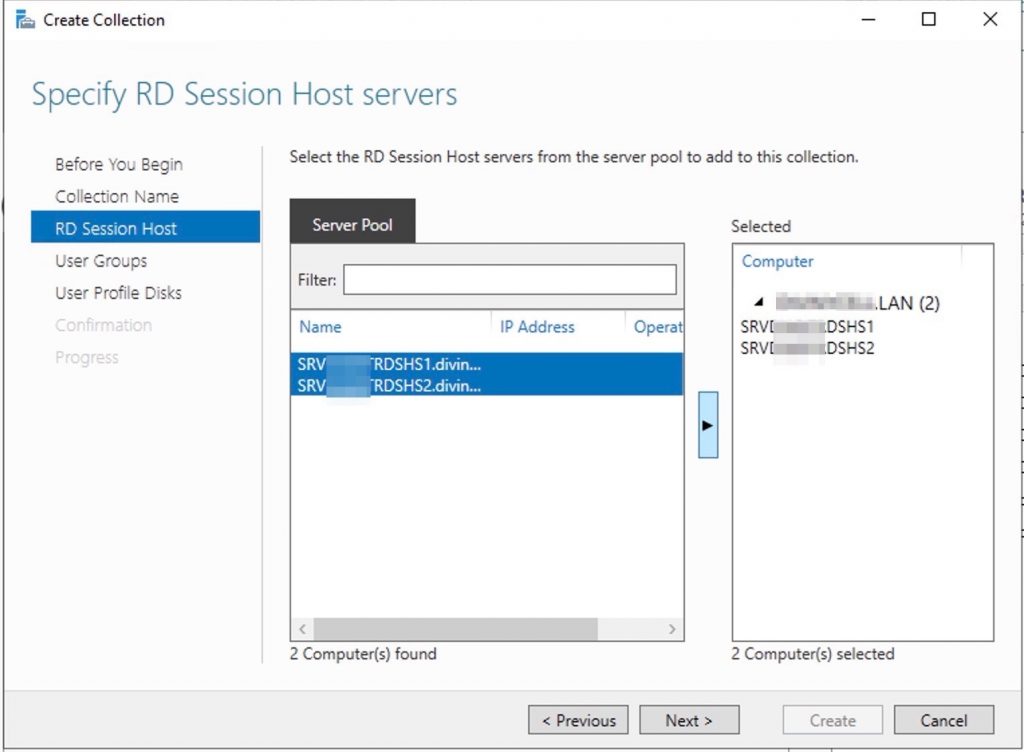
Add the hosts to hold this collection
Select who can access to this collection
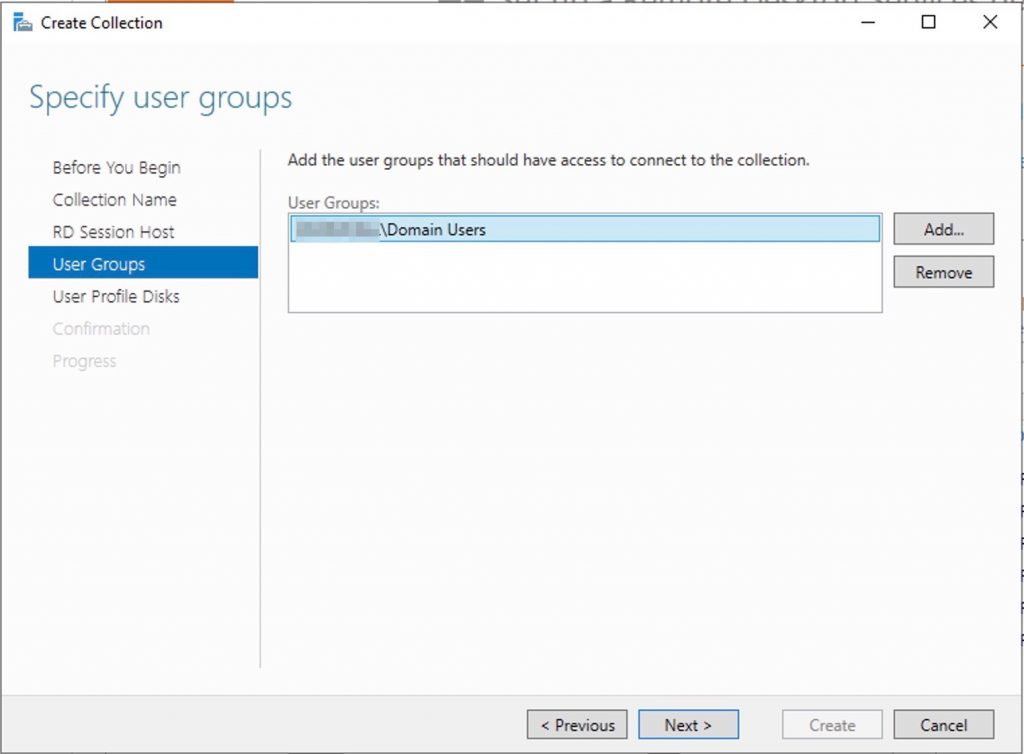
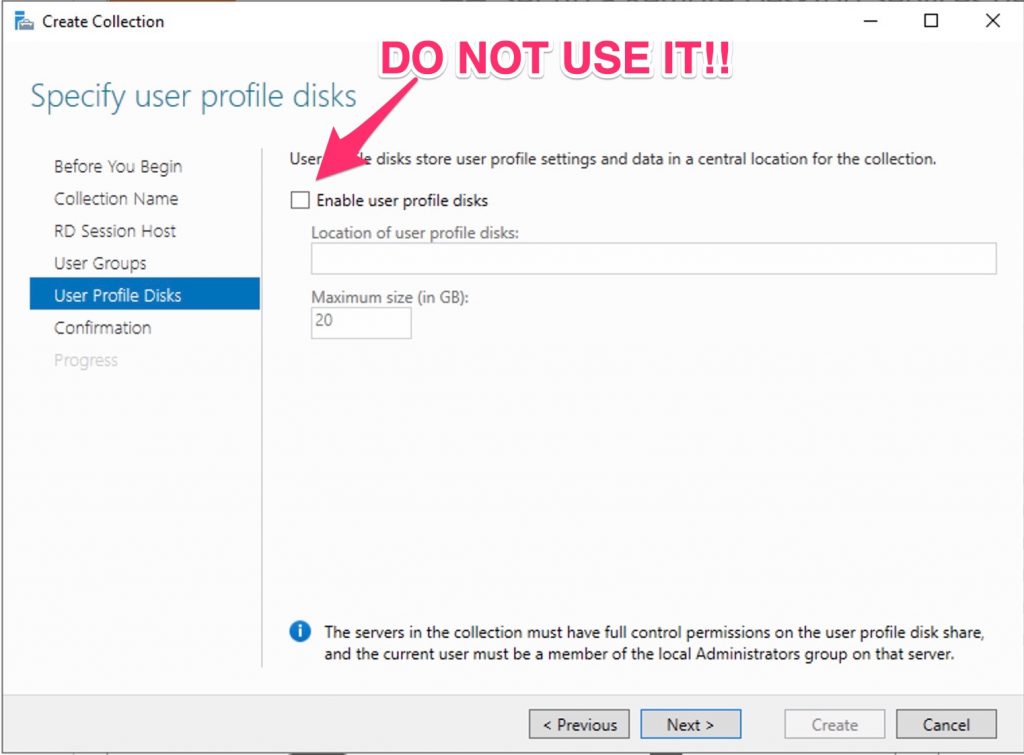
Deselect the option “Enable user profile disks” because we are using FSLogix.
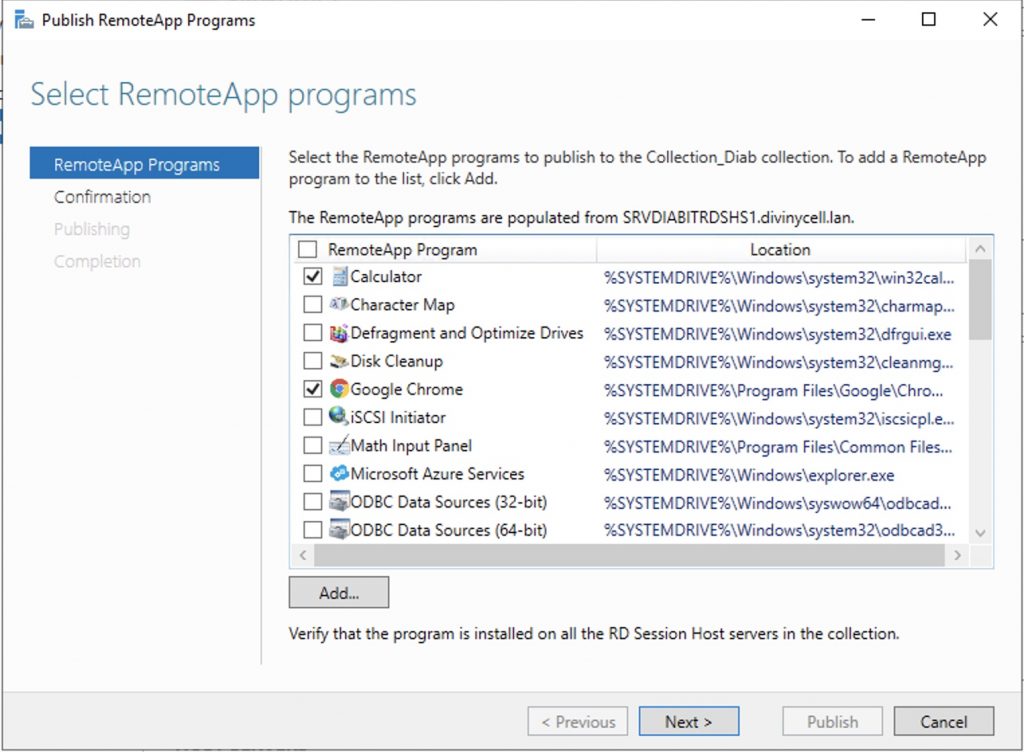
At this point we can add some apps to publish….
Select the app you want to do the test…
Now we could connect to the Connection Brocker Web interface and we can see the Collection just created.
To to RDWEB (https://ip-of-connection-brockerserver/RDWEB)
2) Some Tips
Normally you can’t connect to your session Hosts trought the Connection Brocker from the RDP client , but you need to connect to the Web interface and fallow this process.
If you need to use the normal RDP client ( MSTSC.exe) you have to modify the fallowing registry key of the Connection Broker
Computer\HKEY_LOCAL_MACHINE\SYSTEM\CurrentControlSet\Control\Terminal Server\ClusterSettings
Add the fallowing :
reg_sz DefaultTsvUrl plus the value tsv://MS Terminal Services Plugin.1.COLLECION

So, you really need to write “MS Terminal Services Plugin.1.” plus your collection‘s name
Doing this, you can connect to your host session hosts, trought the Connection Broker with MSTSC.exe !!
Moreover, if you want to connect to you Connection Brocker, now you need to pass the /admin switch.
e.g : MSTSC.exe serverconnectionbroker.yourdomain.com /admin
3) Activate the Terminal Services Licensing
Connect to the server where you installed the Licensing Manager and proceed with the activation
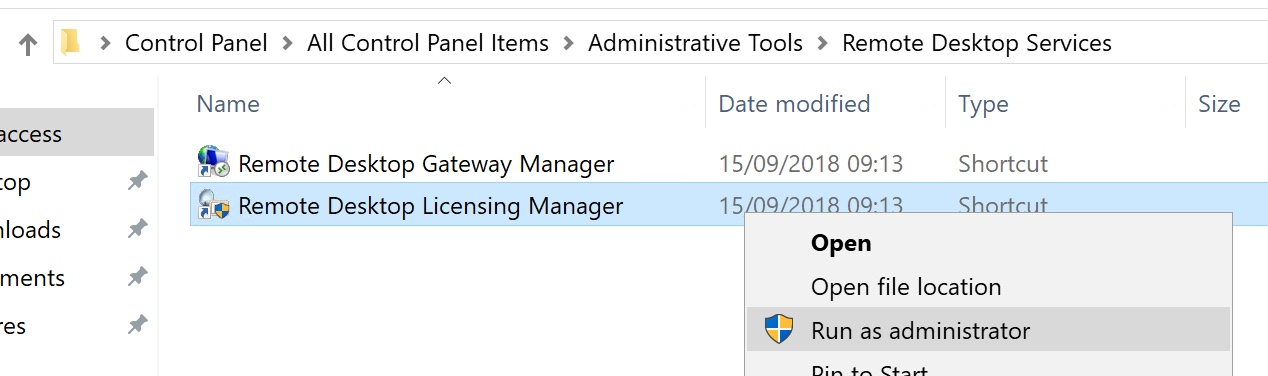
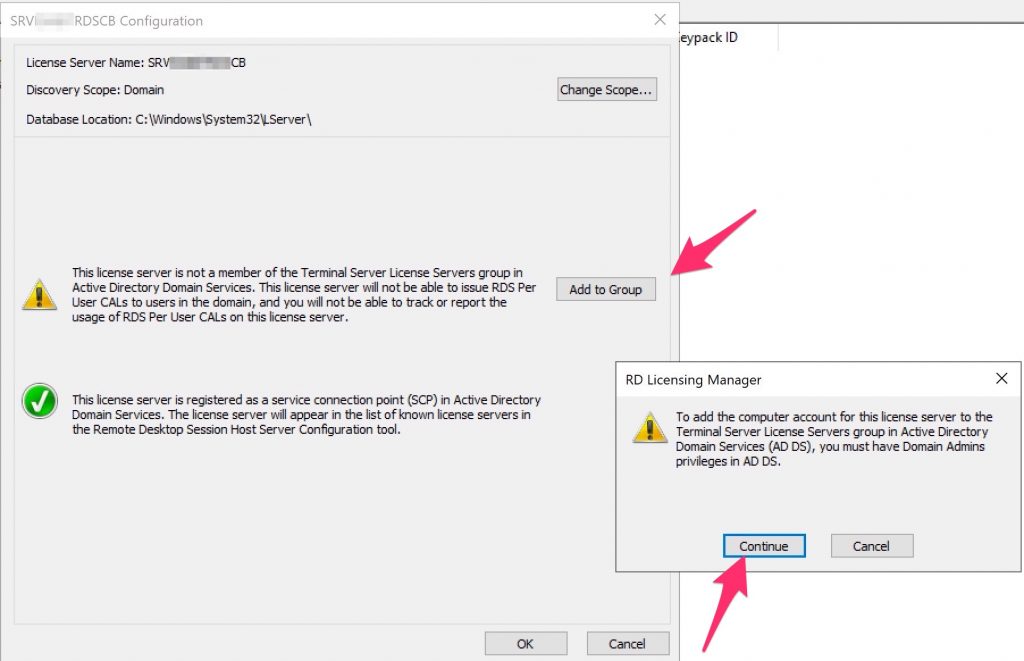
Right click on your server and select “activate” in my case is grey out because I’ve just did it.
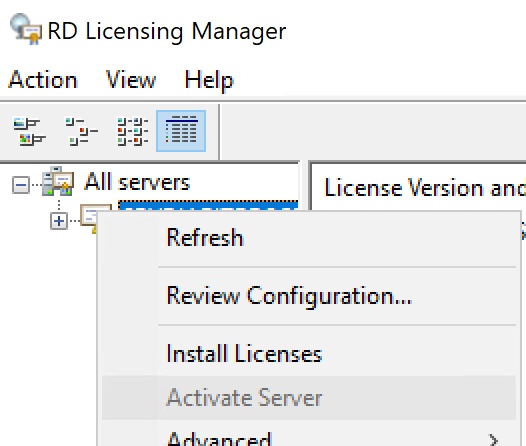
The Wizard starts, fill all your data ..
After that, verity the “Review Configuration” (right click on License Server Name) and add your server into “License Servers Group”… In my case, the SCP is just ok.
Ok and , as we can see , the license server is up
At this point we need to inform our Session Host servers which is our license server.. To do this we’ll use GPOs..
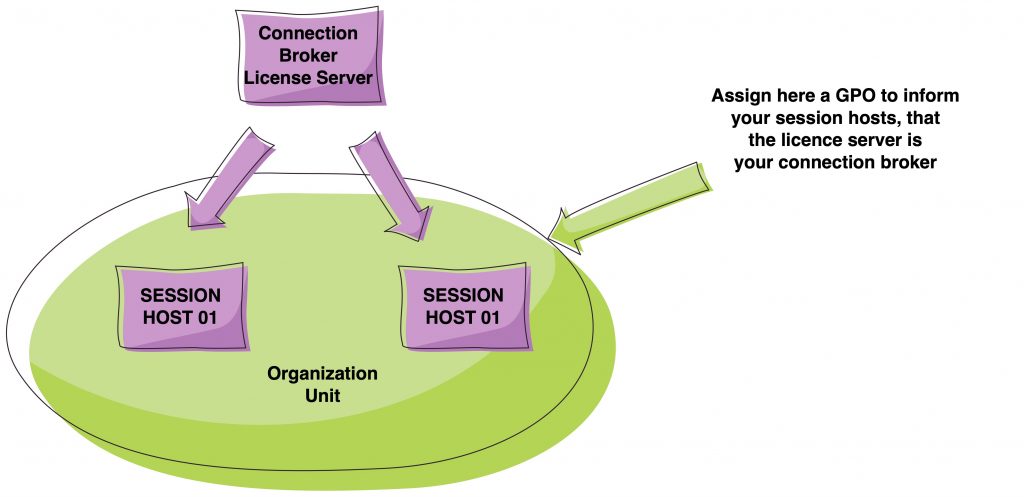
We need to create a GPO (Computer) that has these informations.
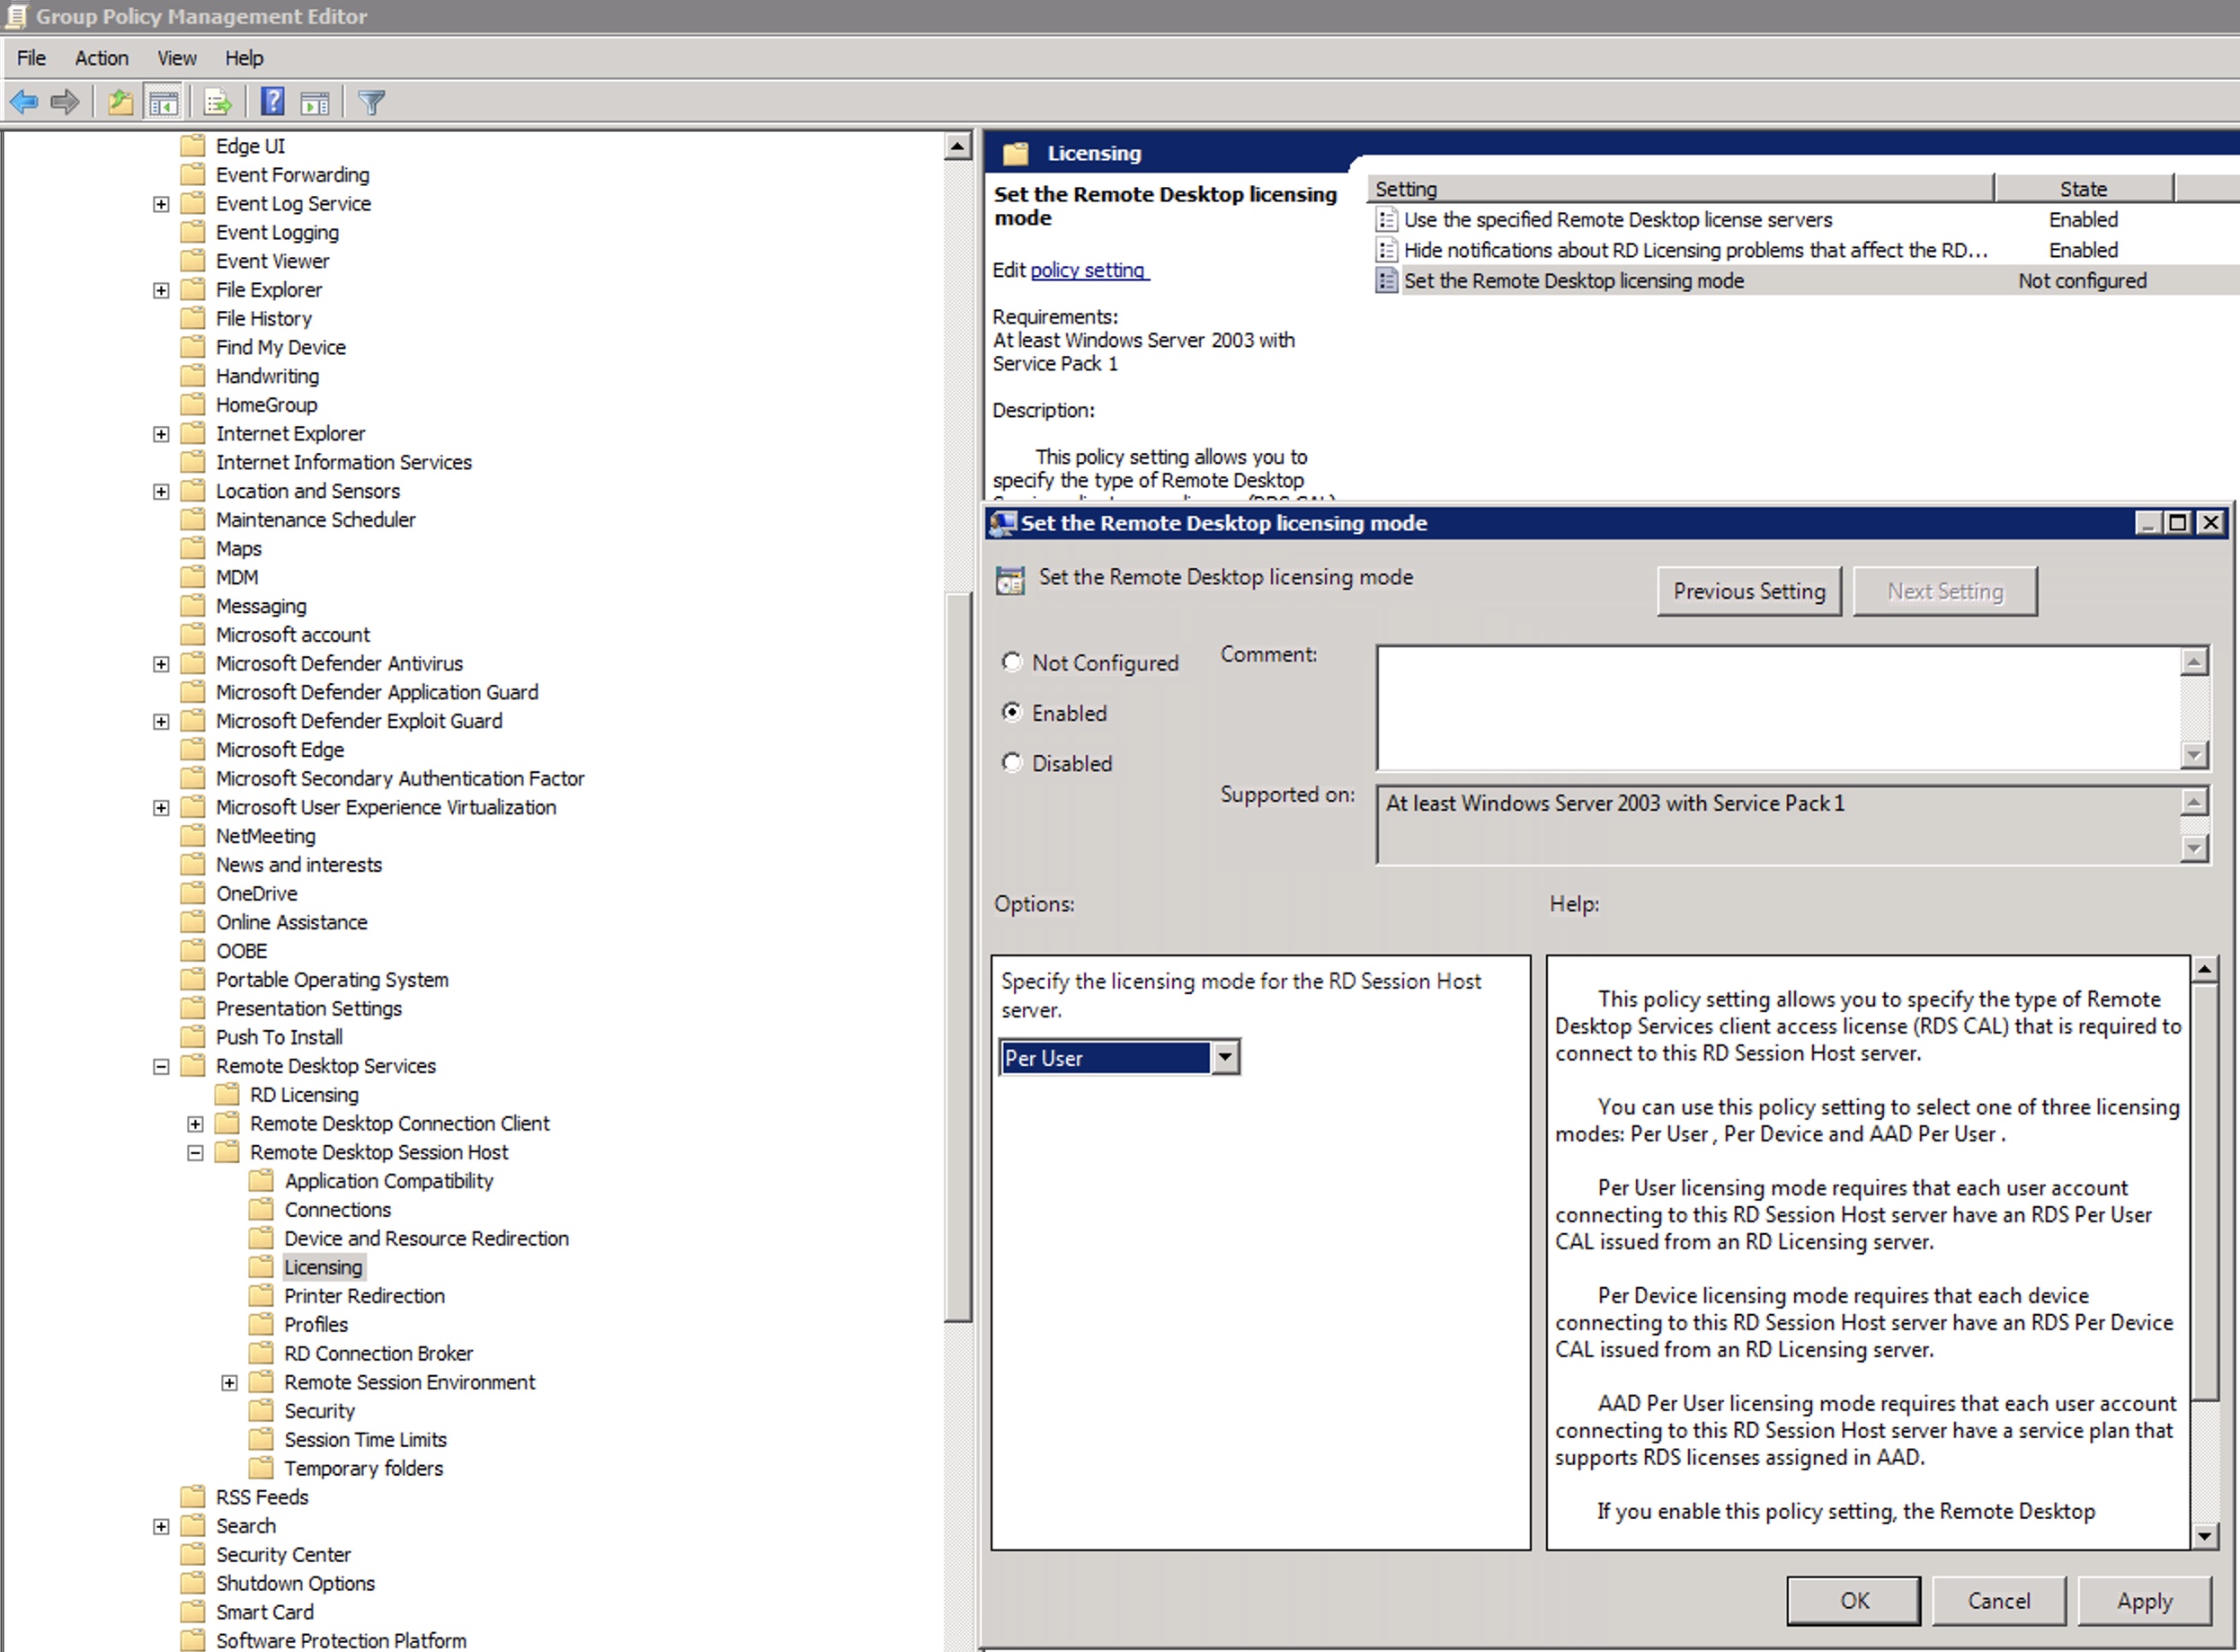
Fill this parameter “Use the specified RD license servers” with the FQDN of your CB/License server.
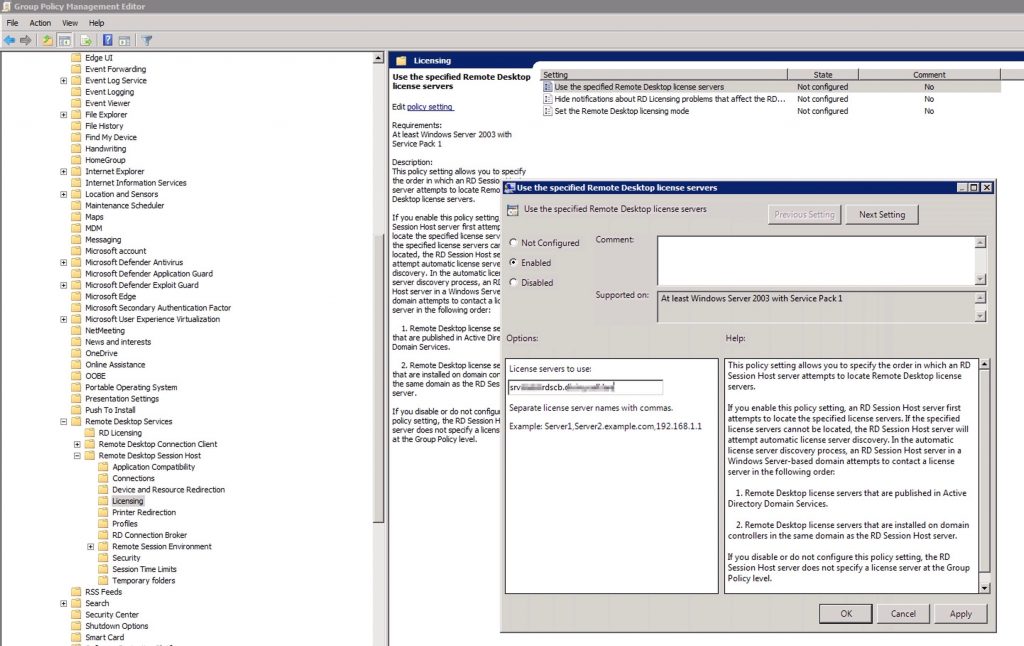
Assign, also, the type of license schema (User/Device)..
Now, connect to both Session Hosts servers,open the “Remote Desktop Licensing Diagnoser” and run a GPUPDATE /Force from cli…

Our Hosts is now correctly registered to our license server.
That’s it.