If you are a Windows user, you are probably familiar with the concept of a server. A server is a computer that provides services to other computers or clients on a network. Windows Server is a powerful platform that can be used for a variety of tasks, such as hosting websites, managing databases, or storing files. However, connecting to a Windows Server from a Windows 10 computer can be a bit tricky if you don’t know how to do it. In this blog post, we will show you how to connect to a Windows Server from a Windows 10 computer using several methods.
Video Tutorial:
There are many reasons why you might need to connect to a Windows Server from a Windows 10 computer. For example, if you work in an organization that uses a Windows Server to store files or run applications, you will need to be able to access those resources. Similarly, if you are a developer who needs to test your applications on a Windows Server, you will need to connect to it from your Windows 10 computer. Regardless of your specific situation, knowing how to connect to a Windows Server from a Windows 10 computer can be extremely useful.
Method 1: Remote Desktop Connection
Remote Desktop Connection is a built-in feature in Windows 10 that allows you to connect to a remote computer or server over the internet. Here are the steps to connect to a Windows Server using Remote Desktop Connection:
1. Press Win+R keys and type ‘mstsc’ in the Run dialog box and hit Enter.
2. In the Remote Desktop Connection window, type the IP address or hostname of the Windows Server you want to connect to.
3. If this is the first time you are connecting to this server, you may need to click on «Connect Anyway» or «Connect» to confirm the connection.
4. Enter the username and password for the Windows Server you are connecting to.
5. Once you are connected, you will see the desktop of the Windows Server.
Pros:
– Remote Desktop Connection is easy to use and is built into Windows 10.
– It supports multiple remote sessions at the same time.
– It provides a secure connection between the local and remote computers.
Cons:
– It requires the Windows Server to have Remote Desktop enabled.
– It may not work if the network connection is slow or unstable.
Method 2: PowerShell
PowerShell is a command-line tool that is designed for system administrators. It can be used to manage local and remote Windows Server instances. Here are the steps to connect to a Windows Server using PowerShell:
1. Open PowerShell on your Windows 10 computer.
2. Type the following command: Enter-PSSession -ComputerName
3. Replace with the name or IP address of the Windows Server you want to connect to.
4. Enter the username and password for the Windows Server you are connecting to.
5. Once you are connected, you can run PowerShell commands on the remote Windows Server.
Pros:
– PowerShell provides more control and flexibility than Remote Desktop Connection.
– It does not require the Windows Server to have Remote Desktop enabled.
Cons:
– It requires some knowledge of PowerShell commands and syntax.
– It may not be suitable for users who are not familiar with the command-line interface.
Method 3: Windows Admin Center
Windows Admin Center is a web-based tool that is designed to manage Windows Server instances from a central location. It can be used to connect to and manage multiple Windows Server instances from a single Windows 10 computer. Here are the steps to connect to a Windows Server using Windows Admin Center:
1. Download and install Windows Admin Center on your Windows 10 computer.
2. Launch Windows Admin Center and click on «Add«.
3. Type the name or IP address of the Windows Server you want to connect to.
4. Enter the username and password for the Windows Server you are connecting to.
5. Once you are connected, you can manage the Windows Server using Windows Admin Center.
Pros:
– Windows Admin Center is easy to use and provides a centralized management solution for Windows Server instances.
– It does not require the Windows Server to have Remote Desktop enabled.
Cons:
– It requires an additional software installation on the Windows 10 computer.
– It may not be suitable for users who prefer a command-line interface.
What to Do If You Can’t Connect to Windows Server from Windows 10
If you are unable to connect to a Windows Server from your Windows 10 computer, there are a few things you can try:
– Check that Remote Desktop is enabled on the Windows Server.
– Check that the Windows Server is connected to the network and is accessible from your Windows 10 computer.
– Check that the Windows Firewall on the Windows Server is not blocking the Remote Desktop connection.
– Restart the Windows Server and try again.
– Contact your system administrator or IT support for assistance.
Bonus Tip
If you need to connect to a Windows Server frequently, you may want to save the connection settings for future use. To do this, follow these steps:
1. Open Remote Desktop Connection.
2. Enter the connection details for the Windows Server you want to connect to.
3. Click on «Show Options«.
4. Click on «Save As«.
5. Enter a name for the connection settings file and save it to a convenient location.
6. To use the saved connection settings file, simply double-click on it to open Remote Desktop Connection with the saved settings.
5 FAQs
Q: Can I connect to a Windows Server from a non-Windows computer?
A: Yes, you can use Remote Desktop Protocol (RDP) or a third-party remote access solution to connect to a Windows Server from a non-Windows computer.
Q: How do I enable Remote Desktop on a Windows Server?
A: To enable Remote Desktop on a Windows Server, follow these steps:
1. Open «Windows Firewall with Advanced Security«.
2. Click on «Inbound Rules«.
3. Scroll down and locate «Remote Desktop (TCP-In)«.
4. Right-click on «Remote Desktop (TCP-In)» and click on «Enable Rule«.
Q: Can I use PowerShell to manage multiple Windows Server instances at the same time?
A: Yes, you can use PowerShell to manage multiple Windows Server instances at the same time. You can use the Enter-PSSession command to connect to each Windows Server and run commands on them.
Q: Does Windows Admin Center work with Windows Server Core installations?
A: Yes, Windows Admin Center is designed to work with Windows Server Core installations. It provides a web-based interface for managing Windows Server Core instances.
Q: Is Windows Admin Center free to use?
A: Yes, Windows Admin Center is a free tool that can be used to manage Windows Server instances.
Final Thoughts
Connecting to a Windows Server from a Windows 10 computer is an essential task for system administrators, developers, and users who need to access remote resources or applications. In this blog post, we have shown you three different methods to connect to a Windows Server from a Windows 10 computer: Remote Desktop Connection, PowerShell, and Windows Admin Center. Each method has its pros and cons, so you can choose the one that best fits your needs and preferences. If you encounter any issues while connecting to a Windows Server, you can follow our troubleshooting tips or seek assistance from your system administrator or IT support.
Browse to http://servername/connect and choose to download the Connector.
- Click on Run.
- Click Yes to accept the User Account Control warning.
- Something is wrong because Windows 10 could not run the Connector it just downloaded from your server.
What is client connector for Windows Server Essentials?
Windows Server Essentials Connector is software that helps you connect your PC or Mac client to Windows Server 2012 R2 with the Windows Server Essentials Experience server role enabled. It also enables and manages key client-side functionality of Windows Server Essentials Experience.
Is Windows Server 2012 R2 32 or 64 bit?
Windows Server 2012 is based on Windows Server 2008 R2 and Windows 8 and requires x86-64 CPUs (64-bit), while Windows Server 2008 worked on the older IA-32 (32-bit) architecture as well.
Can’t connect to any network Windows 10?
How to Fix Windows 10 Network Connection Bugs
- Verify that it is indeed a Windows 10 problem.
- Reboot your modem and router.
- Make sure Wi-Fi is turned on.
- Turn airplane mode off.
- Open a web browser.
- Move to the same room as your router.
- Move to a less-populated location.
- Forget your Wi-Fi network and then re-add it.
How do I add a Windows 2012 machine to a domain?
In Server Manager, select Local Server in the left pane. In the right pane of Server Manager under Properties, click WORKGROUP. In the System Properties dialog on the Computer Name tab, click Change. In the Computer Name/Domain Changes dialog, click Domain, type the FQDN of your Active Directory domain and click OK.
How do I connect to a client server?
To connect a client computer to the server
- Log on to the computer that you want to connect to the server.
- Open an Internet browser, such as Internet Explorer.
- The Connect your computer to the server page appears.
- In the file download security warning message, click Run.
How do I connect to a client server Windows 10?
Remote Desktop from a Windows Computer
- Click the Start button.
- Click Run…
- Type “mstsc” and press the Enter key.
- Next to Computer: type in the IP address of your server.
- Click Connect.
- If all goes well, you will see the Windows login prompt.
Is Windows 2000 Server operating system?
Overview of Windows 2000 Server Microsoft introduced an operating system named Windows 2000 Server which was designed for both client and server computers. It was the successor to Windows NT 4.0 and the predecessor to Windows XP. This operating system was being called as Windows NT 5.0 during its development period.
Does Windows Server 2012 still get security updates?
Microsoft has announced Extended Security Updates for Windows Server 2008 and 2012, and for SQL Server 2012 – and made it free if you run them in its Azure cloud. The current extended support offering for Windows Server 2012 and 2012 R2 ends on October 10, 2023.
How to run Windows 10 connector for Windows Server 2012 R2?
The solution was to create a local admin account, login to it, delete the user associated with Azure AD (when I installed W10, I created a user account using my organisation details), connect to the http://server-name/connect and run the connector package. Would the solution be the same for Server 2012 R2 Datacenter?
Is there a fix for Windows Server 2012 R2 Essentials?
Windows Server 2012 R2 Essentials There will be a new package available for Windows 10 Client Connector of Windows Server 2012 R2 Essentials. There will also be an inbox fix for Windows Server 2012 R2 Essentials for this issue. The inbox fix will be shipped via Windows Update to the server.
How to download Windows Server Essentials connector for Windows?
Once you click on the “Download” button, you will be prompted to select the files you need. Windows Server Essentials Connector is software that helps you connect your PC or Mac client to Windows Server 2012 R2 with the Windows Server Essentials Experience server role enabled.
Can you connect W10 pro to Windows 2012 Essentials?
Larry Struckmeyer [MVP]– –If your question is answered please mark the response as the answer so that others can benefit. I struck this error when trying to connect a W10 Pro machine to a Server 2012 Essentials server.
In this guide, you will learn how to enable Remote Desktop on Windows 10, 11, and Windows Server. I’ll also show you on to enable RDP using PowerShell and group policy.
Tip: Use a remote desktop connection manager to manage multiple remote desktop connections. You can organize your desktops and servers into groups for easy access.
Table of contents
- Enable Remote Desktop on Windows 10
- Enable Remote Desktop on Windows 11
- Enable Remote Desktop on Windows Server
- PowerShell Enable Remote Desktop
- Group Policy Configuration to allow RDP
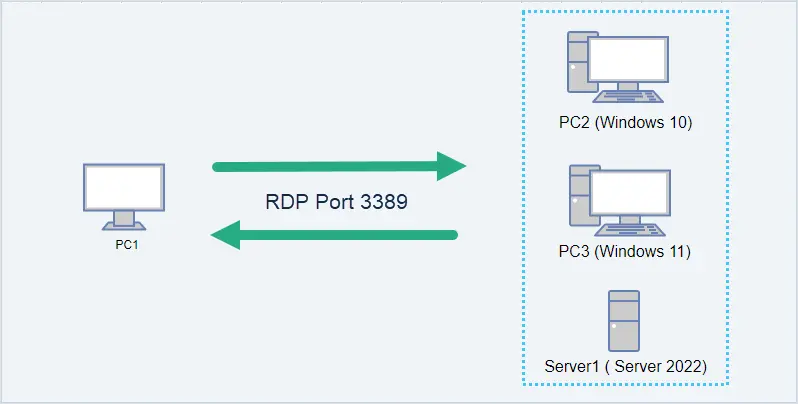
In the diagram below, my admin workstation is PC1. I’m going to enable RDP on PC2, PC3, and Server1 so that I can remotely connect to them. RDP uses port TCP 3389. You can change the RDP listening port by modifying the registry.
In this example, I’m going to enable remote desktop on PC2 that is running windows 10.
Step 1. Enable Remote Desktop
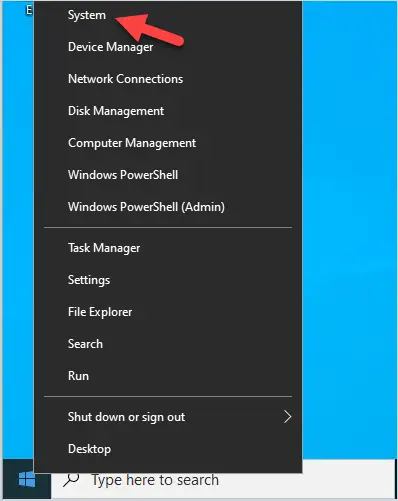
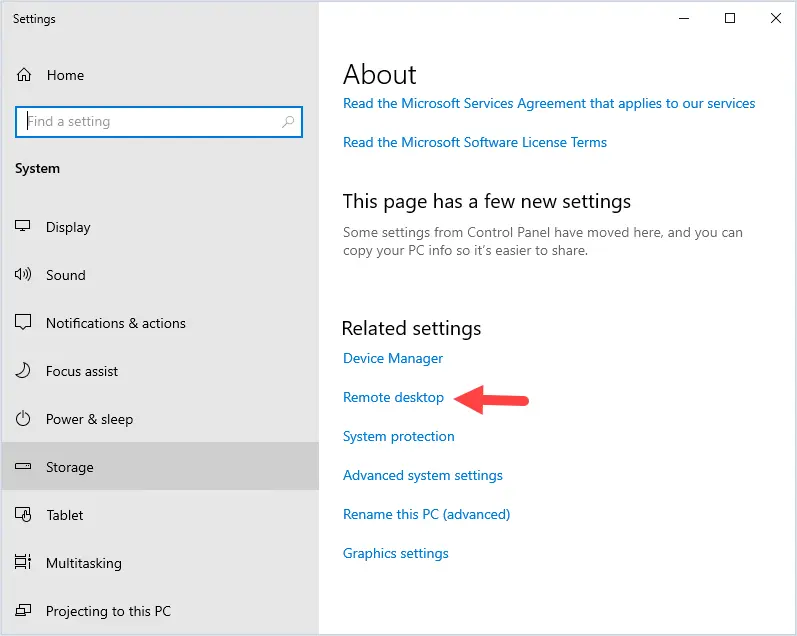
Right click the start menu and select system.
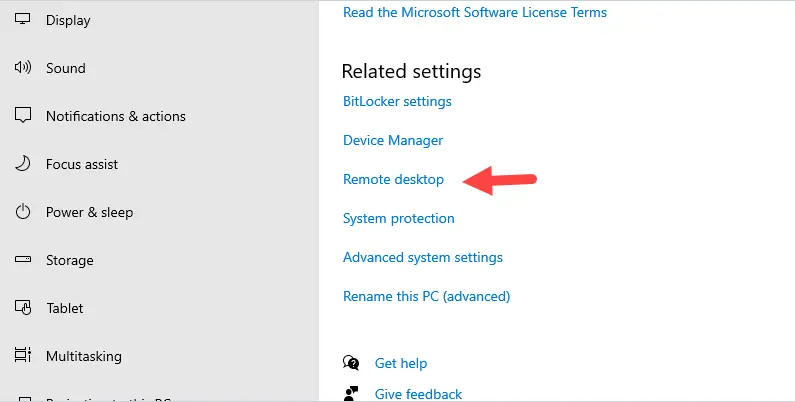
Under related settings click on Remote desktop.
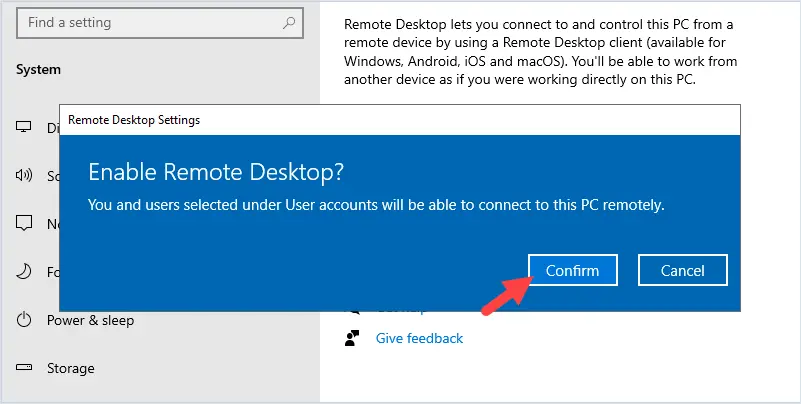
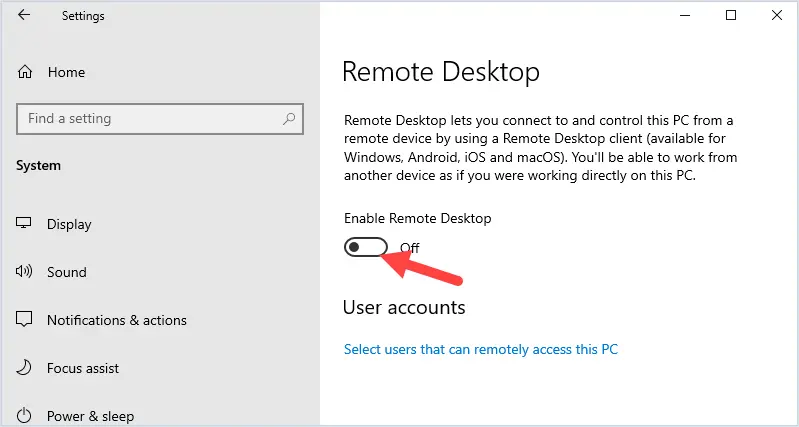
Click the slider button to enable remote desktop.
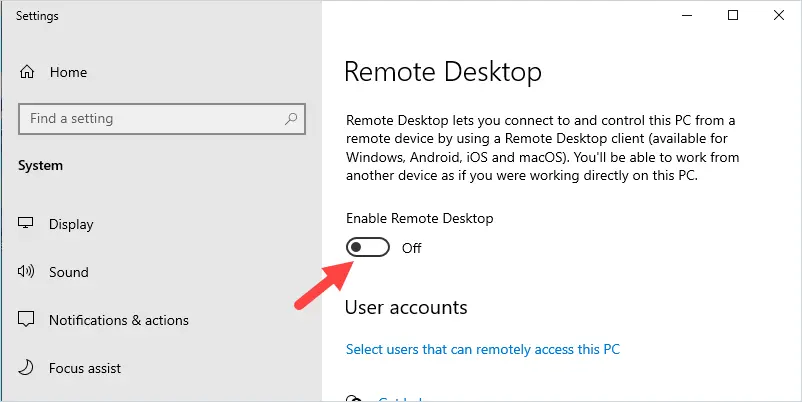
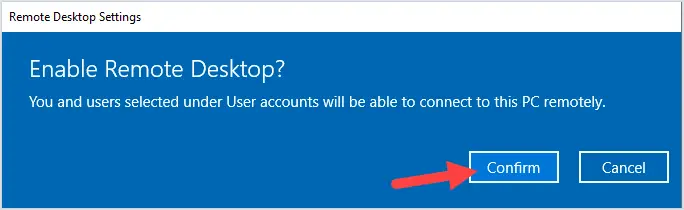
You will get a popup to confirm that you want to enable Remote desktop. Click confirm.
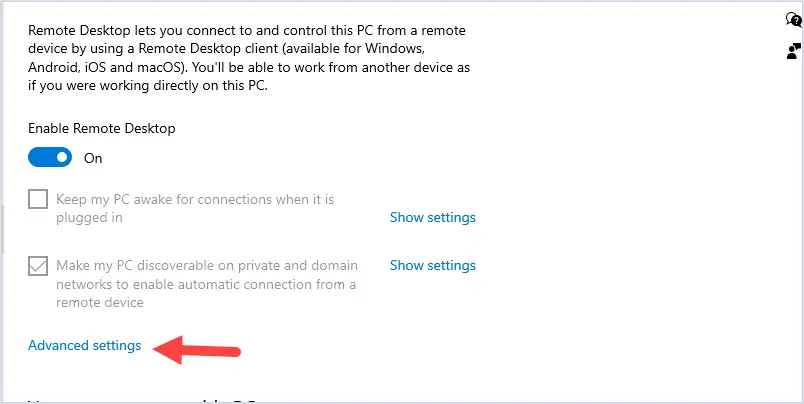
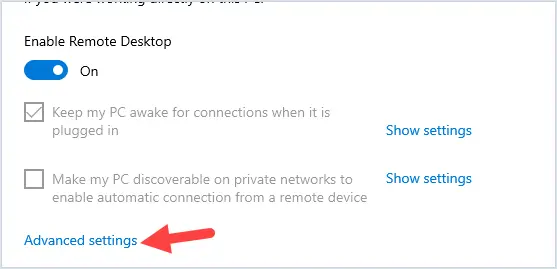
Next, Click on Advanced Settings.
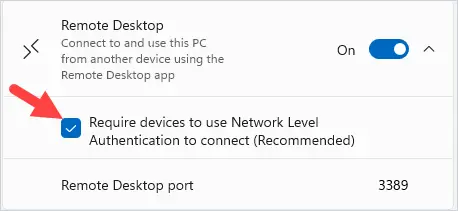
Make sure “Require computers to use Network Level Authentication to connect” is selected.
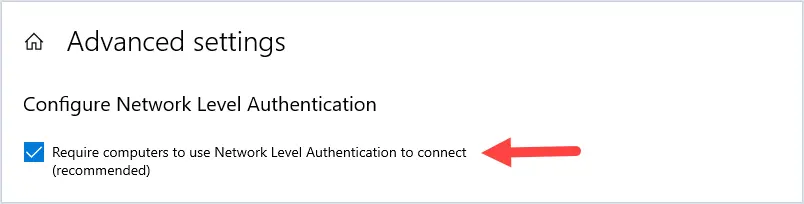
This setting will force the user to authenticate before it will start a remote desktop session. This setting will enable a layer of security and prevent unauthorized remote connections.
Step 2. Select Users Accounts
The next step is to ensure only specific accounts can use RDP.
By default, only members of the local administrators group will be allowed to connect using remote desktop.
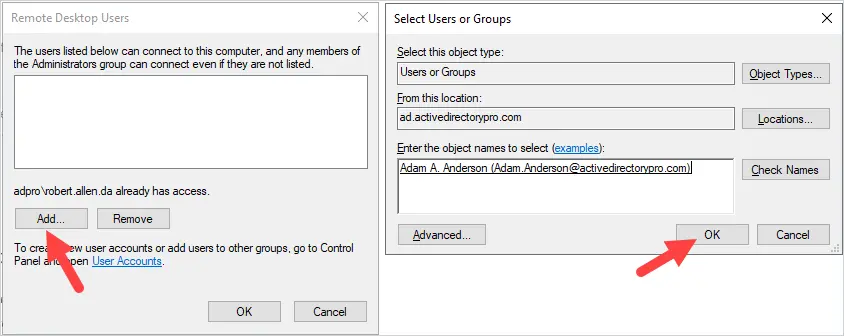
To add or remove user accounts click on “select users that can remotely access this PC”.

To add a user click the Add button and search for the username.
In this example, I’m going to add a user Adam A. Anderson.
Tip. I recommend creating a domain group to allow RDP access. This will make it easier to manage and audit RDP access.
That was the last step, remote desktop is now enabled.
Let’s test the connection.
From PC1 I open Remote Desktop Connection and enter PC2.
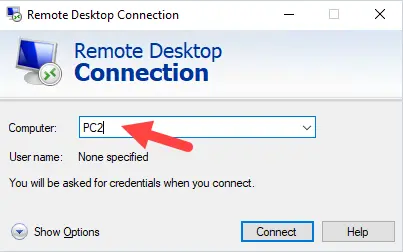
I am prompted to enter credentials.
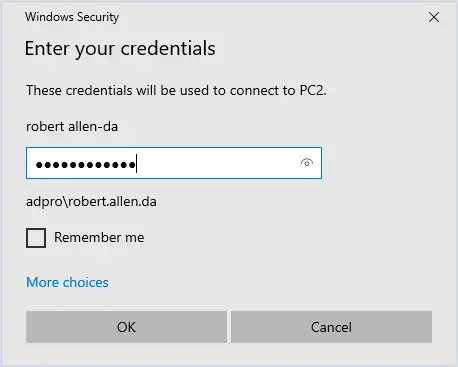
Success!
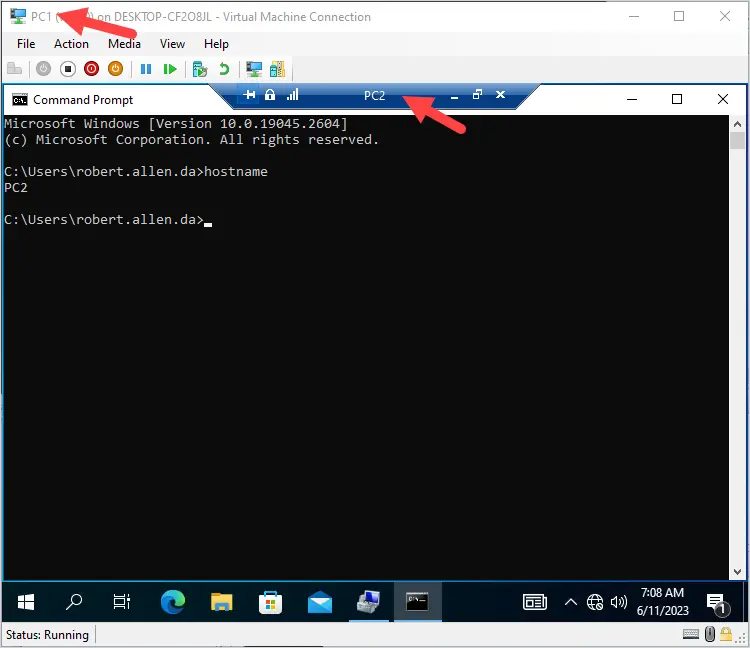
I now have a remote desktop connection to PC2.
In the screenshot below you can see I’m connected via console to PC1 and I have a remote desktop connection open to PC2.
Damware Mini Remote Control
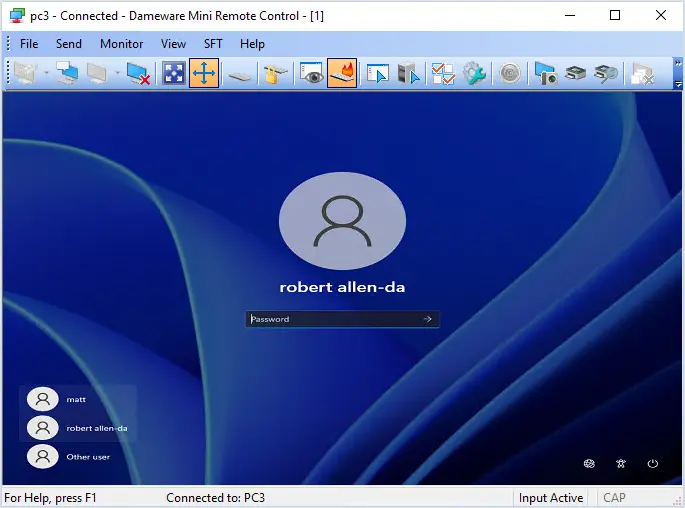
Multiple monitor support. Reboot and wake sleeping computers remotely.
Remote access to Windows, Linux, and Mac OS X operating systems. In session chat, remote screenshot, file transfer, and more.
Download 14 Day Free Trial
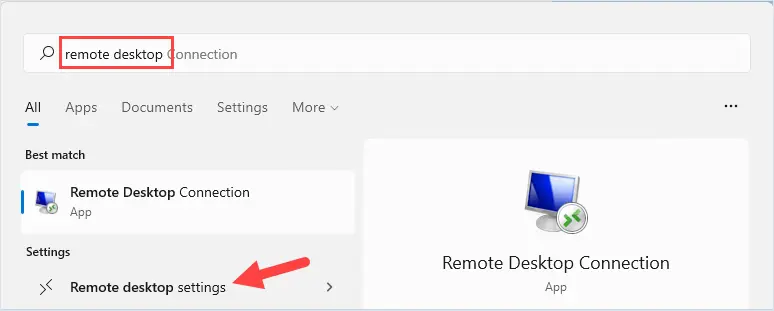
Enable Remote Desktop on Windows 11
In this example, I’ll enable remote desktop on my Windows 11 computer (PC3).
Step 1. Enable Remote Desktop
Click on search.

Enter “remote desktop” and click on “Remote desktop settings”
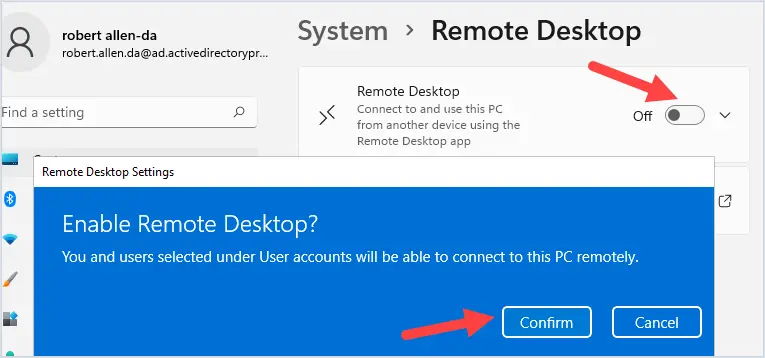
Click the slider to enable remote desktop. You will get a popup to confirm.
Click the down arrow and verify “Require devices to use Network Level Authentication to connect” is enabled.
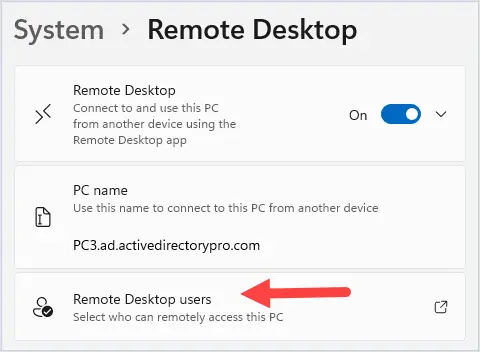
Remote Desktop is now enabled. In the next step, you will select which users are allowed to use remote desktop.
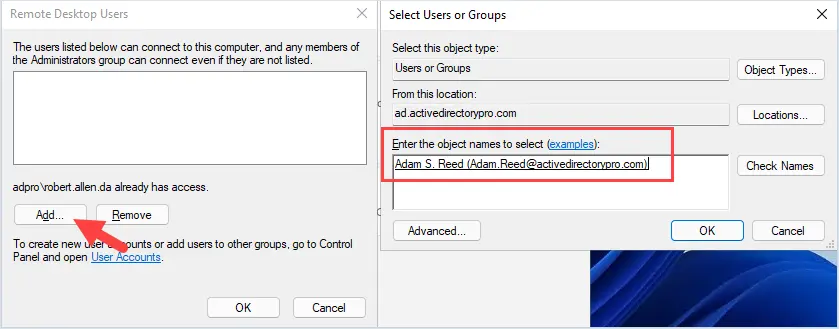
Step 2. Remote Desktop Users
By default, only members of the local administrators group can use remote desktop. To add additional users follow these steps.
Click on “Remote Desktop users”
Click on add and search or enter a user to add. In this example, I’ll add the user adam.reed.
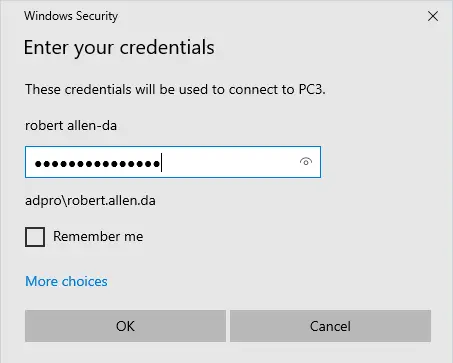
Now I’ll test if remote desktop is working.
From my workstation PC1 I’ll create a remote desktop connection to PC3 (windows 11).
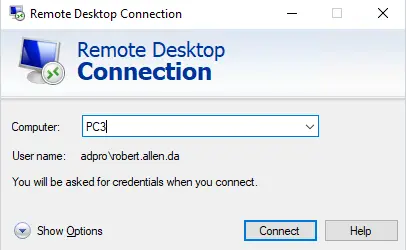
Enter the password to connect.
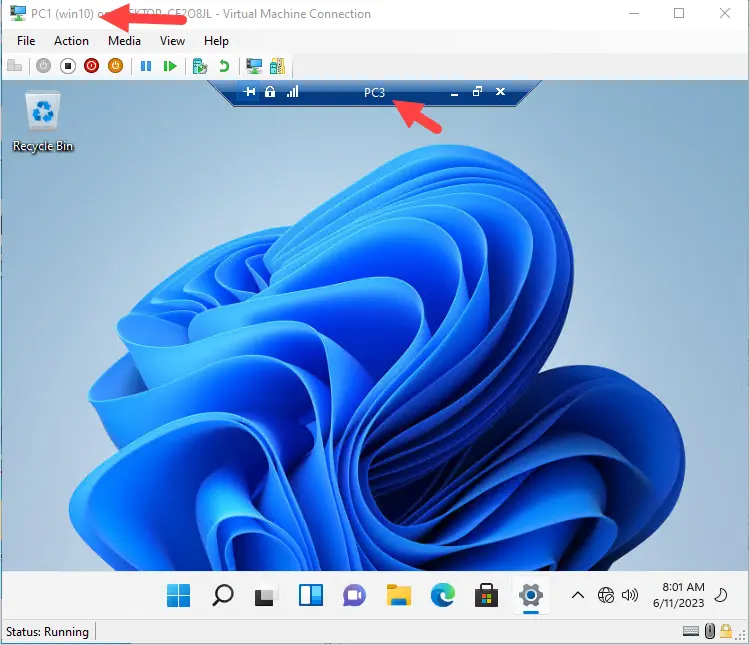
The connection is good!
You can see in the screenshot below I’m on the console of PC1 and I have a remote desktop connection to PC3 that is running Windows 11.
Enable Remote Desktop on Windows Server
In this example, I’ll enable remote desktop on Windows Server 2022.
Step 1. Enable Remote Desktop.
Right click the start menu and select System.
On the settings screen under related settings click on “Remote desktop”.
Click the slider button to enable remote desktop.
You will get a popup to confirm that you want to enable Remote desktop. Click confirm.
Click on Advanced settings.
Make sure “Require computers to use Network level Authentication to connect” is enabled.
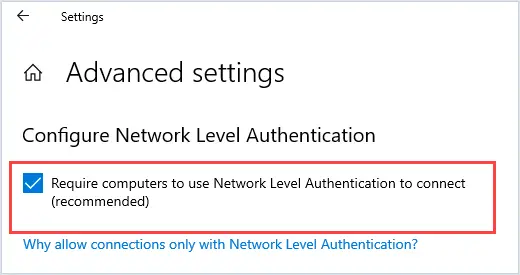
Remote desktop is now enabled, the next step is to select users that can remotely access the PC.
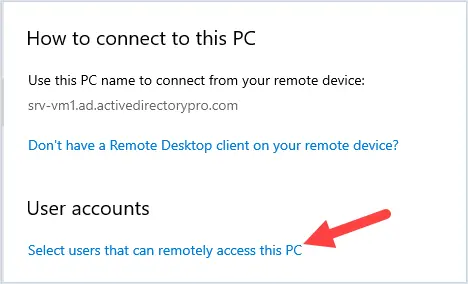
Step 2. Select User accounts
By default, only members of the local administrators group will be allowed to connect using remote desktop.
To add additional users click on click on “select users that can remotely access this pc”.
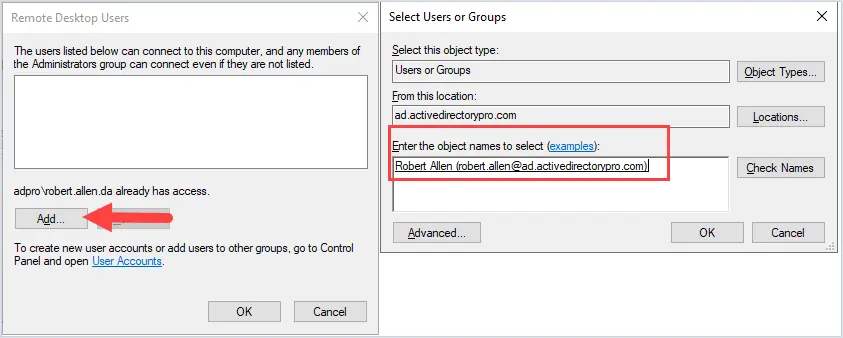
Next, click add then enter or search for users to add. In this example, I’ll add the user robert.allen. Click ok.
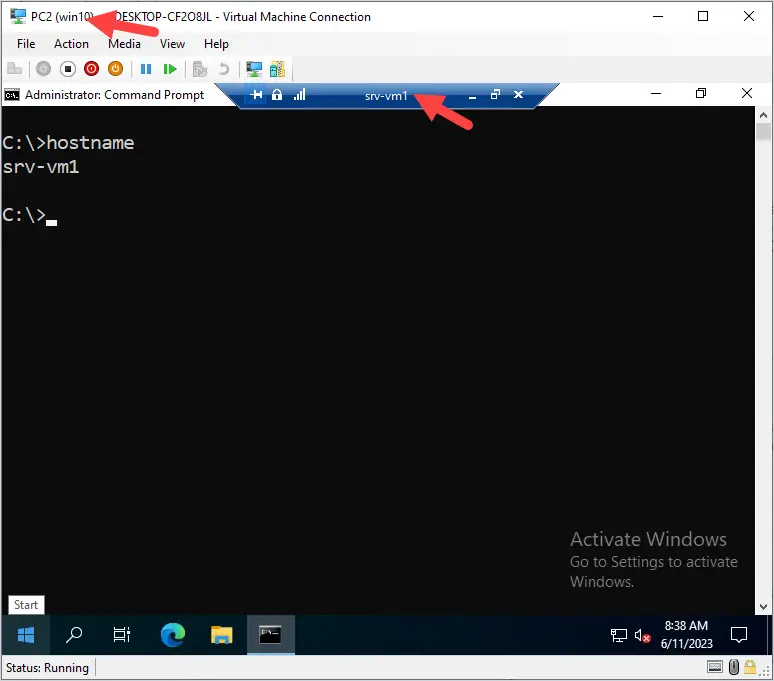
Now I’ll test if remote desktop is working on my Windows 2022 server.
From my workstation (pc2) I open the remote desktop connection client and enter srv-vm1and click connect. Enter my username and password and click ok.
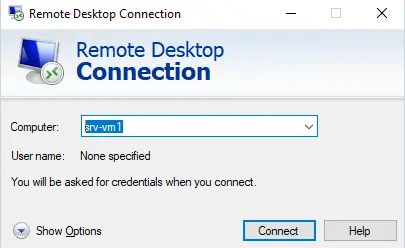
Awesome, it works!
I’ve established a remote session to my Windows 2022 server from my Windows 10 computer.
PowerShell Enable Remote Desktop
To enable Remote Desktop using PowerShell use the command below. This will enable RDP on the local computer.
Set-ItemProperty -Path 'HKLM:\System\CurrentControlSet\Control\Terminal Server' -name "fDenyTSConnections" -value 0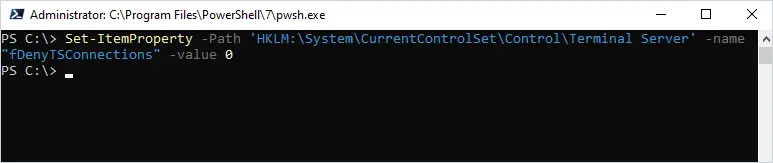
You can use the below PowerShell command to check if remote desktop is enabled.
if ((Get-ItemProperty "hklm:\System\CurrentControlSet\Control\Terminal Server").fDenyTSConnections -eq 0) { write-host "RDP is Enabled" } else { write-host "RDP is NOT enabled" }
To enable remote desktop remotely you can use the invoke-command. This requires PS remoting to be enabled, check out my article on remote powershell for more details.
In this example, I’ll enable remote desktop on the remote computer PC2.
invoke-command -ComputerName pc2 -scriptblock {Set-ItemProperty -Path 'HKLM:\System\CurrentControlSet\Control\Terminal Server' -name "fDenyTSConnections" -value 0} 
Group Policy Configuration to allow RDP
If you need to enable and manage the remote desktop settings on multiple computers then you should use Group Policy or intune.
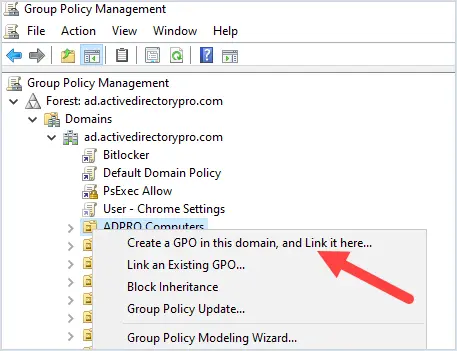
Follow the steps below to create a new GPO.
Step 1. Create a new GPO
Open the group policy management console and right click the OU or root domain to create a new GPO.
In this example, I’m going to create a new GPO on my ADPPRO Computers OU, this OU has all my client computers.
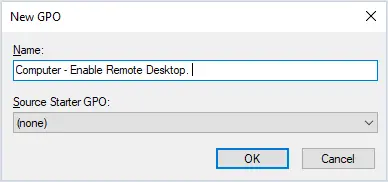
Give the GPO a name.
Edit the GPO and browse to the following policy setting.
Computer Configuration -> Policies -> Administrative Templates -> Windows Components -> Remote Desktop Services -> Remote Desktop Session Host -> Connections;
Enable the policy setting -> Allow users to connect remotely by using Remote Desktop Services
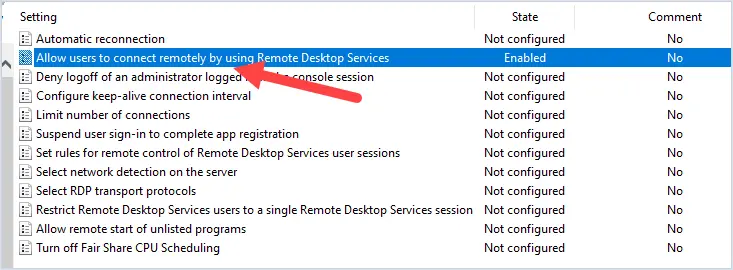
That is the only policy setting that needs to be enabled to allow remote desktop
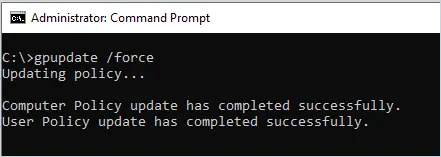
Step 2. Update Computer GPO
The GPO policies will auto refresh on remote computers every 90 minutes.
To manually update GPO on a computer run the gpupdate command.
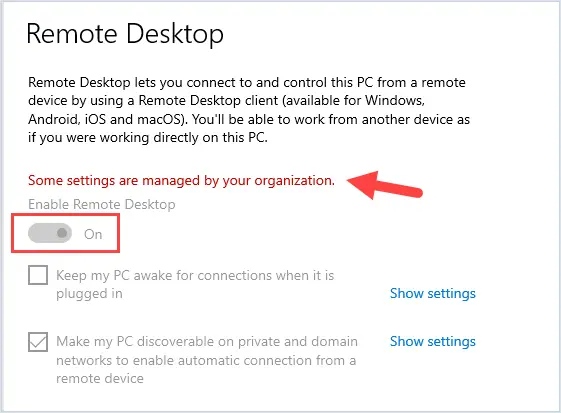
When remote desktop is managed with group policy the settings will be greyed out. This will allow you to have consistent settings across all your computers. It will also prevent users or the helpdesk from modifying the settings.
That’s a wrap.
I just showed you several ways to enable remote desktop on Windows computers. If you are using Active Directory with domain joined computers then enabling RDP via group policy is the best option.
Related Articles
- 5 Best Remote Desktop Connection Managers
I am new to networking and server configuration, so please bare with me if something is not accurately depicted. Thank you in advance:
I have attempted to connect a Windows 10 Pro computer to a Windows Server 2016 however have been unsuccessful. I am able to connect a Windows 7 and XP system to the server. I can ping the domain and use nslookup to find the domain, however after providing
my credentials I get an error that says «Could not connect to (domain). Network path not found.»
After reviewing the logs on Windows 10 I have a code 53, and on the Server an event ID of 1058.
Server is set to a private ip of 10.0.0.x and the router is also set on that ip of 10.0.0.x
I have scoured the internet to find an answer to my problems, but sadly I have not found one yet. I have configured the netlogon, netjoin, TCP/IP Bios Helper in the computer management. I have configured the TCP/IP v4 to include the DNS server address which
consisted of the DC private IP and the default gateway, I have enabled NetBios over TCP/IP on the WINS tab. There is no DHCP server set up. I believe that is everything that I have tried. I ran the Dcdiag and it came up with unable to locate the domain.
I will be able to answer any questions as soon as I can and run any tests on the server and Win10 computer. I am planning on restarting everything from scratch and re-installing both the server and PC, but if there is a solution I am open to try it.
Thank you
How to connect to your server via RDP on Windows 10
-
Support
-
General
- How to connect to your server via RDP on Windows 10
Estimated reading time: 1 min
Introduction
This article will describe how you can connect to your server via Remote Desktop Protocol (RDP).
Prerequisites
- Remote Desktop client on your device
- A Cloud VPS, Pure performanve VPS or Dedicated Server to connect via RDP
Step 1 – Open Remote Desktop Connection
Click on the search bar in the left bottom and type Remote Desktop Connection in the search bar.
Step 2 – Configure Remote Desktop Connection
Enter the hostname or the IP address and click on Connect
Enter the login credentials of your Windows Server
If the Windows Server you want to connect has a self signed certificate it will show a warning that the certificate is not verified.
Click on Yes to start the RDP session with the Windows Server.
Step 3 – Remote Desktop Connection established
Connection to your Windows Server is established via RDP.
Conclusion
Congratulations, you should now have a connection to your Windows Server via RDP.
Was this article helpful?
Like
8
Dislike
1