Windows Vista Enterprise 64-bit Edition Windows Vista Home Basic 64-bit Edition Windows Vista Home Premium 64-bit Edition Windows Vista Ultimate 64-bit Edition Windows Vista Business Windows Vista Business 64-bit Edition Windows Vista Enterprise Windows Vista Home Basic Windows Vista Home Premium Windows Vista Starter Windows Vista Ultimate More…Less
Symptoms
You may experience one or more of the following symptoms on a Windows Vista-based or a Windows Server 2003-based computer that uses a Hewlett-Packard (HP) printer:
-
When you try to install a printer, the Add Printer Wizard stops responding.
-
The computer stops responding.
-
The print spooler stops responding.
-
The print spooler crashes, and you receive one of the following error messages, as appropriate for your situation.
When you use an administrator account
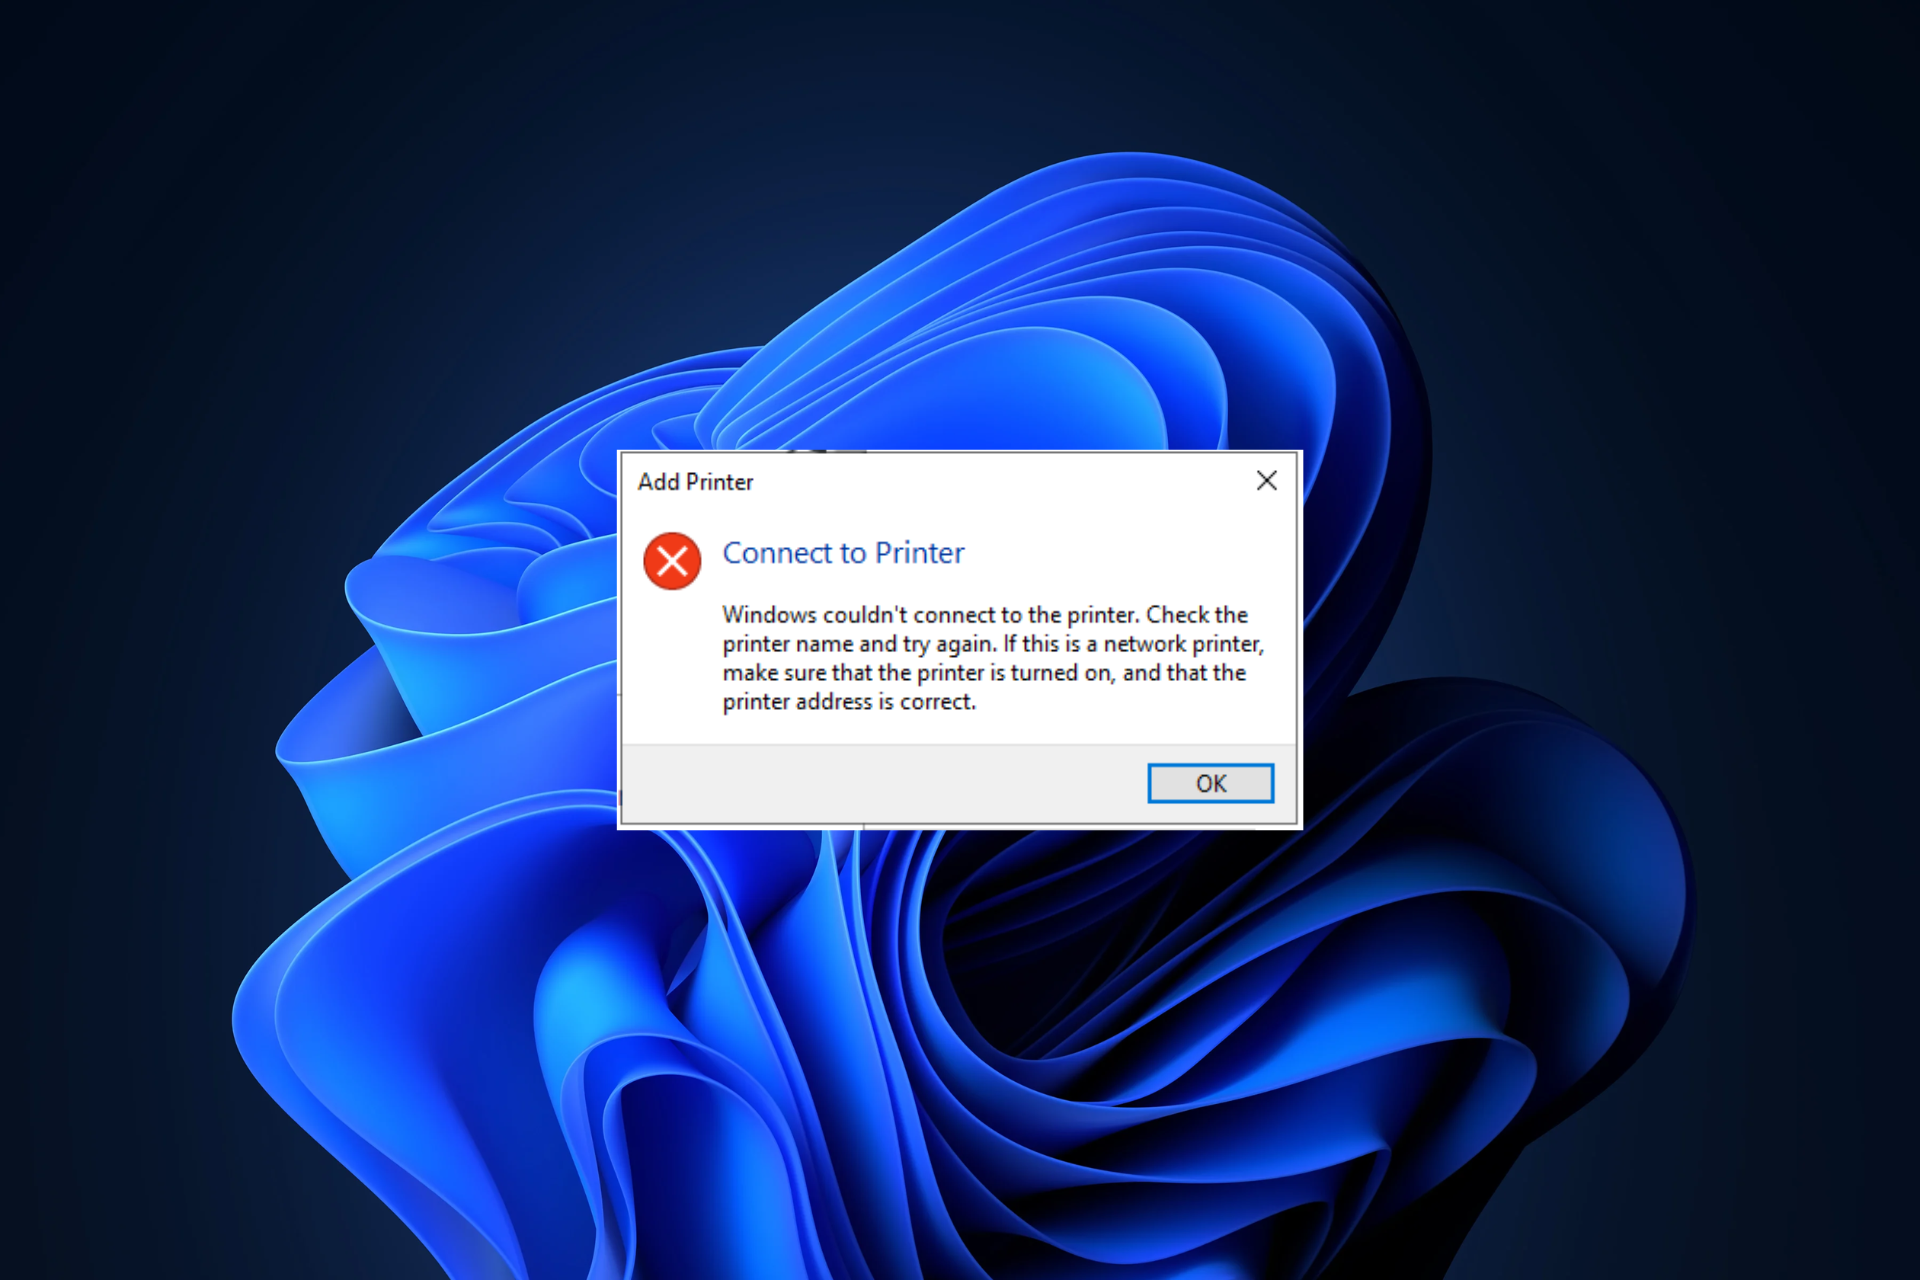
Connect to Printer
——————————
Windows cannot connect to the printer.Operation could not be completed (error 0x000006be).
Either the printer name was typed incorrectly, or the specified printer has lost its connection to the server.
For more information, click Help.
When you use a user accountConnect to Printer
——————————
Windows cannot connect to the printer.Operation could not be completed (error 0x000006be).
You do not have sufficient access to your computer to connect to the selected printer.
Cause
This issue occurs because the HP printer driver uses one of the following files:
-
An HPBmini.dll file («HP Mini Installer») whose version is earlier than 1.0.0.19.
-
An Hpcdmc32.dll file («HP Device Management and Configuration») whose version is earlier than 1.0.2.35.
Resolution
To resolve this issue, obtain a newer version of the HP printer driver. To do this, visit the following HP Web site:
http://welcome.hp.com/country/us/en/support.html?pageDisplay=drivers Microsoft provides third-party contact information to help you find technical support. This contact information may change without notice. Microsoft does not guarantee the accuracy of this third-party contact information.
Note Before you install the new HP printer driver, make sure that the version of the HPBmini.dll file is later than 1.0.0.19 or that the version of the Hpcdmc32.dll file is later than 1.0.2.35. To do this, extract the driver to a temporary folder, and then verify the version of the HPBmini.dll file or the Hpcdmc32.dll file.
More Information
Printer drivers that are reported to use the older version of the HPBmini.dll file
-
HP Color LaserJet 3000/3800 (PCL5, PCL6, PS)
-
HP Color LaserJet 3600
-
HP Color LaserJet 4700 PCL 6
-
HP Color LaserJet 9500 PCL 6
-
HP LaserJet 1320 PCL
-
HP LaserJet 2300
-
HP LaserJet 4250 (PCL & PS)
-
HP LaserJet 4300D (PCL & PS)
-
HP LaserJet 4345 MFP
-
HP LaserJet 4350 (PCL & PS)
-
HP LaserJet 4550-N
-
HP LaserJet 4650 (PCL & PS)
-
HP LaserJet 4700dtn (PCL & PS)
-
HP LaserJet 5500 (PCL5C & PS)
-
HP LaserJet 5550DTN (PCL5C & PS)
-
HP LaserJet 9000 PCL5e/PCL6
-
HP LaserJet 9050dn PCL and PS
-
HP LaserJet 9500 MFP
-
HP LaserJet 9500 (PCL & PS)
-
HP PhotoSmart 3210
References
For more information, click the following article numbers to view the articles in the Microsoft Knowledge Base:
946394 Error message when you try to connect to a print queue in Windows Vista or in Windows Server 2008: «Windows cannot connect to the printer. Operation could not be completed (error 0x000006be)»
953844 On a Windows Server 2003 based computer, the upgrade of HP Print Driver hangs
The third-party products that this article discusses are manufactured by companies that are independent of Microsoft. Microsoft makes no warranty, implied or otherwise, about the performance or reliability of these products.
Need more help?
Want more options?
Explore subscription benefits, browse training courses, learn how to secure your device, and more.
Communities help you ask and answer questions, give feedback, and hear from experts with rich knowledge.
The solutions provided below will restore your printer’s functionality in no time
by Milan Stanojevic
Milan has been enthusiastic about technology ever since his childhood days, and this led him to take interest in all PC-related technologies. He’s a PC enthusiast and he… read more
Updated on
- If Windows cannot connect to the printer, it’s usually a problem with the printer’s drivers.
- However, remember that you can also make preliminary checks to see if the printer is working correctly.
- It’s also helpful to verify the physical connections and the cables between all the components involved in the printing process.
If you recently upgraded your PC to Windows 10 or performed an update to the latest Windows 11 build, you might have encountered an error that says: Windows cannot connect to the printer.
This guide will also help if you encounter the Windows cannot connect to the printer 0x0000011b error or if you received the Operation failed with error 0x0000011b message.
That said, let’s move on to the solutions for the Windows cannot connect to the printer error in Windows 10 & 11. Follow along!
How to fix Windows cannot connect to the printer?
- How to fix Windows cannot connect to the printer?
- 1. Check if your printer is an Unspecified Device and update the drivers
- 1.1 Find out if your printer is listed as an Unspecified Device
- 1.2 Update drivers
- 2. Uninstall and reinstall your printer
- 2.1 Uninstall the printer
- 2.2 Reinstall the printer
- 3. Temporarily disable your antivirus security software
- 4. Check Default printer settings
- 5. Perform a Windows Update
- 6. Clear spooler files and restart spooler service
- 6.1 Stop the Print Spooler service
- 6.2 Delete the contents of the Spool folder and restart the Print Spooler service
- 7. Use the built-in Printer troubleshooter
- Why does my computer say it Cannot connect to the printer?
- What to do if I get the Windows cannot connect to printer 0x0000011b error?
- How to make sure that my printer is working?
- How do I know what IP address my printer is on?
- How to access the printing preferences in Windows 10?
1. Check if your printer is an Unspecified Device and update the drivers
1.1 Find out if your printer is listed as an Unspecified Device
- Click the Start button, type control, and select Control Panel from the results.

- Choose Devices and Printers.

- Scroll down and see if your printer is under the Unspecified section.
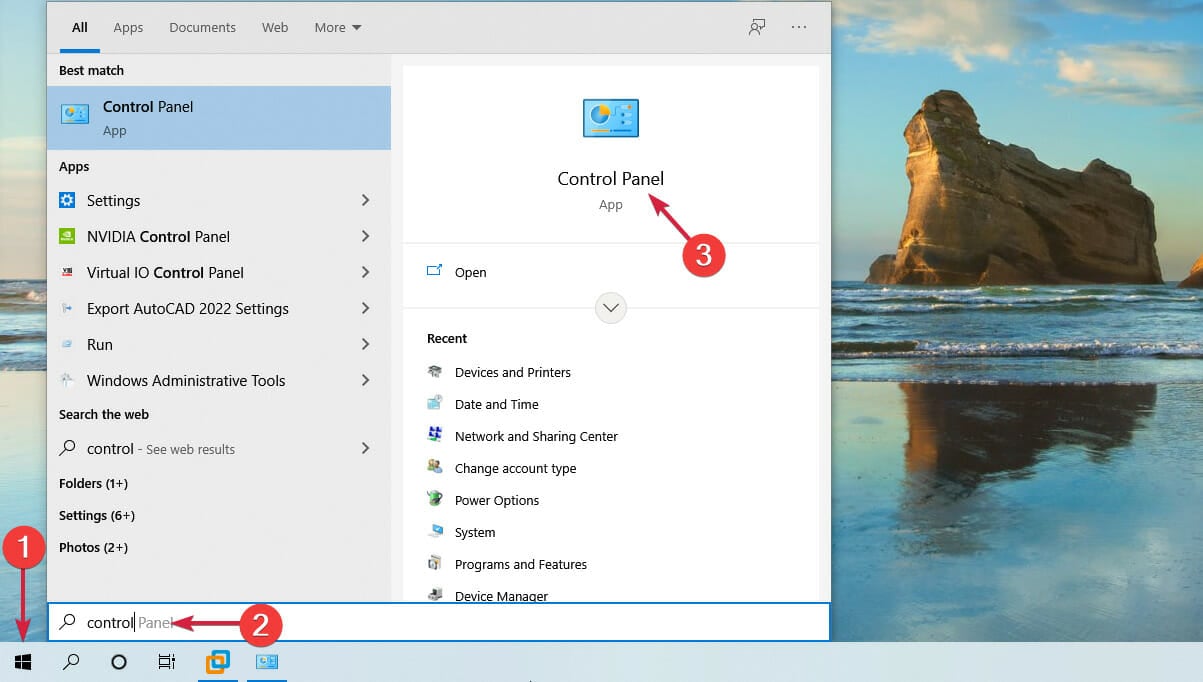

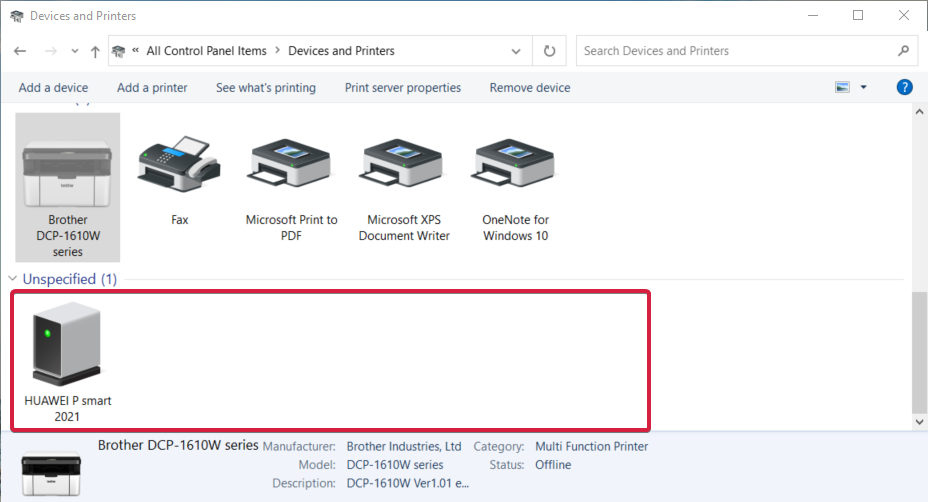
We recommend performing the next step if you see your printer in the Unspecified section.
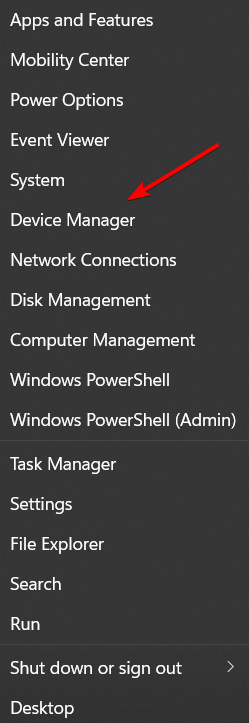
1.2 Update drivers
- Right-click the Start button and select Device Manager from the list.

- Expand the Printers or Printer queues, find your printer in the list, right-click it, and select Update driver. If you don’t find it in the mentioned sections, you can also look under USB controllers or LPT on your PC.

- Now select Search automatically for drivers.
- If the system finds a new driver, it will install it, and you will have to restart your PC for the changes to take effect.

If you updated or upgraded to Windows 10, you might have to update your current printer driver.
Downloading and installing the driver manually is also an option to consider. Do this if Windows doesn’t automatically find a driver update for your printer or you don’t have an installation disk.
You can check the manufacturer’s website and find your printer’s latest driver. And if you have the installation disc, it may contain the software for installing a driver for your printer.
Another method you can use to update your drivers is a tool such as Outbyte Driver Updater. Install it, and you’ll automatically update all outdated drivers with just a few clicks.
This method is perfect if you don’t want to search and download drivers manually, so be sure to try it out.
⇒ Get Outbyte Driver Updater
2. Uninstall and reinstall your printer
2.1 Uninstall the printer
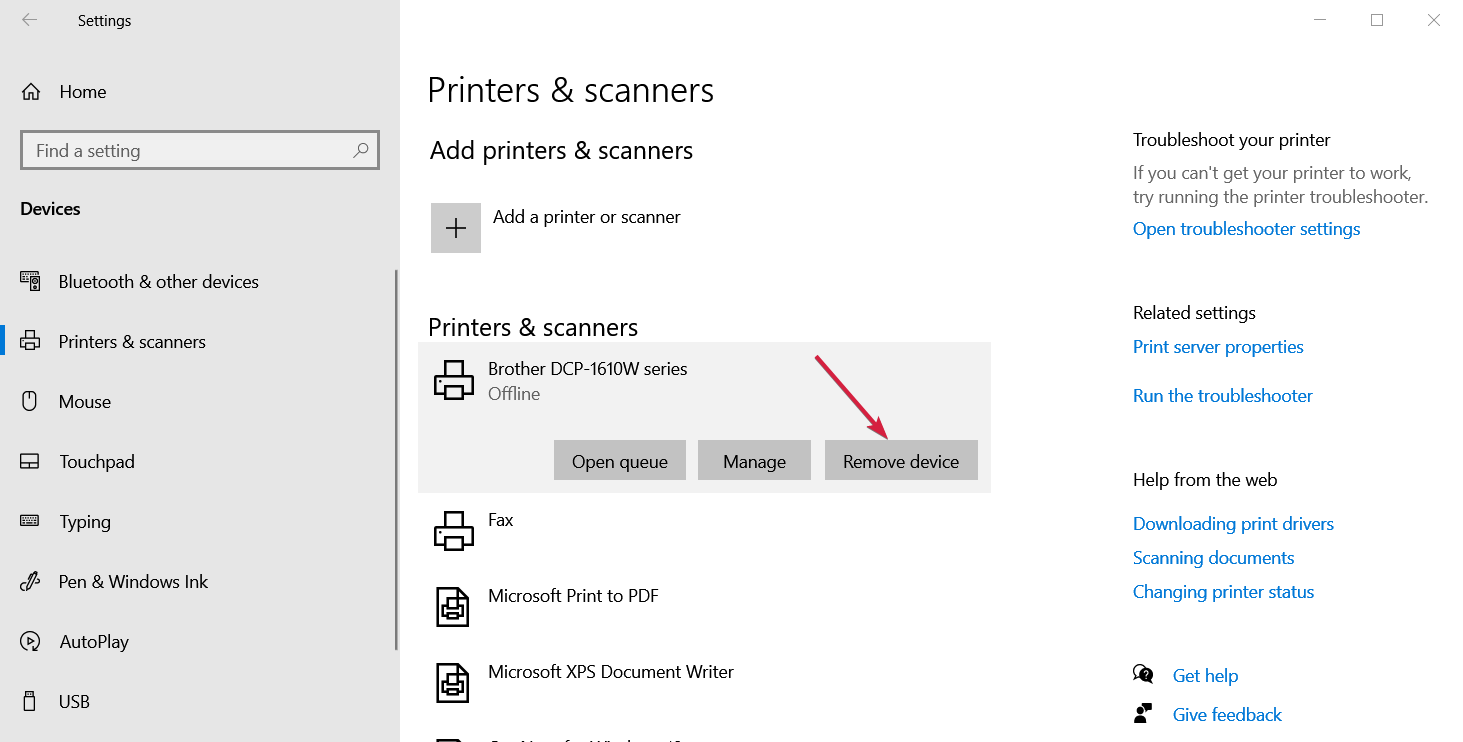
- Select Start and click on Settings.
- Choose Devices.

- Click Printers & Scanners on the left pane.
- Find your printer and click on it, then select Remove device.

In case you see Windows cannot connect to the printer in Windows 10, this solution will help.
If you have problems with this step, we also have an article on what to do if you can’t remove the printer in Windows 10.
2.2 Reinstall the printer
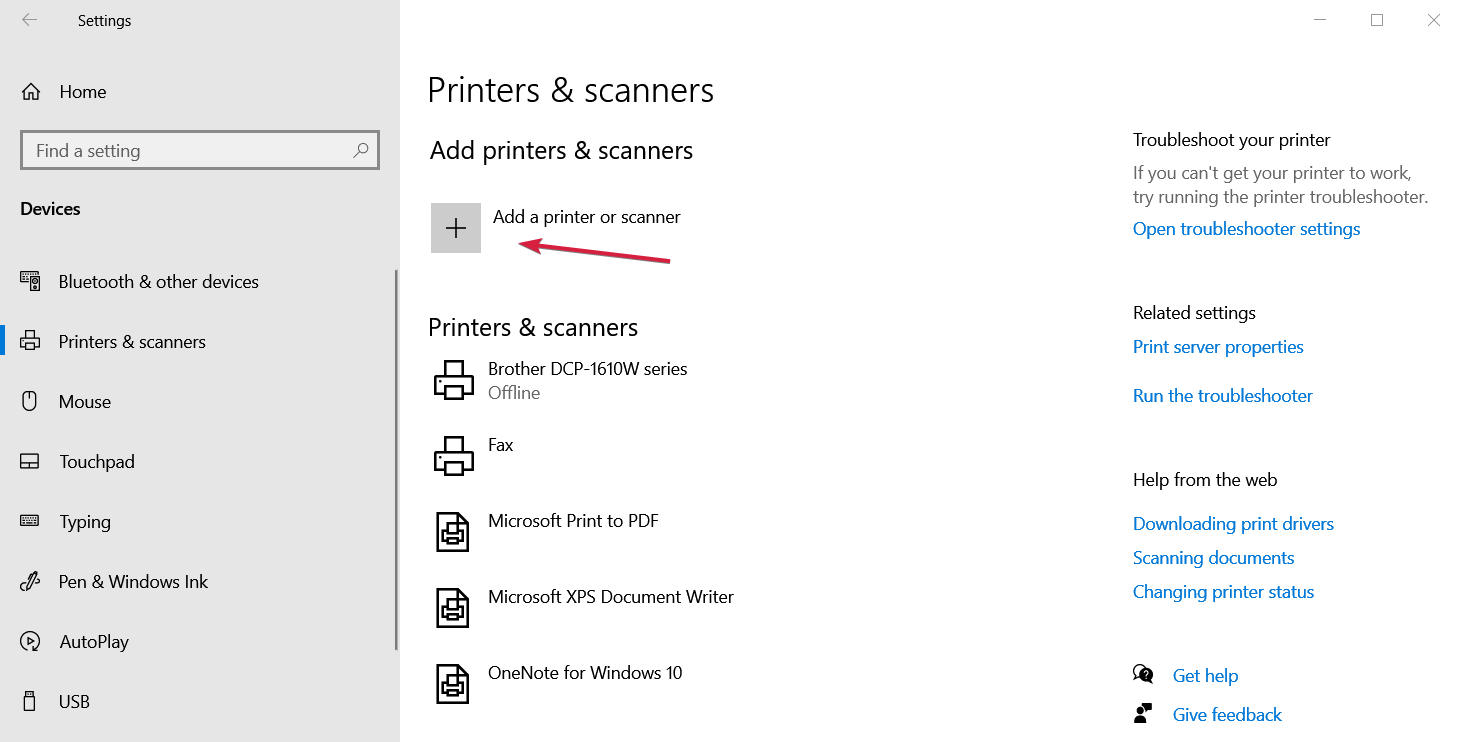
- Click the Start button and select Settings.
- Choose Devices.
- Click Printers & Scanners on the left pane.
- Select Add a printer or scanner.
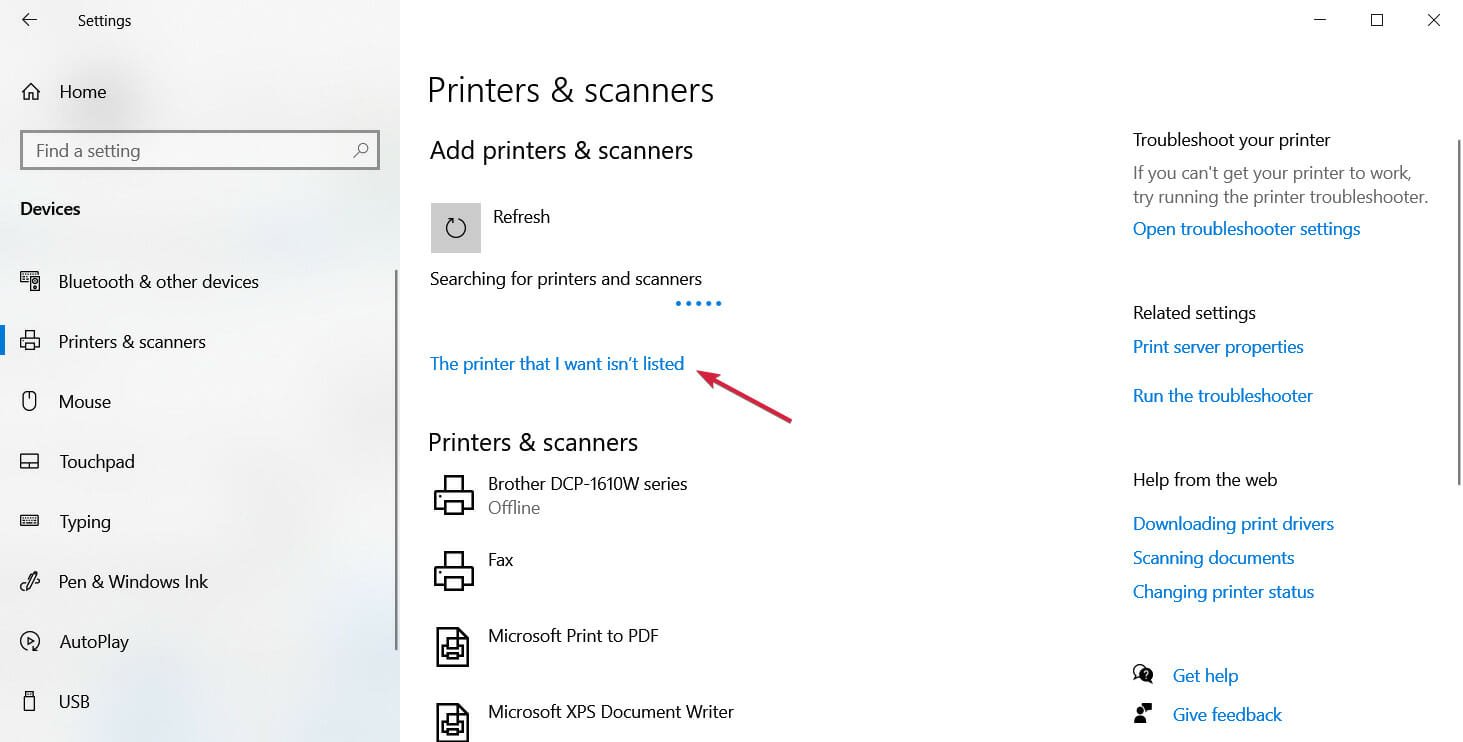
- If the system detects your printer, select it and go on with the installation. If not, you can click on The printer I want isn’t listed.
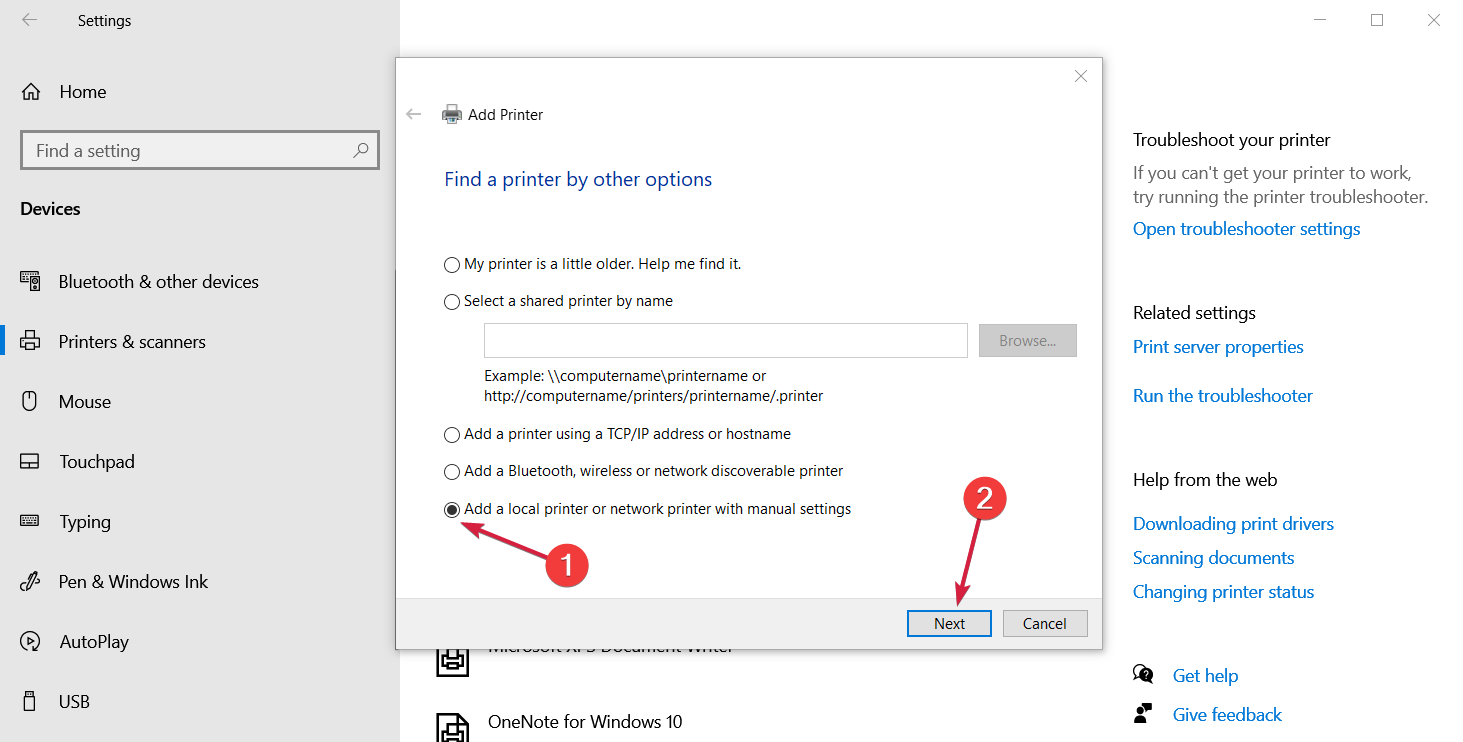
- Now you have plenty of options for every situation, including a network or a Bluetooth printer. In our example, we chose to Add a local printer because it’s the most common. Select the appropriate option for you and click Next.
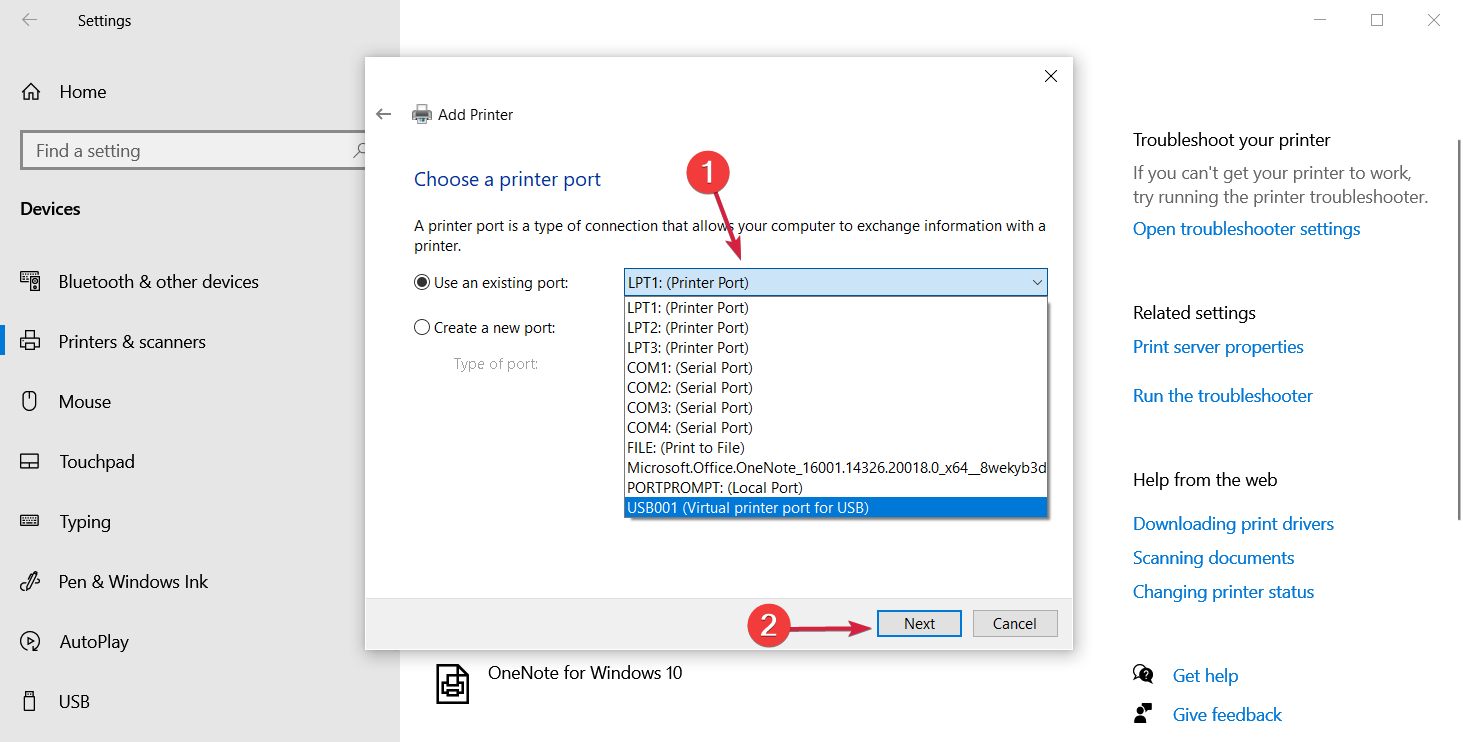
- Next, select the port with your printer from the drop-down menu and click Next. Nowadays, printers use USB ports, which may be different in your situation. If you don’t know which one is, consult the printer documentation or contact the manufacturer for the information.
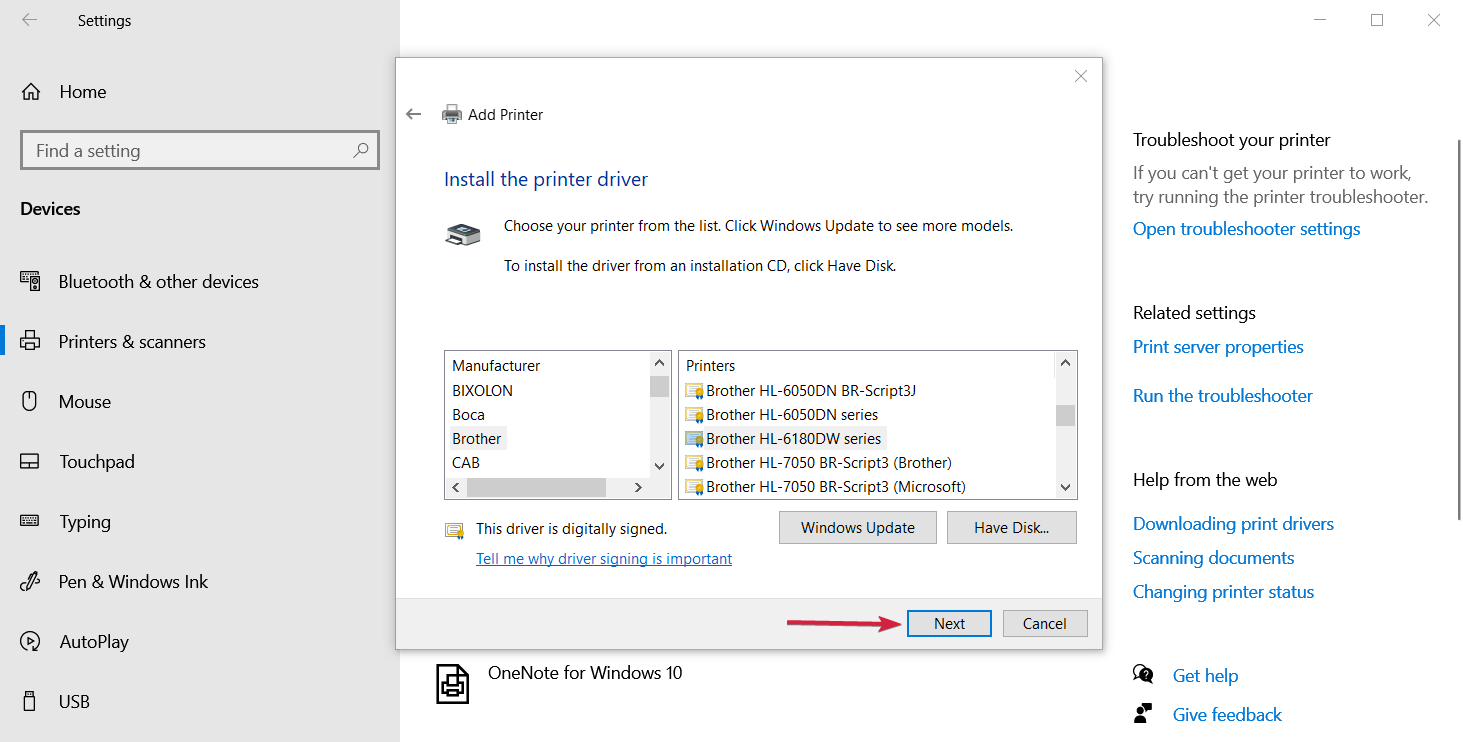
- Try to find the manufacturer and the model in the list. If there aren’t many to choose from, clicking the Windows Update button will add a lot more, but the process takes a few minutes.
- You can also click on the Have Disk button if you have the software disk that came with the printer. After you select the printer, click Next.
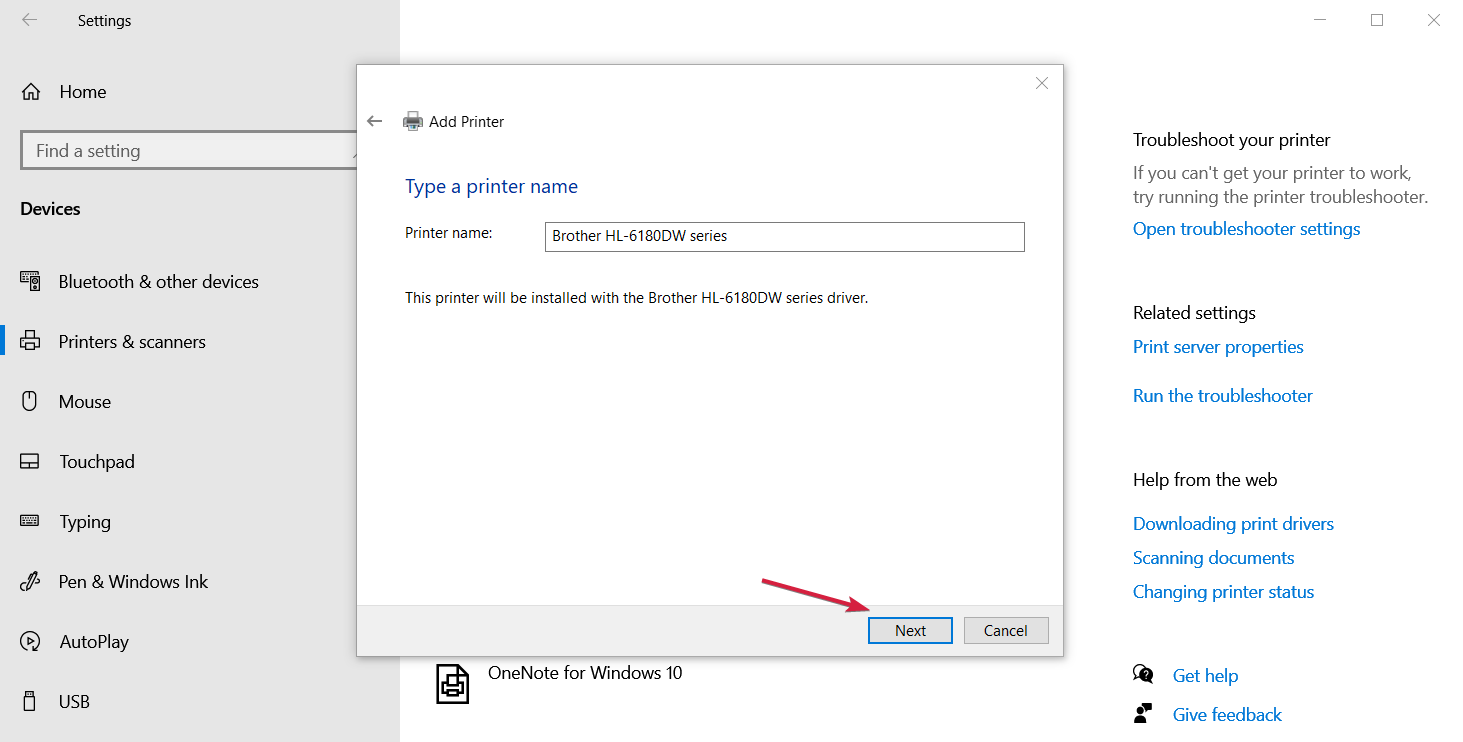
- Select the printer name (it’s already there, but you may change it) and click Next.
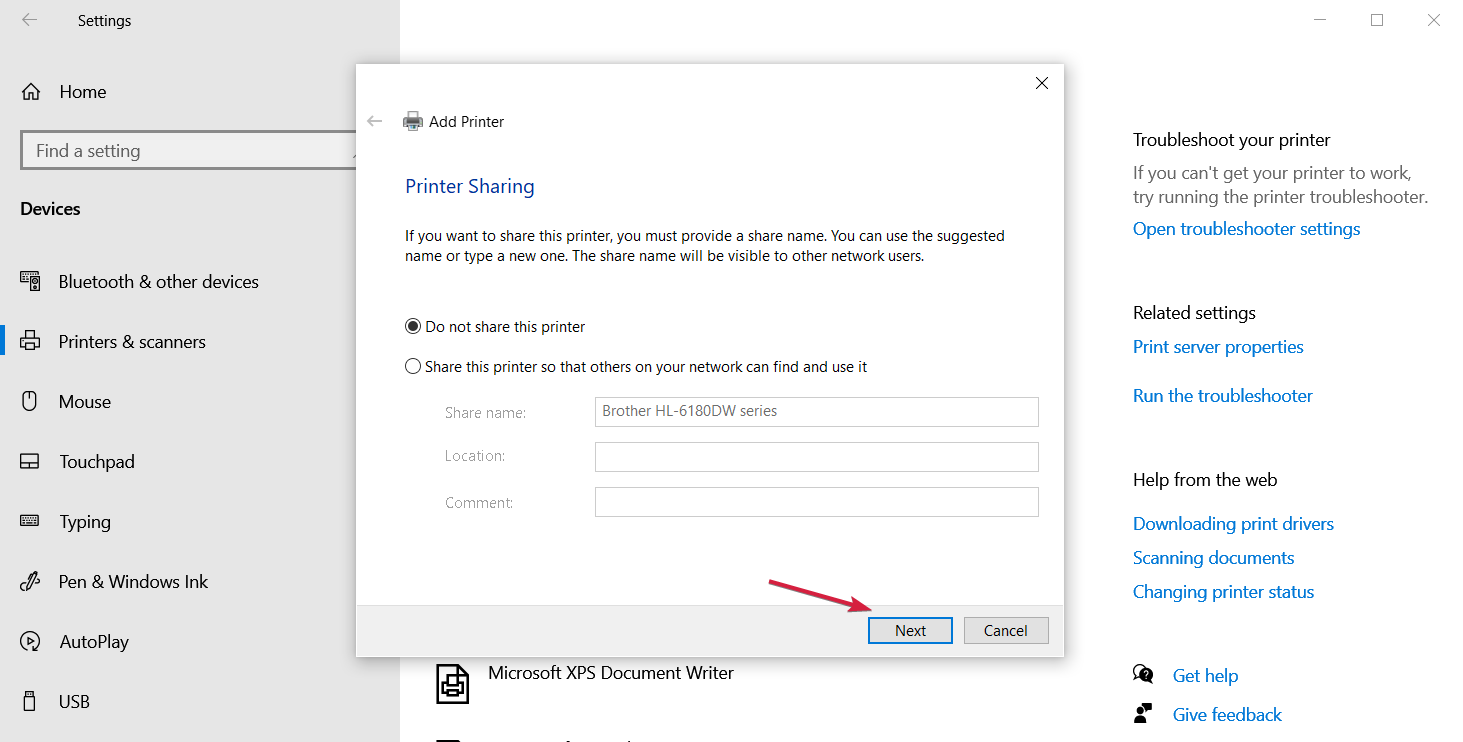
- The system will install the printer in a few seconds. You will be able to decide if you want to share the printer or not but in the end, click Next.
- You can click the Print a test page button in the last window and select Finish. Printing the page will tell you if the printer works, so we recommend using it.

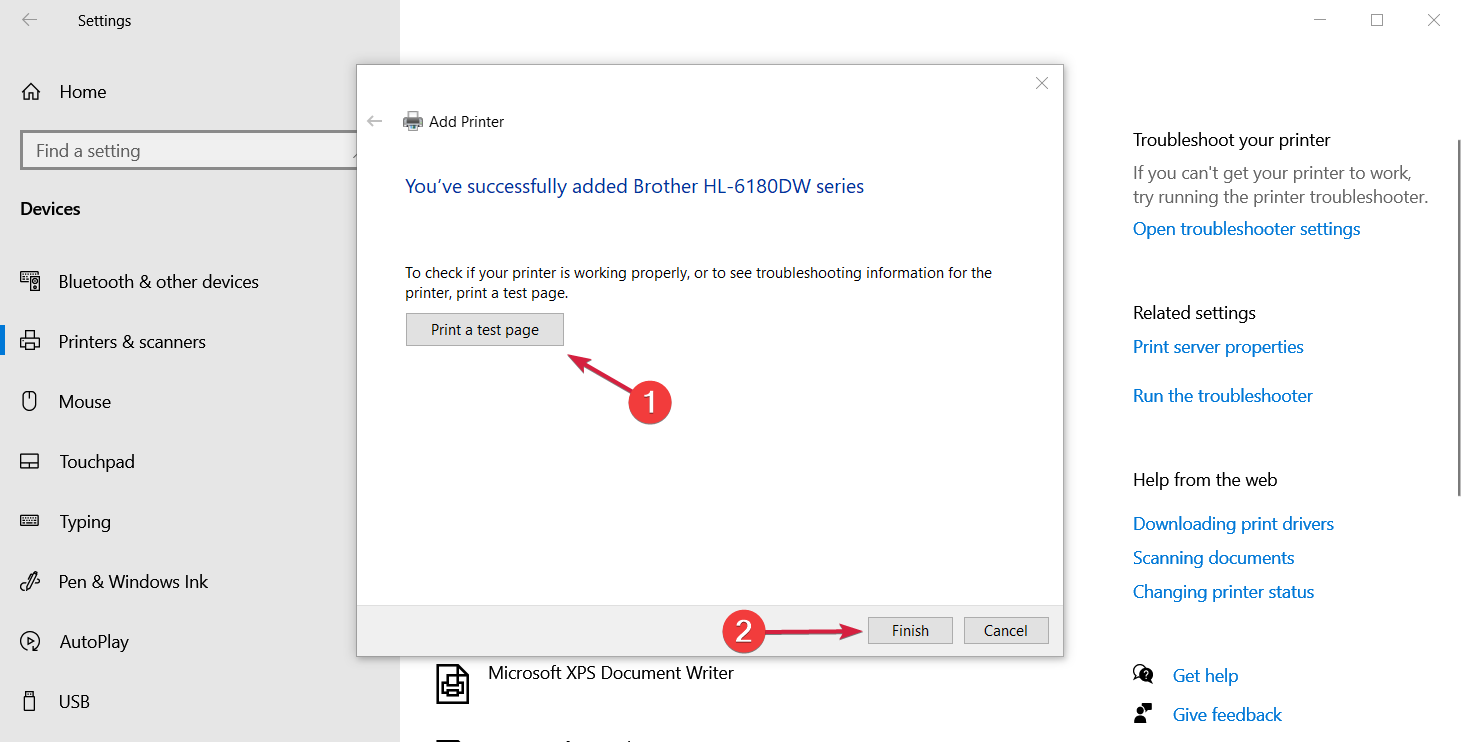

NOTE
You can print a test page to ensure the printer works correctly. Check the device’s manufacturer’s website for troubleshooting or driver updates if it is installed but doesn’t work.
To connect to a local printer, plug in the printer’s USB cable to an available USB port on your computer, then turn on the printer.
3. Temporarily disable your antivirus security software
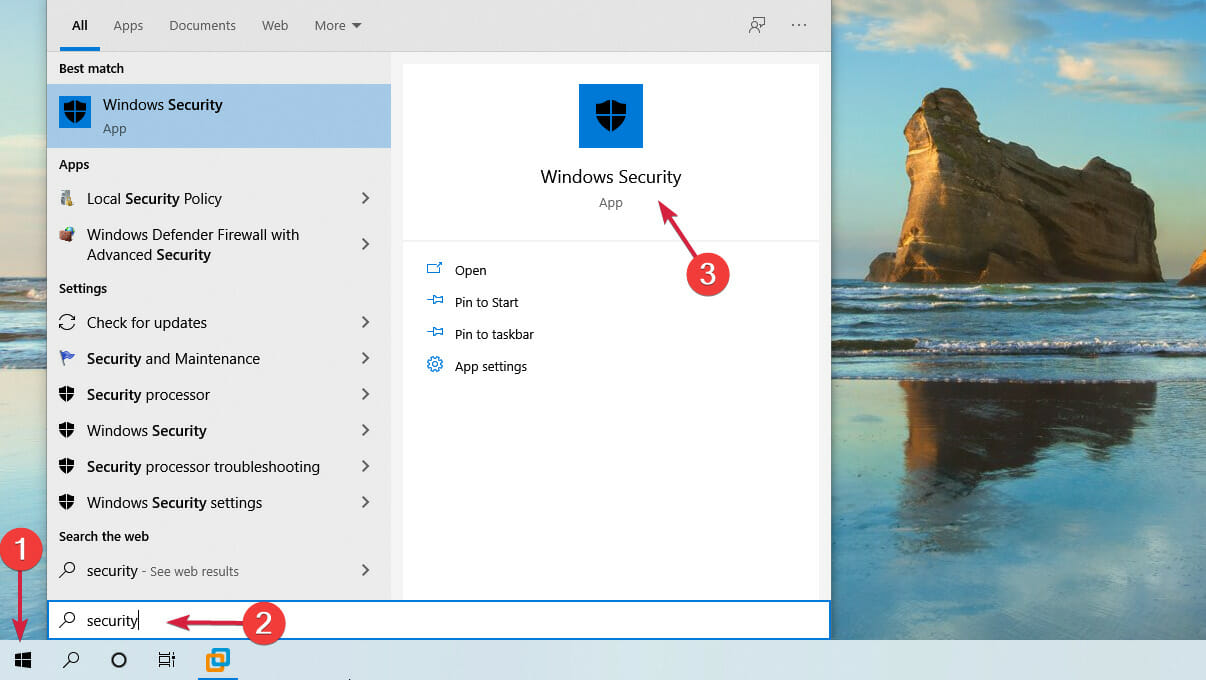
- Click the Start button, type security, and click on Windows Security from the results.

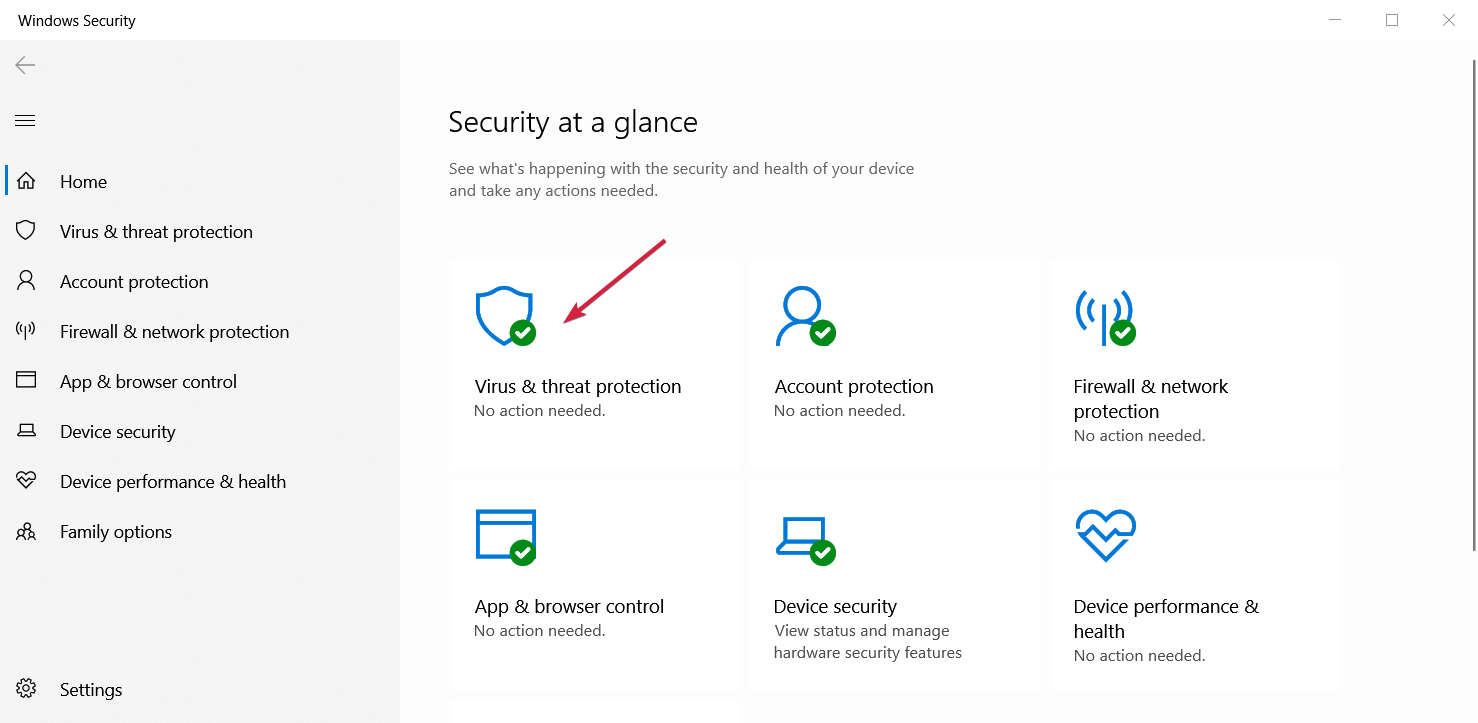
- Now select Virus and threat protection.

- Scroll down and click on Manage settings under Virus & threat protection settings.
- Turn off Real-time protection.

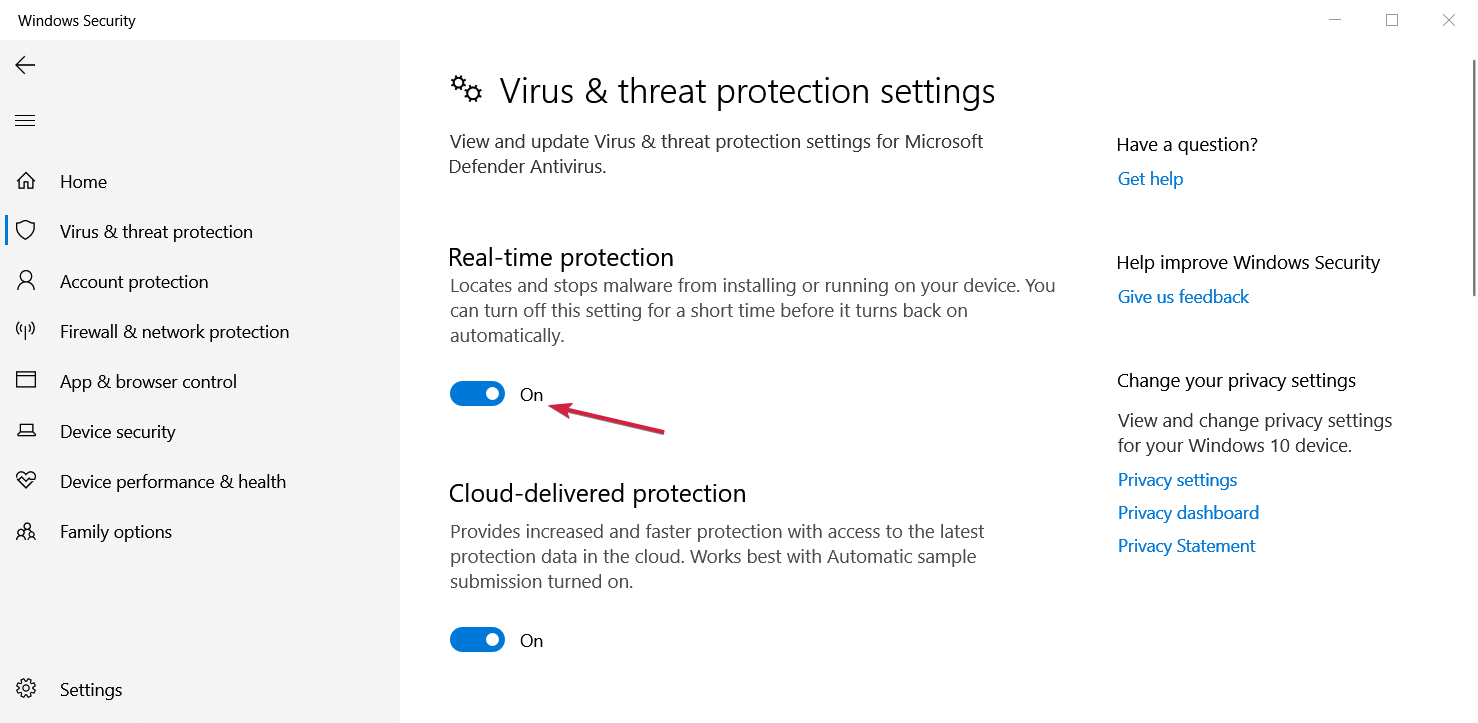
In this solution, we have explained how to turn off the essential protection from your system, Microsoft Windows Defender.
How we test, review and rate?
We have worked for the past 6 months on building a new review system on how we produce content. Using it, we have subsequently redone most of our articles to provide actual hands-on expertise on the guides we made.
For more details you can read how we test, review, and rate at WindowsReport.
However, if you have a third-party antivirus installed, the Windows Defender protection is already bypassed, and you will have to disable that antivirus instead.
Try looking for the disable feature in the main window of your antivirus or on its settings window. Don’t worry; all of them have an option to injure themselves.
- Error Printing message in Windows 10/11 [3 Steps to Fix]
- Fix: Printer in Error State [Brother, Epson, HP, Canon]
- Fix: Error printing in Windows 10/11 [3 Easy Steps]
Another option is to uninstall third-party software on your PC, such as computer cleaners or antivirus tools.
When protecting your PC – use an antivirus- temporarily disable it because you need it to prevent your computer from security threats.
Immediately after fixing the connection error, you can enable it back. However, if the antivirus is indeed causing this issue, perhaps this is a good moment to consider switching to a different one.

Editor’s tip
If you’re looking for a reliable antivirus that won’t interfere with your system, give it a try to ESET Internet Security.
- Fix: Credentials Supplied Are Not Sufficient Error on Windows 11
- 4 Ways to Fix PCL XL Error Subsystem Kernel on Windows
4. Check Default printer settings
- Click Start and select Settings.
- Choose Devices.
- Click Printers & Scanners on the left pane.
- Scroll to Let Windows manage my default printer and uncheck the box.

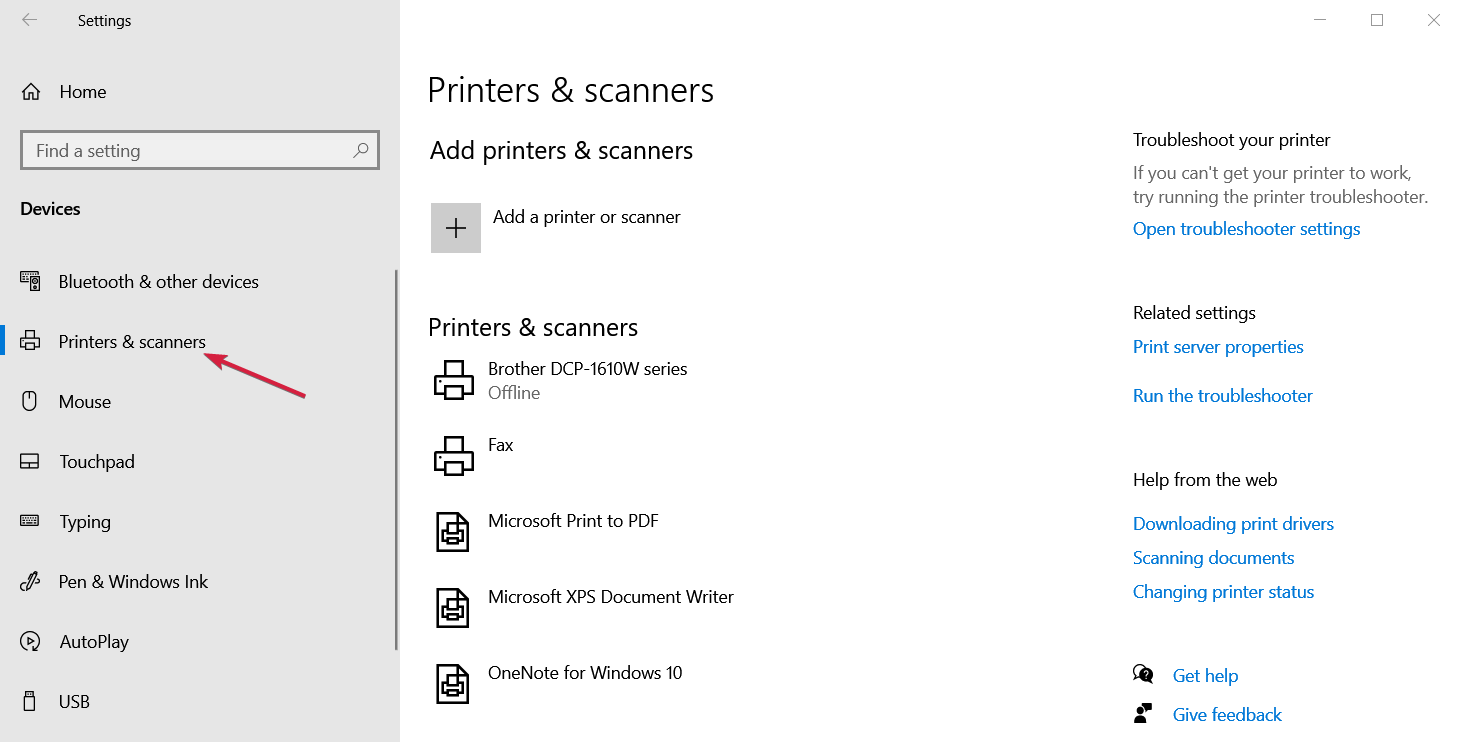
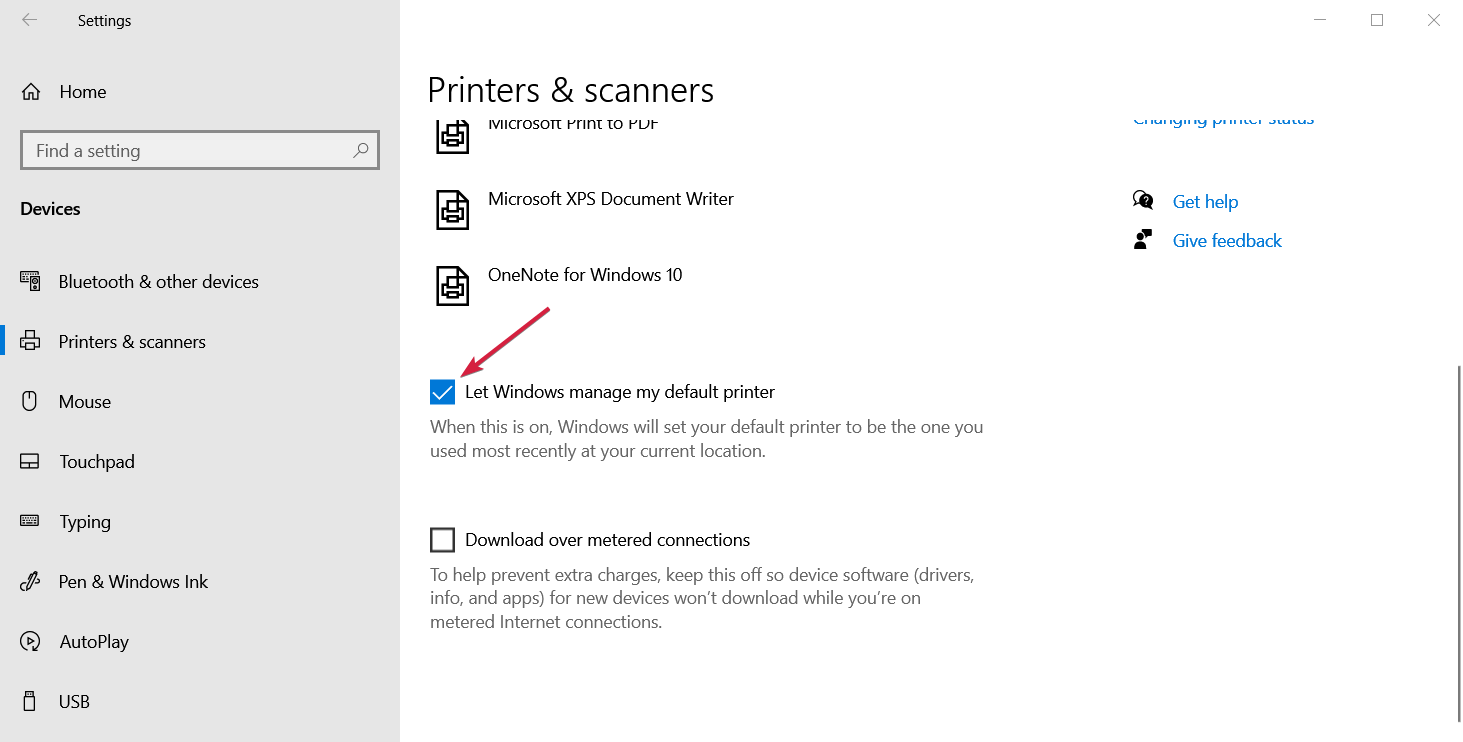
If your printer keeps switching from the default one, you can change this setting on Windows 10 from the current printer to the one you want to use.
5. Perform a Windows Update
- Go to Start, type update, and click on Check for updates from the results.

- Hit the Check for updates button from the right.

- If the system finds new updates, they will be downloaded and installed, but restart your PC to complete the updates.

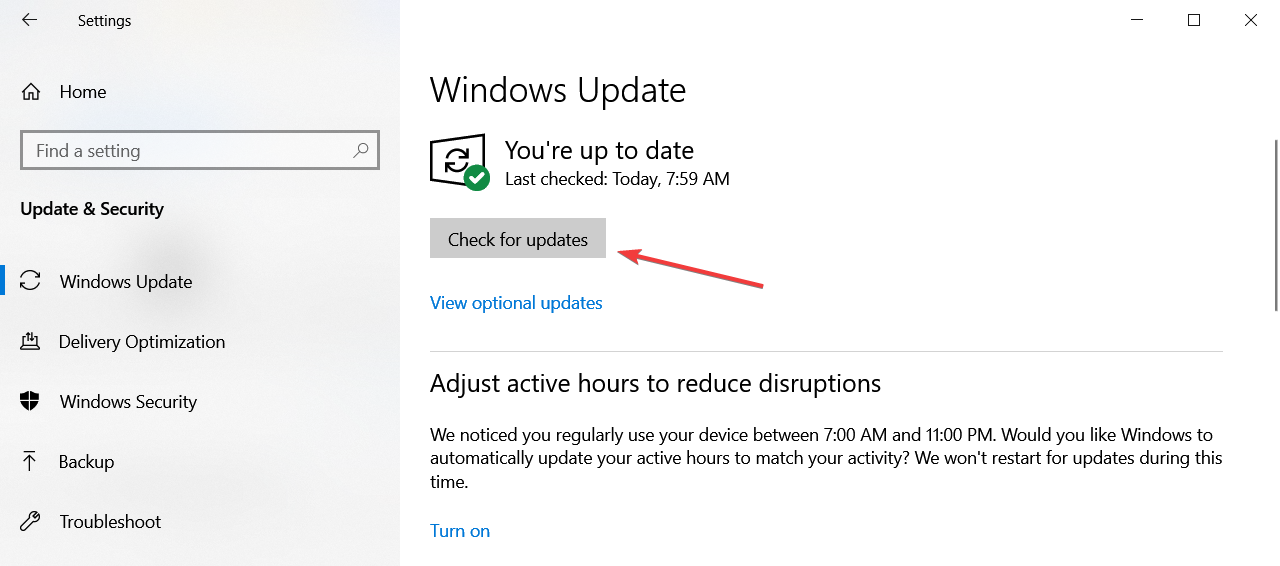
You must keep updating Windows with the latest system updates and drivers for a healthy computer. This also helps resolve any issues or difficulties you may be experiencing.
If you have trouble updating your OS, we have an excellent guide explaining what to do if the Windows Update is not working correctly.
6. Clear spooler files and restart spooler service
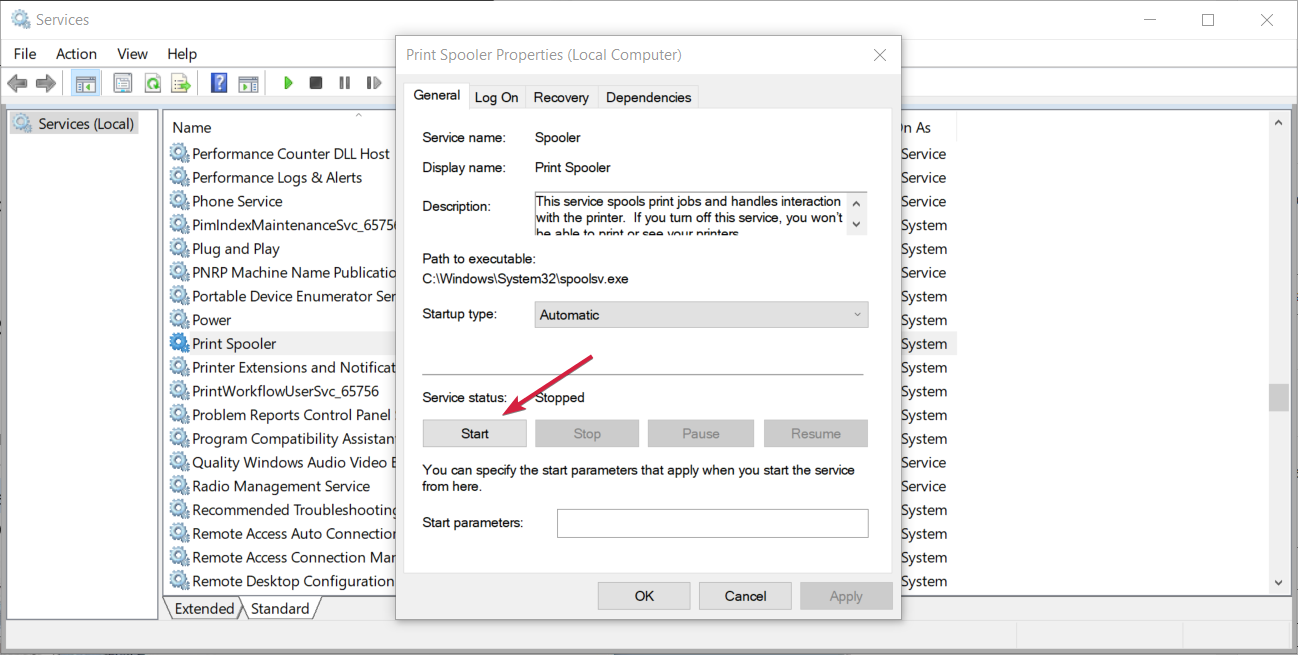
6.1 Stop the Print Spooler service
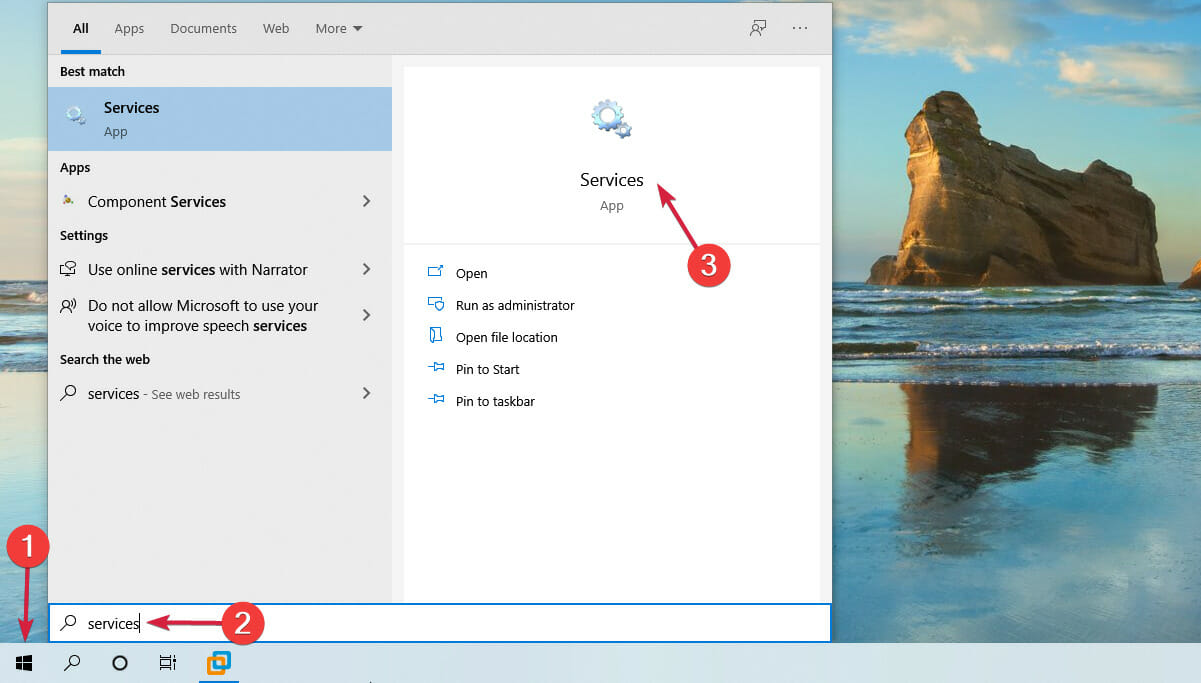
- Click Start, type services, and click on the app from the results.

- Under Services, double-click Print Spooler.

- Select Stop, then OK.

6.2 Delete the contents of the Spool folder and restart the Print Spooler service
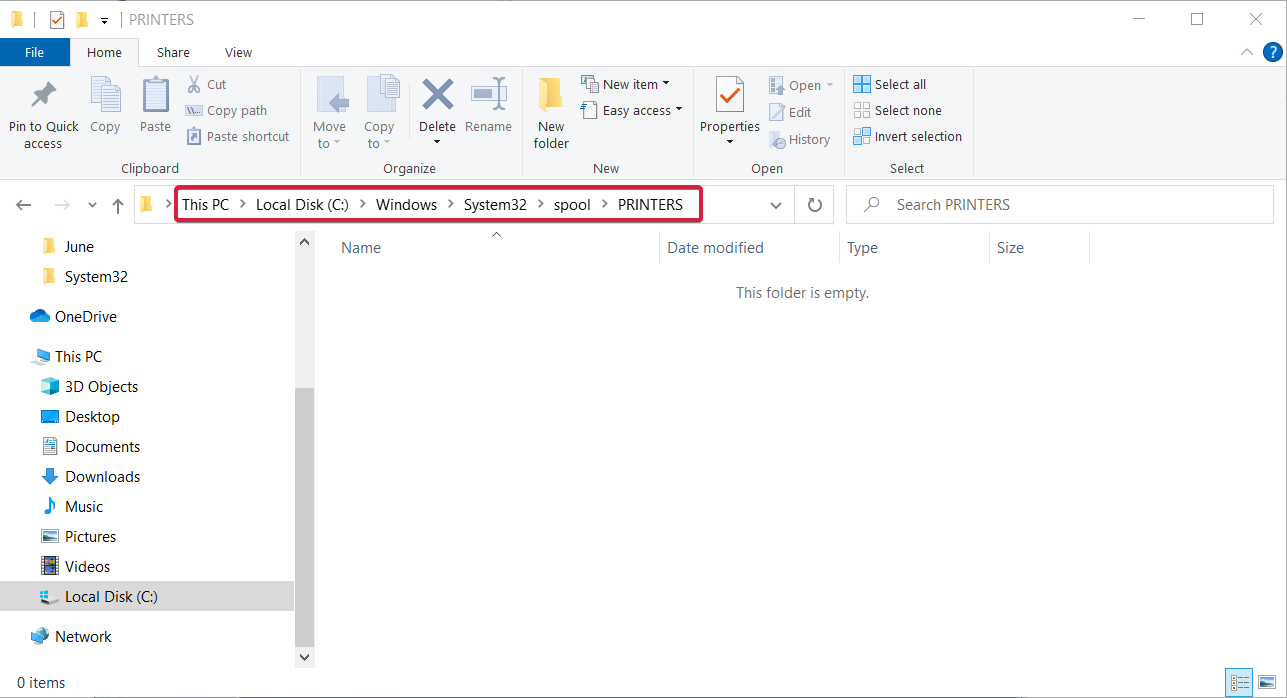
- Press the Windows key + E to start File Manager, then go to the following path (you will need administrative privileges to access the folder):
C:\\Windows\System32\spool\PRINTERS
- Delete all the folders in the folder if you find any. In our example, you can see that the folder is empty, but it might be different in your case.

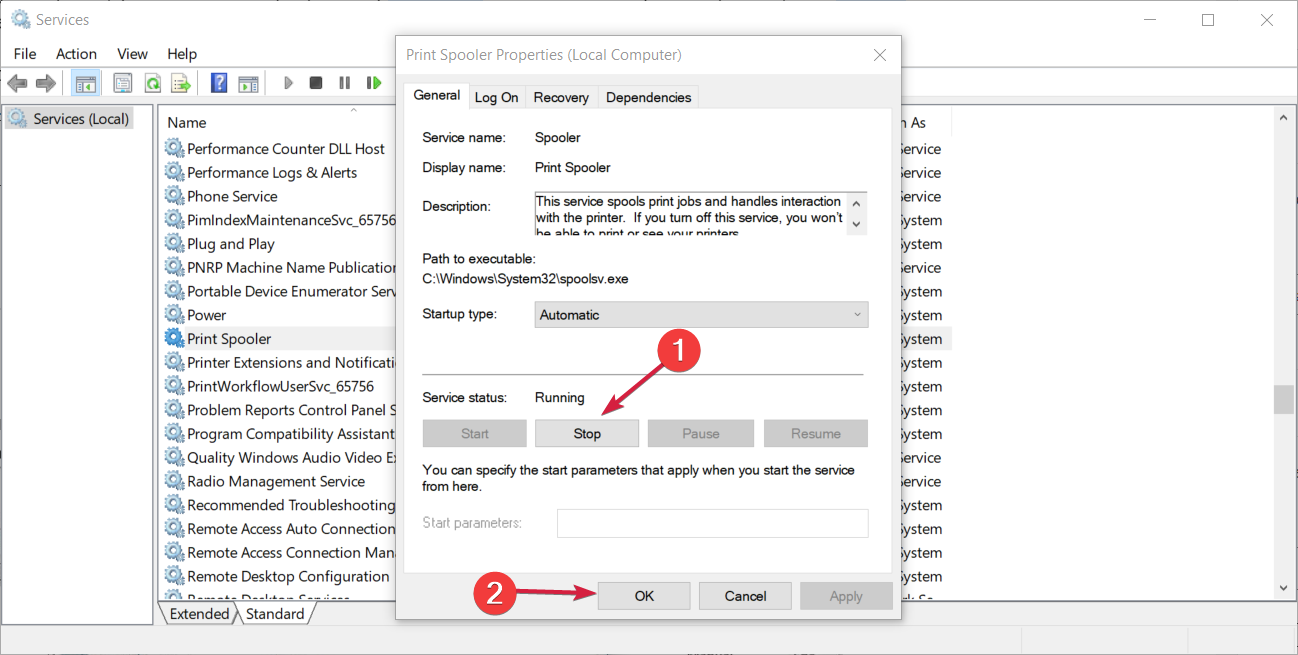
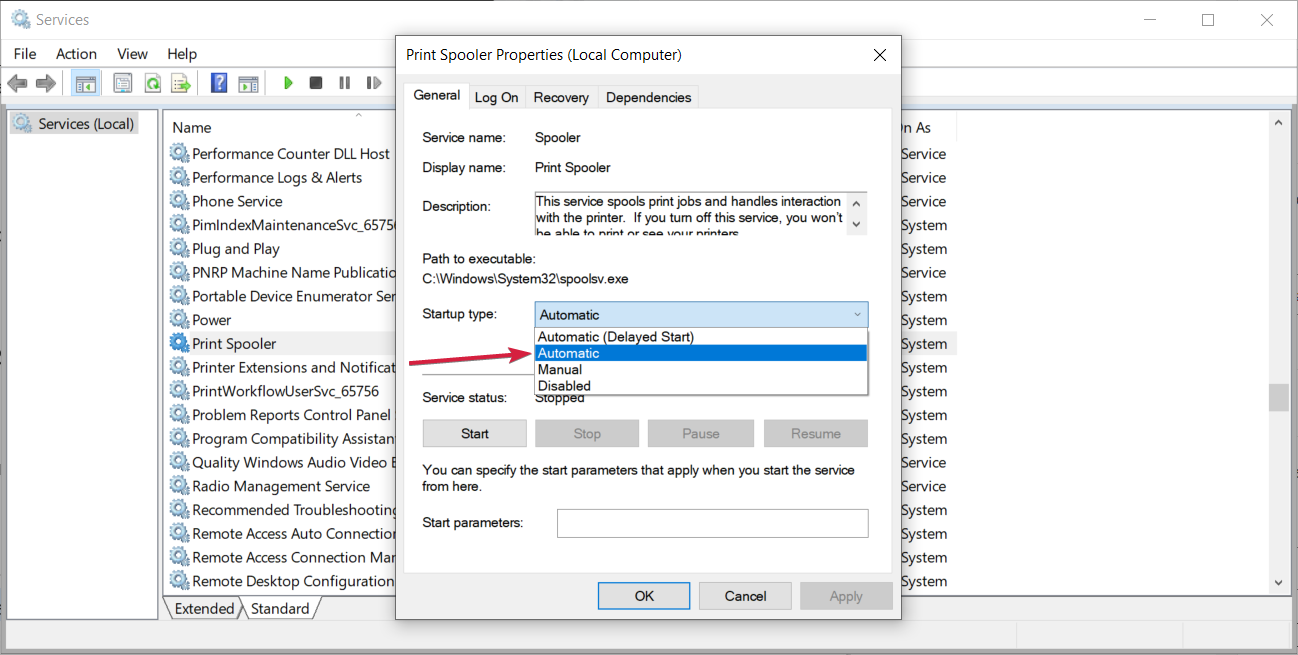
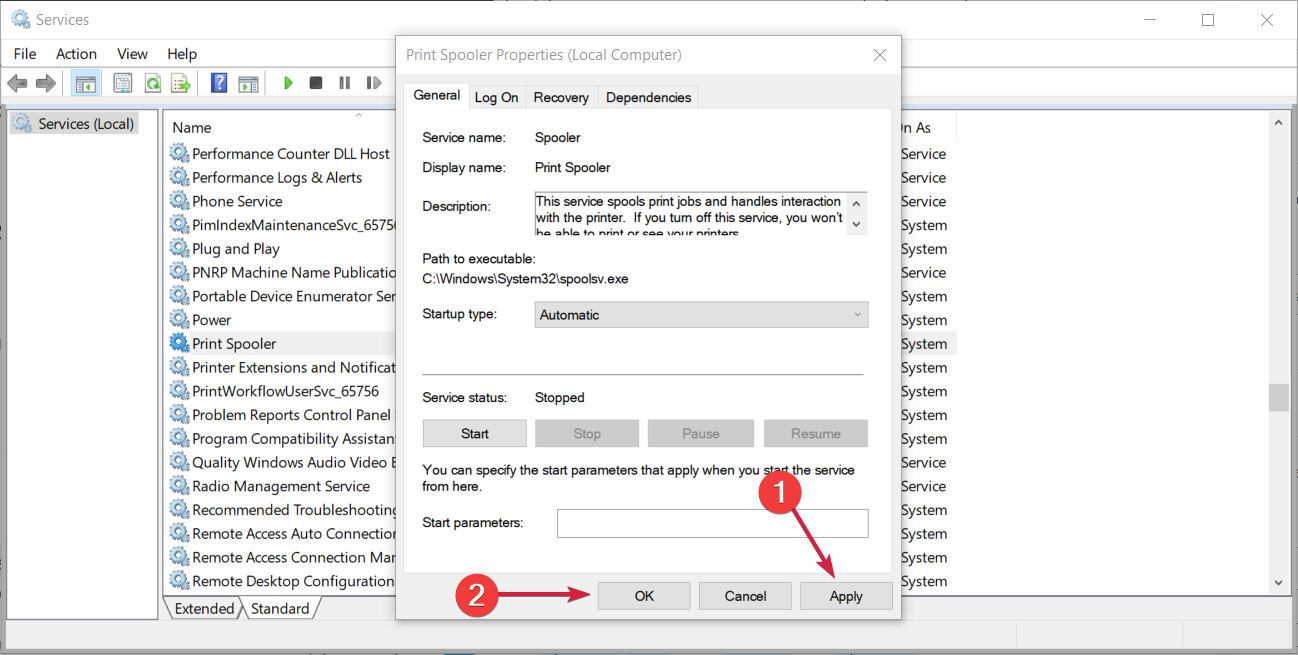
- Click the Start button, type services, and select the Services app from the results.
- Under Services, double-click Print Spooler again.
- Click Start.
- Go to the Startup Type list and select the Automatic box.
- Click Apply, then click OK.

We also have a helpful article that will guide you on what to do if the Print Spooler keeps stopping on Windows 10.
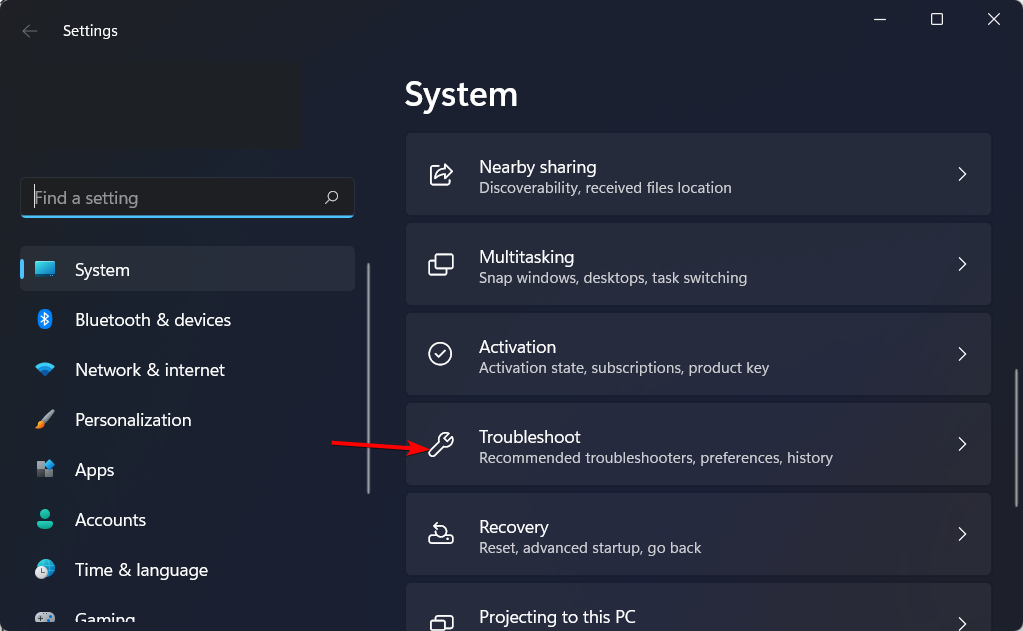
7. Use the built-in Printer troubleshooter
- Press Windows + I, then go down to the Troubleshoot section and click it.

- Choose Other troubleshooters from the right side.
- Find the Printer troubleshooter and click Run next to it.

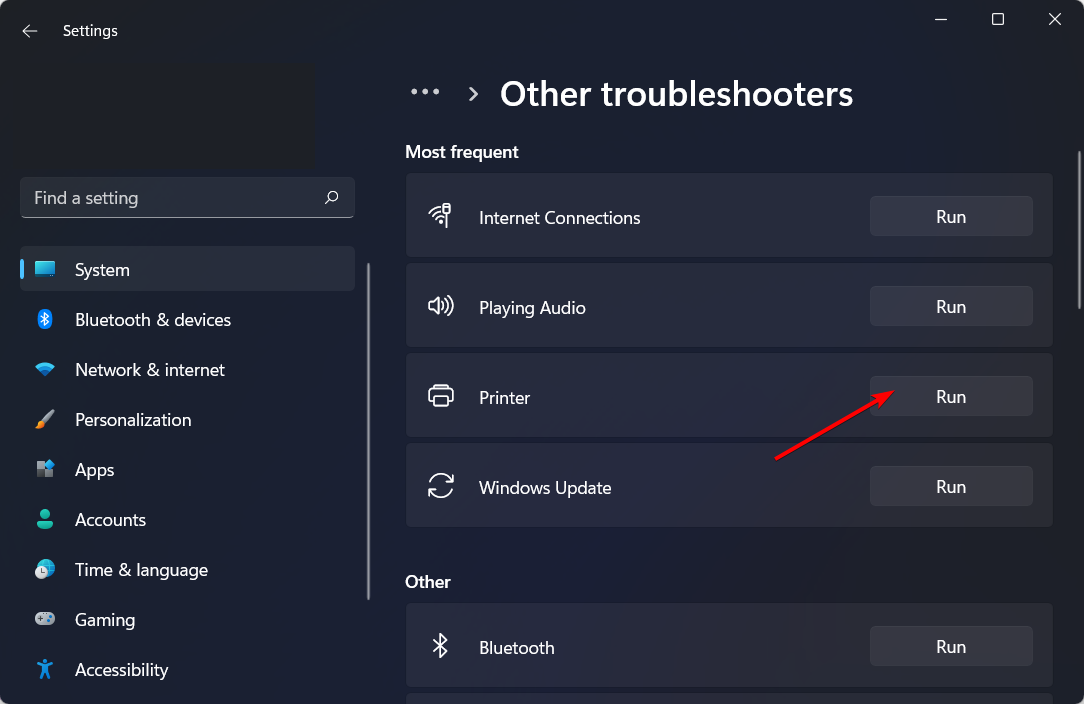
The Windows built-in troubleshooter is specialized in finding printer issues and offering fixes to those errors.
Thus, it is one of the most efficient and fast solutions you can try if you come across Windows cannot connect to the printer in Windows.
We recommend that you look at our post on the seven best printers compatible with Windows 11 in case you are looking for an extra one.
Why does my computer say it Cannot connect to the printer?
There are many causes for the Windows not connecting to the printer issue. It’s possible that your USB cable is broken or your computer just isn’t recognizing your printer.
Moreover, there might be an issue with the driver for your printer, or your Windows operating system needs an update. The antivirus software you’re using is another possible cause since it might interfere with your printer.
Note that our users reported many similar issues with their printer, which we will cover below. Some of the most common ones are the following:
- Operation failed with error 0x00000a Windows cannot connect to the printer – This problem manifests itself due to the fact that the CryptFindOIDInfo method returns a null pointer.
- Windows cannot connect to the printer in network – Turn on the function on the computer that is called the Internet Printing Client.
- No printers were found, Windows cannot connect to the printer – This issue is most commonly brought on by a clogged print queue on the computer where the printer is installed.
- Windows cannot connect to the printer there is not enough memory – This happens when the computer does not have enough memory available for the All-in-One to print. This can happen when there is not enough free space on the hard drive.
- Access is denied, Windows cannot connect to the printer – Your user account does not have the appropriate permissions to establish a connection to the printer.
- Windows cannot connect to the printer 0x0000011b – It’s possible that the print spooler service is frozen.
- Shared printer, Windows cannot connect to the printer – Remove your printer’s installation and then reinstall it.
- Windows cannot connect to the printer 0x0000007c – As it turns out, this issue is purportedly triggered by an update that was provided by Microsoft; as part of their security updates. Microsoft has released this update as part of their security updates.
If your Windows 11 shared printer is not working, then check out our dedicated guide for more help.
What to do if I get the Windows cannot connect to printer 0x0000011b error?
There are various printer errors on Windows, but most can be fixed by running a troubleshooter or updating your driver.
Some errors, such as printer error 0x000003e3, might require you to adjust your configuration; and ensure that your device is properly connected and configured.
If you’re unable to install the printer, you might have a driver problem; but it’s also possible that your device is damaged somehow.
How to make sure that my printer is working?
We have a couple of troubleshooting steps to perform to ensure that the printer and other components are working.
Many issues regarding the connection to the printer come from simple problems like a cable not being plugged in completely or other basic settings.
Although they seem evident to many of you, it’s no harm to check them out before getting into more complicated things.
➡ Make sure that your printer is powered and turned on
Ensure that the printer’s power cable is plugged into an electrical outlet. Also, ensure the printer is turned on from the power button. It should be a light or an indication on the screen.
➡ Connect the data cable properly
Sometimes, the data cable between your printer and computer may not be completely plugged in, so check both ends for proper connection.
You may also try another cable if you have any reason to believe the current one might have suffered any damage.
For wireless printers, turn on the wireless option from your printer, then run the wireless connectivity test from the menu option (if you have one).
➡ Turn on all network components
If you’re on a shared printer or network, ensure that all the components needed are turned on as well.
For instance, if a printer is shared through a PC in the network, then that PC should be turned on. Also, the router that connects the computer must be functioning correctly.
➡ Reboot your computer
Although this is not directly related to solving the problem with your printer, a reboot may solve many issues with Windows.
Just click the Start button, select the Power icon and choose Restart. Then, wait for the PC to reboot and see if there are any changes.
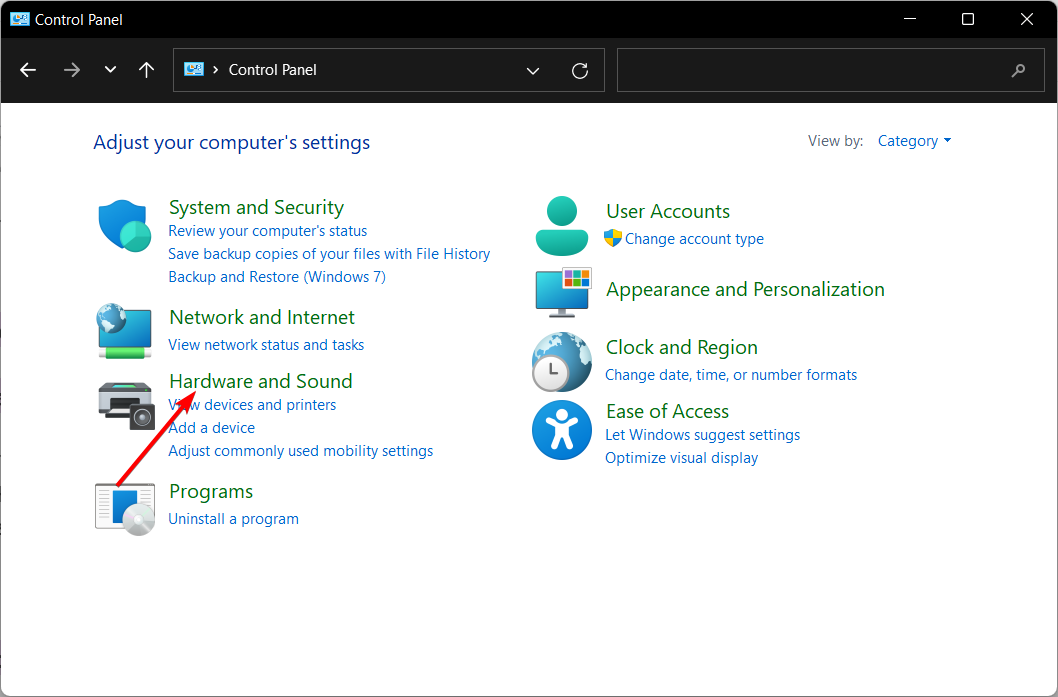
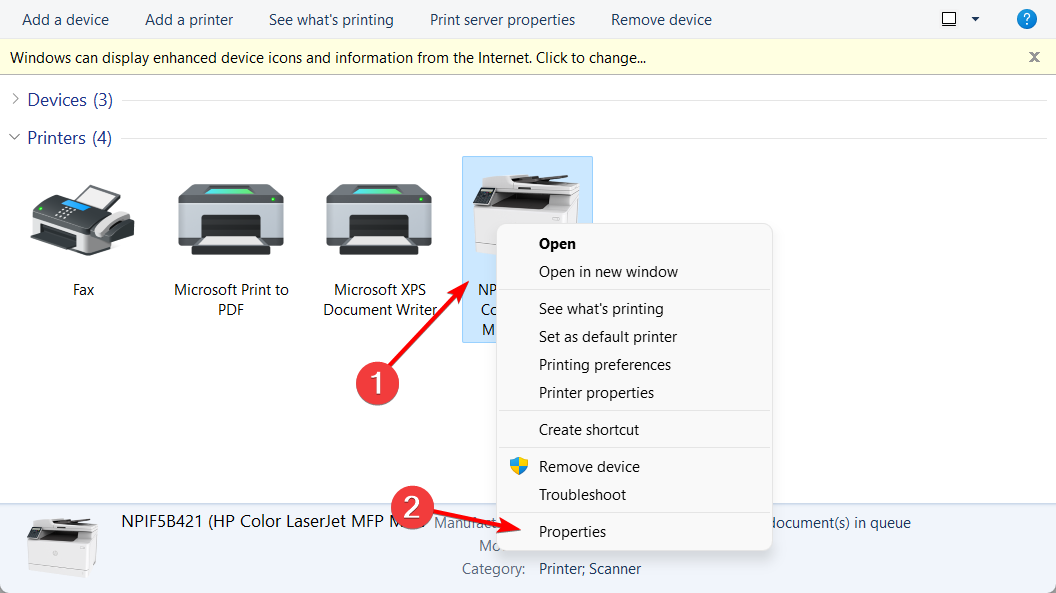
How do I know what IP address my printer is on?
- Press Windows, then type control and open the top result.
- Here, navigate to Hardware and Sound.

- Next, go to Devices and Printers.
- Right-click your printer and select Properties.

- Then look in the Web Services or Ports tab for your IP address.

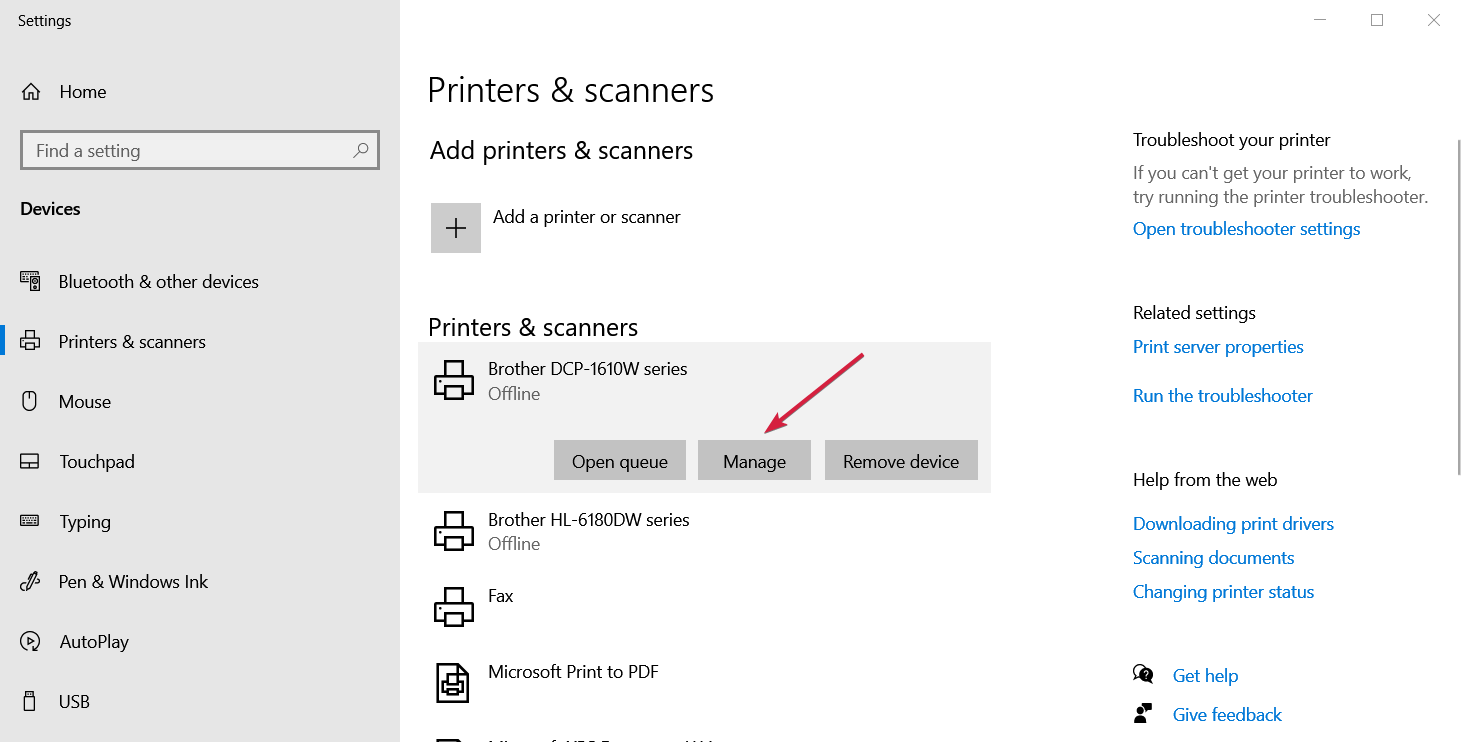
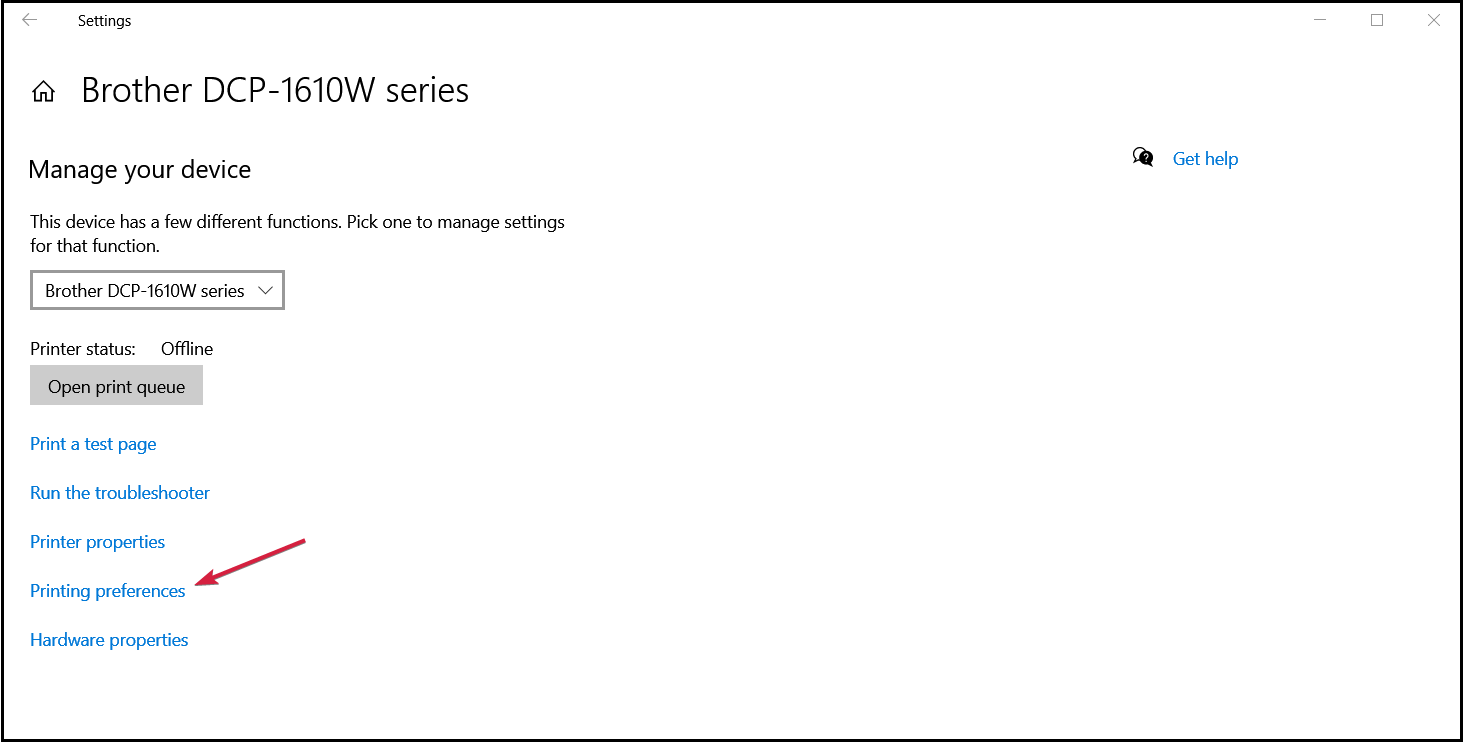
How to access the printing preferences in Windows 10?
If the printer comes with its software for printing, scanning, and management, it’s all simple, but configuring the printer may be tricky if you don’t have it anymore.
You can go to the manufacturer’s support webpage, look for your printer and download the software if available. If not, you can follow our little tip on changing the printing preferences.
- Click the Start button and select Settings.
- Select Printers and scanners from the left pane.
- Click on your printer and select Manage.
- Now choose the Printing preferences option.
- In the next window, you can tweak the settings as you like, but remember that it may look different for your printer model and manufacturer.

If none of our solutions worked, contact your printer’s manufacturer for more troubleshooting and support based on your specific issue.
Of course, trying other cables for your printer might also be helpful, including the power, data, and network cables that may be connected to your printer.
From our experience, cables can be affected by wear and tear and may cause many problems, including complete disconnection.
If your PC runs on Windows 10 S, some printers may not work well with it, or you may experience limited functionality with your printer.
We hope our solutions helped you solve this printer connection problem, and now you can continue your work without any issues. The fixes here will also work if Windows cannot connect to the printer in Windows 7
Because the main problem when it comes to such an issue is a malfunctioning driver, we also recommend consulting our guide on how to remove a corrupted printer driver.
Share with us your experiences in the comments section below, and write us any questions or suggestions you might have.
![]()
Fix Windows Cannot Connect to the Printer: If you are connected to a local network which shares a printer, it may be possible you may receive the error message “Windows cannot connect to the printer. Operation failed with error 0x000000XX” while trying to add the shared printer to your computer using Add Printer feature. This issue occurs because, after the printer is installed, Windows 10 or Windows 7 incorrectly looks for the Mscms.dll file in a subfolder different than the windows\system32 subfolder.

Now there is alreadya Microsoft hotfix for this issue but it doesn’t seem to work for many users. So without wasting any time let’s see how to actually Fix Windows Cannot Connect to the Printer on Windows 10 with the below-listed troubleshooting guide.
Note: You could try the Microsoft hotfix first, just in case if this work for you then you will save a lot of time.
Table of Contents
Make sure to create a restore point just in case something goes wrong.
Method 1: Copy the mscms.dll
1.Navigate to the following folder: C:\Windows\system32\
2.Find the mscms.dll in the above directory and right-click then select copy.

3.Now paste the above file in the following location according to your PC architecture:
C:\windows\system32\spool\drivers\x64\3\ (For 64-bit)
C:\windows\system32\spool\drivers\w32x86\3\ (For 32-bit)
4.Reboot your PC to save changes and again try to connect to the remote printer again.
This should help you Fix Windows Cannot Connect to the Printer issue, if not then continue.
Method 2: Create A New Local Port
1.Press Windows Key + X then select Control Panel.

2.Now click Hardware and Sound then click on Devices and Printers.

3.Click Add a printer from the top menu.

4.If you don’t see you printer listed click the link which says “The printer that I want isn’t listed.“

5.From the next screen select “Add a local printer or network printer with manual settings” and click Next.

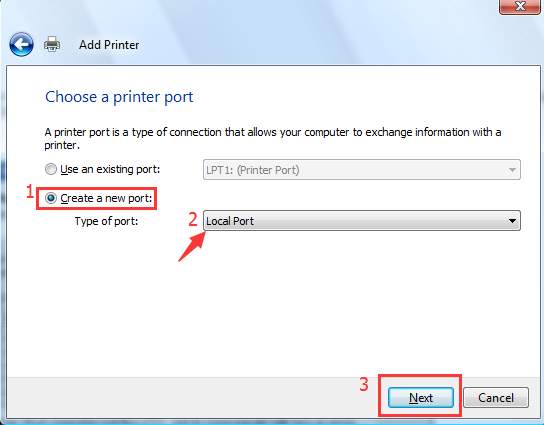
6.Select Create a new port and then from type of port drop-down select Local Port and then click Next.

7.Type the printer’s address in Printers port name field in the following format:
\\IP address or the Computer Name\Printers Name
For example \\192.168.1.120\HP LaserJet Pro M1136

8.Now click OK and then click Next.
9.Follow on-screen instructions to finish the process.
Method 3: Restart Print Spooler Service
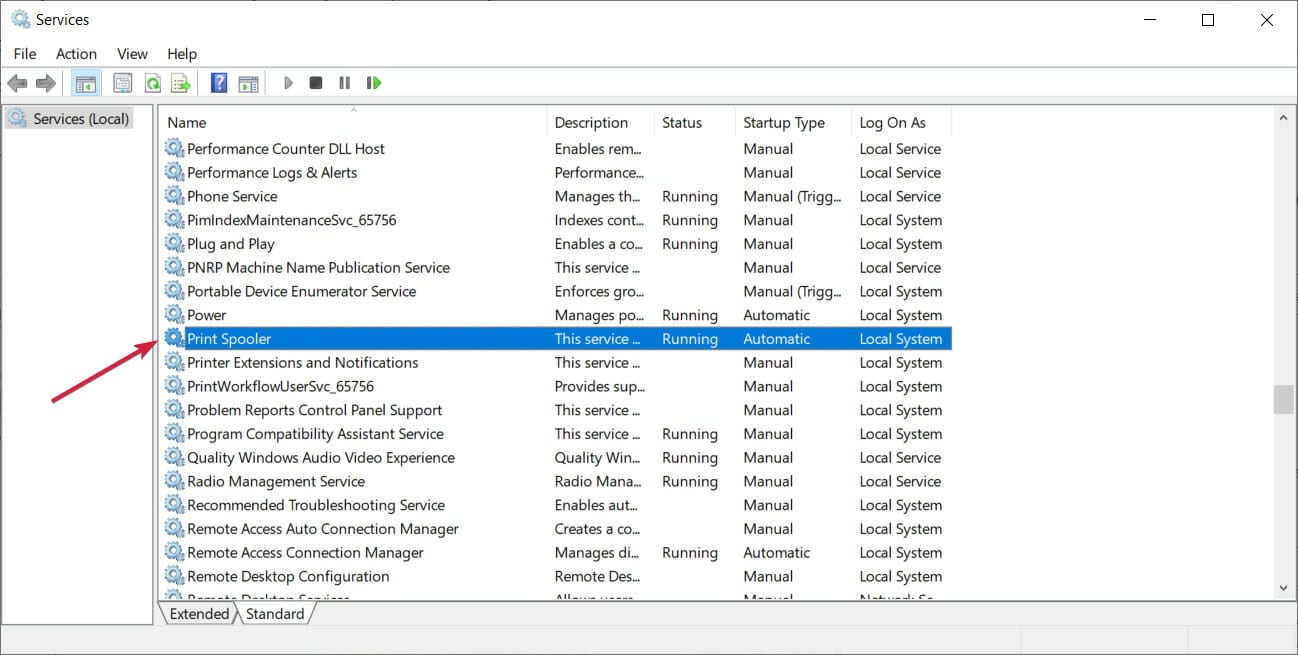
1.Press Windows Key + R then type services.msc and hit Enter.

2.Find Print Spooler service in the list and double-click on it.
3.Make sure the Startup type is set to Automatic and the service is running, then click on Stop and then again click on start in order to restart the service.

4.Click Apply followed by OK.
5.After that, again try to add the printer and see if the you’re able to Fix Windows Cannot Connect to the Printer issue.
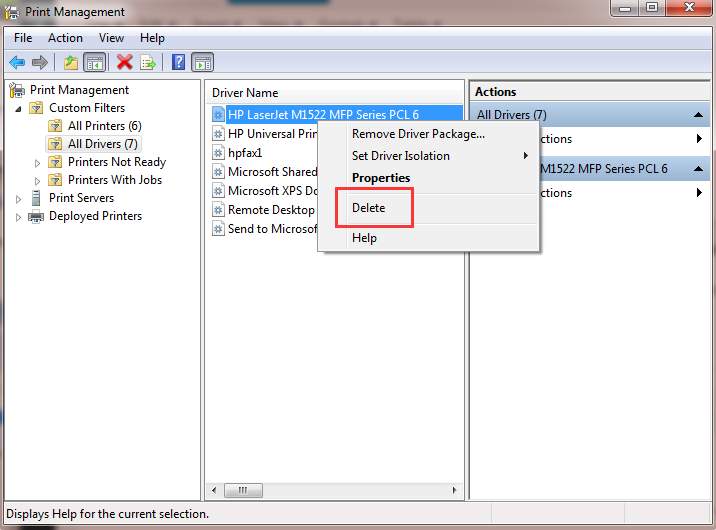
Method 4: Delete Incompatible Printer Drivers
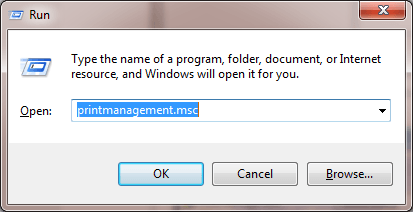
1.Press Windows key + R then type printmanagement.msc and hit Enter.
2.From the left pane, click All Drivers.

3.Now in the right window pane, right-click on the printer driver and click Delete.
4.If you see more than one printer driver names, repeat the above steps.
5.Again try to add the printer and install its drivers. See if you are able to Fix Windows Cannot Connect to the Printer issue, if not then continue with the next method.
Method 5: Registry Fix
1.First, you need to stop Printer Spooler service (Refer to method 3).
2.Press Windows Key + R then type regedit and hit Enter to open Registry Editor.

3.Navigate to the following registry key:
HKEY_LOCAL_MACHINE\SOFTWARE\Microsoft\Windows NT\CurrentVersion\Print\Providers\Client Side Rendering Print Provider
4.Now right-click on Client Side Rendering Print Provider and select Delete.

5.Now again start Printer Spooler service and reboot your PC to save changes.
Recommended for you:
- Fix Windows 10 Update Error 0x8007042c
- Fix Windows Update Error 0x80010108
- How To Fix Error 0X80010108 In Windows 10
- Fix Windows Update Error 0x800706d9
That’s it you have successfully Fix Windows Cannot Connect to the Printer issue but if you still have any questions regarding this article then feel free to ask them in comment’s section.
The Windows Cannot Connect To The Printer is an error message that pops up when a Windows device cannot establish a connection with the selected printer. This error is accompanied by various error codes, the most common of which are 0x00000002, 0x00000709, 0x0000007c, and 0x000006e4. This error terminates the printing process initiated by the user.
When the printer’s physical connection (wired or wireless) with the computer is not set up correctly or, the printer is not shared and is inaccessible through the network, this error becomes pretty apparent. The same error is also seen if the print queue is stuck. There are other reasons too, which we will discuss in detail and suggest appropriate fixes for this printer issue.
Table of Contents
Here are some additional reasons for the Windows Cannot Connect To The Printer error and some associated common error codes.
- Error codes 0x0000011b & 0x00000002: These error codes are displayed when there is an issue with the printer spooler service
- Error code 0x00000709: This can occur if there is another printer that is set as the default one.
- Error code 0x0000007c: This happens when there is corruption in the registry key or due to some glitches on the operating system (seen after performing security updates).
- Error codes 0x000006e4 & 0x00000057: This error code is generated when the printer drivers are corrupt or outdated.
Fixes For “Windows Cannot Connect To The Printer” Error
First of all, start by checking the physical connections with the printer. Ensure that the cables are connected well. For wireless printers, ensure that the wireless options are enabled and available. Finally, power cycle the printer (Turn it off and then on) and see if the connection is established with it.
If these basic troubleshooting methods do not work, try these suggested fixes.
Use Printer Troubleshooter
There is a Windows utility known as the Troubleshooters that can be used to solve the issues pertaining to the connectivity problems on the Printer. Using the troubleshooter in both host and client computers (in the case of shared printers) can bring better results.
Here’s how to use it.
- Press Windows + I to open the Windows Settings.
- Go to System > Troubleshoot > Other troubleshooters.

- Navigate to the Printer and click on Run to launch the troubleshooter.
- Follow the prompts to see if it fixes the issue.


Restart the Printer Spooler
If you are getting the error code 0x0000011b along with the “Windows Cannot Connect To The Printer”, this fix can do wonders for you.
This process needs to be performed on the host computer where the printer is installed. In this step, we will restart the Printer Spooler, which establishes communication between Windows and the printer. We will also make some minor changes to the registry.
- Press Windows Key + R, type
regedit, and hit enter. - Now, go to this Registry location.
Computer\HKEY_LOCAL_MACHINE\SYSTEM\CurrentControlSet\Control\Print
- Right-click on the Print Folder.
- Select New > DWORD(32-bit) value.
- Set the name of the Value as
RpcAuthnLevelPrivacyEnabled - Now, right-click on the Value and select Modify.
- Set the value Data to 0 and click on Ok to save the changes.
- Now, again return to the Run box. Type
services.mscand hit enter. - Find a Service named Printer Spooler and Right-click on it.

- Select Restart.
- Check if the client’s computer can connect to the shared printer.


NOTE: Make sure to backup your registry before making any changes to it.
Create A New Local Port For The Printer
If the error message pops up with an error code 0x00000002 this method could help you.
Creating a new Local port for the Printer will create a new destination manually. This will cause the Windows to recognize the printer with a fresh address, and the issue can get solved.
- Press Windows Key + I to open up Settings.
- Go to Bluetooth & devices > Printers & Scanners.
- Click on Add device Button.
- If Windows fails to recognize the printer, Click on Add Manually.

- Choose the option to Add a local printer or network printer with manual settings.

- Choose the Create a new port option and select the Standard TCP/IP Port as the Type of port.
- Enter the Hostname or IP address and click on Next.
- Wait for a while and choose the Device type to Standard.
- Click on Finish to complete the process.


Select the Printer as Default
Windows might have a problem getting connected to a printer; if it is set to default. This usually occurs when a computer is connected to multiple printers, but only one of them is set to be the default.
To overcome this, you can change the default printer to the one you are having the issue with.
- Press Windows Key + I to open up the Windows settings.
- Go to Bluetooth & devices > Printers & scanners.
- Turn on the option Let Windows manage my default printer.
- Find the name of the Printer having the issue and open it.
- Click on More devices and printers settings.

- From the Printers section, select your desired printer and right-click on it
- Click on Set as default printer.


Delete Conflicting Printer Driver
If the operating system has multiple printer drivers operating, this can generate driver conflict and bring issues as such.You can fix this by uninstalling the incompatible printer driver. Here’s how to do it.
- Press Windows Key + R to open Run.
- Type
printmanagement.mscand hit enter.
- From the Left panel, go to All Drivers Section.
- You will find the list of printer drivers available on your device.
- Find the Driver that you have identified as unnecessary for your printer.
- Right-click on it and select Remove Driver Package.


Note: Print Management Utility is not available on the Home edition of the Windows OS.
Update the Printer Driver
Updating the drivers is sometimes useful in fixing a printer’s functional glitches and connectivity issues. With newer updates, users can also notice some performance improvements as well. Here’s how to update the printer driver on Windows devices.
- Press Windows Key + X and open the Device Manager.
- Navigate to the Print queues and expand the list of devices under it.
- Right-click on the printer and select Update driver.

- Choose Search Automatically for drivers to make the WIndows search for the latest available drivers for the Printer.

- Follow the prompts and install the updates for the printer.


Uninstall the Windows Feature Updates
Many users have reported encountering this issue after installing Windows security updates. In this case, uninstalling the recently installed update package resolves the issue.
- Press Windows Key + I to go to the Windows settings.
- Go to Windows Updates > Update history > Uninstall updates.
- Select the recently installed update that you think is the culprit and click on Uninstall.


When you are trying to add a network shared printer, if you receive message “Windows cannot connect to the printer.”(commonly occur to Windows 7), you must be very frustrated. But don’t worry. You can use solutions in this post to fix the problem. Each solution has been reported to be useful. So try all of them until you have the problem fixed.
The error would appear with a specific error code like 0x0000007e. The most common error codes are as follows:
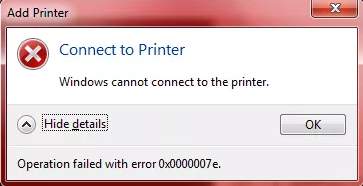
Windows Cannot Connect to the Printer – Operation Failed with Error 0x0000007e
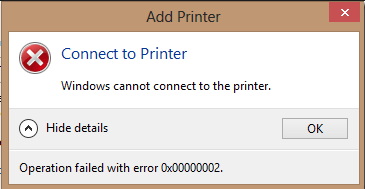
Windows Cannot Connect to the Printer – Operation Failed with Error 0x00000002
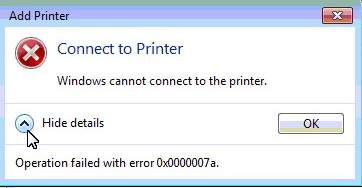
Windows Cannot Connect to the Printer – Operation Failed with Error 0x0000007a
Solution 1: Restart Print Spooler Service
Solution 2: Create a New Local Port
Solution 3: Delete Printer Drivers
Solution 4: Copy “mscms.dll” Manually
Solution 5: Delete a Subkey
Solution 1: Restart Print Spooler Service
Follow steps below to stop Print Spooler service then start it again.
1. Press Win+R (Windows logo key and R key) at the same time. A Run dialog box will open.
2. Type services.msc in the run box and click OK button.
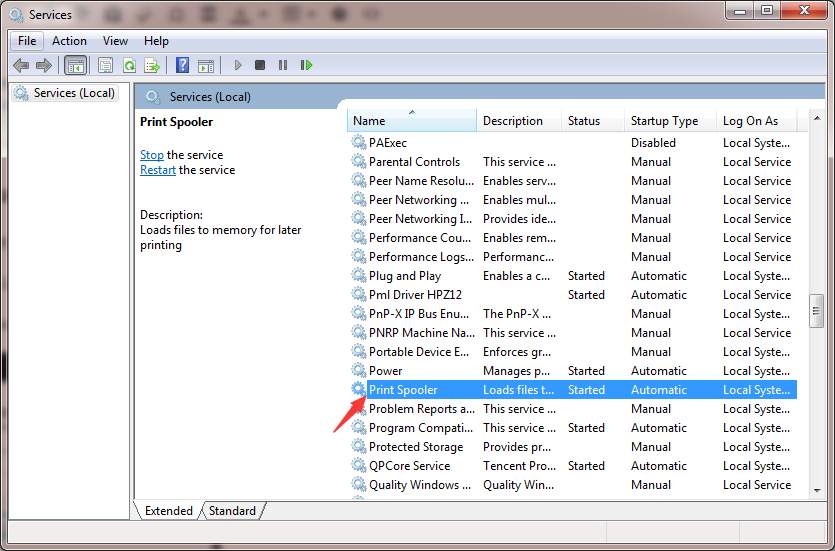
3. In the Name list, locate and double-click on service Print Spooler.
3. Under Service status, click Stop button.
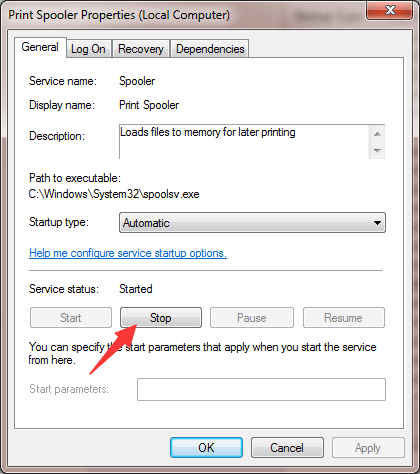
4. Click Start button to start the service again.
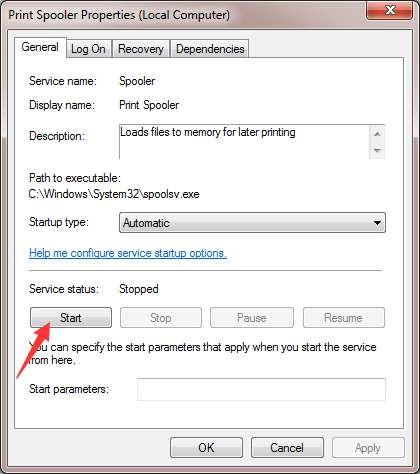
5. Click OK button.
After that, add the printer again and see if the problem persists.
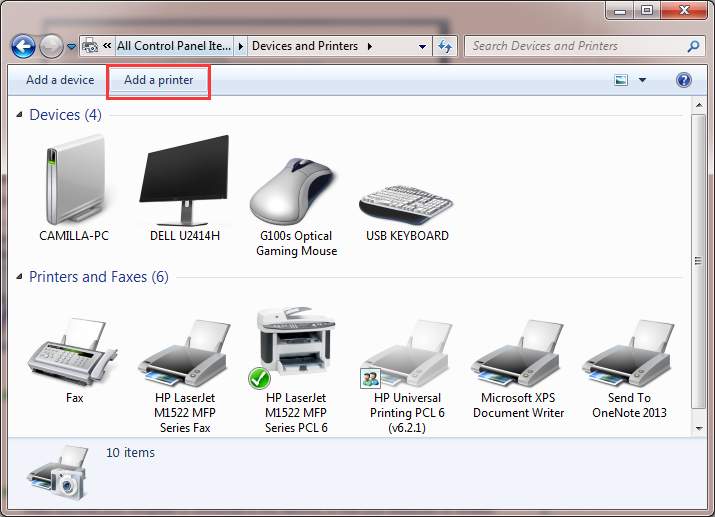
Solution 2: Create a New Local Port
Follow these steps:
1. Open Control Panel.
2. View by Large icons, click Devices and Printers.
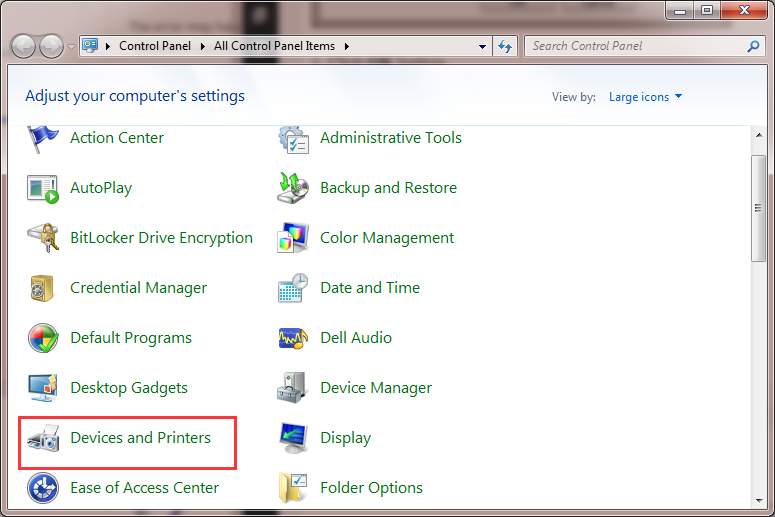
3. Click Add a printer at the top of the window. Note: To continue, you need to login to the computer as an administrator.
4. Select Add a network, wireless or Bluetooth printer.
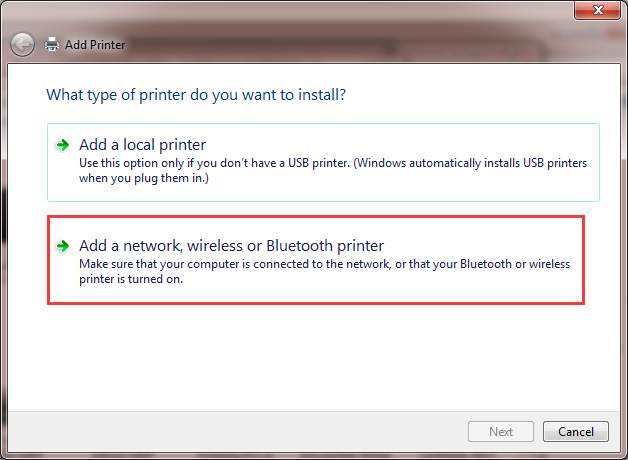
5. Select Create a new port, change the “Type of port” to Local Port then click Next button.
6. Enter a port name in the box. The port name is the printer’s address. The address format is \\IP address or the Computer Name\Printer’s Name (refer to the following screen). Then click OK button.

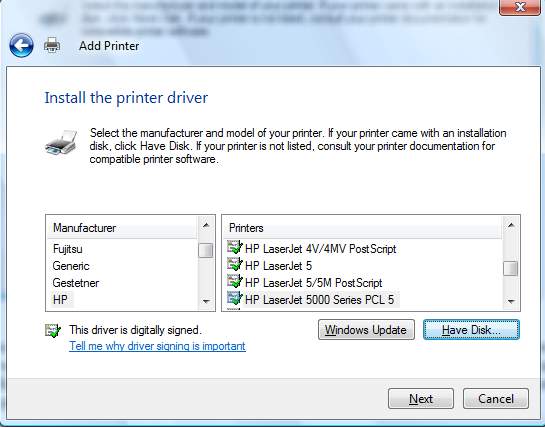
7. Select the printer model from the directory and click Next button.
8. Follow the rest on-screen instructions to finish adding the printer.
Solution 3: Delete Printer Drivers
The problem can be caused by printer drivers. So you can try to remove the drivers and install them again.
Follow steps below:
1. Press Win+R (Windows logo key and R key) at the same time. A Run dialog box will open.
2. Type printmanagement.msc in the run box and click OK button.
3. In the left pane, click All Drivers.
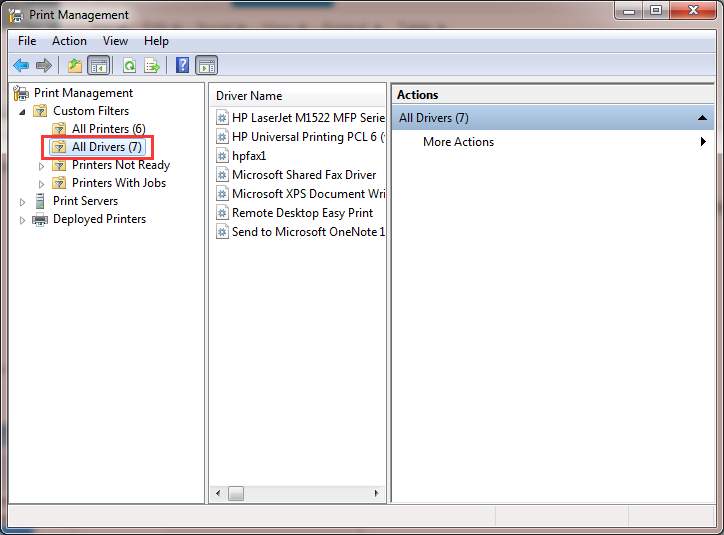
4. In the right pane, right-click on the printer driver and click Delete on the pop-up menu.
If you see more than one printer driver names, repeat steps above to remove them one by one.
5. Add the printer again.
If the problem persists, you may want to install the driver manually. You can download and install the driver from the printer manufacturer’s website.
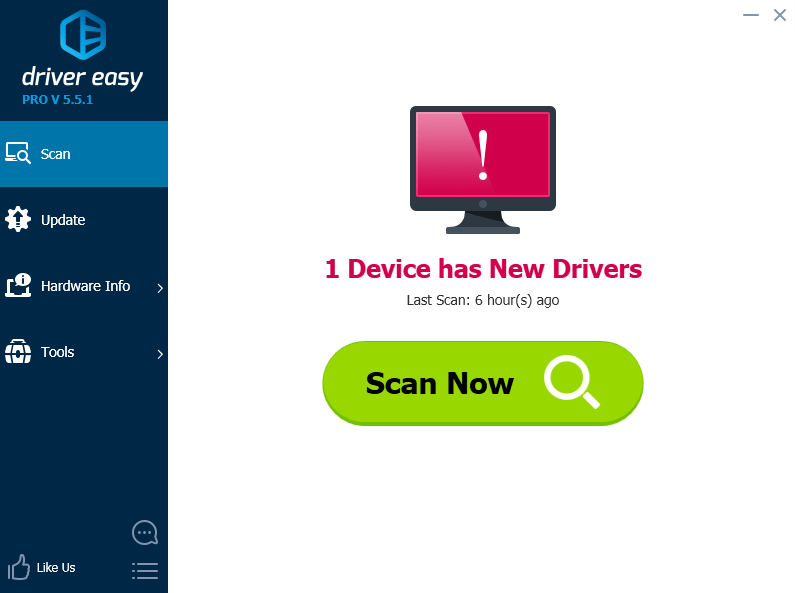
If you have difficulty downloading the driver manually, you can use Driver Easy to help you. Driver Easy can scan your computer to detect all problem drivers then provide you with new drivers instantly. Download its Free version to have a try. If you find it helpful, you can consider upgrading to the Pro version. The Pro version allows you to update all drivers with just one-click.
Solution 4: Copy “mscms.dll” Manually
1. Open C:\Windows\system32 and find the file “mscms.dll“.
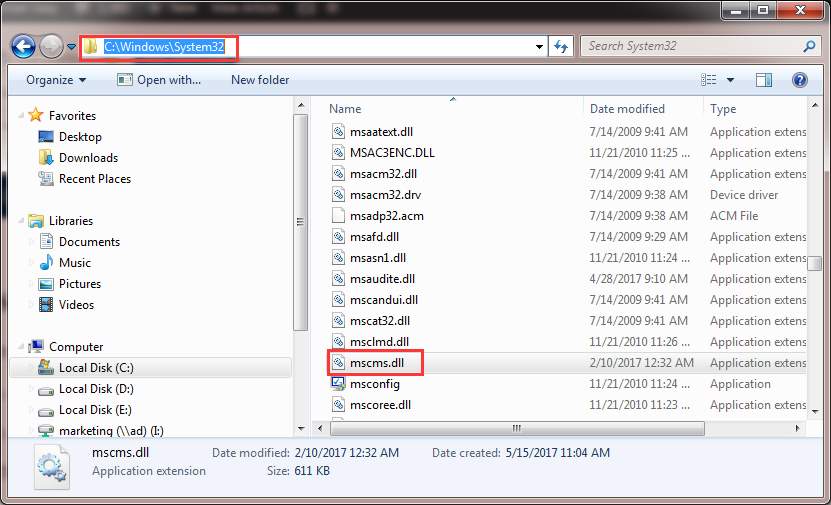
2. Copy the file to the following path:
C:\windows\system32\spool\drivers\x64\3\ if you are using 64-bit windows
C:\windows\system32\spool\drivers\w32x86\3\ if you are using 32-bit windows
If you have no idea which version of Windows you are using, see How to Get Operating System Version.
3. Try to connect to the printer again.
Solution 5: Delete a Subkey
Modifying registry keys incorrectly may cause serious system problems. So before you get started, it is recommended that you back up the registry key so you can restore it in case any problems occurs.
1. Stop Print Spooler service. (refer steps in Solution 1 to stop the service)
2. Press Win + R (Windows logo key and R key) at the same time. A Run dialog box will open.
3. Type regedit in the run box and click OK button.
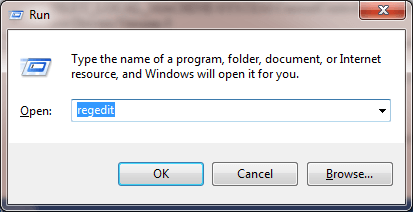
4. Expand HKEY_LOCAL_MACHINE\SOFTWARE\Microsoft\Windows NT\CurrentVersion\Print\Providers\Client Side Rendering Print Provider. Right-click on Client Side Rendering Print Provider and select Delete.
5. Start the Print Spooler service.
6. Reboot your computer and try to add the printer again.
Hope the solutions here will help you fix the printer not connecting issue.
81
81 people found this helpful