В мире ИТ существует уже довольно широкий спектр операционных систем, начиная с серверных, заканчивая операционными системами для мобильных устройств. В обычных пользовательских компьютерах и в серверах довольно часто используются две ОС — Linux и Windows. Поэтому очень часто возникают ситуации, когда приходится подключаться по сети из одной операционной системы к другой для выполнения разнообразных операций.
В этой статье мы рассмотрим варианты подключения к Linux из Windows. Существуют бесплатные и условно бесплатные утилиты вроде AnyDesk или TeamViewer, но установка их довольно тривиальна и не нуждается в дополнительном пояснении. Утилиты подобного рода обладают рядом ограничений при бесплатном некоммерческом использовании, либо их функциональность не удовлетворяет тем или иным потребностям пользователя. Мы рассмотрим полностью бесплатные способы как подключится к Linux из Windows.
Удалённый доступ к Linux с помощью VNC
На сегодняшний день самое популярное удаленное подключение к Linux из Windows, с использованием привычный в Windows графического интерфейса, является VNC (Virtual Network Computing) — утилита, использующая протокол RFB (Remote FrameBuffer — удалённый кадровый буфер). Управление осуществляется путём передачи нажатий клавиш на клавиатуре и движений мыши с одного компьютера на другой и ретрансляции содержимого экрана через компьютерную сеть.
В качестве сервера VNC в данном примере будет использоваться TightVNC, установленный в Ubuntu 20.04. Для установки сервера VNC необходимо выполнить ряд действий:
Шаг 1. Установка рабочей среды XFCE
Xfce — одна из самых легковесных рабочих сред, используемых в Linux, она будет быстро работать даже при слабом и нестабильном сетевом подключении. Установите её с помощью команд:
sudo apt update
sudo apt install xfce4 xfce4-goodies
Шаг 2. Установка TightVNC
Далее установите TightVNC:
sudo apt install tightvncserver
Шаг 3. Настройка пароля
Перед началом выполнения всех действий необходимо задать пароль пользователя VNC. Выполните команду:
vncpasswd
Вам будет предложено создать новый пароль, а также пароль только для просмотра. Откажитесь от второй опции:
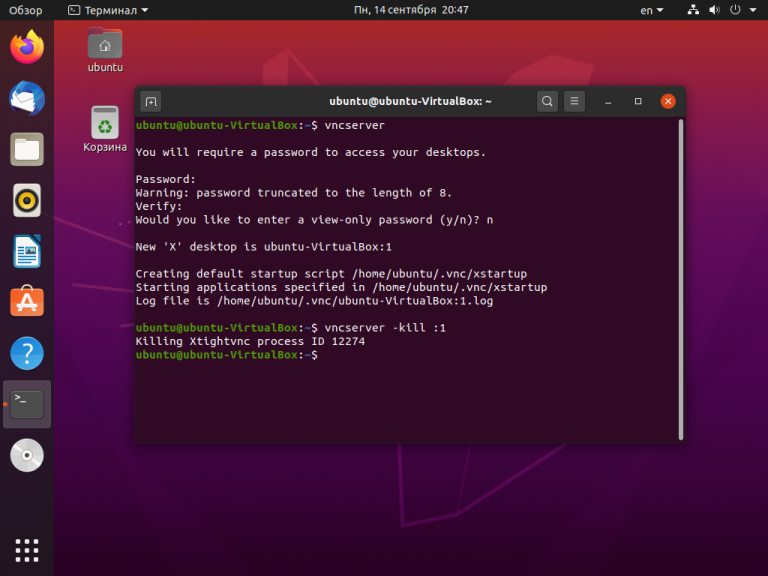
Завершите процесс vncserver:
vncserver -kill :1
Шаг 4. Настройка скрипта запуска
Отредактируйте скрипт, который выполняется после запуска VNC-сервера:
nano ~/.vnc/xstartup
Он должен содержать такой текст:
#!/bin/sh

unset SESSION_MANAGER

unset DBUS_SESSION_BUS_ADDRESS

startxfce4 &
Сделайте файл исполняемым:
chmod +x ~/.vnc/xstartup
Шаг 5. Запуск VNC сервера
На этом этапе уже можно запустить VNC-сервер с помощью команды:
vncserver
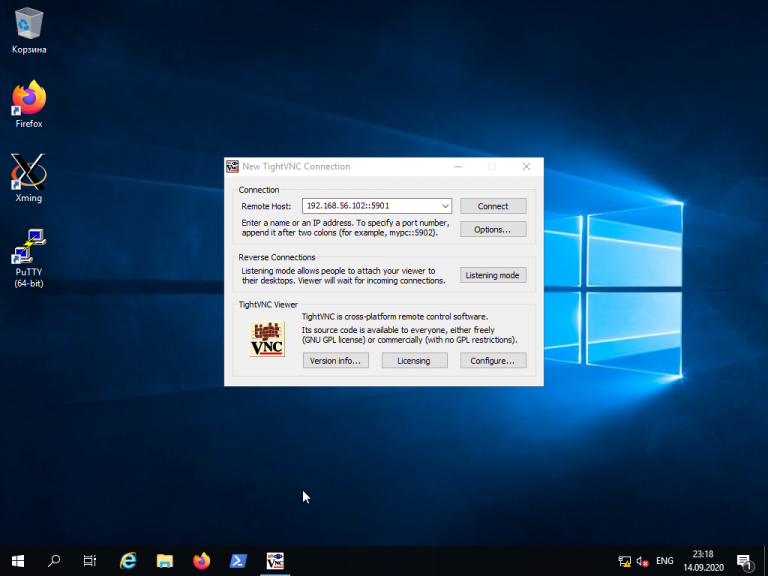
Шаг 6. Подключение из Windows
Для того, чтобы подключиться из Windows к вашему Linux-серверу, используйте TightVNC Viewer.
Укажите IP-адрес компьютера, к которому нужно подключиться, и номер порта в поле Remote Host. В данном примере — 192.168.56.102::5901:
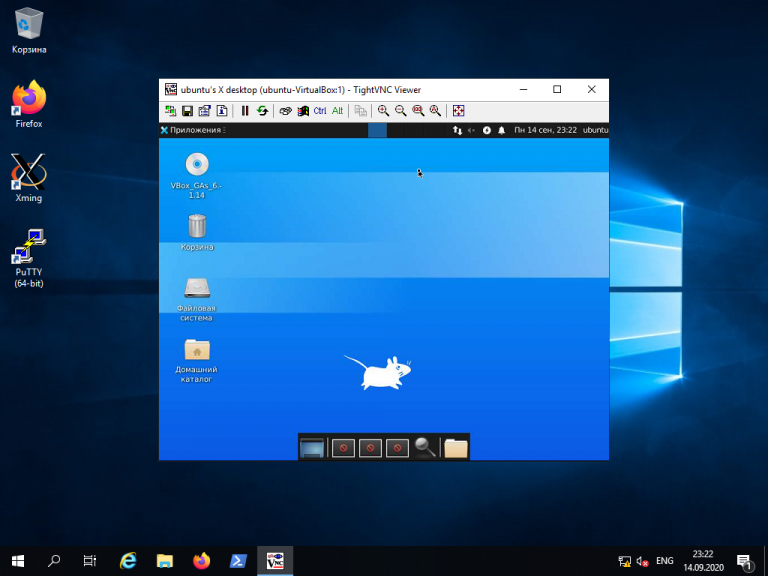
После того, как будет введён пароль, вы должны увидеть рабочий стол Xfce:
Шаг 8. Настройка systemd
Для того, чтобы запуск вашего VNC-сервера добавить в автозагрузку надо использовать systemd. Создайте новый файл сервиса systemd:
sudo nano /etc/systemd/system/vncserver@.service
Его содержимое должно быть следующим:
[Unit]

Description=Systemd VNC server startup script for Ubuntu 20.04

After=syslog.target network.target

[Service]

Type=forking

User=ubuntu

ExecStartPre=-/usr/bin/vncserver -kill :%i &> /dev/null

ExecStart=/usr/bin/vncserver -depth 24 -geometry 800x600 :%i

PIDFile=/home/ubuntu/.vnc/%H:%i.pid

ExecStop=/usr/bin/vncserver -kill :%i

[Install]

WantedBy=multi-user.target
Измените имя пользователя ubuntu и рабочего каталога ubuntu на нужные вам значения. Если у вас запущен VNC-сервер, остановите его:
vncserver -kill :1
Сообщите systemd о появлении нового сервиса:
sudo systemctl daemon-reload
Добавьте запуск вашего нового сервиса в список автозагрузки:
sudo systemctl enable vncserver@1.service
Запустите VNC-сервер:
sudo systemctl start vncserver@1
Использование RDP для удалённого подключения
Помимо VNC, для управления Linux-сервером из Windows можно воспользоваться RDP (Remote Desktop Protocol). Для этого на компьютере с Ubuntu 20.04 установите утилиту xrdp:
sudo apt install xrdp
Для корректной работы сервиса необходимо добавить пользователя xrdp в группу ssl-cert:
sudo adduser xrdp ssl-cert
Установите Xfce:
sudo apt-get install xfce4
Добавьте Xfce в сессии RDP в качестве рабочего стола по умолчанию:
echo xfce4-session >~/.xsession
Перезапустите сервис xrdp:
sudo systemctl restart xrdp.service
Процедура подключения из Windows к Linux-серверу по протоколу RDP почти ничем не отличается от подключения к удалённым Windows-серверам. Введите IP-адрес сервера, логин и пароль пользователя в Linux:
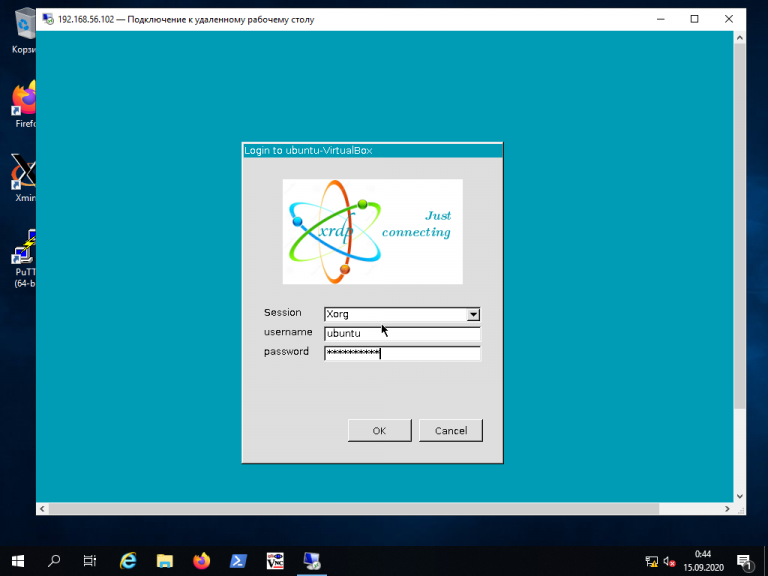
Если всё сделано правильно, вы увидите рабочий стол Xfce:
Для подключения к компьютеру под управлением Linux по протоколу SSH из Windows можно воспользоваться PowerShell. Сначала становите OpenSSH Client, если ещё не установлен. Запустите на вашем компьютере PowerShell от имени администратора системы и выполните следующую команду:
Get-WindowsCapability -Online | ? Name -like 'OpenSSH*'
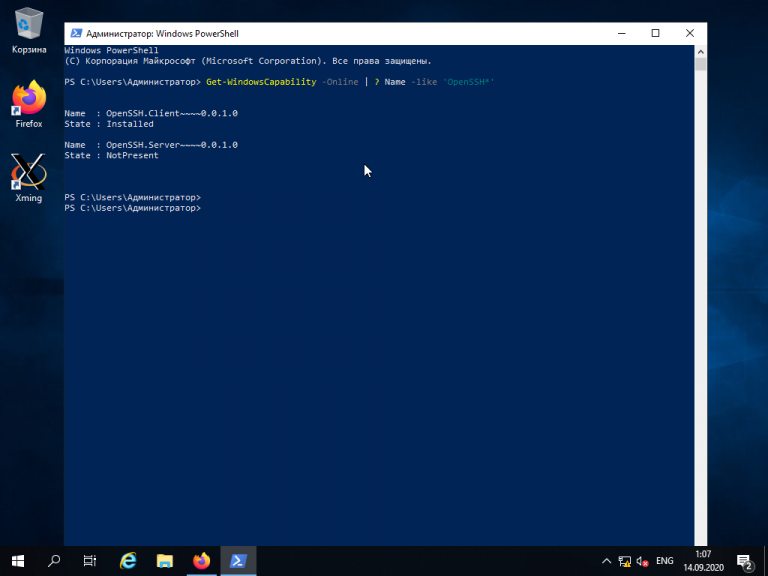
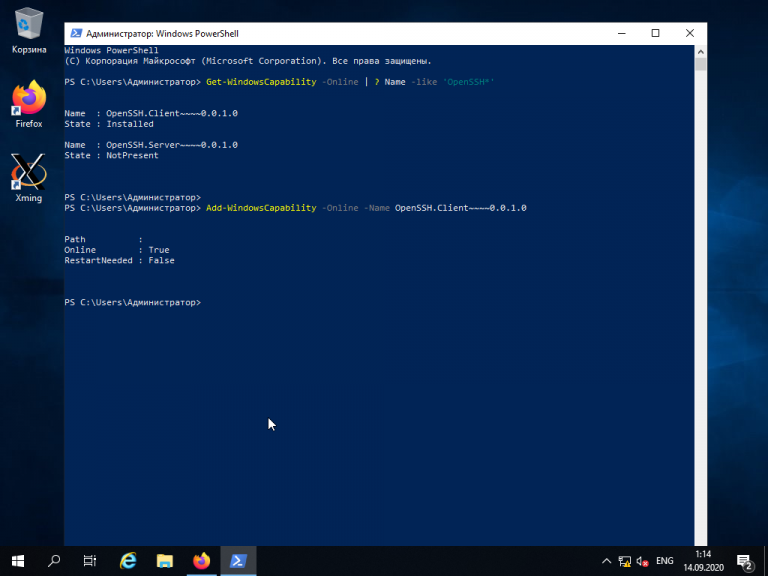
Это необходимо для того, чтобы узнать текущую версию SSH-клиента. В данном примере доступна версия OpenSSH.Client-0.0.1.0. Установите OpenSSH.Client с помощью команды:
Add-WindowsCapability -Online -Name OpenSSH.Client~~~~0.0.1.0
Для того, чтобы подключиться к устройству, на котором запущен SSH-сервер, необходимо ввести имя пользователя и IP-адрес. Команда для подключения по SSH используя PowerShell выглядит так:
ssh ubuntu@192.168.56.1
Здесь ubuntu — имя пользователя на удалённом компьютере, а 192.168.56.1 — IP-адрес Linux-сервера, на котором запущен демон SSH.
При первом подключении необходимо подтвердить использование специального персонального ключа для шифрованного соединения по SSH-протоколу (введите слово Yes), затем введите пароль пользователя (в данном случае для пользователя ubuntu):
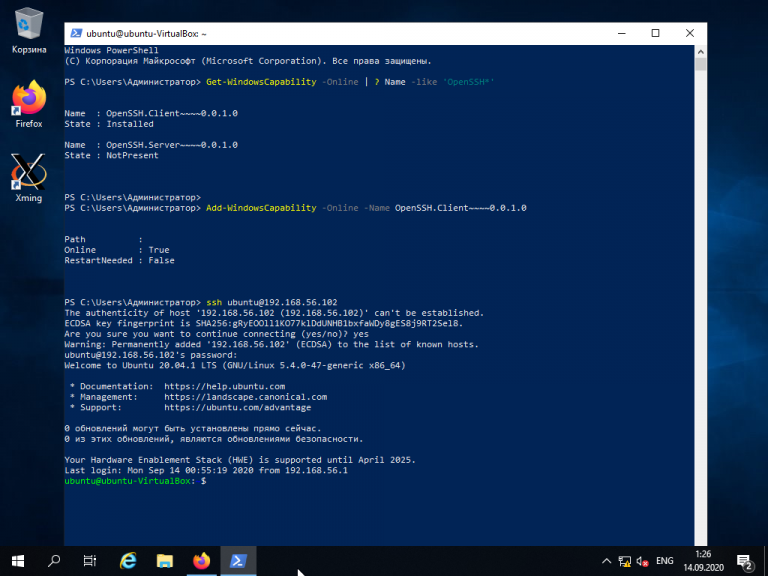
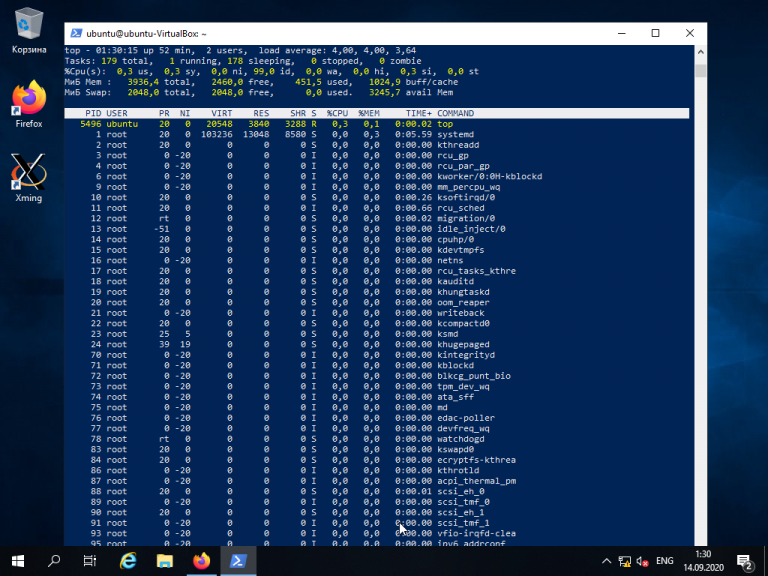
Как видите, соединение прошло успешно. Теперь можно выполнять все команды так же, как если бы вы их выполняли используя стандартный Linux SSH-клиент:
Для завершения терминальной сессии на удалённом компьютере введите команду exit. Теперь вы знаете как выполняется подключение к Linux из Windows по SSH.
Использование Putty для подключения к Linux
Пожалуй, одним из самых популярных способов подключения к Linux из Windows является кроссплатформенная утилита Putty — небольшая по размерам, но очень часто незаменима для подключения по таким протоколам как SSH, Telnet, rlogin и даже с помощью последовательных портов.
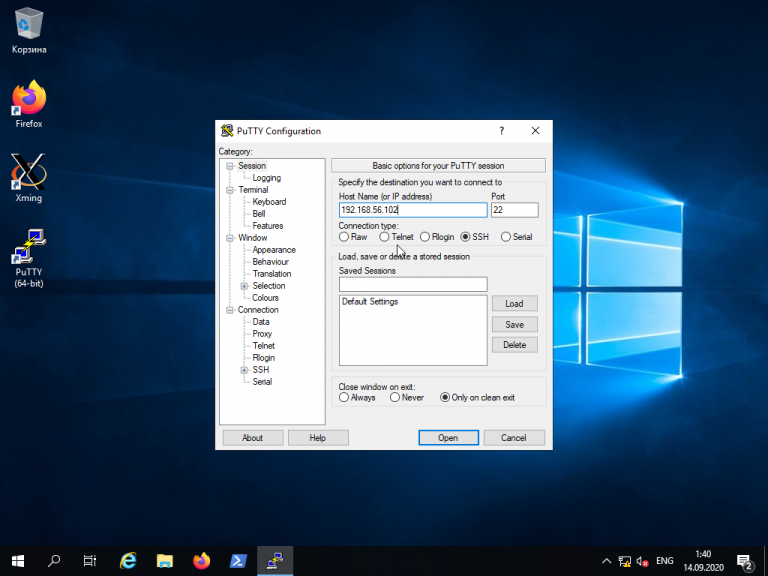
Для обычного подключения к Linux-серверу по протоколу SSH достаточно в поле Host Name (or IP—address) указать его IP-адрес и нажать кнопку Open (в данном примере Linux-сервер имеет IP-адрес: 192.168.56.102):
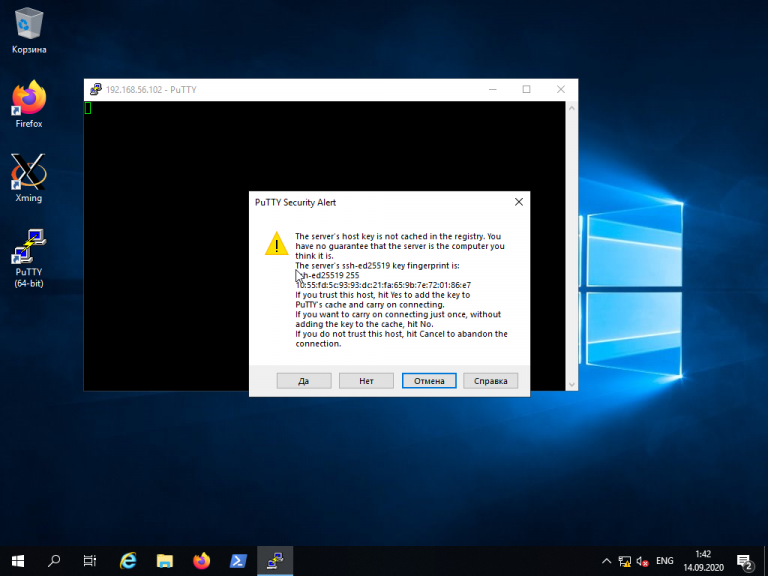
При первом подключении Putty предупредит, что используется специальный ключ безопасности и его нужно добавить в доверенные хосты. Нажмите кнопку Да:
Далее нужно будет ввести логин и пароль. Если всё сделано правильно, запустится удалённая сессия терминала Linux:

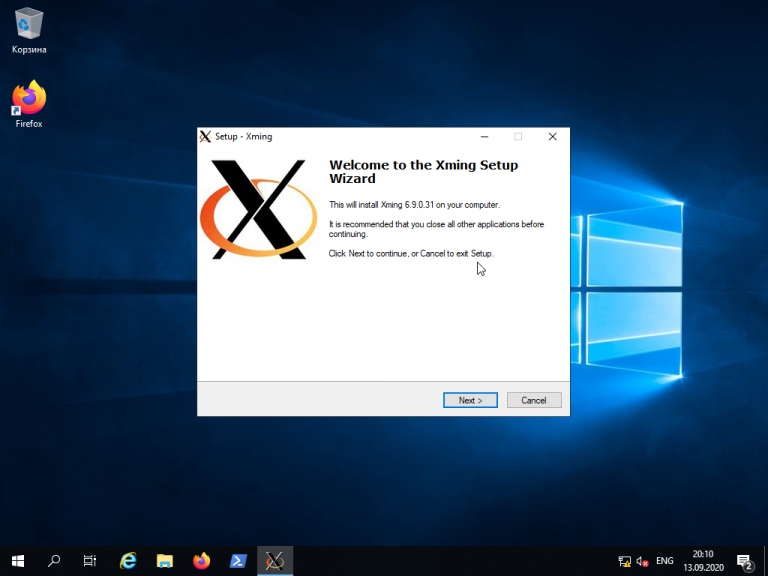
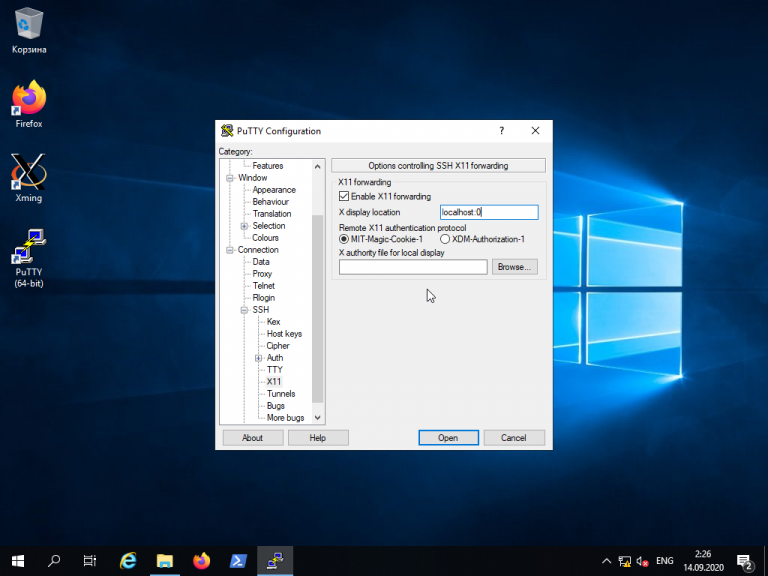
Мало кто знает, что Putty позволяет запустить почти любое приложение, установленное на компьютере с Linux, по сети в Windows. Для этого на компьютере с Windows нужно установить собственный X-сервер. В данном примере воспользуемся Xming.
Скачайте Xming с официального сайта. Установка довольно тривиальная, поэтому не будем на ней останавливаться. Ничего не меняйте в процессе установки. Просто нажимайте кнопку Next до тех пор, пока программа не установится и не запустится:
Когда установка Xming завершится, откройте Putty и в настройках сессии для вашего подключения в разделе SSH -> X11 включите флажок напротив опции Enable X11 forwarding, а также, в строке Отображение дисплея X впишите значение localhost:0, после чего откройте сессию подключения с помощью кнопки Open:
В открывшемся терминале Putty введите консольное название программы, обладающей графическим интерфейсом. В данном примере введено название графического редактора drawing:
drawing &
(Знак & позволит запустить программу в фоновом режиме, в этом случае в окне Putty можно будет выполнять и другие команды):
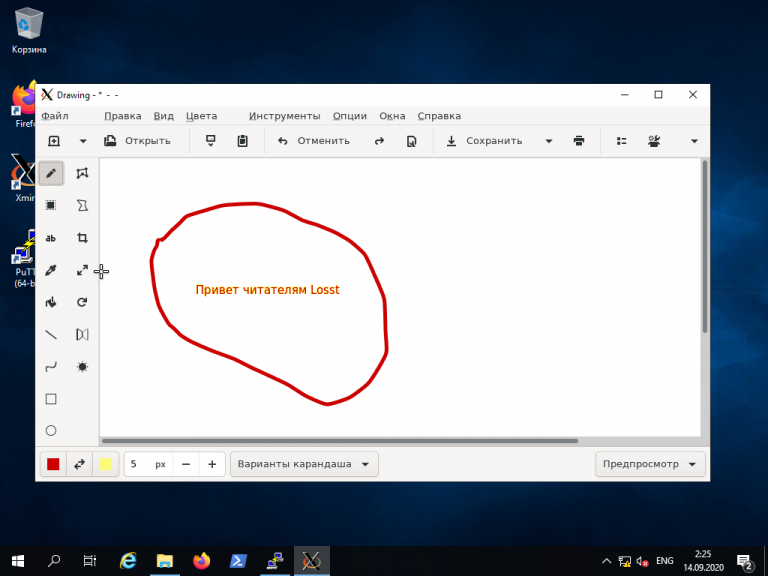
Как видите, Linux-приложение drawing успешно запустилось по сети на X-сервере, установленном в Windows. С ним можно работать так же, как и с локальным приложением.
Выводы
Сегодня не существует слишком уж больших проблем для подключения к Linux из Windows. Способов существует довольно много. Каждый из них обладает своими достоинствами и недостатками, например, скорость работы VNC, да и других тоже, существенно зависит от скорости сетевого соединения. Существуют также программные средства, позволяющие подключаться к Linux-серверам используя мессенджеры или браузеры.
Обнаружили ошибку в тексте? Сообщите мне об этом. Выделите текст с ошибкой и нажмите Ctrl+Enter.

Статья распространяется под лицензией Creative Commons ShareAlike 4.0 при копировании материала ссылка на источник обязательна .
Table of Contents
1
Connecting to a Linux server from a Windows 10 machine is essential for remote server management, file transfers, and running command-line operations. In this tutorial, we will explore the steps to establish a connection between your Windows 10 PC and a Linux server. Whether you are a developer, system administrator, or enthusiast, this guide will help you navigate the process with ease.
Step 1: Install an SSH Client:
To establish a secure connection to a Linux server, you will need an SSH client on your Windows 10 PC. One of the popular SSH clients for Windows is PuTTY.
– Download PuTTY from the official website (https://www.putty.org/) and follow the installation instructions.
– Once installed, launch PuTTY to proceed with the next steps.
Step 2: Configure the Connection:
To connect to the Linux server, you need the server’s IP address and login credentials. Here’s how you can configure the connection in PuTTY:
– Launch PuTTY.
– In the «Host Name» field, enter the IP address or domain name of your Linux server.
– Under the «Connection Type» section, make sure «SSH» is selected.
– Set the «Port» to 22 (default SSH port).
– Choose a name for your saved session and click «Save» to store the configuration for future use.
Step 3: Establish the Connection:
Now, let’s establish the SSH connection between your Windows 10 PC and the Linux server:
– In PuTTY, select the saved session you created in the previous step.
– Click the «Open» button to start the SSH connection.
– A command prompt-like window will appear, asking for your username and password.
– Enter your Linux server’s login credentials.
– If the credentials are valid, you will be connected to the Linux server, and you can start executing commands or performing operations remotely.
Step 4: Optional: Use Public Key Authentication:
To enhance security and streamline the authentication process, you can set up public key authentication. Here’s a summary of the steps involved:
– Generate an SSH key pair on your Windows 10 PC using tools like PuTTYgen.
– Copy the public key to your Linux server.
– Configure SSH on the Linux server to accept the public key.
– Use the private key on your Windows 10 PC to authenticate the connection.
| Pros | Cons |
|---|---|
| 1. Enables secure remote management and file transfers. | 1. Requires installation of additional software (PuTTY). |
| 2. Provides a command-line interface for executing operations on the Linux server. | 2. Connection requires the server’s IP address and login credentials. |
| 3. Can be used to configure, monitor, and troubleshoot Linux servers from a Windows 10 PC. | 3. May require additional steps for advanced security measures such as public key authentication. |
By following these steps, you can establish a secure connection to a Linux server from your Windows 10 PC using PuTTY or any other SSH client of your choice. This connection allows you to remotely manage your server, transfer files, and execute commands seamlessly. Whether you are a beginner or an experienced user, mastering this process is essential for effective server administration and development tasks. Start exploring the power of remote Linux server management today!
Video Tutorial: How do I access Linux terminal from Windows?
How do I access Linux files from Windows network?
When it comes to accessing Linux files from a Windows network, there are a few methods you can explore. Here are the steps to achieve this:
1. Enable File and Printer Sharing on the Windows PC:
– Go to the Control Panel and open «Network and Sharing Center.«
– Click on «Change advanced sharing settings» in the left-hand pane.
– Expand the «Private» network profile section.
– Ensure that «Turn on network discovery,» «Turn on file and printer sharing,» and «Enable sharing so anyone with network access can read and write files in the Public folders» options are enabled.
– Save the changes.
2. Install and Configure Samba on the Linux Machine:
– Install the Samba package using the package manager specific to your Linux distribution.
– Once installed, navigate to the Samba configuration file located at «/etc/samba/smb.conf» and open it using a text editor.
– Configure the necessary settings such as defining the shared folders, access permissions, and user authentication.
– Save the configuration file and restart the Samba service.
3. Connect to the Linux Shared Folder from Windows:
– On the Windows PC, open File Explorer.
– In the address bar, enter the IP address or hostname of the Linux machine, preceded by «\\,» for example: «\\192.168.1.100» or «\\linuxhostname«.
– Press Enter, and you should see a list of shared folders on the Linux machine.
– Click on the desired shared folder to access its contents.
– If prompted, enter the username and password of a Linux user with permissions to access the shared folder.
Remember that you need to ensure both machines are connected to the same network for this setup to work. Additionally, it’s worth noting that firewalls and security settings on either system can impact connectivity, so be sure to check and adjust those accordingly if necessary.
Please note that the specific steps may vary based on the Linux distribution you are using. It’s always a good idea to refer to the official documentation or online guides for your particular distribution for more detailed instructions.
How to access Linux server remotely?
To access a Linux server remotely, you can follow these steps:
1. Ensure that the Linux server is running and connected to the internet. You will need the server’s IP address or hostname to establish a remote connection.
2. Open a terminal or command prompt on your local computer. The exact process may vary depending on your operating system.
3. Use the SSH (Secure Shell) protocol to connect to the Linux server. The SSH client is often pre-installed on Linux and macOS systems, but on Windows, you might need to download and install an SSH client like PuTTY or OpenSSH.
4. In the terminal or command prompt, enter the following command to connect using SSH:
«`
ssh username@server_ip
«`
Replace «username» with the appropriate username for your Linux server, and «server_ip» with the actual IP address or hostname of the server.
5. Press Enter and you will be prompted to enter the password for the specified username. Note that when you type the password, it won’t be visible in the terminal for security reasons. Press Enter after entering the password.
6. If the username and password were correct, you should now be logged into the Linux server remotely. You can execute commands and interact with the server through the terminal.
Alternatively, if you want to access the Linux server’s graphical interface remotely, you can use a remote desktop solution like VNC or RDP. However, these typically require additional configuration and setup on both the server and client sides.
Remember, it’s important to ensure that the server is protected by strong passwords and potentially additional security measures like key-based authentication or firewall rules to safeguard against unauthorized access.
Please note that these steps are provided as a general guideline, and the exact process may vary based on your specific Linux distribution and server configuration. It’s always recommended to refer to the official documentation or consult the server administrator for more detailed instructions.
Yes, a Windows client can connect to a Linux server. Here’s how it can be done:
1. Ensure that both the Windows client and Linux server are connected to the same network. This can be a local area network (LAN) or a wide area network (WAN) such as the internet.
2. Install the necessary software on the Windows client. There are several options available for connecting to a Linux server from a Windows machine, such as SSH (Secure Shell), Telnet, or FTP (File Transfer Protocol). SSH is typically the most secure and commonly used method.
3. Set up SSH on the Linux server. SSH is often pre-installed on Linux distributions, but if it’s not, you can install the OpenSSH package. Make sure SSH is enabled and running on the server.
4. Configure any necessary firewall settings. If a firewall is enabled on either the Windows client or Linux server, you may need to open the appropriate ports to allow the connection. By default, SSH uses port 22.
5. Obtain the IP address or hostname of the Linux server. This information is necessary to establish the connection from the Windows client.
6. Use an SSH client on the Windows machine to connect to the Linux server. There are several SSH clients available for Windows, such as PuTTY, OpenSSH for Windows, or built-in features like PowerShell’s SSH cmdlets.
7. Launch the chosen SSH client, enter the IP address or hostname of the Linux server, and provide valid login credentials (username and password) for the Linux server.
8. Once connected, you should be able to interact with the Linux server through a command-line interface. You can execute commands, transfer files, and perform other tasks as needed.
Remember to adjust the instructions according to the specific software versions and configurations you have on both the Windows client and Linux server.
How do I access a Linux server?
To access a Linux server, you can follow these steps:
1. Obtain the server’s IP address or hostname: You will need the server’s IP address or hostname to establish a connection. This information is typically provided by the server administrator.
2. Open a terminal: On your local computer, open a terminal application. The specific terminal application will depend on your operating system. On macOS, you can use Terminal, on Windows, you can use PowerShell or a third-party application like PuTTY, and on Linux, you can use the default terminal emulator.
3. Use the SSH command: SSH (Secure Shell) is a protocol that allows secure remote access to servers. In your terminal, use the SSH command followed by the username and the server’s IP address or hostname. For example:
«`
ssh username@server_ip
«`
If the server uses a non-standard SSH port, you can specify it using the `-p` option followed by the port number:
«`
ssh -p port_number username@server_ip
«`
4. Authenticate yourself: Once you run the SSH command, you will be prompted to enter the password for the username. Type the password and press Enter. Note that you won’t see any visual feedback while typing the password, but it is being entered.
Alternatively, you can use public key authentication for increased security. In this case, you would need to generate an SSH key pair, copy the public key to the server, and configure the server to accept the key for authentication. This method eliminates the need to enter a password for each login.
5. Access the Linux server: After successful authentication, you will gain access to the Linux server. You can now execute commands, navigate the file system, edit files, and perform other administrative tasks as needed.
Remember that accessing a Linux server requires appropriate permissions and credentials. It’s essential to ensure you have the necessary authorization and follow any security measures defined by the server administrator.
Can I remote access Linux from Windows?
Yes, it is definitely possible to remotely access a Linux system from a Windows machine. Here are the steps you can follow to achieve this:
1. Install an SSH client on your Windows machine: You will need an SSH (Secure Shell) client to establish a remote connection. One of the popular options for Windows is PuTTY, which is a free and open-source SSH client.
2. Obtain the IP address of the Linux machine: To connect to the Linux machine, you will need to know its IP address. You can usually find this information in the network settings or by using the `ifconfig` command in the Linux terminal.
3. Launch the SSH client (PuTTY): Open PuTTY on your Windows machine. You will see a window where you can configure the connection settings.
4. Configure the connection settings: In PuTTY, enter the IP address of the Linux machine in the «Host Name» field. Make sure the connection type is set to «SSH«. If needed, you can also specify a port number (default is usually 22).
5. Establish the connection: Once you have entered the necessary information, click on the «Open» button to establish the SSH connection. A terminal window will open, prompting you to log in.
6. Enter your Linux credentials: In the terminal window, you will be prompted to enter your Linux username and password. Provide the correct credentials to log in to the Linux machine.
7. Interact with the Linux system: After successful authentication, you will have remote access to the Linux system from your Windows machine. You can now perform various tasks, execute commands, transfer files, or manage the Linux system remotely.
By following these steps, you can seamlessly access and control a Linux machine from your Windows system using remote access through SSH. It allows you to manage Linux servers, troubleshoot issues, or perform any necessary tasks without needing physical access to the Linux machine.
Время на прочтение
6 мин
Количество просмотров 26K

В прошлой статье я обещал рассмотреть механизм удаленного подключения с Windows на серверы под управлением *nix, и наоборот при помощи PowerShell. Обещанного обычно ждут три года, но я успел чуть раньше. Что ж, если хочется с верного макбука управлять гетерогенной инфраструктурой, или наоборот ― с Surface Pro рулить Linux-серверами без всяких putty, ― прошу под кат.
Microsoft Loves Linux
Еще в 2015 году Microsoft торжественно объявила о запуске программы «Microsoft Linux». Сюда вошла как банальная поддержка гостевых *nix-like OS на Hyper-V, так и встроенная в Windows 10 Ubuntu и возможность запуска в Docker продуктов Microsoft, таких как SQL Server.
Компания также опубликовала исходный код PowerShell, что позволило запускать «Ракушку Мощи» не только на Windows. Из-под одноименного аккаунта на Github, помимо исходного кода, выложены и бинарники под большинство современных систем (лицензия MIT).
Это позволяет настроить удаленное управление с помощью единого инструмента ― PowerShell. Помимо подключения к консоли компьютера, можно запускать отдельные команды, в том числе и на нескольких серверах одновременно. Довольно удобно для автоматизации задач администрирования, таких как массовое изменение настроек, инвентаризация, сбор логов.
Порой удобно совмещать традиционные консольные команды со вставками PowerShell:
cat /etc/passwd | ConvertFrom-Csv -Delimiter ':' -Header Name,Passwd,UID,GID,Description,Home,Shell | Sort-Object Name | Format-TableДля подключения к Windows-машинам при помощи PowerShell используется протокол WS-Man. Для GNU\Linux привычен SSH. Так как сегодня становятся универсальными оба протокола, разберем их подробнее.
PowerShell 6.0 под Windows и *nix, пока еще находится в бете. Поэтому не рекомендую без хорошего тестирования применять на боевых серверах описанное ниже.
Магомед не идет к горе
Когда технология удаленного доступа при помощи PowerShell только набирала обороты, единственным универсальным способом подключения к разным системам был протокол WS-Man. Для тестового стенда я взял Windows Server 2016 и Centos 7, для которых и буду настраивать возможность удаленного подключения и выполнения команд при помощи этого протокола.
Для начала установим на Centos свежий PowerShell:
curl https://packages.microsoft.com/config/rhel/7/prod.repo > /etc/yum.repos.d/microsoft.repo

yum install -y powershell

pwsh
После установки появилась возможность запускать привычные Windows-администратору командлеты. Например, посмотрим версию PS и получим список запущенных процессов командлетами $PSVersionTable и Get-Process:

Работаем в консоли PowerShell на CentOS.
Чтобы подключаться к Linux-машине с консоли Windows, нам понадобится установить и настроить:
- OMI (Open Management Infrastructure) ― адаптация WMI, которую также можно использовать для управления компьютерами с ОС, отличными от Windows;
- PSRP (PowerShell Remoting Protocol) ― библиотека, необходимая для удаленного подключения PowerShell.
Подробно с работой и эволюцией OMI и PSRP можно ознакомиться в отличном материале от Matt Wrock, я же просто установлю OMI командой:
yum install omiДалее нужно настроить порты и аутентификацию в конфигурационном файле /etc/opt/omi/conf/omiserver.conf, после чего перезапустить сервер командой:
/opt/omi/bin/service_control restartДля упрощения эксперимента я не буду настраивать ни NTLM-аутентификацию, ни Kerberos. Еще и шифрование отключу ― разумеется, в боевой среде делать этого не стоит. Для включения текстовой аутентификации и шифрования на стороне Windows в работе winrm достаточно выполнить следующие команды:
winrm set winrm/config/client/auth @{Basic="true"}
winrm set winrm/config/client @{AllowUnencrypted="true"}
winrm set winrm/config/service/auth @{Basic="true"}
winrm set winrm/config/service @{AllowUnencrypted="true"}
После настройки можно проверить работу OMI из консоли Windows:
winrm enumerate http://schemas.microsoft.com/wbem/wscim/1/cim-schema/2/OMI_Identify?__cimnamespace=root/omi -r:http://server:5985 -auth:Basic -u:root -p:"password" -skipcncheck -skipcacheck -encoding:utf-8 -unencrypted
Подключаемся к CentOS из cmd.
Теперь проверим работу обратным подключением ― из Linux к Windows:
/opt/omi/bin/omicli ei root/cimv2 Win32_Environment --auth Basic --hostname server -u username -p password --port 5985 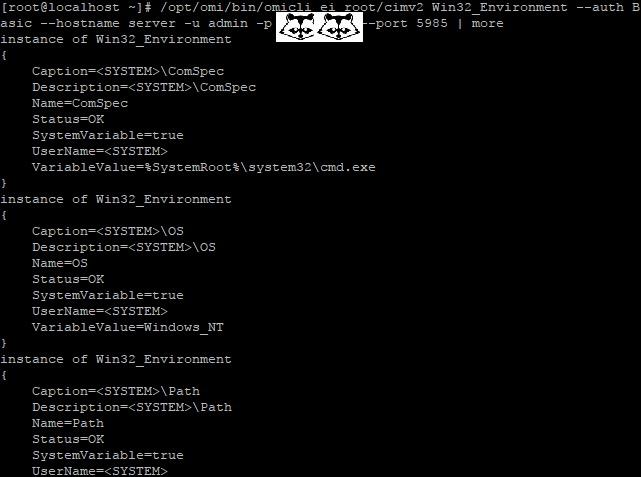
… а затем с CentOS подключаемся к Windows.
После того, как WMI\OMI заработал, нужно установить и настроить PSRP. К сожалению и вопреки инструкции, бинарник отсутствует. Библиотеку пришлось компилировать, долго и нудно исправляя возникающие ошибки зависимостей:
yum groupinstall 'Development Tools'
yum install openssl-devel pam-devel
git clone --recursive [https://github.com/PowerShell/psl-omi-provider.git](https://github.com/PowerShell/psl-omi-provider.git)

cd psl-omi-provider/
make release
rpm -ihv target/Linux_ULINUX_1.0_x64_64_Release/psrp-1.4.1-0.universal.x64.rpm
Теперь мы сможем подключаться с Windows на Linux и наоборот при помощи PowerShell. Начнем с Windows на Linux:
$cred = Get-Credential

#пропустим проверку сертификата для нашей тестовой лаборатории
$o = New-PSSessionOption -SkipCACheck -SkipRevocationCheck -SkipCNCheck

#выполнение команды:
Invoke-Command -ComputerName server -ScriptBlock { Get-Process } -Authentication Basic -SessionOption $o -Credential $cred -UseSSL | Select-Object -First 5

#подключение к консоли
Enter-PSSession -ComputerName 'server' -Credential $cred -Authentication basic -UseSSL -SessionOption $o
С Windows на Linux.
Аналогичным образом можно провести и обратное подключение.
Invoke-Command можно «натравить» на список компьютеров, и с рабочей станции Windows создать пользователя на всех серверах Linux командой вида:
 Invoke-Command -ComputerName server1,server2,server3  -ScriptBlock { adduser admin;echo admin:password | chpasswd
 }
Надо сказать, что способ не самый удобный и эффективный. Минусов добавляет компиляция библиотек, разнообразные баги ― например, на момент написания статьи PSRP не позволял нормально подключиться из Linux в Windows.
Да и сами разработчики рекомендуют не плясать вокруг WS-Man, а обратиться к проверенному способу ― SSH. Что ж, попробуем и его.
Гора идет к Магомету
На этот раз машина с Windows получит чуть больше специфической подготовки ― нужно установить свежий PowerShell и OpenSSH.
После можно проверить синтаксис командлета New-PSSession. Если все произошло как надо, то командлет, помимо привычного параметра ComputerName, будет поддерживать и HostName.

PowerShell 6.0.0-beta.9 и обновленный синтаксис командлета.
Установка OpenSSH описана в отдельной инструкции.
Но под спойлером вы найдете все основные моменты.
Качаем последний релиз или используем пакет из репозитория Chocolatey. Все это разархивируем в \Program Files\OpenSSH.
В консоли с правами администратора переходим в папку с разархивированным содержимым и запускаем установку командой:
powershell -ExecutionPolicy Bypass -File install-sshd.ps1
Теперь генерируем ключи:
.\ssh-keygen.exe -A
.\FixHostFilePermissions.ps1 -Confirm:$false
В тестовой среде мы будем использовать парольную аутентификацию, поэтому стоит убедиться что она включена в файле sshd_config:
```bash
PasswordAuthentication yes
```
Если вы также хотите автоматически запускать PowerShell при подключении по SSH, то в параметре subsystem нужно прописать путь к желаемой версии PS:
Subsystem powershell C:/Program Files (x86)/PowerShell/6.0.0-beta.9/pwsh.exe -sshs -NoLogo -NoProfileДля работы клиента SSH нужно добавить директорию в %PATH% любым удобным способом. Например, таким:
setx path "%path%;C:\Program Files\OpenSSH"Остается только настроить и запустить службы:
Set-Service sshd -StartupType Automatic
Set-Service ssh-agent -StartupType Automatic
net start sshd
После установки уже можно наслаждаться подключением к серверу Windows по ssh.

C Windows через Putty на Linux, с Linux обратно на Windows по SSH.
На достигнутом останавливаться не будем и перейдем к настройке Linux. При настройке сервера SSH по умолчанию достаточно прописать PowerShell в Subsystem:
Subsystem powershell /usr/bin/pwsh -sshs -NoLogo -NoProfileТеперь проверим подключение через командлет New-PSSession и Invoke-Command.
Сначала Windows:
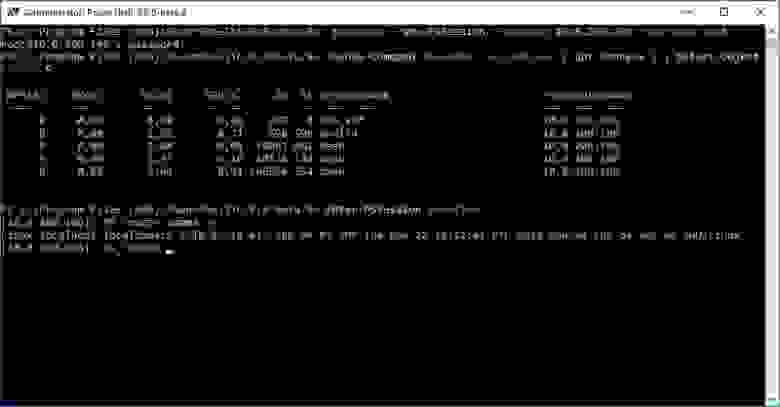
Работаем из PowerShell с Linux-сервером.
Теперь подключимся из Linux к Windows:

Работаем из PowerShell с Windows-сервером.
В отличие от WS-Man, SSH настраивается намного проще и работает стабильнее. Да и беспарольное подключение по ключам настраивать привычнее.
В хозяйстве пригодится
С однозначным «советом потребителю» все опять сложно: SSH проще в настройке и стабильнее, но WS-Man использует API и позволяет применять инструменты вроде JEA. На боевых серверах использовать WS-Man я бы не стал однозначно, а вот реализация OpenSSH в Windows как сервера, так и клиента мне понравилась. Для самопальной автоматизации вполне подойдет даже без PowerShell.
В любом случае, границы между Linux и Windows хоть и медленно, но начинают стираться, что безусловно радует.
Putty is a free and open-source cross-platform that allows you to connect to a Linux server and access your Linux server. This software also supports Telnet and Rlogin protocols. This program must be downloaded and installed before connecting to your Linux server. Instead of using the built-in Linux systems, Linux PuTTY is used. Linux distributions come with SSH functionality incorporated into their terminal, although in real environments, PuTTY is more commonly used than the default Linux systems. In this article, you will learn How to Connect to a Linux VPS Using Putty (SSH).
After buying your Linux VPS, it is essential to know how to use putty in Linux. Putty Linux is not that complicated but helps you to work with its GUI and experience easier usage.
What is putty in Linux?
For Windows, Linux, and Unix-like operating systems, PuTTY is a free and open-source GUI client that supports a broad number of protocols, including SSH, Telnet, Rlogin, and serial. This graphical terminal tool called PuTTY Linux is capable of connecting to serial ports and supporting the SSH, telnet, and rlogin protocols. It can also establish a connection to raw sockets, usually for debugging purposes. The main usage of Putty on Linux is probably debugging: connecting to raw sockets and connecting to serial ports. This is because most users would just use the preinstalled OpenSSH in a terminal window on Linux for basic SSH access.
Particular advantages of using Linux PuTTY include when working away. Configuration is more dependable and simple. And after a brief interval, it connects to connect remotely. Windows administrators typically use PuTTY as SSH and telnet clients to connect from their local Windows PCs to remote Linux servers. PuTTY, however, is not just for Windows. It is also well-liked by Linux users.
Connect To Linux VPS with Putty
Step 1. Download & Install Putty
Firstly, you need to download and install Putty software. Most Linux distributions have official default repositories where PuTTY in Linux can be installed. Here, we go as follows.
Download a suitable software version of Putty, if your system support 64-bit so download it, if not download the 32-bit version. Then, complete the installation steps and Install the Putty to Linux connection!
Step 2. Use Putty to connect to a VPS using Password
Search the “Putty” in your Windows search box and open it. In the launched window, put the IP or Hostname and click Open. Example, IP: 192.168.1.14 or Hostname: server1.domain.com
Note: The default SSH port number is 22, also make sure the SSH radio button is selected!
It will pop up a Warning page at the first login! If you are sure that you have entered the correct information, click Yes. Future connections do not show this warning because the host key is now cached on the local computer.
Now the connection is created, Just type the Username and press Enter, After that, type Putty Password and press Enter again.
Note: Due to security reasons, You won’t see the typed characters as a password!
 Hola! You are in!
Using the Putty SSH client, you can connect to your account.
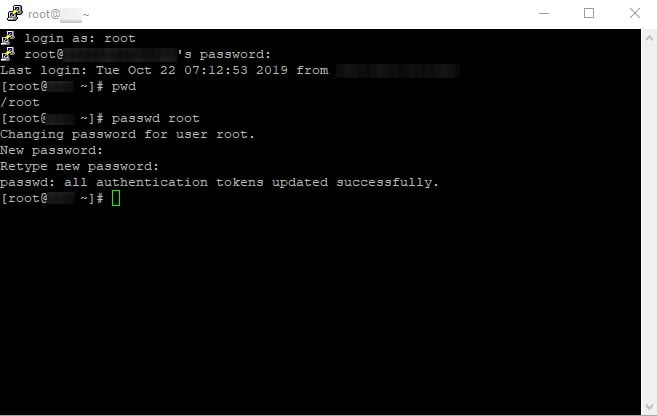
How to change the Linux VPS Root Password
We always recommend changing the default root password to a personal one! You can use passwd command to do it in 3 simple steps!
- Execute the
passwdin the shell prompt

- Enter the new password. As mentioned, the password does not echo to the screen.
- Reenter the new password and press Enter.
You’ve now used PuTTY to successfully get into your SSH account and configured it to connect using a secure SSH key pair. You only need to double-click on the stored session you established and input your passphrase to connect securely in the future.
What are Putty Alternatives?
PuTTY still has a lot of users that use it to connect to Linux servers and network devices using SSH, but its single-session handling design has some drawbacks. Today, a wide variety of SSH clients and terminal emulators that aim to outperform PuTTY are readily available. Let’s look at different online PuTTY alternatives and how they differ from this venerable program.
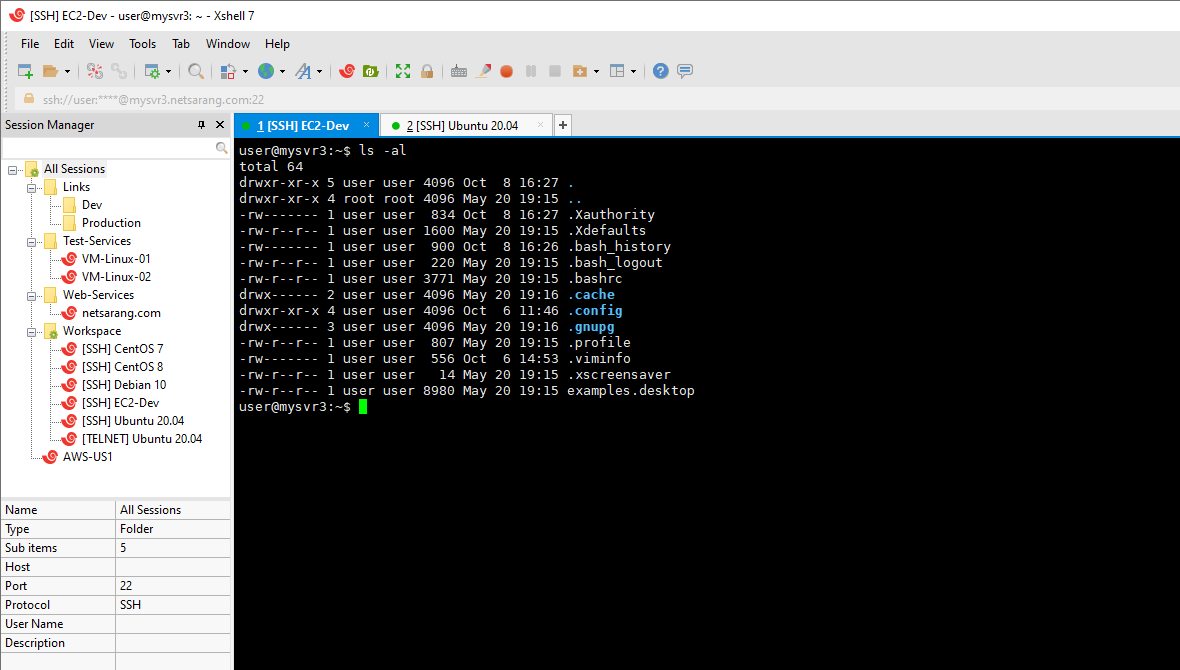
Xshell
An application called Xshell was created by Netsarang as part of their PC X software collection to simplify the interface between UNIX, Linux, and Windows systems. The SSH client component of that package, Xshell, was created with difficult administrative responsibilities in mind. You can manage numerous connections with a session manager, and switching between them is simple with Xshell’s tabbed GUI interface. Complex scripts can be written more easily with Xshell’s draft & send interface. Xshell supports cutting-edge encryption techniques like GSSAPI and PKCS#11 if security is a priority.
Bitvise SSH Client
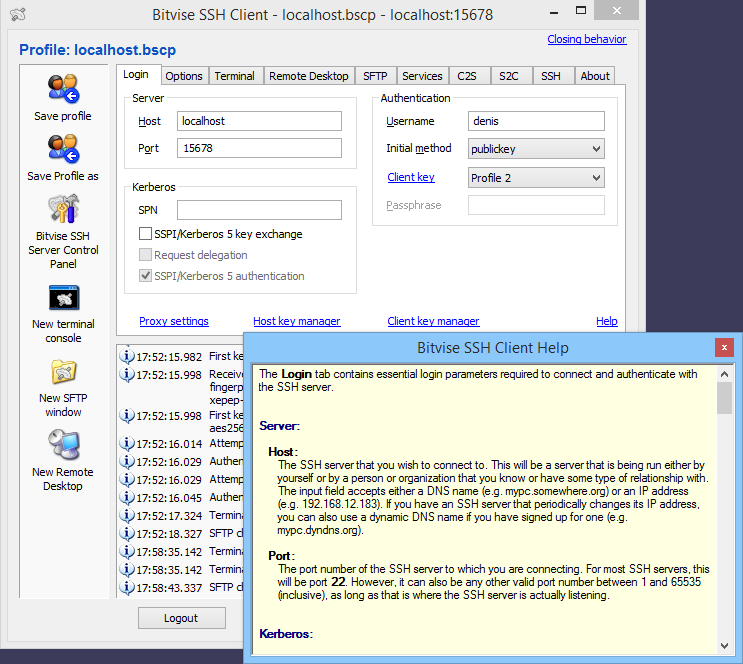
The Bitvise SSH Client is a free Windows utility that works in conjunction with the Bitvise SSH Server but can also be used independently. For up to 30 days, the Bitvise SSH Server is free. The SSH client is free forever and compatible with Windows OS. It is a contemporary terminal emulator that supports SFTP, SSH, SCP, and tunneling connections and offers both a GUI and command-line interface. Moreover, complex tunneling features are used. Bitvise SSH Client offers features like dynamic port forwarding and proxy server functionality, coupled with the security of encryption technology. To speed up the connection procedure, Bitvise has integrated typical activities like Remote Desktop forwarding into the Interface.
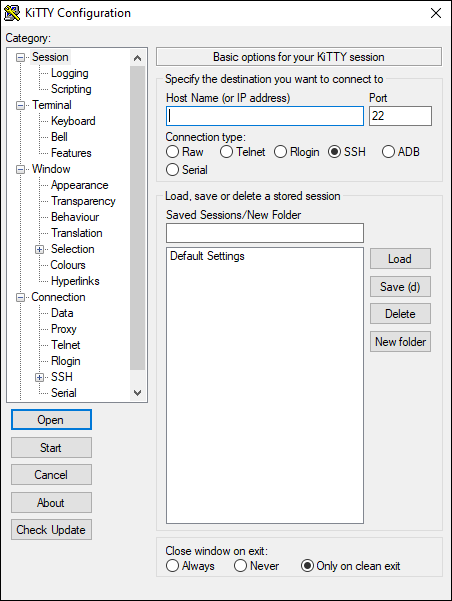
Kitty
A fork of PuTTY is KiTTY. That implies that the source code of PuTTY was previously copied and modified to create this unique program. The original program has been altered and upgraded since that copy was made. As a development of the PuTTY code, KiTTY is the genuine heir to PuTTY, therefore if you’re looking for a PuTTY alternative, this is it. The utility contains SCP for secure file transfers and offers an SSH secure connection. Kitty is also routinely updated, therefore this utility has steadily strayed from PuTTY’s basic functionality. Only Windows users can download Kitty for free. You can log into distant Windows, Linux, Unix, and macOS devices even if the interface only supports Windows.
You can write scripts to automatically log in and execute commands on the command line of the remote computer. The interface can display numerous concurrent sessions.
You are recommended to explore other alternatives of Petty to find the best option.
Click Save after entering the hostname (or IP address) and a session name. Before clicking the Save button, make sure the destination has already been specified if you have a key file.
To connect to Windows VPS, you should use RDP. To learn more, refer to our related article on How To Connect To A Windows VPS?
Also, to connect to Linux VPS, putty is used as you read in this article.
Conclusion
In this article, you learned How to Connect to a Linux VPS Using Putty (SSH). The most popular method for connecting to a Linux-based VPS from a Windows machine is through SSH, which can be done with PuTTY for Linux. Free software called PuTTY enables command-line access to your server. Now, you know what PuTTY is, how to install and use it, and also the way you can access remote systems.
Introduction
Connecting to a Linux server for the first time may seem confusing, especially if you have a strong Windows background. SSH allows you to establish a secure connection between your computer and the Linux server and manage it remotely.
This article explains how to use PuTTY and OpenSSH client on Windows to connect to a Linux server.
In the end of this tutorial, you know:
- How to install PuTTY and OpenSSH client on Windows
- How to connect to the server using password authentication
- How to create public and private key pairs
- How to connect to the server using public key authentication
- How to enhance the security of your Linux server
Prerequisites
- A Windows workstation
- A Linux server instance
Get Your Linux Server Credentials
- Navigate to your Customer Portal
- Click «Products»
- Click your instance.
- Copy your credentials
- IP Address
- Username
- Password
Install PuTTY
PuTTY is an open-source SSH and Telnet client for Windows which is available for all versions of Windows.
- Download PuTTY from the official website.
- Run the PuTTY installer to install PuTTY.
Connect to The Server with PuTTY Using Password
- Open up the Windows Start menu, search for «PuTTY» and launch the application.
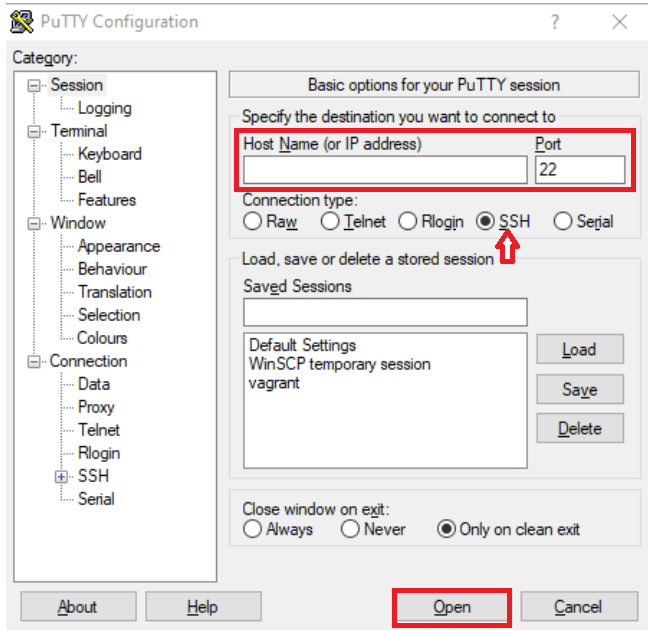
- Enter the following information into the window named «PuTTY Configuration»
- Host Name (or IP address) — this is the IP address of your Vultr server
- Port — the default port for SSH is 22. See the «Server hardening» section if you want to change the default port.
- Click «Open» to start the connection
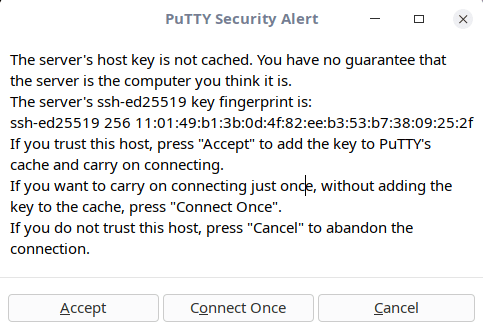
- In the «PuTTY Security Alert» dialog, choose «Accept». You can check the message in the dialog for more information about the security alert.
-
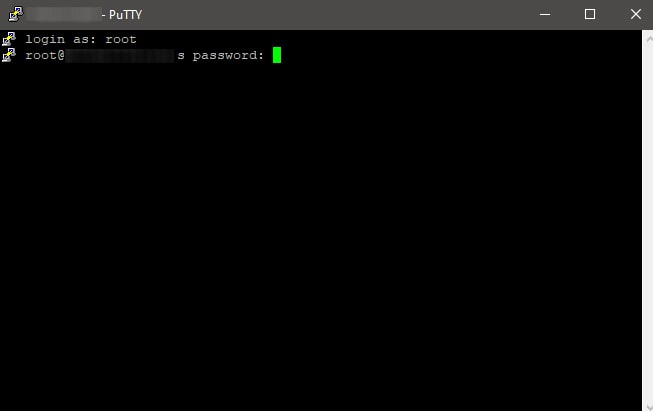
Enter your username from the previous step. Here is an example result
login as: root -
Copy the password from the previous step. Paste the password by clicking the right mouse on the terminal. Here is an example result. The password is not visible.
root@149.28.148.36's password: -
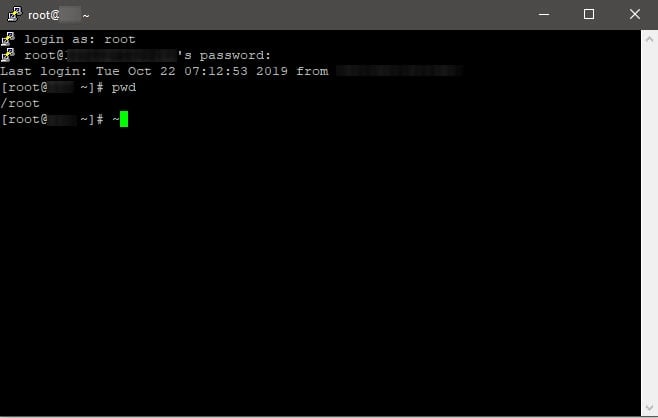
You are now logged into your server. Here is an example result with a Ubuntu 22.04 server.
login as: root root@149.28.148.36's password: Welcome to Ubuntu 22.04 LTS (GNU/Linux 5.15.0-25-generic x86_64) * Documentation: https://help.ubuntu.com * Management: https://landscape.canonical.com * Support: https://ubuntu.com/advantage System information as of Sat Apr 23 09:49:11 AM UTC 2022 System load: 0.0 Processes: 134 Usage of /: 27.0% of 24.41GB Users logged in: 0 Memory usage: 23% IPv4 address for enp1s0: 149.28.148.36 Swap usage: 0% 0 updates can be applied immediately. root@vultr:~# -
Type
exitthen pressEnterto log out of your server.
Install OpenSSH Client on Windows
OpenSSH Client is another option to connect to your server through SSH included in Windows 10 and Windows Server 2019.
- Open up the Windows Start menu, search and open «Manage optional features».
- Check the list «Installed features» to see if «OpenSSH client» is already installed.
- Click «Add a feature». Find «OpenSSH Client», then click «Install».
- Open Command Prompt
-
Check OpenSSH version:
$ ssh -V
The result should be like:
OpenSSH_for_Windows_8.1p1, LibreSSL 3.0.2
Connect to The Server with OpenSSH Using Password
- Open Command Prompt or Windows PowerShell
-
Run the following command to connect to your server. Replace
rootwith your server username. Replaceservernamewith the IP address of your server.$ ssh root@servername -
After connected, answer
yeswhen you get a message like:The authenticity of host '149.28.148.36 (149.28.148.36)' can't be established. ECDSA key fingerprint is SHA256:ZbS/36vzv0lEzwkSkFGwA8A7gh/GWGFaQFeeC7fPAcY. Are you sure you want to continue connecting (yes/no/[fingerprint])? -
Copy the password from the previous step. Paste the password by clicking the right mouse on the terminal. Here is an example result. The password is not visible.
root@149.28.148.36's password: -
You are now logged into your server. Here is an example result with a Ubuntu 22.04 server.
login as: root root@149.28.148.36's password: Welcome to Ubuntu 22.04 LTS (GNU/Linux 5.15.0-25-generic x86_64) * Documentation: https://help.ubuntu.com * Management: https://landscape.canonical.com * Support: https://ubuntu.com/advantage System information as of Sat Apr 23 09:51:22 AM UTC 2022 System load: 0.0 Processes: 134 Usage of /: 27.0% of 24.41GB Users logged in: 0 Memory usage: 23% IPv4 address for enp1s0: 149.28.148.36 Swap usage: 0% 0 updates can be applied immediately. root@vultr:~# -
Type
exitthen pressEnterto log out of your server.
Benefits of Public & Private SSH Keys
Public key authentication provides a reliable and secure alternative to the password authentication. It frees the users from remembering complicated passwords.
Public key authentication also allows secured, automated login in countless automation tools.
In public key authentication, the SSH key pairs includes two keys:
- A public key is on the SSH server. Anyone can encrypt the data using the public key. Using the private key is the only way to decrypt the data.
- A private key remains with the user. The user can use a passphrase to protect the private key files from unauthorized access.
In this article, you generate an ED25519 format keypair. Here are some advantages of ED25519 format compared to other formats:
- Small public and private key length for the same level of security.
- Fast key generation and verification.
Create an ED25519 format keypair with PuTTY

- Open up the Windows Start menu, search for «PuTTYgen» and launch the application.
- Under the «Parameters» section, select «EdDSA». Make sure that the selection box is «Ed25519 (255 bits)»
- Click «Generate».
- Move the mouse over the blank area to generate the keys.
- Click «Save private key» to save the private key. You can set a passphrase to protect the private key from unauthorized access.
- Copy the content of under «Public key for pasting into OpenSSH authorized_keys» file.
The public key is a string as follows:
ssh-ed25519 AAAAC3NzaC1lZDI1NTE5AAAAIAWT7d2UKNJJ6jurMml+6tCktL4dWuWtvTOomJ1rQv12 eddsa-key-20220424
The private key is a file with extension .ppk that you need to login to the server.
Here is the content of the generated private key
PuTTY-User-Key-File-3: ssh-ed25519
Encryption: none
Comment: eddsa-key-20220424
Public-Lines: 2
AAAAC3NzaC1lZDI1NTE5AAAAIAWT7d2UKNJJ6jurMml+6tCktL4dWuWtvTOomJ1r
Qv12
Private-Lines: 1
AAAAIGb7S+9kgp96L9HUUY04rgE7laU86BO1scZv8WBSAoo4
Private-MAC: f956dd2563aeb14132be4ea22d22a29ac16733b3285fd07876049226e6774ca5
Create an ED25519 format keypair with OpenSSH on Windows 10 & 11
- Open Command Prompt or Windows PowerShell.
-
Run the following command to generate an ED25519 format key pair. Replace
<comments>with your own comment to organize the keys easier.$ ssh-keygen -t ed25519 -C "<comment>" - (Optional) Enter the name of the private key when asked «Enter file in which to save the key».
- (Optional) Enter the passphrase to protect the private key from unauthorized access. Leave empty for no passphrase.
Here is an example output
Generating public/private ed25519 key pair.
Enter file in which to save the key (C:\Users\quanh/.ssh/id_ed25519):
Enter passphrase (empty for no passphrase):
Enter same passphrase again:
Your identification has been saved in my-vultr-key.
Your public key has been saved in my-vultr-key.pub.
The key fingerprint is:
SHA256:tmAS/9vfH6prgMC3sZkd2yGxUKW6zN7jgrx2oaX1jmg <comment>
The key's randomart image is:
+--[ED25519 256]--+
|        ....     |
|       . ..      |
|    o   ..o      |
|     = o.+ .     |
|    . *.S = .    |
|     oo&.= .     |
|    . *+= .    . |
|     Eooo= . .. .|
|    oooo=++++....|
+----[SHA256]-----+
Here is the content of the Public key named my-vultr-key.pub:
ssh-ed25519 AAAAC3NzaC1lZDI1NTE5AAAAILuIiHMAsxs5KEfZp6JTp+qP2oqRLqryI0Yc8Ksan9Ft my-vultr-key
Here is the content of the Private key named my-vultr-key:
-----BEGIN OPENSSH PRIVATE KEY-----
b3BlbnNzaC1rZXktdjEAAAAABG5vbmUAAAAEbm9uZQAAAAAAAAABAAAAMwAAAAtzc2gtZW
QyNTUxOQAAACA1qB9J7bfq9x9uxn+y1jmUY6m8h774k6oq1IyRC4nudAAAAJD16Q3I9ekN
yAAAAAtzc2gtZWQyNTUxOQAAACA1qB9J7bfq9x9uxn+y1jmUY6m8h774k6oq1IyRC4nudA
AAAEA/gZuKIFDh6iYkEXYS8N9bl/9w98B6DrpzzHlG8T67EzWoH0ntt+r3H27Gf7LWOZRj
qbyHvviTqirUjJELie50AAAADG15IHZ1bHRyIGtleQE=
-----END OPENSSH PRIVATE KEY-----
Install the Public Key on an Existing Server
- Log in to your server using password by following the step at the beginning of this article using PuTTY or OpenSSH Client.
-
Edit the
~/ssh/authorized_keyswith your favorite text editor. Paste your public key into a new line.nano ~/.ssh/authorized_keys -
Type
exitthen pressEnterto log out of your server.
Install the Public Key on a Server Through the Customer Portal when Deploying
Follow this article to deploy a new server with your SSH key.
Connect to the Server with PuTTY Using SSH Key

- Open up the Windows Start menu, search for «PuTTY» and launch the application.
- Enter the following information into the window named «PuTTY Configuration»
- Host Name (or IP address) — this is the IP address of your Vultr server
- Port — the default port for SSH is 22.
- On the left sidebar, select «Connection» > «SSH» > «Auth».
- Click the «Browser» button and select your private key from PuTTYgen
- Click «Open» to start the connection
-
Enter your username from the previous step. Here is an example result
login as: root -
You are now logged into your server. Here is an example result with a Ubuntu 22.04 server.
login as: root
Authenticating with public key "eddsa-key-20220424"
Welcome to Ubuntu 22.04 LTS (GNU/Linux 5.15.0-25-generic x86_64)

 * Documentation:  https://help.ubuntu.com
 * Management:     https://landscape.canonical.com
 * Support:        https://ubuntu.com/advantage

  System information as of Sun Apr 24 07:33:03 AM UTC 2022

  System load:  0.0                Processes:               134
  Usage of /:   27.2% of 24.41GB   Users logged in:         0
  Memory usage: 23%                IPv4 address for enp1s0: 149.28.148.36
  Swap usage:   0%

 * Super-optimized for small spaces - read how we shrank the memory
   footprint of MicroK8s to make it the smallest full K8s around.

   https://ubuntu.com/blog/microk8s-memory-optimisation

0 updates can be applied immediately.

root@vultr:~#
Connect to the Server with OpenSSH Using SSH Key
- Open Command Prompt or Windows PowerShell.
-
If your private key is in the default location (
~/.ssh/id_ed25519) then run the following command to connect to the server. Replacerootwith your server username. Replaceservernamewith the IP address of your server.$ ssh root@servername -
If your private key is in not the default location. Run the following command to connect to the server. Replace
rootwith your server username. Replaceservernamewith the IP address of your server. Replaceprivate_key_pathwith your private key path.$ ssh root@servername -i private_key_path -
(Optional) Set your private key as default for all servers. Replace
private_key_pathwith your private key path.$ cp private_key_path ~/.ssh/id_ed25519 -
You are now logged into your server. Here is an example result with a Ubuntu 22.04 server.
Welcome to Ubuntu 22.04 LTS (GNU/Linux 5.15.0-25-generic x86_64)

 * Documentation:  https://help.ubuntu.com
 * Management:     https://landscape.canonical.com
 * Support:        https://ubuntu.com/advantage

  System information as of Sun Apr 24 07:35:01 AM UTC 2022

  System load:  0.0                Processes:               134
  Usage of /:   27.2% of 24.41GB   Users logged in:         0
  Memory usage: 23%                IPv4 address for enp1s0: 149.28.148.36
  Swap usage:   0%

 * Super-optimized for small spaces - read how we shrank the memory
   footprint of MicroK8s to make it the smallest full K8s around.

   https://ubuntu.com/blog/microk8s-memory-optimisation

0 updates can be applied immediately.

root@vultr:~#
Server Hardening
Create a sudo User
A best practice for security is to perform server administration as a non-root user.
-
Follow one of the following article to create a sudo user on your Linux server:
- Ubuntu
- Debian
- CentOS
- Fedora
- OpenBSD
- Arch Linux
- Alma Linux
- VzLinux
- Rocky Linux
-
Create a
.sshfolder in the home directory$ mkdir -p ~/.ssh -
Edit the
~/ssh/authorized_keyswith your favorite text editor. Paste your public key into a new line.$ nano ~/.ssh/authorized_keys
Disable Empty Password
Some Linux distributions allow to create users without passwords.
Set the value of PermitEmptyPasswords to no in /etc/ssh/sshd_config file to disable SSH connections with empty passwords.
PermitEmptyPasswords no
Limit Users Login Access Using SSH
SSH server allows all users to access remotely. Following below steps to override the default setting and limit users access using SSH
-
To allow specific users to access using SSH, set the value of
AllowUsersin/etc/ssh/sshd_configfile as follows. Replaceuser1,user2, andubuntuwith your selected usernames.AllowUsers user1 user2 ubuntu -
To prevent specific users to access using SSH, set the value of
DenyUsersin/etc/ssh/sshd_configfile as follows. Replaceuser3, anduser4with your selected username.DenyUsers user3 user4
Disable SSH Password Authentication
Follow below steps to disable password authentication to your server.
- Make sure you can login using SSH keys
-
Set the value of
PasswordAuthenticationtonoin/etc/ssh/sshd_configfile to disable password authentication.PasswordAuthentication no
Disable SSH Login for root User
Disabling access for the root user is a good security practice.
Set the value of PermitRootLogin to no in /etc/ssh/sshd_config file to disable log in with root
PermitRootLogin no
Change Idle Timeout Interval
Users often keep their SSH connection idle for a long period of time. Setting a timeout after a period of inactivity is a good practice.
Set the value of ClientAliveInterval to your desirable idle timeout in /etc/ssh/sshd_config file. For example, change the timeout value to 360 seconds.
ClientAliveInterval 360
Disable Tunneling and Port Forwarding
To disable tunneling and port forwarding, set the following values in /etc/ssh/sshd_config file.
AllowAgentForwarding no
AllowTcpForwarding no
PermitTunnel no
Apply the New SSH Configuration
-
Check if there is any error in the configuration
$ sudo sshd -t -
Restart the
sshdservice$ sudo systemctl restart sshd
(Optional) How to Change SSH Default Port 22
Changing the default SSH port is a good practice to avoid unusual traffic to open ports. Before changing the port, you may need to configure the SELinux and the firewall on your system.
Port 2233 is the custom port in this article.
Check if your desirable unused port number is in use
$ sudo lsof -i -P -n | grep LISTEN
Configure SELinux to allow the Custom Port for Incoming SSH traffic
Some Linux distributions such as CentOS, RHEL, Alma Linux and Rocky Linux uses SELinux, a built-in security mechanism.
Follow the below steps to configure SELinux to allow your custom port for incoming SSH traffic.
-
Run the following command to check if your server is using SELinux. Skip this section if you are not using SELinux.
$ sestatus -
Change to 2233
$ sudo semanage port -a -t ssh_port_t -p tcp 2233 -
Check if SELinux allows the custom port for incoming SSH traffic
$ sudo semanage port -l | grep ssh
The result should looks like:
ssh_port_t tcp 2233, 22
How to Open A Port with firewalld
Some Linux distributions use firewalld as the default firewall. You need to open the custom port on firewall.
-
Check if you are using
firewalld$ sudo systemctl status firewalld -
Open the custom port with
firewalld. Replace2233with your custom port.$ sudo firewall-cmd --add-port=2233/tcp --permanent -
Reload the settings
$ sudo firewall-cmd --reload
How to Open A Port with ufw
Some Linux distributions use ufw as the default firewall. You need to open the custom port on firewall.
-
Check if you are using
ufw$ sudo systemctl status ufw -
Check the
ufwstatus$ sudo ufw status -
Open the custom port with
ufw. Replace2233with your custom port.$ sudo ufw allow 2233 comment 'SSH' -
Enable
ufwif it is not running$ sudo ufw enable
Add a custom Port to the SSH Configuration
-
Set the value of
Portto your desirable unused port number in/etc/ssh/sshd_configfile. For example, change SSH port to2233Port 2233 -
Restart the
sshdservice$ sudo systemctl restart sshd
Connect to the Server with OpenSSH Using SSH Key on a Custom Port
Add -p port to your ssh command to connect to the server on a custom port. Replace port with your custom port.
$ ssh root@servername -p port
More Information
- PuTTY Documentation