- Home
- mobile
- Apple
- How To
- PC Gaming
Here is all you need to know about connecting your AirPods Max to Windows 10!
Apple’s much vaunted AirPods Max are undoubtedly an appealing choice when it comes to owners of Apple products. But is the same also true for people who aren’t as closely wedded to the Apple ecosystem? Can we connect AirPods Max to our Windows 10 device, and enjoy the benefits of the top quality audio they provide?
Well, we’ll be answering that question in this guide. Everything you need to know about connecting AirPods Max and Windows 10 is right here. So without further ado, here is what you need to know.
Are they actually compatible with Windows 10?
We already know that AirPods Max work seamlessly with Apple products. But Apple have also made sure that they are compatible with other, non-Apple devices. According to Apple the H1 audio processors in these earphones mean that noise cancellation and transparency mode are both available on Windows devices. There are some features, such as spatial audio, which will only work on Apple hardware, but the key takeaway here is that, yes, you can use these headphones with your Windows 10 device.
So now we know what we can use these headphones for, how exactly do we get them connected? Here’s what you need to do.
How to connect AirPods Max with Windows 10
- On your non-Apple device, make sure you have Bluetooth enabled (depending on what you are using, you may need to connect a Bluetooth dongle to your device)
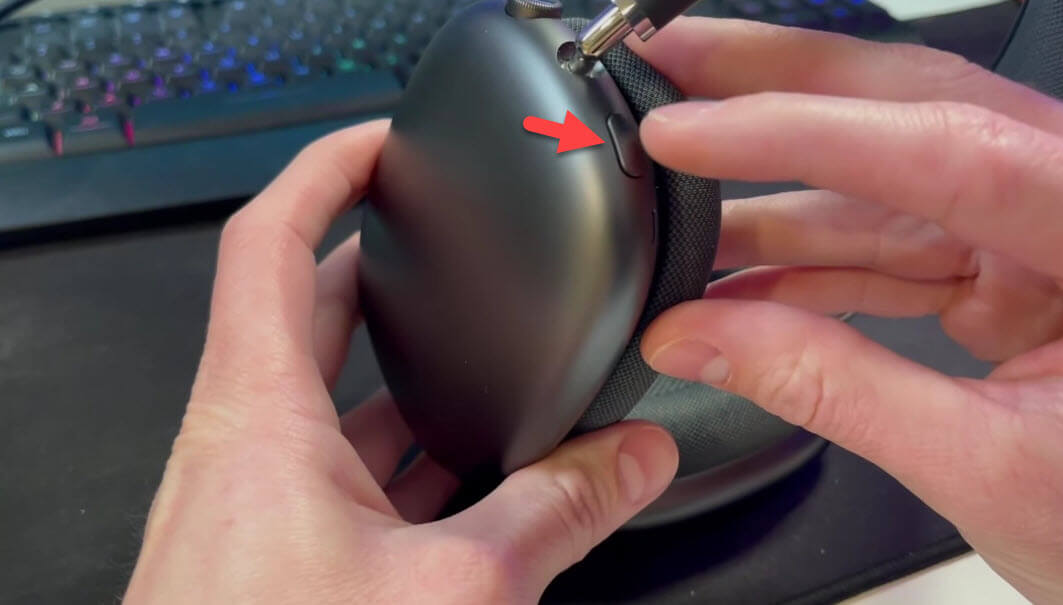
- On your AirPods Max, press and hold the noise control button until the status light flashes white. This indicates that your headphones are in pairing mode.
- When your Max earphones appear in the list of available devices, select them to pair them.
- Your Windows 10 device and your AirPods should now be connected.
Read More: How to use PS Move controllers on Windows 10
For more articles like this, take a look at our
Apple
,
How To
, and
PC Gaming
pages.
AirPods Max deliver immersive, high-fidelity audio. From the canopy to the cushions, every part has been carefully made to fit just right. Outside noise is blocked by industry-leading Active Noise Cancellation, while Transparency mode allows it in. Spatial audio combined with dynamic head tracking creates a theater-like surround sound experience. If you have one and want to know how to pair and use it with your Windows PC, this guide is for you. This guide will show you how to connect and pair your AirPods Max with your Windows 10 or 11 computer.
Table of Contents
How to Pair or Connect AirPods Max to Windows 10/11 Laptop or PC
Here is the process for pairing AirPods Max with Windows:
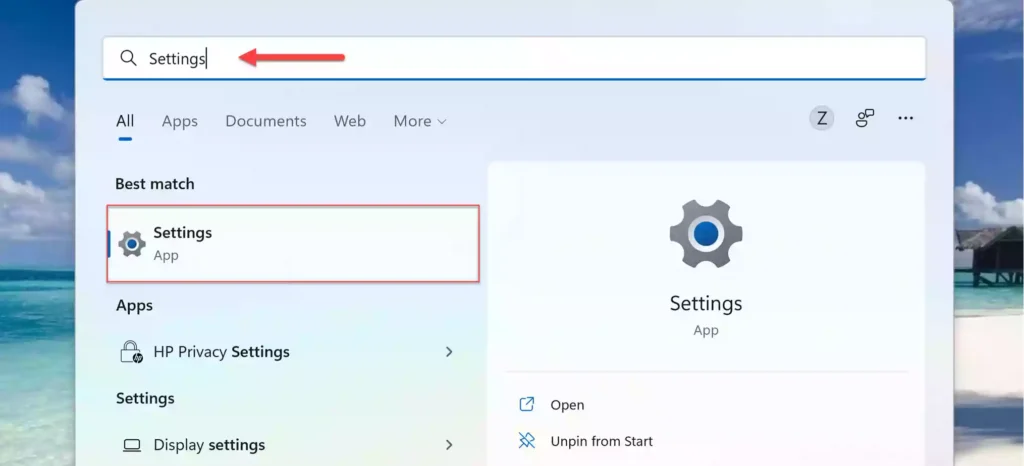
Step 1. Open the Settings app by searching for it in the Start Menu or using the “Windows key + I” shortcut keys.
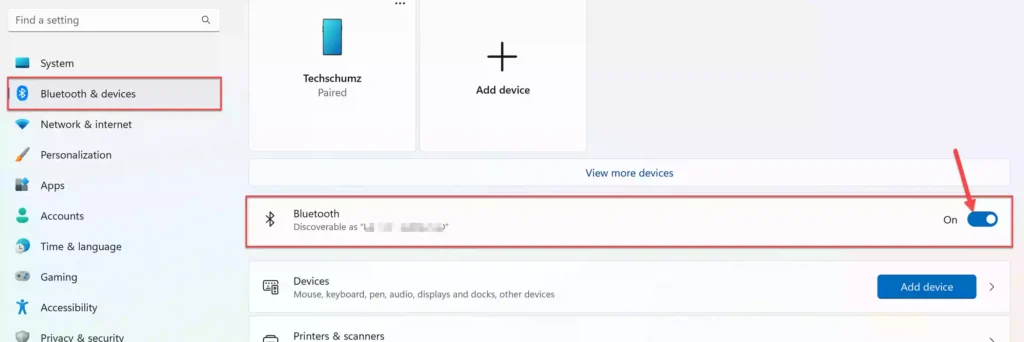
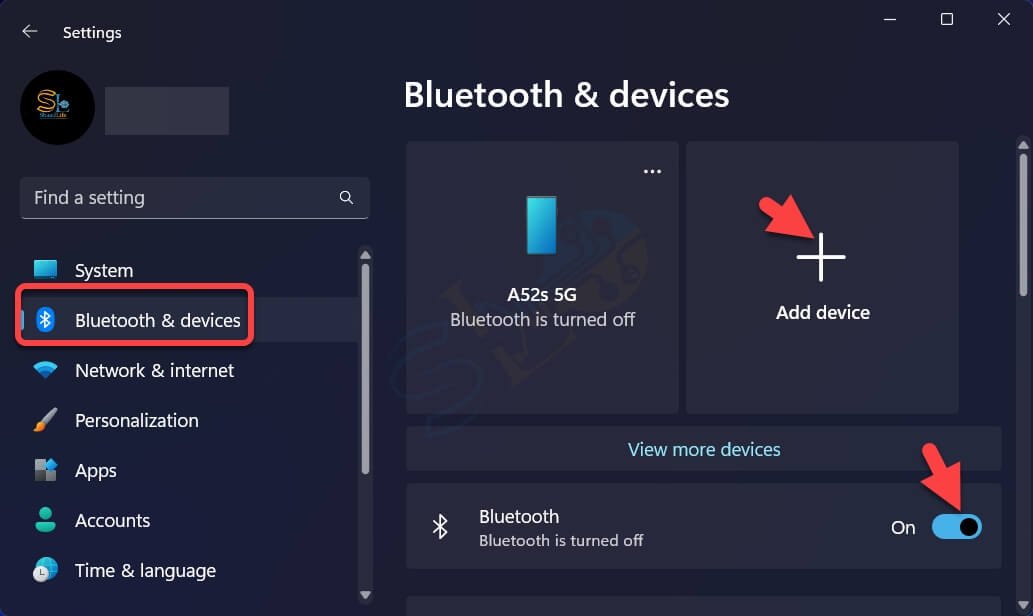
Step 2. Choose “Bluetooth & devices” in the right pane of Windows Settings, and then click the Bluetooth toggle to enable it.
Step 3. After turning on the Bluetooth, put your Nothing AirPods Max in pairing mode. To do so, press and hold the noise-canceling button on your AirPods Max until the white status light starts flashing. This indicates that your headphones are in pairing mode.
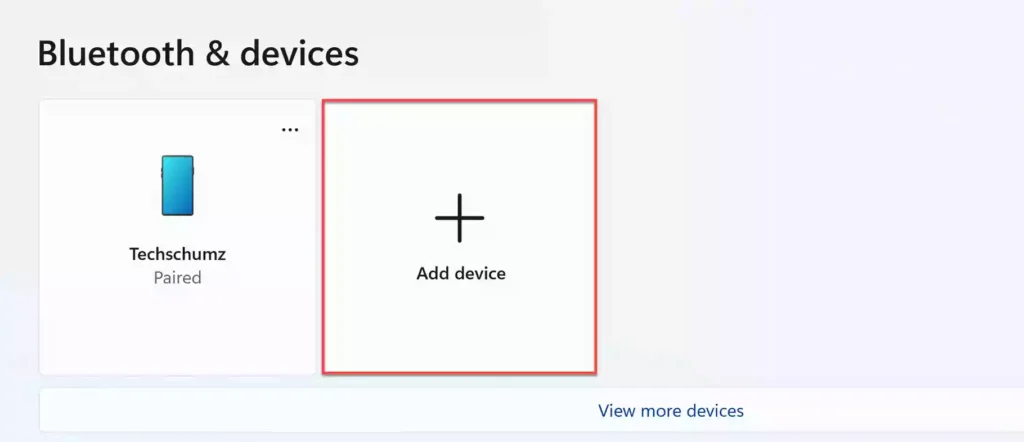
Step 4. Now, click on the “Add device” option to continue.
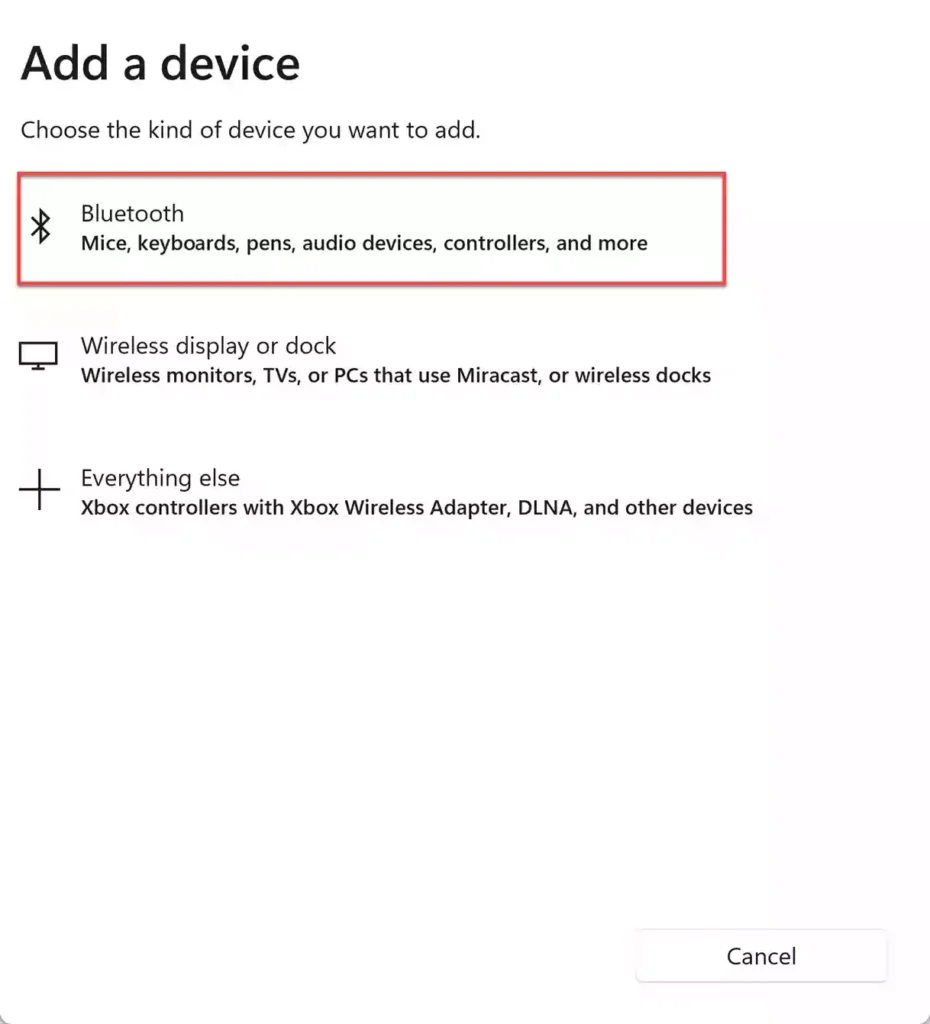
Step 5. Then, from the three options presented, select “Bluetooth.”
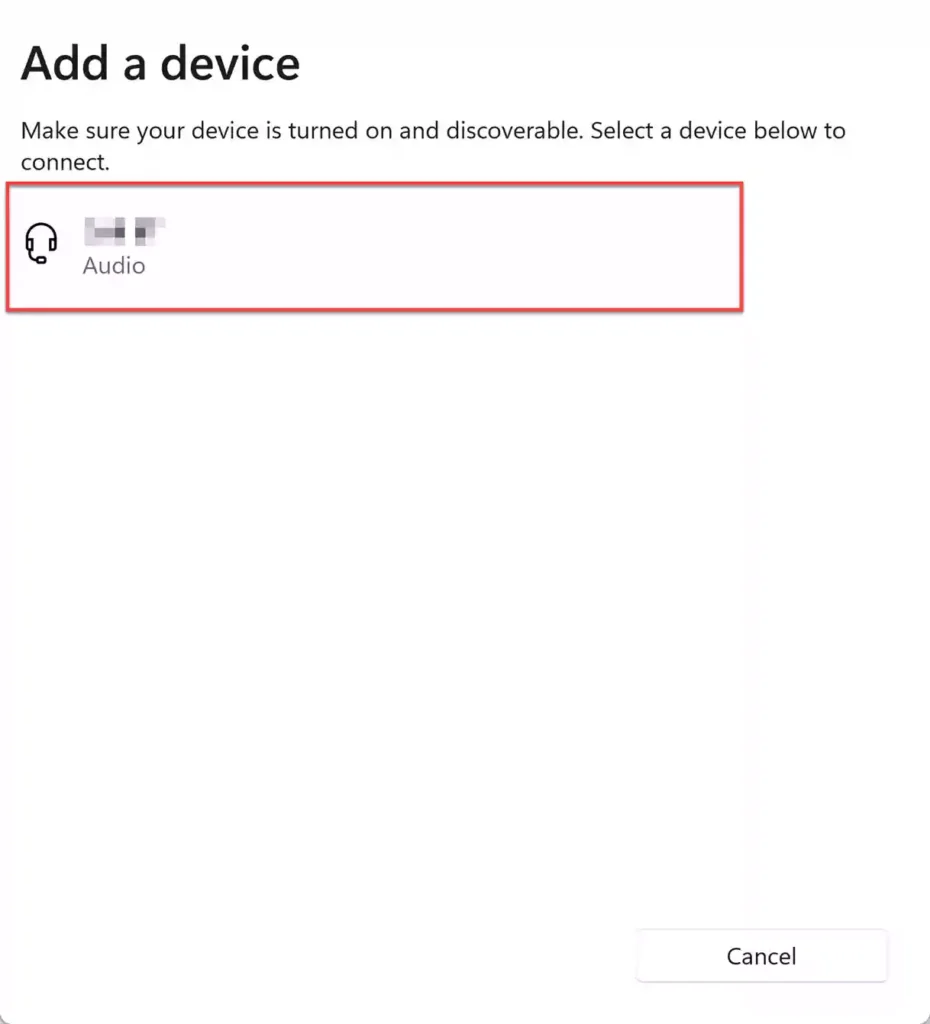
Step 6. Finally, let your Windows 10 or 11 PC search for available devices. When you see your AirPods Max listed, click on it to connect it to your PC.
Frequently Asked Questions
Does my AirPods Max work with my Windows PC?
Using AirPods Max with Apple products is already known to be simple. Apple, on the other hand, has ensured that they are also compatible with non-Apple devices. According to Apple, noise cancellation and transparency modes are both available on Windows devices thanks to the H1 audio processors in these earbuds. The most important thing to remember is that you can use these headphones with your Windows PC, even if some features, such as spatial audio, are only available on Apple devices.
Why my AirPods mic is not working on my PC?
To make your AirPods microphone work, you must make it the default communications device. Right-click the sound icon and select Sounds. Right-click on the AirPods headset in the Playback tab and select Set as Default Communication Device.
Why can’t I connect my AirPods Max to my Windows PC or laptop
The most common reason for your AirPods Max not working is a pairing issue. Disconnecting your AirPods Max from your Bluetooth device and resetting your AirPods Max should resolve the issue in most cases. Cleaning the charging pins in the casing should solve the problem in other cases.
How to reset my AirPods Max?
To reset AirPods Max to factory settings, hold down the noise control button and the Digital Crown for 15 seconds, or until the LED flashes amber, then white. After you’ve reset your AirPods Max, you can reconnect them to your Windows computer.
Read also:
How to Connect AirPods to Samsung Galaxy S22
How to Connect or Pair Bose Earbuds With Your Devices
AirPods Max is one of the best TWS headphones in the market and if you want to pair it with a non-Apple product like a Windows computer then you’re at the right place. This post will show you how to connect AirPods Max to a Windows 10/11 PC or laptop.
The Apple AirPod Max is a fantastic pair of headphones with best-in-class active noise cancellation (ANC) and a superb sound signature. Still, it also has a few irritating quirks that blatantly identify it as an Apple product. The AirPods Max are more of the same in the over-ear form if you already adore your AirPods Pro and are an Apple ecosystem resident.
Since purchasing Beats by Dre in 2014 for an absurd sum of money, it has been clear that Apple has its sights set on the consumer audio market. The AirPods Pro are actually some of the best true wireless earbuds you can get, and the original AirPods were a success despite being poor. We were thrilled yet dubious when Apple finally unveiled its long-awaited over-ear headphones, the AirPods Max. For more information about AirPods Max visit here.
Do They Work with Windows in Reality?
Using AirPods Max with Apple goods is already known to be effortless. Apple has, though, made sure that they are also compatible with other, non-Apple devices. Noise cancellation and transparency mode are both accessible on Windows devices, according to Apple, thanks to the H1 audio processors in these earbuds. The most important thing to remember is that you may use these headphones with your Windows PC, even if some capabilities, like spatial audio, will only function on Apple devices.
How to Connect AirPods Max to Windows 10/11 Laptop & PC
Here is the process to pair AirPods Max to Windows:
1. Hold down the noise control button on your AirPods Max until the white status light starts to flash. This shows that the pairing mode on your headphones is active.
Pairing Mode AirPods Max
2. On Windows 10:
- Press Windows + I keys to open Settings directly.
- Click Devices.
- Click Bluetooth & other devices > turn on Bluetooth and select Add Bluetooth or other device.

Add Bluetooth or other device
3. On Windows 11:
- Press Windows + I keys to open Settings directly.
- Select Bluetooth & devices > enable Bluetooth and click + Add device.
+ Add device
4. Select Bluetooth.

Bluetooth
5. From the list, select AirPods Max.
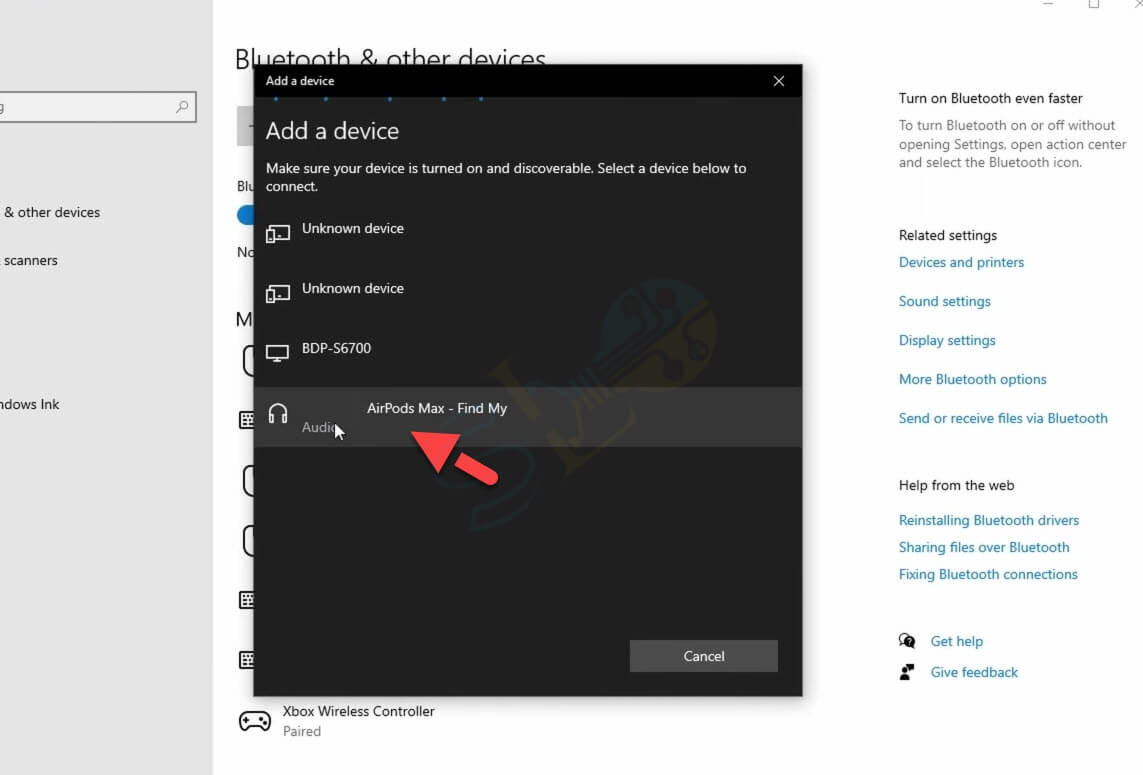
Connect AirPods Max to a Windows
6. Finally, the AirPods Max is connected to your computer.
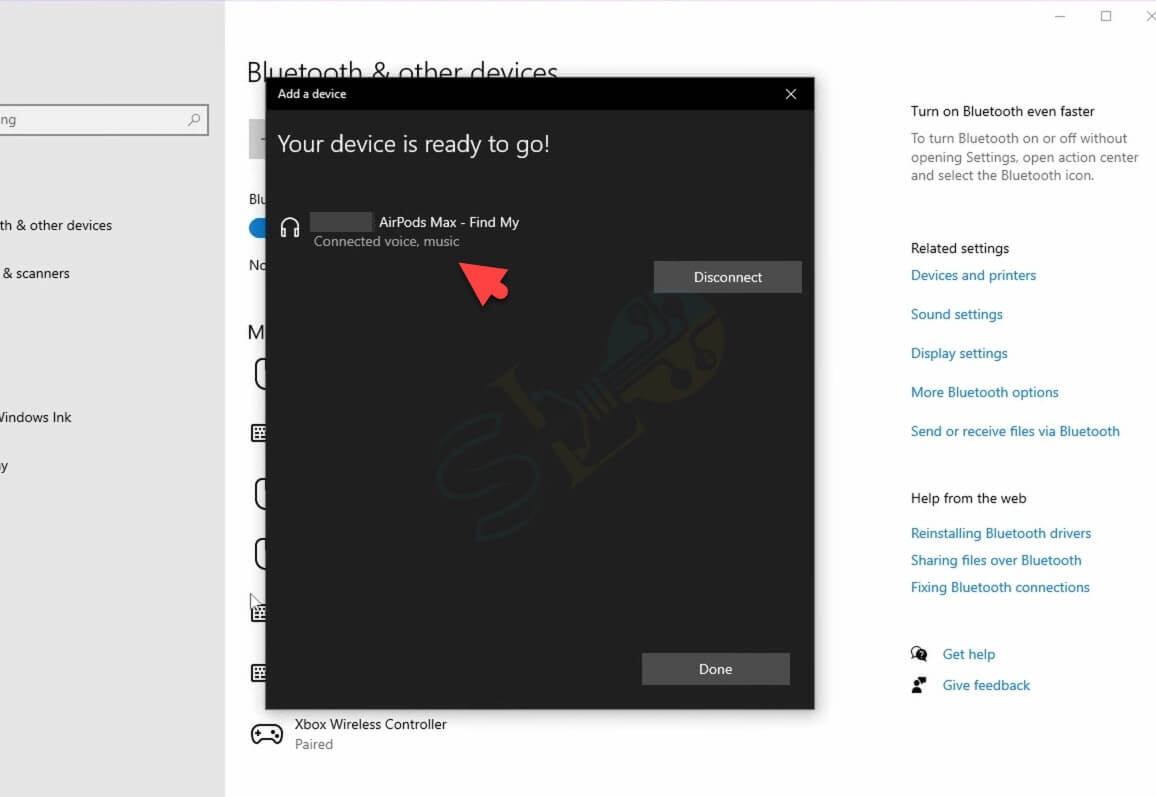
Connect AirPods Max to a Windows
Learn the Controls
The AirPods Max doesn’t have any touch controls; instead, they rely on a digital crown similar to that on an Apple Watch and a separate noise-canceling button. Both buttons, which have many functions, are located on top of the right ear cup.
The digital crown is a good place to start because it has a lot of settings and functionality.
- Control the volume level by turning the crown in either direction.
- Single-press to play or pause.
- Double-press the crown to skip forward.
- Triple-press to go back.
- Press and hold to trigger Siri.
A phone call may also be answered or ended using the digital crown.
- Single-press to answer or end a call.
- Double-press to reject a call.
- During a call, single press to answer a second incoming call and put the first call on hold.
- With two calls active, double-press to hang up the current call and switch to the other call.
- Press and hold to reject a second incoming call.
- Double-press to stop listening through your headphones and send the call to your phone.
That’s it. These were the steps to connect and pair the AirPods Max to a Windows 10/11 PC or laptop.
Read more
How to Pair Sennheiser HD 450BT to Laptop in Windows 10/11
How to Connect Bose QC35 Headphone to a Laptop in Windows 10/11

ShaadLife Team
We are professional How-to content writers. As a tech enthusiast and geek, we love to write and share articles about different operating systems such as Android, Windows, macOS, iOS, and some other products like a smartwatch and smart TV.
Introduction
Are you the proud owner of the Apple AirPods Max and wondering how to connect them to your PC? Look no further! In this guide, we will walk you through the step-by-step process of connecting your AirPods Max to your PC, ensuring that you can enjoy your favorite music, podcasts, and videos with high-quality sound.
The AirPods Max offers a seamless wireless experience, designed to work seamlessly with Apple devices. However, connecting them to a PC requires a few additional steps. Whether you want to use your AirPods Max for video conferencing, gaming, or simply to enjoy your favorite music while working, we’ve got you covered.
Before we dive into the process, it’s important to note that the AirPods Max are compatible with PCs running Windows 10 or later versions. If you are using an older version of Windows or a different operating system, connecting AirPods Max may not be possible. However, if you meet the compatibility requirements, let’s get started!
In the following sections, we will guide you through the necessary steps to connect your AirPods Max to your PC. We will cover everything from checking compatibility to pairing your devices and adjusting settings. So, grab your AirPods Max and let’s begin the journey to PC connectivity!
Step 1: Check Compatibility
Before attempting to connect your AirPods Max to your PC, it’s essential to ensure that your PC meets the necessary compatibility requirements. Here’s what you need to check:
- Operating System: Confirm that your PC is running Windows 10 or a later version. Compatibility may vary with older versions of Windows or different operating systems.
- Bluetooth Capability: Check whether your PC has built-in Bluetooth functionality. Most modern PCs come equipped with Bluetooth, but if yours doesn’t, you will need to purchase a Bluetooth adapter separately.
If your PC satisfies both of these requirements, you are ready to proceed to the next step. However, if your PC is not running the appropriate operating system or lacks Bluetooth capability, you may need to consider alternative methods for audio connectivity.
It’s important to note that while AirPods Max is designed to work seamlessly with Apple devices, it can still be paired with non-Apple devices such as PCs. However, some features may be limited, and you may not have access to certain functionalities that are exclusive to Apple devices.
Once you’ve verified the compatibility of your PC, you can move on to the next step: installing a Bluetooth adapter (if necessary).
Step 2: Installation of Bluetooth Adapter (If Required)
If your PC does not have built-in Bluetooth capability, don’t worry! You can still connect your AirPods Max by installing a Bluetooth adapter. Follow these steps to get started:
- Check for an available USB port: Examine your PC for accessible USB ports. Most Bluetooth adapters connect via USB, so make sure you have a spare USB port available.
- Purchase a compatible Bluetooth adapter: Visit an electronics store or browse online for a Bluetooth adapter that is compatible with your PC. Look for one that supports Bluetooth 4.0 or higher for optimal performance.
- Insert the Bluetooth adapter: Once you have obtained a Bluetooth adapter, carefully insert it into an available USB port on your PC. Ensure a secure connection is made.
- Install device drivers (if necessary): In some cases, you may need to install device drivers for the Bluetooth adapter to function correctly. Check the instructions provided with the adapter for any driver installation requirements.
- Restart your PC: After the adapter is inserted and any necessary drivers have been installed, restart your PC to ensure that the changes take effect and the adapter is recognized.
Now that you have successfully installed the Bluetooth adapter (if required), you are ready to proceed to the next step: putting your AirPods Max into pairing mode.
Step 3: Put AirPods Max in Pairing Mode
Before you can connect your AirPods Max to your PC, you need to put them into pairing mode. Follow these simple steps to put your AirPods Max into pairing mode:
- Ensure your AirPods Max are charged: Make sure your AirPods Max have sufficient battery power by charging them with the included Lightning cable.
- Locate the noise control button: On your AirPods Max, locate the noise control button. This button is located on the top of the right ear cup.
- Press and hold the noise control button: Press and hold the noise control button until the LED indicator on the bottom of the right ear cup starts flashing white.
By following these steps, you have successfully put your AirPods Max into pairing mode. The flashing white light indicates that your AirPods Max are now discoverable and ready to be paired with your PC.
Note that after a certain period of inactivity, your AirPods Max will automatically exit pairing mode to save battery power. In such cases, you will need to repeat these steps to put them back into pairing mode.
Now that your AirPods Max are in pairing mode, proceed to the next step: opening your PC’s Bluetooth settings.
Step 4: Open PC’s Bluetooth Settings
Now that your AirPods Max are in pairing mode, it’s time to open your PC’s Bluetooth settings to establish a connection. Follow these steps to open the Bluetooth settings on your PC:
- Click on the Windows Start button: Located on the bottom left corner of your screen, click on the Windows Start button to open the Start menu.
- Search for “Bluetooth settings”: In the search bar within the Start menu, type “Bluetooth settings” and select the corresponding result.
- Open Bluetooth settings: The Bluetooth settings window will open, displaying available Bluetooth devices in your vicinity.
Once you have successfully reached the Bluetooth settings window on your PC, you are ready to proceed to the next step: pairing your AirPods Max with your PC.
Note that the steps to open Bluetooth settings may vary slightly depending on the version of Windows you are using. If you encounter any difficulties, refer to your PC’s user manual or search online for specific instructions based on your operating system.
With the Bluetooth settings window open, let’s move on to the next step: pairing your AirPods Max with your PC.
Step 5: Pair AirPods Max with PC
Now that you have opened your PC’s Bluetooth settings, it’s time to pair your AirPods Max with your PC. Follow these steps to establish a connection:
- Click on “Add Bluetooth or other device”: Within the Bluetooth settings window, click on the “Add Bluetooth or other device” button. This will initiate the pairing process.
- Select “Bluetooth”: In the “Add a device” window, choose the option to add a Bluetooth device.
- Wait for the PC to detect your AirPods Max: Your PC will begin scanning for available Bluetooth devices. Wait for your AirPods Max to appear in the list of devices. It should be displayed as “AirPods Max” or a similar name.
- Select your AirPods Max: Once your AirPods Max is detected, click on it to select it as the device you want to connect to your PC.
- Complete the pairing process: Follow any additional on-screen prompts to complete the pairing process. This may include confirming a passcode or accepting a pairing request on both your PC and your AirPods Max.
Once the pairing process is completed successfully, your AirPods Max will be connected to your PC. You can now enjoy high-quality audio wirelessly from your AirPods Max while using your PC.
It’s worth noting that the exact steps and prompts may vary slightly depending on your PC’s operating system and version of Windows. If you encounter any difficulties or if the pairing process fails, refer to your PC’s user manual or search online for specific troubleshooting steps.
Now that your AirPods Max are successfully paired with your PC, let’s move on to the final step: testing the connection and adjusting settings.
Step 6: Test Connection and Adjust Settings
With your AirPods Max now connected to your PC, it’s important to test the connection and adjust any necessary settings to ensure optimal performance. Follow these steps to test the connection and make any desired adjustments:
- Play audio on your PC: Open your preferred media player or streaming service on your PC and play some audio content, such as music or a video.
- Verify audio output: Check that the audio is playing through your AirPods Max. You can do this by listening to the audio output and confirming that it is coming from your AirPods Max instead of the PC’s speakers.
- Adjust volume: Use the volume controls on your AirPods Max or your PC to adjust the volume level to your preference.
- Explore additional settings: Depending on your PC’s operating system and Bluetooth settings, you may have the option to customize additional settings for your AirPods Max. This can include features such as equalizer presets, microphone input, and more. Take some time to explore these settings and make any desired adjustments.
By following these steps, you can ensure that your AirPods Max are functioning properly and that you have the best audio experience while using your PC.
If you encounter any issues during the testing process, such as audio cutting out or connectivity problems, try the following actions:
- Ensure proximity to your PC: Make sure your AirPods Max are within a reasonable range of your PC to maintain a good Bluetooth connection.
- Check for software updates: Ensure that both your PC’s operating system and your AirPods Max have the latest software updates installed.
- Restart your devices: Sometimes, a simple restart can resolve connectivity issues. Try restarting your PC and AirPods Max to see if it improves the connection.
With the connection tested and any necessary adjustments made, you are now ready to enjoy the convenience of using your AirPods Max with your PC for all your audio needs.
Conclusion
Connecting your AirPods Max to your PC opens up a world of possibilities for enjoying high-quality audio wirelessly while working, gaming, or simply relaxing. Throughout this guide, we have covered the step-by-step process to connect your AirPods Max to your PC, from checking compatibility to adjusting settings. By following these steps, you can seamlessly integrate your AirPods Max into your PC setup.
Remember to check for compatibility requirements, and if your PC lacks built-in Bluetooth capabilities, consider investing in a Bluetooth adapter. Putting your AirPods Max into pairing mode and opening your PC’s Bluetooth settings are essential steps in establishing the connection. Once paired, you can test the connection and make any necessary adjustments to enhance your audio experience.
It’s important to note that while AirPods Max is primarily designed for use with Apple devices, they can still be paired with non-Apple devices such as PCs. However, some features may be limited in this scenario. For the best experience, we recommend using AirPods Max with Apple devices.
Now that you know how to connect your AirPods Max to your PC, you can enjoy the convenience and freedom of wireless audio wherever you go. Whether you’re listening to music, watching videos, or engaging in video conferences, your AirPods Max will provide you with high-quality sound and a seamless experience.
So, grab your AirPods Max, follow the steps outlined in this guide, and immerse yourself in an extraordinary audio experience while using your PC!
Audio is one very important half of a coin when it comes to having a truly immersive and enjoyable experience with technology in this day and age. More often than not, it is what complements what you see to give you a more grounded and complete understanding of what you’re dealing with.
All of this is essentially a long and quite protracted way of saying that it’s very important that you invest in quality audio devices. And, naturally, when we’re talking about some of the top audio devices in this day and age, it would be incredibly remiss of us (and of anyone, for that matter) to not mention Apple’s AirPods Max.
To put it simply, this device is at the pinnacle of tech and innovation in its space and, as such, is a worthwhile investment on any day and at any time. So, it’s only natural that you would want to know how to connect AirPods Max to laptop without stress today.
In this post, we’ll be covering every major and minor thing that goes into this process so you’ll be able to execute it in record time and with minimal stress.
Enjoy!
Why Consider Using the AirPods Max with Your Laptop?
Before we go into how to connect AirPods Max to laptop this year, let’s take a moment to quickly address the elephant in the room. Namely, why would you want to even consider choosing the AirPods Max to pair with your laptop in the very first place?
Now, we would be lying if we said that this isn’t a perfectly valid question to ask right now. I mean, you don’t need to follow the happenings of the audio industry very closely for you to know that there are dozens of brands in this industry with new ones joining the stock each year.
The direct implication of this is that, at any given point in time, there are hundreds to even thousands of products that you could opt for. What’s more, the AirPods Max doesn’t come cheap by any means, at least, comparatively speaking.
All of this would only beg the pressing question of why exactly it is that you would want to choose this particular hill to die on in the very first instance. Well, we’ll have you know that there are a number of quite valid reasons why you would want to pick this particular product.
Some of these include but aren’t limited to the following:
It Offers the Most Exquisite Audio Experience
Yes, at this point, even we understand (and accept) that we’ve been harping on a little excessively about the audio quality of this device. That being said, it is important to stress that we’re going that far because the device is just that good.
The sound that this device emits is not just rich, immersive, and sonorous, but it is also incredibly clear, ensuring that you never have to strain to soak in all that it has to offer. Of course, in terms of ensuring that you have the best audio quality at your disposal, the AirPods Max goes one step further to provide you with one of the most efficient noise-canceling features in the industry at this time!
What this translates to is that you have advanced algorithms working around the clock to ensure that your environment does not impair your listening experience in any appreciable way.
It Affords You a Truly Aesthetically Pleasing Design
It may be to varying degrees but still, the simple truth remains that looks matter to everyone. After all, what exactly would be the point of having a device that works perfectly but does not have an appealing enough aesthetic for you to take it out?
Well, when you use the AirPods Max, you won’t have anything to worry about on that front!
The look and feel of this device are so good that several surveys have shown that many consumers get it because of these elements alone!
Now, what we particularly love about the AirPods Max’s design is the fact that the appearance of the device is perfectly complemented with high-end functionality.
This is to say that it is built in such a way that it isn’t just elegant and sleek, but it is also remarkably easier for you to clean it as well!
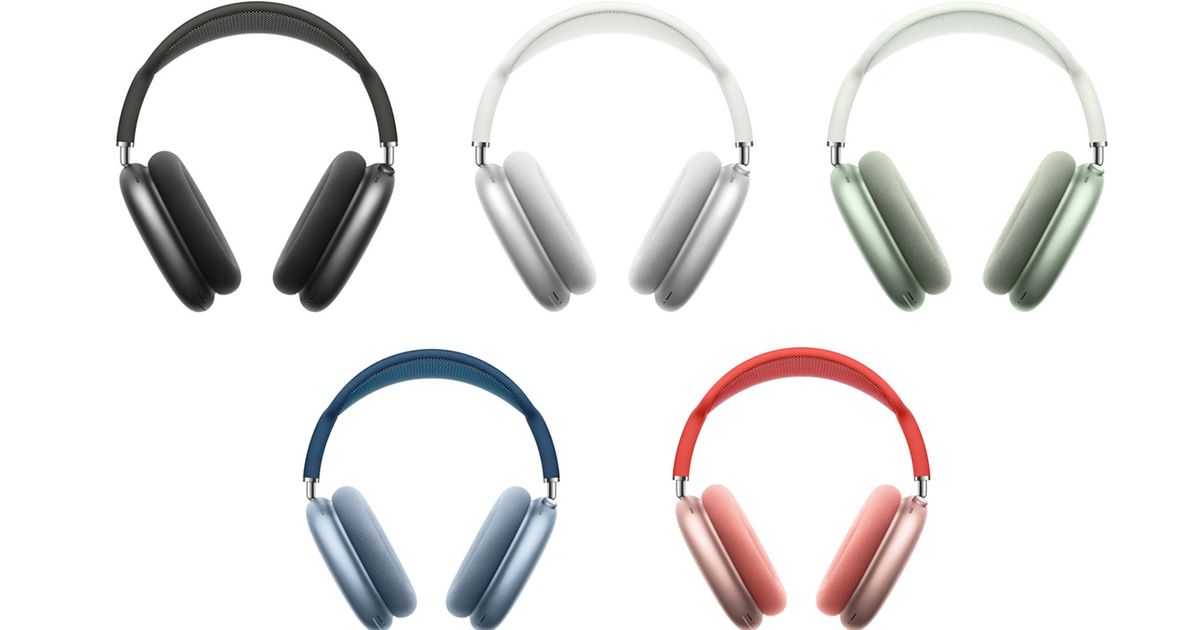
Of course, it is worth adding that you get the AirPods Max in five (5) different color options so you can really bring out the stylist in you!
It Has an Amazing Battery Life
More often than not, what we see with devices that offer the beauty and functionality that the AirPods Max does is that they get very stingy with battery life. However, what would you say if you learned that you could push the AirPods Max up to 20 hours on just one single charge?!
Yes, the battery life of this device is just that good! It gets better too!
If you opt to not activate features and functionalities like spatial audio and noise canceling, you can increase that lifespan to up to 24 complete hours!
Just how great is that?
If for no other reason, this alone makes them worth their considerable price tag to us.
They Offer Seamless Integration Into the Apple Environment
This is yet another huge selling point of these devices. For those who use devices like iPads and iPhones, you would do well to consider getting this device. The main reason for this is that it has been specially designed to efficiently complement the features of all the products in the Apple environment.
As such, you would be getting enhanced functionality on a scale only previously imagined with this tool!
As such, you can see that there are so many incentives for you to learn how to connect AirPods Max to laptop.
So, let’s delve into that right away!
How to Connect AirPods Max to Laptop – The Complete Guide
Learning how to connect AirPods Max to laptop is a breeze. However, there are some points that you have to keep in mind if you want to execute this action. The most important of these is the operating system or OS of the device that you want to connect your AirPods Max to. This is because the OS of the device is what will strongly determine how that process will go.
How to Connect AirPods Max to macOS Laptops
Because these devices come from the same makers as the AirPods Max, you will quickly discover that you tend to get more out of the deal when you use your earbuds with these types of laptops.
All you have to do is put on your AirPods Max and open the “Bluetooth” of your Mac device. It’ll start scanning for nearby devices so you simply need to wait till it picks up your AirPods Max’s signal and then click on it. It’s as simple as that!
Interestingly, it gets simpler still, too!
If you happen to own an iPhone and you’ve paired your AirPods Max to the device, if you happen to be using the same iCloud account to operate the Mac device as well, your AirPods Max is configured to pair automatically to the laptop, even without you executing any setup process!
That’s just one of the many perks of operating in the Apple ecosystem.
How to Connect AirPods Max to Windows OS Laptops
To learn how to connect your AirPods Max to a laptop with Windows OS, all you have to do is locate and push the “Noise Control” button found on your AirPods Max. You are to do this till you see the white status light start to flash.
Next, make your way to the settings of your laptop and look for the “Bluetooth & Devices” option. Click on it. You would now need to toggle the button in front of the “Bluetooth” option in the “On” option. Now, click on “Add Devices”. This will prompt your laptop to start searching for Bluetooth signals in its proximity.
It should only take a few moments for it to pick up the signal of your AirPods Max. However, even when you see that it has found that signal, you should still wait for the scanning process to be completed. Once it has been done, you only need to select the signal for your AirPods Max and it will be added to your list of paired devices.
And, with that, you will be able to enjoy great audio whenever you use your laptop!
What to Remember Here
When learning how to connect AirPods Max to a non-Mac device, there is one important element you might do well to remember, and that’s the fact that the AirPods Max wasn’t built for this.
What we are saying is that, because you won’t be connecting the AirPods Max to an Apple product, there are certain features that you will be unable to access by default. Some of the features that you won’t be able to leverage include Siri and spatial audio.
That said, certain other functionalities such as Transparency mode and Active Noise Cancelation will work just fine.
So, be sure you’re okay with this before you proceed.
Takeaway
And that’s pretty much it about how to connect your AirPods Max to laptop. So, don’t hesitate to bring the best audio experience to your device. Get to connecting it with the AirPods Max now!
Check out more on the AirPods Max here.