Picture this: you just setup a remote site and now you find yourself having to support servers (or users) you can’t physically get to. Since walking to their desk is not an option, you need to figure out How to enable Remote Desktop via Group Policy so it gets applied to machines at that site. Today, that’s exactly what I’m going to show you how to do.
The biggest problem you could be potentially faced with, is actual permissions to modify any GPOs. I’m going to assume you have the permissions so we’ll just continue on with a bullet list that’s easy peasy for you to understand.
- Open up Group Policy Management Console (GPMC).
- Create a New Group Policy Object and name it Enable Remote Desktop.
- Navigate to: Computer Configuration -> Windows Settings -> Security Settings -> Windows Firewall with Advanced Security -> Windows Firewall with Advanced Security -> Inbound Rules and Create a New Rule. Screenshot below.

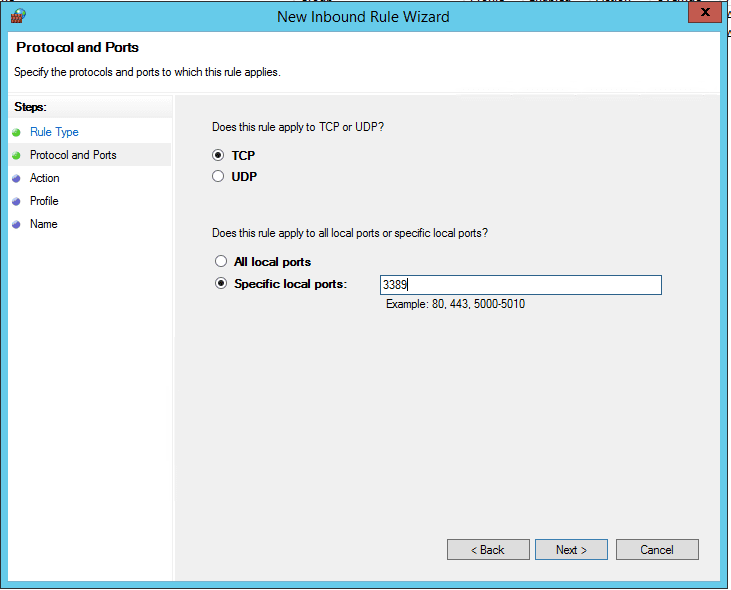
- Select Port in the New Inbound Rule Wizard.
- Ensure TCP and Specific Local Port : 3389
- Allow the Connection and only select Domain and Private Profiles.
- Name this rule – Inbound Rule for RDP Port 3389
Now that we have added the local ports, we’ll need to enable the Remote Desktop Session Host policies.
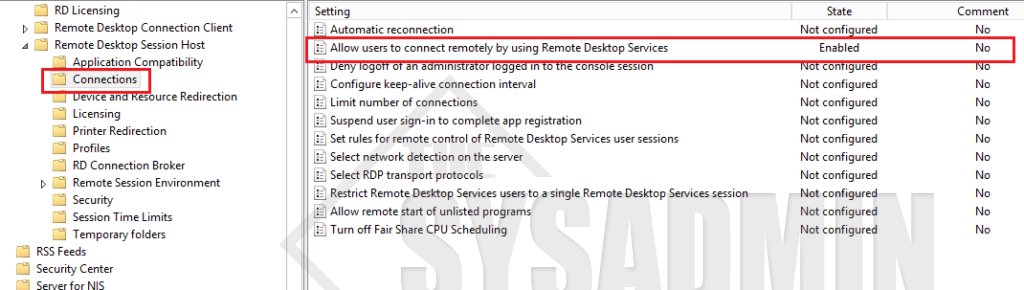
- Go to Computer Configuration -> Policies -> Administrative Templates -> Windows Components -> Remote Desktop Services -> Remote Desktop Session Host -> Connections
- Allow users to connect remotely by using Remote Desktop Services to Enable.
- Now we’re going to enable Network Level Authentication. This is highly recommended and has many security advantages. However, that’s out of the scope of this article so I won’t go in to the details now.
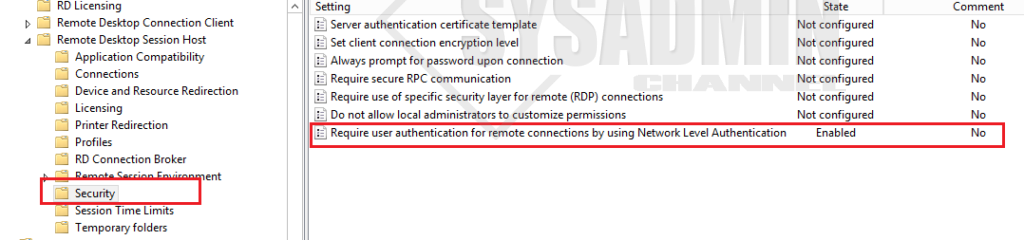
- Go to Computer Configuration -> Policies -> Administrative Templates -> Windows Components -> Remote Desktop Services -> Remote Desktop Session Host -> Security
- Set Require user authentication for remote connections by using Network Level Authentication to Enable.
- Last but certainly not least, we need to apply the newly created GPO to an Organizational Unit so it actually works.
- Close out of GPMC. There aren’t any more settings to configure.
Enable Remote Desktop using Group Policy (GPO) Video Demo
Last but certainly not least be sure to check out our YouTube Channel for awesome How-To’s and other Sysadmin related content.
Время на прочтение
7 мин
Количество просмотров 159K
Parallels Parallels Remote Application Server (RAS) представляет из себя RDP с человеческим лицом, но некоторые его фишки должны быть настроены на стороне Windows Server (либо в виртуальных машинах, которые вы используете). Под катом рекомендации Матвея Коровина из команды техподдержки Parallels о настройках Windows Server при использовании RAS.
Ниже будут представлены групповые политики, которые смогут сделать ваш Parallels RAS (или просто сервер терминалов) более удобным и безопасным. Для более целевого использования приведенных ниже конфигураций, рекомендуем создать отдельную группу пользователей Parallels RAS и применять групповые политики именно к ней.

Часть первая. «Запрещательная»
Прячем элементы эксплорера (Диски, кнопка «Пуск» и тд)
По умолчанию при подключении к терминальному серверу \ виртуальной машине пользователь, добавленный в группу «Пользователи удаленного рабочего стола» увидит полностью функциональный рабочий стол.
Локальные диски будут ему видны и часто доступны. Согласитесь, это неплохая дыра в безопасности, если пользователь даже со своими лимитированными правами будет иметь возможность доступа к локальным дискам и файлам на удаленном сервере.
Даже если установить правильное разграничение доступа и тем самым обезопасить себя пугливый юзверь все равно будет путать диски терминального сервера со своими локальными дисками и в ужасе звонить в тех поддержку. Наилучшим решением такой ситуации будет спрятать локальные диски терминального сервера от пытливого взора энд юзера.
Расположение групповой политики:
User Configuration\Policies\Administrative Templates\Windows Components\Windows Explorer
И измените значение следующих опций:
• Hide these specified drives in My Computer — изменив значение этой опции, вы можете убрать упоминание конкретных дисков из меню компьютера и всех связанных меню, однако это не запрещает доступ к дискам. Если пользователь задаст абсолютный адрес диска, то он откроется.
• Prevent access to drives from My Computer — запретить доступ к конкретным дискам. При включении этой опции доступ к дискам будет ограничен, но диски будут отображены в file explorer.
Что еще можно спрятать от пользователя, используя эту групповую политику:
• Remove Run menu from Start Menu – при активации убирает кнопку «Пуск» из меню
• Remove Search button from Windows Explorer – здесь все просто: поиск в эксплорере будет недоступен
• Disable Windows Explorer’s default context menu – это функция лишает пользователя возможности вызывать менюшку правым кликом мыши (можно купить старых мышек от мака и сэкономить на одной кнопке)
После написания этой части проснулась просто-таки депутатская страсть к запретам. На этом фоне стоит рассказать вам, какими способами можно запретить пользователю все.
И так поехали:
Запрещаем использование командной строки (даже если пользователь сможет открыть CMD ему останется просто любоваться черным окошком с уведомлением о запрете доступа)
Расположение групповой политики:
User Configuration → Policies → Administrative Templates → System → Prevent access to the command promt.
Меняем значение на enabled.
Опция Disable the command prompt script processing also запрещает пользователю выполнять скрипты.
Есть один нюанс: если у вас настроены логон скрипты при включении этой опции, они выполняться не будут.
Убираем кнопки выключения \ перезагрузки \ сна (будет обидно, если удаленный пользователь случайно выключит терминальный сервер)
Расположение групповой политики:
User Configuration → Administrative Templates → Start Menu and Taskbar → Remove and prevent access to the Shut Down, Restart, Sleep, and Hibernate Commands
При включении этой опции пользователь сможет только заблокировать сессию или разлогиниться из нее.
Запрещаем Автозапуск «Управление сервером» при логине
Расположение групповой политики:
Computer Configuration → Policies → Administrative Templates → System → Server Manager → Do not display Server Manager automatically at logon
Меняем значение на enabled.
Запрещаем запуск PowerShell
Расположение групповой политики:
User Configuration → Policies → Administrative Templates → System → Don’t run specified Windows applications
Включаем эту политику и добавляем туда следующие приложения
powershell.exe and powershell_ise.exe
Этой политикой можно запретить запуск любых установленных (а также не установленных) приложений.
Прячем элементы панели управления
Расположение групповой политики:
User Configuration → Administrative Templates → Control Panel → Show only specified Control Panel items.
При включении этой политики все элементы панели управления будут скрыты от пользователя. Если пользователю должны быть доступны какие-либо элементы, добавьте их в исключения.
Запрещаем запуск редактора реестра
Расположение групповой политики:
User Configuration → Policies → Administrative Templates → System → Prevent access to registry editing tools
Меняем значение на enabled.
Запрещаем все
Логичным завершением этой части статьи будет рассказ о том, как запретить пользователям все. Есть мнение, что пользователь должен подключиться к удаленному рабочему столу, посмотреть на него и, убедившись в торжестве технического прогресса, отключиться.
Для достижения этой цели нам нужно создать групповую политику добавления дополнительных ключей в реестре Windows:
Расположение групповой политики:
User Configuration\Preferences\ Windows Settings\Registry
Кликаем правой кнопкой мыши по Registry затем New затем Registry item
Добавляем новый REG_DWORD параметр RestrictRun со значением 1 в ключ реестра
HKCU\Software\Microsoft\Windows\CurrentVersion\Policies\Explorer\
Теперь пользователю запрещено запускать любые приложения кроме системных.
Как запретить ему пользоваться CMD и Power Shell описано выше.
Если вы все-таки решите (исключительно по доброте душевной) разрешить пользователям запуск каких-либо приложений, их нужно будет добавить в «разрешительный список» путем создания в ключе
HKCU\Software\Microsoft\Windows\CurrentVersion\Policies\Explorer\RestrictRun
Значением типа string, используя порядковый номер разрешаемой программы в качестве имени (нумерация как это не странно начинается с 1), и именем разрешаемой программы в качестве значения.
Пример:
HKCU\Software\Microsoft\Windows\CurrentVersion\Policies\Explorer\RestrictRun]
String Name:«1»=«notepad.exe»
String Name «2»=«calc.exe»
При такой конфигурации пользователь сможет запустить только блокнот и калькулятор.
На этом хочется закончить «Запрещательную» часть. Конечно, можно упомянуть еще некоторое количество «Низя», но все это настраивается через Parallels Client и встроенные политики Parallels RAS.

Часть вторая. «Время и прочая романтика»
Установка временных лимитов для удаленных сессий
Бывает, что пользователь запускает приложение в фоне и может даже не пользоваться им. Если для обычных приложений это не страшно, то запущенное в фоне опубликованное приложение / рабочий стол занимает лицензию, а лицензии, как бы дико это не звучало для России, стоят денег.
Для решения этого вопроса умные люди из Microsoft придумали различные статусы терминальных сессий и временные лимиты для них.
Какие бывают статусы терминальных сессий:
Active – сессия активна и в ней что-то происходит. Пользователь двигает мышкой, нажимает на кнопки и создает имитацию бурной деятельности
IDLE – соединение есть, сессия запущена, приложение работает, но пользователь активности не проявляет
Disconnected – пользователь нажал крестик и отключился. Объяснять конечному пользователю, что за зверь логоф и чем он питается — бесполезно.
Наиболее целесообразно устанавливать временные рамки на IDLE и Disconnected сессий.
В них ничего не происходит, а лицензии занимаются.
Добиться этого мы можем опять-таки, используя групповые политики.
Расположение групповой политики:
User Configuration → Policies → Administrative Templates Administrative Templates → Windows Components → Remote Desktop Services → Remote Desktop Session Host → Session Time Limits
В этой ветке есть несколько опций. Давайте разберем их все:
Set time limit for active but idle Remote Desktop Services sessions
Максимальное время работы для Active сессий.
Set time limit for active Remote Desktop Services sessions
Максимальное время работы для IDLE сессий.
Set time limit for disconnected sessions
Максимальное время работы для disconnected сессий.
End session when time limits are reached
Если установить эту политику в Enabled статус, то по достижению временного лимита сессии будут завершаться, а не отключаться.
Настройка временных лимитов – важный шаг для оптимизации работы сервера и оптимизации затрат на ПО.
Установка времени логина для пользователей или скажем нет переработкам
У каждого из нас есть рабочий день, а также утро, вечер и ночь. Но Британские (или Мальтийские) ученые недавно выяснили, что от работы, оказывается, можно заболеть или даже умереть. Работа — это очень сильный и опасный наркотик, поэтому в ярой заботе о любимых пользователях мы должны ограничить им время, когда они могут логиниться на сервер. А то надумают тоже работать из дома, отпуска и по выходным. И помогут нам в этом не групповые политики. Настройка времени работы находится в свойствах пользователя. Где-то далеко в начале этой статьи я упоминал, что все манипуляции лучше производить со специально созданной группой пользователей Parallels RAS, так вот, на примере этой группы мы и разберем, как установить часы работы.
Идем в левый нижний угол нашего экрана, нажимаем кнопку пуск и печатаем dsa.msc
Откроется всеми любимая оснастка Active Directory Users and Computers.
Найдите созданную вами группу пользователей Parallels RAS кликните по ней правой кнопкой мыши и зайдите в свойства. Во вкладке Account будет опция Logon Hours в которой нужно выбрать разрешенные и запрещенные часы работы для группы.
Итог этого раздела:
1. Вы великолепны
2. Жизни пользователей спасены от переработки

Часть третья. «Интерактивная»
Используя опубликованные ресурсы, часто приходится не только запрещать все подряд на сервере, но и перенаправлять в удаленную сессию локальные ресурсы. И если с принтерами, сканерами, дисками, звуком и COM портами никаких сложностей не возникнет, Parallels RAS прекрасно их перенаправляет без дополнительных настроек со стороны Windows, то с перенаправлением USB устройств и веб камер все не так просто.
Для перенаправления данного типа оборудования нужно, чтобы звезды сошлись в правильном порядке не только на сервере, но и на клиентской машине:
На компьютере пользователя измените следующую групповую политику:
Computer Configuration → Administrative Templates → Windows Components → Remote Desktop Services → Remote Desktop Connection Client → RemoteFX USB Device Redirection
Присвойте ей значение Enabled
Теперь в свойствах Parallels клиента (Connection Properties → Local Resources) вы сможете выбрать, какое именно из подключенных USB устройств должно быть перенаправлено на сервер.
Примечание: USB устройство может быть задействовано либо в опубликованном приложении, либо на локальном компьютере, но не одновременно и там, и там.
На стороне сервера необходимо установить драйверы и все необходимое ПО для работы USB устройства. К сожалению, универсального драйвера для всего подряд человечество еще не придумало.
На этом хотелось бы завершить обзор настроек Windows, которые будут важны для работы Parallels RAS.

З.Ы. Таких длинных текстов писать не доводилось давно, отсюда огромная благодарность всем тем, кто осилил эту статью.
In this article, you’ll learn how to enable Remote Desktop using Group policy. On Active Directory domain joined computers, you can enable Remote Desktop using GPO.
Remote desktop is an operating system feature that allows a user to connect to a computer in another location, see that computer’s desktop and interact with it as if it were local.
Windows 11 Remote Desktop feature is majorly used by IT for remote administration. Typically, the IT teams relies on Remote Desktop access to connect to the devices such as Windows 11, Windows Server 2022 and manage tasks.
The need for enabling the Remote Desktop comes when you have a remote site, and you have to support remote users. Enabling the Remote Desktop via group policy on all computers seems to be the best solution.
In most organizations, the remote desktop feature is enabled by default. Typically, in an Active Directory environment, a GPO is used to enable the Remote Desktop. So let’s get started with enabling the Remote Desktop feature.
Read: Intune Remote Help Feature in Endpoint Manager
Table of Contents
There are three configurations you require to enable the remote desktop on computers:
- Allow users to connect remotely by using Remote Desktop Services
- Require user authentication for remote connections by using Network Level Authentication
- Allow Port 3389 (Remote Desktop Port) through Windows Firewall
All the above configurations needs to be in place for the Remote Desktop feature to work on computers. And all the configurations can be applied via group policy.
Learn: How to Disable Check for Updates using Group Policy (GPO)
When you create a group policy, you need not apply it at domain level. You can either apply it for selected OU’s or link the GPO to multiple OU’s.
In this article, I am going to create and apply the GPO at domain level as I am doing this in my lab setup. Applying the GPO at domain level means you are enabling the remote desktop feature on all domain joined computers.
In your case, you might have to test the policy first on a pilot batch of computers and then link the GPO to the required OU’s or group of systems. The steps to enable remote desktop will remain the same no matter where and how you apply the policy.
Also Read: How to Enable Remote Assistance Using Group Policy
Note: You can create a separate GPO for every configuration or create a single GPO and add all the above configurations in a single GPO.
Step 1 – Create a GPO to Enable Remote Desktop
We will now look at the steps to enable Remote Desktop using Group Policy.
- Log in to Windows Server and open the Group Policy Management console (GPMC)
- Expand the Domains and right-click your domain and select Create a GPO in this domain and link it here.
 1")
Enter the name of this new GPO as “Enable Remote Desktop” and click OK.
 2")
You have to edit the GPO and proceed with configuring the following policies.
Step 2 – Enable Allow users to connect remotely by using Remote Desktop Services
The first policy that we will configure is to Allow users to connect remotely by using Remote Desktop Services. This policy setting allows you to configure remote access to computers by using Remote Desktop Services.
If you enable this policy setting, users who are members of the Remote Desktop Users group on the target computer can connect remotely to the target computer by using Remote Desktop Services.
If you disable this policy setting, users cannot connect remotely to the target computer by using Remote Desktop Services. The target computer will maintain any current connections, but will not accept any new incoming connections.
Read: How to Allow logon through Remote Desktop Services
In the Group policy management editor, navigate to Computer Configuration > Policies > Administrative Templates > Windows Components > Remote Desktop Services > Remote Desktop Session Host > Connections.
Right-click the policy setting “Allow users to connect remotely by using Remote Desktop Services” and select Edit. Now enable this policy setting by selecting Enabled. Click Apply and OK.
 3")
Step 3 – Enable Network Level Authentication for Remote Connections
The “Require user authentication for remote connections by using Network Level Authentication” policy setting allows you to specify whether to require user authentication for remote connections to the RD Session Host server by using Network Level Authentication.
Network Level Authentication is a method used to enhance RD Session Host server security by requiring that a user be authenticated to the RD session Host Server before a session can be created.
This policy setting enhances security by requiring that user authentication occur earlier in the remote connection process.
If you enable this policy setting, only client computers that support Network Level Authentication can connect to the RD Session Host server.
Read: Disable Windows Spotlight using GPO
To determine whether a client computer supports Network Level Authentication, start Remote Desktop Connection on the client computer, click the icon in the upper-left corner of the Remote Desktop Connection dialog box, and then click About. In the About Remote Desktop Connection dialog box, look for the phrase Network Level Authentication supported.
If you disable this policy setting, Network Level Authentication is not required for user authentication before allowing remote connections to the RD Session Host server.
It is recommended that you enable this policy setting when you enable Remote Desktop using Group Policy.
In the Group policy management editor, navigate to Computer Configuration > Policies > Administrative Templates > Windows Components > Remote Desktop Services > Remote Desktop Session Host > Security.
Right-click the policy setting “Require user authentication for remote connections by using Network Level Authentication” and click Edit. Enable this policy setting by selecting Enabled. Click Apply and OK.
 4")
With the above policy settings enabled, you can select the “Enable Remote Desktop” GPO and take a look at the configured settings. The settings are visible when you select the Settings tab of the GPO in GPM console.
 5")
Step 4 – Allow Port 3389 (Remote Desktop Port) through Windows Firewall
Remote Desktop Protocol listens on TCP port 3389 and UDP port 3389. If your domain firewall doesn’t have the port 3389 allowed, the RDP connections will fail.
The below procedure shows how to open RDP port 3389 through Windows Firewall. In case the port 3389 is allowed though firewall, jump to next section.
Recommended: Configure Domain Controller Interactive logon Message
As mentioned earlier, you can either edit an existing GPO and allow port 3389 or create a new GPO to enable Remote Desktop Port 3389.
In the Group Policy Management Editor, go to Computer Configuration > Windows Settings > Security Settings > Windows Defender Firewall with Advanced Security.
We want to allow the incoming RDP connection to all computers (TCP 3389 port). Right-click the Inbound Rules section and select New Rule.
On the Rule Type window, select Port. Click Next.
 6")
On the Protocol and Ports window, configure the following:
- Does this rule apply to TCP or UDP – Select TCP.
- Does this rule apply to all local ports or specific local ports? – Select Specific local ports and enter the port number – 3389.
Click Next to continue.
 7")
As we want to allow port 3389 through our firewall, select Allow the connection. Click Next.
 8")
This is an important section where you have to select a profile and specify when does this rule apply. Ultimately, domain profile is where you want the port 3389 to be allowed. Click Next.
 9")
Specify the name and description of this rule and click Finish.
 10")
We have successfully created an inbound rule allowing port 3389 along with enable remote desktop GPO policy.
 11")
Step 5 – Test the “Enable Remote Desktop GPO” on Client Machines
This is the final step where we check if the GPO has been successfully deployed to client machines. By default, the group policy refresh interval is 90 minutes. You can modify the GP refresh interval if required.
On the client computer, launch the CMD as administrator and run the command gpupdate. Wait for the computer policy update and user policy update to finish.
 12")
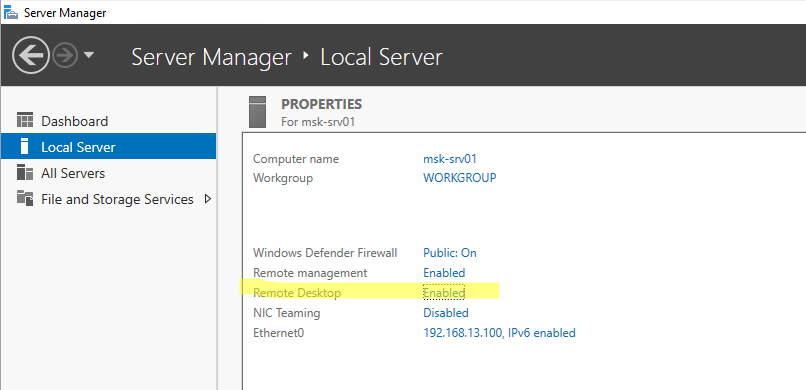
Now go to System Properties and select the Remote tab. Notice that Allow remote connections to this computer is enabled along with Network Level authentication for RDP connections. This confirms that we have successfully enabled the Remote Desktop using Group Policy.
 13")

Prajwal Desai is a Microsoft MVP in Intune and SCCM. He writes articles on SCCM, Intune, Windows 365, Azure, Windows Server, Windows 11, WordPress and other topics, with the goal of providing people with useful information.
Протокол Remote Desktop Protocol (RDP) позволяет удаленно подключиться к рабочему столу компьютера с Windows и работать с ним, как будто это ваш локальный компьютер. По умолчанию RDP доступ в Windows запрещен. В этой статье, мы покажем, как включить и настроить RDP доступ в Windows 10 и Windows Server 2016/2019.
Содержание:
- Включаем удаленный рабочий стол в Windows 10
- Как включить RDP доступ с помощью PowerShell?
- RDP доступ к Windows Server 2016/2019
- Включение RDP с групповых политик в домене Active Direcrtory
- Как удаленно включить RDP на компьютере Windows?
Включаем удаленный рабочий стол в Windows 10
Самый простой способ включить RDP доступ в Windows – воспользоваться графическим интерфейсом.
Откройте свойства системы через панель управления, или выполнив команду SystemPropertiesRemote.

Перейдите на вкладку Remote Settings (Удаленный доступ), включите опцию Allow remote connection to this computer (Разрешить удалённые подключения к этому компьютеру).
В целях безопасности желательно разрешить подключение только с клиентов RDP с поддержкой протокола NLA (Allow connections only from computers running Remote Desktop with Network Level Authentication/ Разрешить подключение только с компьютеров, на которых работает удаленный рабочий стол с проверкой подлинности на уровне сети).

Сохраните изменения, нажав ОК.
По умолчанию право на подключение к компьютеру через RDP есть только у членов группы локальных администраторов. Если вам нужно разрешить RDP доступ другим пользователям, нажмите кнопку Select Users.
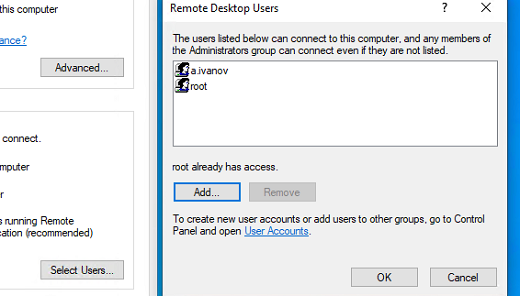
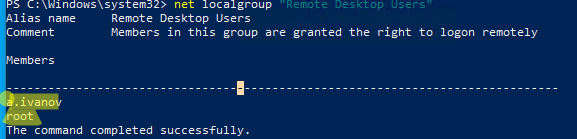
Все пользователи, которых вы укажете здесь будет добавлены в локальную группу Remote Desktop Users. Вы можете в командной строке вывести список пользователей в этой группе:
net localgroup "Remote Desktop Users"
или
net localgroup “Пользователи удаленного рабочего стола”
Чтобы добавить нового пользователя в группу доступа RDP, выполните:
net localgroup "Remote Desktop Users" /add publicuser
В русской версии Windows измените название группы на “Пользователи удаленного рабочего стола”.
В новых билдах Windows 10 классическая панель для включения RDP доступа теперь спрятана и Microsoft рекомендует пользоваться новой панелью Setting.
- Перейдите в Settings -> System —> Remote Desktop;
- Включите опцию Enable Remote Desktop;

- Подтвердите включение RDP на компьютере.
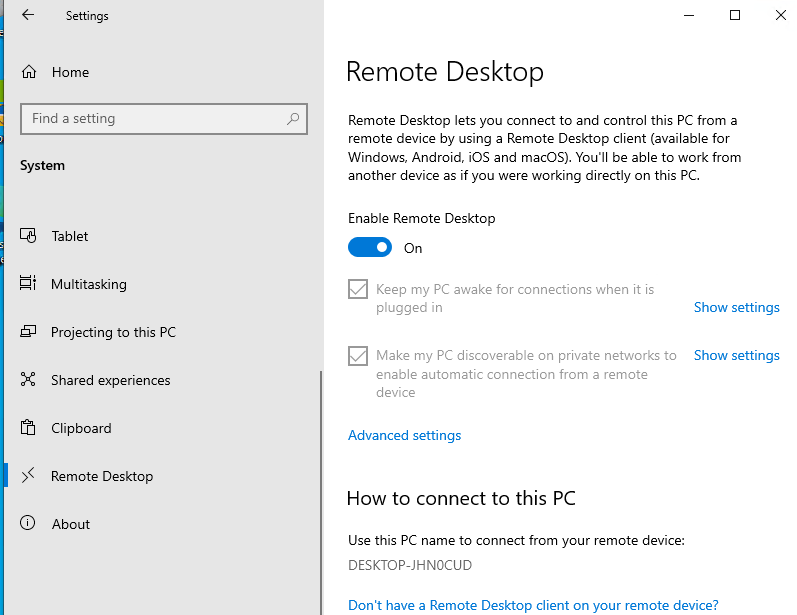
Обратите внимание, что вы не можете включить RDP доступ к редакции Windows 10 Home. RDP сервер работает только на Windows 10 Pro и Enterprise. Впрочем, есть обходное решение.
Обратите внимание, что по умолчанию при включении Remote Desktop, включаются две опции:
- Keep my PC awake for connection when it is plugged in ;
- Make my PC discoverable on private networks to enable automatic connection from a remote device
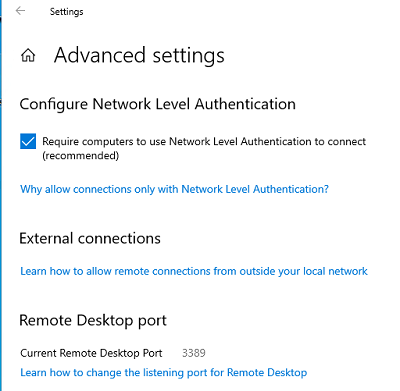
На жмите на ссылку “Advanced settings”. Здесь можно включить использование протокола “Network Level Authentication” для RDP подключений (рекомендуется).
Если на компьютере включен Windows Defender Firewall (брандмауэр), то нужно проверить, что в нем разрешены входящие RDP подключения. По умолчанию для RDP подключений используется порт TCP
3389
, а в последних билдах Windows также используется
UDP 3389
( см. статью про кейс с черным экраном вместо рабочего стола при RDP доступе).
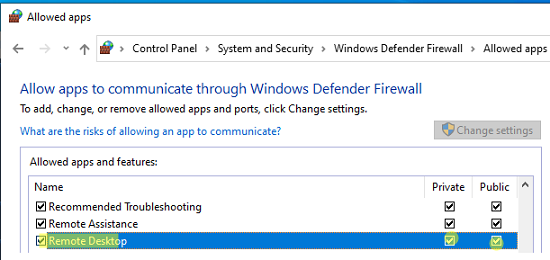
Перейдите в панель управления и выберите элемент Windows Defender Firewall. Откройте список стандартных правил брандмауэра Windows, щелкнув в левом столбце по ссылке Allow an app or feature through Windows Firewall.
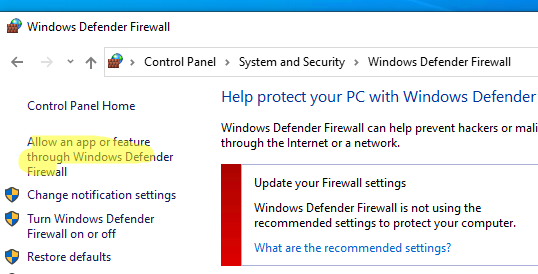
Проверьте, что правило Remote Desktop включено для профиля Private (домашняя или рабочая сеть) и, если необходимо, для профиля Public (общедоступные сети).
Подробнее про типы сетей и профили брандмауэра Windows здесь.
Если нужно, вы можете дополнительно ограничить длительность RDP сессий с помощью GPO.
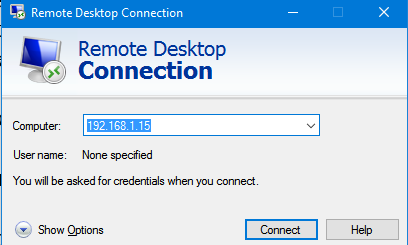
Теперь к данному компьютеру можно подключится с помощью RDP клиента. Встроенный RDP клиент Windows –
mstsc.exe
. Он сохраняет всю историю RDP подключений с компьютера. Поддерживается копирование файлов между локальным и удаленным компьютером прямо через буфер обмена RDP.
Также вы можете использовать менеджеры RDP подключений, такие как RDCMan или mRemoteNG, или альтернативные клиенты.
Для удобства пользователей пароль для RDP подключения можно сохранить в Windows Credential Manager.
Как включить RDP доступ с помощью PowerShell?
Вы можете включить RDP доступ в Windows с помощью пары PowerShell команд. Это гораздо быстрее:
- Запустите консоль PowerShell.exe с правами администратора;
- Включите RDP доступ в реестре с помощью командлета Set-ItemProperty:
Set-ItemProperty -Path 'HKLM:\System\CurrentControlSet\Control\Terminal Server' -name "fDenyTSConnections" -value 0Чтобы закрыть RDP доступ, измените значение fDenyTSConnections на 1.
- Разрешите RDP подключения к компьютеру в Windows Defender Firewall. Для этого включите предустановленное правило :
Enable-NetFirewallRule -DisplayGroup "Remote Desktop"
- Если нужно добавить пользователя в группу в локальную группу RDP доступа, выполните:
Add-LocalGroupMember -Group "Remote Desktop Users" -Member 'a.petrov'

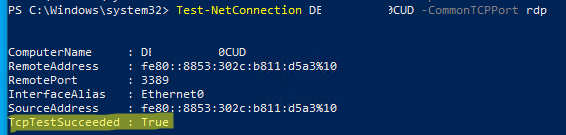
Чтобы проверить, что на компьютере открыт RDP порт, воспользуйтесь командлетом Test-NetConnection:
Test-NetConnection -ComputerName deskcomp323 -CommonTCPPort rdp
RDP доступ к Windows Server 2016/2019
В отличии от десктопной редакции Windows 10, в Windows Server по умолчанию поддерживается два одновременных RDP подключения. Эти подключения используются администраторами для управления сервером.
Включается RDP в Windows Server аналогично. Через SystemPropertiesRemote, через Server Manager или командами PowerShell, рассмотренными выше.
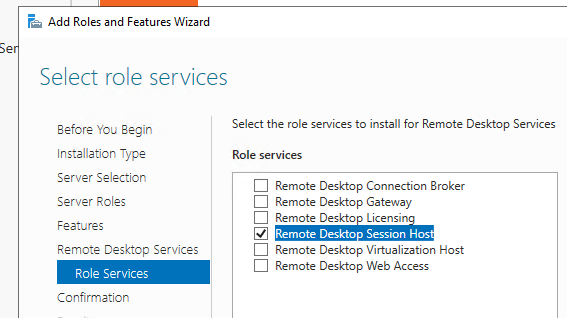
Вы можете использовать Windows Server в качестве терминального сервера. В этом случае множество пользователей могут одновременно подключаться к собственному рабочему столу на сервере. Для этого нужно установить и настроить на сервере роль Remote Desktop Session Host. Это требует приобретения специальных RDS лицензии (CAL). Подробнее о RDS лицензировании здесь.
Для дополнительно защиты RDP сессий можно использовать SSL/TLS сертификаты.
Включение RDP с групповых политик в домене Active Direcrtory
Если вам нужно включить RDP доступ сразу на большом количестве компьютеров, можно воспользоваться групповыми политиками (GPO). Мы подразумеваем, что все компьютеры включены в домен Windows.
- Запустите консоль управления доменными GPO
gpmc.msc
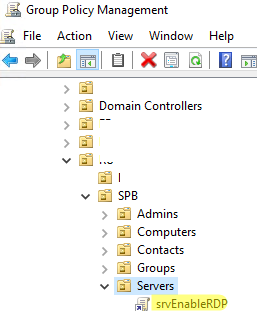
; - Создайте новую (или отредактируйте уже существующую) групповую политику и привяжите ее к целевой OU с компьютерами или серверами;
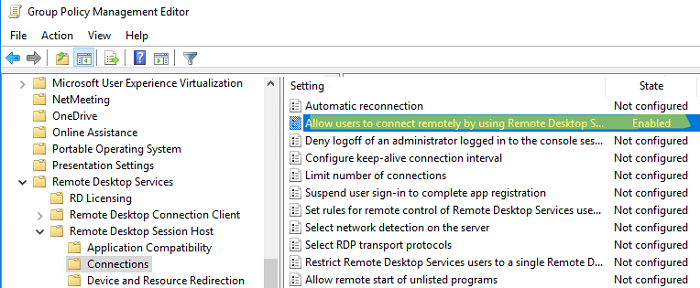
- Переключитесь в режим редактирования политики и перейдите в секцию GPO Computer Configuration -> Administrative Templates -> Windows Components -> Remote Desktop Services -> Remote Desktop Session Host -> Connections;
- Найдите и включите политику Allow Users to connect remotely by using Remote Desktop Services, установив ее в Enable;
- Обновите параметры групповых политик на клиентах;
- После применения данной политики вы сможете подключится ко всем компьютерам по RDP (политика применится как к десктопным клиентам с Windows 10, так и к Windows Server). Если нужно, вы можете более тонко нацелить политики на компьютеры с помощью WMI фильтров GPO.
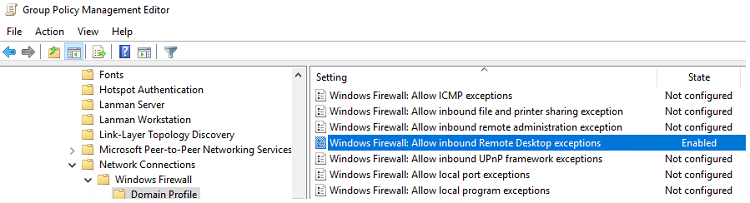
- Если на компьютерах включен Windows Defender Firewall, нужно в этой же GPO разрешить RDP-трафик для доменного профиля. Для этого нужно активировать правило Windows Firewall: Allow inbound Remote Desktop Exceptions (находится в разделе Computer Configuration -> Administrative Templates -> Network -> Network Connections -> Windows Firewall -> Domain Profile).
Подробнее о настройке правил брандмаура Windows через GPO рассказано здесь.
Как удаленно включить RDP на компьютере Windows?
Также вы можете удаленно включить RDP на любом компьютере Windows. Для этого у вас должен быть удаленный доступ к этому компьютеру (через PowerShell или WMI) и ваша учетная запись состоять в группе локальных администраторов на этом компьютере.
Вы можете удаленно включить RDP через реестр. Для этого на удаленном компьютере должна быть включена служба Remote Registry (по умолчанию она отключена). Чтобы запустить службу:
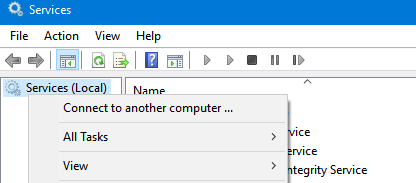
- Запустите консоль управления службами (
services.msc
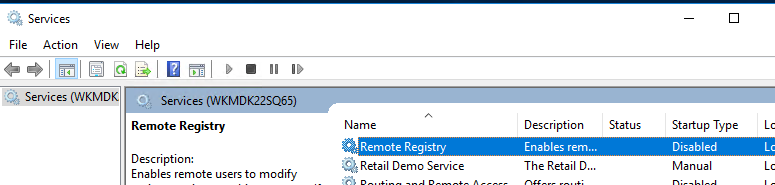
); - Выберите Connect to another computer и укажите имя удаленного компьютера;
- Найдите в списке службу Remote Registry, измените тип запуска на Manual (ручной) и затем запустите службу – Start.
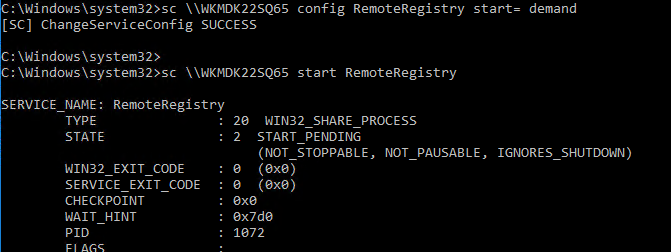
Тоже самое можно выполнить удаленно из командной строки с помощью встроенной утилиты
sc
(позволяет создавать, управлять или удалять службы Windows):
sc \\WKMDK22SQ65 config RemoteRegistry start= demand
sc \\WKMDK22SQ65 start RemoteRegistry
Затем на локальном компьютере
- Запустите редактор реестра
regedit.exe - Выберите в меню Файл пункт Connect Network Registry (Подключить сетевой реестр)
- Укажите имя или IP адрес удаленного компьютера, на котором нужно включить службу RDP;
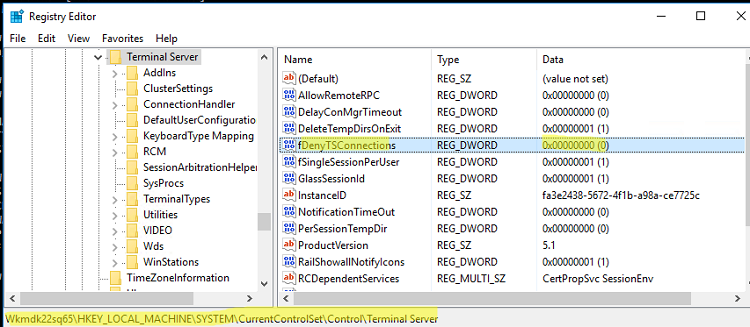
- Перейдите в раздел
HKEY_LOCAL_MACHINE\SYSTEM\CurrentControlSet\Control\Terminal Server
; - Найдите параметр fDenyTSConnections (тип REG_DWORD). Если данный ключ отсутствует – создайте его. Измените его значение на 0, чтобы включить RDP.
Для отключения RDP доступа нужно изменить значение fDenyTSConnections на 1.
Сразу после этого без перезагрузки удаленный компьютер должен стать доступным по RDP.
Но гораздо быстрее можно включить RDP в реестре удаленого компьютера через командную строку:
REG ADD "\\WKMDK22SQ65\HKLM\SYSTEM\CurrentControlSet\Control\Terminal Server" /v fDenyTSConnections /t REG_DWORD /d 0 /f
Если на удаленном компьютере настроен PowerShell remoting, вы можете выполнить на нем удаленную команду через Invoke-Command:
Invoke-Command -Computername WKMDK22SQ65 -ScriptBlock {Set-ItemProperty -Path "HKLM:\System\CurrentControlSet\Control\Terminal Server" -Name "fDenyTSConnections" –Value 0}
Если в Windows установлен OpenSSH сервер, вы можете подключиться к нему любым ssh клиентом и внести изменения в реестр в локальной ssh сессии.
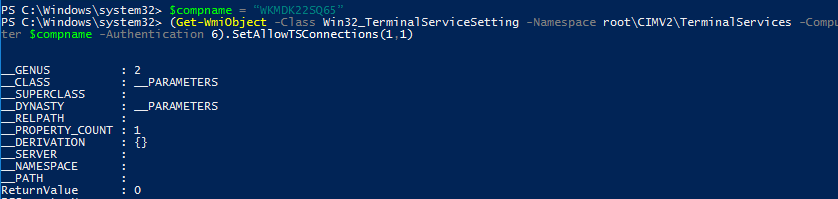
Также вы можете подключиться к удаленному компьютеру и включить RDP через WMI:
$compname = “WKMDK22SQ65”
(Get-WmiObject -Class Win32_TerminalServiceSetting -Namespace root\CIMV2\TerminalServices -Computer $compname -Authentication 6).SetAllowTSConnections(1,1)
How To Enable Remote Desktop Via Group Policy Objects (GPO)

")
Teams responsible for supporting physically distant computers and users need to use a tool that enables them to exercise remote access and control over a network. Microsoft’s Remote Desktop is a popular solution for accessing computers anywhere in the world.
In this article, we will look at how to enable Remote Desktop Group Policy on Windows 10 systems so it can be applied to all connected machines at a remote site.
The first obstacle to overcome when setting up a Group Policy for Remote Desktop is obtaining the necessary permissions that enable you to modify a Group Policy Object (GPO). Getting these permissions is beyond the scope of this article, and we will presume that you have worked with your system administrators and have the necessary level of access.
How to create a firewall rule via Group Policy
The following list of essential points outlines the steps necessary to update the Remote Desktop Group Policy to allow remote control to be implemented on the associated computers.
-
Open the Group Policy Management Console (GPMC).

-
Create a new Group Policy Object called Enable Remote Desktop.
-
Navigate through the following settings so you can create a new rule:
Computer Configuration -> Windows Settings -> Security Settings -> Windows Firewall with Advanced Security -> Windows Firewall with Advanced Security -> Inbound RulesNow choose to Create a New Rule. The screenshot below shows you where you should be in the Windows configuration screens.

-
In the New Inbound Rule Wizard, select the Port parameter.
-
Make sure TCP is selected and the Specific local port parameter is set at 3389.

-
Click Next and allow the Connection. Limit the connection to Domain and Private Profiles.
-
Give the rule a meaningful name like – Inbound Rule for RDP Port 3389.


How to enable Remote Desktop Session Host policies
Once the local ports have been added, further Remote Desktop group policy settings need to be updated to enable the required Remote Desktop Session Host policies.
- Go to:
Computer Configuration -> Policies -> Administrative Templates -> Windows Components -> Remote Desktop Services -> Remote Desktop Session Host -> Connections - Enable the setting to Allow users to connect remotely by using Remote Desktop Services.

- Before we finish modifying Group Policy to allow Remote Desktop, we are going to enable Network Level Authentication. While this is not a necessary part of enabling RDP Group Policy, it is highly recommended as it provides enhanced security for your remote sessions.
- Navigate to:
Computer Configuration -> Policies -> Administrative Templates -> Windows Components -> Remote Desktop Services -> Remote Desktop Session Host -> Security. - Enable the Require user authentication for remote connections by using Network Level Authentication setting.

- The last step and arguably the most important is to apply the Group Policy Object we just created to an Organizational Unit. Without this step, the policy will exist but not be used for accessing any remote machines.
- Close the GPMC as you are finished. No more settings need to be modified to implement Remote Desktop using a Group Policy.

