Самая мерзкая, наверное, особенность Windows 10 — это принудительная неотключаемая установка всех обновлений. Windows даже в 2015 году не может ничего установить, не перезагрузившись, поэтому юзеру, в общем, ничего не остаётся, как периодически перезагружаться. Максимум, что позволяет Microsoft — выбрать желаемое время перезагрузки, но и его бесконечно сдвигать нельзя.
Если вы утром включаете компьютер, а вечером выключаете, то всё нормально, и вы вряд ли заметите какое-то неудобство. Но у меня, например, вечером компьютер просто засыпает, а утром просыпается с тем же набором запущенных программ и открытых документов. Я так привык (и не только я, судя по отзывам в сети), а принудительная перезагрузка этот способ работы, разумеется, рушит. Я бы предпочёл вручную устанавливать обновления, когда это удобно мне.
Ну ладно, к делу. Всё-таки есть способ контролировать алгоритм обновления Win10. Я его нашёл вот в этой статье.
Собственно, там описано несколько разных способов, самый красивый из них, на мой взгляд — способ № 4. К сожалению, он работает только при Wi-Fi-подключении. Оказывается, Windows не скачивает обновления, если подключение к интернету тарифицируемое. Это очень мило со стороны Microsoft (могла бы ведь и скачивать…).
Чтобы указать, что соединение тарифицируемое, надо открыть Settings → Network & Internet, в списке Wi-Fi-сетей нажать на Advanced options, и там поставить галочку Metered connection (или Лимитное подключение в русской версии).

Но, к сожалению, при подключении по проводу так сделать не получится. Поэтому я лично применил способ № 5 / 6. Он использует кровавую энтерпрайз-магию.
Для начала надо запустить Group Policy Editor. Можно найти его поиском или набрать gpedit.msc в меню Start. Выглядит он так:
В нём надо найти папку Computer Configuration / Administrative Templates / Windows Components / Windows Update. В ней выбрать Configure Automatic Updates.
И выставить настройки вот так:
Там есть несколько вариантов настроек:
- 2 — Notify for download and notify for install
- 3 — Auto download and notify for install
- 4 — Auto download and schedule the install
- 5 — Allow local admin to choose setting
Я выбрал “3”, чтобы система скачивала обновления, но не устанавливала их. Можно выбрать “2” — тогда она и скачивать их не будет.
После применения этих настроек, надо пойти в Windows Update и нажать кнопку Check for updates. Только после этого Windows поймёт, что настройки изменены. В дальнейшем она будет приставать к вам с просьбами установить обновления, но сама их устанавливать (и перезагружать компьютер) уже не будет.
Этот пост в блоге POST /blog (20:28 04.09.2015)
Reading time
2 min
Views 7K
Read this article to find out how to disable automatic update option in Windows 10. Let’s explore how to remove an unnecessary or faulty Windows update by using integrated system tools or with third-party apps.

Do it with the Services tool
The first method works for Windows 10 Home, Professional and Enterprise.
Type Services in the search field (the magnifying glass icon on the taskbar) and run this system tool.

Find Windows Update service and open its properties.

Click on Stop and select Startup Type – Disabled

After these changes are applied and the computer restarts, Windows Update will not work anymore, so updates won’t be downloaded and installed automatically.
Try Local Group Policy Editor
The second method is only good for Windows 10 Professional and Enterprise. As other versions of Windows lack such component as Local Group Policy Editor.
To start the Local Group Policy Editor, type gpedit.msc in the search field and press Enter.

When in the Editor, go to Computer Configuration – Administrative Templates – Windows Components – Windows Update.

Find the policy Configure Automatic Updates, open it and set it to Disabled. Click Apply/Ok.

Free utilities to disable automatic updates in Windows 10
Also, you can use free utilities to prevent Windows 10 from updating automatically.
As an example, we’ll show you Win Updates Disabler, but there are other tools as well.
Run the program, jump to the tab Disable to check the box next to Disable Windows Updates. After that, click Apply Now for the changes to take effect.
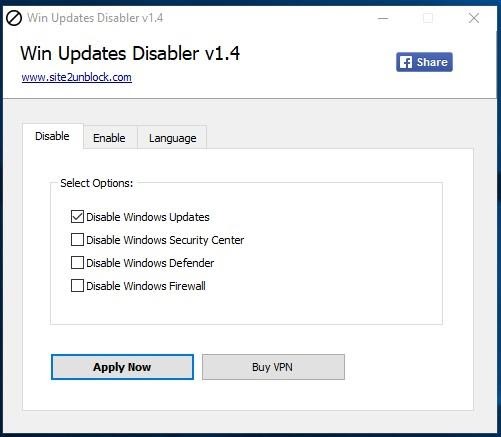
As seen from the screenshot, this program can also disable Windows Firewall and Windows Defender. If necessary, you can turn everything on again in the tab Enable.

How to remove the updates that have already been installed?
If some updates were installed incorrectly, or you want to remove only particular Windows 10 updates, this is also possible.
To do it:
Go to Control Panel and select Programs & Features.
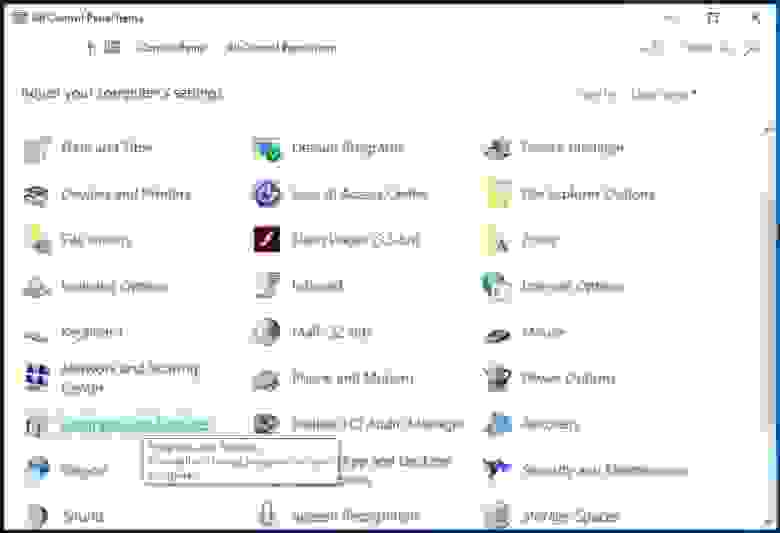
Jump to the tab View Installed Updates.

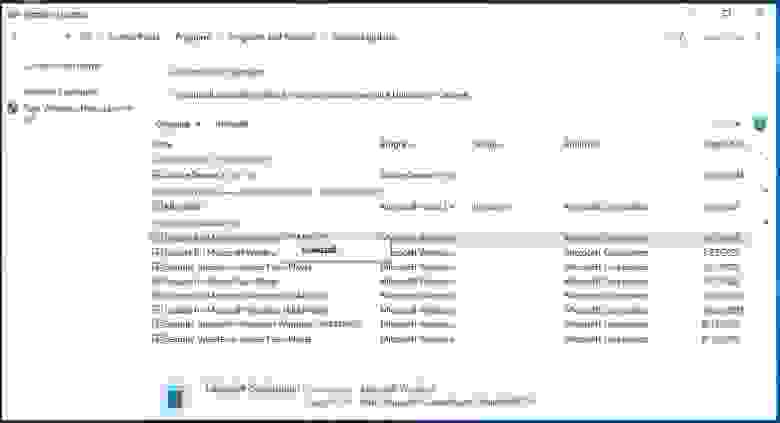
Sort them by installation date by clicking on Installed On.

Right-click on one of the updates which you want to delete from the system and click Uninstall.
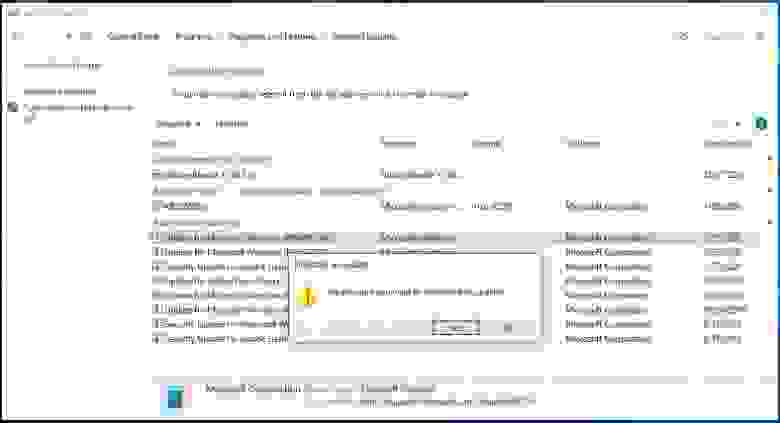
Confirm your decision and changes will take effect after the system restart.
See the full article with all additional video tutorials. If you still have any questions, please ask in a comments. Also visit our Youtube channel, there are over 400 video tutorials.
![]() В Windows Server 2016 можно столкнуться с ситуацией, когда встроенный клиент Windows Update очень долго выполняет проверку обновлений. Характерно то, что проблема может проявляться плавающим образом и воспроизводиться не всегда. Замечено, что чаще всего проблема проявляется в случае, если система была недавно включена или перезагружена. В этой заметке мы поговорим о том, какие могут быть причины у такого поведения и как это можно попробовать исправить.
В Windows Server 2016 можно столкнуться с ситуацией, когда встроенный клиент Windows Update очень долго выполняет проверку обновлений. Характерно то, что проблема может проявляться плавающим образом и воспроизводиться не всегда. Замечено, что чаще всего проблема проявляется в случае, если система была недавно включена или перезагружена. В этой заметке мы поговорим о том, какие могут быть причины у такого поведения и как это можно попробовать исправить.
При попытке вызвать проверку обновлений из интерфейса настроек системы в Settings > Update & security > Windows Update мы можем столкнуться с длительным циклом ожидания в статусе «Checking for updates…»
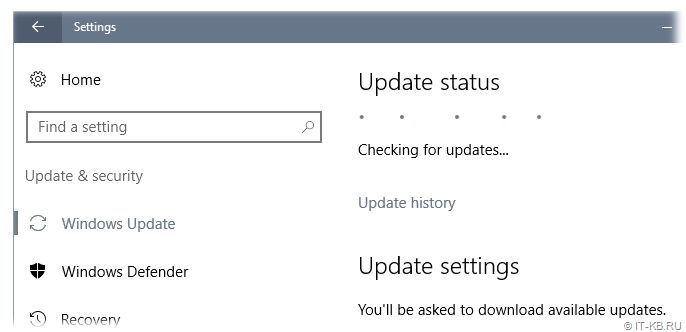
Результатом такого ожидания может стать возникновение ошибки типа:
We couldn't connect to the update service. We'll try again later, or you can check now. If it still doesn't work, make sure you're connected to the Internet.
Это привносит проблемы и в других операциях обслуживания системы.
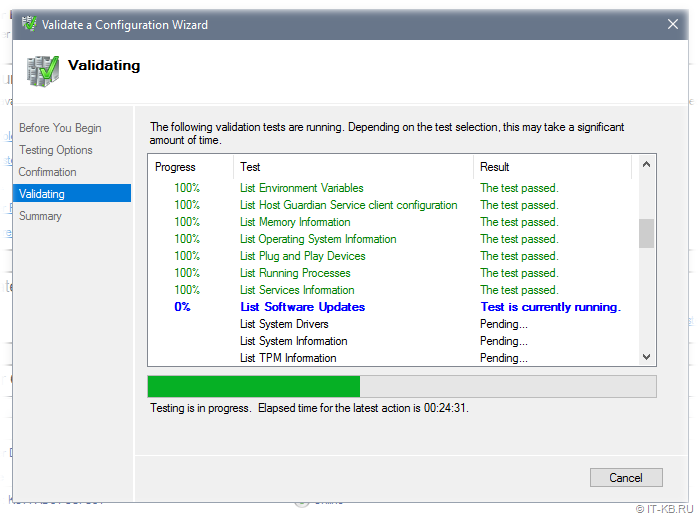
Отражение проблемы с Windows Update в Failover Cluster Manager
В качестве примера отрицательного влияния проблемной работы Windows Update можно привести мастер проверки конфигурации кластера, вызываемый из оснастки Failover Cluster Manager. В ходе выполнения валидации кластера, на этапе сбора информации об установленных на кластерных узлах обновлениях («List Software Updates«) мы можем получить состояние длительного ожидания.
В ходе изучения ситуации по следам «коллективного разума» я обнаружил, что самые разнообразные проблемы c Windows Update в Windows Server 2016 известны давно и с ними столкнулись многие:
- TechNet Forums : Windows Server 2016 Updates slow!
- Superuser : Windows Update stuck on Checking for updates
- Born’s Tech and Windows World : Windows Server 2016: Slow updates
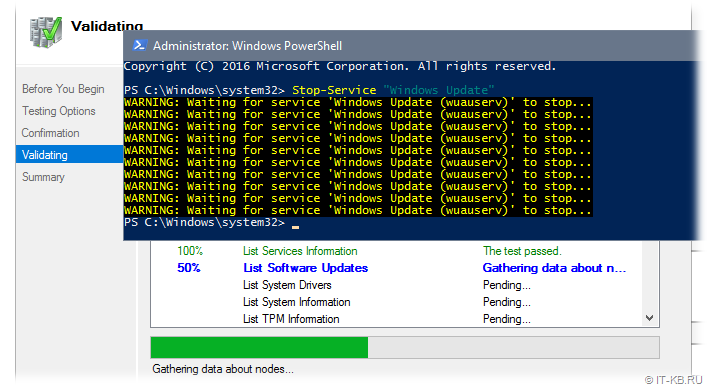
Методом «а если попробовать…» было выявлено, что в качестве обходного решения в вышеописанной ситуации с Failover Cluster Manager, может быть простой перезапуск службы «Windows Update«.
Возможно, потребуется сделать лишь остановку этой службы, а запустится служба через несколько секунд автоматически. Если служба не остановилась с первого раза (остановка привела к ошибке), то пробуем выполнить остановку повторно. Выполнить остановку службы можно как через оснастку управления службами services.msc, так и через PowerShell.
Stop-Service "Windows Update"
Сразу после того, как служба будет остановлена (а затем сама автоматически запустится) мы увидим сдвиг в работе механизма проверки обновлений.
В случае с кластером, выполнить остановку/перезапуск службы «Windows Update» нам может потребоваться на всех узлах кластера, начиная с того, на котором запущен мастер проверки.
В попытках понять, что же не так с проверкой обновлений в Windows Server 2016 и проведения ряда экспериментов с видимыми настройками клиента Windows Update в графической среде, стало очевидно то, что наличие включённой опции «Defer feature updates» в Settings > Update & security > Windows Update > Advanced options явным образом влияет на воспроизведение проблемы.

То есть, как только мы отключаем данную опцию, включенную в Windows Server 2016 по умолчанию, то механизм проверки обновлений начинает работать так, как мы этого от него ожидаем при наличии сервера WSUS.
Дальнейшее изучение вопроса показало, что причиной странного поведения клиента Windows Update может являться механизм «Dual Scan» (подробней в статьях «Improving Dual Scan on 1607» и «Demystifying Dual Scan»), который заставляет при проверке обновлений в качестве источника использовать не только форсировано настроенный в доменных групповых политиках сервер WSUS в локальной сети, но и Интернет-службы Windows Update.
Соответственно, при условии, что компьютеры имеют ограниченный доступ в Интернет или не имеют его вовсе, может возникнуть эффект длительного ожидания с возникновением ошибок разного содержания.
Чтобы решить описанную проблему, нам потребуется провести настройку групповой политики Active Directory, с помощью которой настраиваются наши серверы на базе Windows Server 2016. Однако, как выяснилось, в этом вопросе всё не так очевидно, понятно и однозначно, как хотелось бы.
Варианты решения с готовыми политиками GPO (неработающие в нашем случае)
Примечание: Если важен только готовый рецепт и не интересны эксперименты по следам ранее предложенных в Интернете приёмов(которые в нашем случае не помогли), то можете смело пропустить этот раздел заметки и читать заключительный раздел.
В ранних выпусках Windows 10 (с версии 1607) и Windows Server 2016 за отключение попыток использования онлайн репозитория Windows Update отвечала политика:
«Do not allow update deferral policies to cause scans against Windows Update«
в разделе:
Computer Configuration > Administrative Templates > Windows Components > Windows Update.
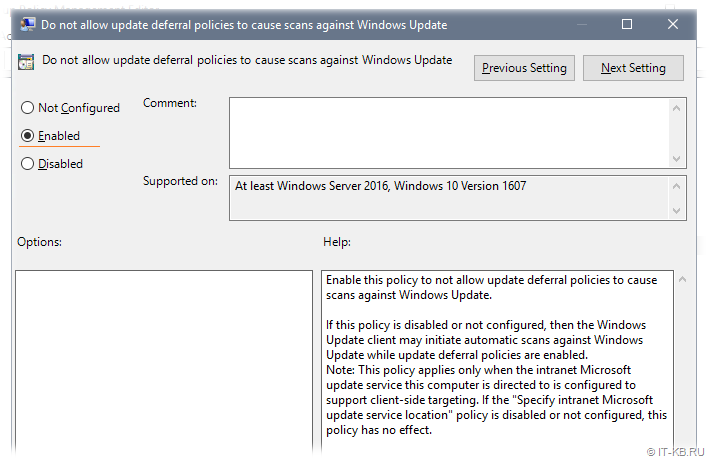
В результате применения этой политики в системном реестре Windows появляется параметр DisableDualScan, установленный в 1:
Windows Registry Editor Version 5.00

[HKEY_LOCAL_MACHINE\SOFTWARE\Policies\Microsoft\Windows\WindowsUpdate]
"DisableDualScan"=dword:00000001
И, судя по старым статьям, на более ранних версиях Windows 10 описанная политика могла быть полезна для решения проблемы.
Однако, в более поздних версиях Windows 10 (начиная с версии 2004), Windows 11, а так же, возможно, в более новых версиях Windows Server, данная политика была перенесена в подраздел Legacy Policies и была заменена новой политикой:
«Specify source service for specific classes of Windows Updates«
в разделе:
Computer Configuration > Administrative Templates > Windows Components > Windows Update > Manage updates offered from Windows Server Update Service.
Предполагается включение этой политики и выбор WSUS в качестве источника для всех предлагаемых типов обновлений.
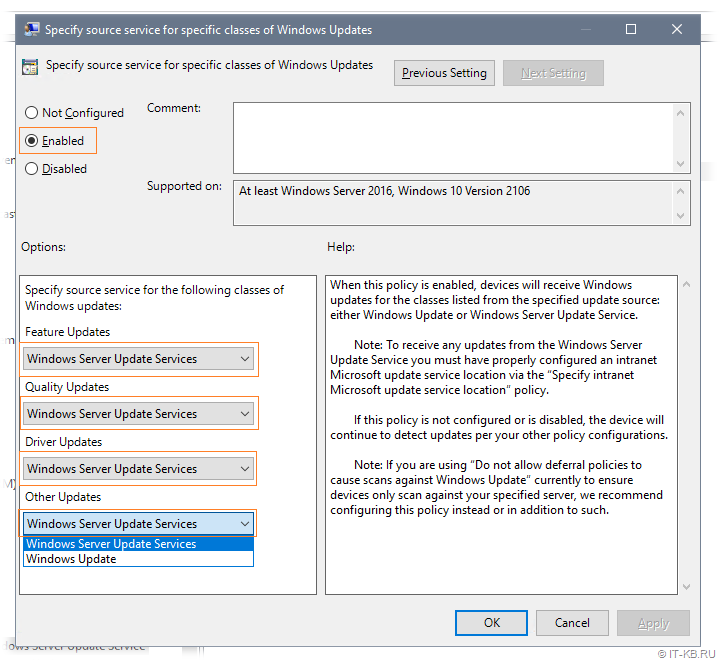
В результате применения этой политики в системном реестре Windows появляется 4 параметра с соответствующими именами, установленных в 1:
Windows Registry Editor Version 5.00

[HKEY_LOCAL_MACHINE\SOFTWARE\Policies\Microsoft\Windows\WindowsUpdate]
"SetPolicyDrivenUpdateSourceForFeatureUpdates"=dword:00000001
"SetPolicyDrivenUpdateSourceForQualityUpdates"=dword:00000001
"SetPolicyDrivenUpdateSourceForDriverUpdates"=dword:00000001
"SetPolicyDrivenUpdateSourceForOtherUpdates"=dword:00000001
Логично предполагать, что включать и настраивать данную политику резонно лишь для серверных систем, которые в локальных сетях, как правило, обновляются с сервера WSUS и имеют ограниченный доступ в Интернет. Для клиентских же систем, часть из которых может оказаться мобильными и периодически перемещающимися из локальной сети во внешние сети с доступом в Интернет, в некоторых ситуациях может оказаться логичней использовать настроенный по умолчанию механизм выбора источника (то есть, чтобы в качестве дополнительного источника мог выступать онлайн репозиторий Windows Update).
Эксперименты с двумя выше описанными политиками показали, что на данный момент времени сами по себе (ни по отдельности ни вместе) эти политики не решают проблему в нашем конкретном случае.
В ходе дальнейшего изучения опыта борьбы коллег со странностями работы Windows Update в Windows Server 2016 обнаружил статью «Windows admin blog : Некорректное отображение информации на WSUS | Проблемы обновления со WSUS (Dual Scan)», где в качестве одного из решений предложено включение «олдскульной» политики:
«Do not connect to any Windows Update Internet locations«
в разделе:
Computer Configuration > Administrative Templates > Windows Components > Windows Update > Manage updates offered from Windows Server Update Service.
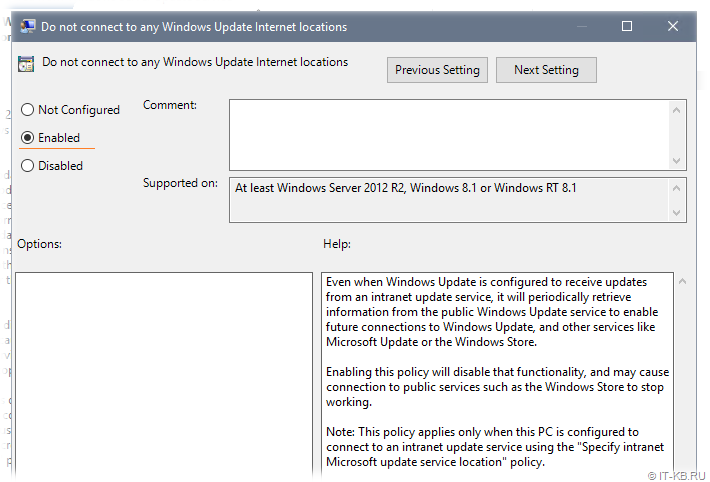
В результате применения этой политики в системном реестре Windows появляется параметр DoNotConnectToWindowsUpdateInternetLocations, установленный в 1:
Windows Registry Editor Version 5.00

[HKEY_LOCAL_MACHINE\SOFTWARE\Policies\Microsoft\Windows\WindowsUpdate]
"DoNotConnectToWindowsUpdateInternetLocations"=dword:00000001
Однако, практика показала, что применение данной политики может привести к появлению новой ошибки в ходе проверки обновлений:
There were some problems installing updates, but we'll try again later. If you keep seeing this and want to search the web or contact support for information, this may help: (0x8024500c)
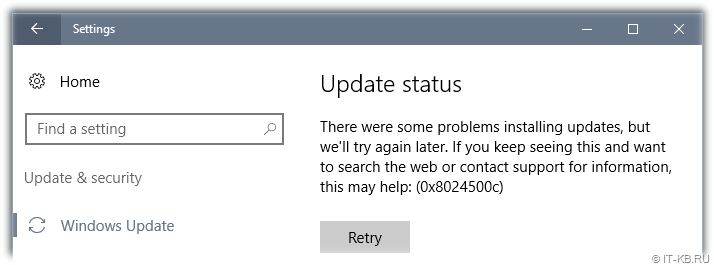
Причём избавиться от этой ошибки не поможет ни перезапуск службы, ни перезагрузка системы, а по свидетельствам очевидцев, эта ошибка воспроизводится так же и на Windows 10.
Понимая то, что данная политика не решает проблемы, можно было бы не упоминать о ней в нашей заметке. Однако помимо того, что она не только не закрывает исходную проблему, но и может создать новую трудно интерпретируемую проблему, мы и упоминаем здесь о ней, как о неподходящем варианте решения.
Перебрав ряд других групповых политик, как по одиночке, так и в в разных комбинациях, мне так и не удалось найти решения на базе каких-либо готовых политик.
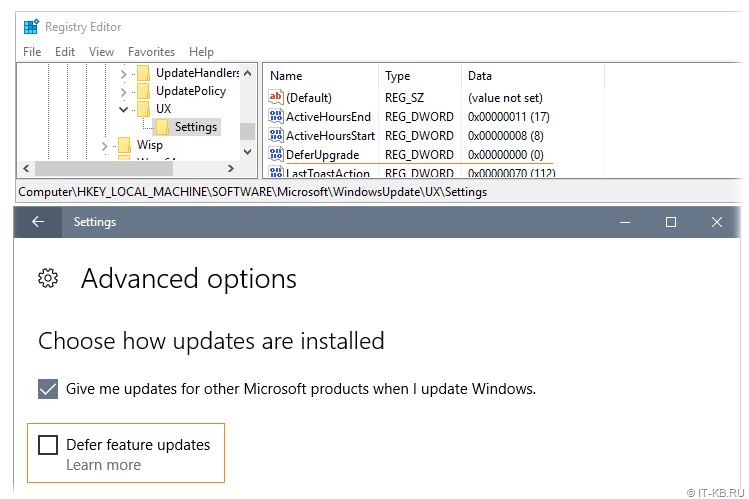
Отключение опции «Defer feature updates» с помощью GPP
В конечном итоге пришлось прибегнуть к помощи Group Policy Preferences (GPP) для управления опцией «Defer feature updates«, отображаемой в графической оболочке Windows Server 2016.
Отключение данной опции приводит к следующему изменению в системном реестре:
Windows Registry Editor Version 5.00

[HKEY_LOCAL_MACHINE\SOFTWARE\Microsoft\WindowsUpdate\UX\Settings]
"DeferUpgrade"=dword:00000000
Соответственно, для настройки серверов с Windows Server 2016 на явное отключение данной опции мы можем создать в доменной групповой политике, применяемой к серверам, объект GPP, настраивающий параметр реестра DeferUpgrade.

С помощью Item-level targeting можем указать то, что данный параметр реестра будет обновляться только на системах семейства Windows Server 2016.
Для оперативной проверки результата выполняем на конечном сервере обновление групповых политик и инициируем процедуру проверки обновлений:
gpupdate /force
UsoClient.exe startscan
Убедимся в том, что после применения GPO в реестре на серверных системах с Windows Server 2016 применились изменения и в графической консоли настроек системы опция «Defer feature updates» отображается в выключенном состоянии.
Все последующие проверки обновлений Windows теперь должны начать работать напрямую с WSUS без длительных попыток обращения к Интернет-службам Windows Update.
Download Windows Speedup Tool to fix errors and make PC run faster
If you have Windows 11/10 Pro or Enterprise edition, you may see the “Some settings are managed by your organization” message on the Windows Update page. Windows displays this message when your organization has configured some Windows Update Policies. If you have a personal computer with Windows 11/10 Pro or Enterprise edition, you can also configure Windows Update Policies. In this article, we will show you how to view the Configured Windows Update Policies applied to your computer.

The following instructions will show you how to view Configured Windows Update Policies applied to your computer. Because of a change in UI, the steps to view configured Windows Update Policies are different for Windows 10 and Windows 11 users.
Windows 11
Windows 11 users have to follow the following steps to view configured update policies on their computers:

- Open Windows 11 Settings.
- Select Windows Update from the left side.
- Now, click Advanced options.
- Scroll down and then click Configured update policies.
After that, Windows 11 will show you all the update policies configured on your system.
Windows 10
If you have Windows 10, you can view the configured Windows Update Policies by following the steps written below:

- Open Windows 10 Settings.
- Select Update & security.
- Now, select Windows Update from the left side.
- Click on the “View configured update policies” link under the “Some settings are managed by your organization” message on the Windows Update page.
After performing the above steps, you will see all the update policies configured on your Windows 10 device.
How to change Configured Windows Update Policies applied to your computer
We have seen how to view configured Windows Update Policies applied to your computer. Now, let’s see if you want to change these Windows Update Policies, how can you do that? You can change the configured Windows Update Policies by using the Local Group Policy Editor. The Local Group Policy Editor is not available on Windows 11/10 Home edition.

Do note that you need an administrative account to change the configured Windows Update Policies. Go through the following instructions to change configured Windows Update Policies applied to your computer:
- Open the Run command box by pressing the Win + R keys.
- Type
gpedit.mscand click OK. This will open the Local Group Policy Editor. - Now, expand Computer Configuration.
- Go to “Administrative Templates > Windows Components > Windows Update.”
You will see the following four types of Settings under the Windows Update category and on the right pane:
- Legacy Policies
- Manage end user experience
- Manage updates offered from Windows Server Update Service
- Manage updates offered from Windows update
Double-click on any of the above Settings to view Windows Update Policies. You can view the status of all the updated policies. Let’s see what different statuses mean:
- Not configured: This status means that the particular update policy is not configured on your computer.
- Enabled: This status shows that the particular update policy is configured on your computer.
- Disabled: This status means that the particular update policy is disabled on your computer.
To configure a Windows Update policy or change the configured update policy, double-click on it and change its settings accordingly.
Related read: Your organization has set some policies to manage updates.
How do I change Windows Update Policies?
To change Windows Update in Group Policy, open the Local Group Policy Editor and go to “Computer Configuration > Administrative Templates > Windows Components > Windows Update.” Now, double-click on any of the settings on the right side to view and change the Windows Update Policies.
Read: Limit Bandwidth and set the Time when Windows Updates can download
How do I remove a configured update policy?
You can remove a configured update policy via the Local Group Policy Editor. But for this, you need to log in to Windows using an administrative account. Open the Local Group Policy Editor and go to “Computer Configuration > Administrative Templates > Windows Components > Windows Update.” Now, open a configured Windows Update policy and select Disabled.
Read next: Recommended Windows Update policies Admins should be using.
Anand Khanse is the Admin of TheWindowsClub.com, a 10-year Microsoft MVP (2006-16) & a Windows Insider MVP (2016-2022). Please read the entire post & the comments first, create a System Restore Point before making any changes to your system & be careful about any 3rd-party offers while installing freeware.
You are here:
Home » Windows 10 » Remove “Some Settings Are Managed By Your Organization” Message In Windows 10 Settings
Over the last weekend, I performed a clean install of Windows 10 with November Update on my desktop PC, turned off automatic Windows updates via Group Policy after the install, and made several changes to default privacy settings to improve the privacy.
Since making changes to Group Policy and changing default privacy settings, I have been getting “Some settings are managed by your organization” message in the Windows Update section as well as in the Privacy section of the Settings app. The desktop PC is purely used for running virtual machines, and it’s not part of a domain or organization.
The “Some settings are managed by your organization” message appearing in the Privacy section of Settings app because you have configured Windows 10 to send only Basic device data to Microsoft instead of Enhanced or Full.
To stop seeing “Some settings are managed by your organization” message in the Privacy section of the Settings app, you need to let Windows 10 send Enhanced data to Microsoft.
According to this page of Microsoft, Windows 10 collects and sends performance as well as usage data to Microsoft to troubleshoot and improve its products and services.
Remove “Some settings are managed by your organization” in Windows Update
And if you are looking to remove “Some settings are managed by your organization” message from the Windows Update section of Settings, you need to restore Windows Update settings to its default in Group Policy.
However, if you really want to disable or configure how automatic Windows updates are installed, you can use the Registry Editor as changing default settings in Registry will not show the message in the Windows Update section. You can refer to our how to disable automatic Windows updates in Windows 10 Home edition (works for both Home and Pro) to configure Windows update settings in Registry.
Follow the instructions in Method 1 to remove the message from Windows Update.
Method 1- remove Some settings are managed by your organization message from Windows Update
Method 2 – remove the message from the Privacy section
Method 3 – remove the message from the Privacy section
Method 1
Step 1: Type Gpedit.msc in Start menu search and then press Enter key to open Local Group Policy Editor.
Step 2: Navigate to the following policy:
Computer configuration > Administrative Templates > Windows Components > Windows Update
On the right-side, double-click on the entry labeled Configure Automatic Updates to open its properties.
Step 3: Select Not Configured, and then click Apply button. Restart your PC if the message is still appearing when you open Windows Update in Settings, simply click Check for updates button once. The message will disappear in no time.
And if you want to disable updates, please refer to our how to turn off automatic updates in Windows 10 guide for detailed instructions.
Method 2
This will remove the message only from the Privacy section
Step 1: Open Settings app either by clicking its icon in the Start menu or using the Windows logo + I hotkey.
Step 2: Once the Settings app is launched, click Privacy.
Step 3: Click Feedback & diagnostics. Under the Diagnostics and usage data section, select either Enhanced or Full from the drop-down menu to turn off “Some settings are managed by your organization” message.
Method 3
Note that this method applies only to Windows 10 Pro edition as Group Policy Editor is not part of Home edition.
Step 1: Type Gpedit.msc in Start menu or Run command box and then press the Enter key.
Step 2: In the Local Group Policy Editor, navigate to the following policy:
Computer configuration > Administrative Templates > Windows Components > Data Collection and Preview Builds.
Step 3: On the right-side, double-click on Allow Telemetry to open its properties, select Enabled, and then select either Enhanced or Full, as shown in the picture below.
Click the Apply button. That’s it!