Building is a fairly general term without strict definition; It usually refers to the whole process that outputing the final product (an executable or a library) from source materials. Depending on the requirements, building will involve several of the following: pre-processing, compiling, linking, converting data files, automatically testing, packaging.
Among the tools that defining the building behaviors for Platform Dependent products whose programming language usually be C or C++, CMake is the most popular one as it is open-source and cross-platform. The building process with CMake takes place in two stages:
- Given abstract,
platform and compiler independentbuilding procedures defined by developers, generating standardMakefileorProject Filesfor IDEs (Visual Studio, Xcode etc.) . - Invoke the desired
native build toolto undertake the actual building process.
Here we introduce the usage of CMake. The environment of this tutorial is Windows 10; The output of each command will be different from that running on Linux. For the syntax of CMake Language, you may visit CMake Syntax for details.
Hello World
The following is a good starting point for learning about CMake.
- Create a new folder
test. - Under the directory, create the source file
main.cpp.
1
2
3
4
5#include <stdio.h>
int main(){
printf("Hello World from test Main!\n");
return 0;
} - Create the CMake file named exactly
CMakeLists.txt
1
2
3cmake_minimum_required(VERSION 3.10)
project(Main)
add_executable(Main main.cpp) - Run
cmake .to generate nativeproject files. UnderWindows, CMake will generate aVisual Studioproject by default. When finished, lots of contents created in the directory:
1
2
3
4
5
6
7
8
9
10
11
12
│ ALL_BUILD.vcxproj
│ ALL_BUILD.vcxproj.filters
│ CMakeCache.txt
│ CMakeLists.txt
│ cmake_install.cmake
│ main.cpp
│ Main.sln
│ Main.vcxproj
│ Main.vcxproj.filters
│ ZERO_CHECK.vcxproj
│ ZERO_CHECK.vcxproj.filters
└─CMakeFiles/ - Run
cmake --build .to create executable. You could find theMain.exein<root-dir>/Debug.
1
2
3
4
5
6
7
8
9
10
11
12
13
14
15
16
17
18
│ ALL_BUILD.vcxproj
│ ALL_BUILD.vcxproj.filters
│ CMakeCache.txt
│ CMakeLists.txt
│ cmake_install.cmake
│ main.cpp
│ Main.sln
│ Main.vcxproj
│ Main.vcxproj.filters
│ ZERO_CHECK.vcxproj
│ ZERO_CHECK.vcxproj.filters
├─CMakeFiles/
├─Debug/
│ Main.exe
│ Main.ilk
│ Main.pdb
├─Main.dir/
└─x64/ - Run executable via
Debug\Main.exe
1
Hello World from test Main!
Explanation
Generate a Project Buildsystem
To generate a buildsystem with CMake, the following must be defined:
Source Tree: The top-level directory containing source files provided by the project. Then the generation will start withCMakeLists.txtunder this directory.Build Tree: The top-level directory where buildsystem files and output artifacts being placed. CMake will also create aCMakeCache.txthere to store persistent information.Generator: The type of buildsystem to generate. If not specified, CMake will choose the proper one automatically. When using one of the Command-Line Build Tool Generators CMake expects that the environment needed by the compiler toolchain is already configured in the shell. When using one of the IDE Build Tool Generators, no particular environment is needed.
You could run CMake with one of the following command signatures to specify them.
cmake [<options>] <path-to-source>: Then the current directory is the build tree,<path-to-source>is the source tree. Both absolute an relative path is valid. The source tree must contain aCMakeLists.txtfile and must not contain aCMakeCache.txtfile.cmake [<options>] <path-to-existing-build>: Then<path-to-existing-build>is the build tree which must contain aCMakeCache.txtfile because CMake will load the source tree from it.cmake [<options>] -S <path-to-source> -B <path-to-build>. Specify both<path-to-build>and<path-to-source>. The source tree must contain aCMakeLists.txtfile; The build tree will be created automatically if it does not already exist.
Options
For the full list of options please visit https://cmake.org/cmake/help/latest/manual/cmake.1.html#options or cmake --help
-C <initial-cache>: Pre-load a script that contains a list ofset()commands to initialize the cache values. The loaded entries take priority over the project’s default values.-D <var>:<type>=<value>or-D <var>=<value>: Create or update a CMake CACHE entry.-G <generator-name>Specify a build system generator. Runcmake --helpto get the name of supported generators--log-level=<ERROR|WARNING|NOTICE|STATUS|VERBOSE|DEBUG|TRACE>: Set the log level. Themessage()command will only output messages of the specified log level or higher. The default log level isSTATUS.
Build a Project
Use cmake --build <dir> [<options>] [-- <build-tool-options>] to build an already-generated project binary tree.
--build <dir>The binary directory when building.--parallel [<jobs>], -j [<jobs>]: Specify the maximum number of concurrent processes. If<jobs>is omitted, use the default number.--target <tgt>..., -t <tgt>...: Build specific<tgt>s .--config <cfg>: For multi-configuration tools, choose specific<cfg>.--clean-first: Clean existing built target and re-build it.-target clean: Clean existing built target only.
Output message
message([SEND_ERROR|STATUS|FATAL_ERROR|DEBUG|TRACE] "message text" ...)
CMake displays STATUS to TRACE messages on stdout with prefix --; All other message types are sent to stderr. FATAL_ERROR will terminate the process immediately whereas CMake Error stops generation only but continues processing.
Set Project Name
project(<PROJECT-NAME> [VERSION <major>[.<minor>[.<patch>[.<tweak>]]]])
This command will set the name of the project and store it in PROJECT_NAME. When called from the top-level CMakeLists.txt, it will also store the project name in CMAKE_PROJECT_NAME. Simultaneously, the variables PROJECT_SOURCE_DIR, <PROJECT-NAME>_SOURCE_DIR, PROJECT_BINARY_DIR, <PROJECT-NAME>_BINARY_DIR will be defined according to the absolute path of the corresponding directory.
Add Executable
add_executable(<name> [source1] [source2 ...])
This command will add an executable target called <name> to be built from the source files listed in the command invocation; The source files can also be added later using target_sources(). The <name> must be globally unique within a project. By default the executable will be created in the build tree directory with the name <name> or <name>.exe depending on the native platform.
In-Source and Out-of-Source Build
Some build trees created with GNU autotools have a make distclean command that removes Makefiles and others belonging to the generated build system. However, CMake has no way to track exactly which files are generated by itself. Therefore, it’s recommended to adopt the out-of-source build —- placing the build tree separately from the source tree. Then one can clean the build by clear or delete the build tree without affect the original source files.
A Better Hello World
Reorganize the Project Directory
- Create
src/to place source files - Create
CMakeLists.txtundersrc/ - Create
build/to place buildsystem
After that, the structure of our project will be
1 |
| CMakeLists.txt |
Config Source and Binary Directory
1 |
add_subdirectory(source_dir [binary_dir]) |
This command will add source_dir run its CMakeLists.txt; A relative path will be evaluated with respect to the current directory. The binary_dir specifies the directory in which to place the output files. Both relative path and absolute path are valid; A relative path it will be evaluated with respect to the current output directory. If binary_dir is not specified, the value of source_dir before expanding will be used.
In top-level CMakeLists.txt become:
1 |
cmake_minimum_required(VERSION 3.10) |
Config Source Directory
It’s tedious to list all source files manually, regardless of using
1 |
add_executable(project source1.c source2.c) |
or
1 |
set(DIR source1.c source2.c) |
aux_source_directory(<dir> <variable>) will collects the names of all the source files in <dir> and stores the list in the <variable>. Note that there is no way for the build system that knows when a new source file has been added; When a new source is just added to the directory, one would have to manually rerun CMake to generate a build system incorporating the new file.
In CMakeLists.txt of src/, add
1 |
aux_source_directory(. SRC_DIR) |
Config Binary Directory
In CMakeLists.txt of src/, add
1 |
aux_source_directory(. SRC_DIR) |
Specify the C++ Standard
In top-level CMakeLists.txt, add
1 |
set(CMAKE_CXX_STANDARD 11) |
Add a Version Number
Add the version number in project.
1 |
project(Main VERSION 1.0) |
Then the variables PROJECT_VERSION, <PROJECT-NAME>_VERSION, PROJECT_VERSION_MAJOR, <PROJECT-NAME>_VERSION_MAJOR, PROJECT_VERSION_MINOR, <PROJECT-NAME>_VERSION_MINOR, PROJECT_VERSION_PATCH, <PROJECT-NAME>_VERSION_PATCH, PROJECT_VERSION_TWEAK, <PROJECT-NAME>_VERSION_TWEAK will be defined accordingly.
It’s also valid to specify the version number directly in the source code,; Using CMakeLists.txt provides more flexibility. Under src/, create a new file config.h.in with the following content:
1 |
|
configure_file(<input> <output>) will copy the <input> to an <output> file with the evaulated values referenced as @VAR@ or ${VAR}. Each variable reference will be replaced with the current value of the variable, or the empty string if the variable is not defined.
The configured file will be written into the ${CMAKE_CURRENT_BINARY_DIR}; We must add that directory to the list of paths to search for include files. In src/CMakeLists.txt, add
1 |
configure_file(config.h.in config.h) |
target_include_directories(<target> <INTERFACE|PUBLIC|PRIVATE> [items1...]) [<INTERFACE|PUBLIC|PRIVATE> [items2...] ...]) specifies include directories to when compiling a given target. The named <target> must have been defined by such as add_executable() or add_library().
Finally, in main.cpp, let’s include the header file and print the version number.
1 |
#include <stdio.h> |
A Complex Hello World
Add Math Library
Create math/ under src/, add CMakeLists.txt, MathFunctions.cpp with MathFunctions.h
MathFunctions.h
1 |
extern double power(double base, int exponent); |
MathFunctions.cpp
1 |
#include "MathFunctions.h" |
src/math/CMakeLists.txt
1 |
aux_source_directory(. DIR_LIB_SRCS) |
After that, the structure will be
1 |
| CMakeLists.txt |
Build and Use Static Library
In src/math/CMakeLists.txt, add
1 |
set(LIBRARY_OUTPUT_PATH ${PROJECT_BINARY_DIR}/lib) |
add_library(<name> [STATIC | SHARED] [source1] [source2 ...]) will add a library target called <name>.
The top-level CMakeLists.txt become:
1 |
cmake_minimum_required(VERSION 3.10) |
The src/CMakeLists.txt become:
1 |
aux_source_directory(. SRC_DIR) |
The structure become
1 |
| CMakeLists.txt |
Build and use Dynamic Library
src/math/CMakeLists.txt become
1 |
aux_source_directory(. DIR_LIB_SRCS) |
MathFunctions.h become
1 |
extern __declspec( dllexport ) double power(double base, int exponent); |
src/CMakeLists.txt become:
1 |
aux_source_directory(. SRC_DIR) |
Then the structrue become
1 |
| CMakeLists.txt |
When running with dynamic-linked library, you should put the .dlls under the same folder of .exe.
https://cmake.org/cmake/help/latest/guide/tutorial/ https://cliutils.gitlab.io/modern-cmake/
How to setup CMake for C++ (Windows)
by | Last Updated:
C / C++
In this article I will provide you with the information on how to setup CMake and compile your C++ project. You may also use this to compile third-party projects and solutions that you depend upon.
If you like this content consider checking out my course on CMake where I cover this and much more.
Table of Contents
- What do you need to follow through this tutorial
- Why do we need CMake?
- Install CMake
- Creating our project
- How to generate build files
- Adding more source files
- Using CMake GUI to build
- Using Visual Studio 2017/2019
What do you need to follow through this tutorial
- You would need to have some basic knowledge of C++ as I will not be explaining why or what the application that we are compiling does. Start from this post that explains the basics of C++.
- There are some terminal commands being executed but you will not need previous knowledge on Command Prompts / PowerShell. Check out this post on how to operate the command line.
- Visual Studio installed with support for C++ compilation. CMake will automatically detect your Visual Studio installation later.
Why do we need CMake?
C++ is an old language. Do not make a mistake it is really powerful and provides a lot of control over low level memory and system programming. As an old language though it misses some of the modern high-level language concepts. When programming in C++ it is hard to target multiple platforms as there is no unified project structure as well as good package management.
On other languages like Java, C# and python the code is always compiled to an intermediate language or is interpreted directly at runtime. That code is then run by a special virtual machine that translates it to commands for the specific machine.
This is what CMake strives to solve but the other way around. It is a project generator. On Windows one would want to work with Visual Studio project files and solutions and on Linux one would rather have Make files. This essentially means that we unify our project files under CMake which on the other hand generates the project files for the specific system.
Read more: You can check out more on how the compiler and linker work to gain in depth knowledge on why the process is different than other languages.
Install CMake
To install cmake you open this page: https://cmake.org/download/
You should find the corresponding binary for your windows installation (x64, x86) and download the .msi file. It should roughly look something like this:

The install wizard is pretty straightforward just make sure that on the question “By default CMake does not add its directory to the system PATH” you check one of the options Add CMake to system Path so that later we can execute commands from the windows terminal.
Creating our project
We will have the most simple example for our first compile using CMake. We will start as always with our “Hello, World!” application using a single .cpp file to demonstrate how CMake will generate a project and compile that file.
We will have the following project structure:
- src
- main.cpp
- CMakeLists.txt
In our “main.cpp” file we will write down the following “Hello, World!” application:
#include <iostream>

int main() {
    std::cout << "Hello, World!" << std::endl;
    return 0;
}
The “CMakeLists.txt” file is our base of operations when using CMake. It can link other CMakeLists files which later on will make it easy to include dependency (vendor) projects and compile them along our application. We will start with the most basic content for our file so that we can compile our “main.cpp” into a simple console application:
# This will set the minimum version of CMake required to generate the projects
# CMakeLists has its own language and features and as more and more versions are
# added it will include new keywords and options
cmake_minimum_required(VERSION 3.18)

# This will give our project a name
project(Main)

# This instructs CMake that we want to generate an executable file from this project
# Other options would be add_library but this is a topic for another time
# You can notice that we also pass on the path to our cpp file
add_executable(Main src/main.cpp)
How to generate build files
To start generating the cmake projects we will need to open a terminal window inside the root folder where our CMakeLists.txt file resides. This can easily be done by clicking shift + right mouse button inside the folder and then selecting “Open PowerShell window here”. After we’ve done that we can execute the following commands:
mkdir build
cd build
cmake ..
This will create the directory build, then move the terminal working directory to build and then generate projects using the “CMakeLists.txt” file in the previous directory as noted by the two dots after cmake (single dot means current directory, two dots means one directory up).
You can also specify the source and build directories by adding the following flags:
cmake -B [build directory] -S [source directory]After executing this command the “build” folder will be filled with project files. Double clicking the “Main.sln” file would open up Visual Studio. If you’ve followed up until now you would have 3 projects in the solution explorer as follows:
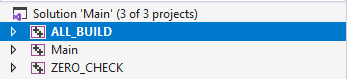
- Main – this is the project that we want to build and that will generate our executable.
- ALL_BUILD – by default this will be set up as the startup project and it will run Main and ZERO_CHECK.
- ZERO_CHECK – as our project is not actually controlled by visual studio but generated externally we cannot add source/header files inside of visual studio itself. To do that we would need to append them into the add_executable command inside of “CMakeLists.txt”. The ZERO_CHECK project would then monitor for changes in that file and regenerate VS projects based on the changes.
Now that we have Visual Studio open we can build the project. Use the shortcut ctrl + shift + b to run the build command or click on the top menu “Build” -> “Build Solution”.
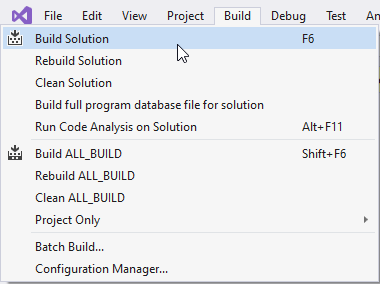
Note: If you still have the command line open you can also use the command
cmake --build . --config Debug
You can run the project by right clicking on the “Main” project in Visual Studio solution explorer and selecting the option “Set as Startup Project”. On the top navigation bar you will notice a play button with the label of “Local Windows Debugger” that you can click to run your project (shortcut is ctrl + F5).
Note: If you’ve built the project using the command line you can run the application that we just compiled by using the following commands:
cd Debug .\Main.exe
Adding more source files
To add other files to the project you would need to create them in the target directory using Windows Explorer and then add them to CMakeLists. Lets say for example that we decide to move the “#include <iostream>” and all future includes into another file. We also want to create a header file called “main.h” and another C++ file called “other.cpp” resulting in the following following changes:
- build
- …generated build files…
- src
- main.h
- main.cpp
- other.cpp
- CMakeLists.txt
Create a file called main.h in the src directory with the following content
void print_hello_world();Then we modify main.cpp to include main.h instead of <iostream> and also call the newly defined function. This would result into the following file:
#include "main.h"

int main() {

print_hello_world();
    return 0;
}
Lets also add another file that would implement the print_hello_world function and call it other.cpp:
#include <iostream>

void print_hello_world() {
    std::cout << "Hello, World!" << std::endl;
}
At this point visual studio would not be able to compile the project as it will not know about other.cpp. It would be able to find the main.h file. To fix this we need to open CMakeLists.txt and modify the following line:
add_executable(Main src/main.cpp src/other.cpp src/main.h)Though it is no need to add the header file it is a good practice to list all source files so that you can also see them listed in the solution explorer later.
You can now run build. Visual Studio will display a prompt if you want to reload the projects. Be sure to click on “Reload All”.
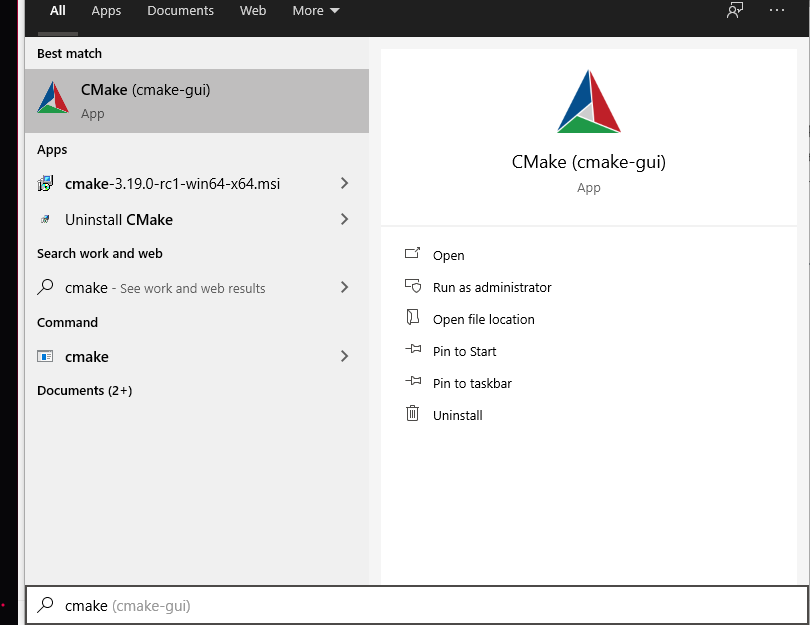
Using CMake GUI to build
To use the visual CMake application is even easier. As CMake is already installed on Windows you can open the “Start” menu and start typing “cmake”. Select the “CMake (cmake-gui)” that should appear as a search result.
After you open it a window will appear where you can put on some options for generating the project files. First thing you should locate the “Where is the source code” input field and select the folder where your project resides (the root CMakeLists.txt file). Then you can select a directory where the projects will be generated by giving a value to the “Where to build the binaries”. In my case I create a separate directory but you can also just write the path to the “build” directory again. After these two fields are filled in you can click on the “Generate” button bellow. It should look something like this:
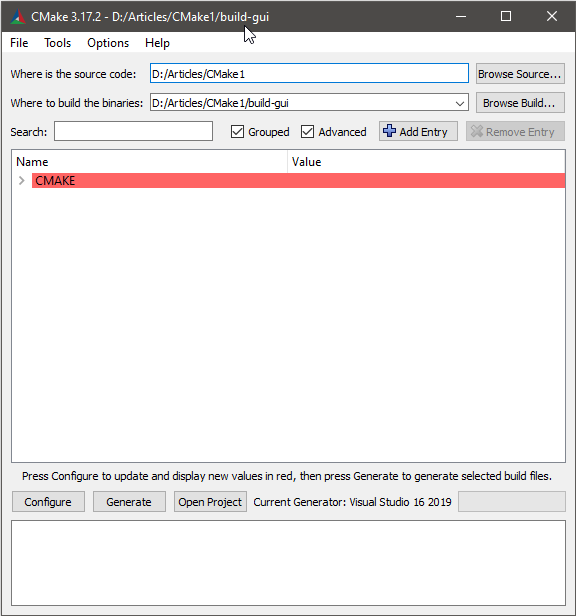
After the projects are generated you can repeat the steps above for the new directory “build-gui”. You will also have the option to click on the “Open Project” button in the CMake GUI Window.
Using Visual Studio 2017/2019
On the latest versions of visual studio you can open alternatively open the root directory with Visual Studio. It will automatically detect that it is a CMake type of project. The benefit of opening the solution this way is that Visual Studio will not actually generate a solution. It will use another build system called “Ninja” that I will talk about in another post. This system is faster on rebuilds which makes it more efficient to compile C++ code.
You can follow up with:
- What are CMake targets
- How to manage dependencies in CMake: Vanilla vs Vcpkg
- More posts on CMake
- Posts on the topic of C++ game development
Время на прочтение
11 мин
Количество просмотров 69K

В процессе разработки я люблю менять компиляторы, режимы сборки, версии зависимостей, производить статический анализ, замерять производительность, собирать покрытие, генерировать документацию и т.д. И очень люблю CMake, потому что он позволяет мне делать всё то, что я хочу.
Многие ругают CMake, и часто заслуженно, но если разобраться, то не всё так плохо, а в последнее время очень даже неплохо, и направление развития вполне позитивное.
В данной заметке я хочу рассказать, как достаточно просто организовать заголовочную библиотеку на языке C++ в системе CMake, чтобы получить следующую функциональность:
- Сборку;
- Автозапуск тестов;
- Замер покрытия кода;
- Установку;
- Автодокументирование;
- Генерацию онлайн-песочницы;
- Статический анализ.
Кто и так разбирается в плюсах и си-мейке может просто скачать шаблон проекта и начать им пользоваться.
Содержание
- Проект изнутри
- Структура проекта
- Главный CMake-файл (./CMakeLists.txt)
- Информация о проекте
- Опции проекта
- Опции компиляции
- Основная цель
- Установка
- Тесты
- Документация
- Онлайн-песочница
- Скрипт для тестов (test/CMakeLists.txt)
- Тестирование
- Покрытие
- Скрипт для документации (doc/CMakeLists.txt)
- Скрипт для онлайн-песочницы (online/CMakeLists.txt)
- Проект снаружи
- Сборка
- Генерация
- Сборка
- Опции
- MYLIB_COVERAGE
- MYLIB_TESTING
- MYLIB_DOXYGEN_LANGUAGE
- Сборочные цели
- По умолчанию
- mylib-unit-tests
- check
- coverage
- doc
- wandbox
- Примеры
- Сборка
- Инструменты
- Статический анализ
- Послесловие
Проект изнутри
Структура проекта
.
├── CMakeLists.txt
├── README.en.md
├── README.md
├── doc
│   ├── CMakeLists.txt
│   └── Doxyfile.in
├── include
│   └── mylib
│       └── myfeature.hpp
├── online
│   ├── CMakeLists.txt
│   ├── mylib-example.cpp
│   └── wandbox.py
└── test
    ├── CMakeLists.txt
    ├── mylib
    │   └── myfeature.cpp
    └── test_main.cpp
Главным образом речь пойдёт о том, как организовать CMake-скрипты, поэтому они будут разобраны подробно. Остальные файлы каждый желающий может посмотреть непосредственно на странице проекта-шаблона.
Главный CMake-файл (./CMakeLists.txt)
Информация о проекте
В первую очередь нужно затребовать нужную версию системы CMake. CMake развивается, меняются сигнатуры команд, поведение в разных условиях. Чтобы CMake сразу понимал, чего мы от него хотим, нужно сразу зафиксировать наши к нему требования.
cmake_minimum_required(VERSION 3.13)Затем обозначим наш проект, его название, версию, используемые языки и прочее (см. команду project).
В данном случае указываем язык CXX (а это значит C++), чтобы CMake не напрягался и не искал компилятор языка C (по умолчанию в CMake включены два языка: C и C++).
project(Mylib VERSION 1.0 LANGUAGES CXX)Здесь же можно сразу проверить, включён ли наш проект в другой проект в качестве подпроекта. Это сильно поможет в дальнейшем.
get_directory_property(IS_SUBPROJECT PARENT_DIRECTORY)Опции проекта
Предусмотрим две опции.
Первая опция — MYLIB_TESTING — для выключения модульных тестов. Это может понадобиться, если мы уверены, что с тестами всё в порядке, а мы хотим, например, только установить или запакетировать наш проект. Или наш проект включён в качестве подпроекта — в этом случае пользователю нашего проекта не интересно запускать наши тесты. Вы же не тестируете зависимости, которыми пользуетесь?
option(MYLIB_TESTING "Включить модульное тестирование" ON)Кроме того, мы сделаем отдельную опцию MYLIB_COVERAGE для замеров покрытия кода тестами, но она потребует дополнительных инструментов, поэтому включать её нужно будет явно.
option(MYLIB_COVERAGE "Включить измерение покрытия кода тестами" OFF)Опции компиляции
Разумеется, мы крутые программисты-плюсовики, поэтому хотим от компилятора максимального уровня диагностик времени компиляции. Ни одна мышь не проскочит.
add_compile_options(
    -Werror

    -Wall
    -Wextra
    -Wpedantic

    -Wcast-align
    -Wcast-qual
    -Wconversion
    -Wctor-dtor-privacy
    -Wenum-compare
    -Wfloat-equal
    -Wnon-virtual-dtor
    -Wold-style-cast
    -Woverloaded-virtual
    -Wredundant-decls
    -Wsign-conversion
    -Wsign-promo
)
Расширения тоже отключим, чтобы полностью соответствовать стандарту языка C++. По умолчанию в CMake они включены.
if(NOT CMAKE_CXX_EXTENSIONS)
    set(CMAKE_CXX_EXTENSIONS OFF)
endif()
Основная цель
Наша библиотека состоит только из заголовочных файлов, а значит, мы не располагаем каким-либо выхлопом в виде статических или динамических библиотек. С другой стороны, чтобы использовать нашу библиотеку снаружи, её нужно установить, нужно, чтобы её можно было обнаружить в системе и подключить к своему проекту, и при этом вместе с ней были привязаны эти самые заголовки, а также, возможно, какие-то дополнительные свойства.
Для этой цели создаём интерфейсную библиотеку.
add_library(mylib INTERFACE)Привязываем заголовки к нашей интерфейсной библиотеке.
Современное, модное, молодёжное использование CMake подразумевает, что заголовки, свойства и т.п. передаются через одну единственную цель. Таким образом, достаточно сказать target_link_libraries(target PRIVATE dependency), и все заголовки, которые ассоциированы с целью dependency, будут доступны для исходников, принадлежащих цели target. И не требуется никаких [target_]include_directories. Это будет продемонстрировано ниже при разборе CMake-скрипта для модульных тестов.
Также стоит обратить внимание на т.н. выражения-генераторы: $<...>.
Данная команда ассоциирует нужные нам заголовки с нашей интерфейсной библиотекой, причём, в случае, если наша библиотека будет подключена к какой-либо цели в рамках одной иерархии CMake, то с ней будут ассоциированы заголовки из директории ${CMAKE_CURRENT_SOURCE_DIR}/include, а если наша библиотека установлена в систему и подключена в другой проект с помощью команды find_package, то с ней будут ассоциированы заголовки из директории include относительно директории установки.
target_include_directories(mylib INTERFACE
    $<BUILD_INTERFACE:${CMAKE_CURRENT_SOURCE_DIR}/include>
    $<INSTALL_INTERFACE:include>
)
Установим стандарт языка. Разумеется, самый последний. При этом не просто включаем стандарт, но и распространяем его на тех, кто будет использовать нашу библиотеку. Это достигается за счёт того, что установленное свойство имеет категорию INTERFACE (см. команду target_compile_features).
target_compile_features(mylib INTERFACE cxx_std_17)Заводим псевдоним для нашей библиотеки. Причём для красоты он будет в специальном «пространстве имён». Это будет полезно, когда в нашей библиотеке появятся разные модули, и мы заходим подключать их независимо друг от друга. Как в Бусте, например.
add_library(Mylib::mylib ALIAS mylib)Установка
Установка наших заголовков в систему. Тут всё просто. Говорим, что папка со всеми заголовками должна попасть в директорию include относительно места установки.
install(DIRECTORY include/mylib DESTINATION include)Далее сообщаем системе сборки о том, что мы хотим иметь возможность в сторонних проектах звать команду find_package(Mylib) и получать цель Mylib::mylib.
install(TARGETS mylib EXPORT MylibConfig)
install(EXPORT MylibConfig NAMESPACE Mylib:: DESTINATION share/Mylib/cmake)
Следующее заклинание нужно понимать так. Когда в стороннем проекте мы вызовем команду find_package(Mylib 1.2.3 REQUIRED), и при этом реальная версия установленной библиотеки окажется несовместимой с версией 1.2.3, CMake автоматически сгенерирует ошибку. То есть не нужно будет следить за версиями вручную.
include(CMakePackageConfigHelpers)
write_basic_package_version_file("${PROJECT_BINARY_DIR}/MylibConfigVersion.cmake"
    VERSION
        ${PROJECT_VERSION}
    COMPATIBILITY
        AnyNewerVersion
)
install(FILES "${PROJECT_BINARY_DIR}/MylibConfigVersion.cmake" DESTINATION share/Mylib/cmake)
Тесты
Если тесты выключены явно с помощью соответствующей опции или наш проект является подпроектом, то есть подключён в другой CMake-проект с помощью команды add_subdirectory, мы не переходим дальше по иерархии, и скрипт, в котором описаны команды для генерации и запуска тестов, просто не запускается.
if(NOT MYLIB_TESTING)
    message(STATUS "Тестирование проекта Mylib выключено")
elseif(IS_SUBPROJECT)
    message(STATUS "Mylib не тестируется в режиме подмодуля")
else()
    add_subdirectory(test)
endif()
Документация
Документация также не будет генерироваться в случае подпроекта.
if(NOT IS_SUBPROJECT)
    add_subdirectory(doc)
endif()
Онлайн-песочница
Аналогично, онлайн-песочницы у подпроекта тоже не будет.
if(NOT IS_SUBPROJECT)
    add_subdirectory(online)
endif()
Скрипт для тестов (test/CMakeLists.txt)
Тестирование
Первым делом находим пакет с нужным тестовым фреймворком (замените на свой любимый).
find_package(doctest 2.3.3 REQUIRED)Создаём наш исполняемый файл с тестами. Обычно непосредственно в исполняемый бинарник я добавляю только файл, в котором будет функция main.
add_executable(mylib-unit-tests test_main.cpp)А файлы, в которых описаны сами тесты, добавляю позже. Но так делать не обязательно.
target_sources(mylib-unit-tests PRIVATE mylib/myfeature.cpp)Подключаем зависимости. Обратите внимание, что к нашему бинарнику мы привязали только нужные нам CMake-цели, и не вызывали команду target_include_directories. Заголовки из тестового фреймворка и из нашей Mylib::mylib, а также параметры сборки (в нашем случае это стандарт языка C++) пролезли вместе с этими целями.
target_link_libraries(mylib-unit-tests
    PRIVATE
        Mylib::mylib
        doctest::doctest
)
Наконец, создаём фиктивную цель, «сборка» которой эквивалентна запуску тестов, и добавляем эту цель в сборку по умолчанию (за это отвечает атрибут ALL). Это значит, что сборка по умолчанию инициирует запуск тестов, то есть мы никогда не забудем их запустить.
add_custom_target(check ALL COMMAND mylib-unit-tests)Покрытие
Далее включаем замер покрытия кода, если задана соответствующая опция. В детали вдаваться не буду, потому что они относятся больше к инструменту для замеров покрытия, чем к CMake. Важно только отметить, что по результатам будет создана цель coverage, с помощью которой удобно запускать замер покрытия.
find_program(GCOVR_EXECUTABLE gcovr)
if(MYLIB_COVERAGE AND GCOVR_EXECUTABLE)
    message(STATUS "Измерение покрытия кода тестами включено")

    target_compile_options(mylib-unit-tests PRIVATE --coverage)
    target_link_libraries(mylib-unit-tests PRIVATE gcov)

    add_custom_target(coverage
        COMMAND
            ${GCOVR_EXECUTABLE}
                --root=${PROJECT_SOURCE_DIR}/include/
                --object-directory=${CMAKE_CURRENT_BINARY_DIR}
        DEPENDS
            check
    )
elseif(MYLIB_COVERAGE AND NOT GCOVR_EXECUTABLE)
    set(MYLIB_COVERAGE OFF)
    message(WARNING "Для замеров покрытия кода тестами требуется программа gcovr")
endif()
Скрипт для документации (doc/CMakeLists.txt)
Нашли Doxygen.
find_package(Doxygen)Дальше проверяем, установлена ли пользователем переменная с языком. Если да, то не трогаем, если нет, то берём русский. Затем конфигурируем файлы системы Doxygen. Все нужные переменные, в том числе и язык попадают туда в процессе конфигурации (см. команду configure_file).
После чего создаём цель doc, которая будет запускать генерирование документации. Поскольку генерирование документации — не самая большая необходимость в процессе разработки, то по умолчанию цель включена не будет, её придётся запускать явно.
if (Doxygen_FOUND)
    if (NOT MYLIB_DOXYGEN_LANGUAGE)
        set(MYLIB_DOXYGEN_LANGUAGE Russian)
    endif()
    message(STATUS "Doxygen documentation will be generated in ${MYLIB_DOXYGEN_LANGUAGE}")
    configure_file(Doxyfile.in Doxyfile)
    add_custom_target(doc COMMAND ${DOXYGEN_EXECUTABLE} ${CMAKE_CURRENT_BINARY_DIR}/Doxyfile)
endif ()
Скрипт для онлайн-песочницы (online/CMakeLists.txt)
Тут находим третий Питон и создаём цель wandbox, которая генерирует запрос, соответствующий API сервиса Wandbox, и отсылает его. В ответ приходит ссылка на готовую песочницу.
find_program(PYTHON3_EXECUTABLE python3)
if(PYTHON3_EXECUTABLE)
    set(WANDBOX_URL "https://wandbox.org/api/compile.json")

    add_custom_target(wandbox
        COMMAND
            ${PYTHON3_EXECUTABLE} wandbox.py mylib-example.cpp "${PROJECT_SOURCE_DIR}" include |
            curl -H "Content-type: application/json" -d @- ${WANDBOX_URL}
        WORKING_DIRECTORY
            ${CMAKE_CURRENT_SOURCE_DIR}
        DEPENDS
            mylib-unit-tests
    )
else()
    message(WARNING "Для создания онлайн-песочницы требуется интерпретатор ЯП python 3-й версии")
endif()
Проект снаружи
Теперь рассмотрим, как этим всем пользоваться.
Сборка
Сборка данного проекта, как и любого другого проекта на системе сборки CMake, состоит из двух этапов:
Генерация
cmake -S путь/к/исходникам -B путь/к/сборочной/директории [опции ...]Если команда выше не сработала из-за старой версии CMake, попробуйте опустить
-S:cmake путь/к/исходникам -B путь/к/сборочной/директории [опции ...]
Подробнее про опции.
Сборка проекта
cmake --build путь/к/сборочной/директории [--target target]Подробнее про сборочные цели.
Опции
MYLIB_COVERAGE
cmake -S ... -B ... -DMYLIB_COVERAGE=ON [прочие опции ...]Включает цель coverage, с помощью которой можно запустить замер покрытия кода тестами.
MYLIB_TESTING
cmake -S ... -B ... -DMYLIB_TESTING=OFF [прочие опции ...]Предоставляет возможность выключить сборку модульных тестов и цель check. Как следствие, выключается замер покрытия кода тестами (см. MYLIB_COVERAGE).
Также тестирование автоматически отключается в случае, если проект подключается в другой проект качестве подпроекта с помощью команды add_subdirectory.
MYLIB_DOXYGEN_LANGUAGE
cmake -S ... -B ... -DMYLIB_DOXYGEN_LANGUAGE=English [прочие опции ...]Переключает язык документации, которую генерирует цель doc на заданный. Список доступных языков см. на сайте системы Doxygen.
По умолчанию включён русский.
Сборочные цели
По умолчанию
cmake --build path/to/build/directory
cmake --build path/to/build/directory --target all
Если цель не указана (что эквивалентно цели all), собирает всё, что можно, а также вызывает цель check.
mylib-unit-tests
cmake --build path/to/build/directory --target mylib-unit-testsКомпилирует модульные тесты. Включено по умолчанию.
check
cmake --build путь/к/сборочной/директории --target checkЗапускает собранные (собирает, если ещё не) модульные тесты. Включено по умолчанию.
См. также mylib-unit-tests.
coverage
cmake --build путь/к/сборочной/директории --target coverageАнализирует запущенные (запускает, если ещё не) модульные тесты на предмет покрытия кода тестами при помощи программы gcovr.
Выхлоп покрытия будет выглядеть примерно так:
------------------------------------------------------------------------------
                           GCC Code Coverage Report
Directory: /path/to/cmakecpptemplate/include/
------------------------------------------------------------------------------
File                                       Lines    Exec  Cover   Missing
------------------------------------------------------------------------------
mylib/myfeature.hpp                            2       2   100%
------------------------------------------------------------------------------
TOTAL                                          2       2   100%
------------------------------------------------------------------------------
Цель доступна только при включённой опции MYLIB_COVERAGE.
См. также check.
doc
cmake --build путь/к/сборочной/директории --target docЗапускает генерацию документации к коду при помощи системы Doxygen.
wandbox
cmake --build путь/к/сборочной/директории --target wandboxОтвет от сервиса выглядит примерно так:
{
    "permlink" :    "QElvxuMzHgL9fqci",
    "status" :  "0",
    "url" : "https://wandbox.org/permlink/QElvxuMzHgL9fqci"
}
Для этого используется сервис Wandbox. Не знаю, насколько у них резиновые сервера, но думаю, что злоупотреблять данной возможностью не стоит.
Примеры
Сборка проекта в отладочном режиме с замером покрытия
cmake -S путь/к/исходникам -B путь/к/сборочной/директории -DCMAKE_BUILD_TYPE=Debug -DMYLIB_COVERAGE=ON
cmake --build путь/к/сборочной/директории --target coverage --parallel 16
Установка проекта без предварительной сборки и тестирования
cmake -S путь/к/исходникам -B путь/к/сборочной/директории -DMYLIB_TESTING=OFF -DCMAKE_INSTALL_PREFIX=путь/к/установойной/директории
cmake --build путь/к/сборочной/директории --target install
Сборка в выпускном режиме заданным компилятором
cmake -S путь/к/исходникам -B путь/к/сборочной/директории -DCMAKE_BUILD_TYPE=Release -DCMAKE_CXX_COMPILER=g++-8 -DCMAKE_PREFIX_PATH=путь/к/директории/куда/установлены/зависимости
cmake --build путь/к/сборочной/директории --parallel 4
Генерирование документации на английском
cmake -S путь/к/исходникам -B путь/к/сборочной/директории -DCMAKE_BUILD_TYPE=Release -DMYLIB_DOXYGEN_LANGUAGE=English
cmake --build путь/к/сборочной/директории --target doc
Инструменты
-
CMake 3.13
На самом деле версия CMake 3.13 требуется только для запуска некоторых консольных команд, описанных в данной справке. С точки зрения синтаксиса CMake-скриптов достаточно версии 3.8, если генерацию вызывать другими способами.
-
Библиотека тестирования doctest
Тестирование можно отключать (см.
опцию MYLIB_TESTING). -
Doxygen
Для переключения языка, на котором будет сгенерирована документация, предусмотрена опция
MYLIB_DOXYGEN_LANGUAGE. -
Интерпретатор ЯП Python 3
Для автоматической генерации онлайн-песочницы.
Статический анализ
С помощью CMake и пары хороших инструментов можно обеспечить статический анализ с минимальными телодвижениями.
Cppcheck
В CMake встроена поддержка инструмента для статического анализа Cppcheck.
Для этого нужно воспользоваться опцией CMAKE_CXX_CPPCHECK:
cmake -S путь/к/исходникам -B путь/к/сборочной/директории -DCMAKE_BUILD_TYPE=Debug -DCMAKE_CXX_CPPCHECK="cppcheck;--enable=all;-Iпуть/к/исходникам/include"После этого статический анализ будет автоматически запускаться каждый раз во время компиляции и перекомпиляции исходников. Ничего дополнительного делать не нужно.
Clang
При помощи чудесного инструмента scan-build тоже можно запускать статический анализ в два счёта:
scan-build cmake -S путь/к/исходникам -B путь/к/сборочной/директории -DCMAKE_BUILD_TYPE=Debug
scan-build cmake --build путь/к/сборочной/директории
Здесь, в отличие от случая с Cppcheck, требуется каждый раз запускать сборку через scan-build.
Послесловие
CMake — очень мощная и гибкая система, позволяющая реализовывать функциональность на любой вкус и цвет. И, хотя, синтаксис порой оставляет желать лучшего, всё же не так страшен чёрт, как его малюют. Пользуйтесь системой сборки CMake на благо общества и с пользой для здоровья.
→ Скачать шаблон проекта
We’re Earthly. We make building software simpler and faster with containerization. If you’re into CMake and automation, Earthly could be just the tool you need. Check it out.
CMake is an open source multiplatform tool that you can use to help with build automation, testing, packaging, and the installation of software. One of the main advantages of CMake is that it supports generating build scripts for a wide variety of platforms including Windows, macOS, and Linux. This gives developers the flexibility they need when building a new project and hopefully helps speed up the build.
In this article, you’ll learn more about CMake and if it’s the right solution for you. You’ll also walk through the process of installing it on Windows.
Pros and Cons of CMake

There are a number of benefits to using CMake to help build your solutions, including the fact that CMake can run on all major platforms, including Windows, Linux, and macOS. This means that a team of developers who are using different operating systems can still have common development tools.
Using CMake for projects, instead of something like Visual Studio projects, helps you avoid being locked into one integrated development environment (IDE). A team can create a project using CMake, and then each developer can use their preferred IDE to work on it. CMake integration is supported by a variety of IDE tools, including CLion, Atom, and Visual Studio.
It may be useful for some developers and software architects to understand what dependencies are within their projects and the nature of the dependency. CMake can create a visualization of any dependencies within the project, that you can use to create documentation.
While many would assume that CMake’s active development is an advantage (which it is!), it also has its downsides: Not everyone within a developer team will be running the same version of CMake. However, to help reduce this issue, CMake has introduced policies that define how certain CMake features should behave. This means your team can set a common policy regardless of what version people are using.
Another disadvantage of CMake is the lack of information available for some versions. It can be hard to find accurate information to resolve an issue or answer a question.
When to Use CMake
As you can see, CMake can be a useful build system. Developers using CMake can quickly check performance on different build backends and easily move between them.
CMake can also help to keep your source code folder clean. It can separate the build system, intermediaries, and output files from the source code, keeping your code clean for the future.
Install CMake on Windows
There are several ways to install CMake on Windows. The first option is to use pre-compiled binaries as either the Windows Installer file (MSI) or the compressed version (ZIP) files. You just have to download the files and then walk through the interactive installation wizard.
The second option is to download and build CMake from the source, and CMake even includes a source release download option.
The third option is to use a package manager tool, such as Windows Package Manager or Chocolatey. This can be especially convenient if you already have either installed on your machine. We will use the package manager method you’ll use for your installation here.
If you’re using Windows Package Manager, run the following command to install CMake:
winget install kitware.cmakeIf you’re using Chocolatey, use the following command:
Install a CMake Extension with Visual Studio
Once you’ve finished installing CMake on Windows, you need to install an extension that lets you integrate the functionality of CMake into your IDE (Visual Studio is used here).
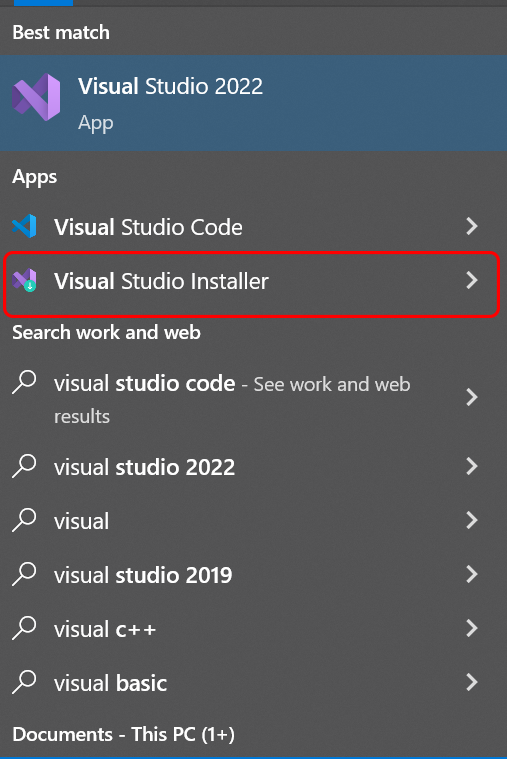
To install the CMake extension, you need to select Start and then open the Visual Studio Installer from the menu:
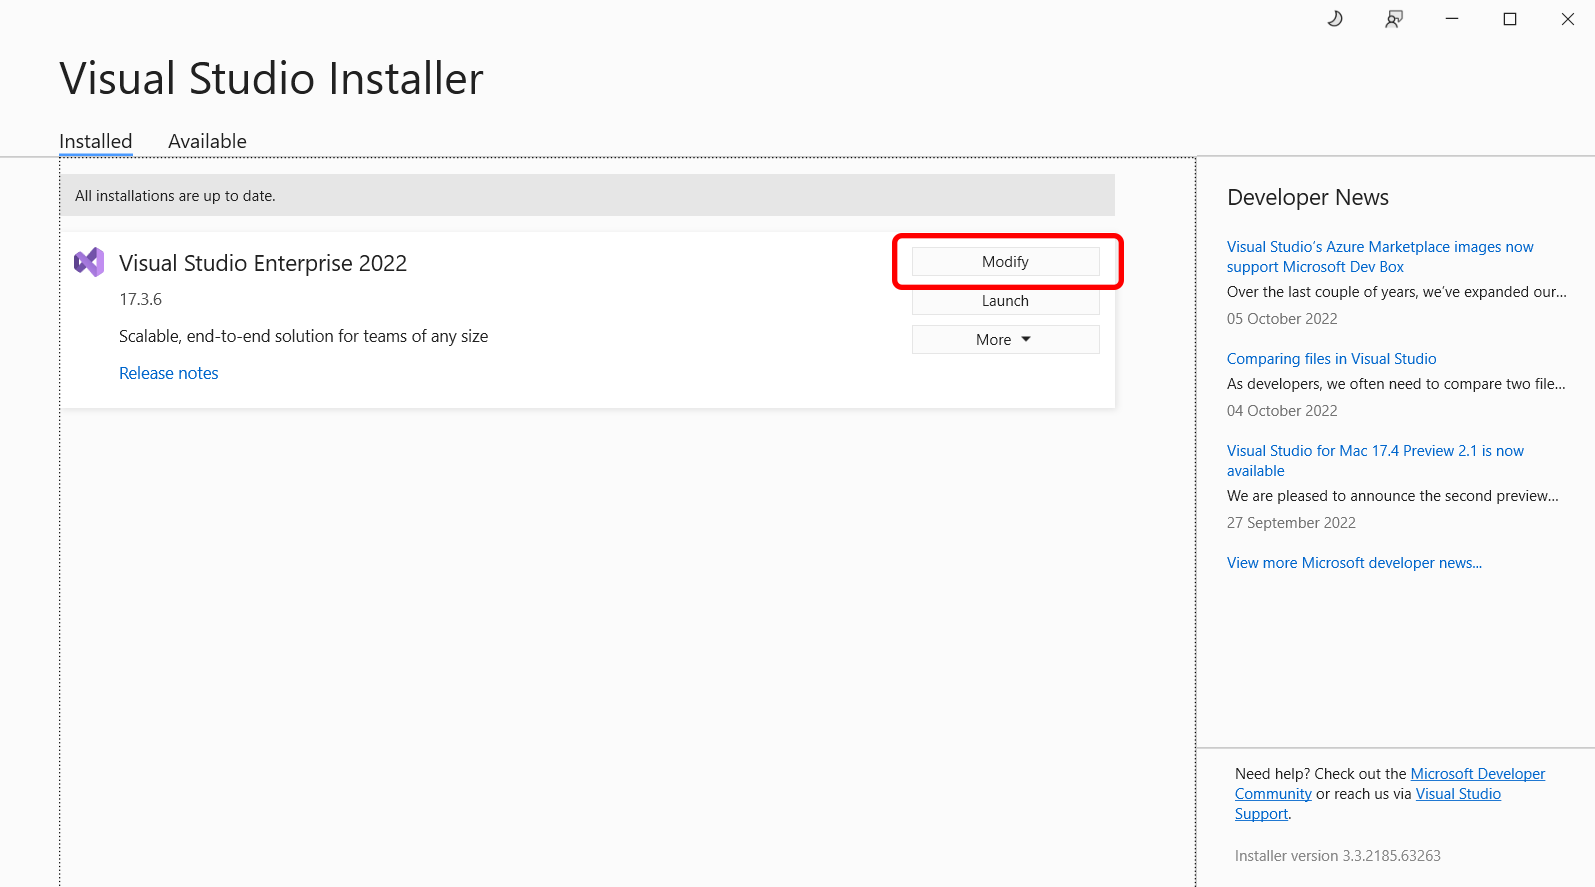
Once the Visual Studio Installer loads, select Modify:
Under Workloads, locate Desktop development with C++, which can be found under Desktop & Mobile:
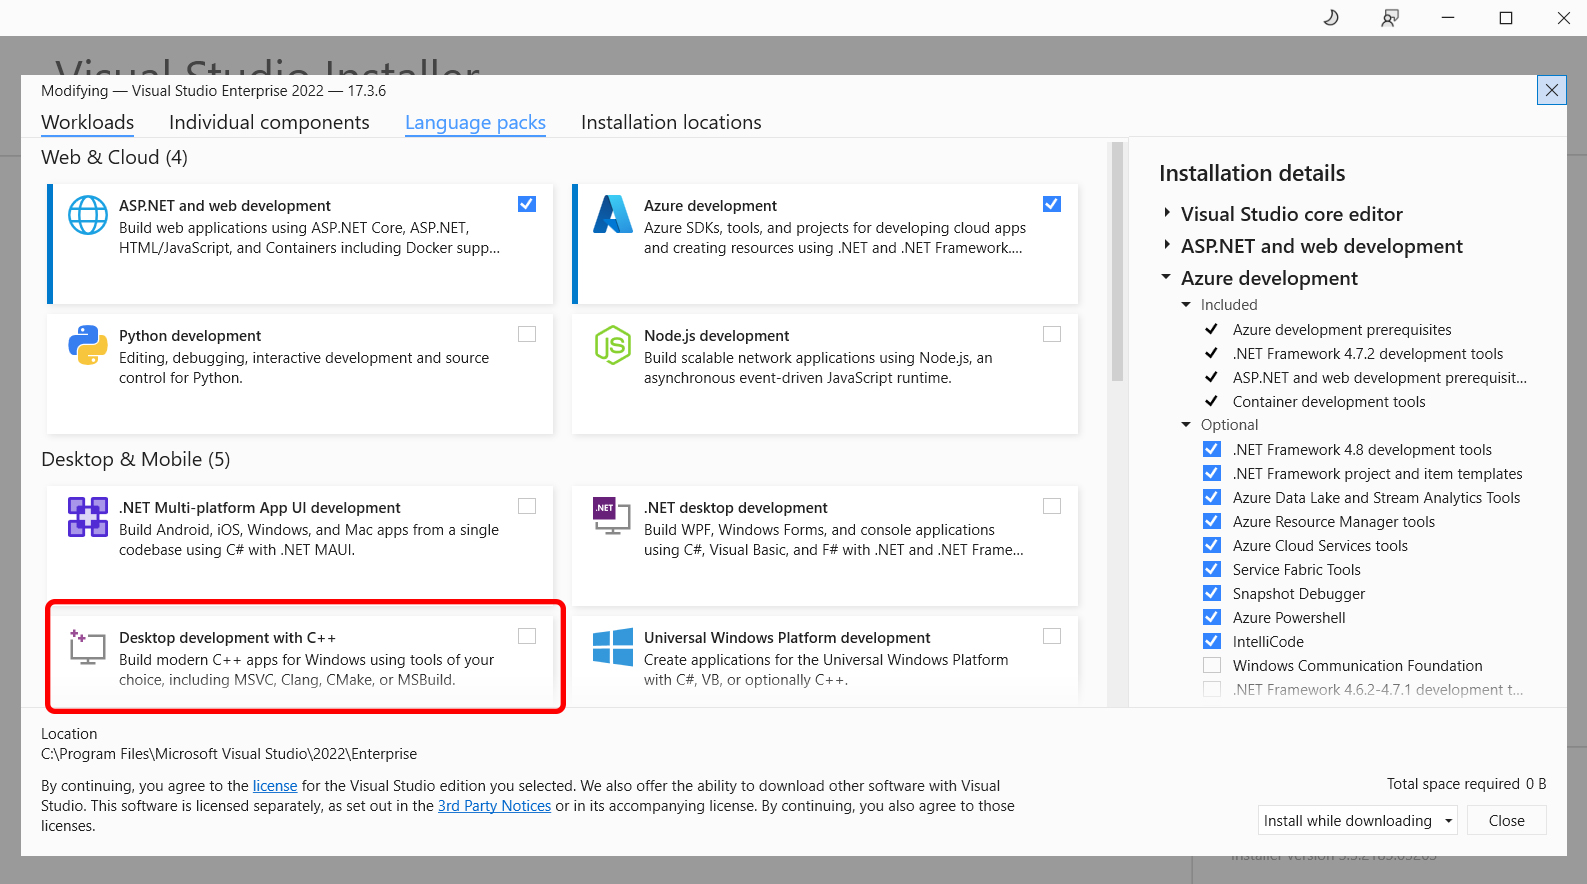
On this same page, you also need to find and select the Linux and embedded development with C++ component. This component ensures you have cross-platform CMake development capabilities:
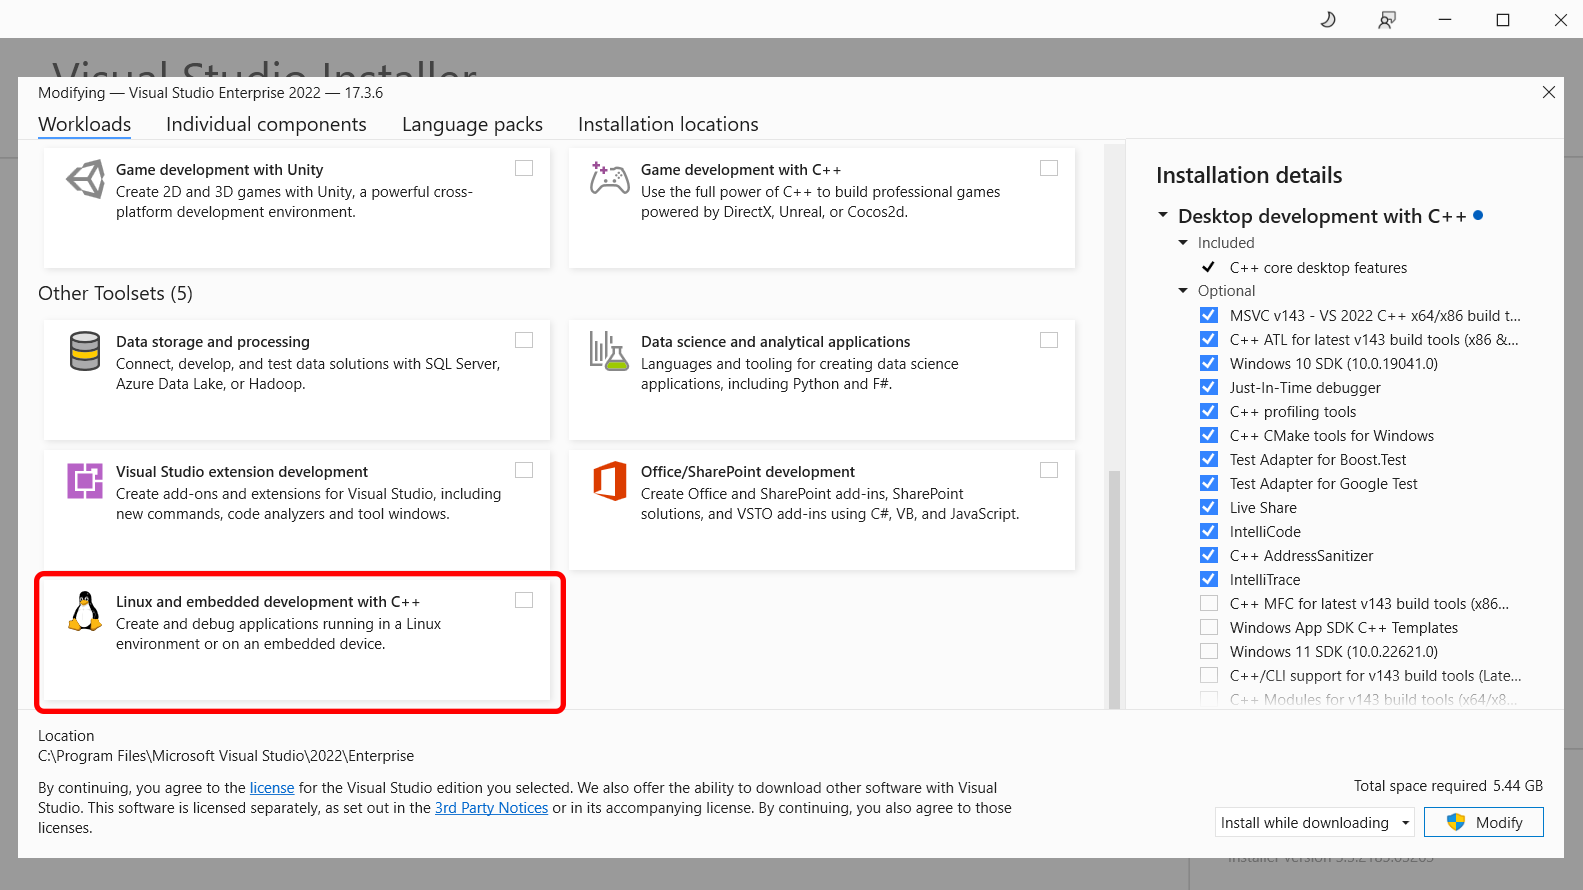
Once you’ve selected both, select Modify again, and the additional tools will be installed.
Integrate an IDE
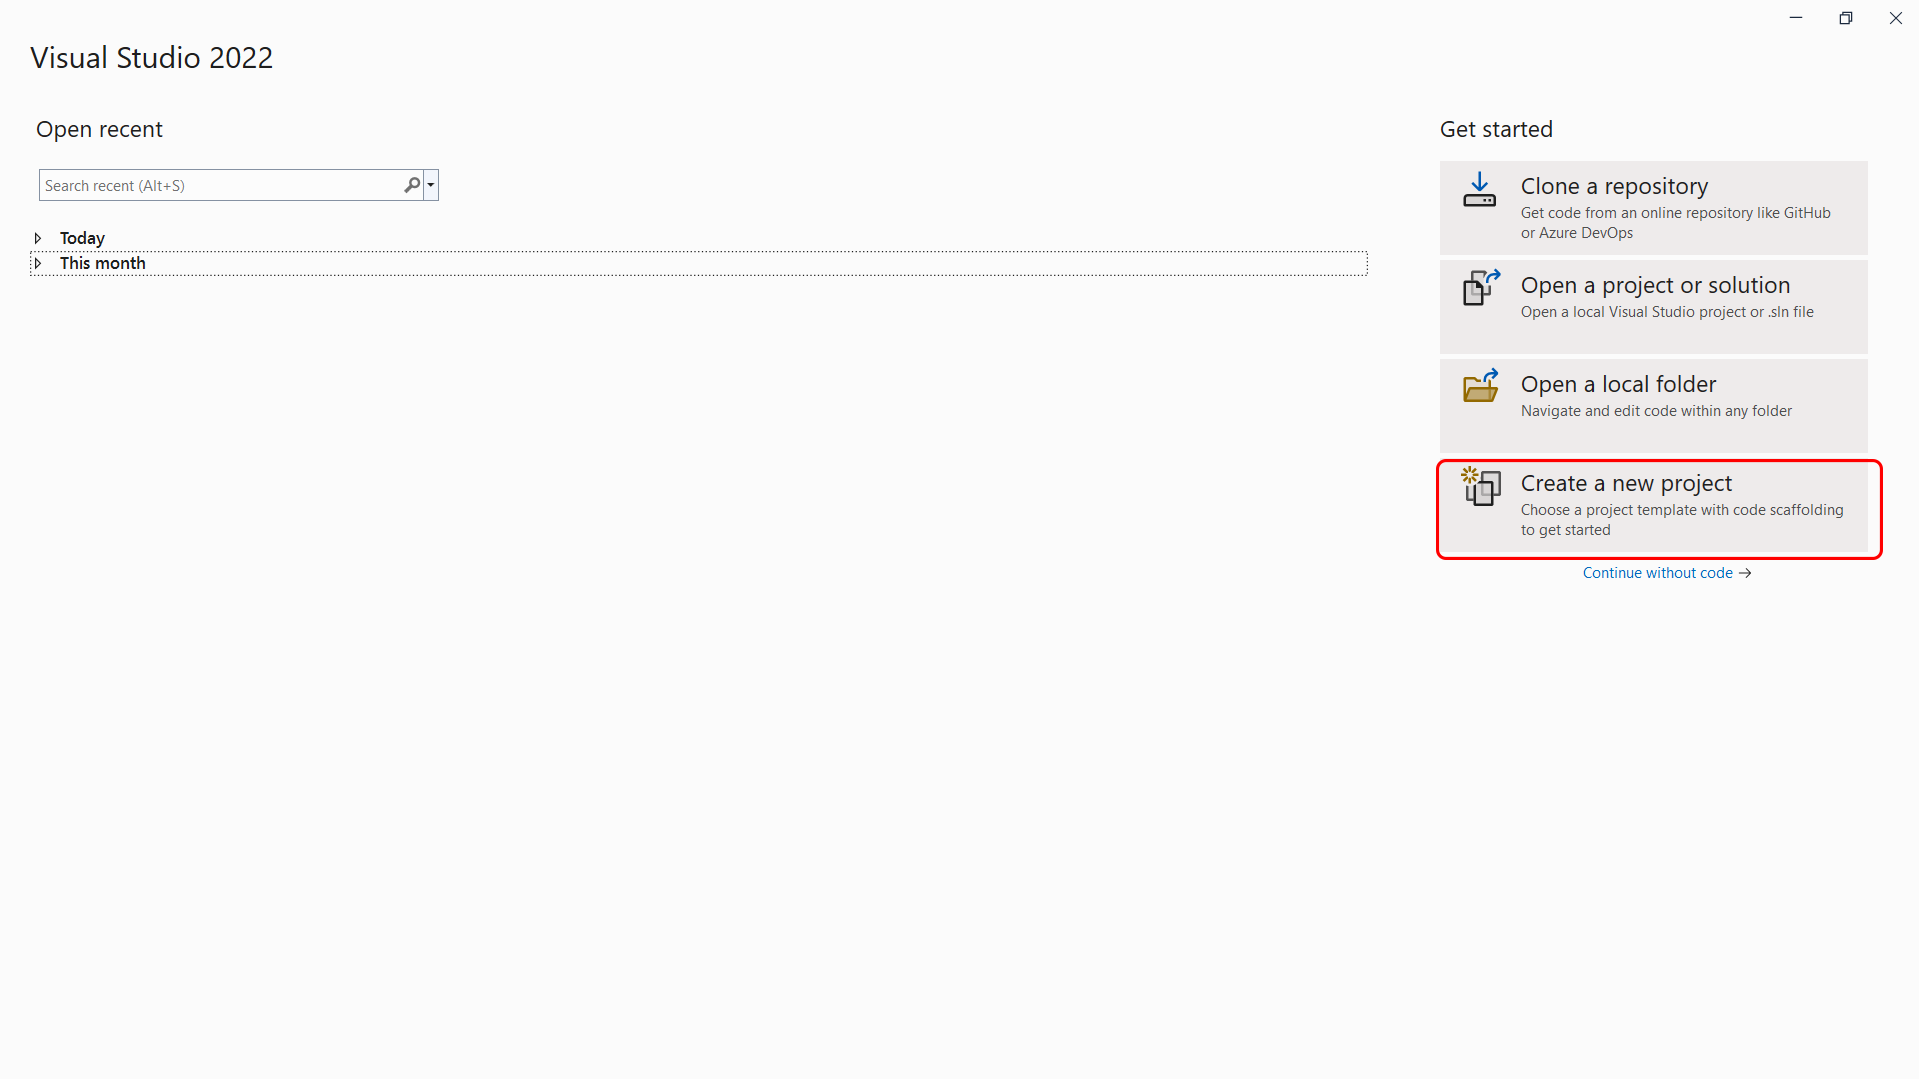
Now that you’ve installed CMake and a few components, it’s time to use them. Start a new project by opening Visual Studio and selecting Create a new project > CMake project:
After selecting CMake project, Visual Studio, and CMake will create a directory and a file called CMakeLists.txt, which is a set of instructions describing certain settings within the project, such as source files and targets.
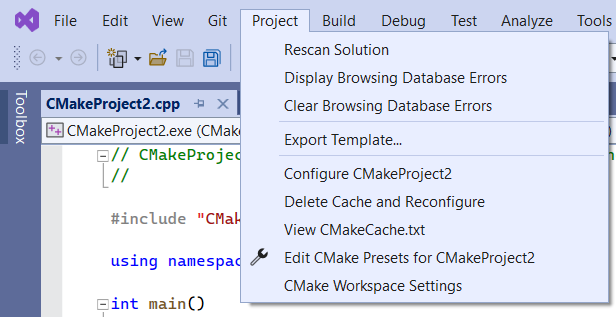
When Visual Studio detects that there is a CMakeLists.txt file within a project that’s been opened, it adds CMake items to the Project menu, which gives you access to commands for viewing and editing CMake scripts:
Configure CMake Projects
CMake supports two files that let you specify build and test options. These files are CMakePresets.json and CMakeUserPresets.json. Microsoft recommends that you use CMakePresets.json.
To ensure that Visual Studio uses the CMakePresets.json file, you need to enable it. You can do so via Tools > Options > CMake > General. Please ensure that the Always use CMake Presets option is selected:

If Visual Studio can’t find a CMakePresets.json file, it will fall back to using the default configure presets.
There are three key settings within your CMakePresets.json file: target systems, configure presets, and build presets. The target system is the system on which CMake is invoked to configure and build your project. You can use systems installed on your local machine, SSH connections, and all Windows Subsystem for Linux (WSL) installations.
The configure preset option is used when CMake is invoked to generate the project build system. Depending on your target system, the options for this will change. So if you are using Ubuntu as your target system, your configure preset could be Linux debug.
The build preset value is used when CMake is invoked to build the project and should align with the configure preset. If Visual Studio can’t find any build presets that are associated with the configure preset, then it will provide the default build preset.
As you can see, there are a lot of options available to configure your CMake projects to suit your needs and project. If you’re looking for even more information on how to configure your projects, check out this Visual Studio documentation.
Build CMake Projects on Visual Studio
When you’re ready, Visual Studio gives you several options to build your CMake projects, including the toolbar or the Solution Explorer.
If you want to use the toolbar, you need to find the Startup Item drop-down:

Select your preferred target to build, and either press F5 or choose Run.
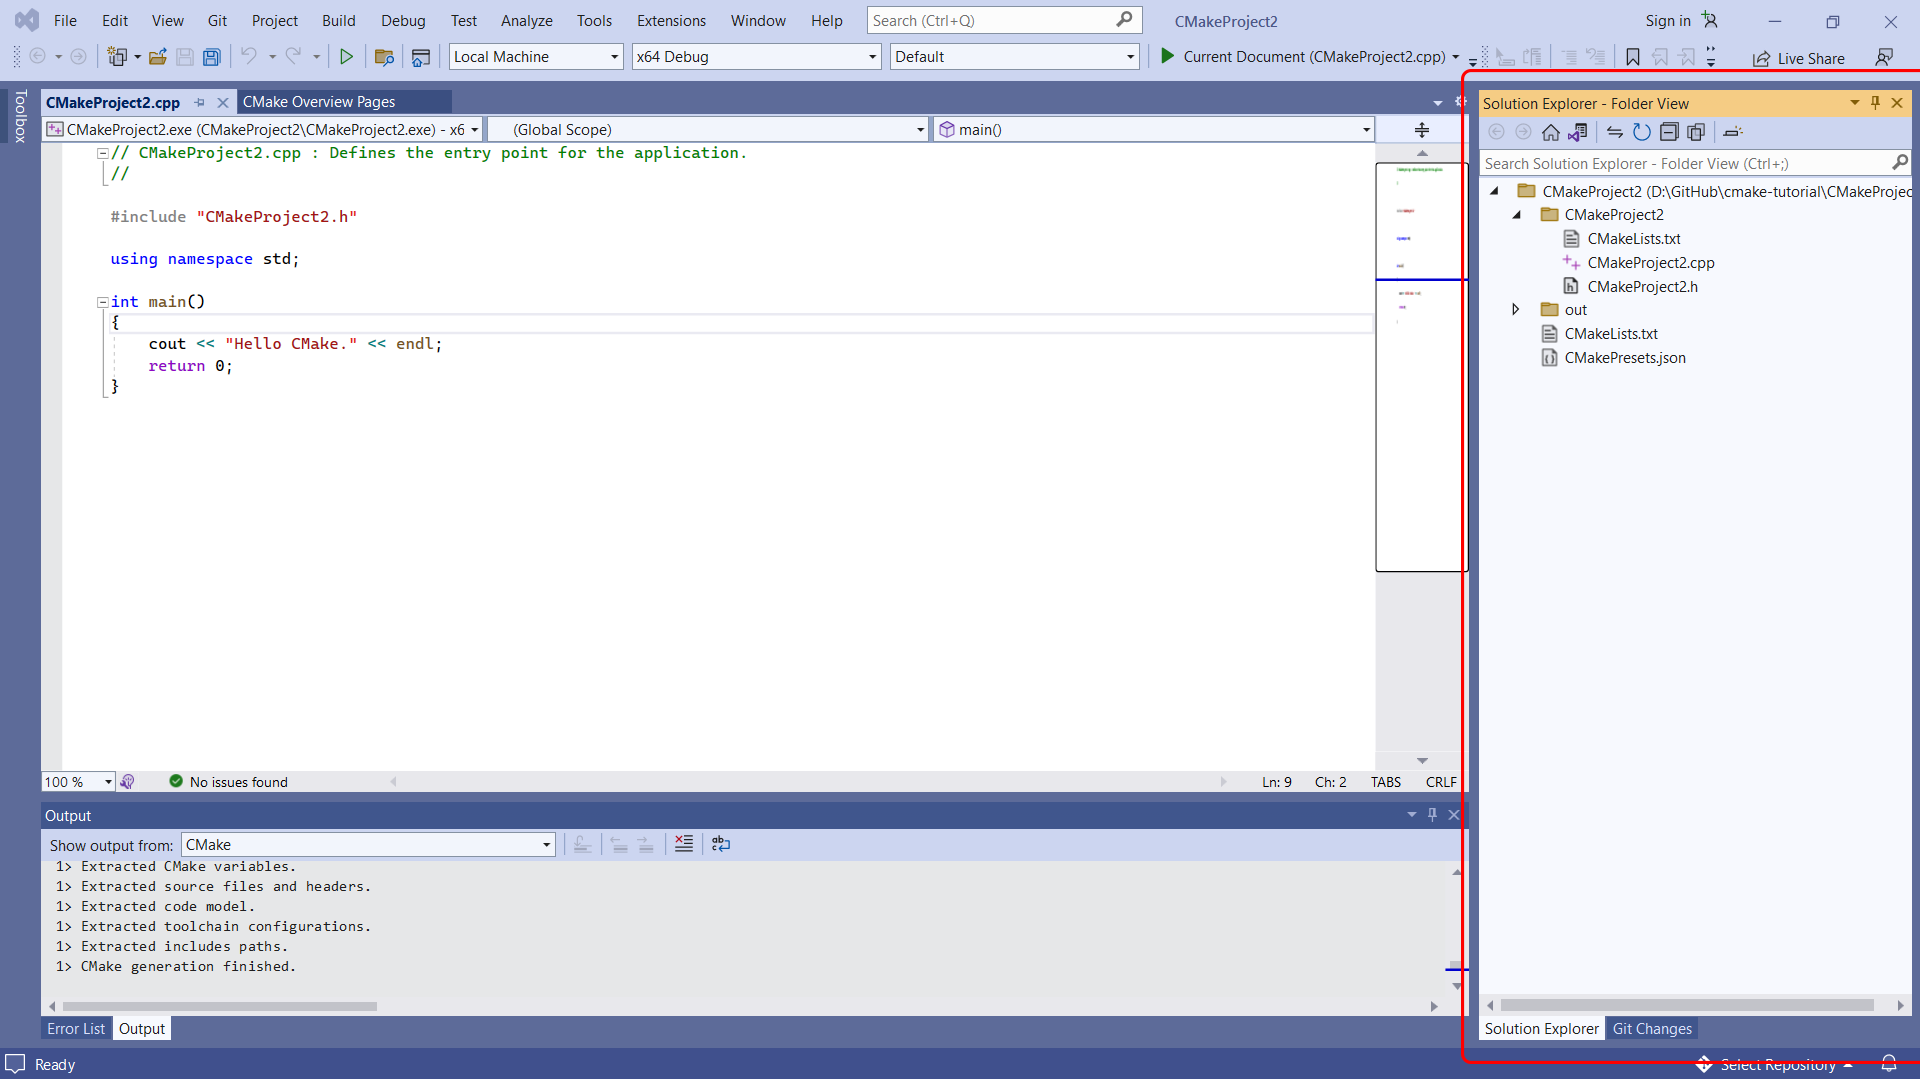
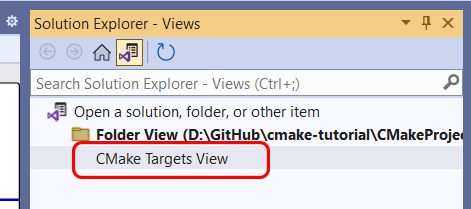
If you want to use the Solution Explorer, navigate to the Solution Explorer on the right-hand side of your screen. By default, it will be set to the Folder View:
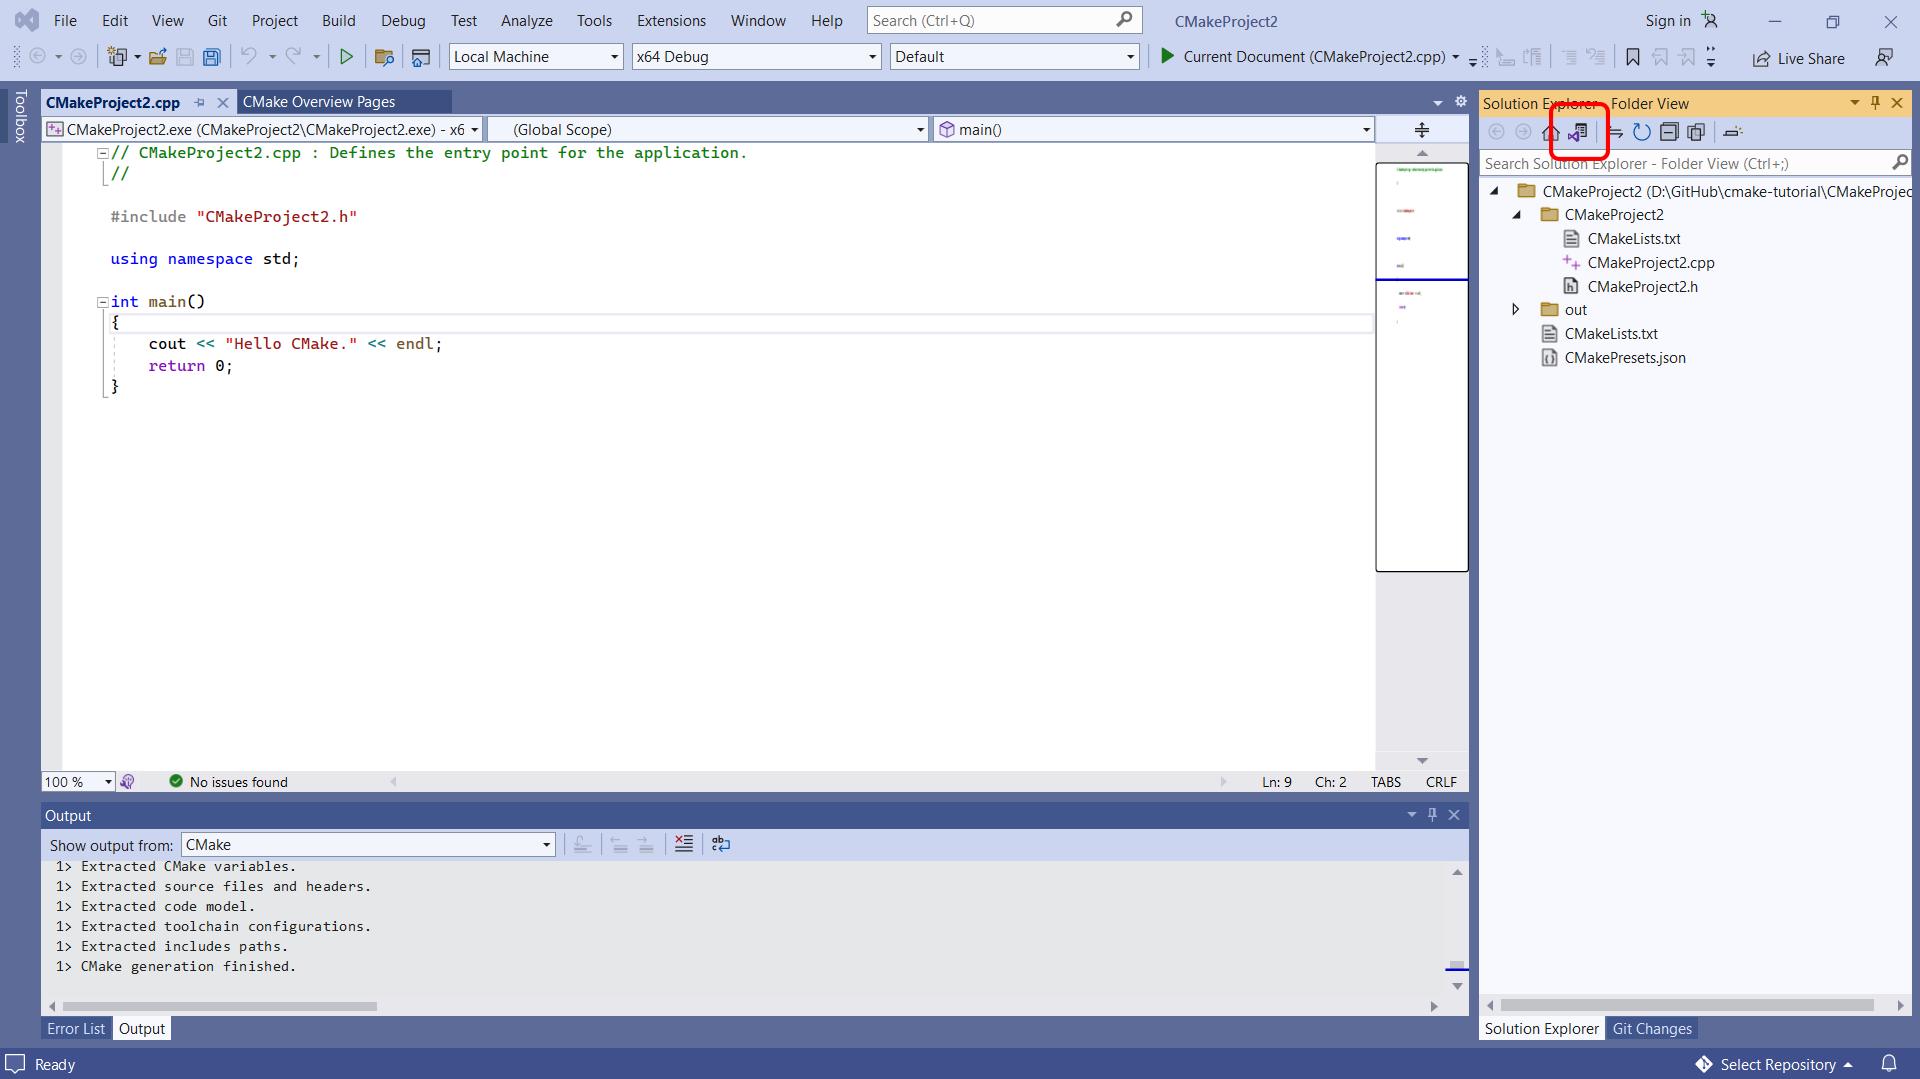
You need to change the Folder View to the CMake Targets View. To do this, select the view icon:
Then select CMake Targets View:
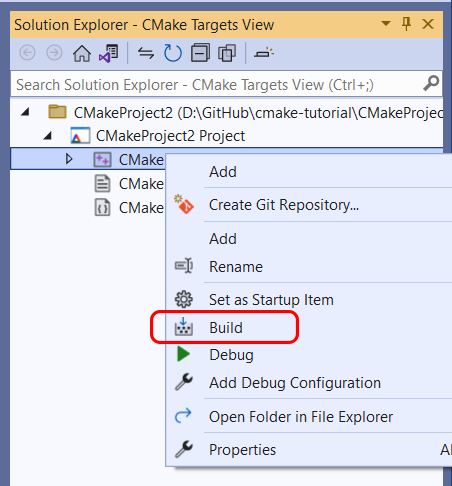
Then right-click on CMake Target and select Build from the context menu:
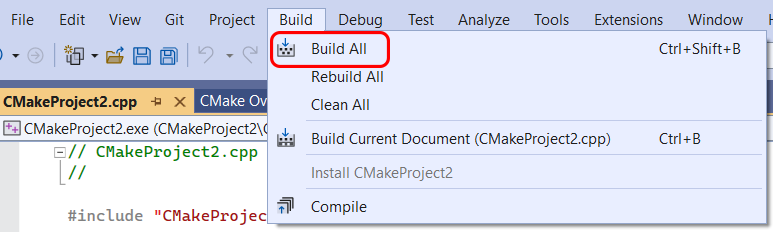
Lastly, you can select Build > Build All from the main menu of Visual Studio to build your CMake project:
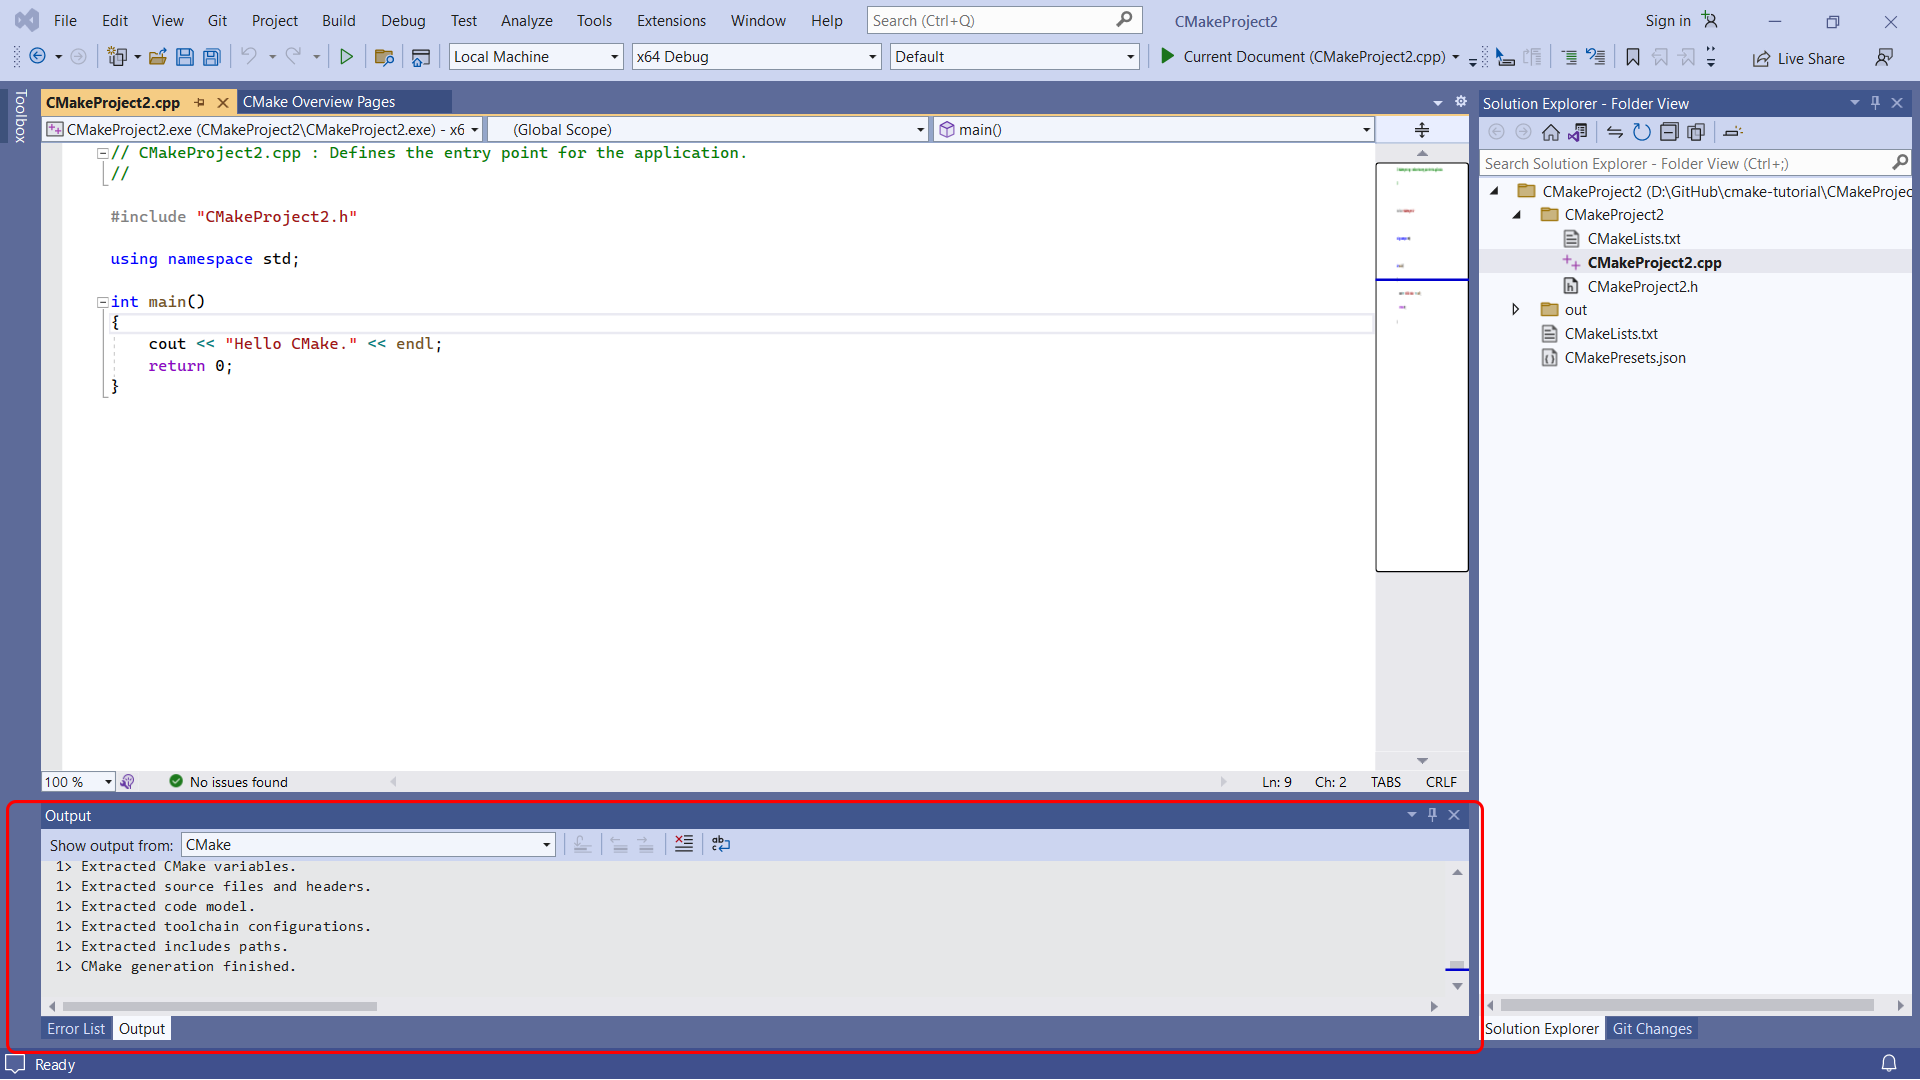
After completing either one of these options, you can find the build results within the Output window and Error List:
Debug CMake Projects
As you know, when writing code, it’s never perfect the first time, which is why you’ll need to be able to debug your code.
To debug your CMake project using Visual Studio, start by selecting one of the targets shown in the Startup Item drop-down within the toolbar:
Then select Debug > Start Debugging from the main toolbar:
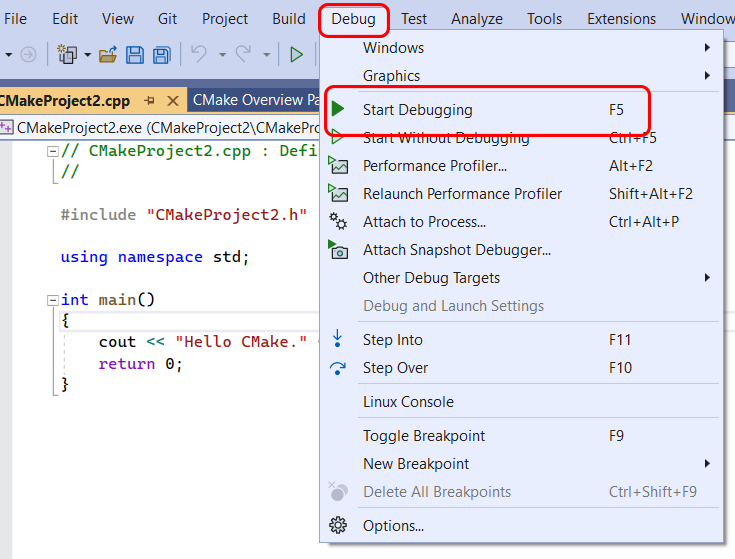
If any changes have been made since the last time you built the project, the debug command will build it first before the debugging can take place.
The launch.vs.json file can be used to customize your CMake debugging session. This file can be used to input any environment variables or command line arguments that you might want to pass into the program during debugging.
Conclusion
CMake is a versatile tool that aids in build automation, testing, packaging, and software installation. It integrates with many IDEs, giving developers the flexibility to stick with their preferred IDE. It ensures your application’s compatibility across any platform. While CMake isn’t for everyone, it can be a robust solution for the right developer or project.
And if you’re looking to optimize your builds further, you might want to give Earthly a shot for its efficient caching and straightforward syntax.
Earthly makes builds simple
Fast, repeatable builds with an instantly familiar syntax – like Dockerfile and Makefile had a baby.
Learn More