CMake Tools
CMake Tools provides the native developer a full-featured, convenient, and powerful workflow for CMake-based projects in Visual Studio Code.
Important doc links
- CMake Tools quick start
- Configure and build a project with CMake Presets
- Configure a project with kits and variants
- Build a project with kits and variants
- Configure and build a project using tasks
- Debug a project
- Configure CMake Tools settings
- How to
- FAQ
- Read the online documentation
- Contribute
Issues? Questions? Feature requests?
PLEASE, if you experience any problems, have any questions, or have an idea
for a new feature, create an issue on the GitHub page!
This extension itself does not provide language support for the CMake scripting language.
For that we bundle this extension which provides the support.
A closed-source extension that provides even better support can also be installed: CMake Language Support
Microsoft Open Source Code of Conduct
This project has adopted the Microsoft Open Source Code of Conduct. For more information see the Code of Conduct FAQ or contact opencode@microsoft.com with any additional questions or comments.
Data/Telemetry
This extension collects usage data and sends it to Microsoft to help improve our products and services. Collection of telemetry is controlled via the same setting provided by Visual Studio Code: "telemetry.enableTelemetry". Read our privacy statement to learn more.
Credits
This project was started by @vector-of-bool and is now currently maintained by Microsoft.
First written on 2020-09-11.
Last updated on 2021-01-02.
In this article and several more, I will be discussing developing a very simple C++ library and application using CMake and Visual Studio Code. I will also use git and Google Test, and port the project from Windows to Linux. Most of the information is applicable to using almost any IDE, or indeed, no IDE at all.
Why Use CMake?
CMake is a powerful and robust build system. You specify what you want done, not how to do it. CMake then takes that information and generates the files needed to build the system. For example, CMake can generate solution (.sln) and project files (.vcxproj) that Visual Studio and Visual Studio Code use on Windows. Similar capabilities are available for every other popular IDE. It can even create make files if you want to do everything from the command line. Because it can be called from the command line, it integrates well with continuous integration/continuous build systems.
You can specify the build tools that you want to use; for example, you can use MSVC or LLVM on Windows, and gnu or LLVM on Unix-like systems, including Linux, OSX, and MSYS or MinGW. Aside from specifying the tools to use, no other changes are required to the CMake specification files. You will see this when I port my project from Windows using the Visual Studio build tools to Linux using the gnu build tools.
With CMake, you can download, build, and use a large number of tools. I will show one example of this when I use Google Test in this project. Just about any tool that can be downloaded from the internet, and which provides CMake files for building, can be used.
Installing the Needed Tools
I will start the project on Windows using VS Code and the Visual Studio Build Tools, but if you wish, you can start with a different IDE, or even a different operating system. In a later article, I will discuss using the gnu tools on Linux (Ubuntu).
So let’s begin.
Installing Visual Studio Code and Extensions
On Windows, the latest version of Visual Studio Code is available on its download page. Select the appropriate version; click on the Windows button for the x64 version, or one of the ARM links for ARM if that is applicable to you. The download will begin. When it is completed, run the downloaded file.
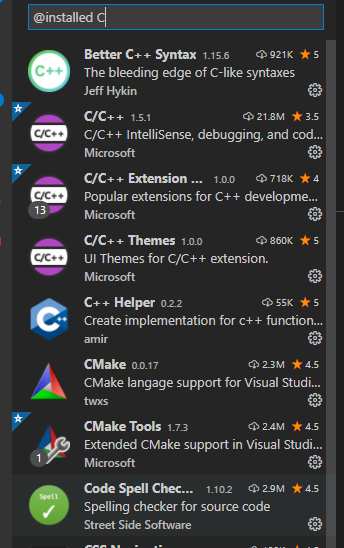
Next, we need two VSCode extensions. Start VS Code and display the extensions panel (select View → Extensions from the main menu). In the search box, enter C++. A number of C and C++ extensions are displayed. You want the one called C++. Make sure it is from Microsoft. This extension provides Intellisense, debugging, and browsing capabilities. Click on the Install button to install it.
The second extension is CMake Tools. Search for and install it.
Installing Visual Studio Build Tools
We need the build tools provided by Visual Studio. Don’t worry, we aren’t installing Visual Studio, just the build tools.
On the Visual Studio downloads page, move down into the All Downloads section. As I write this, the current version of Visual Studio is 2019, so I will be referring to it in this section. If a later version is available, use that instead. Select Tools for Visual Studio 2019. Click on the Download button for Build Tools for Visual Studio 2019. Download and save the file. When the download has completed, open the file. This starts Visual Studio Installer. Again, don’t worry, we are not installing Visual Studio, just the build tools. When the installer window opens select only the build tools. After some time (several minutes), the install will complete. Close the installer.
Open the Windows Start menu and start Developer Command Prompt for VS 2019; do not open the standard command prompt or Powershell. At the command prompt, enter:
cmake --versionThe following should be displayed, although the version number may be different:
cmake version 3.17.20032601-MSVC_2

CMake suite maintained and supported by Kitware (kitware.com/cmake).
If the message says that it cannot find CMake, then the build tools did not install correctly.
You will almost always be starting VS Code from the command line of Developer Command Prompt, so you will probably want to add it to the Productivity section of the Start menu.
Installing Git
We will need git. If you have done any development work, you probably already have it installed. If not, Git for Windows is available here.
A Simple C++ Program With Library
We will start by creating a simple C++ program with a simple library. You can perform similar steps, with slight modifications, if you are on Linux or any other Unix-like system. To support the program, we will create a directory structure and start VS Code as follows:
Open a Developer Command Prompt. Enter:
cd c:\Users\xxx   #where xxx is your Windows user name
mkdir Projects    # if you have not previously created a projects directory
cd Projects
mkdir vscode-cmake-hello
cd vscode-cmake-hello
mkdir apps
mkdir hello
cd hello
mkdir include
mkdir src
cd ..         # return to c:\Users\xxx\Projects\hello
git init      # initialize git for the project
code .        # start VS Code
In the Explorer list in VS Code, select the hello/include directory and create a new file called hello.h. Place the following code in that file and save it:
#pragma once

#include <string>

const std::string generateHelloString(const std::string & personName);
Again in the Explorer list, select hello/src and create a new file called hello.cpp. Place the following code in that file and save it:
#include "hello.h"

using namespace std;

const string generateHelloString(const string & personName)
{
    return "Hello " + personName;
}
That is all the code we need for our library. Now create the program to use the library. In the Explorer list, select the apps directory and create a new file called main.cpp. Place the following code in that file and save it:
#include <iostream>
#include "hello.h"

int main(int, char**) {
    std::string helloJim = generateHelloString("Jim");
    std::cout << helloJim << std::endl;

    return 0;
}
To build the library and program, we will use CMake. There are many examples of CMake on the internet, many of which are outdated or just plain bad. For this program and library, I am following Modern CMake by Henry Schreiner and others.
In the Explorer list, select VSCODE-CMAKE-HELLO in VS Code and create a new file. Call it CMakeLists.txt. Enter the following and save the file:
# version 3.11 or later of CMake needed later for installing GoogleTest
# so let's require it now.
cmake_minimum_required(VERSION 3.11-3.18)

project(
    VscodeCmakeHello
    VERSION 0.1
    DESCRIPTION "Small CMake example built with VSCode")

add_subdirectory(hello)   # look in hello subdirectory for CMakeLists.txt to process
add_subdirectory(apps)    # look in apps subdirectory for CMakeLists.txt to process
In the Explorer list, select apps and create a new file. Call it CMakeLists.txt. Enter the following and save the file:
# version 3.11 or later of CMake or needed later for installing GoogleTest
# so let's require it now.
cmake_minimum_required(VERSION 3.11-3.18)

project(main)

add_executable(main main.cpp)
# We need hello.h and the hello library
target_link_libraries(main
    PRIVATE hello)

# Tell C++ compiler to use C++20 features. We don't actually use any of them.
target_compile_features(main PUBLIC cxx_std_20)
Create a file called CMakeLists.txt in the hello directory and place the following code in it:
# version 3.11 or later of CMake or needed later for installing GoogleTest
# so let's require it now.
cmake_minimum_required(VERSION 3.11-3.18)

project(hello)

add_library(hello src/hello.cpp)

# PUBLIC needed to make both hello.h and hello library available elsewhere in project
target_include_directories(${PROJECT_NAME}
    PUBLIC ${PROJECT_SOURCE_DIR}/include)

# Tell compiler to use C++20 features. The code doesn't actually use any of them.
target_compile_features(hello PUBLIC cxx_std_20)
Look at the status bar on the VS Code window. If it looks similar to this:

then terminate and restart VS Code. The status bar should now look like this:
![]()
From left to right, master* indicates that you are editing the git master branch and that changes have been made. The symbols and 0s indicate that there are currently no errors in workspace. Next is a button that will run CMake (CMake: [Debug]). No Kit Selected indicates that the build tools have not yet been selected; we will get to them in a moment. Following that is a Build button, the default target, a bug button that will run the application in debug mode, and a button that will run the application without starting the debugger. The remainder of the status bar provides other information that we are not currently concerned with.
We first have to run CMake to create the build files. Click on the CMake: [Debug] button. The first time you do so, a list of build tool kits is displayed below the main menu. Select either Unspecified, or Visual Studio Build Tools 2019 Release - amd64. The No Kit Selected text in the status bar will change to [Visual Studio Build Tools 2019 Release - amd64], and a list of CMake configurations are displayed: Debug, Release, MinSizeRel, and RelWithDebInfo.
Select Debug. This will execute CMake and generate a Visual Studio solution file (.sln) and Visual Studio project files (.vcxproj) if there are no errors. If there are errors, then something is not right with the CMakeLists.txt files or the C++ source files.
If you selected any of the other CMake actions, the executable, library, and debug related files would be placed in other subdirectories. For example, if you build release versions, they will be placed in build/Release.
The first time you run debugging by either clicking on the Bug button, or by selecting Run → Start Debugging, a list of build environments will be displayed just below the main menu. Select C++ (Windows).
To do a clean and rebuild, all we have to do is delete the build directory and all of its contents, then run CMake and Build.
Debugging
After a debug build, you can debug main.exe by clicking on the bug button in the status bar. Alternatively, you can select Run → Start Debugging from the main menu. In the latter case, the first time you do this, a list of debug environments is displayed. Select C++ (Windows). If the active file in VS Code is a C++ source file, a list of configurations is then displayed. You can select either cl.exe - Build and debug active file or Default configuration. If a different type of file is active, such as CMakeLists.txt, then the configuration list is not displayed.
In either case, a file called launch.json is added to the .vscode directory. Open that file and change the program to ${workspaceFolder}/build/apps/Debug/main.exe
Now you can run debug from either the bug button or the menu item.
Summary and What’s Next
This article discussed how to create a C++ project containing a program called main and a library called hello with Visual Studio Code using CMake. How to debug the program is also discussed.
There is still much to do, but that will be discussed in the following articles:
- Creating a Shared Library
- Adding GoogleTest to the project.
- Saving The Project to Source Control
- Porting The Project to Linux
UPDATES
The code in hello.cpp was updated to correct a typo. Thanks Vlad T. for pointing that out.
Search code, repositories, users, issues, pull requests…
Provide feedback
Saved searches
Use saved searches to filter your results more quickly
Sign up
I. C++ project with VSCode
There are multiple ways of creating C++ project. You could choose to go with heavy lifting IDE(Microsoft Visual Studio, Eclipse, Code::Blocks, CLion,…), or go with plain notepad++, compiler, and a console.
But all of these IDE required you to install additional software on your PC, and the text editor, compiler combo make it hard when debugging your program.
Then you may want to start with VsCode, a perfect fit between two options above, simple but has enough extension for your needs, and you can use it for different programming languages.
Let’s start
1. Target system
As mention above, vscode is a code editor with a lot of powerful extensions. But at the core, it’s still a text editor, and to build your C/C++ program, you still need to provide the compiler.
The compiler, where and how to install it.
- Windows
- You can get MS visual studio code compiler cl here, it’s come with IDE though
- Or you can get MingGW-g++, it’s pretty old but yeah
- Linux or Windows Subsystem for Linux
- Should come with pre-install gnu-g++, you could test with type
g++ --versionto check. If it’s not installed, thensudo apt install g++should do the job
- Should come with pre-install gnu-g++, you could test with type
2. VsCode extensions
There is a lot of extensions, which support C/C++ development on vscode. But to keep it simple, we usually go with one below.
3. Let’s build and debug it
Alright, after you get all the extensions and compiler in place, let’s create a simple C++ program and try to build it.
- Create a folder for your project, open vscode then [Ctrl + k + o] to open your project folder.
- Create a main.cpp and input your sample code.
#include <iostream>
int main(int argc, const char* argv[])
{
    std::cout << "ayy" << std::endl;
}- [Ctrl + Shift + p]: type in “C/C++: edit configurations”.
You can choose UI option to show the UI for setting, go through it and change the setting your self, after you finished just [Ctrl + s] the configuration shall be save and store to ./.vscode/c_cpp_properties.json in your project folder
If you chose the JSON, the c_cpp_properties.json shall be open right away for you with default a default config for the available compiler in your environment. Below is sample configurations, 1st for mingw64 g++ compiler and 2nd is for msvc compiler.
{
    "configurations": [
        {
            "name": "Win32_mingw64",
            "includePath": [
                "${workspaceFolder}/**"
            ],
            "defines": [
                "_DEBUG",
                "UNICODE",
                "_UNICODE"
            ],
            "windowsSdkVersion": "10.0.18362.0",
            "compilerPath": "C:/Program Files/mingw-w64/x86_64-8.1.0-posix-seh-rt_v6-rev0/mingw64/bin/g++.exe",
            "intelliSenseMode": "windows-gcc-x64",
            "cStandard": "c17",
            "cppStandard": "c++17"
        },
        {
            "name": "Win32_cl",
            "includePath": [
                "${workspaceFolder}/**"
            ],
            "defines": [
                "_DEBUG",
                "UNICODE",
                "_UNICODE"
            ],
            "windowsSdkVersion": "10.0.18362.0",
            "compilerPath": "C:/Program Files (x86)/Microsoft Visual Studio/2019/Community/VC/Tools/MSVC/14.27.29110/bin/Hostx64/x64/cl.exe",
            "intelliSenseMode": "windows-msvc-x64",
            "cStandard": "c17",
            "cppStandard": "c++17"
        }
    ],
    "version": 4
}
[Ctrl + Shift + p]: “Select configuration” then you can create multiple configuration and switch between them.
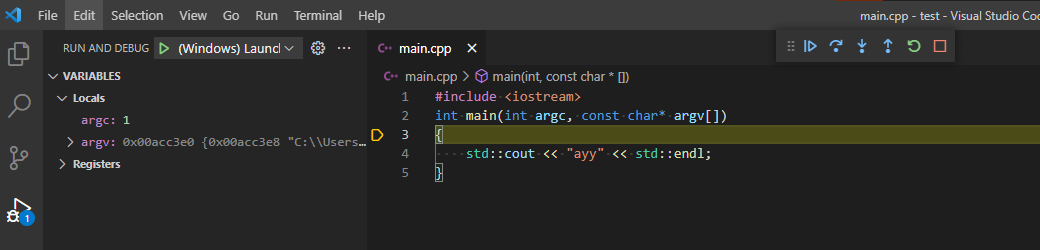
[Ctrl + Shift + p]: “Build and Debug Active File”, you can build and debug a simple Cpp program, remember to open your main.cpp first as active file. Red one is default, green is Tasks option, which is created after 1st execute.

Select your target compiler, then your Cpp file will be build and executed. If you want to stop the program, place debug point on the line count ruler in the editor or else it will run to the end right away.
NOTE: To able to use the msvc compiler, vscode has to be lunched from “Developer Command Prompt for VS”. i.e. Start > Developer Command Prompt for VS > cd to project folder >
code .to open vscode
After execute, your vscode shall spawn a new tasks.json file in .vscode folder of project. Below is sample tasks.json file, which is generated when you run with 2 different compiler (msvc and gnu-g++).
{
    "tasks": [
        {
            "type": "cppbuild",
            "label": "mvsc_preruntask",             // Default value is "C/C++: cl.exe build active file", you could change it
            "command": "cl.exe",                    // call the compiler to compile the program
            "args": [                               // input args for the compiler
                "/Zi",
                "/EHsc",
                "/nologo",
                "/Fe:",
                "${fileDirname}\\app.exe",          // "${fileDirname}\\${fileBasenameNoExtension}.exe", output to app.exe file
                "${fileDirname}\\*.cpp"             // "${file}" , change to target build all *.cpp file in current folder
            ],
            "options": {
                "cwd": "${fileDirname}"
            },
            "problemMatcher": [
                "$msCompile"
            ],
            "group": "build",
            "detail": "Task generated by Debugger.",
            "promptOnClose": true
        },
        {
            "type": "cppbuild",
            "label": "g++_preruntask",              // "C/C++: g++.exe build active file"
            "command": "C:/Program Files/mingw-w64/x86_64-8.1.0-posix-seh-rt_v6-rev0/mingw64/bin/g++.exe",
            "args": [
                "-g",
                "${fileDirname}\\*.cpp",            // "${file}"
                "-o",
                "${fileDirname}\\app.exe"           // "${fileDirname}\\${fileBasenameNoExtension}.exe"
            ],
            "options": {
                "cwd": "C:/Program Files/mingw-w64/x86_64-8.1.0-posix-seh-rt_v6-rev0/mingw64/bin"
            },
            "problemMatcher": [
                "$gcc"
            ],
            "group": "build",
            "detail": "Task generated by Debugger.",
            "promptOnClose": true
        }
    ],
    "version": "2.0.0"
}
More on tasks.json setup here!
Basically you can change the tasks to call to external script command to build your project (i.e. make,..). But for now it’s a simple project so let’s just change some of its default value (label, compiler args) so we can refer to it in lunch debug.
[Ctrl + Shift + D] to lunch debug operations, we will refer to those build tasks before proceed with the debugger.
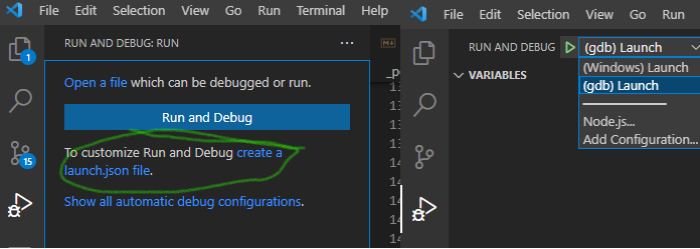
Select the target environment, a lunch.json file will be created in .vscode folder. Change some default value, so lunch operation shall prefer to your preLunchTask. After updates, in debug shall show you the available options.
{
    // Use IntelliSense to learn about possible attributes.
    // Hover to view descriptions of existing attributes.
    // For more information, visit: https://go.microsoft.com/fwlink/?linkid=830387
    "version": "0.2.0",
    "configurations": [
        {
            "preLaunchTask": "mvsc_preruntask",     // label of target task in your tasks.json
            "name": "(Windows) Launch",
            "type": "cppvsdbg",
            "request": "launch",
            "program": "${workspaceFolder}/app.exe", // application name you want to debug
            "args": [],                              // input args for the debug program, in this case is "app.exe"
            "stopAtEntry": true,                     // debug stop at entry of main
            "cwd": "${fileDirname}",
            "environment": [],
            "console": "integratedTerminal"
        },
        {
            "preLaunchTask": "g++_preruntask",
            "name": "(gdb) Launch",
            "type": "cppdbg",
            "request": "launch",
            "program": "${workspaceFolder}/app.exe",
            "args": [],
            "stopAtEntry": true,
            "cwd": "${fileDirname}",
            "environment": [],
            "externalConsole": false,
            "MIMode": "gdb",
            "miDebuggerPath": "C:/Program Files/mingw-w64/x86_64-8.1.0-posix-seh-rt_v6-rev0/mingw64/bin/gdb.exe",
            "setupCommands": [
                {
                    "description": "Enable pretty-printing for gdb",
                    "text": "-enable-pretty-printing",
                    "ignoreFailures": true
                }
            ]
        },
    ]
}
Now open your main.cpp, press F5.
More on lunch.json setting here!
II. (Too bland?) Let’s add CMake flavor
So in first section, we able to setup a simple project to build and debug your cpp file. If you want to extend the project, adding new file, using external library, you need to update the tasks.json so it will call to your build script or external build system to handle larger project.
But today we shall using CMake(build system generator). It basically generate build directory base our selected build tool and help us to move our project between platform and compiler easily.
Build system: Build automation involves scripting or automating the process of compiling computer source code into binary code. Ex: make, GNU make, nmake, bitbake, ninja
Build system generator: Generator tools do not build directly, but rather generate files to be used by a native build tool. Ex: CMake
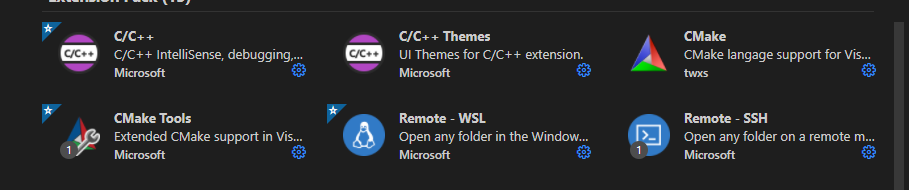
Let’s get the CMake extension, install RemoteSSH/WSL if you want develop on remote machine(Linux) from your windows base environment.
CMake project setup is pretty much the same for both windows and linux, so for the following section, we shall use vscode to setup a project on remote linux.
Let’s switch development environment to Linux from your windows machine
Click here. 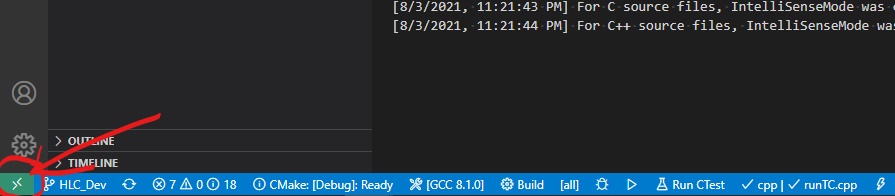 Select your target, could be either WSL on your windows or a remote linux machine with SSH
 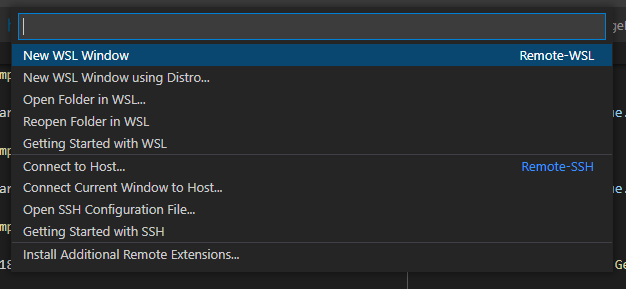 After that, vscode shall connect to your remote machine. Go to extension tab, it will show available extension that you can install on remote machine (it’s the the same as previous section).
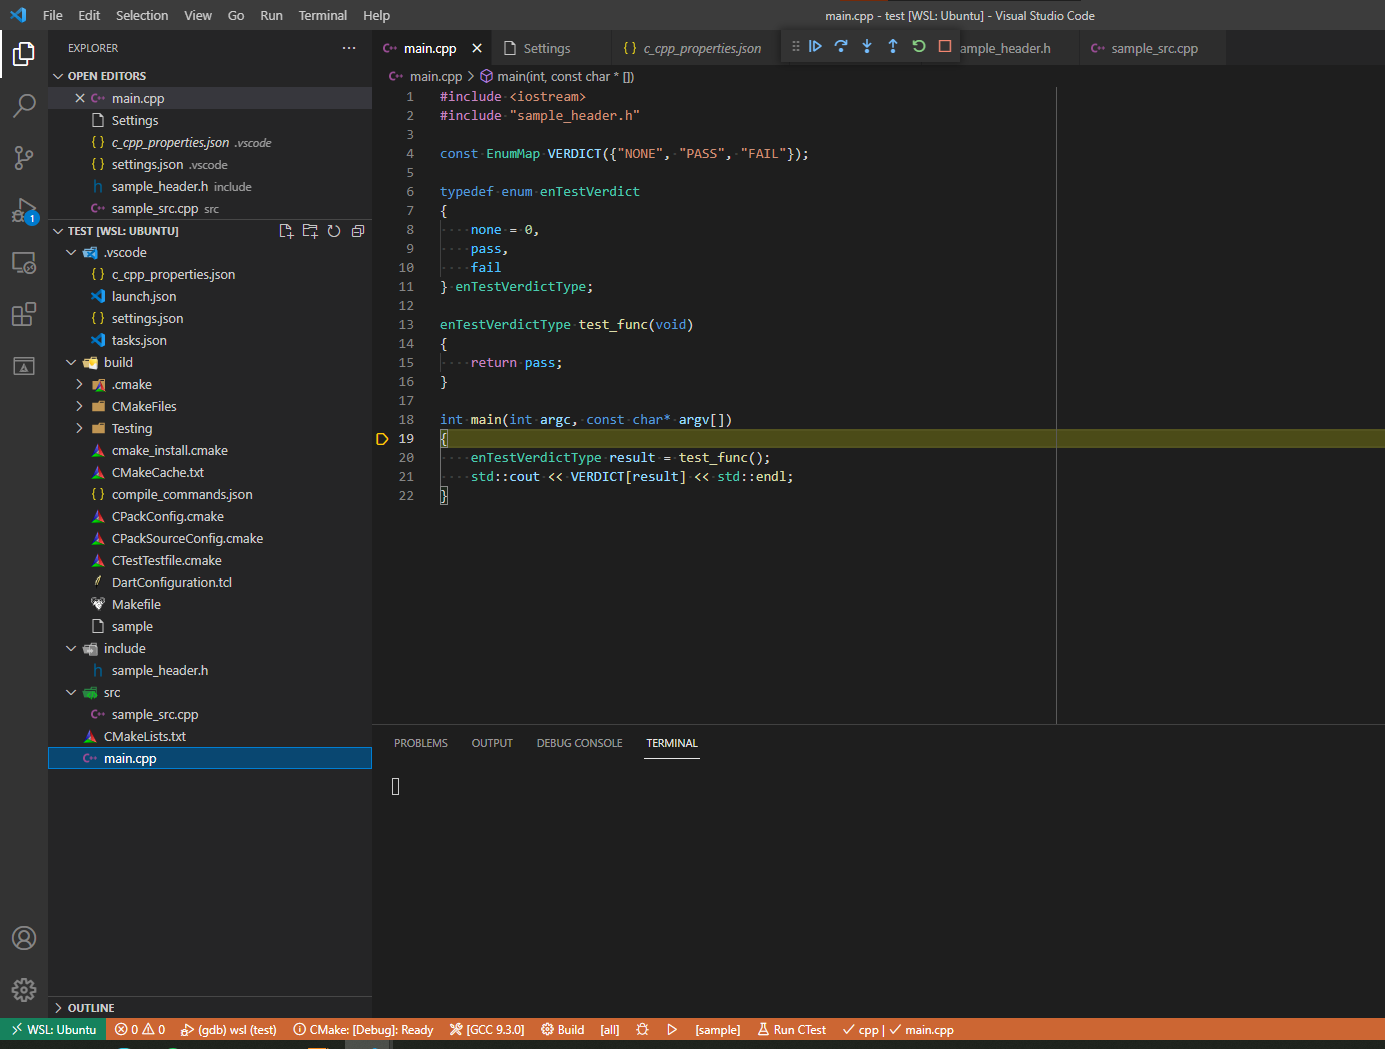
[Ctrl + Shift + P]: “cmake”, it will show you available operation with cmake extension. Click on configure, select the compiler and enter your project name. 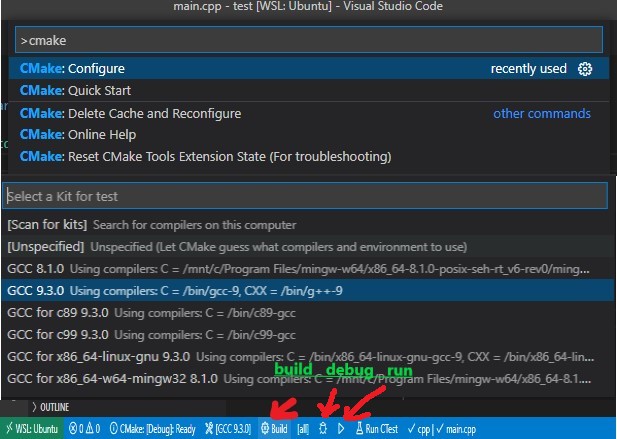 CMake extension request you to create a CMakeLists.txt for your project, and it should be like this.
cmake_minimum_required(VERSION 3.0.0)
project(sample VERSION 0.1.0)

include(CTest)
enable_testing()

add_executable(sample main.cpp)

set(CPACK_PROJECT_NAME ${PROJECT_NAME})
set(CPACK_PROJECT_VERSION ${PROJECT_VERSION})
include(CPack)
In the status bar, you should able to see 3 action: Build, Debug, Lunch. Click on build or F7 and cmake shall create build directory and build your project in it. 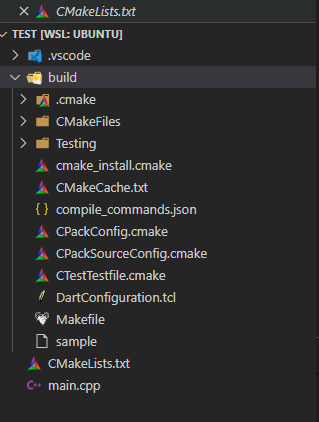 Let’s update the directory: add src and include folder and provide additional code there.
 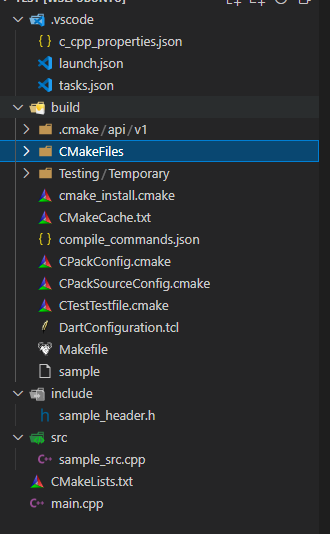 Then update your CMakeLists.txt as following (for more about CMake, please check CMake Documentation
cmake_minimum_required(VERSION 3.0.0)
project(sample VERSION 0.1.0)

include(CTest)
enable_testing()

set (SRC_FILES main.cpp ${CMAKE_CURRENT_SOURCE_DIR}/src/sample_src.cpp) # your source files


add_executable(sample ${SRC_FILES}) # build executable "sample"


target_include_directories(sample PUBLIC ${CMAKE_CURRENT_SOURCE_DIR}/include) # include directory for header files


set(CPACK_PROJECT_NAME ${PROJECT_NAME})
set(CPACK_PROJECT_VERSION ${PROJECT_VERSION})
include(CPack)
Almost done, let’s update some setting of cmake, so we can push input args to our programs as previous debug session. Create a file settings.json in .vscode folder and input below content.
{
    "cmake.debugConfig":
    {
        "stopAtEntry": true,        # debug stop at entry of main
        "args": ["a", "b", "c"],    # we push 3 input args here
        "MIMode": "gdb",
        "externalConsole": false,
    }
}
OK, now Ctrl + F5, it shall build your project and lunch debug mode.
Nice, now you can update your project, create additional modules, add external libraries, etc. Of course, you have to update the CMakeLists.txt correspondingly with the changes of project. We will have a CMake topic in the near future.
VSCode remote extension is pretty convenience when you want to create/build your project in remote machine(raspberry,…). You can just setup a raspberry with ssh enable and it’s good to go. No need for additional keyboard, mouse, monitor or using ssh with CLI.
Remote and debug?
When your program required su to run then normal debug will not work. Here is a workaround.
cd /usr/bin
sudo mv gdb gdb_origin
sudo vim gdb
Input:
#!/bin/sh

sudo gdb_origin $@
sudo chmod 0755 gdb
Now you are able to debug your program as su.
Время на прочтение
6 мин
Количество просмотров 10K

В CMake 3.19 и 3.20 был зарелижен CMakePresets.json, который позволяет пользователям указывать общие параметры настройки, сборки и тестирования и делиться ими с другими пользователями. Мы добавили поддержку CMakePresets.json в Visual Studio и создали расширение CMake Tools для Visual Studio Code. Теперь вы можете вызывать CMake с CMakePresets.json в Visual Studio, в Visual Studio Code, в конвейере непрерывной интеграции и из терминалов в Windows, Linux и macOS.
Интеграция CMake Presets теперь доступна в Visual Studio 2019 16.10 Preview 2 и CMake Tools 1.7.
Почему я должен использовать CMake Presets?
Поддержка configurePresets была зарелижена в CMake 3.19. Наша команда в Microsoft работала над поддержкой buildPresets и testPresets в CMake 3.20, и мы очень рады решить некоторые типичные проблемы, связанные с конфигурацией и сборкой CMake, с помощью CMake Presets (пресетов).
-
Более плавный переход между Visual Studio и Visual Studio Code. С добавлением поддержки CMakePresets.json один и тот же файл можно использовать для управления CMake как в Visual Studio, так и в Visual Studio Code. Это упрощает разработчикам в вашей команде переключение между Visual Studio и Visual Studio Code и позволяет работать в среде разработки, которая лучше всего отвечает их текущим потребностям.
-
Предустановки для отдельно взятого проекта всегда можно сохранить или достать из системы контроля версий. CMake поддерживает два файла: CMakePresets.json и CMakeUserPresets.json. CMakePresets.json предназначен для сохранения глобальных предустановок проекта, а CMakeUserPresets.json задуман для хранения собственных локальных предустановок под отдельных разработчиков. Это гарантирует, что информацию, касающуюся конкретного проекта, можно будет вносить в систему контроля версий, а новым членам группы будет проще влиться в работу. Это также упрощает для команд синхронизацию изменений в своих сборках CMake. И CMakePresets.json, и CMakeUserPresets.json поддерживаются в Visual Studio и Visual Studio Code.
-
Воспроизведение сборок в Visual Studio и Visual Studio Code из командной строки. Поскольку CMakePresets.json поддерживается самим CMake, тот же файл CMakePresets.json можно использовать для вызова CMake в Visual Studio, в Visual Studio Code, в конвейере непрерывной интеграции и из командной строки в Windows, Linux и macOS. Вызов CMake с CMakePresets.json из командной строки поддерживается с CMake версии 3.20.
-
Упростите возню с инструкциями по сборке для проектов CMake с открытым исходным кодом. Вы можете запулить любой проект, в корневом каталоге репозитория которого есть файл CMakePresets.json, собрать и протестировать его локально, используя инструкции, вложенные в пресет. Все аргументы команды, которые могут быть переданы в CMake или CTest из командной строки, можно указать в Configure, Build или Test пресетах.
Больше информации о пресетах CMake вы можете найти в моей недавней презентации в ACCU, где я демонстрирую, как использовать CMakePresets.json в Visual Studio, из командной строки и в конвейере GitHub Actions. Вы также можете ознакомиться с примером файла CMakePresets.json, зарегистрироваться в Pure Virtual C++ или почитать официальную документацию CMake. Более подробная информация об интеграции пресетов CMake в Visual Studio и VS Code приведена ниже.
Пресеты CMake в Visual Studio
Лучшим источником информации об интеграции пресетов CMake в Visual Studio является наша документация. Интеграция пресетов CMake в Visual Studio пока еще в статусе превью.
CMakePresets.json станет рекомендуемой альтернативой CMakeSettings.json. Visual Studio никогда не будет считывать данные одновременно из CMakePresets.json и CMakeSettings.json. Вы можете включить интеграцию пресетов CMake для всех проектов в Tools > Options > CMake > General. Чтобы активировать интеграцию, необходимо закрыть и снова открыть папку в Visual Studio.
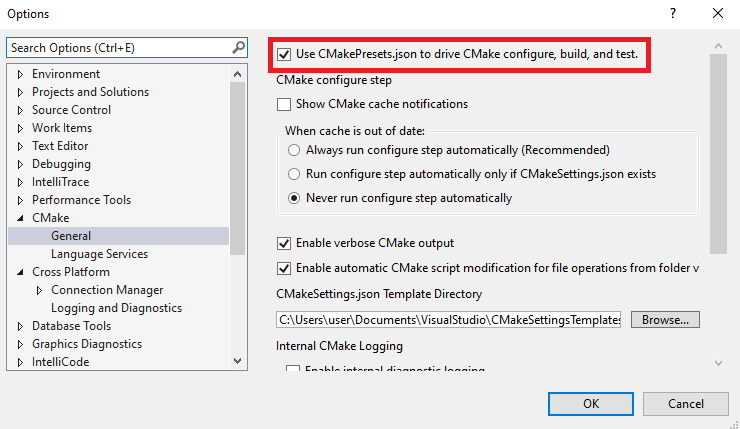
Вы можете включить интеграцию пресетов CMake для одного проекта, добавив файл CMakePresets.json в корень открытой папки. Опять же, для активации интеграции вы должны закрыть и снова открыть папку. Дополнительные сведения смотрите в разделе Enable CMake Presets integration in Visual Studio 2019.
После включения интеграции пресетов CMake вы увидите три раскрывающихся списка в панели меню.

В раскрывающемся списке слева указывается активная целевая система (Target System). Это система, в которой CMake будет вызываться для настройки и сборки проекта. В этом раскрывающемся списке отображается локальный компьютер, все SSH-подключения в Connection Manager по имени узла и все инсталляции Windows Subsystem для Linux (WSL), которые сможет найти Visual Studio.
В раскрывающемся списке посередине указывается активный Configure Preset, который будет использоваться при вызове CMake для создания системы сборки проекта. В этом раскрывающемся списке приведены не скрытые Configure пересеты, определенные в файлах CMakePresets.json и CMakeUserPresets.json, которые применяются в Target System. Активный Configure Preset на изображении выше — это ninja-debug.
В раскрывающемся списке справа указывается активный Build Preset, который будет использоваться при вызове CMake для сборки проекта. В этом раскрывающемся списке приведены не скрытые Build пресеты, определенные в файлах CMakePresets.json и CMakeUserPresets.json, которые применяются к активному Configure Preset. Активный Build Preset на изображении выше — verbose-build. Ознакомьтесь с нашей документацией по настройке и сборке в разделе CMake configuration and build.
С помощью Visual Studio вы можете редактировать, создавать и отлаживать ваши CMake таргеты в Windows, WSL и удаленных системах из одной IDE. Visual Studio автоматически скопирует ваш исходный код в указанную целевую систему, но ваши инструменты сборки (CMake, генератор, компиляторы), rsync, zip и gdb должны быть уже установлены. Дополнительная информация в разделе Creating a Linux environment.
Дополнительную информацию о добавлении, редактировании пресетов, запуске тестов и многом другом смотрите в нашей документации в разделе CMake Presets integration in Visual Studio.
Пресеты CMake в расширении CMake Tools для Visual Studio Code
Лучшим источником информации об интеграции пресетов CMake в расширение CMake Tools является наша документация. Интеграция пресетов CMake в расширение CMake Tools пока еще в статусе превью.
CMakePresets.json станет рекомендуемой альтернативой файлам китов (kits) и вариантов (variants). CMake Tools никогда не будет считывать настройки одновременно из CMakePresets.json и китов и вариантов. Вы можете включить интеграцию пресетов CMake, изменив значение cmake.useCMakePresets в settings.json.
|
Параметр |
Описание |
Допустимые значения |
Значение по умолчанию |
|
cmake.useCMakePresets |
Используйте CMakePresets.json для запуска CMake configure, build, и test |
always, never, auto |
auto |
Значение auto расценивается как always, если в cmake.sourceDirectory активной папки есть CMakePresets.json, и расценивается как never, если в cmake.sourceDirectory активной папки нет файла CMakePresets.json. Установите значение cmake.useCMakePresest на always или never, чтобы явно включать или отключать интеграцию пресетов CMake для всех проектов CMake. Дополнительная информация в разделе Enable CMake Presets in the CMake Tools extension.
После включения интеграции пресетов CMake вы можете запускать несколько новых команд.
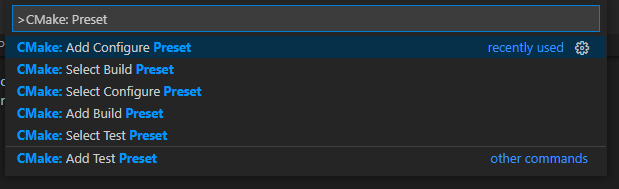
Используйте команды CMake: Select Configure Preset, CMake: Select Build Preset и CMake: Select Test Preset, чтобы выбрать ваши активные пресеты. Ваши активные пресеты отображаются в строке состояния.
![]()
На изображении выше [active-configure-preset] указывает активный Configure Preset, [active-build-preset] указывает активный Build Preset, а [active-test-preset] указывает активный Test Preset.
Дополнительные сведения о добавлении, редактировании пресетов, запуске CMake и многом другом смотрите в нашей документации по интеграции пречетов CMake в Visual Studio Code.
Что дальше?
Интеграция пресетов CMake в Visual Studio и Visual Studio Code пока еще в статусе превью. Мы продолжим дополнять нашу интеграцию учитывая ваши отзывы в будущих релизах Visual Studio и расширения CMake Tools для VS Code.
В Visual Studio лучший способ сообщить об ошибке или предложить функцию — это нажать кнопку Send Feedback в правом верхнем углу IDE. Дополнительная информация в разделе Visual Studio feedback options.
В VS Code лучший способ сообщить об ошибке или предложить функцию — создать (или проголосовать за) issue в GitHub репозитории расширения.
Нам интересно узнать о вашем опыте внедрения CMakePresets.json. Вы можете связаться с нами по адресу cmake@microsoft.com, чтобы оставить отзыв и поделиться своей историей. Вы также можете связаться с нами в Twitter (@VisualC).
Перевод материала подготовлен в преддверии старта курса «C++ Developer. Professional».
Всех желающих приглашаем на вебинар «Корутины — что это и зачем?». На этом открытом уроке разберем понятие сопрограмм (coroutines), их классификацию, детально рассмотрим реализацию, допущения и компромиссы, предлагаемые новым стандартом C++. Рассмотрим пользовательские типы, которые добавились для реализации сопрограмм (Promise, Awaitable.) Разберём пример реализации асинхронного сетевого взаимодействия с использованием сопрограмм.
→ РЕГИСТРАЦИЯ