Getting Started#
A key goal for this project has been that Python.NET should “work just
the way you’d expect in Python”, except for cases that are .NET-specific
(in which case the goal is to work “just the way you’d expect in C#”).
A good way to start is to interactively explore .NET usage in python
interpreter by following along with the examples in this document. If
you get stuck, there are also a number of demos and unit tests located
in the source directory of the distribution that can be helpful as
examples. Additionally, refer to the wiki on
GitHub, especially the
Tutorials there.
Installation#
Python.NET is available as a source release on
GitHub and as a
platform-independent binary wheel or source distribution from the Python
Package Index.
Installing from PyPI can be done using pip install pythonnet.
To build from source (either the sdist or clone or snapshot of the
repository), only the .NET6 SDK (or newer) and Python itself are required. If
dotnet is on the PATH, building can be done using
Loading a Runtime#
All runtimes supported by clr-loader can be used, which are
- Mono (
mono) -
Default on Linux and macOS, supported on all platforms.
- .NET Framework (
netfx) -
Default on Windows and also only supported there. Must be at least version
4.7.2. - .NET Core (
coreclr) -
Self-contained is not supported, must be at least version 3.1.
The runtime must be configured before clr is imported, otherwise the
default runtime will be initialized and used. Information on the runtime in use
can be retrieved using pythonnet.get_runtime_info()).
A runtime can be selected in three different ways:
Calling pythonnet.load#
The function pythonnet.load() can be called explicitly. A single
string parameter (like load("coreclr") will select the respective runtime.
All keyword arguments are passed to the underlying
clr_loader.get_<runtime-name> function.
from pythonnet import load

load("coreclr", runtime_config="/path/to/runtimeconfig.json")
Note
All runtime implementations can be initialized without additional parameters.
While previous versions of clr_loader required a runtimeconfig.json
to load .NET Core, this requirement was lifted for the version used in
pythonnet.
Via Environment Variables#
The same configurability is exposed as environment variables.
PYTHONNET_RUNTIME-
selects the runtime (e.g.
PYTHONNET_RUNTIME=coreclr) PYTHONNET_<RUNTIME>_<PARAM>-
is passed on as a keyword argument (e.g.
PYTHONNET_MONO_LIBMONO=/path/to/libmono.so)
The equivalent configuration to the load example would be
PYTHONNET_RUNTIME=coreclr
PYTHONNET_CORECLR_RUNTIME_CONFIG=/path/to/runtimeconfig.json
Note
Only string parameters are supported this way. It has the advantage, though,
that the same configuration will be used for subprocesses as well.
Constructing a Runtime instance#
The runtime can also be explicitly constructed using using the
clr_loader.get_* factory functions, and then set up using
pythonnet.set_runtime():
from pythonnet import set_runtime
from clr_loader import get_coreclr

rt = get_coreclr(runtime_config="/path/to/runtimeconfig.json")
set_runtime(rt)
This method is only recommended, if very fine-grained control over the runtime
construction is required.
Importing Modules#
Python.NET allows CLR namespaces to be treated essentially as Python
packages.
from System import String
from System.Collections import *
Types from any loaded assembly may be imported and used in this manner.
To load an assembly, use the AddReference function in the clr
module:
import clr
clr.AddReference("System.Windows.Forms")
from System.Windows.Forms import Form
Note
Earlier releases of Python.NET relied on “implicit loading” to
support automatic loading of assemblies whose names corresponded to an
imported namespace. This is not supported anymore, all assemblies have to be
loaded explicitly with AddReference.
Python.NET uses the PYTHONPATH (sys.path) to look for assemblies to load, in
addition to the usual application base and the GAC (if applicable). To ensure
that you can import an assembly, put the directory containing the assembly in
sys.path.
Interacting with .NET#
Using Classes#
Python.NET allows you to use any non-private classes, structs,
interfaces, enums or delegates from Python. To create an instance of a
managed class, you use the standard instantiation syntax, passing a set
of arguments that match one of its public constructors:
from System.Drawing import Point

p = Point(5, 5)
In many cases, Python.NET can determine the correct constructor to call
automatically based on the arguments. In some cases, it may be necessary
to call a particular overloaded constructor, which is supported by a
special __overloads__ attribute.
Note
For compatibility with IronPython, the same functionality is available with
the Overloads attribute.
from System import String, Char, Int32

s = String.Overloads[Char, Int32]('A', 10)
s = String.__overloads__[Char, Int32]('A', 10)
Using Generics#
Pythonnet also supports generic types. A generic type must be bound to
create a concrete type before it can be instantiated. Generic types
support the subscript syntax to create bound types:
from System.Collections.Generic import Dictionary
from System import *

dict1 = Dictionary[String, String]()
dict2 = Dictionary[String, Int32]()
dict3 = Dictionary[String, Type]()
Note
For backwards-compatibility reasons, this will also work with some native
Python types which are mapped to corresponding .NET types (in particular
str -> System.String and int -> System.Int32). Since these mappings
are not really one-to-one and can lead to surprising results, use of this
functionality is discouraged and will generate a warning in the future.
Managed classes can also be subclassed in Python, though members of the
Python subclass are not visible to .NET code. See the helloform.py
file in the /demo directory of the distribution for a simple Windows
Forms example that demonstrates subclassing a managed class.
Fields and Properties#
You can get and set fields and properties of CLR objects just as if they
were regular attributes:
from System import Environment

name = Environment.MachineName
Environment.ExitCode = 1
Using Indexers#
If a managed object implements one or more indexers, one can call the
indexer using standard Python indexing syntax:
from System.Collections import Hashtable

table = Hashtable()
table["key 1"] = "value 1"
Overloaded indexers are supported, using the same notation one would use
in C#:
items[0, 2]
items[0, 2, 3]
Using Methods#
Methods of CLR objects behave generally like normal Python methods.
Static methods may be called either through the class or through an
instance of the class. All public and protected methods of CLR objects
are accessible to Python:
from System import Environment

drives = Environment.GetLogicalDrives()
It is also possible to call managed methods “unbound” (passing the
instance as the first argument) just as with Python methods. This is
most often used to explicitly call methods of a base class.
Note
There is one caveat related to calling unbound methods: it is
possible for a managed class to declare a static method and an instance
method with the same name. Since it is not possible for the runtime to
know the intent when such a method is called unbound, the static method
will always be called.
The docstring of CLR a method (__doc__) can be used to view the
signature of the method, including overloads if the CLR method is
overloaded. You can also use the Python help method to inspect a
managed class:
from System import Environment

print(Environment.GetFolderPath.__doc__)

help(Environment)
Advanced Usage#
Overloaded and Generic Methods#
While Python.NET will generally be able to figure out the right version
of an overloaded method to call automatically, there are cases where it
is desirable to select a particular method overload explicitly.
Like constructors, all CLR methods have a __overloads__ property to allow
selecting particular overloads explicitly.
Note
For compatibility with IronPython, the same functionality is available with
the Overloads attribute.
from System import Console, Boolean, String, UInt32

Console.WriteLine.__overloads__[Boolean](True)
Console.WriteLine.Overloads[String]("string")
Console.WriteLine.__overloads__[UInt32](42)
Similarly, generic methods may be bound at runtime using the subscript
syntax directly on the method:
someobject.SomeGenericMethod[UInt32](10)
someobject.SomeGenericMethod[String]("10")
Out and Ref parameters#
When a managed method has out or ref parameters, the arguments
appear as normal arguments in Python, but the return value of the method
is modified. There are 3 cases:
-
If the method is
voidand has oneoutorrefparameter,
the method returns the value of that parameter to Python. For
example, ifsomeobjecthas a managed method with signature
void SomeMethod1(out arg), it is called like so:
new_arg = someobject.SomeMethod1(arg)
where the value of arg is ignored, but its type is used for overload
resolution.
-
If the method is
voidand has multipleout/ref
parameters, the method returns a tuple containing theout/ref
parameter values. For example, ifsomeobjecthas a managed method
with signaturevoid SomeMethod2(out arg, ref arg2), it is called
like so:
new_arg, new_arg2 = someobject.SomeMethod2(arg, arg2)
-
Otherwise, the method returns a tuple containing the return value
followed by theout/refparameter values. For example:
found, new_value = dictionary.TryGetValue(key, value)
Delegates and Events#
Delegates defined in managed code can be implemented in Python. A
delegate type can be instantiated and passed a callable Python object to
get a delegate instance. The resulting delegate instance is a true
managed delegate that will invoke the given Python callable when it is
called:
def my_handler(source, args):
    print('my_handler called!')

# instantiate a delegate
d = AssemblyLoadEventHandler(my_handler)

# use it as an event handler
AppDomain.CurrentDomain.AssemblyLoad += d
Delegates with out or ref parameters can be implemented in
Python by following the convention described in Out and Ref
parameters.
Multicast delegates can be implemented by adding more callable objects
to a delegate instance:
d += self.method1
d += self.method2
d()
Events are treated as first-class objects in Python, and behave in many
ways like methods. Python callbacks can be registered with event
attributes, and an event can be called to fire the event.
Note that events support a convenience spelling similar to that used in
C#. You do not need to pass an explicitly instantiated delegate instance
to an event (though you can if you want). Events support the += and
-= operators in a way very similar to the C# idiom:
def handler(source, args):
    print('my_handler called!')

# register event handler
object.SomeEvent += handler

# unregister event handler
object.SomeEvent -= handler

# fire the event
result = object.SomeEvent(...)
Exception Handling#
Managed exceptions can be raised and caught in the same way as ordinary Python
exceptions:
from System import NullReferenceException

try:
    raise NullReferenceException("aiieee!")
except NullReferenceException as e:
    print(e.Message)
    print(e.Source)
Using Arrays#
The type System.Array supports the subscript syntax in order to make
it easy to create managed arrays from Python:
from System import Array, Int32

myarray = Array[Int32](10)
Managed arrays support the standard Python sequence protocols:
items = SomeObject.GetArray()

# Get first item
v = items[0]
items[0] = v

# Get last item
v = items[-1]
items[-1] = v

# Get length
l = len(items)

# Containment test
test = v in items
Multidimensional arrays support indexing using the same notation one
would use in C#:
items[0, 2]

items[0, 2, 3]
Using Collections#
Managed arrays and managed objects that implement the IEnumerable or
IEnumerable<T> interface can be iterated over using the standard iteration
Python idioms:
domain = System.AppDomain.CurrentDomain

for item in domain.GetAssemblies():
    name = item.GetName()
Type Conversion#
Type conversion under Python.NET is fairly straightforward — most
elemental Python types (string, int, long, etc.) convert automatically
to compatible managed equivalents (String, Int32, etc.) and vice-versa.
Custom type conversions can be implemented as Codecs.
Types that do not have a logical equivalent in Python are exposed as
instances of managed classes or structs (System.Decimal is an example).
The .NET architecture makes a distinction between value types and
reference types. Reference types are allocated on the heap, and
value types are allocated either on the stack or in-line within an
object.
A process called boxing is used in .NET to allow code to treat a
value type as if it were a reference type. Boxing causes a separate copy
of the value type object to be created on the heap, which then has
reference type semantics.
Understanding boxing and the distinction between value types and
reference types can be important when using Python.NET because the
Python language has no value type semantics or syntax — in Python
“everything is a reference”.
Here is a simple example that demonstrates an issue. If you are an
experienced C# programmer, you might write the following code:
items = System.Array.CreateInstance(Point, 3)
for i in range(3):
    items[i] = Point(0, 0)

items[0].X = 1 # won't work!!
While the spelling of items[0].X = 1 is the same in C# and Python,
there is an important and subtle semantic difference. In C# (and other
compiled-to-IL languages), the compiler knows that Point is a value type
and can do the Right Thing here, changing the value in place.
In Python however, “everything’s a reference”, and there is really no
spelling or semantic to allow it to do the right thing dynamically. The
specific reason that items[0] itself doesn’t change is that when you
say items[0], that getitem operation creates a Python object that
holds a reference to the object at items[0] via a GCHandle. That
causes a ValueType (like Point) to be boxed, so the following setattr
(.X = 1) changes the state of the boxed value, not the original
unboxed value.
The rule in Python is essentially:
the result of any attribute or item access is a boxed value
and that can be important in how you approach your code.
Because there are no value type semantics or syntax in Python, you may
need to modify your approach. To revisit the previous example, we can
ensure that the changes we want to make to an array item aren’t “lost”
by resetting an array member after making changes to it:
items = System.Array.CreateInstance(Point, 3)
for i in range(3):
    items[i] = Point(0, 0)

# This _will_ work. We get 'item' as a boxed copy of the Point
# object actually stored in the array. After making our changes
# we re-set the array item to update the bits in the array.

item = items[0]
item.X = 1
items[0] = item
This is not unlike some of the cases you can find in C# where you have
to know about boxing behavior to avoid similar kinds of lost update
problems (generally because an implicit boxing happened that was not
taken into account in the code).
This is the same thing, just the manifestation is a little different in
Python. See the .NET documentation for more details on boxing and the
differences between value types and reference types.
Время на прочтение
6 мин
Количество просмотров 11K
Подозреваю, многие из вас задумывались — как можно в .NET приложение добавить поддержку макросов — чтобы можно было расширять возможности программы без ее перекомпиляции и предоставить сторонним разработчикам возможность легко и просто получить доступ к API вашего приложения? В статье рассмотрено, как в качестве основы для выполнения макросов использовать IronPython — реализацию языка Python на платформе .NET.
Для начала, следует определится — что мы будем иметь в виду под словом «макрос» — это скрипт, который без перекомпиляции проекта позволял бы получить доступ к определенному API. Т.е. вытаскивать значения с формы, модифицировать их — и все это в режиме run-time, без модификации приложения.
Первым вариантом, который приходит на ум будет создание собственного интерпретатора для простенького скрипт-языка. Вторым — будет динамическая компиляция какого-нибудь .NET языка (того же C#) — с динамической же подгрузкой сборок и выполнением через Reflection. И третий — использование интерпретируемых .NET языков (DLR) — IronPython или IronRuby.
Создавать свой язык + интерпретор к нему с возможностью .NET interoperability — задача нетривиальная, оставим ее для энтузиастов.
Динамическая компиляция — слишком громоздко и тащит за собой использование Reflection. Однако, этот метод не лишен преимуществ — написанный макрос компилируется единожды и в дальшейшем может использоватся многократно — в виде полноценной .NET сборки. Итак — финалист — метод номер три — использование существующих DLR языков. В качестве такого языка выбираем IronPython (примите это как факт :). Текущая версия IPy — 2.0, взять можно на codeplex.com/IronPython
Перейдем непосредствено к кодированию.
Для начала, рассмотрим интерфейс тестового приложения «Notepad».


В меню «Сервис» и разместим пункт «Макросы». Для примера рассмотрим простейший вариант формирования списка макросов — в каталоге с программой создадим папку «Macroses» файлы из этой папки станут пунктами меню.
private void Main_Load(object sender, EventArgs e)

    {

      MacrosToolStripMenuItem itm = null;

      string[] files = Directory.GetFiles(@".\Macroses");

      foreach (string file in files)

      {

        itm = new MacrosToolStripMenuItem(Path.GetFileNameWithoutExtension(file)) { MacrosFileName = file };

        itm.Click += new EventHandler(macroToolStripMenuItem_Click);

        макросыToolStripMenuItem.DropDownItems.Add(itm);

      }

    }internal class MacrosToolStripMenuItem : ToolStripMenuItem

{

 public MacrosToolStripMenuItem(string FileName) : base(FileName) { }

 public string MacrosFileName { get; set; }

}

* This source code was highlighted with Source Code Highlighter.
MacrosToolStripMenuItem — класс-наследник от ToolStripMenuItem отличающийся только свойством MacrosFileName
Для начала, создадим макрос, который просмотрит текст в textBox’е и найдет все e-mail адреса вида «vpupkin@mail.ru». В папке Macroses создаем файл SaveEmail.py, запускаем приложение — и смотрим, что в меню Макросы появился пункт SaveEmail.
Теперь собственно ключевой момент — выполнение IPy скрипта и доступ его к интерфейсу. Добавляем к проекту ссылку на сборку IronPython.dll. И создаем класс MacroRunner — выполняющий скрипт.
public class MacroRunner

  {

    public static Form CurrentForm;public string FileName { get; set; }public MacroRunner() { }public void Execute()

    {

      // собственно среда выполнения Python-скрипта

      IronPython.Hosting.PythonEngine pyEngine = new IronPython.Hosting.PythonEngine();

      // важный момент - к среде выполнения подключаем текушую выполняемую сборку, т.к.

      // в ней собственно и объявлена форма, к которой необходимо получит доступ

      pyEngine.LoadAssembly(System.Reflection.Assembly.GetExecutingAssembly());      try

      {

        pyEngine.ExecuteFile(FileName);

      }

      catch (Exception exc)

      {

        MessageBox.Show(exc.Message);

      }

    }

  }

* This source code was highlighted with Source Code Highlighter.
Ключевой момент — подключение к выполняющей среде IPy текущей сборки — для доступа к форме. Когда сборка подключена, в IPy скрипте появится возможность использовать классы пространства имен Notepad. Так же, через LoadAssebmly можно добавить и другие необходимые сборки — типа System.Windows.Forms — чтобы работать с формами.
Класс готов, теперь модифицируем обработчик клика на пунктах подменю Макросы
protected void macroToolStripMenuItem_Click(object sender, EventArgs e)

    {

      MacrosToolStripMenuItem item = sender as MacrosToolStripMenuItem;
MacroRunner runner =
new MacroRunner() { FileName = item.MacrosFileName };
MacroRunner.CurrentForm = this;
runner.Execute();
}* This source code was highlighted with Source Code Highlighter.
Здесь следует отметить следующий момент — чтобы передать в IPy-скрипт форму, из которой собственно вызывается макрос — используется статическое поле CurrentForm. В скрипте форма будет доступна как Notepad.MacroRunner.CurrentForm. В идеале, скрипт, разумеется, не должен иметь полного доступа к интерфейсу формы — а должен пользоватся только предоставленным API — и ограничиваться только им. Но сейчас этим заморачиваться не будем — и просто сделаем textBox открытым (Modifier = Public). Ну и кроме текстового поля, разрешим скрипту доступ к пункту меню Сервис (Modifier = Public).
Работа с формой закончена, собираем проект и открываем файл SaveEmail.py — теперь работаем только с макросами.
Итак, первый макрос — SaveEmail.py:
from Notepad import *

import re
text = MacroRunner.CurrentForm.textBox.Text
links = re.findall("\w*@\w*\.\w{2,4}", text)
file = open("emails.txt", "w")
file.write("\n".join(links))
file.close()* This source code was highlighted with Source Code Highlighter.
Т.к. сборка подключена к среде выполнения — то доступно пространство имен Notepad — в котором объявлены классы приложения. Как раз сейчас потребуется статический метод класса MacroRunner — чтобы получить доступ к активной форме (еще раз оговорюсь — что правильнее было бы предоставить не прямой доступ, а через класс-посредник — которые ограничит доступ определенным API). Ну а дальше все просто — получаем текст, регулярным выражением вытаскиваем email — и сохраняем их в файл в текущем каталоге.
Можно запустить приложение, ввести произвольный текст, содежащий email — и убедиться, что после того, как макрос отработал — в папке с выполняемой программой появился файл emails.txt.
Теперь еще один пример, что может сделать макрос — чуть интереснее предыдущего. Итак, создаем в папке Macroses файл UIModifier.py. Как можно догадаться по названию — макрос будет изменять элементы интерфейса приложения. Конкретно — добавит новый пункт в меню Сервис. Для того, чтобы можно было работать с элементами управления WinForms необходимо в среде выполнения IPy подключить сборку System.Windows.Forms. Это можно сделать в момент запуска скрипта из приложения — добавить еще один вызов LoadAssembly. Но мы решили — никаких перекомпиляций, пусть IronPython обходится своими силами. Ну что ж, силы есть :). Чтобы подключить сборку используется метод AddReference класса clr.
from Notepad import *

main = MacroRunner.CurrentForm
import clr
clr.AddReference("System.Windows.Forms")
from System.Windows.Forms import *def pyHello(s,e):
MessageBox.Show("Hello from IPy!")
item = ToolStripMenuItem()
item.Name ="pybtn"
item.Text = "Python created!"
item.Click += pyHellomain.сервисToolStripMenuItem.DropDownItems.Add(item)
* This source code was highlighted with Source Code Highlighter.
Все просто — получаем текущую форму, подключаем сборку System.Windows.Forms и импортируем из пространства имен System.Windows.Forms все — пригодится.
pyHello — простенький обработчик события — при щелчке на созданном пункте меню — будет выводится сообщение.
Запускаем приложение, выполняем макрос. Смотрим пункт меню Сервис:


При щелчке на пункт меню «Python сreated!» появится стандартный MessageBox — собственно, чего и добивались.
Спасибо всем за внимание 
Python is one of the most popular languages. Julio Sampaio explains how IronPython allows you to integrate Python with .NET.
Python is one of the most popular languages for many reasons. Julio Sampaio explains how IronPython allows you to integrate Python with your favorite .NET language.
Have you ever imagined integrating some Python code along with .NET? This idea goes a bit beyond the possibility of creating Python code within Visual Studio, although that’s an important step towards such a goal. IronPython is a way to accomplish this integration. It is an open-source implementation of the Python language to allow closer integration with the .NET Framework.
IronPython works as an extension to the .NET Framework, but it can also be used by .NET projects to take advantage of Python’s scripting power. Other than that, since IronPython is a real implementation of Python itself, there’s no need to learn a new language or extra features if you already know Python.
This article explores the language and teaches how you can benefit from its integration with .NET.
Setup
There are a couple of ways to install it. If you aim to use IronPython standalone in projects other than those in Visual Studio, you can download and install it. Examples in this article use the 2.7.11 release, but the examples should work well with the latest version.
Go to the GitHub download page, and click the MSI installer to download it. I’m assuming you’re following this tutorial from a Windows OS. Visual Studio still has no support for adding Python extensions on macOS, for instance.
Run the installer and follow the steps until the end.
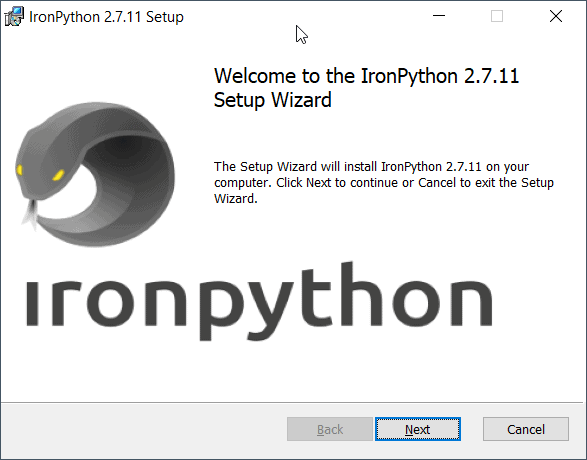
Figure 1. Installing IronPython on Windows.
During the process, you may notice a screen that shows the Python versions being installed (Figure 2). It comes by default with Python’s IronPython language, along with the pip (package manager for Python).
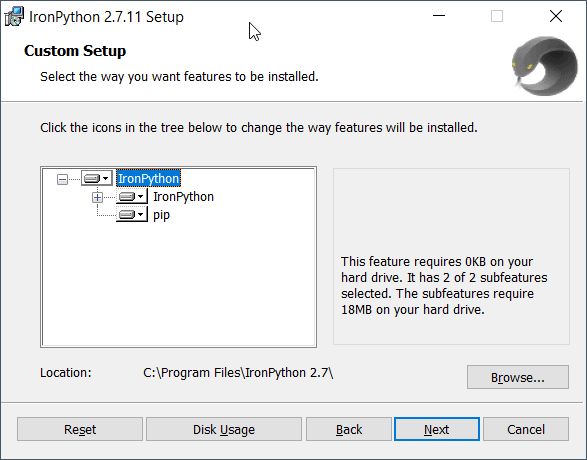
Figure 2. Selecting the IronPython features.
Make sure to browse for the installation location shown in Figure 2 if you won’t use the default one. After the process is done, you can go to the specified folder and run the file ipy.exe. It represents the command line interface from which you may run your IronPython commands.
Run it, and check in Figure 3 how the interface looks.
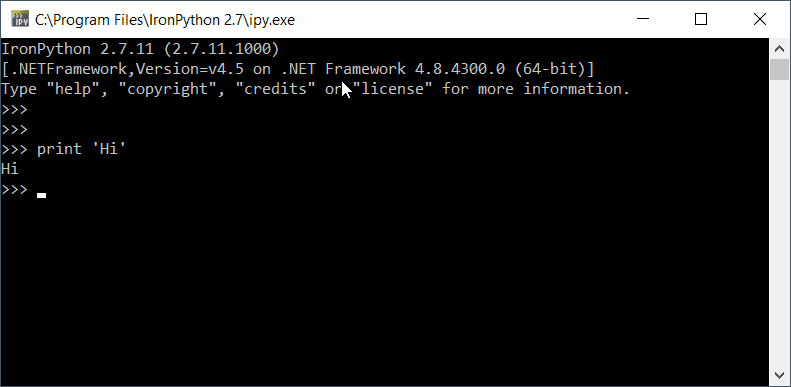
Figure 3. IronPython command-line shell.
It is also a REPL, which allows you to execute interactive Python code to try it out. Do it as you please.
Alternatively, you can also download IronPython binary files, extract them and access the executor via the command line. We’ll stick, however, to the installer-based version which is more concise and straightforward.
WinForms with IronPython
Now that you have the environment set up, it’s time to learn what IronPython is capable of doing. Perhaps one of the best ways to prove its interoperability with .NET is through the construction of some WinForms.
To see this in action, you will create a simple MessageBox to display a message window and two buttons: Yes and No. Figure 4 illustrates how the box is going to look .
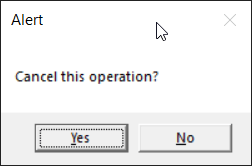
Figure 4. A MessageBox built with IronPython.
Each operation is going to run some Python code to perform different actions. You can find the code for this in Listing 1.
Listing 1. Creating a box with action buttons.
|
import clr clr.AddReference(‘System’) clr.AddReference(‘System.Windows.Forms’) import System import System.Windows.Forms as WinForms message = «Cancel this operation?» caption = «Alert» buttons = WinForms.MessageBoxButtons.YesNo result = WinForms.MessageBox.Show(message, caption, buttons) if result == WinForms.DialogResult.Yes: WinForms.MessageBox.Show(«Great, it’s canceled!») System.Console.Write(«Success!») else: print «Sorry, something went wrong!» |
If you’ve coded with Python and C# before, this code may look weirdly familiar.
The starting point of any mixed code with IronPython starts with its CLR module (the common language runtime). It allows a deep integration between both languages. With it in hand, you can add as many references as you want, such as the System and the Windows Forms.
Take note of how the whole coding experience is Python-based, and only Python. This includes the imports, the variables, the code indentation, the conditional statements, etc.
Once you add the .NET references, you’re allowed to use them throughout the code as real Python objects. The methods, types, parameters, and results also apply, so be careful. Also, pay attention to the body of the if condition. In case the user selects the option “Yes”, another message box is displayed along with a logline coded in C# via System.Console. Otherwise, the negative log is displayed but this time via Python’s print function. Cool, isn’t it?
Save the code to a file called Hello.py into the same folder that IronPython is installed. Then, open a standard command line (cmd), navigate to the IronPython root folder:
|
cd C:\Program Files\IronPython 2.7 |
Then run the following command:
The execution triggers the message box shown in Figure 4. Go ahead and test both the buttons. Figure 5 shows what happens after clicking the Yes option.
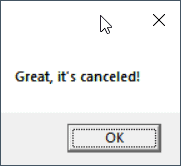
Figure 5. Message box opened after Yes option-click.
The image above will be followed by the message “Success” logged in the console.
Dealing with generics
Generics are an important part of Object-oriented programming, and IronPython allows its usage along with some Python code. Take the classic example of Collections. They represent one of the most traditional uses of generics in C#. Check out the code presented in Listing 2.
Listing 2. Dealing with Generics in IronPython
|
from System.Collections.Generic import List items = List[str]() items.Add(‘Item A’) items.Add(‘Item B’) items.Add(‘Item C’) for item in items: print item |
Note how array-like this syntax is. Yes, you can provide IronPython with generics just the way you access array indices. If you try to add anything other than strings, like shown below:
|
items = List[str]() items.Add(123) |
A corresponding error will be thrown:
|
Traceback (most recent call last): File «Hello.py», line 3, in <module> TypeError: expected str, got int |
Object-oriented programming
OOP is another crucial part when it comes to C# development. Among its many facets, being able to create classes (along with attributes and methods) and instantiate objects is also possible in IronPython. To demonstrate, change the content of your Hello.py file with the code shown in Listing 3.
Listing 3. Example of a C# class in IronPython
|
1 2 3 4 5 6 7 8 9 10 11 12 13 14 15 16 17 18 19 20 21 22 |
class Person: name = ‘John Silva’ age = 12 email = ‘john@email.com’ # setters def setName(self, name): self.name = name def setAge(self, age): self.age = age def setEmail(self, email): self.email = email # getters def getName(self): return self.name def getAge(self): return self.age def getEmail(self): return self.email def getInfo(self): print «Hi! I’m «, self.name, «, I’m «, self.age, «years old and this is my email: «, self.email |
Pretty simple. There’s just a couple of attributes and getters/setters for each. To make use of this class, you’d have to import it within another Python file. However, to simplify it, open another command line window and cd into the folder where the Hello.py file is located. Then, execute the command below in order to let ipy notice that specific class:
Now, it’s time to enter into the interactive mode. Just hit the ipy command for that, and the terminal must change to how it is shown in Figure 6.
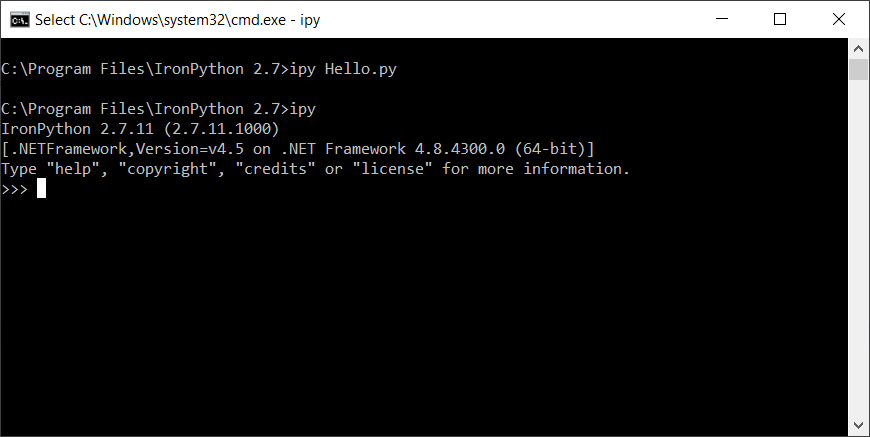
Figure 6. IronPython interactive mode.
Then, you can run some interactive code exploring the Person class previously created. Type the following code lines directly to the new shell window:
|
import sys sys.path.append(‘C:\Program Files\IronPython 2.7’) import Hello |
Make sure to change IronPython’s path with yours. Finally, play with it by creating a person object and calling its methods:
|
person = Hello.Person() person.getInfo() > Hi! I‘m John Silva, I’m 12 years old and this is my email: john@email.com |
Figure 7 shows a bit more of the options you can base at.
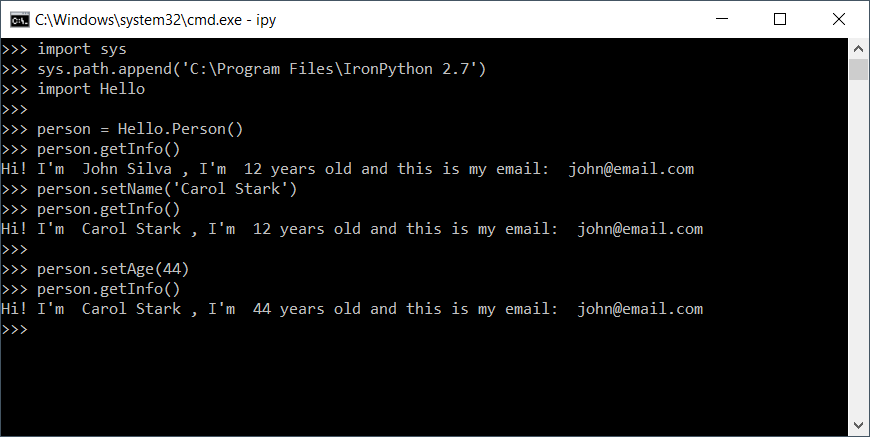
Figure 7. Playing with Person object’s methods in IronPython.
What else can you do with IronPython?
IronPython can work for many of the .NET facets, such as ASP.NET web applications, APIs, data science, etc., but it’s been more widely used for desktop application development.
There used to be an IronPython Studio to integrate with Visual Studio 2008. However, time and maintenance have proved too difficult to keep up with. Today, you can add IronPython’s dependencies to your .NET projects via NuGet, especially if you’re working with Visual Studio.
It’s important to note that IronPython has been around for quite a long time, and still, the team has been working to maintain and update it. The documentation is not complete, but it’s enough to make some grounds when getting started. Additionally, the classic book IronPython in Action is a must-read if you’re willing to understand more about its capability.
I am trying to copy some of the code from the example included in this page and modify it to run on iron python using some help from these tutorials. But I’m stuck as when stepping outside the tutorials, I don’t know what modules I need to be importing.
At the moment I have the following code
import clr
clr.AddReference("System.Drawing")
clr.AddReference("System.Windows.Forms")

from System.Windows.Forms import Application, Form, Button, Label, DockStyle, AnchorStyles, Panel, Screen, FlowLayoutPanel

class OKWindow(Form):
   def __init__(self,InfoTXT):
      newlines = 0
      screenSize = Screen.GetWorkingArea(self)
      STRwidth = 200
      STRheight = 30
      FORMheight = 160
      FORMwidth = 300
      self.Text = 'Information'
      self.Height = FORMheight
      self.Width = FORMwidth


      self.flowPanel = FlowLayoutPanel()
      #self.flowPanel.AutoSize = true
      #self.flowPanel.AutoSizeMode = AutoSizeMode.GrowAndShrink
      self.Controls.Add(flowPanel)

      label = Label()
      label.Text = InfoTXT
      label.Top = 30
      label.Left = 50
      label.Height = STRheight
      label.Width = STRwidth

      button = Button()
      button.Text = "OK"
      button.Width = 100
      button.Top = FORMheight - 80
      button.Left = (FORMwidth / 2) - 50
      print button.Anchor
      button.Anchor = AnchorStyles.Bottom

      button.Click += self.buttonPressed

      self.Controls.Add(label)
      self.Controls.Add(button)

   def buttonPressed(self, sender, args):
      Application.Exit()

def information(Message):
   Application.EnableVisualStyles()
   form = OKWindow(Message)
   Application.Run(form)
(Note: The code is not exact as it’s currently running within OCTGN’s iron python scripting engine. I call the information() function from elsewhere with some text such as information('Important Announcement').)
So the code aborts as soon as I try to execute this self.flowPanel = FlowLayoutPanel(). If I comment out the flowPanel lines, the windows form appears normally.
So it seems to me that I haven’t imported the module that is needed properly. Unfortunately I have no idea what to load. I tried loading whatever I thought would be the right one, but none seem to work for me.
How can I figure out what module to import from System.Windows.Forms in order to create a FlowLayoutPanel in my code? And in general how does one figure out what to import in order to get the relevant functionality?
Введение
Подключение C# Windows Forms к проекту на Python позволяет создавать графический интерфейс пользовательского приложения с использованием Windows Forms в среде Python. Это предоставляет возможность объединить мощь и гибкость языка Python с возможностями Windows Forms для создания привлекательных и функциональных приложений.
Шаг 1: Установка необходимого программного обеспечения
Перед началом работы необходимо установить следующее программное обеспечение:
-
Microsoft Visual Studio — интегрированная среда разработки (IDE) для работы с языком программирования C# и Windows Forms.
Ссылка для скачивания: https://visualstudio.microsoft.com/downloads/
-
Python — скриптовый язык программирования.
Ссылка для скачивания: https://www.python.org/downloads/
Шаг 2: Создание проекта в Visual Studio
- Откройте Visual Studio.
- Выберите «Создать проект».
- В открывшемся окне выберите «Windows Forms Application» и нажмите «Далее».
- Укажите имя проекта и папку для сохранения проекта. Нажмите «Создать».
- В окне решений выберите «Form1.cs» и отредактируйте его по своему усмотрению, добавляя необходимые элементы управления и задавая действия при нажатии на кнопки и другие события.
Шаг 3: Создание Python-скрипта
-
Откройте текстовый редактор (например, блокнот) и создайте новый файл.
-
Сохраните файл с расширением «.py» и выберите папку для сохранения.
-
Импортируйте необходимые модули для работы с C# Windows Forms.
import clr clr.AddReference("System.Windows.Forms") clr.AddReference("System.Drawing") from System.Windows.Forms import Application, Form, Button, MessageBox from System.Drawing import Size -
Создайте класс для вашего приложения, наследующийся от класса Form.
class MyApp(Form): def __init__(self): self.Text = "Мое приложение" self.ClientSize = Size(300, 200) button = Button() button.Text = "Нажми меня" button.Click += self.button_Click self.Controls.Add(button) def button_Click(self, sender, e): MessageBox.Show("Привет, мир!") -
Создайте экземпляр вашего приложения и запустите его.
if __name__ == "__main__":
    app = MyApp()
    Application.Run(app)
Шаг 4: Связывание C# Windows Forms с Python-скриптом
- Сохраните ваш Python-скрипт в папке проекта Visual Studio.
- Откройте «Solution Explorer» в Visual Studio.
- Щелкните правой кнопкой мыши на папке «Проект» и выберите «Добавить существующий элемент».
- Выберите ваш Python-скрипт и нажмите «Добавить».
- Щелкните правой кнопкой мыши на вашем Python-скрипте в «Solution Explorer».
- В выпадающем меню выберите «Свойства».
- В разделе «Действия по сборке» выберите «Встроенный ресурс».
- В поле «Правило имя ресурса» введите имя вашего Python-скрипта.
- Сохраните изменения и запустите ваш проект.
Заключение
Подключение C# Windows Forms к проекту на Python предоставляет мощные инструменты для создания графических приложений в среде Python. Следуя этому пошаговому руководству, вы сможете быстро начать разрабатывать свои собственные приложения, совмещая преимущества обоих языков программирования.