- Products
- 1.1.1.1 (DNS Resolver)
- Set up
- Router
-
Go to the IP address used to access your router’s admin console in your browser.
- Linksys and Asus routers typically use
http://192.168.1.1orhttp://router.asus.com(for ASUS). - Netgear routers typically use
http://192.168.1.1orhttp://routerlogin.net. - D-Link routers typically use
http://192.168.0.1. - Ubiquiti routers typically use
http://unifi.ubnt.com.
- Linksys and Asus routers typically use
-
Enter the router credentials. For consumer routers, the default credentials for the admin console are often found under or behind the device.
-
In the admin console, find the place where DNS settings are set. This may be contained within categories such as WAN and IPv6 (Asus Routers) or Internet (Netgear Routers). Consult your router’s documentation for details.
-
Take note of any DNS addresses that are currently set and save them in a safe place in case you need to use them later.
-
Depending on what you want to configure, choose one of the following DNS addresses for IPv4:
Use 1.1.1.1 resolverBlock malware with 1.1.1.1 for FamiliesBlock malware and adult content with 1.1.1.1 for Families
-
Depending on what you want to configure, choose one of the following DNS addresses for IPv6:
Use 1.1.1.1 resolver
2606:4700:4700::1111
2606:4700:4700::1001
Block malware with 1.1.1.1 for Families
2606:4700:4700::1112
2606:4700:4700::1002
Block malware and adult content with 1.1.1.1 for Families
2606:4700:4700::1113
2606:4700:4700::1003
-
Save the updated settings.
Using DNS-Over-TLS on OpenWrt
It is possible to encrypt DNS traffic out from your router using DNS-over-TLS if it is running OpenWrt. For more details, see our blog post on the topic: Adding DNS-Over-TLS support to OpenWrt (LEDE) with Unbound.
FRITZ!Box
Starting with FRITZ!OS 7.20, DNS over TLS is supported, see Configuring different DNS servers in the FRITZ!Box.
Многие из нас уже привыкли использовать публичный DNS сервер 8.8.8.8 от Google или его аналог 77.88.8.8 от Яндекс за их скорость и надежность, зачастую предпочитая их предоставляемым провайдерами сервисам. А знаете ли Вы, что есть Public DNS серверы 1.1.1.1 и 1.0.0.1, предоставляемые американской компанией Cloudflare, которые так же достаточно быстрые и при том такие же надежные?! Вот и я не знал до недавнего времени. Я открыл для себя этот сервис совершенно случайно, во время массовой истерии с блокировкой Telegram и думаю теперь буду им периодически пользоваться.
Последнее время некоторые пользователи стали задумываться о собственной информационной безопасности (70% населения это пока вообще до фонаря), а потому может возникнуть резонный вопрос — а можно ли доверять DNS 1.1.1.1 и насколько безопасен сервис от Cloudflare?! Можно, ровно настолько, насколько Вы доверяете Гуглу, Яндексу или собственному провайдеру. И те, и другие, и третьи — коммерческие компании и прибыль является приоритетом. Первые два стопроцентно используют статистику запросов для продажи своей рекламы, а операторы связи вообще темные лошадки и Вы вряд ли узнаете когда-нибудь, с кем они делятся информацией. А потому обычному среднестатистическому пользователю модно спокойно использовать ДНС сервер 1.1.1.1 и ничего не опасаться. Тем более, что основной упор Cloudflare делает на безопасность.
А вот для параноиков эти ДНС серверы подойдут куда больше, чем другие за счет возможности использования шифрования и приватного режима. Правда с его настройками придется попрыгать с бубном, но оно того стоит, уж поверьте — Ваш запрос уже будет достаточно проблематично перехватить и расшифровать.
Как настроить DNS 1.1.1.1 на маршрутизаторе или компьютере
Есть два пути, которые позволят Вам использовать у себя DNS сервер 1.1.1.1 или 1.0.0.1 от Cloudflare — прописать его на роутере, чтобы мог использоваться всеми клиентами домашней сети, либо на одном конкретном компьютере. Давайте рассмотрим оба варианта.
1. Настройка на роутере
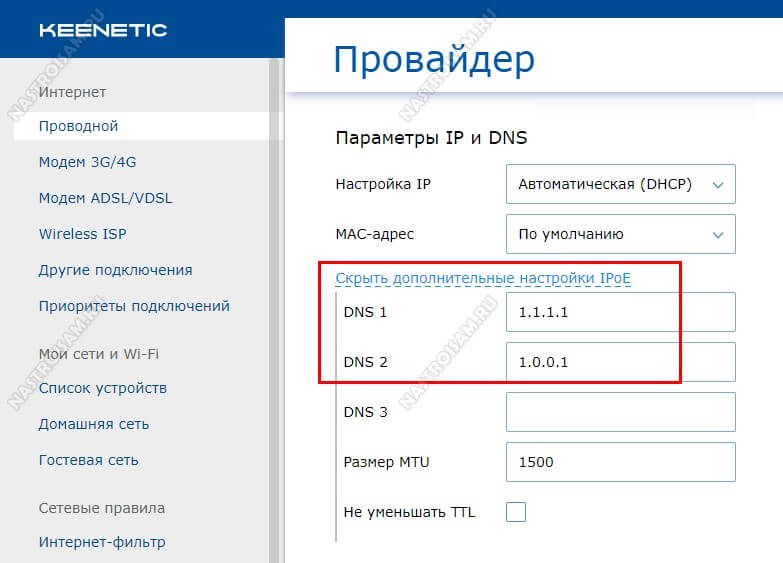
Какой-бы модем или WiFi-роутер Вы не использовали, у него есть два места, где можно прописать ДНС. Первый — это внешнее соединение WAN. Какой бы тип подключения Вы не использовали — PPPoE, Динамический IP или Статический IP — в его параметрах можно вручную прописать свои серверы DNS. Вот пример для Keenetic:
Второе место — это настройки DHCP-сервера. То есть, в этом случае сервис будет навешиваться клиентам домашней сети, которые автоматически получают параметры IP от роутера.
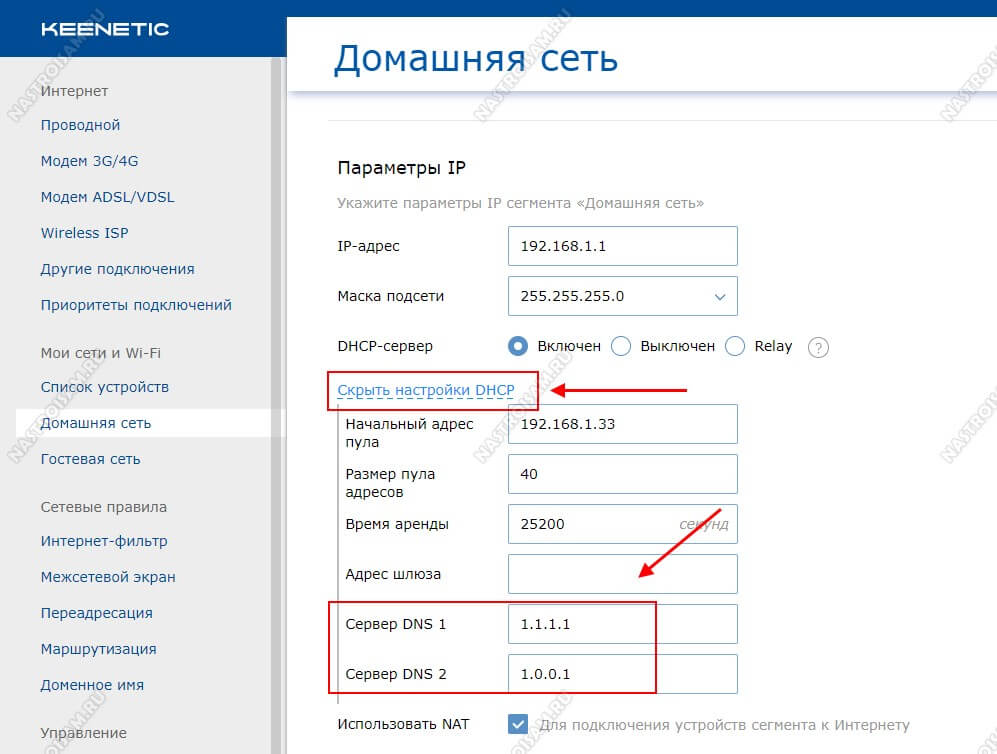
Остаётся только прописать адреса в соответствующие поля, сохранить настройки и перезагрузить роутер.
2. Настройка DNS в Windows
Этот вариант подойдёт, если Вы хотите использовать серверы 1.1.1.1 и 1.0.0.1 на одном конкретном компьютере или ноутбуке под управлением операционной системы Windows 10. Кстати, для более старых версий ОС эта инструкция будет так же актуальна.
Итак, нажимаем комбинацию клавиш Win+R, чтобы появилось окно «Выполнить».
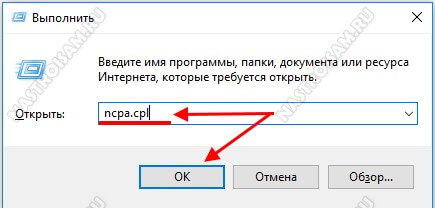
В строчке «Открыть» введите команду ncpa.cpl и нажмите кнопку «ОК». Должен появится список сетевых подключений Windows. Выбираем подключение, через которое ПК выходит в Интернет и кликаем по нему правой кнопкой мыши:
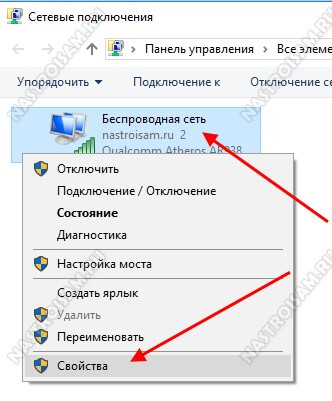
В появившемся контекстном меню выбираем пункт «Свойства», чтобы открыть параметры подключения:
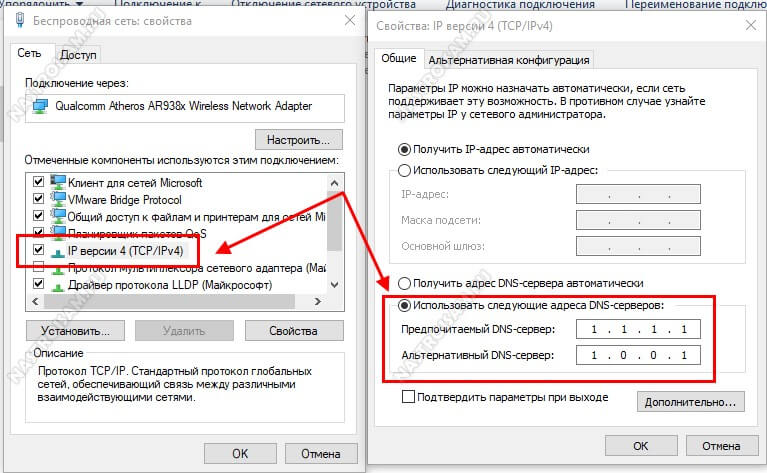
В списке компонентов надо будет дважды кликнуть по строчке «IP версии 4 (TCP/IPv4)», чтобы открылось ещё одно окно. В нём надо будет поставить флажок «Использовать следующие адреса DNS-серверов» и прописать предпочиаемым DNS 1.1.1.1, а альтернативным — сервер 1.0.0.1. Нажимаем на кнопку «ОК» и проверяем работу сервиса.
Step by Step instructions for setting up Cloudflare Dynamic DNS with an Asuswrt-merlin router
Recently, I’ve wanted to be able to VPN into my home network so that I can perform various tasks while out of the house. My provider does not offer static IP addresses to residential customers, so I have to rely on a Dynamic DNS service. I don’t want to have my personal IP publicly listed on my domain, however, so I’d like to use Cloudflare to proxy the IP.
Asuswrt-merlin (developed by Eric Sauvageau – well worth a look if you are currently running the stock asuswrt firmware) provides the ability to link the router up to a Dynamic DNS service (DDNS).
However, it does not natively support Cloudflare as a DDNS. In fact, Cloudfare doesn’t appear to have a dedicated DDNS system (certainly not on the free tier). But, with some clever trickery (produced by others), its possible to set it up to update DNS records in cloudfare.
None of this is my handiwork, but for posterity, I want to document the full process to set it up here.
What do you need?
- A Cloudflare account
- A USB Stick
- An Asus router running asuswrt-merlin version 384.7 or above
Step One: Cloudfare Setup
The first thing you are going to need, is a cloudfare DNS record, and an API key, so that your router can update the record. Follow the guide to create a new API key, when selecting permissions, give the key access to edit the DNS zones for your target domain.
Once you have completed that, go to the DNS section for your domain, and add a new A record. You can call this whatever you like. For now, just set it to any IP address (such as 1.1.1.1) – we’ll be changing it automatically soon.
Set the following settings:
| Setting | Value |
| Type | A |
| Name | Whatever your subdomain for the home network should be, in this example, its mynetwork |
| IPv4 Address | For now, just set it to any IP address (such as 1.1.1.1) – we’ll be changing it automatically soon. |
| Proxy Status | You’ll want to set the Proxy flag to on, in order to benefit from hiding this IP address from the world. |

Step Two: Router Preparation
Because asuswrt does not support Cloudflare as a listed DDNS service, we’re going to need to set the router up to run a custom script. Before we do that though, we’re going to need to get the router ready, with all the required software. In this section, I’ll assume you’re running stock asuswrt-merlin, and haven’t done any customisation yet.
SSH Configuration
First, we’re going to allow ssh login on the terminal, so we can access the router via CLI. Log into your routers web interface (by default this should be 192.168.1.1).
Navigate to Administration > System, and enable SSH. I would recommend only doing it for LAN only, so that outside attackers are unable to get into it. You’ll also want to allow password login (or set up some authorised keys). Hit the Apply button to commit those changes.

JFFS Configuration
Next, we need to ensure that JFFS2 is configured on the router. Set Enable JFFS custom scripts and configs to Yes.

Finally, plug a USB stick into the router. We’re going to format this and leave it permanently in place, so be sure you’ve taken all the data off it first.
Step 3: Router Setup
Now that we’ve got ssh set up, we’re going to log into the box. Open up a terminal, and use ssh [loginUser]@[routerIP] Where loginUser is the username you log into the webUI with, and routerIP is the IP address of the router. Enter the password, and you’ll be presented with the session prompt.

Asus Merlin has a fairly powerful terminal menu that simplifies a lot of tasks, we’re going to use it here to get a few things set up. Type amtm to load the menu up.

Formatting the USB Stick
First, type in the fd command. This will prompt you for various decisions relating to formatting the USB drive you just plugged in. Unless you explicitly want something different, you can use the recommended settings for most of them.
You get a chance to confirm your choices just before it executes. If you are unhappy with any of your choices (or have forgotten to take the data off), you can use this chance to correct any issues. Once you confirm here, everything on the disk will be wiped out.

Once this completes (it can take a bit depending on the size of the drive you plugged in). It’ll take you back to the main menu.
Required Package Setup
If you enter i, it will show you all the packages you can install via amtm, I won’t go into details about these, but the one we want is Entware. Type in ep and hit enter to install this package. Once this is done, hit e to exit the amtm menu.
Back at the ssh prompt, we’re going to install python. Type in opkg install python3 – This should prompt Entware to install the python packages.
Script Setup
Ok, now we’ve got everything set up and ready, we need to configure the router to update the DNS settings. Thankfully, others have forged this path before, so we just need to grab the required script.
Download the ddns-start script from this repository. The easiest method is to navigate to the raw file, then right-click and select Save As. Once you have it, you’re going to want to open the file, and update it with the relevant settings, as described on the repository’s README.
Copy the file
Once we have the file, and updated the settings, we’re going to copy it to the router.
There’s a few options for doing this, but I’m going to use scp for this. From a standard terminal prompt (not your ssh session), type in scp [path to local file] [loginUser]@[routerIP]:/jffs/scripts/ddns-start – you’ll be prompted to enter your ssh credentials again.

NB: Windows tends to download the file as a .txt file – When copying the file over, remove the extension. For this to work, the file name needs to be exactly ddns-start
Once this completes, ssh back into the box, and check the file is present

Next, lets make sure the file is executable by the system, using chmod +x /jffs/scripts/ddns-start.

You can manually execute this script using ./jffs/scripts/ddns-start – If everything goes well, it should just return to the command prompt without error.

You can verify the script worked successfully, by returning to the Cloudflare dashboard DNS settings, and checking the IP has changed from the original value to your current IP. If you don’t know what that is, use WhatIsMyIPAddress to check.
Final Step: Configure DDNS
Log back into the router webUI, and navigate to WAN > DDNS. Here, we should set the following values:
| Setting | Value |
| Enable the DDNS Client | Yes |
| Method to retrieve WAN IP | Internal |
| Server | Custom |
| Host Name | The subdomain we set up in Cloudflare (in the case above, its mynetwork.example.com) |
| Forced update interval (in days) | 21 |
Once you have configured this, hit Apply to save the changes.

Conclusion
Now you should have a cloudflare DNS record that hides your home IP address, and updates automatically whenever the WAN IP of the router changes. From here, you can add additional DNS records that point to this A record (such as vpn.example.com for your VPN traffic). This will allow you multiple subdomains for whatever you need, all driven from a single record that is updated by your router.
(Image credit: Future)
All your web traffic runs through a DNS (Domain Name Service), usually managed by your ISP (Internet Service Provider). Several companies offer alternatives, allowing you to route your traffic through a faster or more secure medium, and the web infrastructure giant Cloudflare has its own DNS for consumers: 1.1.1.1, which promises to be faster than the competition. However, it’s also more secure and private too.
What is Cloudflare?
Cloudflare is a web infrastructure company offering content delivery network (CDN), Distributed Denial of Service (DDoS) mitigation, Authoritative DNS services, and a consumer DNS resolver service. Its network serves over 6 million websites, and between all of its services, Cloudflare has a huge infrastructure spread out around the globe (the closer its CDN servers are to your computer, the faster it can serve content). The sheer size of the Cloudflare CDN also means it had the potential to serve as a consumer-level DNS system.
What is DNS and what makes Cloudflare’s service unique?
DNS is essentially the web’s phonebook. Every website is located at an IP address — a string of digits denoting the server’s exact web location. Because remembering a bunch of IP addresses like «104.16.213.223» would be a pain. Instead, domain names like «WindowsCentral.com» are stored in a DNS database alongside the IP address. So that when you type «WindowsCentral.com» into your browser, the computer sends that domain through the network to a DNS server, which returns the page located at «104.16.213.223.»
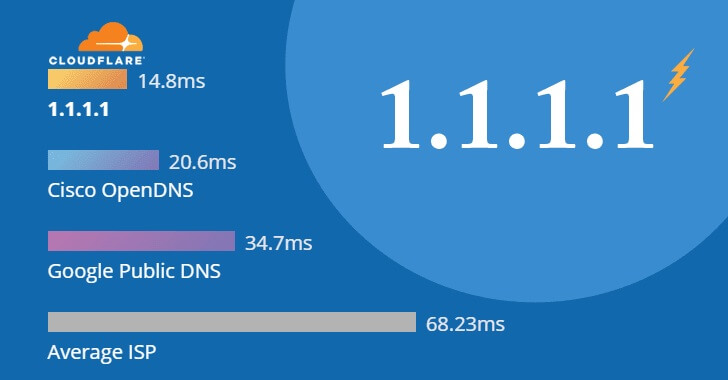
Your ISP already offers a DNS resolver, making it easy to get online quickly. But they’re not always the fastest or most secure services, so third-party options have grown in popularity. Over the years, we’ve seen a lot of companies offering fast DNS services, including Cisco OpenDNS and Google Public DNS. While these services are known to be quick and reliable, Cloudflare’s 1.1.1.1 claims to be even faster and more secure.
According to Cloudflare, 1.1.1.1’s average latency is around 14ms, making it the fastest DNS resolver everywhere (Google Public DNS latency average is 34ms). Alongside speed, Cloudflare is also touting greater privacy, promising that users’ records will never be stored on drives and that it’ll flush out logs every 24 hours.
This how-to guide will walk you through the steps to configure your router or computer to use the super-fast and secure 1.1.1.1 DNS resolver from Cloudflare.
Cloudflare free DNS resolver IP addresses
These are the IP addresses to set up Cloudflare’s consumer DNS service on a computer or router.
IP version 4
- 1.1.1.1
- 1.0.0.1
IP version 6
- 2606:4700:4700::1111
- 2606:4700:4700::1001
How to configure Cloudflare DNS service on router
The best way to change your current DNS settings to start using Cloudflare’s 1.1.1.1 is to reconfigure your router. Instead of setting up each device individually, this approach automatically configures every home device (desktop, laptop, tablet, phone, game console, and smart TV).
To configure your router to use the Cloudflare DNS addresses, do the following:
Important: The instructions to configure may be different on your router. Before proceeding, check your manufacturer support website for more specific details.
- Open web browser.
- Enter the IP address of your router and press Enter.
- Quick tip: You can find out this information using the «Windows key + R» keyboard shortcut, typing cmd, clicking «OK,» and on Command Prompt run the ipconfig command. The router IP address will be the one that is listed in the «Default Gateway» field.
- Log in using your router username and password as required. (Typically, you’ll find this information on a sticker on your router.)
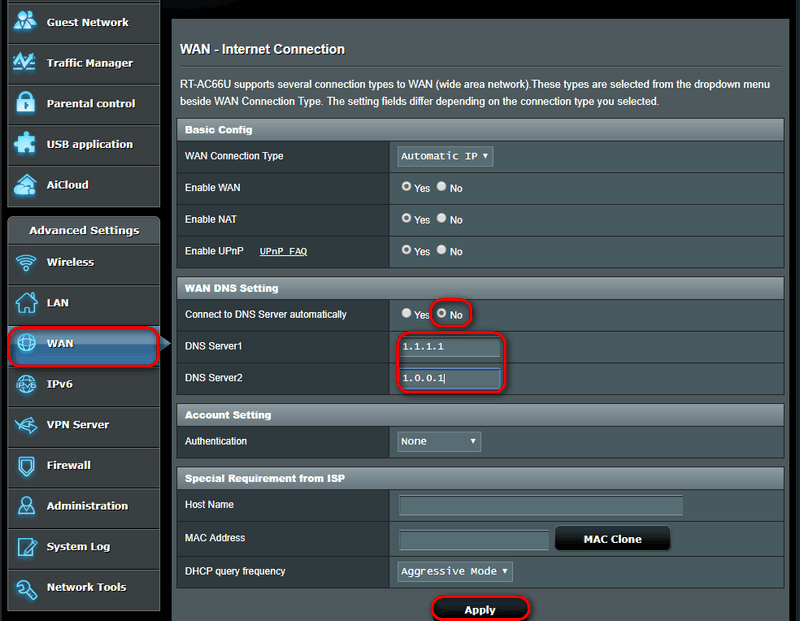
- Open the DNS server settings page. Refer to your router manufacturer support website to locate these settings. However, most of the time, these settings can be found in the advanced settings section. Here’s the location to get to the DNS settings in some of the most popular home router brands:
- Linksys: Setup > Basic Setup.
- ASUS: WAN > Internet Connection.
- Google Wifi: Settings > Networking & General > Advanced Network > DNS.
- Netgear: Internet.
- D-Link: Manual Internet Connection Setup.
- In the DNS settings section use these IPv4 addresses:
- 1.1.1.1
- 1.0.0.1
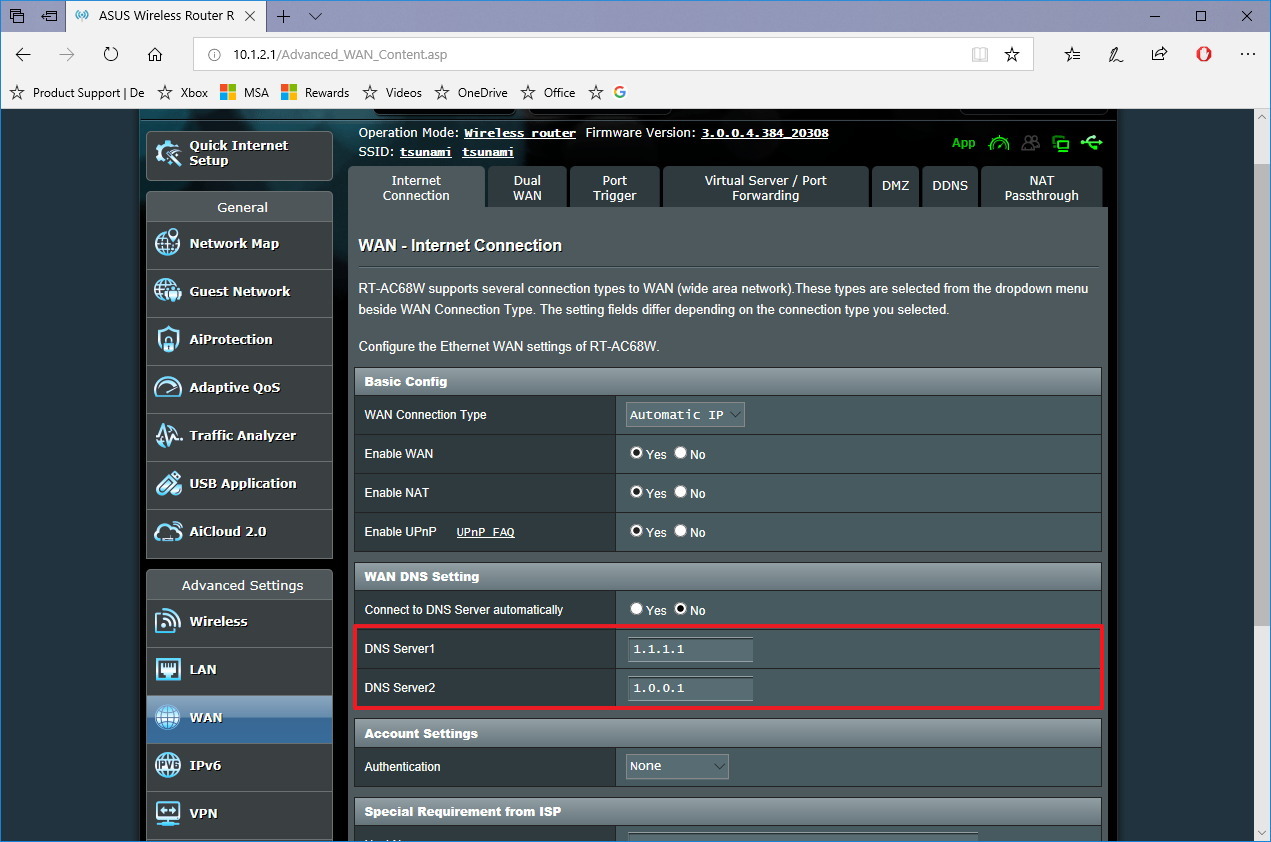
- Save your settings.
- Restart your browser.
Once you complete the steps, restart your computer to start using the new settings.
Alternatively, you can open Command Prompt and run these two commands:
- ipconfig /flushdns
- ipconfig /renew
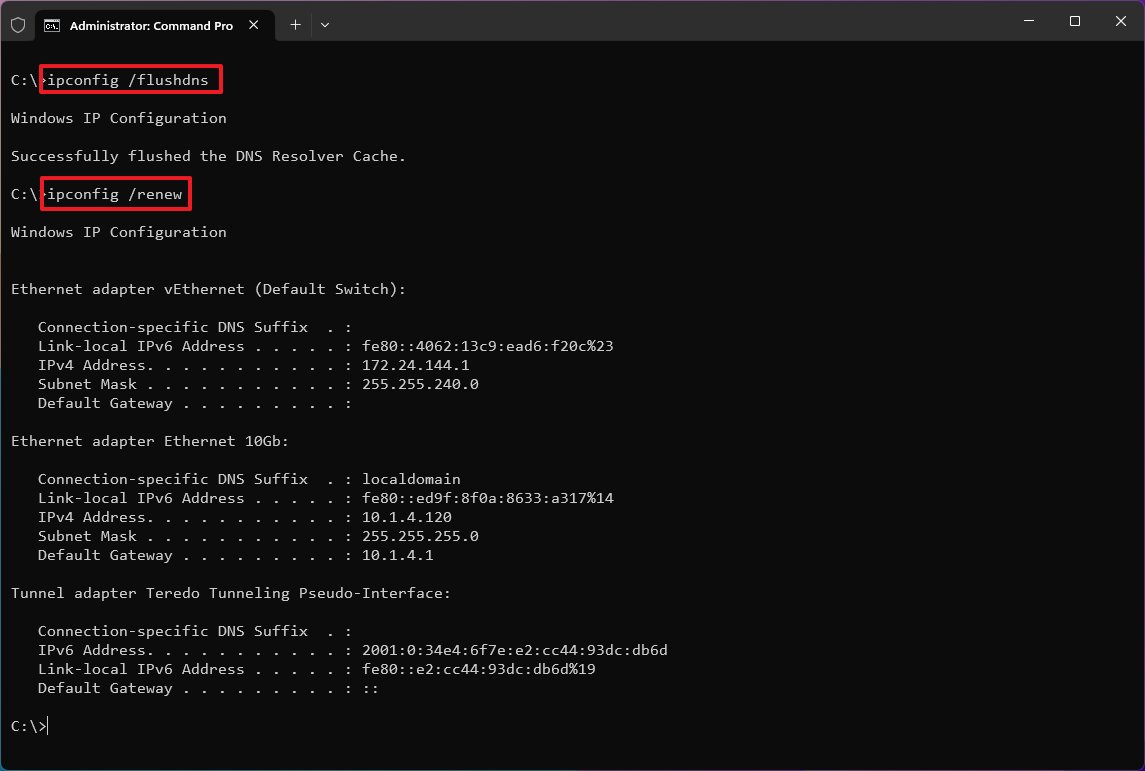
These commands will purge the DNS Resolver cache on your device and request a renewal of the IPv4 settings.
You don’t need to apply the IP version 6 addresses on your router if your network already uses IP version 4. However, if you must use the IPv6 addresses, you must enter them in your router’s IPv6 DNS setting page.
- 2606:4700:4700::1111
- 2606:4700:4700::1001
How to configure Cloudflare DNS service on Windows 11
Alternatively, if configuring your home router is a little challenging, or you want to use the Cloudflare DNS settings on every network you connect, including public networks (for example, coffee shops and airports), with your laptop or tablet, you can configure the DNS settings on Windows 11 (or Windows 10), instead of configuring your router.
Using these instructions is not recommended if you’re using a computer at work because changing these settings could cause connectivity problems and other issues. If you want to change these settings on your work computer, always consult with your IT administrator first.
To set the Cloudflare DNS settings on Windows 11, use these steps:
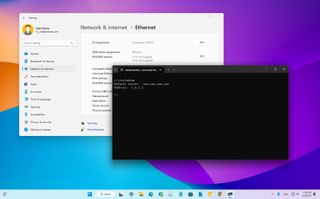
- Open Settings.
- Click on Network & internet.
- Click the active network connection – for example, Ethernet.
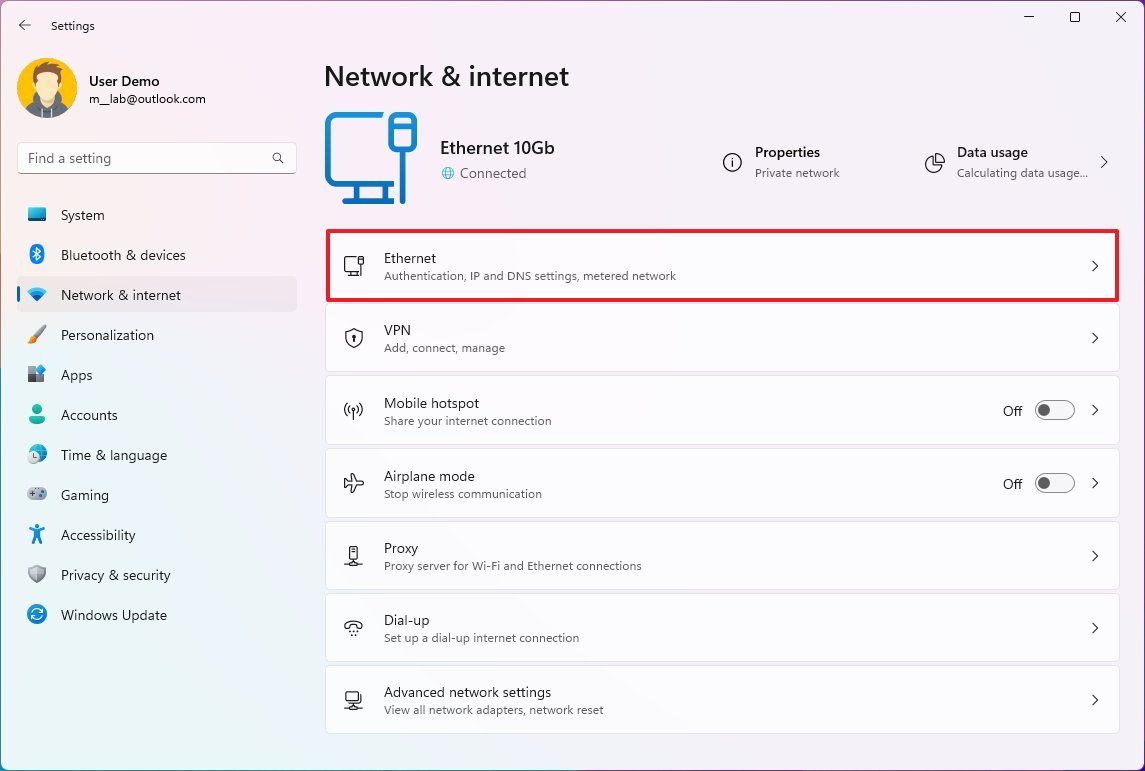
- Under the «DNS server assignment» section, click the Edit button.
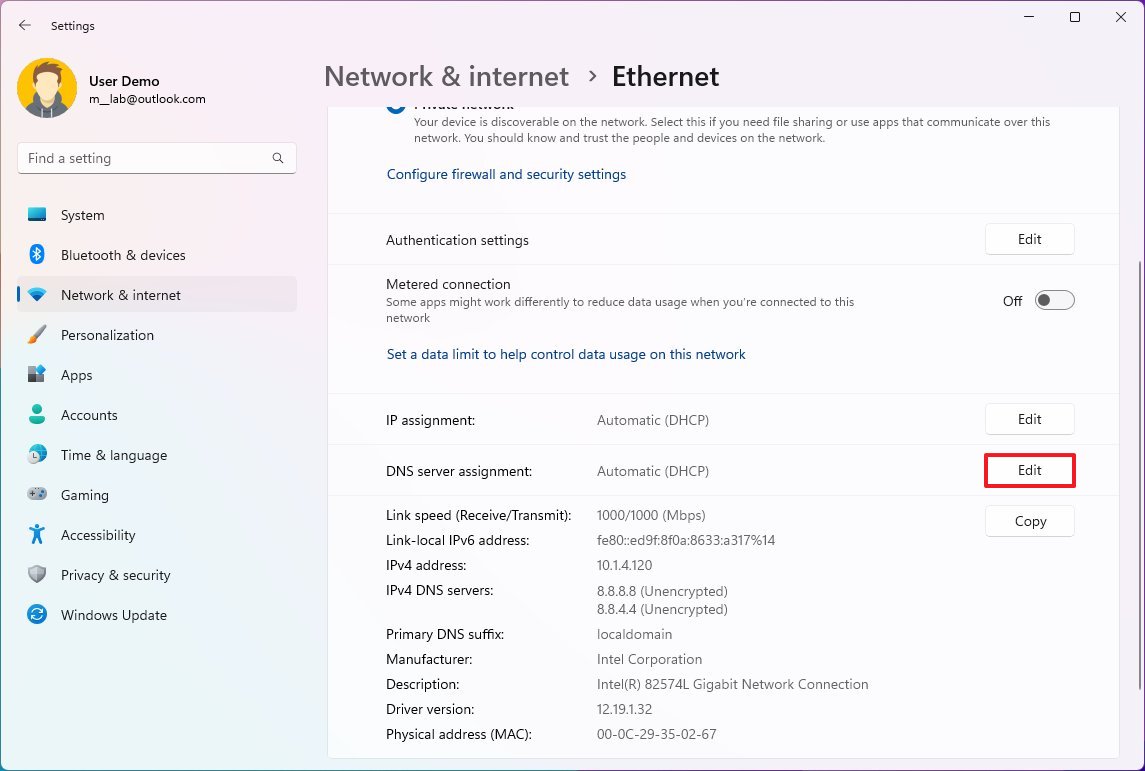
- Select the Manual option.
- Turn on the IPv4 toggle switch.
- Under the “Preferred DNS” section, specify the Cloudflare DNS address: 1.1.1.1
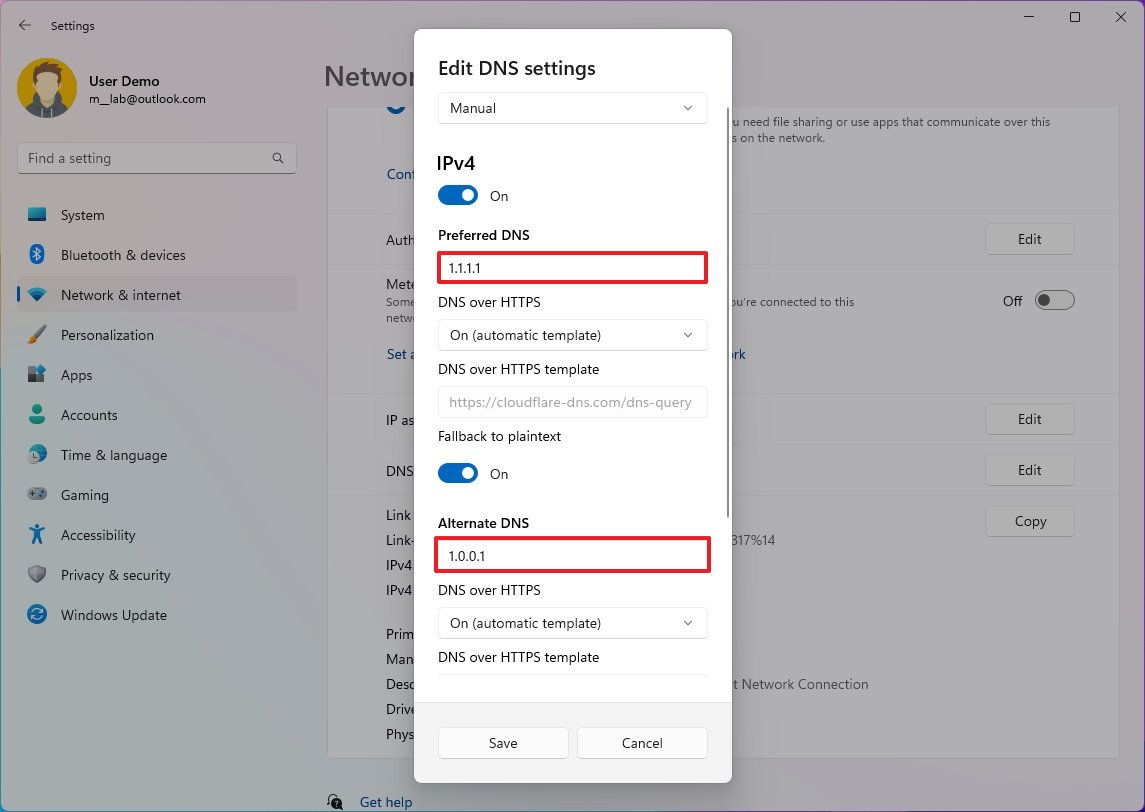
- (Optional) Select the «On (automatic template)» option from the «DNS over HTTPS» setting.
- (Optional) Turn on the «Fallback to plaintext» toggle switch.
- Under the «Alternate DNS» section, specify the secondary Cloudflare DNS address: 1.0.0.1
- (Optional) Select the «On (automatic template)» option from the «DNS over HTTPS» setting.
- (Optional) Turn on the «Fallback to plaintext» toggle switch.
- (Optional) Turn on the IPv6 toggle switch.
- Under the “Preferred DNS” section, specify the Cloudflare DNS address: 2606:4700:4700::1111

- Under the «Alternate DNS» section, specify the secondary Cloudflare DNS address: 2606:4700:4700::1001
- (Optional) Select the «Encrypted only (DNS over HTTPS)» option from the «DNS over HTTPS» setting.
- Click the Save button.
Once you complete the steps, the computer will use the Cloudflare servers to resolve domain names.
How to configure Cloudflare DNS service on Windows 10
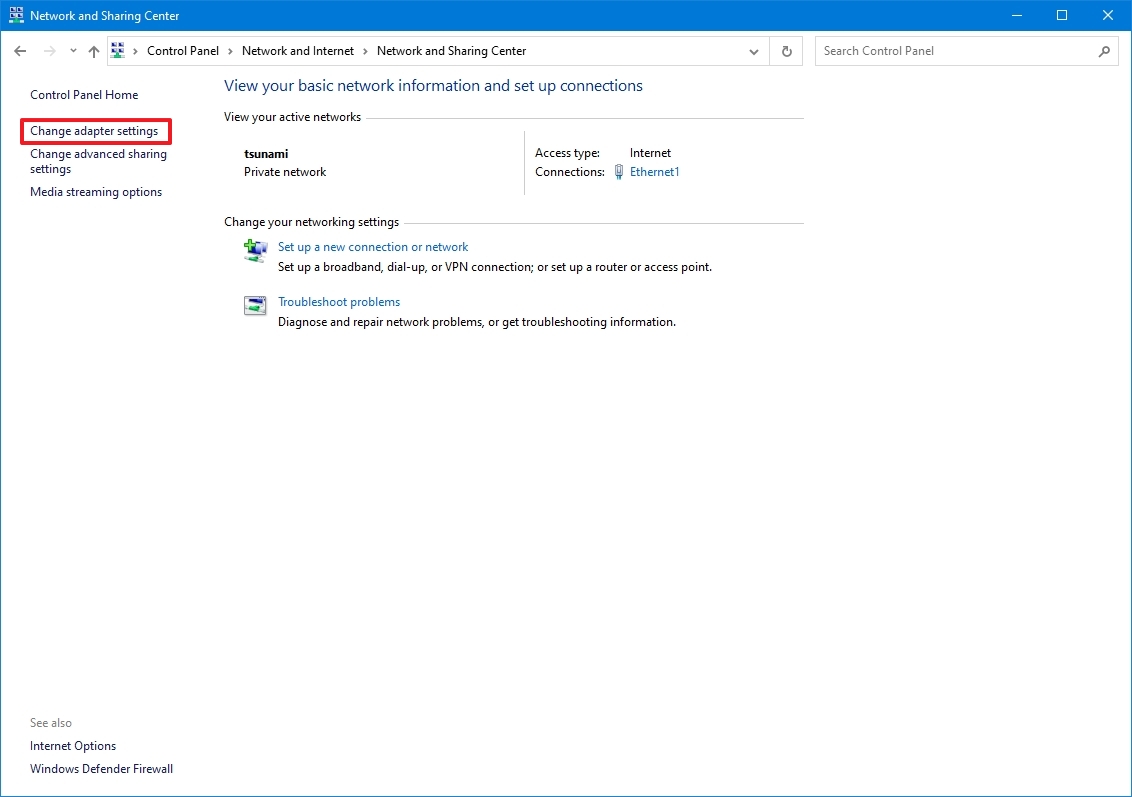
To configure the Cloudflare DNS settings on Windows 10, do the following:
- Open Start.
- Search for Control Panel, and click the top result to open the experience.
- Click on Network and Internet.
- Click on Network and Sharing Center.
- Click on Change Adapter Settings.
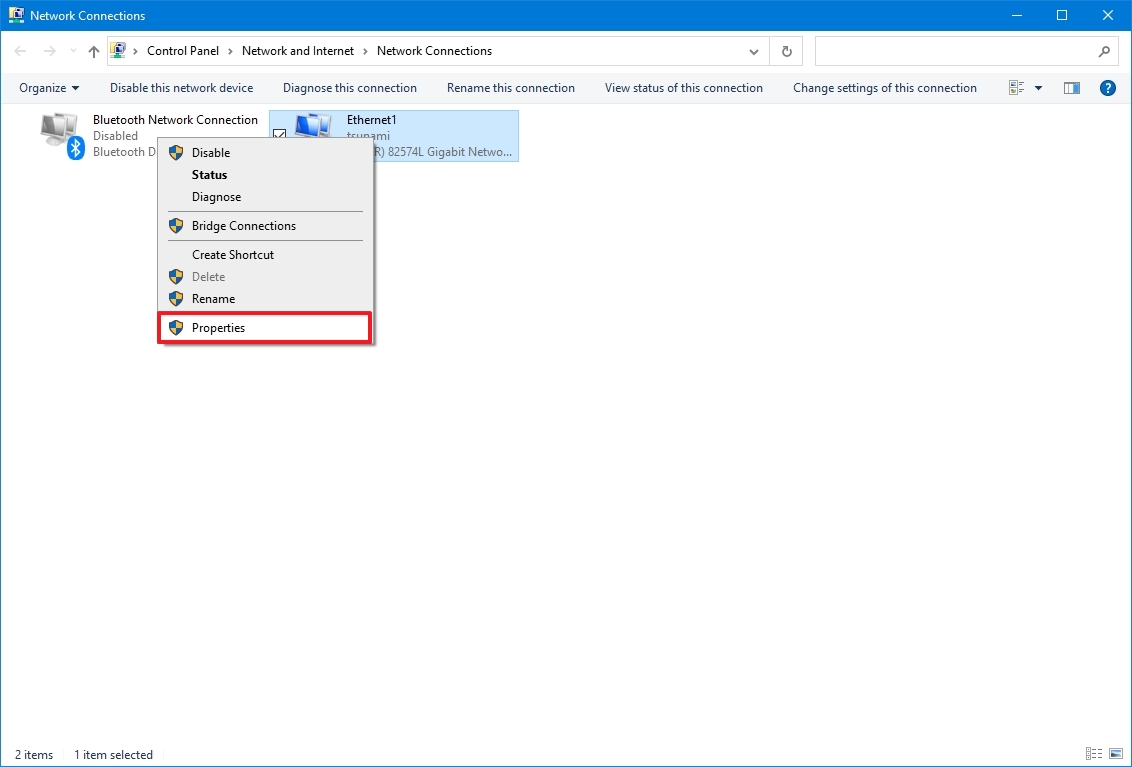
- Right-click the active Wi-Fi or Ethernet adapter, and select the Properties option.
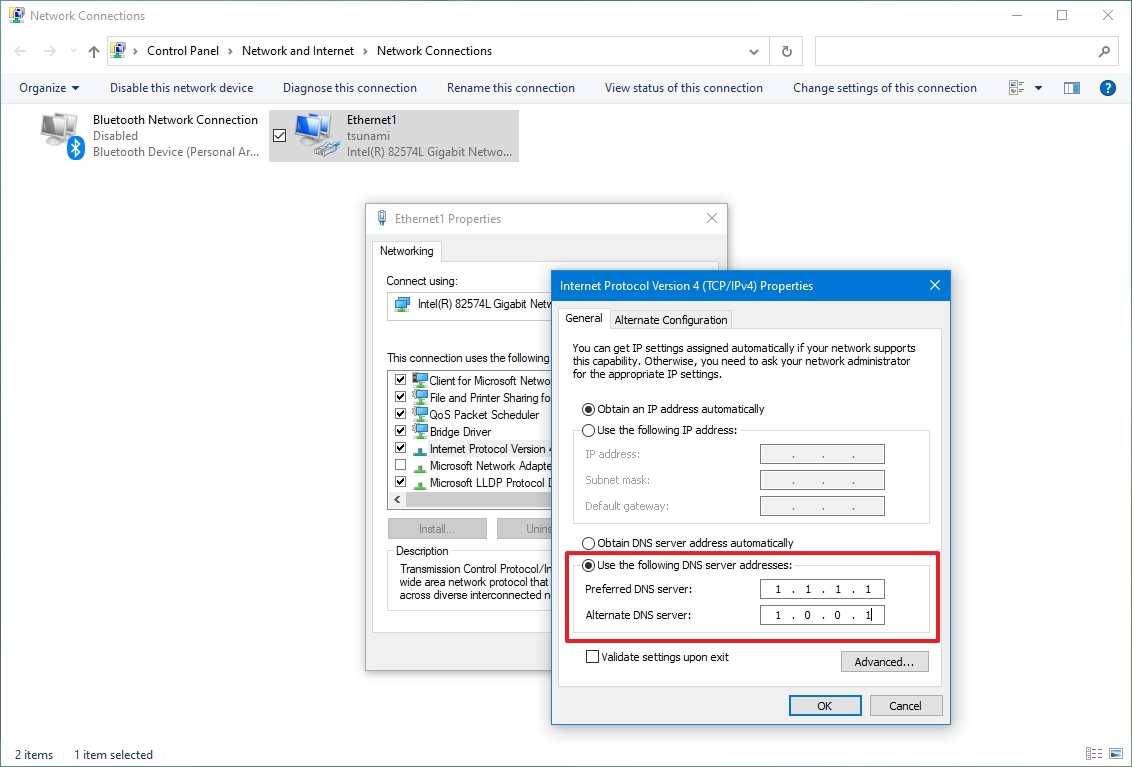
- Select the «Internet Protocol Version 4 (TCP/IPv4)» option.
- Click the Properties button.
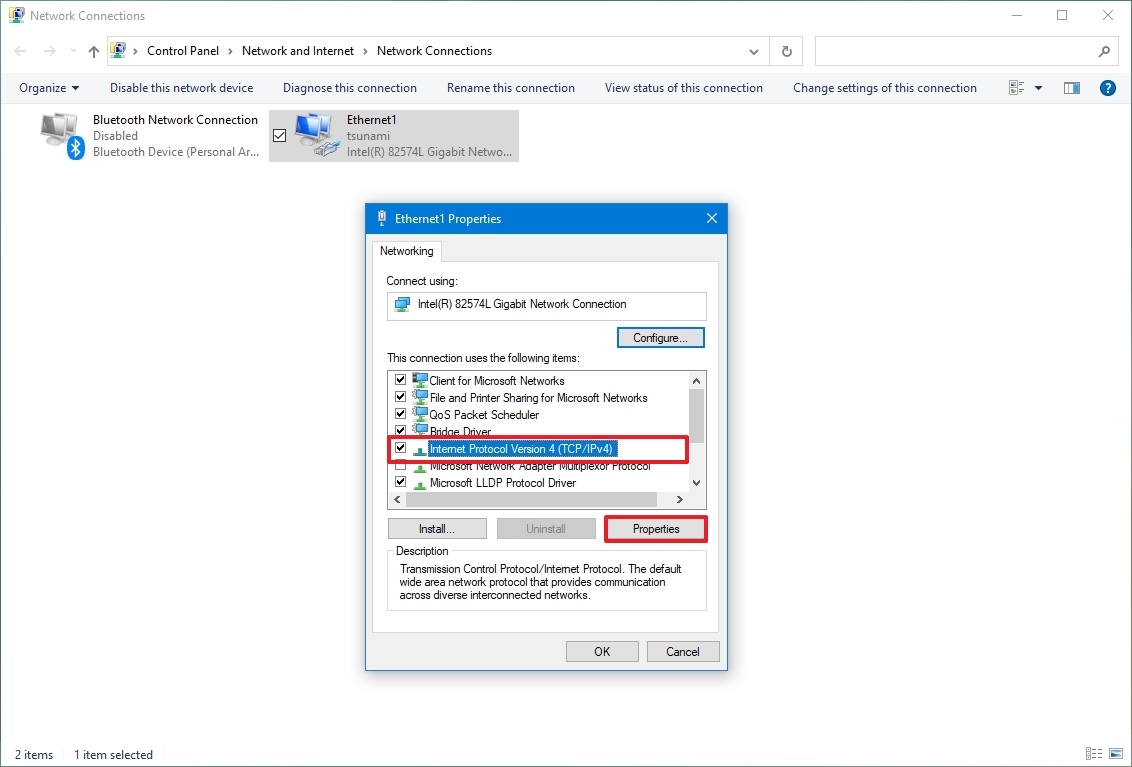
- Select the «Use the following DNS server addresses» option.
- In the «Preferred DNS server» field, enter this IPv4 address: 1.1.1.1
- In the «Alternative DNS server» field, enter this IPv4 address: 1.0.0.1
- Click the OK button.
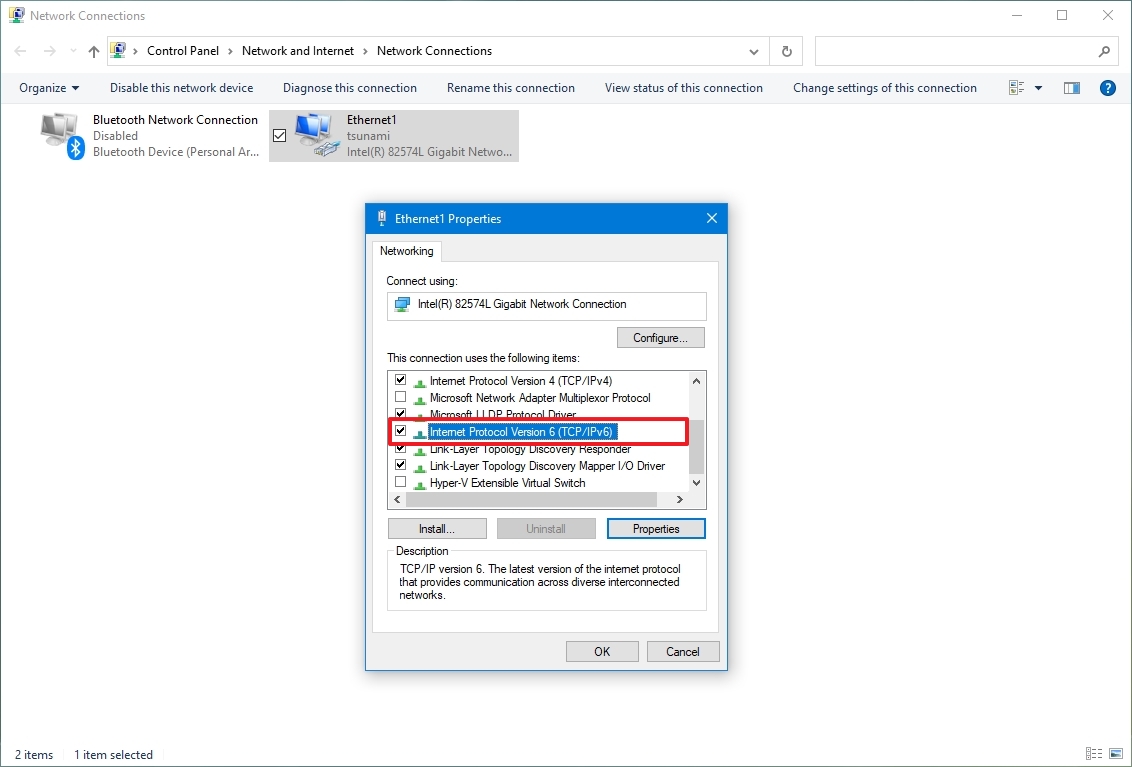
- (Optional) Select the option if the «Internet Protocol Version 6 (TCP/IPv6)» stack is enabled in the network adapter properties.
- Click the Properties button.
- Select the Use the following DNS server addresses option.
- In the «Preferred DNS server» field, enter this IPv6 address: 2606:4700:4700::1111
- In the «Alternative DNS server» field, enter this IPv6 address: 2606:4700:4700::1001
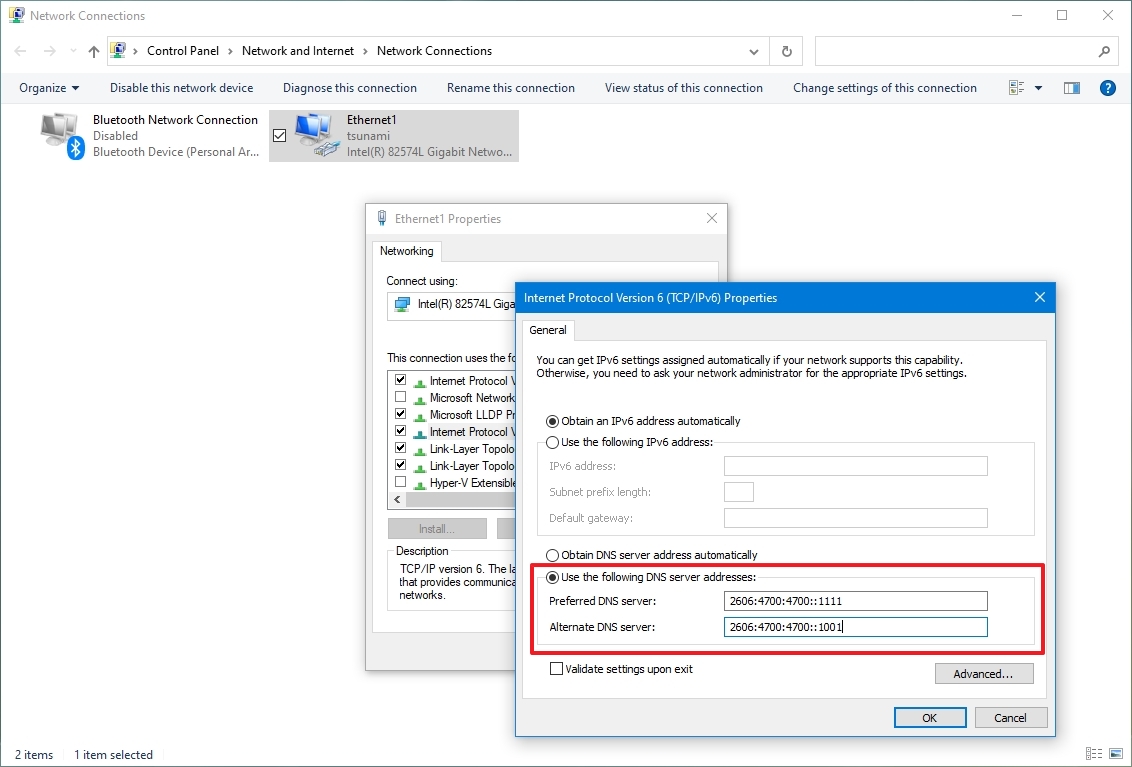
- Click the OK button.
- Click the Close button.
After completing the steps, your device will contact the Cloudflare servers to resolve domain names (for example, Google.com or WindowsCentral.com).
The steps mentioned above focus on Windows 10, but the instructions will also work on Windows 8.1 and 7.
How to check if you’re using the Cloudflare DNS settings
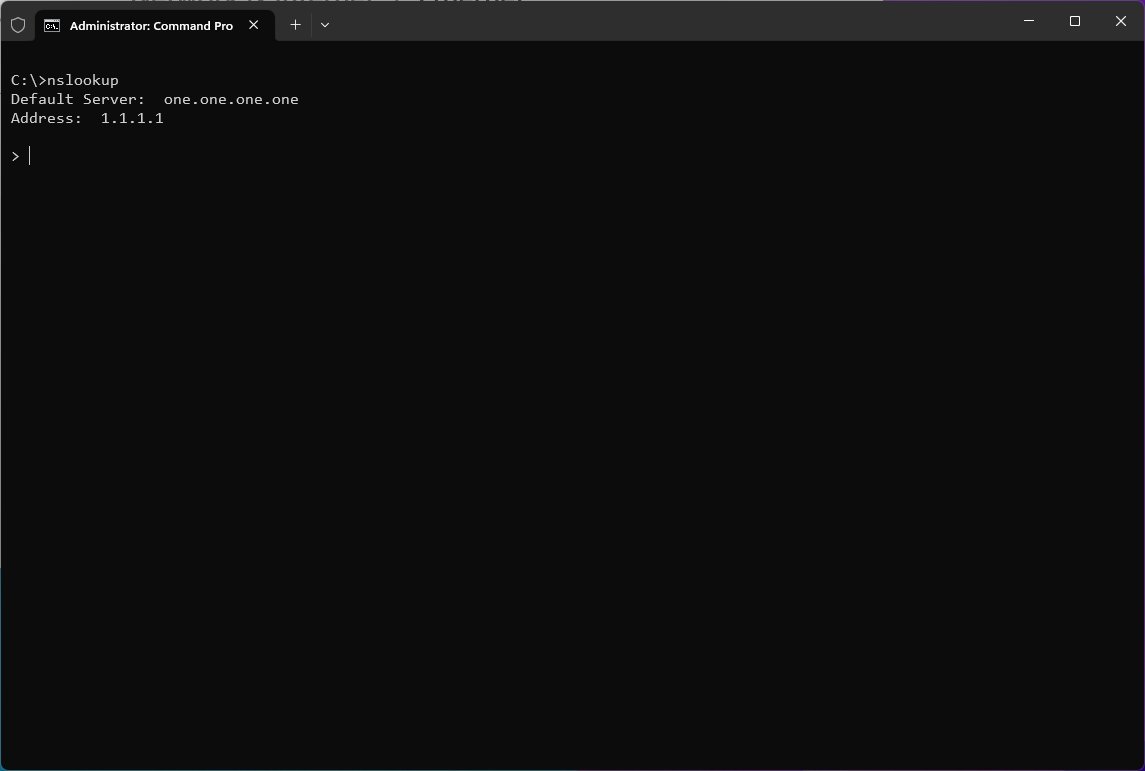
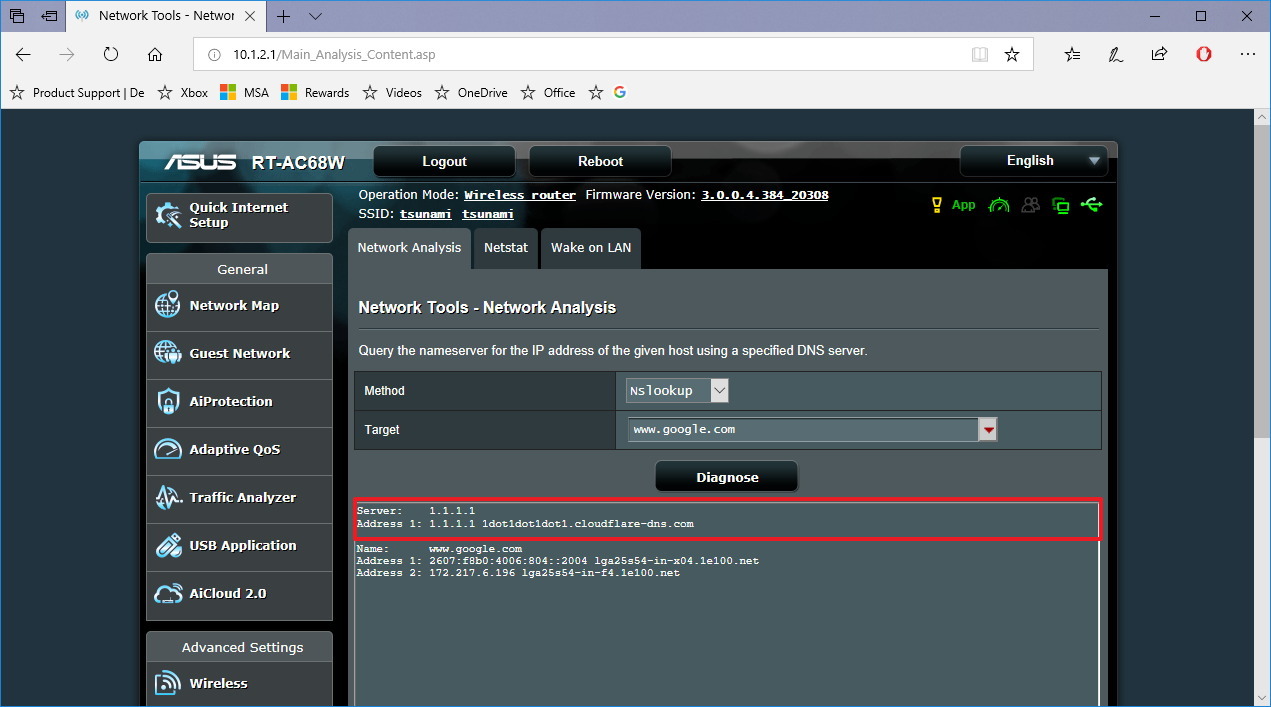
If you want to make sure that you’re in fact using the Cloudflare DNS settings, you can use the nslookup tool to find out this information quickly:
- Open Start.
- Search for cmd, and click the top result to open Command Prompt.
- Type the following command and press Enter: nslookup
The output of the command should include this result:
- Default Server: one.one.one.one
- Address: 1.1.1.1
If you’re using the IPv6 addresses, then the output should look like this:
- Default Server: one.one.one.one
- Address: 2606:4700:4700::1111
If you’re configuring your router instead of your computer, the nslookup tool will show the IP address of your router. This is an expected result as it’s your router the one that is making the DNS requests on behalf of all the devices connected in the network.
If this is the case, you can verify that the Cloudflare DNS settings are configured correctly using your router’s network tools (if applicable), and using the nslookup method to test the settings.
More resources
For more helpful articles, coverage, and answers to common questions about Windows 10 and Windows 11, visit the following resources:
- Windows 11 on Windows Central — All you need to know
- Windows 10 on Windows Central — All you need to know

Cutting-edge operating system
A refreshed design in Windows 11 enables you to do what you want effortlessly and safely, with biometric logins for encrypted authentication and advanced antivirus defenses.
All the latest news, reviews, and guides for Windows and Xbox diehards.
Mauro Huculak is technical writer for WindowsCentral.com. His primary focus is to write comprehensive how-tos to help users get the most out of Windows 10 and its many related technologies. He has an IT background with professional certifications from Microsoft, Cisco, and CompTIA, and he’s a recognized member of the Microsoft MVP community.
Cloudflare DNS is a DNS resolver that anyone can use for free. The company claims it to be the world’s fastest and the most private service while your ISP’s DNS servers are usually much more slow and insecure.
Cloudflare provides DNS over HTTPS (DoH) encryption for your ISP to be unable to sell you DNS data. 1.1.1.1 – is the primary IP address of Cloudflare private and fast DNS. 1.0.0.1 is the IP of their secondary resolving server. If you use IPv6 you should type 2606:4700:4700::1111 and 2606:4700:4700::1001 respectively.
We recommend that you switch to Cloudflare DNS on your router and mobile data to speed up your Internet connection and make it more secure.
In this article we will explain how to assign 1.1.1.1 and 1.0.0.1 DNS servers on a router, computer with Windows 10, phone and tablet under Android 9 or iPhone/iPad running iOS 11 and 12.
You can also visit the official website – https://1.1.1.1 to read additional information about the service.
[Quick Navigation]:
- How to use Cloudflare DNS servers on your Wireless Router
- Configure DNS on a computer with Windows 10
- Set 1.1.1.1 as a DNS server on Android device for Wi-Fi connection
- Set 1.1.1.1 as a DNS server on iPhone & iPad for Wi-Fi connection
- How to use 1.1.1.1 DNS server on cellular connection (mobile data) on iPhone and Android
- Log into your router settings by typing the username and the password.
- Head to the WAN or Internet settings page.
- Switch to manual DNS settings.
- Specify 1.1.1.1 as your primary DNS server and 1.0.0.1 as your secondary one:

- Click Apply or Save Settings.
- Reboot your router to be 100% sure that it started using new DNS servers.
Now all the devices connected to this router via Wi-Fi and Ethernet will use Cloudflare DNS.
Assign 1.1.1.1 and 1.0.0.1 as DNS Servers on a PC Running Windows 10
If your PC is connected to your ISP directly or you don’t have access to the router you can specify Cloudflare DNS manually in the network settings of your Windows computer.
Using Cloudflare DNS on Android
Some time ago we explained how to manually assign DNS servers on old Android versions. In this paragraph I will show how to set up 1.1.1.1 as a primary server on Android 9.
Setting Up 1.1.1.1 on iPhone or iPad
How to use Cloudflare’s 1.1.1.1 DNS server on cellular connection (mobile data) on iPhone and Android
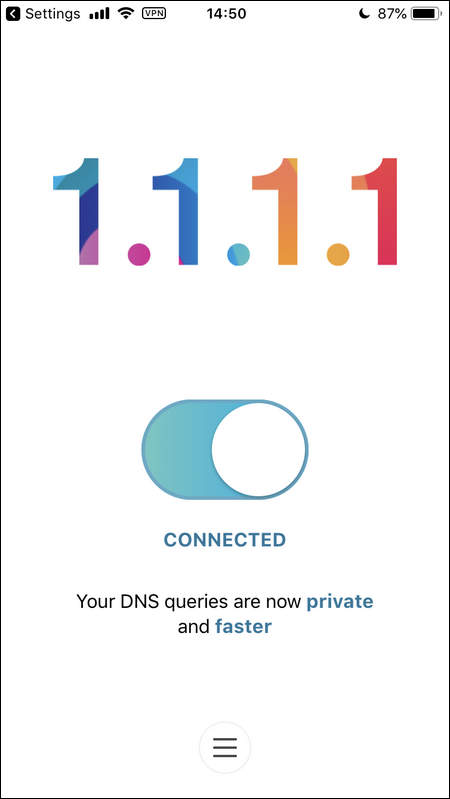
Many of you want to use the faster and more secure DNS on your mobile data. But, as you might know, you cannot manually assign a DNS server for your cellular connection. Long story short, you need to install the official app for this purpose.
Go to Google Play Store or Apple Store and install the 1.1.1.1: Faster Internet app on your iPhone or Faster & Safer Internet on your Android device device.
Then simply launch it and follow the instructions to activate it. Now you may enable and disable it at any time:
Enjoy Cloudflare’s fast and secure DNS on your devices!