- Choose a terminal
- Confirm Git is installed
- Configure Git
- Choose a repository
-
Clone a repository
- Clone with SSH
-
Clone with HTTPS
- Clone using a token
-
Convert a local directory into a repository
- Add a remote
- View your remote repositories
- Download the latest changes in the project
-
Branches
- Create a branch
- Switch to a branch
- View differences
- View the files that have changes
-
Add and commit local changes
- Stage and commit all changes
- Send changes to GitLab.com
- Delete all changes in the branch
- Unstage all changes that have been added to the staging area
- Undo most recent commit
- Merge a branch with default branch
- Advanced use of Git through the command line
- Synchronize changes in a forked repository with the upstream
Git is an open-source distributed version control system. GitLab is built
on top of Git.
You can do many Git operations directly in GitLab. However, the command line is required for advanced tasks,
like fixing complex merge conflicts or rolling back commits.
If you’re new to Git and want to learn by working in your own project,
learn how to make your first commit.
For a quick reference of Git commands, download a Git Cheat Sheet.
For more information about the advantages of working with Git and GitLab:
- Watch the GitLab Source Code Management Walkthrough video.
- Learn how GitLab became the backbone of the Worldline development environment.
To help you visualize what you’re doing locally, you can install a
Git GUI app.
Choose a terminal
To execute Git commands on your computer, you must open a terminal (also known as command
prompt, command shell, and command line). Here are some options:
- For macOS users:
- Built-in Terminal. Press ⌘ command + space and type
terminal. - iTerm2. You can integrate it with Zsh and Oh My Zsh for color highlighting and other advanced features.
- Built-in Terminal. Press ⌘ command + space and type
- For Windows users:
- Built-in command line. On the Windows taskbar, select the search icon and type
cmd. - PowerShell.
- Git Bash. It is built into Git for Windows.
- Built-in command line. On the Windows taskbar, select the search icon and type
- For Linux users:
- Built-in Linux Terminal.
Confirm Git is installed
You can determine if Git is already installed on your computer by opening a terminal
and running this command:
If Git is installed, the output is:
If your computer doesn’t recognize git as a command, you must install Git.
Configure Git
To start using Git from your computer, you must enter your credentials
to identify yourself as the author of your work. The username and email address
should match the ones you use in GitLab.
-
In your shell, add your user name:
git config --global user.name "your_username" -
Add your email address:
git config --global user.email "your_email_address@example.com" -
To check the configuration, run:
git config --global --listThe
--globaloption tells Git to always use this information for anything you do on your system.
If you omit--globalor use--local, the configuration applies only to the current
repository.
You can read more on how Git manages configurations in the
Git configuration documentation.
Choose a repository
Before you begin, choose the repository you want to work in. You can use any project you have permission to
access on GitLab.com or any other GitLab instance.
To use the repository in the examples on this page:
- Go to https://gitlab.com/gitlab-tests/sample-project/.
- In the upper-right corner, select Fork.
- Choose a namespace for your fork.
The project becomes available at https://gitlab.com/<your-namespace>/sample-project/.
You can fork any project you have access to.
Clone a repository
When you clone a repository, the files from the remote repository are downloaded to your computer,
and a connection is created.
This connection requires you to add credentials. You can either use SSH or HTTPS. SSH is recommended.
Clone with SSH
Clone with SSH when you want to authenticate only one time.
- Authenticate with GitLab by following the instructions in the SSH documentation.
- Go to your project’s landing page and select Clone. Copy the URL for Clone with SSH.
- Open a terminal and go to the directory where you want to clone the files. Git automatically creates a folder with the repository name and downloads the files there.
-
Run this command:
git clone git@gitlab.com:gitlab-tests/sample-project.git -
To view the files, go to the new directory:
You can also
clone a repository and open it directly in Visual Studio Code.
Clone with HTTPS
Clone with HTTPS when you want to authenticate each time you perform an operation
between your computer and GitLab.
- Go to your project’s landing page and select Clone. Copy the URL for Clone with HTTPS.
- Open a terminal and go to the directory where you want to clone the files.
-
Run the following command. Git automatically creates a folder with the repository name and downloads the files there.
git clone https://gitlab.com/gitlab-tests/sample-project.git -
GitLab requests your username and password.
If you have enabled two-factor authentication (2FA) on your account, you cannot use your account password. Instead, you can do one of the following:
-
Clone using a token with
read_repositoryorwrite_repositorypermissions. - Install an OAuth credential helper.
If you have not enabled 2FA, use your account password.
-
Clone using a token with
-
To view the files, go to the new directory:
Clone using a token
Clone with HTTPS using a token if:
- You want to use 2FA.
- You want to have a revocable set of credentials scoped to one or more repositories.
You can use any of these tokens to authenticate when cloning over HTTPS:
- Personal access tokens.
- Deploy tokens.
- Project access tokens.
- Group access tokens.
git clone https://<username>:<token>@gitlab.example.com/tanuki/awesome_project.git
Convert a local directory into a repository
You can initialize a local folder so Git tracks it as a repository.
- Open the terminal in the directory you’d like to convert.
-
Run this command:
A
.gitfolder is created in your directory. This folder contains Git
records and configuration files. You should not edit these files
directly. - Add the path to your remote repository
so Git can upload your files into the correct project.
Add a remote
You add a “remote” to tell Git which remote repository in GitLab is tied
to the specific local folder on your computer.
The remote tells Git where to push or pull from.
To add a remote to your local copy:
- In GitLab, create a project to hold your files.
- Visit this project’s homepage, scroll down to Push an existing folder, and copy the command that starts with
git remote add. -
On your computer, open the terminal in the directory you’ve initialized, paste the command you copied, and press enter:
git remote add origin git@gitlab.com:username/projectpath.git
After you’ve done that, you can stage your files and upload them to GitLab.
View your remote repositories
To view your remote repositories, type:
The -v flag stands for verbose.
Download the latest changes in the project
To work on an up-to-date copy of the project, you pull to get all the changes made by users
since the last time you cloned or pulled the project. Replace <name-of-branch>
with the name of your default branch
to get the main branch code, or replace it with the branch name of the branch
you are currently working in.
git pull <REMOTE> <name-of-branch>
When you clone a repository, REMOTE is typically origin. This is where the
repository was cloned from, and it indicates the SSH or HTTPS URL of the repository
on the remote server. <name-of-branch> is usually the name of your
default branch, but it may be any
existing branch. You can create additional named remotes and branches as necessary.
You can learn more on how Git manages remote repositories in the
Git Remote documentation.
Branches
A branch is a copy of the files in the repository at the time you create the branch.
You can work in your branch without affecting other branches. When
you’re ready to add your changes to the main codebase, you can merge your branch into
the default branch, for example, main.
Use branches when you:
- Want to add code to a project but you’re not sure if it works properly.
- Are collaborating on the project with others, and don’t want your work to get mixed up.
A new branch is often called feature branch to differentiate from the
default branch.
Create a branch
To create a feature branch:
git checkout -b <name-of-branch>
GitLab enforces branch naming rules
to prevent problems, and provides
branch naming patterns
to streamline merge request creation.
Switch to a branch
All work in Git is done in a branch.
You can switch between branches to see the state of the files and work in that branch.
To switch to an existing branch:
git checkout <name-of-branch>
For example, to change to the main branch:
View differences
To view the differences between your local unstaged changes and the latest version
that you cloned or pulled:
View the files that have changes
When you add, change, or delete files or folders, Git knows about the changes.
To check which files have been changed:
Add and commit local changes
When you type git status, locally changed files are shown in red. These changes may
be new, modified, or deleted files or folders.
-
To stage a file for commit:
git add <file-name OR folder-name> -
Repeat step 1 for each file or folder you want to add.
Or, to stage all files in the current directory and subdirectory, typegit add .. -
Confirm that the files have been added to staging:
The files should be displayed in green text.
-
To commit the staged files:
git commit -m "COMMENT TO DESCRIBE THE INTENTION OF THE COMMIT"
Stage and commit all changes
As a shortcut, you can add all local changes to staging and commit them with one command:
git commit -a -m "COMMENT TO DESCRIBE THE INTENTION OF THE COMMIT"
Send changes to GitLab.com
To push all local changes to the remote repository:
git push <remote> <name-of-branch>
For example, to push your local commits to the main branch of the origin remote:
Sometimes Git does not allow you to push to a repository. Instead,
you must force an update.
Delete all changes in the branch
To discard all changes to tracked files:
This action removes changes to files, not the files themselves.
Untracked (new) files do not change.
Unstage all changes that have been added to the staging area
To unstage (remove) all files that have not been committed:
Undo most recent commit
To undo the most recent commit:
This action leaves the changed files and folders unstaged in your local repository.
You can learn more about the different ways Git can undo changes in the
Git Undoing Things documentation.
Merge a branch with default branch
When you are ready to add your changes to
the default branch, you merge the feature branch into it:
git checkout <default-branch>
git merge <feature-branch>
In GitLab, you typically use a merge request to merge your changes, instead of using the command line.
To create a merge request from a fork to an upstream repository, see the
forking workflow.
Advanced use of Git through the command line
For an introduction of more advanced Git techniques, see Git rebase, force-push, and merge conflicts.
Synchronize changes in a forked repository with the upstream
To create a copy of a repository in your namespace, you fork it.
Changes made to your copy of the repository are not automatically synchronized with the original.
To keep the project in sync with the original project, you need to pull from the original repository.
You must create a link to the remote repository to pull
changes from the original repository. It is common to call this remote repository the upstream.
You can now use the upstream as a <remote> to pull new updates
from the original repository, and use the origin
to push local changes and create merge requests.
The Secure Socket Shell (SSH) is the preferred connection mechanism, especially when compared to HTTPS, to connect from Git to a remote server such as GitLab, GitHub or BitBucket.
In this Git tutorial, we show you how to configure SSH keys to securely connect your local Git instance with your remote repositories.
GitLab SSH key configuration steps
The steps to follow to configure GitLab SSH keys for secure Git connections are as follows:
- Create an SSH key pair on your personal computer
- Copy the value of the public SSH key
- Log into GitLab and navigate to your account’s Preferences tab
- Create a new GitLab SSH key
- Paste the public key in as the value and set an expiration date
- Copy the SSH URL of the GitLab repo you wish to clone
- Issue a git clone command with the SSH URL
Create GitLab SSH Keys with ssh-keygen
Both Ubuntu and Windows machines support SSH out of the box.
Updated versions of Windows 10 and Windows Server have built-in support since 2018, so there is no need to download Putty, PuttyGen or Plink to create RAS keys or to SSH in to GitLab. Just open PowerShell in Windows or a Linux terminal window on Ubuntu and issue the following command:
C:\gitlab\ssh\example> ssh-keygen -o -t rsa -C "[email protected]"
The options provided to the ssh-keygen command force the tool to create an RSA compatible key using the latest OpenSSL standards. The -C switch simply adds a comment to the end of the public file.
| Git and SSH tutorials |
|---|
|
Need to setup SSH for GitHub, GitLab, or CodeDeploy? These SSH Key tutorials will help:
These quick tutorials will get you working with Git and the secure shell in no time. |
Accept all of the defaults when prompted for a passphrase or a special storage location. By default, all GitLab SSH keys must go in an .ssh folder under the user’s home directory. Furthermore, a blank passphrase is acceptable unless your organization’s compliance rules state otherwise.
This operation will create Git SSH keys named id_ras.pub and id_rsa respectively.
Copy the public SSH key
You must configure the value of the public key in GitLab. Open the public key in a text editor and copy the value to the clipboard:
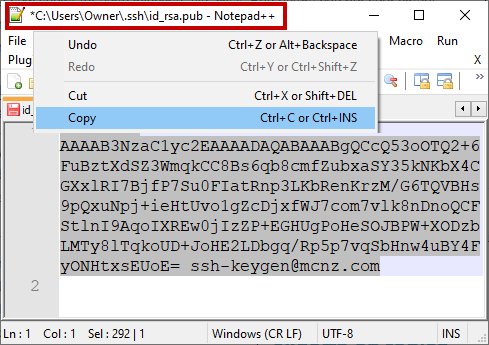
Copy the .pub key produced from the GitLab SSH key generation operation and configure it into GitLab.
Configure GitLab SSH keys
Log into GitLab and click on your account preferences.
Click the SSH Keys link and paste the copied value into the text field.
Set an expiration date, and then click the blue button to persistently add the GitLab SSH key.
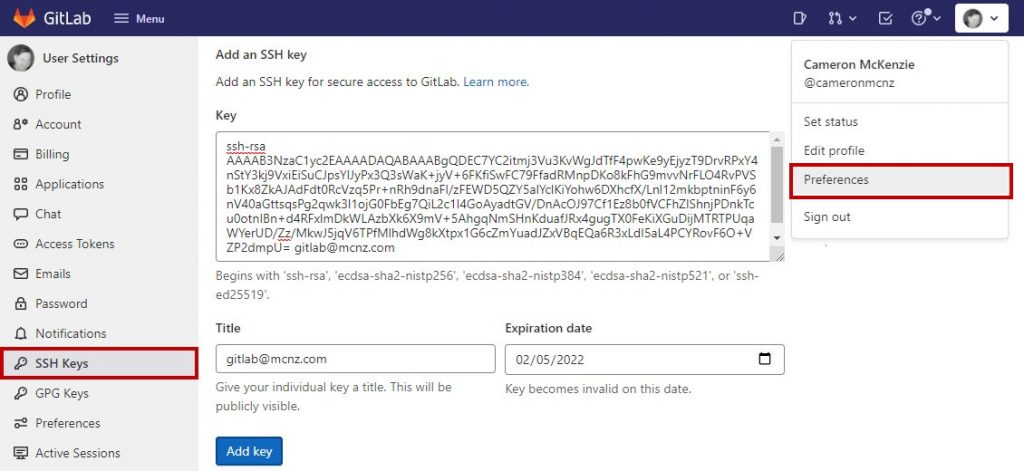
Configure GitLab SSH keys under your account preferences.
Clone GitLab with SSH
With the SSH key configured in GitLab, you can now perform regular Git operations such as clone, push, pull and fetch over SSH. Simply clone your repository of choice with the SSH URL, which is found on the landing page of your GitLab project. My GitLab SSH URL is structured as follows:
[email protected]:cameronmcnz/five-commits.git
Now that you’ve configured GitLab SSH and copied the SSH URL, issue a clone command in PowerShell. The GitLab SSH clone operation pauses to ask if you can confirm the authenticity of the keys being used. Type in yes and allow the operation to continue.
PS C:\gitlab\ssh\example> git clone [email protected]:cameronmcnz/five-commits.git
Cloning into ‘five-commits’ from GitLab over SSH…
Authenticity of GitLab SSH Key can’t be established.
Do you still want to connect to GitLab over SSH (yes or no)? yes
Clone from GitLab over SSH: 100% (222/222), 2.23 MiB | 3.41 MiB/s, done.
Resolving deltas from GitLab over SSH: 100% (111/111), done.
Pull and push to GitLab over SSH
Once the clone operation is successful, continue to use Git as you normally would. All future pull and push operations to GitLab will happen over a secure SSH connection.
And that’s how easy it is to configure GitLab SSH keys to ensure all distributed Git operations happen over a secure channel.
Start using Git on the command line (FREE)
Git is an open-source distributed version control system. GitLab is built
on top of Git.
You can do many Git operations directly in GitLab. However, the command line is required for advanced tasks,
like fixing complex merge conflicts or rolling back commits.
For a quick reference of Git commands, download a Git Cheat Sheet.
For more information about the advantages of working with Git and GitLab:
- Watch the GitLab Source Code Management Walkthrough video.
- Learn how GitLab became the backbone of the Worldline development environment.
To help you visualize what you’re doing locally, you can install a
Git GUI app.
Git terminology
If you’re familiar with Git terminology, you might want to skip this section and
go directly to prerequisites.
Repository
In GitLab, files are stored in a repository. A repository is similar to how you
store files in a folder or directory on your computer.
- A remote repository refers to the files in GitLab.
- A local copy refers to the files on your computer.
Often, the word «repository» is shortened to «repo».
In GitLab, a repository is contained in a project.
Fork
When you want to contribute to someone else’s repository, you make a copy of it.
This copy is called a fork.
The process is called «creating a fork.»
When you fork a repo, you create a copy of the project in your own
namespace. You then have write permissions to modify the project files
and settings.
For example, you can fork this project, https://gitlab.com/gitlab-tests/sample-project/, into your namespace.
You now have your own copy of the repository. You can view the namespace in the URL, for example
https://gitlab.com/your-namespace/sample-project/.
Then you can clone the repository to your local machine, work on the files, and submit changes back to the
original repository.
Difference between download and clone
To create a copy of a remote repository’s files on your computer, you can either
download or clone the repository. If you download it, you cannot sync the repository with the
remote repository on GitLab.
Cloning a repository is the same as downloading, except it preserves the Git connection
with the remote repository. You can then modify the files locally and
upload the changes to the remote repository on GitLab.
Pull and push
After you save a local copy of a repository and modify the files on your computer, you can upload the
changes to GitLab. This is referred to as pushing to the remote, because you use the command
git push.
When the remote repository changes, your local copy is behind. You can update your local copy with the new
changes in the remote repository.
This is referred to as pulling from the remote, because you use the command
git pull.
Prerequisites
To start using GitLab with Git, complete the following tasks:
- Create and sign in to a GitLab account.
- Open a terminal.
- Install Git on your computer.
- Configure Git.
- Choose a repository.
Open a terminal
To execute Git commands on your computer, you must open a terminal (also known as command
prompt, command shell, and command line). Here are some options:
- For macOS users:
- Built-in Terminal. Press ⌘ command + space and type
terminal. - iTerm2. You can integrate it with zsh and oh my zsh for color highlighting and other advanced features.
- Built-in Terminal. Press ⌘ command + space and type
- For Windows users:
- Built-in command line. On the Windows taskbar, select the search icon and type
cmd. - PowerShell.
- Git Bash. It is built into Git for Windows.
- Built-in command line. On the Windows taskbar, select the search icon and type
- For Linux users:
- Built-in Linux Terminal.
Install Git
Determine if Git is already installed on your computer by opening a terminal
and running this command:
git --versionIf Git is installed, the output is:
git version X.Y.ZIf your computer doesn’t recognize git as a command, you must install Git.
After you install Git, run git --version to confirm that it installed correctly.
Configure Git
To start using Git from your computer, you must enter your credentials
to identify yourself as the author of your work. The username and email address
should match the ones you use in GitLab.
-
In your shell, add your user name:
git config --global user.name "your_username" -
Add your email address:
git config --global user.email "your_email_address@example.com" -
To check the configuration, run:
git config --global --listThe
--globaloption tells Git to always use this information for anything you do on your system.
If you omit--globalor use--local, the configuration applies only to the current
repository.
You can read more on how Git manages configurations in the
Git configuration documentation.
Choose a repository
Before you begin, choose the repository you want to work in. You can use any project you have permission to
access on GitLab.com or any other GitLab instance.
To use the repository in the examples on this page:
- Go to https://gitlab.com/gitlab-tests/sample-project/.
- In the top right, select Fork.
- Choose a namespace for your fork.
The project becomes available at https://gitlab.com/<your-namespace>/sample-project/.
You can fork any project you have access to.
Clone a repository
When you clone a repository, the files from the remote repository are downloaded to your computer,
and a connection is created.
This connection requires you to add credentials. You can either use SSH or HTTPS. SSH is recommended.
Clone with SSH
Clone with SSH when you want to authenticate only one time.
-
Authenticate with GitLab by following the instructions in the SSH documentation.
-
Go to your project’s landing page and select Clone. Copy the URL for Clone with SSH.
-
Open a terminal and go to the directory where you want to clone the files. Git automatically creates a folder with the repository name and downloads the files there.
-
Run this command:
git clone git@gitlab.com:gitlab-tests/sample-project.git -
To view the files, go to the new directory:
cd sample-project
You can also
clone a repository and open it directly in Visual Studio Code.
Clone with HTTPS
Clone with HTTPS when you want to authenticate each time you perform an operation
between your computer and GitLab.
-
Go to your project’s landing page and select Clone. Copy the URL for Clone with HTTPS.
-
Open a terminal and go to the directory where you want to clone the files.
-
Run the following command. Git automatically creates a folder with the repository name and downloads the files there.
git clone https://gitlab.com/gitlab-tests/sample-project.git -
GitLab requests your username and password:
- If you have 2FA enabled for your account, you must use a Personal Access Token
with read_repository or write_repository permissions instead of your account’s password. - If you don’t have 2FA enabled, use your account’s password.
- If you have 2FA enabled for your account, you must use a Personal Access Token
-
To view the files, go to the new directory:
cd sample-project
NOTE:
On Windows, if you enter your password incorrectly multiple times and an Access denied message appears,
add your namespace (username or group) to the path:
git clone https://namespace@gitlab.com/gitlab-org/gitlab.git.
Convert a local directory into a repository
You can initialize a local folder so Git tracks it as a repository.
-
Open the terminal in the directory you’d like to convert.
-
Run this command:
git initA
.gitfolder is created in your directory. This folder contains Git
records and configuration files. You should not edit these files
directly. -
Add the path to your remote repository
so Git can upload your files into the correct project.
Add a remote
You add a «remote» to tell Git which remote repository in GitLab is tied
to the specific local folder on your computer.
The remote tells Git where to push or pull from.
To add a remote to your local copy:
-
In GitLab, create a project to hold your files.
-
Visit this project’s homepage, scroll down to Push an existing folder, and copy the command that starts with
git remote add. -
On your computer, open the terminal in the directory you’ve initialized, paste the command you copied, and press enter:
git remote add origin git@gitlab.com:username/projectpath.git
After you’ve done that, you can stage your files and upload them to GitLab.
View your remote repositories
To view your remote repositories, type:
git remote -vThe -v flag stands for verbose.
Download the latest changes in the project
To work on an up-to-date copy of the project, you pull to get all the changes made by users
since the last time you cloned or pulled the project. Replace <name-of-branch>
with the name of your default branch
to get the main branch code, or replace it with the branch name of the branch
you are currently working in.
git pull <REMOTE> <name-of-branch>When you clone a repository, REMOTE is typically origin. This is where the
repository was cloned from, and it indicates the SSH or HTTPS URL of the repository
on the remote server. <name-of-branch> is usually the name of your
default branch, but it may be any
existing branch. You can create additional named remotes and branches as necessary.
You can learn more on how Git manages remote repositories in the
Git Remote documentation.
Branches
A branch is a copy of the files in the repository at the time you create the branch.
You can work in your branch without affecting other branches. When
you’re ready to add your changes to the main codebase, you can merge your branch into
the default branch, for example, main.
Use branches when you:
- Want to add code to a project but you’re not sure if it works properly.
- Are collaborating on the project with others, and don’t want your work to get mixed up.
A new branch is often called feature branch to differentiate from the
default branch.
Create a branch
To create a feature branch:
git checkout -b <name-of-branch>Branch names cannot contain empty spaces and special characters. Use only lowercase letters, numbers,
hyphens (-), and underscores (_).
Switch to a branch
All work in Git is done in a branch.
You can switch between branches to see the state of the files and work in that branch.
To switch to an existing branch:
git checkout <name-of-branch>For example, to change to the main branch:
git checkout mainView differences
To view the differences between your local unstaged changes and the latest version
that you cloned or pulled:
git diffView the files that have changes
When you add, change, or delete files or folders, Git knows about the changes.
To check which files have been changed:
git statusAdd and commit local changes
When you type git status, locally changed files are shown in red. These changes may
be new, modified, or deleted files or folders.
-
To stage a file for commit:
git add <file-name OR folder-name> -
Repeat step 1 for each file or folder you want to add.
Or, to stage all files in the current directory and subdirectory, typegit add .. -
Confirm that the files have been added to staging:
git statusThe files should be displayed in green text.
-
To commit the staged files:
git commit -m "COMMENT TO DESCRIBE THE INTENTION OF THE COMMIT"
Stage and commit all changes
As a shortcut, you can add all local changes to staging and commit them with one command:
git commit -a -m "COMMENT TO DESCRIBE THE INTENTION OF THE COMMIT"Send changes to GitLab.com
To push all local changes to the remote repository:
git push <remote> <name-of-branch>For example, to push your local commits to the main branch of the origin remote:
git push origin mainSometimes Git does not allow you to push to a repository. Instead,
you must force an update.
Delete all changes in the branch
To discard all changes to tracked files:
git checkout .This action removes changes to files, not the files themselves.
Untracked (new) files do not change.
Unstage all changes that have been added to the staging area
To unstage (remove) all files that have not been committed:
git resetUndo most recent commit
To undo the most recent commit:
git reset HEAD~1This action leaves the changed files and folders unstaged in your local repository.
WARNING:
A Git commit should not be reversed if you already pushed it
to the remote repository. Although you can undo a commit, the best option is to avoid
the situation altogether by working carefully.
You can learn more about the different ways Git can undo changes in the
Git Undoing Things documentation.
Merge a branch with default branch
When you are ready to add your changes to
the default branch, you merge the feature branch into it:
git checkout <default-branch>
git merge <feature-branch>
In GitLab, you typically use a merge request to merge your changes, instead of using the command line.
To create a merge request from a fork to an upstream repository, see the
forking workflow.
Advanced use of Git through the command line
For an introduction of more advanced Git techniques, see Git rebase, force-push, and merge conflicts.
Synchronize changes in a forked repository with the upstream
To create a copy of a repository in your namespace, you fork it.
Changes made to your copy of the repository are not automatically synchronized with the original.
To keep the project in sync with the original project, you need to pull from the original repository.
You must create a link to the remote repository to pull
changes from the original repository. It is common to call this remote repository the upstream.
You can now use the upstream as a <remote> to pull new updates
from the original repository, and use the origin
to push local changes and create merge requests.
For SSH-based sync-up your code based on windows 11, you should have your RSA certificate. You can simple have it as following:
STEP 1. window button + cmd + enter
STEP 2. run ssh-keygen as following — note that you should use email address instead
C:\Users\your_id>ssh-keygen -o -t rsa -C "your@email.com"
Generating public/private rsa key pair.
Enter file in which to save the key (C:\Users\kurap/.ssh/id_rsa):
Enter passphrase (empty for no passphrase):
Enter same passphrase again:
Your identification has been saved in C:\Users\kurap/.ssh/id_rsa
Your public key has been saved in C:\Users\kurap/.ssh/id_rsa.pub
The key fingerprint is:
SHA256:XT4LvB41/KYIjz94Dv7+R6X+h8qkcDQ3sVsPdpnlMis your@email.com
The key's randomart image is:
+---[RSA 3072]----+
|                 |
|                 |
|            o   .|
|         o + o .=|
|        S * X *=o|
|         . * XoB |
|        +.+ Eo+..|
|       ..Oo* ++ .|
|        o*Xo=o .o|
+----[SHA256]-----+
STEP 3. Copy id_rsa.pub in the command line. Its format will be like below:
C:\Users\your_id>cat .ssh/id_rsa.pub
ssh-rsa AAAAB3NzaC1yc2EAAAADAQABAAABgQDaMoWDfMajVZuTPlNHdKdkcYqX4JUnXiKHJtL4L5....zSJjBx3EF1m7C0DXdjx6kmxKtwr+XAVAQ2kRC2Hkc= your@email.com
STEP 4. Paste id_rsa.pub at GitLab → Preference → SSH Keys → Copy & Paste Credentials → Add Keys


STEP 5. Take your SSH URL at gitlab for cloning. You should set it up at your appropriate location like below:
D:\src> git clone git@gitlab.com:prod/abjohn.git
Command line Git (FREE)
Git is an open-source distributed version control system. GitLab is built
on top of Git.
You can do many Git operations directly in GitLab. However, the command line is required for advanced tasks,
like fixing complex merge conflicts or rolling back commits.
If you’re new to Git and want to learn by working in your own project,
learn how to make your first commit.
For a quick reference of Git commands, download a Git Cheat Sheet.
For more information about the advantages of working with Git and GitLab:
- Watch the GitLab Source Code Management Walkthrough video.
- Learn how GitLab became the backbone of the Worldline development environment.
To help you visualize what you’re doing locally, you can install a
Git GUI app.
Choose a terminal
To execute Git commands on your computer, you must open a terminal (also known as command
prompt, command shell, and command line). Here are some options:
- For macOS users:
- Built-in Terminal. Press ⌘ command + space and type
terminal. - iTerm2. You can integrate it with Zsh and Oh My Zsh for color highlighting and other advanced features.
- Built-in Terminal. Press ⌘ command + space and type
- For Windows users:
- Built-in command line. On the Windows taskbar, select the search icon and type
cmd. - PowerShell.
- Git Bash. It is built into Git for Windows.
- Built-in command line. On the Windows taskbar, select the search icon and type
- For Linux users:
- Built-in Linux Terminal.
Confirm Git is installed
You can determine if Git is already installed on your computer by opening a terminal
and running this command:
If Git is installed, the output is:
If your computer doesn’t recognize git as a command, you must install Git.
Configure Git
To start using Git from your computer, you must enter your credentials
to identify yourself as the author of your work. The username and email address
should match the ones you use in GitLab.
-
In your shell, add your user name:
git config --global user.name "your_username" -
Add your email address:
git config --global user.email "your_email_address@example.com" -
To check the configuration, run:
git config --global --listThe
--globaloption tells Git to always use this information for anything you do on your system.
If you omit--globalor use--local, the configuration applies only to the current
repository.
You can read more on how Git manages configurations in the
Git configuration documentation.
Choose a repository
Before you begin, choose the repository you want to work in. You can use any project you have permission to
access on GitLab.com or any other GitLab instance.
To use the repository in the examples on this page:
- Go to https://gitlab.com/gitlab-tests/sample-project/.
- In the upper-right corner, select Fork.
- Choose a namespace for your fork.
The project becomes available at https://gitlab.com/<your-namespace>/sample-project/.
You can fork any project you have access to.
Clone a repository
When you clone a repository, the files from the remote repository are downloaded to your computer,
and a connection is created.
This connection requires you to add credentials. You can either use SSH or HTTPS. SSH is recommended.
Clone with SSH
Clone with SSH when you want to authenticate only one time.
-
Authenticate with GitLab by following the instructions in the SSH documentation.
-
Go to your project’s landing page and select Clone. Copy the URL for Clone with SSH.
-
Open a terminal and go to the directory where you want to clone the files. Git automatically creates a folder with the repository name and downloads the files there.
-
Run this command:
git clone git@gitlab.com:gitlab-tests/sample-project.git -
To view the files, go to the new directory:
You can also
clone a repository and open it directly in Visual Studio Code.
Clone with HTTPS
Clone with HTTPS when you want to authenticate each time you perform an operation
between your computer and GitLab.
-
Go to your project’s landing page and select Clone. Copy the URL for Clone with HTTPS.
-
Open a terminal and go to the directory where you want to clone the files.
-
Run the following command. Git automatically creates a folder with the repository name and downloads the files there.
git clone https://gitlab.com/gitlab-tests/sample-project.git -
GitLab requests your username and password.
If you have enabled two-factor authentication (2FA) on your account, you cannot use your account password. Instead, you can do one of the following:
-
Clone using a token with
read_repositoryorwrite_repositorypermissions. - Install Git Credential Manager.
If you have not enabled 2FA, use your account password.
-
Clone using a token with
-
To view the files, go to the new directory:
NOTE:
On Windows, if you enter your password incorrectly multiple times and an Access denied message appears,
add your namespace (username or group) to the path:
git clone https://namespace@gitlab.com/gitlab-org/gitlab.git.
Clone using a token
Clone with HTTPS using a token if:
- You want to use 2FA.
- You want to have a revocable set of credentials scoped to one or more repositories.
You can use any of these tokens to authenticate when cloning over HTTPS:
- Personal access tokens.
- Deploy tokens.
- Project access tokens.
- Group access tokens.
git clone https://<username>:<token>@gitlab.example.com/tanuki/awesome_project.gitConvert a local directory into a repository
You can initialize a local folder so Git tracks it as a repository.
-
Open the terminal in the directory you’d like to convert.
-
Run this command:
A
.gitfolder is created in your directory. This folder contains Git
records and configuration files. You should not edit these files
directly. -
Add the path to your remote repository
so Git can upload your files into the correct project.
Add a remote
You add a «remote» to tell Git which remote repository in GitLab is tied
to the specific local folder on your computer.
The remote tells Git where to push or pull from.
To add a remote to your local copy:
-
In GitLab, create a project to hold your files.
-
Visit this project’s homepage, scroll down to Push an existing folder, and copy the command that starts with
git remote add. -
On your computer, open the terminal in the directory you’ve initialized, paste the command you copied, and press enter:
git remote add origin git@gitlab.com:username/projectpath.git
After you’ve done that, you can stage your files and upload them to GitLab.
View your remote repositories
To view your remote repositories, type:
The -v flag stands for verbose.
Download the latest changes in the project
To work on an up-to-date copy of the project, you pull to get all the changes made by users
since the last time you cloned or pulled the project. Replace <name-of-branch>
with the name of your default branch
to get the main branch code, or replace it with the branch name of the branch
you are currently working in.
git pull <REMOTE> <name-of-branch>When you clone a repository, REMOTE is typically origin. This is where the
repository was cloned from, and it indicates the SSH or HTTPS URL of the repository
on the remote server. <name-of-branch> is usually the name of your
default branch, but it may be any
existing branch. You can create additional named remotes and branches as necessary.
You can learn more on how Git manages remote repositories in the
Git Remote documentation.
Branches
A branch is a copy of the files in the repository at the time you create the branch.
You can work in your branch without affecting other branches. When
you’re ready to add your changes to the main codebase, you can merge your branch into
the default branch, for example, main.
Use branches when you:
- Want to add code to a project but you’re not sure if it works properly.
- Are collaborating on the project with others, and don’t want your work to get mixed up.
A new branch is often called feature branch to differentiate from the
default branch.
Create a branch
To create a feature branch:
git checkout -b <name-of-branch>Branch names cannot contain empty spaces and special characters. Use only lowercase letters, numbers,
hyphens (-), and underscores (_).
Switch to a branch
All work in Git is done in a branch.
You can switch between branches to see the state of the files and work in that branch.
To switch to an existing branch:
git checkout <name-of-branch>For example, to change to the main branch:
View differences
To view the differences between your local unstaged changes and the latest version
that you cloned or pulled:
View the files that have changes
When you add, change, or delete files or folders, Git knows about the changes.
To check which files have been changed:
Add and commit local changes
When you type git status, locally changed files are shown in red. These changes may
be new, modified, or deleted files or folders.
-
To stage a file for commit:
git add <file-name OR folder-name> -
Repeat step 1 for each file or folder you want to add.
Or, to stage all files in the current directory and subdirectory, typegit add .. -
Confirm that the files have been added to staging:
The files should be displayed in green text.
-
To commit the staged files:
git commit -m "COMMENT TO DESCRIBE THE INTENTION OF THE COMMIT"
Stage and commit all changes
As a shortcut, you can add all local changes to staging and commit them with one command:
git commit -a -m "COMMENT TO DESCRIBE THE INTENTION OF THE COMMIT"Send changes to GitLab.com
To push all local changes to the remote repository:
git push <remote> <name-of-branch>For example, to push your local commits to the main branch of the origin remote:
Sometimes Git does not allow you to push to a repository. Instead,
you must force an update.
Delete all changes in the branch
To discard all changes to tracked files:
This action removes changes to files, not the files themselves.
Untracked (new) files do not change.
Unstage all changes that have been added to the staging area
To unstage (remove) all files that have not been committed:
Undo most recent commit
To undo the most recent commit:
This action leaves the changed files and folders unstaged in your local repository.
WARNING:
A Git commit should not be reversed if you already pushed it
to the remote repository. Although you can undo a commit, the best option is to avoid
the situation altogether by working carefully.
You can learn more about the different ways Git can undo changes in the
Git Undoing Things documentation.
Merge a branch with default branch
When you are ready to add your changes to
the default branch, you merge the feature branch into it:
git checkout <default-branch>
git merge <feature-branch>
In GitLab, you typically use a merge request to merge your changes, instead of using the command line.
To create a merge request from a fork to an upstream repository, see the
forking workflow.
Advanced use of Git through the command line
For an introduction of more advanced Git techniques, see Git rebase, force-push, and merge conflicts.
Synchronize changes in a forked repository with the upstream
To create a copy of a repository in your namespace, you fork it.
Changes made to your copy of the repository are not automatically synchronized with the original.
To keep the project in sync with the original project, you need to pull from the original repository.
You must create a link to the remote repository to pull
changes from the original repository. It is common to call this remote repository the upstream.
You can now use the upstream as a <remote> to pull new updates
from the original repository, and use the origin
to push local changes and create merge requests.