Updated by
Daisy on Sep 19, 2023
Disk cloning refers to creating a one-to-one copy of an HDD or SSD disk. So cloning Windows to another drive means copying the operating system, programs, and other vital data within Windows to another. You will get the same information on the target drive as on the original Windows.
This article will explain how to clone Windows to another drive. But before we start explaining the method, let’s see the reasons for cloning Windows to another drive.
Creating a copy of your computer to another drive can sometimes be necessary. For example, cloning Windows to an SSD can be very helpful in improving the read and write performance of your computer. There are many reasons for cloning Windows to another drive. The following are some of the main reasons:
- Create a backup: Cloning Windows to a drive can give you an accurate copy of your computer. Data can be recovered in the event of a system crash or data loss.
- Upgrade to a larger drive: If your current drive runs low on storage space, you can clone Windows to a larger drive to free up space. Or you can completely wipe the hard drive to gain more free space on the original drive.
- Migrate OS: Cloning Windows to another drive avoids the hassle of manually following the OS because cloning can transfer everything automatically.
Whatever the reason you want to clone Windows to another drive, the most important thing is to find a reliable cloning method. Traditional copy-and-paste methods are tedious and laborious, and Disk Management and Diskpart only work for partitioning and formatting disks. But don’t worry. We have a much brighter tool to recommend — EaseUS Partition Master Professional, which allows you to easily clone Windows to another drive with one click.
Next, we will learn how to clone Windows to another drive using the professional tool below.
- Tip
- Before you start cloning Windows to another drive, you need to ensure two things:
- 1. The capacity of the target drive needs to be larger than the source drive.
- 2. To avoid data loss, it is better to backup all essential data on the target drive in advance.
How to Clone Windows to Another Drive
EaseUS Partition Master is a comprehensive computer disk management software. It supports cloning partitions, such as copying NTFS partitions and FAT partitions. And it also promotes one-click migration of the operating system. It has a «Clone OS disk» feature that helps you to migrate Windows to another drive.
You don’t need to worry about the complicated process either, the tool is easy to use, and even if you are new to the cloning process, you can easily complete it. You can follow the steps below to complete cloning Windows to another drive. Then you can set the drive as a bootable drive.
Guide 1. Clone Windows to Another Drive
Download EaseUS Partition Master before starting the cloning process, and follow the steps below to complete the cloning.
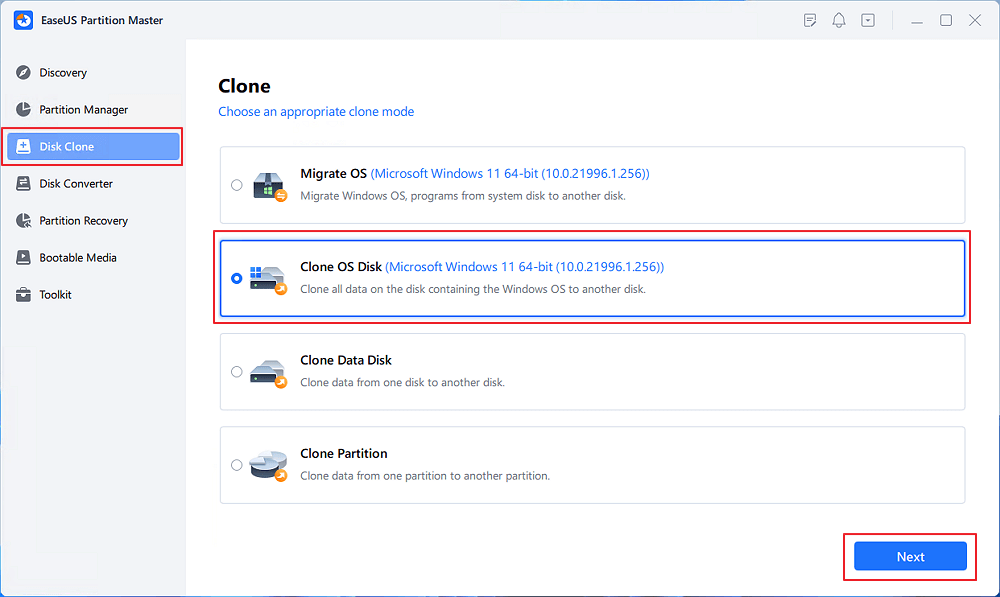
Step 1. Launch EaseUS Partition Master, go to the Disk Clone tab, select «Clone OS Disk» and click «Next».
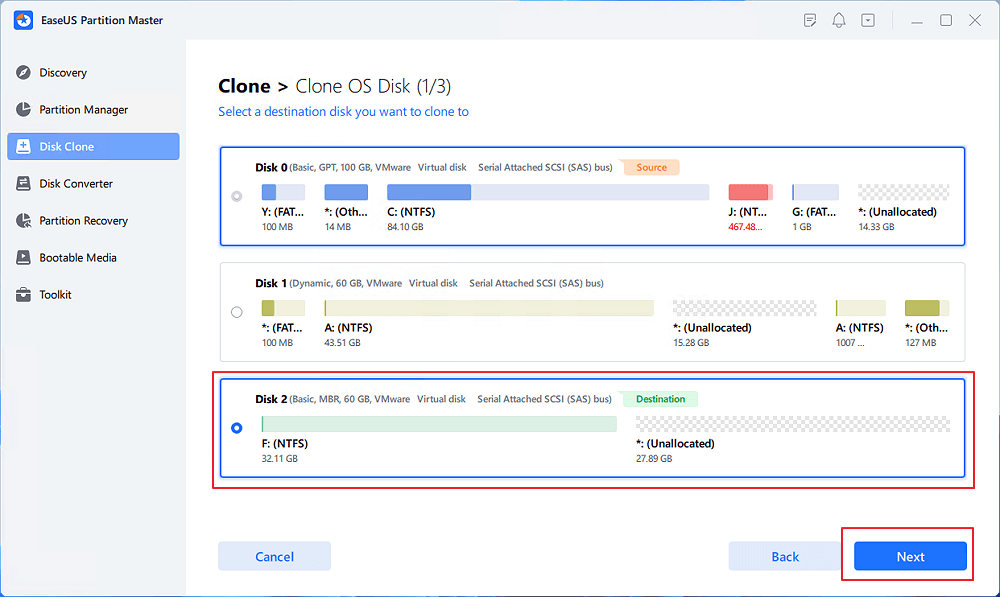
Step 2. Select the target new drive where you want to clone the OS to, and click «Next».
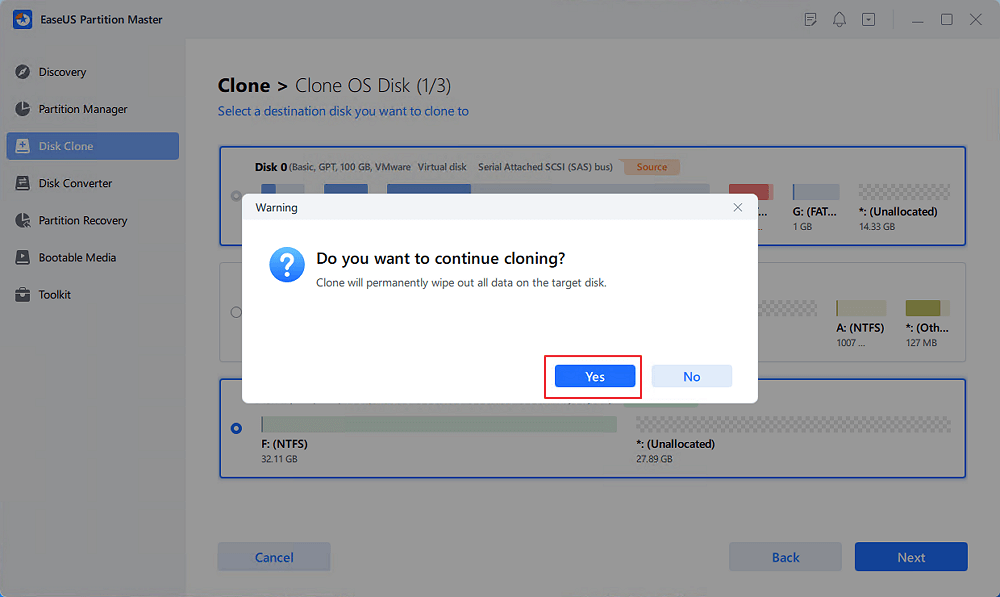
Click «Yes» to confirm that you want to continue the OS disk cloning process.
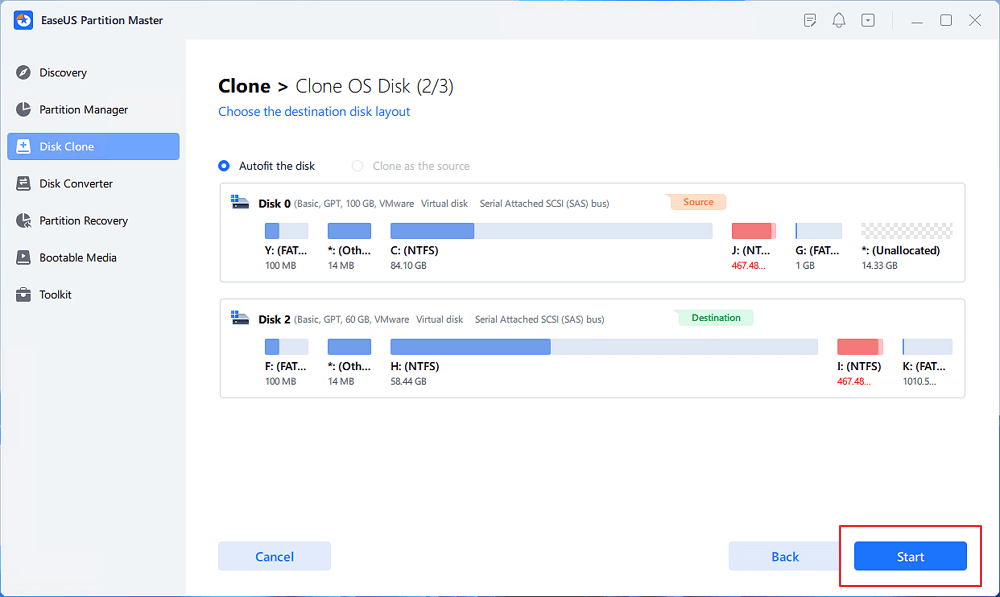
Step 3. View the disk layout, and click «Start» to begin the OS cloning process.
Step 4. When the process completes, you’ll see a confirming message, asking «if you want to start up computer from the clone target disk».
- Reboot Now means to reboot your PC and configure the computer to boot OS from the new disk immediately.
- Done means you want to make the changes later.

- Notice:
- If you want to clone Windows to new SSD or a new hard drive, please initialize it to MBR or GPT format with EaseUS Partition Master first before using it.
Guide 2. Boot From the Cloned Drive
After successfully cloning Windows to another drive, you need to change the boot drive. This will allow you to boot your computer from the cloned drive. Please follow the steps below to boot your computer from another drive.
Step 1. Turn on your computer and press F2/F8/Del to enter the BIOS environment.
Step 2. In the boot menu on the right side, you will change the boot order and set the cloned drive as bootable.
Step 3. Once the setup is complete, you can exit the BIOS.
- Important
- If the cloned drive won’t boot, you need to understand the reason first. Check if there are bad sectors or the clone is incomplete, and then look for a solution to restart the disk cloning.
The above two guides are the steps to clone Windows to another drive and boot your computer from another without installing the operating system. EaseUS Partition Master is a very effective tool. Cloning with it can also bring the following conveniences.
- SSD 4K alignment: To maintain the performance of the cloned SSD.
- Clone hard drive to larger drive: Extend the space of the computer disk
- Migrate OS to SSD: Avoid the hassle of reinstallation
- Clone HDD to SSD: Improve the read and write performance of your computer
Download EaseUS Partition Master to solve more disk partition related problems.
Conclusion
This article discusses the benefits of cloning Windows to another drive and the best way to clone it. With EaseUS Partition Master, you can efficiently complete the cloning. And the tool is also very easy to use. Next are some more questions people often ask, so if you are interested, read on.
FAQs About Clone Windows to Another Drive
These questions are also about cloning and are accompanied by simple answers. I hope these questions and answers will be helpful to you.
1. Can you clone Windows to an external SSD?
You can clone Windows to an external SSD. In fact, by using the professional tool, you can clone Windows to an external SSD and clone Windows to an SD card, USB, or external hard drive.
2. Is cloning Windows from HDD to SSD safe?
Yes, cloning Windows from HDD to SSD is safe using a professional tool. Clone Windows from HDD to SSD can avoid the hassle of reinstalling the system. And it can protect and manage data better.
3. Can I clone the C drive to the D drive?
You can clone the C drive to the D drive, including the files, folders, and programs. You can use the «Clone Partition» function of EaseUS Partition Master to clone the C drive partition.
If your PC comes with a relatively low-storage HDD or SSD, you might want to upgrade it. But the main question is whether it’s possible to move the genuine Windows to your new drive.
Well, the short answer is yes! In fact, there are two possible ways to do it. This way, you do not need to install Windows entirely on your new storage device. Also, this can come in handy if you’re trying to back up the drive to recover the system in case of a future failure.
In this article, we will guide you through both methods on how to move Windows to another drive, whether it be on an HDD, SSD, optical disk, or even your flash drive!
Table of Contents
Before You Begin
Before jumping into the main content, there are a few things you need to consider. You might want to get some additional devices, like a UPS (to prevent data loss from a power failure), a secondary device (flash drive or SD card for backing up data), and, most importantly, the right destination drive.
Get the Right Drive

If you haven’t already bought a drive, we recommend getting one larger or with equivalent disk space than the former. While it’s possible to migrate Windows from a larger to a smaller drive, you will require a third-party cloning tool to do this correctly. In such a case, you may skip the first method as you’ll likely encounter a re-imaging process error.
Likewise, we also recommend getting an SSD over a traditional HDD or other storage disks. These days, you can find NVMe, SATA, or M.2 SSDs, all of which are faster, more durable, and quieter than traditional drives.
Backup Important Files
Moving Windows to another drive may take approximately 20 minutes to 1 hour, depending on your system. Thus, there’s a potential risk of data loss due to power failure or other reasons.
As a precaution, we highly recommend backing up your important data using any preferred method. Well, you could use a secondary storage device (flash drive or SD card) or even online backup tools like OneDrive, Google Drive, and iCloud.
Defrag Your HDD
Defragging means rearranging the unordered or unorganized files on your hard drive. Basically, this is a Windows optimization technique that helps improve the speed and performance of your HDD.
Well, this process will store all the HDD’s data in a contiguous block, which can speed up the cloning process. Indeed, defragging your drive will organize all the unordered files, and hence the migration of Windows to another device becomes much more efficient.
However, we do not recommend defragging an SSD if you’re already using one. This is because it has no significant advantage and even has a chance of reducing its lifespan.
Perform Disk Cleanup
Since cloning produces the exact copy of your source drive, all the temporary and junk files will also migrate to the new storage device. To prevent this, we recommend performing a disk cleanup, and here’s a quick guide on how you can do just that:
- Press the Windows/Start key and search for Disk Cleanup.

- Launch the utility and wait until the disk space is calculated.
- Under Files to delete, you’ll get a long list of items you might want to remove.
- Select all and hit the Ok button.

- Finally, press Delete all and wait until your HDD or SSD space is freed.


Now that you have backed up vital files, defragged your HDD, and performed a disk cleanup, it’s time to start moving Windows to your destination drive. Before that, kindly install your new HDD or SSD in the right slot and plug in the data and power connectors.
Once that’s done, you can now proceed with one of the two methods below. As mentioned earlier, you may skip the first one if you’re trying to clone a hard drive from a larger source to a smaller destination drive.
Restoring System Image
If you’re planning to transfer Windows to an equivalent-sized drive or on a larger one, the best method is to create a system image. Then, you can use this at your destination HDD, SSD, or an alternative disk to move the OS.
An advantage of this is that you won’t require any third-party cloning tool. However, you need to first create a bootable USB flash drive or DVD using the Windows Media Creation tool. Please follow the below instructions on how you can do it the right way:
- First, press Windows + R and run the
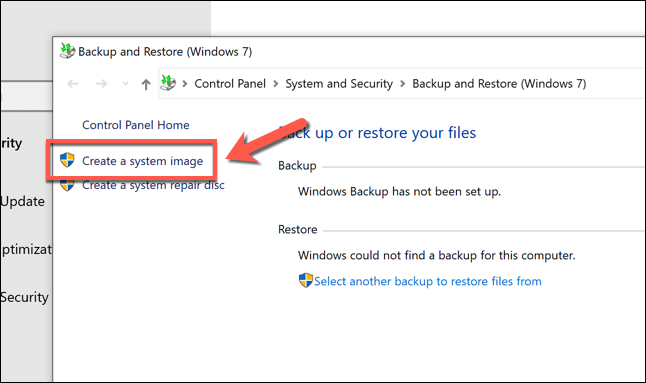
controlcommand to launch Control Panel. - Under System and Security, select Backup and Restore (Windows 7).

- Next, choose to Create a system image.

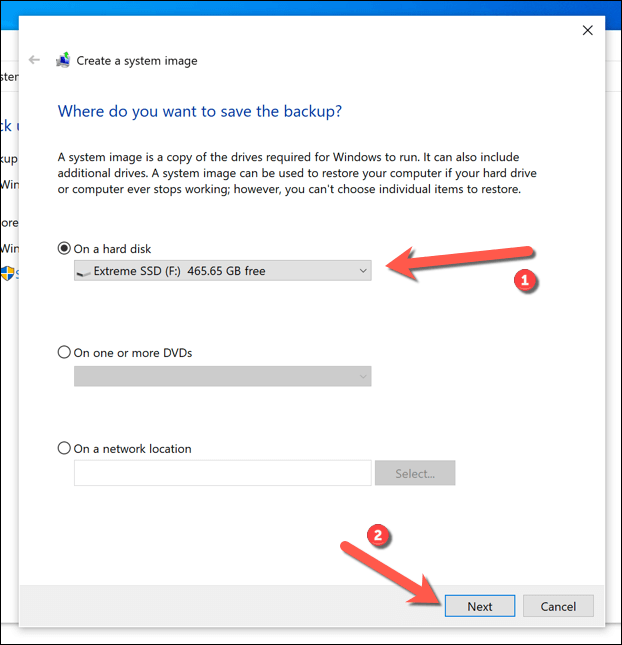
- Once a new window pops up, choose the On a hard disk option, select your drive from the drop-down, and hit Next.

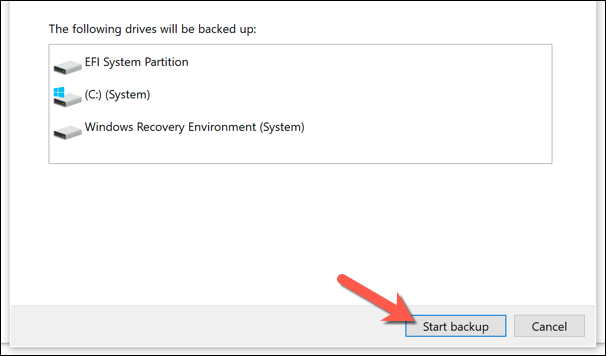
- You’ll get a list of all your partitions that will be backed up. Press the Start Backup button to continue.
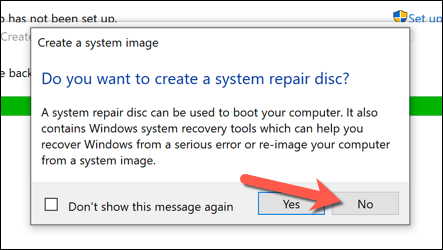
- Now, wait until you’re asked whether to create a system repair disk. For now, you can select No. However, we recommend pressing Yes if you’re facing severe Windows issues and wish to fix this.
- Once this process is completed, shut down Windows, and remove your current drive.
- Then, insert the bootable USB or DVD and turn on your PC.

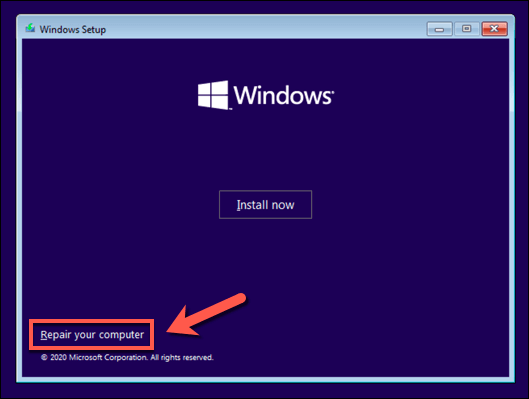
- Now, you should automatically enter the Windows Setup screen, where you can press Next to continue.

If it doesn’t, you might need to change the boot priority. For this, we have prepared a separate guide to help you change the boot drive in Windows. - Next, click the Repair your computer link at the screen’s bottom-left corner.

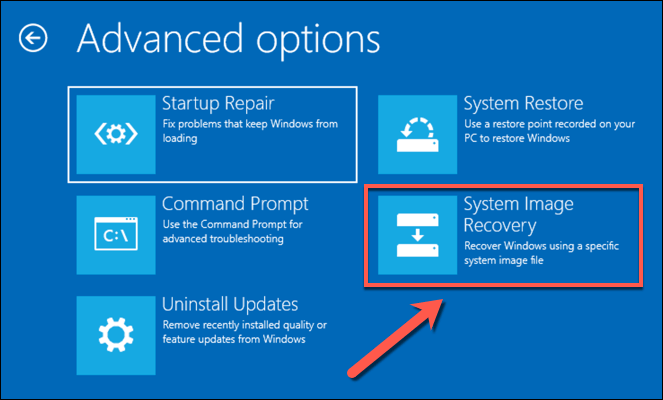
- Once you enter the Advanced Startup screen, go to Troubleshoot > Advanced Options > System Image Recovery.

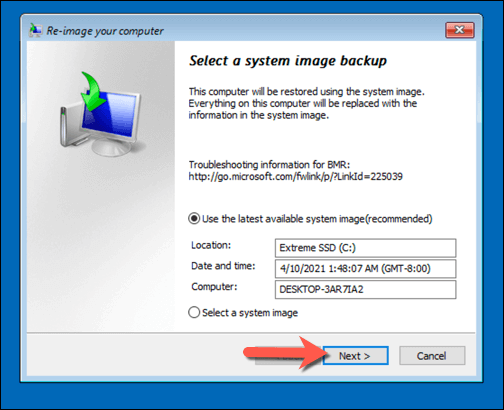
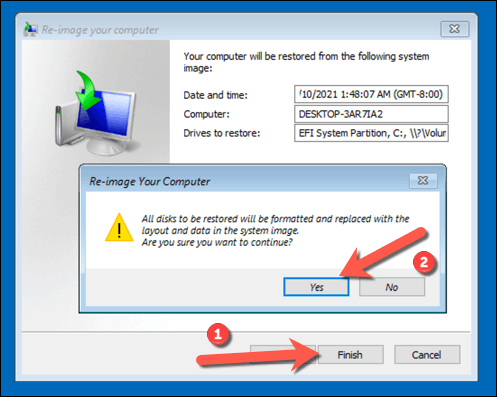
- After the Re-image your computer dialogue box shows up, select Use the latest available system image, and click on Next.

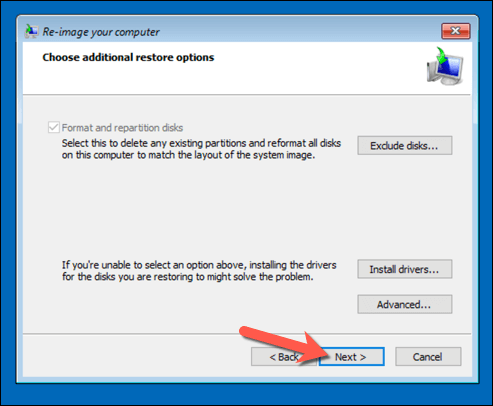
- Now, you can press Exclude disks button and remove any partition you wish. But if you want to clone the exact copy, you can directly press Next.
- Then, tap the Yes button to confirm your action.


Now, your PC should boot normally, and the transfer of Windows to the new drive should be successful. However, if an unallocated partition remains, you might want to extend your drive’s volume to take complete advantage:
- In the instant search section on your Windows taskbar, search for
Create and format hard disk partitions. Select this to launch the Disk Management utility.
- Right-click your drive and select the Extend Volume option.

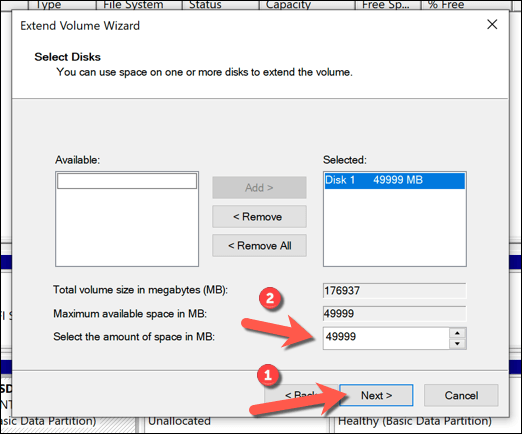
- In the Extend Volume Wizard, press Next.

- Now, ensure the amount of space is correctly configured and tap Next.
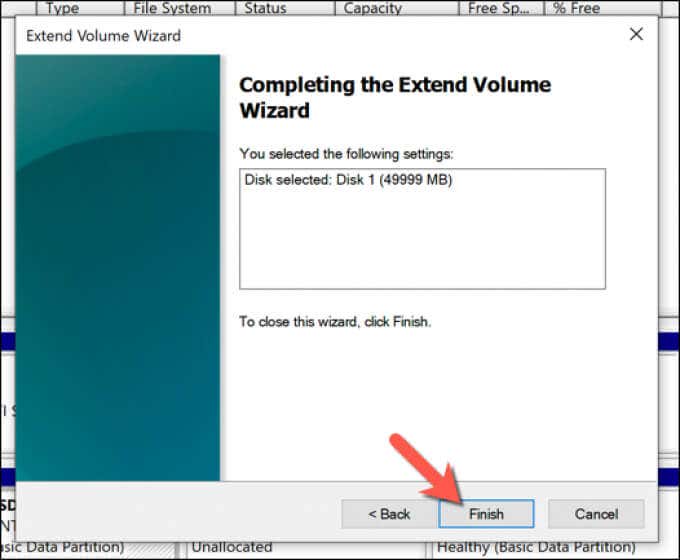
- Finally, click the Finish button, which should merge the partitions.


Cloning Your Storage Device
The other easy way to move Windows to another drive is by cloning your bootable drive. However, the process requires a third-party cloning tool. Some popular ones include Clonezilla, AOMEI Partition Manager, Macrium Reflect, etc.
For demonstration purposes, we have included the steps for Macrium Reflect. You may choose any other software, as the process should be somewhat similar:
- Firstly, navigate to the manufacturer’s website and download the installation file.
- After setup, launch the utility. Some software, including Macrium Reflect, requires admin privilege. So, you may have to press the Yes button to get past the user-control prompt.
- Now, navigate to the Local disks section on the right pane.
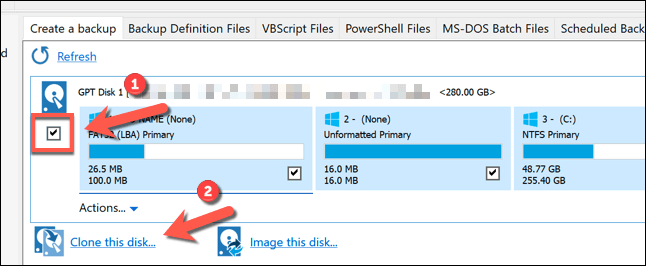
- Here, check the disk you’re trying to clone and select Clone this disk option.

- Once the clone window pops up, check the source drive from the Source section again.
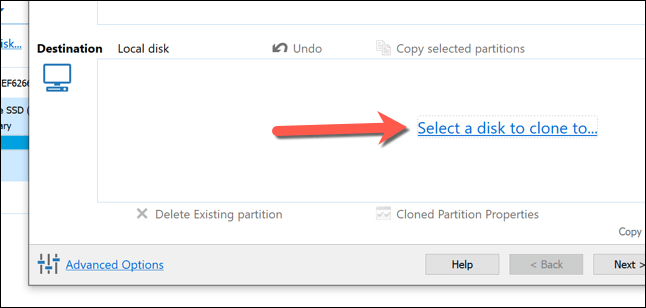
- Then, move to the Destination section and press the Select a disk to clone to option.

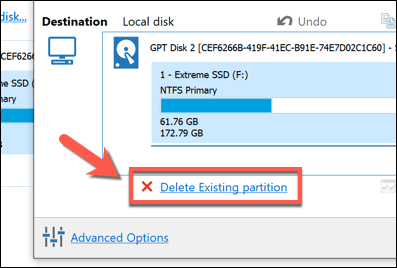
- Here, choose your destination drive and tap Next to move forward. While you’re at it, you may also choose to delete any additional partition.
- Lastly, hit the Finish button and wait for the cloning process to finish.

- Once the clone is completed, press the Ok button and restart your computer.
- Now, get into BIOS and change the boot priority. You should find this option under the Boot options.
- Save the setting using the dedicated key and start Windows. You should be able to boot without any issues.
- Now, you can extend your drive to remove the unallocated partition (after cloning a smaller to a larger hard drive).


В этой статье мы рассмотрим, как перенести установленную Windows с одного жесткого диска на другой только с помощью встроенных средств без использования сторонних программ (таких, как Paragon, AOMEI или Acronis). Эта инструкция поможет вам, например, перенести Windows с HDD на новый SSD диск, или склонировать установленную и настроенную Windows на другой компьютер (есть нюансы) или новый жесткий диск большего размера.
В качестве примера мы склонируем установленную Windows 10 на новый диск с помощью загрузочной USB флешки, командной строки и встроенной утилиты robocopy.
Обратите внимание, что перенос операционной системы копированием на новый диск будет гарантированно работать только при переносе в рамках одного и того же компьютера (или сходных по аппаратному обеспечению), когда вы клонируете вашу Windows на другой жесткий диск того же компьютера. Если вы хотите скопировать установленную Windows на диск для другого компьютера, то для его запуска на новом железе придется повозиться с драйверами контроллеров дисков, чипсета, видеокарты.
Вы сможете склонировать жесткий диск на новый диск меньшего размера, если место, занятое на системном диске текущей Windows меньше, чем емкость нового диска. Если это не так, придется удалить/переместить часть файлов с диска. Чаще всего такой вопрос возникает при переносе на SSD диск меньшей емкости, чем обычный HDD.
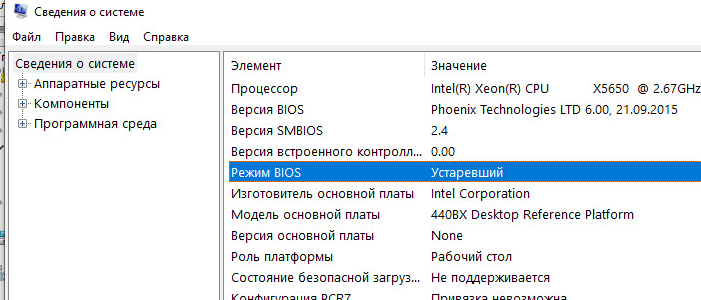
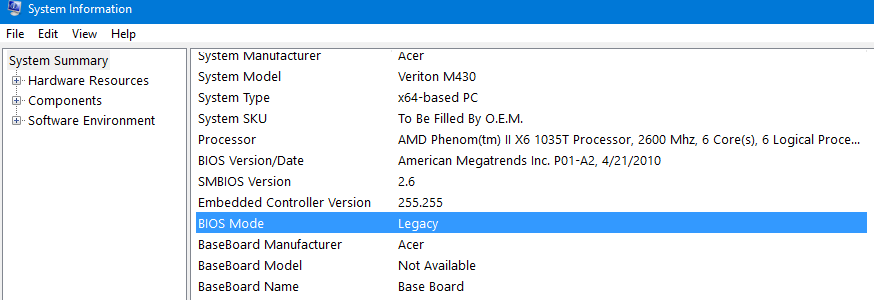
Процедура переноса Windows на другой диск зависит от, того, в каком режиме работает ваш компьютер: BIOS или UEFI. Выполните команду:
msinfo32
Если в строке BIOS mode (режим BIOS) указано Legacy (Устаревший), у вас компьютер с BIOS (или UEFI работает в режиме Legacy/CSM). Если указано UEFI – у вас современных компьютер и Windows установлена в UEFI режиме.
- Если компьютер работает в нативном UEFI режиме и имеет таблицу разделов GPT, я буду помечать команды для таких компьютеров
UEFI GPT
; - Если у вас старый компьютер с BIOS или с UEFI но в Legacy режиме, а таблица разделом MBR – команды будут помечены меткой
BIOS MBR
.
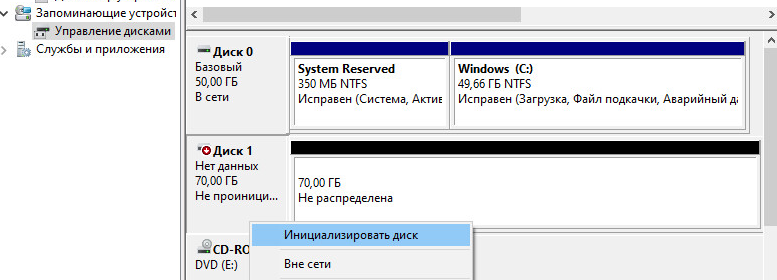
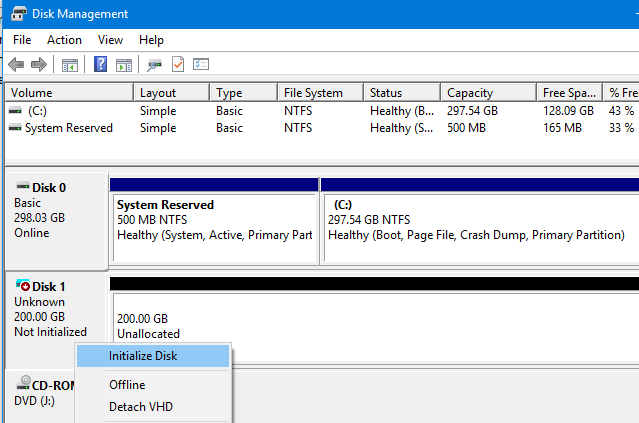
В первую очередь нужно создать таблицы разделов на новом диске. Это можно сделать непосредственно из запущенной Windows 10 с помощью diskpart. Если диск новый, инициализируйте его с помощью консоли
diskmgmt.msc
или PoweShell команды Initialize-Disk:
Get-Disk | Where-Object PartitionStyle –Eq 'RAW' | Initialize-Disk
Теперь создадим таблицу разделов на диске. Откройте командную строку с правами администратора и выполните команду:
diskpart
В контексте
diskpart
выполните следующие команды.
list disk
select disk 1
(в зависимости от номера вашего нового диска, который выдала предудущая команда)
clean
Далее команды отличаются в зависимости от типа вашей платформы.
Для
UEFI GPT
:
convert gpt
create partition efi size=100
format fs="FAT32" quick label="EFI"
create partition msr size=16
create partition primary
format fs="NTFS" quick label="NEW_SYSTEM"
exit
Мы создали на новом диске таблицу разделов GPT, два небольших служебных раздела (EFI и MSR), на оставшемся месте создан один большой раздел (см. подробнее о структуре GPT разделов для EFI).
Если на диске уже есть разделы, вы можете изменить тип таблицы разделов с MBR на GPT без потери данных с помощью встроенной утилиты mbr2gpt.exe.
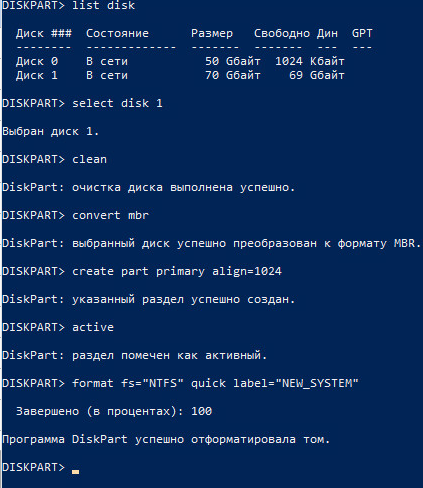
Для
BIOS MBR
следующие команды:
convert mbr
 create partition primary align=1024
active
format fs="NTFS" quick label="NEW_SYSTEM"
exit
Для клонирования Windows на новый диск вам понадобится загрузочная USB флешка с установочным образом Windows 10 (проще всего создать такую флешку с помощью MediaCreationTool).
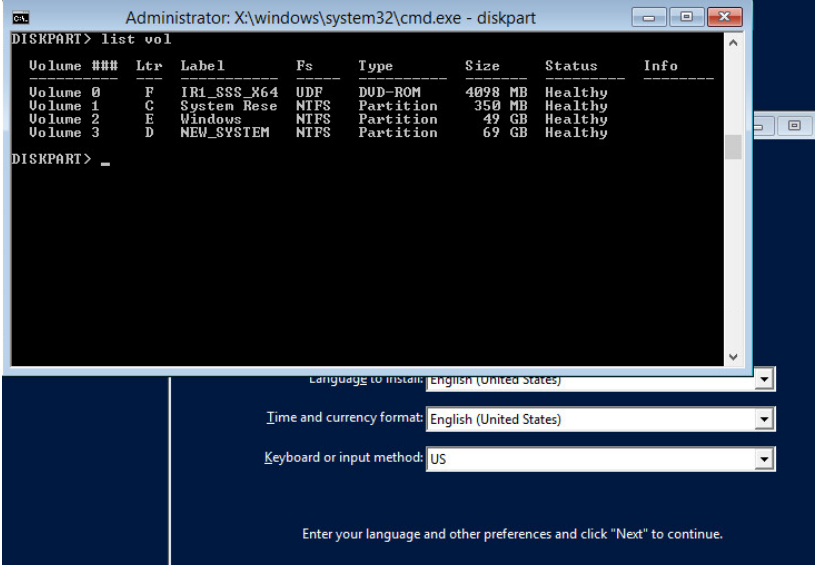
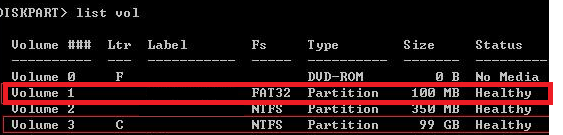
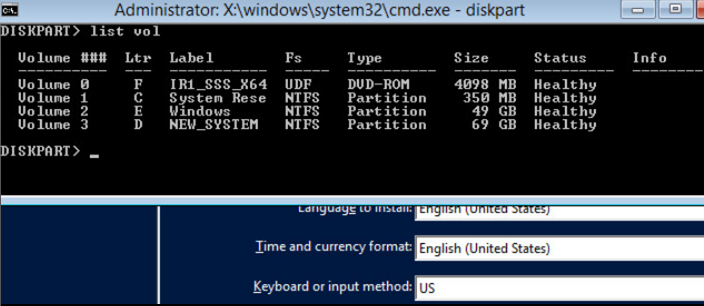
Перезагрузите ваш компьютер и загрузитесь с установочного диска. При появлении окна установки Windows нажмите Shift+F10 чтобы открыть командую строку. В открывшемся окне выполните команды
diskpart
list vol
exit
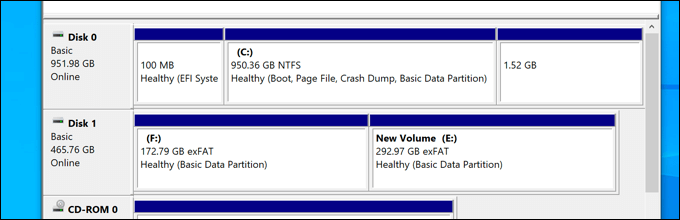
На скриншоте ниже видно, что оригинальному разделу Windows на старом диске присвоена буква диска E:, а большому разделу на новом диске (с меткой NEW_SYSTEM) назначена буква D:.
Если буквы диска не назначены, вы можете назначить их из diskpart следующим образом:
select disk 1
list part
select part 1
assign
list volume
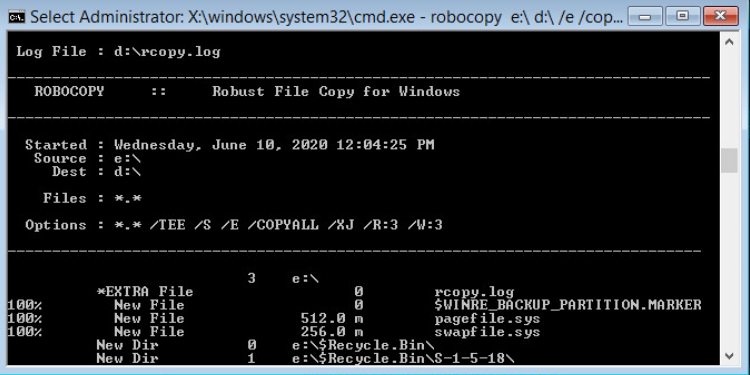
Теперь нужно скопировать файлы со старого диска с установленной Windows на новый. Проще всего это сделать с помощью robocopy. Следующая команда robocopy скопирует все символические ссылки, файлы и папки с атрибутами, NTFS правами и timestamp. При этом лог копирования будет сохранен в корень целевого диска:
robocopy E:\ D:\ /E /COPYALL /SL /XJ /R:3 /W:3 /UNILOG:"D:\rcopy.log" /TEE
Копирование может занять продолжительно время в зависимости от размер старого диска (в моем случае копирование 60 Гб диска заняло около часа).
Теперь можно выключить компьютер и отключить старый жесткий диск.
Следующий шаг, настройка загрузчика Windows на новом диске.
Опять загрузите компьютер в среде установки Windows и запустите командную строку (
Shift+F10
).
Восстановление
BIOS MBR
загрузчика.
Проверьте букву диска, назначенную новому большому разделу на диске:
diskpart
list vol
Диску назначена буква C:
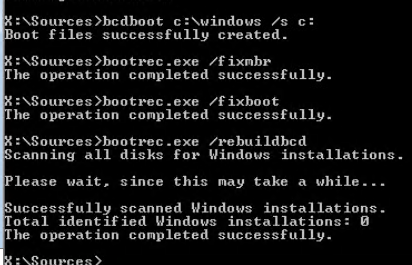
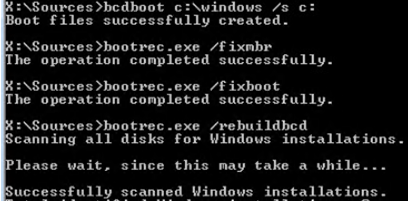
Восстановите BCD загрузчик на диске C:
bcdboot C:\Windows /S C:
Исправьте MBR запись и записи в BCD загрузчике:
bootrec.exe /FixMbr
bootrec.exe /FixBoot
bootrec.exe /RebuildBcd
Восстановление загрузчика на
UEFI GPT
компьютере (подробно эта процедура описана в статье восстановление загрузчика Windows 10 на UEFI компьютере).
Нужно определить букву системного диска и назначить букву диска разделу с EFI.
Diskpart
List vol
В данном примере системному разделу назначена буква диска C. Вам нужно назначить букву разделу EFI (размер 100 мб и файловая система FAT32) следующими командами (в командах измените номера разделов в соответствии с вашей конфигурацией):
select volume 1
assign letter M:
exit
Теперь нужно пересоздать конфигурацию BCD загрузчика:
cd /d m:\efi\microsoft\boot\
ren BCD BCD.bak
bcdboot С:\Windows /l en-us /s M: /f ALL
Перезагрузите компьютер и отключите загрузочную флешку. Убедитесь, что Windows корректно загрузилась с нового диска.
Все установленные приложения, документы и настройки остались на месте. Вы успешно скопировали установленную Windows 10 на новый диск.
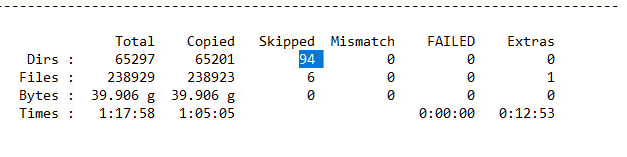
При копировании файлов на новый диск с помощью robocopy могут встречаться ошибки. Откройте на новом диске файл
rcopy.log
и посмотрите какие файлы не были скопированы. В моем случае не было скопировано 94 файла (в моем случае не скопировать только мусорные файлы).

В статье опущена процедура создания загрузочной записи для среды восстановления Windows. Обычно она находится на отдельном разделе System Reserved. Если вы хотите настроить работу среду Windows Recovery Environment (WinRE) , следуйте инструкциям в статье.
If you’ve just upgraded your PC and want to migrate Windows 10 to a new hard drive, you’ll have to consider your options. This is a job that beginners might struggle with, but it doesn’t have to be—you just need to figure out how you’re going to move your files from A to B and ensure Windows will boot from your new drive.
There are a few ways you can do this. You could create a new system image to migrate from one drive of equal size to another. Alternatively, you could consider cloning your hard drive to copy your installation, especially if your drives are different sizes. Here’s what you’ll need to do to begin the process.
Before You Move Windows 10 to a New Hard Drive
Before you consider a transfer of Windows 10 to a new hard drive, you should consider backing up your essential files, independently of any new system image you create.
While this process shouldn’t have an impact on your original drive and files, you may cause data loss if you accidentally overwrite your initial drive in the process. To be sure that your data is safe, you should always perform an independent backup of your files using portable media (such as a USB drive) or online cloud storage.
Once you’ve backed up your essential files, you’ll have two options to consider. The process to move Windows 10 to a new hard drive depends on if you’re moving to a drive of equivalent or larger size or if the drive is smaller, as the process will vary.
It doesn’t matter if you’re moving from a traditional drive to a hybrid or solid state drive, as only the size of the drive itself matters. If you’re moving to a drive of equivalent or larger size, you’re free to create a system image to clone your drive using Windows’ own built-in system imaging tools.
However, if you’re moving to a drive that’s smaller than the original, you won’t be able to use this method, as Windows will show an error during the re-imaging process. Instead, you’ll need to transfer Windows 10 to a new hard drive using third-party tools that will allow you to copy the files successfully to the smaller drive.
Create a New System Image to Migrate Windows to Drives of Equivalent or Larger Size
If you want to migrate Windows 10 to an equivalently-sized or larger hard drive than the original, the best method is to use Windows’ own system imaging tool. This will allow you to copy your original drive exactly to your new drive.
It’s important to stress that this method only works if you’re using a drive of equivalent or larger size. If it’s smaller, you’ll need to follow the steps below to use a third-party tool instead.
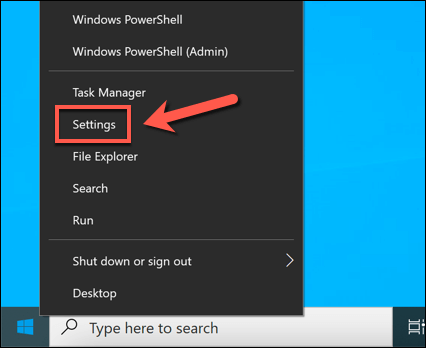
- To begin, you’ll need to create a new system image for your Windows installation. To do this, right-click the Start menu and select the Settings option.
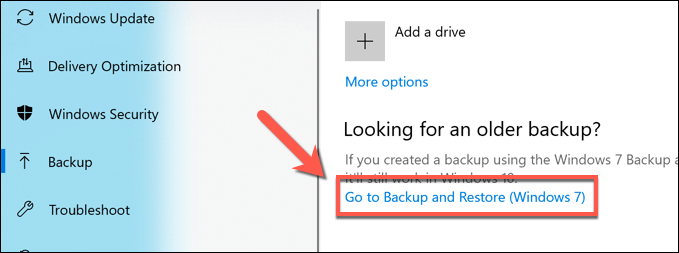
- In the Settings menu, select Update & Security > Backup. In the Backup menu, select the Go to Backup and Restore (Windows 7) option, listed under the Looking for an older backup? category.
- In the older Control Panel window, select the Create a system image option, visible in the left-hand menu. Make sure to connect an external drive (such as an external USB hard drive) at this point, unless you plan on using a network location to store your system image (such as a network attached storage device).
- A new Create a system image menu will open and automatically begin scanning for a suitable external drive or network location to store the system image. If you’re using a portable hard drive, select this from the On a hard disk drop-down menu. If you’re using a network storage location, choose the On a network location option, then select a suitable location on your network to store the file. Select Next to continue.
- Windows will confirm the partitions on your drive that will be copied to the new system image. Select Start backup to begin.
- Allow the system image creation process to finish. Once completed, Windows will ask you if you want to create a new system repair disk. It may be a good idea to do this, especially if you manage to corrupt your MBR or GPT boot files in the process. However, you can select either Yes or No to proceed.
After creating the new system image, you’re ready to use it on your new drive. At this stage, connect your new hard drive to your PC and remove the existing hard drive. You could also leave your existing hard drive in place and format it, allowing you to repurpose it as a secondary storage drive.
Use a System Image to Move Windows to a New Hard Drive
With a new system image of your existing drive ready, you can use the image to create a complete copy of your Windows installation on a new hard drive. As we’ve mentioned previously, you can only do this if the new drive is the same size or larger than the previous system drive.
- To begin, insert your Windows installation media using a portable USB memory stick or DVD. Once inserted, boot your PC and ensure that your BIOS or UEFI settings prioritize that drive over any other drives. Once the Windows installation menu appears, select Next, then select Repair your computer in the bottom left corner.
- In the Advanced Options menu, select Troubleshoot > System Image Recovery.
- Windows should automatically detect the system image on your external hard drive in the Re-image your computer menu. If it doesn’t, select the Select a system image option to locate it manually. Otherwise, leave the Use the latest available system image (recommended) option selected, then select Next to continue.
- Using the new system image, your new hard drive will be formatted with the same partitions as the previous drive. If you want to exclude any partitions first, select Exclude disks and uncheck them. Otherwise, select Next to continue.
- Select Finish > Yes to begin the disk imaging process, which will take some time to complete. Once this process is finished, select Restart Now to boot into your PC. You can remove the Windows installation drive or disk at this point, and you may also need to change your BIOS/UEFI settings to ensure that the new drive is selected as the first boot disk.
If you’ve copied your files to a new drive of the same size, you won’t need to do anything else at this stage—Windows will boot as normal, and you can resume using your PC. If you’ve cloned your drive to a larger sized drive, however, you may need to take additional steps to utilize the additional space.
Resize the System Partition After Using a System Image
A system image clones your drive entirely, recreating all available partitions on the previous drive to the exact sizes as the original partitions. If you’ve used a system image to move Windows to a larger hard drive, you’ll need to resize the system partition (C:) to utilize all of the available space on the new drive.
- To do this, boot into Windows on your new drive and sign in. Right-click the Start menu and select the Disk Management option.
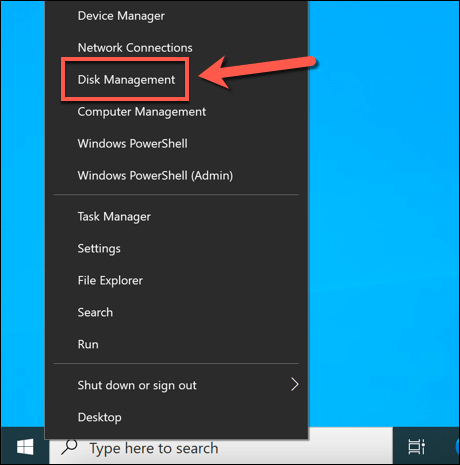
- In the Disk Management menu, right-click your system partition (C:) and select Extend Volume.

- In the Extend Volume Wizard menu, select Next, then ensure that the amount of additional space (equivalent to the figure in the Maximum available space in MB box) is selected in the Select the amount of space in MB box. Select Next to continue.
- Confirm that the details are correct, then select Finish to complete the process.
After a few moments, your system partition will be expanded to include the additional space on your drive, ensuring that all available drive space is usable.
Transfer Windows 10 to a Different Sized Hard Drive Using Third-Party Software
Using a new system image to clone your hard drive is still the best way to migrate Windows 10 to a new hard drive. Unfortunately, as this process doesn’t work if you’re moving from a larger to smaller drive, you’ll need to use third-party software to copy Windows instead.
Various tools exist for this method, but one good (and free) option is to use Macrium Reflect Free. The free version of Macrium Reflect allows you to clone your Windows installation from a larger to a smaller drive, resizing the partition table in the process. You can also use this to clone Windows to a larger driver if you’d prefer.
Before you follow these steps, make sure that both your existing hard drive and new hard drive are connected to your PC and are detectable in Windows.
- To begin, download and install the Home Use version of Macrium Reflect Free from the Macrium Reflect website. Once installed, run the software and make sure that the checkbox next to the disk containing your system partition (C:) is selected. Once selected, select the Clone this disk option below it.
- In the Clone menu, select your new (smaller) drive by selecting the Select a disk to clone to option in the Destination section.
- With the new disk selected, you’ll need to delete any existing partitions on the drive by first selecting them in the Destination category, then selecting the Delete Existing partition option to remove them.
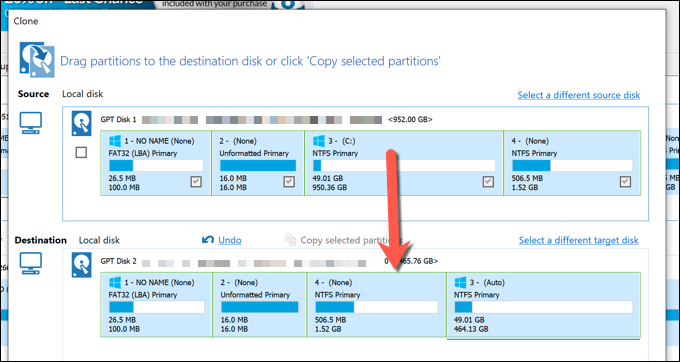
- With any existing partitions on your new drive removed, drag and drop each of the partitions on your drive (excluding the system C: partition) from the Source category to the Destination category. Leaving your system partition (C:) last, drag and drop that partition onto the Destination category.
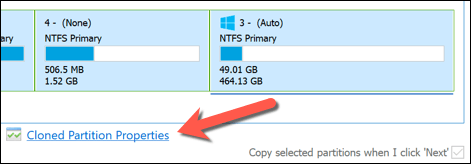
- Macrium Reflect will automatically resize your system partition to use up the remaining space on your new drive if your new drive is smaller than the original. If you’d like to change the size of your C: partition (or you’re using a larger drive, so wish to resize it to use up the additional space), select it in the Destination category first, then select the Cloned Partition Properties option.
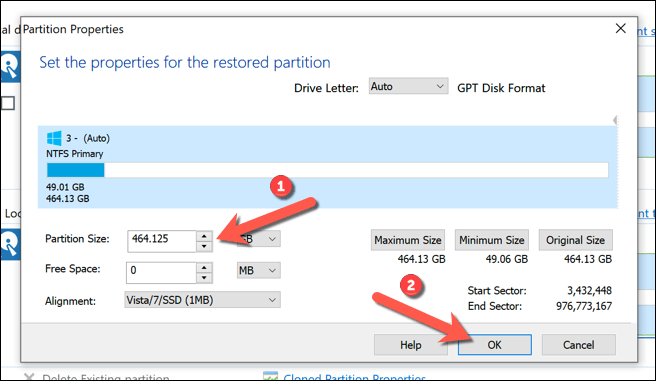
- In the Partition Properties menu, resize your partition using the Partition Size box. If you’re using a larger drive, make sure that the Free Space box reaches 0 MB to ensure you’re utilizing all available space. Select OK to confirm the change.
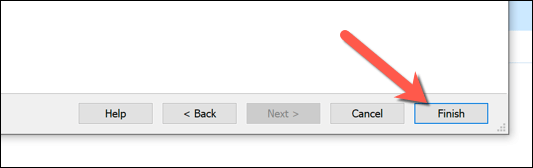
- Select Finish to confirm your cloning options.
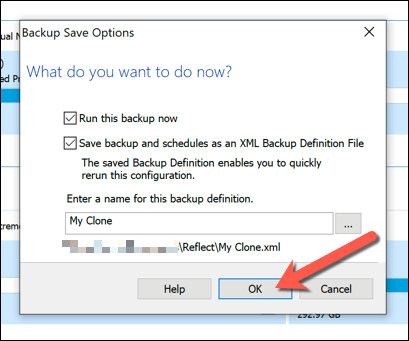
- Leave the options intact in the Backup Save Options menu that appears next, then select OK to confirm.
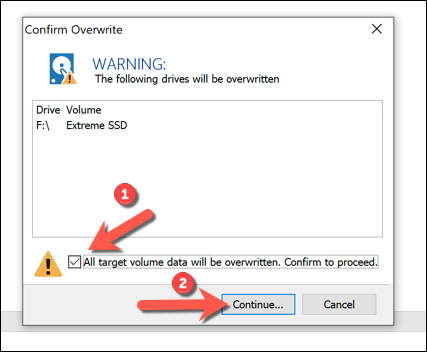
- Macrium will need permission to delete existing partitions and begin the cloning process. Select the available checkbox in the Confirm Overwrite menu, then select Continue to proceed. Allow some time for the cloning process to finish.
Once completed, your existing hard drive containing your Windows installation and all other files will be cloned to your new drive. You can shut down your PC and remove your previous hard drive at this stage, or use Disk Management to format and repurpose it instead.
Final Steps
Whether you’re using a Windows 10 system image to move to a new drive of the same size, or using third-party software like Macrium Reflect to clone it instead, you’ll be ready to boot up and use your new drive without any further steps. You may need to resize your system partition if the drive is bigger than the original, however.
If you do run into problems, you may want to consider reinstalling Windows 10 and starting afresh without cloning your drive entirely. You can do this without losing your personal files, but you may need to install your software again and transfer your Windows 10 license in the process.
In this article we will show how to copy (move) your Windows installation without reinstalling to another hard drive using built-in tools (without any third-party software like Paragon, AOMEI or Acronis). For example, this guide will help you to migrate your Windows from an HDD to a new SSD, clone an installed and configured Windows to another computer (there are some nuances) or a new larger hard drive.
As an example, we will clone an installed Windows 10 to a new drive using a bootable USB stick, command prompt and built-in robocopy tool.
Note that you will be able to clone an operation system by copying it to a new disk only if you migrate it on the same computer (or two computers with similar hardware). If you want to copy an installed Windows to a disk for another computer, you will have to get new drivers for disk controllers, chipset and videocard to boot the OS on a new hardware.
You can clone a hard drive to a new smaller drive if Windows occupies less space on the current drive than your new drive is in size. Otherwise, you will have to delete/move some files from the source drive. The most often, a question like this arises when migrating to SSDs, which are usually smaller than classic HDDs.
The procedure of migrating Windows to another drive depends on your computer’s firmware: BIOS or UEFI. Run the following command:
msinfo32
If you see Legacy in the BIOS mode value, your computer is using BIOS (or UEFI works in the Legacy/CSM mode). If you see UEFI, you have got a modern computer, and Windows is installed in the UEFI mode.
- If a computer works in the native UEFI mode and uses GPT partition table for a boot drive, I will tag commands for such computers with
UEFI GPT - If you have an old computer with BIOS or UEFI working in the Legacy mode and the drive partition table is MBR, the commands will be marked as
BIOS MBR
First of all, you must create partition table on your new drive. You can do it directly from running Windows 10 using diskpart. If the disk is new, initialize it with diskmgmt.msc or using the Initialize-Disk PowerShell cmdlet:
Get-Disk | Where-Object PartitionStyle –Eq 'RAW' | Initialize-Disk
Then create a partition table on the new drive. Open the command prompt as an administrator and run this command:
diskpart
In the diskpart context, run the following commands:
list disk
select disk 1 (depending on the number of the new disk the previous command returned)
clean
Then the commands will differ depending on your platform type.
For UEFI GPT:
convert gpt
 create partition efi size=100
 format fs="FAT32" quick label="EFI"
 create partition msr size=16
 create partition primary
 format fs="NTFS" quick label="NEW_SYSTEM"
 exit
We have created a GPT partition table, two small service partitions (EFI and MSR) and a large partition occupying all the left space on the new drive (learn more about the GPT partition structure in Windows and EFI partition).
If there are some partitions on the drive, you can change the type of your partition table from MBR to GPT without data loss using the mbr2gpt.exe tool built into Windows 10.
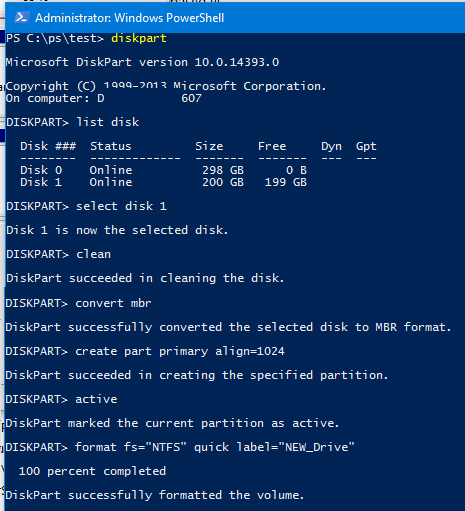
Use the following commands for BIOS MBR:
convert mbr
 create partition primary align=1024
 active
 format fs="NTFS" quick label="NEW_SYSTEM"
 exit
To clone Windows to a new drive, you will need a boot USB stick with a Windows 10 install image (it is easy to create it using MediaCreationTool).
Restart your computer and boot from the Windows 10 install media. When the Windows installation window appears, press Shift+F10 to open the command prompt. Run the following commands:
diskpart
 list vol
 exit
In the screenshot below, you can see that the E: disk letter is assigned to the original Windows partition on the old drive, and D: is assigned to the large partition (with the NEW_SYSTEM label) on the new drive.
If the disk letters are not assigned, you can fix it in diskpart as follows:
select disk 1
 list part
 select part 1
 assign
 list volume
Then copy files from the old drive with the installed Windows to the new one. The easiest way to do it is to use robocopy. The following robocopy command will copy all symbolic links, files and folders containing attributes, NTFS permissions and file timestamps. The copy log will be saved in the root of the target drive:
robocopy E:\ D:\ /E /COPYALL /COPY:DAT /SL /XJ /R:3 /W:3 /UNILOG:"D:\rcopy.log" /TEE

It may take a long time to copy files depending on the size of your old disk (in my case, it took about an hour to copy a 60 GB disk).
Then you can shut down your computer and remove your old hard drive.
The next step is to configure the Windows bootloader on the new disk.
If you try to boot from the new disk without fixing the boot records, the Operation system not found error will appear.
Boot your computer in Windows installation environment again and open the command prompt (Shift+F10).
Restore the bootloader on BIOS MBR device.
Check the disk letter assigned to the new large partition on the drive:
diskpart
 list vol
The drive letter C: is assigned.
Copy the BCD bootloader files on the drive C:
bcdboot C:\Windows /S C:
Change the MBR record and update boot entries in the BCD configuration file:
bootrec.exe /FixMbr
 bootrec.exe /FixBoot
 bootrec.exe /RebuildBcd
Here is how to restore an UEFI GPT bootloader on a computer (learn more in the article on how to repair EFI Bootloader on Windows 10).
Get the system drive letter and assign a disk letter to the EFI partition.
Diskpart
 List vol

In this example, drive letter C is assigned to the system partition. You must assign a letter to the EFI partition (100 MB and FAT32) using the following commands (change the partition numbers according to your configuration):
select volume 1
 assign letter M:
 exit
Now you need to recreate the BCD bootloader and boot configuration:
cd /d m:\efi\microsoft\boot\
 ren BCD BCD.bak
 bcdboot c:\Windows /l en-us /s M: /f ALL
Restart your computer and remove the boot USB stick. Make sure that Windows 10 has booted correctly from your new drive.

All installed apps, files and settings remained in place. You have successfully copied an installed Windows 10 to a new drive.
When you copy files to a new disk using robocopy, some errors may occur. Open rcopy.log on your new drive to see what files have not been copied. In my case, 94 files were not copied (only junk and temporary files were not copied).
The article doesn’t describe how to create a boot record for Windows Recovery Environment. Usually it is located on a separate System Reserved partition. If you want to configure Windows Recovery Environment (WinRE), follow the instructions in this article.