![]()
Download Article
Free up disk space & speed up your PC by deleting temporary files
![]()
Download Article
- Using Disk Cleanup
- Using Settings
- Clearing Temporary Files Manually
- Video
|
|
|
Windows 10 creates temporary files while you use certain apps to speed up certain processes. However, your PC can create hundreds of temporary files in a day, which take up hard drive space and slow down your computer. For example, an open Microsoft Word document creates a temporary copy of the file every few minutes! This wikiHow will show you how to clear temporary files from your Windows 10 PC using Disk Cleanup, the Settings app, and simple commands in the Run dialog.
Things You Should Know
- Temporary files are mostly harmless, but can fill up your hard drive and make your computer run slow.
- Delete temporary files using the default built-in program called Disk Cleanup.
- You can also manually clear temp files using the Settings app and Run dialog commands.
-

1
Open Disk Cleanup. Search “disk cleanup” in the taskbar’s search box and click the first result, which is the Disk Cleanup app. This is the easiest method for cleaning up temporary files on your Windows 10 computer.
- You can also press the Windows key + S to open the search function if you can’t find it in the taskbar.
-
2
Click the drive you want to clean. The drive you use the most will have the most temporary files.
Advertisement
-
3
Click OK. This will confirm your drive choice.
-
4
Click to check the boxes next to «Temporary Internet Files» and «Temporary Files.» You’ll see how much space they will free up along the right side of the columns.
- Suggested boxes to delete are checked by default; you can leave these checked and delete these files or you can click to uncheck the box and not delete these files.
-
5


Advertisement
-
1
Open your Windows Settings
. You can click on the Start icon and then the gear to open Settings.
-
2
Click System. It’s the computer icon.
-
3
Click Storage. This is near the bottom of the menu on the left.
-
4
Click the drive where Windows 10 is installed. It usually has a Windows logo over the drive icon and might be called “This PC.”
-
5
Click Temporary Files. The number here represents how much space the temporary files are taking up. The next page shows you all the files that are considered temporary files, including files in the Downloads folder, files in the Recycling Bin, and thumbnails.
-
6
Click to check the boxes next to the files you want to delete.
-
7
Click Remove files. You’ll see a progress bar of the deletion.[2]


Advertisement
-
1
Press ⊞ Win+R to open the Run box. This is the most involved method of clearing your temporary files.
-
2
Type “%temp%” in the Run box and press ↵ Enter. You’ll be directed to the folder that contains all the temporary files.
-
3
Select all files and folders. You can click the first file, press and hold ⇧ Shift and click the last file, or you can click the first file and press Ctrl+A to select them all.
-
4
Right-click anywhere in the folder and click Delete. You will need an administrator account to do this.
- All those files are moved into the Recycle Bin and can be restored if needed.
- For more Windows file management, check out our guide on finding hidden files and folders.


Advertisement
Ask a Question
200 characters left
Include your email address to get a message when this question is answered.
Submit
Advertisement
Video
Thanks for submitting a tip for review!
About This Article
Article SummaryX
1. Open Disk Cleanup.
2. Click to check the boxes next to Temporary Internet Files and Temporary Files.
3. Click OK.
Did this summary help you?
Thanks to all authors for creating a page that has been read 298,645 times.
Is this article up to date?
On Windows 10, temporary files are those app files stored on your computer to hold information for a short period. In addition, the system has many different temporary file types, including those leftover files after installing a new version, upgrade logs, error reporting, temporary Windows installation files, and more.
Typically, these files won’t cause any issues. However, they can grow quickly using valuable space on the hard drive, which can be the reason preventing you from installing a new version of the operating system, or they can be the reason you are running out of space on your computer. If you use Windows 10, you have a few ways to safely remove temporary files using the Settings app and the Disk Cleanup tool.
This guide will teach you how to quickly delete temporary files on Windows 10 to free up space or reclaim storage space after installing a feature update.
- Delete temporary files on Windows 10 from Settings
- Delete temporary files on Windows 10 from Disk Cleanup
- Delete temporary files on Windows 10 from Temp folder
Delete temporary files on Windows 10 from Settings
To remove temporary files on Windows 10, use these steps:
-
Open Settings on Windows 10.
-
Click on System.
-
Click on Storage.
-
Under the “Local Disk” section, click the Temporary files option.

-
Select the temporary files you want to remove.
-
Click the Remove files button.


Once you complete the steps, junk files will be removed from your computer, freeing up space for more important files.
Delete temporary files automatically
Alternatively, you can use “Storage sense” to automatically free up space by removing those temporary files and content from the recycle bin.
To delete files wasting space automatically using Storage Sense on Windows 10, use these steps:
-
Open Settings.
-
Click on System.
-
Click on Storage.
-
Under the “Storage” section, turn on the toggle switch.

-
(Optional) Click the “Configure Storage Sense or run it now” option to adjust the cleanup settings or run Storage Sense on-demand.


After completing the steps, Storage sense will delete most temporary files and those that have been in the recycle bin for more than 30 days.
Delete temporary files on Windows 10 from Disk Cleanup
If you are getting a message about your device running out of space, you can also use the Disk Cleanup tool to delete temporary files to free up space on your device.
To remove Windows 10 temporary files from Disk Cleanup, use these steps:
-
Open File Explorer.
-
Click on This PC from the left navigation pane.
-
Right-click the drive with the Windows 10 installation and select the Properties option.

-
Click the Disk Cleanup button.

-
Click the “Clean up system files” button.
-
Check the items you want to delete. For example, Temporary Windows Installation Files, Windows upgrade log files, Recycle Bin, Temporary Files, and System created Windows Error Reporting.

-
Click the OK button.
-
Click the Delete Files button.


Once you complete the steps, temporary files will permanently be deleted from your computer, making room for new files.
Delete temporary files on Windows 10 from Temp folder
To clear the temporary files from the Temp folder to free up space, use these steps:
-
Open File Explorer.
-
Type the following path in the address bar and press Enter:
%temp%
-
Click the Select all button from the Home tab.
-
Click the Delete button from the Home tab.

-
Click the Yes button to confirm.

After you complete the steps, Windows 10 will delete the files from the Temp folder, freeing up storage space on your computer.
Question: How do I delete temporary files from Windows 10?
“My system lags a lot due to temporary files taking up valuable space on my drive. I want to delete them to free up space on my Windows PC. Can anyone tell me how to delete these temp files? And what is the best way to ensure that I am doing it safely and effectively?”
Temporary files, also referred to as temp or foo files, are files your operating system or program creates to help your computer runs faster and more smoothly. Windows temporary files can be a nuisance, as most often, computers don’t automatically delete them and they can get accumulated over time, therefore taking up storage on your disk space and sometimes leading to system slowing down and crashes. Knowing how to delete temp files in Windows 10/11 will boost the performance of your computer, ensuring it runs without a hitch. In this article, we’ll explain briefly where temp files are stored. We’ll also discuss the five best ways of removing temporary files with manual and automatic methods.

- Part 1: Where Are Temporary Files Stored?
- Part 2: How to Delete Temporary Files in Windows 10/11?
- Method 1: Delete Temporary Files in Windows 10/11 Using Run
- Method 2: Delete Temporary Files in Windows 10/11 from Settings
- Method 3: Auto Delete Temp Files Windows 10/11 by Activating Storage Sense
- Method 4: Delete Temporary Files In Windows 10/11 via Disk Cleanup
- Method 5: Use the Command Line to Delete Temp Files Windows 10/11
- Bonus Tip: How to Recover Deleted Temporary Files in Windows 10/11
- FAQs about Temporary Files in Windows 10/11
Part 1: Where Are Temporary Files Stored?
Before we go through the methods of deleting temporary files, let’s first figure out the question –where are temporary files stored Windows 10/11?
Temp files can be found located in different folders depending on what has creates them. The ones that Windows OS creates are typically stored in the “%system%\Windows\Temp” folder — that’s likely where the majority of temporary files on your computer get stored. Whereas the others that “Users” create are saved in their user profile folder “%userprofile%\AppData\Local\Temp.”
To access and delete these files, you can easily use Windows Search, which we will explain further in the following sections.
When necessary temporary files are not cleared out regularly, they become junk files that build up and slow down your computer. To boot your system’s performance, below we’ve listed five methods to safely delete temp files Windows 10/11. Check them out:
Method 1: Delete Temporary Files in Windows 10/11 Using Run
The first way to delete temporary files Windows 10 manually and completely is by using the system’s in-built Run tool. Here’s how to delete temporary files in Windows 10 using Run:
- Press the Win + R keys together to open the “Run” dialog box.
-
Enter %temp% and Hit “OK”. This will open the Temp folder.
- Select the specific unwanted folders and temp files or select all items by pressing the Ctrl + A keys at the same time.
-
Hit the “Delete” key and select “Yes” when prompted. If it pops up a Folder in Use window, simply click Skip to continue to remove the selected temp files.
The deleted temp files will go into the Recycle bin. If you want to get them permanently deleted, go ahead to the Recycle Bin and empty it.
Method 2: Delete Temporary Files in Windows 10/11 from Settings
Another way to manually remove temporary files from Windows is by navigating to the storage via Settings. Here’s how to delete temporary files in Windows 10/11 from settings:
-
Open Windows Settings 10 by pressing the Win + I keys and navigate to System.
- Select “Storage” on the left-hand pane.
-
Under the Local Disk (C:) section, choose “Temporary files”. If you are unable to see this option, they may be hidden. So select “Show more categories”.
-
You’ll see a list of temp files you can remove. Select all the temporary files you wish to delete and hit “Remove files”.
Your Windows PC will now begin deleting the selected temp files.
Method 3: Auto Delete Temp Files Windows 10/11 by Activating Storage Sense
If you don’t want to delete temp files Windows 10 manually, you can use the Storage Sense feature to remove them automatically and at a set frequency. Here’s how to automatically delete temp files in Windows 10 by activating the Storage Sense:
- Press the Win + I keys to open Settings.
- Navigate to System > Storage.
-
Under Storage, click on “Configure Storage Sense or run it now”.
-
Turn on Storage Sense. Then check the box next to the “Delete temporary files that my apps aren’t using” option.
- After the cleanup settings are adjusted on-demand, click “Clean now” at the bottom, Storage Sense will start freeing up space by deleting most temporary files that have stayed in the recycle bin for more than 30 days.
Note: You can also schedule a disk cleanup and specify whether you want to delete temporary files from the Recycle Bin and Downloads folder as you need.
Method 4: Delete Temporary Files In Windows 10 via Disk Cleanup
If running out of drive space, you can also use the Windows in-built utility –Disk Cleanup to scan and remove temporary files that are no longer necessary. Let’s see how to clear temp files in Windows 10 through Disk Cleanup:
-
Press the Win+ E keys to launch “File Explorer”. Then Choose “This PC.”
-
Right-click on the hard disk and then choose “Properties”.
-
On the General tab, hit “Disk Cleanup.”
-
Under Files to delete, select the files or folders you wish to delete. Alternatively, you can choose “Clean up system files”, Disk Cleanup will calculate how much space the system can free up safely.
-
Press “OK”. Wait for the clean-up to finish and you’re good to go.
Method 5: Use the Command Line to Delete Temp Files Windows 10/11
You can also utilize the Windows Command Prompt to delete temporary files from your Windows. Here’s how to delete temporary files in Windows 10 using CMD:
- Press the Win + S keys and type “CMD” in the search bar that appears.
-
From the results list, right-click Command Prompt and select the Run as administrator option.
-
The CMD windows will appear. Type the command “del /q/f/s %TEMP%\*”and then hit Enter.
- Once the command runs, you’ll see lines of code which indicates that temp files have been deleted from the Temp folder.
Bonus Tip: How to Recover Deleted Temporary Files in Windows 10/11
Sometimes while deleting unwanted temporary files, users may also remove some temp files that are needed by apps. If that has happened to you, you can easily recover them by using third-party software like Tenorshare 4DDiG Windows Data Recovery. It is an all-in-one solution to recover deleted, lost, hidden, and corrupted files from external and internal storage devices. Here’s what more 4DDiG offers:
- Recovers 1000+ file types, including photos, audio, videos, and documents.
- Retrieves data from hard disks, USB drives, Recycle bin, SD cards, and digital cameras.
- Recovers deleted data from lost partitions, system crashes, and virus attacks.
- User-friendly and easy-to-navigate interface.
- Supports all older and newer Windows OS versions.
Here’s how you can use 4DDiG to recover your deleted temporary files:
- Select a Local Disk
- Scan the Local Disk
- Preview and Recover Deleted Temp Files
Download and install the 4DDiG tool on your PC. Launch the tool and choose the drive where you’ve deleted the temp files.
Buy Now
Buy Now
Click “Start». The tool will look for accidentally deleted files. You can also set the target file type from the top right corner.
Once the scanning starts, you can pause or stop it to preview your targeted files. Press “Recover” after you’ve identified your target temp files.
Save the recovered temp files in a safe location on your PC and you’re ready to go.
FAQs about Temporary Files in Windows 10/11
Q1: Why should I delete temporary files?
Over time temporary files take up drive space and can lead to system errors and lagging. So it is necessary to delete redundant temp files to avoid various issues caused by corrupted or infected files stored in your computer and boost system performance.
Q2: Is it safe to delete temporary files?
Yes, it’s perfectly safe to delete unnecessary temp files. Temporary files are created to store temporary information so that the task can be executed smoothly when it is running. And they don’t need to be permanently stored on your computer. But keep in mind that do not remove them when they are running because this may lead to program errors.
Q3: When do you need to delete temporary files?
When you’re running low on storage space, it’s time to delete all or some of the temp files to free up space for other files and data and speed up your computer.
Conclusion
Hopefully, we’ve answered your query “How to delete temporary files in Windows 10” using five proven methods. Temp files are essential to remove because they cause the system to slow down and also take up lots of drive space. Deleting them will help you boost your system performance.
However, if you’ve accidentally deleted some critical data alongside the temp files, you can easily retrieve it through Tenorshare 4DDiG Data Recovery software. It is your go-to tool and the best option for recovering accidentally deleted files from all kinds of storage devices. Recover your files now in just three clicks!
Tenorshare 4DDiG Data Recovery
4DDiG is your second to none choice to recover all lost data on Windows/Mac computer from various loss scenarios like deletion, formatting, RAW, etc. with a higher success rate.
Free Download
Free Download
BUY NOW
BUY NOW
Sometimes, despite having enough RAM, our system lags or hangs. This trouble can be due to storage issues or any extra unnecessary program running in the background. One way to prevent this slowing down of our system is to delete temporary files created automatically as it will boost your system’s performance.
1. Deleting all temp files:
To delete all the temporary files follow the below steps:
Step 1: Press Windows key + R to open the Run command. Then type “temp” in the search field and press OK.
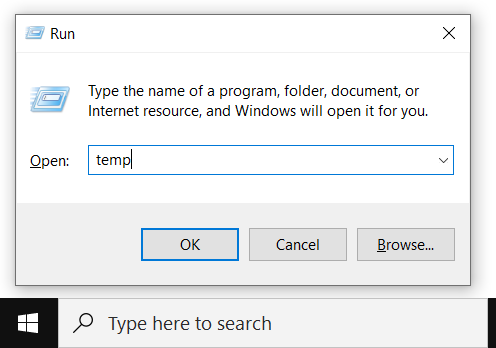
type in “temp” and press ok
Step 2: Now, select all temp files using ctrl + A and then press delete.
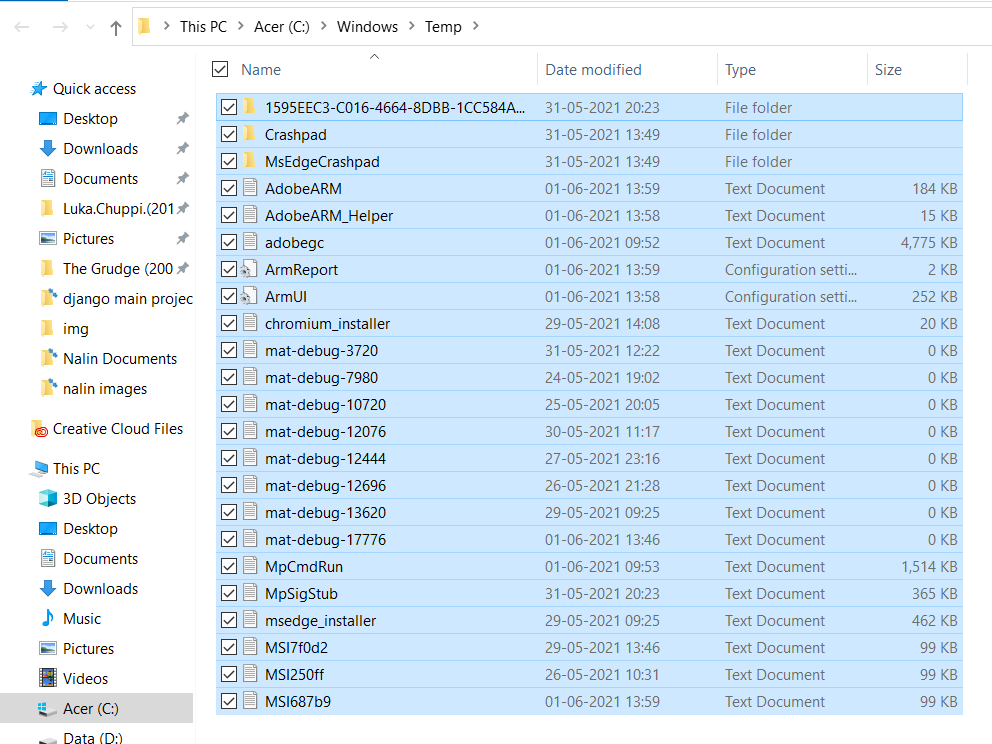
Select all and press delete
2. Deleting local temp files:
To delete the local temporary files follow the below steps:
Step 1: Press Windows key + R to open the Run command. Then type “%temp%” in the search field and press OK.
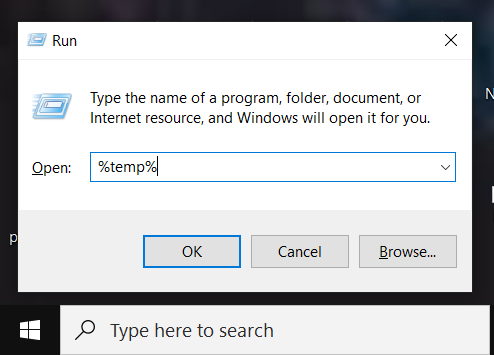
Type %temp% and press OK
Step 2: Now, select all local temp files using ctrl + A and then press delete.
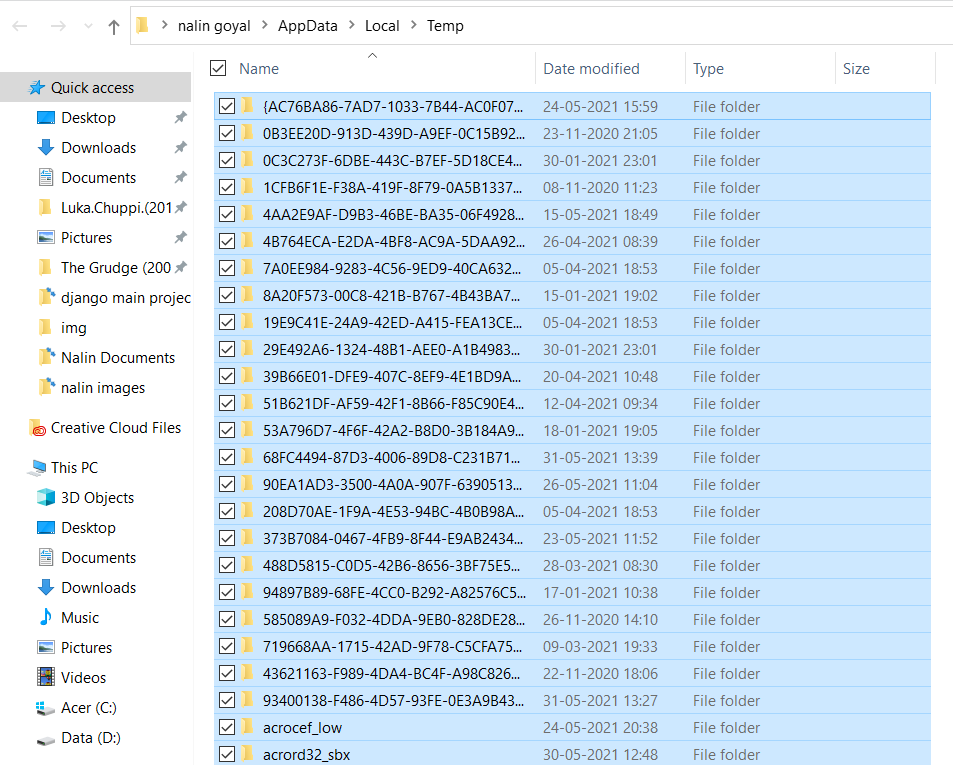
Select all files and press delete
3. Deleting local temp files using Prefetch:
To delete the local temporary files using Prefetch follow the below steps:
Step 1: Press Windows key + R to open the Run command. Then type “Prefetch” in the search field and press OK.
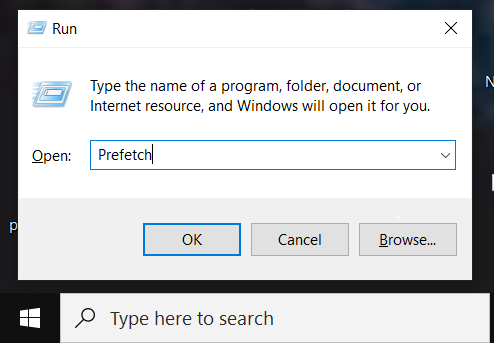
Type “prefetch” and press ok
Step 2: Now, select all prefetch files using ctrl + A and then press delete.
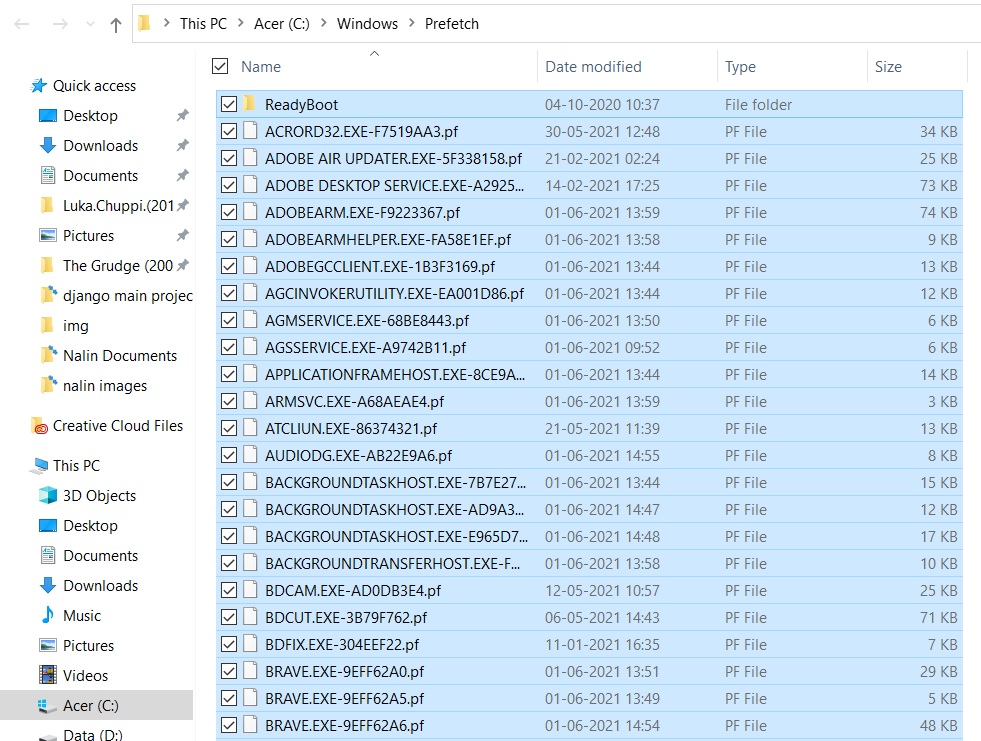
Select all prefetch files and press delete
Finally, delete all the files from recycle bin too. All temporary files are deleted, and now you are good to go!!
Last Updated :
06 Jun, 2021
Like Article
Save Article
What to Know
- Enter %temp% from Search/Run, and delete what’s in there. Also empty the Recycle Bin.
- Alternatively, use a command line command. Save rd %temp% /s /q in a text file with the .BAT extension.
One way to free up disk space in Windows 11, 10, 8, 7, Vista, and XP is to delete temporary files. Temp files are files that your operating system only needed to exist temporarily while in use, but are now just wasting space.
Most temporary files are stored in the Windows Temp folder, the location of which differs from computer to computer. Manually cleaning this out in Windows usually takes less than a minute, but it could take longer depending on how large the collection of temporary files is.
How to Remove Junk Files From Windows 11
How to Delete Temporary Files in Windows
Follow these simple steps to delete your temporary Windows files:
-
Open the Run dialog box.
In Windows 11, 10, and 8, right-click the Start button and select Run.
In earlier versions of Windows, choose Start to bring up the search box or find Run.
Another way to open the Run dialog box is to enter the WIN+R keyboard shortcut.
-
In the Run window or search box, enter the following command exactly:
%temp%This command, which is technically one of many environment variables in Windows, will open the folder that Windows has designated as your Temp folder, probably C:\Users\[username]\AppData\Local\Temp.
-
Select all the files and folders within the Temp folder that you want to delete. Unless you have a reason to otherwise, select them all.
If you’re using a keyboard or mouse, click one item and then use Ctrl+A to select every item within the folder. If you’re on a touch-only interface, choose Select all from the Home menu at the top of the folder.
You don’t need to know what each temp file you’re going to delete is for, or what or how many files are included in any subfolders you select. Windows won’t let you delete any files or folders that are still in use. More on that in a bit.
-
Delete all the temporary files and folders you’ve selected, either using the Delete key on your keyboard or the Delete button from the Home menu.
Depending on your version of Windows, and how your computer is configured, you might be asked to confirm that you wish to Delete Multiple Items. You may even have to select Yes on a special Confirm Multiple File Delete window that appears. Handle any messages about hidden files in this folder the same way—it’s fine to delete those, too.
-
Choose Skip if you’re presented with a File In Use or a Folder In Use warning during the temporary file deletion process.
This is Windows telling you that the file or folder you’re trying to delete is locked and still in use by a program, or maybe even Windows itself. Skipping these allows the deleting to continue with the remaining data.
If you’re getting a lot of these messages, check the Do this for all current items checkbox and then select Skip again. You’ll have to do it once for the file messages and again for the folder ones, but warnings should stop after that.
Rarely will you see a message like Error Deleting File or Folder that will stop the temp file deleting process completely. If this happens, restart your computer and try again. If even that doesn’t work, try starting Windows in Safe Mode and repeating the steps above.
-
Wait while all the temp files are deleted, which could take anywhere from a few seconds if you only have a few files in this folder, and up to several minutes if you have many and they’re large.
You won’t be prompted when the process is complete. Instead, the progress indicator will just disappear, and you’ll see your empty, or almost empty, temp folder up on the screen. Feel free to close this window.
If you happen to be deleting so much data that not all of it can be sent to Recycle Bin, you’ll be told that they’ll be permanently removed.
-
Finally, locate Recycle Bin on your Desktop, right-click or tap-and-hold the icon, and then choose Empty Recycle Bin.
-
Select Yes on the prompt to confirm that you want to delete the items, which will permanently remove those temporary files from your computer. You now, in the short term, have an empty temporary files section.
The next time you delete temporary files in Windows, feel free to hold down Shift as you delete the files. It’s a trick that will skip over storing them in Recycle Bin, essentially «permanently» deleting them and saving you this last step.
Using a Command Line Command
The steps shown above are considered the normal way to delete temporary files, but you have to do it manually. If you’d rather, you can build your own mini-program that can delete these temp files automatically with a simple double-click/tap of a BAT file.
You can do this using the rd (remove directory) Command Prompt command to delete the entire folder and all the subfolders.
Type the following command into Notepad or some other text editor, and save it with the .BAT file extension:
rd %temp% /s /q
The q parameter suppresses confirmation prompts to delete the files and folders, and s is for deleting all the subfolders and files in the temp folder.
If the %temp% environment variable is for some reason not working, feel free to substitute in the actual folder location mentioned in Step 2 above, but make sure you type the correct folder path, and to be safe, surround the path in quotes like this (change the username, of course):
rd "C:\Users\jonfi\AppData\Local\Temp" /s /q
Other Types of Temporary Files in Windows
The Windows Temp folder isn’t the only place temporary files, and other no-longer-needed groups of files, are stored on Windows computers.
The folder you found in Step 2 above is where you’ll find some of the operating-system-created temporary files in Windows, but the C:\Windows\Temp\ folder contains a number of additional files that you no longer need to keep. Feel free to open that Temp folder and delete anything you find in there.
The Settings app in Windows 11 and Windows 10 has an entire section dedicated to deleting temporary files. Get there through Settings > System > Storage > Temporary files. Included there are things like delivery optimization files, Windows upgrade log files, temporary files left over by apps, and more. Choose what to remove, and then select Remove files.
Those same, harder-to-find locations for temporary files are accessible in older versions of Windows, too, like Windows 7, via Disk Cleanup. This utility is included in all versions of Windows and can help remove the contents of some of those other temp folders for you automatically. You can open that in a Run dialog box (WIN+R) via the cleanmgr command.
Check Your Browser Cache
Your browser also keeps temporary files, usually in an attempt to speed up your browsing by loading cached versions of web pages when you revisit them. Review our guide on how to clear your browser’s cache for help deleting these types of temporary files. Ctrl+Shift+Del (Windows) or Command+Shift+Delete (Mac) is usually the shortcut to that option.
Handy Tools for Easy Removal
Dedicated «system cleaners» like the free CCleaner program can make this, and similar jobs, really easy. Many free computer cleaner programs exist to choose from, too, including Wise Disk Cleaner.
FAQ
-
How do you delete temp internet files?
To delete temporary internet files and cookies in Internet Explorer, go to Tools (gear icon) > Internet Options and select Delete under Browsing history. In Firefox, open the menu and go to Options > Preferences > Privacy & Security > Clear History. In Chrome, go to More > More tools > Clear browsing data.
-
How do you clear temp files on Android?
Older versions of Android used to let you clear a device’s cache all at once. Now, you need to clear the cache of individual apps. To do that, go to Settings > Apps, select an app, and choose Storage & cache > Clear cache, or Storage > Clear Cache.
-
Where does Excel store temp files?
The default location for temporary Excel files in Windows 11 and 10 is C:\Users\AppData\Local\Microsoft\Office\UnsavedFiles. If you’re trying to find a deleted or lost Excel workbook, this is the first place you should look. Copy and paste the file into a new location, such as Documents or your Desktop, then open it in Excel.
-
Where does Firefox store temp files?
Firefox calls temp files the «cache». You can get information about it by typing about:cache in the location bar. Typically, Firefox places temporary cache files in the C:\Users\[username]\AppData\Local\Temp location.
Thanks for letting us know!
Get the Latest Tech News Delivered Every Day
Subscribe