Loading
Для работы проектов iXBT.com нужны файлы cookie и сервисы аналитики.
Продолжая посещать сайты проектов вы соглашаетесь с нашей
Политикой в отношении файлов cookie
Мечта о том, что когда-нибудь я вытащу планшет из небольшого рюкзака, поставлю его на док-станцию и немедленно начну работать прямо как с привычным ноутбуком, пока еще остается мечтой. Те, кто когда-нибудь пользовался планшетами 2-в-1, а не только смотрел рекламные видео, это понимают. Каждый новый такой планшет — компромисс между удобством и компактностью. Это горькая правда.
Производители, которые пытаются повторить функциональность ноутбука обречены на вечное несовершенство. Те, есть те, кто это осознают, и просто стараются сделать то, что возможно в заданных рамках. Среди таких производителей — компания Chuwi. О их планшете Chuwi Hi10 Plus сегодня и пойдет речь. Для начала — краткий видеообзор.
Компания Chuwi, несмотря на свое странное для русского уха (а также для уха поклонника Star Wars) название, хорошо известна продвинутому российскому гику как производитель дешевых планшетов с двумя операционными системами Android + Windows (а также с док-станциями). В модельном ряду у компании есть как совсем бюджетные модели (с диагональю 8″ и стоимостью меньше 100$), так и «продвинутые» устройства с диагональю 12″. Правда, все они «атомные», то есть, планшетов на процессорах Core компания не делает.
Модельный ряд компании достаточно большой, целиком все актуальные модели можно посмотреть на английском сайте Chuwi, а пообщаться по поводу их особенностей — в группе Chuwi в ВК. Наименования запутанные — если сначала планшеты серии Vi позиционировались как недорогие, а Hi — «навороченные», то потом названия стали обрастать всякими «Pro», «Ultimate», и тому подобное. Имеющийся у меня на тесте Chuwi Hi10 Plus — это не продолжатель Chuwi Hi10 Pro, и даже не родственник Chuwi Hi10, а «улучшенный и дополненный» Chuwi Vi10 Plus. Его основные фишки — долгая работа от батареи, металлический корпус, чехол-клавиатура и поддержка пера.
Изучаем характеристики
Но перейдем к нашему планшету. В этой таблице я приведу их в сравнении с предшественником Vi10 Plus и «вроде как одноклассником» Hi10 Pro.
| Chuwi Hi10 Plus | Chuwi Hi10 Pro | Chuwi Vi10 Plus | |
| Экран | 10.8″, 1920×1280 (3:2), 450 Nit | 10.1″, 1920×1200 (16:10), 350 Nit, OGS | 10.8″, 1920×1280 |
| Процессор | Intel Z8300 | Intel Z8300 | Intel Z8300 |
| Память | 4 Гб | 4 Гб | 2 Гб |
| Флеш | 64 Гб | 64 Гб | 32 Гб |
| Карты памяти | microSD (до 128 Гб) | microSD (до 128 Гб) | microSD (до 128 Гб) |
| Порты и разъемы | 1xUSB 3.0 (Type-C), 1xmicroUSB, 1xmicroHDMI, 1×3.5mm | 1xUSB 3.0 (Type-C), 1xmicroUSB, 1xmicroHDMI, 1×3.5mm | 1xUSB 3.0 (Type-C), 1xmicroUSB, 1xmicroHDMI, 1×3.5mm |
| ОС | Remix OS 3.0 (Android 5.0), Windows 10 | Remix OS 3.0 (Android 5.0), Windows 10 | Remix OS 3.0 (Android 5.0), Windows 10 |
| Камеры | 2 Мпикс/2 Мпикс | 2 Мпикс/2 Мпикс | 2 Мпикс/2 Мпикс |
| Батарея | 8400mAh | 8400mAh | 8400mAh |
| Аксессуары | Чехол с клавиатурой, стилус | Док-станция с клавиатурой, стилус | Чехол с клавиатурой, стилус |
| Материалы | Магниевый сплав | Алюминий | Магниевый сплав |
| Размеры и вес | 27.64 x 18.48 x 0.88 см, 686 г. | 26.18 x 16.73 x 0.85 см, 562 г. | 27.64 x 18.48 x 0.88 см, 686 г. |
| Цена |
От 13700 до 16700 рублей, в зависимости от комплектации Узнать актуальную |
От 11700 рублей, в зависимости от комплектации узнать актуальную |
От 9700 рублей, в зависимости от комплектации узнать актуальную |
Цены указаны со ссылками на официальный магазин Chuwi на Aliexpress. Возможно, кто-то из магазинов (или из продавцов с Ali сможет дать цены больше/меньше, или устроит распродажи). Для Chuwi Hi10 Plus на момент написания статьи были хорошие цены на комплекты сразу с клавиатурой и стилусом, уже продающиеся модели в основном без комплектов, аксессуары покупают отдельно.
Разбираемся в технических характеристиках
Даже по характеристикам заметно, что планшет является продолжателем модели Vi10 Plus. Размеры, вес, экран — все совпадает. Мало того, даже внешний вид планшета практически тот же самый. Также, присутствует характерная для серии Vi чехол-клавиатура, а не полноценная док-станция (как в случае с Hi10 Pro). Кстати, чехлы совместимы. На мой взгляд, они предпочтительнее док-станций, у которых есть только одно преимущество — наличие дополнительного (дополнительных) USB портов. В случае с тонкими моделями это достаточно важно, потому что другой возможности получить полноразмерный разъем, увы, нет.
Впрочем, различие с моделью Vi10 есть, и оно очень существенное. В планшет наконец-то поставили 4 Гбайт оперативной памяти, а также 64 Гбайт встроенного встроенного хранилища. Как человек, который работал за планшетом с 2 Гбайт оперативной памяти и 32 Гбайт «диска» (и вспомнивший ВСЕ ругательства, уже изрядно подзабытые), могу сказать, что сделали это явно не зря.
За счет соотношения экрана 3:2 и разрешения 1920×1280, устройство кажется вполне предназначенным для работы, по сравнению с вытянутыми «мультимедийными» 16:10. На мой взгляд, было бы еще лучше, если бы форм-фактор был 4:3 (на данный момент, насколько мне известно, на рынке нет интересных предложений с таким форм-фактором).
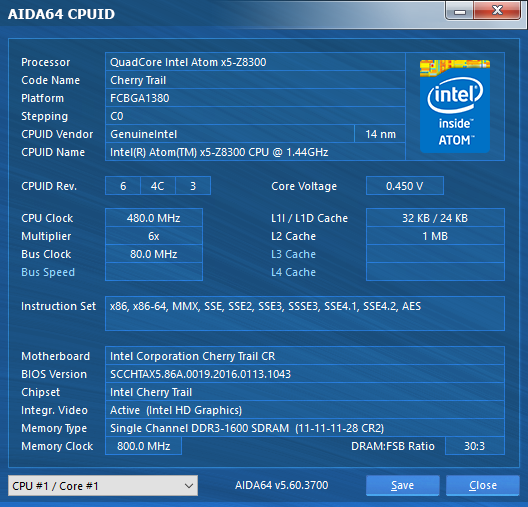
Платформа Atom z8300 на сегодняшний день является стандартом де-факто для новых «атомных» планшетов-трансформеров. Я пробегусь по ее основным возможностям.
Этот чипсет был анонсирован во втором квартале 2015 года, выполнен по технологии 14 нм и имеет SDP 2 Вт (22 нм и 2,2 Вт у Atom Z3735F). В нем установлено четыре вычислительных ядра, поддерживающих 64-х битные вычисления, их базовая тактовая частота составляет 1,44 ГГц. При этом в режиме разгона (Burst) она может повышаться до 1,84 ГГц. В состоянии простоя частота ядер может снижаться до 480 МГц.
Основное внимание по сравнению с предыдущими моделями было уделено графическому ядру — у него одновременно понизилась частота, и при этом увеличилась производительность. Встроенный в чип блок аппаратного декодирования видео поддерживает, в частности, кодеки H.264, H.265 (HEVC) и VP9 — в общем, все, что нужно в условиях реальной жизни.
При этом, конечно же, не стоит считать процессоры Intel Atom X5 чем-то, что может сравниться по скорости работы с процессорами Core. Их энергопотребление и стоимость в разы ниже — так что, ожидать от них хоть какой-нибудь прыти в приложениях совершенно не стоит. Тем более не стоит пытаться запустить на них какие-нибудь высокопроизводительные игры.
Внешний вид, порты, разъемы
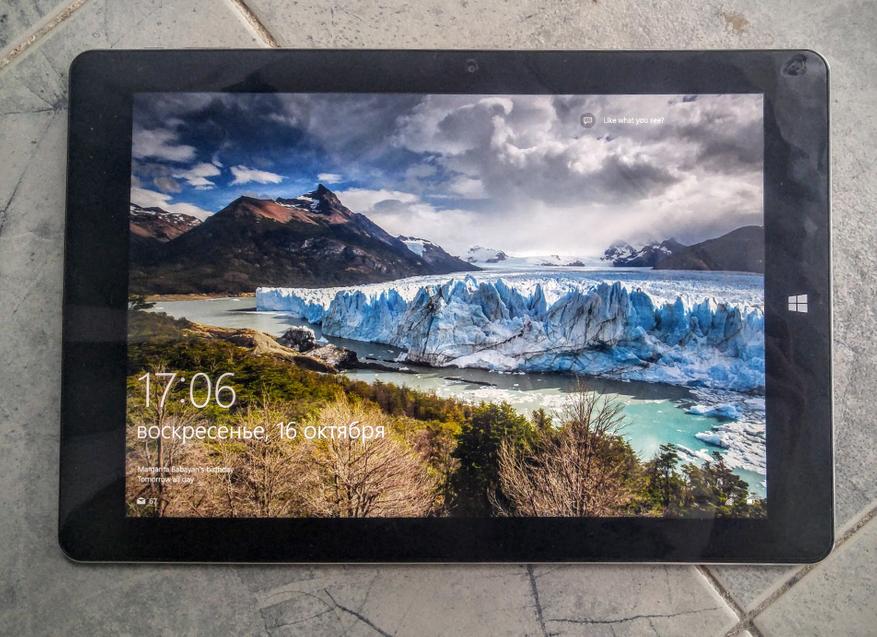
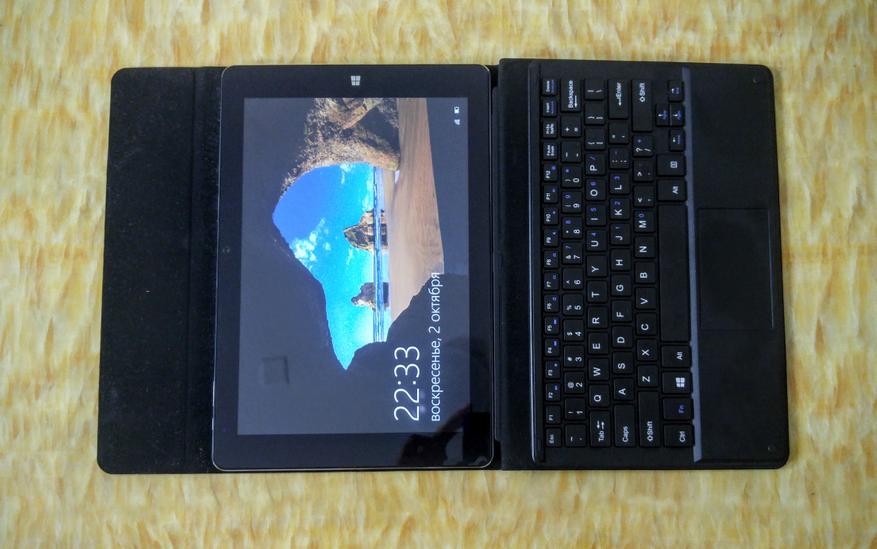
Перейдем непосредственно к самому планшету. Я буду рассматривать его эргономику сразу с чехлом- клавиатурой — на мой взгляд, покупать такое устройство без чехла не очень осмысленно, тем более, что большинство магазинов дает чехол-клавиатуру «в нагрузку». Спереди сам по себе планшет выглядит стандартно. Достаточно толстые рамки — впрочем, сложно было бы ожидать чего-то иного от бюджетного решения с неплохими характеристиками.
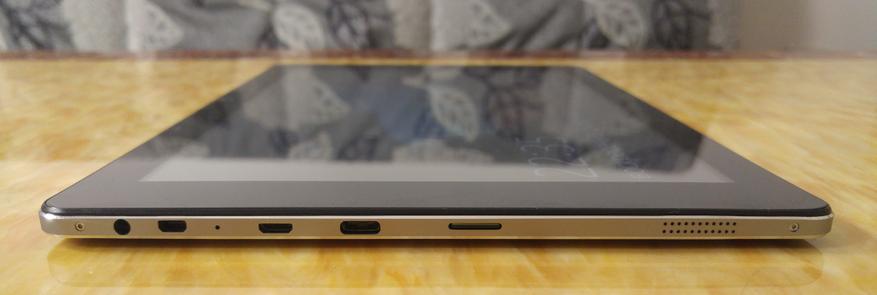
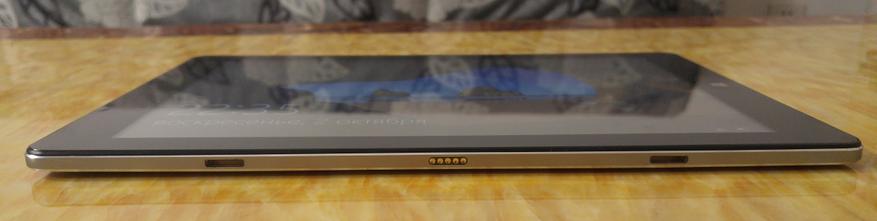
Все порты и разъемы сосредоточены с левой стороны. Слева направо тут: слот для microSD карточки, разъемы USB Type-C и microUSB, разъем microHDMI, а также гнездо для гарнитуры/наушников.
Положение, в котором планшет устанавливается на чехол, только одно, изменить угол наклона никак нельзя. Впрочем, при работе за столом оно достаточно комфортно. Но если поставить конструкцию на колени, то экран хочется наклонить к себе.
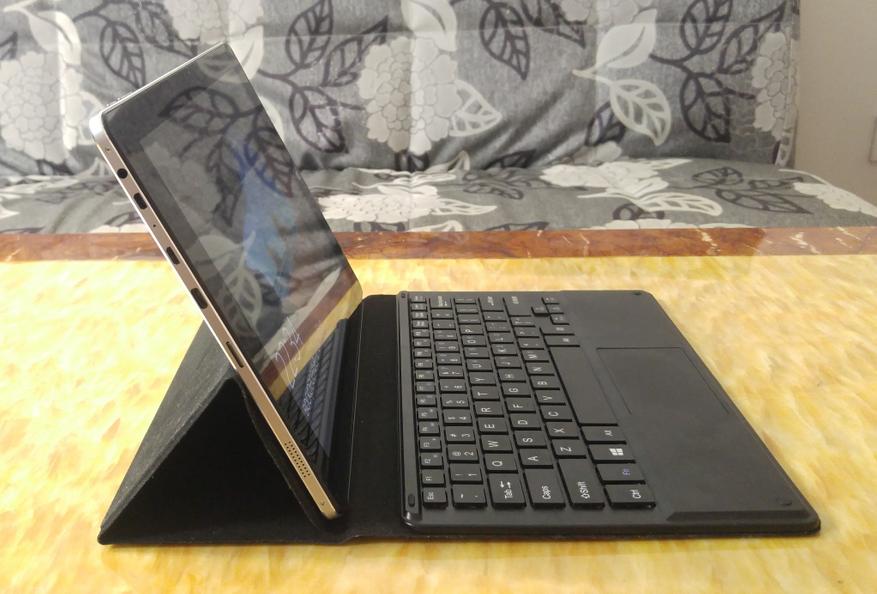
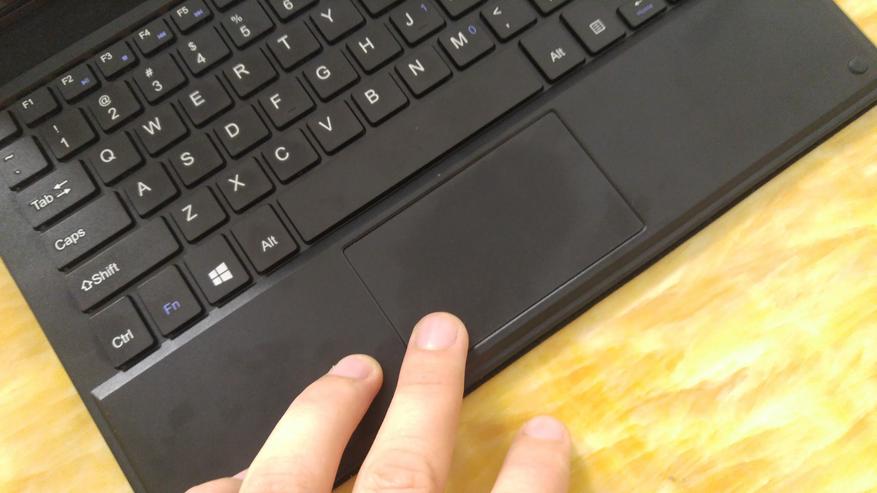
Клавиатура полноразмерная, островная. Порадовал отдельный ряд функциональных клавиш, а также «американский» Enter (полосочкой).
Клавиши слегка дребезжат при нажатии, наборное поле прогибается. Впрочем, ничего криминального — конечно, клавиатура далека до лучших образцов ноутбучных, однако, заметно превосходит по качеству худшие или нетбучные. В моем экземпляре русских букв не нанесли, подозреваю, что при доставке в Россию они в том или ином виде будут.
Отдельно хочется отметить резиновые вставки по углам клавиатуры. Благодаря им, в закрытом состоянии клавиши не касаются экрана и не оставляют на них отпечатков.

Тачпад небольшой, отдельных механических клавиш у него нет, нужно нажимать на сенсорное поле. «Клик» излишне тугой. Работать с ним не очень удобно, лучше всего подключать мышь.
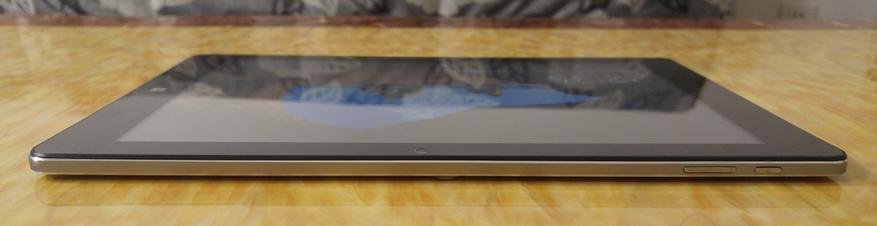
Кнопки включения-выключения и качелька регулировки громкости у планшета находится сверху.
А на нижней грани — разъем для клавиатуры. У клавиатуры нет защелок, но для фиксации используются пазы.
«Ответная» сторона чехла. Кстати, хочу подчеркнуть, что чехол сделан из чего-то вроде «искусственного бархата», который просто люто собирает пыль.

Задняя крышка у планшета металлическая. Это магниевый сплав, а не алюминий, поэтому он не так приятен на ощупь, но зато гораздо более прочный и долговечный.
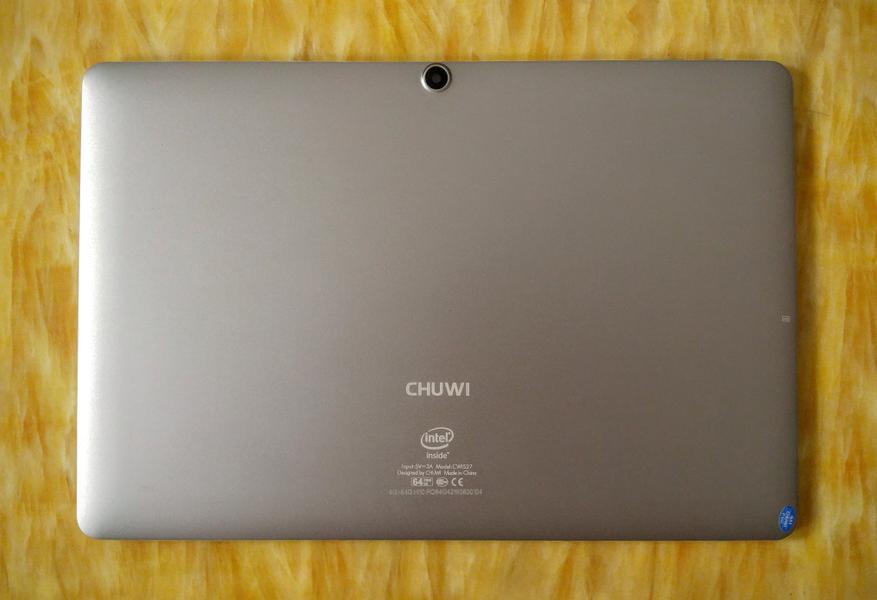
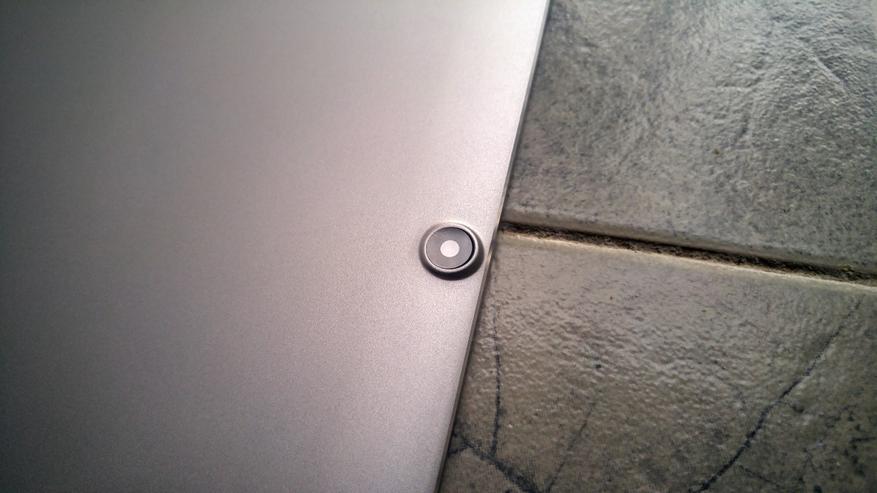
Клавиатура слегка выпирает, однако, за счет легкого скругления задней крышки, она не касается поверхности если планшет лежит на столе. Камера двухмегапиксельная, «затычка».
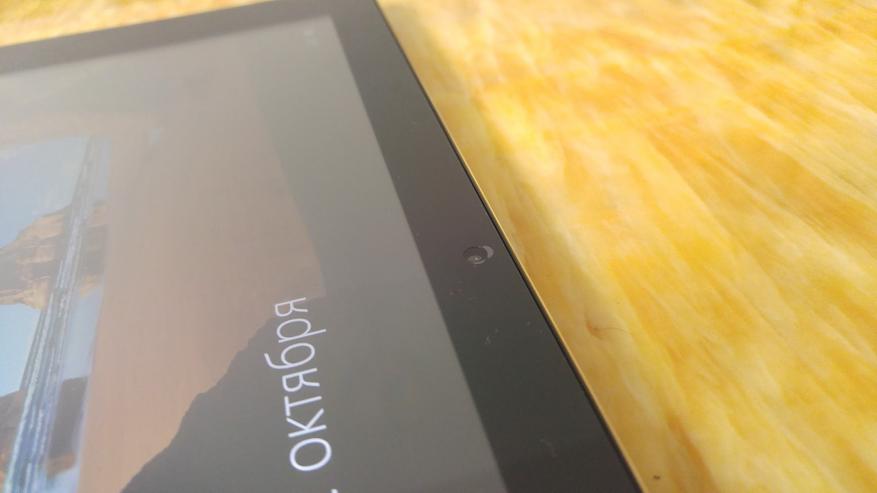
Передняя камера тоже на два мегапикселя. Из магазина планшет приехал с наклеенной пленкой — не очень ровно и красиво, зато практично.
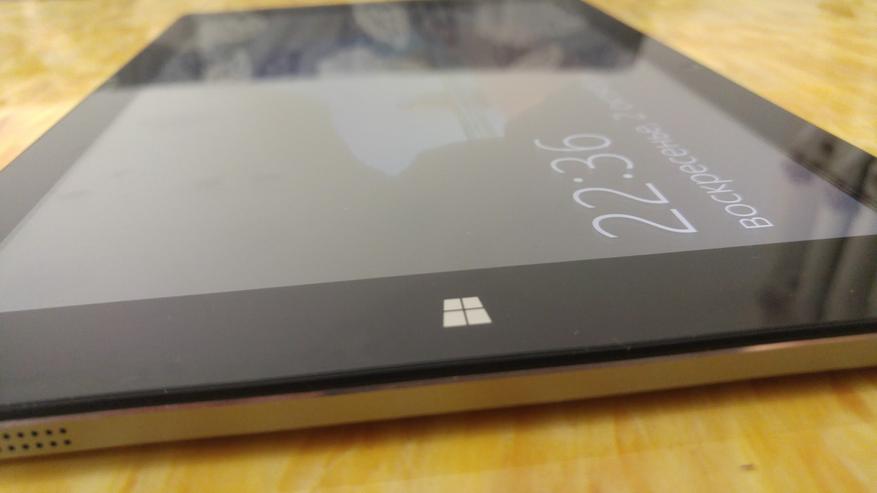
Кнопка «Windows» сенсорная.
Вид на решетку динамика справа. Видно, что планшет собран на винтиках с torx-головкой. Видимо, его можно будет легко разобрать. Правда, я не умею, так что, не возьмусь.
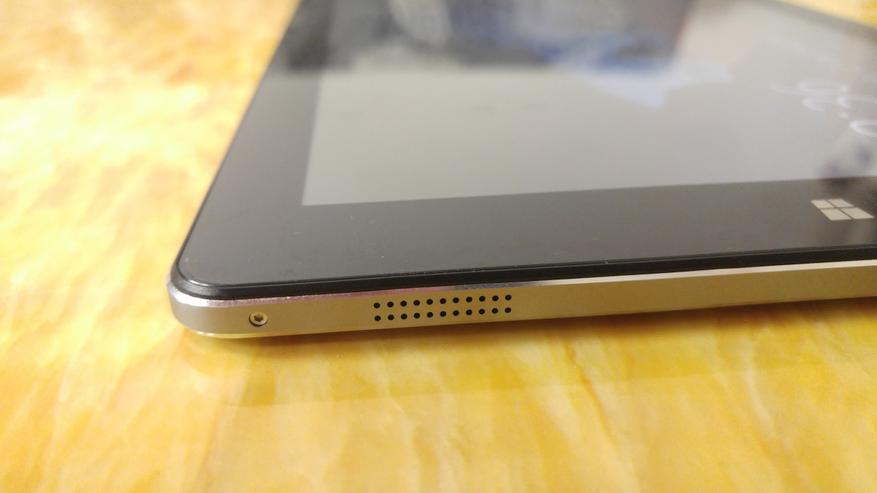
Качество исполнения у планшета неплохое. Никакого скрипа не слышно, лишних щелей и пазов не наблюдается.
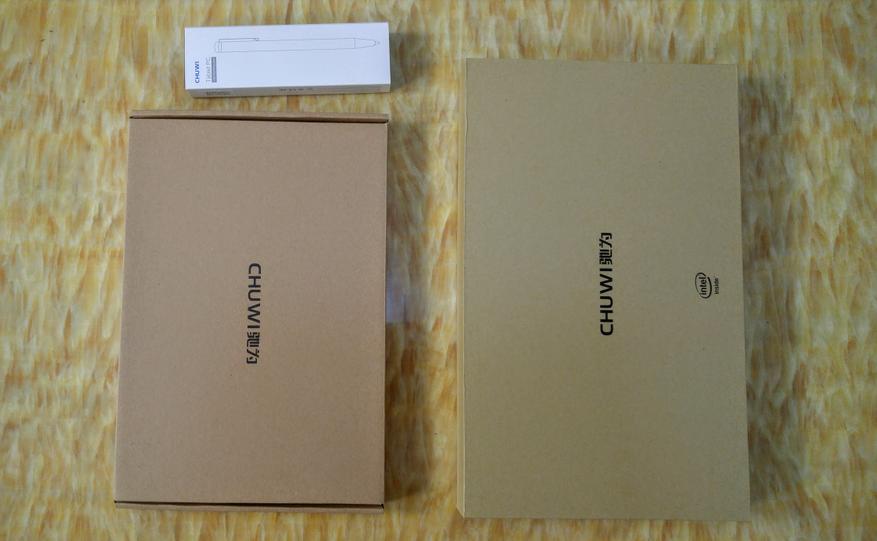
Упаковка и комплект поставки
Все три «части» комплекта приехали ко мне вот в таком разрозненном виде.
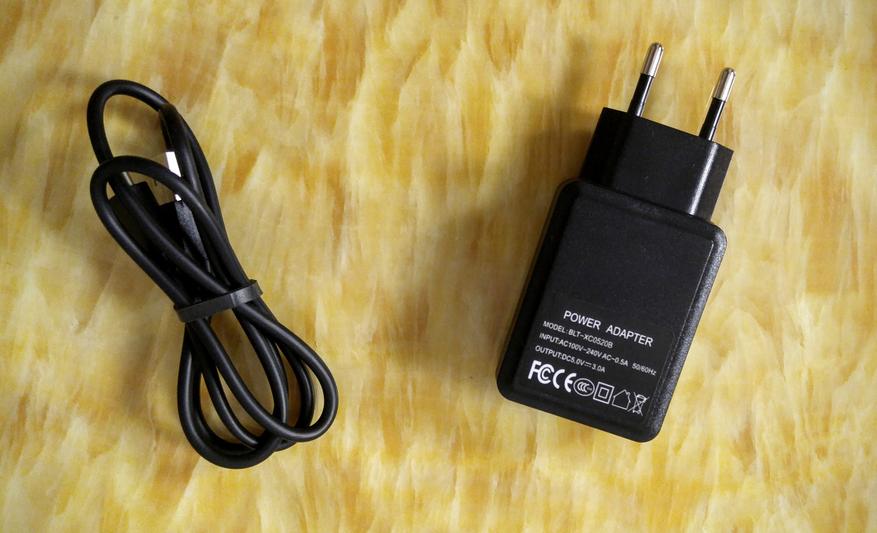
В комплекте с планшетом — никаких излишеств, лишь шнурок USB Type-C, да мощная трехамперная зарядка.
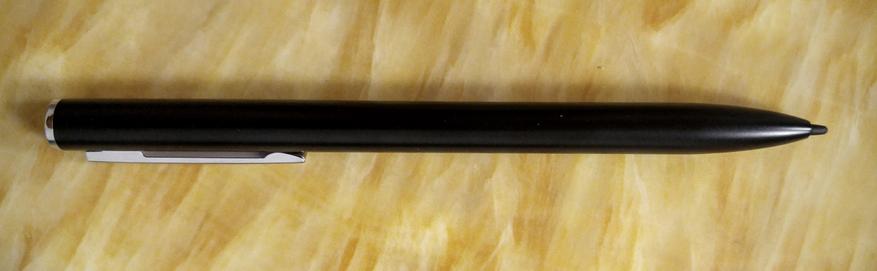
Отдельно — вот вид на стилус с близкого расстояния.
Оболочка
Chuwi Hi10 Plus работает под управлением двух операционных систем — Windows 10 и Remix OS. С первой все, в принципе понятно, к тому же, так как мой образец был предсерийным, некоторые функции на нем не работали (я подробно поговорю о работе в Windows 10 во второй части обзора). А вот Remix OS — штука достаточно интересная. Это такая оболочка, работающая поверх Android 5, принципы UI которой ближе всего к классическим оконным менеджерам. То есть, в оболочке есть рабочий стол, ярлыки, папки.
Оболочка поддерживает русский язык, никаких особых огрехов русификации я не заметил. При первой загрузке ПО предлагает понаставить всякого мусора, и очень обижается, если его не ставить.
В вертикальном варианте такой оконный менеджер конечно выглядит странно и непривычно.
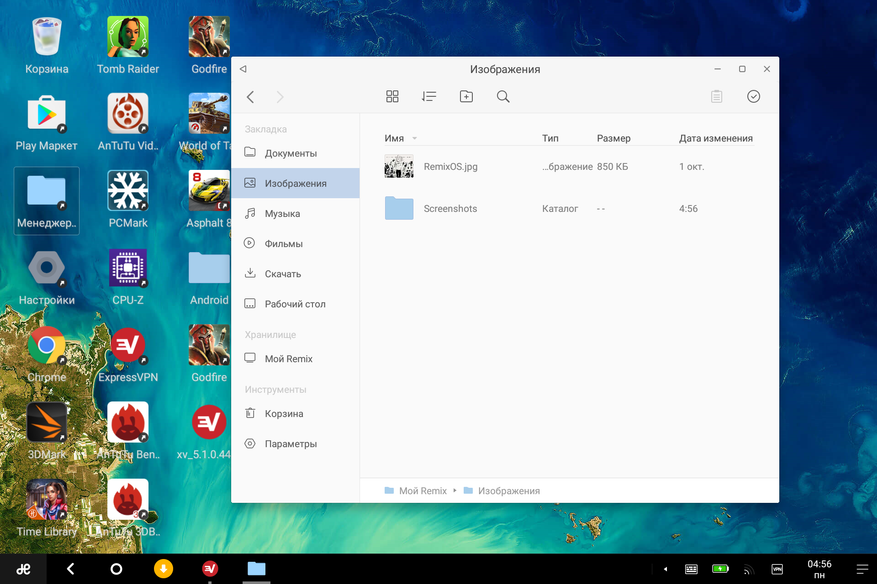
Но стоит повернуть планшет горизонтально и поставить на док-станцию, как все становится на свои места.
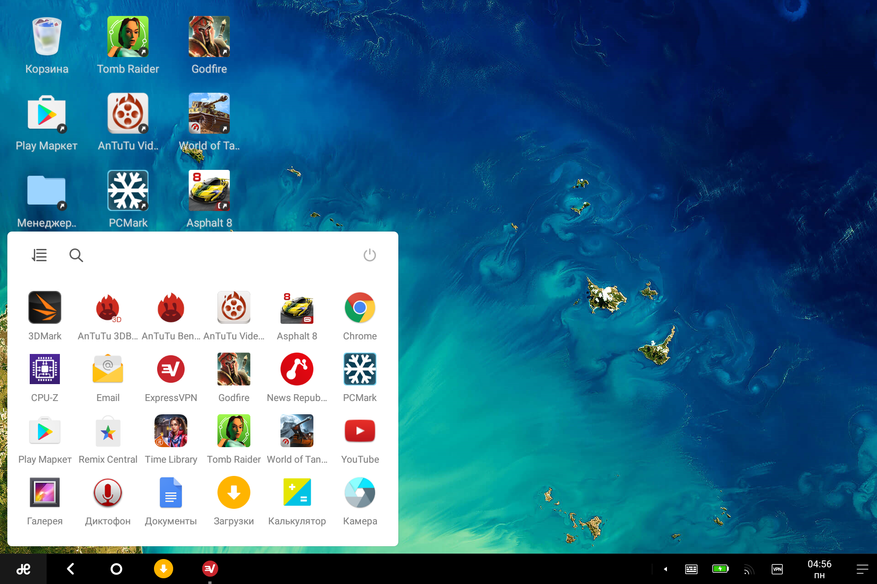
Использовать быстрый лаунчер достаточно удобно. Правда, в какой-то момент приложений в нем становится многовато и его приходится проматывать. Отдельной похвалы заслуживает файловый менеджер. В нем есть привычные закладки, и работают клавиатурные сокращения.
Впрочем, клавиатурные сокращения работают не только по файловому менеджеру, но и во всех приложениях. Так, например, Alt-F4 закрывает активное окно. Мало того, внизу отображаются значки активных приложений, и на них можно тыкать, перемещаясь между задачами.
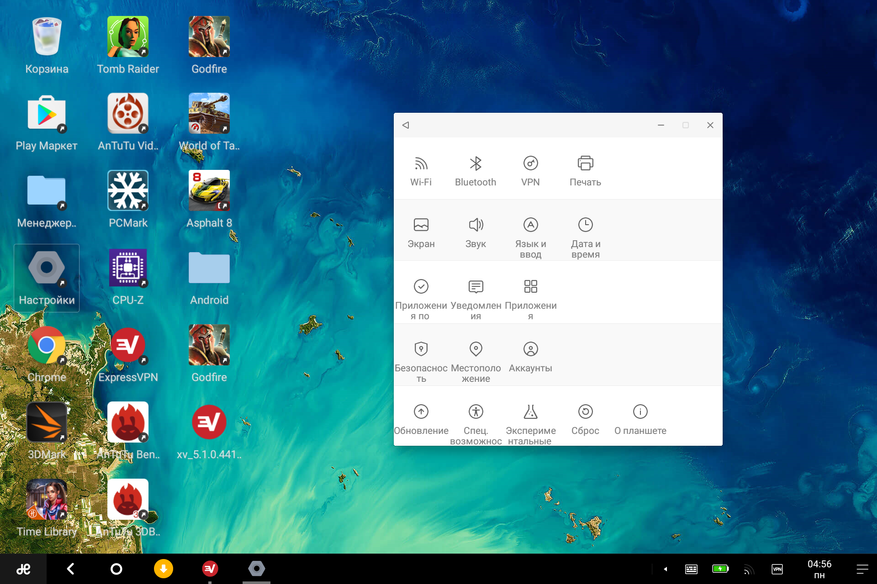
Из всего того, что я видел, Remix OS — наиболее адаптированная к использованию планшета в качестве рабочего инструмента. Я написал на планшете бОльшую часть этого поста, и не испытывал особых затруднений. Мало того, все работало стабильно.
Тесты производительности
БОльшую часть тестов производительности я провел под OS Android — дело в том, что планшет новый, и не все драйвера на нем работали корректно. Поэтому, из Windows будет только один скриншот. Точнее, даже фотография.
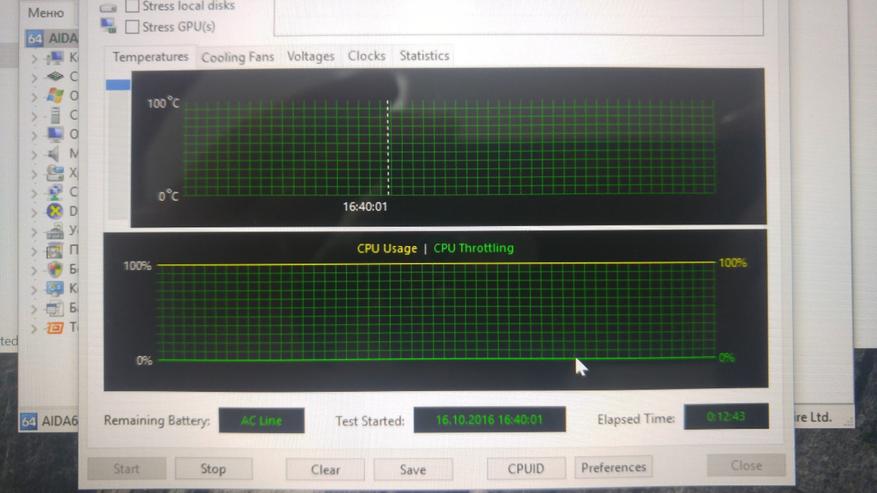
Как видите, во время стресс-теста AIDA64, процессор планшета не уходит в термальный троттлинг. Это говорит о хорошо организованной системе охлаждения.
UPD: Как оказалось, скорее всего я неправ по поводу троттлинга. Замечание из комментариев:
Дело в том, по молчанию UEFI настроен так, что система DPTF управляет снижением частоты процессора, пропуском тактов, отключением ядер, при этом регистр троттлинга в MSR не используется. Из-за этого многие программы просто не фиксируют троттлинг. Intel сделала хитрый финт, чтобы визуально казалось, что нагрев не растёт и всё работает штатно.
Так что нужно менять настройки в DPTF UEFI, чтобы троттлинг фиксировался программами или наблюдать за поведением процессора (например, частотой) и температурой. Например, если температура стабилизировался на критической отметке и частота начала скакать — это начало троттлинга. И т.п.
Не существует планшетов на Atom x5/x7, которые в стоке не троттлят. А с более-менее нормальным охлаждением вообще единицы, но они есть. Большинство китайских производителей просто «кладут болт» на систему охлаждения (Chuwi в этом мастера). Вопросу охлаждения планшетов на Атом нужно уделять чуть больше внимания, потому что влияет троттлинг очень сильно (особенно на производительность GPU).
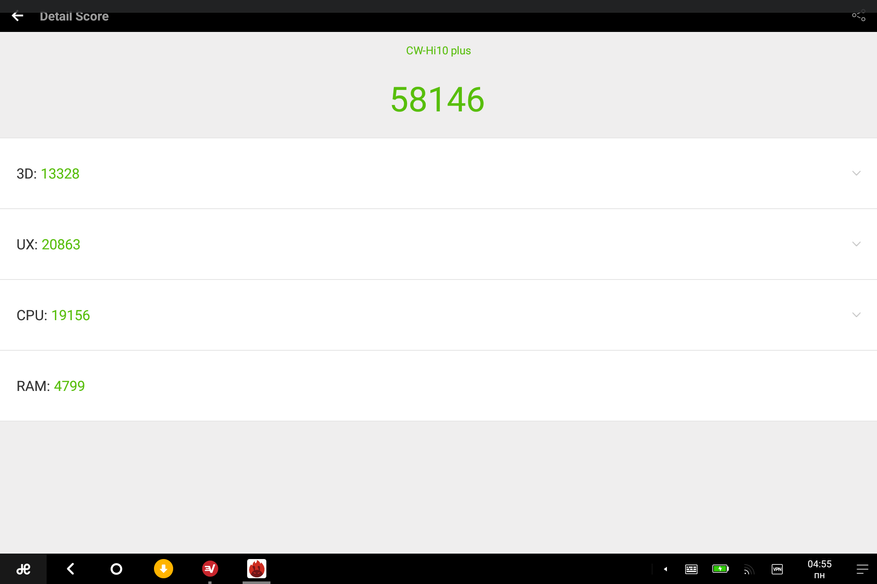
Дальше цифры. Народный Antutu показывает не особо впечатляющие цифры.
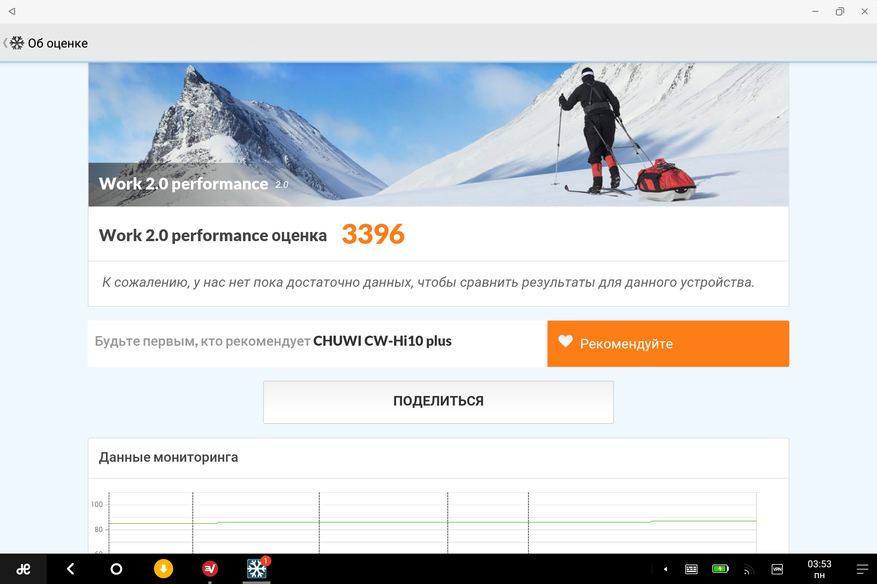
В 3DMark, впрочем, производительность достойная.
За счет большого объема памяти и с повседневными задачами планшет справляется неплохо.
К сожалению, пока мне не удалось провести полноценный инструментальный тест батареи, по оценкам планшет работал долго, около 7-8 часов. Но стоило подключить клавиатуру, как начинал разряжаться в два раза быстрее. Возможно, это баг текущей прошивки (ну не может же клавиатура потреблять столько же энергии, сколько сам планшет).
Что дальше
Во второй части статьи я выложу более подробное описание Chuwi Hi10 Plus — полноценно протестирую работу в Windows, постараюсь установить все драйвера и сделать так, чтобы вся функциональность заработала. Вы можете задавать мне вопросы в комментах, а также рассказывать, что вам было бы интересно потестировать, планшет остается у меня на руках.
Промежуточные итоги
Планшет Chuwi Hi10 Plus показал очень неплохой потенциал, однако, на данный момент прошивки и драйвера у него сырые. Как показывает практика, один-два месяца покупатели все еще будут работать его бета-тестерами, однако, к какому-то времени большинство багов поправят разработчики или сообщество. Оно на английском сайте поддержки Chuwi очень активное. Сама ветка поддержки, в которой выкладывают новые драйвера находится тут. Кроме того, у Chuwi есть русскоязычное сообщество Вконтакте,
На момент выхода поста, планшет продавался по цене от 13700 до 16700 тысяч, в зависимости от комплектации.
узнать актуальную цену
На мой взгляд, это более чем достойное предложение. Конечно, если вы не боитесь закатать рукава и покопаться с драйверами Windows (в Android все работает стабильно).
Windows computer not recognizing Chuwi Hi10 Plus Phone? Or Chuwi Hi10 Plus android phone won’t connect to the PC? It can be the result of missing Chuwi Hi10 Plus USB drivers or bad or corrupted drivers. To fix Chuwi Hi10 Plus Android phone not showing up on PC, download the Chuwi Hi10 Plus USB driver and install it on your computer.
Chuwi USB drivers are essential to efficiently connect Chuwi Hi10 Plus to Computer and Laptop using a USB cable. On this page, we have managed to share the official Chuwi Hi10 Plus USB driver for Windows 11, Windows 10, Windows 7, Windows 8.1, and Windows 8. Apart from the official USB Driver for Chuwi Hi10 Plus, we have also shared Chuwi Hi10 Plus ADB interface drivers and Fastboot drivers.
The Chuwi Hi10 Plus Android USB driver allows you to connect your phone as an MTP USB device (Media Transfer Protocol) to the computer so that you can transfer images, videos, documents, and other files between the phone and computer. Thus it will fix the android file transfer not working issue.
The Chuwi Hi10 Plus ADB driver and Fastboot driver allow you to pass ADB and Fastboot commands from the PC to perform certain operations on your phone.
Table of Contents
- 1 Download Chuwi Hi10 Plus USB Driver
- 1.1 Chuwi Hi10 Plus Driver for Flashing Firmware
- 1.2 Chuwi Hi10 Plus USB Driver for normal connecting to PC
- 1.3 Chuwi Hi10 Plus ADB and Fastboot Drivers
- 2 How to Install Chuwi Hi10 Plus Intel USB Driver
- 3 How to Install Chuwi Hi10 Plus USB Drivers Manually
- 4 How to Install Chuwi Hi10 Plus ADB and Fastboot Drivers
The Chuwi mobile drivers offered here can be used to flash stock firmware, stock recovery, TWRP recovery, CWM Recovery, Unlocking Bootloader, etc. It can also be used for general purposes like transferring media and files to and from mobile to PC.
Chuwi Hi10 Plus Driver for Flashing Firmware
Download Now
How to install: Follow Tutorial
Chuwi Hi10 Plus USB Driver for normal connecting to PC
Download Now
How to install: Follow Tutorial
The Chuwi Hi10 Plus Fastboot and ADB drivers can be downloaded below.
Chuwi Hi10 Plus ADB and Fastboot Drivers
Download Now
How to install: Follow Tutorial
[!] Note: If you face Driver Signature Error while installing the USB Driver, then watch this video to fix the problem.
Also Download: Chuwi HiBook Pro USB Drivers
How to Install Chuwi Hi10 Plus Intel USB Driver
- Download and extract Intel USB Drivers (intel-android-driver-1.10.0.zip) package to Desktop on your computer.

- After extracting the driver package, you’ll get Intel Android Driver setup (IntelAndroidDrvSetup1.10.0.exe) file.
- Right-click on the Intel Android USB Driver setup file and select Run as administrator.

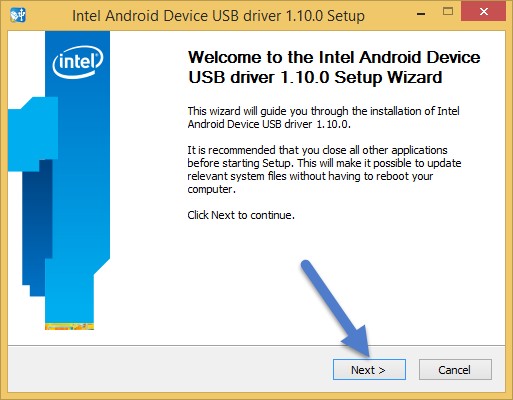
- Intel Android Device USB driver setup window should open, click on Next to continue.

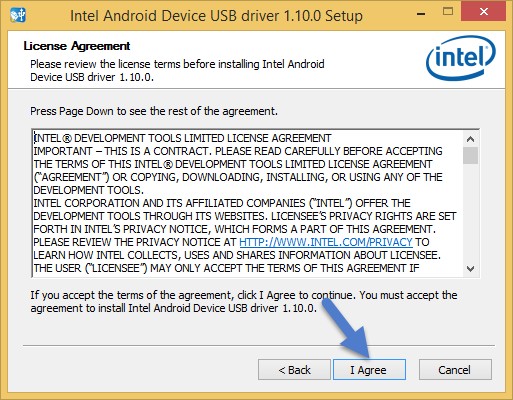
- Click on I Agree button to agree to the license agreement.
- Select the components you want to install and click Next to continue.
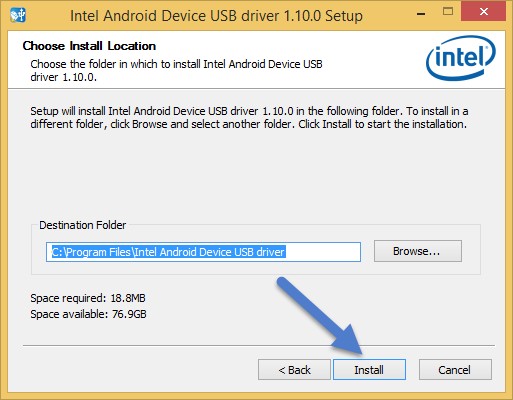
- Now, choose the destination folder to install Intel USB Driver and click on Install.
- Now, the Intel Android Drivers should start installing on your computer.
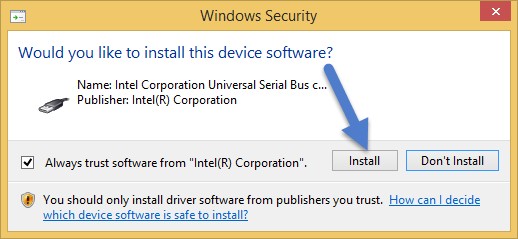
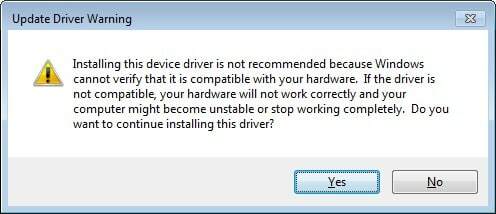
- Click on Install if a Windows Security window asking «Would you like to install this device software?» pops-up.

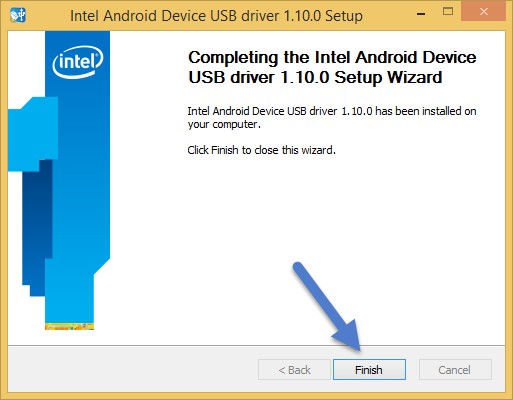
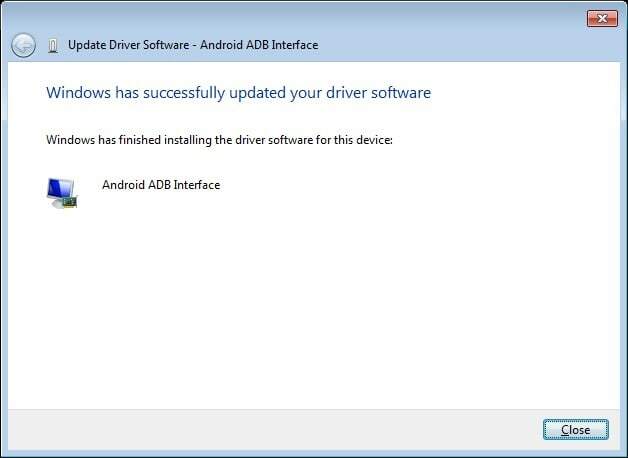
- Once the Intel Drivers are installed, a window should pop-up saying «Intel Android Device USB driver is installed successfully«. Click on OK.

- Now, click on Finish to close the setup wizard.
- Finally, reboot your computer.


How to Install Chuwi Hi10 Plus USB Drivers Manually
- Download and extract the latest_usb_driver_windows.zip package on your computer.

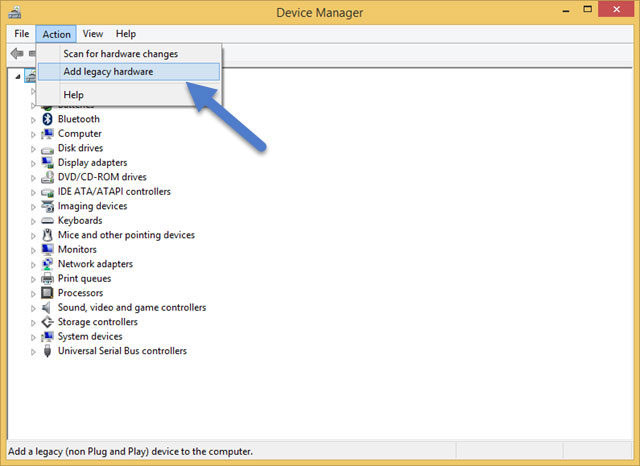
- Open the Device Manager on your computer by right-clicking Windows Start Button and selecting Device Manager.

- Once the Device Manager window opens, click on your Computer name.

- Now click on Action and then on Add legacy hardware.

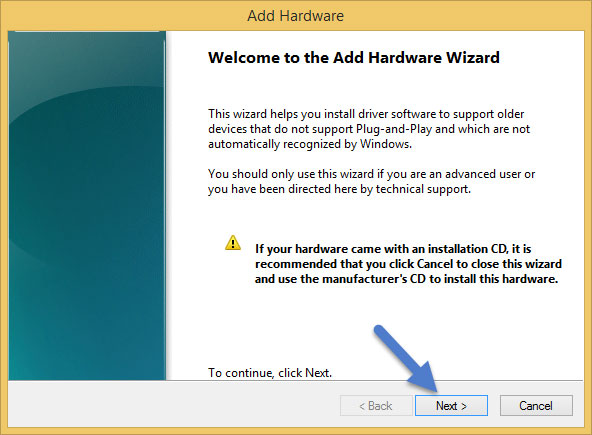
- Now Add Hardware Wizard window should pop-up. Click on Next to continue.

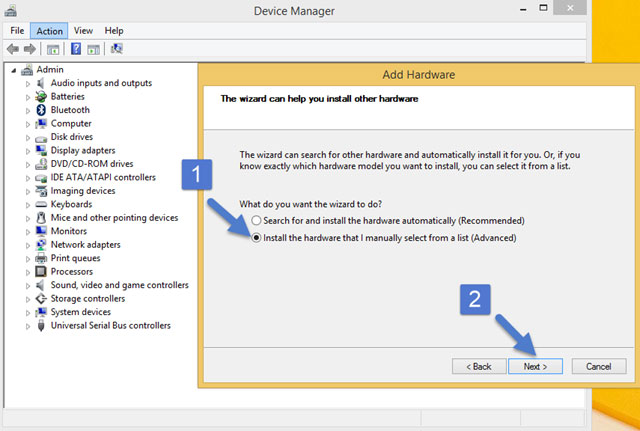
- In the next screen, select Install the hardware that I manually select from a list (Advanced) option and click on Next.
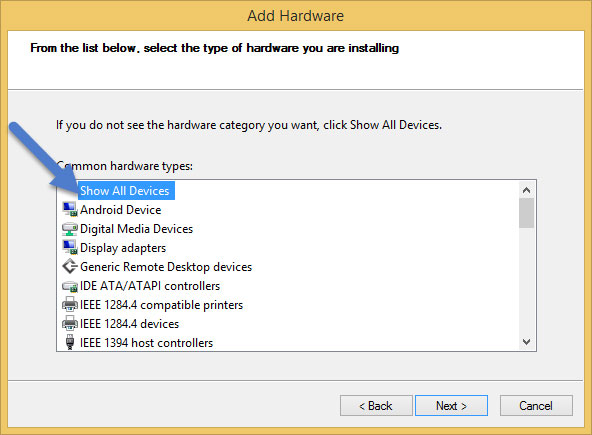
- Now select Show All Devices and click on Next.
- Now click on Have Disk… to open the Install From Disk window.
- Click on Browse… and navigate to the folder where you have extracted the drivers in Step #1.

- Now select android_winusb.inf file and click on Open and then on OK.

- Select the Android ADB Interface driver from the list and click on Next.
- Confirm the Hardware driver to install and click on Next to begin the installation process.
- Once installed, click on Finish.
- Follow Steps #3 to #13 again and install the Android Bootloader Interface driver and Android Composite ADB Interface driver.
- Once all the listed drivers are installed, reboot your computer.


How to Install Chuwi Hi10 Plus ADB and Fastboot Drivers
- Download and extract 15 seconds ADB installer on your computer to obtain the adb-setup.exe file.
- Now right click on the adb driver installer setup file and click on Run as administrator.

- Now you’ll see a command prompt window with a blue background and white text.

- It should say, Do you want to install ADB and Fastboot? Press the Y key on your keyboard and hit Enter.
- Now, it should ask whether you want to install ADB system-wide? Again press the Y key and hit Enter.
- Now, the ADB and Fastboot installation process should begin.
- When finished, it should say, Do you want to install device drivers? Press the Y key and hit Enter.
- Now the «Device Driver Installation Wizard» window should open.
- Click on Next to continue installing the Google USB Drivers (WinUSB).

- Once installed, click on Finish and restart your computer.


Important Notes:
[*] Driver Signature Error: If you got Driver Signature Error While installing the Driver then See this Video to fix this problem.
[*] Broken link: Report here.
[*] Have we missed any device model? Let us know by contacting us via Contact Us page.
Reader Interactions

On this page, we have managed to share the official USB driver of the Chuwi Hi10 Plus Device. If you were already searching for the USB driver of the device, then this page will help you out.
There are 2 USB drivers available for the device, i.e., Intel Driver and ADB Driver. The Intel Driver is compatible with all the Flash Tool, and the ADB Driver can be useful for establishing a connection between the mobile and the computer.
Chuwi Hi10 Plus Intel Driver
The Intel Android Driver is compatible with the Intel Flash Tool and the IMEI Tool and can be helpful if you are trying to install firmware (ROM) on the device.
Driver Name: Intel Android Driver
Package Name: Intel_Android_Driver_v1.10.0.zip
Driver Size: 8.9 MB
How to Install: Follow Guidelines
Get Driver
Chuwi Hi10 Plus ADB Driver
You can use the ADB Driver to connect the mobile (powered by android) to the computer and transfer data between the mobile and the computer.
Driver Name: Android ADB Driver
Package Name: usb_driver_r13-windows.zip
Driver Size: 8.27 MB
How to Install: Follow Guidelines
Get Driver
How to Install any USB Driver Manually
- Download and extract the USB driver on the computer.
- Open Device Manager (devmgmt.msc) and Click on the Computer Name > Action Menu > Add Legacy Hardware.
- Click on the Next button.
- Select the Install the hardware that I manually Select from a list checkbox and Click on the Next button.
- Again, Click on the Next button.
- Click on the Have Disk > Browse > Locate the .inf file (found in the extracted driver folder) and Click on Open Button.
- Click on the Finish button to complete the installation.
Follow Complete Guidelines
Readme Once:
[*] Driver Signature Error: If you are facing Driver Signature Error while installing the USB Driver, then head over to How to Fix Driver Signature Error page.
[*] Driver Easy: We recommend you to use Driver Easy application to update all the computer drivers in a Single Click.
[*] Chuwi Hi10 Plus Stock Firmware: If you are looking for the Chuwi Hi10 Plus Stock Firmware, then head over to the Stock Firmware page.
Download and Install Android USB Driver
In this article, you will find out the Chuwi USB Drivers? Don’t worry about it, we are here to give you the latest officially released drivers for your Chuwi Hi10 Plus smartphone or tablet and check for the USB driver for your device? If yes are you checking out an easy way to connect your device to a PC or Laptop? You’ve come to the right place! Here we’ve provided free download Chuwi Hi10 Plus USB drivers for all models supported their model numbers, just check below.
Additionally, Chuwi Mobile doesn’t offer computer suite application, connecting your device to a PC while not downloading and installing the USB driver given here is a not possible task. Therefore, download Chuwi USB drivers from here, install it on your PC and connect Chuwi smartphone/tablet to PC or Laptop with successfully.
Here, we have provided 2 USB drivers for your Chuwi Hi10 Plus Android device on this page.
| USB Driver Type | ADB Driver |
| USB Driver Purpose | Secure your device to a computer |
| File Size | 8.3 MB |
| USB Driver link | Click here to Download |
Download Chuwi Hi10 Plus Qualcomm Driver
| USB Driver Type | Qualcomm Driver |
| USB Driver Purpose | Flashing stock firmware on your device |
| File Size | 11.00 MB |
| Qualcomm Driver link | Click here to Download |
Watch video tutorial about ADB USB Drivers
If you don’t like this video tutorial or if you would like to get more command, then continue reading.
How to Install Android USB Drivers for Windows?
- Let’s get started, download the USB driver and extract it on your desktop.
- Currently, open Device Manager > Action > Add legacy hardware.

- Click “Next” in the Add legacy hardware wizard.

- NOW, select“Install the hardware that I manually select from the list (Proceed)” and click “Next“.

- When done choose “Show all devices“, click “Next” and select the extracted file manually from your PC.

- Now to start installing your new hardware, click “Next” once again.

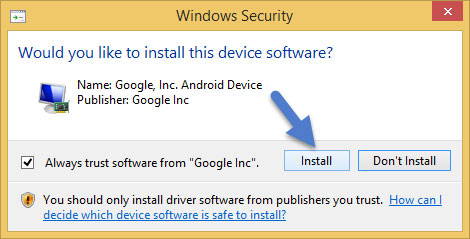
- Click “Install” in the Windows security prompt window.

- Click “Finish” to complete the installation.

You May Also Like:
Samsung USB Drivers
Huawei USB Drivers
Nokia USB Drivers
Motorola USB Drivers
LG USB Drivers
Oppo USB Drivers
Meizu USB Drivers
Xiaomi USB Drivers
Lenovo USB Drivers
Vivo USB Drivers
ZTE USB Drivers
Supported Operating Systems 32-bit / 64-bit
Need USB driver to download for Windows 10, Windows 8.1, Windows 7? Just in case you are having problems at the part of your USB is not operating, see the article below to settle your USB problems.
How to Install Android USB Drivers on Windows 10
Installation the Android USB driver on Windows 10 for the first time, some awesome steps guide below:
- Connect your Android device to your computer’s USB port.
- From Windows Explorer, open “Computer Management”.
- In the “Computer Management” left pane, select Device Manager.
- In the “Device Manager” right pane, locate and expand Portable Devices > Other Devices, depending on which one you see.
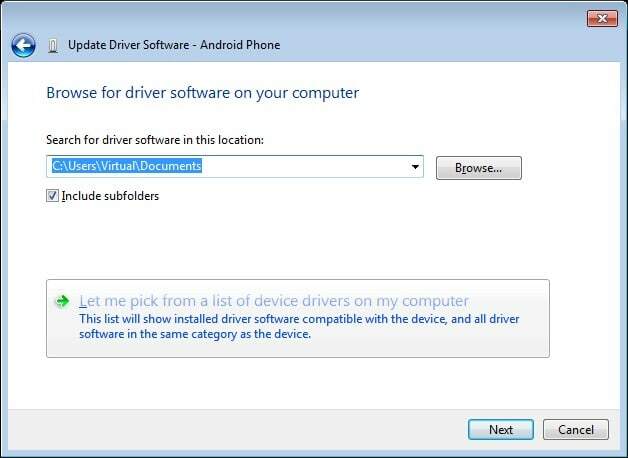
- Right-click the name of the device you connected, and then select “Update Driver Software”.
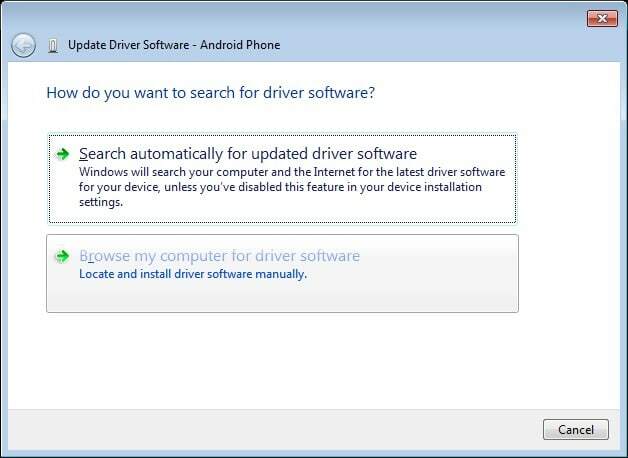
- In the “Hardware Update Wizard“, select Browse my computer for driver software and click “Next”.
- Click Browse and then locate the USB driver folder. For example, the Google USB Driver is located in.
android_sdkextrasgoogleusb_driver - Click “Next” to install the driver.
How to Install Android USB Drivers on Windows 8.1
Installation the Android USB driver on Windows 8.1 for the first time, some awesome steps guide below:
- Connect your Android device to your computer’s USB port.
- Access search, as follows: Touch screen: On your computer, swipe in from the right edge of the screen and tap “Search”.Using a mouse: Point to the lower-right corner of the screen, move the mouse pointer up, and then click “Search”.
- In the search box, type into and then click “Device Manager”.
- Double-click the device category, and then double-click the device you want.
- Click the “Driver” tab, click Update Driver, and follow the instructions.
How to Install Android USB Drivers on Windows 7
Installation the Android USB driver on Windows 7 for the first time, some awesome steps guide below:
- Connect your Android device to your computer’s USB port.
- Right-click on “Computer” from your desktop or Windows Explorer, and select “Manage”.
- Select “Devices” in the left pane.
- Locate and expand “Another device” in the right pane.
- Right-click the device name (such as Nexus S) and select “Update Driver Software”. This will launch the Hardware Update Wizard.
- Select Browse my computer for driver software and click “Next”.
- Click “Browse” and locate the USB driver folder. (The Google USB Driver is located in
android_sdkextrasgoogleusb_driver.) - Click “Next” to install the driver.
Or, to upgrade an existing Android USB driver on Windows 7 and higher with the new driver:
- Connect your Android device to your computer’s USB port.
- Right-click on “Computer” from your desktop or Windows Explorer, and select “Manage”.
- Select “Device Manager” in the left pane of the Computer Management window.
- Locate and expand “Android Phone” in the right pane.
- Right-click on “Android Composite ADB Interface” and select “Update Driver”. This will launch the Hardware Update Wizard.
- Select “Install from a list or specific location” and click “Next”.
- Select “Search for the best driver in these locations” uncheck “Search removable media”, and check to Include this location in the search.
- Click “Browse” and locate the USB driver folder. (The Google USB Driver is located in
android_sdkextrasgoogleusb_driver.) - Click “Next” to upgrade the driver.
That’s it. Now you have successfully finished installing Android ADB Driver on your Windows computer. From now on, you will be able to connect your Android smartphone or tablet with the PC successfully.
In the event that you might want to connect with us for many reasons, utilize the contact page.
Home » Chuwi Hi10 Plus USB Driver
If you are an owner of Chuwi Hi10 Plus and looking out for usb drivers to connect your device to the computer, then you have landed on the right page. Download Chuwi Hi10 Plus USB driver from here, install it on your computer and connect your device with PC or Laptop successfully.
Here, we have provided two usb drivers for your Chuwi Hi10 Plus.
USB Driver Type: Intel Driver
USB Driver Purpose: For flashing Stock firmware on your device
File Size: 9 MB
Download Now
USB Driver Type: ADB Driver
USB Driver Purpose: For connecting your device to a computer
File Size: 8.3 MB
Download Now
Steps To Install Chuwi Hi10 Plus Intel Driver In Computer
Video Tutorial
If you don’t like this video tutorial or if you would like to get more instructions, then continue reading.
Step 1: To get started, download the driver and extract it on your desktop.

Step 2: Open the extracted file and click “Next” in the setup wizard.
Step 3: Now, click “I agree” in the Licence Agreement.
Step 4: Browse the destination folder and select “Install” in the install location wizard.
Step 5: Click “Install” in the Windows security prompt window.
Step 6: Once done, click “Finish” to complete installation.
That’s it. Your device driver is now successfully installed on your computer.
Steps To Install Chuwi Hi10 Plus ADB Driver In Computer
Video Tutorial
If you don’t like this video tutorial or if you would like to get more instructions, then continue reading.
Step 1: To get started, download the driver and extract it on your desktop.

Step 2: Now, open Device Manager > Action > Add legacy hardware.
Step 3: Next, click «Next» in the Add legacy hardware wizard.
Step 4: Now choose «Install the hardware that I manually select from the list (Advanced)» and click «Next«.
Step 5: Once done choose «Show all devices«, click «Next» and select the extracted file manually from your computer.
Step 6: Now to start installing your new hardware, click «Next» again.
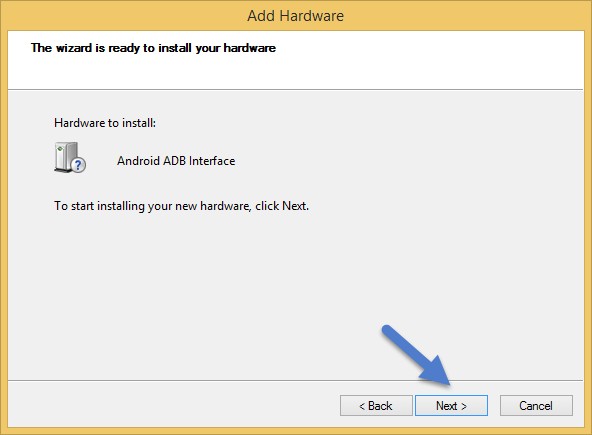
Step 7: Click «Install» in the Windows security prompt window.
Step 8: Next, click «Finish» to complete installation.

That’s it. Now you have successfully finished installing ADB driver in your Computer. If you encounter any issues while following this tutorial, do let me know via comments.

Rajarajacholan Kulothungan is a tech nerd and an Android enthusiast working for AllUSBDrivers.com from 2020. He has a knack for finding the right Windows USB driver for Android devices, and he shares his experiences here.
Reader Interactions
Если вы используете устройства Chuwi, это руководство предназначено для вас. Сегодня мы представляем вам сборник USB-драйверов Chuwi для различных моделей устройств компании. Обычно при подключении устройства к ПК драйверы USB устанавливаются автоматически. Однако для устройств Chuwi такая возможность недоступна. Итак, вам нужно вручную загрузить и установить драйверы Chuwi USB.
Вы можете найти полный список различных устройств Chuwi и соответствующих им в этом посте. Кроме того, как мы уже упоминали о ручной установке, вы можете обратиться к краткому и простому руководству по установке, которое мы предоставили. Это упростит вам установку драйверов Chuwi USB. Так что иди проверь это.

Скачать драйверы Chuwi USB
Вот список драйверов Chuwi USB для разных моделей своих устройств. Вы можете загрузить драйверы USB, перейдя по соответствующей ссылке.
| Список устройств Chuwi | Ссылка для загрузки USB-драйвера |
| Chuwi V8S | Скачать |
| Chuwi V17 Pro | Скачать |
| Chuwi V99X | Скачать |
| Chuwi V88HD | Скачать |
| Chuwi V89 | Скачать |
| Chuwi DX1 | Скачать |
| Chuwi 99i | Скачать |
| Chuwi v10HD 3G | Скачать |
| Chuwi VX8 3G Business Edition | Скачать |
| Chuwi VX8 | Скачать |
| Chuwi VX2 | Скачать |
| Chuwi VX3 | Скачать |
| Chuwi V17HD | Скачать |
| Chuwi VX1 | Скачать |
| Chuwi Vi8 Plus | Скачать |
| Электронная книга Chuwi | Скачать |
| Chuwi Hi10 | Скачать |
| Chuwi Vi10 Pro | Скачать |
| Chuwi Vi10 Ultimate | Скачать |
| Chuwi Vi7 | Скачать |
| Chuwi Hi8 | Скачать |
| Chuwi Hi8 Redux | Скачать |
| Chuwi Vi 8 | Скачать |
| Chuwi VL8 | Скачать |
| Chuwi Vi 10 с двойной загрузкой | Скачать |
| Chuwi Hi9 | Скачать |
| Chuwi Hi13 | Скачать |
| Chuwi HiPad | Скачать |
| Chuwi Hi9 Pro | Скачать |
| Chuwi Hi9 Plus | Скачать |
| Chuwi Hi9 Air | Скачать |
| Chuwi Hi8 Air | Скачать |
| Chuwi Hi10 Plus | Скачать |
| Chuwi Hi10 Plus Z8350 | Скачать |
| Chuwi HiBook Pro | Скачать |
| Chuwi Hi10 Pro | Скачать |
| Chuwi HiBook | Скачать |
| Chuwi Hi8 Pro | Скачать |
| Chuwi Hi12 | Скачать |
| Chuwi Vi10 Plus | Скачать |
Другие важные драйверы
- Загрузите и установите драйверы MediaTek MT65xx USB VCOM
- Что такое SP Flash Tool? Как прошить стоковую прошивку с помощью SP Flash Tool
- Скачать SmartPhone Flash Tool (SP Flash Tool)
- Последняя версия Factory Upgrade Downgrade Spreadtrum Flash Tool
- Как прошить TWRP Recovery на любом смартфоне MediaTek с помощью SP Flash Tool
- Как загрузить последнюю версию инструмента загрузки телефона Qcom
- Последняя версия Factory Upgrade Downgrade Spreadtrum Flash Tool
- Загрузите USB-драйверы Android для Windows и Mac
Как установить драйвер USB
1. Прежде всего, установите Android SDK на свой компьютер. Вы можете скачать здесь.
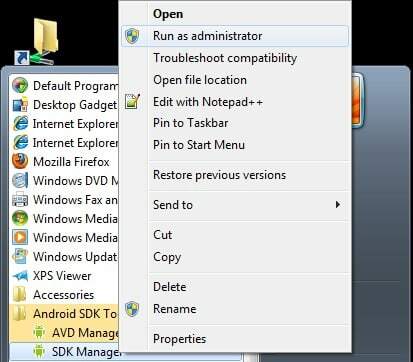
2. После установки Android SDK перейдите в меню «Пуск». Выберите Android SDK Tools -> SDK Manager. Щелкните его правой кнопкой мыши и выберите Запустить от имени администратора
Примечание: Убедитесь, что SDK Manager запущен в режиме администратора. В противном случае возникнут проблемы с установкой новых компонентов.
3. В диспетчере SDK выберите ДОПОЛНИТЕЛЬНО. Там нужно выбрать Драйвер Google USB а затем щелкните Установить 1 пакет.

4. Когда установка будет завершена, подключите свое устройство Android.
5. Откройте диспетчер устройств на своем ПК. Вы можете сделать это, выполнив поиск «Диспетчер устройств» в строке поиска. Здесь выберите Телефон на Андроиде, щелкните правой кнопкой мыши и выберите — Обновите программное обеспечение драйвера

6. Появится новое диалоговое окно, выберите «Найдите на моем компьютере драйверы»Из вариантов.
7. Теперь выберите «Разрешите мне выбрать из списка драйверов устройств на моем компьютере»Вариант.
8. Выбрать «Показать все устройства»В раскрывающемся меню.

9. Щелкните значок «есть дискКнопка

10. Введите путь к драйверу Google USB.
C: Program Files (x86) Android android-sdk extras google usb_driver

11. Выбрать «Интерфейс Android ADB»Из списка устройств.

12. Подтвердите установку USB-драйвера Android, нажав кнопку «да».
13. Нажмите Установить.

14. Теперь установка завершена. Вы можете нажать кнопку закрытия, чтобы завершить работу мастера установки.
Итак, ребята. В зависимости от используемых устройств вы можете загрузить и установить USB-драйверы Chuwi. Надеемся, это руководство было для вас полезным.
Сваям — профессиональный технический блоггер со степенью магистра компьютерных приложений, а также имеет опыт разработки под Android. Он убежденный поклонник Stock Android OS. Помимо технических блогов, он любит игры, путешествовать и играть на гитаре.
Chuwi HI10 Plus has been released for some time, and it has been tested for many users to prove its superior quality. Sometimes, the tablet is bricked for wrong operation, we need to prepare the ROM for Chuwi HI10 Plus Remix OS, Windows 10 OS, and Android 5.1 OS. Right now Chuwi has provided the official Chuwi HI10 Plus ROM.
[Official Version] [4G/64G] Chuwi Hi10 Plus Download:
Chuwi Hi10 Plus use same system files with Chuwi Vi10 plus, except for Bios.
Remix OS:
Chuwi Hi10 Plus Remix OS 2.0:
https://www.dropbox.com/s/koveo4 … singleboot.rar?dl=0
Android:
Chuwi Hi10 Plus Android 5.1:
https://www.dropbox.com/s/i8puk9 … _DS_V1.0.1.zip?dl=0
Windows:
Chuwi Hi10 Plus Windows – Seven Parts:
https://www.dropbox.com/sh/ubyvv … G6CzwsxWiSw1da?dl=0
(The Windows file is so large, i divided it into seven parts so that you can download it easily)
Driver:
Chuwi Hi10 Plus All Drivers:
https://www.dropbox.com/s/gmxqts … ver%20C189.zip?dl=0
Chuwi Hi10 Plus Touch Driver:
https://www.dropbox.com/s/mga1er … h%20driver.rar?dl=0
Tutorial:
http://forum.chuwi.com/thread-2254-1-1.html
(Pls refer to Vi10 Plus tutorial)
Password:
en.chuwi.com
Above documents are used for Z8300 CPU Hi10 Plus, before serial number Hi10 Q64G42160804000 (including this serial number)
————————————————————————————
Chuwi Hi10 Plus Z8350 (20161118) Andorid, Windows Download: (after serial number Hi10 Q64G42160804000 )
Android :
Chuwi Hi10 Plus (Z8350) Android download:
https://chuwiinnovationtechnolog … xa2ozcb6waup20pere6
Windows :
Chuwi Hi10 Plus (Z8350) Windows download:
https://www.dropbox.com/s/77pfgt … R.0923.X64.zip?dl=0
or https://chuwiinnovationtechnolog … ef6i008721sy857wuls
Update on Sept.8 ,2017
CHUWI Hi10 Plus Tablet PC
Coupon code: Hi10PlusK
SP: $156.99
| Start | End | Items (English) | pro price | Coupon | Amount |
| 10.13 | 10.31 | CHUWI Hi10 Plus Tablet PC with Keyboard | 149.99 | 907Hi10 | 100 |
| 11.14 | 11.30 | CHUWI Hi10 Plus Tablet PC | 155.99 | GBTPC04 | 30 |
Windows computer not recognizing Chuwi Hi10 Plus Phone? Or Chuwi Hi10 Plus android phone won’t connect to the PC? It can be the result of missing Chuwi Hi10 Plus USB drivers or bad or corrupted drivers. To fix Chuwi Hi10 Plus Android phone not showing up on PC, download the Chuwi Hi10 Plus USB driver and install it on your computer.
Chuwi USB drivers are essential to efficiently connect Chuwi Hi10 Plus to Computer and Laptop using a USB cable. On this page, we have managed to share the official Chuwi Hi10 Plus USB driver for Windows 11, Windows 10, Windows 7, Windows 8.1, and Windows 8. Apart from the official USB Driver for Chuwi Hi10 Plus, we have also shared Chuwi Hi10 Plus ADB interface drivers and Fastboot drivers.
The Chuwi Hi10 Plus Android USB driver allows you to connect your phone as an MTP USB device (Media Transfer Protocol) to the computer so that you can transfer images, videos, documents, and other files between the phone and computer. Thus it will fix the android file transfer not working issue.
The Chuwi Hi10 Plus ADB driver and Fastboot driver allow you to pass ADB and Fastboot commands from the PC to perform certain operations on your phone.
The Chuwi mobile drivers offered here can be used to flash stock firmware, stock recovery, TWRP recovery, CWM Recovery, Unlocking Bootloader, etc. It can also be used for general purposes like transferring media and files to and from mobile to PC.
Chuwi Hi10 Plus Driver for Flashing Firmware
Download Now
How to install: Follow Tutorial
Chuwi Hi10 Plus USB Driver for normal connecting to PC
Download Now
How to install: Follow Tutorial
The Chuwi Hi10 Plus Fastboot and ADB drivers can be downloaded below.
Chuwi Hi10 Plus ADB and Fastboot Drivers
Download Now
How to install: Follow Tutorial
[!] Note: If you face Driver Signature Error while installing the USB Driver, then watch this video to fix the problem.
Also Download: Chuwi HiBook Pro USB Drivers
How to Install Chuwi Hi10 Plus Intel USB Driver
- Download and extract Intel USB Drivers (intel-android-driver-1.10.0.zip) package to Desktop on your computer.
- After extracting the driver package, you’ll get Intel Android Driver setup (IntelAndroidDrvSetup1.10.0.exe) file.
- Right-click on the Intel Android USB Driver setup file and select Run as administrator.
- Intel Android Device USB driver setup window should open, click on Next to continue.
- Click on I Agree button to agree to the license agreement.
- Select the components you want to install and click Next to continue.
- Now, choose the destination folder to install Intel USB Driver and click on Install.
- Now, the Intel Android Drivers should start installing on your computer.
- Click on Install if a Windows Security window asking «Would you like to install this device software?» pops-up.
- Once the Intel Drivers are installed, a window should pop-up saying «Intel Android Device USB driver is installed successfully«. Click on OK.
- Now, click on Finish to close the setup wizard.
- Finally, reboot your computer.
How to Install Chuwi Hi10 Plus USB Drivers Manually
- Download and extract the latest_usb_driver_windows.zip package on your computer.
- Open the Device Manager on your computer by right-clicking Windows Start Button and selecting Device Manager.
- Once the Device Manager window opens, click on your Computer name.
- Now click on Action and then on Add legacy hardware.
- Now Add Hardware Wizard window should pop-up. Click on Next to continue.
- In the next screen, select Install the hardware that I manually select from a list (Advanced) option and click on Next.
- Now select Show All Devices and click on Next.
- Now click on Have Disk… to open the Install From Disk window.
- Click on Browse… and navigate to the folder where you have extracted the drivers in Step #1.
- Now select android_winusb.inf file and click on Open and then on OK.
- Select the Android ADB Interface driver from the list and click on Next.
- Confirm the Hardware driver to install and click on Next to begin the installation process.
- Once installed, click on Finish.
- Follow Steps #3 to #13 again and install the Android Bootloader Interface driver and Android Composite ADB Interface driver.
- Once all the listed drivers are installed, reboot your computer.
Video Tutorial: How to Install Chuwi Hi10 Plus Android USB Drivers
Subscribe to Android USB Drivers
How to Install Chuwi Hi10 Plus ADB and Fastboot Drivers
- Download and extract 15 seconds ADB installer on your computer to obtain the adb-setup.exe file.
- Now right click on the adb driver installer setup file and click on Run as administrator.
- Now you’ll see a command prompt window with a blue background and white text.
- It should say, Do you want to install ADB and Fastboot? Press the Y key on your keyboard and hit Enter.
- Now, it should ask whether you want to install ADB system-wide? Again press the Y key and hit Enter.
- Now, the ADB and Fastboot installation process should begin.
- When finished, it should say, Do you want to install device drivers? Press the Y key and hit Enter.
- Now the «Device Driver Installation Wizard» window should open.
- Click on Next to continue installing the Google USB Drivers (WinUSB).
- Once installed, click on Finish and restart your computer.
Video Tutorial: How to Install Chuwi Hi10 Plus ADB and Fastboot Drivers
Subscribe to Android USB Drivers
Important Notes:
[*] Driver Signature Error: If you got Driver Signature Error While installing the Driver then See this Video to fix this problem.
[*] Broken link: Report here.
[*] Have we missed any device model? Let us know by contacting us via Contact Us page.
Reader Interactions