Nowadays, more developers adopt the Single Page Application (SPA) architecture for their web applications or static site. This article will talk about the various merits and demerits of SPAs and build one using the Vue JS Library.
What is a SPA?
According to the MDN Web Docs, single Page Applications (SPA) allow users to use websites without loading new pages during navigation. SPAs utilise Client-Side Routing instead of Server Side Routing, which websites traditionally use.
In Server-Side routing, when a user visits a new page, the browser sends a request to the server, asking for the required files to load the page. The server grants the request, and the browser downloads the views and scripts for that page. This process repeats every time the user wants to navigate to other pages within the website.
In Client-Side Routing, when the user visits the website for the first time, the server provides the browser with an index.html file which comes with a bundled script of the entire website. All the necessary HTML, CSS and JavaScript codes are retrieved with a single page load. All the required resources are dynamically retrieved and added to the page. In Vue, when navigation happens, Vue uses Vue-router to check for the differences in the DOM and renders them on the page.
Pros & Cons
Let’s have a look on the pros and cons of the SPA approach
Pros
- It is highly reactive
- Less load on the server
- Better User Experience
- Better client-server interaction, the dividing of front-end’s and back-end’s concerns
Cons
- SEO is challenging
- JavaScript is strictly required
- Performance on client side
Alright, enough chit-chat on SPA. Let’s get to the exciting stuff, building SPAs using Vue and Vue-router.
Tools
There are different ways of adding vue-router to a vue project. In this article, we will be using a tool called vue-cli.
Vue-cli
For a new project, vue-CLI would work perfectly. With Vue-cli, we can start our project with one of Vue’s many open-source templates, and we can also choose to create our template.
First, we’ll need to install it using
npm install -g vue-cli
Enter fullscreen mode
Exit fullscreen mode
Let’s create a new application called spa-app using
vue create spa-app
Enter fullscreen mode
Exit fullscreen mode
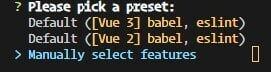
Then you will be asked to select a preset, use the arrow keys to navigate to Manually select features and press enter
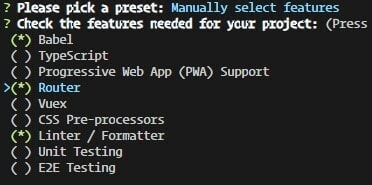
Afterwards, you will be asked to select features needed for your project, use the arrow keys to navigate to Router, press space to select and press enter to proceed.
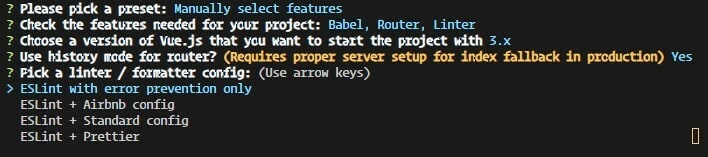
You will then be asked to choose a version of Vue.js to start the project. We will be using Vue 3, so press enter to proceed.

We won’t use history mode in this article, but just press enter to proceed with it.

We will go with the default options for the linter, so press enter to proceed.
Press enter to select lint on save and proceed.

We will choose the default here also. Press enter to proceed.
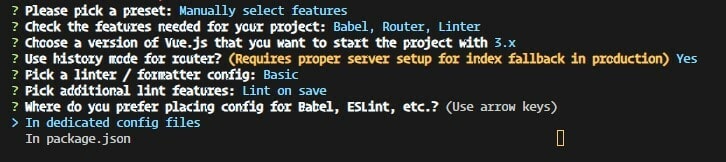
If you choose to save these settings as a preset for future purposes, you can by pressing enter and following the steps, but I will not be doing that, so I will type n and press enter.

Vue-Cli will then help us create our project using the required features selected, Initialize a local git repository and install a CLI plugin.
Once Vue-Cli is done creating the application, change the directory to the developed app and run the app by typing
cd spa-app
npm run serve
Enter fullscreen mode
Exit fullscreen mode
You should see a page like this on your localhost server.
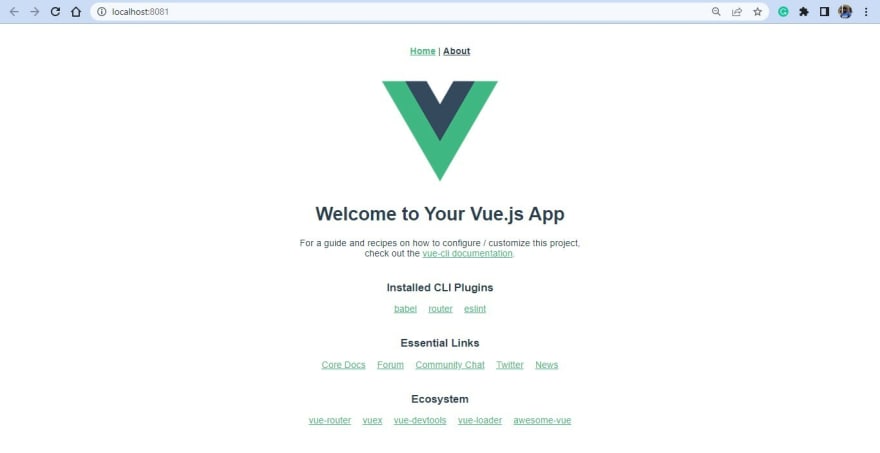
If you click on the about link, it will take you to the about page without a browser reload.
How does this work? Let us find out. On your code editor, navigate to the src > main.js file. This file is the webpack entry point. The App.vue component, the parent component for all other components, is imported there.
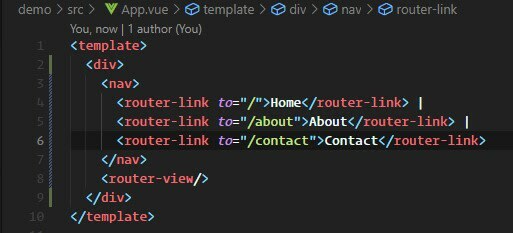
In the src > App.vue file, you will notice a couple of components.
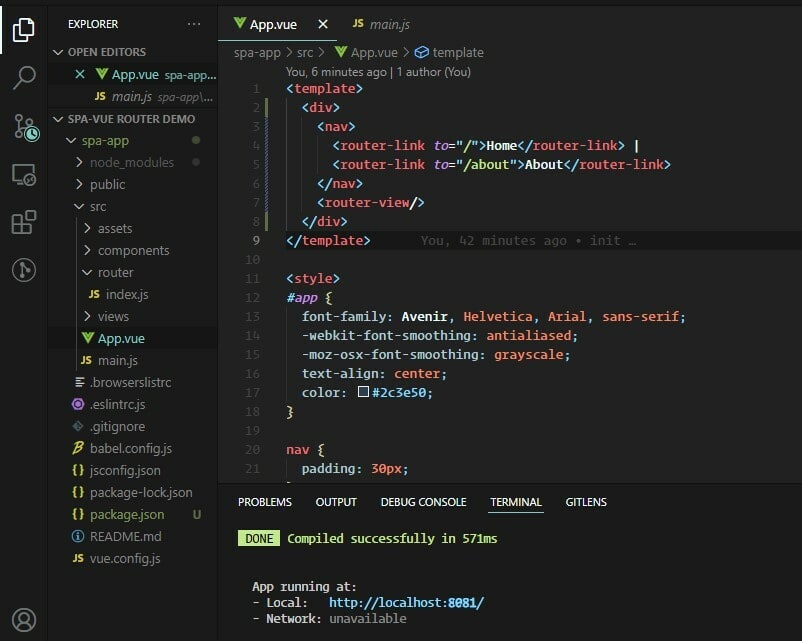
The router-link component serves as an anchor tag to help navigate the user.
The router-view component is a functional component that renders the matched component for the given path.
We know how vue displays links on the page, but configuring Vue-router to our settings is still challenging. Let’s dive deeper into the code.
If you navigate to src > router directory, we will find an index.js file.
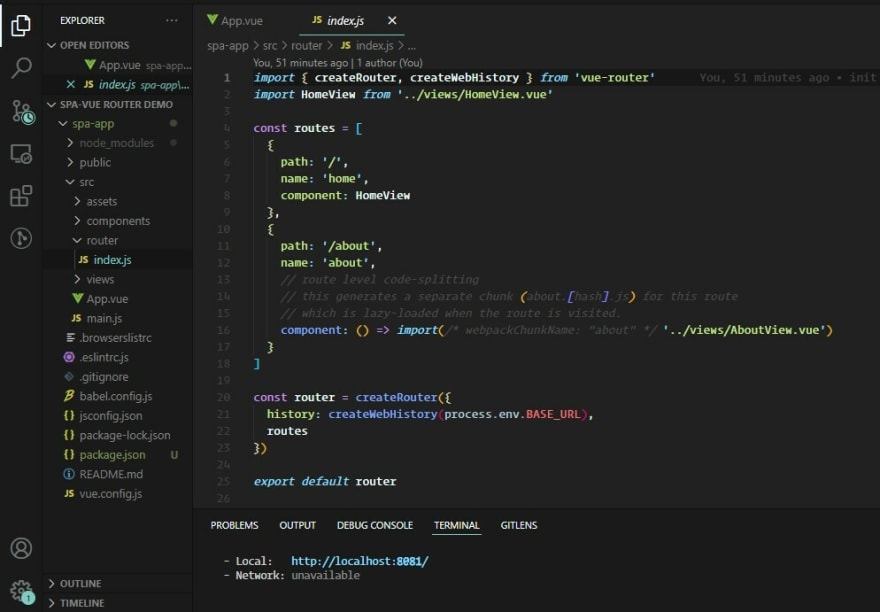
The file contains all the logic for telling vue what component to render to the screen with a particular path. If you look closely, we are importing the createRouter and createWebHistory hooks from vue.
The createRouter hook creates a Router instance that the Vue app can use. You pass in all the routes for the website in an array.
The createWebHistory hook is also imported because we chose to use histories with the router during installation. This hook creates an HTML5 history.
If you want to add a new page, you can create a new view in the src > views directory, import it into the src > router > index.js file, add the route as an object in the array, and state the component in the component key-value pair.
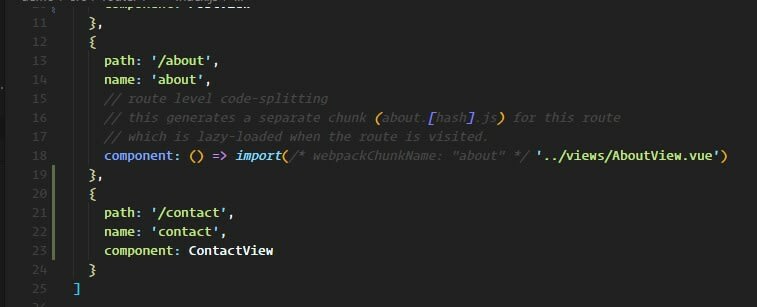
Afterwards, you can use the router-link component in any other component to link to that component. Since we are adding a contact view component, you can add a link to your contact page in your App.vue file.
Congratulations, you have created a Single Page Application using Vue-Cli and Vue-router.
Conclusion
In this article, we learnt about SPAs, the difference between Server-Side and Client-Side routing, and the Pros and Cons of SPAs. We also learned how to build a SPA with Vue CLI and Vue-router and configure routing with the vue-router. Thanks for reading through if you made it this far, I hope you learned something valuable today.
На чтение 5 мин. Просмотров 65 Опубликовано
В настоящее время все больше разработчиков используют архитектуру одностраничных приложений (SPA) для своих веб-приложений или статических сайтов. В этой статье мы расскажем о различных достоинствах и недостатках SPA и построим одно из них с помощью библиотеки Vue JS.
Содержание
- Что такое SPA?
- Плюсы и минусы
- Плюсы
- Минусы
- Инструменты
- Vue-cli
- Заключение
Что такое SPA?
Согласно MDN Web Docs, одностраничные приложения (SPA) позволяют пользователям использовать веб-сайты без загрузки новых страниц во время навигации. SPA используют маршрутизацию на стороне клиента вместо маршрутизации на стороне сервера, которую традиционно используют веб-сайты.
При маршрутизации на стороне сервера, когда пользователь заходит на новую страницу, браузер посылает запрос на сервер, запрашивая необходимые файлы для загрузки страницы. Сервер удовлетворяет запрос, и браузер загружает представления и скрипты для этой страницы. Этот процесс повторяется каждый раз, когда пользователь хочет перейти на другие страницы сайта.
При маршрутизации на стороне клиента, когда пользователь впервые посещает сайт, сервер предоставляет браузеру файл index.html, в котором содержится сценарий всего сайта. Все необходимые коды HTML, CSS и JavaScript извлекаются при загрузке одной страницы. Все необходимые ресурсы динамически извлекаются и добавляются на страницу. В Vue, когда происходит навигация, Vue использует Vue-router для проверки различий в DOM и отображает их на странице.
Плюсы и минусы
Давайте рассмотрим плюсы и минусы подхода SPA
Плюсы
- Высокая реактивность
- Меньшая нагрузка на сервер
- Лучший пользовательский опыт
- Лучшее взаимодействие клиента и сервера, разделение забот front-end’а и back-end’а.
Минусы
- SEO является сложной задачей
- JavaScript строго обязателен
- Производительность на стороне клиента
Ладно, хватит болтать о SPA. Давайте перейдем к самому интересному – созданию SPA с помощью Vue и Vue-router.
Инструменты
Существуют различные способы добавления vue-router в проект vue. В этой статье мы будем использовать инструмент под названием vue-cli.
Vue-cli
Для нового проекта отлично подойдет vue-CLI. С помощью Vue-cli мы можем начать наш проект с одного из многочисленных шаблонов Vue с открытым исходным кодом, а также создать свой шаблон.
Сначала нам нужно установить его, используя
npm install -g vue-cli
Войти в полноэкранный режим Выйти из полноэкранного режима
Давайте создадим новое приложение под названием spa-app с помощью команды
vue create spa-app
Войти в полноэкранный режим Выйти из полноэкранного режима
Затем вам будет предложено выбрать предустановку, используйте клавиши со стрелками для перехода к пункту Ручной выбор функций и нажмите ввод.

После этого вам будет предложено выбрать функции, необходимые для вашего проекта, используйте клавиши со стрелками для перехода к Router, нажмите пробел для выбора и нажмите ввод для продолжения.

Затем вам будет предложено выбрать версию Vue.js для запуска проекта. Мы будем использовать Vue 3, поэтому нажмите Enter, чтобы продолжить.

Мы не будем использовать режим истории в этой статье, но просто нажмите Enter для продолжения.

Мы будем использовать опции по умолчанию для линтера, поэтому нажмите Enter, чтобы продолжить.

Нажмите Enter, чтобы выбрать lint on save и продолжить.

Здесь мы также выберем вариант по умолчанию. Нажмите ввод, чтобы продолжить.

Если вы хотите сохранить эти настройки в качестве предустановленных для будущих целей, вы можете нажать клавишу Enter и выполнить все шаги, но я не буду этого делать, поэтому я наберу n и нажму Enter.

Затем Vue-Cli поможет нам создать наш проект, используя выбранные необходимые функции, инициализировать локальный git-репозиторий и установить CLI-плагин.
Как только Vue-Cli закончит создание приложения, измените каталог на разработанное приложение и запустите приложение, набрав
cd spa-app
npm run serve
Войти в полноэкранный режим Выйти из полноэкранного режима
Вы должны увидеть страницу, подобную этой, на вашем сервере localhost.

Если вы нажмете на ссылку about, она приведет вас на страницу about без перезагрузки браузера.
Как это работает? Давайте разберемся. В редакторе кода перейдите к файлу src > main.js. Этот файл является точкой входа webpack. В нем импортируется компонент App.vue, родительский компонент для всех остальных компонентов.
В файле src > App.vue вы заметите несколько компонентов.

Компонент router-link служит в качестве якорного тега для навигации пользователя.
Компонент router-view – это функциональный компонент, который отображает компонент, соответствующий заданному пути.
Мы знаем, как vue отображает ссылки на странице, но настроить Vue-router под наши параметры все еще сложно. Давайте погрузимся глубже в код.
Если перейти в директорию src > router, мы найдем файл index.js.

Этот файл содержит всю логику для указания vue, какой компонент выводить на экран по определенному пути. Если присмотреться, мы импортируем из vue хуки createRouter и createWebHistory.
Хук createRouter создает экземпляр Router, который может использовать приложение Vue. Вы передаете все маршруты для сайта в виде массива.
Хук createWebHistory также импортируется, поскольку мы решили использовать истории с маршрутизатором во время установки. Этот хук создает историю HTML5.
Если вы хотите добавить новую страницу, вы можете создать новое представление в каталоге src > views, импортировать его в файл src > router > index.js, добавить маршрут как объект в массив и указать компонент в паре ключ-значение компонента.

После этого вы можете использовать компонент router-link в любом другом компоненте для ссылки на этот компонент. Поскольку мы добавляем компонент представления контактов, вы можете добавить ссылку на страницу контактов в файл App.vue.

Поздравляем, вы создали одностраничное приложение с помощью Vue-Cli и Vue-router.
Заключение
В этой статье мы узнали о SPA, разнице между маршрутизацией на стороне сервера и на стороне клиента, а также о плюсах и минусах SPA. Мы также узнали, как создать SPA с помощью Vue CLI и Vue-router и настроить маршрутизацию с помощью vue-router. Спасибо за прочтение, если вы дочитали до конца, надеюсь, вы узнали сегодня что-то ценное.
I understood that routing libraries for SPAs like https://github.com/ReactTraining/react-router help to parse the URL and put the app into a corresponding state of a state machine.
Is there more to routing than this?
Why is routing needed in the first place?
Why are URLs important? For example in a desktop app there are no URLs, so what’s the big deal about them in a web app?
![]()
jonrsharpe
116k27 gold badges232 silver badges439 bronze badges
asked Sep 22, 2016 at 10:19
![]()
2
I also have this problem: «Why do we need routing?». You can write apps without routing at all. The code can get messy but still, it is not impossible.
My biggest reason for having routing is because, if the user hits the Back button of the browser (Forward button as well, for that matter), they will not be navigating within the app. The user might expect to navigate within the app using the history of the different «pages» they loaded previously. Instead, they will be thrown out of the web app. Hitting the Refresh button would also throw them to the root of the app.
From the user’s point of view, it is a regular web app (they doesn’t need to know how it is designed: SPA or otherwise) and it should work as any web app/website should work. Routing ensures this, doesn’t it?
![]()
answered Mar 30, 2017 at 23:48
![]()
0
This is a very good question, and one that I don’t see discussed as often as I think it should be. The short answer is that often, in a Single Page Web Application, you don’t need routing. If you are building an application which doesn’t require its pages to be indexed by Google, and you either don’t care, or don’t want the user to be able to Bookmark pages, then there is no reason to implement routing.
In an SPA, routing adds additional complexity and effort, so if you can avoid doing it, you should. Of course, modern frameworks such as Angular and React provide facilities for making routing much easier, but even then some things can be hard to do with routing, for example animating between pages.
A good example of a web application where routing would be redundant would be a multi-page form which you want to control the user’s passage through and possibly prevent them from returning to pages which have became inapplicable.
Implementing such a form with routes would be a nightmare as you would have to prevent the user from visiting certain pages in their history.
It’s useful to ask yourself what a route actually is in a SPA. It’s easy to think of it as just a ‘web-page’, but what it really is is a state, and when you navigate between routes what you are really doing is navigating between different states of the app. The fact that the appearance of the app may change between states is incidental to what is really going on. So what a route does is give the user a means of returning to particular states of the app.
You should only implement a route in an SPA when there is a state of the app which you want the user to be able to return to.
An alternative, and perhaps more useful way of doing this, would be to implement Undo and Redo mechanisms.
Of course, even when you don’t have routes you still have to care about what happens when the user clicks the History Back button, but then you simply have a modal alert which warns them that they are about to leave the app should they proceed with the navigation.
answered Aug 13, 2020 at 21:09
![]()
Richard HunterRichard Hunter
1,9632 gold badges15 silver badges22 bronze badges
3
In desktop applications you have buttons and other controls to get what you want. So routing in UI apps would be the set of all UI controls.
In web apps on the other hand, all functionality is accessed via some text which is the links and the parameters.
A URL is the path to access a functionality. Routing is like the mechanism to decide which functionality to call based on the provided URL and params.
So basically routing is a mapping between an URL and the functionality of a web server.
![]()
Jan Bodnar
11.1k6 gold badges68 silver badges78 bronze badges
answered Sep 22, 2016 at 10:24
![]()
ACVACV
10k5 gold badges76 silver badges81 bronze badges
Routing in SPAs is used to load certain parts of the web app e.g. yourappurl.com/profile/userid/ will load the profile part of an SPA with the right user profile corresponding to the userid. This can be seen in the GitHub example you provided:
<Router history={browserHistory}>
<Route path="/" component={App}>
  <Route path="about" component={About}/>
  <Route path="users" component={Users}>
    <Route path="/user/:userId" component={User}/>
  </Route>
  <Route path="*" component={NoMatch}/>
</Route>
SPA refers to the fact that in general you have an index.html as your «main view» and then depending on the routing you add/remove certain parts from the index.html with frameworks like React or AngularJS etc.
answered Sep 22, 2016 at 10:51
![]()
tech4242tech4242
2,3583 gold badges23 silver badges33 bronze badges
4
I have the same question from time to time.
I would like to say router in SPA is a component hierarchy helper.
As @tech4242 pointed out, we don’t have an something like segue in iOS. So what should we use to help users navigate if we don’t use router? We are talking about SPA here. So we can manage this in store or state. Yes, that’s feasible but not preferable.
Try to think this from the perspective of using a component-oriented library (either React or Vue). Using router help us use a certain component for a specific route. When users move back and forth between different route, we are relying on the route to tell what component to display. We simply couple a component with a specific route, which makes our root component (normally called App) clear, maintainable and readable. Without router, either the root component or state would be messy and hard to maintain.
answered Apr 13, 2018 at 6:08
![]()
TodanleyTodanley
4783 silver badges12 bronze badges
Back
Learn how to use the React router to develop a SPA website
by Percy Bolmér, August 10, 2021
![By [Brando Makes Branding] on Unsplash](https://d33wubrfki0l68.cloudfront.net/e469f0cd787ea378ce8c2e4f51ecdb31d24eb9a2/59696/_app/immutable/assets/img0-c93a9035.webp)
What is SPA?
SPA stands for Single Page Application. It is a very common way of programming websites these days. The idea is that the website loads all the HTML/JS the first time you visit. When you then navigate, the browser will only rerender the content without refreshing the website.
This is used to make the user experience feel a lot smoother. You can tell when it’s a SPA or multi-page application when navigating between menus often because a multi-page application will reload, making the whole UI blink fast depending on the content. This is due to it refreshing the website. A SPA will instead feel smooth in the transaction as it simply shows other content without refreshing.
We will look at how we can use the React-Router to build one.
Developing the SPA
First, create the application template using create-react-app.
create-react-app appEnter the newly created app folder and install the React Router, which we will use to create the SPA.
npm i react-router-dom --saveWe will begin by modifying the created application, open up src/App.js and replace everything in it with the following:
App.js removing the original splash screen
import './App.css';
import Main from './layouts/main';

function App() {
  return (
    <Main></Main>
  );
}

export default App;
Notice that we are returning the Main component? Let’s create it so the application doesn’t crash. Create a folder called layouts and a file in it called layouts/main.js. This file will hold the base layout of the application.
mkdir layouts
touch layouts/main.js
In the main.js, we will create a navbar that looks very bad, but we are here to learn React Router and not CSS. This will have navigation links to an about page and a contact page. Below the navbar, we will have a content div that will be used to render the selected link. This is a very common SPA setup where you have a static layout with navigation and a card that changes the content. Here’s the code:
Main.js — The applications default layout
import Navbar from '../components/navbar/navbar'
function Main() {
    return (
        <div>
            <Navbar></Navbar>
            <div className="content">

            </div>
        </div>
    )
}

export default Main;
Let’s create the navbar and then visit the page. Create a folder in the src called components which will hold the components of the application. Then create components/navbar/navbar.js.
mkdir -p components/navbar/
touch components/navbar/navbar.js
Navbar.js — A simple list of links
function Navbar() {
    return (
        <div className="navbar">
            <h1>Navbar</h1>
            <ul>
                <li><a href="/">Home</a></li>
                <li><a href="/about">about</a></li>
                <li><a href="/contact">Contact</a></li>
            </ul>
        </div>
    )
}

export default Navbar;
Finally, open src/index.css, and paste in the following CSS snippet to render the navbar as a horizontal list instead:
index.css — Adding horizontal navbar
.navbar ul {
  list-style-type: none;
  margin: 0;
  padding: 0;
  overflow: hidden;
}

.navbar li {
  float: left;
}

.navbar li a {
  display: block;
  padding: 8px;
  background-color: #dddddd;
}
Start the application and visit localhost:3000 to view the resulting application.
npm start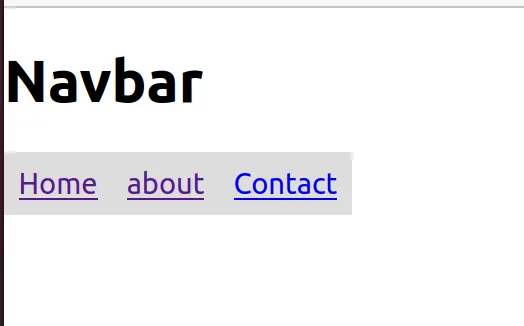
Before we can start implementing the Router we need to create three components, which will all be very simple, as they just print their name.
mkdir components/about
mkdir components/contact
mkdir components/home
About.js — Printing the name
function About() {
    return (
        <h1>About</h1>
    )
}

export default About;
Copy and paste the above code for all three components and change the name to the correct one. So you should have components/about/About.js, components/contact/Contact.js and components/home/Home.js which all look like the About gist, but with its name changed.
Learning To Use the React Router
If you have created all three components, it’s finally time to learn how to use the React Router. We will make it so that each link changes the content shown to the correct component.
There are two files we need to modify to make this work: the layouts/main.js has to be updated to include the Router and then components/navbar/navbar.js needs to replace all <a> tags with a Component named Link from the React router. We will go through it all step by step so we can examine what each component is.
Begin by adding the following import to main.js
Importing needed components from the react-router-dom
import { HashRouter, Switch, Route } from "react-router-dom";Before moving on, we will learn what each component is. This is important, and I’ve seen many people learning the pattern instead of what the components do. I strongly believe that understanding what the components do will make using them easier.
-
Router — A router is an interface that needs to be fulfilled to act as a router. There are a few different default routers available. We will begin using the HashRouter, but there is also the common BrowserRouter. Here is a great [Stack Overflow](https://stackoverflow.com/questions/51974369/
what-is-the-difference-between-hashrouter-and-browserrouter-in-react) discussion about the difference between them. -
HashRouter — The Hash router uses # in the URL to sync the UI. An example is http://localhost:3000/#/about. We will begin using this and later learn to switch it out.
-
BrowserRouter — A router that uses the HTML5 history API. This is the router we will use.
-
Switch — A component that lets us control how to render different Routes. It will only render the first matching child route. Great for avoiding having many routes render at the same time.
-
Route — A component that will render whenever the URL matches the assigned pattern. This means that we can have many Routes render at the same time, which is why the Switch is important.
-
NavLink/Link — Links is the component to use that allows the Router to change the navigation in your application. NavLink is simply an extension of Link that allows for styling. I tend to use NavLink because it adds the
.activateclass to the currently selected Link in the navbar. This allows us to easily show which the currently selected Link is.
We will add the HashRouter around all the content inside the main.js. This is to make sure that the components inside are used properly. If a Route component would be outside the HashRouter it will not work. So we must make the HashRouter the parent. This is the reason why it’s common to find Routers in App.js.
Hint: we will remove HashRouter and use BrowserRouter later.
The Switch will be placed inside the Content div since it is in the Content div that we want to render the selected page. Remember, whenever a Route matches the URL it will render, and the switch will make sure only the first match renders.
All Routes will go inside the Switch since we only want to render one component at a time. Note that this is not always the case. It is not uncommon to find the same setup, but with a few Routes outside the switch. Here’s the code:
Main.js — Full example where we route to the correct component depending on the URL
import Navbar from '../components/navbar/navbar'
import  { BrowserRouter, HashRouter, Switch, Route } from "react-router-dom";
import Home from '../components/home/home'
import Contact from '../components/contact/contact'
import About from '../components/about/about'

function Main() {
    return (
        <div>
            <HashRouter>
                <Navbar></Navbar>
                <div className="content">

                    <Switch>
                        <Route exact path="/" component={Home}/>
                        <Route path="/contact" component={Contact}/>
                        <Route path="/about" component={About}/>
                    </Switch>
                </div>
            </HashRouter>
        </div>
    )
}

export default Main;
Next, we need to change the Navbar.js to use the special NavLink component instead of <a>. This is because the Router will only work if we use the Link components.
Notice how the / path has the exact keyword in it? This is because the / URL will match ALL paths by default since they all contain /. And remember what link the switch will select? The first match, so we need to say that only select the / if it’s an exact match. The code is as follows:
Navbar.js — The full navbar with NavLinks instead of a tags
import  { NavLink } from "react-router-dom";

function Navbar() {
    return (
        <div className="navbar">
            <h1>Navbar</h1>
            <ul>
                <li><NavLink exact to="/">Home</NavLink></li>
                <li><NavLink to="/contact">Contact</NavLink></li>
                <li><NavLink to="/about">About</NavLink></li>
            </ul>
        </div>
    )
}

export default Navbar;
Optionally you can modify the.active CSS in index.css to highlight the selected link.
index.css — Highlight the select navlink
.active {
  color: #ffffff;
}
Visit localhost:3000 to view the result and try navigation around. You should see the top navbar stays around while the content is switched.
 — Notice the # used in the URL by the hashrouter.](https://d33wubrfki0l68.cloudfront.net/aebb81178405c807648f0eacf78bbc1fb619103b/cb578/_app/immutable/assets/img2-a2d17faf.webp)
 — URL changed when selected another navlink and content](https://d33wubrfki0l68.cloudfront.net/10eddecbb1a8eda9c28ec271aa68783cbe44235a/4f174/_app/immutable/assets/img3-b21bdb90.webp)
Passing Data to a Link (UseParams and UseLocation)
One key feature of the links is that we can pass data into the components. This can be important when setting up a user profile etc.
We will look into the two ways we can pass data with the current Router.
The first way is by using the useParams hook from the react-router. This is a hook that allows you to pass key-value pairs in the URL. Let’s add the user profile and print a username to showcase.
First, create a new folder named user and a file in it named components/user/profile.js.
mkdir components/user
touch components/user/profile.js
In profile.js we need to import the useParams hook. We will then assign the value of the username using this hook. Here’s the code:
profile.js — useParams is used to extract the username from the URL
import { useParams } from "react-router";

function Profile() {
    // Use the useParams hook to get the username from the URL
    // username has to be applied as a named parameter in the route
    const { username } = useParams();

    return (
        <h1>{username} Profile</h1>
    )
}

export default Profile;
How do useParams know what value to extract? Using named parameters in the route declaration. So we need to change the Route in main.js to include this in the URL. Parameters are named by adding :parameter to the Route. So we want to add :username.
main.js — Added a profile Route with a :username parameter
import Navbar from '../components/navbar/navbar'
import  { HashRouter, Switch, Route } from "react-router-dom";
import Home from '../components/home/home'
import Contact from '../components/contact/contact'
import About from '../components/about/about'
import Profile from '../components/user/profile'
function Main() {
    return (
        <div>
            <HashRouter>
                <Navbar></Navbar>
                <div className="content">

                    <Switch>
                        <Route exact path="/" component={Home}/>
                        <Route path="/contact" component={Contact}/>
                        <Route path="/about" component={About}/>

                        <Route path="/profile/:username" component={Profile}/>
                    </Switch>
                </div>
            </HashRouter>
        </div>
    )
}

export default Main;
The last thing we need to change is the navbar to show the profile page, and insert a value in the link. This will be hardcoded right now, but in a real scenario, your navbar would grab the username from somewhere.
Navbar.js — Added a link to profile/percybolmer, where percybolmer is the username value
import  { NavLink } from "react-router-dom";

function Navbar() {
    return (
        <div className="navbar">
            <h1>Navbar</h1>
            <ul>
                <li><NavLink exact to="/">Home</NavLink></li>
                <li><NavLink to="/contact">Contact</NavLink></li>
                <li><NavLink to="/about">About</NavLink></li>
                <li><NavLink to="/profile/percybolmer">Profile</NavLink></li>
            </ul>
        </div>
    )
}

export default Navbar;
Visit the website again, and see the results. Notice how the URL shows the value of the username. Try changing the URL in the browser to see changes apply.
 — The url to the profile page](https://d33wubrfki0l68.cloudfront.net/890859b58bdaa5aabfb0b6a21352705e93e3ea36/a982c/_app/immutable/assets/img4-af0d64f7.webp)
Passing Data by React Router (useLocation)
As you might have figured out, using URL parameters does not allow us to easily add many parameters. It does only allow strings to be passed, and you will likely want to pass more data.
Luckily this is also possible, using state in the links. Each link can have the to parameter accept objects and that can be passed using state. The state can be passed by using the useLocation hook.
The to object should have the state and the pathname variable set, the pathname is the URL endpoint to use.
{
"pathname": "url",
"state": {
    "yourstatevar": "value"
  }
}
Now you’re thinking, “Great, time to use it.” However, there are some very common questions on Stack Overflow and other forums that all occur due to the following things we will go through.
“Yes, I intentionally made these mistakes to make sure we can address them .”— Evil Programming Teacher
These are the issues:
- HashRouter does not support the
useLocationhook. - The Router is not allowed to be inside the same component as the component that puts the router on the tree. You can read a great blog article about it here.
First off, HashRouter does not support the useLocation hook. This is important to know and also very highlighted in the documentation. So we will be switching from HashRouter to BrowserRouter. The only change we need to do is change the name used and make sure to import it.
And while we are changing the name we need to address issue number two. We will simply move the Router into the index.js file. This will make the Router component Wrap the application and thus making it not part of the same component. Here’s the code:
Index.js — Using the Browser Router around our App
import React from 'react';
import ReactDOM from 'react-dom';
import './index.css';
import App from './App';
import reportWebVitals from './reportWebVitals';
import  { BrowserRouter } from "react-router-dom";
ReactDOM.render(
  <React.StrictMode>
    <BrowserRouter>
      <App />
    </BrowserRouter>
  </React.StrictMode>,
  document.getElementById('root')
);

// If you want to start measuring performance in your app, pass a function
// to log results (for example: reportWebVitals(console.log))
// or send to an analytics endpoint. Learn more: https://bit.ly/CRA-vitals
reportWebVitals();
Next, we will remove the router from main.js.
Main.js — No router anymore
import Navbar from '../components/navbar/navbar'
import  { Switch, Route } from "react-router-dom";
import Home from '../components/home/home'
import Contact from '../components/contact/contact'
import About from '../components/about/about'
import Profile from '../components/user/profile'
function Main() {
    return (
        <div>

                <Navbar></Navbar>
                <div className="content">

                    <Switch>
                        <Route exact path="/" component={Home}/>
                        <Route path="/contact" component={Contact}/>
                        <Route path="/about" component={About}/>

                        <Route path="/profile/:username" component={Profile}/>
                    </Switch>
                </div>

        </div>
    )
}

export default Main;
Then we need to update the navbar.js to make sure the TO object passes more data. The code is below:
Navbar — With a to object in the Link
import  { NavLink } from "react-router-dom";

function Navbar() {
    return (
        <div className="navbar">
            <h1>Navbar</h1>
            <ul>
                <li><NavLink exact to="/">Home</NavLink></li>
                <li><NavLink to="/contact">Contact</NavLink></li>
                <li><NavLink to="/about">About</NavLink></li>
                <li><NavLink to={{
                    pathname: "/profile/percybolmer",
                    state: { registrationdate: "2021-07-07" },
                }}>Profile</NavLink></li>
            </ul>
        </div>
    )
}

export default Navbar;
And last, we need to use the useLocation hook. In this example, I’ll show you how to assign both the State variable and the pathname. Usage is just as the useParams hook.
Profile.js — Using the useLocation hook twice.
import { useParams, useLocation } from "react-router-dom";
import React from 'react';


const Profile = () => {
    // Use the useParams hook to get the username from the URL
    // username has to be applied as a named parameter in the route
    let { username } = useParams();
    // useLocation hook is used to grab the state from the input to object
    // You can grab each field in the object by using the same name as the variable name
    let { pathname } = useLocation();
    let { state } = useLocation();

    return (
        <div>
            <h1>{username} Profile</h1>
            <p> Registered on:{state.registrationdate} </p>
            <p> Visiting: {pathname}</p>
        </div>
    )
}

export default Profile;
Visit localhost:3000 and view the result. Don’t forget to notice that the URLs have changed since we removed the HashRouter.
 — Showing the data from useLocation hook](https://d33wubrfki0l68.cloudfront.net/9f5e3af6b5c00d2727b57223795f03622e7274d3/551a6/_app/immutable/assets/img5-4edfbc37.webp)
Programmatically Route Using useHistory
Sometimes you might want to programmatically reroute the user based on some kind of event. This can be done by using the useHistory hook, which will return a history object we can use to redirect the browser. Using it is simple. When you use the history object and use the push(route) it will renavigate the browser.
Let’s make the H1 tag in the navbar a button that redirects to the homepage upon clicking.
We will use the same approach as before, assign a variable by using the hook. We will add a function that will use this variable and push the route.
navbar.js — useHistory example to redirect browser
import  { NavLink , useHistory} from "react-router-dom";

function Navbar() {

    let history = useHistory();

    function goHome(path) {
        history.push("/");
    }

    return (
        <div className="navbar">
            <button type="button" onClick={goHome}><h1>Navbar</h1></button>
            <ul>
                <li><NavLink exact to="/">Home</NavLink></li>
                <li><NavLink to="/contact">Contact</NavLink></li>
                <li><NavLink to="/about">About</NavLink></li>
                <li><NavLink to={{
                    pathname: "/profile/percybolmer",
                    state: { registrationdate: "2021-07-07" },
                }}>Profile</NavLink></li>
            </ul>
        </div>
    )
}

export default Navbar;
Try visiting localhost:3000 again. Navigate to something other than the / page and then press the button. Voila, it should have navigated you back!
Conclusion
You have reached the end of this article. Hopefully, you have found it useful.
You can find the full code used in the article at GitHub.
Today, we have covered the following topics:
- How to set up and use the React Router
- Positioning of the Router
- Using Switch to route between many links
- Linking to a subpage in a subcomponent
- Passing data by using the
useParamsanduseLocationhooks - Programatically reroute using the
useHistoryhook
Thanks for reading. Now go out there and route the world.
# Начало работы
Примечание
Мы будем использовать синтаксис ES2015 (opens new window) в примерах кода в этом руководстве.
Кроме того, все примеры будут использовать полную сборку Vue, чтобы позволить компиляцию шаблонов на лету. Подробнее о различиях сборок читайте здесь (opens new window).
Создавать одностраничные приложения (SPA) используя Vue + Vue Router очень просто: с помощью Vue.js, мы уже компонуем своё приложение из компонентов. Добавляя Vue Router, мы просто сопоставляем наши компоненты с маршрутами и объясняем Vue Router где их отображать. Вот простой пример:
# HTML
# JavaScript
Внедряя маршрутизатор, мы сможем получить к нему доступ через this.$router, а также к текущему маршруту через this.$route внутри любого компонента:
В документации мы будем часто использовать экземпляр router (маршрутизатора). Имейте ввиду, что this.$router в точности то же самое, что и router. Причина, почему используем this.$router заключается в том, что мы не хотим импортировать маршрутизатор в каждом компоненте, в котором потребуется управлять маршрутизацией.
Вы также можете увидеть этот пример вживую здесь (opens new window).
Обратите внимание, что <router-link> автоматически получает класс .router-link-active при совпадении маршрута. Подробнее об этом можно узнать в справочнике API.