 Dism Host Servicing Process — системный процесс, который что-то делает, но что — непонятно. Информации в интернете очень мало. Но кажется мне удалось узнать — если Dism Host Servicing Process грузит процессор, то все дело может быть в том.. что идет подготовка Windows для крупного или важного обновления. Эту информацию я нашел на официальном сайте Microsoft.
В общем все что я находил в интернете, указывает на связь Dism Host Servicing Process с обновлениями.
Также нашел информацию, что для решения проблемы нагрузки, можно попробовать выполнить эти команды:
dism /online /cleanup-image /restorehealth
dism /online/cleanup-image/CheckHealth
dism /online/cleanup-image/scanhealth
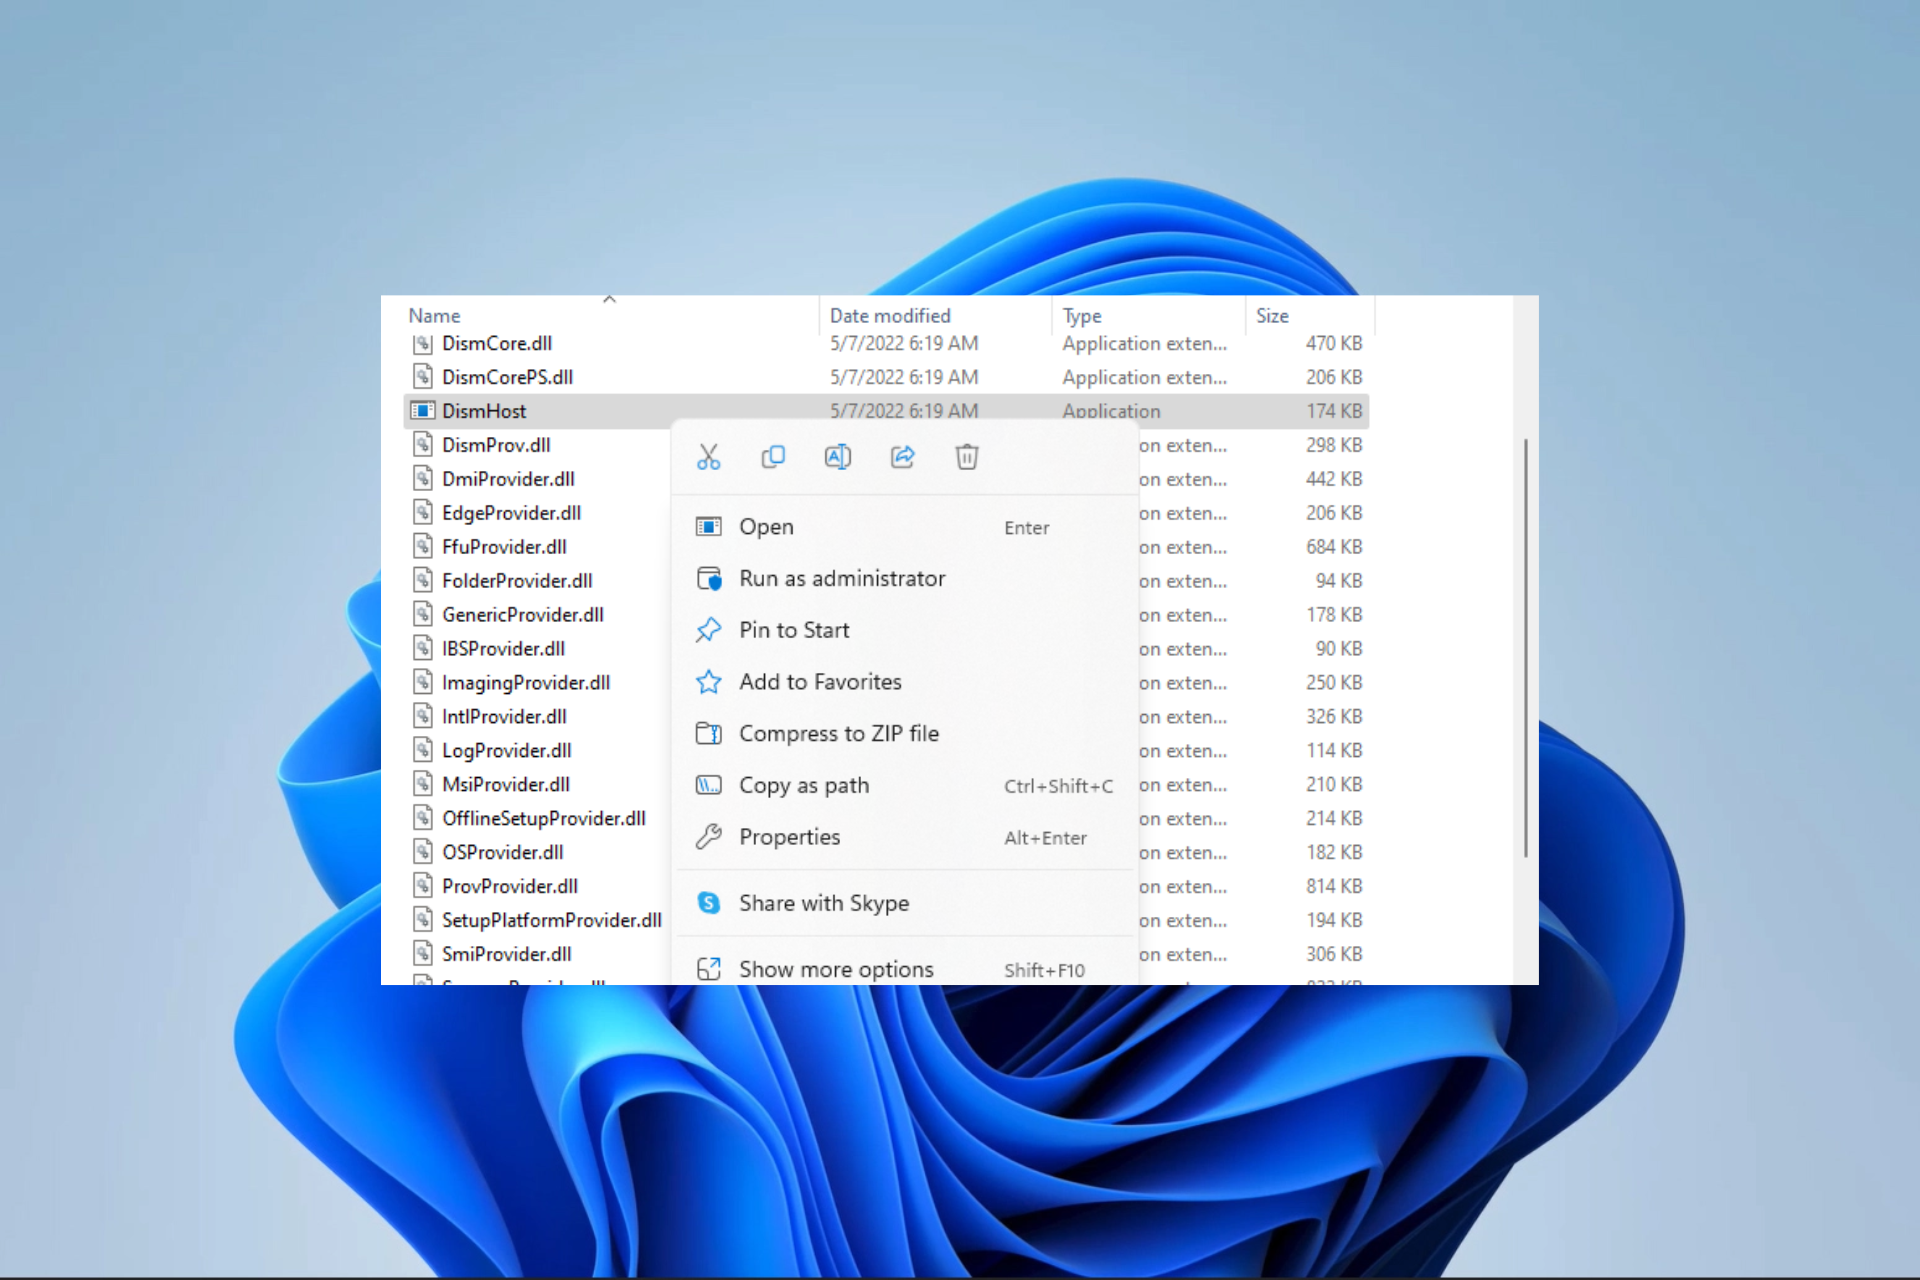
Команды нужно выполнять в командной строке, запущенной от администратора.
Запуск командной строки от администратора
Dism Host Servicing Process грузит — возможно на ПК есть вирусы?
Еще нашел информацию, что Dism Host Servicing Process может грузить ПК когда в системе произошла ошибка или когда присутствуют вирусы. Проверить ПК на вирусы никогда не будет лишним, уж поверьте. Проверить советую двумя утилитами:
- Dr.Web CureIt! — утилита для обнаружения опасных вирусов, таких как троян, черви всякие, ботнеты. Одна из лучших утилит. Работает быстро, скачивается уже вместе с актуальными антивирусными базами.
- AdwCleaner — утилита попроще, но зато ищет в прямом смысле вредные и надоедливые вирусы — рекламные. Они не крадут ваши личные данные, но зато могут показывать рекламу на рабочем столе, на сайтах, и все для этого делают. И в ярлыках прописывают вирусные сайты и создают левые задания в планировщике, устанавливаюсь странные расширения в браузерах. Со всем этим утилита прекрасно справляется.
Не знаю поможет или нет, но все же — попробуйте восстановить работу Windows до того времени, когда еще не было проблемы. Для этого зажмите Win + R, вставьте команду control sysdm.cpl, потом нажмите ОК. Перейдите на вкладку Защита системы, выберите системный диск и нажмите кнопку Восстановить. Попробуйте вернуть состояние ПК до возникновения проблемы.
На форуме Microsoft также нашел ссылку — Исправление ошибок в центре обновлений. Одному человеку данное руководство помогло, поэтому советую и вам глянуть:
https://support.microsoft.com/ru-ru/help/10164/fix-windows-update-errors
Один юзер написал, что нужно остановить службу центра обновлений.
На заметку:
- Чтобы зайти в список служб — зажмите Win + R, и укажите команду services.msc, далее нажмите ОК, в списке найдите Центр Обновления или Windows Update и попробуйте остановить.
- Сделайте перезагрузку.
- И посмотрите — будет ли снова грузить процессор?
Еще пользователи пишут — после обновления проблема с Dism Host Servicing Process исчезает.
Появилась мысль — а может просто стоит.. оставить ПК на ночь, пусть он подготавливается, может хватит столько времени виндовсу и она все сделает что ей там нужно?
Еще может быть и ошибка такая:

На этом все ребята. Информации в интернете почти нет, поэтому сори, что не особо то и помог вам информационно. Удачи.
На главную!
25.10.2018
This legitimate process is sometimes mimicked by system viruses
by Afam Onyimadu
Afam is a geek and the go-to among his peers for computer solutions. He has a wealth of experience with Windows operating systems, dating back to his introduction… read more
Updated on
- DismHost.exe is a legitimate process useful for many repair functions on a Windows computer.
- We discourage removing the process unless you are certain it is a duplicate used by viruses.
There is contradictory information regarding the authenticity of Windows’s DismHost.exe (Dism Host Servicing) process. While some claim it to be a legitimate process, others point out that it could be malicious software.
So, in this comprehensive guide, we talk about the process and introduce all the essential concepts surrounding it.
What is DismHost file?
The authentic DismHost.exe file belongs to Microsoft Corporation’s Microsoft Deployment Image Servicing and Management software component.
This file is a 32-bit Microsoft Windows process that can be found in any of the paths below, the first for 32-bits and the latter for 64-bit operating systems:
How we test, review and rate?
We have worked for the past 6 months on building a new review system on how we produce content. Using it, we have subsequently redone most of our articles to provide actual hands-on expertise on the guides we made.
For more details you can read how we test, review, and rate at WindowsReport.
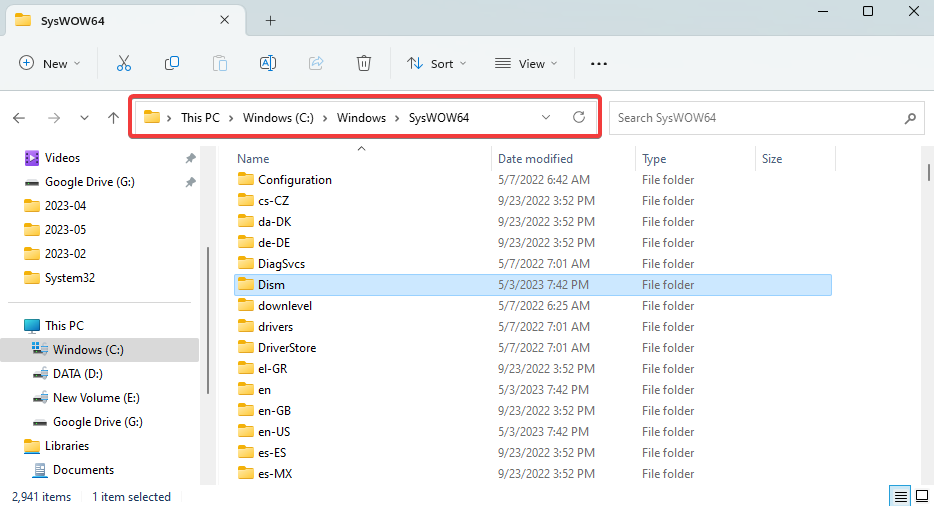
C:\Windows\System32\dism
C:\Windows\SysWoW64\dism
Is DismHost a virus?
By default, DismHost is a legitimate Windows system process and not a virus. Some of our readers have found this file in the Temp folder, but this only means that Windows Defender could not complete a scheduled scan. This exe file is helpful for the following processes:
- Fixing corrupted system files – When the CheckHealth command is executed, it repairs corrupted files that may cause problems.
- Updating drivers – The tool has a Get-Drivers command to update your system drivers.
- Enabling or disabling Windows features – You can start or stop specific Windows 11 features using the Get-Features command.
We recommend you do not remove it from your computer, but if you must, below are easy steps.
How do I get rid of DismHost.exe?
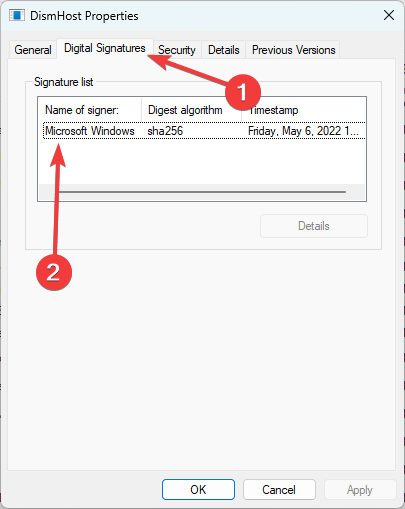
1. Verify the DismHost.exe authenticity
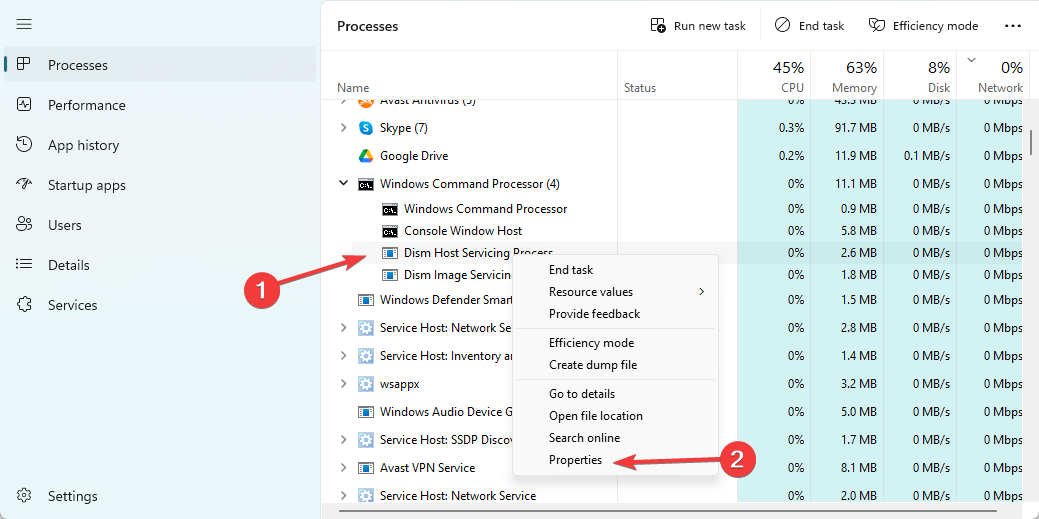
- Press Ctrl + Shift + Esc to open the Task Manager.
- Click on any DISM process and select Properties.

- Navigate to the Digital Signatures tab and verify that the Name of the Signer is Microsoft Windows. It is a virus if it has a different signer, and you must remove it.

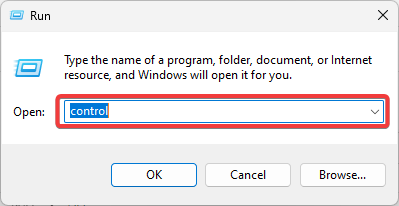
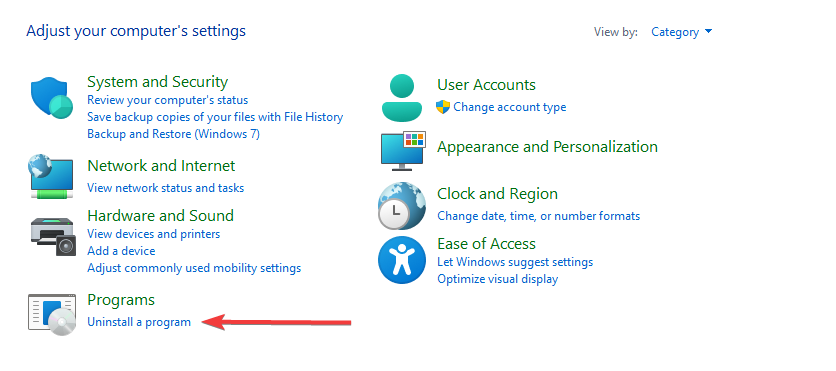
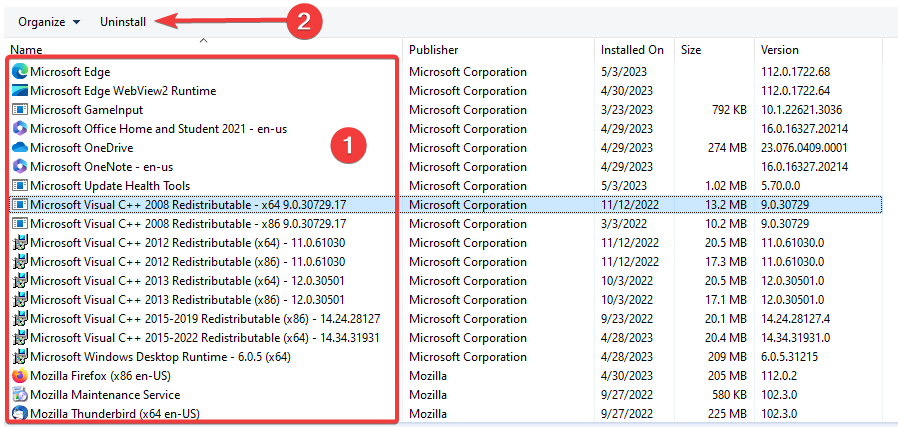
2. Uninstall DismHost.exe
- Press Windows + R to open the Run dialog.
- Type control and hit Enter.

- Click on Uninstall a program.

- If there is a DismHost application, click on it and select Uninstall.

In most cases, if the app shows up in the Control Panel, it may be malware and should be removed, which means you will have to run a malware scan after uninstalling it.
- What is The Difference Between CHKDSK, SFC, And DISM on Windows 11?
- How to Uninstall Windows 11 Default Apps Using PowerShell
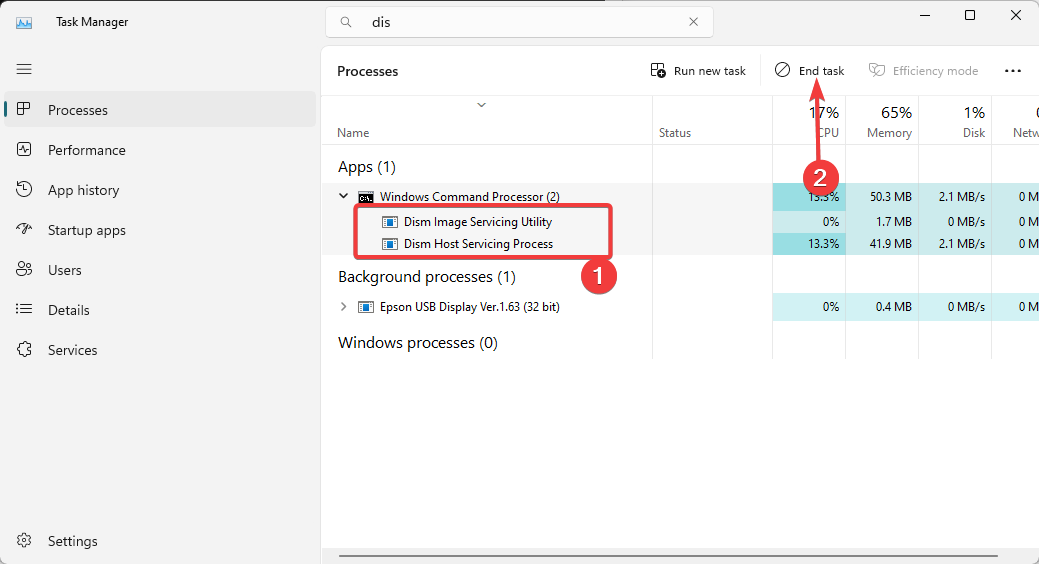
3. Remove from Task Manager
- Press Ctrl + Shift + Esc to open the Task Manager.
- Click on any DISM process and select End task. You must do this for all the running DISM processes.

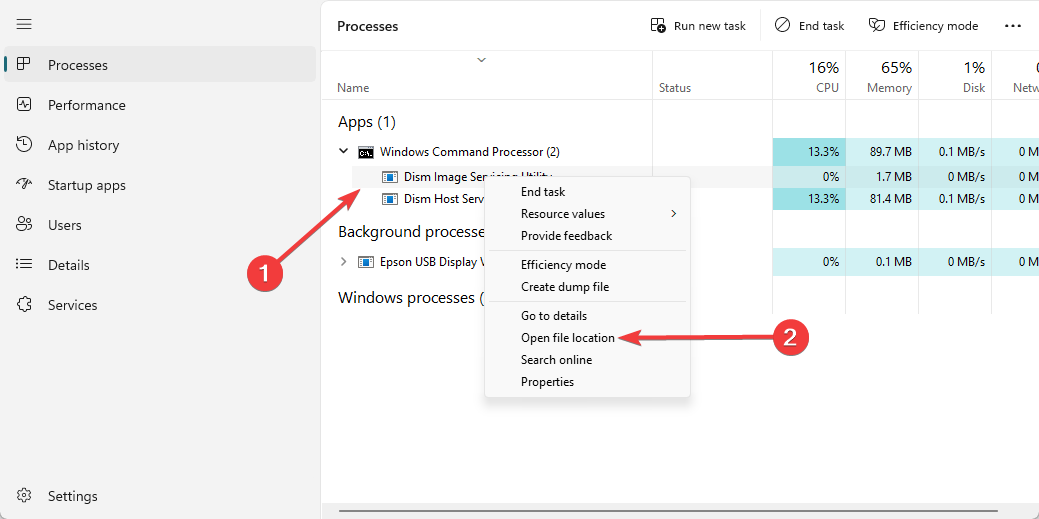
- Right-click on a DISM process and select Open file location.
- Alternatively, to get the location of DismHost.exe, go to the path below:
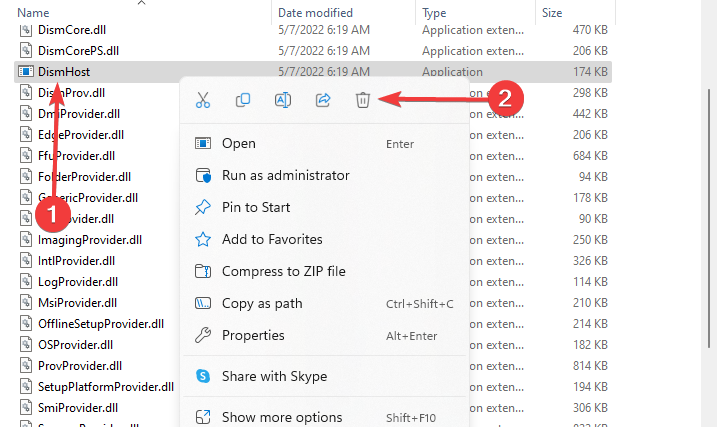
C:\Windows\System32\Dism - Right-click on DismHost and click the Delete icon.

4. Disabling the service from the Command Prompt
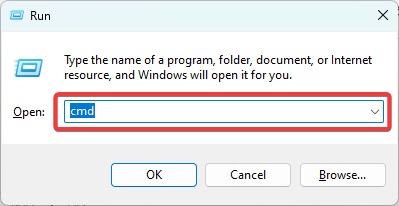
- Press Windows + R to open the Run dialog.
- Type cmd and press Ctrl + Shift + Enter to open an elevated Command Prompt.
- Type the script below in the Command Prompt and hit Enter to disable the running DismHost.exe service.
sc config DismHost start= disabled

- Navigate to the path where the DismHost is located and delete the file (This may be bundled in the same directory as a specific program if the process is malware).

In conclusion, the first solution is the method to adopt if you are getting rid of the legitimate DismHost.exe file. If it is not the legitimate file, you may use any of the other 2 solutions, and you should proceed with a virus scan.
Lastly, it is crucial to understand that deleting the genuine DismHost.exe process may lead to system instability or hinder specific system maintenance and repair functions.
You may want to look at this article if you encounter a DISM error on your devices.
That is all we will cover in this guide. Let us know if you have any questions using the comments section below.
![]()
- Home
- News
- Solved – DISM Host Servicing Process High CPU Usage
By Tina |
Last Updated
What is DISM host servicing process? How to fix the error DISM host servicing process high CPU? How to uninstall DismHost.exe? This post from MiniTool will demonstrate all solutions respectively.
What Is DISM Host Servicing Process?
DISM, whose full name is Deployment Image Servicing and Management, handles the process of mounting, unmounting the Windows Image files while installing the critical system updates. The DISM is a command line tool which can be used in the background to deploy and mount the Windows image safely.
However, as for the DISM Host Service process or DismHost.exe, there is some conflicting information. Some users claim that it is an important component of Windows operating system, while some antivirus programs regard it as the malware.
In my opinion, the DismHost.exe can’t be regarded as the component of the Windows operating system. You can’t see any window or can’t have an icon of this file on the Taskbar.
In addition, the DISM host servicing process may lead to several problems, such as:
- Be regarded as malware.
- Lead to the Service Host Local System network restricted problem.
- Lead to high disk /CPU usage, usually up to 90% – 100%.
- Consume Internet Bandwidth.
In general, the DISM host servicing process high CPU is the most common one. So, in the following section, we will show you how to solve the DISM Host Service Process high disk usage error.
How to Fix DISM Host Servicing Process High CPU
In this part, we will show you how to fix the error DISM host servicing process high CPU or high disk usage problem.
Method 1. Disable Superfetch Service
In order to fix the DismHost.exe DISM host servicing process high CPU problem, you can choose to disable Superfetch service.
Now, here is the tutorial.
- Press Windows key and R key together to open Run dialog.
- In the pop-up window, type services.msc in the box and click OK to continue.
- In the Services window, find out the Superfetch and double-click it.
- In the Properties window, change the Startup type to Disabled and Service status to Stopped.
- Then click Apply and OK to save the changes.

When it is finished, reboot your computer and check whether the error DISM host servicing process high CPU is solved.
Method 2. Stop BIT Service
In order to fix the error DISM host servicing process Windows 10 high disk usage, you can choose to stop the BIT service.
Now, here is the tutorial.
- Press Windows key and R key together to open Run dialog.
- Then type services.msc in the box and click OK to continue.
- In the pop-up window, find out the Background Intelligent Transfer Service and double-click it.
- Then change the Startup type to Disabled and Service status to Stopped.
- Click Apply and OK to save the changes.
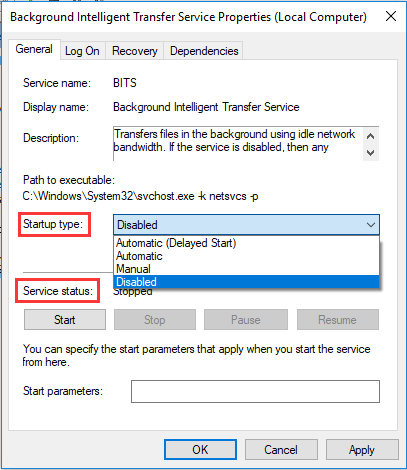
When it is finished, reboot your computer and check whether the error DISM host servicing process high disk usage is solved.
Method 3. Run Malware or Virus Scan
If virus or malware program uses the DismHose.exe file as its host, Windows Defender may not find it as a threat, and it will be used to steal and send information to the hackers. And it may give rise to the error DISM host servicing process high CPU.
So, in order to fix this DismHost.exe problem, you can choose to run malware or virus scan. Now, here is the tutorial.
- Press Windows key and I key together to open Settings.
- In the pop-up window, choose Update & Security.
- Go to Windows Defender tab, and click Open Windows Defender Security Center.
- Then choose Virus & threat protection.
- In the pop-up window, click Quick scan to continue.
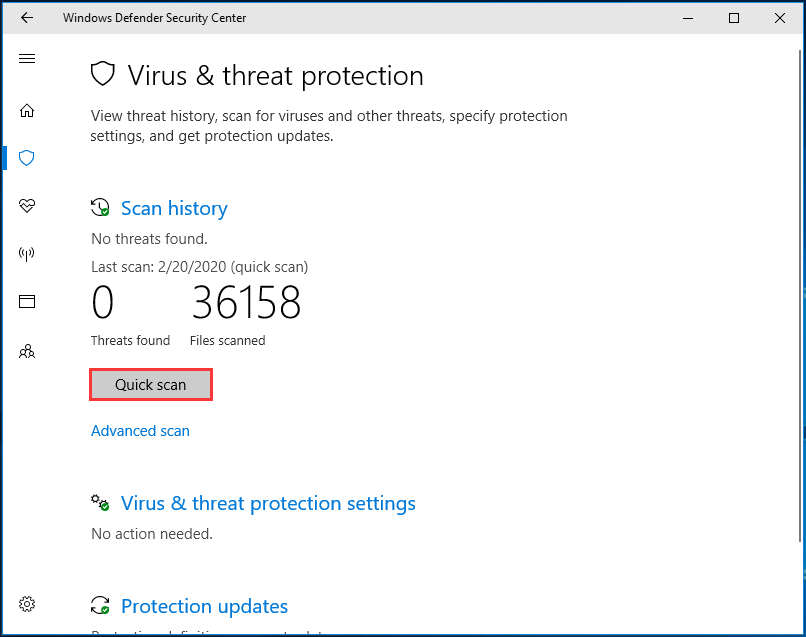
After the scanning process is finished, if there is any virus or malware on your computer, Windows Defender will remove it. After that, reboot your computer and check whether the DISM host servicing process high CPU error is solved.
Method 4. Uninstall DismHost.exe
As we have mentioned in the above part, the DismHost.exe is not a component of Windows operating system and it is often regarded as the virus or malware by the antivirus program. So, in order to fix the error DISM host servicing process high CPU, you can choose to uninstall DismHost.exe.
Now, here is the tutorial.
- Open Control Panel.
- Then choose Uninstall a program under Programs.
- Find out the program and right-click it to choose Uninstall.
- Then open C:/Program Files and find the folder with the name of DISM host servicing process. If you can’t find it, it means that the DismHost.exe has been removed.
- In addition, you can open Registry Editor window and navigate to HKEY_LOCAL_MACHINE> Software and see if the DISM host servicing process is here. If it is, remove it again.
After all steps are finished, reboot your computer and check whether the error DISM host servicing process high CPU is solved.
>> See what you can do if DISM /Online /Cleanup-image /Restorehealth is stuck.
Final Words
To sum up, this post introduced what the DISM host servicing process is and how to fix the DISM host servicing process high CPU error. If you have any different ideas to fix this problem, please share it in the comment zone.
About The Author
Position: Columnist
Tina is a technology enthusiast and joined MiniTool in 2018. As an editor of MiniTool, she is keeping on sharing computer tips and providing reliable solutions, especially specializing in Windows and files backup and restore. Besides, she is expanding her knowledge and skills in data recovery, disk space optimizations, etc. On her spare time, Tina likes to watch movies, go shopping or chat with friends and enjoy her life.
При работе с операционной системой Windows 10 пользователи иногда могут обратить внимание на процесс с названием Dism Host Servicing Process, который активно использует ресурсы диска. Этот процесс может вызывать задержки при работе компьютера и приводить к нежелательным простоям системы. Понимание причин, по которым Dism Host Servicing Process перегружает диск, поможет пользователям принять меры для устранения этой проблемы.
Dism Host Servicing Process (или Deployment Image Servicing and Management) является встроенной программой Windows 10, предназначенной для технического обслуживания образов развертывания операционной системы. Этот процесс запускается системой в фоновом режиме и может быть ответственным за множество операций, включая установку обновлений, восстановление системы, настройку и обслуживание Windows-образов и др.
Одной из причин перегрузки диска при работе Dism Host Servicing Process может быть обновление операционной системы. Когда Windows нуждается в обновлении, Dism Host Servicing Process загружает обновления и запускает процесс их установки. В таком случае использование ресурсов диска значительно возрастает, что может привести к замедлению работы компьютера.
Еще одной причиной интенсивной активности Dism Host Servicing Process может быть наличие поврежденных или несовместимых файлов в операционной системе. При обнаружении таких файлов Dism Host Servicing Process может пытаться их исправить или удалить, что вызывает повышенную активность диска. В этом случае пользователю рекомендуется проверить целостность системных файлов с помощью команды SFC /scannow.
Несмотря на то, что Dism Host Servicing Process может вызывать задержки при работе компьютера, удаление этого процесса не является рекомендуемым решением, так как это может негативно повлиять на стабильность и функциональность операционной системы.
Содержание
- Dism host servicing process: проблема высокой загрузки диска в Windows 10
- Что такое Dism host servicing process?
- Почему Dism host servicing process грузит диск в Windows 10?
- Как определить причину высокой загрузки диска?
Dism host servicing process: проблема высокой загрузки диска в Windows 10
Однако, в редких случаях пользователи могут столкнуться с проблемой, когда процесс DismHost.exe начинает высоко загружать диск, что приводит к увеличению использования процессора и замедлению работы системы.
Существует несколько причин, почему процесс Dism Host Servicing Process может вызывать высокую загрузку диска:
- Ошибка обновления: некорректно установленные обновления операционной системы могут вызывать постоянное выполнение процесса DismHost.exe, что приводит к высокой загрузке диска.
- Коррупция системных файлов: поврежденные или неполные системные файлы могут вызывать неправильное выполнение процесса DismHost.exe и приводить к высокой загрузке диска.
- Вредоносное ПО: некоторые вирусы или вредоносные программы могут маскироваться под процесс DismHost.exe и использовать его для незаконной активности, что вызывает высокую загрузку диска.
Для решения проблемы высокой загрузки диска, вызванной процессом Dism Host Servicing Process, можно предпринять следующие действия:
- Проверить наличие необходимых обновлений операционной системы и установить их. Это поможет восстановить нормальную работу процесса DismHost.exe.
- Выполнить проверку целостности системных файлов с помощью утилиты System File Checker (SFC). Если будут обнаружены поврежденные файлы, их можно восстановить с помощью команды sfc /scannow в командной строке.
- Прогнать антивирусное ПО на наличие вредоносных программ, которые могут использовать процесс DismHost.exe для незаконной активности. В случае обнаружения вредоносного ПО, необходимо удалить его.
Если указанные действия не решат проблему, можно попробовать обратиться в службу поддержки Microsoft или использовать специализированные программы для анализа и исправления ошибок в реестре и системе операционной системы.
Что такое Dism host servicing process?
DISM – это встроенный инструмент в Windows 10, который используется для управления образами Windows, включая установку, удаление и обновление компонентов системы. Dism host servicing process запускает этот инструмент, чтобы обеспечить обслуживание и настройку компонентов операционной системы без необходимости перезагрузки компьютера.
Dism host servicing process работает в фоновом режиме и передает запросы на дисковую деятельность к файлам и компонентам системы. Во время этого процесс может потреблять ресурсы ЦП и загружать диск, что иногда приводит к замедлению работы компьютера.
Частые причины, по которым Dism host servicing process может загружать диск в Windows 10, включают автоматическое обновление операционной системы, обслуживание компонентов Windows Update, установку новых программ и обновление драйверов устройств. Если система работает на медленном диске или при низкой свободной памяти, это может привести к замедлению работы компьютера.
Для уменьшения нагрузки на диск от Dism host servicing process, можно выполнить несколько действий. Во-первых, проверьте наличие обновлений операционной системы и установите их в удобное время. Во-вторых, оптимизируйте процессы загрузки и установки программ, чтобы они не конфликтовали с работой Dism host servicing process. Наконец, очистите временные файлы и кэш системы, чтобы освободить место на диске и улучшить производительность компьютера.
| Имя процесса | Описание |
|---|---|
| DismHost.exe | Процесс Dism host servicing process, отвечающий за управление и обновление компонентов системы через инструмент командной строки DISM |
Почему Dism host servicing process грузит диск в Windows 10?
Одной из причин, по которой Dism host servicing process может нагружать диск в Windows 10, является выполнение операций по обновлению или восстановлению системных компонентов. Во время этих процессов дисм-хост может загружать дополнительные файлы и временные данные на диск для выполнения задачи.
Еще одной причиной загрузки диска может быть запуск сканирования и анализа системных файлов с помощью инструмента DISM (Deployment Image Servicing and Management). В этом случае дисм-хост может работать с файлами на диске, что вызывает нагрузку.
Если Dism host servicing process постоянно нагружает диск и вызывает проблемы с производительностью, возможно, есть проблемы с системными файлами или настройками Windows. В таких случаях рекомендуется проверить систему на наличие ошибок с помощью инструментов, таких как проверка целостности системных файлов, и выполнить необходимые действия по исправлению проблем.
- Один из способов проверки целостности системных файлов — выполнить команду «sfc /scannow» в командной строке с правами администратора. Это позволит системе проверить и восстановить поврежденные или испорченные файлы.
- Также можно выполнить проверку и исправление ошибок с помощью инструмента DISM. Для этого нужно выполнить команду «Dism /Online /Cleanup-Image /RestoreHealth» в командной строке с правами администратора.
Если вы не уверены в своих навыках работы с командной строкой или не можете решить проблемы самостоятельно, рекомендуется обратиться к специалистам по компьютерам для получения помощи и руководства.
В целом, Dism host servicing process нагружает диск в Windows 10 из-за выполнения важных операций по обновлению, восстановлению и обслуживанию системы. Если это вызывает проблемы с производительностью, рекомендуется провести проверку и восстановление системных файлов с помощью специальных инструментов.
Как определить причину высокой загрузки диска?
Высокая загрузка диска в операционной системе Windows 10 может быть вызвана различными факторами. Для определения причины и решения проблемы, можно использовать набор инструментов и методов.
Вот несколько способов, которые помогут вам определить причину высокой загрузки диска:
| Метод | Описание |
|---|---|
| Диспетчер задач | Откройте Диспетчер задач (Ctrl + Shift + Esc) и перейдите на вкладку «Диски». Здесь вы сможете увидеть процессы, которые используют дисковый драйв наиболее интенсивно. |
| Ресурс Монитор | Ресурс Монитор является расширенным инструментом, который позволяет отслеживать активность диска на более глубоком уровне. Вы можете найти его в разделе «Административные инструменты» в «Панели управления». |
| Проверка диска на наличие ошибок | Иногда высокая загрузка диска может быть связана с поврежденным сектором на диске. Чтобы проверить диск на наличие ошибок, перейдите на вкладку «Свойства» для соответствующего диска в «Моем компьютере», затем выберите «Проверка» в разделе «Инструменты». |
| Отключение ненужных служб и автозагрузок | Некоторые приложения и службы могут запускаться автоматически при начале работы системы и использовать ресурсы диска. Чтобы увидеть и отключить ненужные службы и автозагрузки, введите «msconfig» в поисковой строке, откройте вкладку «Загрузка» и отключите нежелательные элементы. |
| Установка антивирусного программного обеспечения | Временами причина высокой загрузки диска может быть связана с вредоносными программами. Установите надежное антивирусное программное обеспечение и выполните проверку системы. |
Используя эти методы, вы сможете определить и устранить причину высокой загрузки диска в операционной системе Windows 10, что поможет сделать работу с компьютером более плавной и эффективной.
DISM Host Servicing Process: Deployment Image Servicing and Management or DISM is a component in Microsoft Windows, which is mostly used to service and prepare Windows images. It appears as DismHost.exe, and it can be found usually in the Windows Temp folder or its sub directions.
If your version of DISM is updated and correct, then it will not cause any problem or create a threat for your PC. But, if you are using an old version or any outdated version of it, then there may be some threats in your PC. Let me tell you that the DISM Host servicing process is used as a front in many Trojan viruses, so please take care of this. Let’s learn more about DISM and see whether it is a virus or not.
The DismHost.exe is having a possibility of 27% dangerous to your system. It is also not a part of the Windows Operating System, and it doesn’t have a window. Also, it doesn’t appear on the taskbar or available as an icon. So, it can cause a wide range of problems, like high CPU usage:
- If the DISM Host Servicing process (DismHost.exe) is founded in a subdirectory of C:\Windows, then it is 34% dangerous.
- If the DISM Host Servicing process (DismHost.exe) is founded in a subdirectory of C:\Program Files, then it is 19% dangerous.
- If the DISM Host Servicing process (DismHost.exe) is founded in a subdirectory of the user’s previous folder, then it may be 28% dangerous.
Please ensure that the variant of the DismHost.exe is not an outdated one.
Read Also:
- Facebook is Getting Hammered
- Apple Offers Six Months Free Apple Music to AirPods, Beats Owners
DismHost.exe may be a reason for many problems if it is left unchecked, as mentioned before, also, including:
- It may be a malware or virus.
- If it leads to Service Host Local Service Network Restricted problems which cause high disk or CPU usage sometimes till 90 to 100% and consumes internet bandwidth.
How to Fix DISMHost.exe Errors
Here are some of the methods and measures which is going to help us solve these problems related to DISM Host Servicing Process
Solution 1: DISM Host Servicing Process High CPU/Disk Usage
High disk and CPU usage for no particular reason is a widespread problem that is caused by the DismHost.exe. It is visible as Service Host process and its subunits in the performance tab in the Task Manager. If you are facing some problem, then read further.
Having a look at the Task Manager can quickly tell you that the Windows Service Host local Service network restricted is causing this issue. It can happen on any configuration of the PC.
Windows Service local service network contains lots of sub-services in it, and one of them is causing the high CPU usage, and it is Superfetch
For getting rid of such high CPU usage, there is a need for you to disable the Superfetch service as it is the cause of this problem. Follow the steps below for disabling Superfetch:
Step 1 – Firstly, click on the windows button and type services and the search box. And then tap on the first result you see.
Step 2 – Now, locate Superfetch service in the ordered list.
Step 3 – After finding Right Click on it and then select Disable.
Step 4 – Finally, reboot your PC and see if the problem is solved or not.
Solution 2: How to Uninstall the DismHost.exe Process
You can also remove the DismHost.exe process from the PC to solve all the issues, without any further consequences. Follow the below-mentioned steps for uninstalling it:
Step 1 – First of all, click on the windows icon and then type control panel in the search box. Tap on the first result you see.
Step 2 – Next, click on Uninstall a Program.
Step 3 – Then, locate the program in the section.
Step 4 – Now, click on Uninstall.
Step 5 – Finally, reboot your PC and see if the problem is solved or not.
The tool is going to uninstall the program, and your disk usage will be back to normal.
Read Also:
- Insider SEO Tips That Will Increase Traffic
- How to Disable Avast Antivirus Temporarily and Permanently
Solution 3: Checking That the Program Was Uninstalled Successfully
Step 1 – After Uninstalling reboot your PC.
Step 2 – Next, open C:/Program Files and see that if you find a folder having a name DISM host servicing process.
Step 3 – In the end, check the registry too additionally. Open the registry and under HKEY_LOCAL_MACHINE, Software check that DISM Host Servicing Process is there or not.
Solution 4: DISM Host Servicing Process Consumes Internet Bandwidth
The DISM Host Servicing Process also consumes your Internet Bandwidth, so the method to solve this issue is going to be similar to the method used before:
Step 1 – At first, click on the windows button and type services in the search box. Tap on the topmost result you see.
Step 2 – Then, locate Background Intelligent Transfer Service in the list. And if you see it running, then stop it.
Step 3 – Now, Right Click on it and select Disable.
Step 4 – Finally, reboot your PC and see if the issue is solved or not.
Recommended:
- Ntoskrnl.exe High CPU or Disk Usage
- CompatTelRunner.exe High CPU and Disk Usage
- IRQL_NOT_LESS_OR_EQUAL
- Com Surrogate Has Stopped Working
Conclusion
I feel that the issue is resolved by now. If it not, then you must refer a professional.