Время на прочтение
14 мин
Количество просмотров 147K
Введение: Добрый день или вечер, или даже ночь дорогие хабравчане. В данной статье продолжим изучать особенности протокола IPv6 и его отличия от IPv4. В данной статье будет минимальное количество теории и максимальное количество настройки. Начнем с настройки DHCPV6 и рассмотрим особенности работы этого протокола на основе протокола IPv6, также посмотрим на то, как настраиваются протокола динамической маршрутизации на основе IPv6. Оборудования для настройки выберем Cisco (в третей части Juniper).
IPV6 — это весело. Часть 1
Также хотелось поблагодарить всех пользователей, которые комментируют, задают вопросы. Задавая некоторые неудобные вопросы вы заставляете меня снова лезть в книжки, что-то повторять, что-то лучше осваивать и отвечать на ваши вопросы. Также каждый из вас может повлиять на выпуск следующей части. Не бойтесь задавать вопросы, если что-то не ясно.
План
- Настройка протокола DHCPV6
- Настройка статических маршрутов
- Настройка протоколов динамической маршрутизации (RIPng,EIGRP,OSPF,IS-IS,BGP)
- Настройка ACL ( Расширенные именованные листы)
- VRRP v3,
- Настройка IPv6 ICMP ограничение по скорости
- Dual IPv4 and IPv6 Protocol Stacks
По просьбам трудящихся, прежде всего хотелось выразить свое мнение относительно IPv6 и подвести некий итог написанного в предыдущей главе. Разберу по пунктам:
- В IPv6 нету Broadcast, ARP.
Broadcast частично заменили Multicast адреса и адреса Link Local (читайте предыдущую статью). ARP протокол заменен протоколом NDP; - В IPv6 нет технологии NAT, которая есть в IPv4. Смело спорьте с тем, кто скажет обратное. Экономия адресов в IPv6 не используется, адресов хватит на всех. Уровень безопасности, который обеспечивает NAT в технологии IPv4, заменен адресами Unique Local (читайте предыдущую статью), но нельзя забывать, что безопасность должны обеспечивать межсетевые экраны – это их функция. Название Nat64 которое можете встретить в литературе про IPv6, идет речь о совместном использовании технологии IPv6, IPv4 (читайте предыдущую статью);
- По моим ощущениям, осталось 3-4 года для полного перехода на IPv6. По моим представлениям переход будет параллелен;
- Благодаря Link Local адресам сетевые устройства могут общаться в пределах одного локального канала и только в пределах его;
- Появилась фича которая называется: «проверка уникальности IPv6 адреса». Используется в DHCPV6, полный процесс будет описан чуть ниже. Суть ее в том, что после назначения ip-адреса устройству он посылает icmp запрос, destination выбирает данный ему адрес, если приходит ответ — то его адрес не уникален и нужно получать новый IPv6 адрес;
- Появились адреса anycast (читать статью). В сети могут существовать несколько хостов с абсолютно идентичными IPv6-адресами. Вариант использования я выявил один, в случае, когда находятся три балансировщика около сервера. Им дается один и тот же адрес, который называется anycast. Принцип работы балансировщика пояснять не буду, так как это не тема статьи;
- Вендоры, такие как Cisco или Juniper, полностью готовы к переходу на IPv6, дело остается за операторами связи и ИТ-компаниями.
Ошибки свойственны человеку, но для нечеловеческих ляпов нужен компьютер. (Paul Ehrlich)
DHCPV6
SLAAC — это способ, который позволяет устройству получить свой префикс, длину префикса и адрес шлюза по умолчанию от маршрутизатора IPv6 без помощи DHCPv6-сервера. При использовании SLAAC для получения необходимой информации устройства полагаются на сообщения «Объявления маршрутизатора ICMPv6».
IPv6-маршрутизаторы периодически отправляют сообщения «Объявления маршрутизатора ICMPv6» всем устройствам в сети под управлением IPv6. По умолчанию маршрутизаторы Cisco отправляют такие сообщения каждые 200 секунд на адрес групповой передачи всем IPv6-узлам. IPv6-устройству, находящемуся в сети, не нужно ждать этих периодических сообщений. Устройство может отправить сообщение «Запрос маршрутизатора ICMPv6», который использует адрес групповой передачи всем IPv6-узлам. Когда маршрутизатор IPv6 получает такое сообщение, он сразу же отправляет в ответ объявление маршрутизатора.
IPv6-маршрутизация не включена по умолчанию. Чтобы маршрутизатор работал как IPv6-маршрутизатор, необходимо использовать команду глобальной конфигурации ipv6 unicast-routing.
Сообщение «Объявления маршрутизатора ICMPv6» содержит префикс, длину префикса и другие сведения IPv6-устройства. Кроме того, такое сообщение указывает IPv6-устройству, как ему получить информацию по адресации. сообщение «Объявления маршрутизатора» может выглядеть в одном из следующих 3 вариантов.
- Вариант 1: только SLAAC. Устройство должно использовать префикс, длину префикса и шлюз по умолчанию, которые содержатся в сообщении «Объявления маршрутизатора». Другая информация недоступна с DHCPv6-сервера;
- Вариант 2: SLAAC и DHCPv6. Устройство должно использовать префикс, длину префикса и шлюз по умолчанию, которые содержатся в сообщении «Объявления маршрутизатора». На DHCPv6-сервере доступна и другая информация, например адрес DNS-сервера. Устройство получит эту дополнительную информацию в процессе поисков и запросов к DHCPv6-серверу. Этот процесс называется «DHCPv6 без запоминания состояний», поскольку DHCPv6-серверы не выделяют и не отслеживают какие-либо назначения IPv6-адресов, а предоставляют дополнительную информацию, например об адресе DNS-сервера;
- Вариант 3: только DHCPv6. Устройство не должно использовать информацию из сообщения «Объявления маршрутизатора» для пополнения своей информации об адресации. Вместо этого устройство будет использовать обычные процессы поисков и запросов к DHCPv6-серверам для получения всей своей информации об адресации. Такая информация включает в себя индивидуальный адрес IPv6, длину префикса, адрес шлюза по умолчанию и адреса DNS-серверов. В этом случае DHCPv6-сервер работает как DHCP-сервер, который фиксирует данные аналогично DHCP-серверу для IPv4. DHCPv6-сервер выделяет и отслеживает IPv6-адреса, чтобы не назначать один и тот же IPv6-адрес на нескольких устройствах.

Компьютер позволяет нам совершать ошибки гораздо быстрее, чем любые другие изобретения человечества: за исключением, пожалуй, текилы и оружия. (Mitch Radcliffe)
Общие сведения о SLAAC
Автоматическая настройка адреса без отслеживания состояния (SLAAC) — это способ получения устройством глобального IPv6-адреса одноадресной рассылки без использования DHCPv6-сервера. В основе SLAAC лежит протокол ICMPv6. Протокол ICMPv6 аналогичен ICMPv4, но при этом он имеет дополнительные функциональные возможности и демонстрирует большую устойчивость к ошибкам. SLAAC использует ICMPv6-сообщения запроса маршрутизатора и объявления маршрутизатора, чтобы предоставить информацию об адресации и другую информацию о конфигурации, обычно предоставляемую DHCP-сервером.
- Сообщение запроса маршрутизатора (RS) — если клиент настроен на получение информации об адресации автоматически с использованием SLAAC, он посылает на маршрутизатор сообщение RS. Сообщение RS отправляется на IPv6-адрес многоадресной рассылки FF02::2, который поддерживают все маршрутизаторы.
- Сообщение объявления маршрутизатора (RA) — для предоставления информации об адресации маршрутизатор отправляет сообщения RA клиентам, настроенным на получение IPv6-адресов автоматически. Сообщение RA содержит префикс и длину префикса локального сегмента. Эта информация используется клиентом для создания собственного глобального индивидуального IPv6-адреса. Маршрутизатор передаёт сообщение RA периодически или в ответ на сообщение RS. По умолчанию маршрутизаторы Cisco отправляют сообщения RA каждые 200 секунд. Сообщения RA всегда отправляются на общий для всех узлов IPv6-адрес многоадресной рассылки FF02::1.
Как видно из термина, SLAAC не отслеживает состояние адреса. Служба без отслеживания состояния говорит о том, что ни один из серверов не поддерживает информацию о сетевом адресе. В отличие от сервера DHCP, сервер SLAAC не знает, какие IPv6-адреса используются, а какие доступны
Принцип работы SLACC + DHCPV6 без отслеживание состояния
Для отправки маршрутизатором сообщений RA, на нём предварительно необходимо настроить работу IPv6-маршрутизации. Для активации IPv6-маршрутизации необходимо выполнить следующие команды:
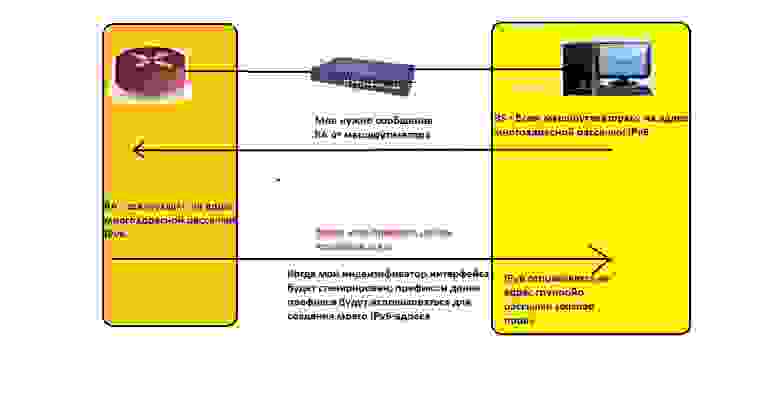
Router(config)# ipv6 unicast-routing- В топологии, PC1 настроен на автоматическое получение настроек IPv6-адресации. С момента загрузки PC1 не получил сообщений RA, поэтому он отправляет сообщение RS на адрес многоадресной рассылки, который поддерживают все маршрутизаторы, чтобы проинформировать локальный IPv6-маршрутизатор о необходимости получения сообщения RA.
- R1 получает сообщение RS и отправляет в ответ сообщение RA. В сообщение RA включены префикс и длина префикса сети. Сообщение RA отправлено на общий для всех узлов IPv6-адрес многоадресной рассылки FF02::1 с адресом канала маршрутизатора типа link-local в качестве IPv6-адреса источника.
- PC1 получает сообщение RA, содержащее префикс и длину префикса для локальной сети. PC1 будет использовать эту информацию для создания собственного глобального индивидуального IPv6-адреса. PC1 имеет теперь 64-разрядный префикс сети, но требует 64-битный идентификатор интерфейса (IID) для создания глобального индивидуального адреса.
Существует для способа создания PC1 собственного уникального IID:
EUI-64, генерация случайным образом.
Поскольку SLAAC — это процесс без отслеживания состояния, перед использованием PC1 этого вновь созданного IPv6-адреса, необходимо проверить его уникальность., PC1 посылает по протоколу ICMPv6 сообщение запроса поиска соседа с собственным адресом в качестве IPv6-адреса назначения. Если другие устройства не отвечают сообщением запроса поиска соседа, значит, адрес является уникальным и может быть использован PC1. Если сообщение запроса поиска соседей получено PC1, значит, адрес не уникален и операционная система должна установить новый идентификатор интерфейса для использования.
Этот процесс является частью процесса обнаружения соседних устройств ICMPv6 и известен как обнаружение адресов-дубликатов (DAD).
Настроен ли клиент на автоматическое получение информации об IPv6-адресации с использованием SLAAC, DHCPv6 или сочетанием обоих вариантов, зависит от настроек, содержащихся в сообщении RA. ICMPv6 сообщения RA содержат два флага, обозначающих, какой из вариантов должен быть использован клиентом (смотреть в Части 1).
Этими флагами являются флаг управляемой конфигурации адресов (M) и флаг другой конфигурации (O).

Утверждать, что Java хорош тем, что работает на всех ОС, — то же самое, что утверждать, что анальный секс хорош тем, что подходит к любому полу. (Alanna)
Функции SLAAC,DHCPV6+SLAAC,DHCPV6
Рассмотрим все три способа, изменение флагов.
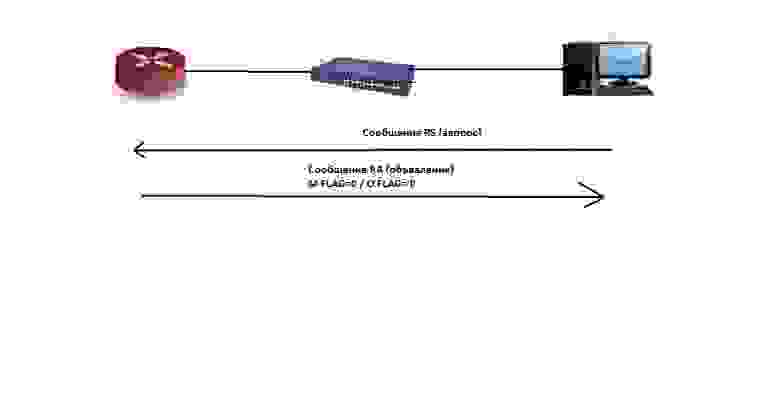
- SLAAC — Этот вариант указывает клиенту использовать только информацию из сообщения RA. Сюда входит информация о префиксе, длине префикса, DNS-сервере, MTU и информация о шлюзе по умолчанию. Далее клиент не получает никакой информации от сервера DHCPv6. Глобальный индивидуальный IPv6-адрес создаётся путём объединения префикса, полученного в сообщении RA, и идентификатора интерфейса, полученного с помощью EUI-64 или сгенерированного случайным образом.
Сообщения RA настроены на отдельном интерфейсе маршрутизатора. Для повторной активации режима SLAAC на интерфейсе, на котором мог быть установлен другой вариант работы, флаги M и O необходимо сбросить на их первоначальные значения, равные 0. Для этого применяются следующие команды режима конфигурации интерфейса:
Router(config-if)# no ipv6 nd managed-config-flag
Router(config-if)# no ipv6 nd other-config-flag
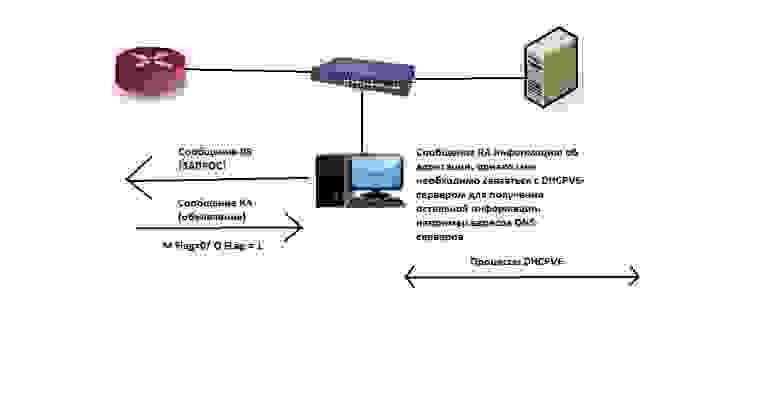
- DHCPV6+SLAAC — Для DHCPv6 без отслеживания состояния значение флага O установлено равным 1, а значение флага M остается со значением по умолчанию, равным 0. Значение флага O, равное 1, используется для информирования клиента о том, что на DHCPv6-сервере без отслеживания состояния доступна дополнительная информация о конфигурации.
Для того чтобы изменить сообщение RA, отправляемое на интерфейс маршрутизатора для указания использования DHCPv6 без отслеживания состояния, используйте следующие команды:
Router(config-if)# ipv6 nd other-config-flag
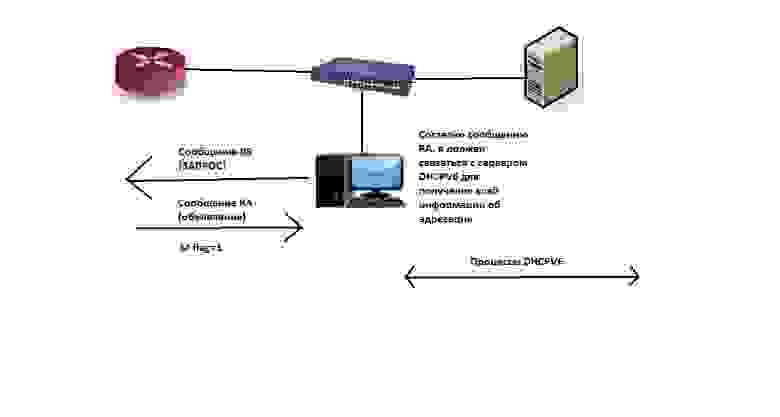
- Протокол DHCPv6 с отслеживанием состояния (только DHCPv6)
Флаг M указывает, используется ли DHCPv6 с отслеживанием состояния. Флаг O не используется. Для того чтобы изменить значение флага М с 0 на 1 для объявления DHCPv6 с отслеживанием состояния, применяются следующие команды:Router(config-if)# ipv6 nd managed-config-flag
Создание языка программирования — это как прогулка по парку. По парку Юрского периода. (Larry Wall)
Процессы DHCPV6
В случае если в сообщении RA указан вариант работы DHCPv6 (с отслеживанием состояния или без), инициируется работа DHCPv6. Сообщения протокола DHCPv6 посылаются через протокол UDP. Сообщения DHCPv6 от сервера к клиенту используют UDP порт назначения 546. Клиент отправляет сообщения на сервер DHCPv6 через UDP порт назначения 547.
Клиенту — теперь DHCPv6-клиенту — необходимо определить местоположение сервера DHCPv6. клиент передаёт сообщение DHCPv6 SOLICIT на зарезервированный IPv6-адрес многоадресной рассылки FF02::1:2, используемый всеми DHCPv6 серверами. Этот адрес многоадресной рассылки действует в рамках канала link-local, это означает, что маршрутизаторы не направляют сообщения в другие сети.
Один или несколько серверов DHCPv6 отвечают DHCPv6-сообщением ADVERTISE. Сообщение ADVERTISE сообщает DHCPv6-клиенту, что сервер доступен для предоставления службы DHCPv6.
Клиент отвечает серверу DHCPv6 сообщением REQUEST или INFORMATION-REQUEST, в зависимости от того, является ли DHCPv6-сервер сервером с отслеживанием состояния или без него.
- DHCPv6-клиент без отслеживания состояния — клиент отправляет DHCPv6 сообщение INFORMATION-REQUEST серверу DHCPv6, запрашивая только параметры конфигурации, например, адрес DNS-сервера. Клиент создаёт собственный IPv6-адрес при помощи префикса из сообщения RA и самогенерируемого идентификатора интерфейса.
- DHCPv6-клиент с отслеживанием состояния — клиент отправляет DHCPv6 сообщение REQUEST серверу для получения IPv6-адреса и всех остальных параметров конфигурации от сервера.

Программы — это как секс: гораздо лучше, когда бесплатно. (Linus Torvalds)
Теперь оставим теорию и выведем только настройку
- Настройка маршрутизатора в качестве DHCPV6 сервера без отслеживания состояния
Активация маршрутизации IPv6Router(config)# ipv6 unicast-routingНастройка DHCPV6 пула
Router(config)#ipv6 dhcp pool (pool-name)Настройка параметров пула
Router(config-dhcpv6)# dns-server (указываем адрес dns-server-address)
Router(config-dhcpv6)#domain-name (указываем имя domain)
Настройка интерфейса
Router(config-)# interface (type number) Router(config-if)# ipv6 dhcp server (pool name) Router(config-if)# ipv6 nd other-config-flag - В качестве клиента
Router(config)#interface (interface-number) Router(config-if)# ipv6 enable Router(config-if)# ipv6 address autoconfig (Команда ipv6 address autoconfig включает автоматическую настройку IPv6-адресации с использованием SLAAC) Проверка: show ipv6 dhcp pool,show ipv6 interface (type-number) - Сервер DHCPV6 с отслеживанием состояния
Активация маршрутизации IPv6Router(config)#ipv6 unicast-routingНастройка DHCPV6-пула
Router(config)#ipv6 dhcp pool (pool-name)Настройка параметров пула
Router(config-dhcpv6)# address (prefix/length (lifetime (valid-lifetime preferred-lifetime)infinite))
Router(config-dhcpv6)# dns-server (dns-server-address)
Router(config-dhcpv6)# domain-name (domain-name)
Настройка интерфейса
Router(config)#interface (interface-number)
Router(config-if)# ipv6 dhcp server (pool-name)
Router(config-if)# ipv6 nd managed-config-flag
Настройка маршрутизатора в качестве DHCPV6-клиента с отслеживанием состояния
Router(config)#interface (interface-number) Router(config-if)# ipv6 enable Router(config-if)# ipv6 address dhcp - Настройка маршрутизатора в качестве агента рентрансляции
Router(config)#interface (interface-number)
Router(config-if)# ipv6 dhcp relay destination (address)
Если отладка — процесс удаления ошибок, то программирование должно быть процессом их внесения. (Edsger W. Dijkstra)
2) Настройка статических маршрутов в IPv6
Router(config)# ipv6 route ipv6-prefix/prefix-length { ipv6-address | exit-intf }2) Настройка рекурсивного статического маршрута
Router(config)#ipv6 route 2001:DB8:ACAD:2::/64 2001:DB8:ACAD:4::2
Router(config)#ipv6 route 2001:DB8:ACAD:5::/64 2001:DB8:ACAD:4::2
Router(config)#ipv6 route 2001:DB8:ACAD:3::/64 2001:DB8:ACAD:4::2
Название сети – next-hop.В данном примере разные сети next-hop один и тот же.
3) Настройка напрямую подключнного статического маршрута
Router(config)#ipv6 route 2001:DB8:ACAD:3::/64 s0/0/0Настройка полностью заданного статического маршрута IPv6
Router(config)#ipv6 route 2001:DB8:ACAD:3::/64 s0/0/0 fe80::2 (суть его в том,что если используете адрес типа Lin-Local то надо обязательно указать тип выходного интерфейса)5)настройка маршрутов по умолчанию
ipv6 route ::/0 { ipv6-address | exit-intf }Настройка суммарного IPv6-адреса
Router(config)#ipv6 route 2001:DB8:ACAD:1::/64 2001:DB8:ACAD:4::2
Router(config)#no ipv6 route 2001:DB8:ACAD:2::/64 2001:DB8:ACAD:4::2
Router(config)#no ipv6 route 2001:DB8:ACAD:3::/64 2001:DB8:ACAD:4::2
Router(config)#no ipv6 route 2001:DB8:ACAD:4::/64 2001:DB8:ACAD:4::2
В сумме
Router(config)#ipv6 route 2001:DB8:ACAD:4::/61 2001:DB8:ACAD:4::2Если бы McDonalds разрабатывал ПО, один из сотни биг-маков был бы отравлен, а администрация отвечала бы: «В качестве извинения примите купон на два бесплатных биг-мака». (Mark Minasi)
3) Настройка динамической маршрутизации в IPv6
Ripng
Router(config)#interface (number)
Router(config-if)# ipv6 rip RIP-AS enable
Router(config-if)# exit
передать маршрут по умолчанию
Router(config)# pv6 rip имя_домена default-information originateEIGRP
Router(config)# ipv6 router eigrp autonomous-system
Router(config-rtr)# eigrp router-id 1.0.0.0 – задание номера процесса
Router(config-rtr)# no shutdown
Router(config)# interface (type/number) (заходим в интерфейс)
Router(config-if)# ipv6 eigrp (AS)
Router(config-if)# ipv6 bandwidth-percent eigrp as-number percent-настройка процентного соотношения пропускной способности,
R2(config-rtr)# redistribute static - распределения маршрута по умолчанию
Router(config-if)# ipv6 hello-interval eigrp as-number seconds - изменение hello интервала
Router(config-if)# ipv6 hold-time eigrp as-number seconds - изменение hold-time
OSPF3
Router(config)# ipv6 router ospf 10 –активировать режим OSPF
Router(config-rtr)# router-id 1.1.1.1 (задаем router-id)
Router(config-rtr)# auto-cost reference-bandwith 1000 (задаем cost)
Router(config)# interface (type/number) (заходим в интерфейс)
Router(config-if)# ipv6 ospf 10 area (number) (назначаем интерфейс в протокол ospf,номер процесса,номер
area)
Router#clear ipv6 ospf process
IS-IS
Router(config)# isis area-tag (например router isis area2)
Router(config-rtr)# net network-entity-title (например 49.0001.0000.0000.000с.00
Router(config)# interface Ethernet 0/0/1
Router(config)# ipv6 address {ipv6-address/prefix-length | prefix-name sub-bits/prefix-length}
Router(config-if)# ipv6 router isis area-name (ipv6 router isis area2)
BGP
Router(config)# router bgp 65000
Router(config-rtr)# no bgp default ipv4-unicast ( выключаем ipv4 unicast аддресса для BGP)
Router(config-rtr)#bgp router-id (сконфигурим 32-битный роутер id ,будьте аккуратный эта команда сбросит все активный BGP peering сессии)
Router(config-rtr)# neighbor 2001:DB8:0:CC00::1 remote as 64600 – добавим ipv6 адрес соседа и автономную систему.
Router(config-rtr)# address-family ipv6 [unicast |multicast]
Router(config-rtr-af)#neighbor 2001:DB8:CC00::1 activate – активируем соседа для обмена префиксами ipv6
4) ACL
Router(config)#ipv6 access-list NO-BYX-SIDET-VKONTAKTE
Router(config-ipv6-acl)#deny ipv6 2001:db8:cafe:30::/64 any
Router(config-ipv6-acl)#permit ipv6 any any
все это может выглядеть следующем образом-
Router(config)#ipv6 access-list access-list-name
Router(config-ipv6-acl)#deny | permit protocol (source-ipv6-prefix/prefix-length |any|host source-ipv6-addres) (operator(port-number)) (destination-ipv6-prefix/prefix-length | any | host destination-ipv6-address) (operator(port-number))
Router(config)# interface (type/number) (заходим в интерфейс)
Router(config-if)# ipv6 traffic-filter access-list-name { in |out }
5) VRRP,HSPR
Router(config)# fhrp version vrrp v3 – включаем ,когда используется 3 версия,вторая не не активна.
Router(config)# interface type number
Router(config-if)#  vrrp (group-id address-family (ipv6)
Router(config-if)# vrrp 3 address-family ipv6
Router(config-if-vrrp)# address 2001:abc:cafe:11::/64 primary (или secondary)
Router(config-if-vrrp)# description group 3
Router(config-if-vrrp)# match-address (добавляем второй адрес в объявление)
Router(config-if-vrrp)# preempt delay minimum 30 – включаем преимущество  низкой приоритетности мастера с опцией задержки (опциально)
HSPR
Switch (config)# interface type number
Switch (config-if)#no switchport
Switch (config)#standby 1 ipv6 autoconfig
Router(config)# interface type number
Router(config-if)#standby version (2)
Router(config)# interface type number
Router(config-if)#standby (group-number) ipv6 (link-local |address)
Router(config-if)#standby [group-number]preempt [delay {minimumseconds | reload seconds |sync seconds}]
Router(config-if)#standby [group-number]priority priority
6) Настройка IPv6 ICMP ограничение по скорости
Router(config)#ipv6 icmp error- interval (bucketsize) (interval в милл сек,диапозон 0 2147483647,bucketsize – опциально,диапозон 1 - 2007) Dual IPv4 and IPv6 Protocol Stacks
Switch(config)# sdm prefer dual-ipv4-and-ipv6 default
Switch(config)# ip routing
Switch(config)# ipv6 unicast-routing
Switch(config)# interface gigabitethernet2/0/1
Switch(config-if)# no switchport
Switch(config-if)# ip address 192.168.99.1 244.244.244.0
Switch(config-if)# ipv6 address 2001:0DB8:c18:1::/64 eui 64
Switch(config-if)# end
Учитывая печальное состояние современных компьютерных программ, разработку ПО до сих пор можно считать искусством, а не научной дисциплиной. (Bill Clinton)
Вот и подошла вторая часть к концу. Кто слушал — молодец. Из написанной статьи я понял одно: для настройки BGP, IS-IS нужно писать отдельные статьи. В целом настройка ipv6 не сильно отличается от ipv4, местами получается даже проще. В третьей части я опишу настройку протоколов на основе оборудования Juniper networks. Она, по сути, будет довольно короткой, поэтому оставляйте свои комментарии под статьей. Повторюсь, ваша критика, вопросы или пожелания могут повлиять на написании новой статьи. Всем удачи.
Список используемой литературы
- CCNA RS
- CCNP RS
- IP Version 6 in Junos (EDU-JUN-IPV6)
- XGU.RU
- cisco.com
From Wikipedia, the free encyclopedia
The Dynamic Host Configuration Protocol version 6 (DHCPv6) is a network protocol for configuring Internet Protocol version 6 (IPv6) hosts with IP addresses, IP prefixes, default route, local segment MTU, and other configuration data required to operate in an IPv6 network. It is not just the IPv6 equivalent of the Dynamic Host Configuration Protocol for IPv4.
IPv6 hosts may automatically generate IP addresses internally using stateless address autoconfiguration (SLAAC), or they may be assigned configuration data with DHCPv6.
IPv6 hosts that use stateless autoconfiguration may require information other than an IP address or route. DHCPv6 can be used to acquire this information, even though it is not being used to configure IP addresses. DHCPv6 is not necessary for configuring hosts with the addresses of Domain Name System (DNS) servers, because they can be configured using Neighbor Discovery Protocol, which is also the mechanism for stateless autoconfiguration.[1]
Many IPv6 routers, such as routers for residential networks, must be configured automatically with no operator intervention. Such routers require not only an IPv6 address for use in communicating with upstream routers, but also an IPv6 prefix for use in configuring devices on the downstream side of the router. DHCPv6 prefix delegation provides a mechanism for configuring such routers.
Operation[edit]
Port numbers[edit]
Clients listen for DHCP messages on UDP port 546. Servers and relay agents listen for DHCP messages on UDP port 547.[2]: §7.2
Identifiers[edit]
DHCP unique identifier[edit]
The DHCP unique identifier (DUID) is used by a client to get an IP address from a DHCPv6 server. It has a 2-byte DUID type field, and a variable-length identifier field up to 128 bytes. Its actual length depends on its type. The server compares the DUID with its database and delivers configuration data (address, lease times, DNS servers, etc.) to the client.
Four DUID types are identified:[2]: §11
- Link-layer address plus time (DUID-LLT)
- Vendor-assigned unique ID based on enterprise number (DUID-EN)
- Link-layer address (DUID-LL)
- UUID-based DUID (DUID-UUID)
RFC 6939: Client Link-Layer Address Option[edit]
Due to the fact that it is difficult to manage multiple identifiers in a dual-stack environment, and the fact that DUIDs are simply not optimal for some situations, RFC 6939 was released, giving a way to identify a host based on its MAC address. It defines a way for a DHCPv6 relay to pass that information to a DHCPv6 server.
Example[edit]
In this example, without rapid-commit present, the server’s link-local address is fe80::0011:22ff:fe33:5566 and the client’s link-local address is fe80::aabb:ccff:fedd:eeff.
- Client sends a solicit from [fe80::aabb:ccff:fedd:eeff]:546 to multicast address [ff02::1:2]:547.[3]
- Server replies with an advertise from [fe80::0011:22ff:fe33:5566]:547 to [fe80::aabb:ccff:fedd:eeff]:546.
- Client replies with a request from [fe80::aabb:ccff:fedd:eeff]:546 to [ff02::1:2]:547.
- Server finishes with a reply from [fe80::0011:22ff:fe33:5566]:547 to [fe80::aabb:ccff:fedd:eeff]:546.
DHCPv6 Message types[edit]
This table lists the DHCPv6 message types.
| Code | Name | RFC |
|---|---|---|
| 1 | SOLICIT | RFC 8415 |
| 2 | ADVERTISE | RFC 8415 |
| 3 | REQUEST | RFC 8415 |
| 4 | CONFIRM | RFC 8415 |
| 5 | RENEW | RFC 8415 |
| 6 | REBIND | RFC 8415 |
| 7 | REPLY | RFC 8415 |
| 8 | RELEASE | RFC 8415 |
| 9 | DECLINE | RFC 8415 |
| 10 | RECONFIGURE | RFC 8415 |
| 11 | INFORMATION-REQUEST | RFC 8415 |
| 12 | RELAY-FORW | RFC 8415 |
| 13 | RELAY-REPL | RFC 8415 |
| 14 | LEASEQUERY | RFC 5007 |
| 15 | LEASEQUERY-REPLY | RFC 5007 |
| 16 | LEASEQUERY-DONE | RFC 5460 |
| 17 | LEASEQUERY-DATA | RFC 5460 |
| 18 | RECONFIGURE-REQUEST | RFC 6977 |
| 19 | RECONFIGURE-REPLY | RFC 6977 |
| 20 | DHCPV4-QUERY | RFC 7341 |
| 21 | DHCPV4-RESPONSE | RFC 7341 |
| 22 | ACTIVELEASEQUERY | RFC 7653 |
| 23 | STARTTLS | RFC 7653 |
IETF standards[edit]
- RFC 8415, «Dynamic Host Configuration Protocol for IPv6 (DHCPv6)» — Obsoletes RFC 3315, RFC 3633, RFC 3736, RFC 4242, RFC 7083, RFC 7283, RFC 7550.
- RFC 3319, «Dynamic Host Configuration Protocol (DHCPv6) Options for Session Initiation Protocol (SIP) Servers»
- RFC 3646, «DNS Configuration options for Dynamic Host Configuration Protocol for IPv6 (DHCPv6)»
- RFC 4704, «The Dynamic Host Configuration Protocol for IPv6 (DHCPv6) Client Fully Qualified Domain Name (FQDN) Option»
- RFC 5007, «DHCPv6 Leasequery»
- RFC 6221, «Lightweight DHCPv6 Relay Agent» (LDRA) — Updates RFC 3315, Errata
- RFC 6355, «Definition of the UUID-Based DHCPv6 Unique Identifier (DUID-UUID)»
- RFC 6939, «Client Link-Layer Address Option in DHCPv6»
- RFC 7653, «DHCPv6 Active Leasequery»
See also[edit]
- Comparison of DHCP server software
- Dynamic Host Configuration Protocol (DHCP)
- Neighbor Discovery Protocol, which also supports DNS Configuration
- Prefix delegation, which allows a DHCPv6 client to obtain a whole prefix.
References[edit]
- ^ J. Jeong, ed. (February 2006). IPv6 Host Configuration of DNS Server Information Approaches. Network Working Group. doi:10.17487/RFC4339. RFC 4339. Informational.
- ^ a b T. Mrugalski; M. Siodelski; B. Volz; A. Yourtchenko; M. Richardson; S. Jiang; T. Lemon; T. Winters (November 2018). Dynamic Host Configuration Protocol for IPv6 (DHCPv6). IETF. doi:10.17487/RFC8415. ISSN 2070-1721. RFC 8415. Proposed Standard. Obsoletes RFC 3315, 3633, 3736, 4242, 7083, 7283 and 7550.
- ^ T. Mrugalski; M. Siodelski; B. Volz; A. Yourtchenko; M. Richardson; S. Jiang; T. Lemon; T. Winters (November 2018). Dynamic Host Configuration Protocol for IPv6 (DHCPv6). IETF. doi:10.17487/RFC8415. ISSN 2070-1721. RFC 8415. Proposed Standard. sec. 14. Obsoletes RFC 3315, 3633, 3736, 4242, 7083, 7283 and 7550.
External links[edit]
![]()
Wikiversity has learning resources about DHCPv6
- IANA DHCPv6 Parameters
- IPv6 Intelligence: DHCPv6, comparison of DHCPv6 packages and implementations (Last updated: April, 2009)
- IPv6 Ready: DHCPv6, list of IPv6 Phase II Certified DHCPv6 implementations (Last updated: December, 2012)
This module describes how to
configure Dynamic Host Configuration Protocol (DHCP) for IPv6.
DHCPv6 Prefix Delegation
The IPv6 Access Services—DHCPv6 Prefix Delegation feature can be used to manage link, subnet, and site addressing changes.
Dynamic Host Configuration Protocol for IPv6 (DHCPv6) can be used in environments to deliver stateful and stateless information,
which are defined as follows:
-
Stateful prefix delegation—Address assignment is centrally managed and clients must obtain configuration information such
as address autoconfiguration and neighbor discovery that is not available through protocols. -
Stateless prefix delegation—Stateless configuration parameters do not require a server to maintain any dynamic state for
individual clients, such as Domain Name System (DNS) server addresses and domain search list options.
Extensions to DHCPv6 also enable prefix delegation, through which an ISP can automate the process of assigning prefixes to
a customer for use within the customer’s network. The prefix delegation occurs between a provider edge (PE) device and customer
premises equipment (CPE) using the DHCPv6 prefix delegation option. Once the ISP has delegated prefixes to a customer, the
customer may further subnet and assign prefixes to the links in the customer’s network.
Configuring Nodes Without Prefix Delegation
Stateless DHCPv6 allows DHCPv6 to be used for configuring a node with parameters that do not require a server to maintain
any dynamic state for the node. The use of stateless DHCP is controlled by router advertisement (RA) messages multicasted
by routers. The Cisco IOS XE DHCPv6 client will invoke stateless DHCPv6 when it receives an RA. The Cisco IOS XE DHCPv6 server
will respond to a stateless DHCPv6 request with configuration parameters, such as the DNS servers and domain search list options.
Client and Server Identification
Each DHCPv6 client and server is identified by a DHCP unique identifier (DUID). The DUID is carried in client identifier
and server identifier options. The DUID is unique across all DHCP clients and servers, and it is stable for any specific client
or server. DHCPv6 uses DUIDs based on link-layer addresses for both the client and server identifier. The device uses the
MAC address from the lowest-numbered interface to form the DUID. The network interface is assumed to be permanently attached
to the device.
When a DHCPv6 client requests two prefixes with the same DUID but with different identity association identifiers (IAIDs)
on two different interfaces, these prefixes are considered to be for two different clients, and the interface information
is maintained for both.
Rapid Commit
The DHCPv6 client can obtain configuration parameters from a server either through a rapid two-message exchange (solicit,
reply) or through a four-message exchange (solicit, advertise, request, and reply). By default, the four-message exchange
is used. When the rapid-commit option is enabled by both the client and the server, the two-message exchange is used.
DHCPv6 Client and
Relay Functions
The DHCPv6 client and relay functions are mutually exclusive on an
interface. When one of these functions is enabled and a user tries to configure
a different function on the same interface, one of the following messages is
displayed: “Interface is in DHCP client mode” or “Interface is in DHCP relay
mode.”
The following sections describe
these functions:
Client Function
The DHCPv6 client
function can be enabled on individual IPv6-enabled interfaces.
 Note |
You need APPX license package to enable the DHCPv6 client function on the device. |
The DHCPv6 client can
request and accept those configuration parameters that do not require a server
to maintain any dynamic state for individual clients, such as DNS server
addresses and domain search list options.
The DHCPv6 client can
also request the delegation of prefixes. The prefixes acquired from a
delegating device will be stored in a local IPv6 general prefix pool. The
prefixes in the general prefix pool can then be referred to from other
applications; for example, the general prefix pool can be used to number device
downstream interfaces.
For IPv6, the details of the default gateway are
received from router advertisement (RA) and not from the DHCP server. The
details of the default gateway obtained from the DHCP server are not added in
the client server. Hence, the following IPv6 commands must be configured on the
client interface:
-
pv6 nd autoconfig prefix”
-
“ipv6 nd autoconfig default”
Server Selection
A DHCPv6 client
builds a list of potential servers by sending a solicit message and by
collecting advertise message replies from servers. These messages are ranked
based on the preference value, and servers may add a preference option to their
advertise messages explicitly stating their preference value. If the client
needs to acquire prefixes from servers, only servers that have advertised
prefixes are considered.
IAPD and IAID
An Identity
Association for Prefix Delegation (IAPD) is a collection of prefixes assigned
to a requesting device. A requesting device may have more than one IAPD; for
example, one for each of its interfaces.
Each IAPD is
identified by an IAID. The IAID is chosen by the requesting device and is
unique among the IAPD IAIDs on the requesting device. IAIDs are made consistent
across reboots by using information from the associated network interface,
which is assumed to be permanently attached to the device.
DHCPv6 Relay Agent
A DHCPv6 relay agent,
which may reside on the client’s link, is used to relay messages between the
client and the server. The DHCPv6 relay agent operation is transparent to the
client. A DHCPv6 client locates a DHCPv6 server using a reserved, link-scoped
multicast address. For direct communication between the DHCPv6 client and the
DHCPv6 server, both of them must be attached to the same link. However, in some
situations where ease of management, economy, or scalability is a concern, it
is desirable to allow a DHCPv6 client to send a message to a DHCPv6 server that
is not connected to the same link. IPv6 enable is required for IPv6 DHCP relay,
although IPv6 address is configured.
DHCPv6 Relay Agent
Notification for Prefix Delegation
The DHCPv6 relay
agent notification for prefix delegation allows the device working as a DHCPv6
relay agent to find prefix delegation options by reviewing the contents of a
DHCPv6 RELAY-REPLY packet that is relayed by the relay agent to the client.
When a prefix delegation option is found by the relay agent, the relay agent
extracts the information about the prefix that is being delegated and inserts
an IPv6 static route matching the prefix delegation information onto the relay
agent. Future packets destined to that prefix via relay will be forwarded based
on the information contained in the prefix delegation. The IPv6 static route is
then left in the routing table until the prefix delegation lease time expires
or the relay agent receives a release packet from the client releasing the
prefix delegation.
No user
configuration is required for this feature. Static route management is done
automatically by the relay agent.
IPv6 routes are
added when the relay agent relays a RELAY-REPLY packet, and IPv6 routes are
deleted when the prefix delegation lease time expires or the relay agent
receives a release message. An IPv6 static route in the routing table of the
relay agent can be updated when the prefix delegation lease time is extended.
The DHCP—DHCPv6
Relay Agent Notification for Prefix Delegation feature leaves a static IPv6
route on the routing table of the relay agent. The registered IPv6 address
allows unicast reverse packet forwarding (uRPF) to work by allowing the device
doing the reverse lookup to confirm that the IPv6 address on the relay agent is
not malformed or spoofed. The static route that remains in the routing table of
the relay agent can be redistributed to other routing protocols to advertise
the subnets to other nodes. Static routes will be removed when a DHCP_DECLINE
message is sent by the client.
DHCPv6 Relay Options:
Remote-ID for Gigabit Ethernet and Fast Ethernet Interfaces
The DHCPv6 Ethernet
Remote ID Option feature adds the remote identification (remote-ID) option to
relayed (RELAY-FORWARD) DHCPv6 packets.
The remote-ID
option provides information to the DHCPv6 server, which includes port
information, the system’s DUID, and the VLAN ID. This information can be used
to uniquely identify both the relay and the port on the relay through which the
client packet arrived. The DHCPv6 server uses this information to select
parameters specific to a particular user, host, or subscriber modem.
The addition of the
remote-ID option to the RELAY-FORWARD packet occurs automatically and no user
configuration is necessary.
The DHCPv6 server
does not need to echo the remote-ID option in the RELAY-REPLY packet. The
Internet Assigned Numbers Authority (IANA) has assigned the DHCPv6 option code
37 for the relay agent remote-ID option.
If the remote-ID
option is included in the RELAY-REPLY packet, the option is removed from the
packet before it is relayed to the client.
DHCPv6 Relay Options: Reload
Persistent Interface ID
The DHCPv6
Relay—Reload Persistent Interface ID Option feature makes the interface ID
option persistent. The interface ID is used by relay agents to decide which
interface should be used to forward a RELAY-REPLY packet. A persistent
interface-ID option will not change if the device acting as a relay agent goes
offline during a reload or a power outage. When the device acting as a relay
agent returns online, it is possible that changes to the internal interface
index of the relay agent may have occurred in certain scenarios (such as, when
the relay agent reboots and the number of interfaces in the interface index
changes, or when the relay agents boot up and has more virtual interfaces than
it did before the reboot). This feature prevents such scenarios from causing
any problems.
This feature
changes the DHCPv6 interface-ID option to be expressed as the short form of the
interface name. The interface name as the DHCPv6 interface ID helps avoid
potential problems that could arise due to physical or logical interfaces
changing on the relay agent after a reload.
DHCPv6 Relay Chaining
DHCPv6 messages can
be relayed through multiple relay agents. This configuration is called
relay
chaining. A relay chaining configuration can be supported only when each
relay agent adds information to DHCPv6 messages before relaying them. The
information helps in relaying the DHCPv6 reply back to the DHCPv6 client
through the same path.
The delegated IPv6 prefix must be routable in order to be useful.
The actual DHCPv6 Prefix Delegation (PD) client may not be permitted to inject
routes into the delegating network. In service provider (SP) networks, for
example, an edge device typically acts as a DHCPv6 relay agent, and this edge
device often has the responsibility to maintain routes within the SP network
for clients’ PD bindings. In the event that DHCPv6 requests and responses are
relayed through a chain of DHCPv6 relays, there may be a need to introduce
appropriate routes (particularly with DHCPv6 PD) in the Forwarding Information
Base (FIB) so that routing is handled transparently.
DHCPv6 Relay SSO and ISSU
In specific Cisco networking devices that support dual route processors (RPs), stateful switchover (SSO) takes advantage
of RP redundancy to increase network availability. The feature establishes one of the RPs as the active processor while the
other RP is designated as the standby processor, and then synchronizing critical state information between them. Following
an initial synchronization between the two processors, SSO dynamically maintains RP state information between them.
The Cisco IOS XE In Service Software Upgrade (ISSU) process allows the Cisco IOS XE software to be updated or otherwise modified
while packet forwarding continues. In most networks, planned software upgrades are a significant cause of downtime. The ISSU
allows the Cisco IOS XE software to be modified while packet forwarding continues. This increases network availability and
reduces downtime caused by planned software upgrades.
The SSO and the ISSU use redundant hardware, with the active and standby RP each running an instance of the DHCPv6 relay
agent. Both instances exchange run-time state data.
For further information about the SSO and the ISSU, see the “Stateful Switchover” and the “Cisco IOS XE In Service Software Upgrade” modules respectively, in the
Cisco IOS High Availability Configuration Guide.
DHCPv6 Relay Options: Remote-ID for Ethernet Interfaces
This feature adds the remote identification (remote-ID) option to relayed (RELAY-FORWARD) DHCPv6 packets.
The remote-ID option provides information to the DHCPv6 server, including port information, the system’s DUID, and the VLAN
ID. Collectively, this information can be used to uniquely identify both the relay and the port on the relay through which
the client’s packet arrived. The DHCPv6 server uses this information to select parameters specific to a particular user, host,
or subscriber modem. This feature works only for Ethernet interfaces at this time.
This feature introduces no user configuration. Because the addition of the remote-ID option to the RELAY-FORWARD packet occurs
automatically, no user configuration is necessary.
The DHCPv6 server does not need to echo the remote-ID option in the RELAY-REPLY packet. Internet Assigned Numbers Authority
(IANA) has assigned the DHCPv6 option code 37 for the relay agent remote-ID option.
If the remote-ID option is included in the RELAY-REPLY packet, the option is stripped out of the packet before the packet
is relayed to the client.
DHCPv6 Relay Options: Reload Persistent Interface-ID
This feature makes the interface-ID option, which is used by relay agents to decide which interface should be used when forwarding
a RELAY-REPLY packet, persistent. A persistent interface-ID option will not change if the router acting as a relay agent goes
offline (such as during a reload or a power outage). When the router acting as a relay agent returns online, it is possible
that changes to the internal interface index of the relay agent may have occurred in certain scenarios (such as cases where
the relay agent reboots and has a change in the number of interfaces in the interface index, or the relay agents boots up
and has more virtual interfaces than it did before the reboot). This feature prevents this scenario from causing any problems.
This feature changes the DHCPv6 interface-ID option to be expressed as simply the short form of the interface name. This
syntax helps avoid potential problems that could arise due to physical or logical interfaces changing on the relay agent after
a reload.
How to Implement
DHCP for IPv6
Configuring the DHCPv6 Server Function
Configuring the DHCPv6
Configuration Pool
SUMMARY STEPS
-
enable
-
configure
terminal
-
ipv6dhcp
pool
poolname -
domain-name
domain
-
dns-server
ipv6-address
-
prefix-delegation
ipv6-prefix
/
prefix-length
client-duid [iaid
iaid ] [lifetime ] -
prefix-delegation
pool
poolname
[lifetime
valid-lifetime
preferred-lifetime ] -
exit
-
interface
type
number
-
ipv6
dhcp
server
poolname
[rapid-commit ] [preference
value ]
[allow-hint ] -
end
DETAILED STEPS
| Command or Action | Purpose | |||
|---|---|---|---|---|
| Step 1 |
Example: |
Enables
|
||
| Step 2 |
Example: |
Enters global |
||
| Step 3 |
dhcp pool Example: |
Configures a The |
||
| Step 4 |
Example: |
Configures a |
||
| Step 5 |
Example: |
Specifies the |
||
| Step 6 |
Example: |
Specifies a |
||
| Step 7 |
prefix-delegation Example: |
Specifies a The lifetime values are lifetime can be specified as:
The specified duration is between 60 and 4294967295 seconds or |
||
| Step 8 |
Example: |
Exits |
||
| Step 9 |
Example: |
Specifies |
||
| Step 10 |
Example: |
Enables or disables DHCPv6 service on an interface.
|
||
| Step 11 |
Example: |
Returns to |
Configuring a Binding
Database Agent for the Server Function
SUMMARY STEPS
-
enable -
configure
terminal
-
ipv6
dhcp
database
agent
[write-delay
seconds ]
[timeout
seconds ] -
end
DETAILED STEPS
| Command or Action | Purpose | |
|---|---|---|
| Step 1 |
Example: |
Enables
|
| Step 2 |
Example: |
Enters global |
| Step 3 |
Example: |
Specifies
|
| Step 4 |
Example: |
Returns to |
Configuring the DHCPv6 Client
Function
General prefixes
can be defined dynamically from a prefix received by a DHCPv6 prefix delegation
client. The delegated prefix is stored in a general prefix.
SUMMARY STEPS
-
enable -
configure
terminal
-
interface
type
number
-
ipv6
dhcp
clientpd
{prefix-name |
hint
ipv6-prefix }
[rapid-commit ] - ipv6 nd autoconfig prefix
- ipv6 nd autoconfig default-router
-
end
DETAILED STEPS
| Command or Action | Purpose | |||
|---|---|---|---|---|
| Step 1 |
Example: |
Enables
|
||
| Step 2 |
Example: |
Enters global |
||
| Step 3 |
Example: |
Specifies an |
||
| Step 4 |
pd {prefix-name | Example: |
Enables the
|
||
| Step 5 |
ipv6 nd autoconfig prefix Example: |
Allows Neighbor Discovery to install all valid on-link prefixes |
||
| Step 6 |
ipv6 nd autoconfig default-router Example: |
Allows Neighbor Discovery to install a default route to the |
||
| Step 7 |
Example: |
Returns to |
Example
The following
example depicts the usage of
ipv6 dhcp client pd
hint command along with the
ipv6 dhcp client pd
pd-name command.
interface GigabitEthernet0/0/10
no ip address
media-type auto-select
negotiation auto
ipv6 address prefix-from-provider ::1/48
ipv6 enable
ipv6 dhcp client pd hint 2001:DB8:43::/48
ipv6 dhcp client pd prefix-from-provider
Configuring the DHCPv6 Relay
Agent
SUMMARY STEPS
-
enable -
configure
terminal
-
interface
type
number
-
ipv6
enable -
ipv6
dhcp
relay
destination
ipv6-address
[interface-type
interface-number ] -
end
DETAILED STEPS
| Command or Action | Purpose | |
|---|---|---|
| Step 1 |
Example: |
Enables
|
| Step 2 |
Example: |
Enters global |
| Step 3 |
Example: |
Specifies an |
| Step 4 |
Example: |
Enables IPv6 |
| Step 5 |
Example: |
Specifies a |
| Step 6 |
Example: |
Returns to |
Configuring Route Addition for Relay and Server
To enable route addition by DHCPv6 relay and server for the delegated prefix, use the
ipv6
dhcp
iapd-route-add
command in global configuration mode.
DHCPv6 relay inserts a route for the delegated prefix without additional configuration (i.e., the default is
ipv6
dhcp
iapd-route-add
, which of course isn’t NVGEN’ed.) If you want to disable this insertion, you must configure no
ipv6
dhcp
iapd-route-add
.
The relay tracks valid and preferred lifetimes for the delegated prefix. When the prefix reaches the end of the valid lifetime,
the route is automatically removed from the routing table.
To add routes for individually assigned IPv6 addresses on the relay or server, use the
ipv6
dhcp
iana-route-add
command in global configuration mode.
Defining a General
Prefix with the DHCPv6 Prefix Delegation Client Function
Perform this task to configure the
DHCPv6 client function on an interface and enable prefix delegation on an
interface. The delegated prefix is stored in a general prefix.
SUMMARY STEPS
- enable
- configure
terminal - interface
type
number - ipv6
dhcp
client
pd {prefix-name |
hint
ipv6-prefix}
[rapid-commit]
DETAILED STEPS
| Command or Action | Purpose | |
|---|---|---|
| Step 1 |
enable Example: |
Enables privileged EXEC mode.
|
| Step 2 |
configure Example: |
|
| Step 3 |
interface Example: |
configuration mode. |
| Step 4 |
ipv6 Example: |
Enables the DHCPv6 client process and enables a request for prefix
|
Configuring a
VRF-Aware Relay for MPLS VPN Support
Configuring a VRF-Aware Relay
Note |
You do not have to configure this feature on specified interfaces. If you want the feature to be enabled globally only on |
SUMMARY STEPS
-
enable
-
configure
terminal
-
ipv6
dhcp-relay
option
vpn
-
interface
type
number
-
ipv6
dhcp
relay
option
vpn
-
ipv6
dhcp
relay
destination
ipv6-address [interface-type
interface-number |
vrf
vrf-name |
global ] -
end
DETAILED STEPS
| Command or Action | Purpose | |
|---|---|---|
| Step 1 |
Example: |
Enables privileged EXEC mode.
|
| Step 2 |
Example: |
Enters global configuration mode. |
| Step 3 |
Example: |
Enables the DHCP for IPv6 relay VRF-aware feature globally. |
| Step 4 |
Example: |
Specifies an interface type and number, and enters interface configuration mode. |
| Step 5 |
Example: |
Enables the DHCP for IPv6 relay VRF-aware feature on the specified interface. Enabling this command supersedes the configuration |
| Step 6 |
Example: |
Specifies a destination address to which client messages are forwarded. |
| Step 7 |
Example: |
Returns to privileged EXEC mode. |
Restarting the
DHCPv6 Client on an Interface
Perform this task to restart the
DHCPv6 client on a specified interface after first releasing and unconfiguring
previously acquired prefixes and other configuration options.
SUMMARY STEPS
- enable
- clear
ipv6
dhcp
client
interface-type
interface-number
DETAILED STEPS
| Command or Action | Purpose | |
|---|---|---|
| Step 1 |
enable Example: |
Enables privileged EXEC mode.
|
| Step 2 |
clear Example: |
Restarts the DHCPv6 client on an interface. |
Deleting Automatic Client Bindings from the DHCPv6 Binding Table
SUMMARY STEPS
-
enable
-
clear
ipv6
dhcp
binding
[ipv6-address ] [vrf
vrf-name ]
DETAILED STEPS
| Command or Action | Purpose | |
|---|---|---|
| Step 1 |
Example: |
Enables privileged EXEC mode.
|
| Step 2 |
Example: |
Deletes automatic client bindings from the DHCPv6 binding table. |
Troubleshooting
DHCPv6
Note |
Step 1 is common to each debug command. Step 2 to Step 5 are |
SUMMARY STEPS
- enable
- debug
ipv6
dhcp [detail] - debug
ipv6
dhcp
database - debug
ipv6
dhcp
relay - debug
ipv6
dhcp
redundancy [detail]
DETAILED STEPS
| Command or Action | Purpose | |
|---|---|---|
| Step 1 |
enable Example: |
Enables privileged EXEC mode.
|
| Step 2 |
debug Example: |
Enables debugging for DHCPv6. |
| Step 3 |
debug Example: |
Enables debugging for the DHCPv6 binding database. |
| Step 4 |
debug Example: |
Enables DHCPv6 relay agent debugging. |
| Step 5 |
debug Example: |
Enables DHCPv6 redundancy debugging. |
Verifying the DHCPv6
Configuration
SUMMARY STEPS
- enable
- show
ipv6
dhcp - show
ipv6
dhcp
binding [ipv6-address] - show
ipv6
dhcp
database [agent-URL] - show
ipv6
dhcp
interface [type
number] - show
ipv6
dhcp
pool [poolname] - show
running-config
DETAILED STEPS
| Command or Action | Purpose | |
|---|---|---|
| Step 1 |
enable Example: |
Enables privileged EXEC mode.
|
| Step 2 |
show Example: |
Displays the DUID on a specified device. |
| Step 3 |
show Example: |
Displays automatic client bindings from the DHCPv6 database. |
| Step 4 |
show Example: |
Displays the DHCPv6 binding database agent information. |
| Step 5 |
show Example: |
Displays DHCPv6 interface information. |
| Step 6 |
show Example: |
Displays DHCPv6 configuration pool information. |
| Step 7 |
show Example: |
Displays the current configuration running on the router. |
Example Verifying
the DHCPv6 Configuration
Sample Output from the show
ipv6 dhcp Command
The following sample output from
the
show
ipv6
dhcp command displays the DUID of the device:
Device# show ipv6 dhcp

This device's DHCPv6 unique identifier(DUID): 000300010002FCA5DC1C
Sample Output from the show ipv6 dhcp binding Command
In the following sample output, the
show
ipv6
dhcp
binding command displays information about two
clients, including their DUIDs, IAPDs, prefixes, and preferred and valid
lifetimes:
Device# show ipv6 dhcp binding

Client: FE80::202:FCFF:FEA5:DC39 (GigabitEthernet2/1/0)
DUID: 000300010002FCA5DC1C
IA PD: IA ID 0x00040001, T1 0, T2 0
Prefix: 3FFE:C00:C18:11::/68
preferred lifetime 180, valid lifetime 12345
expires at Nov 08 2002 02:24 PM (12320 seconds)
Client: FE80::202:FCFF:FEA5:C039 (GigabitEthernet2/1/0)
DUID: 000300010002FCA5C01C
IA PD: IA ID 0x00040001, T1 0, T2 0
Prefix: 3FFE:C00:C18:1::/72
preferred lifetime 240, valid lifetime 54321
expires at Nov 09 2002 02:02 AM (54246 seconds)
Prefix: 3FFE:C00:C18:2::/72
preferred lifetime 300, valid lifetime 54333
expires at Nov 09 2002 02:03 AM (54258 seconds)
Prefix: 3FFE:C00:C18:3::/72
preferred lifetime 280, valid lifetime 51111
Sample Output from the show ipv6 dhcp database Command
The following sample output from the
show
ipv6
dhcp
database command shows information on the binding
database agents TFTP, NVRAM, and flash:
Device# show ipv6 dhcp database

Database agent tftp://172.19.216.133/db.tftp:
write delay: 69 seconds, transfer timeout: 300 seconds
last written at Jan 09 2003 01:54 PM,
write timer expires in 56 seconds
last read at Jan 06 2003 05:41 PM
successful read times 1
failed read times 0
successful write times 3172
failed write times 2
Database agent nvram:/dhcpv6-binding:
write delay: 60 seconds, transfer timeout: 300 seconds
last written at Jan 09 2003 01:54 PM,
write timer expires in 37 seconds
last read at never
successful read times 0
failed read times 0
successful write times 3325
failed write times 0
Database agent flash:/dhcpv6-db:
write delay: 82 seconds, transfer timeout: 3 seconds
last written at Jan 09 2003 01:54 PM,
write timer expires in 50 seconds
last read at never
successful read times 0
failed read times 0
successful write times 2220
failed write times 614
Sample Output from the show ipv6 dhcp interface Command
The following is sample output from the
show
ipv6
dhcp
interface command. In the first example, the
command is used on a device that has an interface acting as a DHCPv6 server. In
the second example, the command is used on a router that has an interface
acting as a DHCPv6 client:
Device# show ipv6 dhcp interface

GigabitEthernet2/1/0 is in server mode
Using pool: svr-p1
Preference value: 20
Rapid-Commit is disabled
Router2# show ipv6 dhcp interface
GigabitEthernet2/1/0 is in client mode
State is OPEN (1)
List of known servers:
Address: FE80::202:FCFF:FEA1:7439, DUID 000300010002FCA17400
Preference: 20
IA PD: IA ID 0x00040001, T1 120, T2 192
Prefix: 3FFE:C00:C18:1::/72
preferred lifetime 240, valid lifetime 54321
expires at Nov 08 2002 09:10 AM (54319 seconds)
Prefix: 3FFE:C00:C18:2::/72
preferred lifetime 300, valid lifetime 54333
expires at Nov 08 2002 09:11 AM (54331 seconds)
Prefix: 3FFE:C00:C18:3::/72
preferred lifetime 280, valid lifetime 51111
expires at Nov 08 2002 08:17 AM (51109 seconds)
DNS server: 2001:DB8:1001::1
DNS server: 2001:DB8:1001::2
Domain name: example1.net
Domain name: example2.net
Domain name: example3.net
Prefix name is cli-p1
Rapid-Commit is enabled
Sample Output from the show ipv6 dhcp pool Command
In the following sample output, the
show
ipv6
dhcp
pool command displays information about the
configuration pool named svr-p1, including static bindings, prefix information,
the DNS server, and the domain names found in the svr-p1 pool:
Device# show ipv6 dhcp pool

DHCPv6 pool: svr-p1
Static bindings:
Binding for client 000300010002FCA5C01C
IA PD: IA ID 00040002,
Prefix: 3FFE:C00:C18:3::/72
preferred lifetime 604800, valid lifetime 2592000
IA PD: IA ID not specified; being used by 00040001
Prefix: 3FFE:C00:C18:1::/72
preferred lifetime 240, valid lifetime 54321
Prefix: 3FFE:C00:C18:2::/72
preferred lifetime 300, valid lifetime 54333
Prefix: 3FFE:C00:C18:3::/72
preferred lifetime 280, valid lifetime 51111
Prefix from pool: local-p1, Valid lifetime 12345, Preferred lifetime 180
DNS server: 2001:DB8:1001::1
DNS server: 2001:DB8:1001::2
Domain name: example1.net
Domain name: example2.net
Domain name: example3.net
Active clients: 2
Current configuration : 22324 bytes
!
! Last configuration change at 14:59:38 PST Tue Jan 16 2009
! NVRAM config last updated at 04:25:39 PST Tue Jan 16 2009 by name01
!
hostname Router
!
ip cef
ipv6 unicast-routing
ipv6 cef
ipv6 cef accounting prefix-length
!
!
interface GigabitEthernet0/0/0
ip address 10.4.9.11 255.0.0.0
media-type 10BaseT
ipv6 address 2001:DB8:C18:1::/64 eui-64
Configuration
Examples for Implementing DHCPv6
Example: Configuring the DHCPv6 Client Function
In the following example, this Dynamic Host Configuration Protocol for IPv6 (DHCPv6) client has three interfaces. Ethernet
interface 0/0 is the upstream link to a service provider, which has a DHCPv6 server function enabled. The Fast Ethernet interfaces
0/0 and 0/1 are links to local networks.
The upstream interface, Ethernet interface 0/0, has the DHCPv6 client function enabled. Prefixes delegated by the provider
are stored in the general prefix called prefix-from-provider.
The local networks, Fast Ethernet interfaces 0/0 and 0/1, both assign interface addresses based on the general prefix called
prefix-from-provider. The bits on the left of the addresses come from the general prefix, and the bits on the right of the
addresses are specified statically.
interface Ethernet 0/0
 description uplink to provider DHCP IPv6 server
 ipv6 dhcp client pd prefix-from-provider
!
interface FastEthernet 0/0
 description local network 0
 ipv6 address prefix-from-provider ::5:0:0:0:100/64
!
interface FastEthernet 0/1
 description local network 1
ipv6 address prefix-from-provider ::6:0:0:0:100/64| Course Index |
|---|
| Part 1 – Introduction: What is IPv6 |
| Part 2 – IPv6 Addressing & Subnetting |
| Part 3 – IPv6 Headers & Header Extensions |
| Part 4 – ICMPv6 & IPv6 Neighborships |
| Part 5 – IPv6 Configuration, EUI-64, SLAAC & Dual Stack |
| Part 6 – IPv6 DHCP (DHCPv6) |
| Part 7 – IPv6 on Windows |
| Part 8 – IPv6 on Linux |
| Part 9 – IPv6 on Mac |
| Part 10 – IPv6 DNS, Monitoring & Address Management |
| Part 11 – IPv6 Routing |
| Part 12 – IPv6 Security & Tunneling |
| Part 13 – IPv6 Internet Connection & Address Planning |
What Is DHCPv6?
DHCPv6, or Dynamic Host Configuration Protocol for IPv6, is a network protocol that assigns unique IP addresses to devices connected to an IPv6 network. It automates the configuration process and simplifies network management. DHCPv6 ensures efficient and seamless communication between devices by providing them with essential network parameters.
All about DHCPv6 and Dynamic Address Assignment
The Dynamic Host Configuration Protocol (DHCP) in Version 6 was created to support automatic IPv6 addressing using DHCP, like it was common with IPv4. Back in the day in the IPv4 World, we did not have automatic configuration of addresses like we do with SLAAC now.
You have learned before, that there also was no possibility to tell a client the router’s IP address (default gateway) nor the address of the DNS servers.
All this can be done using our built-in ICMPv6 toolkit, which I find absolutely great. For some implementations and some networks it might make sense to implement another solution: DHCPv6
DHCPv6 is the stateful alternative to SLAAC. Remember, the S in SLAAC comes from stateless. Stateless means, the state is not recorded, so the address generated by a client is not essentially known to the infrastructure and is not essentially the same every time. In large deployments, engineers might want to do stateful address assignment and keep record which client received which IPv6 address at which time. This can also help fulfill strict security requirements in larger companies.
To the rescue comes DHCPv6!
DHCPv6 has been defined in many RFCs, the most recent one being RFC8415. It can provide SLAAC hosts with additional information which is not commonly provided by SLAAC, such as DNS servers.
Yes, I told you before, DNS can be supplied inside a Router Advertisement message (RA). There is RFC6106 for announcing DNS servers with RA, but this was mostly not implemented by the networking vendors and thus could not be used in production very well. RFC6106 was since obsoleted by a new RFC8106.
DHCPv6 also supports IPv6 Prefix Delegation which is common with DSL routers and some Internet service providers, to receive not only the public IP address (upstream prefix), but also a globally routed prefix for use in the local network (downstream prefix) from the provider.
Watch my video where I explain DHCPv6:
How DHCPv6 works
On a high-level overview, DHCPv6 uses UDP Port 546 for the client and UDP Port 547 for the server and follows these simple steps:
- the DHCP Unique Identifier (DUID) is sent by the client to request an address
- the DHCPv6 server checks the DUID with the DHCPv6 database for reservation or pool
- the IPv6 address is announced by DHCP server to the client
The detailed technical steps are:
- the DHCP client sends a solicit from its Link-Local address to multicast group ff02::1:2 (all DHCP servers)
- the DHCP server replies with an advertise message from its Link-Local address to the Link-Local address of the client (remember, both have to be link-local as the client has no other address yet!)
- the DHCP client replies with a request message from its Link-Local address to multicast group ff02::1:2 (all DHCP servers)
- the DHCP server ends the communication with the assignment of an address and replying from its Link-Local address to the Link-Local address of the client
DHCPv6 Example #1: How to configure a Cisco DHCPv6 Server & Client
Let’s do a lab together as an example how DHCPv6 works.
You can copy and paste the sample configuration to real hardware or virtual machines. Or, if you prefer, you can just read and not try out for yourself.
How to Configure a Cisco DHCPv6 Server
! Cisco DHCPv6 Server
!
hostname R1
!
ipv6 unicast-routing
ipv6 cef
ipv6 dhcp pool test
  address prefix 2010:AA01:10::/64 lifetime infinite infinite
  dns-server AAAA:BBBB:10FE:100::15
  dns-server 2010:AA01::15
  domain-name example.com
!
!
!
interface G0/0/1
  no ip address
  duplex auto
  speed auto
  ipv6 address 2010:AA01:10::2/64
  ipv6 dhcp server test rapid-commit
!
end
How to Configure a Cisco DHCPv6 Client
! Cisco DHCPv6 Client
!
hostname R2
!
ipv6 unicast-routing
ipv6 cef
!
interface FastEthernet0/1
  no ip address
  duplex auto
  speed auto
  ipv6 address dhcp rapid-commit
  ipv6 enable
!
end
How to troubleshoot a Cisco DHCPv6 Server
Here are some example troubleshooting commands you can use on Cisco gear in regards to the DHCPv6 service:
Show Cisco DHCPv6 Address Pools
R1# show ipv6 dhcp pool
DHCPv6 pool: test
  Address allocation prefix: 2010:AA01:10::/64 valid 4294967295 preferred 4294967295 (1 in use, 0 conflicts)
  DNS server: AAAA:BBBB:10FE:100::15
  DNS server: 2010:AA01::15
  Domain name: example.com
  Active clients: 1
Show Cisco DHCPv6 Server Bindings (Allocations)
R2# show ipv6 dhcp binding
Client: FE80::C801:88FF:FEAC:1C
  DUID: 00030001CA0188AC0000
  Username : unassigned
  IA NA: IA ID 0x00040001, T1 43200, T2 69120
    Address: 2010:AA01:10:0:
D16D:EC61:EDCB:8BD1
preferred lifetime INFINITY, , valid lifetime INFINITY,
Show Cisco DHCPv6 Client Status (Interfaces)
R2# show ipv6 dhcp interface
  FastEthernet1/0 is in client mode
  Prefix State is IDLE
  Address State is OPEN
  Renew for address will be sent in 11:17:16
  List of known servers:
  Reachable via address: FE80::C800:88FF:FEAC:1C
  DUID: 00030001CA0088AC0000
  Preference: 0
  Configuration parameters:
  IA NA: IA ID 0x00040001, T1 43200, T2 69120
  Address: 2010:AA01:10:0:D16D:EC61:
EDCB:8BD1/128
  preferred lifetime INFINITY, valid lifetime INFINITY
  DNS server: AAAA:BBBB:10FE:100::15
  DNS server: 2010:AA01::15
  Domain name: example.com
  Information refresh time: 0
  Prefix Rapid-Commit: disabled
  Address Rapid-Commit: enabled
DHCPv6 Example #2: How to configure a Linux DHCPv6 Server using ISC dhcpd
One of the most common DHCPv6 implementations is still the ISC dhcpd server that runs on UNIX and Linux and supports IPv6 since version 4. You can try these example configurations on a virtual machine our your own host.
How to Configure a UNIX/Linux DHCPv6 Server
Server ISC dhcpd6:
First edit the configuration file in /etc/dhcp/dhcpd6.conf:
default-lease-time 600;
max-lease-time 7200;
log-facility local7;
subnet6 2001:db8:0:1::/64 {
        # Range for clients
        range6 2001:db8:0:1::129 2001:db8:0:1::254;
# Range for clients requesting a temporary address
range6 2001:db8:0:1::/64 temporary;
# Additional options
option dhcp6.name-servers fec0:0:0:1::1;
option dhcp6.domain-search “domain.example”;
# Prefix range for delegation to sub-routers
prefix6 2001:db8:0:100:: 2001:db8:0:f00:: /56;
# Example for a fixed host address
host specialclient {
host-identifier option dhcp6.client-id 00:01:00:01:4a:
1f:ba:e3:60:b9:1f:01:23:45;
fixed-address6 2001:db8:0:1::127;
}
}
And then restart the dhcpd6 daemon using the init system of your Linux distribution.
How to Configure a Debian GNU/Linux DHCPv6 Client
Your configuration is in the file /etc/network/interfaces:
auto eth0
iface eth0 inet6 dhcp
Now restart your networking stack and check out your brand new IPv6 connectivity!
How to Configure IPv6 SLAAC on UNIX/Linux
For Stateless Address Autoconfiguration (SLAAC) you just need to put this one line into your networking configuration at /etc/network/interfaces:
iface eth0 inet6 autoSame here – please restart your networking stack now and enjoy your brand new IPv6!
Recommended Resources for additional reading
Apart from the links throughout this course I recommend the following resources for additional information:
- The Internet Society (ISOC) IPv6 Portal
- Test your IPv6 connectivity on test-ipv6.com
- The official IANA list of assigned IPv6 address space is very interesting
- The Google IPv6 deployment statistics
- The RIPE NCC IPv6 working group and mailing list
Book recommendations on IPv6
I can recommend the following 3 books which I enjoyed reading:
This concludes IPv6 Foundation Part 6: IPv6 DHCP (DHCPv6) of the original IPv6 Foundation Master Class.
Previous Part: IPv6 Foundation Part 5: IPv6 Configuration, EUI-64, SLAAC & Dual Stack
Next Part: IPv6 Foundation Part 7: IPv6 on Windows
Without DHCP, we couldn’t have the flexibility we have in terms of IPv4 addressing. With IPv6, we want to maintain and enhance this flexibility. To accomplish this goal, we have DHCPv6. This new protocol is not a simple “porting” of features from the old stack to the new stack. Instead, we are talking about a complete re-design of its functionalities. DHCPv6 brings more features, enabling an even easier configuration. Furthermore, it has three different flavors: SLAAC, Stateless, and Stateful. In this article, we will see how does it work, and how to implement these technologies.
This article comes with a configuration lab. You can download this Packet Tracer file for free by clicking the link below.

Once you downloaded it, just open the file (you need to un-zip). After that, just continue reading the article, and try the commands you learn in the lab. You will become a master of DHCPv6 in the blink of an eye.
DHCPv6 Lab Intro
The Topology
For this article, we have a fairly simple topology. As you can see from the picture below, we only have one router, one switch, and six computers.
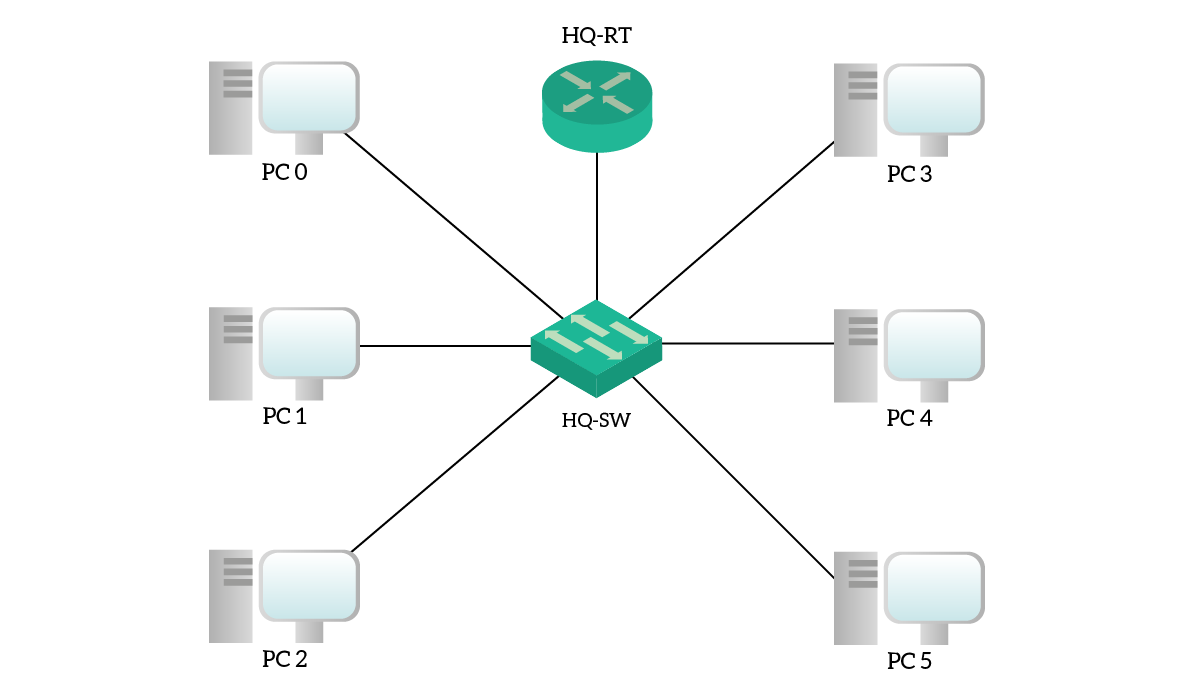
Instead of physical segmentation, we used VLANs to divide the network. Even so, we keep the logical topology quite simple, as we have only two VLANs. PC0, PC1 and PC2 are in VLAN 10, named “Left”, whereas all other PCs are in VLAN 20, named “Right”. As a result, we can implement a different type of DHCPv6 in each VLAN.
The Requirements
Requirements are as simple as the topology. For the “Left” subnet, we are going to use SLAAC, while for the “Right” subnet we are going to use Stateless DHCPv6. Unfortunately, Packet Tracer does not support a clean implementation of Stateful DHCPv6, so we are just going to explain it.
Before we can dive into the configuration part, we will present to you the theory behind all of these DHCPv6 flavors. After that, not only we will configure this technology, but we will see how to troubleshoot them.
DHCPv6 Explained
To understand DHCPv6, you need to understand IPv6 first. If you think you need a refresh, you can check our IPv6 fundamentals article. There you will find everything you need to know about IPv6. Once you feel confident about these technologies, you can just continue with the reading.
Stateless Auto Address Configuration (SLAAC)
SLAAC just means Stateless Auto Address Configuration, but it shouldn’t be confused with Stateless DHCPv6. In fact, we are talking about two different approaches.
SLAAC is the simplest way to give an IPv6 address to a client because it exclusively relies on the Neighbor Discovery Protocol. This protocol, which we simply call NDP, allows devices on a network to discover their Layer 3 neighbors. We use it to retrieve the layer 2 reachability information, like ARP, and to find out routers on the network.
When a device comes online, it sends a Router Solicitation message. He’s basically asking “Are there some routers out there?”. If we have a router on the same network, that router will reply with a Router Advertisement message. Using this message, the router will tell the client some information about the network:
- Who is the default gateway (the link-local address of the router itself)
- What is the global unicast prefix (for example,
2001:DB8:ACAD:10::/64)
With this information, the client is going to create a new global unicast address using the EUI-64 technique. Now the client has an IP address from the global unicast prefix range of the router, and that address is valid over the Internet.
This method is extremely simple and requires virtually no configuration. However, we can’t centralize it and we cannot specify further information, such as DNS settings. To do that, we need to use a DHCPv6 technique. Note that, with SLAAC, we don’t need to use any DHCPv6 packet.
Stateless DHCPv6
Stateless DHCPv6 brings to the picture the DHCPv6 protocol. With this approach, we still use SLAAC to obtain reachability information, and we use DHCPv6 for extra items.
The client always starts with a Router Solicitation, and the router on the segment responds with a Router Advertisement. This time, the Router Advertisement has a flag called other-config set to 1. Once the client receives the message, it will still use SLAAC to craft its own IPv6 address. However, the flag tells the client to do something more.
After the SLAAC process succeeds, the client will craft a DHCPv6 request and send it through the network. A DHCPv6 server will eventually reply with all the extra information we needed, such as the DNS server or domain name.
We call this approach stateless because the DHCPv6 server does not manage any lease for the clients. Instead, it just gives extra information as needed.
Stateful DHCPv6
Stateful DHCPv6 is the exact porting of DHCP into the IPv6 world. With this approach, a DHCPv6 server handles leases and extra information, just like traditional IPv4 DHCP.
The client starts again with a Router Solicitation, but this time the Advertisement in reply contains the managed-config set to 1. This tells the client to not use SLAAC, but DHCPv6 instead. The client will then generate a DHCPv6 request to get both addressing and extra information. The DHCPv6 server will be the one choosing the IPv6 address, not the client.
Configure & Troubleshoot DHCPv6
DHCPv6 Configuration
In this part of the article, we are going to cover how to configure Stateless DHCPv6, Stateful DHCPv6, and SLAAC.
Stateless DHCPv6
We decided to start with Stateless DHCPv6 as this is the most comprehensive implementation. It gives you an overview of the commands for both SLAAC and Stateful. According to the requirements, we should use this approach for the “Right” subnet. All basic IPv6 commands, such as unicast-routing or addresses on the interfaces are already in place. As a result, we can focus on the DHCP configuration.
The interface doing routing for the Right subnet is the GigabitEthernet 0/1.20. To successfully enable Stateless DHCPv6, we need to define a pool with the extra information we want to use, and turn on the other-config flag for that interface. Here’s our step-list.
- Define a pool with the
ipv6 dhcp poolglobal configuration command, calling it “Right”. This will enter the promptRouter(config-dhcpv6)#, where we can configure extra settings. - In the DHCPv6 prompt, enter the DNS server with
dns-servercommand. This must be an IPv6 address, and for this lab, we are using2001:db8:acad:10::15. - Define the domain name with
domain-namecommand, for this lab useright.company.local. - Go to the interface configuration mode, and associate the interface with the pool using
ipv6 dhcp servercommand. - Turn on the
other-configflag for the interface usingipv6 nd other-config-flagcommand, with no extra parameter.
For your convenience, we grouped all the commands you need to enter hereafter.
ipv6 dhcp pool Right
 dns-server 2001:db8:acad:10::15
 domain-name right.company.local

interface GigabitEthernet 0/1.20
 ipv6 dhcp server Right
 ipv6 nd other-config-flag
Your Packet Tracer score should increase, but clients still won’t get the IPv6 address. We need to do something more.
Configuring clients in Packet Tracer
By default, Packet Tracer clients have no IPv6 address. Furthermore, they are set to be static, which is not what we want for this lab. We need to log into the client and change the setting to Auto-Config. To do that, we simply click on the client and go to the Desktop Tab. From there, we select the first icon (“IP Configuration”).
The following window will appear, and we can change the addressing method for IPv6. For this lab, we should set it to Auto-Config on all clients, in order to take advantage of Neighbor Discovery. However, for a Stateless DHCPv6 network, the setting will automatically switch from Auto-Config to DHCP when the client tires to contact the DHCP server.
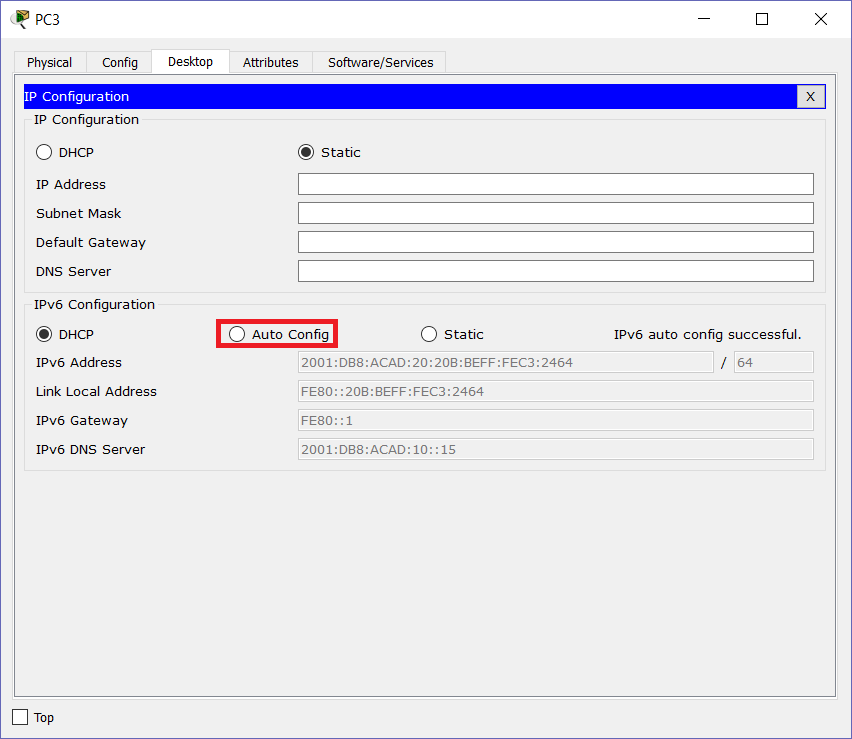
Apply those settings to all the clients and we are set to go!
Stateful DHCPv6
For this lab, we are not going to configure Stateful DHCPv6. However, its configuration is extremely easy. The first thing we want to do is to tell the pool which prefix is going to manage. To do that, we use the address prefix command in the pool configuration prompt. As a parameter, we need to enter a global unicast prefix, for example 2001:db8:acad:10::/64.
The next step is at the interface level. We need to turn on the managed-config flag in the Neighbor Discovery. This is easily done with ipv6 nd managed-config-flag. The remaining configuration is identical to Stateless DHCPv6.
SLAAC
Unlike DHCPv6, SLAAC is on by default. In other words, every Ethernet interface on a Cisco router with an IPv6 address automatically sends Router Advertisements. As a result, SLAAC is already working on our “Left” subnet: we just need to check clients.
Note: if your clients haven’t obtained the IPv6 address, try to enable the other-config flag on GigabitEthernet 0/1.10. This may be related to a Packet Tracer bug!
Troubleshooting DHCPv6
Cisco always offers us some great commands to check why things went wrong. We have several show commands for DHCPv6 too, and here we present them.
We can use show ipv6 dhcp pool to have an overview of the pools currently active on the router. This command presents the pools by name, with the settings of each. If the pool is stateful, the number of connected clients is shown. Otherwise, “Active clients” will always be zero.
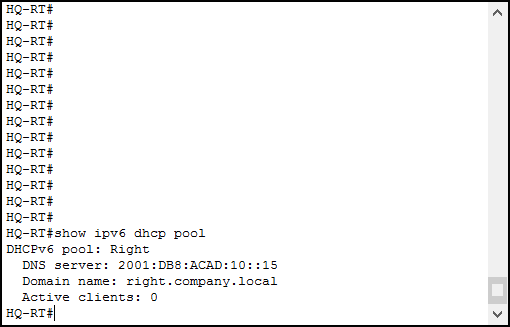
Furthermore, you can use show ipv6 dhcp interface to see all the interfaces with Stateless or Stateful DHCPv6 enabled.
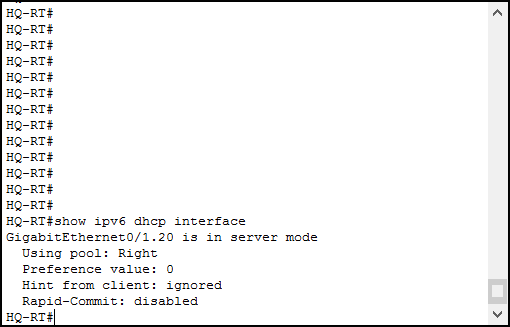
If you enabled stateful DHCPv6, you can check your bindings with show ipv6 dhcp bindings. Furthermore, to truly analyze what’s happening, use debug ipv6 dhcp details. However, this is an advanced command that you won’t need in simple deployments.
Conclusion
With this article and this lab, we learned a lot about DHCPv6. We are now able to understand how does it work, what are its flavors, and how to implement it. Here’s what to remember:
- SLAAC automatically works with a router, while Stateless DHCPv6 gives addresses using SLAAC and extra information using DHCP. The only configuration where the server gives IPv6 addresses is the Stateful one.
- You need to tune Neighbor Discovery flag with
ipv6 nd other-config-flagandipv6 nd managed-config-flagcommands - You can define a pool with
ipv6 dhcp pool, and enter here settings like DNS Server or domain name - Associate a pool to an interface with
ipv6 dhcp servercommand - Troubleshoot with
show ipv6 dhcp pool,show ipv6 dhcp interfaceandshow ipv6 dhcp bindings
Now, it’s time to practice! Try this lab as many times as you need to be able to do it on your own. Then, you will be ready to continue with our CCNA Journey. In our path, we will see how to configure some interesting services, such as NTP, Access Lists, and NAT. Just continue with the Free CCNA Course!