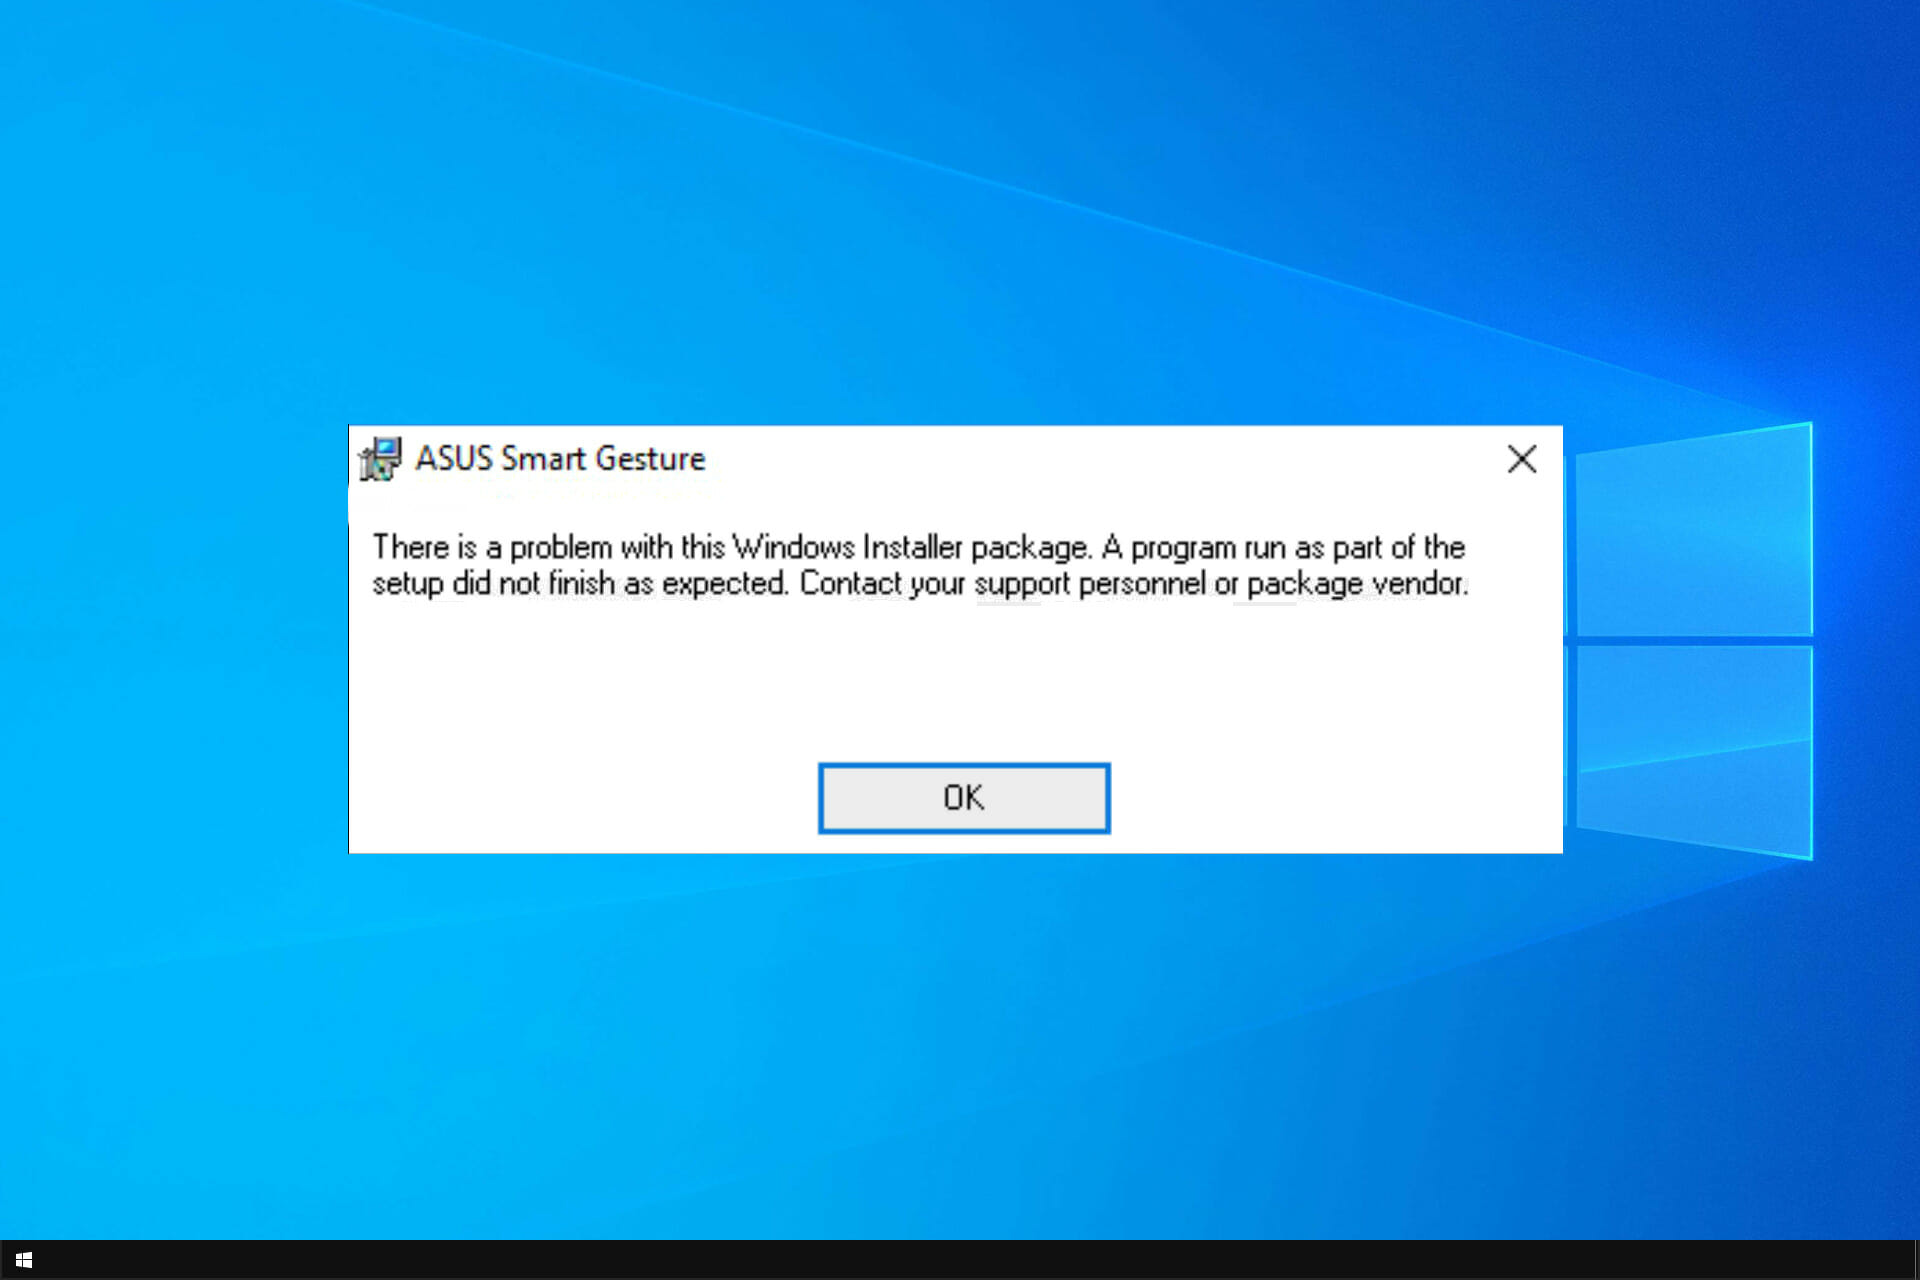
Most of the time, Windows applications install smoothly onto your device. This is why many users panic when seeing the “There is a problem with this Windows installer package” error during the installation process of popular apps such as iTunes, Unreal Engine, and even Adobe Acrobat Reader.
There’s nothing to worry about — in this guide, you will learn how to fix this error even if you’re not tech-savvy.
Causes of the “There is a problem with this Windows installer package” error
Even though there’s no single sure cause of this error, most users have reported the following as the leading cause of installer package error:
- You have an outdated or damaged installer file. You might be trying to install an application with an old or corrupted installer file. This doesn’t allow the app to install properly, causing the error.
- You downloaded the wrong package. Some systems are 32-bit, while others are 64-bit. You need to make sure to download the right bit version of the installer package in order to match your system’s bit version.
- Your computer doesn’t meet the minimum requirements. Some applications may return the “There is a problem with this Windows installer package” error if your computer doesn’t meet the minimum system requirements to run the app.
- Your Windows is not updated. Many issues can arise from an outdated system. Some users reported that updating Windows fixed this error.
- You don’t have full access to the installation folder. Permissions are very important when operating a PC. It’s possible that you chose an installation directory that you don’t have full access to, meaning that the installer can’t create necessary files to finish the install process.
Fixed “There is a problem with this Windows installer package”
After identifying the possible causes, you can begin troubleshooting. There are various methods you can try.
Method 1: Make sure you have administrative permissions
If you lack the appropriate permissions to install applications, you can easily run into the error of this article. If you’re using a public or work computer, this is normal — you’re most likely not an administrator. Make sure to contact the administrator and ask them for help.
However, if this issue occurs on your personal device, here’s what you can do to give yourself administrator permissions.
- Click on the Windows icon in your taskbar and select Settings.
- Click on Accounts.
- Choose Family & other users from the menu on the left.
- Select your account, then click on Change account type.
- Choose the Administrator option from the drop-down menu and click OK.
- Locate the installer file then right-click on it and choose Run as administrator.
Method 2: Use the Program Install and Uninstall troubleshooter
Microsoft has a free to download troubleshooter that aims to help with installation issues. Here’s how you can get it.
- Navigate to this Microsoft website and click on the Download button.
- Launch the file you just downloaded.
- Click Next, then choose Installing.
- Select the application you want to install or choose Not listed and browse your computer manually to locate the installer file.
- Wait for the troubleshooter to identify issues and help you install the application.
Please note that the Program Install and Uninstall troubleshooter isn’t perfect and might not be able to identify an issue. In this case, we recommend you attempt our other methods listed on this page to get rid of the error.
Method 3: Repair the software
There’s a possibility that the application you’re trying to update can’t install because it’s corrupted. When this happens, simply repair the app using these steps.
- Click on the Windows icon in your taskbar and select Settings.
- Click on Apps and wait for your system to load your installed applications.
- Select the problematic application and click on Modify.
- Choose the Repair option and follow the on-screen instructions to repair the application.
- Try installing now to see if the error still appears.
Method 4: Re-register Windows Installer
The Windows Installer is a key component for installing applications on your device. While you can’t simply repair or uninstall it like other apps, you can use the command prompt to re-register it and possibly fix related issues.
- Press the Windows + R keys on your computer at the same time to open Run.
- Type in “cmd” and hit the Ctrl + Shift + Enter keys at the same time. This will launch the Command Prompt with Administrator permissions.
- Input the following commands, pressing Enter after each line:
- msiexec.exe /unregister
- msiexec.exe /regserver
- Close the Command Prompt and check if the installer runs properly.
Method 5: Restart the Windows Installer service
If re-registering Windows Installer didn’t work, try restarting the service. This will give your computer a chance to properly restart the service. To do that, follow the next steps.
- Press the Windows + R keys on your computer at the same time to open Run.
- Type in “services.msc” and click on the OK button. This is going to launch Services, which should display every available service on your computer.
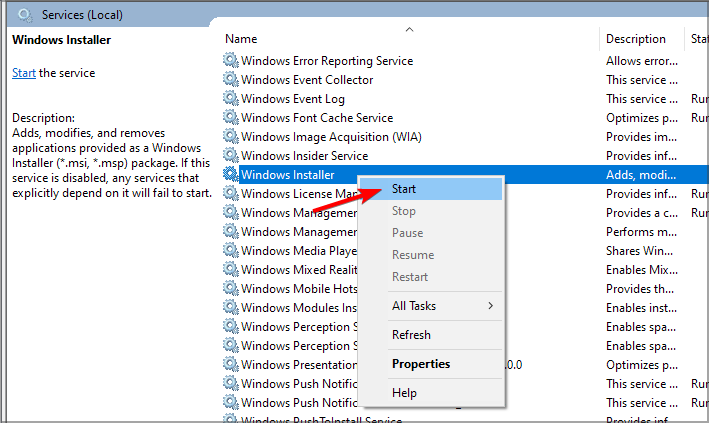
- Locate the Windows Installer service, then right-click on it and choose Stop.
- Wait a minute, then right-click Windows Installer and choose Start.
- Restart your computer and attempt the installation again.
Hopefully, one of our methods was able to get rid of the “There is a problem with this Windows installer package” issue on your computer. Enjoy installing your apps smoothly.
Sometimes, you can encounter the “There is a problem with this Windows Installer package” error while trying to install an application through an MSI installer. This error occurs if your system can’t run a script, program, or DLL file necessary for such operations. You will also encounter corresponding error messages in each case:
- Error 1720: There is a problem with this Windows Installer package. A script required for this install to complete could not be run.
- Error 1721: There is a problem with this Windows Installer package. A program required for this install to complete could not be run.
- Error 1722: There is a problem with this Windows Installer package. A program run as part of the setup did not finish as expected.
- Error 1723: There is a problem with this Windows Installer package. A DLL required for this install to complete could not be run.
Even if they are different errors, you need similar solutions to resolve all of them. First, make sure to log in with an admin account and run the program as an administrator. Some installers require admin privileges to run properly. Also, make sure that there is enough space to install the application.
Table of Contents
Re-register Windows Installer
Windows uses the MSIExec engine to run the MSI installer. If the registration of this engine becomes corrupt, you can’t run such installers. To resolve this issue, you need to unregister and then re-register the engine.
- Open Run.
- Type
cmdand press Ctrl + Shift + Enter to open the Elevated Command Prompt. - Enter the following commands:
MSIExec /unregisterMSIExec /regserver
Restart Windows Installer Service
You will also get this error if the Windows Installer service is not running properly or another instance of the installer engine is already running. We recommend checking for both issues at the same time.
- Open Run by pressing Win + R.
- Type
msconfigand press Enter to launch the System Configuration. - Go to the Services tab and search for Windows Installer.
- Make sure the box next to it is checked and press OK.
- Now, press Ctrl + Shift + Esc to open the Task Manager.
- Go to the Details tab.
- Look for
msiexec.exe. If it’s there, select it and click End Task. - Then, open Run again.
- Type
services.mscand press Enter to open Window Services. - Look for Windows Installer and check its Startup Type.
- If it shows Disabled, double-click on it and set the Startup type drop-down list to Manual.
- Click on Start if the Service status indicates Stopped. Otherwise, click Stop and then Start to restart the service.
Restart your computer and check if the issue persists.
Re-register Some DLL Files
Like with the MSIExec engine, your system uses many DLL files while running the MSI installers. You can similarly re-register them to resolve any potential registration issues.
- Open the Elevated Command Prompt.
- Enter the following commands:
regsvr32 Actxprxy.dllregsvr32 Browseui.dllregsvr32 Mshtml.dllregsvr32 ole32.dllregsvr32 Oleaut32.dllregsvr32 Scrrun.dllregsvr32 Shdocvw.dllregsvr32 Shell32.dllregsvr32 urlmon.dll
- Don’t worry if you get a “The module was loaded but the entry point DllRegisterServer was not found” error, simply move on to the next command.
Troubleshoot Compatibility
If the error has the code 1721, it might be because the installer is for a previous version of Windows and therefore is not compatible with your current system. In such cases, you need to troubleshoot for program compatibility.
- Right-click on the installer and select Troubleshoot Compatibility or Show more options > Troubleshoot Compatibility.
- Select Try Recommended Settings.
- Then, click on Test the program.
- If the error doesn’t occur this time, go back to the Troubleshooter and select Next > Yes, save these settings for this program.
Install Necessary Windows Features and Updates
The installation of several programs on your system requires certain supporting software components and features. We recommend installing all such programs to prevent suffering from different installation errors. Even if you already have these components, they might have become corrupt, so it’s worth reinstalling them.
- All available Microsoft Visual C++ Runtime Packages
- Windows Management Framework
- Latest .NET Framework
You should also make sure to have the latest version of your Operating System. The newer applications require the most updated OS versions to be able to provide better features.
- Open Run.
- Type
ms-settings:windowsupdateand press Enter to open Windows Update Settings. - Click on Check for Updates to scan for and download available updates or Install now if your computer has already downloaded them.
Re-download the Installer
It is also possible that the installer you downloaded or transferred is not complete. You can check for such issues by checking its properties.
Select the installer and press Alt + Enter to open its Properties and compare the Size and Size on the disk from the General tab. If the Size on disk is much lower than the Size, the file is not complete.
In such cases, you need to download it again. Also, we recommend you ensure that the installer you download matches the system architecture of your computer while doing so.
Take Ownership of the Temp Folder
Many programs including installers make use of the Temp folder inside AppData to store temporary files. By default, each user accounts have the ownership and permissions of the Temp folder for that account. However, if this setting gets changed somehow, you will encounter many issues, including the above.
In such a scenario, you should see the error code 1723 in the error message, so it’s easier to recognize. You need to take ownership and provide permissions to this folder to resolve the issue.
- Open the Elevated Command Prompt.
- Enter the following commands:
takeown /F %Temp%icacls %Temp% /Grant %userdomain%\%username%:F
Uninstall Application Before Reinstalling
Sometimes the previous software of an application can also interfere with the new installation. In such cases, you need to uninstall the previous application first.
- Open Run.
- Type
appwiz.cpland press Enter to open Programs and Features. - Look for and select your application.
- Click on Uninstall or Uninstall/Change > Uninstall.
- Confirm with Yes and follow the on-screen instructions.
Then, update/reinstall the app again by launching a complete installer. If you can’t uninstall the applications, there may be some app-specific reasons causing such errors. You need to check official websites for what to do in such scenarios.
Remove Pending Installations Using Registry Editor
You will also get this error if you try running an installer when another one is already running on your system. Windows will usually warn you if something like this happens, but it can’t do so if the previous instance of installers is stuck. In such a case, you need to remove all pending installations first.
- Open Run.
- Type
regeditand press Enter to open the Registry Editor. - Navigate to
Computer\HKEY_LOCAL_MACHINE\Software\Microsoft\Windows\CurrentVersion\Installer - If the InProgress key is present, delete all the entries inside it.
- Then go to Computer
HKEY_LOCAL_MACHINE\System\CurrentControlSet\Control\Session Manager - If PendingFileRenameOperations is there, delete all of its entries as well.
Install a Different Version of Application
Sometimes, the latest version of the application or its installer may have some bugs that are responsible for such issues. In such cases, you will only encounter the above error while trying to install one application but can successfully install other programs through MSI installers. You need to try installing a previous or different version of the app instead to resolve the issue.
by Aleksandar Ognjanovic
Aleksandar’s main passion is technology. With a solid writing background, he is determined to bring the bleeding edge to the common user. With a keen eye, he always… read more
Updated on
- To fix problem with this Windows Installer package, you have to use the administrative privileges.
- Your antivirus software can sometimes interfere and cause this message to appear.
- Restarting the required services is a quick and easy way to solve this issue.
From minor third-party tools to complex games and applications, one thing is certain: you need to install a program in order to use them.
There are quite a few Windows Installer errors in Windows 10, and the There is a problem with Windows Installer package error is one of the most resilient.
This isn’t the only message that you can encounter, and you can also get This installation package could not be opened error as well.
If you’re stuck with this error and you’re not sure how to deal with it, we recommend you keep reading this.
How can I fix Windows Installer package error in Windows 10/11?
1. Make sure you have administrative permissions
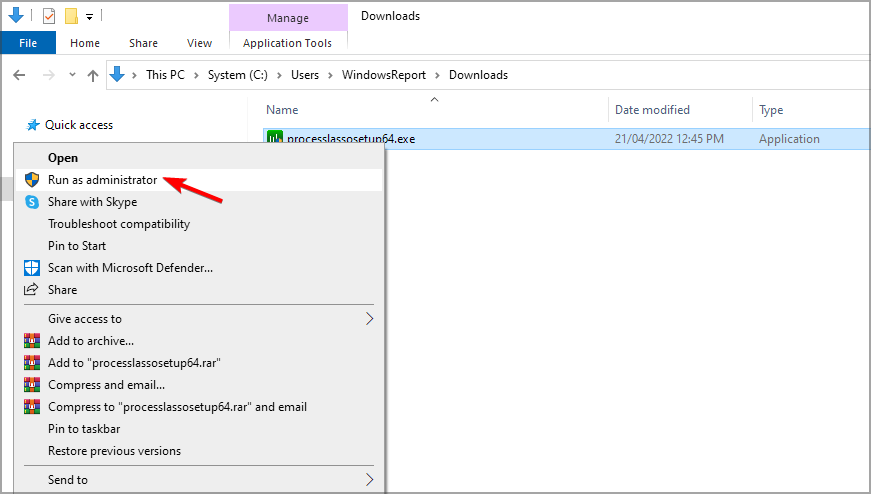
- Locate the setup file that you want to run.
- Right-click and choose Run as administrator from the menu.
- Now follow the instructions on the screen to complete the process.
As you already know, in order to install any application coming from a third-party source, you’ll need administrative permission. Luckily, you can make yourself an administrator easily on Windows.
Hence, you’ll need to authenticate using the Administrator account or have permission to make system-related changes on an alternate account.
How we test, review and rate?
We have worked for the past 6 months on building a new review system on how we produce content. Using it, we have subsequently redone most of our articles to provide actual hands-on expertise on the guides we made.
For more details you can read how we test, review, and rate at WindowsReport.
Do keep in mind that There is a problem with this Windows Installer package can affect uninstall process as well.
2. Disable the antivirus and download the file again
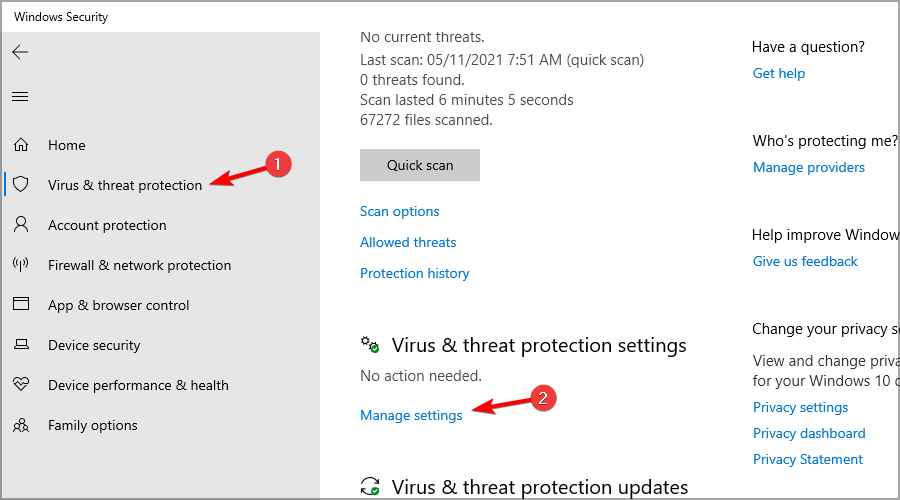
- Press Windows key + X and type defender. Select Windows Security from the list.
- Navigate to the Virus & threat protection and click on Manage settings.
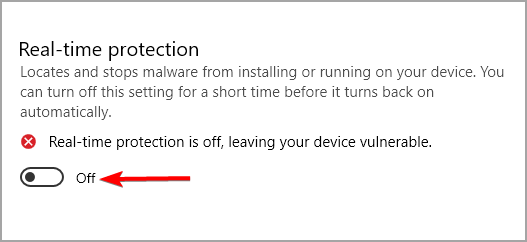
- Disable Real-time protection.
- Now try to install the application again.
You can also try downloading the installation file again and try to reinstall the software.
Users reported There is a problem with this windows installer package with iTunes, Chrome, Microsoft Edge, and Cisco AnyConnect, but it can also affect any other software.
NOTE
Disabling your antivirus protection will leave your system at risk, so use it only with the files you trust. Don’t forget to turn the protection back on once you’re done.
However, for further and stronger thread security, a specialized instrument like ESET Smart Security is highly advised.
3. Run Program Install and Uninstall Troubleshooter
- Visit the troubleshooter download page.
- Click on Download troubleshooter.
- Once the file is downloaded, run it.
- Follow the instructions on the screen to complete the process.
Once you run this software it will check and resolve installation-related errors. It’s also worth mentioning that this tool is provided by Microsoft, so you won’t need to take unnecessary risks with suspicious third-party solutions.
4. Check Windows Installer for errors
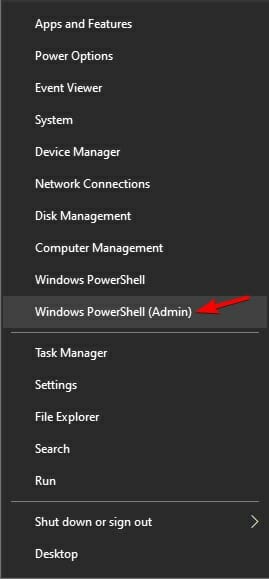
- Right-click the Start menu and and select PowerShell (Admin).
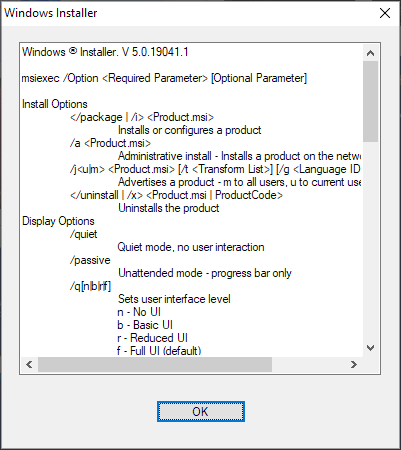
- Type the following command in the command line and press Enter: MSIExec
- If everything is good, you’ll see the pop-up window with Windows Installer details.
- If you see an error report, you should re-register Windows Installer.
In a system as complex as Windows is, you have various services that partake in everything you do. The MSI engine foundation is responsible for the installation, maintenance, and uninstallation of third-party programs.
You don’t need to be a tech enthusiast to get where this is going. If MSI engine (Windows Installer) is down, corrupted, or disabled by mistake, you’ll have a hard time installing anything.
- FIX: Another installation is already in progress error
- [Solved] The installer has insufficient privileges to access
- Security Settings Blocked Self-signed Application [Fix]
- Fix: Page Fault in Nonpaged Area on Windows 10
5. Re-register Windows Installer
- Right-click Start and choose PowerShell(Admin).
- In the command line, type the following commands and press Enter after each:
msiexec.exe /unregister
msiexec.exe /regserver - Close PowerShell and look for changes. If the problem is still there, move to the Step 4.
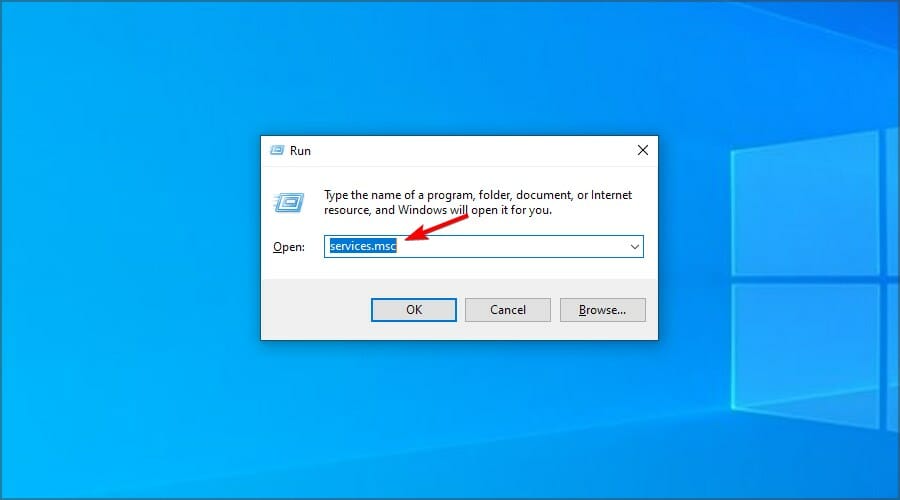
- Press Windows key + R, type services.msc and press Enter.
- Locate Windows Installer. It should be at the bottom of the list.
- Right-click on the service and select Stop.
- Now right-click it again and choose Start.
- Restart your computer.
This is a simple solution, and it can help with There is a problem with this windows installer package error 1722 or any other error.
How can I fix Windows Installer package error on Windows 11?
This error affects all versions of Windows, and if you encounter the issue on Windows 11, you should know that all these solutions can be applied to it as well.
Windows 10 and 11 are pretty similar when it comes to core functionality, so most problems can be fixed by using the same solutions.
That should be enough to rid you of the There is a problem with this Windows Installer package installation error.
If you’re having more issues, we suggest reading our Windows Installer Service could not be accessed article for more useful solutions.
Should you know an alternative solution to this, feel free to tell us in the comments section below.
Problem
When you install or update Adobe Acrobat/Adobe Acrobat Reader using any of the following methods:
- Using Help > Update
- Install using the Creative Cloud Desktop app
- Download the update manually and install
The installation fails with the following error message:
«Error 1722. There is a problem with this Windows Installer package. A program run as part of the setup did not finish as expected. Contact your support personnel or package vendor. Action InstallWebResources, location: <Product Install Path>\AcroCEF\RdrServicesUpdater.exe».
Error when you use Help > Update workflow
Error when you install Acrobat using the Creative Cloud Desktop app
Error when you manually download the installer and update
Solution
The error is shown due to a missing update for Universal C Runtime in Windows. Install the update using one of the following ways:
Solution 1
Download the update manually from Microsoft Download Center.
Once the required update is installed, retry the Acrobat/Acrobat Reader installation.
You must be on Windows 7 Service Pack 1 (SP1) or higher to apply this update.
Solution 2
Use Windows update to update the OS automatically.
Retry Acrobat/Acrobat Reader installation, once all the available Windows updates are installed.
Solution 3
-
If you’re on a 64-bit machine navigate to the folder C:\Windows\SysWOW64\ else navigate to C:\Windows\System32, on a 32-bit machine.
Note: If C:\Windows\SysWOW64 folder exists then you’re on a 64-bit machine.
-
Search for the file msvcr120.dll and msvcp120.dll, and rename both the files.
Don’t delete the files. If the Visual C++ redistributable (vcredist_x86.exe) package fails to install, you can rename the files back. -
Double click the downloaded Visual C++ redistributable (vcredist_x86.exe)package to install it. After the installation completes, check that msvcr120.dll and msvcp120.dll files are installed back. Once confirmed, you can delete the files that you renamed in step 3.
Do not delete the latest installed msvcr120.dll and msvcp120.dll files. -
Install Acrobat/Acrobat Reader.
For several decades, MSI technology has played a crucial role in ensuring seamless installation of Windows Applications on a device. Typically, MSIs will only throw errors to the users if there are significant issues with the package itself.
However, there is one particular error that regular users could encounter: “There is a problem with this Windows Installer package”. So, how do we repair that?
In this article, we will have a look at some of the easy fixes that standard users can try. We will also delve into the process of debugging MSI to identify the root cause of the issue and apply the necessary fixes.
What causes the “There is a problem with this Windows installer package” error?
Unfortunately, there’s no quick answer to this question. However, if you get this error in your system, there are several potential causes to consider:
- Outdated installer file: Typically, it is not recommended to create MSI packages that handle downgrades. So if you are trying to install an old application over a new one that is already present on your system, it could lead to this error.
- Damaged installer file: Your installer file might be corrupted. In this case, you either try to download it again from the vendor’s website or contact the vendor itself.
- Minimum requirements (MSI Launch Conditions): MSI packages can include custom launch conditions that determine if the package can be installed based on specific criteria. For example, graphic card drivers are often designed to intelligently detect if that particular installer package can be applied to your system with the detected graphics card that you have installed.
- Access to the installation folder: In general, MSI packages are designed to be installed per-system, meaning that you need to have the proper privileges to install the package. If the permissions are not there, that might be the cause of why the error shows up.
What are the general fixes for the “There is a problem with this Windows installer package” error?
If you consider that you might be in one of the cases above, here are some easy methods that you can try on your system to get that MSI installed:
1. Check for Administrator Privileges
If this issue happens on your device, chances are that you already have administrator privileges, unless you are not the main user of that computer. To check if you have administrator privileges, navigate to Windows (Start Menu) > Settings> Accounts > Family.
In my case, because I am the only user of the machine, I already have administrator privileges:
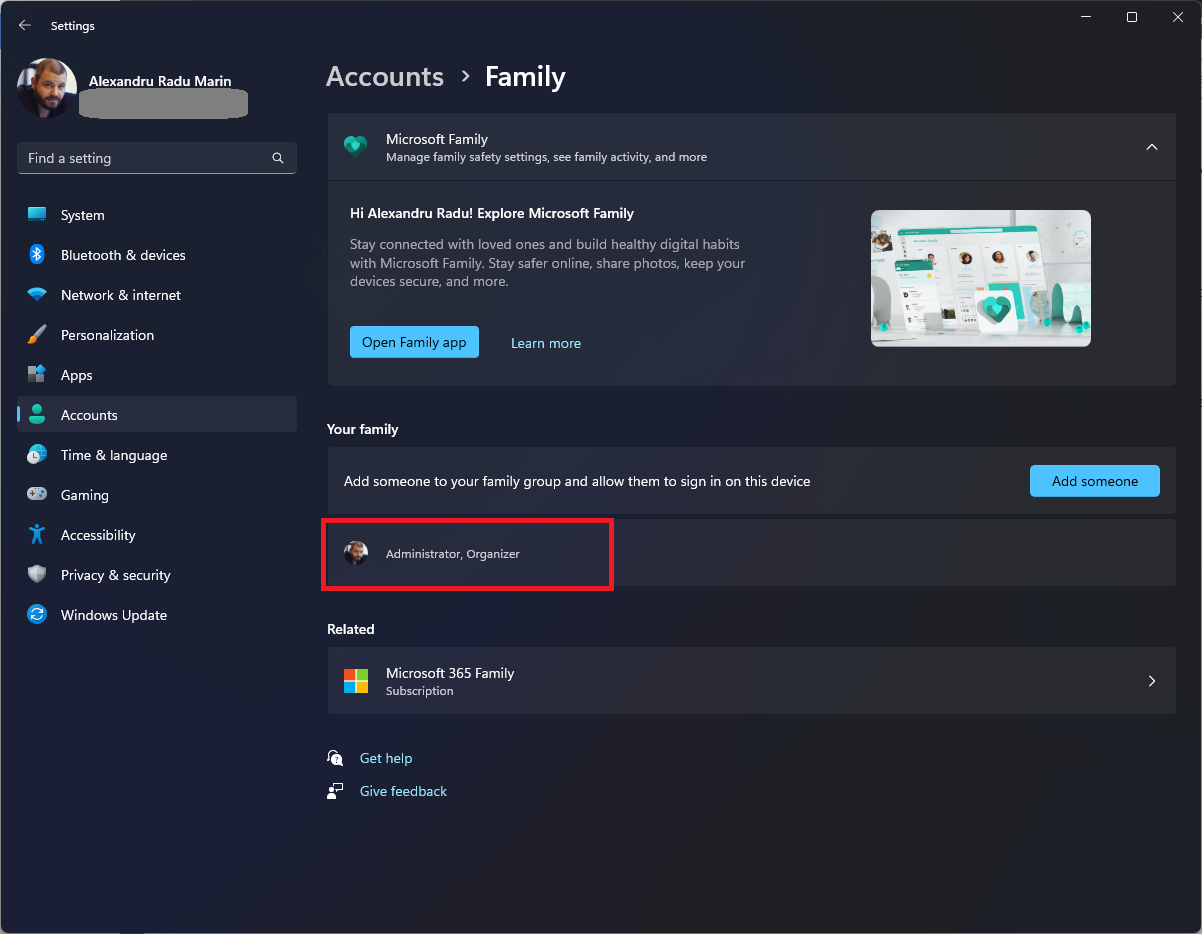
If you don’t see the Administrator role listed in your profile, you can ask to have your account edited and granted the required permissions.
2. Use the Microsoft program “Install and Uninstall Troubleshooter”
Microsoft offers a free tool available to download that aims to help users with installation issues.
1. First, navigate to the Microsoft website and download the tool using the Download button. A file called MicrosoftProgram_Install_and_Uninstall.meta.diagcab should appear in your downloads folder.
2. Next, double-click on the diagcab tool.
3. When prompted wbythe wizard, click on Next.

4. Click on Installing.

5. Select the application you want to install or choose Not listed.
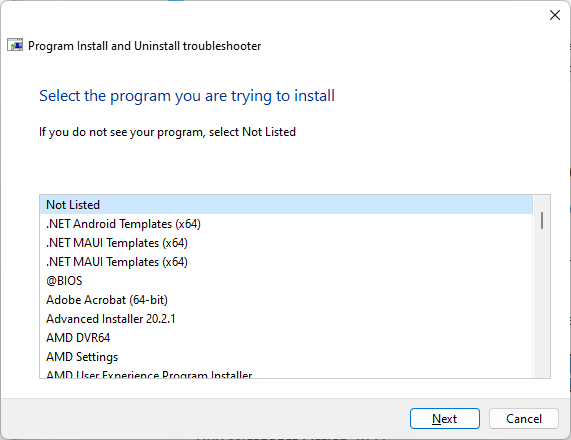
6. Once you select the program, the troubleshooter will scan your system for any installation issues.
7. When the scan is complete, it will provide you with a list of detected problems and potential fixes.
8. Follow the on-screen instructions to apply the recommended fixes.
9. After applying the fixes, try to install the program again to see if the issue has been resolved.
The Program Install and Uninstall troubleshooter isn’t perfect and might not be able to detect certain issues.
3. Fix the installed application by using the “Repair” method
If you already have a version installed on your computer, make sure that the installed version is lower than the one you are trying to install. It might be possible that the update cannot be installed because the original version from your machine is corrupted.
A simple repair of the app might help. Here’s how you can do that:
1. Navigate to Windows (Start Menu) > Settings> Apps > Installed Apps and search for your application.
2. Once you find the application, click on the three dots in the upper right corner and select Modify.
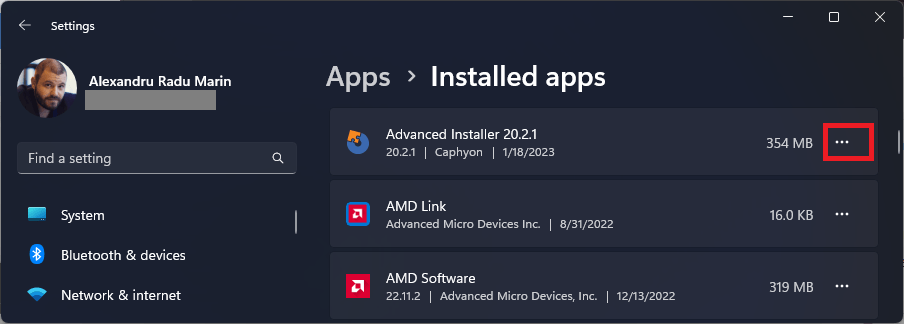
3. The MSI will launch and give you multiple options and one of them should be the Repair option.

Package developers can eliminate the repair options so it might not be present for all installers.
4. Restart the Windows Installer service
If the above methods still weren’t helpful, you can try to restart the Windows Installer Service.
The Windows Installer service is a program/tool integrated into the Windows system that facilitates the installation of software or applications in a structured manner for user convenience. If this service is disabled, then there is a greater possibility of users getting this error while trying to install any application on their system.
To restart the service, follow these steps:
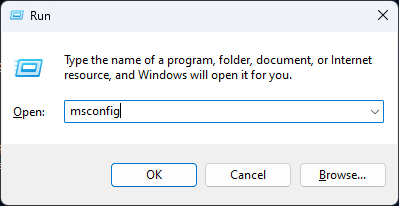
1. Press the Windows + R keys on your computer at the same time, and the Run utility will appear. In the Run tool, type msconfig:
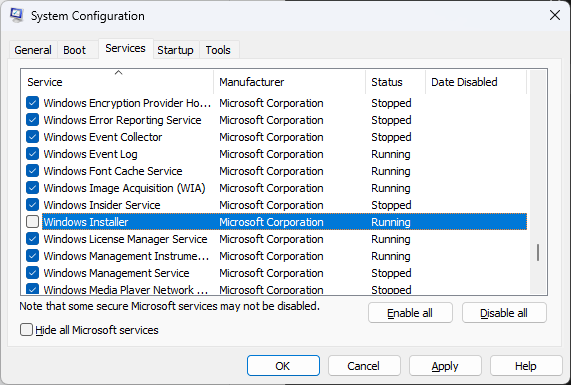
2. On the Services tab, click to deselect the checkbox that is next to Windows Installer and restart the computer. Once you’ve restarted, repeat the same process and check the status of the Windows Installer service again.
5. Re-register Windows Installer service
Still experiencing the error? Try this as a last step: re-register the Windows Installer service.
1. Press the Windows + R keys on your computer at the same time, and the Run utility will appear.
2. In the Run tool, type cmd and hit the Ctrl + Shift + Enter keys at the same time. This will launch the Command Prompt with Administrator permissions.
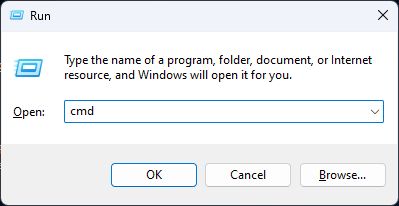
3. Once the cmd is opened, type the following commands and press Enter after each line:
— msiexec.exe /unregister
— msiexec.exe /regserver
Exploring the Depths of the «There is a problem with this Windows Installer Package» Error
If the methods mentioned above didn’t help with the installation of the package, it’s clear that something in the MSI is not configured correctly. This is when it’s recommended to seek the assistance of an experienced IT professional.
The first thing we need to do is get a verbose log to check what is happening in each step of the installation. To do this, we must use the MSIEXEC command line:
Msiexec /i PATH\Name.msi /l*v PATH\log.log
For example, we used the following script:
msiexec /i "C:\Users\User\Documents\Advanced Installer\Projects\Firewall App-SetupFiles\Firewall App.msi" /L*V "C:\Users\User\Documents\Advanced Installer\Projects\Firewall App-SetupFiles\log.log"

As you can see in our case, the error states further “A script required for the install to complete could not be run”, which leads us to believe that there is something wrong with a Custom Action.
Once the log is created, it is time to start investigating where the installer is crashing.
Reading and understanding a log file is not a trivial task. You can learn more about this topic in our MSI Packaging eBook and in our article How Do I Debug a Windows Installer Verbose Log File.
Let’s open up the log file and search for “return value 3”. The value 3 represents a Fatal error and that is what we are searching for.
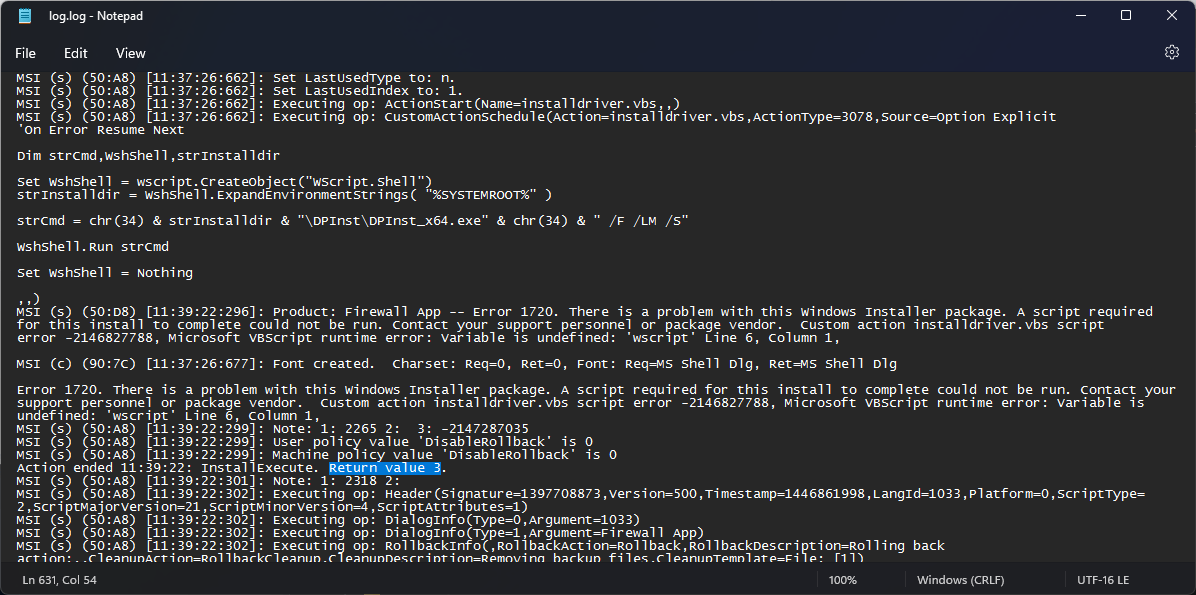
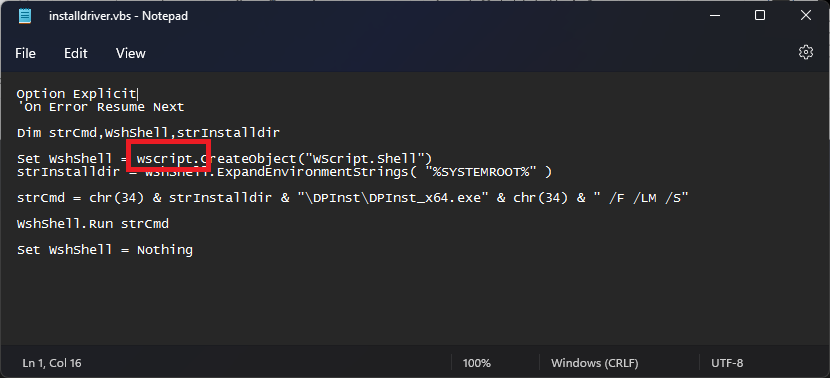
Looking at the above log, we can see that the MSI installer tries to run a Custom Action called installdriver.vbs.
However, you can see immediately afterwards the Error 1720 which actually states the error we see above, but this time it contains more details. It seems that in line 6 of the script, the “wscript variable is undefined”.
Got it! Apparently, there was a mistake in our script. The “wscript” when setting the variable should not exist at all. Once we removed it and rebuilt the package, the installation runs smoothly.
Of course, for this step, you need to use packaging tools to edit the MSI and create a transform file. If you created the package, it’s self-explanatory but in case you are a regular user, it’s best to contact the software manufacturer.
Conclusions
Failures can be caused for multiple reasons, for example, if components are shared between multiple packages on the same machine and the overwrite mechanism fails. Or if another base key is present for a different registry value.
It is essential to know that if the primary five “fixes” listed on top don’t solve the problem, then you need to perform a verbose log and investigate the root cause. This process is more technical, and time-consuming, and requires expertise in handling Windows Installer technology before making any modifications to an MSI.
Let me know in the comments below if you have any questions.
Written by
Alex Marin
Application Packaging and SCCM Deployments specialist, solutions finder, Technical Writer at Advanced Installer.


![[Fixed] There Is A Problem With This Windows Installer Package 1 msiexec-unregister-regserver](https://www.technewstoday.com/wp-content/uploads/2022/04/msiexec-unregister-regserver.jpg)
![[Fixed] There Is A Problem With This Windows Installer Package 2 windows-installer-service-system-configuration](https://www.technewstoday.com/wp-content/uploads/2022/04/windows-installer-service-system-configuration.jpg)
![[Fixed] There Is A Problem With This Windows Installer Package 3 msiexec-exe-task-manager-end-task](https://www.technewstoday.com/wp-content/uploads/2022/04/msiexec-exe-task-manager-end-task.jpg)
![[Fixed] There Is A Problem With This Windows Installer Package 4 windows-installer-service](https://www.technewstoday.com/wp-content/uploads/2022/04/windows-installer-service.jpg)
![[Fixed] There Is A Problem With This Windows Installer Package 5 start-windows-installer](https://www.technewstoday.com/wp-content/uploads/2022/04/start-windows-installer.jpg)
![[Fixed] There Is A Problem With This Windows Installer Package 6 regserv32-commands](https://www.technewstoday.com/wp-content/uploads/2022/04/regserv32-commands.jpg)
![[Fixed] There Is A Problem With This Windows Installer Package 7 troubleshoot-compatibility](https://www.technewstoday.com/wp-content/uploads/2022/04/troubleshoot-compatibility.jpg)
![[Fixed] There Is A Problem With This Windows Installer Package 8 program-compatibility-troubleshooter-test-the-program](https://www.technewstoday.com/wp-content/uploads/2022/04/program-compatibility-troubleshooter-test-the-program.jpg)
![[Fixed] There Is A Problem With This Windows Installer Package 9 windows-update-install-now](https://www.technewstoday.com/wp-content/uploads/2022/11/windows-update-install-now-1.jpg)
![[Fixed] There Is A Problem With This Windows Installer Package 10 takeown-icacls-temp](https://www.technewstoday.com/wp-content/uploads/2022/04/takeown-icacls-temp.jpg)
![[Fixed] There Is A Problem With This Windows Installer Package 11 discord-uninstall](https://www.technewstoday.com/wp-content/uploads/2022/12/discord-uninstall.jpg)
![[Fixed] There Is A Problem With This Windows Installer Package 12 current-version-installer](https://www.technewstoday.com/wp-content/uploads/2022/04/current-version-installer.jpg)
