
Как сделать так, чтобы браузер в среде Windows по умолчанию открывался в полноэкранном режиме и работал только для одного сайта или воспроизводил только одно веб-приложение? Такой полноэкранный формат запуска одного приложения на компьютере называется режимом киоска. Безусловно, немногим пользователям придётся когда-то столкнуться с постановкой этой задачи. Любую веб-страницу в любом полноценном браузере можно переключить на полноэкранный режим клавишей F11. Но в некоторых случаях опыт решения такой неординарной задачи может пригодиться. В каких случаях? И как решить эту задачу?
Зачем нужен режим киоска на компьютере
Работа компьютера в режиме киоска может пригодиться, например, для запуска на корпоративном оборудовании динамического сайта-визитки компании. Или для организации в увеселительном заведении караоке, музыкального автомата, игр и прочих развлечений на базе веб-сервисов. Либо же с целью адаптации под Smart TV домашнего Windows-компьютера, управляемого аэромышью или специальным компьютерным пультом ДУ.
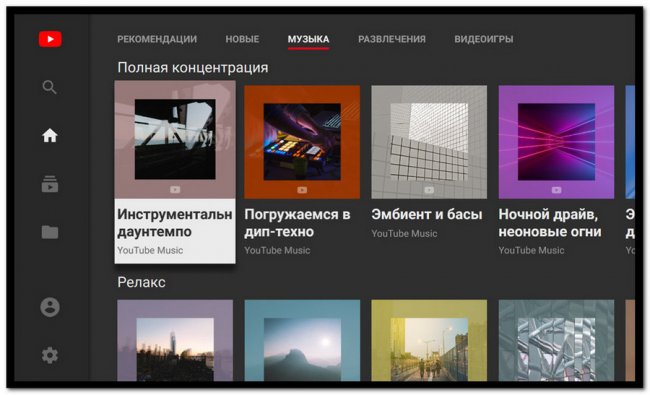
Запускающийся в полноэкранном режиме браузер для одного сайта можно использовать в качестве веб-приложения ТВ-версии YouTube, какого-то онлайн-кинотеатра, соцсети, да любого сервиса. Как вариант для интересного проведения досуга: можно сделать на базе браузера веб-приложение Google Earth и, комфортно умостившись на диване и управляя пультом, совершать виртуальные путешествия по разным уголкам планеты.

Киоск можно использовать в рамках родительского контроля, чтобы дети имели доступ к ограниченным веб-ресурсам.
***
Организовать киоск можно на базе Microsoft Edge в среде Windows 10, а также на базе некоторых Chromium-браузеров в любой поддерживаемой ими версии Windows. Как это делается?
Режим киоска на базе Microsoft Edge
Режим киоска есть даже в Windows 8.1. Он организуется путём создания новой ограниченной пользовательской учётной записи – ограниченной в части полноэкранного запуска одного какого-то Modern UI приложения. Но в числе таких приложений нет браузера. Windows 10 унаследовала эту возможность, и в ней уже она усовершенствовалась. Долгое время Win10, как и Win8.1, позволяла запускать в режиме киоска только UWP-приложения. Но, начиная с версии 1809, этот режим стал доступен для штатного браузера Edge.
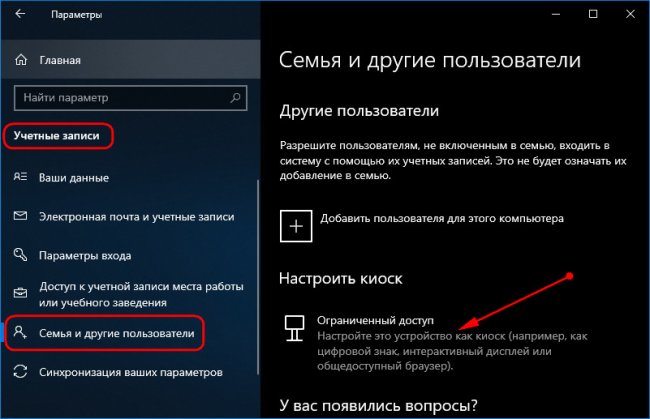
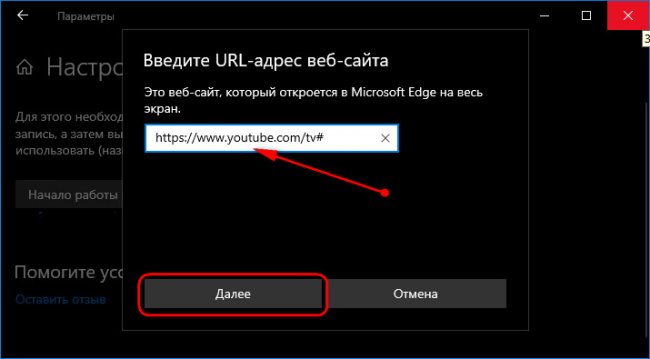
Чтобы запустить нужный сайт в режиме киоска на базе Microsoft Edge, идём в параметры «Десятки», заходим в раздел работы с учётными записями семьи и других пользователей. Кликаем опцию настройки киоска.
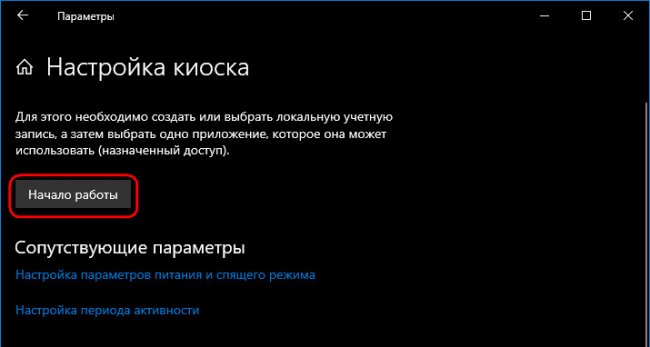
Далее – «Начало работы».
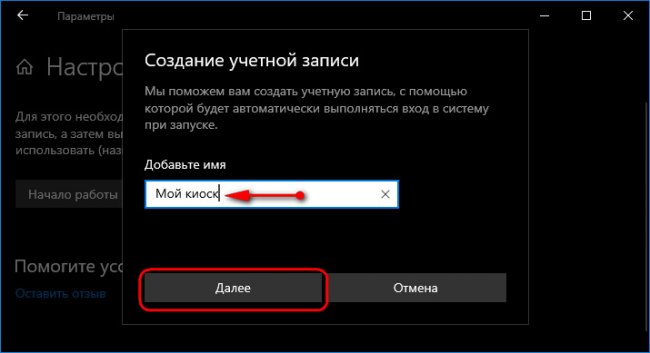
Даём киоску имя.
Выбираем запуск в нём браузера Edge.
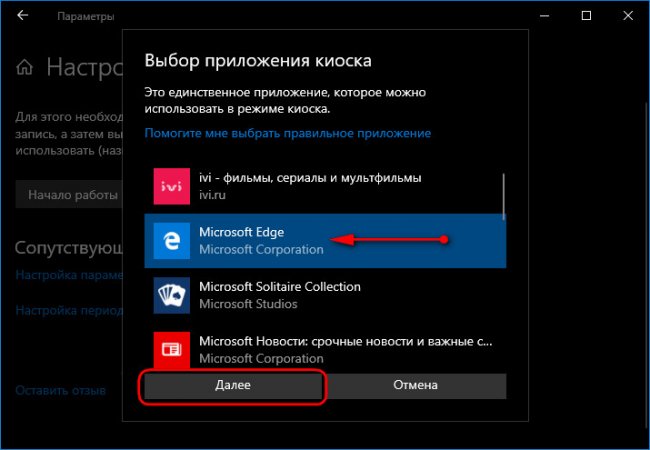
Указываем, что хотим, дабы он работал в режиме интерактивного дисплея.
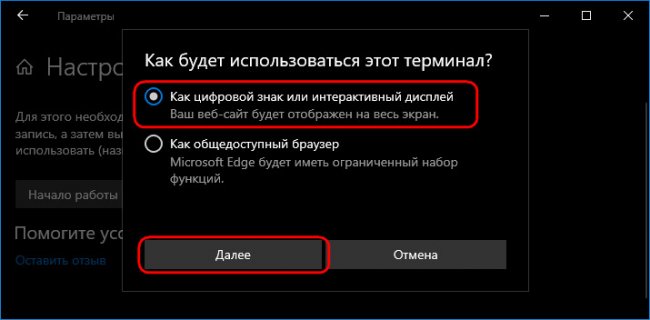
Вводим адрес сайта.
Всё.

Теперь можем заходить в учётную запись созданного киоска и работать с ним в полноэкранном формате.
Для выхода из этого режима необходимо нажать Ctrl+Alt+Del.
В чём недостатки киоска на базе Microsoft Edge? Дело в том, что такая системная возможность преследует прежде всего цель создания ограниченной среды для работы с компьютером встречных-поперечных людей или детей. Все данные, введённые в браузер, в частности, авторизация на сайтах, будут храниться только в рамках текущего сеанса работы. При повторном заходе нужно авторизоваться на сайте вновь. Другой недостаток – в режиме киоска не будут работать установленные в Edge расширения для блокировки рекламы.
Эти недостатки никак не повлияют на работу с сервисами типа Google Earth, но причинят дискомфорт при использовании сайтов типа YouTube, где для персонализированного просмотра контента нужна авторизация.
Режим киоска на базе Chromium-браузеров
А вот работа Chromium-браузеров в режиме киоска лишена недостатков Microsoft Edge. Если мы, конечно, говорим о таковых с поддержкой расширений из магазина Google Chrome, где можно устанавливать блокировщики рекламы для YouTube или для всех подряд сайтов. Более того, в случае с Chromium-браузерами не нужно переключаться на другие учётные записи системы. Ну и, как упоминалось уже, в качестве системы может быть не только Windows 10, но также её ранние версии 8.1, 7, а в отдельных случаях даже Vista и XP.
Работу в режиме киоска поддерживают Google Chrome, Яндекс.Браузер и прочие клоны на базе Chromium – Torch, Opera Neon, SRWare Iron, «Спутник», Blisk. Как сделать из них киоск?
В контекстном меню на ярлыке выбранного браузера выбираем свойства.
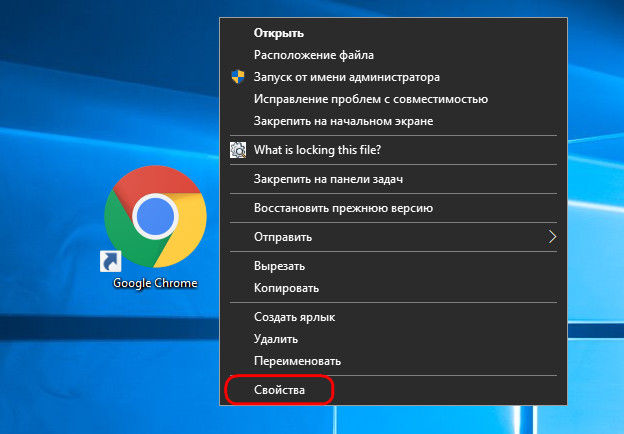
В графу «Объект» вносим изменения: в конце строки ставим пробел и дописываем значение по типу:
—kiosk «https://earth.google.com/web/»
Где в кавычки заключаем адрес нужного нам сайта. Жмём кнопку применения.
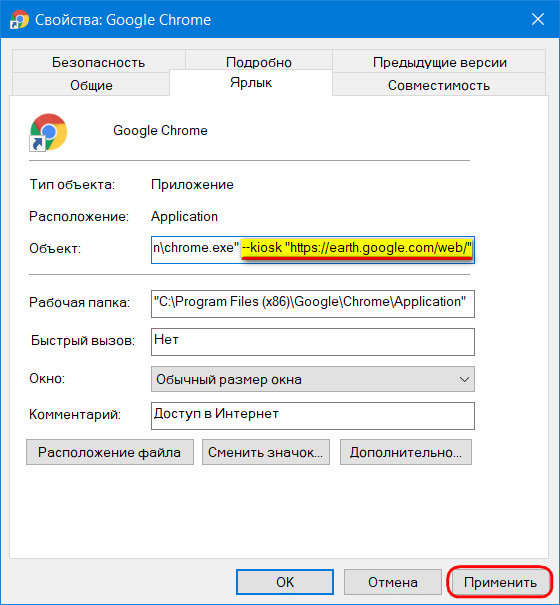
Подтверждаем.

И всё – можем запускать полноэкранное приложение сайта.

Выход из приложения осуществляется стандартными горячими клавишами для закрытия окон Windows – Alt+F4. А в Windows 10 ещё же и можно использовать для этой цели среду представления задач, запускаемую клавишами Win+Tab.
Kiosk Mode feature allows the user to convert the Chromedevice into one usable app machine. It locks away all the other apps and features that Chrome has to offer. Chrome devices can include from a wide variety of Chromebooks, which are specialized and low budget laptops, Chrome CPUs, which are small boxes that only need a monitor to run and finally Chromebase devices, which can be used commercially for business.
Where Can Chrome With Kiosk Mode Be Used?
Chrome has become very popular over the users and is used for both personal and work purpose. The Chrome for Work, also known as Google Chrome Enterprise is a business-focused solution for Chrome devices. It is Google’s initiative to encourage institutions, schools and other workplaces to use Chrome devices. The Chrome Kiosk Mode is an essential requirement for institutions such as libraries and other business that prefer Kiosk systems so the user can use the intended app.

That is the reason why Google inculcated the Single App Kiosk Mode, which locks the user on to a single full-screen Chrome app that cannot be changed or exited. This mode is different from the normal kiosk mode, which allows a few controls to the user. The normal Chrome Kiosk Mode can be activated on the Chrome Browser running in Windows 10 computer. But,this Single App Kiosk Mode is available only on Chrome devices, which locks the user on one particular website or Chrome app.
Also Read: How to Enable Kiosk Mode on Windows 10?
How To Enable Chrome Kiosk Mode In Your Computer?
![]()
Chrome Kiosk Mode On A Managed Chrome Device
If your Network administrator has modified the system policies that are controlling the Chrome OS or browser settings, then this Chrome device comes under the category of Managed devices. To set the Chrome Kiosk Mode, follow these steps:
Step 1. Open the Chrome Device’s admin panel.
Step 2. Locate the Kiosk settings section.
Step 3. You can choose from a variety of selections like Public Session Kiosk, Auto-Launch Public Session and Auto-Launch Kiosk App.
Note: Public Session Kiosk means the normal Chrome Kiosk Mode, and Auto-Launch Kiosk App is a different name for initiating Single App Kiosk Mode.
Also Read: How to Activate Kiosk Mode on Firefox Browser?
Chrome Kiosk Mode On A Non-managed Chrome Device
Step 1. Sign into the Chromebook and open Chrome Browser.
Step 2. On the address bar, type the following command
Chrome://extensions
Step 3. Turn on the Developer Mode by toggling the switch towards the right.

Step 4. Click on Manage Kiosk Applications.
Step 5. Enter the ID of the Kiosk App you want to use in the “Add kiosk application” box.
Step 6. Select Add and then done.
How To Turn Off The Chrome Kiosk Mode?
Step 1. Restart your Chromebook.
Step 2. While the device is turn on, Press Ctrl + Alt + S
Step 3. The Kiosk Mode will Turn Off, and the normal Sign-in screen will appear.
Chrome Kiosk Mode On Chrome For Windows
To set up the Chrome in Kiosk Mode on Windows 10 computer follow these steps:
Step 1. Create a Shortcut of the Chrome browser on your Desktop.
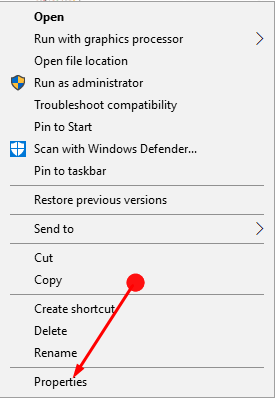
Step 2. Make a right-click on the Chrome shortcut and from the contextual menu, click on Properties.
Step 3. In the Properties window. Click on the Shortcut tab and locate the Target Field.
Step 4. Do not erase anything in the target field. Add “ –Kiosk” at the end of whatever is already mentioned in the target field.

Step 5. Double Click on this shortcut icon and the Chrome browser will always open in Kiosk Mode. However, this will be the normal kiosk mode, which is different from the Single-App Kiosk Mode.
Your Thoughts On How To Enable Chrome Kiosk Mode In Your Computer?
Chrome’s Kiosk Mode is not only useful for businesses, Malls, Libraries but can also be used in your home. If you are left without any option but to hand over your laptop or tablet to your kids, then you could probably enable the kiosk mode so that they wouldn’t be able to make a mess of your system.

Follow us on social media – Facebook and YouTube. For any queries or suggestions, please let us know in the comments section below. We would love to get back to you with a solution. We post regularly on the tips and tricks along with solutions to common issues related to technology. Subscribe to our newsletter to get regular updates on the tech world.
Set up Chrome Browser Kiosk Mode on Windows 10. – If someone else uses your computer. Kiosk mode assists in creating a second user profile on Google Chrome. The second user guest will have full-screen Chrome browser without any of your personal data. Read a related article on How to Change Proxy Settings in Chrome Web Browser.
Kiosk Mode is a characteristic notion in Chrome that lets the computer to be used in a single window. It works on a simple technique of blocking the access to the other parts of the device. Kiosk Mode is not exclusive only for Google Chrome. The kiosk also has the ability to modify in order to use a Guest account or a particular URL. Also, follow How to Sync Google Chrome Tabs on Multiple Computers. It is useful if in case any person uses the PC wherein you’d rather favor they work on with a single web browser. With this kiosk mode, you can administer that. Stick on to our guide to know the steps for setting up this mode.
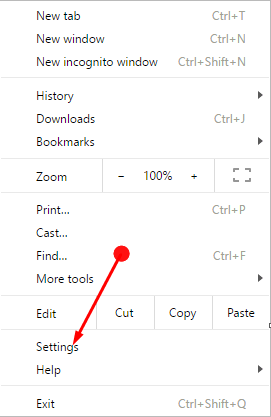
Step 1 – Open Google Chrome and head towards the three dot (hamburger) icon for handling the Chrome Settings.
Step 2 – Here reach out to the Settings from the list of options and click the same. This will lead you to a page related to Chrome Settings.
Follow our related guide to Use chrome://settings/content to Directly Open Content Settings.
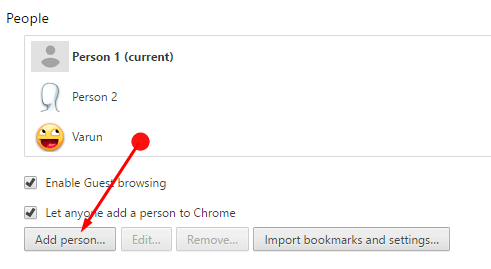
Step 3 – Then move towards the heading People and select the Add Person button.
Step 4 – Now write the name of the New person (Account User) and pick an icon for the account. Make sure to click the Add button to complete the whole process.
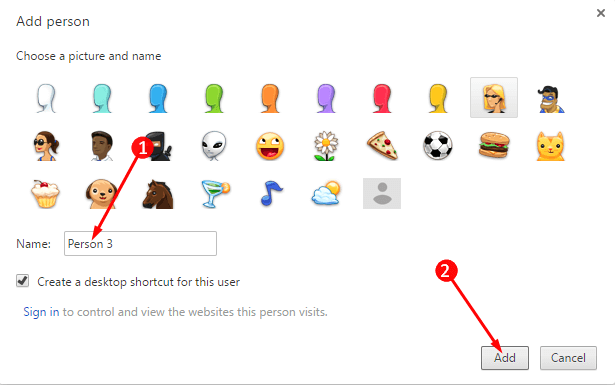
Note – See that the check mark is there on the box reading Create a desktop shortcut for this user. This will add a new account of Google Chrome to your desktop. Now the desktop will contain two accounts of Chrome – the first one and the new one.
You may also like to know How to Add Chrome With Icon to Desktop Context Menu in Windows 10.
Step 5 – Then close all the accounts of Google Chrome available on the desktop.
Step 6 – Now perform a right click on the new Google Chrome icon that you have created in the above step. A list of options will come into view, click Properties.
Step 7 – Click on the Shortcut tab and go to the box adjacent to the option Target. Paste –kiosk just at the end of the given target and click Apply after then Ok.
In case, this does not work then copy and paste the below command here replacing the original target and test one after another.
–chrome-frame –kiosk “http://www.google.com”–kiosk
If this command does not work then try either of these commands
–chrome-frame –kiosk “http://www.google.com”
OR
–kiosk “http://www.google.com”
Step 8 – Now click the Apply and then the OK button to completely Set up Chrome Browser Kiosk Mode.
This will open the Google Chrome in kiosk mode.
Well, you may find another related guide to be helpful – How to Export Import Edge Favorites As HTML File with Chrome, Firefox, IE.
Concluding Words
You all know that Chrome is the most widely used browser people tend to use it time and again. In this case, for the sake of your privacy and to save your personal folder from the intrusion of others, kiosk is the best option. Hence, Set up Chrome Browser Kiosk Mode in Windows 10 and if you have more tips on settings up this, kindly write them to us.
Tools and tips for Win 10 Kiosk mode with browser
Various tools and tips to set up a Windows 10 pc with Chrome and Firefox in Kiosk mode.
This document contains:
- Setup automatic login
- Setup nightly reboots
- Prevent the screen from going black or enter screen saver
- Disable lock screen
- Disable Edge Swipe and Pinch Zoom
- Prepare Chrome startup script
- Prepare Firefox startup script
Setup automatic login
You will need to have two (preferably local) users: one administrator (for setting things up) and one non-administrator (for auto-login). Once you have this, do the following:
- As administrator, press the Windows key and type «regedit» and Enter.
You will have to either change or create new entries depending on whether they already exist or not. - Under
HKEY_LOCAL_MACHINE\SOFTWARE\Microsoft\Windows\CurrentVersion\Policies\System:- Change
LocalAccountTokenFilterPolicy(32-bit DWORD) to 1 (hex or dec is the same).
- Change
- Under
HKEY_LOCAL_MACHINE\Software\Microsoft\Windows NT\CurrentVersion\Winlogon:- Set
AutoAdminLogon(STRING) to 1. - Set
DefaultDomainName(STRING) to the computer name. - Set
DefaultUserName(STRING) to the name of your non-administrator user. - Set
DefaultPassword(STRING) to the password of your non-administrator user. - Delete
AutoLogonCountif it exists.
- Set
Setup nightly reboots
It can be a good idea to do a reboot every night (or every week if you like), to ensure updates are run and so on.
To schedule this, do the following:
- As administrator, press the Windows key and type
Task Schedulerand Enter. - In the right panel, click on
Create Basic Task. - Give it a name (like
Automatic restart every night) and click Next. - When asked
When do you want the task to start?, select Daily. Click Next. - Select some time in the night, like
05:00:00 - Clicking Next will bring you to the Action page. Enter «powershell.exe» under «Program/script»,
and the path to your copy of the restart-computer.ps1 under «Add arguments (optional)». If it’s not working, see
this guide
for info about setting execution policy. - Click Next to review all and finally click Finish.
Prevent the screen from going black or enter screen saver
Prevent screen from going black:
- Click on the Windows-icon on the start menu and type
Power Options - Click on Change Plan Setting-link for Balanced and set both
Turn off the displayandPut the computer to sleeptoNever.
Turn off screen saver:
- Make sure you are logged in as administrator, and click on the Windows-icon on the start menu and type regedit
- Go to
HKEY_USERS\.DEFAULT\Control Panel\Desktop - Set
ScreenSaveActivestring value to 0 (you might need to create this entry if it doesn’t exist).
ForWindows 10 Pro, go here to find a useful instruction: https://www.tenforums.com/tutorials/6567-enable-disable-lock-screen-windows-10-a.html#option2
Disable lock screen
There are different tips on how to disable the lock screen. None of these worked for us, since it’s enforced by policy (the central IT administration has promised us a different policy for kiosk screens, but it hasn’t materialized yet), so we have to do the «powerpoint trick»… Yes, the computer will not lock while a presentation is running, so we start a Powerpoint presentation before starting Chrome.
Disable Edge Swipe and Pinch Zoom
For touch screens:
- Disable Edge swipe i Windows 10: https://www.tenforums.com/tutorials/48507-enable-disable-edge-swipe-screen-windows-10-a.html
2- Disable Pinch Zoom option in Windows 10: https://answers.microsoft.com/en-us/windows/forum/windows_10-desktop-winpc/how-to-disable-pinch-zoom-option-in-windows-10/91124309-3177-4c7d-a52a-087f6e34772c - Disable right click in Windows 10: Open
Pen and Touch, then go toPress and HoldandSettings, uncheckEnable press and hold for right-clicking.
Right clicking can also be disabled in the web page by javascript:
document.addEventListener('contextmenu', function(e) { e.preventDefault(); }, true);
Prepare Chrome startup script
See start-chrome-kiosk.ps1 for an example startup script for Chrome.
The most important flag is the --kiosk flag, but there’s also some more that are useful. Unfortunately, the flags tend to change from version to version without much notice, so alway scheck with the updated list of working flags here: https://peter.sh/experiments/chromium-command-line-switches/
Useful flags:
--kiosk: Enable kiosk mode (fullscreen with no menus)--noerrdialogs: Prevent error dialogs.--disable-infobars: Prevent the yellow information bars.
There used to be a flag called --disable-session-crashed-bubble for disabling the restore dialog that is shown if Chrome did not exit cleanly. After the flag was removed, the only way to avoid the restore dialog seems to be to manually alter the Preferences file (or lock it).
In the start-chrome-kiosk.ps1 script, we are manually altering the file.
Prepare Firefox startup script
Todo
Hiding the mouse cursor
On Windows 7, the cursor starts out visible in the middle of the screen upon boot, so we used to use AutoHideMouseCursor to hide it after a short delay, say 5 seocnds.
On Windows 10, the cursor starts out hidden upon boot, and does not become visible before it’s moved. This is perfect for kiosk screens.
I create a shortcut on my desktop for chrome and then right click and choose properties.. in the «target» box, I add this:
"C:\Program Files (x86)\Google\Chrome\Application\chrome.exe" --kiosk --kiosk-printing "https://google.com/"
here is the breakdown:
--kiosk
(makes it full screen on load)
--kiosk-printing
(makes the system auto print the default print setting when you click print — no asking the customer to click the print button)
and the URL at the end is the homepage onload you want to launch with everytime
pops ups MUST be «allowed» using a normal browser window first
(otherwise you don’t see the error) so be sure to force the website to pop before going full kiosk mode. Clicking allow always will solve this future issue.
and the biggest problem is that you MUST force chrome to NOT run in the background, otherwise the full screen never kicks in.
right-click the chrome icon in the systray (by the clock) and UNCHECK «allow chrome to run in the background»
and then to close the full screen (besides alt-f4)
i use this close kiosk chrome plugin:
https://chrome.google.com/webstore/detail/close-kiosk/dfbjahmenldfpkokepmfmkjkhdjelmkb
the call for this plugin to kick in from a button onclick is:
window.location.href = '/closekiosk';
I hope this helps… I use kiosks for all of my public functions and the web is so much better than a crappy app.. easily fixed and managed. good luck!