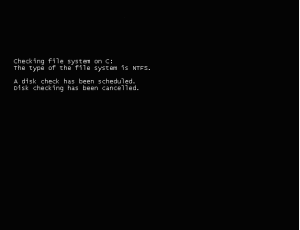
Полагаю, многие сталкивались с ошибкой Checking file system on C (перевод: «Проверка файловой системы на [диске] C») при запуске Windows 7 (или с Checking file system on D). Она обычно случается после сбоя в работе операционной системы. Когда она намертво виснет, многие просто вытягивают из розетки кабель питания или зажимают кнопку включения для принудительного выключения. После повторной загрузки может появиться соответствующий экран с «заветной» надписью (на фото ниже): «Checking file system on C…» — что это и что делать?
«Checking file system on C…» — эта надпись означает, что Microsoft не советует принудительно выключать питание компьютера — это может нанести вред всему ему в целом, а также жестким дискам в частности. Более того, данный процесс может испортить важные файлы, которые используются для нормальной загрузки операционной системы.
Это нормально, если сообщение Checking file system on C при запуске Windows 7 появляется один раз — как раз после описанных выше инцидентов. Тем не менее, некоторые пользователи отмечают, что эта проверка появляется снова и снова — каждый раз при перезагрузке операционной системы. Это отнимает массу времени и просто тратит нервы, но у данной проблемы есть достаточно простое решение.
Что делать при появлении этой ошибки? Для начала нужно проверить диск C на наличие ошибок
Если сообщение Checking file system on C появляется каждый раз при запуске Windows 7, для начала нужно разобраться, если ли ошибки на диске.
Во-первых, нужно проверить ошибки файловой системы
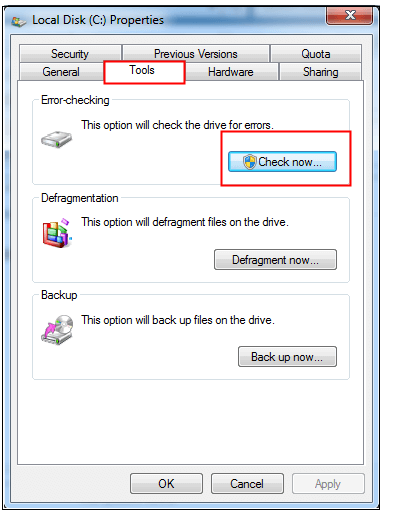
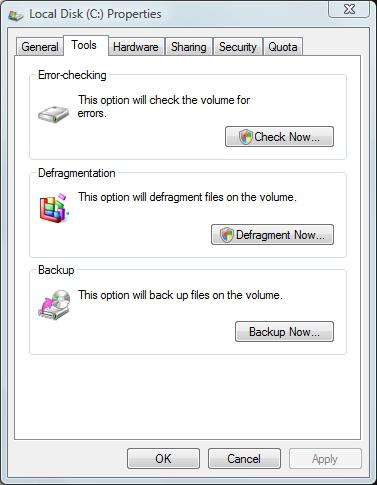
Шаг 1. Откройте «Проводник» и найдите диск C. Запустите контекстное меню нажатием правой кнопки по значку диска и выберите пункт «Свойства».
Шаг 2. Перейдите на вкладку «Инструменты» и нажмите на кнопку «Проверить».
Шаг 3. Переведите в активное положение переключатель «Исправлять ошибки файловой системы автоматически» и нажмите на кнопку «Пуск».
Во-вторых, следует проверить диск C на битые сектора
Если на диске C нет ошибок файловой системы, следует проверить поврежденные сектора. В этом, к примеру, я буду использовать приложение AOMEI Partition Assistant Professional — это удобный инструмент для управления жесткими дисками. Но у него есть аналоги: WinDFT, Seagate Seatools, Victoria.
Шаг 1. Установите и запустите приложение AOMEI Partition Assistant. Откройте контекстное меню диска C, перейдите в пункт «Расширенный» и выберите возможность «Проверить раздел».
Шаг 2. Выберите способ проверки ошибок для выполнения «Проверить на наличие плохих секторов на разделе» и нажмите на кнопку OK.
Шаг 3. Нажмите на кнопку «Старт», чтобы начать проверку.
Примечания:
- Если утилита найдет поврежденные сектора, нужно создать резервную копию диска C. Если в поврежденных секторах есть важные данные, отправьте накопитель в профессиональный центр восстановления данных. Браться за этот процесс самостоятельно не стоит — велик риск навсегда лишиться важной информации.
- Учитывайте, что не все поврежденные сектора могут быть восстановлены, поэтому лучше всего приучите себя создавать резервные копии хранилища по расписанию.
Теперь можно безопасно остановить проверку файловой системы
После проверки диска С на ошибки, вы должны задаться вопросом, как остановить этот процесс при каждом запуске операционной системы Windows 7. Вот два эффективных решения, которые для этого можно использовать.
Во-первых, для этого можно использовать редактор реестра
Шаг 1. Воспользуйтесь сочетание клавиш Windows + R, чтобы открыть диалоговое окно «Выполнить». Введите название приложения regedit и нажмите на клавишу Enter или кнопку OK, чтобы открыть редактор реестра.
Шаг 2. Используйте левую панель данного приложения, чтобы перейти в следующий каталог:
HKEY_LOCAL_MACHINE\SYSTEM\CurrentControlSet\Control\Session Manager
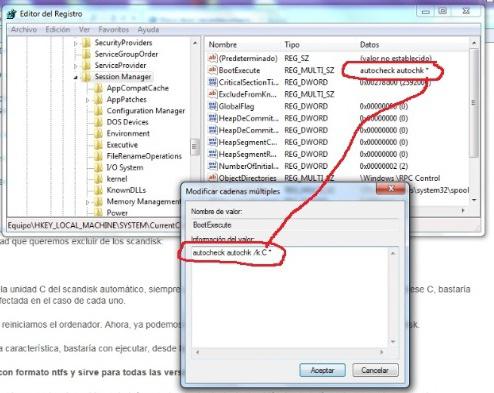
Шаг 3. Откройте файл BootExecute из правой части данного приложения.
Шаг 4. Добавьте значение /K:C в поле ключа перед значком *. Нажмите на кнопку OK, чтобы применить изменение.
Примечания:
- * — этот значок говорит о том, что каждый диск проверяется на согласованность.
- Ключ /K отключает проверку диска при запуске Windows — в данном случае он имеет отношение к диску C.
Шаг 5. Закройте редактор реестра.
Во-вторых, для этого можно использовать «Планировщик заданий»
Шаг 1. Нажмите на кнопку «Пуск» и перейдите в «Панель управления», разверните меню «Система и безопасность» и откройте раздел «Администрирование».
Шаг 2. Откройте «Планировщик заданий». Выберите пункт Autochk и нажмите на кнопку «Отключить» в правой панели.
Вывод
В общем, справиться с ошибкой Checking file system on C при запуске Windows 7 достаточно просто. Для начала нужно проверить диск С на ошибки и битые сектора, а после этого можно избавляться от соответствующей проверки с помощью редактора реестра или «Планировщика заданий».
- Windows 7 мертва. Как стала лучшей и почему осталась такой до сих пор
- Вам придётся обновиться с Windows 7. Заставит не Microsoft, а видеокарта
- Вспоминаем Windows 7: топ-10 фишек, за которые полюбили эту систему после Windows XP
Problem with PC Startup: Checking File System on C
Have you encountered the issue of checking the file system on C at startup? Many users often face this issue, which leads to system crashes. So, you must carefully shut down the PC by pressing the power button or unplugging the power cable. After restarting your Windows PC, the interface shows this error: «checking file system on C.» This error on Windows computers will jeopardize its hard drives when you power on or off directly.
What’s more? This error message damages PC’s the data and disables usual booting. However, it would be natural when checking the file system on C operates one time. But if you find out the issue happens every time you boot your PC, you must stop checking the C file system. This problem is scary! But you can fix checking file system on C with these methods.
You should know the causes of the Checking File System on C error to understand how to fix them. So, when you encounter this issue, fixing the checking file system on C is an absolute thing to do!
Here are the 3 reasons below why the users see the onscreen error message:
Reason 1. Power outage causes the error message
If your Windows PC turns off due to an interruption in the electricity supply, the «checking file system on C» error can appear after restarting it. However, as a power outage is planned, it could stem from an equipment failure, natural weather conditions, and others.
Reason 2. File system damage
Another probable reason for checking the file system on C on Windows is the file system damage. This is how you can contain the file system errors:
Step 1. Double-click the «Computer» icon and search for C drive on the desktop. Once done, «Properties» need to be selected after right-clicking C drive.
Step 2. Click the «tools» option and the «check now» button.
Step 3. A pop-up window will open, where you need to tick before «Fix the system errors automatically» and opt for the «start» button.
Reason 3. Bad sectors
A bad sector is a hard disc on a computer that has been corrupted and can no longer store or retrieve data. Check for faulty sectors if the C disc has no file system issues. The ideal option is to perform the task in a convenient, all-inclusive, complex disc management program, and it only takes a few clicks to use it to check for faulty sectors quickly. An outstanding program will provide capabilities like partition alignment and partition cleaning in addition to erroneous sector checks.
4 Solutions to Fix Checking File System on C on Windows 7/8/10/11
If you want to fix the checking file system on C, follow the top 4 solutions mentioned below:
Do you want to eliminate the checking file system on the C issue on Windows PC? If yes, you can disable Autochk.exe software from the scheduled tasks list. These are the steps below:
Method 1. Using Control Panel
Step 1. Hit the start button and then Control Panel. Under Control Panel, you need to click «system and security» and «Administrative Tools.»
Step 2. «Task Scheduler» needs to be double-clicked at this step. Afterward, you need to search for Autochk in the pop-up window and click it. Opt for «Disable» from the right-side panel.
Method 2. Check the Session Manager Registry Entry
You can fix Checking File System on C on Windows 7/8/10/11 after disabling the automatic checking file system on C through the registry editor. The steps are the following:
Step 1. You need to open the Run dialogue by pressing Windows Key + R. After that; you need to type Regedit and hit Enter button or click «OK» to open the Registry editor.
Step 2. To move to the following path, expand the entries in the left-hand pane:
HKEY_LOCAL_MACHINE\SYSTEM\CurrentControlSet\Control\Session Manager
Step 3. Double-click on BootExecute, located in the right-hand pane.
Step 4: You can change the key’s default value in the pop-up window by incorporating /K:C at the end before. Once done, click «OK» to confirm your changes.
Step 5: You should shut down the «Registry Editor.»
Method 3. Disable the automatic checking file system on C through the registry.
Follow the steps below to disable the automatic checking file system on C through the registry:
Step 1: Hit the start button, and in the search box, type «Regedit.«
Step 2: You must rummage for this registry key:
HKEY_LOCAL_MACHINE\SYSTEM\CurrentControlSet\Control\Session Manager
Step 3: Double-click on BootExecute in the right-hand pane.
Here, autochk or autocheck is the key’s default value, which means every drive is verified for consistency. Simply put /K:C before * to turn off autocheck on the C: disc when Windows starts. Thus, the final value should seem as follows: autocheck autochk /k:C *
If you would love to incorporate more drives, the key must look like this: autocheck autochk /k:C /k:D * after disabling C and D drives.
Lastly, replace the key with the default key to return everything to its default state, which is autochk autocheck*
Method 4. Run CHKDSK to file Windows file errors
You may check where this «checking file system on C» error is located on the disk to get them fixed. However, you can run the CHKDSK check to fix Windows file errors. The steps are shown below:
Step 1. Windows + X and Command Prompt (Admin) must be pressed together.
Step 2. Press «Enter» right after typing «chkdsk /f c:».
Step 3. Don’t forget to type in «chkdsk C: /r«.
Following these, you can check to see if the problem has been resolved. Don’t give up if it doesn’t work; there are other options.
Further Solution: Recover Data When the File System Corrupts
Sometimes, especially after inspecting the faulty file system, files may disappear after executing SFC and CHKDSK. Additionally, there is a significant chance of data loss. Therefore, users should prioritize data security. A specialist data recovery program can be helpful for Windows users.
You can download the effective data recovery program EaseUS Data Recovery Wizard. It was created to aid in the recovery of data lost as a result of a file system malfunction, system crashes, and accidental file deletion.
EaseUS Data Recovery Wizard
- Formatted recovery: You can retrieve all your data, whether it’s an SSD, flash drive, HDD, or USB drive, with EaseUS.
- Damaged HDD recovery: With the support of the EaseUS Data Recovery Wizard, you can recover data from dead hard drive.
- Deleted file recovery: Don’t worry if you accidentally delete a file. The lost files are retrievable with the professional recovery tool.
Final Thoughts
With the help of the solutions above, you can quickly stop checking the file system on C error on your Windows 7/8/10/11 PC. But despite all your answers, there’s a risk of data loss! To save your files from getting permanently deleted from your PC, it’s essential to have premium data recovery software to retrieve files. EaseUS Data Recovery Wizard is the best option since it helps you reduce disk space with several features.
Fix Checking File System on C FAQs
Consider the FAQs mentioned below to obtain a profound understanding of the topic:
1. How do I know if FAT32 or NTFS?
To determine if the file system is FAT32, exFAT or NTFS, you need to open «My Computer or PC,» right-click the drive you want to see, and opt for «Properties.» The file system format will be listed in the Disk Properties window.
2. How to stop checking the file systems on c Windows XP?
Select Run from the Start menu, enter regedit and select OK. Find the following key in the registry, and then click it:
HKEY_LOCAL_MACHINE\System\CurrentControlSet\Control\Session Manager\BootExecute. Click Modify on the Edit menu. After entering autocheck autochk, hit ENTER.
3. How to disable disk check Windows 7 startup?
One of the easiest ways to disable disk check on Windows 7 startup is to utilize the chkntfs command. You must hit the «Start» button and type «command prompt.» Once right-clicking on the command prompt, you need to opt for «Run as Administrator.»
4. How to fix checking the file system on C Windows 7 every boot?
Follow the steps below:
- Step 1. On the Windows 7 desktop, you must double-click the «Computer» icon and search for C drive. After that, «Properties» need to be chosen after right-clicking the C drive.
- Step 2. Hit the «Tools» tab and, after that «check now» button.
- Step 3. Select «Automatically resolve file system faults» and click «Start» in the pop-up window.
5. How long does checking the file system on C take?
Checking the file system on C usually takes over 2 hours based on your drive’s size and the errors discovered.
Do you receive a black screen with such an error message saying that checking file system on C: when trying to boot your computer? If you have no idea what happened, then you have come to the right spot. In this guide on MiniTool Website, we will show you the causes and solutions on it.
Checking Files System on C
It is very common to encounter some problems when booting your computer. Checking your file system on C is one of the troublesome issues you might face and it can even lead to system crashes sometimes. Here is the complete information you might receive:
Checking files system on C:
The type of the file system is NTFS.
Volume label is LOCALDISK.
One of your disks needs to be checked for consistency. You may cancel the disk check, but it is strongly recommended that you continue.
Windows will now check the disk.
To stop disk checking, press any key within xx seconds.
Note:
Note: C: refers to the main hard disk partition that contains the Windows operating system. If the system you are running is installed in D drive, you will receive checking file system on D.
This autodisk check process will be initiated when your computer was not shut down correctly or if something went wrong at the last shutdown. Most of the time, it might be a routine to check the consistency of the hard drive, so you don’t need to worry about it. However, if checking file system on C the type of the file system is NTFS appears whenever the computer boots, you are supposed to figure out the reasons. Here, we have collected several potential reasons for you.
Cause 1: Incorrect Shutdown
If your Windows device shuts down suddenly due to some unexpected factors such as power outage, equipment failure and more, the checking file system on C screen will crop up after restarting it. At the same time, you might also receive this error when removing a USB flash drive improperly, for example, unplugging the USB drive directly while it is saving data without hitting the Safely Remove button.
Cause 2: Corrupted File System
Another possible reason for checking file system on C is file system corruption. If this is the case, the file, directory and disk structure will also be corrupted and unreadable.
Cause 3: Bad Sectors
Maybe there are some bad sectors on the hard disk hence leading to the occurrence of checking file system on C. A bad sector refers to an area of the storage device that is damaged permanently. Once the sector is corrupted, all the data on it may lose and it is unable to store data anymore.
How to Fix Checking Files System on C on Windows 7/8/10/11?
In view of different conditions, we will show you the corresponding solutions to get rid of checking file system on C.
Shut Down Your Computer Properly
Here are some tips on how to shut down your computer properly:
- Don’t press the physical power button directly to turn off your computer.
- Avoid running too many programs at the same time, or else it might arouse an accidental shutdown or system crash.
- Make sure to terminate all the running programs before powering off.
- Remove your USB drive until it completes the task by hitting Safe Remove.
Check File System Errors
Microsoft provides you with an inbuilt disk check utility to help you find and fix the file system errors. Even if some errors are hard to handle, it will show you detailed error information.
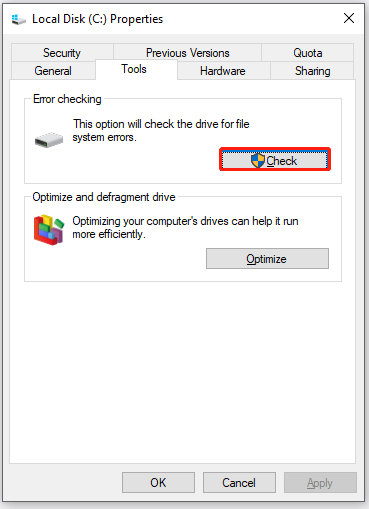
Step 1. Press Win + E at the same time to evoke File Explorer.
Step 2. Click on This PC and right-click on Local Disk (C:) to select Properties in the drop-down menu.
Step 3. Under the Tools tab, tap on Check. (In Windows 7, hit Check now.)
Step 4. Click on Scan drive to start the scanning. (In Windows 7, check the Fix the system errors automatically option and press Start.)
Tips:
Tip: Most file system errors can be fixed by this method. For more solutions on file system errors, you can see this guide — File System Error — Solutions to Deal with it Quickly.
Find and Fix Bad Sectors
If there are bad sectors on the hard drive, you may be also stuck in Checking file system on C when the computer boots up. In this condition, CHKDSK will help you out. This is an inbuilt tool in Windows which enables you to check & fix disk for errors such as bad sectors, cross-linked files, lost clusters, and directory problems. Here’s how to get rid of checking file system on C NTFS with it:
Tips:
Tip: Before performing disk checking and repairing, we sincerely advise you to create a backup for your data with MiniTool ShadowMaker to secure the important files and folders.
MiniTool ShadowMaker TrialClick to Download100%Clean & Safe
Step 1. Type cmd in the search bar to locate Command Prompt and right-click on it to choose Run as administrator.
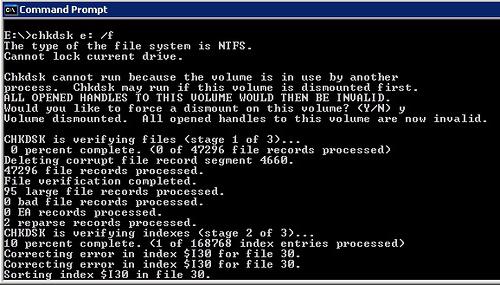
Step 2. Type chkdsk /f/c: and hit Enter. The /f parameter means to find and fix any errors on the hard disk.
Step 3. After the process is complete, type chkdsk C: /r and hit Enter. The /r parameter can help you to detect & locate the bad sectors on the target disk, and even attempt to recover the readable information from the bad sectors.
Step 4. Now, reboot your computer to see if checking file system on C disappears.
Stop Autodisk Check Manaully
After fixing file system errors and bad sectors on your computer, you may not receive checking file system on C again. If you are afraid to get this error message, you can disable autodisk check manually. There are 3 ways for you to choose from: via Registry Editor, Control Panel, and Command Prompt.
# Way 1: Modify the Registry
First, you can stop the autocheck on C drive by modifying the registry on Registry Editor.
Warning:
Warning: You had better create a backup for the registry database before making any changes to Registry Editor. By doing so, you can easily restore the registry from the backup when something goes wrong.
Step 1. Press the Win key + R to launch the Run dialog.
Step 2. Type regedit and hit the Enter key to open Registry Editor. If prompted by User Account Control, click on Yes to grant the permission.
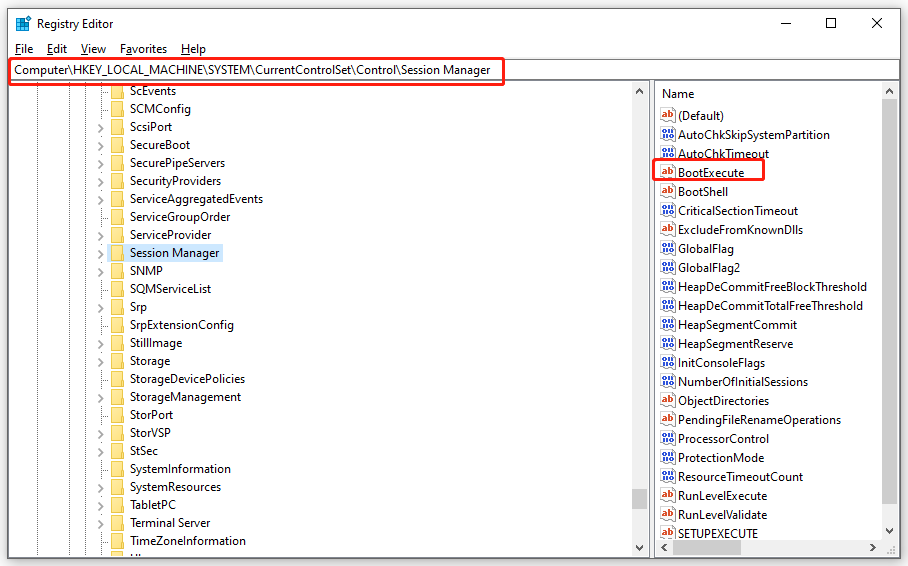
Step 3. Move to the following path and expand the entries on the left-hand pane:
HKEY_LOCAL_MACHINE\SYSTEM\CurrentControlSet\Control\Session Manager
Step 4. Find BootExecute in the right-hand panel and right-click on it to choose Modify in the drop-down menu.
Step 5. Under Value data, type /K:C before * to disable checking file system on C and press OK to confirm this action.
Tips:
Tip:
- * indicates that every drive is checked for consistency.
- The /K:C parameter can help you to disable the automatic file check on C drive when Windows starts.
Step 6. Quit Registry Editor.
# Way 2: Disable Autochk via Administrative Tools
Another option is to disable Autochk from the scheduled tasks list. Here’s how to disable checking file system on C via Task Scheduler.
Step 1. Hit the Start icon and go to Control Panel.
Step 2. Click on System and Security and then scroll down to hit Administrative Tools.
Step 3. Find Task Scheduler and double-click on it. Expand the following folders: Task Scheduler Library > Microsoft > Windows.
Step 4. Find Autochk and double-click on it to choose Disable from the right-hand pane.
Tips:
Tip: What if your Task Scheduler is not working? Go to this guide — 7 Tips to Fix Task Scheduler Not Running/Working Windows 10 and all your worries will be gone.
# Way 3: Run CHKNTFS in Command Prompt
CHKNTFS, also known as check NTFS, is a windows command line that displays or modifies automatic disk checking when the computer is started. Here’s how to remove checking file system on C via it:
Step 1. Run Command Prompt as an administrator.
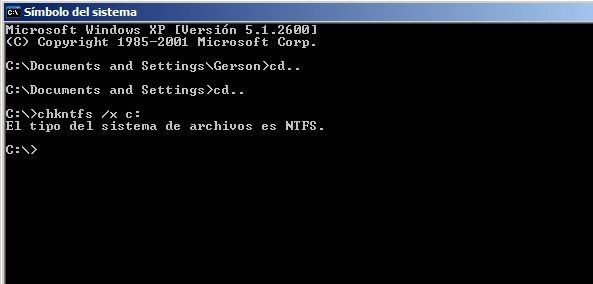
Step 2. Type chkntfs /x c: and hit Enter.
Tips:
Tip: The /x parameter means that one or more partitions will be excluded from checking when your computer boots up.
I was stuck on the checking file system on C black screen whenever the computer boots up. Luckily, I manage to fix it and boot my PC without any errors. If you have the same issue as well, try these solutions in this guide!Click to Tweet
Suggestion: Back up Your C Drive Before Proceeding
Now, your computer can boot up without checking files system on C. As you can see, it is hard to find the specific reason why your computer goes wrong most of the time, let alone the corresponding workarounds. Therefore, it is essential to create a backup of your system so that if anything goes wrong during the process, you can use the backup to restore the system back to the work state. Here, we propose to back up your system with a piece of reliable backup software – MiniTool ShadowMaker.
This free tool is designed to provide data protection and disaster recovery solutions for Windows devices. It supports backing up your important files/folders, selected partitions, operating systems, and even the whole disk on Windows 7/8/10/11 and Windows Server 2008/2012/2016/2019/2022. What’s more, MiniTool ShadowMaker is user-friendly and you can just back up your data just within a few steps. Here’s how to back up your C drive with its one-click system backup solution:
Step 1. Download, install and launch this program.
MiniTool ShadowMaker TrialClick to Download100%Clean & Safe
Step 2. Click on Keep Trial and go to the Backup page.
Step 3. In SOURCE, you can see the system required partitions are selected by default. Therefore, you only need to choose a storage path for your backup image in DESTINATION.
Step 4. Either hit Back Up Now to start the backup or press Back Up Later to delay the process. Once you choose Back Up Later, you can start the delayed task in the Manage page.
Then, you need to create a bootable drive with MiniTool ShadowMaker:
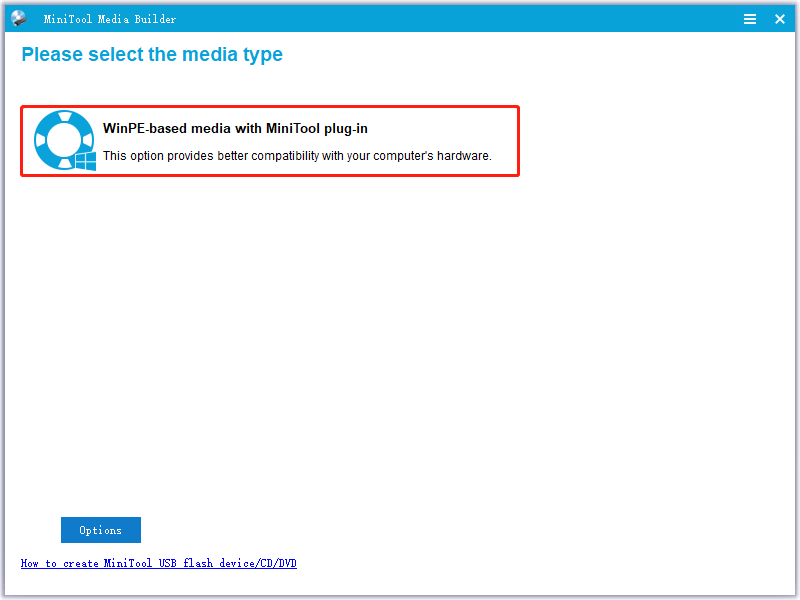
Step 1. Go to the Tools page and hit Media Builder.
Step 2. Click WinPE-based media with MiniTool plug-in and choose USB Flash Disk. When your computer fails to boot, you can boot it from this USB drive and perform a system recovery.
We Need Your Voice
By now, you must stop checking files system on C successfully with the solutions mentioned in this article. More importantly, you still have a risk of encountering the same issue again or making some mistakes during the troubleshooting process, resulting in data loss, hard drive failure or system crash.
In consequence, it is necessary to back up your system with MiniTool ShadowMaker to secure your system. For further queries about our product or the solutions in this article, welcome to leave your ideas in the comment zone or contact us via [email protected].
Checking Files System on C FAQ
How do I check my drive file system?
Launch File Explorer > hit This PC > right-click on the drive you want to check > choose Properties > check the file system under the General tab.
How do I fix file system error?
Fix 1: Check Sectors for Your Hard Drive via MiniTool Partition Wizard.
Fix 2: Run Disk Check
Fix 3: Run SFC
Fix 4: Run A Virus or Malware Scan
Fix 5: Perform System Restore
How do I stop Windows 7 from checking files?
Way 1: Change the Registry
Way 2: Use Control Panel
Way 3: Run CHKNTFS

Что значит Checking file system on c the type of the file system is ntfs?
Checking file system on C the type of the file system is NTFS – надпись появляется на чёрном фоне при старте Windows, и компьютер блокируется надолго. Знакомы эти зловещие и пока непонятные слова? Если такое предупреждение появляется при загрузке, то не стоит паниковать. Это значит, что система защиты ОС от сбоев жёсткого диска работает замечательно.
“Checking file system…”
Дословный перевод фразы: “Проверка файловой системы на диске C. Формат файловой системы – NTFS”. Суть сообщения и процедуры проверки – автоматическое сканирование системного раздела “винчестера”. Обычно это диск C: – тот, где находится Windows.
Почему возникает такое сообщение? Windows по какой-то причине считает, что в файловой системе (среди сохранённых данных), могли возникнуть ошибки. Причинами могут быть:
- неправильное отключение компьютера во время предыдущего сеанса работы;
- сбой электропитания и внезапное отключение ПК;
- самодиагностика HDD сообщила о возможных проблемах.
Раз в несколько месяцев рекомендуется запускать проверку жесткого диска на наличие ошибок вручную. Это поможет как можно дольше работать вашему компьютеру с наименьшим количеством ошибок.
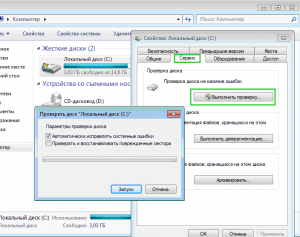
Чтобы вручную запланировать проверку при перезагрузке, зайдите в Свойства диска (правая кнопка мышки по C:). Вкладка Сервис, кнопка “Выполнить проверку…”. Появится уведомление о невозможности выполнить задачу, и предложение запланировать сканирование при перезагрузке.
Ручной запуск проверки локального диска
Полностью загруженная ОС не умеет качественно сканировать диск, на котором находится сама, а потому механизмы Windows назначат задачу проверки HDD при следующей загрузке. Можно отказаться от этой процедуры, нажав любую клавишу в течение 10 секунд после появления предупреждения. Однако делать это не рекомендуется. Пользователь должен знать о надписи Checking file system on C the type of the file system is NTFS”, что это полезная профилактика работоспособности компьютера.
Что делать при появлении предупреждения
Желательно – ничего. Если не трогать клавиатуру в течение 10 секунд после появления надписи “Checking file system…”, то проверка начнётся автоматически.
Начало проверки диска
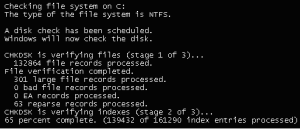
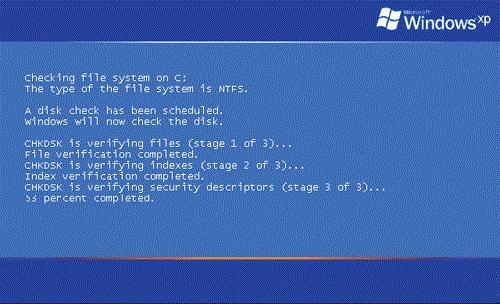
Время от времени на экране будут появляться надписи о прогрессе в процентах и в количестве уже проверенных секторов; иногда – о найденных и исправленных ошибках файловой системы.
Информация о работе Chkdsk: проходит 2й этап из 3, завершено 65%. Исправлено несколько мелких ошибок (records).
Время полной проверки диска варьируется от:
- 10-15 минут при 50-100 Гб на диске C и наличии свободного места;
- вплоть до нескольких часов (200-500 Гб, свободного пространства минимум).
Пользовательской реакции не требуется: все возможные ошибки утилита исправит самостоятельно, а затем загрузит Windows в обычном работоспособном режиме.
Главное – не волноваться и не скорбеть о якобы сбойном HDD раньше времени. Проверку файловой системы можно сравнить с личным врачом, который реагирует на каждый “чих” пациента и просит его обследоваться. Как правило, чихание (подозрение на наличие ошибок!) – рядовой процесс. Но когда организм действительно заболевает (по нашей аналогии – на диске найден сбой), то система самостоятельно примет все необходимые шаги для “лечения”.
Если же вам требуется запустить компьютер как можно быстрее, то для отмены проверки нужно нажать любую клавишу в течение 10 секунд после появления сообщения Checking file system on c the type of the file system is ntfs.
Итоги
Итак, Checking file system on C the type of the file system is NTFS” – что это? Ни в коем случае не ошибка. Исправлять её не требуется. Обычный процесс самодиагностики жёсткого диска, на котором находится Windows.
Методы устранения? Если есть время (порядка 30 минут – 1,5 часов), то лучше позволить компьютеру проверить и вылечить всё, что можно. Если работоспособный ПК нужен срочно, то можно отметить процесс, отложив его на ночь. Для отмены проверки следует нажать на кнопку Reset (Перезагрузка) на корпусе компьютера. Альтернативный метод – нажать на кнопку выключения, и держать её нажатой в течение 5-8 секунд. Способы нежелательные, но вполне безопасные. Не забудьте нажать на любую клавишу в течение 10 секунд после нового появления надписи.
Наверное, не нужно говорить, что большинство пользователей компьютерных систем очень часто при перезагрузке терминала или ноутбука сталкивались с появлением сообщения «Checking file system on C». Попробуем разобраться, что это такое и как его отключить.
Что собой представляет строка с сообщением «Checking file system on C»?
Сразу скажем, не стоит пугаться. Ничего страшного в сообщении «Checking file system on C» нет. Это стандартный процесс проверки целостности операционной системы и диска C на наличие ошибок при загрузке компьютера. Такая надпись возникает после подтверждения запроса о том, что один или несколько дисков требуют проверки («One of discs needs to be checked for consistency»).
Когда нажимается клавиша ввода, и стартует данный процесс. К сожалению, очень многие пользователи игнорируют проверку, что имеет негативные последствия. Достаточно часто подобное сообщение может возникать при перезагрузке снова и снова, иногда игнорирование проверки вообще может привести к полному крашу системы.
Почему запускается проверка диска
Если говорить о причинах запроса на проверку диска (дисков), то наиболее вероятными являются: внезапное отключение электропитания, некорректное завершение работы (принудительное выключение компьютерной системы), зависание компьютера, появление синего «окна смерти» (Memory Dump) и т. д.
Попробуем разобраться, что нужно сделать, чтобы избежать проверки диска при перезагрузке или повторном включении компьютера.
Стандартные способы проверки дисков и разделов
Прежде всего не стоит отменять проверку, сколько бы по времени она ни длилась. В данном случае ОС Windows исправляет системные ошибки автоматически. Если же по каким-либо причинам проверку завершить не удается, следует запустить ее уже после полной загрузки системы.
Для этого в обычном «Проводнике» нужно правым кликом на литере диска, который проверялся при старте, вызвать контекстное меню и выбрать строку «Свойства». На вкладке «Сервис» (для Windows 7) имеется кнопка «Выполнить проверку». После ее нажатия в возникшем окне следует задействовать параметр «Исправлять ошибки автоматически» и начать процесс. В большинстве случаев это помогает. Однако бывают и ситуации, когда сбои в работе системы достаточно серьезны или сам винчестер поврежден, а сообщение появляется снова и снова.
Что делать, если строка с сообщением «Checking file system» появляется при каждой загрузке
В данном случае имеется несколько решений. Для начала стоит проверить диск какой-нибудь сторонней утилитой, в которой имеется функция сканирования поверхности диска и автоматического исправления (восстановления) поврежденных секторов. Программ для этого существует достаточно много. Среди лучших можно выделить приложение Victoria и HDD Regenerator. Последняя утилита, кстати, способна восстанавливать даже физически поврежденные секторы.
Можно использовать и другие методы. Одной из самых простых методик является исполнение в командной строке или в меню «Выполнить» команды chkdsk c: /f, chkdsk c: /f /r или chkdsk c: /f /v /r /x. Система выдаст уведомление о том, что используется системой и проверка невозможна. Ничего страшного. Жмем Enter и ждем завершения процесса. При вводе второй команды проверка будет производиться несколько дольше. На некоторых машинах она может занимать до нескольких часов. Но если не хотите переустанавливать систему, лучше подождать.
К примеру, если запускается процесс «Checking file system on D» (для диска D) также можно использовать команду chkntfs x/ c:, но только для дисков и разделов с файловой системой NTFS. Наверное, и так понятно, что к файловым системам типа FAT32 такая команда не применима.
В крайнем случае, чтобы убрать постоянно возникающее сообщение о проверке «Checking file system on C», можно зайти в системный реестр HKEY_LOCAL_MACHINE\SYSTEM\CurrentControlSet\Control\Session Manager, найти там параметр BootExecute и изменить его значение с установленного на стандартное, устанавливаемое по умолчанию autocheck autochk*. Но неопытным пользователям заниматься редактированием реестра крайне не рекомендуется. Это может вывести из строя всю систему.
