
Всех приветствую!
Эта заметка может быть полезна в случаях, когда ОС Windows начала не стабильно работать, появились ошибки при запуске системных служб, приложений и т.д. Благо, что в самой же ОС есть спец. инструменты для проверки целостности (и исправления) системных файлов (речь о утилитах SFC и DISM).
Собственно, в неск. примерах ниже хочу показать как их можно использовать. В своих прошлых записях я тоже неоднократно ссылался на них (т.е. тема актуальна, несмотря на высокую стабильность работы современных версий Windows).
*
Примечание: системные файлы могут быть повреждены из-за вирусного заражения ОС, при сбоях файловой системы, при работе с некоторым ПО, из-за некорректного обновления, и пр. В целях безопасности — я бы на будущее порекомендовал делать 📌бэкапы важных данных + 📌контрольные точки в Windows.
📌 Важно!
Если у вас также пропали документы, фото, видео — ознакомьтесь с этой инструкцией/подборкой: https://ocomp.info/10-programm-dlya-vosstanovleniya-dannyih.html (часто удается многое восстановить).
*
Содержание статьи📎
- 1 Что можно посоветовать для восстан.-я системных файлов
- 1.1 ШАГ 1 (chkdsk)
- 1.1.1 Можно ли chkdsk запустить с установочной флешки, если текущая Windows не загружается
- 1.2 ШАГ 2 (SFC)
- 1.2.1 Что делать, если ошибки не будут исправлены
- 1.3 ШАГ 3 (DISM)
- 1.4 ШАГ 4 (Контр. точки)
- 1.1 ШАГ 1 (chkdsk)
→ Задать вопрос | дополнить
Что можно посоветовать для восстан.-я системных файлов
ШАГ 1 (chkdsk)
Перед тем, как переходить к восст. сист. файлов — рекомендуется выполнить проверку файловой системы диска (+ исправить ошибки, если будут найдены оные).
Для этого требуется запустить командную строку от имени администратора, а затем воспользоваться командной:
chkdsk v: /f
См. скрины ниже. 👇
Примечание:
- вместо «v:» — можно указать свою букву диска (например, «C:»);
- параметр «/f» — используется для исправления найденных ошибок;
- параметр «/r» — используется для обнаружения повреждённые секторов на диске и восст. информации, которую можно прочитать;
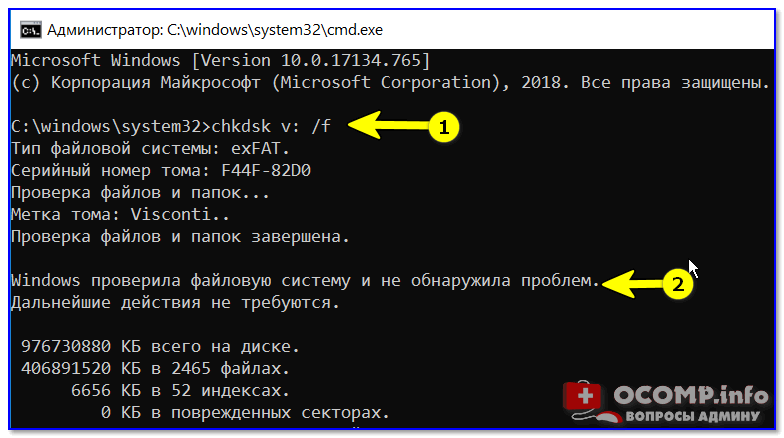
chkdsk v: /f — проверка диска
📌 Обратите внимание, что при успешной операции проверки диска — вы должны увидеть уведомление:
- либо, что Windows не обнаружила проблем;
- либо, что проблемы были устранены!
Проверка системного диска (chkdsk)
*
Можно ли chkdsk запустить с установочной флешки, если текущая Windows не загружается
Можно!
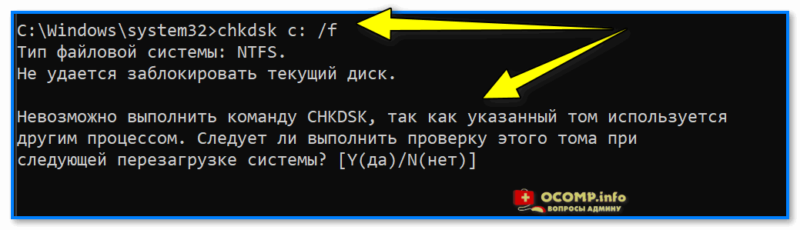
Только не факт, что она вам поможет… (по идее, если проблема с ошибками файловой системы возникли на системном диске — он будет проверен перед загрузкой ОС, причем, автоматически // без вашей просьбы на это).
Как запустить такую проверку:
- для начала нужно записать 📌установочную флешку с Windows;
- далее нужно загрузиться с нее (например, с помощью 📌Boot Menu);
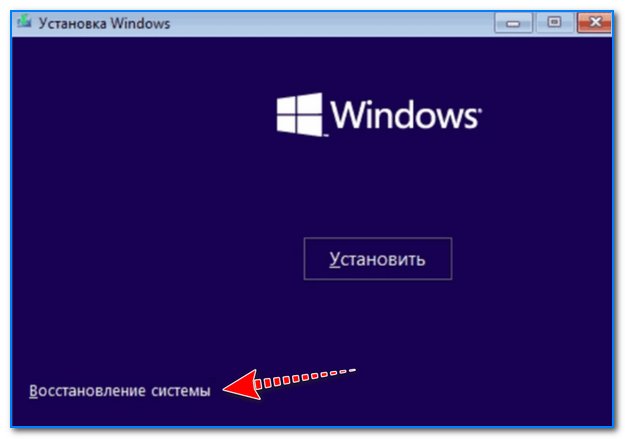
- затем в меню вместо установки начать восстановление ОС;

Восстановление системы // Окно установки Windows 10
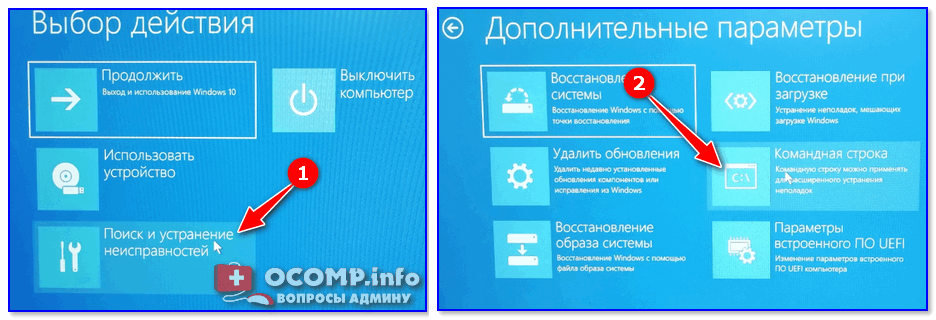
- после перейти в раздел устранения неисправностей и запустить командную строку. См. скрин ниже; 👇

Поиск и устранение неисправностей — командная строка
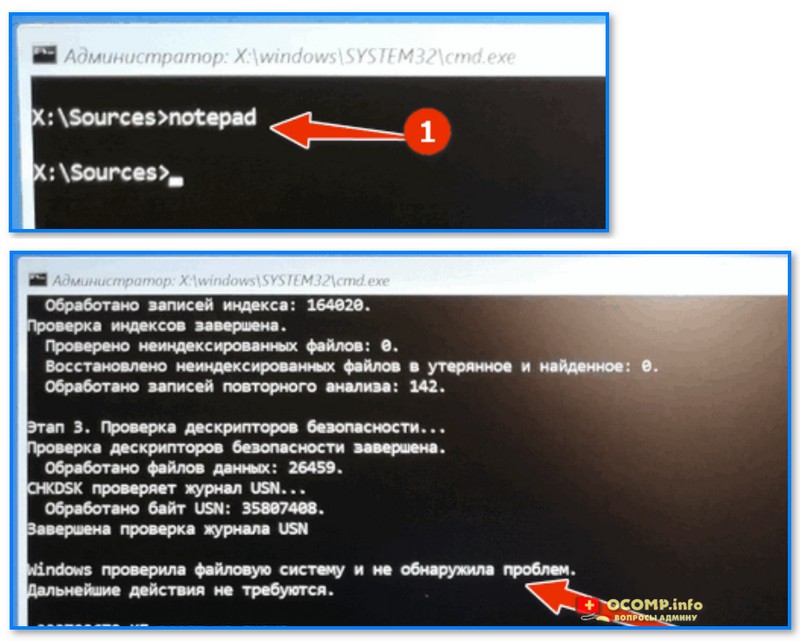
- в командной строке наберите notepad — откроется блокнот, через который можно посмотреть все текущие диски и их буквы (они нам и нужны!);
- собственно, теперь осталось только набрать команду проверки: скажем chkdsk D: /f (вместо «D» — свою букву диска).

Пример проверки диска, при загрузке с флешки
*
ШАГ 2 (SFC)
SFC (System File Checker) — спец. утилита для проверки и восст. файлов ОС.
Чтобы запустить ее — необходимо:
- открыть 📌командную строку от имени админа;
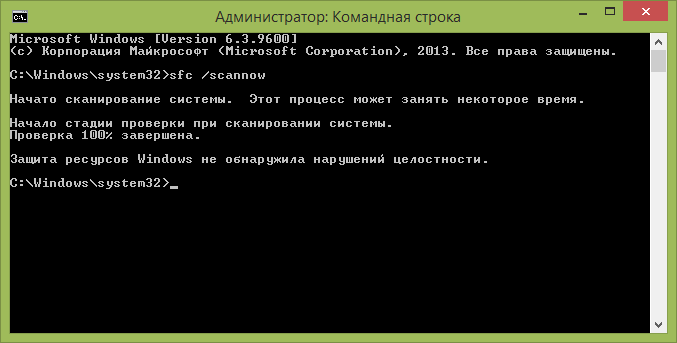
- ввести sfc /scannow и нажать Enter;
- дождаться результатов проверки*.
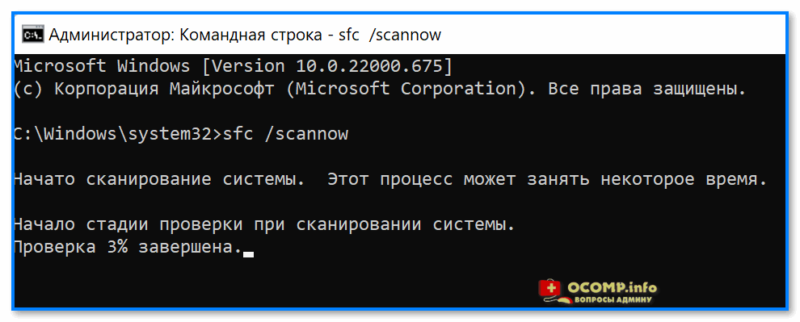
Начато сканирование системы. Этот процесс может занять некоторое время
* Результаты могут быть разными:
- идеально: если ошибки и нарушения целостности найдены не будут;
- хорошо: если найденные ошибки будут исправлены в ходе проверки;
- плохо/требуется доп. проверка: если ошибки будут найдены, но восстановить их не удастся.

Защита ресурсов Windows не обнаружила нарушений целостности
*
Что делать, если ошибки не будут исправлены
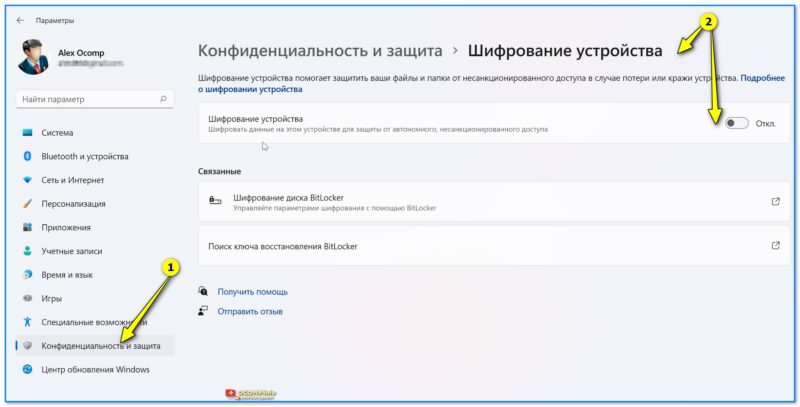
- заходим в 📌параметры ОС Windows и проверяем, чтобы было выключено шифрование диска;

Шифрование диска отключено (Windows 11)
- далее загружаемся с установочной флешки с Windows и запускаем «Восстановление системы»;
Восстановление системы
- далее открываем командную строку (во вкладке «Доп. параметры») и используем команду notepad (с помощью запуска блокнота — сможем узнать буквы всех дисков);
- затем используем команду: sfc /scannow /offbootdir=F:\ /offwindir=F:\Windows (где вместо «F:» — указываем букву диска с Windows. Вероятно, кстати, что буква не будет равна «C»!).
*
ШАГ 3 (DISM)
DISM (Deployment Image and Service Management)
Рекомендуется использовать уже после SFC (см. ШАГ 2).
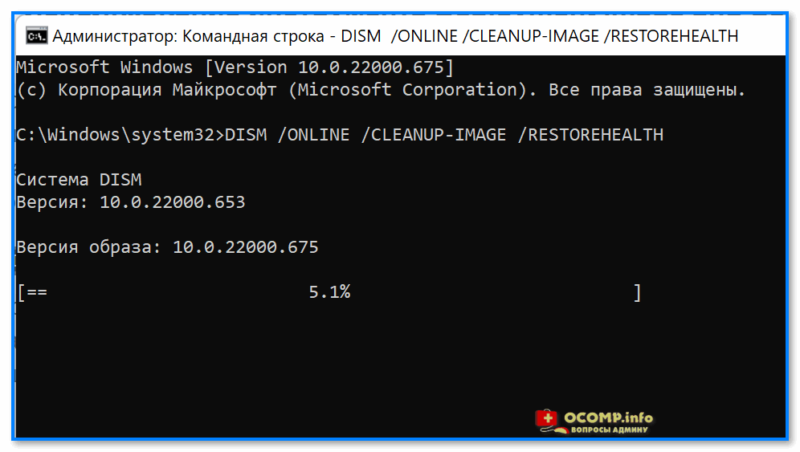
Для запуска сначала также необходимо открыть 📌 командную строку под администратором, а затем ввести:
DISM /ONLINE /CLEANUP-IMAGE /RESTOREHEALTH
Операция занимает в среднем 3-15 мин., и во время ее выполнения — не стоит делать за ПК никаких ресурсоемких задач. См. пример ниже. 👇
DISM — запуск восстановления
В идеале вы должны увидеть сообщение о том, что восстановление выполнено успешно, 100%. См. пример. 👇

DISM — восстановление выполнено успешно, 100%
📌 Если вышеприведенные команда (DISM) выдала ошибку — попробуйте подключить/смонтировать образ ISO с Windows… (Windows взять нужно такой же версии, что установлена и у вас). Это можно сделать прямо в проводнике.
Кстати, кроме проводника образ ISO могут смонтировать в вирт. привод и спец. утилиты.
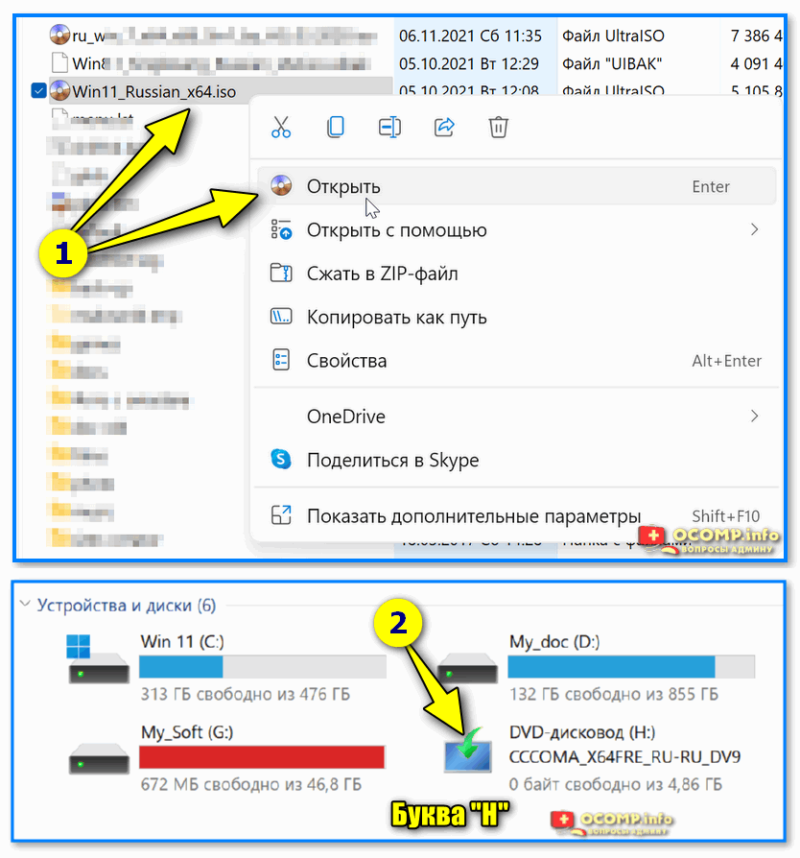
Открываем образ ISO (буква H)
Далее нужно ввести нижеприведенную команду (вместо буквы «H:» — укажите свою), и нажать Enter:
DISM /Online /Cleanup-Image /RestoreHealth /Source:H:\Sources\install.esd
В идеале через 3-15 мин. должно появится сообщение об успешном выполнении операции… 👇

Операция успешно завершена, восстановлено 100%
Примечание: DISM ведет логи, находятся они на системном диске C:\Windows\Logs\DISM (dism.log). Из них можно узнать, что было восстановлено, а что не удалось…
*
ШАГ 4 (Контр. точки)
Если всё вышеприведенное не дало результатов — я бы дополнительно посоветовал проверить наличие точек восстановления в Windows (если в наличии будет та точка, на дату которой система корректно работала, — стоит попробовать откатиться к ней).
Отмечу, что контрольные точки восст. обычно делаются автоматически (при вкл. опции).
*
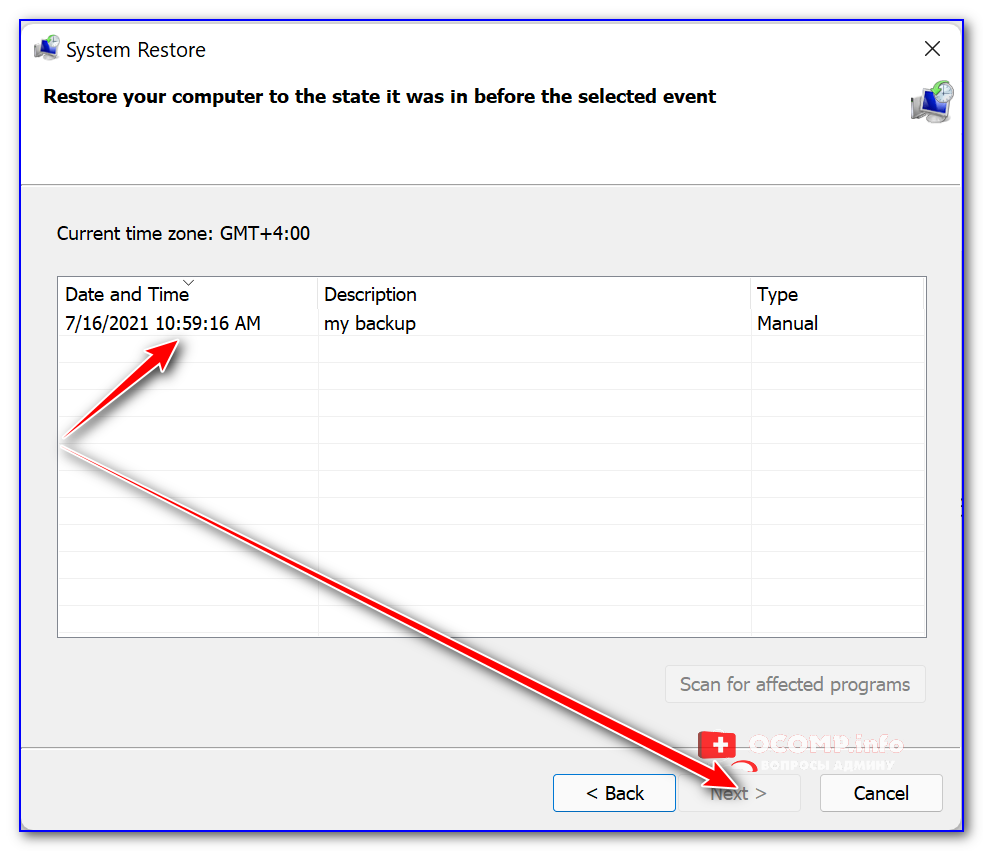
Чтобы посм. какие есть точки восстановления — нужно:
- нажать Win+R, чтобы появилось окно «Выполнить»;
- ввести rstrui и нажать Enter;
- далее перед вами появится окно со списком точек (при их наличии). Если есть дата, на которую ПК корректно работал, выберите ее и попробуйте откатить систему (прим.: файлы и документы пользователя эта операция не затрагивает. По крайней мере, так заявляют разработчики Windows, да и раньше такого никогда не было… 🙂).

Все точки восстановления, список
*
📌 В помощь!
Как работать с точками восстановления в Windows 11 (для отката системы после появл. ошибок, невозможности загрузки и т.д.) — https://ocomp.info/tochku-vosstanovleniya-v-win11.html
*
Иные рекомендации по теме — приветствуются!
Успехов и легкой починки!
🙂


 Многие знают, что проверить целостность системных файлов Windows можно с помощью команды sfc /scannow (впрочем, это знают не все), но мало кто знает, как еще можно использовать данную команду для проверки системных файлов.
В этой инструкции я покажу, как осуществить проверку для тех, кто вообще не знаком с данной командой, а после этого расскажу о различных нюансах ее использования, которые, думаю, будут интересны. См. также более подробную инструкцию для последней версии ОС: проверка и восстановление целостности системных файлов Windows 10 (плюс видео инструкция).
Как проверить системные файлы
В базовом варианте, если у вас есть подозрение на то, что необходимые файлы Windows 8.1 (8) или 7 были повреждены или потеряны, вы можете использовать специально предусмотренный для этих случаев инструмент самой операционной системой.
Итак, для проверки системных файлов, проделайте следующие шаги:
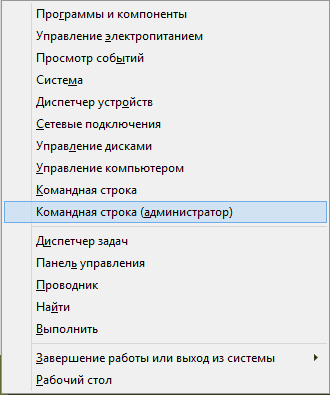
- Запустите командную строку от имени администратора. Для этого в Windows 7 найдите этот пункт в меню Пуск, кликните по нему правой кнопкой мыши и выберите соответствующий пункт меню. Если у вас Windows 8.1, то нажмите клавиши Win + X и запустите «Командная строка (Администратор)» из меню, которое появится.

- В командной строке введите sfc /scannow и нажмите Enter. Эта команда выполнит проверку целостности всех системных файлов Windows и попытается их исправить в том случае, если были обнаружены какие-либо ошибки.
Однако, в зависимости от ситуации, может оказаться, что использование проверки системных файлов в таком виде не в полной мере подходит для данного конкретного случая, а потому расскажу о дополнительных возможностях команды утилиты sfc.
Дополнительные возможности проверки с помощью SFC
Полный список параметров, с которыми можно запустить утилиту SFC выглядит следующим образом:
SFC [/SCANNOW] [/VERIFYONLY] [/SCANFILE=путь к файлу] [/VERIFYFILE=путь к файлу] [/OFFWINDIR=папка с windows] [/OFFBOOTDIR=удаленная папка загрузки]
Что это нам дает? Предлагаю посмотреть по пунктам:
- Вы можете запустить только проверку системных файлов без их исправления (ниже будет информация о том, зачем это может пригодиться) с помощью
sfc /verifyonly
- Имеется возможность проверить и исправить только один системный файл, выполнив команду
sfc /scanfile=путь_к_файлу
(или verifyfile, если исправлять не требуется).
- Для проверки системных файлов не в текущей Windows (а, например, на другом жестком диске) можно использовать
sfc /scannow /offwindir=путь_к_папке_windows
Думаю, эти возможности могут быть полезны в самых различных ситуациях, когда требуется проверить системные файлы на удаленной системе, или для каких-то иных непредвиденных задач.
Возможные проблемы при проверке
При использовании утилиты проверки системных файлов, вы можете столкнуться с некоторыми проблемами и ошибками. Кроме этого, лучше, если вы будете знать некоторые особенности работы этого инструмента, о которых ниже.
- Если при запуске sfc /scannow вы видите сообщение о том, что Защите ресурсов Windows не удается запустить службу восстановления, проверьте, что служба «Установщик модулей Windows» включена, а тип запуска установлен «Вручную».
- Если у вас в системе есть модифицированные файлы, например, вы заменяли значки в проводнике или что-то еще, то выполнение проверки с автоматическим исправлением вернет файлы в первоначальный вид, т.е. если вы меняли файлы специально, это придется повторить.
Может оказаться, что sfc /scannow не удастся исправить ошибки в системных файлах, в этом случае вы можете ввести в командной строке
findstr /c:"[SR]" %windir%\Logs\CBS\CBS.log >"%userprofile%\Desktop\sfc.txt"

Эта команда создаст текстовый файл sfc.txt на рабочем столе со списком файлов, исправление которых не удалось — при необходимости вы можете скопировать необходимые файлы с другого компьютера с той же версией Windows или с дистрибутива ОС.
The Windows System File Checker (SFC) is a nifty
tool for repairing corrupted files. Here’s a quick guide on how you can restore
your files and get your PC running normally again.
Run
SFC
First, you will
need to open an elevated Command Prompt
(CMD). Basically, you will need to run Command Prompt as an administrator.
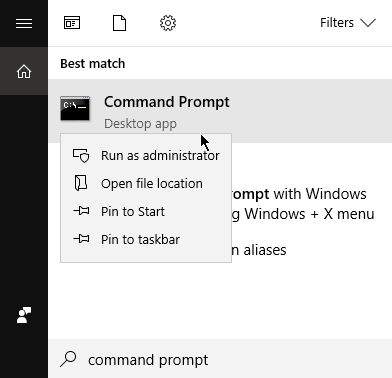
Open an Elevated Command Prompt
Run Search and type Command Prompt. Find Command Prompt from the results, right-click
it, then select Run as Administrator.
Run
DISM (Windows 8 and higher)
Windows 8,
Windows 8.1, and Windows 10 users, you will need to run the Deployment Image Servicing and Management
(DISM) tool before launching SFC.
Note: Windows 7 users can skip ahead to the next step.
In the Command
Prompt, type the following command then press enter:
DISM.EXE /ONLINE /CLEANUP-IMAGE /RESTOREHEALTH
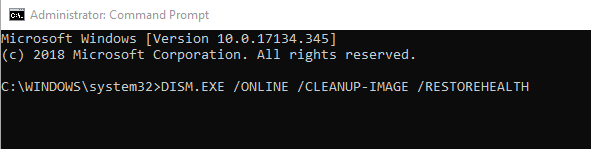
DISM will use
Windows Update to find files that will replace or repair the corrupted
versions. This process could take several minutes.
Run SCANNOW
Now we can scan
the system for corrupted files. On the Command Prompt, type the command:
SFC /SCANNOW
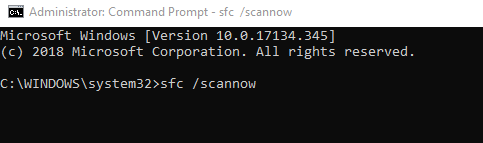
With this
command, Windows will go through your files and replace the corrupted files.
Scanning will take some time. It’s important that you do not close the Command
Prompt until the scan is 100% complete.
Review the Results
Once the scan is
finished, you will receive one of the following messages:
- Windows Resource Protection did not find any integrity violations – Windows was unable to find corrupt files in your hard disk
- Windows Resource Protection could not perform the requested operation – This means you have to run System File Checker using Safe Mode
- Windows Resource Protection found corrupt files and successfully
repaired them – Windows found the broken files and
fixed them - Windows Resource Protection found corrupt files but was unable to fix
some of them — Windows found corrupt files but was
unable to do anything about it
View
SFC details
You can open the
sfcdetails.txt file to view or copy the information gathered from the scan. Use
the instructions below to locate the aforementioned text file.
Open an elevated
Command Prompt and type the following command:
FINDSTR /C:"[SR]" %WINDIR%\LOGS\CBS\CBS.LOG
>"%USERPROFILE%\DESKTOP\SFCDETAILS.TXT"

This will create
a copy of the file on your desktop. Open the file and scan through the results.
Do note that the file will show all the data, including ones that were gathered
from previous SFC runs.
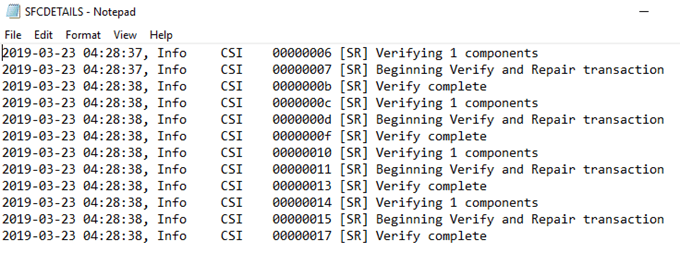
You will need to
check the time and the date to find specific entries.
Replace Corrupt Files Manually
If SFC fails to
replace the broken Windows file, you can try doing so manually. This is
possible as long as you know where the corrupt file is located. You will also
need a good copy of that file so it can be replaced.
Open an elevated
Command Prompt and type the following command:
TAKEOWN /F <FILE LOCATION>
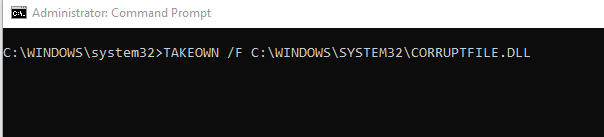
Remember to
replace <File Location> with the path of the corrupt file. This command
will allow you to take ownership of the infected file. CMD will inform you if
the takeover is a success.
Once finished,
give administrators access to the corrupt file. Do so by typing the following
command:
ICACLS <FILE LOCATION> /GRANT ADMINISTRATORS:F

Again, remember
to replace <File Location> with the corrupt file path.
Now you can
replace the bad file with the good version. You will need to copy the good file
and paste it where the old one is. Type the following command:
COPY <SOURCE> <DESTINATION>

Replace
<Source> with the file location of the good copy and replace
<Destination> with the path of the corrupt version.
The solution when the resource is a file it is pretty straight-forward as indicated by others:
C:\> IF EXIST C:\CONFIG.SYS ECHO C:\CONFIG.SYS exists.
Unfortunately, the above does not work for directories. The EXIST function returns the same result for both missing and present folders. Fortunately, there is an obscure workaround:
C:\> IF NOT EXIST C:\FOLDER\NUL ECHO C:\FOLDER missing.
C:\FOLDER missing.
C:\> MD C:\FOLDER
C:\> IF EXIST C:\FOLDER\NUL ECHO C:\FOLDER exists.
C:\FOLDER exists.
It turns out that to support constructs like appending >NUL on command statements, there is a sort of virtual file named «NUL» in every directory. Checking for its existence is equivalent to a check for the directory’s existence.
This behavior is documented in a Microsoft knowledge base article ( https://support.microsoft.com/en-us/kb/65994 ) and I have confirmed its behavior on FreeDOS 1.1 and in a Windows 7 command shell.
EXTRA: The KB article indicates this technique can also be used to see if a drive is present. In the case of checking for drive existence, however, caveats exist:
-
An
Abort, Retry, Fail?error occurs if the drive is not formatted. -
Using this technique to check for drive existence depends on device driver implementation and may not always work.
What command can be used to check for file system errors? How to run the command and what should you notice before running it? All these questions are discussed in this MiniTool’s post and now start reading.
Run CHKDSK to Check for File System Errors
What command can be used to check for file system errors? In Windows, you can run the CHKDSK command.
CHKDSK is an abbreviation of “Check Disk”. As its full name implies, it is used to check for hard drive errors including file system errors. So, you can use the CHKDSK command to check for file system errors in Windows.
What should notice before running the command? Here are the matters:
- Stop all running programs because scanning a drive will pass all data on this drive, including the data involving the program.
- Scan your hard drive using antivirus software in advance. Doing this is to remove potential viruses that interrupt CHKDSK.
- Make sure your computer has a consistent power supply — CHKDSK will be hard stopped if a sudden power outage happens, which may cause serious problems.
Note: Keep the above matters in your mind before you running the CHKDSK command. Otherwise, data loss could happen. See CHKDSK Deletes Your Data.
How to Run the CHKDSK Command
Now you can start running the CHKDSK command to check for file system errors on your hard drive.
How to run the CHKDSK command? There are three ways: executing the command from the drive properties window, running the command through Command Prompt or Windows PowerShell, and running the command from MiniTool Partition Wizard.
Note: The command cannot be used with a local drive letter that has been redirected over the network. What’s more, interrupting CHKDSK is not recommended.
Run CHKDSK From the Drive Properties Window
It is easy to run the CHKDSK command from the drive properties window to check for file system errors. Here’s how to do that:
Step 1: Open your File Explorer.
Step 2: Locate the drive you want to check for file system errors and then right-click it.
Step 3: Choose the Properties option from the context menu.
Step 4: Once accessing the drive properties window, switch to the Tools tab and then click the Check button.

Step 5: For Windows 10, the disk checking tool has been improved — it scans disks periodically. Therefore, when the Error Checking window shows up, it is likely to see a message saying “You don’t need to scan this drive”. Even so, you can click the Scan drive option to manually scan the drive.

Step 6: Wait for the scanning process to end and the scanning report.
If you see a message saying “Windows successfully scanned the drive. No errors were found”, so great! Now, you can click the Close button to close the disk checking tool or click the Show Details link to open Event Viewer with a detailed log of the error checking process.

But if you are informed that Windows has found errors on this drive that need to be repaired…, you need to repair the found errors.
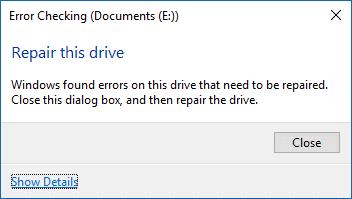
To repair the found errors, perform the following steps:
- Click the Close button on the Error Checking window.
- Once you see the Repair drive option, click it.
- Click the Repair now button or the Repair on next restart button on the next screen.
Note: If the drive to be repaired is a system drive, it may be required to restart your computer before attempting the repairs.

Run CHKDSK From Command Prompt
You can also run the CHKDSK command from Command Prompt or Windows PowerShell to check file system errors. Here we like to show how to run this command using Command Prompt.
Note: If you want to run the CHKDSK command from Windows PowerShell, you should right-click the Windows logo on your taskbar, choose Windows PowerShell (Admin) option, and click the Yes button on the User Account Control window. Then, run the CHKDSK command.
Step 1: Launch Command Prompt as administrator.
- Click the search icon on the taskbar and type cmd into the search bar.
- Right-click the search result and choose the Run as administrator option.
- Click the Yes button on the User Account Control window.
Step 2: Once Command Prompt launches, type the command chkdsk *: (* refers to the drive letter of the drive to be checked) and then hit the Enter key.
You will see that the tool will check the drive from three stages:
- Examine basic file system structure.
- Examine file name linkage.
- Examine security descriptors.
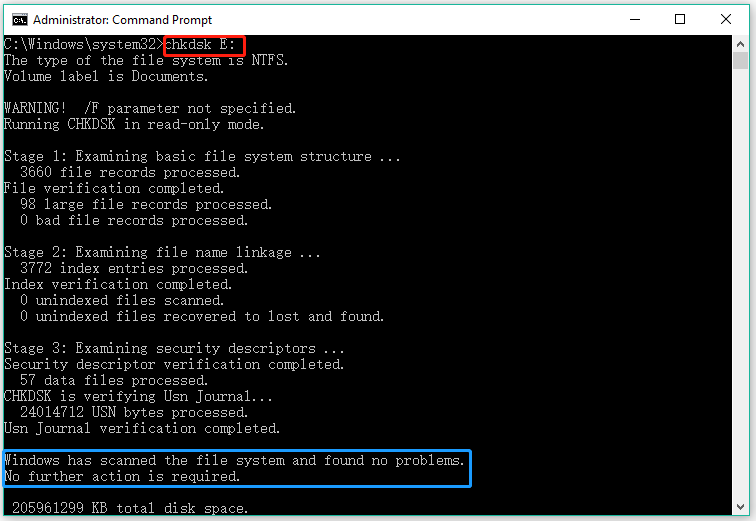
Step 3: Check the test result.
If you receive the message saying Windows has scanned the file system and found no problems, there is no file system error and you can close the window. But if Windows has found file system errors, please run the command chkdsk /f *: (like chkdsk /f E:) to fix them.
Note: The /f parameter tells the disk checking tool to immediately fix errors it finds.

Run CHKDSK From MiniTool Partition Wizard
The third way to check for file system errors in Windows is using MiniTool Partition Wizard.
MiniTool Partition Wizard is a professional partition manager for Windows computers. It is a multifunctional tool — apart from being able to check file system errors, it is also skilled in converting file systems without data loss (NTFS to FAT32, and vice versa), recovering lost data caused by CHKDSK, migrating Windows to another hard drive, and so on.
Now, let’s see how to run the CHKDSK command from MiniTool Partition Wizard.
Step 1: Launch MiniTool Partition Wizard to access its interface.
MiniTool Partition Wizard FreeClick to Download100%Clean & Safe
Step 2: Highlight the drive to be checked for file system errors and then click the Check File System from the left pane.
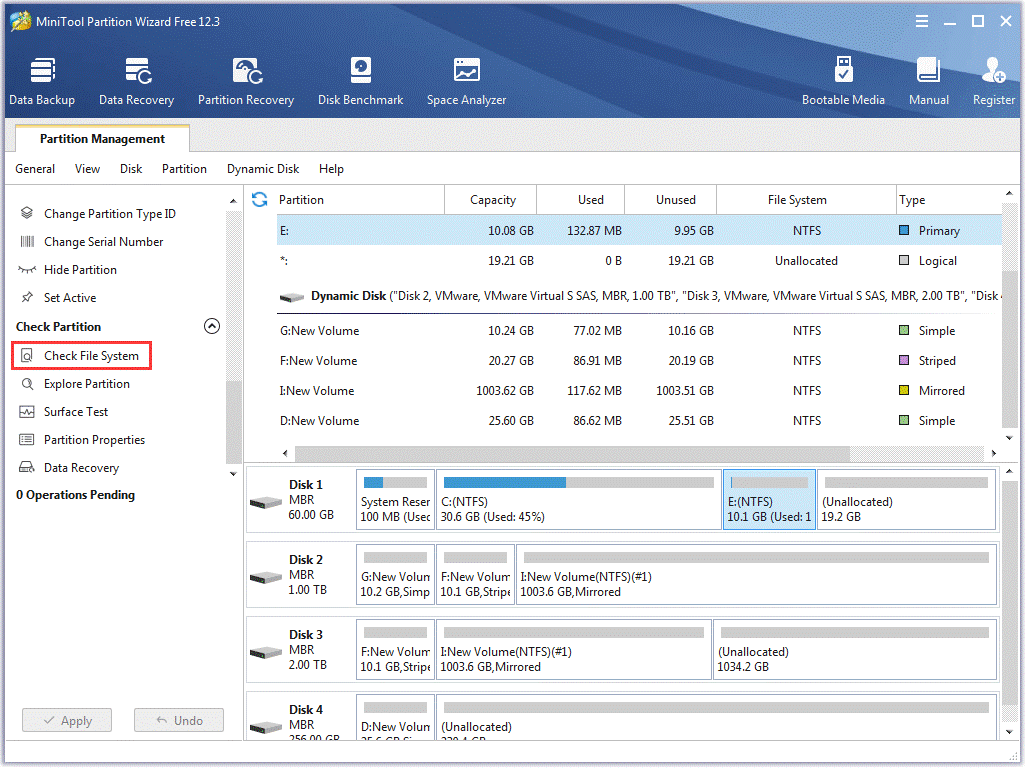
Step 3: Once inside the Check File System window, choose the Check only option or the Check & fix detected errors option.
Note: If you just want to check for errors, please choose the Check only option. But if you want to check for errors and fix them at the same time, then you should choose the Check & fix detected errors option.

Step 4: Click the Start button to inform the software to start the task.
That’s all about how to run the CHKDSK command from MiniTool Partition Wizard to check file system errors. As you see, it is easy to check file system errors using MiniTool Partition Wizard. When CHKDSK refuses to work, you can use the program.
What command can be used to check for file system errors? The command is CHKDSK. How to run the command? The post shows three ways.Click to Tweet
File system error is not a pretty thing and can make things worse. Well, what causes file system errors? This is discussed below.
What Causes File System Errors
The main factors for file system errors include virus or malware infection, damaged files, system crash, power outage, and bad sectors. Also, if you remove a working external storage device from your computer suddenly, this can cause file system errors.
Base on these factors, you may have some ideas on how to avoid file system errors happening. Here we list some tips:
- Regularly scan your computer for viruses or malware. Virus or malware infection causes file system errors, lagging computers as well as data loss.
- Regularly check your hard drive. A hard drive is the soul of a computer, storing all the most important data.
- Make sure your computer has a consistent power supply during the transfer process of the file system or other operations.
- Never remove a working storage device. When the operations on the storage device are done, it is recommended that you safely remove the storage device.
What causes file system errors? How to avoid file system errors. Check the post. Click to Tweet
Bottom Line
You can run the CHKDSK command to check for file system errors in Windows and you can run the command from the drive properties window, Command Prompt or Windows PowerShell, or MiniTool Partition Wizard. If you have some doubts about using MiniTool Partition Wizard, please contact us via [email protected], and we will get back to you as soon as possible.
What Command Can Be Used to Check for File System Errors FAQ
What is the difference between CHKDSK and ScanDisk?
First, CHKDSK is the successor of ScanDisk that can be found in the Windows versions before XP.
Then, although they both can check hard drive for errors, there is one main difference: SanDisk can’t check NTFS disk drives whereas CHKDSK can.
Is CHKDSK bad for SSDs?
CHKDSK is not bad for SSDs. CHKDSK is different from defragging. Defragging is more focused on writing, while CHKDSK does more reading than writing to the drive.
When you run CHKDSK to check something, the tool reads the drive data and sets the found errors aside separately. When the tool is used to fix something, it writes to the drive and the writing operation is so small and quick that can be neglected.
Therefore, it is safe to run CHKDSK for SSDs.
How do I check for bad sectors?
Here are two ways to check for bad sectors on your hard drive.
- Run the chkdsk *: command in Command Prompt (* refers to the drive letter).
- Activate the Check Disk tool through the drive properties window.
You might be interested in Can We Remove Bad Sector From Hard Disk Permanently.
How do I find the Windows file system?
There are many ways to see what file system is running on your hard drive.
Way 1: Through File Explorer
- Open File Explorer.
- Locate the drive that you want to check its file system.
- Right-click the drive and then choose the Properties option.
- Under the General tab, you will see what file system is running on your hard drive.
Way 2: Through Command Prompt or Windows PowerShell
- Open Command Prompt or Windows PowerShell as administrator.
- Type the command: chkdsk *: (* refers to the drive letter of the drive to be checked).
- Hit the Enter key.
- Check the information on the window on which there should be a message saying “the type of the file system is …”
Way 3: Through Disk Management
- Right-click the Windows logo on the taskbar and then choose the Disk Management option.
- Check the information on the window.